Training & Finetuning
Tutorial
AI

Fine-tune an LLM with LoRA & QLoRA in a Flyte Pipeline

Sage Elliott

Sage Elliott

In this post we’ll fine-tune a large language model (LLM) to generate better responses specific to a problem space, evaluate it against the base model, and deploy it as an API for immediate use. All in a single pipeline. This post walks through how to build that pipeline with Flyte 2, using LoRA to keep training fast and cheap.

The full code is on GitHub. Everything runs locally on a single GPU or scale remotely on a cluster with one flag change.

Prefer watching? You can find a recording of the live workshop here: 

Why fine-tune a Custom Large Language Model

This tutorial uses text-to-SQL as the example, but the pattern applies to any task where you have input-output pairs: code generation for your internal libraries, medical report summarization in your house style, customer support responses grounded in your product docs, structured data extraction from your domain's documents. If you can express it as "given this input, produce this output," you can fine-tune for it.

For example, foundation models know SQL. But they don't know your schema. When you ask a general-purpose model to write a query against your tables, it tends to hallucinate column names, guess at relationships, or wrap the answer in conversational padding. You're paying for a massive model that's mediocre at your specific task.

Fine-tuning flips this. A small model (135M to 1.5B parameters) trained on your data could potentially outperform a general-purpose model orders of magnitude larger at the specific thing you need it to do. The fine-tuned model can be cheaper to run, faster to respond, and you own it. No API rate limits, no per-token costs, no dependency on a third-party service staying online. It runs on your infrastructure, on your terms.

How LoRA & QLoRA work

Full fine-tuning updates every weight in the model. For a 7B parameter model, that means training, storing, and deploying billions of modified parameters. It works, but it's very computationally expensive.

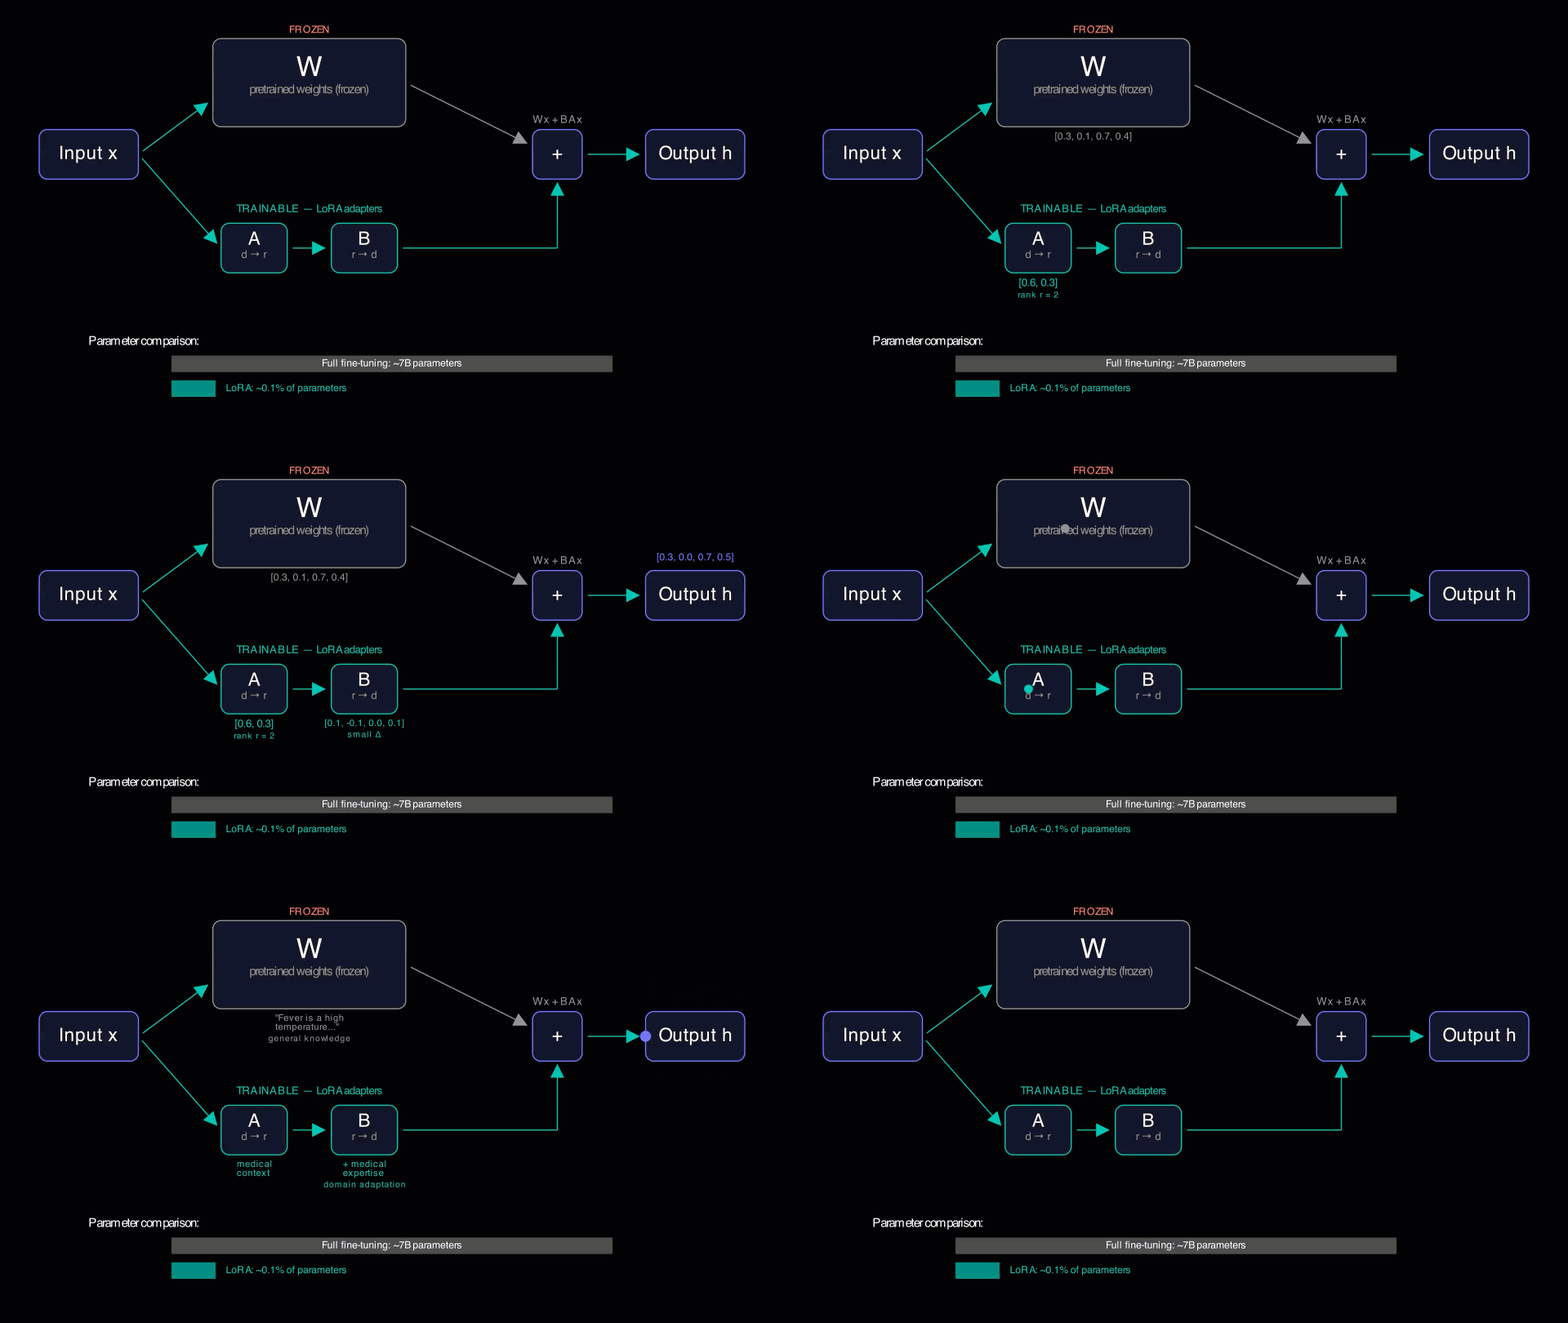
LoRA (Low-Rank Adaptation) takes a different approach. Freeze the entire base model and inject small trainable adapter matrices alongside the original weights. Instead of modifying a large weight matrix W directly, LoRA adds a low-rank decomposition A x B that learns a small correction:
LoRA Example

For a 768x768 layer with rank r=16, LoRA adds 24,576 parameters instead of 589,824. That's about 4% of the original layer. Scale that across the model and the trainable share depends on your rank and which layers you adapt, commonly anywhere from well under 1% up to a few percent of total parameters, while getting results close to full fine-tuning.

Two key parameters control the adapter behavior:

  • r (rank) controls the size of the adapter matrices. Higher rank means more capacity but more parameters.
  • alpha is a scaling factor. The adapter output is multiplied by alpha/r before being added to the main path. It controls how strongly the adapter influences the output without adding any extra parameters.

At inference, LoRA adapters can either be merged into the base model for zero added latency, or kept side-loaded. Because the original weights are untouched, a side-loaded adapter can be hot-swapped on an already-deployed model.

QLoRA(Quantized Low-Rank Adaptation) goes one step further: it quantizes the frozen base model to lower bit precision, so the memory footprint drops even more. The LoRA adapters still train in full precision. This is how you can fine-tune a 7B model on a single consumer GPU.

QLoRA Example

QLoRA can trade off a little quality since the forward pass runs through quantized weights, though with NF4 quantization the gap is often negligible. Still, for small models that already fit in memory, there's no reason to take even a small hit.

Building the the LoRA & QLoRA Fine-tuning Pipeline

Fine-tuning has a natural pipeline shape: download a dataset, train a model, evaluate the result. Each step has different resource needs. Data prep is I/O-bound and usually runs fine on a CPU. Training and evaluation need a GPU. Without orchestration you either overprovision one big machine for everything or glue scripts together with manual handoffs between steps. Flyte lets you define resources per task, cache expensive steps, and version every run so you can trace any model back to the exact data, code, and hyperparameters that produced it.

The dataset we’ll use is sql-create-context, which has around 78,000 schema-question-SQL triples. Fine-tuning on these teaches the model to do one thing well: take a schema and a question and produce a query. The result is clean, direct SQL output grounded in the actual table structure it was given. We’ll see that we even get huge improvements using a very small language model like SmolLM2-135M, which you can swap out for a bigger LLM to get even better results. 

The full code is on GitHub.

Both environments for our CPU and GPU task are defined in config.py.

Data prep gets a lightweight CPU image with just `datasets`. Training gets a full GPU image with the complete requirements. Flyte isolates resources per task, so you're not paying for GPU time while downloading a dataset. The `depends_on` tells Flyte to build the GPU image first since it's the heavier dependency.

Copied to clipboard!
# config.py

import flyte

gpu_env = flyte.TaskEnvironment(
    name="llm-finetune-gpu",
    image=flyte.Image.from_debian_base().with_requirements("requirements.txt"),
    resources=flyte.Resources(cpu=4, memory="24Gi", gpu=1),
)

cpu_env = flyte.TaskEnvironment(
    name="llm-finetune-cpu",
    image=flyte.Image.from_debian_base().with_pip_packages(
        "datasets>=3.0.0", "markdown", "python-dotenv",
    ),
    resources=flyte.Resources(cpu=2, memory="4Gi"),
    depends_on=[gpu_env],
)

This also defines the container images your tasks will run in. For our use case we’ll start with a debian base image and install the requirements listed in requirements.txt, but you can define much more complex images. When the task is run it will check to see if the image exists. If it doesn’t it will build it for you. Defining it with just a few lines of code directly in your python project saves you from having to work on separate docker files. 

The pipeline task orchestrates all three tasks:

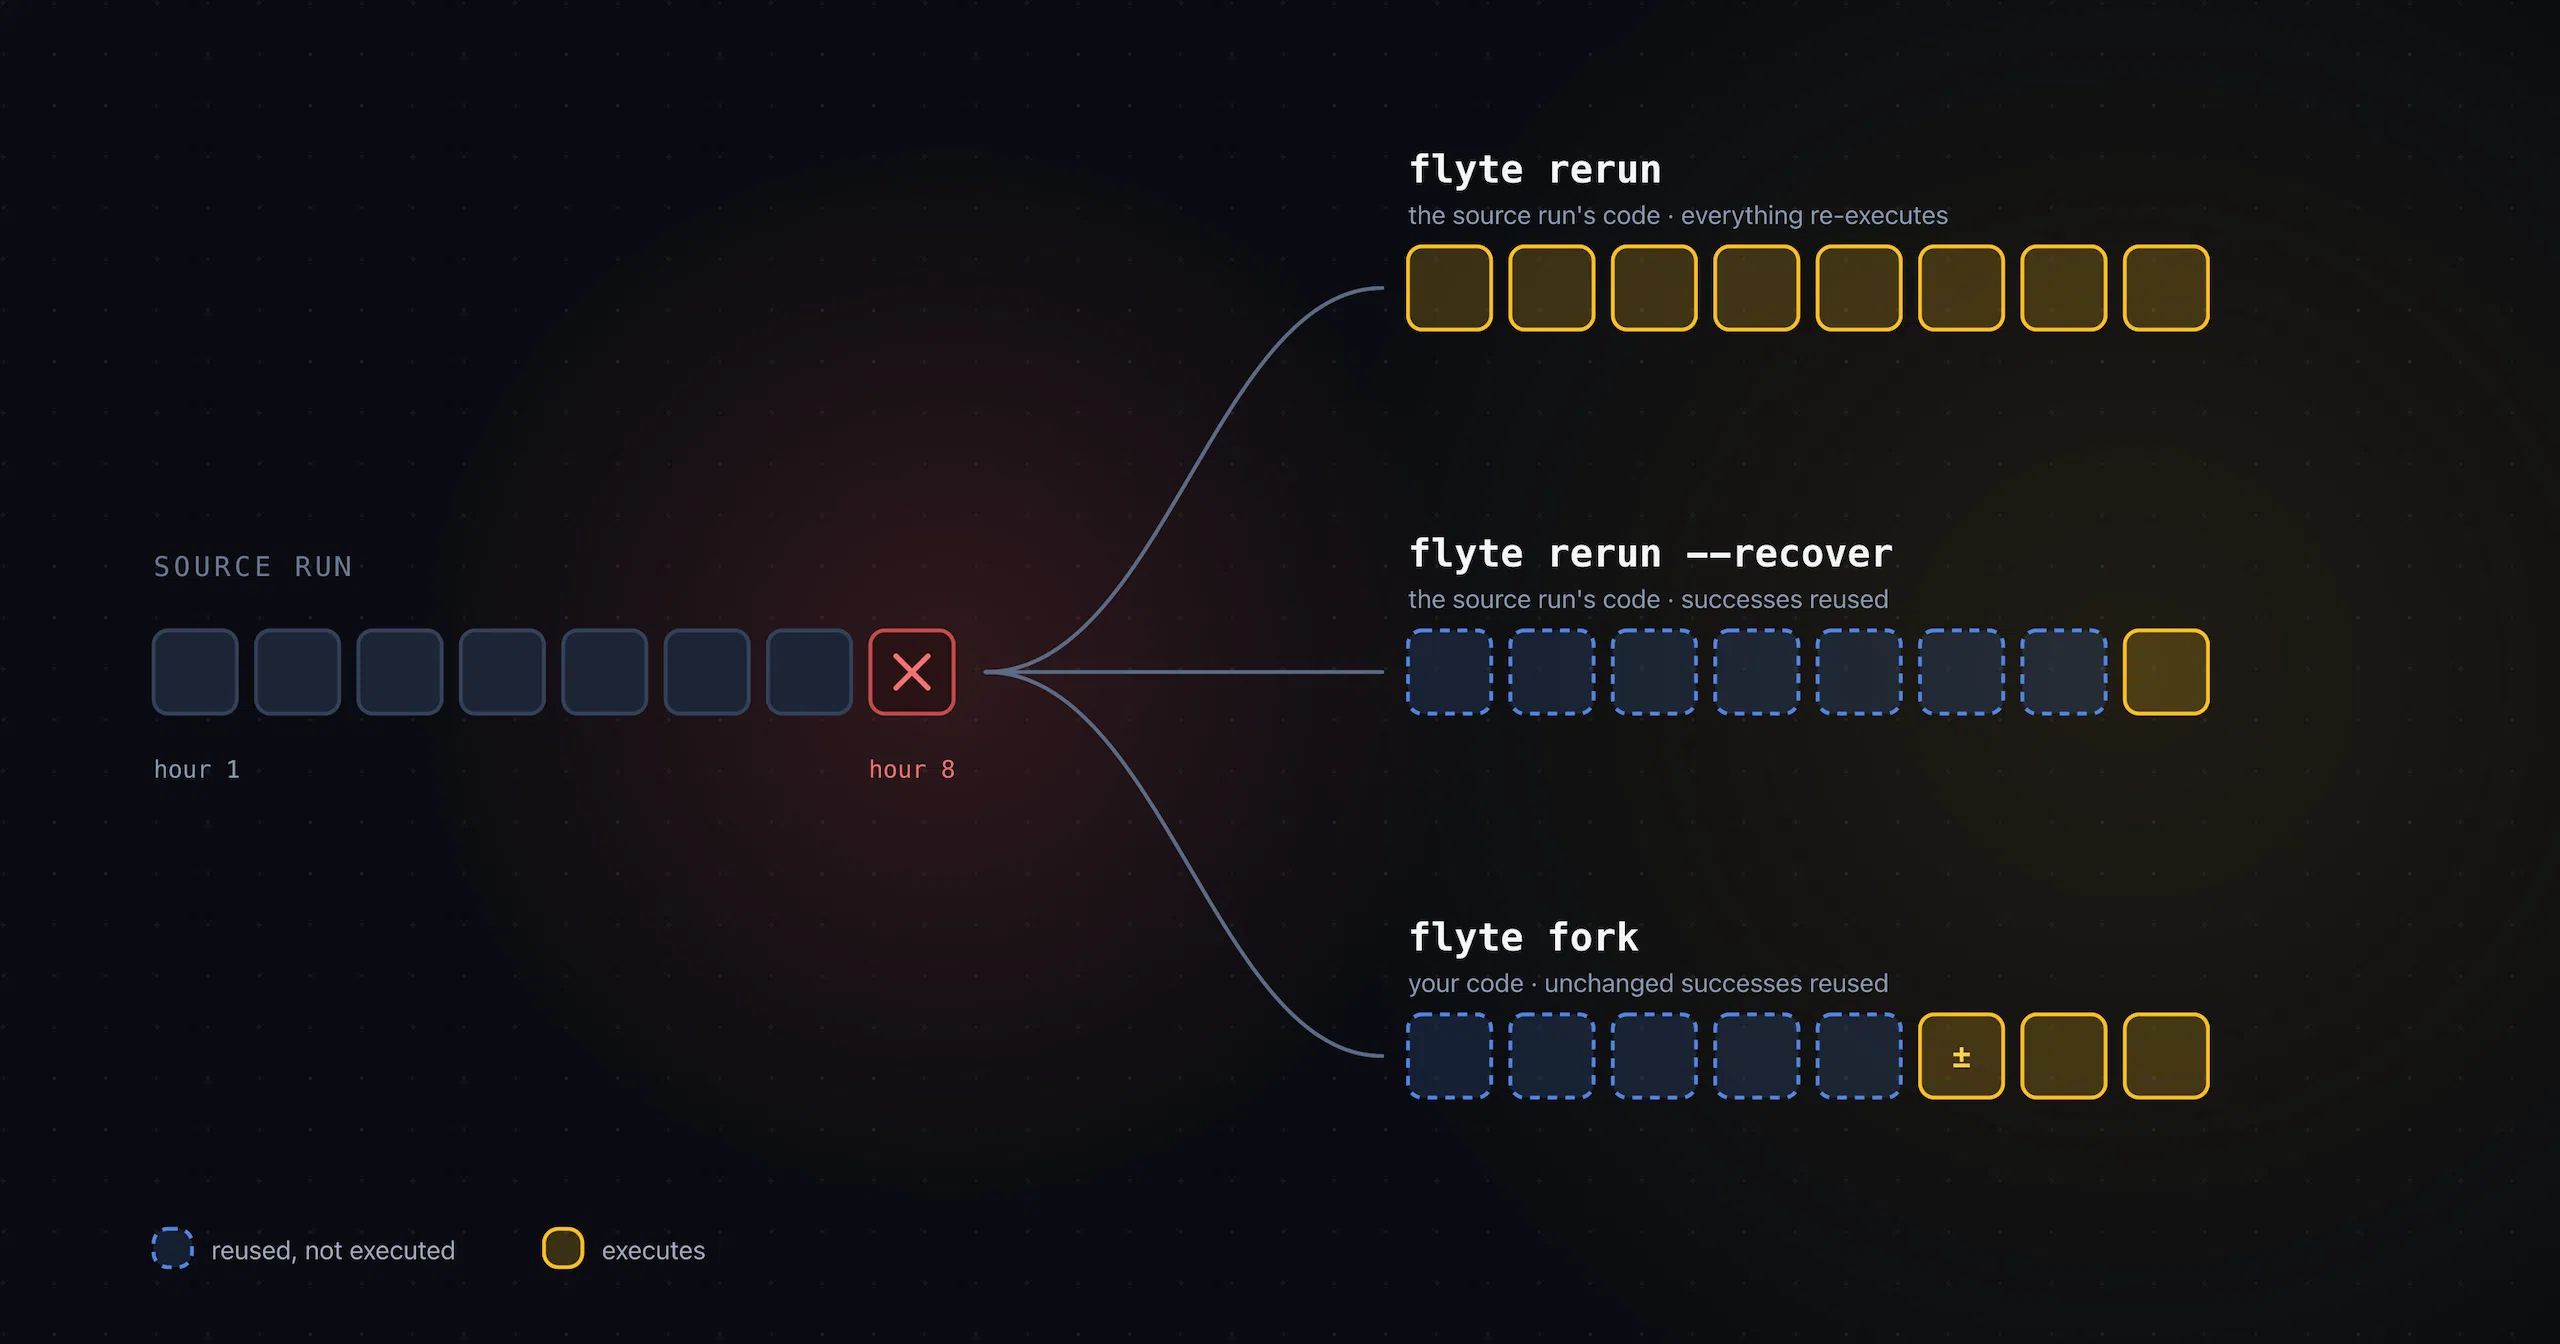
Each `await` passes typed data between tasks. `prepare_data` returns a `flyte.io.Dir` that gets passed to both `train` and `evaluate`. Flyte handles the serialization, versioning, and transfer between tasks automatically. If a task fails, you can re-run from that step without re-downloading the dataset or re-training. The pipeline returns the fine-tuned model directory so it can be deployed directly via `RunOutput`.

Copied to clipboard!
# workflow.py

@cpu_env.task(report=True)
async def pipeline(
    model_name: str = "HuggingFaceTB/SmolLM2-135M",
    dataset_name: str = "b-mc2/sql-create-context",
    method: str = "lora",
    epochs: int = 3,
    lr: float = 2e-4,
    batch_size: int = 4,
    max_train_samples: int = 5000,
    max_eval_samples: int = 500,
    num_eval_examples: int = 50,
    lora_r: int = 16,
    lora_alpha: int = 32,
) -> flyte.io.Dir:

    # Step 1: Download and format dataset
    data_dir = await prepare_data(dataset_name, max_train_samples, max_eval_samples)

    # Step 2: Fine-tune (full / LoRA / QLoRA)
    finetuned_dir = await train(
        model_name, data_dir, method, epochs, lr, batch_size, lora_r, lora_alpha,
    )

    # Step 3: Evaluate base vs fine-tuned
    result = await evaluate(model_name, finetuned_dir, data_dir, num_eval_examples)

    return finetuned_dir

Task 1: Prepare data

The data task downloads from HuggingFace, formats each example into an instruction template, and splits into train/eval.

The `cache="auto"` decorator means this only runs once per unique set of inputs. Change the dataset or sample sizes and it re-runs; keep them the same and Flyte skips straight to the cached result. This matters when you're iterating on training hyperparameters. You don't re-download and re-format the dataset every time you tweak the learning rate.

Copied to clipboard!
# workflow.py
@cpu_env.task(cache="auto")
async def prepare_data(
    dataset_name: str = "b-mc2/sql-create-context",
    max_train_samples: int = 5000,
    max_eval_samples: int = 500,
) -> flyte.io.Dir:
    from datasets import DatasetDict, load_dataset

    ds = load_dataset(dataset_name, split="train")

    def format_example(ex):
        return {
            "text": (
                "### Task: Generate a SQL query to answer the question.\n"
                f"### Schema:\n{ex['context']}\n"
                f"### Question:\n{ex['question']}\n"
                f"### SQL:\n{ex['answer']}\n<|endoftext|>"
            )
        }

    ds = ds.map(format_example)

    # Split into train and eval
    total = len(ds)
    train_end = min(max_train_samples, total - max_eval_samples)
    eval_start = train_end
    eval_end = min(eval_start + max_eval_samples, total)

    processed = DatasetDict({
        "train": ds.select(range(train_end)),
        "eval": ds.select(range(eval_start, eval_end)),
    })

    output_dir = os.path.join(tempfile.mkdtemp(), "dataset")
    processed.save_to_disk(output_dir)

    return await flyte.io.Dir.from_local(output_dir)

The `<|endoftext|>` token at the end of each example is important. It teaches the model to stop generating after the SQL answer instead of continuing with more text.

Step 2: Train LoRA or QLoRA

The training task handles all three fine-tuning methods in one code path. The `method` flag controls the branching:

Copied to clipboard!
# workflow.py

@gpu_env.task(report=True)
async def train(
    model_name: str,
    data_dir: flyte.io.Dir,
    method: str = "lora",
    epochs: int = 3,
    lr: float = 2e-4,
    batch_size: int = 4,
    lora_r: int = 16,
    lora_alpha: int = 32,
) -> flyte.io.Dir:
    import torch
    from datasets import load_from_disk
    from transformers import AutoModelForCausalLM, AutoTokenizer
    from trl import SFTConfig, SFTTrainer

    # Load data
    data_path = await data_dir.download()
    dataset = load_from_disk(data_path)

    # Load tokenizer
    tokenizer = AutoTokenizer.from_pretrained(model_name)
    if tokenizer.pad_token is None:
        tokenizer.pad_token = tokenizer.eos_token

    use_bf16 = torch.cuda.is_available() and torch.cuda.is_bf16_supported()
    dtype = torch.bfloat16 if use_bf16 else torch.float32

    # Load model — QLoRA quantizes to 4-bit, others load at full/bf16 precision
    if method == "qlora":
        from transformers import BitsAndBytesConfig

        model = AutoModelForCausalLM.from_pretrained(
            model_name,
            quantization_config=BitsAndBytesConfig(
                load_in_4bit=True,
                bnb_4bit_quant_type="nf4",
                bnb_4bit_compute_dtype=dtype,
                bnb_4bit_use_double_quant=True,
            ),
            dtype=dtype,
            device_map="auto",
        )
    else:
        model = AutoModelForCausalLM.from_pretrained(
            model_name, dtype=dtype, device_map="auto",
        )

    # Apply LoRA adapters
    if method in ("lora", "qlora"):
        from peft import LoraConfig, get_peft_model, prepare_model_for_kbit_training

        if method == "qlora":
            model = prepare_model_for_kbit_training(model)

        lora_config = LoraConfig(
            r=lora_r,
            lora_alpha=lora_alpha,
            # Attention: what the model focuses on
            # MLP: how it processes information after attention
            target_modules=[
                "q_proj", "v_proj", "k_proj", "o_proj",
                "gate_proj", "up_proj", "down_proj",
            ],
            lora_dropout=0.05,
            bias="none",
            task_type="CAUSAL_LM",
        )
        model = get_peft_model(model, lora_config)

    # Train
    training_args = SFTConfig(
        output_dir=os.path.join(tempfile.mkdtemp(), "checkpoints"),
        num_train_epochs=epochs,
        per_device_train_batch_size=batch_size,
        learning_rate=lr,
        logging_steps=10,
        save_strategy="epoch",
        bf16=use_bf16,
        fp16=not use_bf16 and torch.cuda.is_available(),
        gradient_accumulation_steps=4,
        warmup_steps=10,
        report_to="none",
    )

    trainer = SFTTrainer(
        model=model,
        args=training_args,
        train_dataset=dataset["train"],
        eval_dataset=dataset["eval"],
        processing_class=tokenizer,
    )

    await asyncio.to_thread(trainer.train)

    # Merge LoRA weights back into base model for clean deployment
    if method in ("lora", "qlora"):
        model = model.merge_and_unload()

    save_dir = os.path.join(tempfile.mkdtemp(), "finetuned_model")
    model.save_pretrained(save_dir)
    tokenizer.save_pretrained(save_dir)

    return await flyte.io.Dir.from_local(save_dir)

The model loading branches on `method`. For QLoRA, `BitsAndBytesConfig` quantizes the frozen base weights to 4-bit NF4 format. For full and LoRA, the model loads at full precision (or bf16 if the GPU supports it).

The LoRA target modules cover all seven key layers in each transformer block. The attention layers (q, k, v, o projections) control what the model focuses on. The MLP layers (gate, up, down projections) control how it processes information after attention. By targeting both, LoRA can steer the model's full reasoning path while training a fraction of the weights.

After training, `merge_and_unload()` folds the adapter weights back into the base model. This produces a standard model directory that can be loaded and served without any LoRA-specific code at inference time. Remember you can keep just the LoRA adapter separate and swap it on a hosted model instead. 

The `report=True` decorator enables live training charts in the Flyte UI. The actual tutorial code includes a `MetricsCallback` that pushes loss curves and progress bars to the report in real time (omitted here for clarity, but it's in the full source).

Step 3: Evaluate fine-tuned LoRA vs base model

The evaluate task loads both the original base model and the fine-tuned model, runs the same prompts through each, and compares exact-match accuracy. 

Copied to clipboard!
# workflow.py

@gpu_env.task(report=True)
async def evaluate(
    model_name: str,
    finetuned_dir: flyte.io.Dir,
    data_dir: flyte.io.Dir,
    num_examples: int = 50,
) -> str:
    import torch
    from datasets import load_from_disk
    from transformers import AutoModelForCausalLM, AutoTokenizer

    use_bf16 = torch.cuda.is_available() and torch.cuda.is_bf16_supported()
    dtype = torch.bfloat16 if use_bf16 else torch.float32

    # Load eval data
    data_path = await data_dir.download()
    dataset = load_from_disk(data_path)
    eval_ds = dataset["eval"].select(range(min(num_examples, len(dataset["eval"]))))

    tokenizer = AutoTokenizer.from_pretrained(model_name)
    if tokenizer.pad_token is None:
        tokenizer.pad_token = tokenizer.eos_token

    def generate_sql(model, prompt, max_new_tokens=128):
        inputs = tokenizer(prompt, return_tensors="pt").to(model.device)
        with torch.no_grad():
            outputs = model.generate(
                **inputs,
                max_new_tokens=max_new_tokens,
                do_sample=False,
                pad_token_id=tokenizer.eos_token_id,
            )
        return tokenizer.decode(
            outputs[0][inputs.input_ids.shape[1]:], skip_special_tokens=True
        ).strip()

    def normalize_sql(sql):
        """Extract the first SQL statement and normalize for comparison."""
        for stop in ["###", "\n"]:
            if stop in sql:
                sql = sql[:sql.index(stop)]
        return " ".join(sql.lower().split()).strip().rstrip(";")

    def build_prompt(example):
        return (
            "### Task: Generate a SQL query to answer the question.\n"
            f"### Schema:\n{example['context']}\n"
            f"### Question:\n{example['question']}\n"
            "### SQL:\n"
        )

    # Run base model
    base_model = AutoModelForCausalLM.from_pretrained(
        model_name, dtype=dtype, device_map="auto",
    )

    base_results = []
    for example in eval_ds:
        base_results.append(generate_sql(base_model, build_prompt(example)))

    del base_model
    if torch.cuda.is_available():
        torch.cuda.empty_cache()

    # Run fine-tuned model
    ft_path = await finetuned_dir.download()
    ft_model = AutoModelForCausalLM.from_pretrained(
        ft_path, dtype=dtype, device_map="auto",
    )

    ft_results = []
    for example in eval_ds:
        ft_results.append(generate_sql(ft_model, build_prompt(example)))

    del ft_model
    if torch.cuda.is_available():
        torch.cuda.empty_cache()

    # Score
    base_correct = 0
    ft_correct = 0
    comparisons = []

    for i, example in enumerate(eval_ds):
        expected = example["answer"]
        base_match = normalize_sql(base_results[i]) == normalize_sql(expected)
        ft_match = normalize_sql(ft_results[i]) == normalize_sql(expected)

        if base_match:
            base_correct += 1
        if ft_match:
            ft_correct += 1

        comparisons.append({
            "question": example["question"],
            "expected": expected,
            "base": base_results[i],
            "finetuned": ft_results[i],
            "base_correct": base_match,
            "ft_correct": ft_match,
        })

    total = len(eval_ds)
    base_acc = base_correct / total * 100
    ft_acc = ft_correct / total * 100

    return json.dumps({
        "base_accuracy": round(base_acc, 1),
        "finetuned_accuracy": round(ft_acc, 1),
        "improvement": round(ft_acc - base_acc, 1),
        "num_examples": total,
        "comparisons": comparisons[:10],
    })

The evaluation strategy is pretty straightforward: load each model separately (deleting the first before loading the second to fit in GPU memory), run inference on the same eval set, and compare normalized SQL output.

`normalize_sql` extracts just the first SQL statement by truncating at ### or newline, then lowercases and strips whitespace. This gives a more generous comparison even when the base model keeps generating past the answer.

One of the clearest effects of fine-tuning is visible in the raw output. The base model tends to ramble after producing SQL, repeating the prompt template or generating extra text. The fine-tuned model learns to stop cleanly after the answer, thanks to the `<|endoftext|>` token in the training data.

There can be multiple ways to write the query, so a better way to evaluate could be actually running the queries on a sandboxed database to compare results instead of looking for an exact match. 

Running the LoRA Pipeline

The method flag is all that changes between approaches:

Method What happens Memory Best for
`full` Train all model parameters High Small models, maximum quality
`lora` Freeze base, train low-rank adapters Medium Good balance of quality and efficiency
`qlora` 4-bit quantized base + LoRA adapters Low Large models on limited GPU memory

LoRA (the default):

Copied to clipboard!
flyte run workflow.py pipeline --method lora

Quick test with a small subset:

Copied to clipboard!
flyte run workflow.py pipeline \
  --max_train_samples 100 --max_eval_samples 20 --epochs 3

Remotely on a GPU cluster with a larger model:

Copied to clipboard!
flyte run workflow.py pipeline \
  --method lora --model_name "Qwen/Qwen2.5-0.5B" --epochs 3

The same pipeline, same code, same flags. Flyte handles resource allocation, data passing, and execution. Every run is versioned and reproducible. You can look back at any training run months later and see exactly what parameters, data, and code produced a given model.

For small models like SmolLM2-135M, full fine-tuning and LoRA produce similar results. QLoRA is overkill at this scale since the model already fits in memory, and 4-bit quantization just hurts quality. QLoRA pays off when you need to fine-tune a 7B+ model on a single T4.

Deploying the fine-tuned model

Once the pipeline finishes, the fine-tuned model can be deployed as a FastAPI endpoint. The serving code uses Flyte's `FastAPIAppEnvironment` to wire the trained model directly into the deployment:

Copied to clipboard!
# serve.py

from fastapi import FastAPI, HTTPException
from transformers import AutoModelForCausalLM, AutoTokenizer
from flyte.app import Parameter
from flyte.app.extras import FastAPIAppEnvironment

MODEL_MOUNT_PATH = "/tmp/finetuned_model"


@asynccontextmanager
async def lifespan(app: FastAPI):
    model_path = Path(MODEL_MOUNT_PATH)
    if model_path.exists():
        dtype = torch.float16 if torch.cuda.is_available() else torch.float32
        app.state.tokenizer = AutoTokenizer.from_pretrained(str(model_path))
        app.state.model = AutoModelForCausalLM.from_pretrained(
            str(model_path), dtype=dtype, device_map="auto",
        )
        app.state.model.eval()
    yield


app = FastAPI(title="Fine-Tuned SQL Generator", lifespan=lifespan)

env = FastAPIAppEnvironment(
    name="finetuned-sql-api",
    app=app,
    image=flyte.Image.from_debian_base().with_pip_packages(
        "fastapi", "uvicorn", "torch", "transformers", "accelerate",
    ),
    resources=flyte.Resources(cpu=2, memory="8Gi", gpu=1),
    scaling=flyte.app.Scaling(
        replicas=(0, 1),
        scaledown_after=1800,
    ),
    parameters=[
        Parameter(
            name="model",
            value=flyte.app.RunOutput(
                task_name="llm-finetune-cpu.pipeline",
                type="directory",
            ),
            mount=MODEL_MOUNT_PATH,
        ),
    ],
)


@app.post("/generate")
async def generate_sql(request: SQLRequest):
    if app.state.model is None:
        raise HTTPException(status_code=503, detail="Model not loaded")

    prompt = (
        "### Task: Generate a SQL query to answer the question.\n"
        f"### Schema:\n{request.context}\n"
        f"### Question:\n{request.question}\n"
        "### SQL:\n"
    )

    tokenizer = app.state.tokenizer
    inputs = tokenizer(prompt, return_tensors="pt").to(app.state.model.device)

    with torch.no_grad():
        outputs = app.state.model.generate(
            **inputs,
            max_new_tokens=128,
            do_sample=False,
            pad_token_id=tokenizer.eos_token_id,
        )

    raw = tokenizer.decode(
        outputs[0][inputs.input_ids.shape[1]:], skip_special_tokens=True
    ).strip()

    sql = raw
    for stop in ["###", "\n"]:
        if stop in sql:
            sql = sql[:sql.index(stop)]

    return {"sql": sql.strip(), "raw_output": raw}

`RunOutput` pulls the model directory directly from the training pipeline's output. No manual file transfers, no copying weights to S3, no wiring up artifact paths. Flyte tracks the lineage from training data to deployed model. The endpoint scales to zero when idle and spins up on the first request, so you're not paying for a GPU sitting around waiting for queries.

Test it:

Copied to clipboard!
curl -X POST https://your-app-url/generate \
  -H "Content-Type: application/json" \
  -d '{
    "schema": "CREATE TABLE employees (id INT, name VARCHAR, department VARCHAR, salary INT)",
    "question": "What is the average salary by department?"
  }'
Copied to clipboard!
{
  "sql": "SELECT department, AVG(salary) FROM employees GROUP BY department",
  "raw_output": "SELECT department, AVG(salary) FROM employees GROUP BY department"
}

What’s next

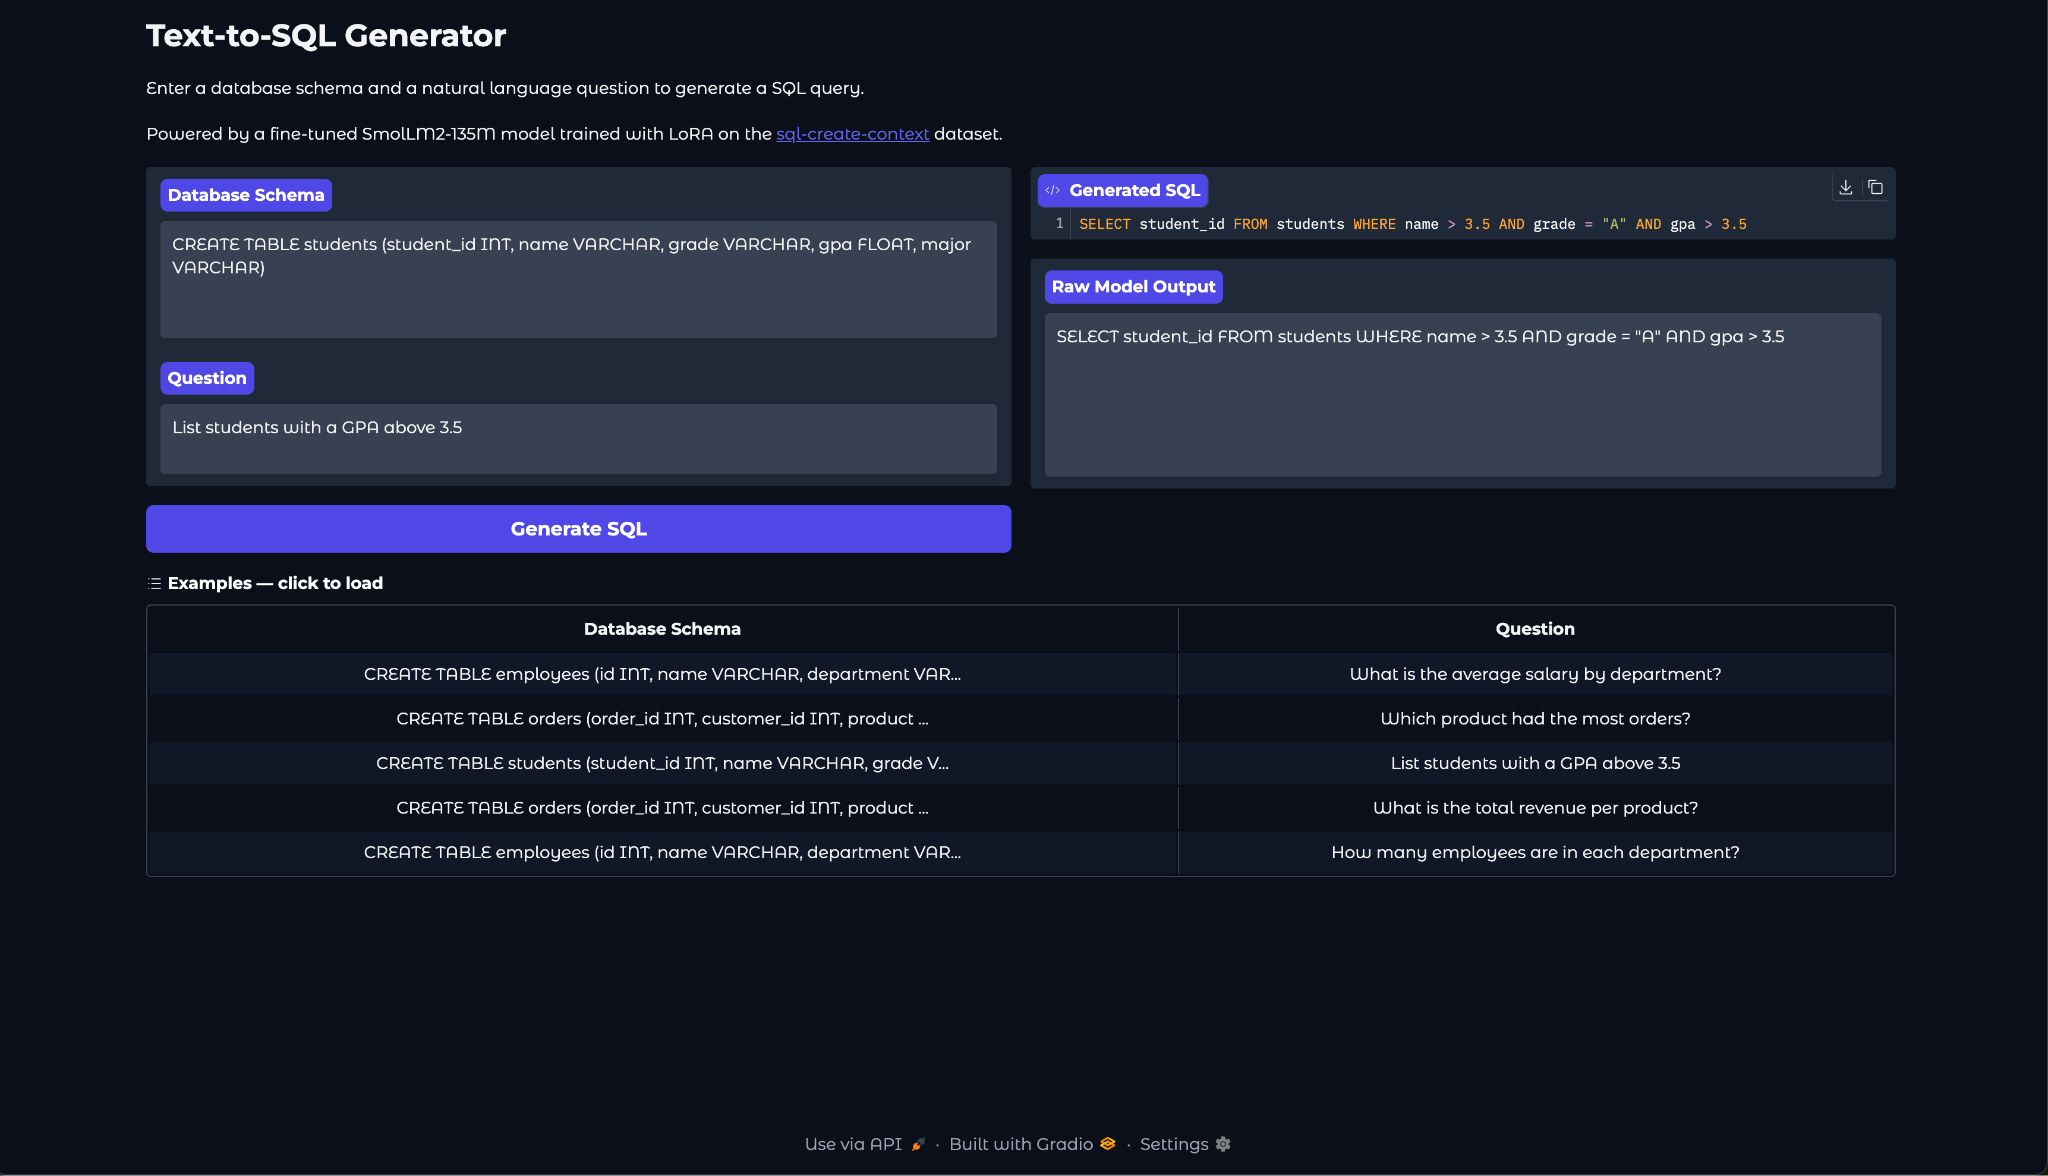
The tutorial on GitHub also includes a Gradio UI that connects to the deployed endpoint for interactive text-to-SQL queries. To try it yourself, clone the workshop repo, run the pipeline with `flyte run workflow.py pipeline`, and swap in your own model or dataset to see how LoRA adapts to different tasks.

Check out the full code on GitHub to run on Flyte or Union and try it with different models or your own dataset.

Or check out getting started with Flyte to bring durable workflows to any AI project.
Try the devbox

A free, local sandbox to explore the Union.ai platform.

Chat with an engineer
No items found.