

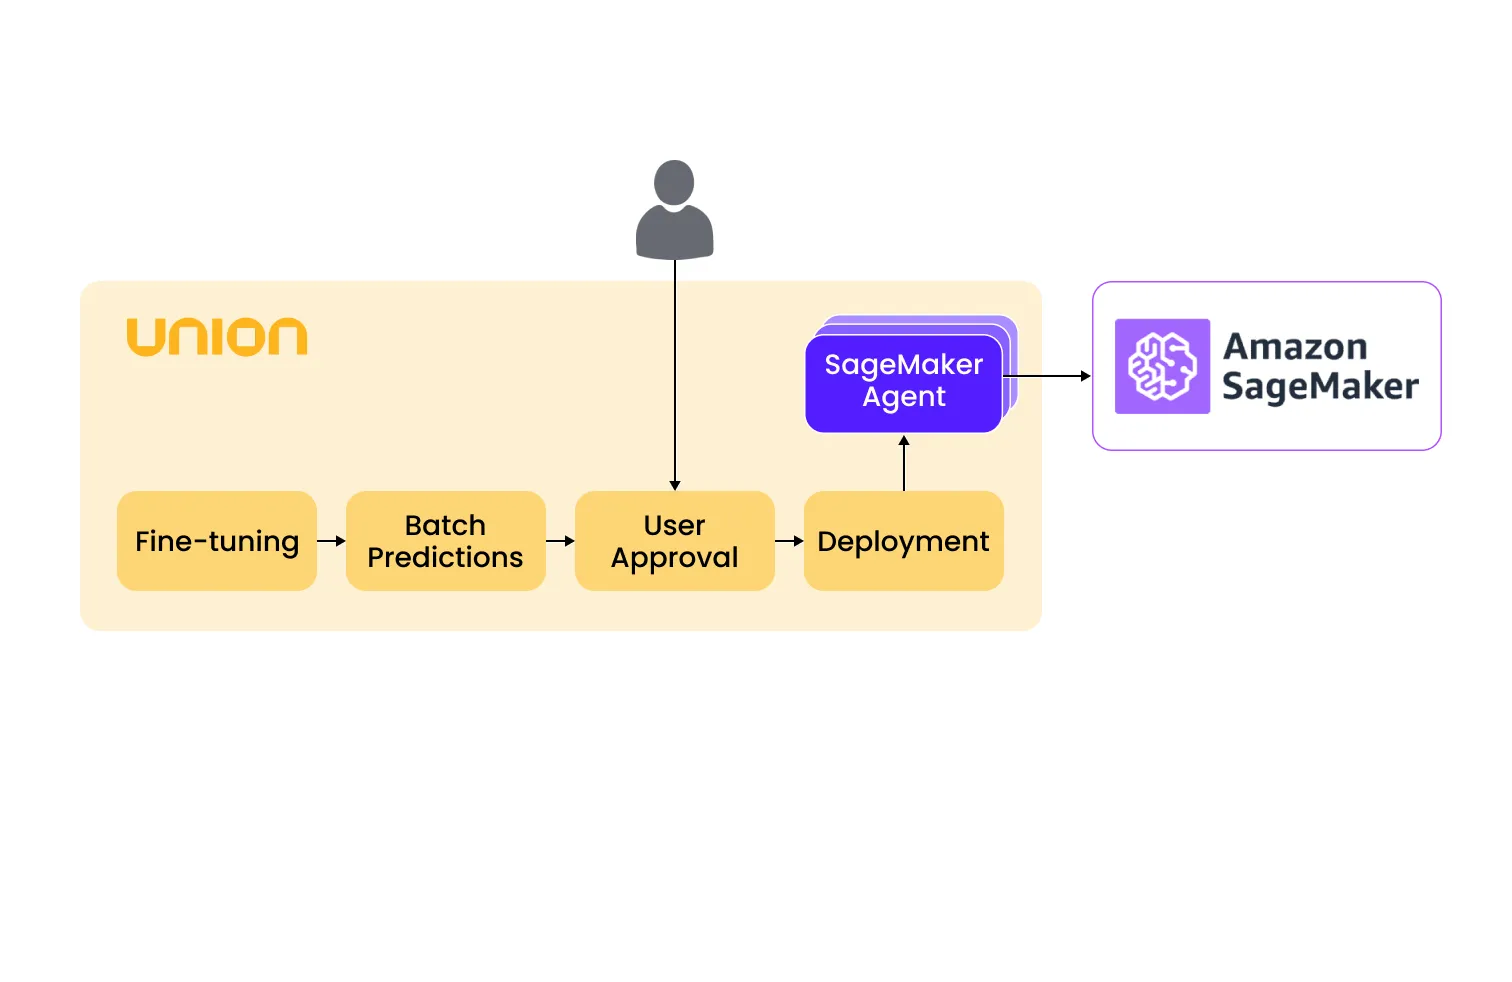
Explore an end-to-end workflow: fine-tuning SAM, batch prediction, user approval, and deployment on SageMaker
Model training and deployment can feel like a tangled mess when the pieces don't integrate cohesively. Consider the dilemma of having to choose which previously trained model to revert to if the currently deployed one fails to deliver accurate results in production. As tools and services are spread out and not centralized, understanding and troubleshooting the model lifecycle process becomes increasingly difficult. This introduces operational complexity and adds delays and brittleness, leading to increased development and maintenance efforts. For example, in SageMaker, tasks such as writing a Dockerfile, building and pushing images, and configuring endpoints must be done manually, which can be time-consuming.
Additional testing and debugging steps could be needed to ensure the manual integration steps are working seamlessly. All this results in inefficient utilization of ML Engineering time, thereby impacting the efficiency, cost, and scalability of the deployment process. In some cases, cross-functional collaboration may be needed to involve DevOps-oriented individuals.
Manual processes are error-prone, leading to higher operational risk factors such as downtime, performance issues, or security vulnerabilities. It also drives higher time to market since each step adds complexity and duration to the deployment process, delaying the availability of the model for end-users. This can impact competitive advantage, especially if the model(s) is a critical business need and enables a strategic application or solution.
SageMaker inference agent makes deploying models on Union a breeze, using SageMaker as the hosting platform. From preparing data to fine-tuning models, and from getting manual approvals to deploying models, everything can be managed in one place!
In this blog post, we'll explore how the SageMaker inference agent makes it easy to deploy a Segment Anything Model (SAM) to SageMaker. We'll also look into the challenges of model deployment and explore strategies to overcome them.
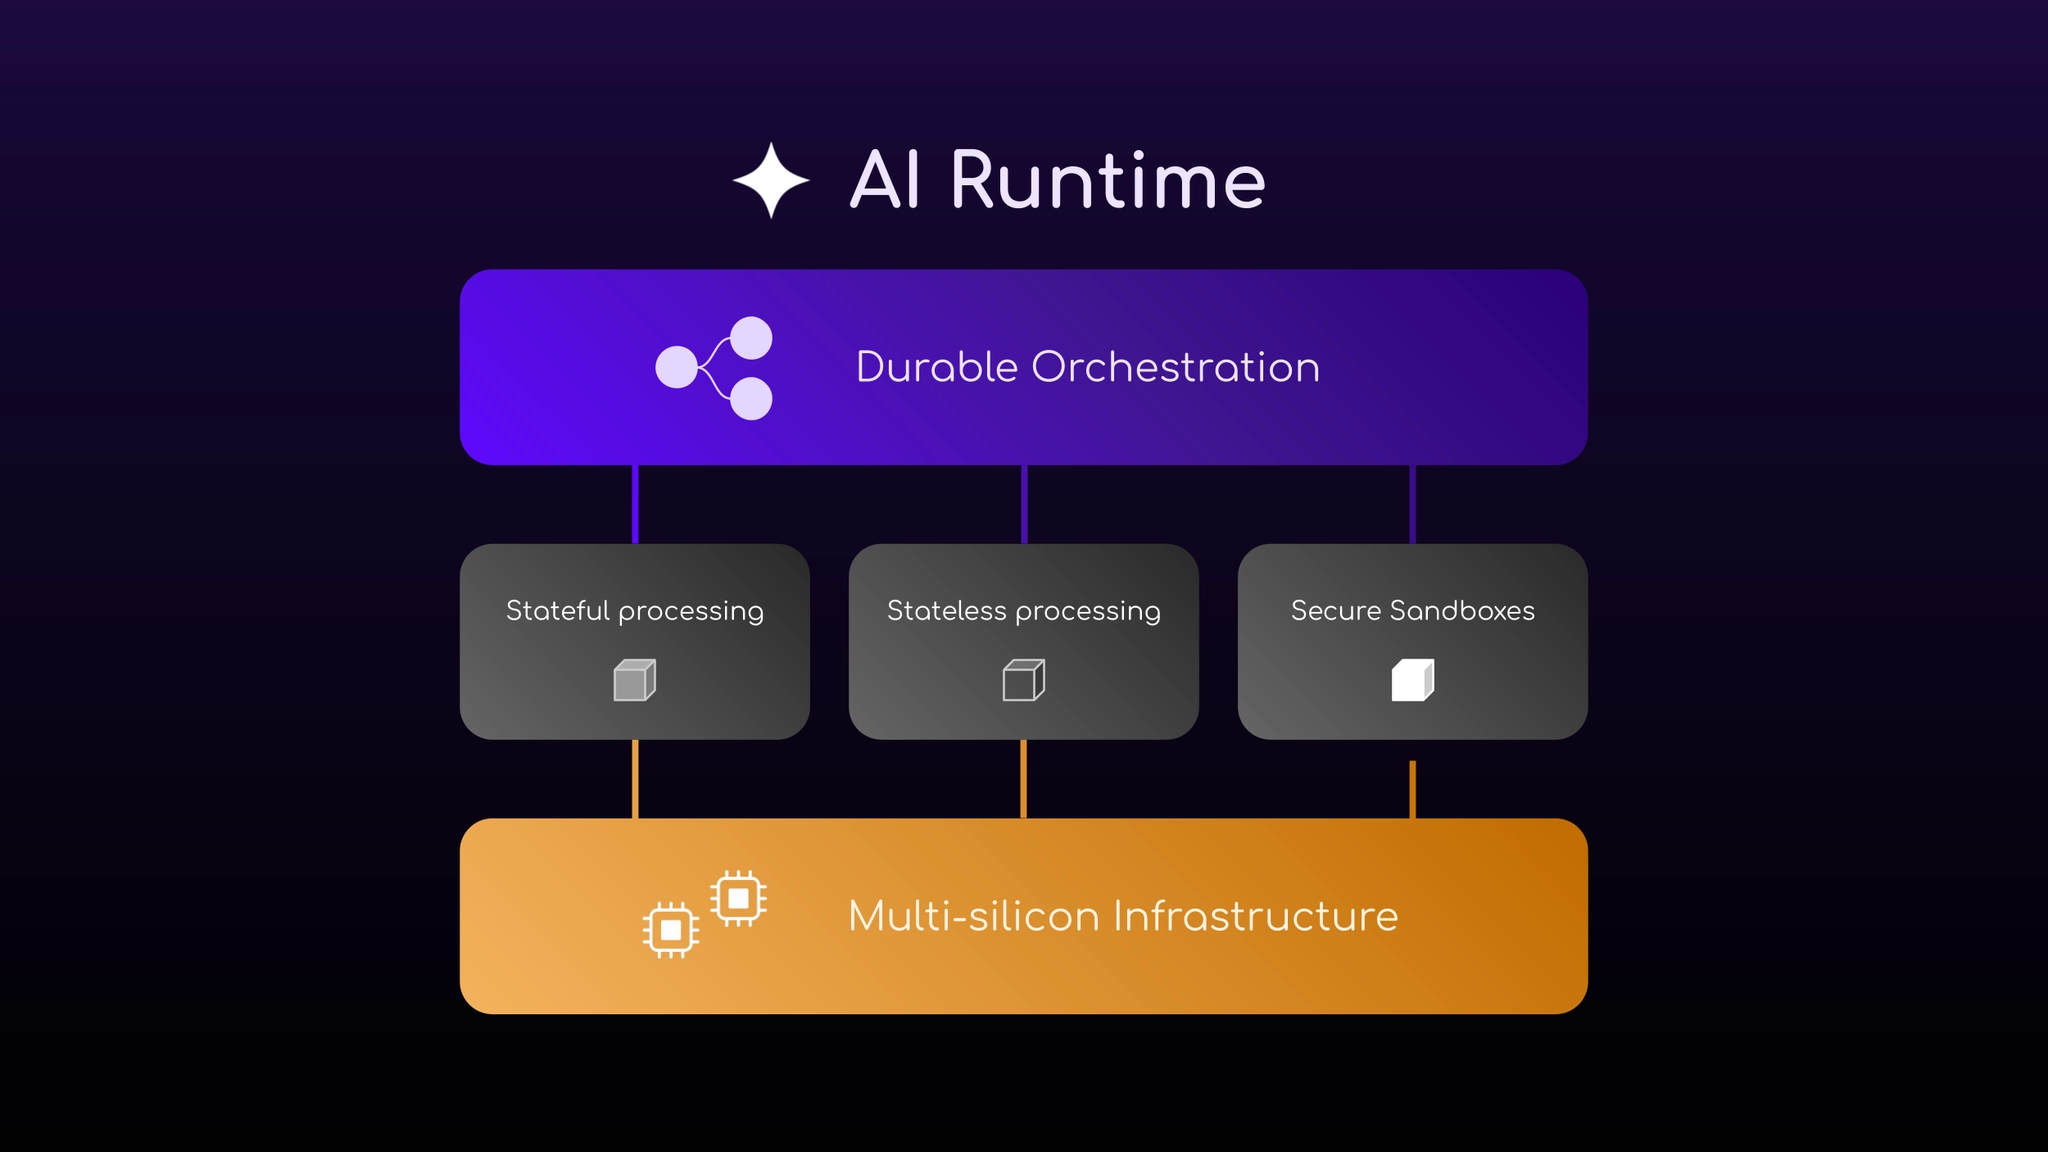
Introducing the SageMaker inference agent
Amazon SageMaker inference is among the most sought-after fully-managed inference frameworks for deploying models. You can utilize your own inference code to process inference requests. It provides an unopinionated and flexible substrate to deploy any custom model serving framework from FastAPI, Flask to Triton.
A typical workflow to deploy a SageMaker serving endpoint involves building an image with the inference code, storing the model in an accessible location and then performing a few specific API invocations to create an endpoint.

Union and the SageMaker inference agent make it incredibly straightforward to create an end-to-end deployment pipeline, which alleviates the need to manage container images and models. You can control the deployment process in a reproducible and traceable manner.
{{sagemaker-01="/blog-component-assets"}}
The end-to-end fine-tuning and deployment workflow
Our goal is to deploy a Segment Anything Model (SAM) for breast cancer detection. This involves fine-tuning SAM on a breast cancer dataset and subsequently deploying it on Amazon SageMaker.
While it's possible to manually fine-tune the model, obtain batch predictions for validation, and deploy for online predictions as separate processes, this traditional approach can present some challenges, in particular:
- Code decoupling: The fine-tuning, batch prediction and serving code can easily become decoupled, leading to code drift. This renders the workflow non-reproducible and makes troubleshooting difficult down the line.
- Deployment complexity: Deploying a model in SageMaker requires packaging the inference code, dependencies and entry point into a single Docker image. Writing Dockerfiles and building containers can be complex, especially during the experimental phase when iterating on the deployment pipeline.
Ideally, it would be nice to have a single, centralized workflow that handles fine-tuning, batch predictions and deployment. This would simplify the process, making it easier to iterate and deploy in production.
Union serves as a single source of truth, centralizing the entire model deployment pipeline. Let's get started on building the pipeline!
If you want to jump directly to the code, it’s on GitHub.
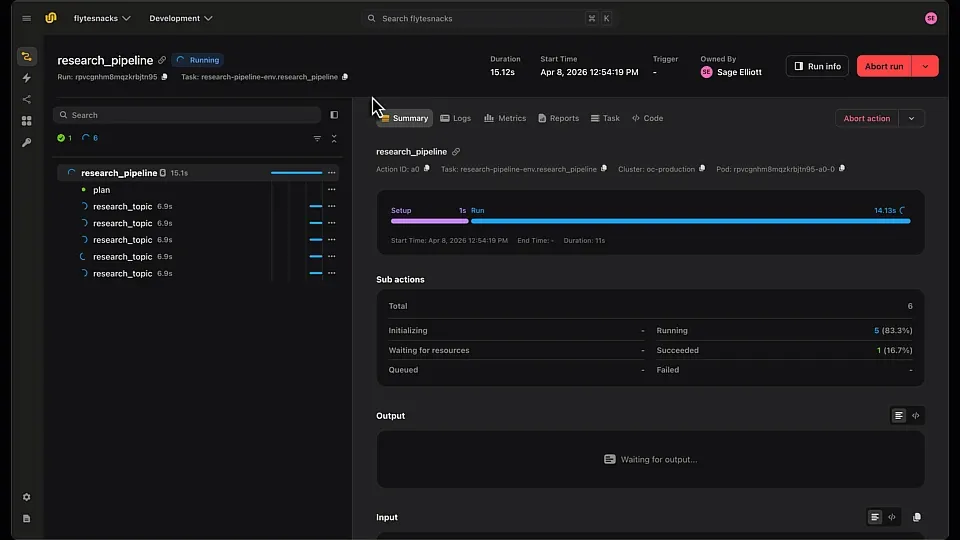
The following code snippet captures the Flyte workflow to fine-tune, batch predict, obtain user approval (I’ll explain the reason below), and deploy the SAM model:


This single workflow serves as a centralized end-to-end deployment pipeline, wherein each component in the pipeline can be treated as a separate entity with its own set of dependencies and code.
Fine-tuning
Fine-tuning is essential for enhancing your model’s capabilities beyond its initial training. SAM demonstrates strong zero-shot performance across various segmentation tasks. For demonstration purposes, we’ll fine-tune it on a toy dataset, but this approach can be scaled up to, for example, a MedSAM foundation model if you choose a larger dataset.
The dependencies are captured in an ImageSpec that automatically builds an image under the hood! Task caching prevents reruns with identical inputs, while the task requests a T4 GPU for fine-tuning the model. Flyte accelerators allow for the request of various accelerator types, including TPUs, specific GPU variants, or fractional GPUs.
Batch predictions
Before deploying the model in production, validating its performance by sending it a batch of inputs can be useful.

User approval
You can then inspect the batch predictions and thereby provide approval for the model to be deployed on SageMaker. This way, you can ensure that the model is performing as expected and identify any potential errors in the model’s predictions. This step helps determine if further fine-tuning or adjustments are necessary to improve the model’s performance or if it meets the required standards for deployment.
Implementing the approval workflow is simple; add `approve()` to the Flyte workflow providing it with the task output, the name of the approval node, and the timeout parameter.
Deployment
Model deployment is crucial for serving models to generate predictions. SageMaker supports various forms, such as real-time, serverless, and asynchronous inference.
The deployment process entails deploying the model on SageMaker, creating an endpoint configuration and endpoint. This process relies on the SageMaker inference agent, which needs to be deployed beforehand.
You can contact the Union team to enable the agent in your Union deployment to use it in production.
`create_sagemaker_deployment()` is a handy utility function that abstracts away the complexities of deploying models on SageMaker. For the complete deployment script, please refer here.
The `sam_deployment_image` corresponds to the image that the SageMaker model will use. It should incorporate the inference code, necessary libraries and an entry point for model serving.
As you can see, there is no requirement to write a Dockerfile. Simply define an `ImageSpec`, send it to the model config, and voilà! An image will be built, pushed to the specified registry, and used by SageMaker to spin up a container!
Generating predictions
You can invoke the deployed endpoint using the `SageMakerInvokeEndpointTask` class.
The invocation happens asynchronously because of the `AsyncInferenceConfig` specified in the endpoint configuration. Therefore, you should provide an S3 location as the input. The output will be populated with the result after it's generated. In this example, the inference input is populated as follows:
Image data and bounding box prompt are contained in the payload on the above, while the input image is displayed below.


The prediction is available in an S3 bucket, as shown above, while the prediction itself is displayed below.

The complete application code is available on GitHub. When you execute on a Flyte cluster, the workflow fine-tunes the model, generates batch predictions, awaits user approval, and proceeds to deploy the model. Flyte’s strong typing, versioned entities, data management, containerization, and declarative infrastructure work together to provide reproducibility, and by centralizing the code, Union mitigates code drift and enhances reproducibility.
Serve your models today!
With the addition of serving integration into Union, you can now train and deploy your models directly within Union. SageMaker inference supports a wide range of ML infrastructure, enabling you to scale your deployments, reduce inference costs, and minimize operational burden. If this interests you, check out our documentation and elevate your model serving capabilities!
.png)