Follow prompt evaluations as they happen, directly in the UI
Getting an AI application to behave the way you want takes more than just wiring things together. The real effort is in the setup: testing prompts, juggling models, tweaking parameters, often for days until you land on something that works reliably.
At first glance, it feels like a small problem. Just tweak the prompt a bit, change the model temperature, bump the token limit, maybe even swap the model. But here’s the catch: even the tiniest tweak can completely change how your application behaves. One version is insightful and polished, the next is verbose nonsense. Multiply that by hundreds or thousands of runs, and suddenly you’ve got an overwhelming search space on your hands.
A quick Python script to fan out experiments might seem fine at first, until you realize you also need to track every single input, output, and parameter so you can explain why something worked, reproduce results later, manage your compute budget, and pick up where you left off when something fails. That’s where “just a script” becomes a time sink, and the process starts eating into the real work of actually improving the application.
Then there’s the question of evaluation: how do you know which configuration is truly best? Human judgment is reliable but slow, expensive, and inconsistent. An increasingly popular alternative that’s gaining traction is the LLM-as-a-judge approach, where one model scores the outputs of another. It isn’t perfect, but studies show these model-based evaluations line up with human judgments over 80% of the time, accurate enough to move quickly without giving up too much quality. And when the criteria are objective, you can simply measure performance against a golden dataset of responses.
The tricky part is that the whole thing is non-deterministic. The same setup can produce different outcomes and what works today might not work tomorrow. That uncertainty is exactly why visibility and reproducibility matter so much. They transform an unpredictable trial-and-error loop into a systematic process you can trust.
Tackling the problem
To make things concrete, let’s narrow the scope to prompt engineering. Prompt engineering is essentially the practice of shaping a model’s input so the output aligns with what you want. And while there are endless ways to tweak a prompt, doing this by hand is inefficient. In many cases, an automated system that generates, tests, and evaluates prompts will uncover stronger candidates than a human working line by line.
Now running dozens or even hundreds of experiments requires a system that can handle failures gracefully, run tasks in parallel, and keep track of what worked and what didn’t. Without that, you end up with wasted compute, duplicated work, and results that are hard to reproduce.
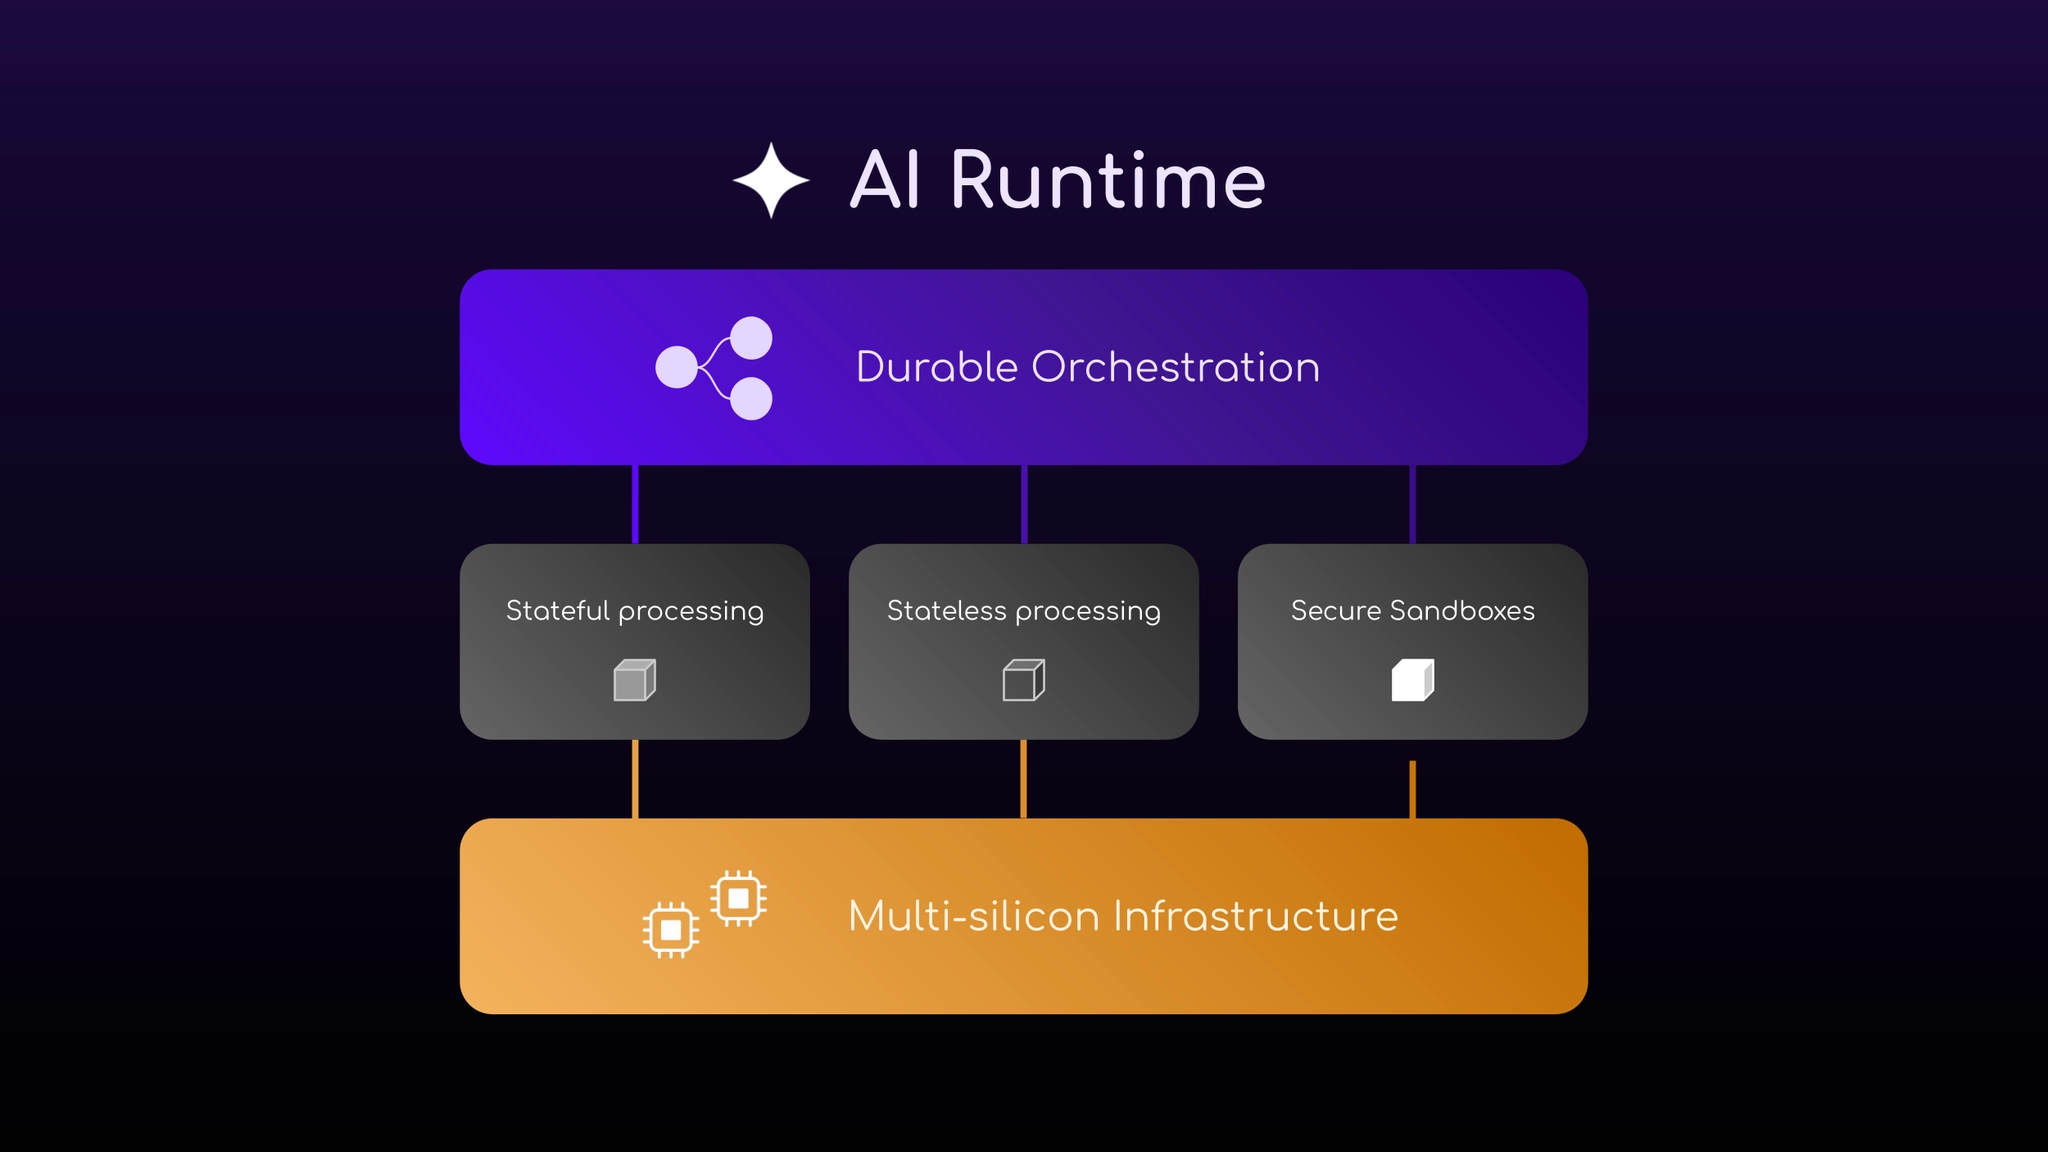
This is where Flyte 2.0 comes in. Think of it as a runtime built for exactly these kinds of workloads: workflows that are dynamic, crash-proof, and easy to observe as they run. When applied to prompt engineering, those qualities bring some tangible advantages:
- Crash recovery: if a workflow step fails, you can resume from the last successful point instead of starting over.
- Parallelism: multiple prompts can be tested simultaneously, which accelerates exploration and saves time.
- Observability: every intermediate step is tracked, so you can monitor progress, debug issues, and even generate reports in real time.
At the end of the day, prompt tuning isn’t about chasing one perfect prompt. It’s about building a process that’s repeatable and reliable, so you can spend your time using the results instead of fighting with the experiments.
See it in action
We’ve put together a tutorial in our docs that walks through how we implemented automated prompt engineering on Flyte 2.0. The tutorial defines a set of tasks and then stitches them together into a driver task that runs the full workflow.
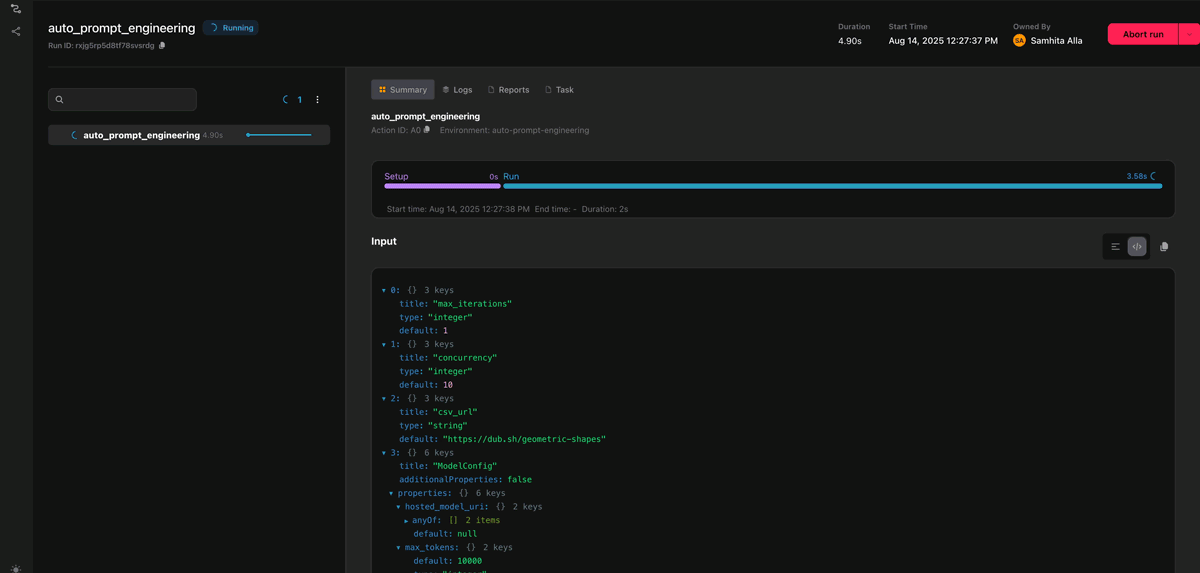
At the center of it is the driver task that accepts multiple user inputs to shape how the workflow runs. The design is intentional: it should be simple enough that even non-technical users can launch it and immediately see what prompt engineering looks like in practice.
Now there are frameworks like DSPy that offer automatic prompt optimization out of the box. What we’ve built here is a lighter, more transparent alternative, but a hands-on way to see how the process works under the hood. This gives you the flexibility to adapt or extend the workflow without being locked into a black box.
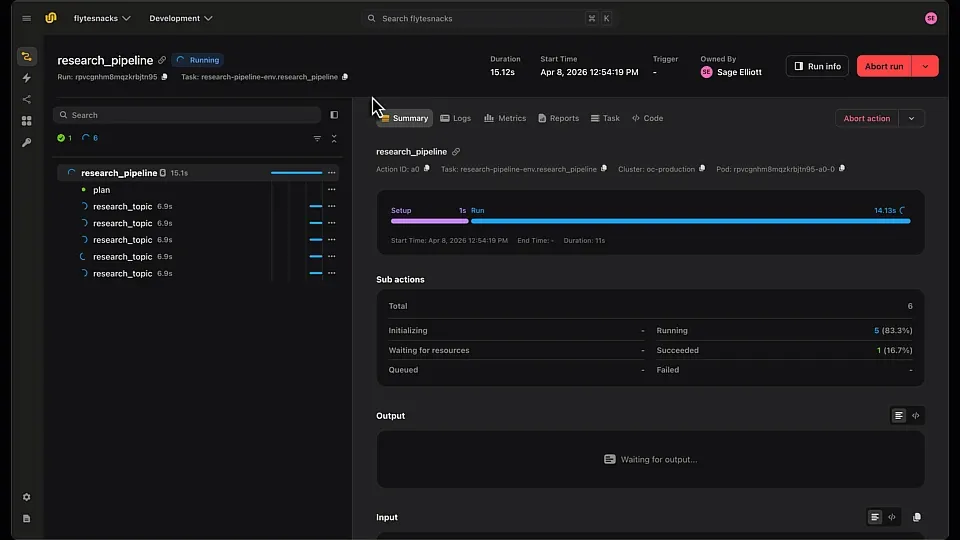
Here’s a quick walkthrough of the execution in action:
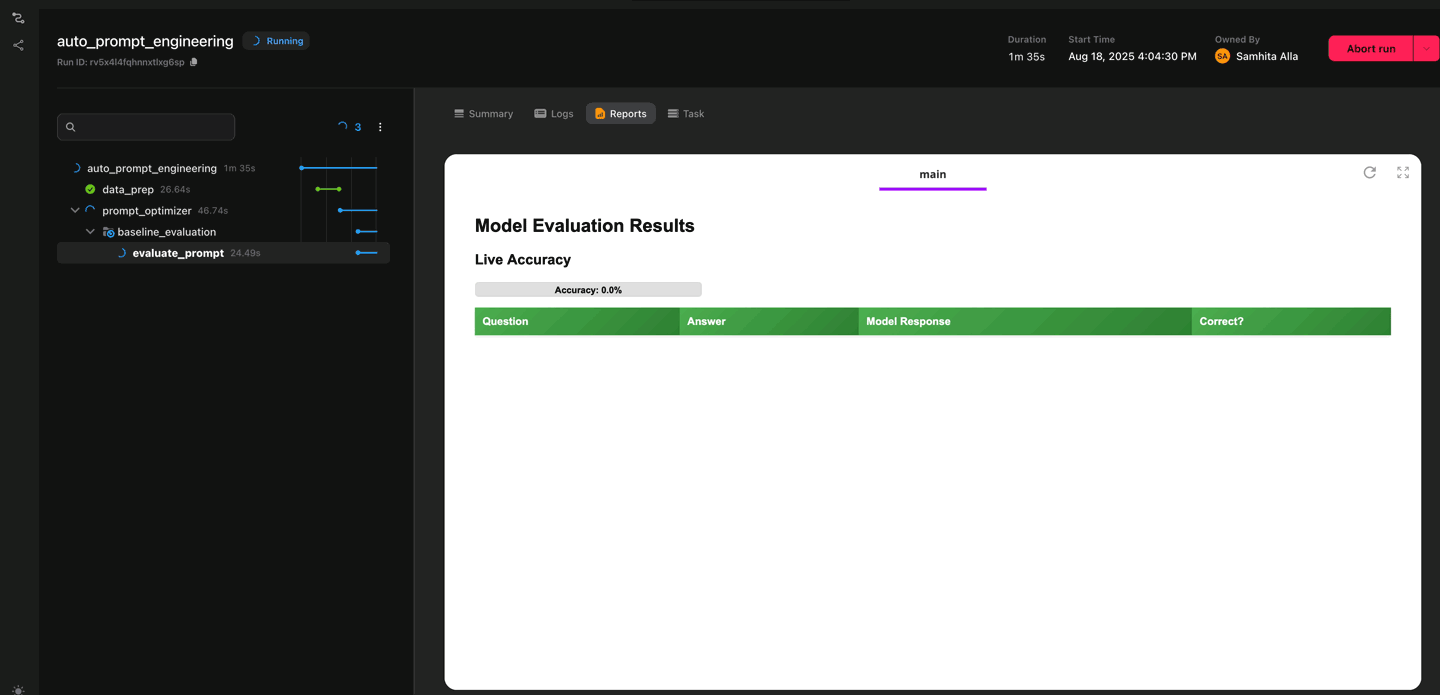
The workflow begins with a simple data preparation step: it downloads a CSV file (for example, you could just export your Google Sheet to CSV) and gets it ready for evaluation. From there, the optimization process kicks in. It starts with a baseline check using the user-provided prompt, then gradually refines it by generating new variations with an LLM.
Each candidate prompt is evaluated against every row in a training subset of the dataset. To speed things up, the evaluations run in parallel, with concurrency controlled by a plain Python semaphore. While this is happening, the system logs results in real time. You can actually watch the model’s responses alongside the review model’s feedback as they come in.
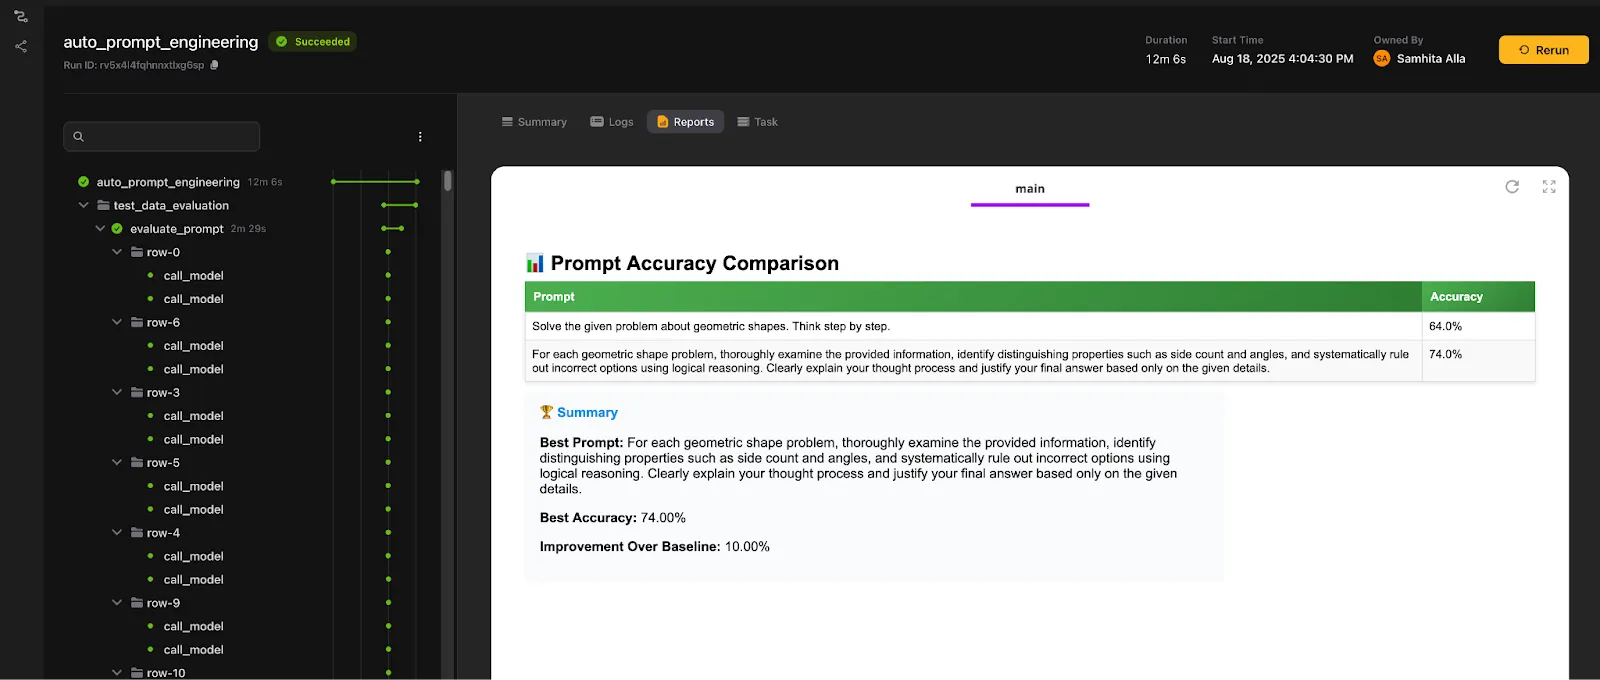
Once a round of evaluation completes, the results are aggregated into a prompt accuracy table, showing the overall accuracy across the dataset. The process then repeats, iterating until the maximum number of optimization cycles is reached. At the end, the workflow selects the best-performing prompt and marks it as the one to use going forward.
What you gain from this setup
- Parallel evaluations: All prompt evaluations run within the same Python runtime as the parent `evaluate_prompt` task with Flyte traces. Because the workload is mostly external API calls (a locally hosted model in this case), aggregation can safely happen in a single parent process.
- Real-time visibility: Results stream in as they’re generated, giving you a quick sense of how prompts are performing without waiting for the entire run to complete.
- Scalable optimization: Whether you want a handful of iterations or hundreds, Flyte’s containerization makes it easy to scale test processes without changing how the workflow is defined.
- Beyond prompts: The same setup works for any tunable parameter of your LLM or agent.
- Failure recovery: If a model call fails, the workflow would normally stop. But with Flyte DSL, you can set a minimum success ratio so the overall run keeps moving even if some tasks fail. And if you do want to rerun, Flyte’s caching ensures you don’t start from scratch. It simply picks up from the failed task, skipping everything that was already successful.
Of course, the prompt optimization workflow is only as good as the models it runs on. For this example, we hosted models locally to keep data in-house. Here’s how we did it with Union serving.
Hosting models with Union serving
In our prompt optimization example, we work with three different models:
- Target model: the one we’re trying to optimize.
- Review model: checks the target’s responses against ground-truth labels.
- Optimizer model: generates improved prompts.
For the target and review roles, we used gpt-oss-20B. For optimization, we brought in GPT-4.1.
You can avoid a review model altogether by forcing the output into a structured format, say, a single word or a categorical label so it can be compared directly against the golden dataset. But in our workflow, the goal is to capture how the model reasons through the task. That requires free-form responses, and so we bring in a review model to extract the objective signal we can actually validate.
Why gpt-oss-20B?
- We’ve all seen the power of GPT models, and when OpenAI released open-source versions, we wanted to put them to the test.
- 20B felt like the right balance: large enough to generate quality responses, but not unnecessarily heavy.
- Using GPT-4.1 as the optimizer gives us the best of both worlds: it crafts better prompts, while gpt-oss-20B handles the actual task responses.
To serve GPT-OSS-20B, we used vLLM together with Union Serving. One of the big advantages here is that model weights can be streamed directly into GPU memory, instead of first downloading them to disk and then loading, which is a big time saver.
Here’s how you can define a custom `VLLMApp` in Union to serve gpt-oss-20B:
Because we set `requires_auth=False`, the model endpoint can be called directly from within a task. With LiteLLM, you just trigger the endpoint and it blends right into the prompt optimization workflow.
From there, all you need is the `hosted_model_uri`, the model endpoint. Once that’s set, everything falls into place: prompt optimization runs on your own hosted model, your data stays local, and you remain fully in control.
Conclusion
Scaling prompt engineering or any model optimization workflow isn’t just about squeezing out a better prompt or a few extra accuracy points. It’s about building a process that’s reproducible, observable, and resilient enough to handle the messy reality of experimentation. Writing prompts is closer to building ML models than it might seem. The outcomes are inherently stochastic, and without a structured way to evaluate, test, and roll them out, it’s mostly guesswork. With the right foundation, you turn that uncertainty into a systematic process, saving time, conserving resources, and steadily improving your AI applications with confidence.
.webp)