Automatic prompt engineering
Code available here.
When building with LLMs and agents, the first prompt almost never works. We usually need several iterations before results are useful. Doing this manually is slow, inconsistent, and hard to reproduce.
Flyte turns prompt engineering into a systematic process. With Flyte we can:
- Generate candidate prompts automatically.
- Run evaluations in parallel.
- Track results in real time with built-in observability.
- Recover from failures without losing progress.
- Trace the lineage of every experiment for reproducibility.
And we’re not limited to prompts. Just like hyperparameter optimization in ML, we can tune model temperature, retrieval strategies, tool usage, and more. Over time, this grows into full agentic evaluations, tracking not only prompts but also how agents behave, make decisions, and interact with their environment.
In this tutorial, we’ll build an automated prompt engineering pipeline with Flyte, step by step.
Set up the environment
First, let’s configure our task environment.
import asyncio
import html
import os
import re
from dataclasses import dataclass
from typing import Optional, Union

import flyte
import flyte.report
import pandas as pd
from flyte.io._file import File

env = flyte.TaskEnvironment(
    name="auto-prompt-engineering",
    image=flyte.Image.from_uv_script(
        __file__, name="auto-prompt-engineering", pre=True
    ),
    secrets=[flyte.Secret(key="openai_api_key", as_env_var="OPENAI_API_KEY")],
    resources=flyte.Resources(cpu=1),
)


CSS = """
<style>
    body {
        font-family: 'Segoe UI', Roboto, Arial, sans-serif;
    }
    .results-table {
        border-collapse: collapse;
        width: 100%;
        box-shadow: 0 2px 5px rgba(0,0,0,0.1);
        font-size: 14px;
    }
    .results-table th {
        background: linear-gradient(135deg, #4CAF50, #2E7D32);
        color: white;
        padding: 10px;
        text-align: left;
    }
    .results-table td {
        border: 1px solid #ddd;
        padding: 8px;
        vertical-align: top;
    }
    .results-table tr:nth-child(even) {background-color: #f9f9f9;}
    .results-table tr:hover {background-color: #f1f1f1;}
    .correct {color: #2E7D32; font-weight: bold;}
    .incorrect {color: #C62828; font-weight: bold;}
    .summary-card {
        background: #f9fbfd;
        padding: 14px 18px;
        border-radius: 8px;
        box-shadow: 0 1px 4px rgba(0,0,0,0.05);
        max-width: 800px;
        margin-top: 12px;
    }
    .summary-card h3 {
        margin-top: 0;
        color: #1e88e5;
        font-size: 16px;
    }
</style>
"""
We need an API key to call GPT-4.1 (our optimization model). Add it as a Flyte secret:
flyte create secret openai_api_key <YOUR_OPENAI_API_KEY>We also define CSS styles for live HTML reports that track prompt optimization in real time:
Prepare the evaluation dataset
Next, we define our golden dataset, a set of prompts with known outputs. This dataset is used to evaluate the quality of generated prompts.
For this tutorial, we use a small geometric shapes dataset. To keep it portable, the data prep task takes a CSV file (as a Flyte File or a string for files available remotely) and splits it into train and test subsets.
If you already have prompts and outputs in Google Sheets, simply export them as CSV with two columns: input and target.
@env.task
async def data_prep(csv_file: File | str) -> tuple[pd.DataFrame, pd.DataFrame]:
    """
    Load Q&A data from a public Google Sheet CSV export URL and split into train/test DataFrames.
    The sheet should have columns: 'input' and 'target'.
    """
    df = pd.read_csv(
        await csv_file.download() if isinstance(csv_file, File) else csv_file
    )

    if "input" not in df.columns or "target" not in df.columns:
        raise ValueError("Sheet must contain 'input' and 'target' columns.")

    # Shuffle rows
    df = df.sample(frac=1, random_state=1234).reset_index(drop=True)

    # Train/Test split
    df_train = df.iloc[:150].rename(columns={"input": "question", "target": "answer"})
    df_test = df.iloc[150:250].rename(columns={"input": "question", "target": "answer"})

    return df_train, df_test
This approach works with any dataset. You can swap in your own with no extra dependencies.
Define models
We use two models:
- Target model → the one we want to optimize.
- Review model → the one that evaluates candidate prompts.
First, we capture all model parameters in a dataclass:
@dataclass
class ModelConfig:
    model_name: str
    hosted_model_uri: Optional[str] = None
    temperature: float = 0.0
    max_tokens: Optional[int] = 1000
    timeout: int = 600
    prompt: str = ""
Then we define a Flyte trace to call the model. Unlike a task, a trace runs within the same runtime as the parent process. Since the model is hosted externally, this keeps the call lightweight but still observable.
@flyte.trace
async def call_model(
    model_config: ModelConfig,
    messages: list[dict[str, str]],
) -> str:
    from litellm import acompletion

    response = await acompletion(
        model=model_config.model_name,
        api_base=model_config.hosted_model_uri,
        messages=messages,
        temperature=model_config.temperature,
        timeout=model_config.timeout,
        max_tokens=model_config.max_tokens,
    )
    return response.choices[0].message["content"]
gpt-oss-20b using vLLM.
import union
from union.app.llm import VLLMApp
from flytekit.extras.accelerators import A10G

Model = union.Artifact(name="gpt-oss-20b")


image = union.ImageSpec(
    name="vllm-gpt-oss",
    builder="union",
    apt_packages=["build-essential", "wget", "gnupg"],
    packages=[
        "union[vllm]==0.1.191b0",
        "--pre vllm==0.10.1+gptoss \
        --extra-index-url https://wheels.vllm.ai/gpt-oss/ \
        --extra-index-url https://download.pytorch.org/whl/nightly/cu128 \
        --index-strategy unsafe-best-match",
    ],
).with_commands(
    [
        "wget https://developer.download.nvidia.com/compute/cuda/repos/debian12/x86_64/cuda-keyring_1.1-1_all.deb",
        "dpkg -i cuda-keyring_1.1-1_all.deb",
        "apt-get update",
        "apt-get install -y cuda-toolkit-12-8",
        "/usr/local/cuda/bin/nvcc --version",
        "chown -R union /root",
        "chown -R union /home",
    ]
)


gpt_oss_app = VLLMApp(
    name="gpt-oss-20b-vllm",
    model=Model.query(),
    model_id="gpt-oss",
    container_image=image,
    requests=union.Resources(cpu="5", mem="26Gi", gpu="1", ephemeral_storage="150Gi"),
    accelerator=A10G,
    scaledown_after=300,
    stream_model=True,
    requires_auth=False,
    extra_args="--async-scheduling",
    env={"VLLM_ATTENTION_BACKEND": "TRITON_ATTN_VLLM_V1"},
)
We use an A10G GPU instance, and with streaming, you can load model weights directly into GPU memory instead of downloading the weights to disk first, then loading to GPU memory.
To deploy the model, cache the model from HuggingFace with a Union artifact:
union cache model-from-hf \
    --hf-token-key hf-api-key \
    --artifact-name gpt-oss-20b \
    --cpu 2 \
    --mem 8Gi \
    --ephemeral-storage 100Gi openai/gpt-oss-20b
Then deploy it:
union deploy apps gpt_oss.py gpt-oss-20b-vllmWhen using a hosted model, just provide its
hosted_model_uri in ModelConfig. All inference happens locally, so your data never leaves your environment.
Finally, we wrap the trace in a task to call both target and review models:
async def generate_and_review(
    index: int,
    question: str,
    answer: str,
    target_model_config: ModelConfig,
    review_model_config: ModelConfig,
) -> dict:
    # Generate response from target model
    response = await call_model(
        target_model_config,
        [
            {"role": "system", "content": target_model_config.prompt},
            {"role": "user", "content": question},
        ],
    )

    # Format review prompt with response + answer
    review_messages = [
        {
            "role": "system",
            "content": review_model_config.prompt.format(
                response=response,
                answer=answer,
            ),
        }
    ]
    verdict = await call_model(review_model_config, review_messages)

    # Normalize verdict
    verdict_clean = verdict.strip().lower()
    if verdict_clean not in {"true", "false"}:
        verdict_clean = "not sure"

    return {
        "index": index,
        "model_response": response,
        "is_correct": verdict_clean == "true",
    }
Evaluate prompts
We now define the evaluation process.
Each prompt in the dataset is tested in parallel, but we use a semaphore to control concurrency. A helper function ties together the generate_and_review task with an HTML report template. Using asyncio.gather, we evaluate multiple prompts at once.
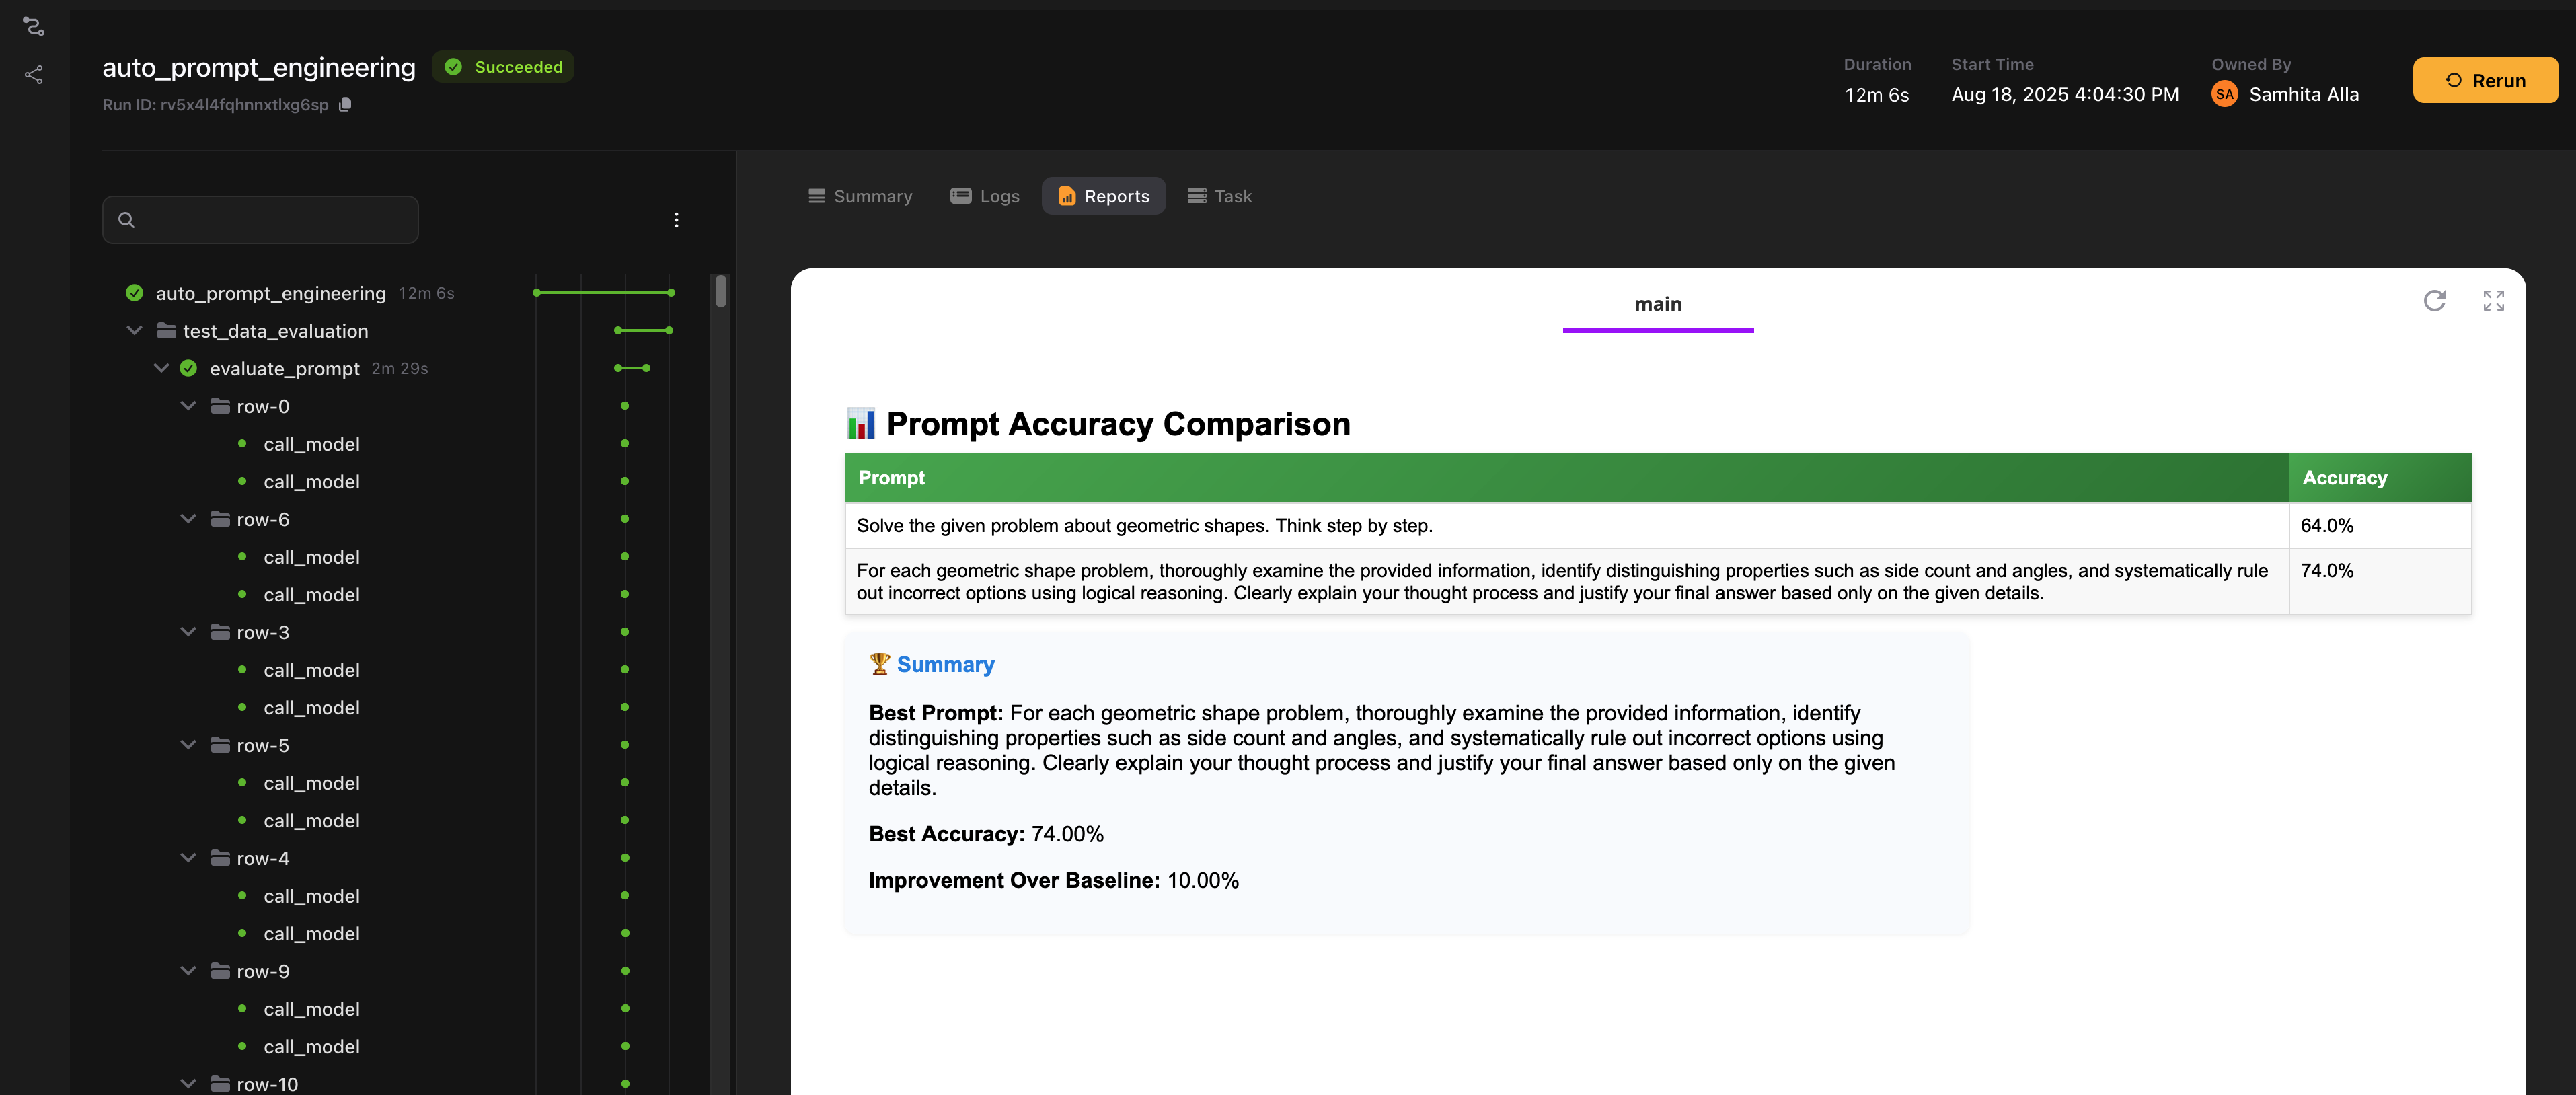
The function measures accuracy as the fraction of responses that match the ground truth. Flyte streams these results to the UI, so you can watch evaluations happen live.
@env.task(report=True)
async def evaluate_prompt(
    df: pd.DataFrame,
    target_model_config: ModelConfig,
    review_model_config: ModelConfig,
    concurrency: int,
) -> float:
    semaphore = asyncio.Semaphore(concurrency)
    counter = {"correct": 0, "processed": 0}
    counter_lock = asyncio.Lock()

    # Write initial HTML structure
    await flyte.report.log.aio(
        CSS
        + """
        <script>
            function updateAccuracy(percent) {
                const bar = document.getElementById('acc-bar');
                const label = document.getElementById('acc-label');
                bar.setAttribute('width', percent * 3);
                label.textContent = `Accuracy: ${percent.toFixed(1)}%`;
            }
        </script>

        <h2 style="margin-top:0;">Model Evaluation Results</h2>
        <h3>Live Accuracy</h3>
        <svg width="320" height="30" id="accuracy-chart">
            <defs>
                <linearGradient id="acc-gradient" x1="0" x2="1" y1="0" y2="0">
                    <stop offset="0%" stop-color="#66bb6a"/>
                    <stop offset="100%" stop-color="#2e7d32"/>
                </linearGradient>
            </defs>
            <rect width="300" height="20" fill="#ddd" rx="5" ry="5"></rect>
            <rect id="acc-bar" width="0" height="20" fill="url(#acc-gradient)" rx="5" ry="5"></rect>
            <text id="acc-label" x="150" y="15" font-size="12" font-weight="bold" text-anchor="middle" fill="#000">
                Accuracy: 0.0%
            </text>
        </svg>

        <table class="results-table">
            <thead>
                <tr>
                    <th>Question</th>
                    <th>Answer</th>
                    <th>Model Response</th>
                    <th>Correct?</th>
                </tr>
            </thead>
            <tbody>
        """,
        do_flush=True,
    )

    # Launch tasks concurrently
    tasks = [
        run_grouped_task(
            i,
            row.Index,
            row.question,
            row.answer,
            semaphore,
            target_model_config,
            review_model_config,
            counter,
            counter_lock,
        )
        for i, row in enumerate(df.itertuples(index=True))
    ]
    await asyncio.gather(*tasks)

    # Close table
    await flyte.report.log.aio("</tbody></table>", do_flush=True)

    async with counter_lock:
        return (
            (counter["correct"] / counter["processed"]) if counter["processed"] else 0.0
        )
Optimize prompts
Optimization builds on evaluation. We give the optimizer model:
- the history of prompts tested so far, and
- their accuracies.
The model then proposes a new prompt.
We start with a baseline evaluation using the user-provided prompt. Then for each iteration, the optimizer suggests a new prompt, which we evaluate and log. We continue until we hit the iteration limit.
@env.task(report=True)
async def prompt_optimizer(
    df_train: pd.DataFrame,
    target_model_config: ModelConfig,
    review_model_config: ModelConfig,
    optimizer_model_config: ModelConfig,
    max_iterations: int,
    concurrency: int,
) -> tuple[str, float]:
    prompt_accuracies: list[PromptResult] = []

    # Send styling + table header immediately
    await flyte.report.log.aio(
        CSS
        + """
    <h2 style="margin-bottom:6px;">📊 Prompt Accuracy Comparison</h2>
    <table class="results-table">
        <thead>
            <tr>
                <th>Prompt</th>
                <th>Accuracy</th>
            </tr>
        </thead>
    <tbody>
    """,
        do_flush=True,
    )

    # Step 1: Evaluate starting prompt and stream row
    with flyte.group(name="baseline_evaluation"):
        starting_accuracy = await evaluate_prompt(
            df_train,
            target_model_config,
            review_model_config,
            concurrency,
        )
        prompt_accuracies.append(
            PromptResult(prompt=target_model_config.prompt, accuracy=starting_accuracy)
        )

        await _log_prompt_row(target_model_config.prompt, starting_accuracy)

    # Step 2: Optimize prompts one by one, streaming after each
    while len(prompt_accuracies) <= max_iterations:
        with flyte.group(name=f"prompt_optimization_step_{len(prompt_accuracies)}"):
            # Prepare prompt scores string for optimizer
            prompt_scores_str = "\n".join(
                f"{result.prompt}: {result.accuracy:.2f}"
                for result in sorted(prompt_accuracies, key=lambda x: x.accuracy)
            )

            optimizer_model_prompt = optimizer_model_config.prompt.format(
                prompt_scores_str=prompt_scores_str
            )
            response = await call_model(
                optimizer_model_config,
                [{"role": "system", "content": optimizer_model_prompt}],
            )
            response = response.strip()

            match = re.search(r"\[\[(.*?)\]\]", response, re.DOTALL)
            if not match:
                print("No new prompt found. Skipping.")
                continue

            new_prompt = match.group(1)
            target_model_config.prompt = new_prompt
            accuracy = await evaluate_prompt(
                df_train,
                target_model_config,
                review_model_config,
                concurrency,
            )
            prompt_accuracies.append(PromptResult(prompt=new_prompt, accuracy=accuracy))

            # Log this new prompt row immediately
            await _log_prompt_row(new_prompt, accuracy)

    # Close table
    await flyte.report.log.aio("</tbody></table>", do_flush=True)

    # Find best
    best_result = max(prompt_accuracies, key=lambda x: x.accuracy)
    improvement = best_result.accuracy - starting_accuracy

    # Summary
    await flyte.report.log.aio(
        f"""
    <div class="summary-card">
        <h3>🏆 Summary</h3>
        <p><strong>Best Prompt:</strong> {html.escape(best_result.prompt)}</p>
        <p><strong>Best Accuracy:</strong> {best_result.accuracy*100:.2f}%</p>
        <p><strong>Improvement Over Baseline:</strong> {improvement*100:.2f}%</p>
    </div>
    """,
        do_flush=True,
    )

    return best_result.prompt, best_result.accuracy
At the end, we return the best prompt and its accuracy. The report shows how accuracy improves over time and which prompts were tested.
Build the full pipeline
The entrypoint task wires everything together:
- Accepts model configs, dataset, iteration count, and concurrency.
- Runs data preparation.
- Calls the optimizer.
- Evaluates both baseline and best prompts on the test set.
@env.task
async def auto_prompt_engineering(
    csv_file: File | str = "https://dub.sh/geometric-shapes",
    target_model_config: ModelConfig = ModelConfig(
        model_name="gpt-4.1-mini",
        hosted_model_uri=None,
        prompt="Solve the given problem about geometric shapes. Think step by step.",
        max_tokens=10000,
    ),
    review_model_config: ModelConfig = ModelConfig(
        model_name="gpt-4.1-mini",
        hosted_model_uri=None,
        prompt="""You are a review model tasked with evaluating the correctness of a response to a navigation problem.
The response may contain detailed steps and explanations, but the final answer is the key point.
Please determine if the final answer provided in the response is correct based on the ground truth number.
Respond with 'True' if the final answer is correct and 'False' if it is not.
Only respond with 'True' or 'False', nothing else.

Model Response:
{response}

Ground Truth:
{answer}
""",
    ),
    optimizer_model_config: ModelConfig = ModelConfig(
        model_name="gpt-4.1",
        hosted_model_uri=None,
        temperature=0.7,
        max_tokens=None,
        prompt="""
<EXPLANATION>
I have some prompts along with their corresponding accuracies.
The prompts are arranged in ascending order based on their accuracy, where higher accuracy indicate better quality.
</EXPLANATION>

<PROMPTS>
{prompt_scores_str}
</PROMPTS>

Each prompt was used together with a problem statement around geometric shapes.

<EXAMPLE>
<QUESTION>
This SVG path element <path d="M 55.57,80.69 L 57.38,65.80 M 57.38,65.80 L 48.90,57.46 M 48.90,57.46 L 45.58,47.78 M 45.58,47.78 L 53.25,36.07 L 66.29,48.90 L 78.69,61.09 L 55.57,80.69"/> draws a Options: (A) circle (B) heptagon (C) hexagon (D) kite (E) line (F) octagon (G) pentagon (H) rectangle (I) sector (J) triangle
</QUESTION>
<ANSWER>
(B)
</ANSWER>
</EXAMPLE>

<TASK>
Write a new prompt that will achieve an accuracy as high as possible and that is different from the old ones.
</TASK>


<RULES>
- It is very important that the new prompt is distinct from ALL the old ones!
- Ensure that you analyse the prompts with a high accuracy and reuse the patterns that worked in the past
- Ensure that you analyse the prompts with a low accuracy and avoid the patterns that didn't worked in the past
- Think out loud before creating the prompt. Describe what has worked in the past and what hasn't. Only then create the new prompt.
- Use all available information like prompt length, formal/informal use of language, etc for your analysis.
- Be creative, try out different ways of prompting the model. You may even come up with hypothetical scenarios that might improve the accuracy.
- You are generating system prompts. This means that there should be no placeholders in the prompt, as they cannot be filled at runtime. Instead focus on general instructions that will help the model to solve the task.
- Write your new prompt in double square brackets. Use only plain text for the prompt text and do not add any markdown (i.e. no hashtags, backticks, quotes, etc).
</RULES>
""",
    ),
    max_iterations: int = 3,
    concurrency: int = 10,
) -> dict[str, Union[str, float]]:
    if isinstance(csv_file, str) and os.path.isfile(csv_file):
        csv_file = await File.from_local(csv_file)

    df_train, df_test = await data_prep(csv_file)

    best_prompt, training_accuracy = await prompt_optimizer(
        df_train,
        target_model_config,
        review_model_config,
        optimizer_model_config,
        max_iterations,
        concurrency,
    )

    with flyte.group(name="test_data_evaluation"):
        baseline_test_accuracy = await evaluate_prompt(
            df_test,
            target_model_config,
            review_model_config,
            concurrency,
        )

        target_model_config.prompt = best_prompt
        test_accuracy = await evaluate_prompt(
            df_test,
            target_model_config,
            review_model_config,
            concurrency,
        )

    return {
        "best_prompt": best_prompt,
        "training_accuracy": training_accuracy,
        "baseline_test_accuracy": baseline_test_accuracy,
        "test_accuracy": test_accuracy,
    }
Run it
We add a simple main block so we can run the workflow as a script:
if __name__ == "__main__":
    flyte.init_from_config()
    run = flyte.run(auto_prompt_engineering)
    print(run.url)
    run.wait()
Run it with:
uv run optimizer.py
Why this matters
Most prompt engineering pipelines start as quick scripts or notebooks. They’re fine for experimenting, but they’re difficult to scale, reproduce, or debug when things go wrong.
With Flyte 2, we get a more reliable setup:
- Run many evaluations in parallel with async Python or native DSL.
- Watch accuracy improve in real time and link results back to the exact dataset, prompt, and model config used.
- Resume cleanly after failures without rerunning everything from scratch.
- Reuse the same pattern to tune other parameters like temperature, retrieval depth, or agent strategies, not just prompts.
Next steps
You now have a working automated prompt engineering pipeline. Here’s how you can take it further:
- Optimize beyond prompts: Tune temperature, retrieval strategies, or tool usage just like prompts.
- Expand evaluation metrics: Add latency, cost, robustness, or diversity alongside accuracy.
- Move toward agentic evaluation: Instead of single prompts, test how agents plan, use tools, and recover from failures in long-horizon tasks.
With this foundation, prompt engineering becomes repeatable, observable, and scalable, ready for production-grade LLM and agent systems.