Image credit: Dalle-3
Flyte is an AI orchestration platform for rapid Data, ML, & AI development, particularly useful for scaling pipelines in production environments. Setting up Flyte requires careful consideration and specific steps to maximize its value. The Union.ai team, along with the Flyte community, has been working on simplifying the deployment process for production settings. To assist GCP users in quickly starting with Flyte, we have released a new set of Terraform modules.
In this post, you will learn about the backend components necessary for a Flyte installation and how the Terraform modules facilitate their implementation in a GCP environment. Given the nature of automation scripts, several decisions have to be made in advance. We will discuss the rationale behind these decisions in this post. If you lack a platform engineering background but are interested in running Flyte, consider reaching out to the Union.ai team via Slack. Let us assist you in setting up Flyte in your environment, while we also offer a managed Flyte service, called Union.
Getting started
At a minimum, a Flyte implementation requires the following components:
- A PostgreSQL 14+ database to be used by `flyteadmin` and `datacatalog` to store execution events and hash maps of inputs/outputs for caching purposes, respectively
- An S3-compliant bucket that can be used both for metadata and raw data storage
- A Kubernetes cluster running a supported version (typically N-2, where N is the latest upstream release)
A production-grade deployment should also include the following:
- Ingress
- SSL
The released Terraform modules automate the configuration process for the dependencies of a production-grade installation and install the `flyte-core` Helm chart.
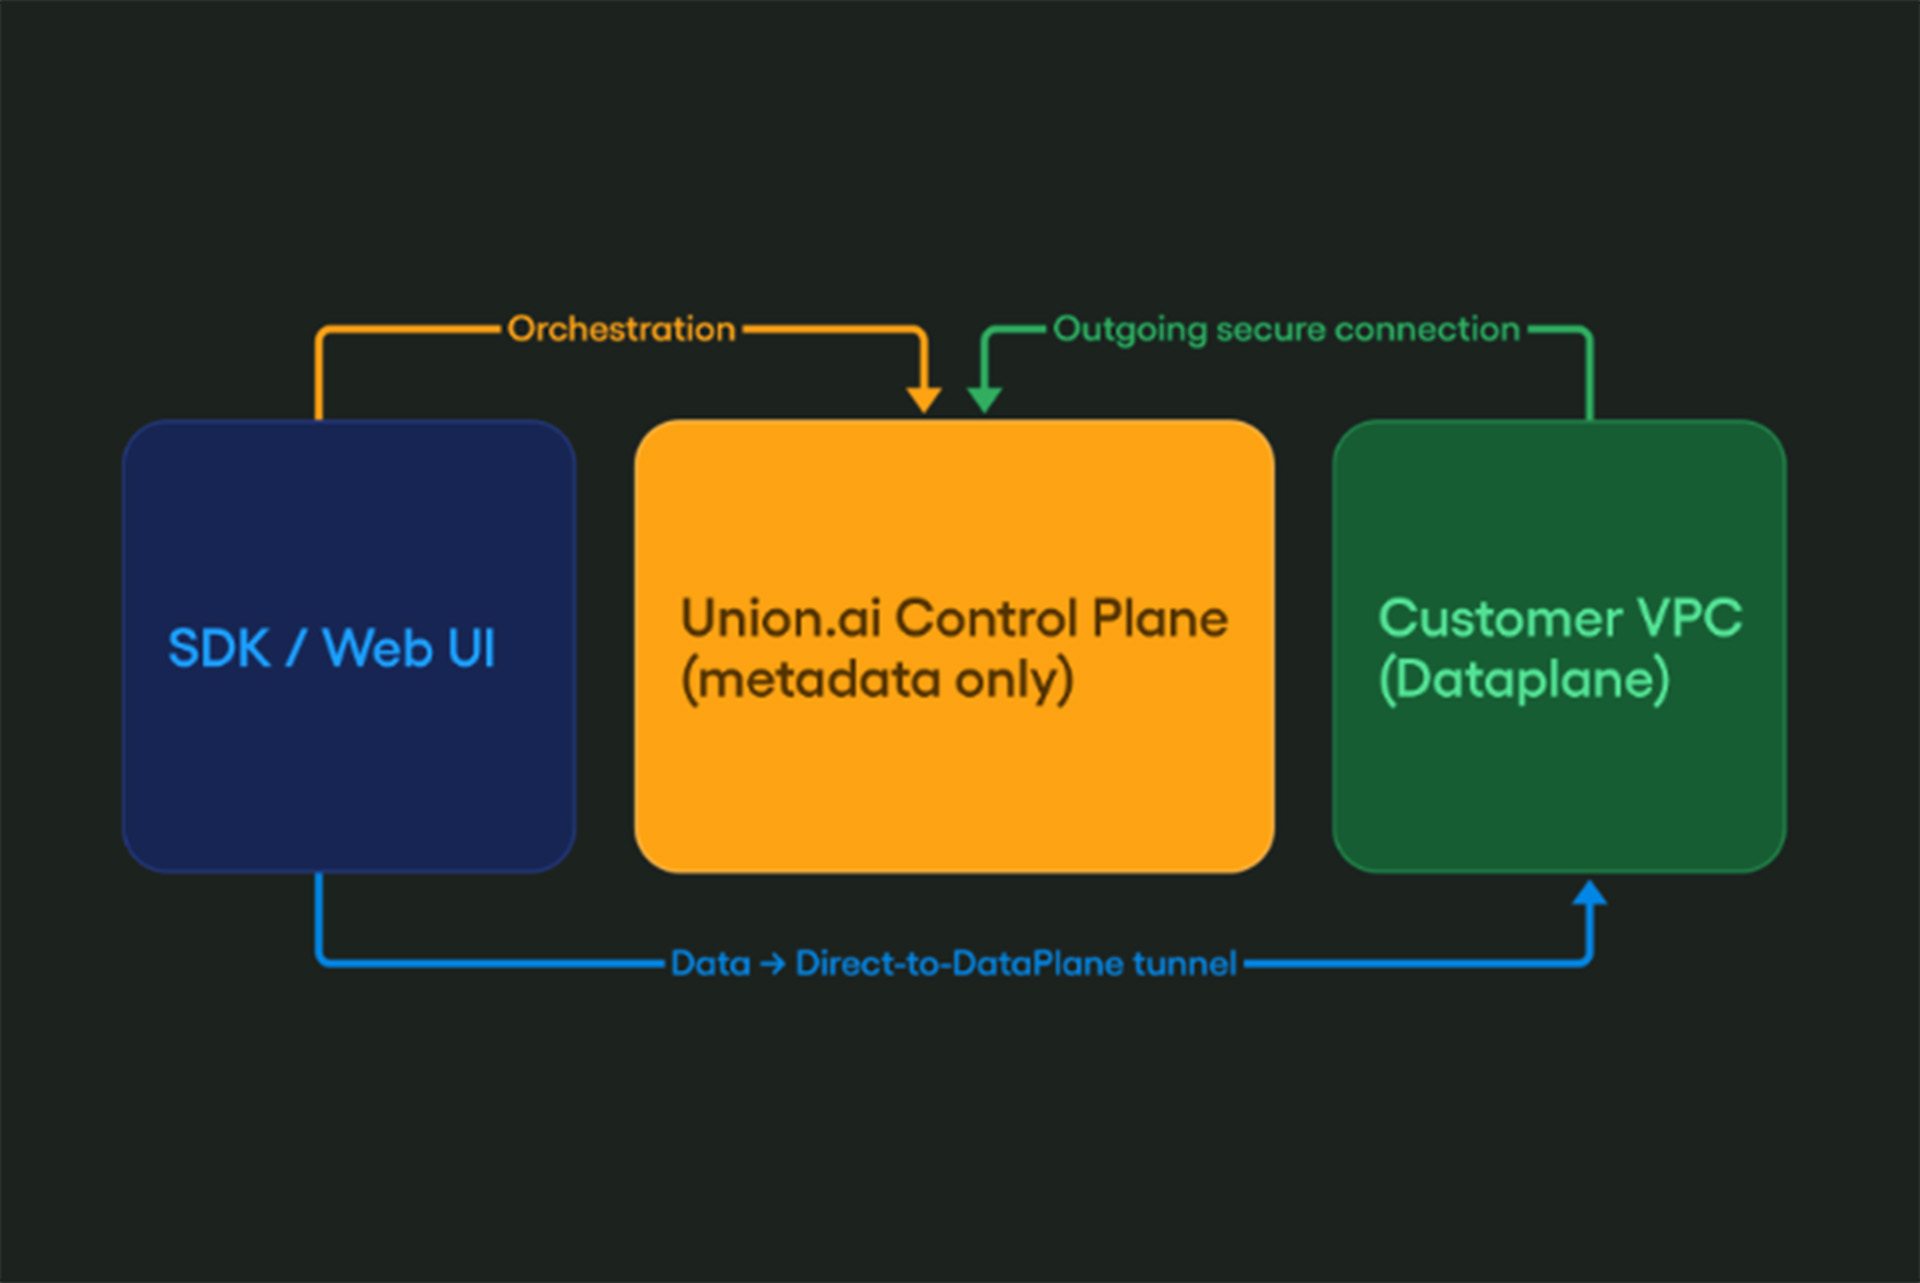
The following diagram provides an overview of the elements configured by the modules in a GCP environment:

The modules and their roles
Google Cloud Storage (gcs.tf)
This module will deploy a single GCS bucket with the following features:
- Public access prevention
- Uniform access control
- No object retention nor lifecycle policies configured
Flyte will use the bucket to store both metadata and raw data generated by Task executions (learn more about how Flyte handles data in the docs)
If you need to separate the two types of data, you will need to add a new bucket definition to the module and indicate the new bucket in the values file:
1. Add the following to the `gcs.tf` module:
2. In your values file, add the name of the additional bucket to the following key, depending on the Helm chart being used:
- flyte-core: `configmap.core.propeller.rawoutput-prefix`
- flyte-binary: `configuration.storage.userDataContainer`
3. Run `terraform apply`
PostgreSQL database (sql.tf)
This module will deploy a Postgres database with the following features:
- Master instance with 1 vCPU and 3840MB RAM
- Latest supported maintenance version under the Postgres 14 release family
- Database instance name `flyte`
- Private Service Connection enabled. This setting will allow GCP services to access the DB instance through a Private Network.
- Single zone availability
By default, a random password will be generated and passed to the Helm chart for the Flyte installation.
Kubernetes cluster (gke.tf)
The GKE cluster deployed by this module will have the following features:
- Kubernetes version from the stable release channel. This is typically two releases earlier than the latest
- Configured Workload Identity Pool
- Node pool instance type: e2-standard-4 (4 vCPU, 16GB RAM). 1 node by default, 3 maximum
- Not managed by the default GCE service account
Ingress
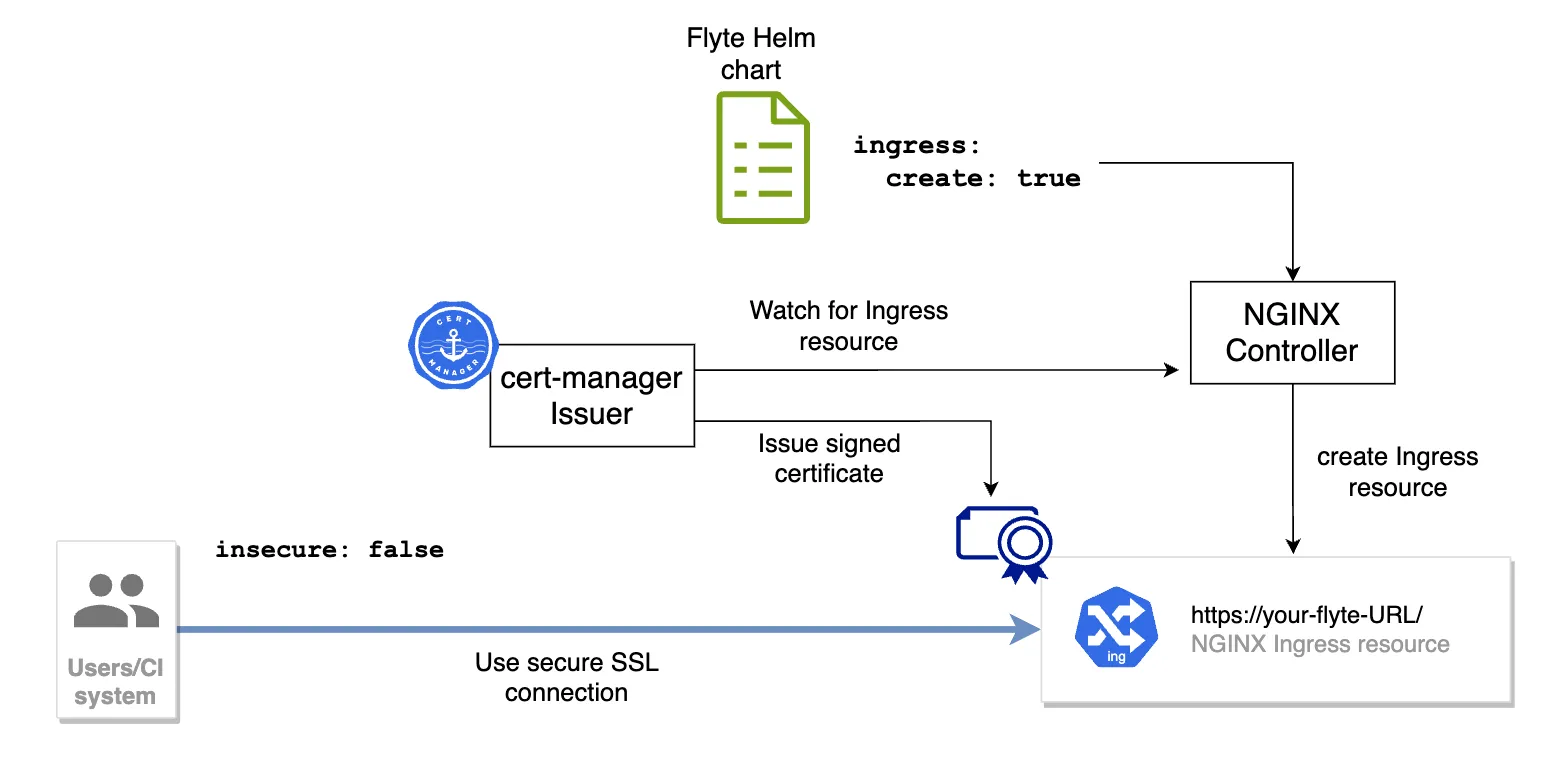
The purpose of an Ingress resource on a Flyte implementation is to provide a scalable mechanism to connect to the multiple services that make up a Flyte environment by using a single entry point. Ingress is one of a few resources that the Kubernetes API doesn’t reconcile but relies on a third-party controller to do so.In this case, the module will deploy the NGINX Ingress controller, which will end up creating the Ingress resources requested by the Flyte Helm chart.
SSL
Additionally, this module deploys cert-manager, an open-source certificate management tool that will issue X.509 certificates to the Ingress resources configured by the NGINX controller, enabling secure communication between clients and the Flyte instance with an SSL connection terminated at the Ingress resource.
One important aspect of cert-manager is that it makes certificates a first-class construct as Kubernetes Custom Resource Definitions (CRDs). Consequently, in observation of the known limitations of Helm at managing CRD’s lifecycle, the modules deploy the CRDs from manifest files instead of using a Helm chart.
Additionally, an Issuer will be created in the same namespace where Flyte’s control plane Pods will run. The Issuer is configured to use LetsEncrypt as the Certificate Authority and the ACME protocol to validate that you own the domain you plan to use to connect to Flyte. Terraform builds that domain by combining the `application` name and `dns-domain` variables in `locals.tf`:
You can override that value by just indicating the FQDN directly in `flyte.tf`:
One important step in the process of using these modules is to create an A record in your DNS provider, pointing to the IP address of your Ingress resource. During the time it takes for the new record to propagate, cert-manager will issue a temporary self-signed certificate. Once propagation is done, the Issuer should complete the certificate request and your UI and CLI connections should be secured by SSL. Learn more in the README.
IAM
This is where things become even more interesting.
The fundamental construct adopted by the IAM reference implementation is Workload Identity, the approach recommended by Google to enable secure access from GKE workloads to Google Cloud services.
Every component in a Flyte implementation ends up consuming a Kubernetes Service Account (KSA), the prime K8s-native mechanism to identify processes or entities connecting to its API. On their own, KSAs have a relatively limited scope: a single Kubernetes namespace inside a single GKE cluster. To enable KSAs to consume services external to the GKE cluster, we make use of a technique known as impersonation, where a KSA inherits the permissions associated with a Google Service Account (Google’s mechanism to provide identity to apps, services, or processes) delivered as a short-lived Access Token.
This module implements the following structure:

The process, carried out automatically by the Terraform modules, includes the following steps (in no exact order):
- Create the KSAs for the different Flyte backend components (`flyteadmin`, `flytepropeller`, `flytescheduler`, `datacatalog`)
- Create the corresponding GSAs, including one for the Flyte worker; the K8s Pods that will execute your Tasks
- Create a custom IAM Role for each GSA, defining the minimum set of permissions required by each component
- Bind the custom role to each GSA
- Bind the GSA to its matching KSA, making it a `WorkloadIdentityUser`
- Annotate the KSA with the corresponding GSA
Regarding step #6, there’s a noteworthy consideration: For every project you may have in Flyte, there will be (by default) three K8s namespaces created, one for each project-domain combination. Once an execution is triggered, the worker Pods will use the `default` KSA that comes with every namespace. The modules will go through each `default` KSA configuring the binding and the required annotations.
By default, the reference implementation comes with a single project: `flytesnacks`. If you need to override this, set your project(s) in the `locals.tf` file:
Working with custom container images
By default, Flyte uses a container image with a minimal set of packages and dependencies (see the definition here). If you need to customize the image to run your workflows, consider ImageSpec as a purely declarative mechanism that will build your OCI Image, without asking you to write a Dockerfile. Learn more about ImageSpec.
Regardless of the mechanism you pick for a custom container image, you will need a container registry. If you plan to use Google Artifact Registry to store your Images, you need to be aware of the two main actors in this operation: the user or CI system that needs to store a custom container Image, and the app (in this case, a Flyte task Pod) that will read the Image from the repository and will use it to run its processes.
The Terraform modules will configure the required roles, service accounts, and permissions to enable authenticated push and pull operations as described in the following diagram:

Head over to the instructions in the repo, to learn how to connect to and use Artifact Registry.
The Flyte module
Finally, the flyte.tf module will take the required outputs from the other modules and will install the flyte-core Helm chart using those settings. In consequence, you don’t need to adjust Helm values files. Once `terraform apply` is done, your Flyte environment is installed.
Closing thoughts
Getting to a point of a highly automated deployment has been made possible only by the feedback of multiple members of the Flyte community who have shared their learnings and struggles. Thank you!
Nevertheless, we’re not done yet.
Short-term plans for the reference implementations include enabling automated Helm deployment for the AWS modules, adding flyte-binary and flyte-core to GCP and AWS respectively, and, incorporating an automated auth implementation with keycloak. If you have more ideas or want to contribute, let us know by creating an Issue.
If you experience any problem using these modules, file an Issue or head over to the #flyte-on-gcp channel where we usually hang out. The community will be happy to help.