=== PAGE: https://www.union.ai/docs/v1/serverless ===
# Documentation
Welcome to the documentation.
## Subpages
- **{{< key product_name >}} Serverless**
- **Tutorials**
- **Integrations**
- **Reference**
- **Community**
- **Architecture**
- **Platform deployment**
=== PAGE: https://www.union.ai/docs/v1/serverless/user-guide ===
# {{< key product_name >}} Serverless
{{< key product_name >}} empowers AI development teams to rapidly ship high-quality code to production by offering optimized performance, unparalleled resource efficiency, and a delightful workflow authoring experience. With {{< key product_name >}} your team can:
* Run complex AI workloads with performance, scale, and efficiency.
* Achieve millisecond-level execution times with reusable containers.
* Scale out to multiple regions, clusters, and clouds as needed for resource availability, scale, or compliance.
> [!NOTE]
> {{< key product_name >}} is built on top of the leading open-source workflow orchestrator, [Flyte](/docs/v1/flyte/).
>
> {{< key product_name >}} Serverless provides **all the features of Flyte, plus much more**
> all in a turn-key, fully-managed, cloud environment.
> There is zero infrastructure to deal with, and you pay only for the resources you use.
> Your data and workflow code is stored safely and securely in the Union.ai cloud infrastructure.
>
> You can switch to another product version with the selector above.
### 💡 **Introduction**
{{< key product_name >}} builds on the leading open-source workflow orchestrator, Flyte, to provide a powerful, scalable, and flexible platform for AI applications.
### 🔢 **Getting started**
Build your first {{< key product_name >}} workflow, exploring the major features of the platform along the way.
### 🔗 **Core concepts**
Understand the core concepts of the {{< key product_name >}} platform.
### 🔗 **Development cycle**
Explore the {{< key product_name >}} development cycle from experimentation to production.
### 🔗 **Data input/output**
Manage the input and output of data in your {{< key product_name >}} workflow.
### 🔗 **Programming**
Learn about {{< key product_name >}}-specific programming constructs.
## Subpages
- **Introduction**
- **Getting started**
- **Core concepts**
- **Development cycle**
- **Data input/output**
- **Administration**
- **Programming**
=== PAGE: https://www.union.ai/docs/v1/serverless/user-guide/introduction ===
# Introduction
{{< key product_name >}} unifies your AI development on a single end-to-end platform, bringing together data, models and compute with workflows of execution on a single pane of glass.
{{< key product_name >}} builds on [Flyte](https://flyte.org), the open-source standard for orchestrating AI workflows.
It offers all the features of Flyte while adding more capability to scale, control costs and serve models.
There are three deployment options for {{< key product_name >}}: **Serverless**, **BYOC** (Bring Your Own Cloud), and **Self-managed**.
## Flyte
Flyte provides the building blocks need for an end-to-end AI platform:
* Reusable, immutable tasks and workflows
* Declarative task-level resource provisioning
* GitOps-style versioning and branching
* Strongly-typed interfaces between tasks enabling more reliable code
* Caching, intra-task checkpointing, and spot instance provisioning
* Task parallelism with *map tasks*
* Dynamic workflows created at runtime for process flexibility
Flyte is open source and free to use.
You can switch to the Flyte docs [here](/docs/v1/flyte/).
You can try out Flyte's technology:
* In the cloud with [{{< key product_name >}} Serverless](https://signup.union.ai).
* On your machine with a **Development cycle > Running in a local cluster**.
For production use, you have to **Platform deployment**.
## {{< key product_name >}} Serverless
[{{< key product_name >}} Serverless](/docs/v1/serverless/) is a turn-key solution that provides a fully managed cloud environment for running your workflows.
There is zero infrastructure to manage, and you pay only for the resources you use.
Your data and workflow code is stored safely and securely in {{< key product_name >}}'s cloud infrastructure.
{{< key product_name >}} Serverless provides:
* **All the features of Flyte**
* Granular, task-level resource monitoring
* Fine-grained role-based access control (RBAC)
* Faster performance:
* Launch plan caching: Cache launch plans, 10-100x speed-up
* Optimized Propeller: more than 10 core optimizations
* Faster cache: Revamped caching subsystem for 10x faster performance
* Accelerated datasets: Retrieve repeated datasets and models more quickly
* Faster launch plan resolution
* Reusable containers (do not pay the pod spin-up penalty)
* Interactive tasks:
* Edit, debug and run tasks right in the pod through VS Code in the browser
* Artifacts discovery and lineage
* Reactive workflows:
* Launch plans trigger (and kick off workflows) on artifact creation
* Smart defaults and automatic linking
* UI based workflow builder
## {{< key product_name >}} BYOC
[{{< key product_name >}} BYOC](/docs/v1/byoc/) (Bring Your Own Cloud) lets you keep your data and workflow code on your infrastructure, while {{< key product_name >}} takes care of the management.
{{< key product_name >}} BYOC provides:
* **All the features of Flyte**
* **All the features of {{< key product_name >}} Serverless**
* Accelerators and GPUs (including fractional GPUs)
* Managed Ray and Spark
* Multi-cluster and multi-cloud
* Single sign-on (SSO)
* SOC-2 Type 2 compliance
## {{< key product_name >}} Self-managed
[{{< key product_name >}} Self-managed](/docs/v1/selfmanaged/) lets you keep full control of your data, code, and infrastructure.
{{< key product_name >}} Self-managed provides:
* **All the features of Flyte**
* **All the features of {{< key product_name >}} Serverless**
* **All the features of {{< key product_name >}} BYOC**
The only difference between {{< key product_name >}} BYOC and {{< key product_name >}} Self-managed is that
with Self-managed you are responsible for the system infrastructure, either partially or fully, according to which option you choose:
* Deploy and manage your data plane yourself on your infrastructure while Union.ai manages the control plane on our infrastructure.
* Deploy and manage both your data plane and control plane on your infrastructure with support and guidance from Union.ai.
This option is suitable for air-gapped deployments.
=== PAGE: https://www.union.ai/docs/v1/serverless/user-guide/getting-started ===
# Getting started
This section gives you a quick introduction to writing and running {{< key product_name >}} workflows.
## Sign up for {{< key product_name >}} Serverless
First, sign up for {{< key product_name >}} Serverless:
{{< button-link text="Create an account" target="https://signup.union.ai/" variant="warning" >}}
Once you've received confirmation that your sign-up succeeded, navigate to
the UI at [serverless.union.ai](https://serverless.union.ai).
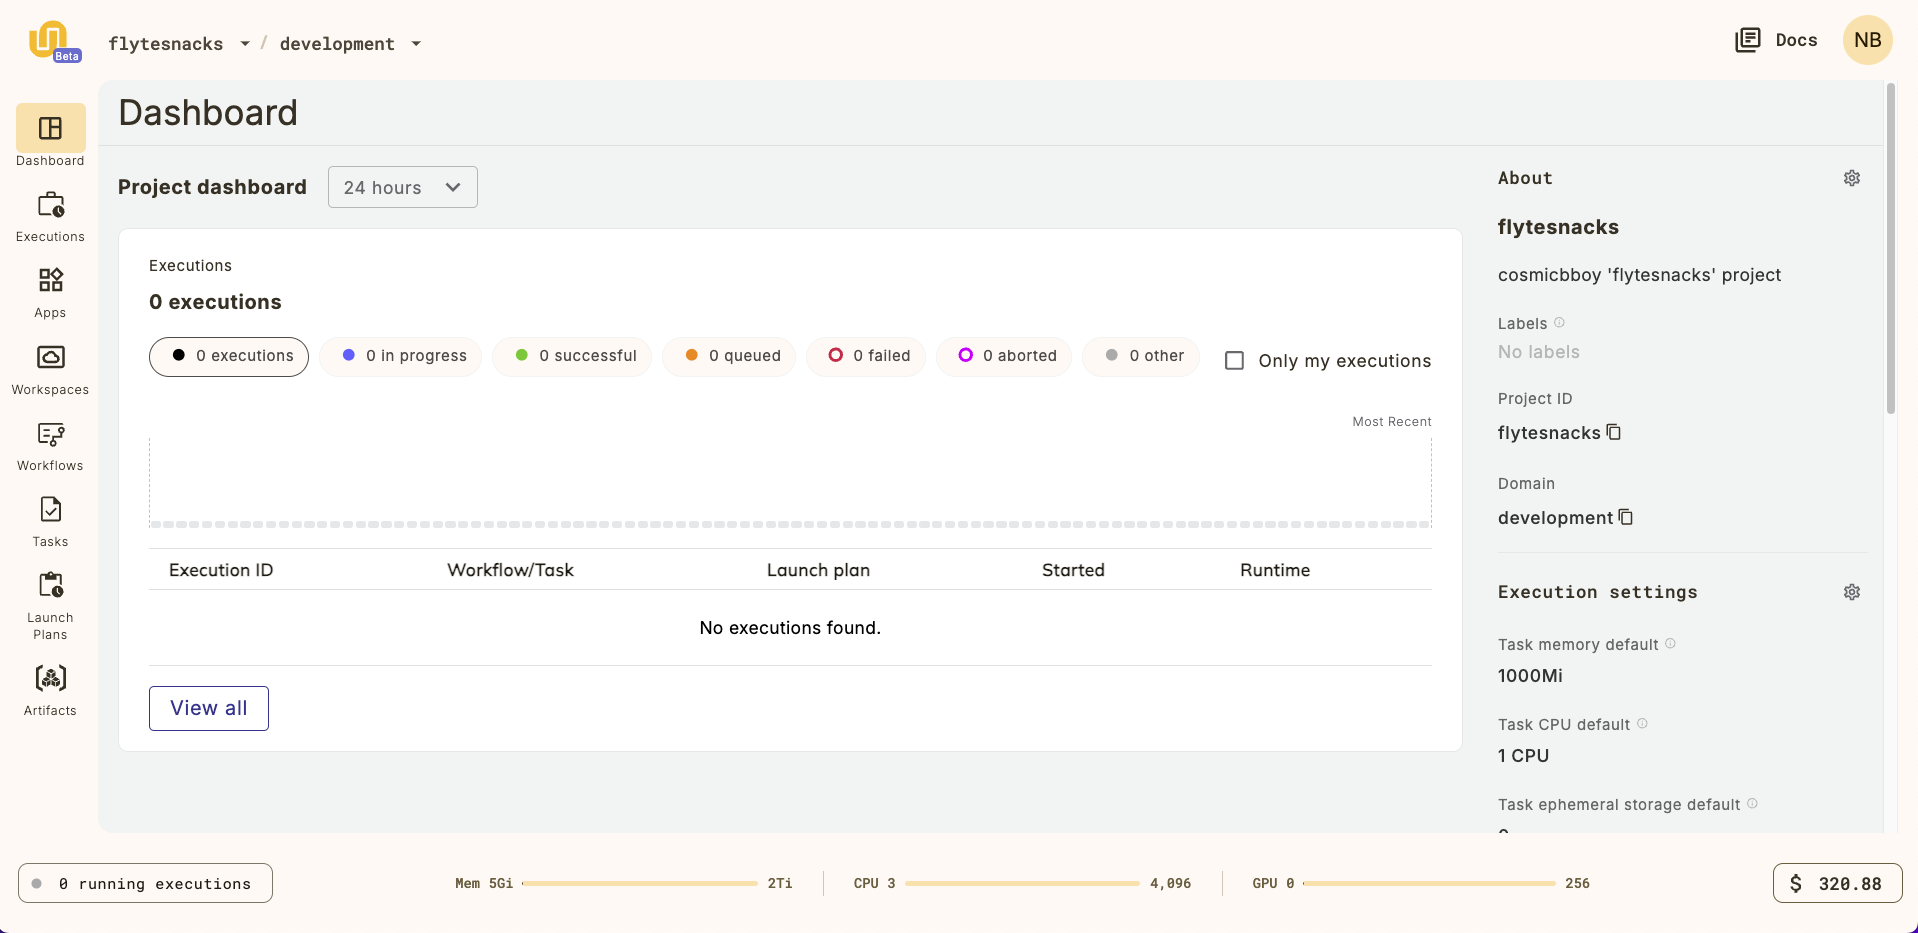
To get started, try selecting the default project, called `{{< key default_project >}}`, from the list of projects.
This will take you to `{{< key default_project >}}` project dashboard:
## Run your first workflow
Run your first workflow on a {{< key product_name >}} Workspace.
Start workspace
Select **Workspaces** in the left navigation bar.
Start the default workspace by clicking on the `default` workspace item.
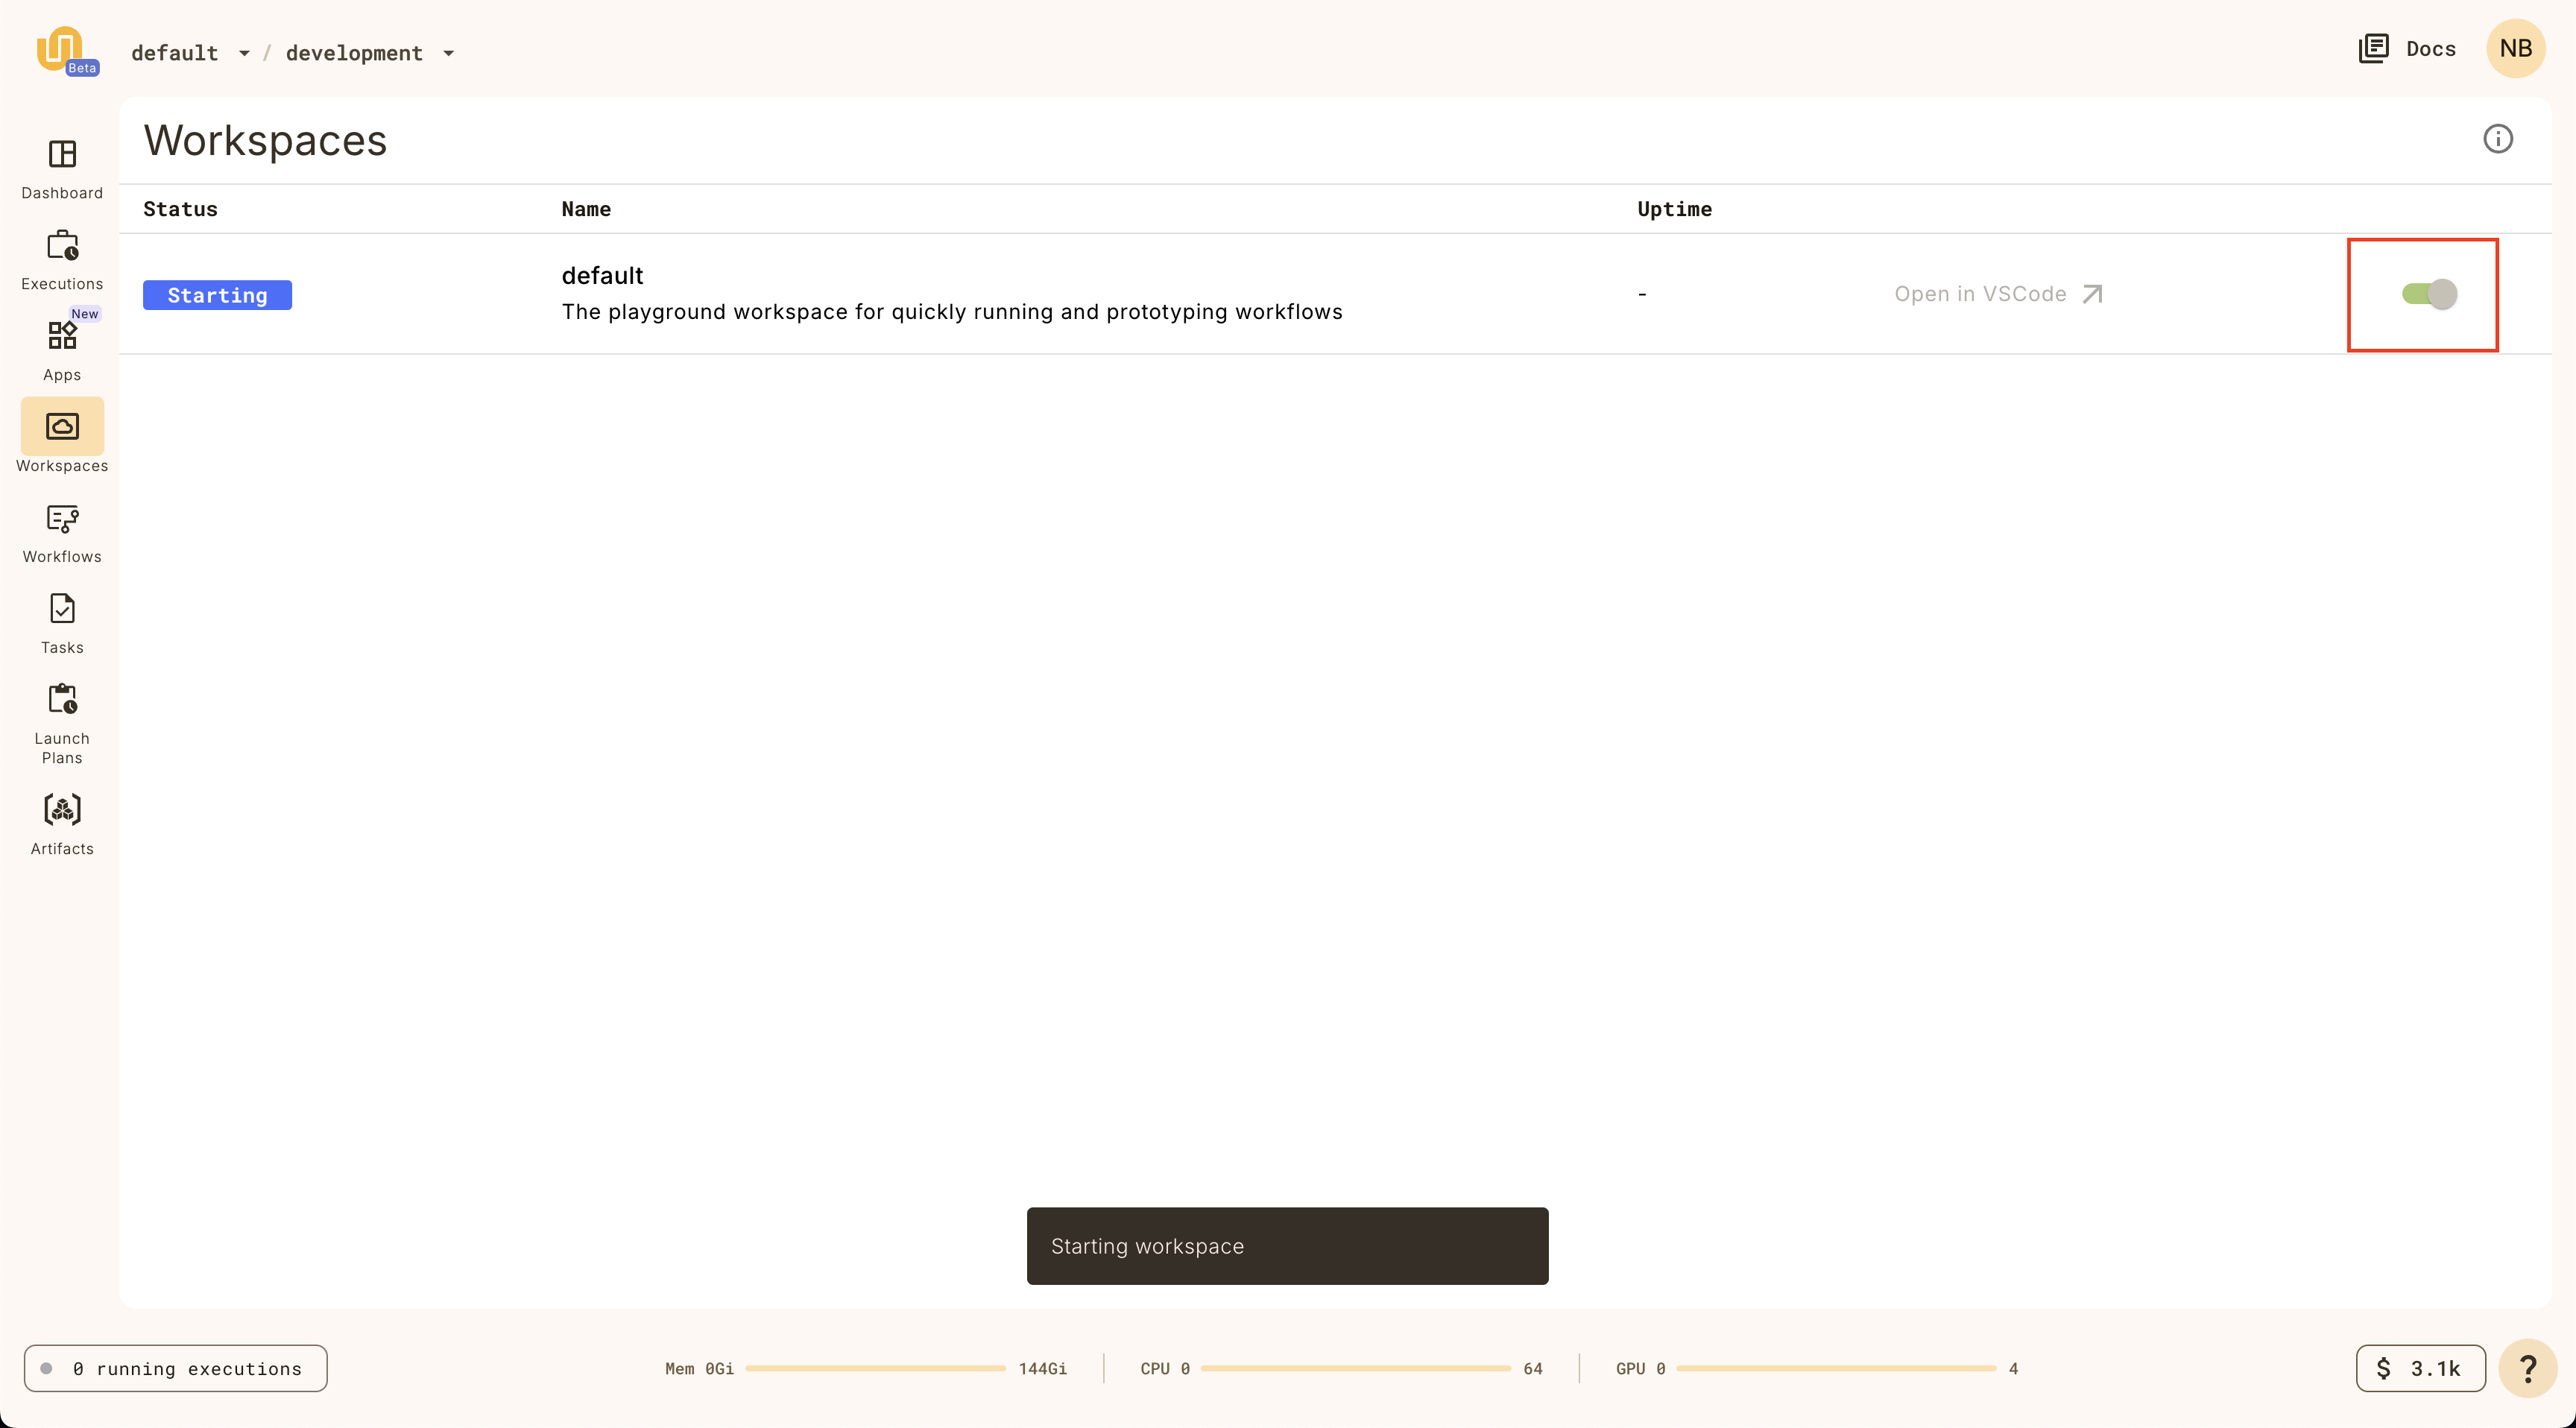)
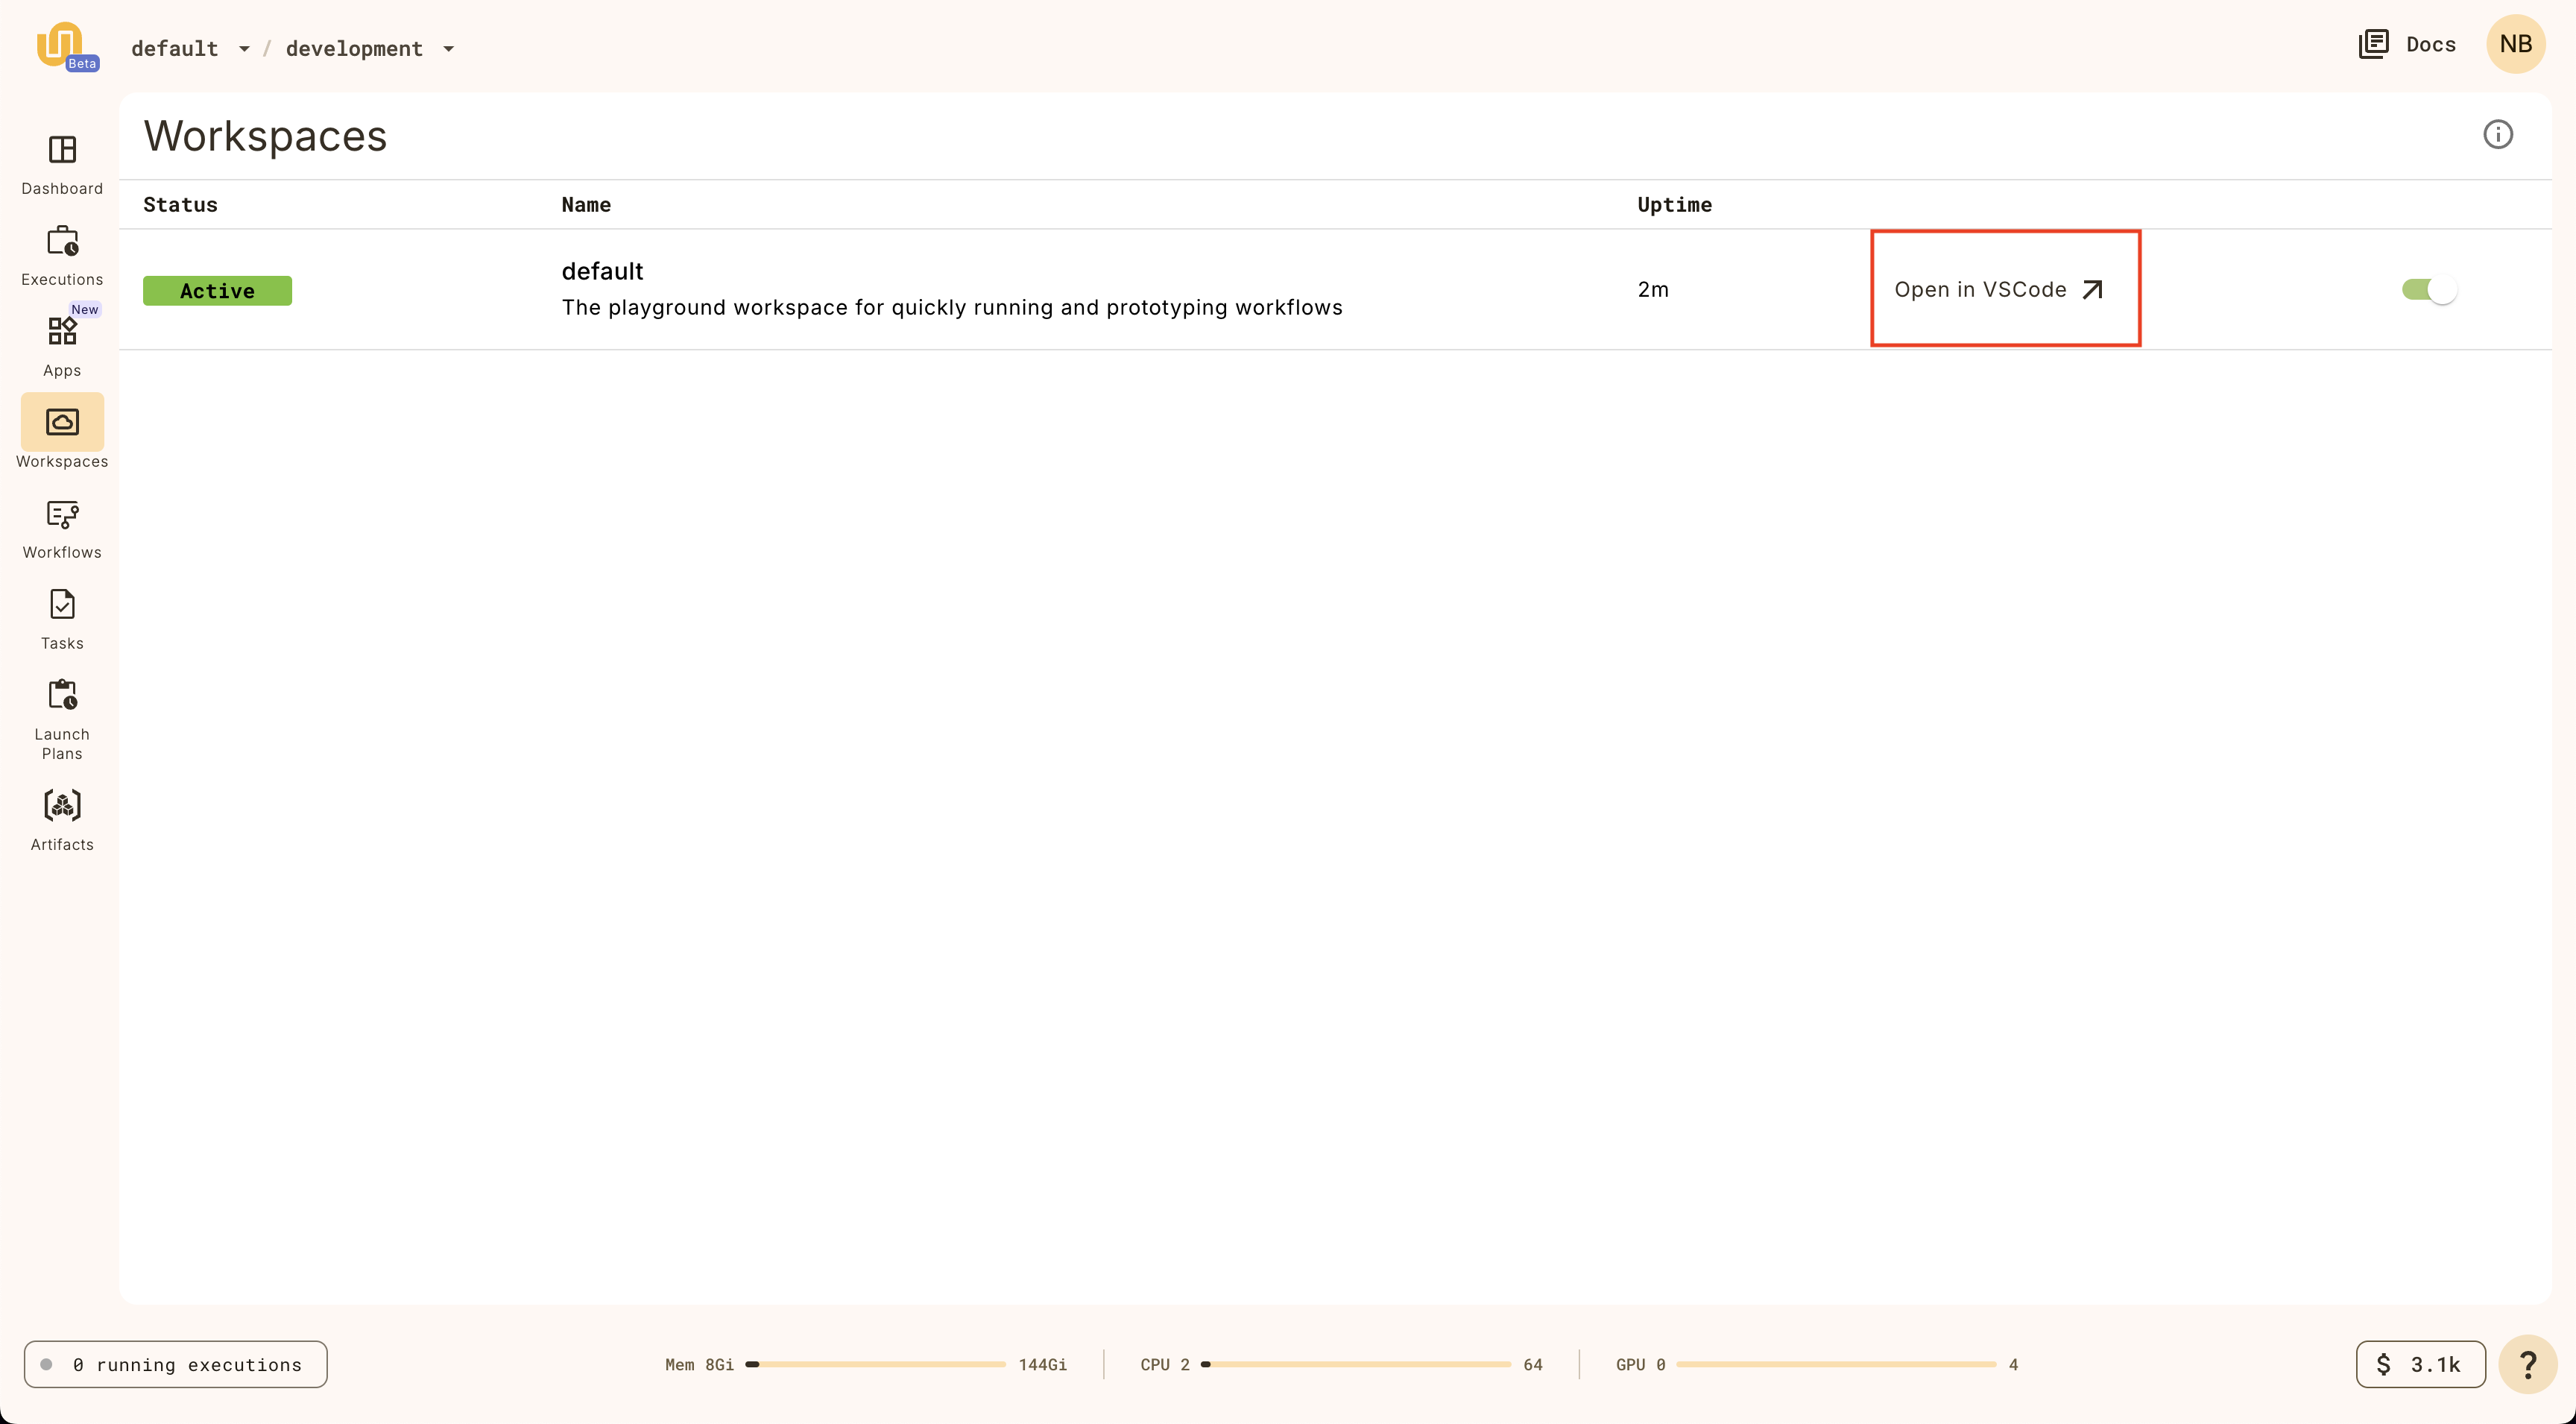
Open workspace
When the `Status` is `Active` on the `default` workspace, you can click on it
again to open the workspace.
_It will take a few moments to load the VSCode interface._
:::)
Complete walkthrough
Once the workspace is open, you should see a VSCode interface in your browser.
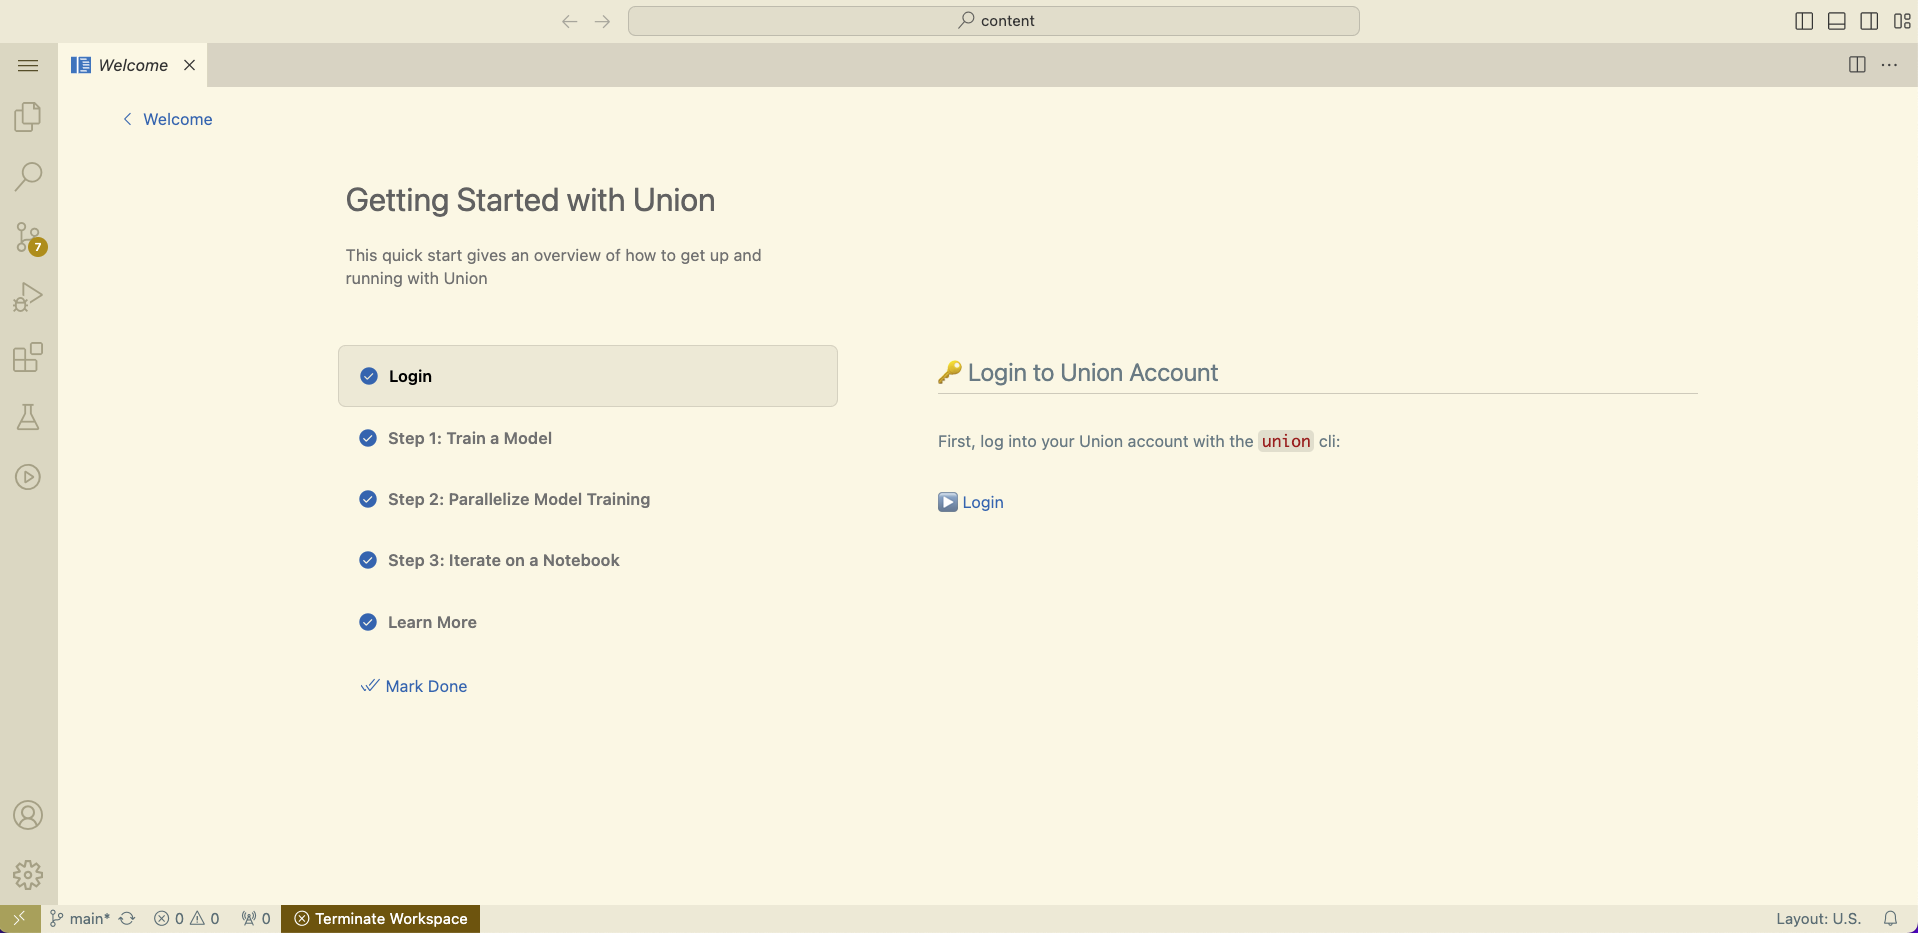
In the walkthrough, you'll learn how to:
1. 🤖 Train a model
2. 🔀 Parallelize model training
3. 📘 Iterate on a Jupyter Notebook
Stop workspace
The workspace will terminate after 20 minutes of idle time, but you can also
stop it manually on the Workspaces page.

🎉 Congratulations! You've just run your first workflow on {{< key product_name >}}.
## Subpages
- **Getting started > Local setup**
- **Getting started > First project**
- **Getting started > Understanding the code**
- **Getting started > Running your workflow**
=== PAGE: https://www.union.ai/docs/v1/serverless/user-guide/getting-started/local-setup ===
# Local setup
In [Getting started](./_index) we showed you how to run your first workflow right in the {{< key product_name >}} interface, in the browser.
In this section we will set up your local environment so that you can start building and deploying {{< key product_name >}} workflows from your local machine.
## Install `uv`
First, [install `uv`](https://docs.astral.sh/uv/#getting-started).
> [!NOTE] Using `uv` as best practice
> The `uv` tool is our [recommended package and project manager](https://docs.astral.sh/uv/).
> It replaces `pip`, `pip-tools`, `pipx`, `poetry`, `pyenv`, `twine`, `virtualenv`, and more.
>
> You can, of course, use other tools,
> but all discussion in these pages will use `uv`,
> so you will have to adapt the directions as appropriate.
## Ensure the correct version of Python is installed
{{< key kit_name >}} requires Python `>=3.9,<3.13`.
We recommend using `3.12`.
You can install it with:
```shell
$ uv python install 3.12
```
> [!NOTE] Uninstall higher versions of Python
> When installing Python packages "as tools" (as we do below with the `{{< key kit >}}`),
> `uv` will default to the latest version of Python available on your system.
> If you have a version `>=3.13` installed, you will need to uninstall it since `{{< key kit >}}` requires `>=3.9,<3.13`.
## Install the `{{< key cli >}}` CLI
Once `uv` is installed, use it to install the `{{< key cli >}}` CLI by installing the `{{< key kit >}}` Python package:
```shell
$ uv tool install {{< key kit >}}
```
This will make the `{{< key cli >}}` CLI globally available on your system.
> [!NOTE] Add the installation location to your PATH
> `uv` installs tools in `~/.local/bin` by default.
> Make sure this location is in your `PATH`, so you can run the `{{< key cli >}}` command from anywhere.
> `uv` provides a convenience command to do this: `uv tool update-shell`.
>
> Note that later in this guide we will be running the `{{< key cli >}}` CLI to run your workflows.
> In those cases you will be running `{{< key cli >}}` within the Python virtual environment of your workflow project.
> You will not be using this globally installed instance of `{{< key cli >}}`.
> This instance of `{{< key cli >}}` is only used during the configuration step, below, when no projects yet exist.
## Configure the connection to your cluster
Next, you need to create a configuration file that contains your {{< key product_name >}} connection information:
```shell
$ {{< key cli >}} create login --serverless
```
This will create the `~/.union/config.yaml` with the configuration information to connect to {{< key product_name >}} Serverless.
> [!NOTE] These directions apply to {{< key product_name >}} Serverless
> To configure a connection to your {{< key product_name >}} instance in {{< key product_name >}} BYOC, see the
> [BYOC version of this page](/docs/v1/byoc//user-guide/getting-started/local-setup#configure-the-connection-to-your-cluster).
> To configure a connection to your {{< key product_name >}} instance in {{< key product_name >}} Self-managed, see the
> [Self-managed version of this page](/docs/v1/selfmanaged//user-guide/getting-started/local-setup#configure-the-connection-to-your-cluster).
By default, the {{< key cli_name >}} CLI will look for a configuration file at `~/.union/config.yaml`. (See **{{< key cli_name >}} CLI** for more details.)
You can override this behavior to specify a different configuration file by setting the `{{< key config_env >}}` environment variable:
```shell
$ export {{< key config_env >}}=~/.my-config-location/my-config.yaml
```
Alternatively, you can always specify the configuration file on the command line when invoking `{{< key cli >}}` by using the `--config` flag.
For example:
```shell
$ {{< key cli >}} --config ~/.my-config-location/my-config.yaml run my_script.py my_workflow
```
> [!WARNING]
> If you have previously used {{< key product_name >}}, you may have configuration files left over that will interfere with
> access to {{< key product_name >}} Serverless through the {{< key cli_name >}} CLI tool.
> Make sure to remove any files in `~/.unionai/` or `~/.union/` and unset the environment
> variables `UNIONAI_CONFIG` and `UNION_CONFIG` to avoid conflicts.
See **Development cycle > Running in a local cluster** for more details on
the format of the `yaml` file.
## Check your CLI configuration
To check your CLI configuration, run:
```shell
$ {{< key cli >}} info
```
You should get a response like this:
```shell
$ {{< key cli >}} info
╭────────────────────────────────────────────────────────── {{< key product_name >}} CLI Info ─────────────────────────────────────────────────────────────╮
│ │
│ {{< key cli >}} is the CLI to interact with {{< key product_name >}}. Use the CLI to register, create and track task and workflow executions locally and remotely. │
│ │
│ {{< key product_name >}} Version : 0.1.132 │
│ Flytekit Version : 1.14.3 │
│ {{< key product_name >}} Endpoint : serverless-1.us-east-2.s.union.ai │
│ Config Source : file │
│ │
╰───────────────────────────────────────────────────────────────────────────────────────────────────────────────────────────────────────╯
```
=== PAGE: https://www.union.ai/docs/v1/serverless/user-guide/getting-started/first-project ===
# First project
In this section we will set up a new project.
This involves creating a local project directory holding your project code
and a corresponding {{< key product_name >}} project to which you will deploy that code using the `{{< key cli >}}` CLI.
## Create a new {{< key product_name >}} project
Create a new project in the {{< key product_name >}} UI by clicking on the project breadcrumb at the top left and selecting **All projects**:

This will take you to the **Projects list**:
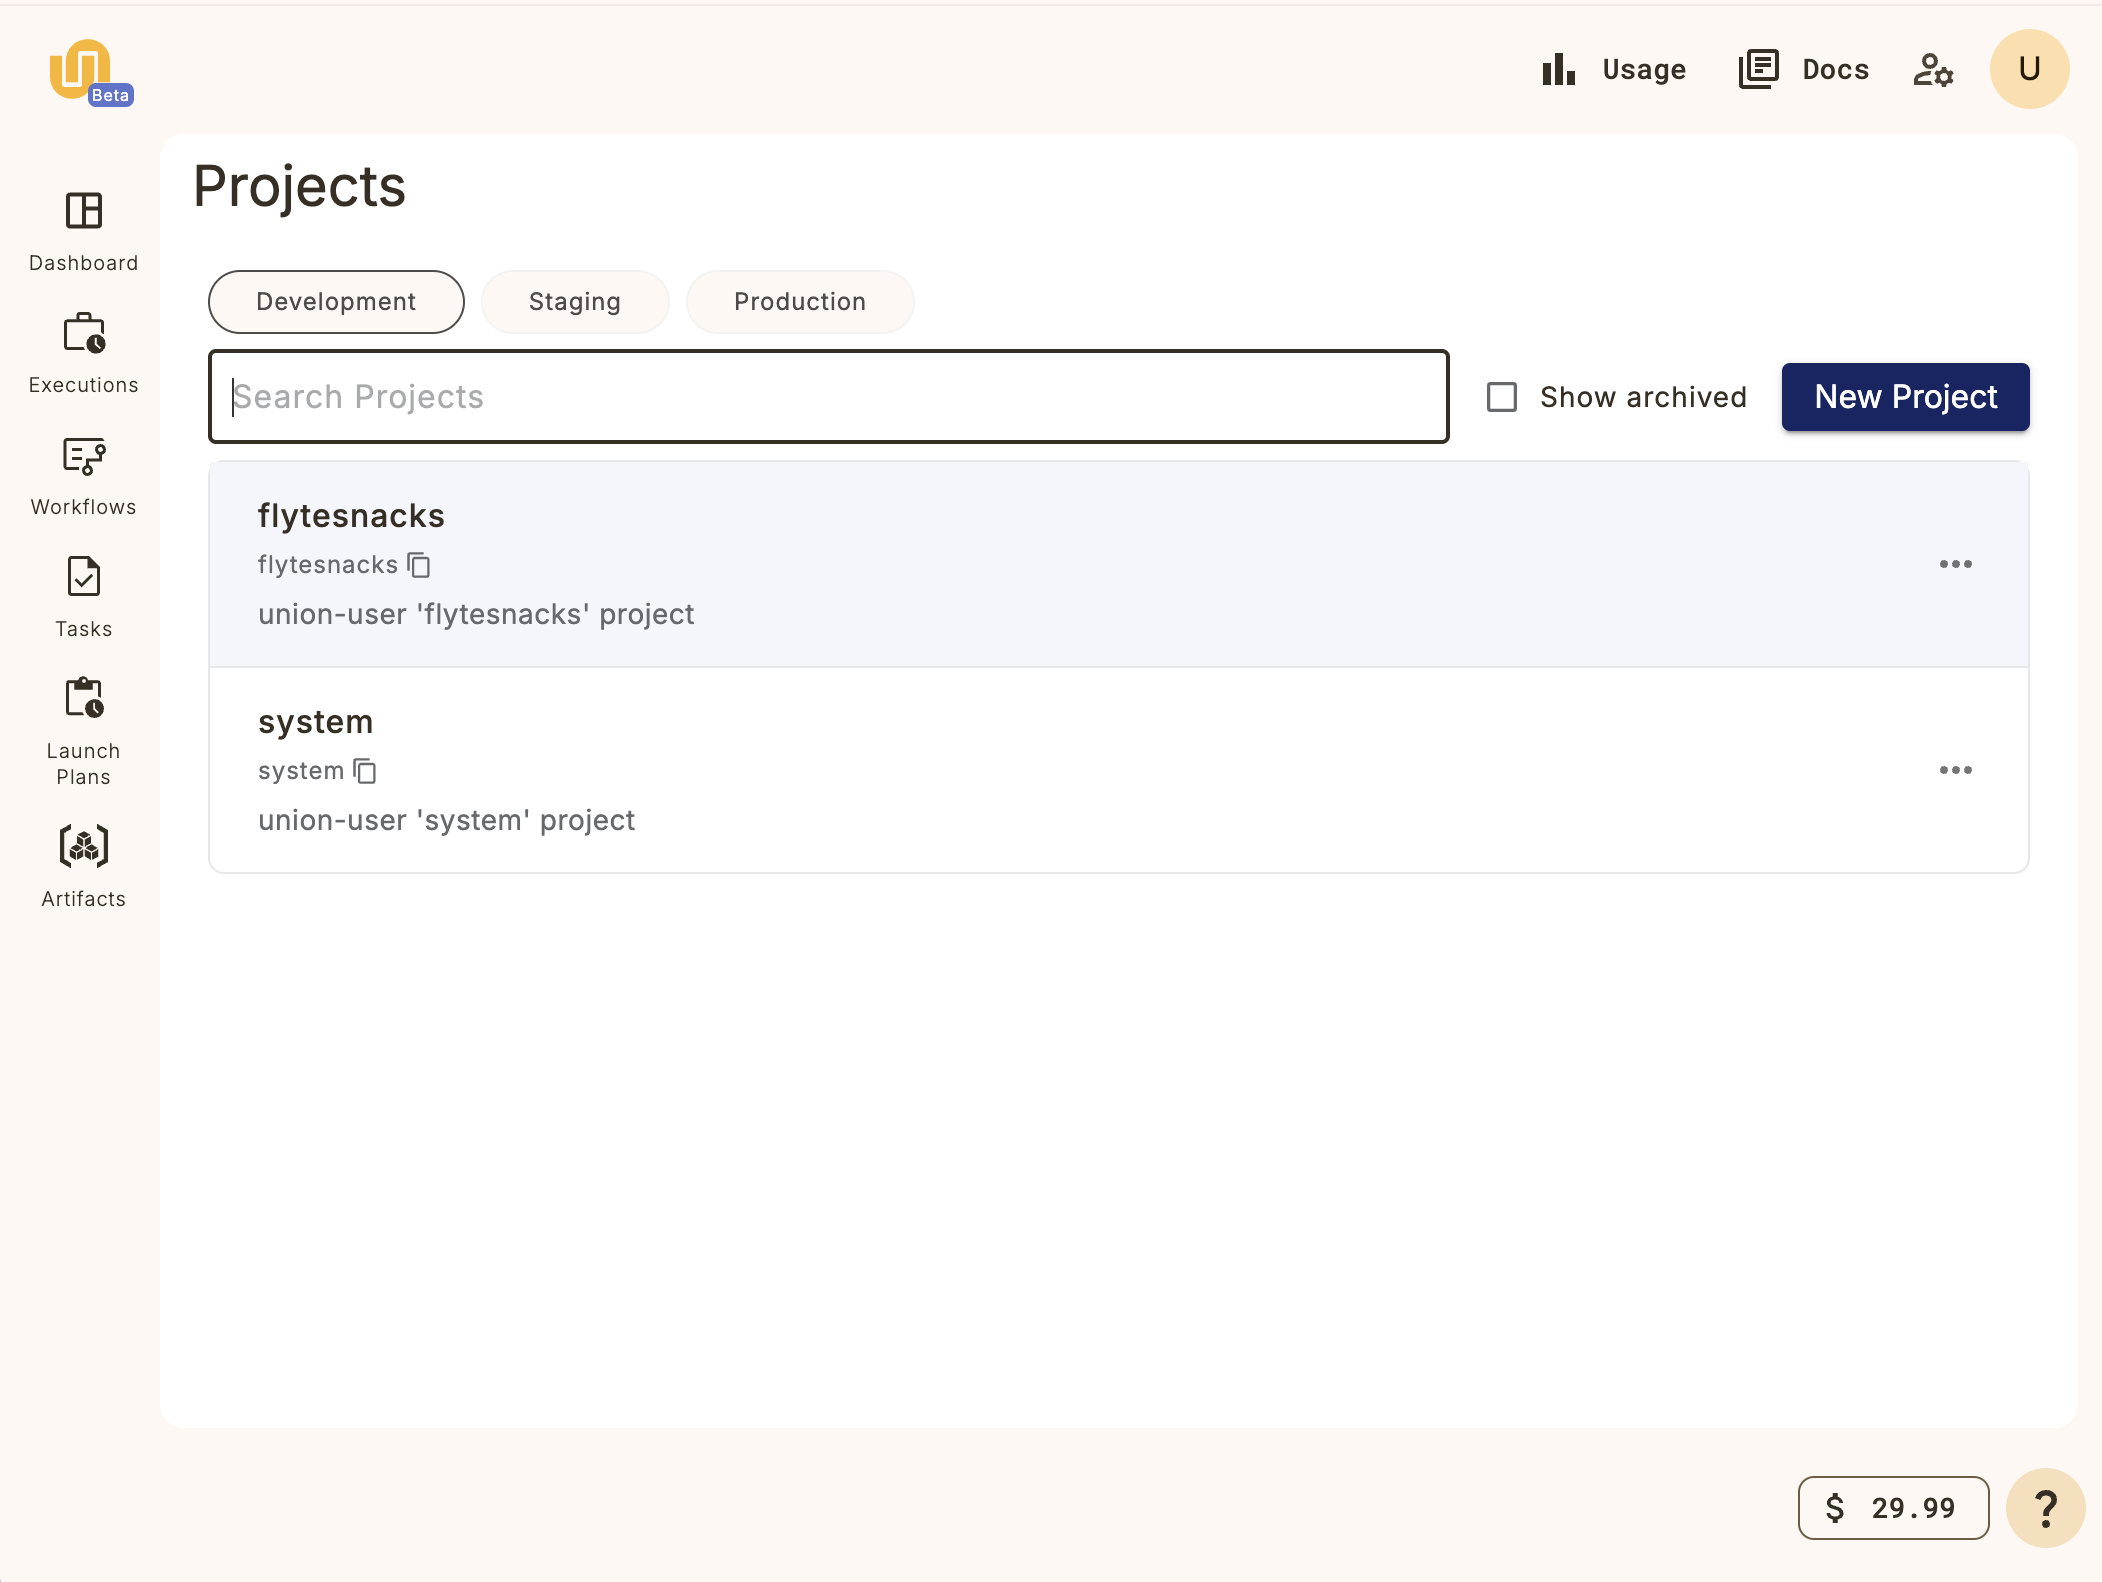
Click on the **New Project** button and fill in the details for your new project.
For this example, let's create a project called **My project**:

You now have a project on {{< key product_name >}} named "My Project" (and with project ID `my-project`) into which you can register your workflows.
> [!NOTE] Default project
> {{< key product_name >}} provides a default project (called **{{< key default_project >}}**) where all your workflows will be registered unless you specify otherwise.
> In this section, however, we will be using the project we just created, not the default.
## Initialize a local project
We will use the `{{< key cli >}} init` command to initialize a new local project corresponding to the project created on your {{< key product_name >}} instance:
```shell
$ {{< key cli >}} init --template {{< key product >}}-simple my-project
```
The resulting directory will look like this:
```shell
├── LICENSE
├── README.md
├── hello_world.py
├── pyproject.toml
└── uv.lock
```
> [!NOTE] Local project directory name same as {{< key product_name >}} project ID
> It is good practice to name your local project directory the same as your
> {{< key product_name >}} project ID, as we have done here.
Next, let's look at the contents of the local project directory.
Continue to **Getting started > Understanding the code**.
=== PAGE: https://www.union.ai/docs/v1/serverless/user-guide/getting-started/understanding-the-code ===
# Understanding the code
This is a simple "Hello, world!" example consisting of flat directory:
```shell
├── LICENSE
├── README.md
├── hello_world.py
├── pyproject.toml
└── uv.lock
```
## Python code
The `hello_world.py` file illustrates the essential components of a {{< key product_name >}} workflow:
```python
# Hello World
import union
image_spec = union.ImageSpec(
# The name of the image. This image will be used byt he say_hello task
name="say-hello-image",
# Lock file with dependencies to install in image
requirements="uv.lock",
# Build the image using Union's built-in cloud builder (not locally on your machine)
builder="union",
)
@union.task(container_image=image_spec)
def say_hello(name: str) -> str:
return f"Hello, {name}!"
@union.workflow
def hello_world_wf(name: str = "world") -> str:
greeting = say_hello(name=name)
return greeting
```
### ImageSpec
The `ImageSpec` object is used to define the container image that will run the tasks in the workflow.
Here we have the simplest possible `ImageSpec` object, which specifies:
* The `name` of the image.
* This name will be used to identify the image in the container registry.
* The `requirements` parameter.
* We specify that the requirements should be read from the `uv.lock` file.
* The `builder` to use to build the image.
* We specify `union` to indicate that the image is built using {{< key product_name >}}'s cloud image builder.
See **Development cycle > ImageSpec** for more information.
### Tasks
The `@{{< key kit_as >}}.task` decorator indicates a Python function that defines a **Core concepts > Tasks**.
A task tasks some input and produces an output.
When deployed to {{< key product_name >}} cluster, each task runs in its own Kubernetes pod.
For a full list of task parameters, see **Core concepts > Tasks > Task parameters**.
### Workflow
The `@{{< key kit_as >}}.workflow` decorator indicates a function that defines a **Core concepts > Workflows**.
This function contains references to the tasks defined elsewhere in the code.
A workflow appears to be a Python function but is actually a [DSL](https://en.wikipedia.org/wiki/Domain-specific_language) that only supports a subset of Python syntax and semantics.
When deployed to {{< key product_name >}}, the workflow function is compiled to construct the directed acyclic graph (DAG) of tasks, defining the order of execution of task pods and the data flow dependencies between them.
> [!NOTE] `@{{< key kit_as >}}.task` and `@{{< key kit_as >}}.workflow` syntax
> * The `@{{< key kit_as >}}.task` and `@{{< key kit_as >}}.workflow` decorators will only work on functions at the top-level
> scope of the module.
> * You can invoke tasks and workflows as regular Python functions and even import and use them in
> other Python modules or scripts.
> * Task and workflow function signatures must be type-annotated with Python type hints.
> * Task and workflow functions must be invoked with keyword arguments.
## pyproject.toml
The `pyproject.toml` is the standard project configuration used by `uv`.
It specifies the project dependencies and the Python version to use.
The default `pyproject.toml` file created by `{{< key cli >}} init` from the `{{< key product >}}-simple` template looks like this
```toml
[project]
name = "{{< key product >}}-simple"
version = "0.1.0"
description = "A simple {{< key product_name >}} project"
readme = "README.md"
requires-python = ">=3.9,<3.13"
dependencies = ["{{< key kit >}}"]
```
(You can update the `name` and `description` to match the actual name of your project, `my-project`, if you like).
The most important part of the file is the list of dependencies, in this case consisting of only one package, `{{< key kit >}}`.
See [uv > Configuration > Configuration files](https://docs.astral.sh/uv/configuration/files/) for details.
## uv.lock
The `uv.lock` file is generated from `pyproject.toml` by `uv sync` command.
It contains the exact versions of the dependencies required by the project.
The `uv.lock` included in the `init` template may not reflect the latest version of the dependencies, so you should update it by doing a fresh `uv sync`.
See [uv > Concepts > Projects > Locking and syncing](https://docs.astral.sh/uv/concepts/projects/sync/) for details.
=== PAGE: https://www.union.ai/docs/v1/serverless/user-guide/getting-started/running-your-workflow ===
# Running your workflow
## Python virtual environment
The first step is to ensure that your `uv.lock` file is properly generated from your `pyproject.toml` file and that your local Python virtual environment is properly set up.
Using `uv`, you can install the dependencies with the command:
```shell
$ uv sync
```
You can then activate the virtual environment with:
```shell
$ source .venv/bin/activate
```
> [!NOTE] `activate` vs `uv run`
> When running the `{{< key cli >}}` CLI within your local project you must run it in the virtual
> environment _associated with_ that project.
> This differs from our earlier usage of the tool when
> **Getting started > Running your workflow > we installed `{{< key cli >}}` globally** in order to
> **Getting started > Running your workflow > set up its configuration**.
>
> To run `{{< key cli >}}` within your project's virtual environment using `uv`,
> you can prefix it use the `uv run` command. For example:
>
> `uv run {{< key cli >}} ...`
>
> Alternatively, you can activate the virtual environment with `source .venv/bin/activate` and then
> run the `{{< key cli >}}` command directly.
>
> In our examples we assume that you are doing the latter.
## Run the code locally
Because tasks and workflows are defined as regular Python functions, they can be executed in your local Python environment.
You can run the workflow locally with the command **Union CLI > `union` CLI commands**:
```shell
$ {{< key cli >}} run hello_world.py hello_world_wf
```
You should see output like this:
```shell
Running Execution on local.
Hello, world!
```
You can also pass in parameters to the workflow (assuming they declared in the workflow function):
```shell
$ {{< key cli >}} run hello_world.py hello_world_wf --name="everybody"
```
You should see output like this:
```shell
Running Execution on local.
Hello, everybody!
```
## Running remotely on {{< key product_name >}} in the cloud
Running you code in your local Python environment is useful for testing and debugging.
But to run them at scale, you will need to deploy them (or as we say, "register" them) on to your {{< key product_name >}} instance in the cloud.
When task and workflow code is registered:
* The `@{{< key kit_as >}}.task` function is loaded into a container defined by the `ImageSpec` object specified in the `container_image` parameter of the decorator.
* The `@{{< key kit_as >}}.workflow` function is compiled into a directed acyclic graph that controls the running of the tasks invoked within it.
To run the workflow on {{< key product_name >}} in the cloud, use the **Union CLI > `union` CLI commands** and the
```shell
$ {{< key cli >}} run --remote --project my-project --domain development hello_world.py hello_world_wf
```
The output displays a URL that links to the workflow execution in the UI:
```shell
👍 Build submitted!
⏳ Waiting for build to finish at: https://serverless.union.ai/org/...
✅ Build completed in 0:01:57!
[✔] Go to https://serverless.union.ai/org/... to see execution in the UI.
```
Click the link to see the execution in the UI.
## Register the workflow without running
Above we used the `{{< key cli >}} run --remote` to register and immediately run a workflow on {{< key product_name >}}.
This is useful for quick testing, but for more complex workflows you may want to register the workflow first and then run it from the {{< key product_name >}} interface.
To do this, you can use the `{{< key cli >}} register` command to register the workflow code with {{< key product_name >}}.
The form of the command is:
```shell
$ {{< key cli >}} register []
```
in our case, from within the `getting-started` directory, you would do:
```shell
$ {{< key cli >}} register --project my-project --domain development .
```
This registers all code in the current directory to {{< key product_name >}} but does not immediately run anything.
You should see the following output (or similar) in your terminal:
```shell
Running {{< key cli >}} register from /Users/my-user/scratch/my-project with images ImageConfig(default*image=Image(name='default', fqn='cr.flyte.org/flyteorg/flytekit', tag='py3.12-1.14.6', digest=None), images=[Image(name='default', fqn='cr.flyte.org/flyteorg/flytekit', tag='py3.12-1.14.6', digest=None)]) and image destination folder /root on 1 package(s) ('/Users/my-user/scratch/my-project',)
Registering against demo.hosted.unionai.cloud
Detected Root /Users/my-user/my-project, using this to create deployable package...
Loading packages ['my-project'] under source root /Users/my-user/my-project
No output path provided, using a temporary directory at /var/folders/vn/72xlcb5d5jbbb3kk_q71sqww0000gn/T/tmphdu9wf6* instead
Computed version is sSFSdBXwUmM98sYv930bSQ
Image say-hello-image:lIpeqcBrlB8DlBq0NEMR3g found. Skip building.
Serializing and registering 3 flyte entities
[✔] Task: my-project.hello_world.say_hello
[✔] Workflow: my-project.hello_world.hello_world_wf
[✔] Launch Plan: my-project.hello_world.hello_world_wf
Successfully registered 3 entities
```
## Run the workflow from the {{< key product_name >}} interface
To run the workflow, you need to go to the {{< key product_name >}} interface:
1. Navigate to the {{< key product_name >}} dashboard.
2. In the left sidebar, click **Workflows**.
3. Search for your workflow, then select the workflow from the search results.
4. On the workflow page, click **Launch Workflow**.
5. In the "Create New Execution" dialog, you can change the workflow version, launch plan, and inputs (if present). Click "Advanced options" to change the security context, labels, annotations, max parallelism, override the interruptible flag, and overwrite cached inputs.
6. To execute the workflow, click **Launch**. You should see the workflow status change to "Running", then "Succeeded" as the execution progresses.
To view the workflow execution graph, click the **Graph** tab above the running workflow.
## View the workflow execution on {{< key product_name >}}
When you view the workflow execution graph, you will see the following:
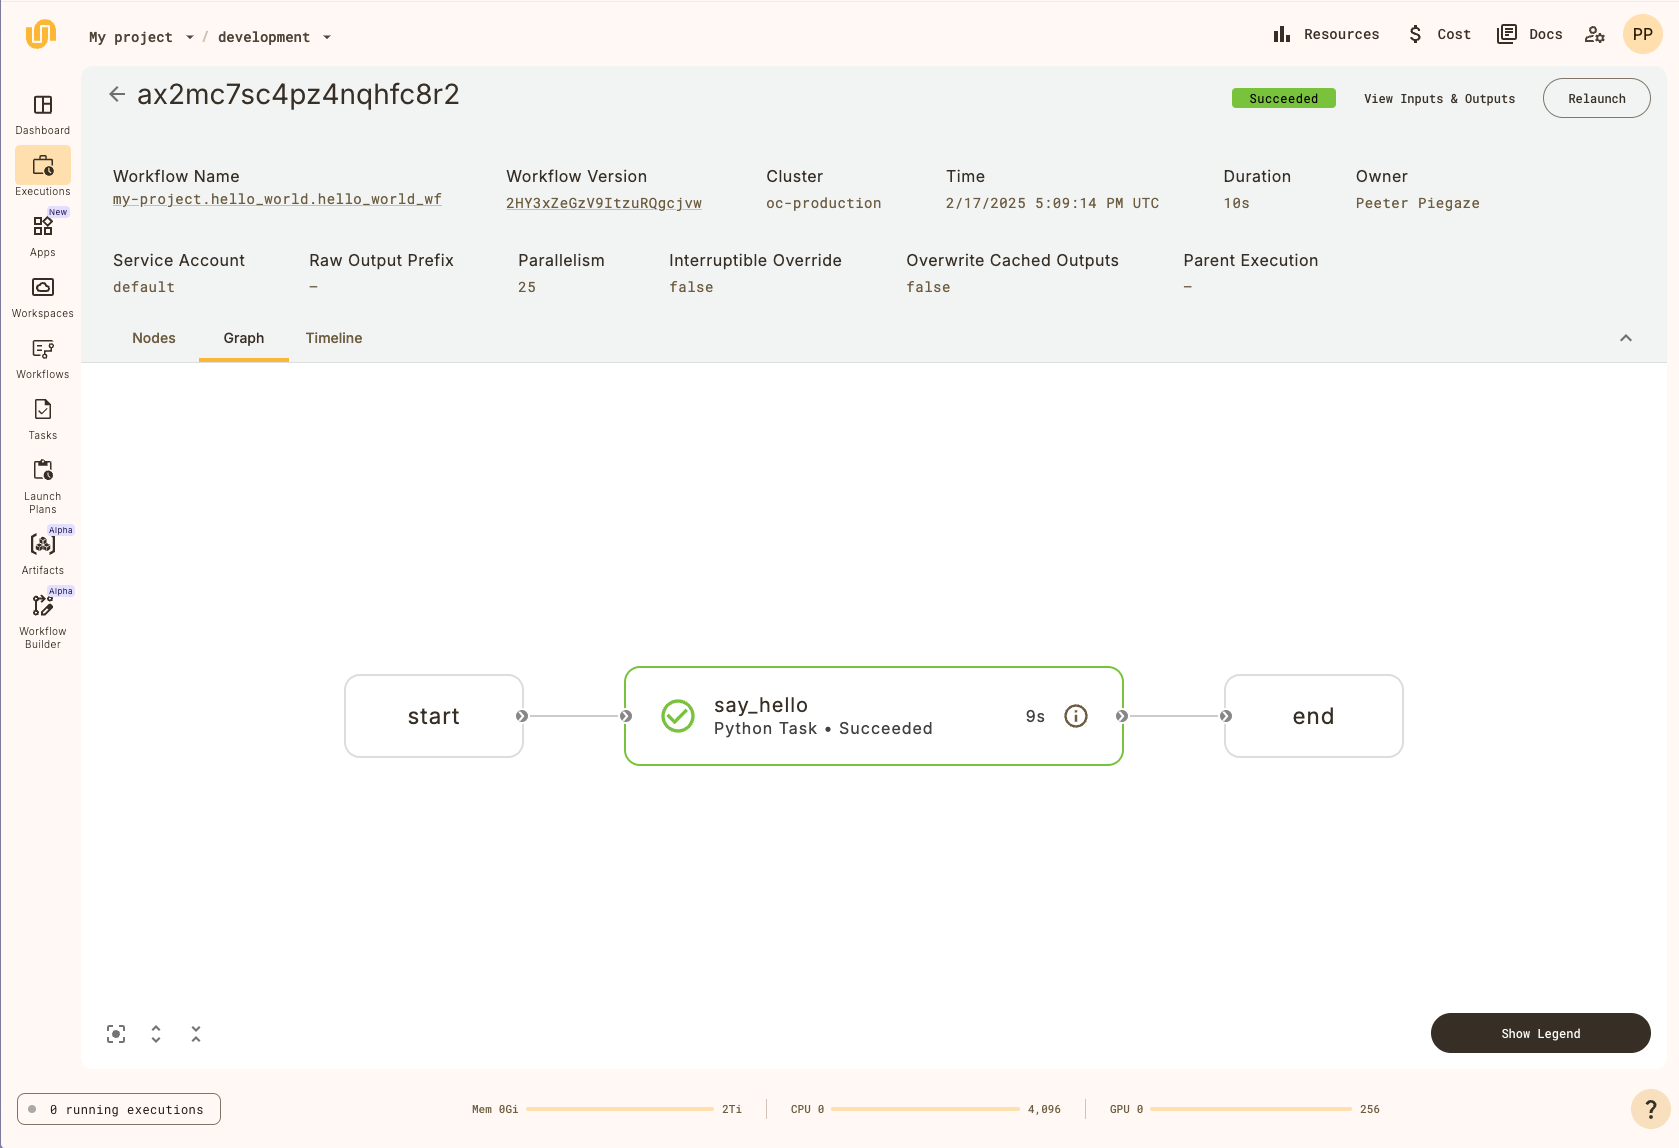
Above the graph, there is metadata that describes the workflow execution, such as the
duration and the workflow version. Next, click on the `evaluate_model` node to open up a
sidebar that contains additional information about the task:

=== PAGE: https://www.union.ai/docs/v1/serverless/user-guide/core-concepts ===
# Core concepts
{{< key product_name >}} is a platform for building and orchestrating the execution of interconnected software processes across machines in a computer cluster.
In {{< key product_name >}} terminology, the software processes are called *tasks* and the overall organization of connections between tasks is called a *workflow*.
The tasks in a workflow are connected to each other by their inputs and outputs. The output of one task becomes the input of another.
More precisely, a workflow in {{< key product_name >}} is a *directed acyclic graph (DAG)* of *nodes* where each node is a unit of execution and the edges between nodes represent the flow of data between them.
The most common type of node is a task node (which encapsulates a task), though there are also workflow nodes (which encapsulate subworkflows) and branch nodes.
In most contexts we just say that a workflow is a DAG of tasks.
You define tasks and workflows in Python using the {{< key kit_name >}} SDK. The {{< key kit_name >}} SDK provides a set of decorators and classes that allow you to define tasks and workflows in a way that is easy to understand and work with.
Once defined, tasks and workflows are deployed to your {{< key product_name >}} instance (we say they are *registered* to the instance), where they are compiled into a form that can be executed on your {{< key product_name >}} cluster.
In addition to tasks and workflows, another important concept in {{< key product_name >}} is the **Core concepts > Launch plans**.
A launch plan is like a template that can be used to define the inputs to a workflow.
Triggering a launch plan will launch its associated workflow with the specified parameters.
## Defining tasks and workflows
Using the {{< key kit_name >}} SDK, tasks and workflows are defined as Python functions using the `@{{< key kit_as >}}.task` and `@{{< key kit_as >}}.workflow` decorators, respectively:
```python
import {{< key kit_import >}}
@{{< key kit_as >}}.task
def task_1(a: int, b: int, c: int) -> int:
return a + b + c
@{{< key kit_as >}}.task
def task_2(m: int, n: int) -> int:
return m * n
@{{< key kit_as >}}.task
def task_3(x: int, y: int) -> int:
return x - y
@{{< key kit_as >}}.workflow
def my_workflow(a: int, b: int, c: int, m: int, n: int) -> int:
x = task_1(a=a, b=b, c=c)
y = task_2(m=m, n=n)
return task_3(x=x, y=y)
```
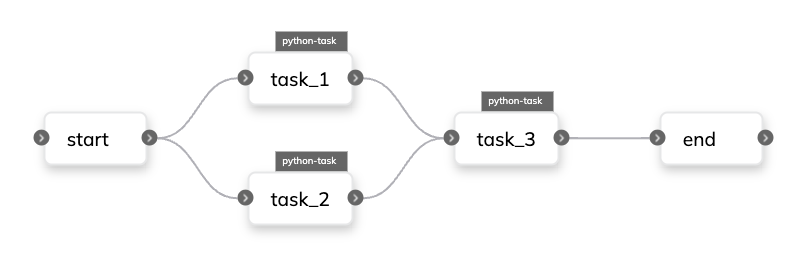
Here we see three tasks defined using the `@{{< key kit_as >}}.task` decorator and a workflow defined using the `@{{< key kit_as >}}.workflow` decorator.
The workflow calls `task_1` and `task_2` and passes the results to `task_3` before finally outputting the result of `task_3`.
When the workflow is registered, {{< key product_name >}} compiles the workflow into a directed acyclic graph (DAG) based on the input/output dependencies between the tasks.
The DAG is then used to execute the tasks in the correct order, taking advantage of any parallelism that is possible.
For example, the workflow above results in the following DAG:
### Type annotation is required
One important difference between {{< key product_name >}} and generic Python is that in {{< key product_name >}} all inputs and outputs *must be type annotated*.
This is because tasks are strongly typed, meaning that the types of the inputs and outputs are validated at deployment time.
See **Core concepts > Tasks > Tasks are strongly typed** for more details.
### Workflows *are not* full Python functions
The definition of a workflow must be a valid Python function, so it can be run locally as a normal Python function during development,
but only *a subset of Python syntax is allowed*, because it must also be compiled into a DAG that is deployed and executed on {{< key product_name >}}.
*Technically then, the language of a workflow function is a domain-specific language (DSL) that is a subset of Python.*
See **Core concepts > Workflows** for more details.
## Registering tasks and workflows
### Registering on the command line with `{{< key cli >}}` or `{{< key ctl >}}`
In most cases, workflows and tasks (and possibly other things, such as launch plans) are defined in your project code and registered as a bundle using `{{< key cli >}}` or `{{< key ctl >}}` For example:
```shell
$ {{< key cli >}} register ./workflows --project my_project --domain development
```
Tasks can also be registered individually, but it is more common to register alongside the workflow that uses them.
See **Development cycle > Running your code**.
### Registering in Python with `{{< key kit_remote >}}`
As with all {{< key product_name >}} command line actions, you can also perform registration of workflows and tasks programmatically with [`{{< key kit_remote >}}`](), specifically, [`{{< key kit_remote >}}.register_script`](),
[`{{< key kit_remote >}}.register_workflow`](), and
[`{{< key kit_remote >}}.register_task`]().
## Results of registration
When the code above is registered to {{< key product_name >}}, it results in the creation of five objects:
* The tasks `workflows.my_example.task_1`, `workflows.my_example.task_2`, and `workflows.my_example.task_3` (see **Core concepts > Tasks** for more details).
* The workflow `workflows.my_example.my_workflow`.
* The default launch plan `workflows.my_example.my_workflow` (see **Core concepts > Launch plans** for more details).
Notice that the task and workflow names are derived from the path, file name and function name of the Python code that defines them: `..`.
The default launch plan for a workflow always has the same name as its workflow.
## Changing tasks and workflows
Tasks and workflows are changed by altering their definition in code and re-registering.
When a task or workflow with the same project, domain, and name as a preexisting one is re-registered, a new version of that entity is created.
## Inspecting tasks and workflows
### Inspecting workflows in the UI
Select **Workflows** in the sidebar to display a list of all the registered workflows in the project and domain.
You can search the workflows by name.
Click on a workflow in the list to see the **workflow view**.
The sections in this view are as follows:
* **Recent Workflow Versions**: A list of recent versions of this workflow.
Select a version to see the **Workflow version view**.
This view shows the DAG and a list of all version of the task.
You can switch between versions with the radio buttons.
* **All Executions in the Workflow**: A list of all executions of this workflow.
Click on an execution to go to the **Core concepts > Workflows > Viewing workflow executions**.
* **Launch Workflow button**: In the top right of the workflow view, you can click the **Launch Workflow** button to run the workflow with the default inputs.
### Inspecting tasks in the UI
Select **Tasks** in the sidebar to display a list of all the registered tasks in the project and domain.
You can search the launch plans by name.
To filter for only those that are archived, check the **Show Only Archived Tasks** box.
Click on a task in the list to see the task view
The sections in the task view are as follows:
* **Inputs & Outputs**: The name and type of each input and output for the latest version of this task.
* **Recent Task Versions**: A list of recent versions of this task.
Select a version to see the **Task version view**:
This view shows the task details and a list of all version of the task.
You can switch between versions with the radio buttons.
See **Core concepts > Tasks** for more information.
* **All Executions in the Task**: A list of all executions of this task.
Click on an execution to go to the execution view.
* **Launch Task button**: In the top right of the task view, you can click the **Launch Task** button to run the task with the default inputs.
### Inspecting workflows on the command line with `{{< key ctl >}}`
To view all tasks within a project and domain:
```shell
$ {{< key ctl >}} get workflows \
--project \
--domain
```
To view a specific workflow:
```shell
$ {{< key ctl >}} get workflow \
--project \
--domain \
```
See **Uctl CLI** for more details.
### Inspecting tasks on the command line with `{{< key ctl >}}`
To view all tasks within a project and domain:
```shell
$ {{< key ctl >}} get tasks \
--project \
--domain
```
To view a specific task:
```shell
$ {{< key ctl >}} get task \
--project \
--domain \
```
See **Uctl CLI** for more details.
### Inspecting tasks and workflows in Python with `{{< key kit_remote >}}`
Use the method [`{{< key kit_remote >}}.fetch_workflow`]() or [`{{< key kit_remote >}}.client.get_workflow`]() to get a workflow.
See [`{{< key kit_remote >}}`]() for more options and details.
Use the method [`{{< key kit_remote >}}.fetch_task`]() or [`{{< key kit_remote >}}.client.get_task`]() to get a task.
See [`{{< key kit_remote >}}`]() for more options and details.
## Running tasks and workflows
### Running a task or workflow in the UI
To run a workflow in the UI, click the **Launch Workflow** button in the workflow view.
You can also run individual tasks in the UI by clicking the **Launch Task** button in the task view.
### Running a task or workflow locally on the command line with `{{< key cli >}}` or `python`
You can execute a {{< key product_name >}} workflow or task locally simply by calling it just like any regular Python function.
For example, you can add the following to the above code:
```python
if __name__ == "__main__":
my_workflow(a=1, b=2, c=3, m=4, n=5)
```
If the file is saved as `my_example.py`, you can run it locally using the following command:
```shell
$ python my_example.py
```
Alternatively, you can run the task locally with the `{{< key cli >}}` command line tool:
To run it locally, you can use the following `{{< key cli >}} run` command:
```shell
$ {{< key cli >}} run my_example.py my_workflow --a 1 --b 2 --c 3 --m 4 --n 5
```
This has the advantage of allowing you to specify the input values as command line arguments.
For more details on running workflows and tasks, see **Development cycle**.
### Running a task or workflow remotely on the command line with `{{< key cli >}}`
To run a workflow remotely on your {{< key product_name >}} installation, use the following command (this assumes that you have your **Development cycle > Setting up a production project**):
```shell
$ {{< key cli >}} run --remote my_example.py my_workflow --a 1 --b 2 --c 3 --m 4 --n 5
```
### Running a task or workflow remotely in Python with `{{< key kit_remote >}}`
To run a workflow or task remotely in Python, use the method [`{{< key kit_remote >}}.execute`](). See [`{{< key kit_remote >}}`]() for more options and details.
## Subpages
- **Core concepts > Workflows**
- **Core concepts > Tasks**
- **Core concepts > Launch plans**
- **Core concepts > Actors**
- **Core concepts > Artifacts**
- **Core concepts > App Serving**
- **Core concepts > Caching**
- **Core concepts > Workspaces**
- **Core concepts > Named outputs**
- **Core concepts > ImageSpec**
=== PAGE: https://www.union.ai/docs/v1/serverless/user-guide/core-concepts/workflows ===
# Workflows
So far in our discussion of workflows, we have focused on top-level workflows decorated with `@{{< key kit_as >}}.workflow`.
These are, in fact, more accurately termed **Core concepts > Workflows > Standard workflows** to differentiate them from the other types of workflows that exist in {{< key product_name >}}: **Core concepts > Workflows > Subworkflows and sub-launch plans**, **Core concepts > Workflows > Dynamic workflows**, and **Core concepts > Workflows > Imperative workflows**.
In this section, we will delve deeper into the fundamentals of all of these workflow types, including their syntax, structure, and behavior.
## Subpages
- **Core concepts > Workflows > Standard workflows**
- **Core concepts > Workflows > Subworkflows and sub-launch plans**
- **Core concepts > Workflows > Dynamic workflows**
- **Core concepts > Workflows > Imperative workflows**
- **Core concepts > Workflows > Launching workflows**
- **Core concepts > Workflows > Viewing workflows**
- **Core concepts > Workflows > Viewing workflow executions**
=== PAGE: https://www.union.ai/docs/v1/serverless/user-guide/core-concepts/workflows/standard-workflows ===
# Standard workflows
A standard workflow is defined by a Python function decorated with the `@{{< key kit_as >}}.workflow` decorator.
The function is written in a domain specific language (DSL), a subset of Python syntax that describes the directed acyclic graph (DAG) that is deployed and executed on {{< key product_name >}}.
The syntax of a standard workflow definition can only include the following:
* Calls to functions decorated with `@{{< key kit_as >}}.task` and assignment of variables to the returned values.
* Calls to other functions decorated with `@{{< key kit_as >}}.workflow` and assignment of variables to the returned values (see **Core concepts > Workflows > Subworkflows and sub-launch plans**).
* Calls to **Core concepts > Launch plans** (see **Core concepts > Workflows > Subworkflows and sub-launch plans > When to use sub-launch plans**)
* Calls to functions decorated with `@{{< key kit_as >}}.dynamic` and assignment of variables to the returned values (see **Core concepts > Workflows > Dynamic workflows**).
* The special **Programming > Conditionals**.
* Statements using the **Programming > Chaining Entities**.
## Evaluation of a standard workflow
When a standard workflow is **Core concepts > Workflows > Standard workflows > run locally in a Python environment** it is executed as a normal Python function.
However, when it is registered to {{< key product_name >}}, the top level `@{{< key kit_as >}}.workflow`-decorated function is evaluated as follows:
* Inputs to the workflow are materialized as lazily-evaluated promises which are propagated to downstream tasks and subworkflows.
* All values returned by calls to functions decorated with `@{{< key kit_as >}}.task` or `@{{< key kit_as >}}.dynamic` are also materialized as lazily-evaluated promises.
The resulting structure is used to construct the Directed Acyclic Graph (DAG) and deploy the required containers to the cluster.
The actual evaluation of these promises occurs when the tasks (or dynamic workflows) are executed in their respective containers.
## Conditional construct
Because standard workflows cannot directly include Python `if` statements, a special `conditional` construct is provided that allows you to define conditional logic in a workflow.
For details, see **Programming > Conditionals**.
## Chaining operator
When {{< key product_name >}} builds the DAG for a standard workflow, it uses the passing of values from one task to another to determine the dependency relationships between tasks.
There may be cases where you want to define a dependency between two tasks that is not based on the output of one task being passed as an input to another.
In that case, you can use the chaining operator `>>` to define the dependencies between tasks.
For details, see **Programming > Chaining Entities**.
## Workflow decorator parameters
The `@{{< key kit_as >}}.workflow` decorator can take the following parameters:
* `failure_policy`: Use the options in **Flytekit SDK**.
* `on_failure`: Invoke this workflow or task on failure. The workflow specified must have the same parameter signature as the current workflow, with an additional parameter called `error`.
* `docs`: A description entity for the workflow.
=== PAGE: https://www.union.ai/docs/v1/serverless/user-guide/core-concepts/workflows/subworkflows-and-sub-launch-plans ===
# Subworkflows and sub-launch plans
In {{< key product_name >}} it is possible to invoke one workflow from within another.
A parent workflow can invoke a child workflow in two ways: as a **subworkflow** or via a **Core concepts > Launch plans > Running launch plans > Sub-launch plans**.
In both cases the child workflow is defined and registered normally, exists in the system normally, and can be run independently.
But, if the child workflow is invoked from within the parent **by directly calling the child's function**, then it becomes a **subworkflow**.
The DAG of the subworkflow is embedded directly into the DAG of the parent and effectively become part of the parent workflow execution, sharing the same execution ID and execution context.
On the other hand, if the child workflow is invoked from within the parent **Core concepts > Launch plans**, this is called a **sub-launch plan**. It results in a new top-level workflow execution being invoked with its own execution ID and execution context.
It also appears as a separate top-level entity in the system.
The only difference is that it happens to have been kicked off from within another workflow instead of from the command line or the UI.
Here is an example:
```python
import {{< key kit_import >}}
@{{< key kit_as >}}.workflow
def sub_wf(a: int, b: int) -> int:
return t(a=a, b=b)
# Get the default launch plan of sub_wf, which we name sub_wf_lp
sub_wf_lp = {{< key kit_as >}}.LaunchPlan.get_or_create(sub_wf)
@{{< key kit_as >}}.workflow
def main_wf():
# Invoke sub_wf directly.
# An embedded subworkflow results.
sub_wf(a=3, b=4)
# Invoke sub_wf through its default launch plan, here called sub_wf_lp
# An independent subworkflow results.
sub_wf_lp(a=1, b=2)
```
## When to use subworkflows
Subworkflows allow you to manage parallelism between a workflow and its launched sub-flows, as they execute within the same context as the parent workflow.
Consequently, all nodes of a subworkflow adhere to the overall constraints imposed by the parent workflow.
Here's an example illustrating the calculation of slope, intercept and the corresponding y-value.
```python
import {{< key kit_import >}}
@{{< key kit_as >}}.task
def slope(x: list[int], y: list[int]) -> float:
sum_xy = sum([x[i] * y[i] for i in range(len(x))])
sum_x_squared = sum([x[i] ** 2 for i in range(len(x))])
n = len(x)
return (n * sum_xy - sum(x) * sum(y)) / (n * sum_x_squared - sum(x) ** 2)
@{{< key kit_as >}}.task
def intercept(x: list[int], y: list[int], slope: float) -> float:
mean_x = sum(x) / len(x)
mean_y = sum(y) / len(y)
intercept = mean_y - slope * mean_x
return intercept
@{{< key kit_as >}}.workflow
def slope_intercept_wf(x: list[int], y: list[int]) -> (float, float):
slope_value = slope(x=x, y=y)
intercept_value = intercept(x=x, y=y, slope=slope_value)
return (slope_value, intercept_value)
@{{< key kit_as >}}.task
def regression_line(val: int, slope_value: float, intercept_value: float) -> float:
return (slope_value * val) + intercept_value # y = mx + c
@{{< key kit_as >}}.workflow
def regression_line_wf(val: int = 5, x: list[int] = [-3, 0, 3], y: list[int] = [7, 4, -2]) -> float:
slope_value, intercept_value = slope_intercept_wf(x=x, y=y)
return regression_line(val=val, slope_value=slope_value, intercept_value=intercept_value)
```
The `slope_intercept_wf` computes the slope and intercept of the regression line.
Subsequently, the `regression_line_wf` triggers `slope_intercept_wf` and then computes the y-value.
It is possible to nest a workflow that contains a subworkflow within yet another workflow.
Workflows can be easily constructed from other workflows, even if they also function as standalone entities.
For example, each workflow in the example below has the capability to exist and run independently:
```python
import {{< key kit_import >}}
@{{< key kit_as >}}.workflow
def nested_regression_line_wf() -> float:
return regression_line_wf()
```
## When to use sub-launch plans
Sub-launch plans can be useful for implementing exceptionally large or complicated workflows that can’t be adequately implemented as **Core concepts > Workflows > Dynamic workflows** or **Core concepts > Workflows > Subworkflows and sub-launch plans > map tasks**.
Dynamic workflows and map tasks share the same context and single underlying Kubernetes resource definitions.
Sub-launch plan invoked workflows do not share the same context.
They are executed as separate top-level entities, allowing for better parallelism and scale.
Here is an example of invoking a workflow multiple times through its launch plan:
```python
import {{< key kit_import >}}
@{{< key kit_as >}}.task
def my_task(a: int, b: int, c: int) -> int:
return a + b + c
@{{< key kit_as >}}.workflow
def my_workflow(a: int, b: int, c: int) -> int:
return my_task(a=a, b=b, c=c)
my_workflow_lp = {{< key kit_as >}}.LaunchPlan.get_or_create(my_workflow)
@{{< key kit_as >}}.workflow
def wf() -> list[int]:
return [my_workflow_lp(a=i, b=i, c=i) for i in [1, 2, 3]]
```
=== PAGE: https://www.union.ai/docs/v1/serverless/user-guide/core-concepts/workflows/dynamic-workflows ===
# Dynamic workflows
A workflow whose directed acyclic graph (DAG) is computed at run-time is a [`dynamic`]() workflow.
The tasks in a dynamic workflow are executed at runtime using dynamic inputs. A dynamic workflow shares similarities with the [`workflow`](), as it uses a Python-esque domain-specific language to declare dependencies between the tasks or define new workflows.
A key distinction lies in the dynamic workflow being assessed at runtime. This means that the inputs are initially materialized and forwarded to the dynamic workflow, resembling the behavior of a task. However, the return value from a dynamic workflow is a [`Promise`]() object, which can be materialized by the subsequent tasks.
Think of a dynamic workflow as a combination of a task and a workflow. It is used to dynamically decide the parameters of a workflow at runtime and is both compiled and executed at run-time.
Dynamic workflows become essential when you need to do the following:
- Handle conditional logic
- Modify the logic of the code at runtime
- Change or decide on feature extraction parameters on the fly
## Defining a dynamic workflow
You can define a dynamic workflow using the `@{{< key kit_as >}}.dynamic` decorator.
Within the `@{{< key kit_as >}}.dynamic` context, each invocation of a [`task`]() or a derivative of the [`Task`]() class leads to deferred evaluation using a Promise, rather than the immediate materialization of the actual value. While nesting other `@{{< key kit_as >}}.dynamic` and `@{{< key kit_as >}}.workflow` constructs within this task is possible, direct interaction with the outputs of a task/workflow is limited, as they are lazily evaluated. If you need to interact with the outputs, we recommend separating the logic in a dynamic workflow and creating a new task to read and resolve the outputs.
The example below uses a dynamic workflow to count the common characters between any two strings.
We define a task that returns the index of a character, where A-Z/a-z is equivalent to 0-25:
```python
import {{< key kit_import >}}
@{{< key kit_as >}}.task
def return_index(character: str) -> int:
if character.islower():
return ord(character) - ord("a")
else:
return ord(character) - ord("A")
```
We also create a task that prepares a list of 26 characters by populating the frequency of each character:
```python
@{{< key kit_as >}}.task
def update_list(freq_list: list[int], list_index: int) -> list[int]:
freq_list[list_index] += 1
return freq_list
```
We define a task to calculate the number of common characters between the two strings:
```python
@{{< key kit_as >}}.task
def derive_count(freq1: list[int], freq2: list[int]) -> int:
count = 0
for i in range(26):
count += min(freq1[i], freq2[i])
return count
```
We define a dynamic workflow to accomplish the following:
1. Initialize an empty 26-character list to be passed to the `update_list` task.
2. Iterate through each character of the first string (`s1`) and populate the frequency list.
3. Iterate through each character of the second string (`s2`) and populate the frequency list.
4. Determine the number of common characters by comparing the two frequency lists.
The looping process depends on the number of characters in both strings, which is unknown until runtime:
```python
@{{< key kit_as >}}.dynamic
def count_characters(s1: str, s2: str) -> int:
# s1 and s2 should be accessible
# Initialize empty lists with 26 slots each, corresponding to every alphabet (lower and upper case)
freq1 = [0] * 26
freq2 = [0] * 26
# Loop through characters in s1
for i in range(len(s1)):
# Calculate the index for the current character in the alphabet
index = return_index(character=s1[i])
# Update the frequency list for s1
freq1 = update_list(freq_list=freq1, list_index=index)
# index and freq1 are not accessible as they are promises
# looping through the string s2
for i in range(len(s2)):
# Calculate the index for the current character in the alphabet
index = return_index(character=s2[i])
# Update the frequency list for s2
freq2 = update_list(freq_list=freq2, list_index=index)
# index and freq2 are not accessible as they are promises
# Count the common characters between s1 and s2
return derive_count(freq1=freq1, freq2=freq2)
```
A dynamic workflow is modeled as a task in the {{< key product_name >}} backend, but the body of the function is executed to produce a workflow at runtime. In both dynamic and static workflows, the output of tasks are Promise objects.
{{< key product_name >}} executes the dynamic workflow within its container, resulting in a compiled DAG, which is then accessible in the UI. It uses the information acquired during the dynamic task's execution to schedule and execute each task within the dynamic workflow. Visualization of the dynamic workflow's graph in the UI is only available after it has completed its execution.
When a dynamic workflow is executed, it generates the entire workflow structure as its output, termed the *futures file*.
This name reflects the fact that the workflow has yet to be executed, so all subsequent outputs are considered futures.
> [!NOTE]
> Local execution works when a `@{{< key kit_as >}}.dynamic` decorator is used because {{< key kit_name >}} treats it as a task that runs with native Python inputs.
Finally, we define a standard workflow that triggers the dynamic workflow:
```python
@{{< key kit_as >}}.workflow
def start_wf(s1: str, s2: str) -> int:
return count_characters(s1=s1, s2=s2)
```
You can run the workflow locally as follows:
```python
if __name__ == "__main__":
print(start_wf(s1="Pear", s2="Earth"))
```
## Advantages of dynamic workflows
### Flexibility
Dynamic workflows streamline the process of building pipelines, offering the flexibility to design workflows
according to the unique requirements of your project. This level of adaptability is not achievable with static workflows.
### Lower pressure on `etcd`
The workflow Custom Resource Definition (CRD) and the states associated with static workflows are stored in `etcd`,
the Kubernetes database. This database maintains {{< key product_name >}} workflow CRDs as key-value pairs, tracking the status of each node's execution.
However, `etcd` has a hard limit on data size, encompassing the workflow and node status sizes, so it is important to ensure that static workflows don't excessively consume memory.
In contrast, dynamic workflows offload the workflow specification (including node/task definitions and connections) to the object store. Still, the statuses of nodes are stored in the workflow CRD within `etcd`.
Dynamic workflows help alleviate some pressure on `etcd` storage space, providing a solution to mitigate storage constraints.
## Dynamic workflows vs. map tasks
Dynamic tasks come with overhead for large fan-out tasks as they store metadata for the entire workflow.
In contrast, **Core concepts > Workflows > Dynamic workflows > map tasks** prove efficient for such extensive fan-out scenarios since they refrain from storing metadata, resulting in less noticeable overhead.
## Using dynamic workflows to achieve recursion
Merge sort is a perfect example to showcase how to seamlessly achieve recursion using dynamic workflows.
{{< key product_name >}} imposes limitations on the depth of recursion to prevent misuse and potential impacts on the overall stability of the system.
```python
from typing import Tuple
import {{< key kit_import >}}
@{{< key kit_as >}}.task
def split(numbers: list[int]) -> tuple[list[int], list[int]]:
length = len(numbers)
return (
numbers[0 : int(length / 2)],
numbers[int(length / 2) :]
)
@{{< key kit_as >}}.task
def merge(sorted_list1: list[int], sorted_list2: list[int]) -> list[int]:
result = []
while len(sorted_list1) > 0 and len(sorted_list2) > 0:
# Compare the current element of the first array with the current element of the second array.
# If the element in the first array is smaller, append it to the result and increment the first array index.
# Otherwise, do the same with the second array.
if sorted_list1[0] < sorted_list2[0]:
result.append(sorted_list1.pop(0))
else:
result.append(sorted_list2.pop(0))
# Extend the result with the remaining elements from both arrays
result.extend(sorted_list1)
result.extend(sorted_list2)
return result
@{{< key kit_as >}}.task
def sort_locally(numbers: list[int]) -> list[int]:
return sorted(numbers)
@{{< key kit_as >}}.dynamic
def merge_sort_remotely(numbers: list[int], threshold: int) -> list[int]:
split1, split2 = split(numbers=numbers)
sorted1 = merge_sort(numbers=split1, threshold=threshold)
sorted2 = merge_sort(numbers=split2, threshold=threshold)
return merge(sorted_list1=sorted1, sorted_list2=sorted2)
@{{< key kit_as >}}.dynamic
def merge_sort(numbers: list[int], threshold: int=5) -> list[int]:
if len(numbers) <= threshold:
return sort_locally(numbers=numbers)
else:
return merge_sort_remotely(numbers=numbers, threshold=threshold)
```
By simply adding the `@{{< key kit_as >}}.dynamic` annotation, the `merge_sort_remotely` function transforms into a plan of execution,
generating a workflow with four distinct nodes. These nodes run remotely on potentially different hosts,
with {{< key product_name >}} ensuring proper data reference passing and maintaining execution order with maximum possible parallelism.
`@{{< key kit_as >}}.dynamic` is essential in this context because the number of times `merge_sort` needs to be triggered is unknown at compile time. The dynamic workflow calls a static workflow, which subsequently calls the dynamic workflow again,
creating a recursive and flexible execution structure.
=== PAGE: https://www.union.ai/docs/v1/serverless/user-guide/core-concepts/workflows/imperative-workflows ===
# Imperative workflows
Workflows are commonly created by applying the `@{{< key kit_as >}}.workflow` decorator to Python functions.
During compilation, this involves processing the function's body and utilizing subsequent calls to
underlying tasks to establish and record the workflow structure. This is the *declarative* approach
and is suitable when manually drafting the workflow.
However, in cases where workflows are constructed programmatically, an imperative style is more appropriate.
For instance, if tasks have been defined already, their sequence and dependencies might have been specified in textual form (perhaps during a transition from a legacy system).
In such scenarios, you want to orchestrate these tasks.
This is where {{< key product_name >}}'s imperative workflows come into play, allowing you to programmatically construct workflows.
## Example
To begin, we define the `slope` and `intercept` tasks:
```python
import {{< key kit_import >}}
@{{< key kit_as >}}.task
def slope(x: list[int], y: list[int]) -> float:
sum_xy = sum([x[i] * y[i] for i in range(len(x))])
sum_x_squared = sum([x[i] ** 2 for i in range(len(x))])
n = len(x)
return (n * sum_xy - sum(x) * sum(y)) / (n * sum_x_squared - sum(x) ** 2)
@{{< key kit_as >}}.task
def intercept(x: list[int], y: list[int], slope: float) -> float:
mean_x = sum(x) / len(x)
mean_y = sum(y) / len(y)
intercept = mean_y - slope * mean_x
return intercept
```
Create an imperative workflow:
```python
imperative_wf = Workflow(name="imperative_workflow")
```
Add the workflow inputs to the imperative workflow:
```python
imperative_wf.add_workflow_input("x", list[int])
imperative_wf.add_workflow_input("y", list[int])
```
> If you want to assign default values to the workflow inputs, you can create a **Core concepts > Launch plans**.
Add the tasks that need to be triggered from within the workflow:
```python
node_t1 = imperative_wf.add_entity(slope, x=imperative_wf.inputs["x"], y=imperative_wf.inputs["y"])
node_t2 = imperative_wf.add_entity(
intercept, x=imperative_wf.inputs["x"], y=imperative_wf.inputs["y"], slope=node_t1.outputs["o0"]
)
```
Lastly, add the workflow output:
```python
imperative_wf.add_workflow_output("wf_output", node_t2.outputs["o0"])
```
You can execute the workflow locally as follows:
```python
if __name__ == "__main__":
print(f"Running imperative_wf() {imperative_wf(x=[-3, 0, 3], y=[7, 4, -2])}")
```
You also have the option to provide a list of inputs and
retrieve a list of outputs from the workflow:
```python
wf_input_y = imperative_wf.add_workflow_input("y", list[str])
node_t3 = wf.add_entity(some_task, a=[wf.inputs["x"], wf_input_y])
wf.add_workflow_output(
"list_of_outputs",
[node_t1.outputs["o0"], node_t2.outputs["o0"]],
python_type=list[str],
)
```
=== PAGE: https://www.union.ai/docs/v1/serverless/user-guide/core-concepts/workflows/launching-workflows ===
# Launching workflows
From the **Core concepts > Workflows > Viewing workflows > Workflow view** (accessed, for example, by selecting a workflow in the **Core concepts > Workflows > Viewing workflows > Workflows list**) you can select **Launch Workflow** in the top right. This opens the **New Execution** dialog for workflows:

At the top you can select:
* The specific version of this workflow that you want to launch.
* The launch plan to be used to launch this workflow (by default it is set to the **Core concepts > Launch plans > Default launch plan**).
Along the left side the following sections are available:
* **Inputs**: The input parameters of the workflow function appear here as fields to be filled in.
* **Settings**:
* **Execution name**: A custom name for this execution. If not specified, a name will be generated.
* **Overwrite cached outputs**: A boolean. If set to `True`, this execution will overwrite any previously-computed cached outputs.
* **Raw output data config**: Remote path prefix to store raw output data.
By default, workflow output will be written to the built-in metadata storage.
Alternatively, you can specify a custom location for output at the organization, project-domain, or individual execution levels.
This field is for specifying this setting at the workflow execution level.
If this field is filled in it overrides any settings at higher levels.
The parameter is expected to be a URL to a writable resource (for example, `http://s3.amazonaws.com/my-bucket/`).
See **Data input/output > Task input and output > Raw data store**.
* **Max parallelism**: Number of workflow nodes that can be executed in parallel. If not specified, project/domain defaults are used. If 0 then no limit is applied.
* **Force interruptible**: A three valued setting for overriding the interruptible setting of the workflow for this particular execution.
If not set, the workflow's interruptible setting is used.
If set and **enabled** then `interruptible=True` is used for this execution.
If set and **disabled** then `interruptible=False` is used for this execution.
See **Core concepts > Tasks > Task hardware environment > Interruptible instances**
* **Environment variables**: Environment variables that will be available to tasks in this workflow execution.
* **Labels**: Labels to apply to the execution resource.
* **Notifications**: **Core concepts > Launch plans > Notifications** configured for this workflow execution.
Select **Launch** to launch the workflow execution. This will take you to the **Core concepts > Workflows > Viewing workflow executions**.
=== PAGE: https://www.union.ai/docs/v1/serverless/user-guide/core-concepts/workflows/viewing-workflows ===
# Viewing workflows
## Workflows list
The workflows list shows all workflows in the current project and domain:

You can search the list by name and filter for only those that are archived.
To archive a workflow, select the archive icon .
Each entry in the list provides some basic information about the workflow:
* **Last execution time**:
The time of the most recent execution of this workflow.
* **Last 10 executions**:
The status of the last 10 executions of this workflow.
* **Inputs**:
The input type for the workflow.
* **Outputs**:
The output type for the workflow.
* **Description**:
The description of the workflow.
Select an entry on the list to go to that **Core concepts > Workflows > Viewing workflows > Workflow view**.
## Workflow view
The workflow view provides details about a specific workflow.

This view provides:
* A list of recent workflow versions:
Selecting a version will take you to the **Core concepts > Workflows > Viewing workflows > Workflow view > Workflow versions list**.
* A list of recent executions:
Selecting an execution will take you to the **Core concepts > Workflows > Viewing workflow executions**.
### Workflow versions list
The workflow versions list shows the a list of all versions of this workflow along with a graph view of the workflow structure:

### Workflow and task descriptions
{{< key product_name >}} enables the use of docstrings to document your code. Docstrings are stored in the control plane and displayed on the UI for each workflow or task.
=== PAGE: https://www.union.ai/docs/v1/serverless/user-guide/core-concepts/workflows/viewing-workflow-executions ===
# Viewing workflow executions
The **Executions list** shows all executions in a project and domain combination.
An execution represents a single run of all or part of a workflow (including subworkflows and individual tasks).
You can access it from the **Executions** link in the left navigation.

## Domain Settings
This section displays any domain-level settings that have been configured for this project-domain combination. They are:
* Security Context
* Labels
* Annotations
* Raw output data config
* Max parallelism
## All Executions in the Project
For each execution in this project and domain you can see the following:
* A graph of the **last 100 executions in the project**.
* **Start time**: Select to view the **Core concepts > Workflows > Viewing workflow executions > Execution view**.
* **Workflow/Task**: The **Core concepts > Workflows > Viewing workflows** or **Core concepts > Tasks > Viewing tasks** that ran in this execution.
* **Version**: The version of the workflow or task that ran in this execution.
* **Launch Plan**: The **Core concepts > Launch plans > Viewing launch plans** that was used to launch this execution.
* **Schedule**: The schedule that was used to launch this execution (if any).
* **Execution ID**: The ID of the execution.
* **Status**: The status of the execution. One of **QUEUED**, **RUNNING**, **SUCCEEDED**, **FAILED** or **UNKNOWN**.
* **Duration**: The duration of the execution.
## Execution view
The execution view appears when you launch a workflow or task or select an already completed execution.
An execution represents a single run of all or part of a workflow (including subworkflows and individual tasks).

> [!NOTE]
> An execution usually represents the run of an entire workflow.
> But, because workflows are composed of tasks (and sometimes subworkflows) and {{< key product_name >}} caches the outputs of those independently of the workflows in which they participate, it sometimes makes sense to execute a task or subworkflow independently.
The top part of execution view provides detailed general information about the execution.
The bottom part provides three tabs displaying different aspects of the execution: **Nodes**, **Graph**, and **Timeline**.
### Nodes
The default tab within the execution view is the **Nodes** tab.
It shows a list of the {{< key product_name >}} nodes that make up this execution (A node in {{< key product_name >}} is either a task or a (sub-)workflow).
Selecting an item in the list opens the right panel showing more details of that specific node:

The top part of the side panel provides detailed information about the node as well as the **Rerun task** button.
Below that, you have the following tabs: **Executions**, **Inputs**, **Outputs**, and **Task**.
The **Executions** tab gives you details on the execution of this particular node as well as access to:
* **Task level monitoring**: You can access the **Core concepts > Tasks > Task hardware environment > Task-level monitoring** information by selecting **View Utilization**.
* **Logs**: You can access logs by clicking the text under **Logs**. See **Core concepts > Tasks > Viewing logs**.
The **Inputs**, **Outputs** tabs display the data that was passed into and out of the node, respectively.
If this node is a task (as opposed to a subworkflow) then the **Task** tab displays the Task definition structure.
### Graph
The Graph tab displays a visual representation of the execution as a directed acyclic graph:

### Timeline
The Timeline tab displays a visualization showing the timing of each task in the execution:

=== PAGE: https://www.union.ai/docs/v1/serverless/user-guide/core-concepts/tasks ===
# Tasks
Tasks are the fundamental units of compute in {{< key product_name >}}.
They are independently executable, strongly typed, and containerized building blocks that make up workflows.
Workflows are constructed by chaining together tasks, with the output of one task feeding into the input of the next to form a directed acyclic graph.
## Tasks are independently executable
Tasks are designed to be independently executable, meaning that they can be run in isolation from other tasks.
And since most tasks are just Python functions, they can be executed on your local machine, making it easy to unit test and debug tasks locally before deploying them to {{< key product_name >}}.
Because they are independently executable, tasks can also be shared and reused across multiple workflows and, as long as their logic is deterministic, their input and outputs can be **Core concepts > Caching** to save compute resources and execution time.
## Tasks are strongly typed
Tasks have strongly typed inputs and outputs, which are validated at deployment time.
This helps catch bugs early and ensures that the data passing through tasks and workflows is compatible with the explicitly stated types.
Under the hood, {{< key product_name >}} uses the [Flyte type system]() and translates between the Flyte types and the Python types.
Python type annotations make sure that the data passing through tasks and workflows is compatible with the explicitly stated types defined through a function signature.
The {{< key product_name >}} type system is also used for caching, data lineage tracking, and automatic serialization and deserialization of data as it’s passed from one task to another.
## Tasks are containerized
While (most) tasks are locally executable, when a task is deployed to {{< key product_name >}} as part of the registration process it is containerized and run in its own independent Kubernetes pod.
This allows tasks to have their own independent set of **Core concepts > ImageSpec** and [hardware requirements](./task-hardware-environment/_index).
For example, a task that requires a GPU can be deployed to {{< key product_name >}} with a GPU-enabled container image, while a task that requires a specific version of a software library can be deployed with that version of the library installed.
## Tasks are named, versioned, and immutable
The fully qualified name of a task is a combination of its project, domain, and name. To update a task, you change it and re-register it under the same fully qualified name. This creates a new version of the task while the old version remains available. At the version level task are, therefore, immutable. This immutability is important for ensuring that workflows are reproducible and that the data lineage is accurate.
## Tasks are (usually) deterministic and cacheable
When deciding if a unit of execution is suitable to be encapsulated as a task, consider the following questions:
* Is there a well-defined graceful/successful exit criteria for the task?
* A task is expected to exit after completion of input processing.
* Is it deterministic and repeatable?
* Under certain circumstances, a task might be cached or rerun with the same inputs.
It is expected to produce the same output every time.
You should, for example, avoid using random number generators with the current clock as seed.
* Is it a pure function? That is, does it have side effects that are unknown to the system?
* It is recommended to avoid side effects in tasks.
* When side effects are unavoidable, ensure that the operations are idempotent.
For details on task caching, see **Core concepts > Caching**.
## Subpages
- **Core concepts > Tasks > Map Tasks**
- **Core concepts > Tasks > Other task types**
- **Core concepts > Tasks > Task parameters**
- **Core concepts > Tasks > Launching tasks**
- **Core concepts > Tasks > Viewing tasks**
- **Core concepts > Tasks > Viewing logs**
- **Core concepts > Tasks > Reference tasks**
- **Core concepts > Tasks > Task hardware environment**
=== PAGE: https://www.union.ai/docs/v1/serverless/user-guide/core-concepts/tasks/map-tasks ===
## Map tasks
A map task allows you to execute many instances of a task within a single workflow node.
This enables you to execute a task across a set of inputs without having to create a node for each input, resulting in significant performance improvements.
Map tasks find application in various scenarios, including:
* When multiple inputs require running through the same code logic.
* Processing multiple data batches concurrently.
Just like normal tasks, map tasks are automatically parallelized to the extent possible given resources available in the cluster.
```python
THRESHOLD = 11
@{{< key kit_as >}}.task
def detect_anomalies(data_point: int) -> bool:
return data_point > THRESHOLD
@{{< key kit_as >}}.workflow
def map_workflow(data: list[int] = [10, 12, 11, 10, 13, 12, 100, 11, 12, 10]) -> list[bool]:
# Use the map task to apply the anomaly detection function to each data point
return {{< key kit_as >}}.{{< key map_func >}}(detect_anomalies)(data_point=data)
```
> [!NOTE]
> Map tasks can also map over launch plans. For more information and example code, see **Core concepts > Launch plans > Mapping over launch plans**.
To customize resource allocations, such as memory usage for individual map tasks, you can leverage `with_overrides`. Here’s an example using the `detect_anomalies` map task within a workflow:
```python
import union
@{{< key kit_as >}}.workflow
def map_workflow_with_resource_overrides(
data: list[int] = [10, 12, 11, 10, 13, 12, 100, 11, 12, 10]
) -> list[bool]:
return (
{{< key kit_as >}}.{{< key map_func >}}(detect_anomalies)(data_point=data)
.with_overrides(requests={{< key kit_as >}}.Resources(mem="2Gi"))
)
```
You can also configure `concurrency` and `min_success_ratio` for a map task:
- `concurrency` limits the number of mapped tasks that can run in parallel to the specified batch size. If the input size exceeds the concurrency value, multiple batches will run serially until all inputs are processed. If left unspecified, it implies unbounded concurrency.
- `min_success_ratio` determines the minimum fraction of total jobs that must complete successfully before terminating the map task and marking it as successful.
```python
@{{< key kit_as >}}.workflow
def map_workflow_with_additional_params(
data: list[int] = [10, 12, 11, 10, 13, 12, 100, 11, 12, 10]
) -> list[typing.Optional[bool]]:
return {{< key kit_as >}}.{{< key map_func >}}(
detect_anomalies,
concurrency=1,
min_success_ratio=0.75
)(data_point=data)
```
For more details see [Map Task example](https://github.com/unionai-oss/union-cloud-docs-examples/tree/main/map_task) in the `unionai-examples` repository and [Map Tasks]() section.
=== PAGE: https://www.union.ai/docs/v1/serverless/user-guide/core-concepts/tasks/task-types ===
# Other task types
Task types include:
* **`PythonFunctionTask`**: This Python class represents the standard default task.
It is the type that is created when you use the `@{{< key kit_as >}}.task` decorator.
* **`ContainerTask`**: This Python class represents a raw container.
It allows you to install any image you like, giving you complete control of the task.
* **Shell tasks**: Use them to execute `bash` scripts within {{< key product_name >}}.
* **Specialized plugin tasks**: These include both specialized classes and specialized configurations of the `PythonFunctionTask`.
They implement integrations with third-party systems.
## PythonFunctionTask
This is the task type that is created when you add the `@{{< key kit_as >}}.task` decorator to a Python function.
It represents a Python function that will be run within a single container. For example::
```python
@{{< key kit_as >}}.task
def get_data() -> pd.DataFrame:
"""Get the wine dataset."""
return load_wine(as_frame=True).frame
```
See the [Python Function Task example](https://github.com/unionai-oss/union-cloud-docs-examples/tree/main/python_function_task).
This is the most common task variant and the one that, thus far, we have focused on in this documentation.
## ContainerTask
This task variant represents a raw container, with no assumptions made about what is running within it.
Here is an example of declaring a `ContainerTask`:
```python
greeting_task = ContainerTask(
name="echo_and_return_greeting",
image="alpine:latest",
input_data_dir="/var/inputs",
output_data_dir="/var/outputs",
inputs=kwtypes(name=str),
outputs=kwtypes(greeting=str),
command=["/bin/sh", "-c", "echo 'Hello, my name is {{.inputs.name}}.' | tee -a /var/outputs/greeting"],
)
```
The `ContainerTask` enables you to include a task in your workflow that executes arbitrary code in any language, not just Python.
In the following example, the tasks calculate an ellipse area. This name has to be unique in the entire project. Users can specify:
`input_data_dir` -> where inputs will be written to.
`output_data_dir` -> where {{< key product_name >}} will expect the outputs to exist.
The `inputs` and `outputs` specify the interface for the task; thus it should be an ordered dictionary of typed input and output variables.
The image field specifies the container image for the task, either as an image name or an ImageSpec. To access the file that is not included in the image, use ImageSpec to copy files or directories into container `/root`.
Cache can be enabled in a ContainerTask by configuring the cache settings in the `TaskMetadata` in the metadata parameter.
```python
calculate_ellipse_area_haskell = ContainerTask(
name="ellipse-area-metadata-haskell",
input_data_dir="/var/inputs",
output_data_dir="/var/outputs",
inputs=kwtypes(a=float, b=float),
outputs=kwtypes(area=float, metadata=str),
image="ghcr.io/flyteorg/rawcontainers-haskell:v2",
command=[
"./calculate-ellipse-area",
"{{.inputs.a}}",
"{{.inputs.b}}",
"/var/outputs",
],
metadata=TaskMetadata(cache=True, cache_version="1.0"),
)
calculate_ellipse_area_julia = ContainerTask(
name="ellipse-area-metadata-julia",
input_data_dir="/var/inputs",
output_data_dir="/var/outputs",
inputs=kwtypes(a=float, b=float),
outputs=kwtypes(area=float, metadata=str),
image="ghcr.io/flyteorg/rawcontainers-julia:v2",
command=[
"julia",
"calculate-ellipse-area.jl",
"{{.inputs.a}}",
"{{.inputs.b}}",
"/var/outputs",
],
metadata=TaskMetadata(cache=True, cache_version="1.0"),
)
@workflow
def wf(a: float, b: float):
area_haskell, metadata_haskell = calculate_ellipse_area_haskell(a=a, b=b)
area_julia, metadata_julia = calculate_ellipse_area_julia(a=a, b=b)
```
See the [Container Task example](https://github.com/unionai-oss/union-cloud-docs-examples/tree/main/container_task).
## Shell tasks
Shell tasks enable the execution of shell scripts within {{< key product_name >}}.
To create a shell task, provide a name for it, specify the bash script to be executed, and define inputs and outputs if needed:
### Example
```python
from pathlib import Path
from typing import Tuple
import {{< key kit_import >}}
from flytekit import kwtypes
from flytekit.extras.tasks.shell import OutputLocation, ShellTask
t1 = ShellTask(
name="task_1",
debug=True,
script="""
set -ex
echo "Hey there! Let's run some bash scripts using a shell task."
echo "Showcasing shell tasks." >> {inputs.x}
if grep "shell" {inputs.x}
then
echo "Found it!" >> {inputs.x}
else
echo "Not found!"
fi
""",
inputs=kwtypes(x=FlyteFile),
output_locs=[OutputLocation(var="i", var_type=FlyteFile, location="{inputs.x}")],
)
t2 = ShellTask(
name="task_2",
debug=True,
script="""
set -ex
cp {inputs.x} {inputs.y}
tar -zcvf {outputs.j} {inputs.y}
""",
inputs=kwtypes(x=FlyteFile, y=FlyteDirectory),
output_locs=[OutputLocation(var="j", var_type=FlyteFile, location="{inputs.y}.tar.gz")],
)
t3 = ShellTask(
name="task_3",
debug=True,
script="""
set -ex
tar -zxvf {inputs.z}
cat {inputs.y}/$(basename {inputs.x}) | wc -m > {outputs.k}
""",
inputs=kwtypes(x=FlyteFile, y=FlyteDirectory, z=FlyteFile),
output_locs=[OutputLocation(var="k", var_type=FlyteFile, location="output.txt")],
)
```
Here's a breakdown of the parameters of the `ShellTask`:
- The `inputs` parameter allows you to specify the types of inputs that the task will accept
- The `output_locs` parameter is used to define the output locations, which can be `FlyteFile` or `FlyteDirectory`
- The `script` parameter contains the actual bash script that will be executed
(`{inputs.x}`, `{outputs.j}`, etc. will be replaced with the actual input and output values).
- The `debug` parameter is helpful for debugging purposes
We define a task to instantiate `FlyteFile` and `FlyteDirectory`.
A `.gitkeep` file is created in the `FlyteDirectory` as a placeholder to ensure the directory exists:
```python
@{{< key kit_as >}}.task
def create_entities() -> Tuple[{{< key kit_as >}}.FlyteFile, {{< key kit_as >}}.FlyteDirectory]:
working_dir = Path({{< key kit_as >}}.current_context().working_directory)
flytefile = working_dir / "test.txt"
flytefile.touch()
flytedir = working_dir / "testdata"
flytedir.mkdir(exist_ok=True)
flytedir_file = flytedir / ".gitkeep"
flytedir_file.touch()
return flytefile, flytedir
```
We create a workflow to define the dependencies between the tasks:
```python
@{{< key kit_as >}}.workflow
def shell_task_wf() -> {{< key kit_as >}}.FlyteFile:
x, y = create_entities()
t1_out = t1(x=x)
t2_out = t2(x=t1_out, y=y)
t3_out = t3(x=x, y=y, z=t2_out)
return t3_out
```
You can run the workflow locally:
```python
if __name__ == "__main__":
print(f"Running shell_task_wf() {shell_task_wf()}")
```
## Specialized plugin task classes and configs
{{< key product_name >}} supports a wide variety of plugin tasks.
Some of these are enabled as specialized task classes, others as specialized configurations of the default `@{{< key kit_as >}}.task` (`PythonFunctionTask`).
They enable things like:
* Querying external databases (AWS Athena, BigQuery, DuckDB, SQL, Snowflake, Hive).
* Executing specialized processing right in {{< key product_name >}} (Spark in virtual cluster, Dask in Virtual cluster, Sagemaker, Airflow, Modin, Ray, MPI and Horovod).
* Handing off processing to external services(AWS Batch, Spark on Databricks, Ray on external cluster).
* Data transformation (Great Expectations, DBT, Dolt, ONNX, Pandera).
* Data tracking and presentation (MLFlow, Papermill).
See the [Integration section]() for examples.
=== PAGE: https://www.union.ai/docs/v1/serverless/user-guide/core-concepts/tasks/task-parameters ===
# Task parameters
You pass the following parameters to the `@{{< key kit_as >}}.task` decorator:
* `accelerator`: The accelerator to use for this task.
For more information, see [Specifying accelerators]().
* `cache`: See **Core concepts > Caching**.
* `cache_serialize`: See **Core concepts > Caching**.
* `cache_version`: See **Core concepts > Caching**.
* `cache_ignore_input_vars`: Input variables that should not be included when calculating the hash for the cache.
* `container_image`: See **Core concepts > ImageSpec**.
* `deprecated`: A string that can be used to provide a warning message for deprecated task.
The absence of a string, or an empty string, indicates that the task is active and not deprecated.
* `docs`: Documentation about this task.
* `enable_deck`: If true, this task will output a Deck which can be used to visualize the task execution. See **Development cycle > Decks**.
```python
@{{< key kit_as >}}.task(enable_deck=True)
def my_task(my_str: str):
print("hello {my_str}")
```
* `environment`: See **Core concepts > Tasks > Task software environment > Environment variables**.
* `interruptible`: See **Core concepts > Tasks > Task hardware environment > Interruptible instances**.
* `limits`: See **Core concepts > Tasks > Task hardware environment > Customizing task resources**.
* `node_dependency_hints`: A list of tasks, launch plans, or workflows that this task depends on.
This is only for dynamic tasks/workflows, where {{< key product_name >}} cannot automatically determine the dependencies prior to runtime.
Even on dynamic tasks this is optional, but in some scenarios it will make registering the workflow easier,
because it allows registration to be done the same as for static tasks/workflows.
For example this is useful to run launch plans dynamically, because launch plans must be registered before they can be run.
Tasks and workflows do not have this requirement.
```python
@{{< key kit_as >}}.workflow
def workflow0():
launchplan0 = LaunchPlan.get_or_create(workflow0)
# Specify node_dependency_hints so that launchplan0
# will be registered on flyteadmin, despite this being a dynamic task.
@{{< key kit_as >}}.dynamic(node_dependency_hints=[launchplan0])
def launch_dynamically():
# To run a sub-launchplan it must have previously been registered on flyteadmin.
return [launchplan0]*10
```
* `pod_template`: See **Core concepts > Tasks > Task parameters > Task hardware environment**.
* `pod_template_name`: See **Core concepts > Tasks > Task parameters > Task hardware environment**.
* `requests`: See **Core concepts > Tasks > Task hardware environment > Customizing task resources**
* `retries`: Number of times to retry this task during a workflow execution.
Tasks can define a retry strategy to let the system know how to handle failures (For example: retry 3 times on any kind of error).
For more information, see **Core concepts > Tasks > Task hardware environment > Interruptible instances**
There are two kinds of retries *system retries* and *user retries*.
* `secret_requests`: See **Development cycle > Managing secrets**
* `task_config`: Configuration for a specific task type.
See the [{{< key product_name >}} Connectors documentation](../../integrations/connectors) and
[{{< key product_name >}} plugins documentation]() for the right object to use.
* `task_resolver`: Provide a custom task resolver.
* `timeout`: The max amount of time for which one execution of this task should be executed for.
The execution will be terminated if the runtime exceeds the given timeout (approximately).
To ensure that the system is always making progress, tasks must be guaranteed to end gracefully/successfully.
The system defines a default timeout period for the tasks.
It is possible for task authors to define a timeout period, after which the task is marked as `failure`.
Note that a timed-out task will be retried if it has a retry strategy defined.
The timeout can be handled in the
[TaskMetadata]().
## Use `partial` to provide default arguments to tasks
You can use the `functools.partial` function to assign default or constant values to the parameters of your tasks:
```python
import functools
import {{< key kit_import >}}
@{{< key kit_as >}}.task
def slope(x: list[int], y: list[int]) -> float:
sum_xy = sum([x[i] * y[i] for i in range(len(x))])
sum_x_squared = sum([x[i] ** 2 for i in range(len(x))])
n = len(x)
return (n * sum_xy - sum(x) * sum(y)) / (n * sum_x_squared - sum(x) ** 2)
@{{< key kit_as >}}.workflow
def simple_wf_with_partial(x: list[int], y: list[int]) -> float:
partial_task = functools.partial(slope, x=x)
return partial_task(y=y)
```
## Named outputs
By default, {{< key product_name >}} employs a standardized convention to assign names to the outputs of tasks or workflows.
Each output is sequentially labeled as `o1`, `o2`, `o3`, ... `on`, where `o` serves as the standard prefix,
and `1`, `2`, ... `n` indicates the positional index within the returned values.
However, {{< key product_name >}} allows the customization of output names for tasks or workflows.
This customization becomes beneficial when you're returning multiple outputs
and you wish to assign a distinct name to each of them.
The following example illustrates the process of assigning names to outputs for both a task and a workflow.
Define a `NamedTuple` and assign it as an output to a task:
```python
import {{< key kit_import >}}
from typing import NamedTuple
slope_value = NamedTuple("slope_value", [("slope", float)])
@{{< key kit_as >}}.task
def slope(x: list[int], y: list[int]) -> slope_value:
sum_xy = sum([x[i] * y[i] for i in range(len(x))])
sum_x_squared = sum([x[i] ** 2 for i in range(len(x))])
n = len(x)
return (n * sum_xy - sum(x) * sum(y)) / (n * sum_x_squared - sum(x) ** 2)
```
Likewise, assign a `NamedTuple` to the output of `intercept` task:
```python
intercept_value = NamedTuple("intercept_value", [("intercept", float)])
@{{< key kit_as >}}.task
def intercept(x: list[int], y: list[int], slope: float) -> intercept_value:
mean_x = sum(x) / len(x)
mean_y = sum(y) / len(y)
intercept = mean_y - slope * mean_x
return intercept
```
> [!NOTE]
> While it's possible to create `NamedTuple`s directly within the code,
> it's often better to declare them explicitly. This helps prevent potential linting errors in tools like mypy.
>
> ```python
> def slope() -> NamedTuple("slope_value", slope=float):
> pass
> ```
You can easily unpack the `NamedTuple` outputs directly within a workflow.
Additionally, you can also have the workflow return a `NamedTuple` as an output.
> [!NOTE]
> Remember that we are extracting individual task execution outputs by dereferencing them.
> This is necessary because `NamedTuple`s function as tuples and require this dereferencing:
```python
slope_and_intercept_values = NamedTuple("slope_and_intercept_values", [("slope", float), ("intercept", float)])
@{{< key kit_as >}}.workflow
def simple_wf_with_named_outputs(x: list[int] = [-3, 0, 3], y: list[int] = [7, 4, -2]) -> slope_and_intercept_values:
slope_value = slope(x=x, y=y)
intercept_value = intercept(x=x, y=y, slope=slope_value.slope)
return slope_and_intercept_values(slope=slope_value.slope, intercept=intercept_value.intercept)
```
You can run the workflow locally as follows:
```python
if __name__ == "__main__":
print(f"Running simple_wf_with_named_outputs() {simple_wf_with_named_outputs()}")
```
=== PAGE: https://www.union.ai/docs/v1/serverless/user-guide/core-concepts/tasks/launching-tasks ===
# Launching tasks
From the **Core concepts > Tasks > Viewing tasks > Task view** (accessed, for example, by selecting a task in the **Core concepts > Tasks > Viewing tasks > Tasks list**) you can select **Launch Task** in the top right:
This opens the **New Execution** dialog for tasks:

The settings are similar to those for workflows. At the top you can select:
* The specific version of this task that you want to launch.
Along the left side the following sections are available:
* **Inputs**: The input parameters of the task function appear here as fields to be filled in.
* **Settings**:
* **Execution name**: A custom name for this execution. If not specified, a name will be generated.
* **Overwrite cached outputs**: A boolean. If set to `True`, this execution will overwrite any previously-computed cached outputs.
* **Raw output data config**: Remote path prefix to store raw output data.
By default, workflow output will be written to the built-in metadata storage.
Alternatively, you can specify a custom location for output at the organization, project-domain, or individual execution levels.
This field is for specifying this setting at the workflow execution level.
If this field is filled in it overrides any settings at higher levels.
The parameter is expected to be a URL to a writable resource (for example, `http://s3.amazonaws.com/my-bucket/`).
See **Data input/output > Task input and output > Raw data store**
**Max parallelism**: Number of workflow nodes that can be executed in parallel. If not specified, project/domain defaults are used. If 0 then no limit is applied.
* **Force interruptible**: A three valued setting for overriding the interruptible setting of the workflow for this particular execution.
If not set, the workflow's interruptible setting is used.
If set and **enabled** then `interruptible=True` is used for this execution.
If set and **disabled** then `interruptible=False` is used for this execution.
See **Core concepts > Tasks > Task hardware environment > Interruptible instances**
* **Environment variables**: Environment variables that will be available to tasks in this workflow execution.
* **Labels**: Labels to apply to the execution resource.
* **Notifications**: **Core concepts > Launch plans > Notifications** configured for this workflow execution.
Select **Launch** to launch the task execution. This will take you to the **Core concepts > Workflows > Viewing workflow executions**.
=== PAGE: https://www.union.ai/docs/v1/serverless/user-guide/core-concepts/tasks/viewing-tasks ===
# Viewing tasks
## Tasks list
Selecting **Tasks** in the sidebar displays a list of all the registered tasks:

You can search the tasks by name and filter for only those that are archived.
Each task in the list displays some basic information about the task:
* **Inputs**: The input type for the task.
* **Outputs**: The output type for the task.
* **Description**: A description of the task.
Select an entry on the list to go to that **Core concepts > Tasks > Viewing tasks > Task view**.
## Task view
Selecting an individual task from the **Core concepts > Tasks > Viewing tasks > Tasks list** will take you to the task view:

Here you can see:
* **Inputs & Outputs**: The input and output types for the task.
* Recent task versions. Selecting one of these takes you to the **Core concepts > Tasks > Viewing tasks > Task view > Task versions list**
* Recent executions of this task. Selecting one of these takes you to the **Core concepts > Workflows > Viewing workflow executions**.
### Task versions list
The task versions list give you detailed information about a specific version of a task:

* **Image**: The Docker image used to run this task.
* **Env Vars**: The environment variables used by this task.
* **Commands**: The JSON object defining this task.
At the bottom is a list of all versions of the task with the current one selected.
=== PAGE: https://www.union.ai/docs/v1/serverless/user-guide/core-concepts/tasks/viewing-logs ===
# Viewing logs
In the **Core concepts > Workflows > Viewing workflow executions**, selecting a task from the list in the **Nodes** tab will open the task details in the right panel.
Within that panel, in the **Execution** tab, under **Logs**, you will find a link labeled **Task Logs**.

This leads to the **Execution logs tab** of the **Execution details page**:

The execution logs provide a live view into the standard output of the task execution.
For example, any `print` statements in the tasks Python code will be displayed here.
## Kubernetes cluster logs
On the left side of the page you can also see the Kubernetes cluster logs for the task execution:

## Other tabs
Alongside the **Execution logs** tab in the **Execution details page**, you will also find the **Execution resources** and **Inputs & Outputs** tabs.
## Cloud provider logs
In addition to the **Task Logs** link, you will also see a link to your cloud provider's logs (**Cloudwatch Logs** for AWS, **Stackdriver Logs** for GCP, and **Azure Logs** for Azure):
=== PAGE: https://www.union.ai/docs/v1/serverless/user-guide/core-concepts/tasks/reference-tasks ===
# Reference tasks
A reference_task references tasks that have already been defined, serialized, and registered. You can reference tasks from other projects and create workflows that use tasks declared by others. These tasks can be in their own containers, python runtimes, flytekit versions, and even different languages.
> [!NOTE]
> Reference tasks cannot be run locally. To test locally, mock them out.
## Example
1. Create a file called `task.py` and insert this content into it:
```python
import {{< key kit_import >}}
@{{< key kit_as >}}.task
def add_two_numbers(a: int, b: int) -> int:
return a + b
```
2. Register the task:
```shell
$ {{< key cli >}} register --project flytesnacks --domain development --version v1 task.py
```
3. Create a separate file `wf_ref_task.py` and copy the following code into it:
```python
from flytekit import reference_task
@reference_task(
project="flytesnacks",
domain="development",
name="task.add_two_numbers",
version="v1",
)
def add_two_numbers(a: int, b: int) -> int:
...
@{{< key kit_as >}}.workflow
def wf(a: int, b: int) -> int:
return add_two_numbers(a, b)
```
4. Register the `wf` workflow:
```shell
$ {{< key cli >}} register --project flytesnacks --domain development wf_ref_task.py
```
5. In the {{< key product_name >}} UI, run the workflow `wf_ref_task.wf`.
=== PAGE: https://www.union.ai/docs/v1/serverless/user-guide/core-concepts/tasks/task-hardware-environment ===
# Task hardware environment
## Customizing task resources
You can customize the hardware environment in which your task code executes through configuration in the `@{{< key kit_as >}}.task` decorator by specifying `requests` and `limits` on:
* CPU number
* GPU number
* Memory size
* Ephemeral storage size
See **Core concepts > Tasks > Task hardware environment > Customizing task resources** for details.
## Accelerators
If you specify GPUs, you can also specify the type of GPU to be used by setting the `accelerator` parameter.
See **Core concepts > Tasks > Task hardware environment > Accelerators** for more information.
## Task-level monitoring
You can also monitor the hardware resources used by a task.
See **Core concepts > Tasks > Task hardware environment > Task-level monitoring** for details.
## Subpages
- **Core concepts > Tasks > Task hardware environment > Customizing task resources**
- **Core concepts > Tasks > Task hardware environment > Accelerators**
- **Core concepts > Tasks > Task hardware environment > Retries and timeouts**
- **Core concepts > Tasks > Task hardware environment > Task-level monitoring**
=== PAGE: https://www.union.ai/docs/v1/serverless/user-guide/core-concepts/tasks/task-hardware-environment/customizing-task-resources ===
# Customizing task resources
When defining a task function, you can specify resource requirements for the pod that runs the task.
{{< key product_name >}} will take this into account to ensure that the task pod is scheduled to run on a Kubernetes node that meets the specified resource profile.
Resources are specified in the `@{{< key kit_as >}}.task` decorator. Here is an example:
```python
from flytekit.extras.accelerators import A100
@{{< key kit_as >}}.task(
requests=Resources(mem="120Gi", cpu="44", ephemeral_storage="100Gi"),
limits=Resources(mem="200Gi", cpu="100", gpu="12", ephemeral_storage="200Gi"),
accelerator=GPUAccelerator("nvidia-tesla-a100")
)
def my_task()
...
```
There are three separate resource-related settings:
* `requests`
* `limits`
* `accelerator`
## The `requests` and `limits` settings
The `requests` and `limits` settings each takes a [`Resource`]() object, which itself has five possible attributes:
* `cpu`: Number of CPU cores (in whole numbers or millicores (`m`)).
* `gpu`: Number of GPU cores (in whole numbers or millicores (`m`)).
* `mem`: Main memory (in `Mi`, `Gi`, etc.).
* `ephemeral_storage`: Ephemeral storage (in `Mi`, `Gi` etc.).
Note that CPU and GPU allocations can be specified either as whole numbers or in millicores (`m`). For example, `cpu="2500m"` means two and a half CPU cores and `gpu="3000m"`, meaning three GPU cores.
The `requests` setting tells the system that the task requires _at least_ the resources specified and therefore the pod running this task should be scheduled only on a node that meets or exceeds the resource profile specified.
The `limits` setting serves as a hard upper bound on the resource profile of nodes to be scheduled to run the task.
The task will not be scheduled on a node that exceeds the resource profile specified (in any of the specified attributes).
> [!NOTE] GPUs take only `limits`
> GPUs should only be specified in the `limits` section of the task decorator:
> * You should specify GPU requirements only in `limits`, not in `requests`, because Kubernetes will use the `limits` value as the `requests` value anyway.
> * You _can_ specify GPU in both `limits` and `requests` but the two values must be equal.
> * You cannot specify GPU `requests` without specifying `limits`.
## The `accelerator` setting
The `accelerator` setting further specifies the *type* of GPU required for the task.
See **Core concepts > Tasks > Task hardware environment > Accelerators** for more information.
## Execution defaults and resource quotas
The execution defaults and resource quotas can be found on the right sidebar of the Dashboard.
They can be edited by selecting the gear icon:

This will open a dialog:

> [!NOTE]
> An ephemeral storage default value of zero means that the task pod will consume storage on the node as needed.
> This makes it possible for a pod to get evicted if a node doesn't have enough storage. If your tasks are built to rely on
> ephemeral storage, we recommend being explicit with the ephemeral storage you request to avoid pod eviction.
## Task resource validation
If you attempt to execute a workflow with unsatisfiable resource requests, the execution will fail immediately rather than being allowed to queue forever.
To remedy such a failure, you should make sure that the appropriate node types are specified in the task decorator (via the `requests`, `limits`, `accelerator`, or other parameters).
## The `with_overrides` method
When `requests`, `limits`, or `accelerator` are specified in the `@{{< key kit_as >}}.task` decorator, they apply every time that a task is invoked from a workflow.
In some cases, you may wish to change the resources specified from one invocation to another.
To do that, use the [`with_overrides` method](../../../../api-reference/flytekit-sdk/packages/flytekit.core.node#with_overrides) of the task function.
For example:
```python
@{{< key kit_as >}}.task
def my_task(ff: FlyteFile):
...
@{{< key kit_as >}}.workflow
def my_workflow():
my_task(ff=smallFile)
my_task(ff=bigFile).with_overrides(requests=Resources(mem="120Gi", cpu="10"))
```
=== PAGE: https://www.union.ai/docs/v1/serverless/user-guide/core-concepts/tasks/task-hardware-environment/accelerators ===
# Accelerators
{{< key product_name >}} allows you to specify **Core concepts > Tasks > Task hardware environment > Customizing task resources** for the number of GPUs available for a given task.
However, in some cases, you may want to be more specific about the type of GPU to be used.
You can use the `accelerator` parameter to specify specific GPU types.
{{< key product_name >}} Serverless comes with three GPU types available:
* **Core concepts > Tasks > Task hardware environment > Accelerators > NVIDIA T4 Tensor Core GPU**
* **Core concepts > Tasks > Task hardware environment > Accelerators > NVIDIA L4 Tensor Core GPU**
* **Core concepts > Tasks > Task hardware environment > Accelerators > NVIDIA A100 GPU**
Pricing for these GPUs can found on the [{{< key product_name >}} Pricing page](https://www.union.ai/pricing#:~:text=*Serverless%20compute%20pricing).
## NVIDIA T4 Tensor Core GPU
The **NVIDIA T4 Tensor Core GPU** is the default.
To use it for a task, specify the number of GPUs required in the `limits` parameter:
```python
@{{< key kit_as >}}.task(
limits=Resources(gpu="1")
)
def my_task():
...
```
Or, you can explicitly specify the `accelerator` parameter as follows:
```python
@{{< key kit_as >}}.task(
limits=Resources(gpu="1"),
accelerator=GPUAccelerator("nvidia-tesla-t4")
)
def my_task():
...
```
## NVIDIA L4 Tensor Core GPU
To use the **NVIDIA L4 Tensor Core GPU** for a task, you must specify the number of GPUs required in the `limits` parameter, and also specify the `accelerator` parameter as follows:
```python
from flytekit.extras.accelerators import L4
@{{< key kit_as >}}.task(
requests=Resources(gpu="1"),
accelerator=L4,
)
def my_task():
...
```
## NVIDIA A100 GPU
To use the **NVIDIA A100 GPU** for a task you must specify the number of GPUs required in the `limits` parameter, and also specify the `accelerator` parameter as follows:
```python
@{{< key kit_as >}}.task(
requests=Resources(gpu="1"),
accelerator=GPUAccelerator("nvidia-tesla-a100"),
)
def my_task():
...
```
=== PAGE: https://www.union.ai/docs/v1/serverless/user-guide/core-concepts/tasks/task-hardware-environment/retries-and-timeouts ===
# Retries and timeouts
## Retry types
{{< key product_name >}} allows you to automatically retry failing tasks. This section explains the configuration and application of retries.
Errors causing task failure are categorized into two main types, influencing the retry logic differently:
* `SYSTEM`: These errors arise from infrastructure-related failures, such as hardware malfunctions or network issues.
They are typically transient and can often be resolved with a retry.
* `USER`: These errors are due to issues in the user-defined code, like a value error or a logic mistake, which usually require code modifications to resolve.
## Configuring retries
Retries in {{< key product_name >}} are configurable to address both `USER` and `SYSTEM` errors, allowing for tailored fault tolerance strategies:
`USER` error can be handled by setting the `retries` attribute in the task decorator to define how many times a task should retry.
This requires a `FlyteRecoverableException` to be raised in the task definition, any other exception will not be retried:
```python
import random
from flytekit import task
from flytekit.exceptions.user import FlyteRecoverableException
@task(retries=3)
def compute_mean(data: List[float]) -> float:
if random() < 0.05:
raise FlyteRecoverableException("Something bad happened 🔥")
return sum(data) / len(data)
```
## Retrying interruptible tasks
Tasks marked as interruptible can be preempted and retried without counting against the USER error budget.
This is useful for tasks running on preemptible compute resources like spot instances.
See **Core concepts > Tasks > Task hardware environment > Interruptible instances**
## Retrying map tasks
For map tasks, the interruptible behavior aligns with that of regular tasks. The retries field in the task annotation is not necessary for handling SYSTEM errors, as these are managed by the platform’s configuration. Alternatively, the USER budget is set by defining retries in the task decorator.
See **Core concepts > Tasks > Map Tasks**.
## Timeouts
To protect against zombie tasks that hang due to system-level issues, you can supply the timeout argument to the task decorator to make sure that problematic tasks adhere to a maximum runtime.
In this example, we make sure that the task is terminated after it’s been running for more that one hour.
```python
from datetime import timedelta
@task(timeout=timedelta(hours=1))
def compute_mean(data: List[float]) -> float:
return sum(data) / len(data)
```
Notice that the timeout argument takes a built-in Python `timedelta` object.
=== PAGE: https://www.union.ai/docs/v1/serverless/user-guide/core-concepts/tasks/task-hardware-environment/task-level-monitoring ===
# Task-level monitoring
In the **Core concepts > Workflows > Viewing workflow executions**, selecting a task within the list will open the right panel.
In that panel, you will find the **View Utilization** button:

Clicking this will take you to the **task-level monitoring** page:

## Execution Resources
This tab displays details about the resources used by this specific task.
As an example, let's say that the definition of this task in your Python code has the following task decorator:
```python
@{{< key kit_as >}}.task(
requests=Resources(cpu="44", mem="120Gi"),
limits=Resources(cpu="44", mem="120Gi")
)
```
These parameters are reflected in the displayed **Memory Quota** and **CPU Cores Quota** charts as explained below:
### Memory Quota

This chart shows the memory consumption of the task.
* **Limit** refers to the value of the `limits.mem` parameter (the `mem` parameter within the `Resources` object assigned to `limits`)
* **Allocated** refers to the maximum of the value of the `requests.mem` parameter (the `mem` parameter within the `Resources` object assigned to `requests`) the amount of memory actually used by the task.
* **Used** refers to the actual memory used by the task.
This chart displays the ratio of memory used over memory requested, as a percentage.
Since the memory used can sometimes exceed the memory requested, this percentage may exceed 100.
### CPU Cores Quota

This chart displays the number of CPU cores being used.
* **Limit** refers to the value of the `limits.cpu` parameter (the `cpu` parameter within the `Resources` object assigned to `limits`)
* **Allocated** refers to the value of the `requests.cpu` parameter (the `cpu` parameter within the `Resources` object assigned to `requests`)
* **Used** refers to the actual number of CPUs used by the task.
### GPU Memory Utilization

This chart displays the amount of GPU memory used for each GPU.
### GPU Utilization

This chart displays the GPU core utilization as a percentage of the GPUs allocated (the `requests.gpu` parameter).
## Execution Logs (Preview)

This tab is a preview feature that displays the `stdout` (the standard output) of the container running the task.
Currently, it only shows content while the task is actually running.
## Map Tasks
When the task you want to monitor is a **map task**, accessing the utilization data is a bit different.
Here is the task execution view of map task. Open the drop-down to reveal each subtask within the map task:

Drill down by clicking on one of the subtasks:

This will bring you to the individual subtask information panel, where the **View Utilization** button for the subtask can be found:

Clicking on View Utilization will take you to the task-level monitoring page for the subtask, which will have the same structure and features as the task-level monitoring page for a standard task (see above).
=== PAGE: https://www.union.ai/docs/v1/serverless/user-guide/core-concepts/launch-plans ===
# Launch plans
A launch plan is a template for a workflow invocation.
It brings together:
* A **Core concepts > Workflows**
* A (possibly partial) set of inputs required to initiate that workflow
* Optionally, **Core concepts > Launch plans > Notifications** and **Core concepts > Launch plans > Schedules**
When invoked, the launch plan starts the workflow, passing the inputs as parameters.
If the launch plan does not contain the entire set of required workflow inputs, additional input arguments must be provided at execution time.
## Default launch plan
Every workflow automatically comes with a *default launch plan*.
This launch plan does not define any default inputs, so they must all be provided at execution time.
A default launch plan always has the same name as its workflow.
## Launch plans are versioned
Like tasks and workflows, launch plans are versioned.
A launch plan can be updated to change, for example, the set of inputs, the schedule, or the notifications.
Each update creates a new version of the launch plan.
## Custom launch plans
Additional launch plans, other than the default one, can be defined for any workflow.
In general, a given workflow can be associated with multiple launch plans, but a given launch plan is always associated with exactly one workflow.
## Viewing launch plans for a workflow
To view the launch plans for a given workflow, in the UI, navigate to the workflow's page and click **Launch Workflow**.
You can choose which launch plan to use to launch the workflow from the **Launch Plan** dropdown menu.
The default launch plan will be selected by default. If you have not defined any custom launch plans for the workflow, only the default plan will be available.
If you have defined one or more custom launch plans, they will be available in the dropdown menu along with the default launch plan.
For more details, see **Core concepts > Launch plans > Running launch plans**.
## Registering a launch plan
### Registering a launch plan on the command line
In most cases, launch plans are defined alongside the workflows and tasks in your project code and registered as a bundle with the other entities using the CLI (see **Development cycle > Running your code**).
### Registering a launch plan in Python with `{{< key kit_remote >}}`
As with all {{< key product_name >}} command line actions, you can also perform registration of launch plans programmatically with [`{{< key kit_remote >}}`](../../development-cycle/union-remote), specifically, `{{< key kit_remote >}}.register_launch_plan`.
### Results of registration
When the code above is registered to {{< key product_name >}}, it results in the creation of four objects:
* The task `workflows.launch_plan_example.my_task`
* The workflow `workflows.launch_plan_example.my_workflow`
* The default launch plan `workflows.launch_plan_example.my_workflow` (notice that it has the same name as the workflow)
* The custom launch plan `my_workflow_custom_lp` (this is the one we defined in the code above)
### Changing a launch plan
Launch plans are changed by altering their definition in code and re-registering.
When a launch plan with the same project, domain, and name as a preexisting one is re-registered, a new version of that launch plan is created.
## Subpages
- **Core concepts > Launch plans > Defining launch plans**
- **Core concepts > Launch plans > Viewing launch plans**
- **Core concepts > Launch plans > Notifications**
- **Core concepts > Launch plans > Schedules**
- **Core concepts > Launch plans > Activating and deactivating**
- **Core concepts > Launch plans > Running launch plans**
- **Core concepts > Launch plans > Reference launch plans**
- **Core concepts > Launch plans > Mapping over launch plans**
- **Core concepts > Launch plans > Reactive workflows**
- **Core concepts > Launch plans > Concurrency control**
=== PAGE: https://www.union.ai/docs/v1/serverless/user-guide/core-concepts/launch-plans/defining-launch-plans ===
# Defining launch plans
You can define a launch plan with the [`LaunchPlan` class](../../../api-reference/flytekit-sdk/packages/flytekit.core.launch_plan).
This is a simple example of defining a launch plan:
```python
import {{< key kit_import >}}
@{{< key kit_as >}}.workflow
def my_workflow(a: int, b: str) -> str:
return f"Result: {a} and {b}"
# Create a default launch plan
default_lp = @{{< key kit_as >}}.LaunchPlan.get_or_create(workflow=my_workflow)
# Create a named launch plan
named_lp = @{{< key kit_as >}}.LaunchPlan.get_or_create(
workflow=my_workflow,
name="my_custom_launch_plan"
)
```
## Default and Fixed Inputs
Default inputs can be overridden at execution time, while fixed inputs cannot be changed.
```python
import {{< key kit_import >}}
# Launch plan with default inputs
lp_with_defaults = {{< key kit_as >}}.LaunchPlan.get_or_create(
workflow=my_workflow,
name="with_defaults",
default_inputs={"a": 42, "b": "default_value"}
)
# Launch plan with fixed inputs
lp_with_fixed = {{< key kit_as >}}.LaunchPlan.get_or_create(
workflow=my_workflow,
name="with_fixed",
fixed_inputs={"a": 100} # 'a' will always be 100, only 'b' can be specified
)
# Combining default and fixed inputs
lp_combined = {{< key kit_as >}}.LaunchPlan.get_or_create(
workflow=my_workflow,
name="combined_inputs",
default_inputs={"b": "default_string"},
fixed_inputs={"a": 200}
)
```
## Scheduled Execution
```python
import {{< key kit_import >}}
from datetime import timedelta
from flytekit.core.schedule import CronSchedule, FixedRate
# Using a cron schedule (runs at 10:00 AM UTC every Monday)
cron_lp = {{< key kit_as >}}.LaunchPlan.get_or_create(
workflow=my_workflow,
name="weekly_monday",
default_inputs={"a": 1, "b": "weekly"},
schedule=CronSchedule(
schedule="0 10 * * 1", # Cron expression: minute hour day-of-month month day-of-week
kickoff_time_input_arg=None
)
)
# Using a fixed rate schedule (runs every 6 hours)
fixed_rate_lp = {{< key kit_as >}}.LaunchPlan.get_or_create(
workflow=my_workflow,
name="every_six_hours",
default_inputs={"a": 1, "b": "periodic"},
schedule=FixedRate(
duration=timedelta(hours=6)
)
)
```
## Labels and Annotations
Labels and annotations help with organization and can be used for filtering or adding metadata.
```python
import {{< key kit_import >}}
from flytekit.models.common import Labels, Annotations
# Adding labels and annotations
lp_with_metadata = {{< key kit_as >}}.LaunchPlan.get_or_create(
workflow=my_workflow,
name="with_metadata",
default_inputs={"a": 1, "b": "metadata"},
labels=Labels({"team": "data-science", "env": "staging"}),
annotations=Annotations({"description": "Launch plan for testing", "owner": "jane.doe"})
)
```
## Execution Parameters
```python
import {{< key kit_import >}}
# Setting max parallelism to limit concurrent task execution
lp_with_parallelism = {{< key kit_as >}}.LaunchPlan.get_or_create(
workflow=my_workflow,
name="with_parallelism",
default_inputs={"a": 1, "b": "parallel"},
max_parallelism=10 # Only 10 task nodes can run concurrently
)
# Disable caching for this launch plan's executions
lp_no_cache = {{< key kit_as >}}.LaunchPlan.get_or_create(
workflow=my_workflow,
name="no_cache",
default_inputs={"a": 1, "b": "fresh"},
overwrite_cache=True # Always execute fresh, ignoring cached results
)
# Auto-activate on registration
lp_auto_activate = {{< key kit_as >}}.LaunchPlan.get_or_create(
workflow=my_workflow,
name="auto_active",
default_inputs={"a": 1, "b": "active"},
auto_activate=True # Launch plan will be active immediately after registration
)
```
## Security and Authentication
We can also override the auth role (either an iam role or a kubernetes service account) used to execute a launch plan.
```python
import {{< key kit_import >}}
from flytekit.models.common import AuthRole
from flytekit import SecurityContext
# Setting auth role for the launch plan
lp_with_auth = {{< key kit_as >}}.LaunchPlan.get_or_create(
workflow=my_workflow,
name="with_auth",
default_inputs={"a": 1, "b": "secure"},
auth_role=AuthRole(
assumable_iam_role="arn:aws:iam::12345678:role/my-execution-role"
)
)
# Setting security context
lp_with_security = {{< key kit_as >}}.LaunchPlan.get_or_create(
workflow=my_workflow,
name="with_security",
default_inputs={"a": 1, "b": "context"},
security_context=SecurityContext(
run_as=SecurityContext.K8sServiceAccount(name="my-service-account")
)
)
```
## Raw Output Data Configuration
```python
from flytekit.models.common import RawOutputDataConfig
# Configure where large outputs should be stored
lp_with_output_config = LaunchPlan.get_or_create(
workflow=my_workflow,
name="with_output_config",
default_inputs={"a": 1, "b": "output"},
raw_output_data_config=RawOutputDataConfig(
output_location_prefix="s3://my-bucket/workflow-outputs/"
)
)
```
## Putting It All Together
A pretty comprehensive example follows below. This custom launch plan has d
```python
comprehensive_lp = LaunchPlan.get_or_create(
workflow=my_workflow,
name="comprehensive_example",
default_inputs={"b": "configurable"},
fixed_inputs={"a": 42},
schedule=CronSchedule(schedule="0 9 * * *"), # Daily at 9 AM UTC
notifications=[
Notification(
phases=["SUCCEEDED", "FAILED"],
email=EmailNotification(recipients_email=["team@example.com"])
)
],
labels=Labels({"env": "production", "team": "data"}),
annotations=Annotations({"description": "Daily data processing"}),
max_parallelism=20,
overwrite_cache=False,
auto_activate=True,
auth_role=AuthRole(assumable_iam_role="arn:aws:iam::12345678:role/workflow-role"),
raw_output_data_config=RawOutputDataConfig(
output_location_prefix="s3://results-bucket/daily-run/"
)
)
```
These examples demonstrate the flexibility of Launch Plans in Flyte, allowing you to customize execution parameters, inputs, schedules, and more to suit your workflow requirements.
=== PAGE: https://www.union.ai/docs/v1/serverless/user-guide/core-concepts/launch-plans/viewing-launch-plans ===
# Viewing launch plans
## Viewing launch plans in the UI
Select **Launch Plans** in the sidebar to display a list of all the registered launch plans in the project and domain:

You can search the launch plans by name and filter for only those that are archived.
The columns in the launch plans table are defined as follows:
* **Name**: The name of the launch plan. Click to inspect a specific launch plan in detail.
* **Triggers**:
* If the launch plan is active, a green **Active** badge is shown. When a launch plan is active, any attached schedule will be in effect and the launch plan will be invoked according to that schedule.
* Shows whether the launch plan has a **Core concepts > Launch plans > Reactive workflows**. To filter for only those launch plans with a trigger, check the **Has Triggers** box in the top right.
* **Last Execution**: The last execution timestamp of this launch plan, irrespective of how the last execution was invoked (by schedule, by trigger, or manually).
* **Last 10 Executions**: A visual representation of the last 10 executions of this launch plan, irrespective of how these executions were invoked (by schedule, by trigger, or manually).
Select an entry on the list to go to that specific launch plan:

Here you can see:
* **Launch Plan Detail (Latest Version)**:
* **Expected Inputs**: The input and output types for the launch plan.
* **Fixed Inputs**: If the launch plan includes predefined input values, they are shown here.
* **Launch Plan Versions**: A list of all versions of this launch plan.
* **All executions in the Launch Plan**: A list of all executions of this launch plan.
In the top right you can see if this launch plan is active (and if it is, which version, specifically, is active). There is also a control for changing the active version or deactivating the launch plan entirely.
See **Core concepts > Launch plans > Activating and deactivating** for more details.
## Viewing launch plans in Python with `{{< key kit_remote >}}`
Use the method `{{< key kit_remote >}}.client.list_launch_plans_paginated` to get the list of launch plans.
=== PAGE: https://www.union.ai/docs/v1/serverless/user-guide/core-concepts/launch-plans/notifications ===
# Notifications
A launch plan may be associated with one or more notifications, which are triggered when the launch plan's workflow is completed.
There are three types of notifications:
* `Email`: Sends an email to the specified recipients.
* `PagerDuty`: Sends a PagerDuty notification to the PagerDuty service (with recipients specified).
PagerDuty then forwards the notification as per your PagerDuty configuration.
* `Slack`: Sends a Slack notification to the email address of a specified channel. This requires that you configure your Slack account to accept notifications.
Separate notifications can be sent depending on the specific end state of the workflow. The options are:
* `WorkflowExecutionPhase.ABORTED`
* `WorkflowExecutionPhase.FAILED`
* `WorkflowExecutionPhase.SUCCEEDED`
* `WorkflowExecutionPhase.TIMED_OUT`
For example:
```python
from datetime import datetime
import {{< key kit_import >}}
from flytekit import (
WorkflowExecutionPhase,
Email,
PagerDuty,
Slack
)
@{{< key kit_as >}}.task
def add_numbers(a: int, b: int, c: int) -> int:
return a + b + c
@{{< key kit_as >}}.task
def generate_message(s: int, kickoff_time: datetime) -> str:
return f"sum: {s} at {kickoff_time}"
@{{< key kit_as >}}.workflow
def my_workflow(a: int, b: int, c: int, kickoff_time: datetime) -> str:
return generate_message(
add_numbers(a, b, c),
kickoff_time,
)
{{< key kit_as >}}.LaunchPlan.get_or_create(
workflow=my_workflow,
name="my_workflow_custom_lp",
fixed_inputs={"a": 3},
default_inputs={"b": 4, "c": 5},
notifications=[
Email(
phases=[WorkflowExecutionPhase.FAILED],
recipients_email=["me@example.com", "you@example.com"],
),
PagerDuty(
phases=[WorkflowExecutionPhase.SUCCEEDED],
recipients_email=["myboss@example.com"],
),
Slack(
phases=[
WorkflowExecutionPhase.SUCCEEDED,
WorkflowExecutionPhase.ABORTED,
WorkflowExecutionPhase.TIMED_OUT,
],
recipients_email=["your_slack_channel_email"],
),
],
)
```
=== PAGE: https://www.union.ai/docs/v1/serverless/user-guide/core-concepts/launch-plans/schedules ===
# Schedules
Launch plans let you schedule the invocation of your workflows.
A launch plan can be associated with one or more schedules, where at most one schedule is active at any one time.
If a schedule is activated on a launch plan, the workflow will be invoked automatically by the system at the scheduled time with the inputs provided by the launch plan. Schedules can be either fixed-rate or `cron`-based.
To set up a schedule, you can use the `schedule` parameter of the `LaunchPlan.get_or_create()` method.
## Fixed-rate schedules
In the following example we add a [FixedRate](../../../api-reference/flytekit-sdk/packages/flytekit.core.schedule#flytekitcoreschedulefixedrate) that will invoke the workflow every 10 minutes.
```python
from datetime import timedelta
import {{< key kit_import >}}
from flytekit import FixedRate
@{{< key kit_as >}}.task
def my_task(a: int, b: int, c: int) -> int:
return a + b + c
@{{< key kit_as >}}.workflow
def my_workflow(a: int, b: int, c: int) -> int:
return my_task(a=a, b=b, c=c)
{{< key kit_as >}}.LaunchPlan.get_or_create(
workflow=my_workflow,
name="my_workflow_custom_lp",
fixed_inputs={"a": 3},
default_inputs={"b": 4, "c": 5},
schedule=FixedRate(
duration=timedelta(minutes=10)
)
)
```
Above, we defined the duration of the `FixedRate` schedule using `minutes`.
Fixed rate schedules can also be defined using `days` or `hours`.
## Cron schedules
A [`CronSchedule`](../../../api-reference/flytekit-sdk/packages/flytekit.core.schedule#flytekitcoreschedulecronschedule) allows you to specify a schedule using a `cron` expression:
```python
import {{< key kit_import >}}
from flytekit import CronSchedule
@{{< key kit_as >}}.task
def my_task(a: int, b: int, c: int) -> int:
return a + b + c
@{{< key kit_as >}}.workflow
def my_workflow(a: int, b: int, c: int) -> int:
return my_task(a=a, b=b, c=c)
{{< key kit_as >}}.LaunchPlan.get_or_create(
workflow=my_workflow,
name="my_workflow_custom_lp",
fixed_inputs={"a": 3},
default_inputs={"b": 4, "c": 5},
schedule=CronSchedule(
schedule="*/10 * * * *"
)
)
```
### Cron expression format
A `cron` expression is a string that defines a schedule using five space-separated fields, each representing a time unit.
The format of the string is:
```
minute hour day-of-month month day-of-week
```
Each field can contain values and special characters.
The fields are defined as follows:
| Field | Values | Special characters |
|----------------|---------------------|--------------------|
| `minute` | `0-59` | `* / , -` |
| `hour` | `0-23` | `* / , -` |
| `day-of-month` | `1-31` | `* / , - ?` |
| `month` | `1-12` or `JAN-DEC` | `* / , -` |
| `day-of-week` | `0-6` or` SUN-SAT` | `* / , - ?` |
* The `month` and `day-of-week` abbreviations are not case-sensitive.
* The `,` (comma) is used to specify multiple values.
For example, in the `month` field, `JAN,FEB,MAR` means every January, February, and March.
* The `-` (dash) specifies a range of values.
For example, in the `day-of-month` field, `1-15` means every day from `1` through `15` of the specified month.
* The `*` (asterisk) specifies all values of the field.
For example, in the `hour` field, `*` means every hour (on the hour), from `0` to `23`.
You cannot use `*` in both the `day-of-month` and `day-of-week` fields in the same `cron` expression.
If you use it in one, you must use `?` in the other.
* The `/` (slash) specifies increments.
For example, in the `minute` field, `1/10` means every tenth minute, starting from the first minute of the hour (that is, the 11th, 21st, and 31st minute, and so on).
* The `?` (question mark) specifies any value of the field.
For example, in the `day-of-month` field you could enter `7` and, if any day of the week was acceptable, you would enter `?` in the `day-of-week` field.
### Cron expression examples
| Expression | Description |
|--------------------|-------------------------------------------|
| `0 0 * * *` | Midnight every day. |
| `0 12 * * MON-FRI` | Noon every weekday. |
| `0 0 1 * *` | Midnight on the first day of every month. |
| `0 0 * JAN,JUL *` | Midnight every day in January and July. |
| `*/5 * * * *` | Every five minutes. |
| `30 2 * * 1` | At 2:30 AM every Monday. |
| `0 0 15 * ?` | Midnight on the 15th of every month. |
### Cron aliases
The following aliases are also available.
An alias is used in place of an entire `cron` expression.
| Alias | Description | Equivalent to |
|------------|------------------------------------------------------------------|-----------------|
| `@yearly` | Once a year at midnight at the start of 1 January. | `0 0 1 1 *` |
| `@monthly` | Once a month at midnight at the start of first day of the month. | `0 0 1 * *` |
| `@weekly` | Once a week at midnight at the start of Sunday. | `0 0 * * 0` |
| `@daily` | Once a day at midnight. | `0 0 * * *` |
| `@hourly` | Once an hour at the beginning of the hour. | `0 * * * *` |
## kickoff_time_input_arg
Both `FixedRate` and `CronSchedule` can take an optional parameter called `kickoff_time_input_arg`
This parameter is used to specify the name of a workflow input argument.
Each time the system invokes the workflow via this schedule, the time of the invocation will be passed to the workflow through the specified parameter.
For example:
```python
from datetime import datetime, timedelta
import {{< key kit_import >}}
from flytekit import FixedRate
@{{< key kit_as >}}.task
def my_task(a: int, b: int, c: int) -> int:
return a + b + c
@{{< key kit_as >}}.workflow
def my_workflow(a: int, b: int, c: int, kickoff_time: datetime ) -> str:
return f"sum: {my_task(a=a, b=b, c=c)} at {kickoff_time}"
{{< key kit_as >}}.LaunchPlan.get_or_create(
workflow=my_workflow,
name="my_workflow_custom_lp",
fixed_inputs={"a": 3},
default_inputs={"b": 4, "c": 5},
schedule=FixedRate(
duration=timedelta(minutes=10),
kickoff_time_input_arg="kickoff_time"
)
)
```
Here, each time the schedule calls `my_workflow`, the invocation time is passed in the `kickoff_time` argument.
=== PAGE: https://www.union.ai/docs/v1/serverless/user-guide/core-concepts/launch-plans/activating-and-deactivating ===
# Activating and deactivating
You can set an active/inactive status on launch plans. Specifically:
* Among the versions of a given launch plan (as defined by name), at most one can be set to active.
All others are inactive.
* If a launch plan version that has a schedule attached is activated, then its schedule also becomes active and its workflow will be invoked automatically according to that schedule.
* When a launch plan version with a schedule is inactive, its schedule is inactive and will not be used to invoke its workflow.
Launch plans that do not have schedules attached can also have an active version.
For such non-scheduled launch plans, this status serves as a flag that can be used to distinguish one version from among the others.
It can, for example, be used by management logic to determine which version of a launch plan to use for new invocations.
Upon registration of a new launch plan, the first version is automatically inactive.
If it has a schedule attached, the schedule is also inactive.
Once activated, a launch plan version remains active even as new, later, versions are registered.
A launch plan version with a schedule attached can be activated through either the UI, `uctl`, or [`{{< key kit_remote >}}`](../../../user-guide/development-cycle/union-remote).
## Activating and deactivating a launch plan in the UI
To activate a launch plan, go to the launch plan view and click **Add active launch plan** in the top right corner of the screen:

A modal will appear that lets you select which launch plan version to activate:

This modal will contain all versions of the launch plan that have an attached schedule.
Note that at most one version (and therefore at most one schedule) of a launch plan can be active at any given time.
Selecting the launch plan version and clicking **Update** activates the launch plan version and schedule.
The launch plan version and schedule are now activated. The launch plan will be triggered according to the schedule going forward.
> [!WARNING]
> Non-scheduled launch plans cannot be activated via the UI.
> The UI does not support activating launch plans that do not have schedules attached.
> You can activate them with `uctl` or `{{< key kit_remote >}}`.
To deactivate a launch plan, navigate to a launch plan with an active schedule, click the **...** icon in the top-right corner of the screen beside **Active launch plan**, and click “Deactivate”.

A confirmation modal will appear, allowing you to deactivate the launch plan and its schedule.
> [!WARNING]
> Non-scheduled launch plans cannot be deactivated via the UI.
> The UI does not support deactivating launch plans that do not have schedules attached.
> You can deactivate them with `uctl` or `{{< key kit_remote >}}`.
## Activating and deactivating a launch plan in Python with `{{< key kit_remote >}}`
To activate a launch plan using version `{{< key kit_remote >}}`:
```python
from union.remote import {{< key kit_remote >}}
from flytekit.configuration import Config
remote = {{< key kit_remote >}}(config=Config.auto(), default_project=, default_domain=)
launch_plan = remote.fetch_launch_plan(ame=, version=).id
remote.client.update_launch_plan(launch_plan.id, "ACTIVE")
```
To deactivate a launch plan version using `{{< key kit_remote >}}`:
```python
from union.remote import {{< key kit_remote >}}
from flytekit.remote import Config
remote = {{< key kit_remote >}}(config=Config.auto(), default_project=, default_domain=)
launch_plan = remote.fetch_launch_plan(ame=, version=)
remote.client.update_launch_plan(launch_plan.id, "INACTIVE")
```
=== PAGE: https://www.union.ai/docs/v1/serverless/user-guide/core-concepts/launch-plans/running-launch-plans ===
# Running launch plans
## Running a launch plan in the UI
To invoke a launch plan, go to the **Workflows** list, select the desired workflow, click **Launch Workflow**. In the new execution dialog, select the desired launch plan from the **Launch Plan** dropdown menu and click **Launch**.
## Running a launch plan on the command line with `uctl`
To invoke a launch plan via the command line, first generate the execution spec file for the launch plan:
```shell
$ uctl get launchplan \
--project
--domain \
\
--execFile .yaml
```
Then you can execute the launch plan with the following command:
```shell
$ uctl create execution \
--project \
--domain \
--execFile .yaml
```
See **Uctl CLI** for more details.
## Running a launch plan in Python with `{{< key kit_remote >}}`
The following code executes a launch plan using `{{< key kit_remote >}}`:
```python
import {{< key kit_import >}}
from flytekit.remote import Config
remote = {{< key kit_as >}}.{{< key kit_remote >}}(config=Config.auto(), default_project=, default_domain=)
launch_plan = remote.fetch_launch_plan(name=, version=)
remote.execute(launch_plan, inputs=)
```
See the [{{< key kit_remote >}}](../../development-cycle/union-remote) for more details.
## Sub-launch plans
The above invocation examples assume you want to run your launch plan as a top-level entity within your project.
However, you can also invoke a launch plan from *within a workflow*, creating a *sub-launch plan*.
This causes the invoked launch plan to kick off its workflow, passing any parameters specified to that workflow.
This differs from the case of **Core concepts > Workflows > Subworkflows and sub-launch plans** where you invoke one workflow function from within another.
A subworkflow becomes part of the execution graph of the parent workflow and shares the same execution ID and context.
On the other hand, when a sub-launch plan is invoked a full, top-level workflow is kicked off with its own execution ID and context.
See **Core concepts > Workflows > Subworkflows and sub-launch plans** for more details.
=== PAGE: https://www.union.ai/docs/v1/serverless/user-guide/core-concepts/launch-plans/reference-launch-plans ===
# Reference launch plans
A reference launch plan references previously defined, serialized, and registered launch plans. You can reference launch plans from other projects and create workflows that use launch plans declared by others.
When you create a reference launch plan, be sure to verify that the workflow interface corresponds to that of the referenced workflow.
> [!NOTE]
> Reference launch plans cannot be run locally. To test locally, mock them out.
## Example
In this example, we create a reference launch plan for the [`simple_wf`](https://github.com/flyteorg/flytesnacks/blob/master/examples/basics/basics/workflow.py#L25) workflow from the [Flytesnacks repository](https://github.com/flyteorg/flytesnacks).
1. Clone the Flytesnacks repository:
```shell
$ git clone git@github.com:flyteorg/flytesnacks.git
```
2. Navigate to the `basics` directory:
```shell
$ cd flytesnacks/examples/basics
```
3. Register the `simple_wf` workflow:
```shell
$ {{< key cli >}} register --project flytesnacks --domain development --version v1 basics/workflow.py.
```
4. Create a file called `simple_wf_ref_lp.py` and copy the following code into it:
```python
import {{< key kit_import >}}
from flytekit import reference_launch_plan
@reference_launch_plan(
project="flytesnacks",
domain="development",
name="basics.workflow.simple_wf",
version="v1",
)
def simple_wf_lp(
x: list[int], y: list[int]
) -> float:
return 1.0
@{{< key kit_as >}}.workflow
def run_simple_wf() -> float:
x = [-8, 2, 4]
y = [-2, 4, 7]
return simple_wf_lp(x=x, y=y)
```
5. Register the `run_simple_wf` workflow:
```shell
$ {{< key cli >}} register simple_wf_ref_lp.py
```
6. In the {{< key product_name >}} UI, run the workflow `run_simple_wf`.
=== PAGE: https://www.union.ai/docs/v1/serverless/user-guide/core-concepts/launch-plans/mapping-over-launch-plans ===
# Mapping over launch plans
You can map over launch plans the same way you can **Core concepts > Launch plans > Mapping over launch plans > map over tasks** to execute workflows in parallel across a series of inputs.
You can either map over a `LaunchPlan` object defined in one of your Python modules or a **Core concepts > Launch plans > Reference launch plans** that points to a previously registered launch plan.
## Launch plan defined in your code
Here we define a workflow called `interest_workflow` that we want to parallelize, along with a launch plan called `interest_workflow_lp`, in a file we'll call `map_interest_wf.py`.
We then write a separate workflow, `map_interest_wf`, that uses a `map` to parallelize `interest_workflow` over a list of inputs.
```python
import {{< key kit_import >}}
# Task to calculate monthly interest payment on a loan
@{{< key kit_as >}}.task
def calculate_interest(principal: int, rate: float, time: int) -> float:
return (principal * rate * time) / 12
# Workflow using the calculate_interest task
@{{< key kit_as >}}.workflow
def interest_workflow(principal: int, rate: float, time: int) -> float:
return calculate_interest(principal=principal, rate=rate, time=time)
# Create LaunchPlan for interest_workflow
lp = {{< key kit_as >}}.LaunchPlan.get_or_create(
workflow=interest_workflow,
name="interest_workflow_lp",
)
# Mapping over the launch plan to calculate interest for multiple loans
@{{< key kit_as >}}.workflow
def map_interest_wf() -> list[float]:
principal = [1000, 5000, 10000]
rate = [0.05, 0.04, 0.03] # Different interest rates for each loan
time = [12, 24, 36] # Loan periods in months
return {{< key kit_as >}}.{{< key map_func >}}(lp)(principal=principal, rate=rate, time=time)
# Mapping over the launch plan to calculate interest for multiple loans while fixing an input
@{{< key kit_as >}}.workflow
def map_interest_fixed_principal_wf() -> list[float]:
rate = [0.05, 0.04, 0.03] # Different interest rates for each loan
time = [12, 24, 36] # Loan periods in months
# Note: principal is set to 1000 for all the calculations
return {{< key kit_as >}}.{{< key map_func >}}(lp, bound_inputs={'principal':1000})(rate=rate, time=time)
```
You can run the `map_interest` workflow locally:
```shell
$ {{< key cli >}} run map_interest_wf.py map_interest_wf
```
You can also run the `map_interest` workflow remotely on {{< key product_name >}}:
```shell
$ {{< key cli >}} run --remote map_interest_wf.py map_interest_wf
```
## Previously registered launch plan
To demonstrate the ability to map over previously registered launch plans, in this example, we map over the [`simple_wf`](https://github.com/flyteorg/flytesnacks/blob/master/examples/basics/basics/workflow.py#L25) launch plan from the basic workflow example in the [Flytesnacks repository](https://github.com/flyteorg/flytesnacks).
Recall that when a workflow is registered, an associated launch plan is created automatically. One of these launch plans will be leveraged in this example, though custom launch plans can also be used.
1. Clone the Flytesnacks repository:
```shell
$ git clone git@github.com:flyteorg/flytesnacks.git
```
2. Navigate to the `basics` directory:
```shell
$ cd flytesnacks/examples/basics
```
3. Register the `simple_wf` workflow:
```shell
$ {{< key cli >}} register --project flytesnacks --domain development --version v1 basics/workflow.py
```
Note that the `simple_wf` workflow is defined as follows:
```python
@{{< key kit_as >}}.workflow
def simple_wf(x: list[int], y: list[int]) -> float:
slope_value = slope(x=x, y=y)
intercept_value = intercept(x=x, y=y, slope=slope_value)
return intercept_value
```
4. Create a file called `map_simple_wf.py` and copy the following code into it:
```python
import {{< key kit_import >}}
from flytekit import reference_launch_plan
@reference_launch_plan(
project="flytesnacks",
domain="development",
name="basics.workflow.simple_wf",
version="v1",
)
def simple_wf_lp(
x: list[int], y: list[int]
) -> float:
pass
@{{< key kit_as >}}.workflow
def map_simple_wf() -> list[float]:
x = [[-3, 0, 3], [-8, 2, 4], [7, 3, 1]]
y = [[7, 4, -2], [-2, 4, 7], [3, 6, 4]]
return {{< key kit_as >}}.{{< key map_func >}}(simple_wf_lp)(x=x, y=y)
```
Note the fact that the reference launch plan has an interface that corresponds exactly to the registered `simple_wf` we wish to map over.
5. Register the `map_simple_wf` workflow. Reference launch plans cannot be run locally, so we will register the `map_simple_wf` workflow to {{< key product_name >}} and run it remotely.
```shell
$ {{< key cli >}} register map_simple_wf.py
```
6. In the {{< key product_name >}} UI, run the `map_simple_wf` workflow.
=== PAGE: https://www.union.ai/docs/v1/serverless/user-guide/core-concepts/launch-plans/reactive-workflows ===
# Reactive workflows
Reactive workflows leverage **Core concepts > Artifacts** as the medium of exchange between workflows, such that when an upstream workflow emits an artifact, an artifact-driven trigger in a downstream workflow passes the artifact to a new downstream workflow execution.
A trigger is a rule defined in a launch plan that specifies that when a certain event occurs -- for instance, a new version of a particular artifact is materialized -- a particular launch plan will be executed. Triggers allow downstream data consumers, such as machine learning engineers, to automate their workflows to react to the output of upstream data producers, such as data engineers, while maintaining separation of concerns and eliminating the need for staggered schedules and manual executions.
Updating any trigger associated with a launch plan will create a new version of the launch plan, similar to how schedules are handled today. This means that multiple launch plans, each with different triggers, can be created to act on the same underlying workflow. Launch plans with triggers must be activated in order for the trigger to work.
> [!NOTE]
> Currently, there are only artifact event-based triggers, but in the future, triggers will be expanded to include other event-based workflow triggering mechanisms.
## Scope
Since a trigger is part of a launch plan, it is scoped as follows:
* Project
* Domain
* Launch plan name
* Launch plan version
## Trigger types
### Artifact events
An artifact event definition contains the following:
* Exactly one artifact that will activate the trigger when a new version of the artifact is created
* A workflow that is the target of the trigger
* (Optionally) Inputs to the workflow that will be executed by the trigger. It is possible to pass information from the source artifact, the source artifact itself, and other artifacts to the workflow that will be triggered.
For more information, see **Core concepts > Artifacts > Connecting workflows with artifact event triggers**.
=== PAGE: https://www.union.ai/docs/v1/serverless/user-guide/core-concepts/launch-plans/concurrency-control ===
# Concurrency control
Concurrency control allows you to limit the number of concurrently running workflow executions for a specific launch plan, identified by its unique `project`, `domain`, and `name`.
This control is applied across all versions of that launch plan.
> [!NOTE]
> To clone and run the example code on this page, see the [Flytesnacks repo](https://github.com/flyteorg/flytesnacks/tree/master/examples/productionizing/).
## How it works
When a new execution for a launch plan with a `ConcurrencyPolicy` is requested, Flyte performs a check to count the number of currently active executions for that same launch plan (`project/domain/name`), irrespective of their versions.
This check is done using a database query that joins the `executions` table with the `launch_plans` table.
It filters for executions that are in an active phase (e.g., `QUEUED`, `RUNNING`, `ABORTING`, etc.) and belong to the launch plan name being triggered.
If the number of active executions is already at or above the `max_concurrency` limit defined in the policy of the launch plan version being triggered, the new execution will be handled according to the specified `behavior`.
## Basic usage
Here's an example of how to define a launch plan with concurrency control:
```python
from flytekit import ConcurrencyPolicy, ConcurrencyLimitBehavior, LaunchPlan, workflow
@workflow
def my_workflow() -> str:
return "Hello, World!"
# Create a launch plan with concurrency control
concurrency_limited_lp = LaunchPlan.get_or_create(
name="my_concurrent_lp",
workflow=my_workflow,
concurrency=ConcurrencyPolicy(
max_concurrency=3,
behavior=ConcurrencyLimitBehavior.SKIP,
),
)
```
## Scheduled workflows with concurrency control
Concurrency control is particularly useful for scheduled workflows to prevent overlapping executions:
```python
from flytekit import ConcurrencyPolicy, ConcurrencyLimitBehavior, CronSchedule, LaunchPlan, workflow
@workflow
def scheduled_workflow() -> str:
# This workflow might take a long time to complete
return "Processing complete"
# Create a scheduled launch plan with concurrency control
scheduled_lp = LaunchPlan.get_or_create(
name="my_scheduled_concurrent_lp",
workflow=scheduled_workflow,
concurrency=ConcurrencyPolicy(
max_concurrency=1, # Only allow one execution at a time
behavior=ConcurrencyLimitBehavior.SKIP,
),
schedule=CronSchedule(schedule="*/5 * * * *"), # Runs every 5 minutes
)
```
## Defining the policy
A `ConcurrencyPolicy` is defined with two main parameters:
- `max_concurrency` (integer): The maximum number of workflows that can be running concurrently for this launch plan name.
- `behavior` (enum): What to do when the `max_concurrency` limit is reached. Currently, only `SKIP` is supported, which means new executions will not be created if the limit is hit.
```python
from flytekit import ConcurrencyPolicy, ConcurrencyLimitBehavior
policy = ConcurrencyPolicy(
max_concurrency=5,
behavior=ConcurrencyLimitBehavior.SKIP
)
```
## Key behaviors and considerations
### Version-agnostic check, version-specific enforcement
The concurrency check counts all active workflow executions of a given launch plan (`project/domain/name`).
However, the enforcement (i.e., the `max_concurrency` limit and `behavior`) is based on the `ConcurrencyPolicy` defined in the specific version of the launch plan you are trying to launch.
**Example scenario:**
1. Launch plan `MyLP` version `v1` has a `ConcurrencyPolicy` with `max_concurrency = 3`.
2. Three executions of `MyLP` (they could be `v1` or any other version) are currently running.
3. You try to launch `MyLP` version `v2`, which has a `ConcurrencyPolicy` with `max_concurrency = 10`.
- **Result**: This `v2` execution will launch successfully because its own limit (10) is not breached by the current 3 active executions.
4. Now, with 4 total active executions (3 original + the new `v2`), you try to launch `MyLP` version `v1` again.
- **Result**: This `v1` execution will **fail**. The check sees 4 active executions, and `v1`'s policy only allows a maximum of 3.
### Concurrency limit on manual trigger
Upon manual trigger of an execution (via `pyflyte` for example) which would breach the concurrency limit, you should see this error in the console:
```bash
_InactiveRpcError:
<_InactiveRpcError of RPC that terminated with:
status = StatusCode.RESOURCE_EXHAUSTED
details = "Concurrency limit (1) reached for launch plan my_workflow_lp. Skipping execution."
>
```
### Scheduled execution behavior
When the scheduler attempts to trigger an execution and the concurrency limit is met, the creation will fail and the error message from FlyteAdmin will be logged in FlyteScheduler logs.
**This will be transparent to the user. A skipped execution will not appear as skipped in the UI or project execution page**.
## Limitations
### "At most" enforcement
While the system aims to respect `max_concurrency`, it acts as an "at most" limit.
Due to the nature of scheduling, workflow execution durations, and the timing of the concurrency check (at launch time), there might be periods where the number of active executions is below `max_concurrency` even if the system could theoretically run more.
For example, if `max_concurrency` is 5 and all 5 workflows finish before the next scheduled check/trigger, the count will drop.
The system prevents exceeding the limit but doesn't actively try to always maintain `max_concurrency` running instances.
### Notifications for skipped executions
Currently, there is no built-in notification system for skipped executions.
When a scheduled execution is skipped due to concurrency limits, it will be logged in FlyteScheduler but no user notification will be sent.
This is an area for future enhancement.
## Best practices
1. **Use with scheduled workflows**: Concurrency control is most beneficial for scheduled workflows that might take longer than the schedule interval to complete.
2. **Set appropriate limits**: Consider your system resources and the resource requirements of your workflows when setting `max_concurrency`.
3. **Monitor skipped executions**: Regularly check FlyteAdmin logs to monitor if executions are being skipped due to concurrency limits.
4. **Version management**: Be aware that different versions of the same launch plan can have different concurrency policies, but the check is performed across all versions.
=== PAGE: https://www.union.ai/docs/v1/serverless/user-guide/core-concepts/actors ===
# Actors
Actors allow you to reuse a container and environment between tasks, avoiding the cost of starting a new container for each task. This can be useful when you have a task that requires a lot of setup or has a long startup time.
To create an actor, instantiate the **Core concepts > Actors > `ActorEnvironment`** class, then add the instance as a decorator to the task that requires that environment.
### `ActorEnvironment` parameters
* **container_image:** The container image to use for the task. This container must have the `{{< key kit >}}` python package installed. Defaults to `cr.union.ai/union/unionai:py3.11-latest`.
* **environment:** Environment variables as key, value pairs in a Python dictionary.
* **limits:** Compute resource limits.
* **replica_count:** The number of workers to provision that are able to accept tasks.
* **requests:** Compute resource requests per task.
* **secret_requests:** Keys (ideally descriptive) that can identify the secrets supplied at runtime. For more information, see **Development cycle > Managing secrets**.
* **ttl_seconds:** How long to keep the Actor alive while no tasks are being run.
The following example shows how to create a basic `ActorEnvironment` and use it for one task:
```python
# hello_world.py
import {{< key kit_import >}}
actor = {{< key kit_as >}}.ActorEnvironment(
name="my-actor",
replica_count=1,
ttl_seconds=30,
requests={{< key kit_as >}}.Resources(
cpu="2",
mem="300Mi",
),
)
@actor.task
def say_hello() -> str:
return "hello"
@{{< key kit_as >}}.workflow
def wf():
say_hello()
```
You can learn more about the trade-offs between actors and regular tasks, as well as the efficiency gains you can expect **Core concepts > Actors > Actors and regular tasks**.
## Caching on Actor Replicas
The `@actor_cache` decorator provides a powerful mechanism to cache the results of Python callables on individual actor replicas. This is particularly beneficial for workflows involving repetitive tasks, such as data preprocessing, model loading, or initialization of shared resources, where caching can minimize redundant operations and improve overall efficiency. Once a callable is cached on a replica, subsequent tasks that use the same actor can access the cached result, significantly improving performance and efficiency.
### When to Use `@actor_cache`
- **Shared Initialization Costs:**
For expensive, shared initialization processes that multiple tasks rely on.
- **Repetitive Task Execution:**
When tasks repeatedly require the same resource or computation on the same actor replica.
- **Complex Object Caching:**
Use custom Python objects as keys to define unique cache entries.
Below is a simplified example showcasing the use of `@actor_cache` for caching repetitive tasks. This dummy example demonstrates caching model that is loaded by the `load_model` task.
```python
# caching_basic.py
from time import sleep
import {{< key kit_import >}}
actor = {{< key kit_as >}}.ActorEnvironment(
name="my-actor",
replica_count=1,
)
@{{< key kit_as >}}.actor_cache
def load_model(state: int) -> callable:
sleep(4) # simulate model loading
return lambda value: state + value
@actor.task
def evaluate(value: int, state: int) -> int:
model = load_model(state=state)
return model(value)
@{{< key kit_as >}}.workflow
def wf(init_value: int = 1, state: int = 3) -> int:
out = evaluate(value=init_value, state=state)
out = evaluate(value=out, state=state)
out = evaluate(value=out, state=state)
out = evaluate(value=out, state=state)
return out
```

You can see that the first call of `evaluate` took considerable time as it involves allocating a node for the task, creating a container, and loading the model. The subsequent calls of `evaluate` execute in a fraction of the time.
You can see examples of more advanced actor usage **Core concepts > Actors > Actor examples**.
## Subpages
- **Core concepts > Actors > Actors and regular tasks**
- **Core concepts > Actors > Actor examples**
=== PAGE: https://www.union.ai/docs/v1/serverless/user-guide/core-concepts/actors/actors-and-regular-tasks ===
# Actors and regular tasks
When deciding whether to use actors or traditional tasks in your workflows, it's important to consider the benefits
and trade-offs. This page outlines key scenarios where actors shine and where they may not be the best fit.
| When to Use Actors | When Not to Use Actors |
| ------------------ | ---------------------- |
| **Short Running Tasks** Traditional tasks spin up a new container and pod for each task, which adds overhead. Actors allow tasks to run on the same container, removing the repeated cost of pod creation, image pulling, and initialization. Actors offer the most benefit for short running tasks where the startup overhead is a larger component of total task runtime. | **Long Running Tasks** For long running tasks, container initialization overhead is minimal, therefore the performance benefits of actors become negligible when task runtime significantly exceeds startup time. |
| **Map Tasks with Large Input Arrays** Map tasks by default share the same image and resource definitions, making them a great use case for actors. Actors provide the greatest benefit when the input array is larger than the desired concurrency. For example, consider an input array with 2,000 entries and a concurrency level of 50. Without actors, map tasks would spin up 2,000 individual containers—one for each entry. With actors, only 50 containers are needed, corresponding to the number of replicas, dramatically reducing overhead. | **Map Tasks with Small Input Arrays** In a map task where the number of actor replicas matches the input array size, the same number of pods and container are initialized when a map task is used without an actor. For example, if there are 10 inputs and 10 replicas, 10 pods are created, resulting in no reduction in overhead. |
| **State Management and Efficient Initialization** Actors excel when state persistence between tasks is valuable. You can use `@actor_cache` to cache Python objects. For example, this lets you load a large model or dataset into memory once per replica, and access it across tasks run on that replica. You can also serve a model or initialize shared resources in an init container. Each task directed to that actor replica can then reuse the same model or resource. | **Strict Task Isolation Is Critical** While actors clear Python caches, global variables, and custom environment variables after each task, they still share the same container. The shared environment introduces edge cases where you could intentionally or unintentionally impact downstream tasks. For example, if you write to a file in one task, that file will remain mutated for the next task that is run on that actor replica. If strict isolation between tasks is a hard requirement, regular tasks provide a safer option. |
| **Shared Dependencies and Resources** If multiple tasks can use the same container image and have consistent resource requirements, actors are a natural fit. | |
# Efficiency Gains from Actors with Map Tasks
Let's see how using Actors with map tasks can cut runtime in half!
We compare three scenarios:
1. **Regular map tasks without specifying concurrency.** This is the fasted expected configuration as flyte will spawn as many pods as there are elements in the input array, allowing Kubernetes to manage scheduling based on available resources.
2. **Regular map tasks with fixed concurrency.** This limits the number of pods that are alive at any given time.
3. **Map tasks with Actors.** Here we set the number of replicas to match the concurrency of the previous example.
These will allow us to compare actors to vanilla map tasks when both speed is maximized and when alive pods are matched one-to-one.
## "Hello World" Benchmark
This benchmark simply runs a task that returns "Hello World", which is a near instantaneous task.
| Task Type | Concurrency/Replicas | Duration (seconds) |
| -------------- | -------------------- | ------------------ |
| Without Actors | unbound | 111 |
| Without Actors | 25 | 1195 |
| With Actors | 25 | 42 |
**Key Takeaway:** For near instantaneous tasks, using a 25-replica Actor with map tasks reduces runtime by 96% if live pods are matched, and 62% when map task concurrency is unbounded.
## "5s Sleep" Benchmark
This benchmark simply runs a task that sleeps for five seconds.
| Task Type | Concurrency/Replicas | Duration (seconds) |
| -------------- | -------------------- | ------------------ |
| Without Actors | unbound | 174 |
| Without Actors | 100 | 507 |
| With Actors | 100 | 87 |
**Key Takeaway:** For five-second long tasks, using a 100-replica Actor with map tasks reduces runtime by 83% if live pods are matched, and 50% when map task concurrency is unbounded.
If you have short running map tasks, you can cut your runtime in half. If you are already using concurrency limits on your map tasks, you can expect even better improvements!
=== PAGE: https://www.union.ai/docs/v1/serverless/user-guide/core-concepts/actors/actor-examples ===
# Actor examples
### Refactoring from Regular Tasks to Actors
Notice that converting a non-actor workflow to use actors is as simple as replacing the `@{{< key kit_as >}}.task` decorator with the `@actor.task` decorator. Additionally, task decorator arguments can be moved either to the actor environment or the actor task decorator, depending on whether they apply to the entire environment (e.g. resource specifications) or to a single task execution (e.g. caching arguments).
```diff
import {{< key kit_import >}}
+ actor = {{< key kit_as >}}.ActorEnvironment(
+ name = "myenv",
+ replica_count = 10,
+ ttl_seconds = 120,
+ requests = {{< key kit_as >}}.Resources(mem="1Gi"),
+ container_image = "myrepo/myimage-with-scipy:latest",
+)
+
- @{{< key kit_as >}}.task(requests={{< key kit_as >}}.Resources(mem="1Gi"))
+ @actor.task
def add_numbers(a: float, b: float) -> float:
return a + b
- @{{< key kit_as >}}.task(container_image="myrepo/myimage-with-scipy:latest")
+ @actor.task
def calculate_distance(point_a: list[int], point_b: list[int]) -> float:
from scipy.spatial.distance import euclidean
return euclidean(point_a, point_b)
- @{{< key kit_as >}}.task(cache=True, cache_version="v1")
+ @actor.task(cache=True, cache_version="v1")
def is_even(number: int) -> bool:
return number % 2 == 0
@{{< key kit_as >}}.workflow
def distance_add_wf(point_a: list[int], point_b: list[int]) -> float:
distance = calculate_distance(point_a=point_a, point_b=point_b)
return add_numbers(a=distance, b=1.5)
@{{< key kit_as >}}.workflow
def is_even_wf(point_a: list[int]) -> list[bool]:
return {{< key kit_as >}}.{{< key map_func >}}(is_even)(number=point_a)
```
## Multiple instances of the same task
In this example, the `actor.task`-decorated task is invoked multiple times in one workflow, and will use the same `ActorEnvironment` on each invocation:
```python
# plus_one.py
import {{< key kit_import >}}
actor = {{< key kit_as >}}.ActorEnvironment(
name="my-actor",
replica_count=1,
ttl_seconds=300,
requests={{< key kit_as >}}.Resources(cpu="2", mem="500Mi"),
)
@actor.task
def plus_one(input: int) -> int:
return input + 1
@{{< key kit_as >}}.workflow
def wf(input: int = 0) -> int:
a = plus_one(input=input)
b = plus_one(input=a)
c = plus_one(input=b)
return plus_one(input=c)
```
## Multiple tasks
Every task execution in the following example will execute in the same `ActorEnvironment`.
You can use the same environment for multiple tasks in the same workflow and tasks across workflow definitions, using both subworkflows and launch plans:
```python
# multiple_tasks.py
import {{< key kit_import >}}
actor = {{< key kit_as >}}.ActorEnvironment(
name="my-actor",
replica_count=1,
ttl_seconds=30,
requests={{< key kit_as >}}.Resources(cpu="1", mem="450Mi"),
)
@actor.task
def say_hello(name: str) -> str:
return f"hello {name}"
@actor.task
def scream_hello(name: str) -> str:
return f"HELLO {name}"
@{{< key kit_as >}}.workflow
def my_child_wf(name: str) -> str:
return scream_hello(name=name)
my_child_wf_lp = {{< key kit_as >}}.LaunchPlan.get_default_launch_plan({{< key kit_as >}}.current_context(), my_child_wf)
@{{< key kit_as >}}.workflow
def my_parent_wf(name: str) -> str:
a = say_hello(name=name)
b = my_child_wf(name=a)
return my_child_wf_lp(name=b)
```
## Custom PodTemplates
Both tasks in the following example will be executed in the same `ActorEnvironment`, which is created with a `PodTemplate` for additional configuration.
```python
# pod_template.py
import os
from kubernetes.client.models import (
V1Container,
V1PodSpec,
V1ResourceRequirements,
V1EnvVar,
)
import {{< key kit_import >}}
image = {{< key kit_as >}}.ImageSpec(
registry=os.environ.get("DOCKER_REGISTRY", None),
packages=["union", "flytekitplugins-pod"],
)
pod_template = {{< key kit_as >}}.PodTemplate(
primary_container_name="primary",
pod_spec=V1PodSpec(
containers=[
V1Container(
name="primary",
image=image,
resources=V1ResourceRequirements(
requests={
"cpu": "1",
"memory": "1Gi",
},
limits={
"cpu": "1",
"memory": "1Gi",
},
),
env=[V1EnvVar(name="COMP_KEY_EX", value="compile_time")],
),
],
),
)
actor = {{< key kit_as >}}.ActorEnvironment(
name="my-actor",
replica_count=1,
ttl_seconds=30,
pod_template=pod_template,
)
@actor.task
def get_and_set() -> str:
os.environ["RUN_KEY_EX"] = "run_time"
return os.getenv("COMP_KEY_EX")
@actor.task
def check_set() -> str:
return os.getenv("RUN_KEY_EX")
@{{< key kit_as >}}.workflow
def wf() -> tuple[str,str]:
return get_and_set(), check_set()
```
## Example: `@actor_cache` with `map`
With map tasks, each task is executed within the same environment, making actors a natural fit for this pattern. If a task has an expensive operation, like model loading, caching it with `@actor_cache` can improve performance. This example shows how to cache model loading in a mapped task to avoid redundant work and save resources.
```python
# caching_map_task.py
from functools import partial
from pathlib import Path
from time import sleep
import {{< key kit_import >}}
actor = {{< key kit_as >}}.ActorEnvironment(
name="my-actor",
replica_count=2,
)
class MyModel:
"""Simple model that multiples value with model_state."""
def __init__(self, model_state: int):
self.model_state = model_state
def __call__(self, value: int):
return self.model_state * value
@{{< key kit_as >}}.task(cache=True, cache_version="v1")
def create_model_state() -> {{< key kit_as >}}.FlyteFile:
working_dir = Path({{< key kit_as >}}.current_context().working_directory)
model_state_path = working_dir / "model_state.txt"
model_state_path.write_text("4")
return model_state_path
@{{< key kit_as >}}.actor_cache
def load_model(model_state_path: {{< key kit_as >}}.FlyteFile) -> MyModel:
# Simulate model loading time. This can take a long time
# because the FlyteFile download is large, or when the
# model is loaded onto the GPU.
sleep(10)
with model_state_path.open("r") as f:
model_state = int(f.read())
return MyModel(model_state=model_state)
@actor.task
def inference(value: int, model_state_path: {{< key kit_as >}}.FlyteFile) -> int:
model = load_model(model_state_path)
return model(value)
@{{< key kit_as >}}.workflow
def run_inference(values: list[int] = list(range(20))) -> list[int]:
model_state = create_model_state()
inference_ = partial(inference, model_state_path=model_state)
return {{< key kit_as >}}.{{< key map_func >}}(inference_)(value=values)
```
## Example: Caching with Custom Objects
Finally, we can cache custom objects by defining the `__hash__` and `__eq__` methods. These methods allow `@actor_cache` to determine if an object is the same between runs, ensuring that expensive operations are skipped if the object hasn’t changed.
```python
# caching_custom_object.py
from time import sleep
import {{< key kit_import >}}
actor = {{< key kit_as >}}.ActorEnvironment(
name="my-actor",
replica_count=1,
)
class MyObj:
def __init__(self, state: int):
self.state = state
def __hash__(self):
return hash(self.state)
def __eq__(self, other):
return self.state == other.state
@{{< key kit_as >}}.actor_cache
def get_state(obj: MyObj) -> int:
sleep(2)
return obj.state
@actor.task
def construct_and_get_value(state: int) -> int:
obj = MyObj(state=state)
return get_state(obj)
@{{< key kit_as >}}.workflow
def wf(state: int = 2) -> int:
value = construct_and_get_value(state=state)
value = construct_and_get_value(state=value)
value = construct_and_get_value(state=value)
value = construct_and_get_value(state=value)
return value
```
=== PAGE: https://www.union.ai/docs/v1/serverless/user-guide/core-concepts/artifacts ===
# Artifacts
{{< key product_name >}} produces many intermediate outputs when running tasks and workflows. These outputs are stored internally in {{< key product_name >}} and are accessible through the relevant executions, but are not usually directly accessible to users.
The Artifact service indexes and adds semantic meaning to outputs of all {{< key product_name >}} task and workflow executions, such as models, files, or any other kinds of data, enabling you to directly access, track, and orchestrate pipelines through the outputs themselves. Artifacts allow you to store additional metadata for these outputs in the form of **Core concepts > Artifacts > Partitions**, which are key-value pairs that describe the artifact and which can be used to query the Artifact Service to locate artifacts. Artifacts allow for loose coupling of workflows—for example, a downstream workflow can be configured to consume the latest result of an upstream workflow. With this higher-order abstraction, {{< key product_name >}} aims to ease collaboration across teams, provide for reactivity and automation, and give you a broader view of how artifacts move across executions.
## Versioning
Artifacts are uniquely identified and versioned by the following information:
* Project
* Domain
* Artifact name
* Artifact version
You can set an artifact's name in code when you **Core concepts > Artifacts > Declaring artifacts** and the artifact version is automatically generated when the artifact is materialized as part of any task or workflow execution that emits an artifact with this name. Any execution of a task or workflow that emits an artifact creates a new version of that artifact.
## Partitions
When you declare an artifact, you can define partitions for it that enable semantic grouping of artifacts. Partitions are metadata that take the form of key-value pairs, with the keys defined at registration time and the values supplied at runtime. You can specify up to 10 partition keys for an artifact. You can set an optional partition called `time_partition` to capture information about the execution timestamp to your desired level of granularity. For more information, see **Core concepts > Artifacts > Declaring artifacts**.
> [!NOTE]
> The `time_partition` partition is not enabled by default. To enable it, set `time_partitioned=True` in the artifact declaration.
> For more information, see the **Core concepts > Artifacts > Declaring artifacts > Time-partitioned artifact**.
## Queries
To consume an artifact in a workflow, you can define a query containing the artifact’s name as well as any required partition values. You then supply the query as an input value to the workflow definition. At execution time, the query will return the most recent version of the artifact that meets the criteria by default. You can also query for a specific artifact version.
For more information on querying for and consuming artifacts in workflows, see **Core concepts > Artifacts > Consuming artifacts in workflows**.
To query for artifacts programmatically in a Python script using `{{< key kit_remote >}}`, see [{{< key kit_remote >}}](../../development-cycle/union-remote).
> [!NOTE] `UnionRemote` vs `FlyteRemote`
> `UnionRemote` is identical to `FlyteRemote`, with additional functionality to handle artifacts.
> You cannot interact with artifacts using `FlyteRemote`.
## Lineage
Once an artifact is materialized, its lineage is visible in the UI. For more information, see **Core concepts > Artifacts > Viewing artifacts**.
## Subpages
- **Core concepts > Artifacts > Declaring artifacts**
- **Core concepts > Artifacts > Materializing artifacts**
- **Core concepts > Artifacts > Consuming artifacts in workflows**
- **Core concepts > Artifacts > Connecting workflows with artifact event triggers**
- **Core concepts > Artifacts > Viewing artifacts**
=== PAGE: https://www.union.ai/docs/v1/serverless/user-guide/core-concepts/artifacts/declaring-artifacts ===
# Declaring artifacts
In order to define a task or workflow that emits an artifact, you must first declare the artifact and the keys for any **Core concepts > Artifacts > Partitions** you wish for it to have. For the `Artifact` class parameters and methods, see the [Artifact API documentation]().
## Basic artifact
In the following example, an artifact called `BasicTaskData` is declared, along with a task that emits that artifact. Since it is a basic artifact, it doesn't have any partitions.
```python
# basic.py
import pandas as pd
import {{< key kit_import >}}
from typing_extensions import Annotated
pandas_image = {{< key kit_as >}}.ImageSpec(
packages=["pandas==2.2.2"]
)
BasicTaskData = {{< key kit_as >}}.Artifact(
name="my_basic_artifact"
)
@{{< key kit_as >}}.task(container_image=pandas_image)
def t1() -> Annotated[pd.DataFrame, BasicTaskData]:
my_df = pd.DataFrame({"col1": [1, 2, 3], "col2": ["a", "b", "c"]})
return BasicTaskData.create_from(my_df)
@{{< key kit_as >}}.workflow
def wf() -> pd.DataFrame:
return t1()
```
## Time-partitioned artifact
By default, time partitioning is not enabled for artifacts. To enable it, declare the artifact with `time_partitioned` set to `True`. You can optionally set the granularity for the time partition to `MINUTE`, `HOUR`, `DAY`, or `MONTH`; the default is `DAY`.
You must also pass a value to `time_partition`, which you can do at runtime or by binding `time_partition` to an input.
### Passing a value to `time_partition` at runtime
```python
# time_partition_runtime.py
from datetime import datetime
import pandas as pd
import {{< key kit_import >}}
from flytekit.core.artifact import Granularity
from typing_extensions import Annotated
pandas_image = {{< key kit_as >}}.ImageSpec(
packages=["pandas==2.2.2"]
)
BasicArtifact = {{< key kit_as >}}.Artifact(
name="my_basic_artifact",
time_partitioned=True,
time_partition_granularity=Granularity.HOUR
)
@{{< key kit_as >}}.task(container_image=pandas_image)
def t1() -> Annotated[pd.DataFrame, BasicArtifact]:
df = pd.DataFrame({"col1": [1, 2, 3], "col2": ["a", "b", "c"]})
dt = datetime.now()
return BasicArtifact.create_from(df, time_partition=dt)
@{{< key kit_as >}}.workflow
def wf() -> pd.DataFrame:
return t1()
```
### Passing a value to `time_partition` by input
```python
# time_partition_input.py
from datetime import datetime
import pandas as pd
import {{< key kit_import >}}
from flytekit.core.artifact import Granularity
from typing_extensions import Annotated
pandas_image = {{< key kit_as >}}.ImageSpec(
packages=["pandas==2.2.2"]
)
BasicArtifact = {{< key kit_as >}}.Artifact(
name="my_basic_artifact",
time_partitioned=True,
time_partition_granularity=Granularity.HOUR
)
@{{< key kit_as >}}.task(container_image=pandas_image)
def t1(date: datetime) -> Annotated[pd.DataFrame, BasicArtifact]:
df = pd.DataFrame({"col1": [1, 2, 3], "col2": ["a", "b", "c"]})
return BasicArtifact.create_from(df, time_partition=date)
@{{< key kit_as >}}.workflow
def wf(run_date: datetime):
return t1(date=run_date)
```
## Artifact with custom partition keys
You can specify up to 10 custom partition keys when declaring an artifact. Custom partition keys can be set at runtime or be passed as inputs.
### Passing a value to a custom partition key at runtime
```python
# partition_keys_runtime.py
from datetime import datetime
import pandas as pd
import {{< key kit_import >}}
from flytekit.core.artifact import Inputs, Granularity
from typing_extensions import Annotated
pandas_image = {{< key kit_as >}}.ImageSpec(
packages=["pandas==2.2.2"]
)
BasicArtifact = {{< key kit_as >}}.Artifact(
name="my_basic_artifact",
time_partitioned=True,
time_partition_granularity=Granularity.HOUR,
partition_keys=["key1"]
)
@{{< key kit_as >}}.task(container_image=pandas_image)
def t1(
key1: str, date: datetime
) -> Annotated[pd.DataFrame, BasicArtifact(key1=Inputs.key1)]:
df = pd.DataFrame({"col1": [1, 2, 3], "col2": ["a", "b", "c"]})
return BasicArtifact.create_from(
df,
time_partition=date
)
@{{< key kit_as >}}.workflow
def wf():
run_date = datetime.now()
values = ["value1", "value2", "value3"]
for value in values:
t1(key1=value, date=run_date)
```
### Passing a value to a custom partition key by input
```python
# partition_keys_input.py
from datetime import datetime
import pandas as pd
import {{< key kit_import >}}
from flytekit.core.artifact import Inputs, Granularity
from typing_extensions import Annotated
pandas_image = {{< key kit_as >}}.ImageSpec(
packages=["pandas==2.2.2"]
)
BasicArtifact = {{< key kit_as >}}.Artifact(
name="my_basic_artifact",
time_partitioned=True,
time_partition_granularity=Granularity.HOUR,
partition_keys=["key1"]
)
@{{< key kit_as >}}.task(container_image=pandas_image)
def t1(
key1: str, dt: datetime
) -> Annotated[pd.DataFrame, BasicArtifact(key1=Inputs.key1)]:
df = pd.DataFrame({"col1": [1, 2, 3], "col2": ["a", "b", "c"]})
return BasicArtifact.create_from(
df,
time_partition=dt,
key1=key1
)
@{{< key kit_as >}}.workflow
def wf(dt: datetime, val: str):
t1(key1=val, dt=dt)
```
## Artifact with model card example
You can attach a model card with additional metadata to your artifact, formatted in Markdown:
```python
# model_card.py
import pandas as pd
import {{< key kit_import >}}
from {{< key kit >}}.artifacts import ModelCard
from typing_extensions import Annotated
pandas_image = {{< key kit_as >}}.ImageSpec(
packages=["pandas==2.2.2"]
)
BasicArtifact = {{< key kit_as >}}.Artifact(name="my_basic_artifact")
def generate_md_contents(df: pd.DataFrame) -> str:
contents = "# Dataset Card\n" "\n" "## Tabular Data\n"
contents = contents + df.to_markdown()
return contents
@{{< key kit_as >}}.task(container_image=pandas_image)
def t1() -> Annotated[pd.DataFrame, BasicArtifact]:
df = pd.DataFrame({"col1": [1, 2, 3], "col2": ["a", "b", "c"]})
return BasicArtifact.create_from(
df,
ModelCard(generate_md_contents(df))
)
@{{< key kit_as >}}.workflow
def wf():
t1()
```
=== PAGE: https://www.union.ai/docs/v1/serverless/user-guide/core-concepts/artifacts/materializing-artifacts ===
# Materializing artifacts
You can materialize an artifact by executing the task or workflow that emits the artifact.
In the example below, to materialize the `BasicArtifact` artifact, the `t1` task must be executed. The `wf` workflow runs the `t1` task three times with different values for the `key1` partition each time.
Note that each time `t1` is executed, it emits a new version of the `BasicArtifact` artifact.
```python
# partition_keys_runtime.py
from datetime import datetime
import pandas as pd
import {{< key kit_import >}}
from flytekit.core.artifact import Inputs, Granularity
from typing_extensions import Annotated
pandas_image = {{< key kit_as >}}.ImageSpec(
packages=["pandas==2.2.2"]
)
BasicArtifact = {{< key kit_as >}}.Artifact(
name="my_basic_artifact",
time_partitioned=True,
time_partition_granularity=Granularity.HOUR,
partition_keys=["key1"]
)
@{{< key kit_as >}}.task(container_image=pandas_image)
def t1(
key1: str, date: datetime
) -> Annotated[pd.DataFrame, BasicArtifact(key1=Inputs.key1)]:
df = pd.DataFrame({"col1": [1, 2, 3], "col2": ["a", "b", "c"]})
return BasicArtifact.create_from(
df,
time_partition=date
)
@{{< key kit_as >}}.workflow
def wf():
run_date = datetime.now()
values = ["value1", "value2", "value3"]
for value in values:
t1(key1=value, date=run_date)
```
> [!NOTE]
> You can also materialize an artifact by executing the `create_artifact` method of `{{< key kit_remote >}}`.
> For more information, see the [{{< key kit_remote >}} documentation](../../development-cycle/union-remote).
=== PAGE: https://www.union.ai/docs/v1/serverless/user-guide/core-concepts/artifacts/consuming-artifacts-in-workflows ===
# Consuming artifacts in workflows
## Defining a workflow that consumes an artifact
You can define a workflow that consumes an artifact by defining a query and passing it as an input to the consuming workflow.
The following code defines a query, `data_query`, that searches across all versions of `BasicArtifact` that match the partition values. This query binds parameters to the workflow's `key1` and `time_partition` inputs and returns the most recent version of the artifact.
```python
# query.py
from datetime import datetime
import pandas as pd
import {{< key kit_import >}}
from flytekit.core.artifact import Inputs
pandas_image = {{< key kit_as >}}.ImageSpec(
packages=["pandas==2.2.2"]
)
BasicArtifact = {{< key kit_as >}}.Artifact(
name="my_basic_artifact"
)
@{{< key kit_as >}}.task(container_image=pandas_image)
def t1(key1: str, dt: datetime, data: pd.DataFrame):
print(f"key1: {key1}")
print(f"Date: {dt}")
print(f"Data retrieved from query: {data}")
data_query = BasicArtifact.query(
time_partition=Inputs.dt,
key1=Inputs.key1,
)
@{{< key kit_as >}}.workflow
def query_wf(
key1: str,
dt: datetime,
data: pd.DataFrame = data_query
):
t1(key1=key1, dt=dt, data=data)
```
You can also directly reference a particular artifact version in a query using the `get()` method:
```python
data = BasicArtifact.get(//BasicArtifact@)
```
> [!NOTE]
> For a full list of Artifact class methods, see the [Artifact API documentation]().
## Launching a workflow that consumes an artifact
To launch a workflow that consumes an artifact as one of its inputs, navigate to the workflow in the UI and click **Launch Workflow**:

In the `query_wf` example, the workflow takes three inputs: `key1`, `dt`, and a `BasicArtifact` artifact query. In order to create the workflow execution, you would enter values for `key1` and `dt` and click **Launch**. The artifacts service will supply the latest version of the `BasicData` artifact that meets the partition query criteria.
You can also override the artifact query from the launch form by clicking **Override**, directly supplying the input that the artifact references (in this case, a blob store URI), and clicking **Launch**:

=== PAGE: https://www.union.ai/docs/v1/serverless/user-guide/core-concepts/artifacts/connecting-workflows-with-artifact-event-triggers ===
# Connecting workflows with artifact event triggers
In the following example, we define an upstream workflow and a downstream workflow, and define a **Core concepts > Launch plans > Reactive workflows** in a launch plan to connect the two workflows via an **Core concepts > Launch plans > Reactive workflows > Trigger types > Artifact events**.
## Imports
First we import the required packages:
```python
from datetime import datetime
import pandas as pd
import {{< key kit_import >}}
from {{< key kit >}}.artifacts import OnArtifact
from flytekit.core.artifact import Inputs
from typing_extensions import Annotated
```
## Upstream artifact and workflow definition
Then we define an upstream artifact and a workflow that emits a new version of `UpstreamArtifact` when executed:
```python
UpstreamArtifact = {{< key kit_as >}}.Artifact(
name="my_upstream_artifact",
time_partitioned=True,
partition_keys=["key1"],
)
@{{< key kit_as >}}.task(container_image=pandas_image)
def upstream_t1(key1: str) -> Annotated[pd.DataFrame, UpstreamArtifact(key1=Inputs.key1)]:
dt = datetime.now()
my_df = pd.DataFrame({"col1": [1, 2, 3], "col2": ["a", "b", "c"]})
return UpstreamArtifact.create_from(my_df, key1=key1, time_partition=dt)
@{{< key kit_as >}}.workflow
def upstream_wf() -> pd.DataFrame:
return upstream_t1(key1="value1")
```
## Artifact event definition
Next we define the artifact event that will link the upstream and downstream workflows together:
```python
on_upstream_artifact = OnArtifact(
trigger_on=UpstreamArtifact,
)
```
## Downstream workflow definition
Then we define the downstream task and workflow that will be triggered when the upstream artifact is created:
```python
@{{< key kit_as >}}.task
def downstream_t1():
print("Downstream task triggered")
@{{< key kit_as >}}.workflow
def downstream_wf():
downstream_t1()
```
## Launch plan with trigger definition
Finally, we create a launch plan with a trigger set to an `OnArtifact` object to link the two workflows via the `Upstream` artifact. The trigger will initiate an execution of the downstream `downstream_wf` workflow upon the creation of a new version of the `Upstream` artifact.
```python
downstream_triggered = {{< key kit_as >}}.LaunchPlan.create(
"downstream_with_trigger_lp",
downstream_wf,
trigger=on_upstream_artifact
)
```
> [!NOTE]
> The `OnArtifact` object must be attached to a launch plan in order for the launch plan to be triggered by the creation of a new version of the artifact.
## Full example code
Here is the full example code file:
```python
# trigger_on_artifact.py
from datetime import datetime
import pandas as pd
import {{< key kit_import >}}
from {{< key kit >}}.artifacts import OnArtifact
from flytekit.core.artifact import Inputs
from typing_extensions import Annotated
pandas_image = {{< key kit_as >}}.ImageSpec(
packages=["pandas==2.2.2"]
)
UpstreamArtifact = {{< key kit_as >}}.Artifact(
name="my_upstream_artifact",
time_partitioned=True,
partition_keys=["key1"],
)
@{{< key kit_as >}}.task(container_image=pandas_image)
def upstream_t1(key1: str) -> Annotated[pd.DataFrame, UpstreamArtifact(key1=Inputs.key1)]:
dt = datetime.now()
my_df = pd.DataFrame({"col1": [1, 2, 3], "col2": ["a", "b", "c"]})
return UpstreamArtifact.create_from(my_df, key1=key1, time_partition=dt)
@{{< key kit_as >}}.workflow
def upstream_wf() -> pd.DataFrame:
return upstream_t1(key1="value1")
on_upstream_artifact = OnArtifact(
trigger_on=UpstreamArtifact,
)
@{{< key kit_as >}}.task
def downstream_t1():
print("Downstream task triggered")
@{{< key kit_as >}}.workflow
def downstream_wf():
downstream_t1()
downstream_triggered = {{< key kit_as >}}.LaunchPlan.create(
"downstream_with_trigger_lp",
downstream_wf,
trigger=on_upstream_artifact
)
```
=== PAGE: https://www.union.ai/docs/v1/serverless/user-guide/core-concepts/artifacts/viewing-artifacts ===
# Viewing artifacts
## Artifacts list
Artifacts can be viewed in the UI by navigating to the artifacts app in the left sidebar:

## Artifact view
Selecting a specific artifact from the artifact list will take you to that artifact's **Overview** page:

Here you can see relevant metadata about the artifact, including:
* Its version
* Its partitions
* The task or workflow that produced it
* Its creation time
* Its object store URI
* Code for accessing the artifact via [{{< key kit_remote >}}](../../development-cycle/union-remote)
You can also view the artifact's object structure, model card, and lineage graph.
### Artifact lineage graph
Once an artifact is materialized, you can view its lineage in the UI, including the specific upstream task or workflow execution that created it, and any downstream workflows that consumed it. You can traverse the lineage graph by clicking between artifacts and inspecting any relevant workflow executions in order to understand and reproduce any step in the AI development process.

You can navigate through the lineage graph by clicking from artifact to artifact.
=== PAGE: https://www.union.ai/docs/v1/serverless/user-guide/core-concepts/serving ===
# App Serving
{{< key product_name >}} lets you build and serve your own web apps, enabling you to build:
- **Model endpoints** with generic web frameworks like FastAPI or optimized inference frameworks like vLLM and SGLang.
- **AI inference-time** components like MCP servers, ephemeral agent memory state stores, etc.
- **Interactive dashboards** and other interfaces to interact with and visualize data and models from your workflows using frameworks like Streamlit, Gradio, Tensorboard, FastHTML, Dash, Panel, Voila, FiftyOne.
- **Flyte Connectors**, which are **Core concepts > App Serving > light-weight, long running services** that connect to external
services like OpenAI, BigQuery, and Snowflake.
- **Any other web services** like **Serving > Custom Webhooks** that can be implemented via web frameworks like FastAPI, Starlette.
## Example app
We will start with a simple Streamlit app. In this case we will use the default
Streamlit "Hello, World!" app.
In a local directory, create the following file:
```shell
└── app.py
```
## App declaration
The file `app.py` contains the app declaration:
```python
"""A simple {{< key product_name >}} app using Streamlit"""
import {{< key kit_import >}}
import os
# The `ImageSpec` for the container that will run the `App`.
# `union-runtime` must be declared as a dependency,
# in addition to any other dependencies needed by the app code.
# Use Union remote Image builder to build the app container image
image = union.ImageSpec(
name="streamlit-app",
packages=["union-runtime>=0.1.18", "streamlit==1.51.0"],
builder="union"
)
# The `App` declaration.
# Uses the `ImageSpec` declared above.
# In this case we do not need to supply any app code
# as we are using the built-in Streamlit `hello` app.
app = union.app.App(
name="streamlit-hello",
container_image=image,
args="streamlit hello --server.port 8080",
port=8080,
limits=union.Resources(cpu="1", mem="1Gi"),
)
```
Here the `App` constructor is initialized with the following parameters:
* `name`: The name of the app. This name will be displayed in app listings (via CLI and UI) and used to refer to the app when deploying and stopping.
* `container_image`: The container image that will be used to for the container that will run the app. Here we use a prebuilt container provided by {{< key product_name >}} that support Streamlit.
* `args`: The command that will be used within the container to start the app. The individual strings in this array will be concatenated and the invoked as a single command.
* `port`: The port of the app container from which the app will be served.
* `limits`: A `union.Resources` object defining the resource limits for the app container.
The same object is used for the same purpose in the `@{{< key kit_as >}}.task` decorator in {{< key product_name >}} workflows.
See **Core concepts > Tasks > Task hardware environment > Customizing task resources > The `requests` and `limits` settings** for details.
The parameters above are the minimum needed to initialize the app.
There are a few additional available parameters that we do not use in this example (but we will cover later):
* `include`: A list of files to be added to the container at deployment time, containing the custom code that defines the specific functionality of your app.
* `inputs`: A `List` of `{{< key kit >}}.app.Input` objects. Used to provide default inputs to the app on startup.
* `requests`: A `{{< key kit >}}.Resources` object defining the resource requests for the app container. The same object is used for the same purpose in the `@{{< key kit_as >}}.task` decorator in {{< key product_name >}} workflows (see **Core concepts > Tasks > Task hardware environment > Customizing task resources > The `requests` and `limits` settings** for details).
* `min_replicas`: The minimum number of replica containers permitted for this app.
This defines the lower bound for auto-scaling the app. The default is 0 .
* `max_replicas`: The maximum number of replica containers permitted for this app.
This defines the upper bound for auto-scaling the app. The default is 1 .
## Deploy the app
Deploy the app with:
```shell
$ {{< key cli >}} deploy apps APP_FILE APP_NAME
```
* `APP_FILE` is the Python file that contains one or more app declarations.
* `APP_NAME` is the name of (one of) the declared apps in APP_FILE. The name of an app is the value of the `name` parameter passed into the `App` constructor.
If an app with the name `APP_NAME` does not yet exist on the system then this command creates that app and starts it.
If an app by that name already exists then this command stops the app, updates its code and restarts it.
In this case, we do the following:
```shell
$ {{< key cli >}} deploy apps app.py streamlit-hello
```
This will return output like the following:
```shell
✨ Creating Application: streamlit-demo
Created Endpoint at: https://withered--firefly--8ca31.apps.demo.hosted.unionai.cloud/
```
Click on the displayed endpoint to go to the app:

## Viewing deployed apps
Go to **Apps** in the left sidebar in {{< key product_name >}} to see a list of all your deployed apps:

To connect to an app click on its **Endpoint**.
To see more information about the app, click on its **Name**.
This will take you to the **App view**:

Buttons to **Copy Endpoint** and **Start app** are available at the top of the view.
You can also view all apps deployed in your {{< key product_name >}} instance from the command-line with:
```shell
$ {{< key cli >}} get apps
```
This will display the app list:
```shell
┏━━━━━━━━━━━━━━━━━━━━━━━━━━━━━━━━━━━━━━━━━┳━━━━━━━━━━━━┳━━━━━━━━━━━━┳━━━━━━━━━━━━━━━┳━━━━━┳━━━━━━━━┓
┃ Name ┃ Link ┃ Status ┃ Desired State ┃ CPU ┃ Memory ┃
┡━━━━━━━━━━━━━━━━━━━━━━━━━━━━━━━━━━━━━━━━━╇━━━━━━━━━━━━╇━━━━━━━━━━━━╇━━━━━━━━━━━━━━━╇━━━━━╇━━━━━━━━┩
│ streamlit-query-2 │ Click Here │ Started │ Stopped │ 2 │ 2Gi │
│ streamlit-demo-1 │ Click Here │ Started │ Started │ 3 │ 2Gi │
│ streamlit-query-3 │ Click Here │ Started │ Started │ 2 │ 2Gi │
│ streamlit-demo │ Click Here │ Unassigned │ Started │ 2 │ 2Gi │
└─────────────────────────────────────────┴────────────┴────────────┴───────────────┴─────┴────────┘
```
## Stopping apps
To stop an app from the command-line, perform the following command:
```shell
$ {{< key cli >}} stop apps --name APP_NAME
```
`APP_NAME` is the name of an app deployed on the {{< key product_name >}} instance.
## Subpages
- **Core concepts > App Serving > Serving custom code**
- **Core concepts > App Serving > Serving a Model from a Workflow With FastAPI**
- **Core concepts > App Serving > API Key Authentication with FastAPI**
- **Core concepts > App Serving > Cache a HuggingFace Model as an Artifact**
- **Core concepts > App Serving > Deploy Optimized LLM Endpoints with vLLM and SGLang**
- **Core concepts > App Serving > Deploying Custom Flyte Connectors**
=== PAGE: https://www.union.ai/docs/v1/serverless/user-guide/core-concepts/serving/adding-your-own-code ===
# Serving custom code
In the introductory section we saw how to define and deploy a simple Streamlit app.
The app deployed was the default hello world Streamlit example app.
In this section, we will expand on this by adding our own custom code to the app.
## Example app
We will initialize the app in `app.py` as before, but now we will add two files containing our own code, `main.py` and `utils.py`.
In a local directory, create the following files:
```shell
├── app.py
├── main.py
└── utils.py
```
## App declaration
The file `app.py` contains the app declaration:
```python
"""A {{< key product_name >}} app with custom code"""
import os
import {{< key kit_import >}}
# The `ImageSpec` for the container that will run the `App`.
# `union-runtime` must be declared as a dependency,
# in addition to any other dependencies needed by the app code.
# Set the environment variable `REGISTRY` to be the URI for your container registry.
# If you are using `ghcr.io` as your registry, make sure the image is public.
image = union.ImageSpec(
name="streamlit-app",
packages=["streamlit==1.51.0", "union-runtime>=0.1.18", "pandas==2.2.3", "numpy==2.2.3"],
builder="union"
)
# The `App` declaration.
# Uses the `ImageSpec` declared above.
# Your core logic of the app resides in the files declared
# in the `include` parameter, in this case, `main.py` and `utils.py`.
app = union.app.App(
name="streamlit-custom-code",
container_image=image,
args="streamlit run main.py --server.port 8080",
port=8080,
include=["main.py", "utils.py"],
limits=union.Resources(cpu="1", mem="1Gi"),
)
```
Compared to the first example we have added one more parameter:
* `include`: A list of files to be added to the container at deployment time, containing the custom code that defines the specific functionality of your app.
## Custom code
In this example we include two files containing custom logic: `main.py` and `utils.py`.
The file `main.py` contains the bulk of our custom code:
```python
"""Streamlit App that plots data"""
import streamlit as st
from utils import generate_data
all_columns = ["Apples", "Orange", "Pineapple"]
with st.container(border=True):
columns = st.multiselect("Columns", all_columns, default=all_columns)
all_data = st.cache_data(generate_data)(columns=all_columns, seed=101)
data = all_data[columns]
tab1, tab2 = st.tabs(["Chart", "Dataframe"])
tab1.line_chart(data, height=250)
tab2.dataframe(data, height=250, use_container_width=True)
```
The file `utils.py` contains a supporting data generating function that is imported into the file above
```python
"""Function to generate sample data."""
import numpy as np
import pandas as pd
def generate_data(columns: list[str], seed: int = 42):
rng = np.random.default_rng(seed)
data = pd.DataFrame(rng.random(size=(20, len(columns))), columns=columns)
return data
```
## Deploy the app
Deploy the app with:
```shell
$ {{< key cli >}} deploy apps app.py streamlit-custom-code
```
The output displays the console URL and endpoint for the Streamlit app:
```shell
✨ Deploying Application: streamlit-custom-code
🔎 Console URL:
https:///org/...
[Status] Pending: OutOfDate: The Configuration is still working to reflect the latest desired
specification.
[Status] Started: Service is ready
🚀 Deployed Endpoint: https://.apps.
```
Navigate to the endpoint to see the Streamlit App!

## App deployment with included files
When a new app is deployed for the first time (i.e., there is no app registered with the specified `name`),
a container is spun up using the specified `container_image` and the files specified in `include` are
copied into the container. The `args` is the then executed in the container, starting the app.
If you alter the `include` code you need to re-deploy your app.
When `{{< key cli >}} deploy apps` is called using an app name that corresponds to an already existing app,
the app code is updated in the container and the app is restarted.
You can iterate on your app easily by changing your `include` code and re-deploying.
Because there is a slight performance penalty involved in copying the `include` files into the container,
you may wish to consolidate you code directly into custom-built image once you have successfully iterated to production quality.
=== PAGE: https://www.union.ai/docs/v1/serverless/user-guide/core-concepts/serving/serving-a-model ===
# Serving a Model from a Workflow With FastAPI
In this section, we create a {{< key product_name >}} app to serve a scikit-learn model created by a {{< key product_name >}} workflow
using `FastAPI`.
## Example app
In this example, we first use a {{< key product_name >}} workflow to train a model and output it as a {{< key product_name >}} `Artifact`.
We then use a {{< key product_name >}} app to serve the model using `FastAPI`.
In a local directory, create the following files:
```shell
├── app.py
├── main.py
└── train_wf.py
```
## App configuration
In the code below, we declare the resources, runtime image, and FastAPI app that
exposes a `/predict` endpoint.
```python
"""A {{< key product_name >}} app that uses FastAPI to serve model created by a {{< key product_name >}} workflow."""
import os
import {{< key kit_import >}}
import joblib
from fastapi import FastAPI
SklearnModel = union.Artifact(name="sklearn-model")
# The `ImageSpec` for the container that will run the `App`, where `union-runtime`
# must be declared as a dependency. In addition to any other dependencies needed
# by the app code. Set the environment variable `REGISTRY` to be the URI for your
# container registry. If you are using `ghcr.io` as your registry, make sure the
# image is public.
image_spec = union.ImageSpec(
name="union-serve-sklearn-fastapi",
packages=["union-runtime>=0.1.18", "scikit-learn==1.5.2", "joblib==1.5.1", "fastapi[standard]"],
builder="union"
)
ml_models = {}
@asynccontextmanager
async def lifespan(app: FastAPI):
model_file = os.getenv("SKLEARN_MODEL")
ml_models["model"] = joblib.load(model_file)
yield
app = FastAPI(lifespan=lifespan)
# The `App` declaration, which uses the `ImageSpec` declared above.
# Your core logic of the app resides in the files declared in the `include`
# parameter, in this case, `main.py`. Input artifacts are declared in the
# `inputs` parameter
fast_api_app = union.app.App(
name="simple-fastapi-sklearn",
inputs=[
union.app.Input(
value=SklearnModel.query(),
download=True,
env_var="SKLEARN_MODEL",
)
],
container_image=image_spec,
framework_app=app,
limits=union.Resources(cpu="1", mem="1Gi"),
port=8082,
)
@app.get("/predict")
async def predict(x: float, y: float) -> float:
result = ml_models["model"]([[x, y]])
return {"result": result}
```
Note that the Artifact is provided as an `Input` to the App definition. With `download=True`,
the model is downloaded to the container's working directory. The full local path to the
model is set to `SKLEARN_MODEL` by the runtime.
During startup, the FastAPI app loads the model using the `SKLEARN_MODEL` environment
variable. Then it serves an endpoint at `/predict` that takes two float inputs and
returns a float result.
## Training workflow
The training workflow trains a random forest regression and saves it to a {{< key product_name >}}
`Artifact`.
```python
"""A {{< key product_name >}} workflow that trains a model."""
import os
from pathlib import Path
from typing import Annotated
import joblib
from sklearn.datasets import make_regression
from sklearn.ensemble import RandomForestRegressor
import {{< key kit_import >}}
# Declare the `Artifact`.
SklearnModel = union.Artifact(name="sklearn-model")
# The `ImageSpec` for the container that runs the tasks.
# Set the environment variable `REGISTRY` to be the URI for your container registry.
# If you are using `ghcr.io` as your registry, make sure the image is public.
image_spec = union.ImageSpec(
packages=["scikit-learn==1.5.2", "joblib==1.5.1"],
builder="union"
)
# The `task` that trains a `RandomForestRegressor` model.
@{{< key kit_as >}}.task(
limits=union.Resources(cpu="2", mem="2Gi"),
container_image=image_spec,
)
def train_model() -> Annotated[union.FlyteFile, SklearnModel]:
"""Train a RandomForestRegressor model and save it as a file."""
X, y = make_regression(n_features=2, random_state=42)
working_dir = Path(union.current_context().working_directory)
model_file = working_dir / "model.joblib"
rf = RandomForestRegressor().fit(X, y)
joblib.dump(rf, model_file)
return model_file
```
## Run the example
To run this example you will need to register and run the workflow first:
```shell
$ {{< key cli >}} run --remote train_wf.py train_model
```
This task trains a `RandomForestRegressor`, saves it to a file, and uploads it to
a {{< key product_name >}} `Artifact`. This artifact is retrieved by the FastAPI app for
serving the model.

Once the workflow has completed, you can deploy the app:
```shell
$ {{< key cli >}} deploy apps app.py simple-fastapi-sklearn
```
The output displays the console URL and endpoint for the FastAPI App:
```shell
✨ Deploying Application: simple-fastapi-sklearn
🔎 Console URL: https:///org/...
[Status] Pending: OutOfDate: The Configuration is still working to reflect the latest desired
specification.
[Status] Pending: IngressNotConfigured: Ingress has not yet been reconciled.
[Status] Pending: Uninitialized: Waiting for load balancer to be ready
[Status] Started: Service is ready
🚀 Deployed Endpoint: https://.apps.
```
You can see the Swagger docs of the FastAPI endpoint, by going to `/docs`:

=== PAGE: https://www.union.ai/docs/v1/serverless/user-guide/core-concepts/serving/fast-api-auth ===
# API Key Authentication with FastAPI
In this guide, we'll deploy a FastAPI app that uses API key authentication. This
allows you to invoke the endpoint from the public internet in a secure manner.
## Define the Fast API app
First we define the `ImageSpec` for the runtime image:
```python
import os
from union import ImageSpec, Resources, Secret
from union.app import App
image_spec = ImageSpec(
name="fastapi-with-auth-image",
builder="union",
packages=["union-runtime>=0.1.18", "fastapi[standard]==0.115.11", "union>=0.1.150"],
)
```
Then we define a simple FastAPI app that uses `HTTPAuthorizationCredentials` to
authenticate requests.
```python
import os
from fastapi import FastAPI, HTTPException, Security, status, Depends
from fastapi.security import HTTPAuthorizationCredentials, HTTPBearer
from typing import Annotated
from union import UnionRemote
app = FastAPI()
fast_api_app = union.app.App(
name="fastapi-with-auth",
secrets=[
union.Secret(key="AUTH_API_KEY", env_var="AUTH_API_KEY"),
union.Secret(key="MY_UNION_API_KEY", env_var="UNION_API_KEY"),
],
container_image=image_spec,
framework_app=app,
limits=union.Resources(cpu="1", mem="1Gi"),
port=8082,
requires_auth=False,
)
async def verify_token(
credentials: HTTPAuthorizationCredentials = Security(HTTPBearer()),
) -> HTTPAuthorizationCredentials:
auth_api_key = os.getenv("AUTH_API_KEY")
if credentials.credentials != AUTH_API_KEY:
raise HTTPException(
status_code=status.HTTP_403_FORBIDDEN,
detail="Could not validate credentials",
)
return credentials
@app.get("/")
def root(
credentials: Annotated[HTTPAuthorizationCredentials, Depends(verify_token)],
):
return {"message": "Hello, World!"}
```
As you can see, we define a `FastAPI` app and provide it as an input in the
`union.app.App` definition. Then, we define a `verify_token` function that
verifies the API key. Finally, we define a root endpoint that uses the
`verify_token` function to authenticate requests.
Note that we are also requesting for two secrets:
- The `AUTH_API_KEY` is used by the FastAPI app to authenticate the webhook.
- The `MY_UNION_API_KEY` is used to authenticate UnionRemote with Union.
With `requires_auth=False`, you can reach the endpoint without going through Union’s authentication, which is okay since we are rolling our own `AUTH_API_KEY`. Before
we can deploy the app, we create the secrets required by the application:
```bash
union create secret --name AUTH_API_KEY
```
Next, to create the MY_UNION_API_KEY secret, we need to first create a admin api-key:
```bash
union create admin-api-key --name MY_UNION_API_KEY
```
## Deploy the Fast API app
Finally, you can now deploy the FastAPI app:
```bash
union deploy apps app.py fastapi-with-auth
```
Deploying the application will stream the status to the console:
```
Image ghcr.io/.../webhook-serving:KXwIrIyoU_Decb0wgPy23A found. Skip building.
✨ Deploying Application: fastapi-webhook
🔎 Console URL: https:///console/projects/thomasjpfan/domains/development/apps/fastapi-webhook
[Status] Pending: App is pending deployment
[Status] Pending: RevisionMissing: Configuration "fastapi-webhook" is waiting for a Revision to become ready.
[Status] Pending: IngressNotConfigured: Ingress has not yet been reconciled.
[Status] Pending: Uninitialized: Waiting for load balancer to be ready
[Status] Started: Service is ready
🚀 Deployed Endpoint: https://rough-meadow-97cf5.apps.
```
Then to invoke the endpoint, you can use the following curl command:
```bash
curl -X GET "https://rough-meadow-97cf5.apps./" \
-H "Authorization: Bearer "
```
=== PAGE: https://www.union.ai/docs/v1/serverless/user-guide/core-concepts/serving/cache-huggingface-model ===
# Cache a HuggingFace Model as an Artifact
This guide shows you how to cache HuggingFace models as Union Artifacts.
The **{{< key cli_name >}} CLI > `{{< key cli >}}` CLI commands > `cache` > `model-from-hf`** command allows you to automatically download and cache models from HuggingFace Hub as Union Artifacts. This is particularly useful for serving large language models (LLMs) and other AI models efficiently in production environments.
## Why Cache Models from HuggingFace?
Caching models from HuggingFace Hub as Union Artifacts provides several key benefits:
- **Faster Model Downloads**: Once cached, models load much faster since they're stored in Union's optimized blob storage.
- **Stream model weights into GPU memory**: Union's **Core concepts > App Serving > Cache a HuggingFace Model as an Artifact > `SGLangApp`** and **Core concepts > App Serving > Cache a HuggingFace Model as an Artifact > `VLLMApp`** classes also allow you to load model weights
directly into GPU memory instead of downloading the weights to disk first, then loading to GPU memory.
- **Reliability**: Eliminates dependency on HuggingFace Hub availability during model serving.
- **Cost Efficiency**: Reduces repeated downloads and bandwidth costs from HuggingFace Hub.
- **Version Control**: Each cached model gets a unique artifact ID for reproducible deployments.
- **Sharding Support**: Large models can be automatically sharded for distributed inference.
- **Streaming**: Models can be streamed directly from blob storage to GPU memory.
## Prerequisites
Before using the `union cache model-from-hf` command, you need to set up authentication:
1. **Create a HuggingFace API Token**:
- Go to [HuggingFace Settings](https://huggingface.co/settings/tokens)
- Create a new token with read access
- Store it as a Union secret:
```bash
union create secret --name HUGGINGFACE_TOKEN
```
2. **Create a Union API Key** (optional):
```bash
union create api-key admin --name MY_API_KEY
union create secret --name MY_API_KEY
```
If you don't want to create a Union API key, Union tenants typically ship with
a `EAGER_API_KEY` secret, which is an internally-provision Union API key that
you can use for the purpose of caching HuggingFace models.
## Basic Example: Cache a Model As-Is
The simplest way to cache a model is to download it directly from HuggingFace without any modifications:
```bash
union cache model-from-hf Qwen/Qwen2.5-0.5B-Instruct \
--hf-token-key HUGGINGFACE_TOKEN \
--union-api-key EAGER_API_KEY \
--artifact-name qwen2-5-0-5b-instruct \
--cpu 2 \
--mem 8Gi \
--ephemeral-storage 10Gi \
--wait
```
### Command Breakdown
- `Qwen/Qwen2.5-0.5B-Instruct`: The HuggingFace model repository
- `--hf-token-key HUGGINGFACE_TOKEN`: Union secret containing your HuggingFace API token
- `--union-api-key EAGER_API_KEY`: Union secret with admin permissions
- `--artifact-name qwen2-5-0-5b-instruct`: Custom name for the cached artifact.
If not provided, the model repository name is lower-cased and `.` characters are
replaced with `-`.
- `--cpu 2`: CPU resources for downloading the caching
- `--mem 8Gi`: Memory resources for downloading and caching
- `--ephemeral-storage 10Gi`: Temporary storage for the download process
- `--wait`: Wait for the caching process to complete
### Output
When the command runs, you'll see outputs like this:
```
🔄 Started background process to cache model from Hugging Face repo Qwen/Qwen2.5-0.5B-Instruct.
Check the console for status at
https://acme.union.ai/console/projects/flytesnacks/domains/development/executions/a5nr2
g79xb9rtnzczqtp
```
You can then visit the URL to see the model caching workflow on the Union UI.
If you provide the `--wait` flag to the `union cache model-from-hf` command,
the command will wait for the model to be cached and then output additional
information:
```
Cached model at:
/tmp/flyte-axk70dc8/sandbox/local_flytekit/50b27158c2bb42efef8e60622a4d2b6d/model_snapshot
Model Artifact ID:
flyte://av0.2/acme/flytesnacks/development/qwen2-5-0-5b-instruct@322a60c7ba4df41621be528a053f3b1a
To deploy this model run:
union deploy model --project None --domain development
flyte://av0.2/acme/flytesnacks/development/qwen2-5-0-5b-instruct@322a60c7ba4df41621be528a053f3b1a
```
## Using Cached Models in Applications
Once you have cached a model, you can use it in your Union serving apps:
### VLLM App Example
```python
import os
from union import Artifact, Resources
from union.app.llm import VLLMApp
from flytekit.extras.accelerators import L4
# Use the cached model artifact
Model = Artifact(name="qwen2-5-0-5b-instruct")
vllm_app = VLLMApp(
name="vllm-app-3",
requests=Resources(cpu="12", mem="24Gi", gpu="1"),
accelerator=L4,
model=Model.query(), # Query the cached artifact
model_id="qwen2",
scaledown_after=300,
stream_model=True,
port=8084,
)
```
### SGLang App Example
```python
import os
from union import Artifact, Resources
from union.app.llm import SGLangApp
from flytekit.extras.accelerators import L4
# Use the cached model artifact
Model = Artifact(name="qwen2-5-0-5b-instruct")
sglang_app = SGLangApp(
name="sglang-app-3",
requests=Resources(cpu="12", mem="24Gi", gpu="1"),
accelerator=L4,
model=Model.query(), # Query the cached artifact
model_id="qwen2",
scaledown_after=300,
stream_model=True,
port=8000,
)
```
## Advanced Example: Sharding a Model with the vLLM Engine
For large models that require distributed inference, you can use the `--shard-config` option to automatically shard the model using the [vLLM](https://docs.vllm.ai/en/latest/) inference engine.
### Create a Shard Configuration File
Create a YAML file (e.g., `shard_config.yaml`) with the sharding parameters:
```yaml
engine: vllm
args:
model: unsloth/Llama-3.3-70B-Instruct
tensor_parallel_size: 4
gpu_memory_utilization: 0.9
extra_args:
max_model_len: 16384
```
The `shard_config.yaml` file is a YAML file that should conform to the
**Core concepts > App Serving > Cache a HuggingFace Model as an Artifact > `remote.ShardConfig`**
dataclass, where the `args` field contains configuration that's forwarded to the
underlying inference engine. Currently, only the `vLLM` engine is supported for sharding, so
the `args` field should conform to the **Core concepts > App Serving > Cache a HuggingFace Model as an Artifact > `remote.VLLMShardArgs`** dataclass.
### Cache the Sharded Model
```bash
union cache model-from-hf unsloth/Llama-3.3-70B-Instruct \
--hf-token-key HUGGINGFACE_TOKEN \
--union-api-key EAGER_API_KEY \
--artifact-name llama-3-3-70b-instruct-sharded \
--cpu 36 \
--gpu 4 \
--mem 300Gi \
--ephemeral-storage 300Gi \
--accelerator nvidia-l40s \
--shard-config shard_config.yaml \
--project flytesnacks \
--domain development \
--wait
```
## Best Practices
When caching models without sharding
1. **Resource Sizing**: Allocate sufficient resources for the model size:
- Small models (< 1B): 2-4 CPU, 4-8Gi memory
- Medium models (1-7B): 4-8 CPU, 8-16Gi memory
- Large models (7B+): 8+ CPU, 16Gi+ memory
2. **Sharding for Large Models**: Use tensor parallelism for models > 7B parameters:
- 7-13B models: 2-4 GPUs
- 13-70B models: 4-8 GPUs
- 70B+ models: 8+ GPUs
3. **Storage Considerations**: Ensure sufficient ephemeral storage for the download process
=== PAGE: https://www.union.ai/docs/v1/serverless/user-guide/core-concepts/serving/deploy-optimized-llm-endpoints ===
# Deploy Optimized LLM Endpoints with vLLM and SGLang
This guide shows you how to deploy high-performance LLM endpoints using SGLang
and vLLM. It also shows how to use Union's optimized serving images that are
designed to reduce cold start times and provide efficient model serving
capabilities.
For information on how to cache models from HuggingFace Hub as Union Artifacts,
see the **Core concepts > App Serving > Cache a HuggingFace Model as an Artifact** guide.
## Overview
Union provides two specialized app classes for serving high-performance LLM endpoints:
- ****Core concepts > App Serving > Deploy Optimized LLM Endpoints with vLLM and SGLang > `SGLangApp`****: uses [SGLang](https://docs.sglang.ai/), a fast serving framework for large language models and vision language models.
- ****Core concepts > App Serving > Deploy Optimized LLM Endpoints with vLLM and SGLang > `VLLMApp`****: uses [vLLM](https://docs.vllm.ai/en/latest/), a fast and easy-to-use library for LLM inference and serving.
By default, both classes provide:
- **Reduced cold start times** through optimized image loading.
- **Fast model loading** by streaming model weights directly from blob storage to GPU memory.
- **Distributed inference** with options for shared memory and tensor parallelism.
You can also serve models with other frameworks like **Core concepts > App Serving > Serving a Model from a Workflow With FastAPI**, but doing so would require more
effort to achieve high performance, whereas vLLM and SGLang provide highly performant LLM endpoints out of the box.
## Basic Example: Deploy a Non-Sharded Model
### Deploy with vLLM
Assuming that you have followed the guide to **Core concepts > App Serving > Cache a HuggingFace Model as an Artifact**
and have a model artifact named `qwen2-5-0-5b-instruct`, you can deploy a simple LLM endpoint with the following code:
```python
# vllm_app.py
import union
from union.app.llm import VLLMApp
from flytekit.extras.accelerators import L4
# Reference the cached model artifact
Model = union.Artifact(name="qwen2-5-0-5b-instruct")
# Deploy with default image
vllm_app = VLLMApp(
name="vllm-app",
requests=union.Resources(cpu="12", mem="24Gi", gpu="1"),
accelerator=L4,
model=Model.query(), # Query the cached artifact
model_id="qwen2",
scaledown_after=300,
stream_model=True, # Enable streaming for faster loading
port=8084,
requires_auth=False,
)
```
To use the optimized image, use the `OPTIMIZED_VLLM_IMAGE` variable:
```python
from union.app.llm import OPTIMIZED_VLLM_IMAGE
vllm_app = VLLMApp(
name="vllm-app",
container_image=OPTIMIZED_VLLM_IMAGE,
...
)
```
Here we're using a single L4 GPU to serve the model and specifying `stream_model=True`
to stream the model weights directly to GPU memory.
Deploy the app:
```bash
union deploy apps vllm_app.py vllm-app
```
### Deploy with SGLang
```python
# sglang_app.py
import union
from union.app.llm import SGLangApp
from flytekit.extras.accelerators import L4
# Reference the cached model artifact
Model = union.Artifact(name="qwen2-5-0-5b-instruct")
# Deploy with default image
sglang_app = SGLangApp(
name="sglang-app",
requests=union.Resources(cpu="12", mem="24Gi", gpu="1"),
accelerator=L4,
model=Model.query(), # Query the cached artifact
model_id="qwen2",
scaledown_after=300,
stream_model=True, # Enable streaming for faster loading
port=8000,
requires_auth=False,
)
```
To use the optimized image, use the `OPTIMIZED_SGLANG_IMAGE` variable:
```python
from union.app.llm import OPTIMIZED_SGLANG_IMAGE
sglang_app = SGLangApp(
name="sglang-app",
container_image=OPTIMIZED_SGLANG_IMAGE,
...
)
```
Deploy the app:
```bash
union deploy apps sglang_app.py sglang-app
```
## Custom Image Example: Deploy with Your Own Image
If you need more control over the serving environment, you can define a custom `ImageSpec`.
For vLLM apps, that would look like this:
```python
import union
from union.app.llm import VLLMApp
from flytekit.extras.accelerators import L4
# Reference the cached model artifact
Model = union.Artifact(name="qwen2-5-0-5b-instruct")
# Define custom optimized image
image = union.ImageSpec(
name="vllm-serving-custom",
builder="union",
apt_packages=["build-essential"],
packages=["union[vllm]>=0.1.189"],
env={
"NCCL_DEBUG": "INFO",
"CUDA_LAUNCH_BLOCKING": "1",
},
)
# Deploy with custom image
vllm_app = VLLMApp(
name="vllm-app-custom",
container_image=image,
...
)
```
And for SGLang apps, it would look like this:
```python
# sglang_app.py
import union
from union.app.llm import SGLangApp
from flytekit.extras.accelerators import L4
# Reference the cached model artifact
Model = union.Artifact(name="qwen2-5-0-5b-instruct")
# Define custom optimized image
image = union.ImageSpec(
name="sglang-serving-custom",
builder="union",
python_version="3.12",
apt_packages=["build-essential"],
packages=["union[sglang]>=0.1.189"],
)
# Deploy with custom image
sglang_app = SGLangApp(
name="sglang-app-custom",
container_image=image,
...
)
```
This allows you to control the exact package versions in the image, but at the
cost of increased cold start times. This is because the Union images are optimized
with [Nydus](https://github.com/dragonflyoss/nydus), which reduces the cold start
time by streaming container image layers. This allows the container to start before
the image is fully downloaded.
## Advanced Example: Deploy a Sharded Model
For large models that require distributed inference, deploy using a sharded model artifact:
### Cache a Sharded Model
First, cache a large model with sharding (see **Core concepts > App Serving > Cache a HuggingFace Model as an Artifact > Advanced Example: Sharding a Model with the vLLM Engine** for details).
First create a shard configuration file:
```yaml
# shard_config.yaml
engine: vllm
args:
model: unsloth/Llama-3.3-70B-Instruct
tensor_parallel_size: 4
gpu_memory_utilization: 0.9
extra_args:
max_model_len: 16384
```
Then cache the model:
```bash
union cache model-from-hf unsloth/Llama-3.3-70B-Instruct \
--hf-token-key HUGGINGFACE_TOKEN \
--union-api-key EAGER_API_KEY \
--artifact-name llama-3-3-70b-instruct-sharded \
--cpu 36 \
--gpu 4 \
--mem 300Gi \
--ephemeral-storage 300Gi \
--accelerator nvidia-l40s \
--shard-config shard_config.yaml \
--project flytesnacks \
--domain development \
--wait
```
### Deploy with VLLMApp
Once the model is cached, you can deploy it to a vLLM app:
```python
# vllm_app_sharded.py
from flytekit.extras.accelerators import L40S
from union import Artifact, Resources
from union.app.llm import VLLMApp
# Reference the sharded model artifact
LLMArtifact = Artifact(name="llama-3-3-70b-instruct-sharded")
# Deploy sharded model with optimized configuration
vllm_app = VLLMApp(
name="vllm-app-sharded",
requests=Resources(
cpu="36",
mem="300Gi",
gpu="4",
ephemeral_storage="300Gi",
),
accelerator=L40S,
model=LLMArtifact.query(),
model_id="llama3",
# Additional arguments to pass into the vLLM engine:
# see https://docs.vllm.ai/en/stable/serving/engine_args.html
# or run `vllm serve --help` to see all available arguments
extra_args=[
"--tensor-parallel-size", "4",
"--gpu-memory-utilization", "0.8",
"--max-model-len", "4096",
"--max-num-seqs", "256",
"--enforce-eager",
],
env={
"NCCL_DEBUG": "INFO",
"CUDA_LAUNCH_BLOCKING": "1",
"VLLM_SKIP_P2P_CHECK": "1",
},
shared_memory=True, # Enable shared memory for multi-GPU
scaledown_after=300,
stream_model=True,
port=8084,
requires_auth=False,
)
```
Then deploy the app:
```bash
union deploy apps vllm_app_sharded.py vllm-app-sharded-optimized
```
### Deploy with SGLangApp
You can also deploy the sharded model to a SGLang app:
```python
import os
from flytekit.extras.accelerators import GPUAccelerator
from union import Artifact, Resources
from union.app.llm import SGLangApp
# Reference the sharded model artifact
LLMArtifact = Artifact(name="llama-3-3-70b-instruct-sharded")
# Deploy sharded model with SGLang
sglang_app = SGLangApp(
name="sglang-app-sharded",
requests=Resources(
cpu="36",
mem="300Gi",
gpu="4",
ephemeral_storage="300Gi",
),
accelerator=GPUAccelerator("nvidia-l40s"),
model=LLMArtifact.query(),
model_id="llama3",
# Additional arguments to pass into the SGLang engine:
# See https://docs.sglang.ai/backend/server_arguments.html for details.
extra_args=[
"--tensor-parallel-size", "4",
"--mem-fraction-static", "0.8",
],
env={
"NCCL_DEBUG": "INFO",
"CUDA_LAUNCH_BLOCKING": "1",
},
shared_memory=True,
scaledown_after=300,
stream_model=True,
port=8084,
requires_auth=False,
)
```
Then deploy the app:
```bash
union deploy apps sglang_app_sharded.py sglang-app-sharded-optimized
```
## Authentication via API Key
To secure your `SGLangApp`s and `VLLMApp`s with API key authentication, you can
specify a secret in the `extra_args` parameter. First, create a secret:
```bash
union secrets create --name AUTH_SECRET
```
Add the secret value to the input field and save the secret.
Then, add the secret to the `extra_args` parameter. For SGLang, do the following:
```python
from union import Secret
sglang_app = SGLangApp(
name="sglang-app",
...,
# Disable Union's platform-level authentication so you can access the
# endpoint in the public internet
requires_auth=False,
secrets=[Secret(key="AUTH_SECRET", env_var="AUTH_SECRET")],
extra_args=[
...,
"--api-key", "$AUTH_SECRET", # Use the secret in the extra_args
],
)
```
And similarly for vLLM, do the following:
```python
from union import Secret
vllm_app = VLLMApp(
name="vllm-app",
...,
# Disable Union's platform-level authentication so you can access the
# endpoint in the public internet
requires_auth=False,
secrets=[Secret(key="AUTH_SECRET", env_var="AUTH_SECRET")],
extra_args=[
...,
"--api-key", "$AUTH_SECRET", # Use the secret in the extra_args
],
)
```
## Performance Tuning
You can refer to the corresponding documentation for vLLM and SGLang for more
information on how to tune the performance of your app.
- **vLLM**: see the [optimization and tuning](https://docs.vllm.ai/en/latest/configuration/optimization.html) and [engine arguments](https://docs.vllm.ai/en/latest/configuration/engine_args.html) pages to learn about how to tune the performance of your app. You can also look at the [distributed inference and serving](https://docs.vllm.ai/en/latest/serving/distributed_serving.html) page to learn more about distributed inference.
- **SGLang**: see the [environment variables](https://docs.sglang.ai/references/environment_variables.html#performance-tuning) and [server arguments](https://docs.sglang.ai/backend/server_arguments.html) pages to learn about all of the available serving
options in SGLang.
=== PAGE: https://www.union.ai/docs/v1/serverless/user-guide/core-concepts/serving/deploying-your-connector ===
# Deploying Custom Flyte Connectors
**Core concepts > App Serving > Deploying Custom Flyte Connectors > Flyte connectors** allow you to extend Union's capabilities by integrating with external services.
This guide explains how to deploy custom connectors that can be used in your Flyte workflows.
## Overview
Connectors enable your workflows to interact with third-party services or systems.
Union.ai supports deploying connectors as services using the `FlyteConnectorApp` class. You can deploy connectors in two ways:
1. **Module-based deployment**: Include your connector code directly in the deployment
2. **ImageSpec-based deployment**: Use pre-built images with connectors already installed
## Prerequisites
Before deploying a connector, ensure you have:
- A Union.ai account
- Any required API keys or credentials for your connector
- Docker registry access (if using custom images)
## Connector Deployment Options
### Module-based Deployment
Module-based deployment is ideal when you want to iterate quickly on connector development. With this approach, you include your connector code directly using the `include` parameter.
```python
# app.py
from union import ImageSpec, Resources, Secret
from union.app import FlyteConnectorApp
image = ImageSpec(
name="flyteconnector",
packages=[
"flytekit[connector]",
"union",
"union-runtime",
"openai", # ChatGPT connector needs openai SDK
],
env={"FLYTE_SDK_LOGGING_LEVEL": "10"},
builder="union",
)
openai_connector_app = FlyteConnectorApp(
name="openai-connector-app",
container_image=image,
secrets=[Secret(key="flyte_openai_api_key")],
limits=Resources(cpu="1", mem="1Gi"),
include=["./chatgpt"], # Include the connector module directory
)
```
With this approach, you organize your connector code in a module structure:
```bash
chatgpt/
├── __init__.py
├── connector.py
└── constants.py
```
The `include` parameter takes a list of files or directories to include in the deployment.
### ImageSpec-based Deployment
ImageSpec-based deployment is preferred for production environments where you have stable connector implementations. In this approach, your connector code is pre-installed in a container image.
```python
# app.py
from union import ImageSpec, Resources, Secret
from union.app import FlyteConnectorApp
image = ImageSpec(
name="flyteconnector",
packages=[
"flytekit[connector]",
"flytekitplugins-slurm",
"union",
"union-runtime",
],
apt_packages=["build-essential", "libmagic1", "vim", "openssh-client", "ca-certificates"],
env={"FLYTE_SDK_LOGGING_LEVEL": "10"},
builder="union",
)
slurm_connector_app = FlyteConnectorApp(
name="slurm-connector-app",
container_image=image,
secrets=[Secret(key="flyte_slurm_private_key")],
limits=Resources(cpu="1", mem="1Gi"),
)
```
## Managing Secrets
Most connectors require credentials to authenticate with external services. Union.ai allows you to manage these securely:
```bash
# Create a secret for OpenAI API key
union create secret flyte_openai_api_key -f /etc/secrets/flyte_openai_api_key --project flytesnacks --domain development
# Create a secret for SLURM access
union create secret flyte_slurm_private_key -f /etc/secrets/flyte_slurm_private_key --project flytesnacks --domain development
```
Reference these secrets in your connector app:
```python
from union import Secret
# In your app definition
secrets=[Secret(key="flyte_openai_api_key")]
```
Inside your connector code, access these secrets using:
```python
from flytekit.extend.backend.utils import get_connector_secret
api_key = get_connector_secret(secret_key="FLYTE_OPENAI_API_KEY")
```
## Example: Creating a ChatGPT Connector
Here's how to implement a ChatGPT connector:
1. Create a connector class:
```python
# chatgpt/connector.py
import asyncio
import logging
from typing import Optional
import openai
from flyteidl.core.execution_pb2 import TaskExecution
from flytekit import FlyteContextManager
from flytekit.core.type_engine import TypeEngine
from flytekit.extend.backend.base_connector import ConnectorRegistry, Resource, SyncConnectorBase
from flytekit.extend.backend.utils import get_connector_secret
from flytekit.models.literals import LiteralMap
from flytekit.models.task import TaskTemplate
from .constants import OPENAI_API_KEY, TIMEOUT_SECONDS
class ChatGPTConnector(SyncConnectorBase):
name = "ChatGPT Connector"
def __init__(self):
super().__init__(task_type_name="chatgpt")
async def do(
self,
task_template: TaskTemplate,
inputs: Optional[LiteralMap] = None,
**kwargs,
) -> Resource:
ctx = FlyteContextManager.current_context()
input_python_value = TypeEngine.literal_map_to_kwargs(ctx, inputs, {"message": str})
message = input_python_value["message"]
custom = task_template.custom
custom["chatgpt_config"]["messages"] = [{"role": "user", "content": message}]
client = openai.AsyncOpenAI(
organization=custom["openai_organization"],
api_key=get_connector_secret(secret_key=OPENAI_API_KEY),
)
logger = logging.getLogger("httpx")
logger.setLevel(logging.WARNING)
completion = await asyncio.wait_for(client.chat.completions.create(**custom["chatgpt_config"]), TIMEOUT_SECONDS)
message = completion.choices[0].message.content
outputs = {"o0": message}
return Resource(phase=TaskExecution.SUCCEEDED, outputs=outputs)
ConnectorRegistry.register(ChatGPTConnector())
```
2. Define constants:
```python
# chatgpt/constants.py
# Constants for ChatGPT connector
TIMEOUT_SECONDS = 10
OPENAI_API_KEY = "FLYTE_OPENAI_API_KEY"
```
3. Create an `__init__.py` file:
```python
# chatgpt/__init__.py
from .connector import ChatGPTConnector
__all__ = ["ChatGPTConnector"]
```
## Using the Connector in a Workflow
After deploying your connector, you can use it in your workflows:
```python
# workflow.py
from flytekit import workflow
from flytekitplugins.openai import ChatGPTTask
chatgpt_small_job = ChatGPTTask(
name="3.5-turbo",
chatgpt_config={
"model": "gpt-3.5-turbo",
"temperature": 0.7,
},
)
chatgpt_big_job = ChatGPTTask(
name="gpt-4",
chatgpt_config={
"model": "gpt-4",
"temperature": 0.7,
},
)
@workflow
def wf(message: str) -> str:
message = chatgpt_small_job(message=message)
message = chatgpt_big_job(message=message)
return message
```
Run the workflow:
```bash
union run --remote workflow.py wf --message "Tell me about Union.ai"
```
## Creating Your Own Connector
To create a custom connector:
1. Inherit from `SyncConnectorBase` or `AsyncConnectorBase`
2. Implement the required methods (`do` for synchronous connectors, `create`, `get`, and `delete` for asynchronous connectors)
3. Register your connector with `ConnectorRegistry.register(YourConnector())`
4. Deploy your connector using one of the methods above
## Deployment Commands
Deploy your connector app:
```bash
# Module-based deployment
union deploy apps app_module_deployment/app.py openai-connector-app
# ImageSpec-based deployment
union deploy apps app_image_spec_deployment/app.py slurm-connector-app
```
## Best Practices
1. **Security**: Never hardcode credentials; always use Union.ai secrets
2. **Error Handling**: Include robust error handling in your connector implementation
3. **Timeouts**: Set appropriate timeouts for external API calls
4. **Logging**: Implement detailed logging for debugging
5. **Testing**: Test your connector thoroughly before deploying to production
By following this guide, you can create and deploy custom connectors that extend Union.ai's capabilities to integrate with any external service or system your workflows need to interact with.
=== PAGE: https://www.union.ai/docs/v1/serverless/user-guide/core-concepts/caching ===
# Caching
{{< key product_name >}} allows you to cache the output of nodes (**Core concepts > Tasks**, **Core concepts > Workflows > Subworkflows and sub-launch plans**) to make subsequent executions faster.
Caching is useful when many executions of identical code with the same input may occur.
Here's a video with a brief explanation and demo, focused on task caching:
📺 [Watch on YouTube](https://www.youtube.com/watch?v=WNkThCp-gqo)
> [!NOTE]
> * Caching is available and individiually enablable for all nodes *within* a workflow directed acyclic graph (DAG).
> * Nodes in this sense include tasks, subworkflows (workflows called directly within another workflow), and sub-launch plans (launch plans called within a workflow).
> * Caching is *not available* for top-level workflows or launch plans (that is, those invoked from UI or CLI).
> * By default, caching is *disabled* on all tasks, subworkflows and sub-launch plans, to avoid unintended consequences when caching executions with side effects. It must be explcitly enabled on any node where caching is desired.
## Enabling and configuring caching
Caching can be enabled by setting the `cache` parameter of the `@{{< key kit_as >}}.task` (for tasks) decorator or `with_overrides` method (for subworkflows or sub-launch plans) to a `Cache` object. The parameters of the `Cache` object are used to configure the caching behavior.
For example:
```python
import {{< key kit_import >}}
# Define a task and enable caching for it
@{{< key kit_as >}}.task(cache={{< key kit_as >}}.Cache(version="1.0", serialize=True, ignored_inputs=["a"]))
def sum(a: int, b: int, c: int) -> int:
return a + b + c
# Define a workflow to be used as a subworkflow
@{{< key kit_as >}}.workflow
def child*wf(a: int, b: int, c: int) -> list[int]:
return [
sum(a=a, b=b, c=c)
for _ in range(5)
]
# Define a launch plan to be used as a sub-launch plan
child_lp = {{< key kit_as >}}.LaunchPlan.get_or_create(child_wf)
# Define a parent workflow that uses the subworkflow
@{{< key kit_as >}}.workflow
def parent_wf_with_subwf(input: int = 0):
return [
# Enable caching on the subworkflow
child_wf(a=input, b=3, c=4).with_overrides(cache={{< key kit_as >}}.Cache(version="1.0", serialize=True, ignored_inputs=["a"]))
for i in [1, 2, 3]
]
# Define a parent workflow that uses the sub-launch plan
@{{< key kit_as >}}.workflow
def parent_wf_with_sublp(input: int = 0):
return [
child_lp(a=input, b=1, c=2).with_overrides(cache={{< key kit_as >}}.Cache(version="1.0", serialize=True, ignored_inputs=["a"]))
for i in [1, 2, 3]
]
```
In the above example, caching is enabled at multiple levels:
* At the task level, in the `@{{< key kit_as >}}.task` decorator of the task `sum`.
* At the workflow level, in the `with_overrides` method of the invocation of the workflow `child_wf`.
* At the launch plan level, in the `with_overrides` method of the invocation of the launch plan `child_lp`.
In each case, the result of the execution is cached and reused in subsequent executions.
Here the reuse is demonstrated by calling the `child_wf` and `child_lp` workflows multiple times with the same inputs.
Additionally, if the same node is invoked again with the same inputs (excluding input "a", as it is ignored for purposes of versioning)
the cached result is returned immediately instead of re-executing the process.
This applies even if the cached node is invoked externally through the UI or CLI.
## The `Cache` object
The [Cache]() object takes the following parameters:
* `version` (`Optional[str]`): Part of the cache key.
A change to this parameter from one invocation to the next will invalidate the cache.
This allows you to explicitly indicate when a change has been made to the node that should invalidate any existing cached results.
Note that this is not the only change that will invalidate the cache (see below).
Also, note that you can manually trigger cache invalidation per execution using the **Core concepts > Caching > The `overwrite-cache` flag**.
If not set, the version will be generated based on the specified cache policies.
When using `cache=True`, **Core concepts > Caching > Enabling caching with the default configuration**, the **Core concepts > Caching > Default cache policy** generates the version.
* `serialize` (`bool`): Enables or disables **Core concepts > Caching > Cache serialization**.
When enabled, {{< key product_name >}} ensures that a single instance of the node is run before any other instances that would otherwise run concurrently.
This allows the initial instance to cache its result and lets the later instances reuse the resulting cached outputs.
If not set, cache serialization is disabled.
* `ignored_inputs` (`Union[Tuple[str, ...], str]`): Input variables that should not be included when calculating the hash for the cache.
If not set, no inputs are ignored.
* `policies` (`Optional[Union[List[CachePolicy], CachePolicy]]`): A list of [CachePolicy]() objects used for automatic version generation.
If no `version` is specified and one or more polices are specified then these policies automatically generate the version.
Policies are applied in the order they are specified to produce the final `version`.
If no `version` is specified and no policies are specified then the **Core concepts > Caching > Default cache policy** generates the version.
When using `cache=True`, **Core concepts > Caching > Enabling caching with the default configuration**, the **Core concepts > Caching > Default cache policy** generates the version.
* `salt` (`str`): A [salt]() used in the hash generation. A salt is a random value that is combined with the input values before hashing.
## Enabling caching with the default configuration
Instead of specifying a `Cache` object, a simpler way to enable caching is to set `cache=True` in the `@{{< key kit_as >}}.task` decorator (for tasks) or the `with_overrides` method (for subworkflows and sub-launch plans).
When `cache=True` is set, caching is enabled with the following configuration:
* `version` is automatically generated by the **Core concepts > Caching > default cache policy**.
* `serialize` is set to `False`.
* `ignored_inputs` is not set. No parameters are ignored.
You can convert the example above to use the default configuration throughout by changing each instance of `cache={{< key kit_as >}}.Cache(...)` to `cache=True`. For example, the task `sum` would now be:
```python
@{{< key kit_as >}}.task(cache=True)
def sum(a: int, b: int, c: int) -> int:
return a + b + c
```
## Automatic version generation
Automatic version generation is useful when you want to generate the version based on the function body of the task, or other criteria.
You can enable automatic version generation by specifying `cache=Cache(...)` with one or more `CachePolicy` classes in the `policies` parameter of the `Cache` object (and by not specifying an explicit `version` parameter), like this:
```python
@{{< key kit_as >}}.task(cache=Cache(policies=[CacheFunctionBody()]))
def sum(a: int, b: int, c: int) -> int:
return a + b + c
```
Alternatively, you can just use the default configuration by specify use `cache=True`. In this case the default cache policy is used to generate the version.
## Default cache policy
Automatic version generation using the default cache policy is used
* if you set `cache=True`, or
* if you set `cache=Cache(...)` but do not specify an explicit `version` or `policies` parameters within the `Cache` object.
The default cache policy is `{{< key kit_as >}}.cache.CacheFunctionBody`.
This policy generates a version by hashing the text of the function body of the task.
This means that if the code in the function body changes, the version changes, and the cache is invalidated. Note that `CacheFunctionBody` does not recursively check for changes in functions or classes referenced in the function body.
## The `overwrite-cache` flag
When launching the execution of a workflow, launch plan or task, you can use the `overwrite-cache` flag to invalidate the cache and force re-execution.
### Overwrite cache on the command line
The `overwrite-cache` flag can be used from the command line with the `{{< key cli >}} run` command. For example:
```shell
$ {{< key cli >}} run --remote --overwrite-cache example.py wf
```
### Overwrite cache in the UI
You can also trigger cache invalidation when launching an execution from the UI by checking **Override**, in the launch dialog:
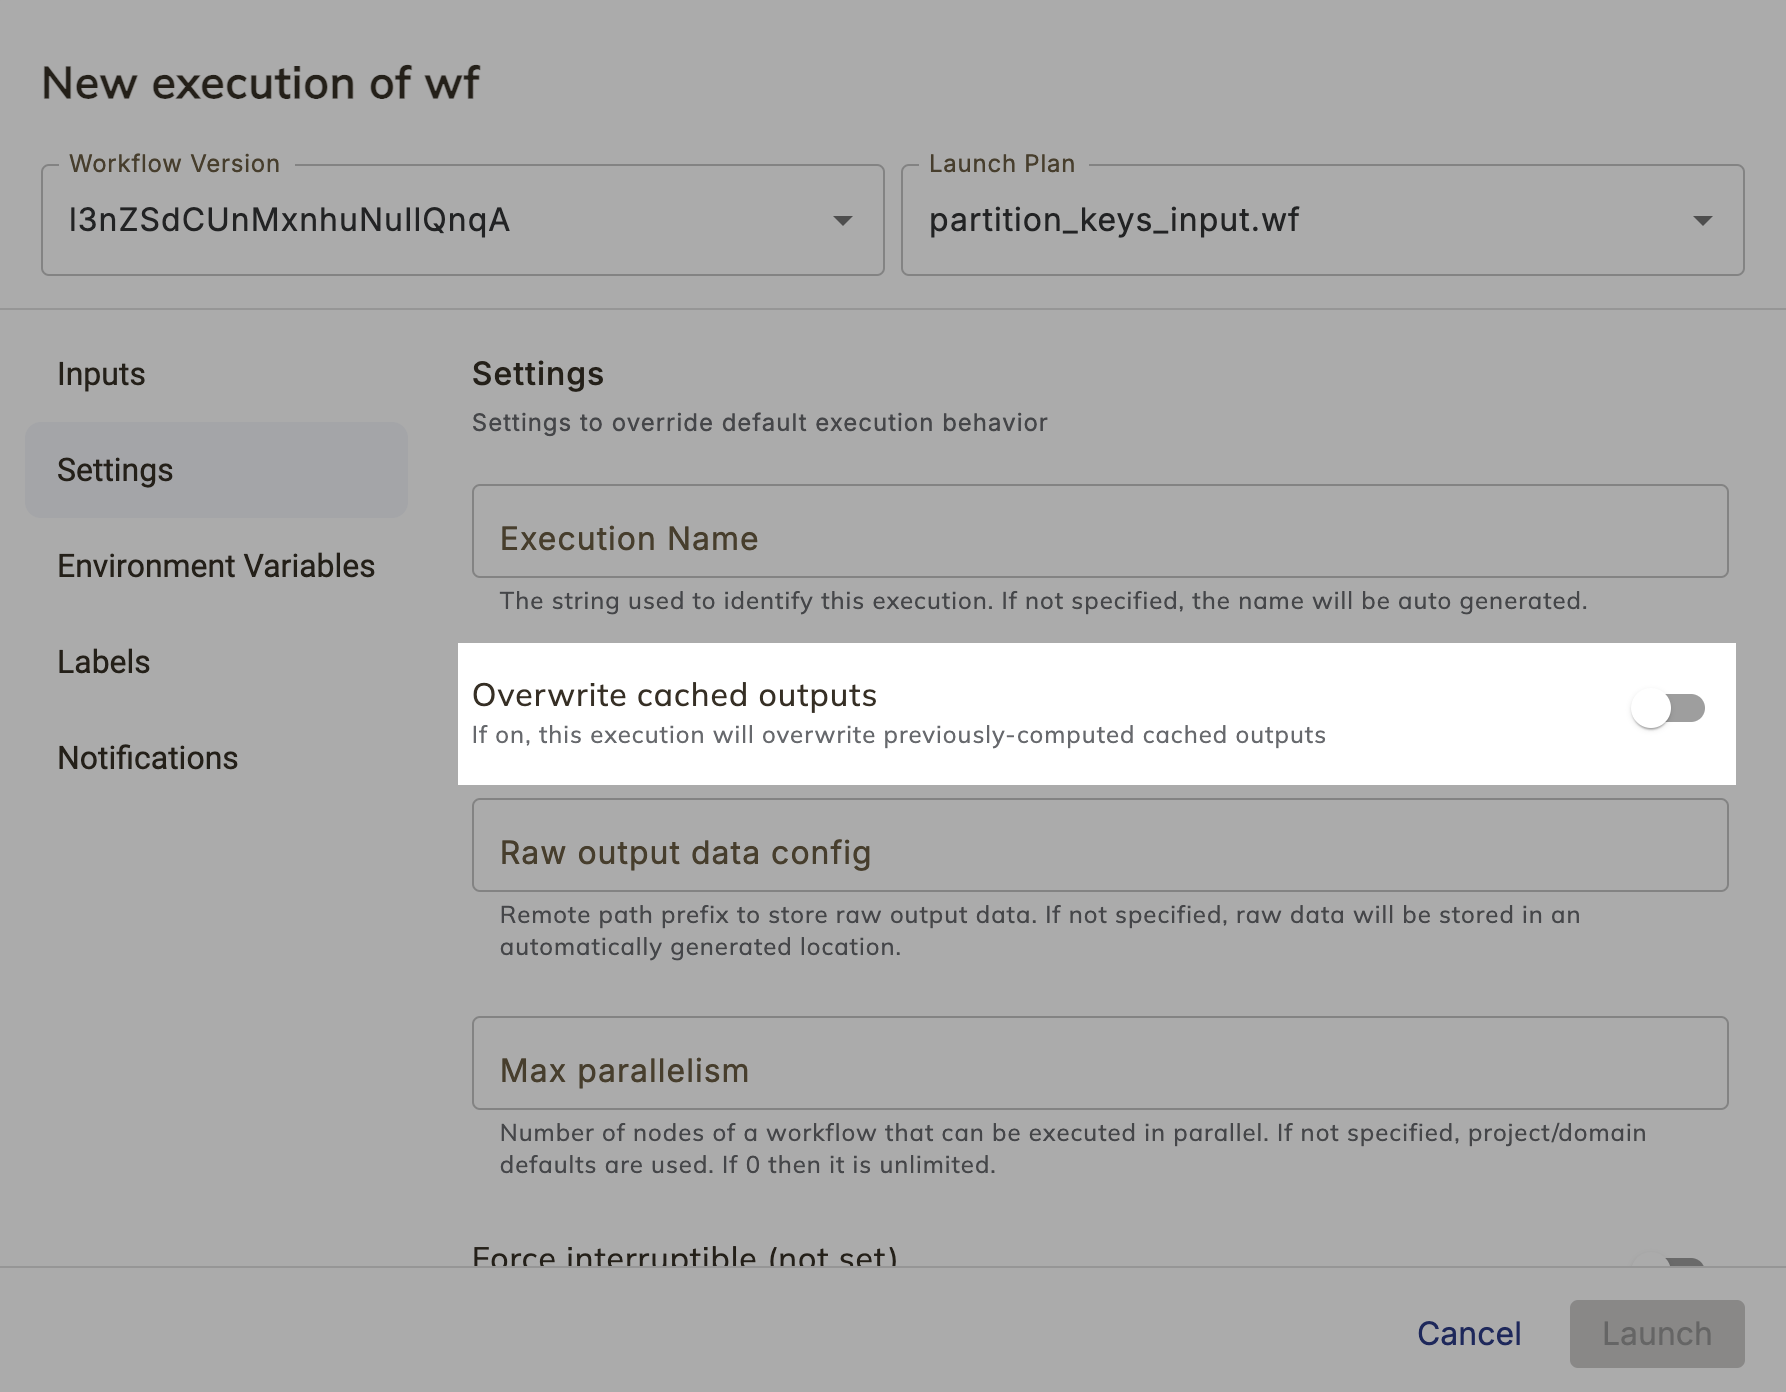
### Overwrite cache programmatically
When using `{{< key kit_remote >}}`, you can use the `overwrite_cache` parameter in the [`{{< key kit_remote >}}.execute`]() method:
```python
from union.remote import {{< key kit_remote >}}
remote = {{< key kit_remote >}}()
wf = remote.fetch_workflow(name="workflows.example.wf")
execution = remote.execute(wf, inputs={"name": "Kermit"}, overwrite_cache=True)
```
## How caching works
When a node (with caching enabled) completes on {{< key product_name >}}, a **key-value entry** is created in the **caching table**. The **value** of the entry is the output.
The **key** is composed of:
* **Project:** A task run under one project cannot use the cached task execution from another project which would cause inadvertent results between project teams that could result in data corruption.
* **Domain:** To separate test, staging, and production data, task executions are not shared across these environments.
* **Cache Version:** The cache version is either explicitly set using the `version` parameter in the `Cache` object or automatically set by a cache policy (see **Core concepts > Caching > Automatic version generation**).
If the version changes (either explicitly or automatically), the cache entry is invalidated.
* **Node signature:** The cache is specific to the signature associated with the execution.
The signature comprises the name, input parameter names/types, and the output parameter name/type of the node.
If the signature changes, the cache entry is invalidated.
* **Input values:** A well-formed {{< key product_name >}} node always produces deterministic outputs.
This means that, given a set of input values, every execution should have identical outputs.
When an execution is cached, the input values are part of the cache key.
If a node is run with a new set of inputs, a new cache entry is created for the combination of that particular entity with those particular inputs.
The result is that within a given project and domain, a cache entry is created for each distinct combination of name, signature, cache version, and input set for every node that has caching enabled.
If the same node with the same input values is encountered again, the cached output is used instead of running the process again.
### Explicit cache version
When a change to code is made that should invalidate the cache for that node, you can explicitly indicate this by incrementing the `version` parameter value.
For a task example, see below. (For workflows and launch plans, the parameter would be specified in the `with_overrides` method.)
```python
@{{< key kit_as >}}.task(cache={{< key kit_as >}}.Cache(version="1.1"))
def t(n: int) -> int:
return n \* n + 1
```
Here the `version` parameter has been bumped from `1.0`to `1.1`, invalidating of the existing cache.
The next time the task is called it will be executed and the result re-cached under an updated key.
However, if you change the version back to `1.0`, you will get a "cache hit" again and skip the execution of the task code.
If used, the `version` parameter must be explicitly changed in order to invalidate the cache.
If not used, then a cache policy may be specified to generate the version, or you can rely on the default cache policy.
Not every Git revision of a node will necessarily invalidate the cache.
A change in Git SHA does not necessarily correlate to a change in functionality.
You can refine your code without invalidating the cache as long as you explicitly use, and don't change, the `version` parameter (or the signature, see below) of the node.
The idea behind this is to decouple syntactic sugar (for example, changed documentation or renamed variables) from changes to logic that can affect the process's result.
When you use Git (or any version control system), you have a new version per code change.
Since the behavior of most nodes in a Git repository will remain unchanged, you don't want their cached outputs to be lost.
When a node's behavior does change though, you can bump `version` to invalidate the cache entry and make the system recompute the outputs.
### Node signature
If you modify the signature of a node by adding, removing, or editing input parameters or output return types, {{< key product_name >}} invalidates the cache entries for that node.
During the next execution, {{< key product_name >}} executes the process again and caches the outputs as new values stored under an updated key.
## Cache serialization
Cache serialization means only executing a single instance of a unique cacheable task (determined by the `cache_version` parameter and task signature) at a time.
Using this mechanism, {{< key product_name >}} ensures that during multiple concurrent executions of a task only a single instance is evaluated, and all others wait until completion and reuse the resulting cached outputs.
Ensuring serialized evaluation requires a small degree of overhead to coordinate executions using a lightweight artifact reservation system.
Therefore, this should be viewed as an extension to rather than a replacement for non-serialized cacheable tasks.
It is particularly well fit for long-running or otherwise computationally expensive tasks executed in scenarios similar to the following examples:
* Periodically scheduled workflow where a single task evaluation duration may span multiple scheduled executions.
* Running a commonly shared task within different workflows (which receive the same inputs).
### Enabling cache serialization
Task cache serializing is disabled by default to avoid unexpected behavior for task executions.
To enable, set `serialize=True` in the `@{{< key kit_as >}}.task` decorator.
The cache key definitions follow the same rules as non-serialized cache tasks.
```python
@{{< key kit_as >}}.task(cache={{< key kit_as >}}.Cache(version="1.1", serialize=True))
def t(n: int) -> int:
return n \* n
```
In the above example calling `t(n=2)` multiple times concurrently (even in different executions or workflows) will only execute the multiplication operation once.
Concurrently evaluated tasks will wait for completion of the first instance before reusing the cached results and subsequent evaluations will instantly reuse existing cache results.
### How does cache serialization work?
The cache serialization paradigm introduces a new artifact reservation system. Executions with cache serialization enabled use this reservation system to acquire an artifact reservation, indicating that they are actively evaluating a node, and release the reservation once the execution is completed.
{{< key product_name >}} uses a clock-skew algorithm to define reservation timeouts. Therefore, executions are required to periodically extend the reservation during their run.
The first execution of a serializable node will successfully acquire the artifact reservation.
Execution will be performed as usual and upon completion, the results are written to the cache, and the reservation is released.
Concurrently executed node instances (those that would otherwise run in parallel with the initial execution) will observe an active reservation, in which case these instances will wait until the next reevaluation and perform another check.
Once the initial execution completes, they will reuse the cached results as will any subsequent instances of the same node.
{{< key product_name >}} handles execution failures using a timeout on the reservation.
If the execution currently holding the reservation fails to extend it before it times out, another execution may acquire the reservation and begin processing.
## Caching of offloaded objects
In some cases, the default behavior displayed by {{< key product_name >}}’s caching feature might not match the user's intuition.
For example, this code makes use of pandas dataframes:
```python
@{{< key kit_as >}}.task
def foo(a: int, b: str) -> pandas.DataFrame:
df = pandas.DataFrame(...)
...
return df
@{{< key kit_as >}}.task(cache=True)
def bar(df: pandas.DataFrame) -> int:
...
@{{< key kit_as >}}.workflow
def wf(a: int, b: str):
df = foo(a=a, b=b)
v = bar(df=df)
```
If run twice with the same inputs, one would expect that `bar` would trigger a cache hit, but that’s not the case because of the way dataframes are represented in {{< key product_name >}}.
However, {{< key product_name >}} provides a new way to control the caching behavior of literals.
This is done via a `typing.Annotated` call on the node signature.
For example, in order to cache the result of calls to `bar`, you can rewrite the code above like this:
```python
def hash_pandas_dataframe(df: pandas.DataFrame) -> str:
return str(pandas.util.hash_pandas_object(df))
@{{< key kit_as >}}.task
def foo_1(a: int, b: str) -> Annotated[pandas.DataFrame, HashMethod(hash_pandas_dataframe)]:
df = pandas.DataFrame(...)
...
return df
@{{< key kit_as >}}.task(cache=True)
def bar_1(df: pandas.DataFrame) -> int:
...
@{{< key kit_as >}}.workflow
def wf_1(a: int, b: str):
df = foo(a=a, b=b)
v = bar(df=df)
```
Note how the output of the task `foo` is annotated with an object of type `HashMethod`.
Essentially, it represents a function that produces a hash that is used as part of the cache key calculation in calling the task `bar`.
### How does caching of offloaded objects work?
Recall how input values are taken into account to derive a cache key.
This is done by turning the literal representation into a string and using that string as part of the cache key.
In the case of dataframes annotated with `HashMethod`, we use the hash as the representation of the literal.
In other words, the literal hash is used in the cache key.
This feature also works in local execution.
Here’s a complete example of the feature:
```python
def hash_pandas_dataframe(df: pandas.DataFrame) -> str:
return str(pandas.util.hash_pandas_object(df))
@{{< key kit_as >}}.task
def uncached_data_reading_task() -> Annotated[pandas.DataFrame, HashMethod(hash_pandas_dataframe)]:
return pandas.DataFrame({"column_1": [1, 2, 3]})
@{{< key kit_as >}}.task(cache=True)
def cached_data_processing_task(df: pandas.DataFrame) -> pandas.DataFrame:
time.sleep(1)
return df \* 2
@{{< key kit_as >}}.task
def compare_dataframes(df1: pandas.DataFrame, df2: pandas.DataFrame):
assert df1.equals(df2)
@{{< key kit_as >}}.workflow
def cached_dataframe_wf():
raw_data = uncached_data_reading_task()
# Execute `cached_data_processing_task` twice, but force those
# two executions to happen serially to demonstrate how the second run
# hits the cache.
t1_node = create_node(cached_data_processing_task, df=raw_data)
t2_node = create_node(cached_data_processing_task, df=raw_data)
t1_node >> t2_node
# Confirm that the dataframes actually match
compare_dataframes(df1=t1_node.o0, df2=t2_node.o0)
if **name** == "**main**":
df1 = cached_dataframe_wf()
stickioesprint(f"Running cached_dataframe_wf once : {df1}")
```
=== PAGE: https://www.union.ai/docs/v1/serverless/user-guide/core-concepts/workspaces ===
# Workspaces
Workspaces provide a convenient VSCode development environment for iterating on
your {{< key product_name >}} tasks, workflows, and apps.
With workspaces, you can:
* Develop and debug your tasks, workflows, or code in general
* Run your tasks and workflows in a way that matches your production environment
* Deploy your workflows and apps to development, staging, or production environments
* Persist files across workspace restarts to save your work
* Specify secrets and resources for your workspace
* Specify custom container images
* Specify custom `on_startup` commands
* Adjust the idle time-to-live (TTL) for your workspace to avoid unneeded expenses
* Authenticate with GitHub to clone private repositories
## Creating a workspace
To create a workspace, click on the **Workspace** tab on left navbar and click
on the **New Workspace** button on the top right.
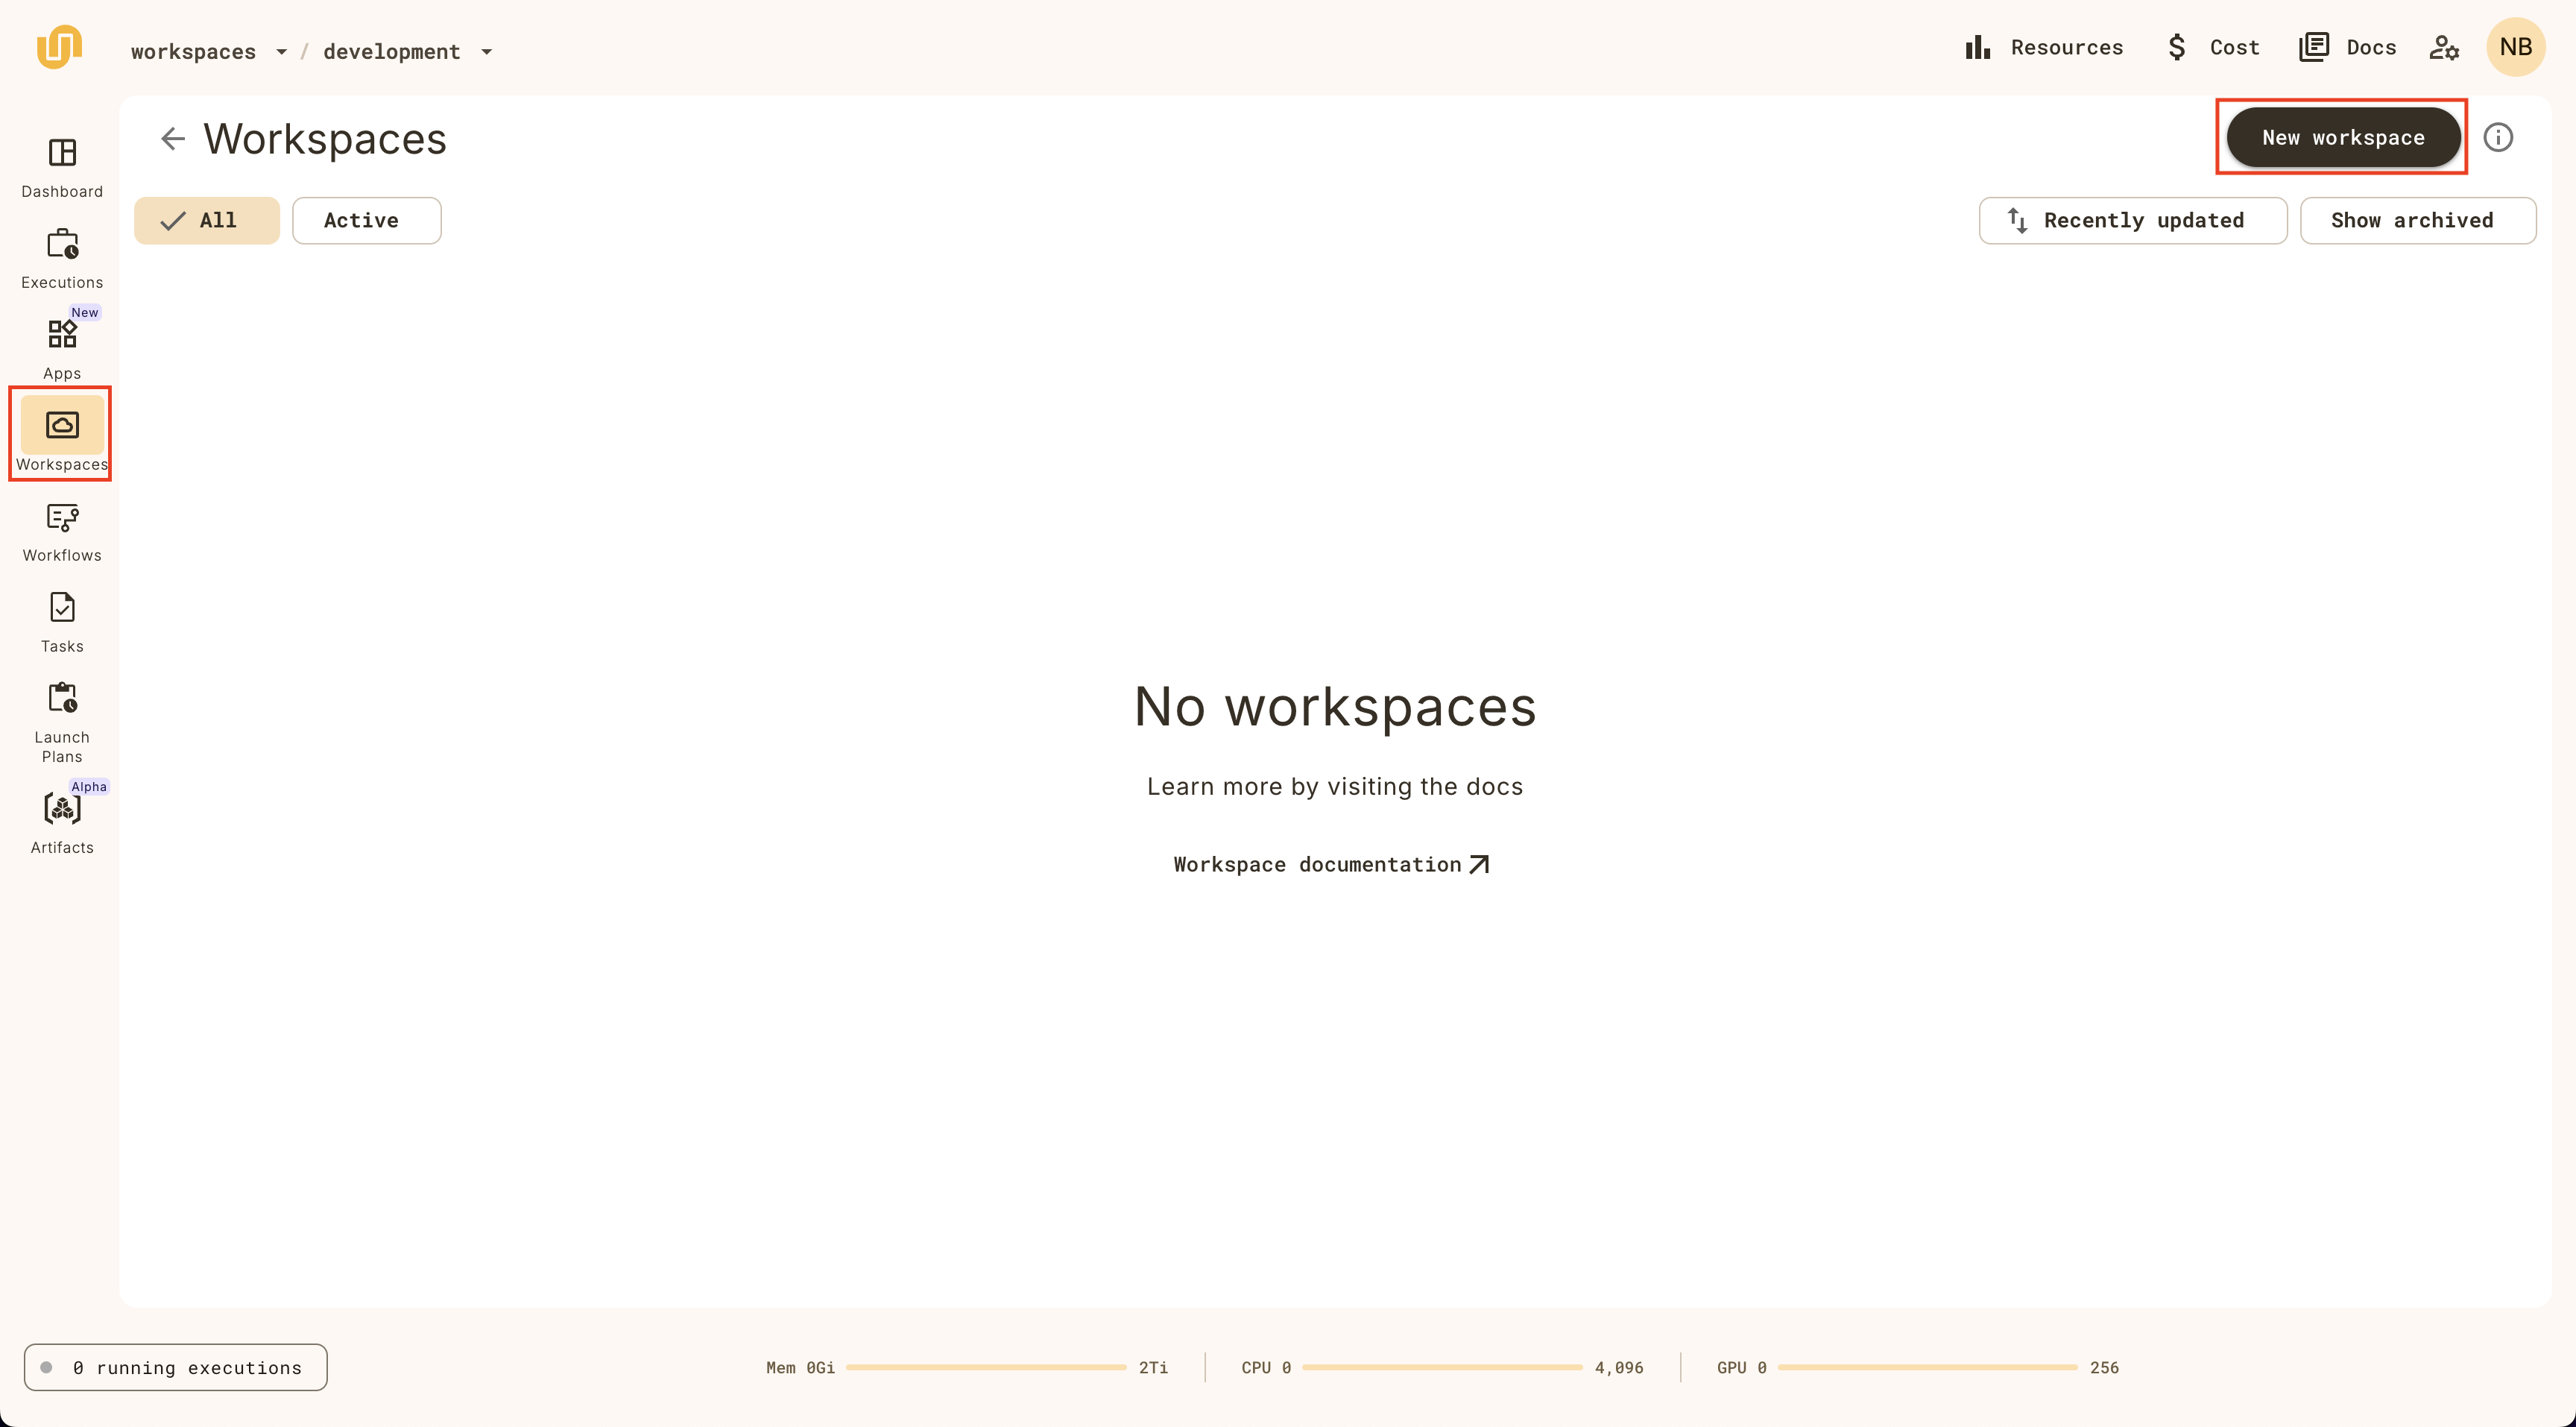
Provide a name for your workspace, set an **Idle TTL** (time to live), and
click **Create**.
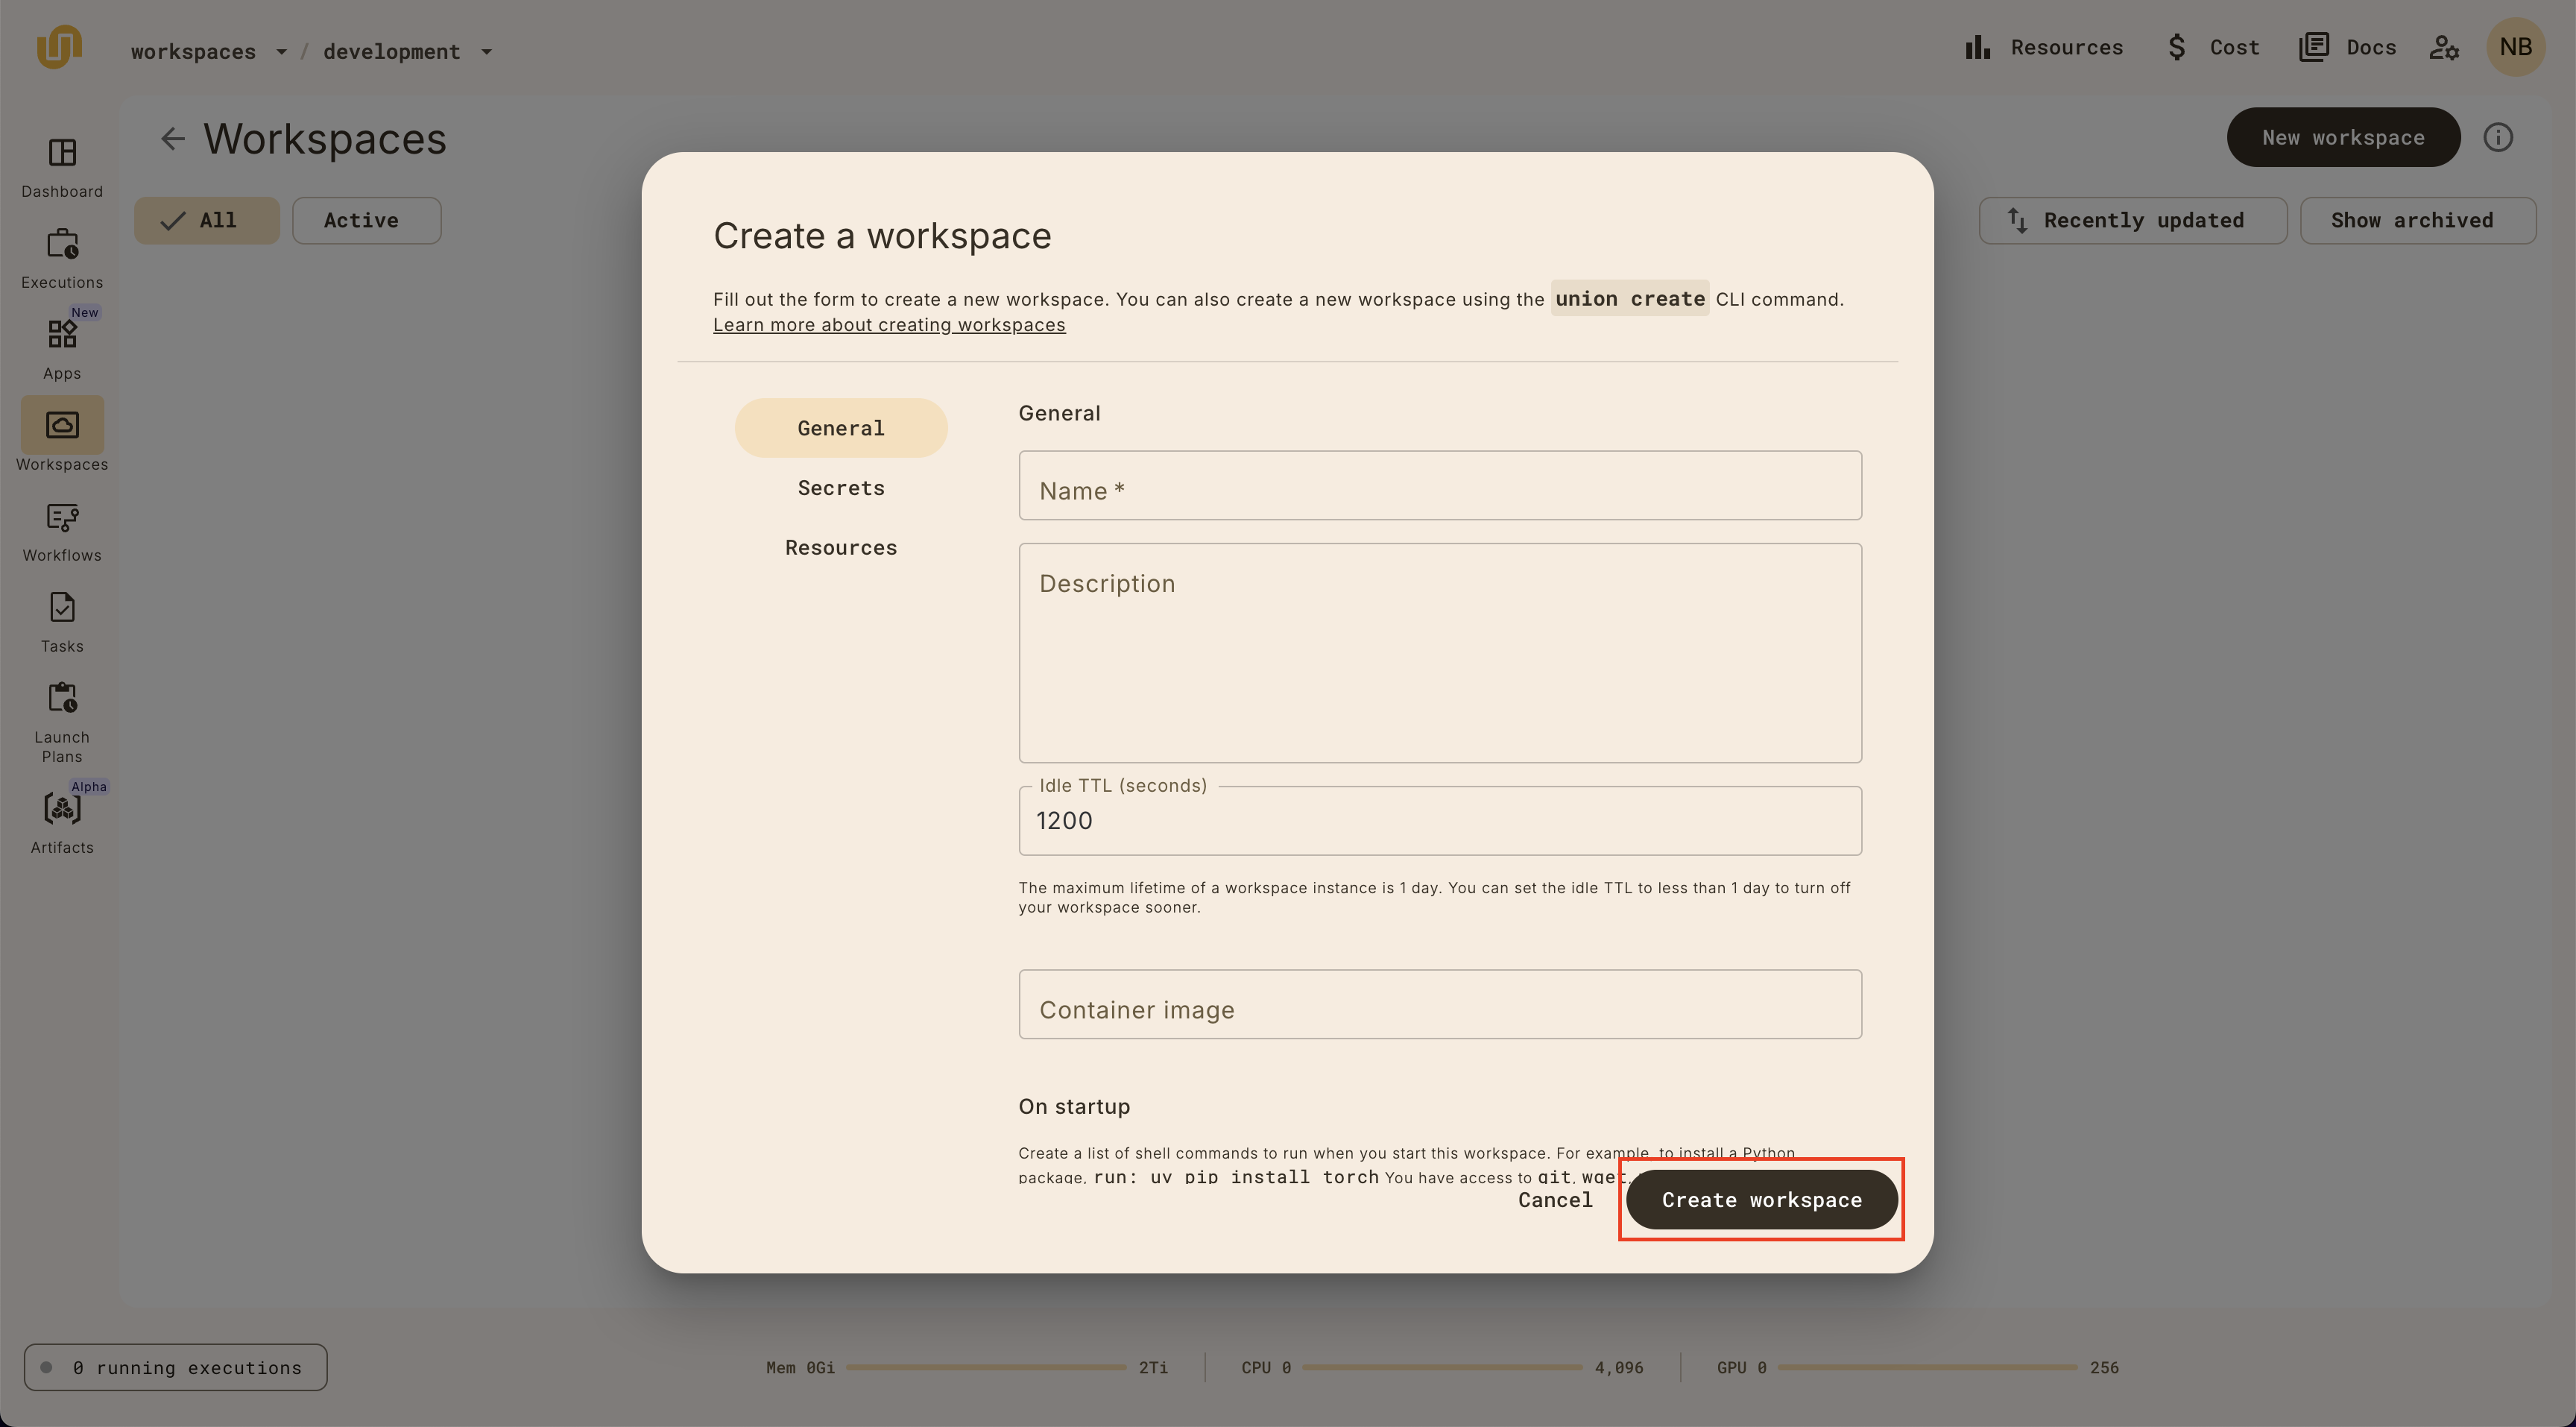
> [!NOTE]
> The Idle TTL is the amount of time a workspace will be idle before it is
> automatically stopped. Workspaces have a global TTL of 1 day, but you can set
> the idle TTL field to a shorter duration to stop the workspace sooner.
You should see a new workspace created in the Workspaces view:

## Running a workspace
To run a workspace, click on the switch on the workspace item:
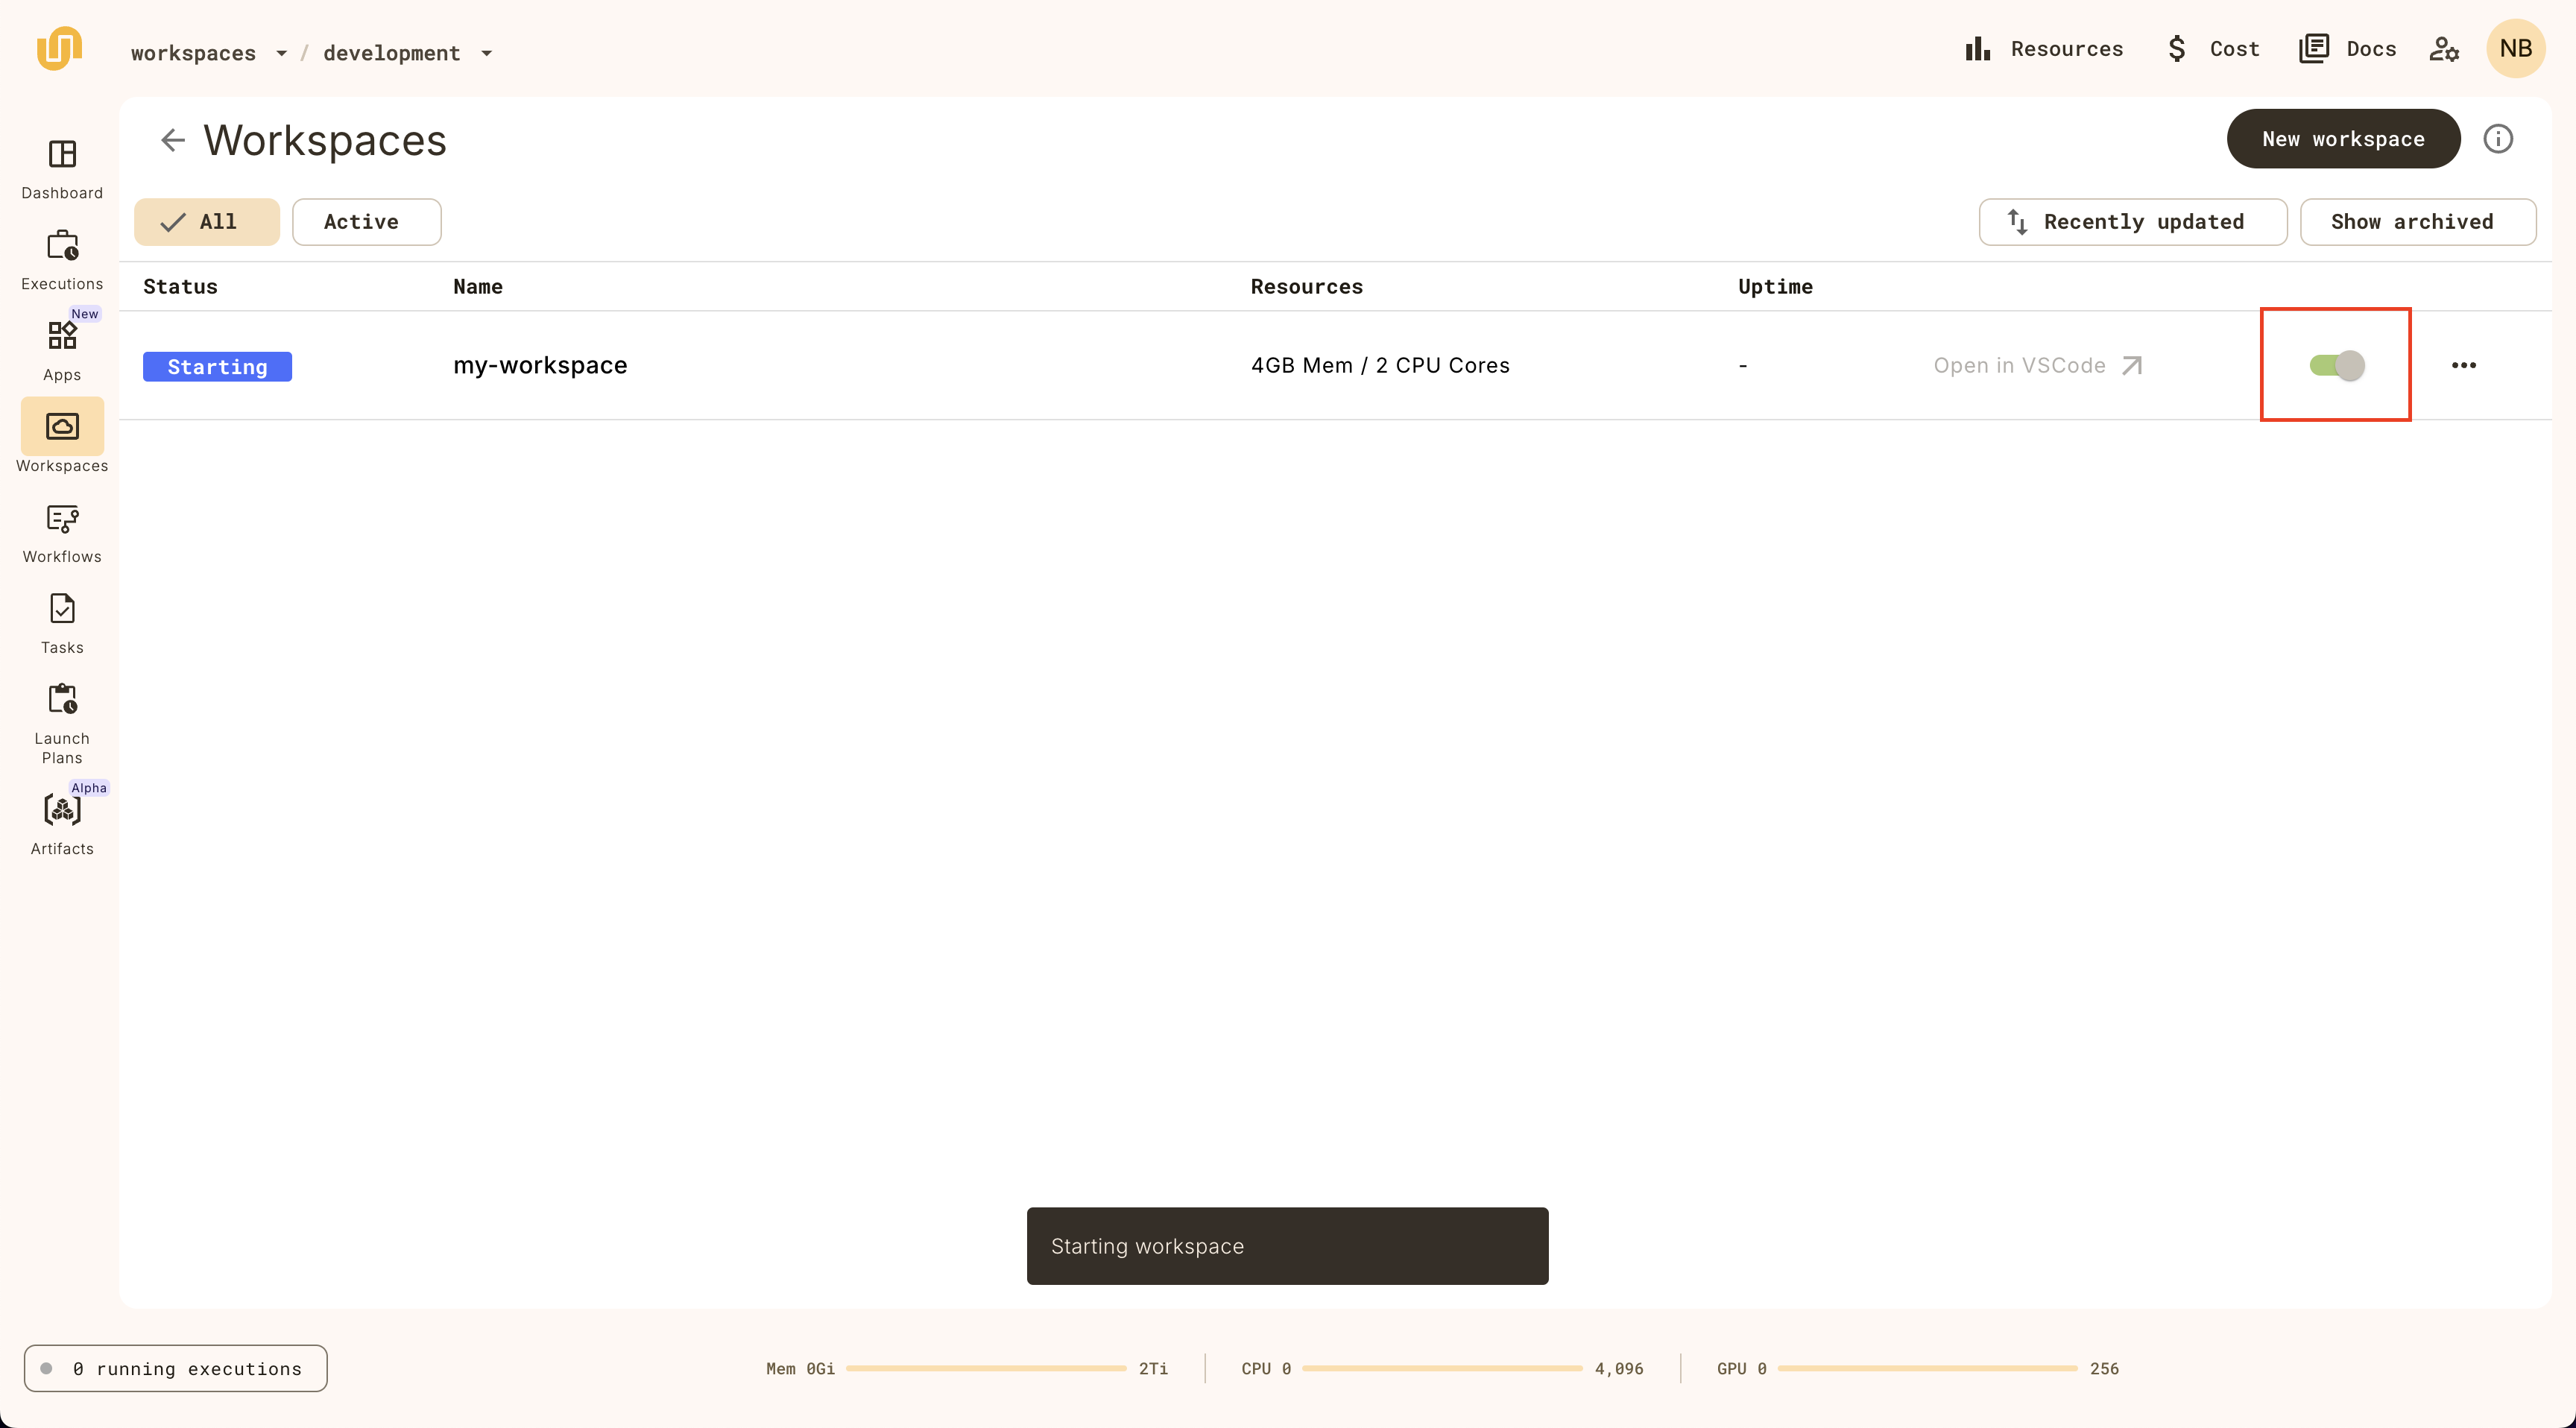
Once the workspace has started, you can click on the **Open in VSCode** button:
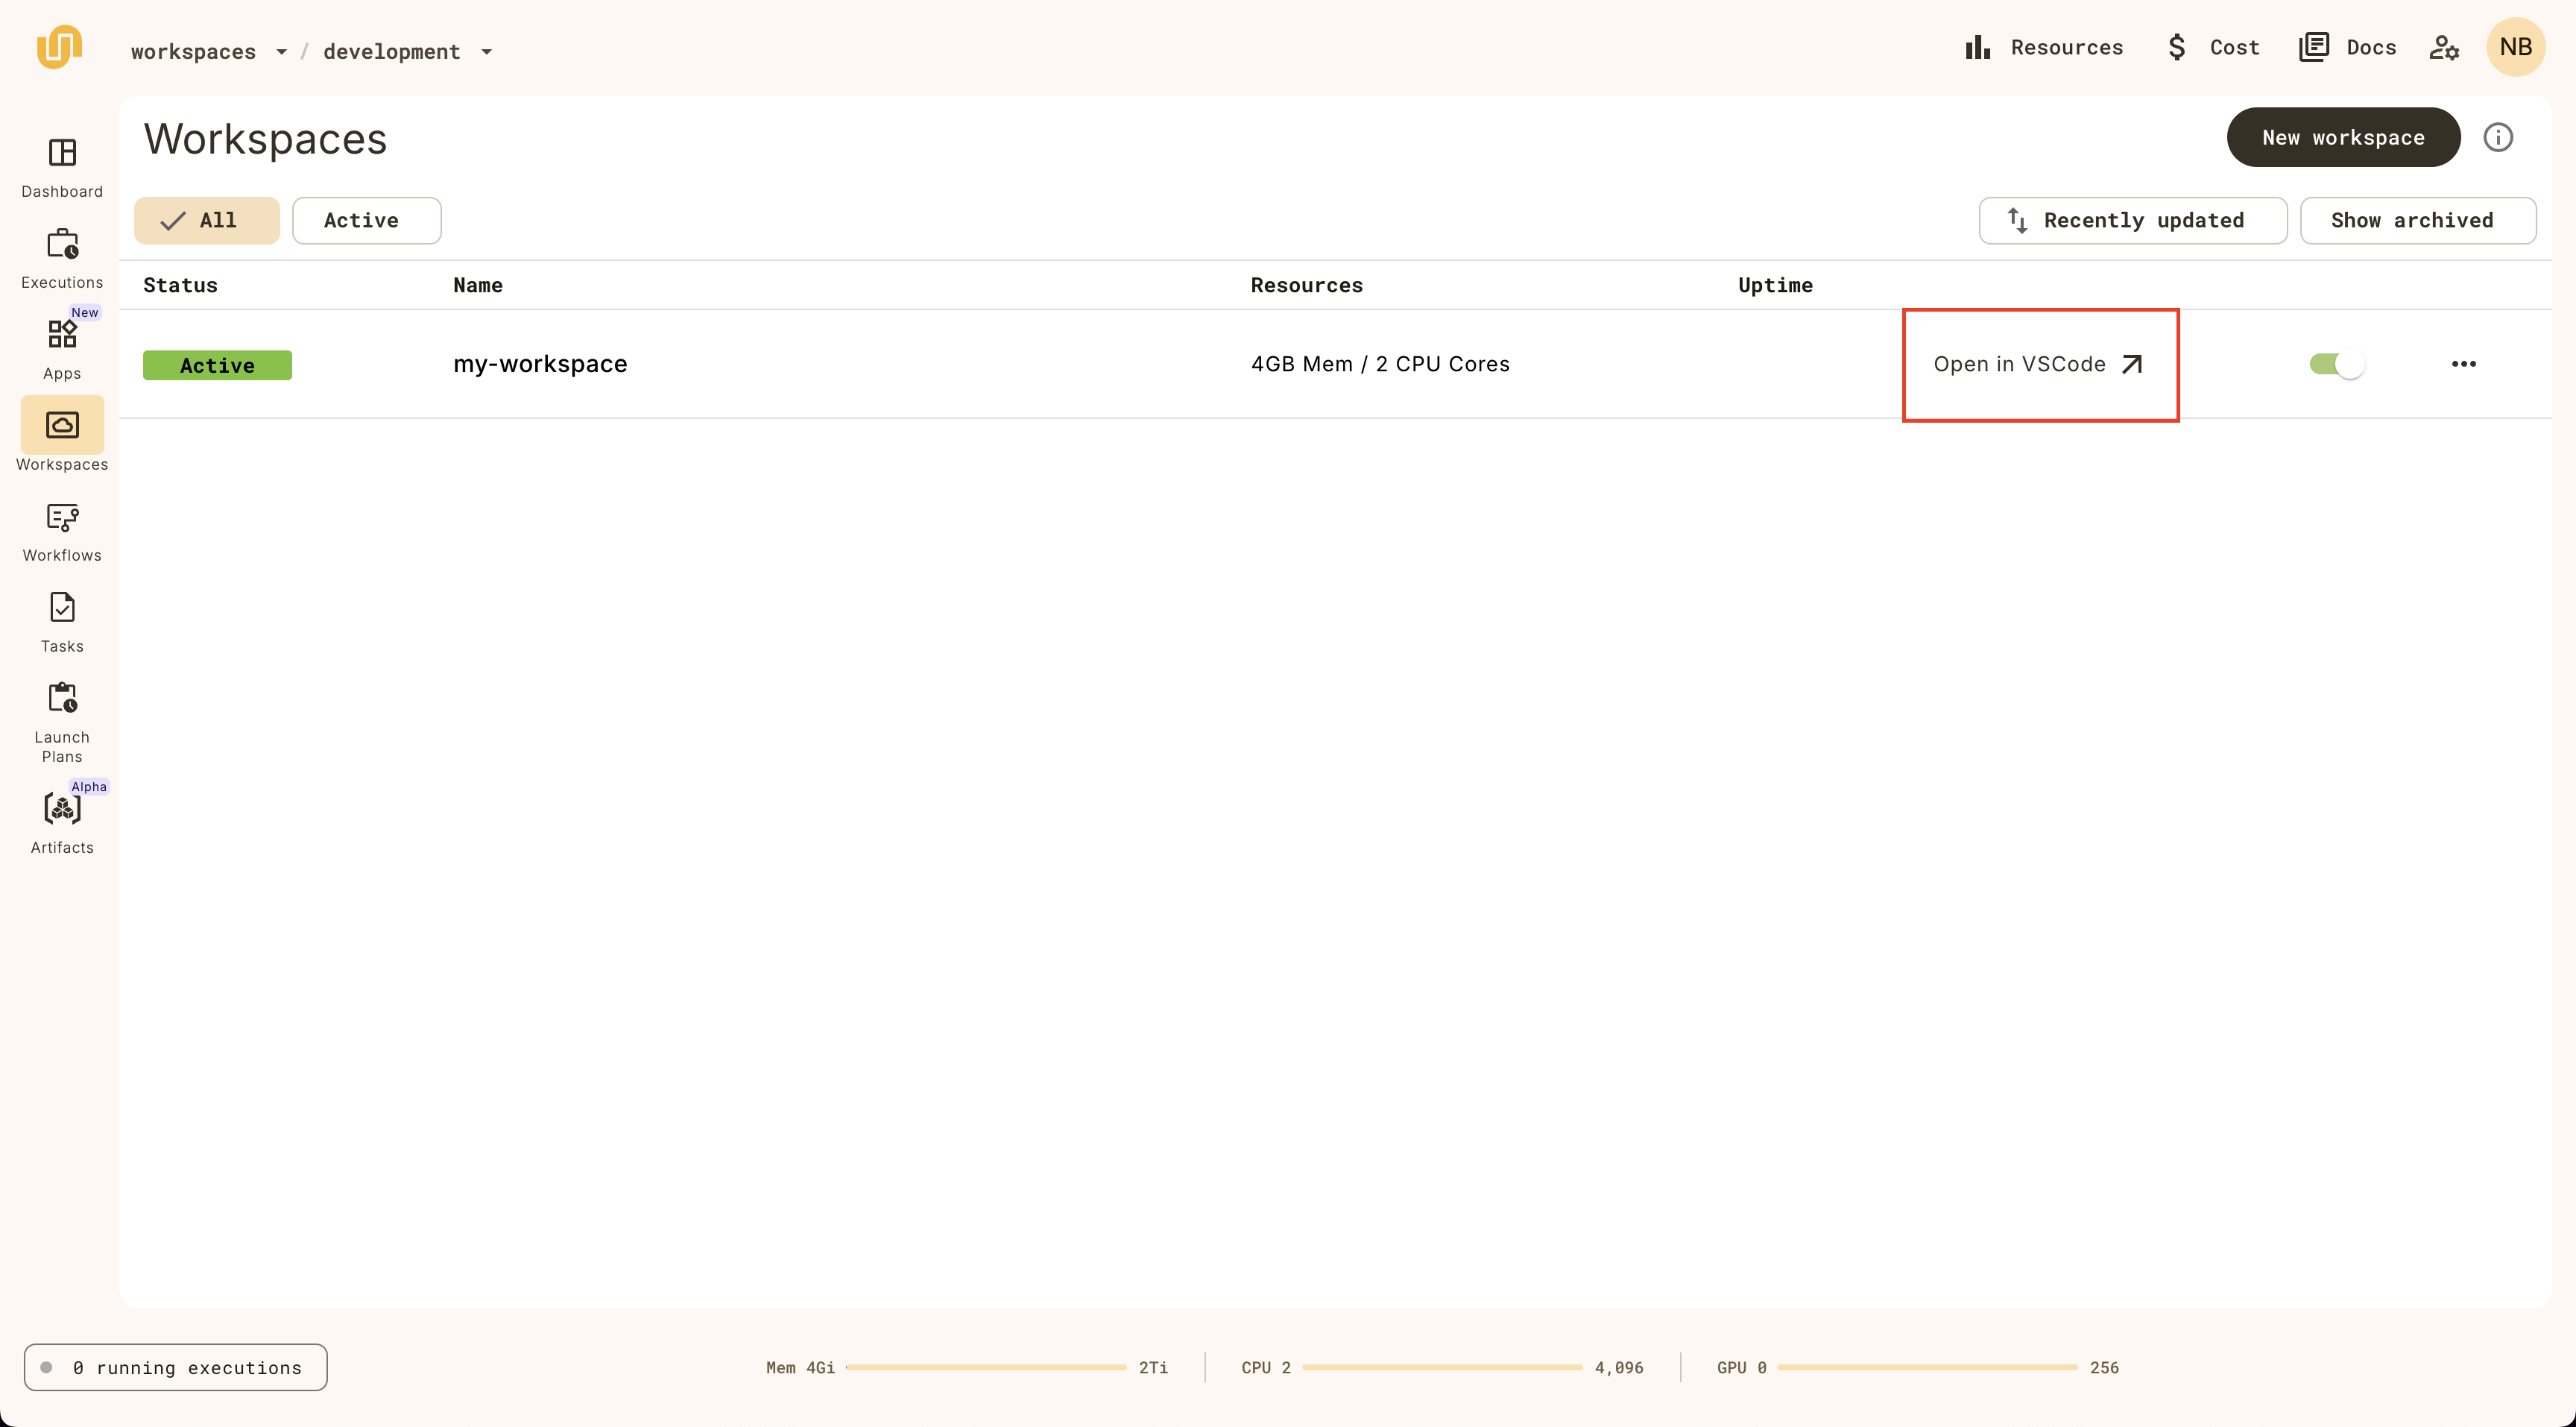
Once the startup commands have completed, you'll see a browser-based VSCode IDE:
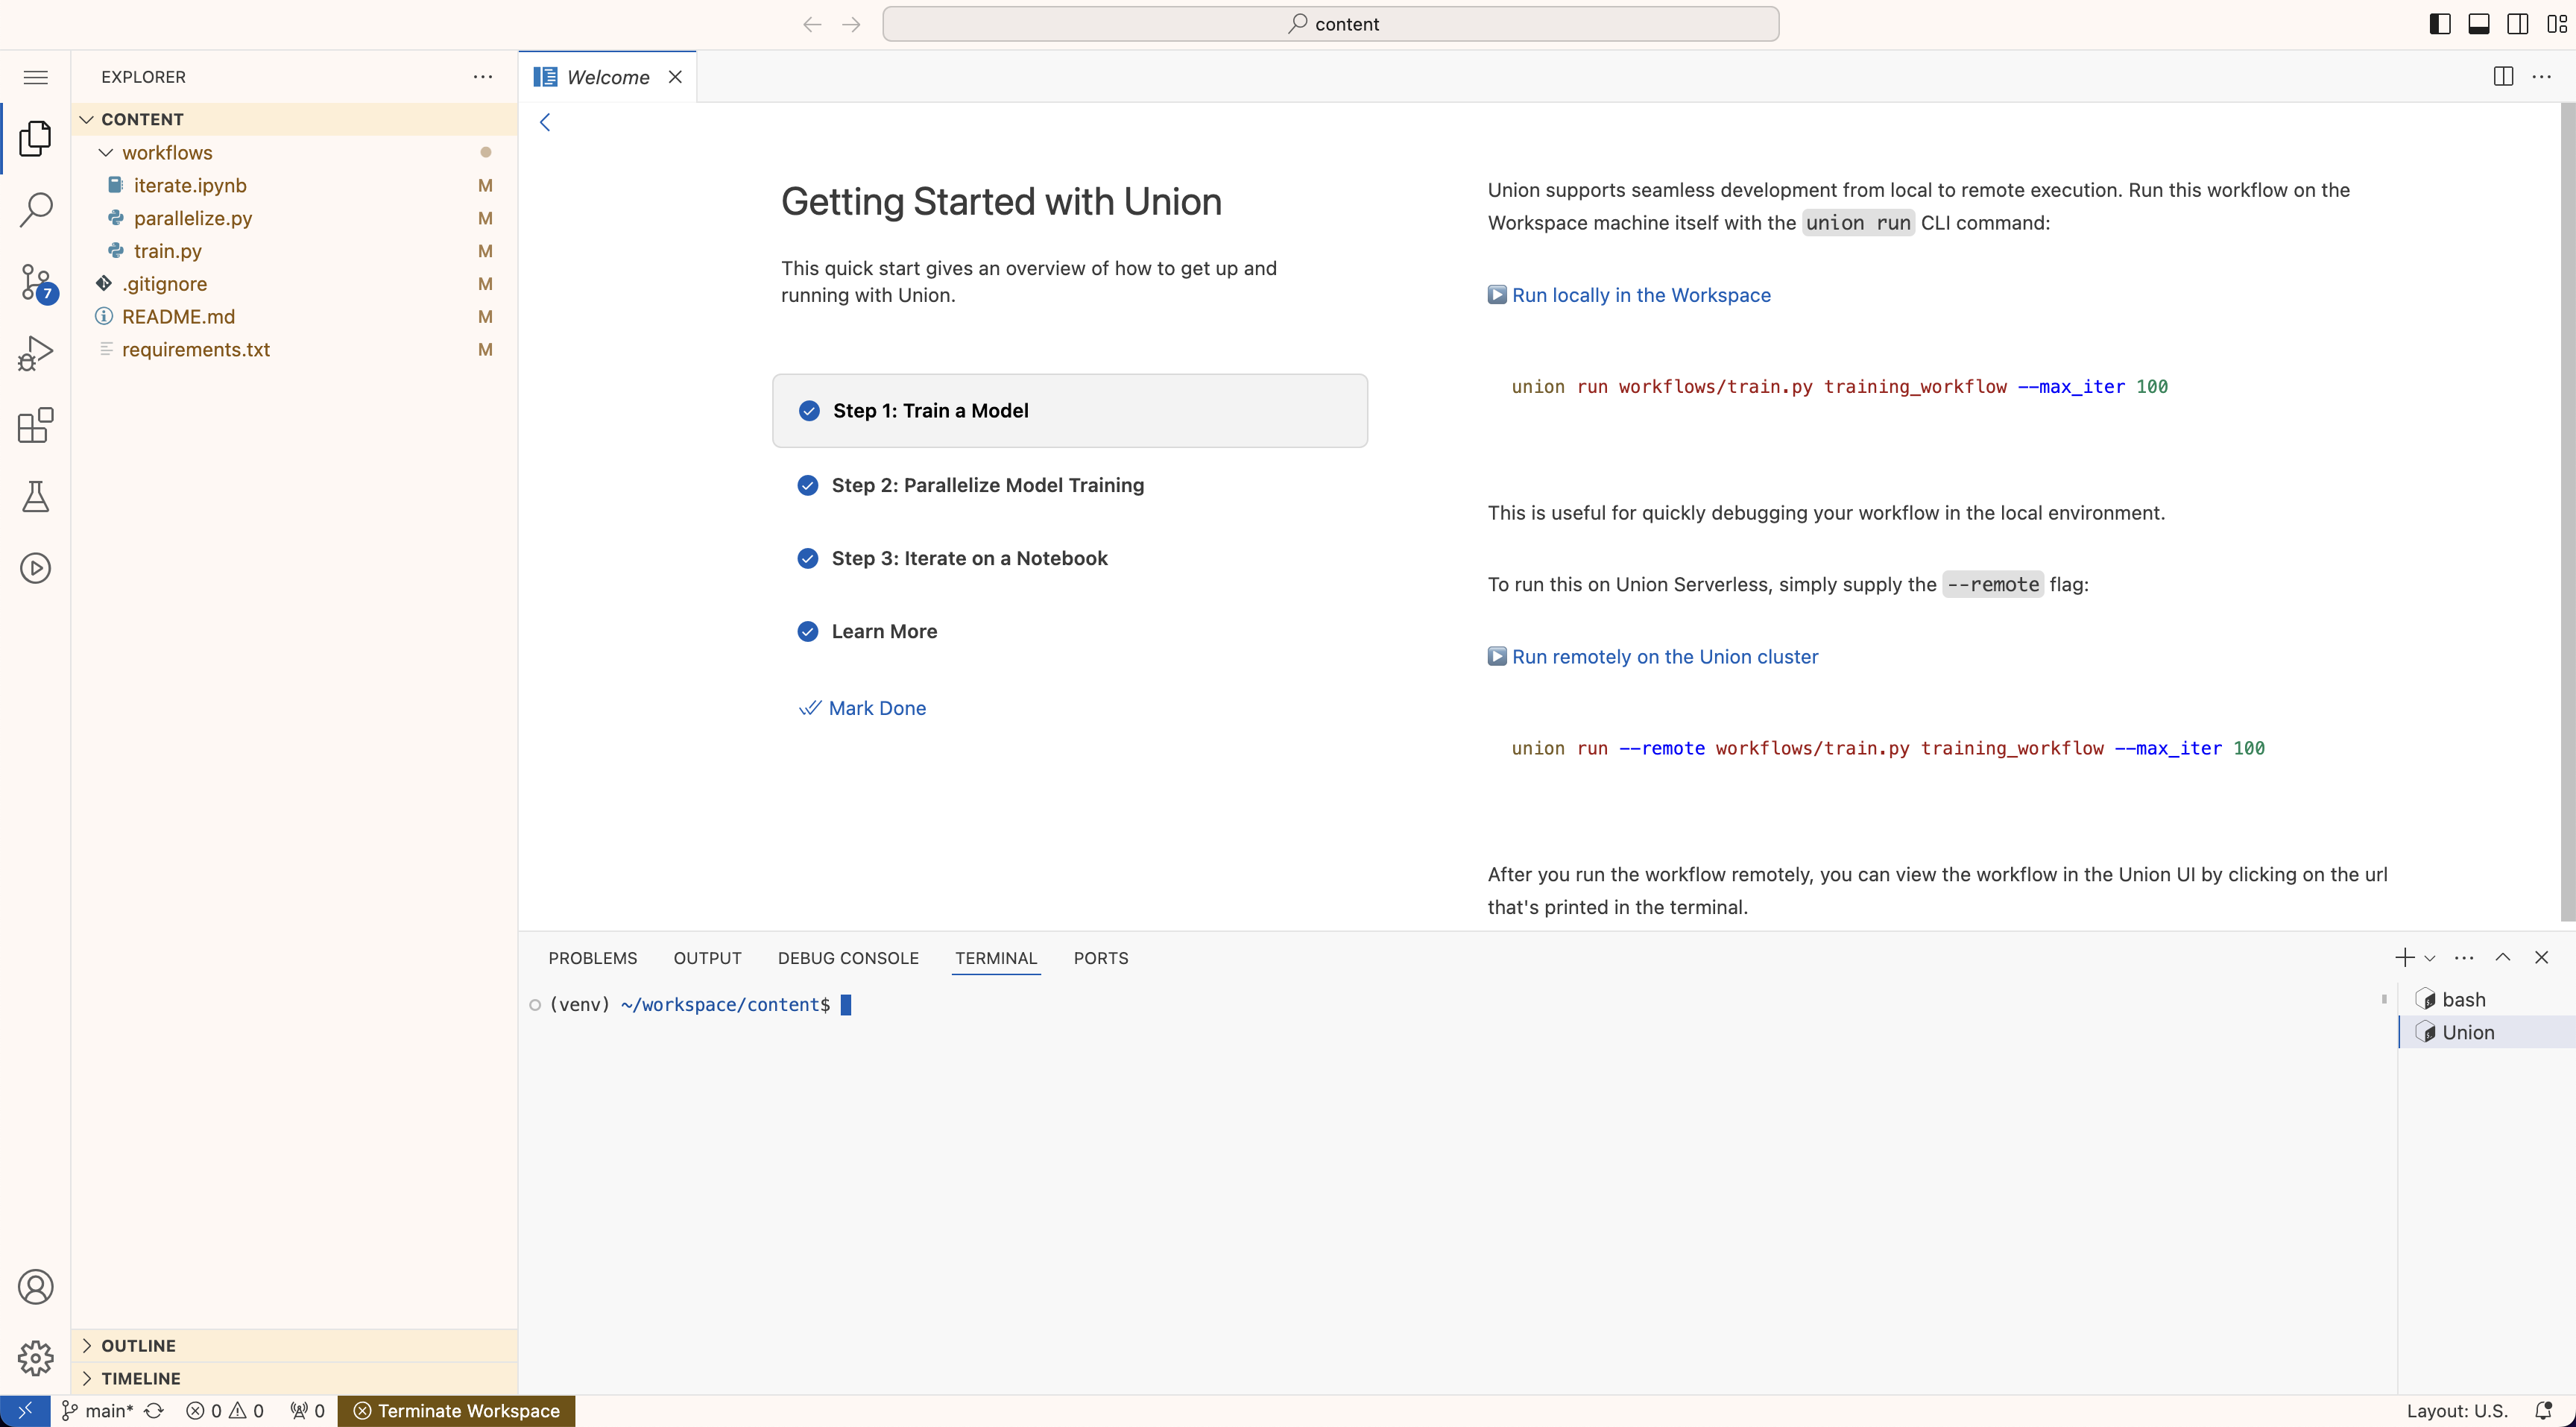
To stop a workspace, click on the toggle switch on the workspace item.
## Filesystem persistence
Any changes to the filesystem that you make in the working directory of your
workspace (the directory you find yourself in when you first open the workspace)
are persisted across workspace restarts.
This allows you to save data, code, models, and other files in your workspace.
> [!NOTE]
> Storing large datasets, models, and other files in your workspace may slow down
> the start and stop times of your workspace. This is because the workspace
> instance needs time to download/upload the files from persistent storage.
## Editing a workspace
Change the workspace configuration by clicking on the **Edit** button:
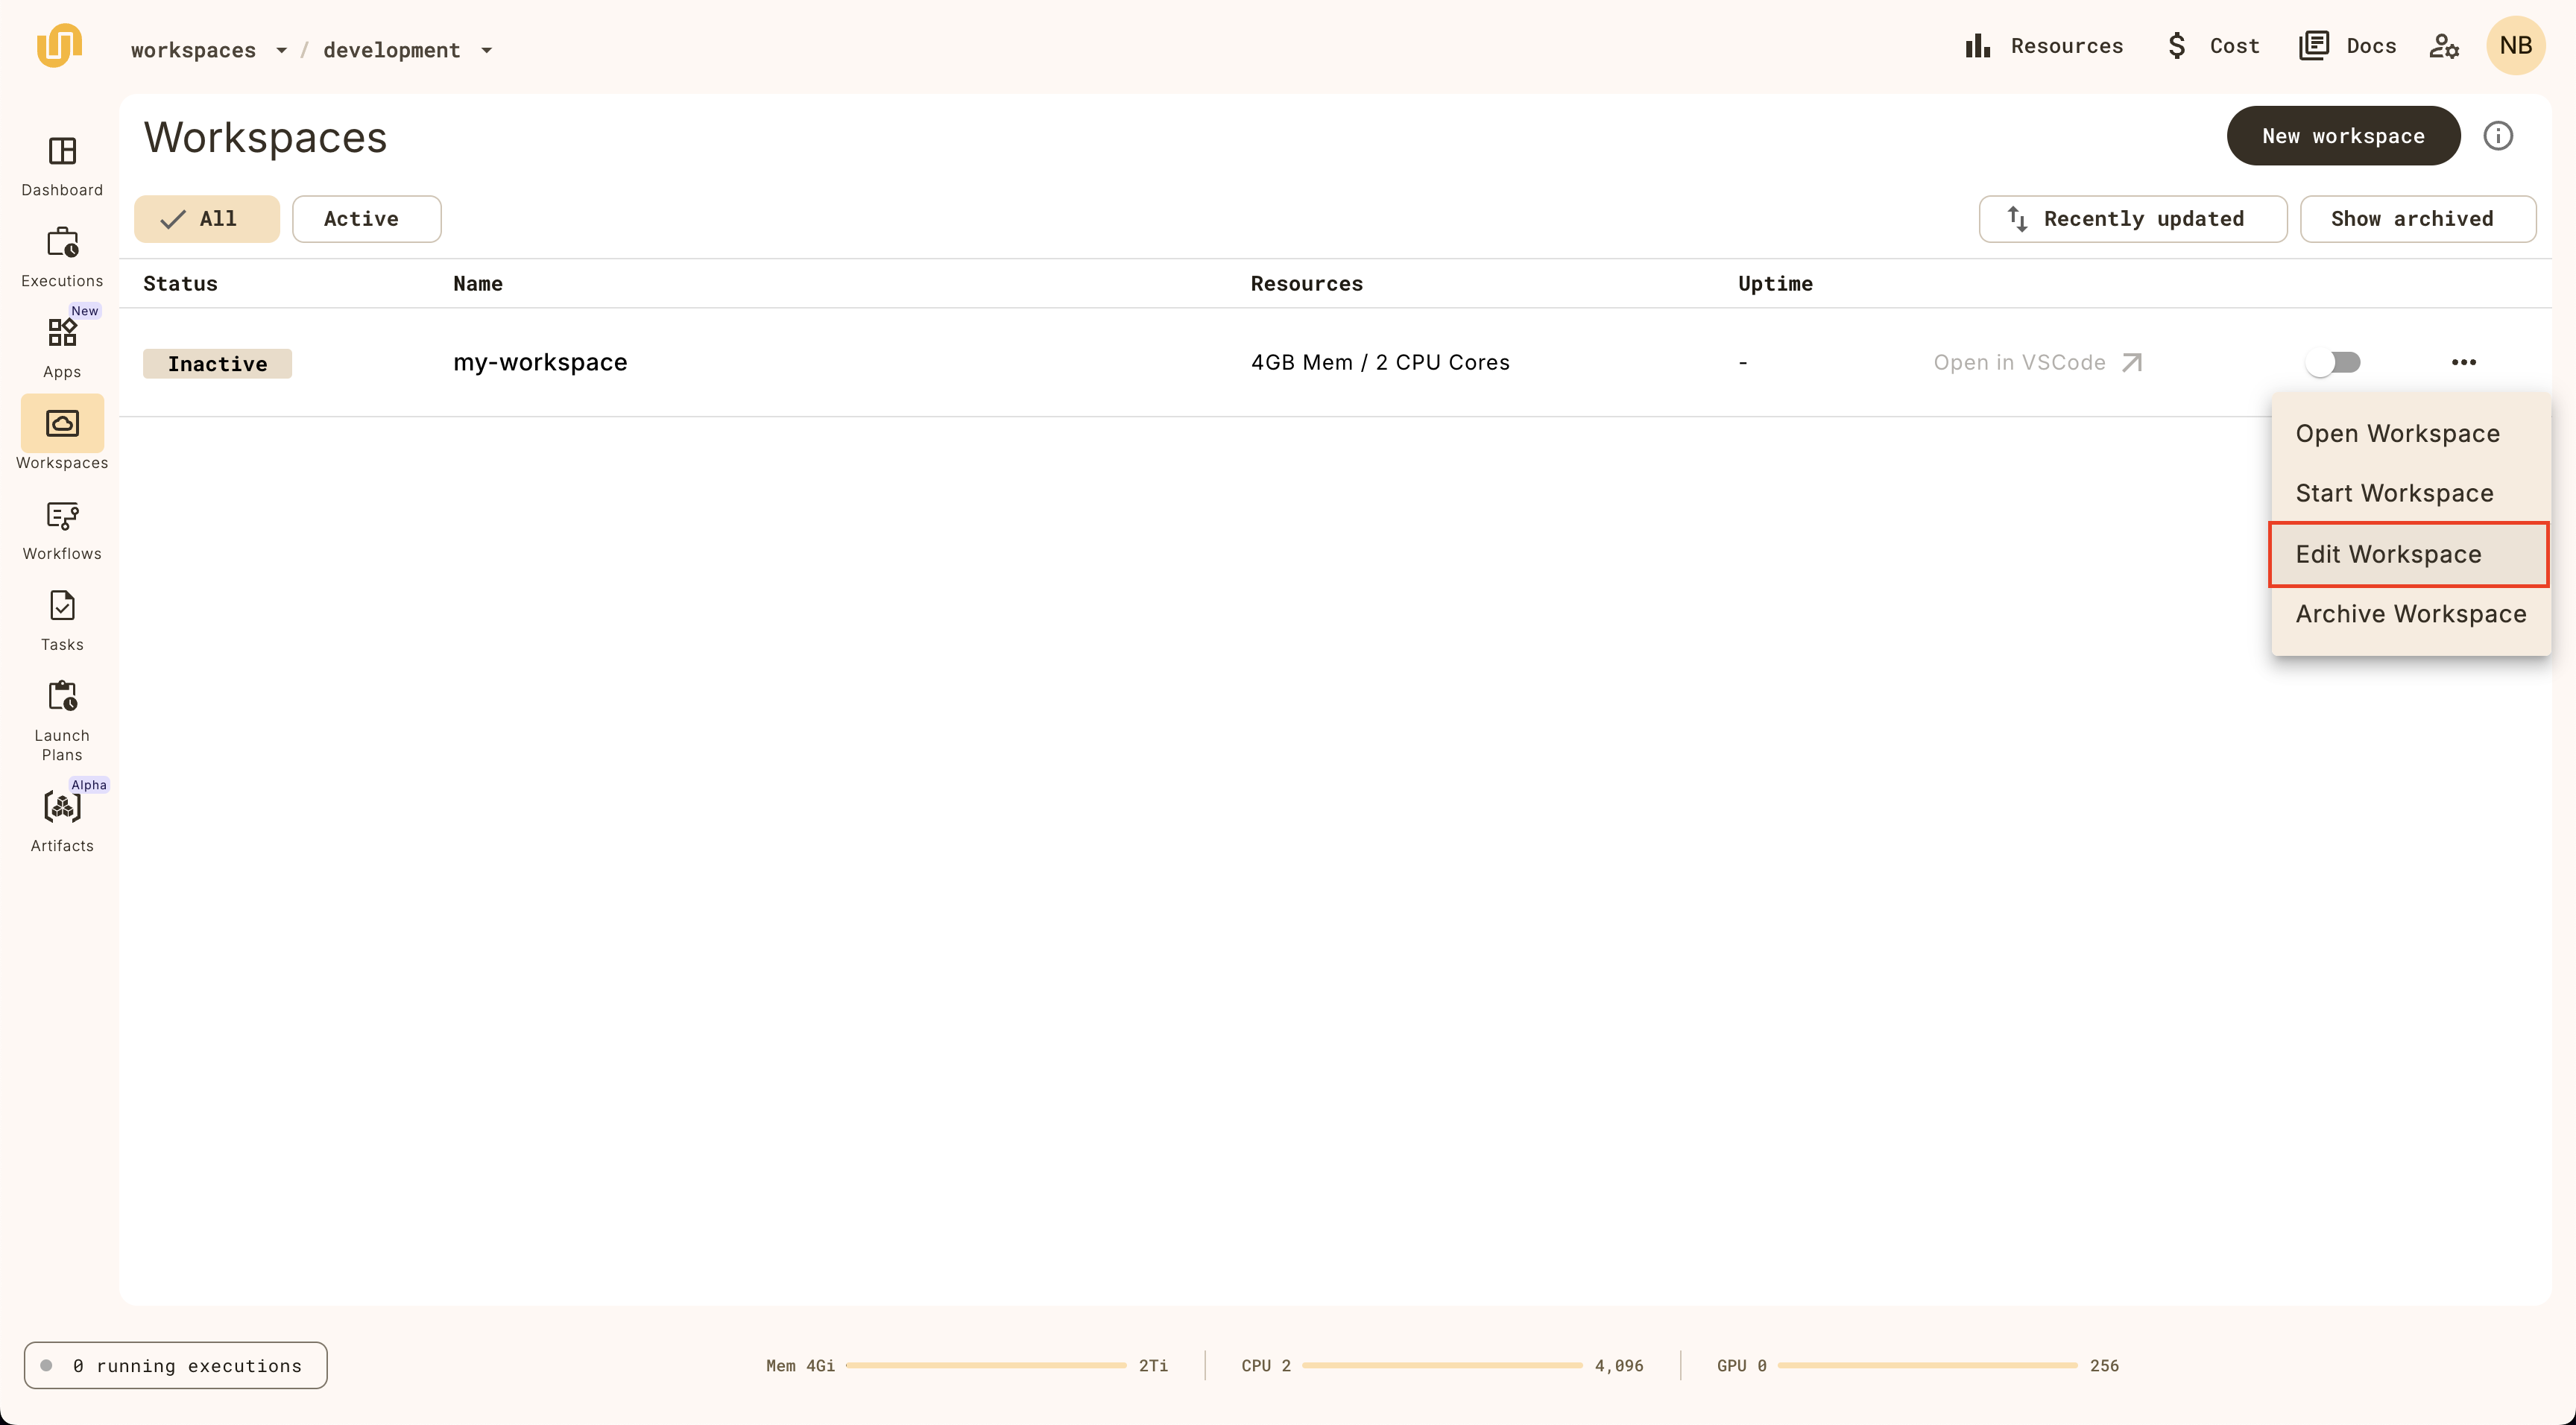
Note that you can change everything except the workspace name.
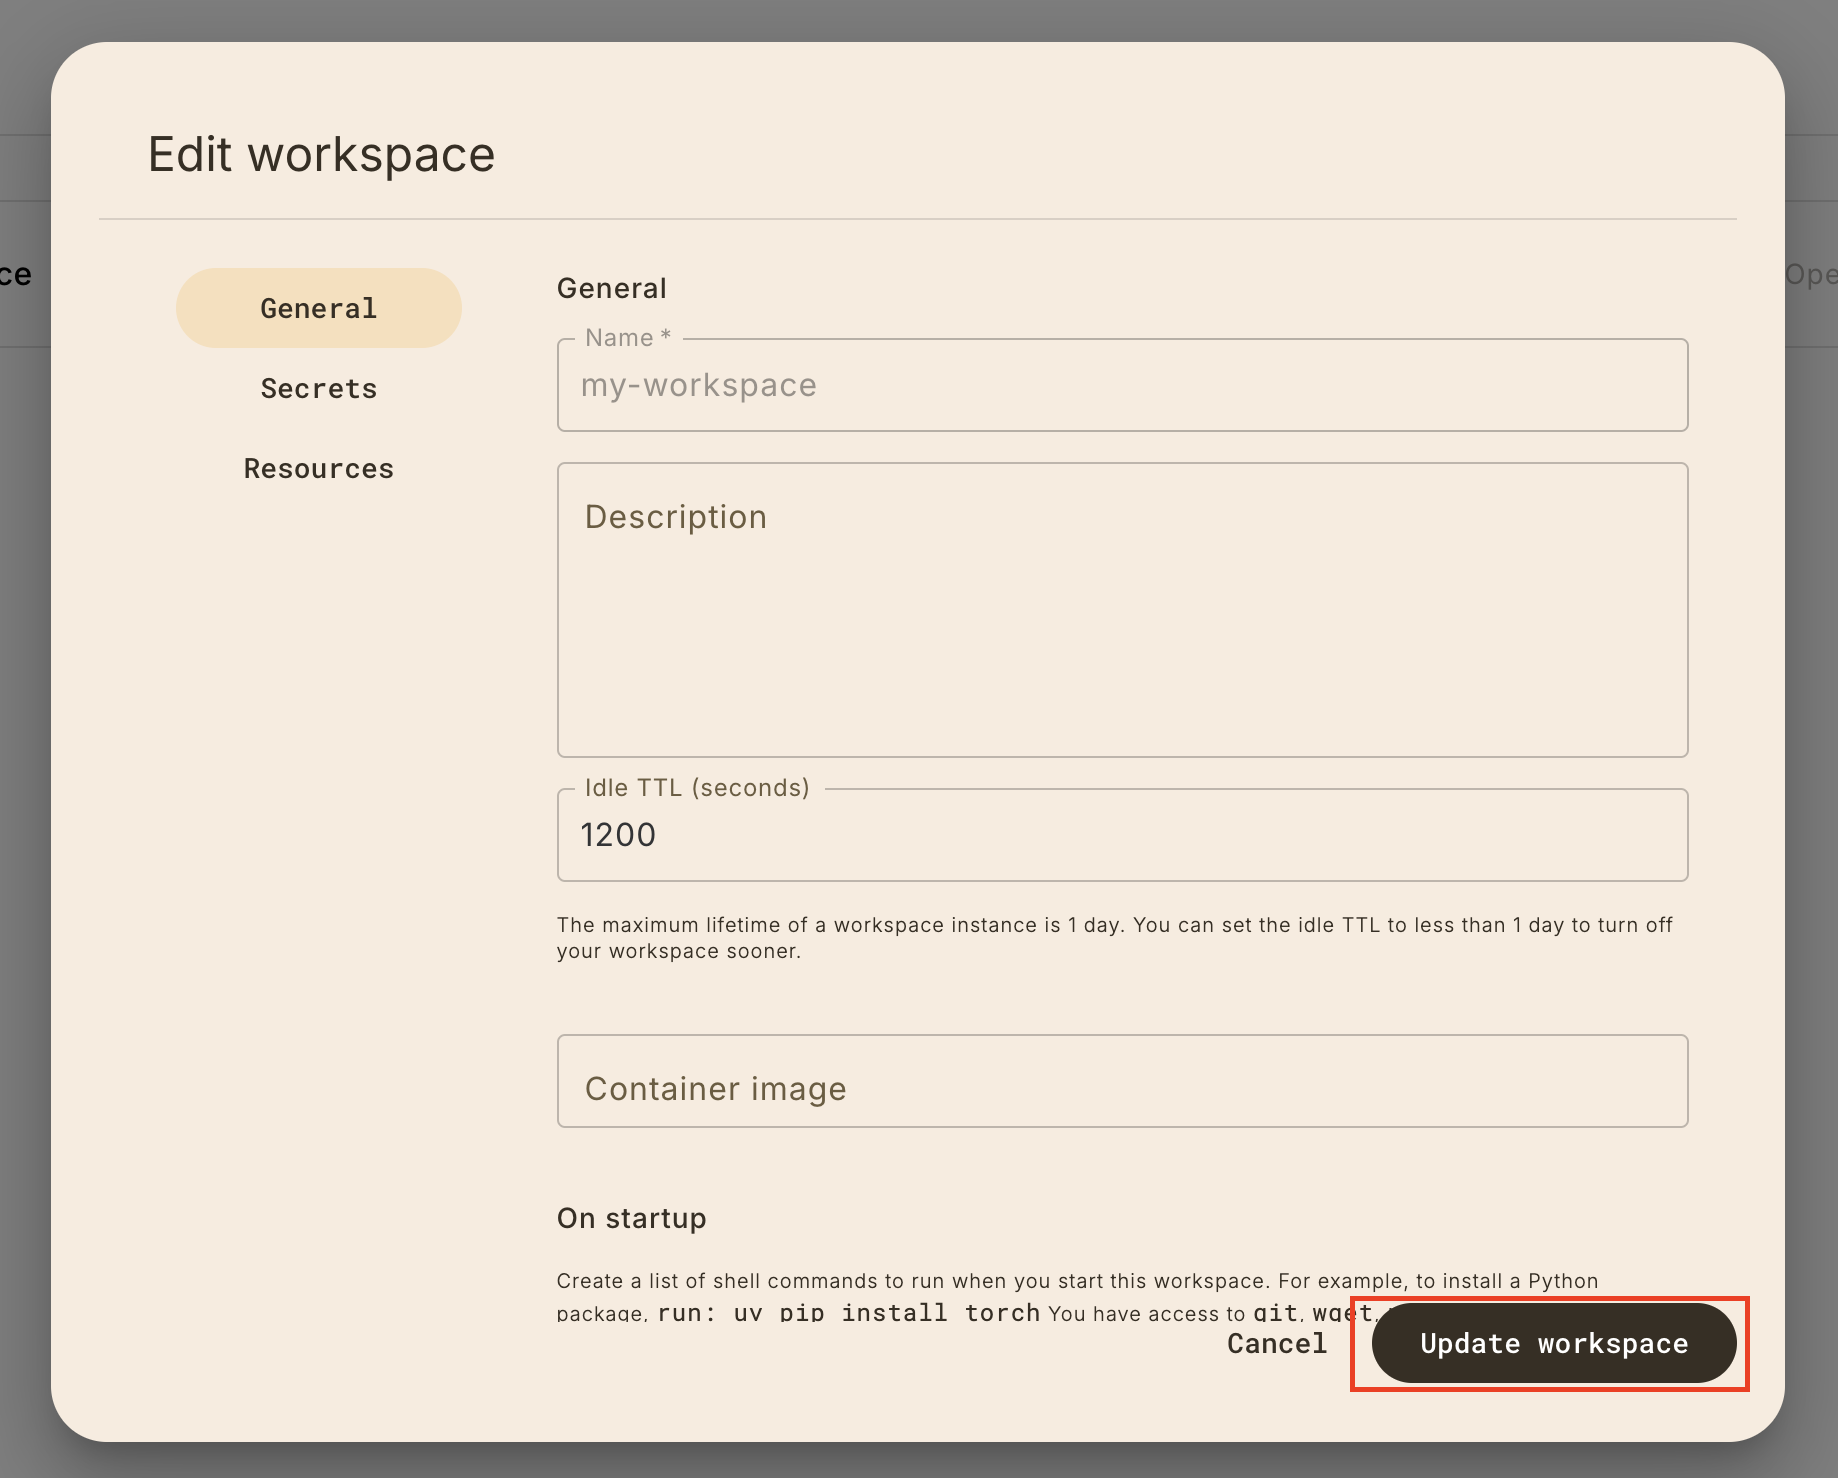
## The workspace detail view
Clicking on the workspace item on the list view will reveal the workspace detail view,
which provides all the information about the workspace.
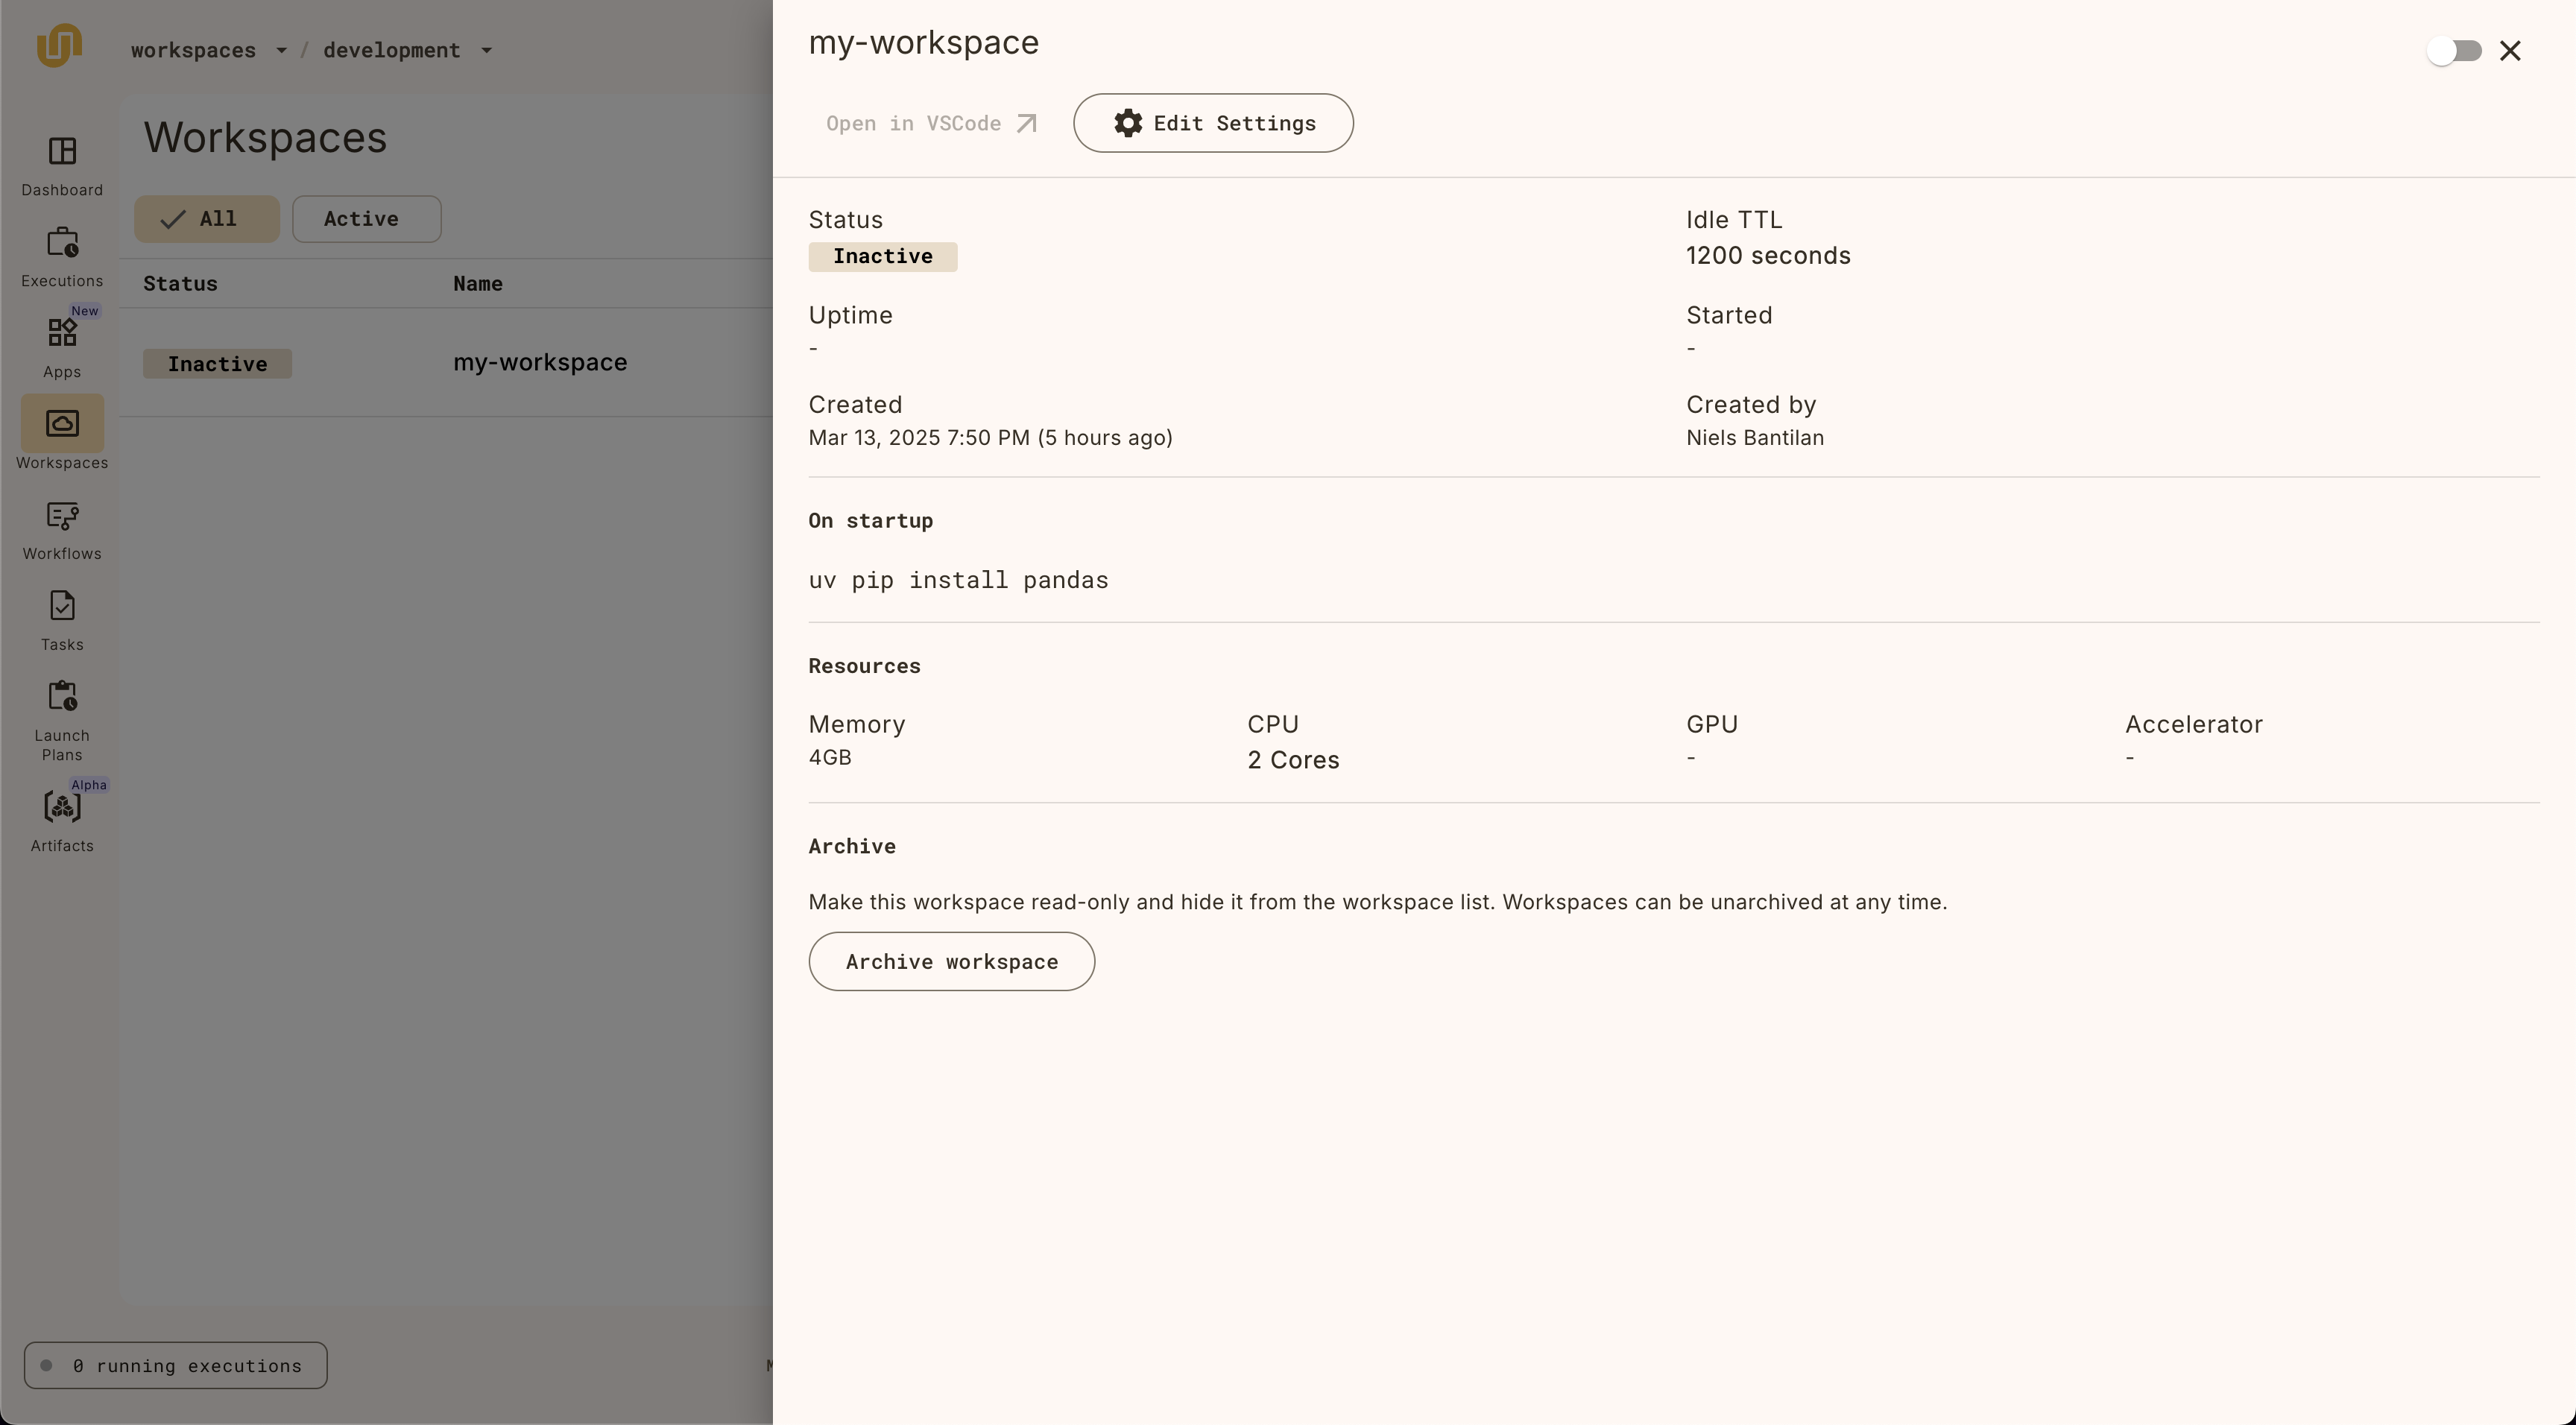
## Archiving a workspace
Archive a workspace by clicking on the **Archive** button:
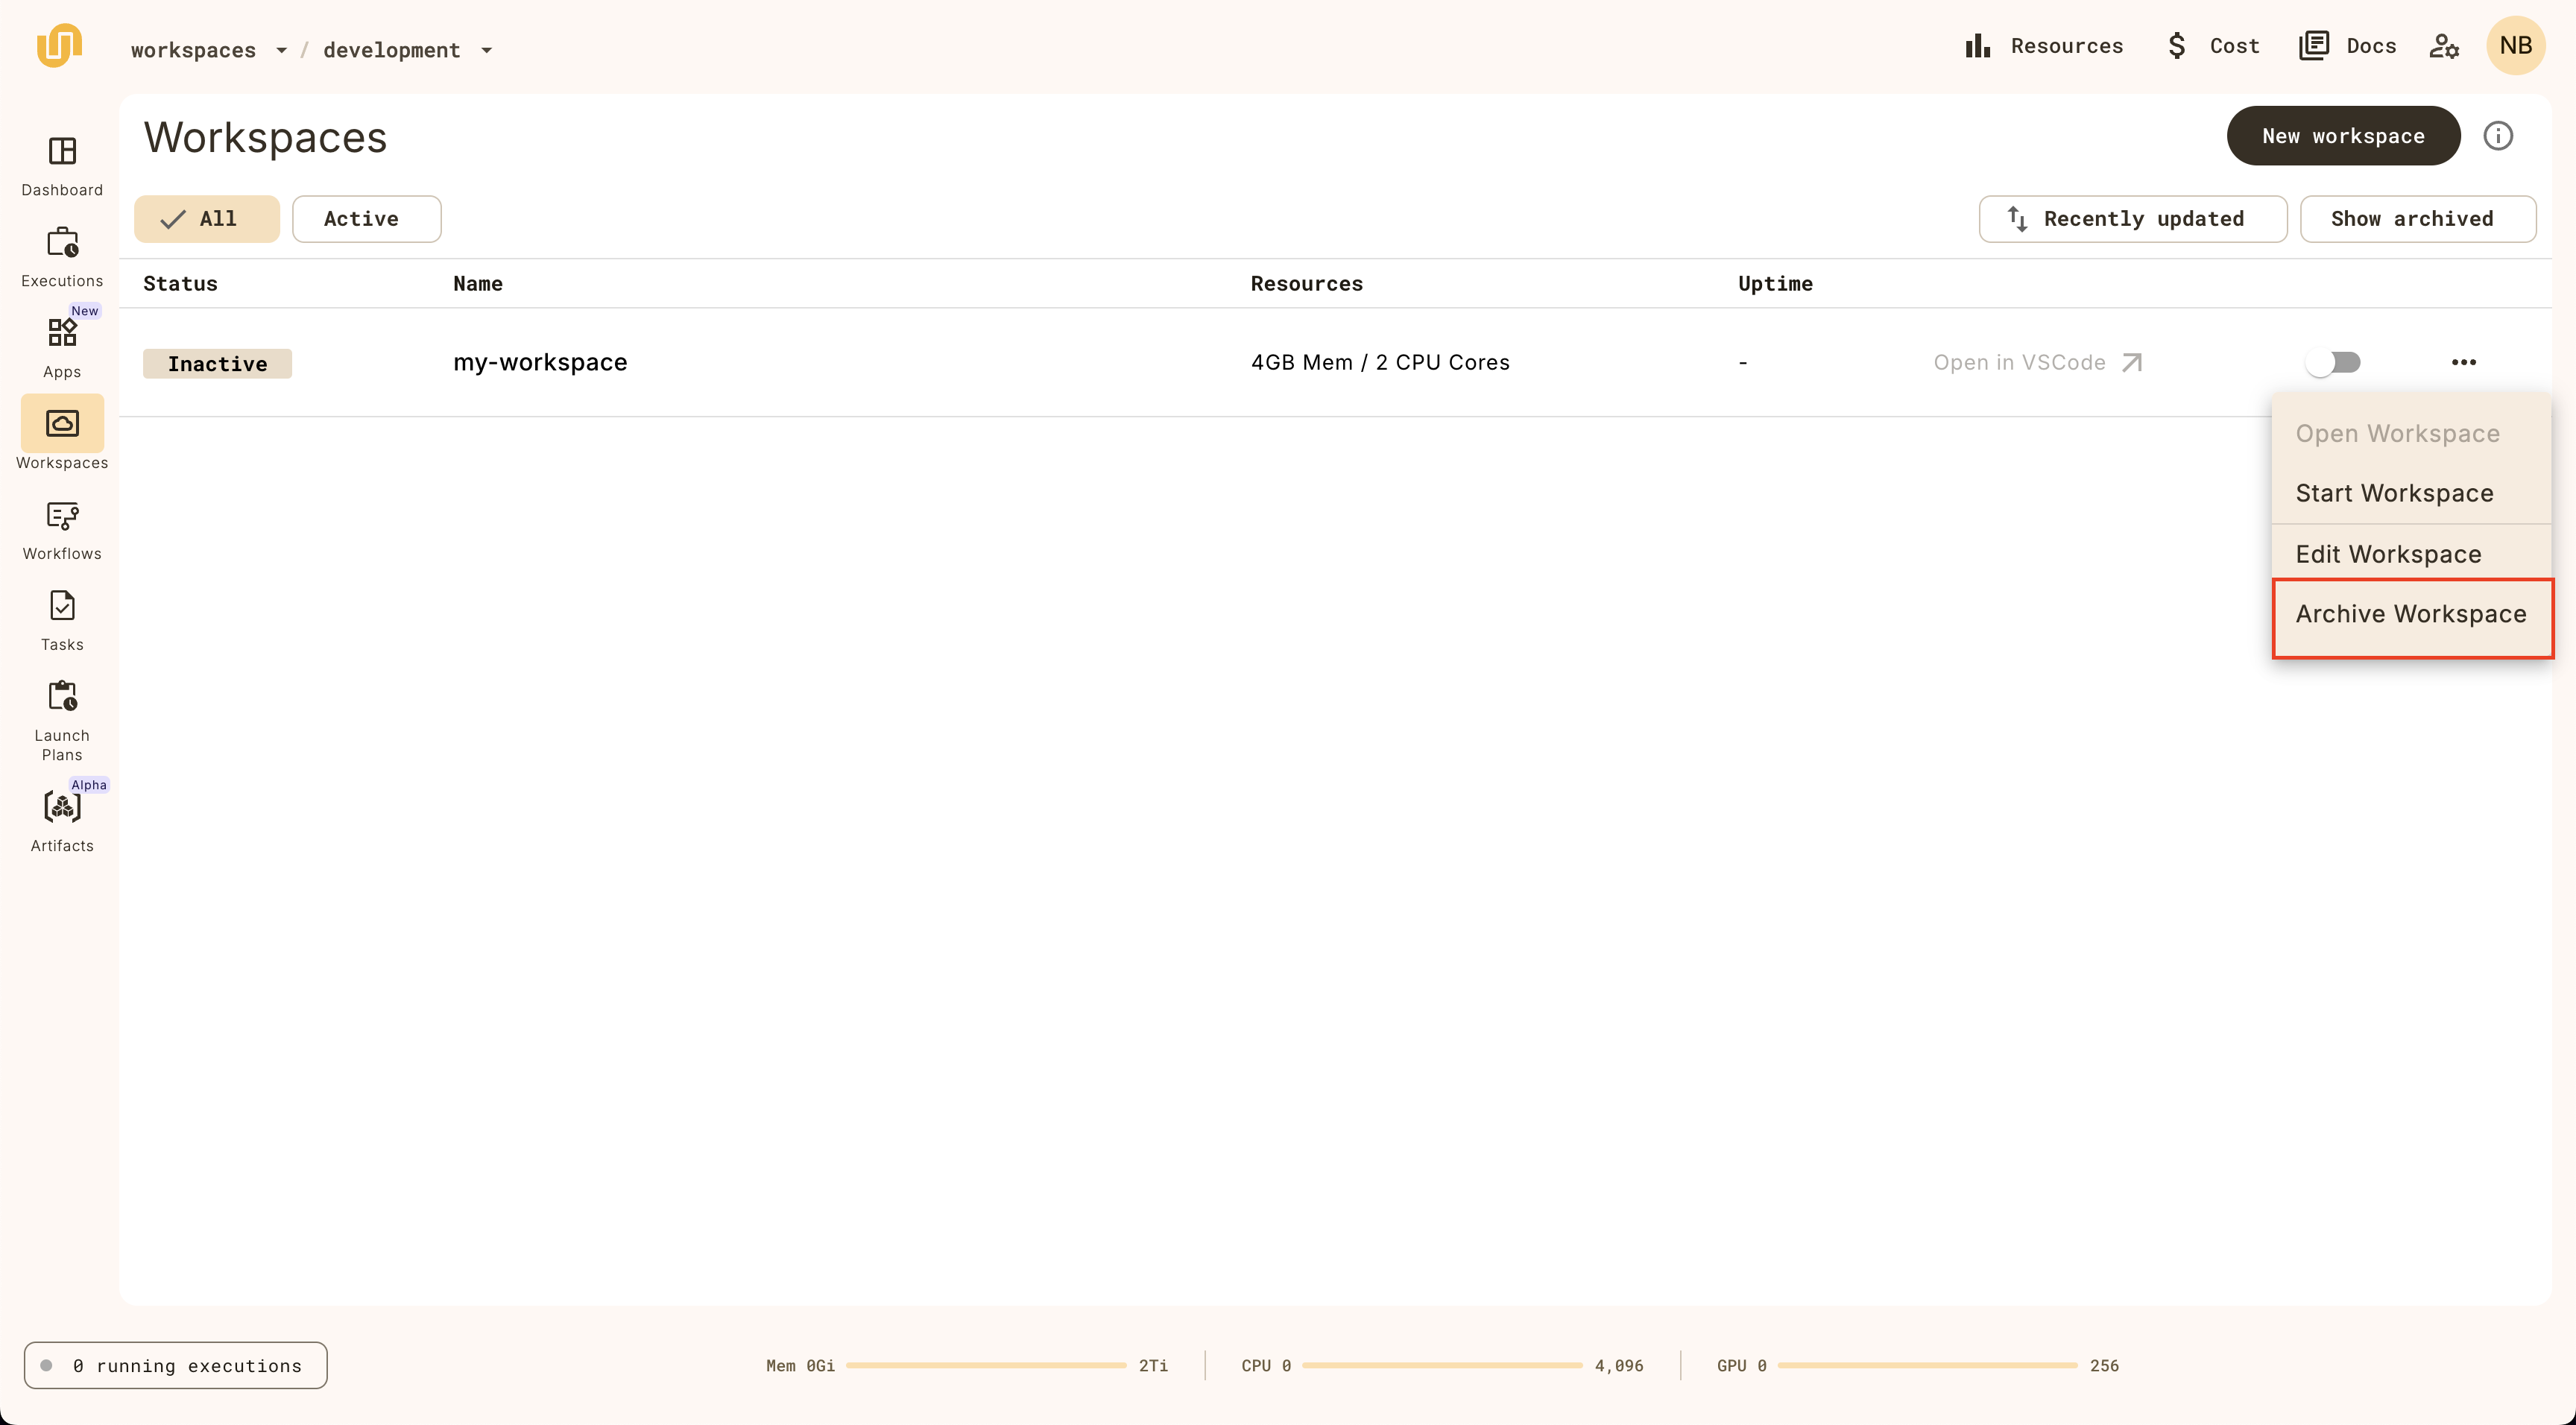
Show archived workspaces by clicking on the **Show archived** toggle
on the top right of the workspaces list view. Unarchive a workspace by clicking
on the **Unarchive** button:
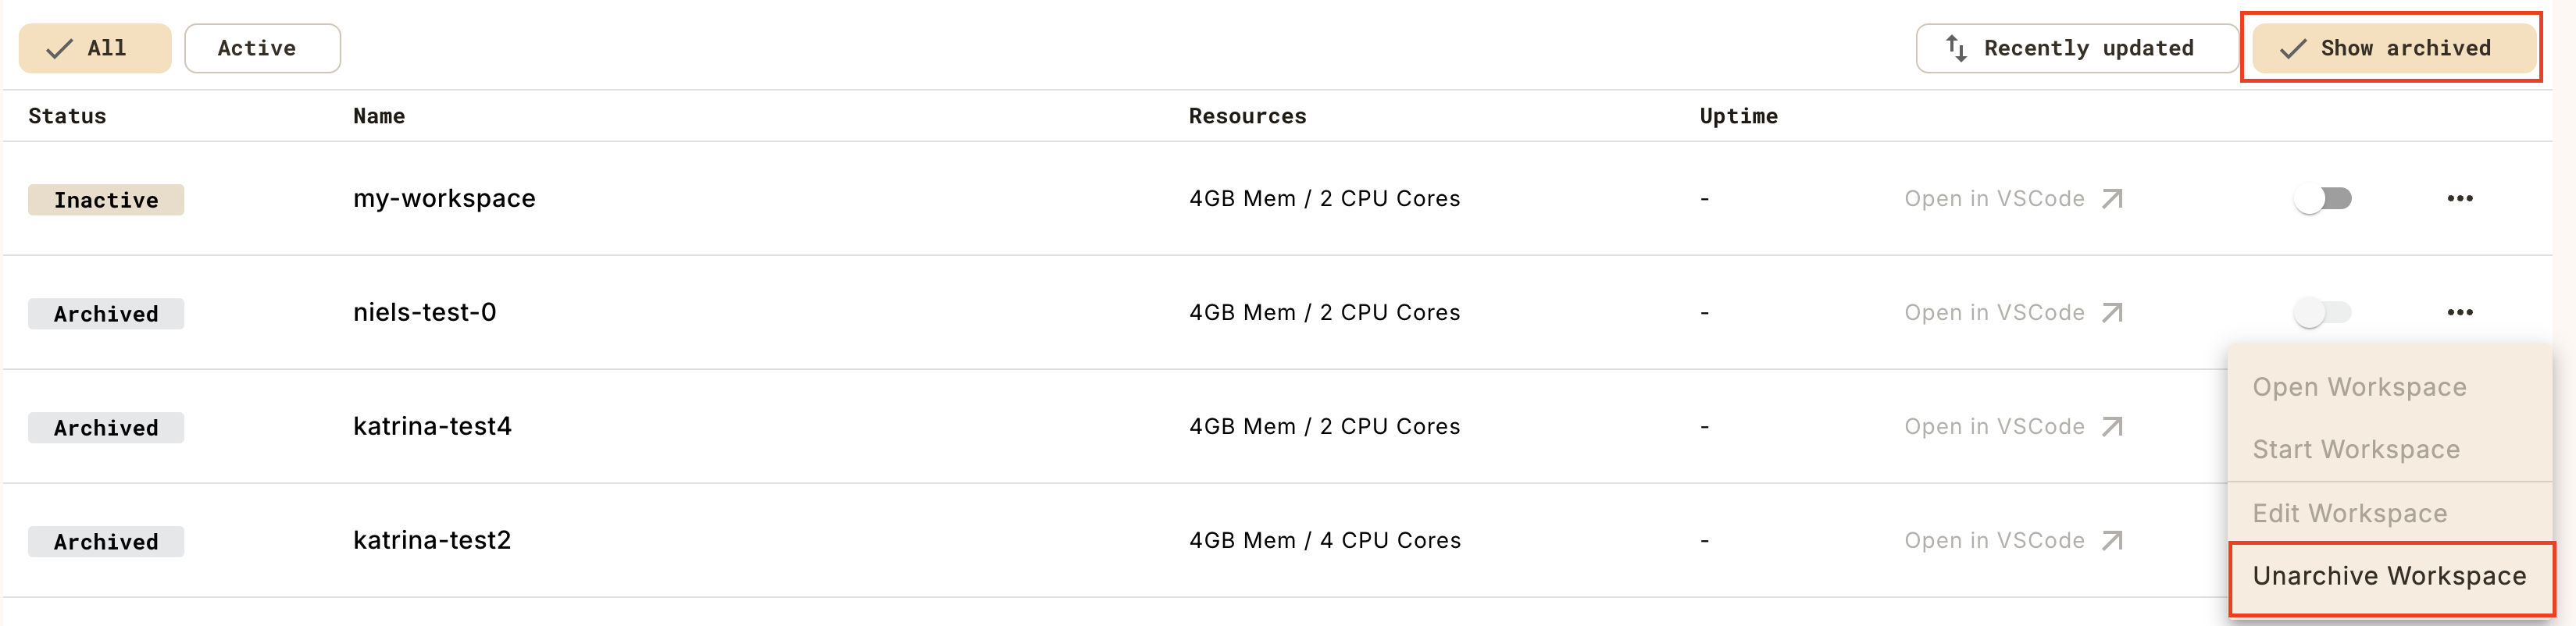
## Workspace CLI commands
The `union` CLI also provides commands for managing workspaces.
### Create a workspace configuration
The first step is to create a yaml file that describes the workspace.
```shell
$ union create workspace-config --init base_image workspace.yaml
```
This will create a `workspace.yaml` file in the current directory, with the
default configuration values that you can edit for your needs:
```yaml
name: my-workspace
description: my workspace description
project:
domain:
container_image: public.ecr.aws/unionai/workspace-base:py3.11-latest
resources:
cpu: "2"
mem: "4Gi"
gpu: null
accelerator: null
on_startup: null
ttl_seconds: 1200
```
Note that the yaml file contains a `project` and `domain` field that you can set to create a
workspace in a specific project and domain.
### Create a workspace
Then, create a workspace using the `union create workspace` command:
```shell
$ union create workspace workspace.yaml
```
This command will also start your workspace, and will print out the workspace
link that you click on to open the workspace in your browser:
```shell
Created: workspace_definition {
...
}
Starting workspace 'my-workspace'
🚀 Workspace started: Open VSCode in Browser
```
### Stop a workspace
When you want to stop a workspace, use the `union stop workspace` command:
```shell
$ union stop workspace --name my-workspace
```
This will print out a message indicating that the workspace has been stopped:
```shell
Workspace instance stopped: org: "org"
...
```
### Update a workspace
To update a workspace, modify the `workspace.yaml` file and run the
`union update workspace` command:
```shell
$ union update workspace workspace.yaml
```
This will print out a message that looks something like:
```shell
Updated: workspace_definition {
...
}
```
### Get existing workspaces
To get existing workspaces, use the `union get workspace` command:
```shell
$ union get workspace
```
This will print out a table of all the workspaces you have access to in the
specified project and domain (the command uses the default project and domain
if you don't provide them).
```shell
┏━━━━━━━━━━━━━━━━━━━━━━┳━━━━━┳━━━━━━━━┳━━━━━┳━━━━━━━━━━━━━━━━━━━━━┳━━━━━━━━━━━━━┳━━━━━━━━━━━━┓
┃ Workspace name ┃ CPU ┃ Memory ┃ GPU ┃ Accelerator ┃ TTL Seconds ┃ Active URL ┃
┡━━━━━━━━━━━━━━━━━━━━━━╇━━━━━╇━━━━━━━━╇━━━━━╇━━━━━━━━━━━━━━━━━━━━━╇━━━━━━━━━━━━━╇━━━━━━━━━━━━┩
│ my-workspace │ 2 │ 4Gi │ - │ - │ 1200 │ - │
└──────────────────────┴─────┴────────┴─────┴─────────────────────┴─────────────┴────────────┘
```
To get the details of a specific workspace, provide
the workspace name with the `--name` flag.
### Start a workspace
To start a workspace, use the `union start workspace` command, specifying the
name of the workspace you want to start in the `--name` flag.
```shell
$ union start workspace --name my-workspace
```
You should see a message that looks like:
```shell
Starting workspace 'my-workspace'
🚀 Workspace started: Open VSCode in Browser
```
## Customizing a workspace
There are several settings that you can customize for a workspace in the UI or
the CLI.
### Setting secrets
If you don't have any secrets yet, create them with the `union create secret`
command:
```shell
$ union create secret --project my_project --domain my_domain --name my_secret
```
You'll be prompted to enter a secret value in the terminal:
```shell
Enter secret value: ...
```
> [!NOTE]
> You can learn more about secrets management **Development cycle > Managing secrets**.
Set secrets for your workspace by clicking on the **Secrets** tab in the sidebar.
Provide the `my_secret` key and optionally, the environment variable you want
to assign it to in the workspace.
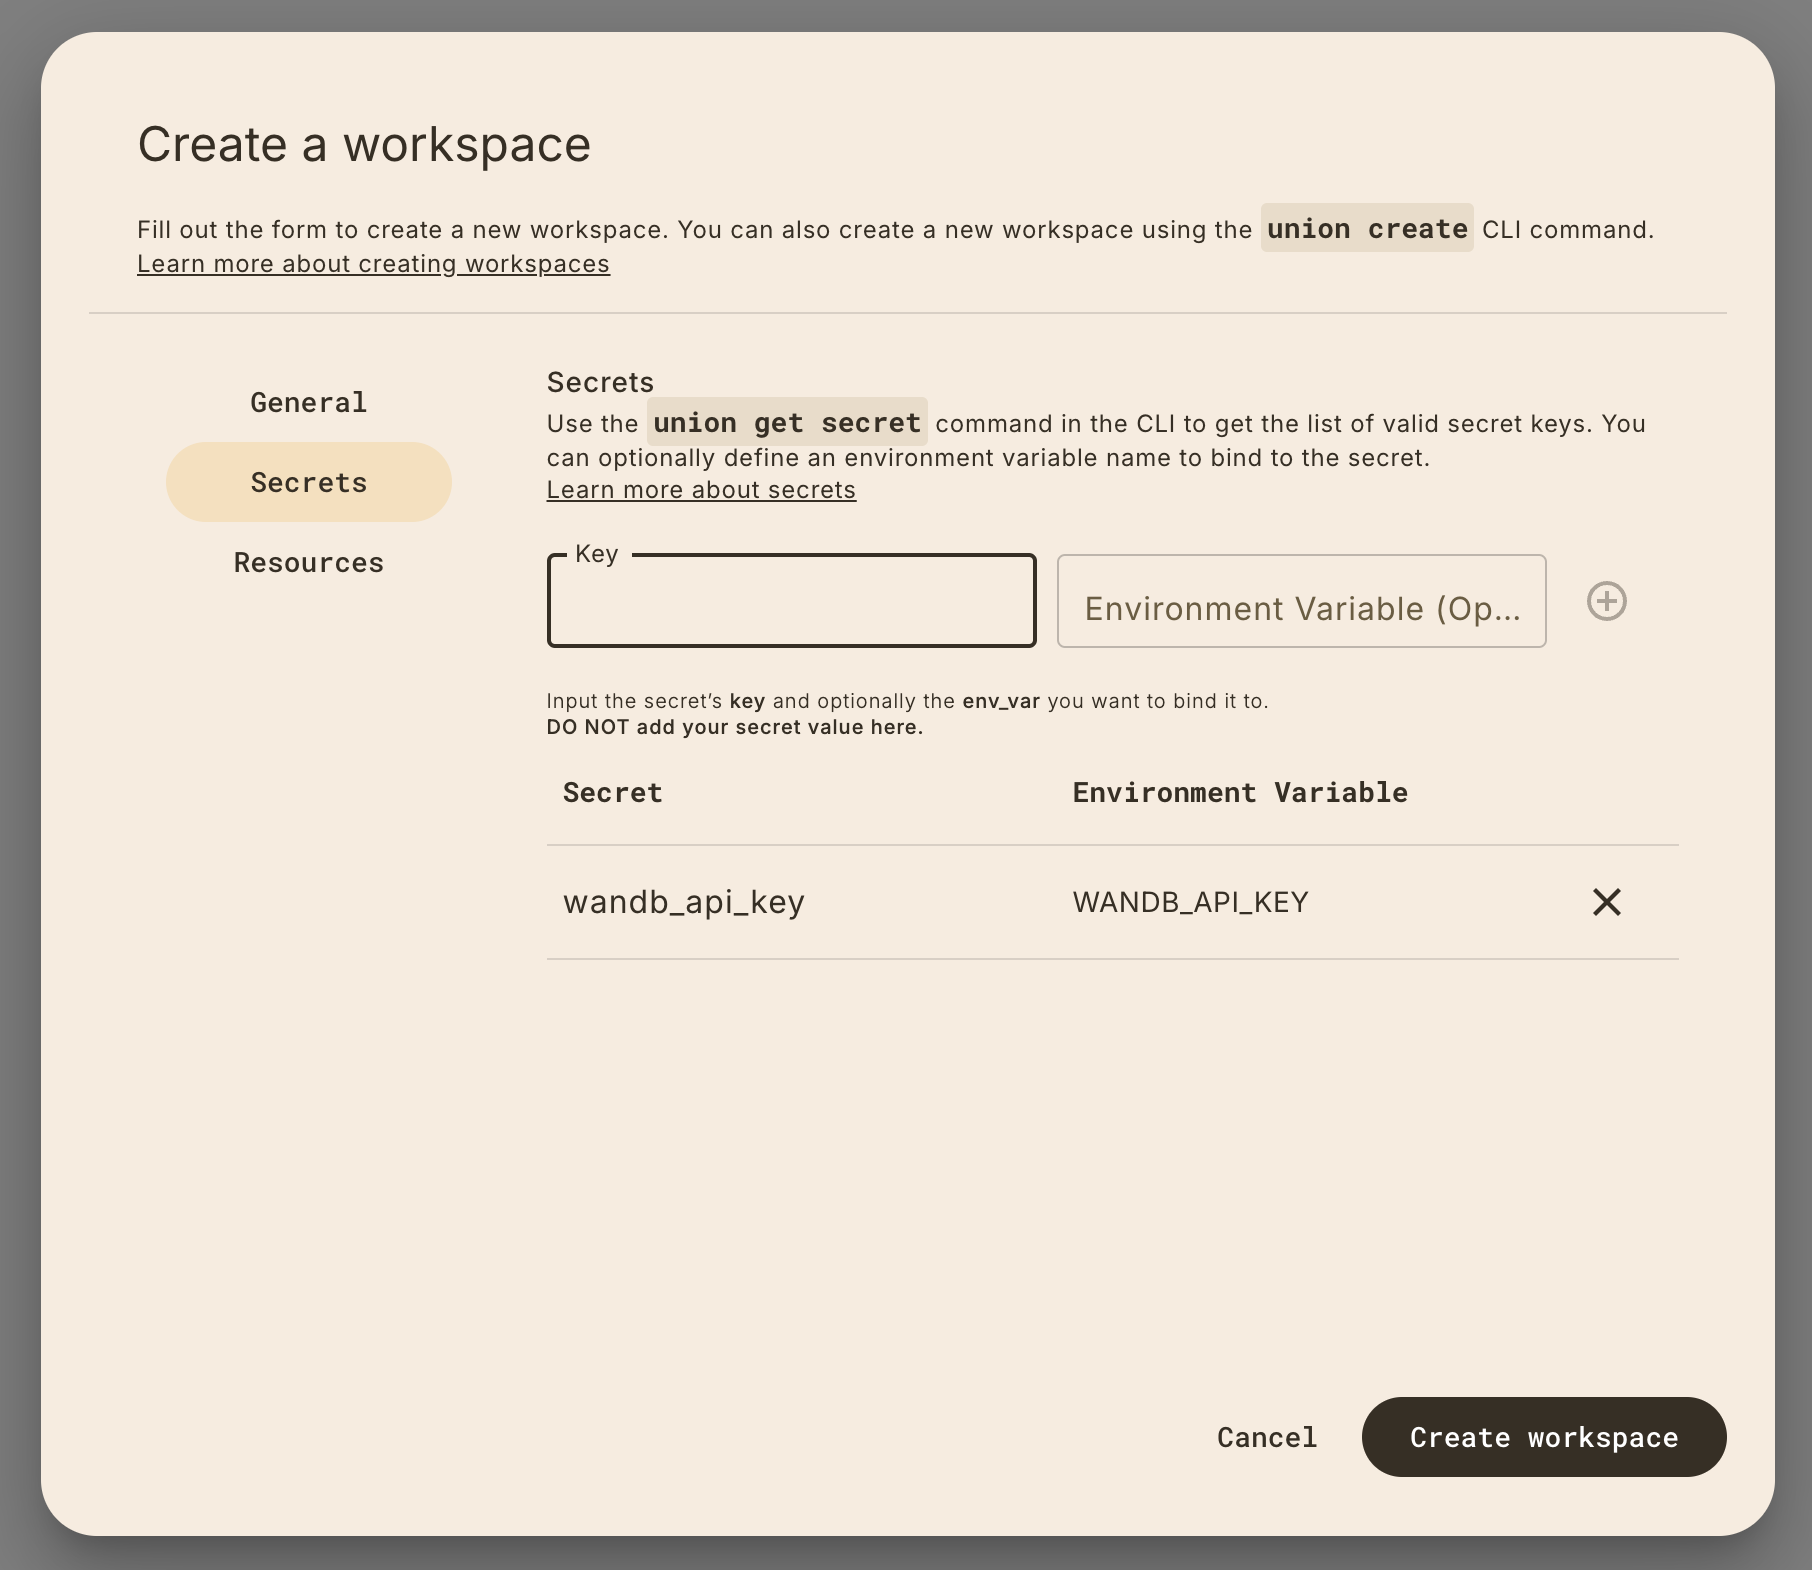
#### Setting secrets via the CLI
Set secrets via the CLI using the `secrets` key, which is a list of objects with
a `key` and `env_var` (optional) field:
```yaml
name: my-workspace
description: my workspace description
project: flytesnacks
domain: development
container_image: public.ecr.aws/unionai/workspace-base:py3.11-latest
secrets:
- key: my_secret # this is the secret key you set when you create the secret
env_var: MY_SECRET # this is an optional environment variable that you
# can bind the secret value onto.
...
```
### Setting CPU, memory, and GPU resources
You can also set the resources for your workspace:
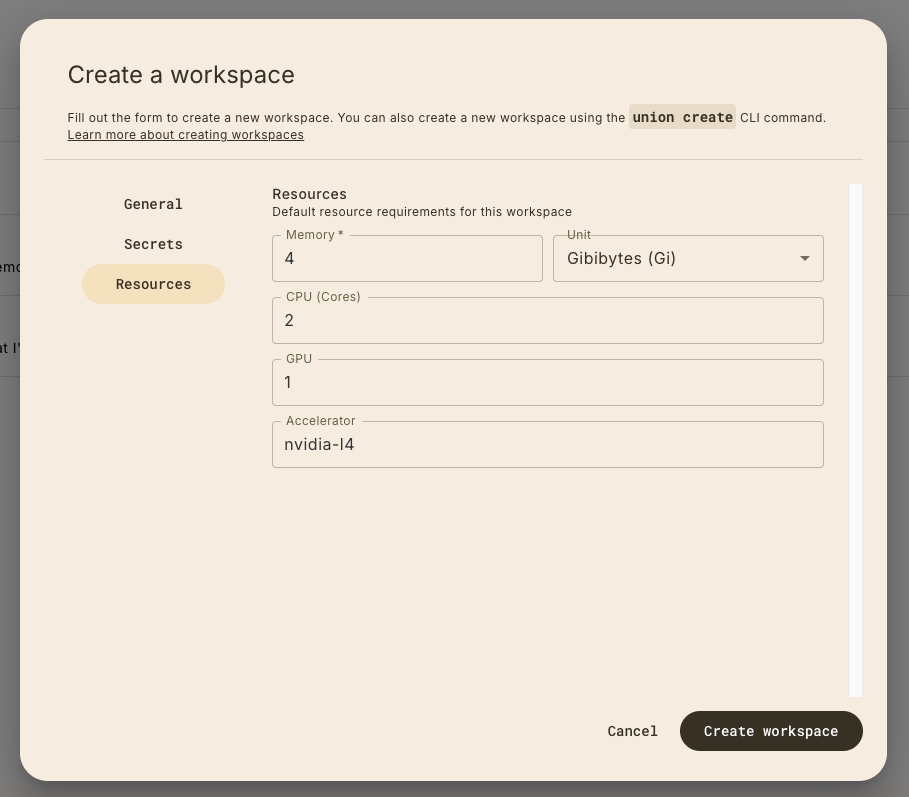
These resources must be compatible with the resource limits available to you
on your Union.ai serverless account. Go the top-level dashboard to view your
execution settings:
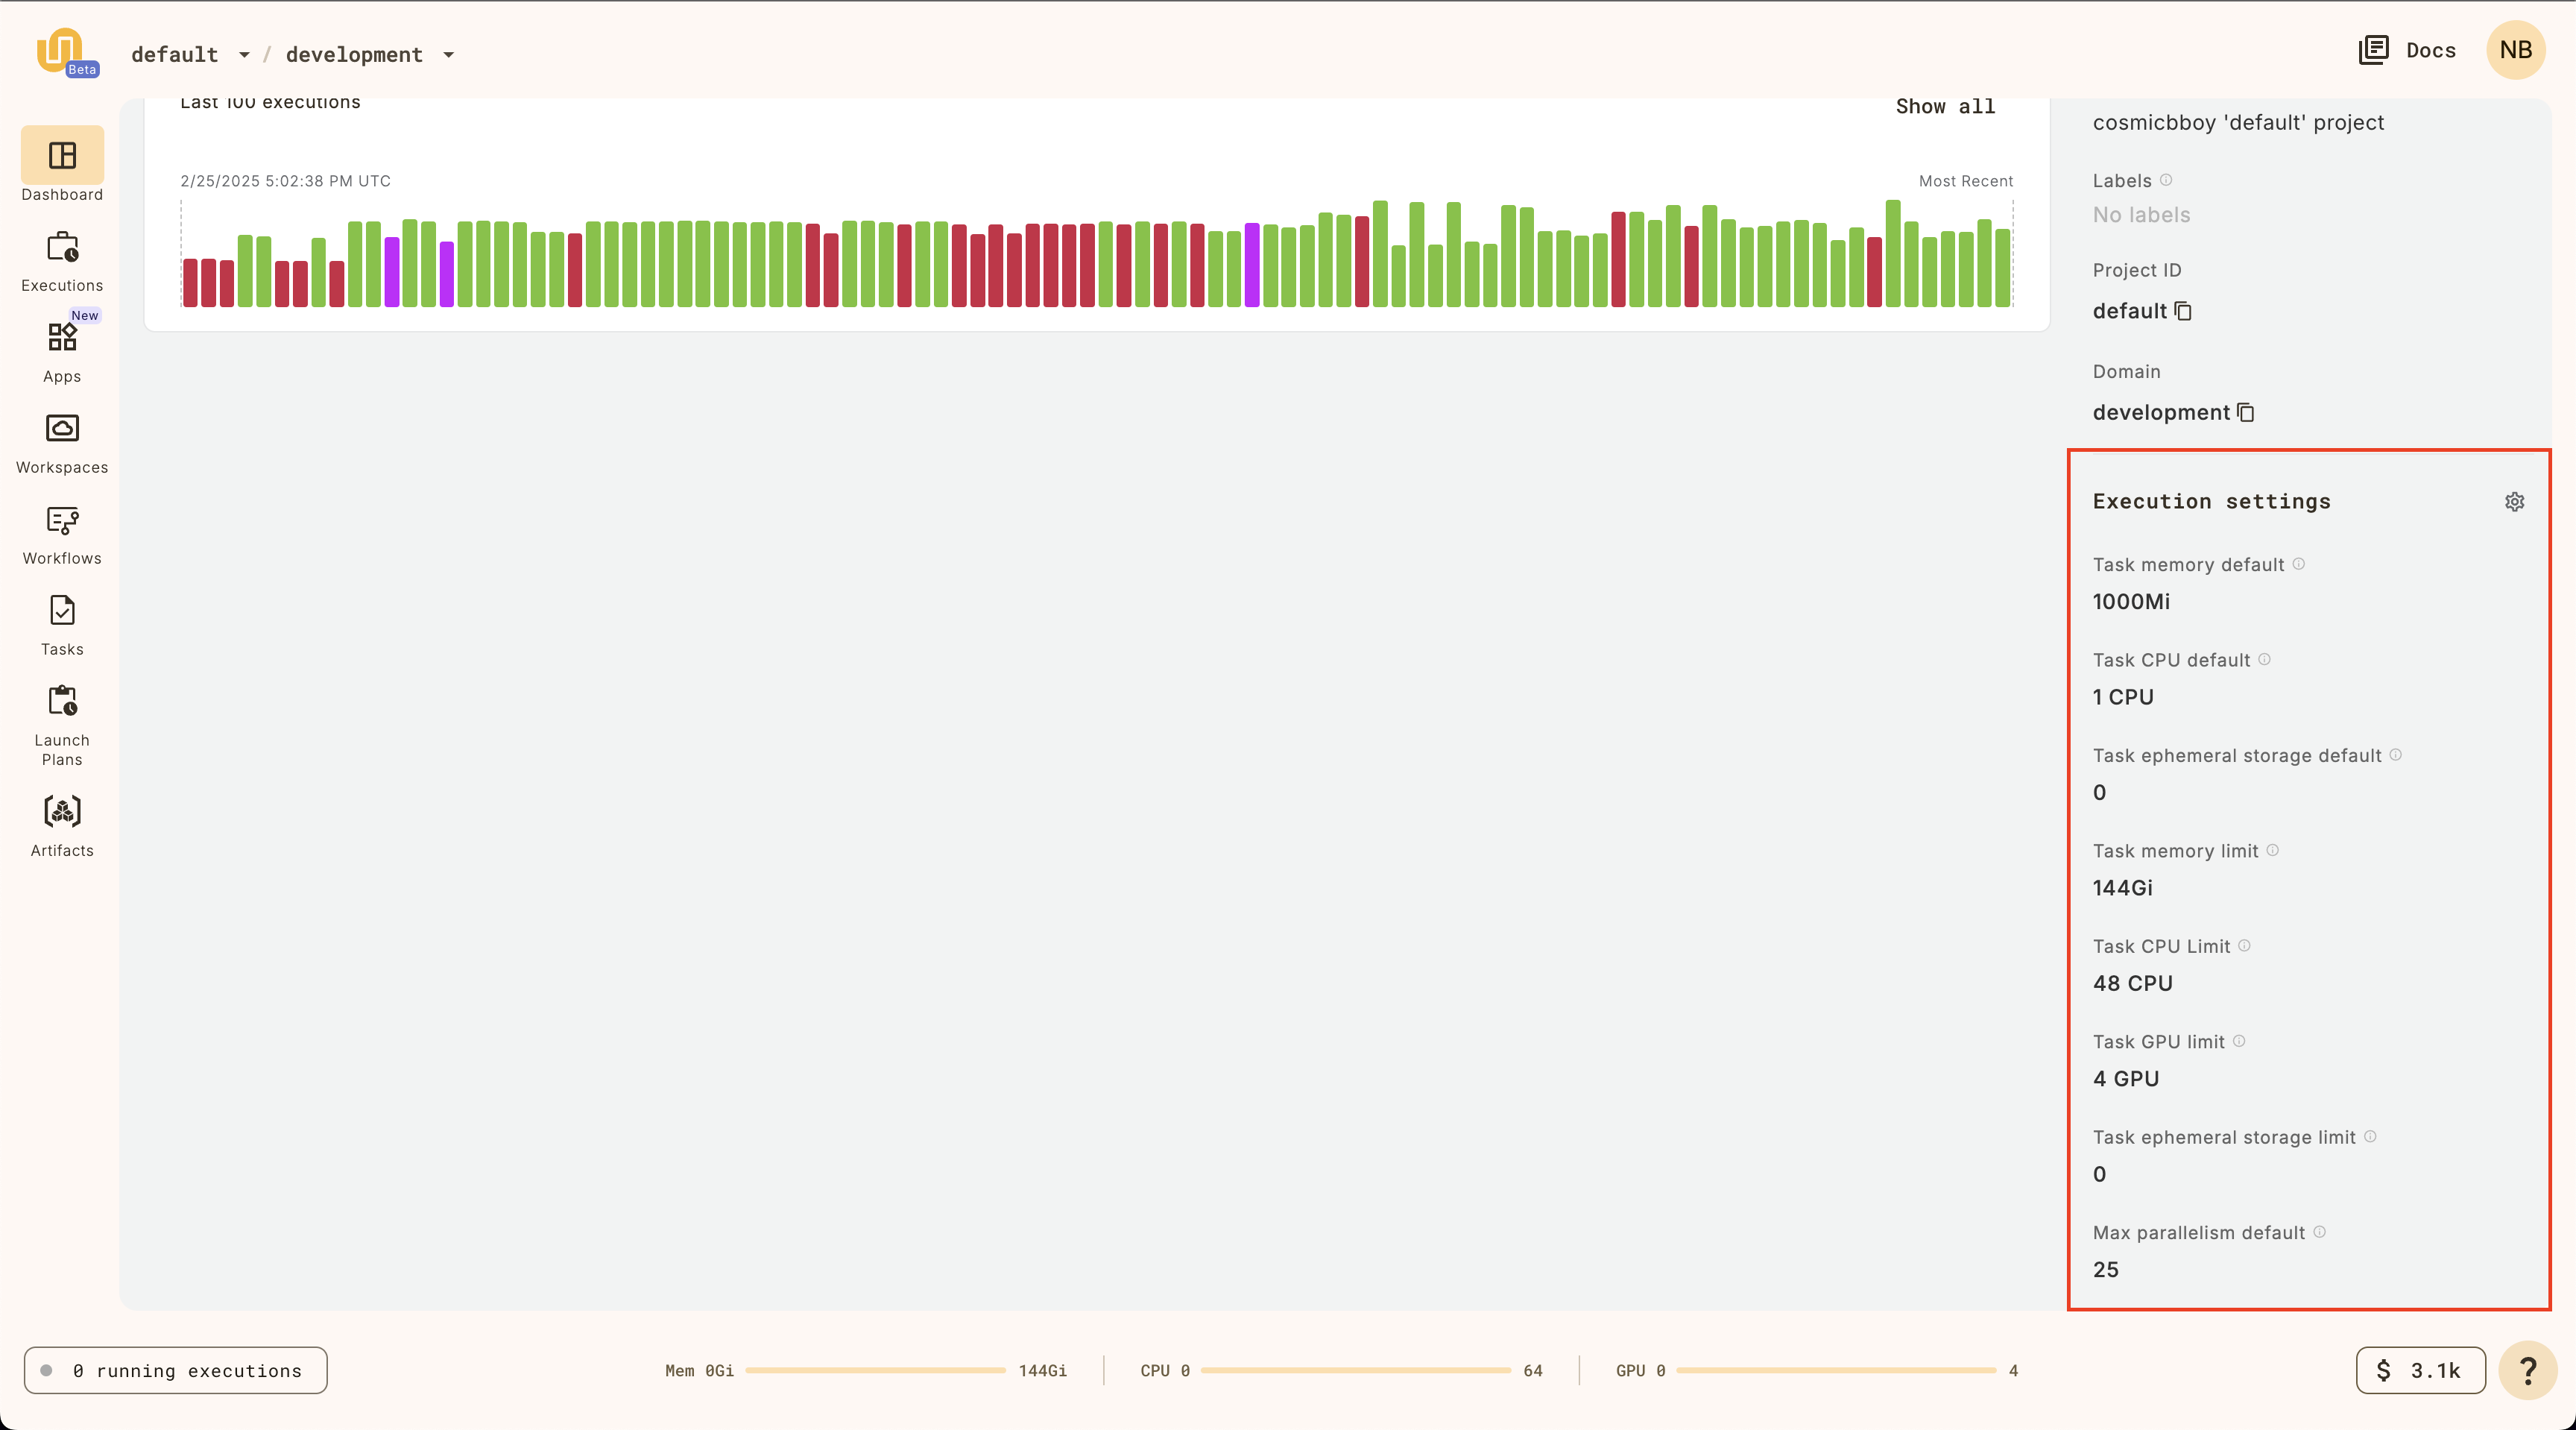
For the `GPU` field, you can choose one of the following values:
* `nvidia-tesla-t4`
* `nvidia-tesla-l4`
* `nvidia-tesla-a100`
Learn more about the available accelerators **Core concepts > Tasks > Task hardware environment > Accelerators**.
### Specifying custom `on_startup` commands
If you need to run any commands like install additional dependencies or `wget`
a file from the web, specify custom `on_startup` commands:
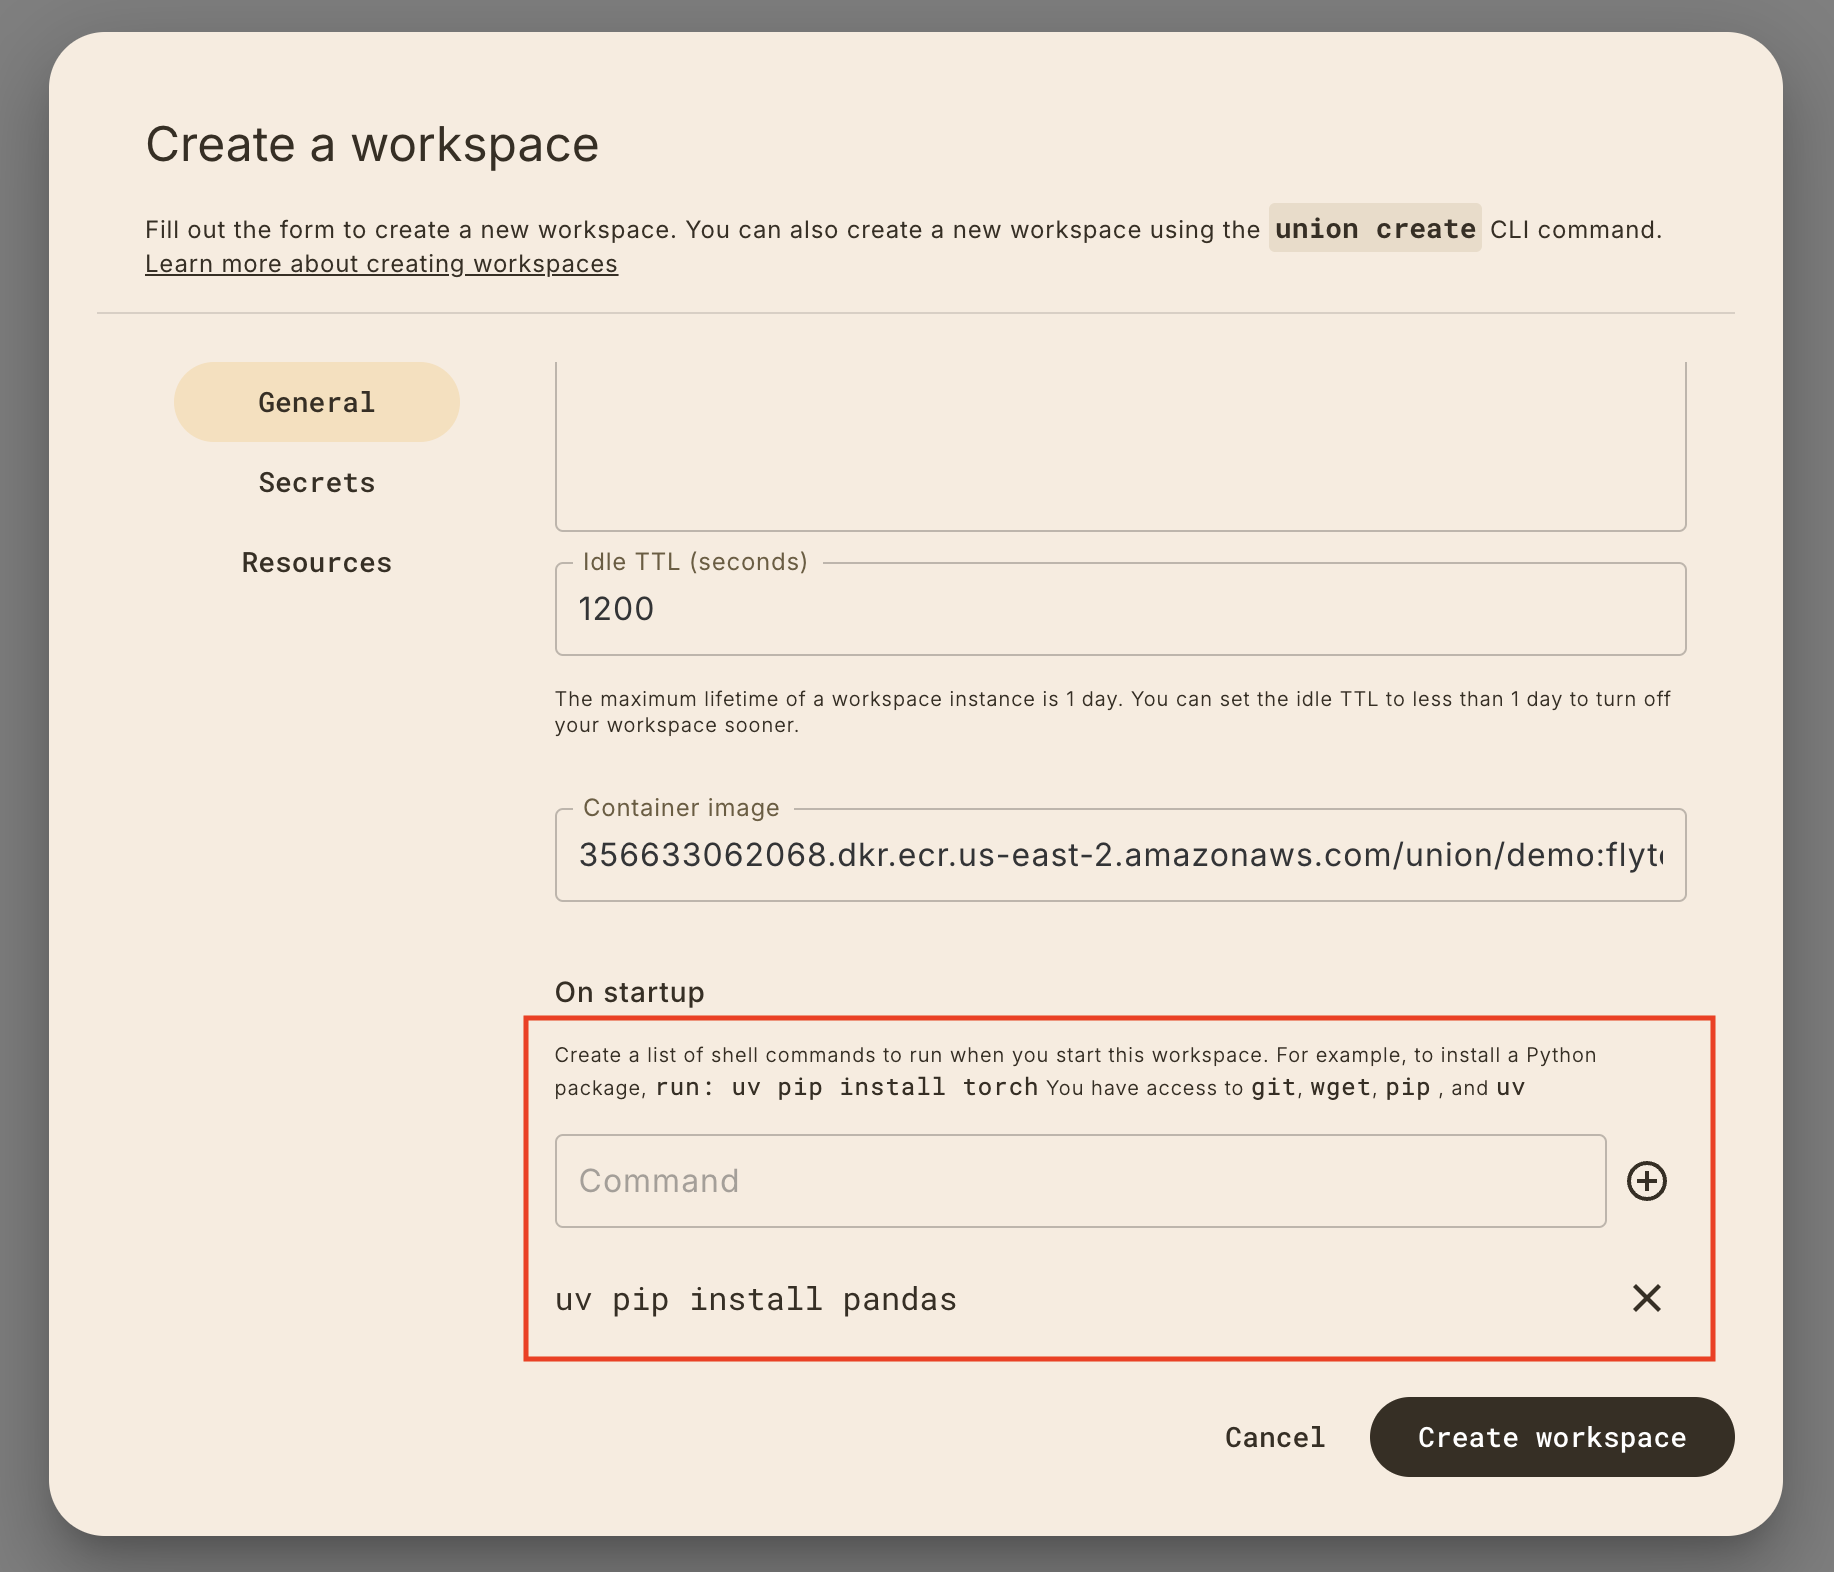
### Specifying custom container images
By default, the workspace will use a Union.ai-provided container image which contains
the following Python libraries:
- `union`
- `flytekit`
- `uv`
- `ipykernel`
- `pandas`
- `pyarrow`
- `scikit-learn`
- `matplotlib`
#### Specifying a custom container image in the UI
You can specify a pre-built custom container image by clicking on the **Container**
tab in the sidebar and provide the image name in the workspace creation form.
> [!NOTE]
> The minimum requirement for custom images is that it has `union>=0.1.166`
> installed in it.
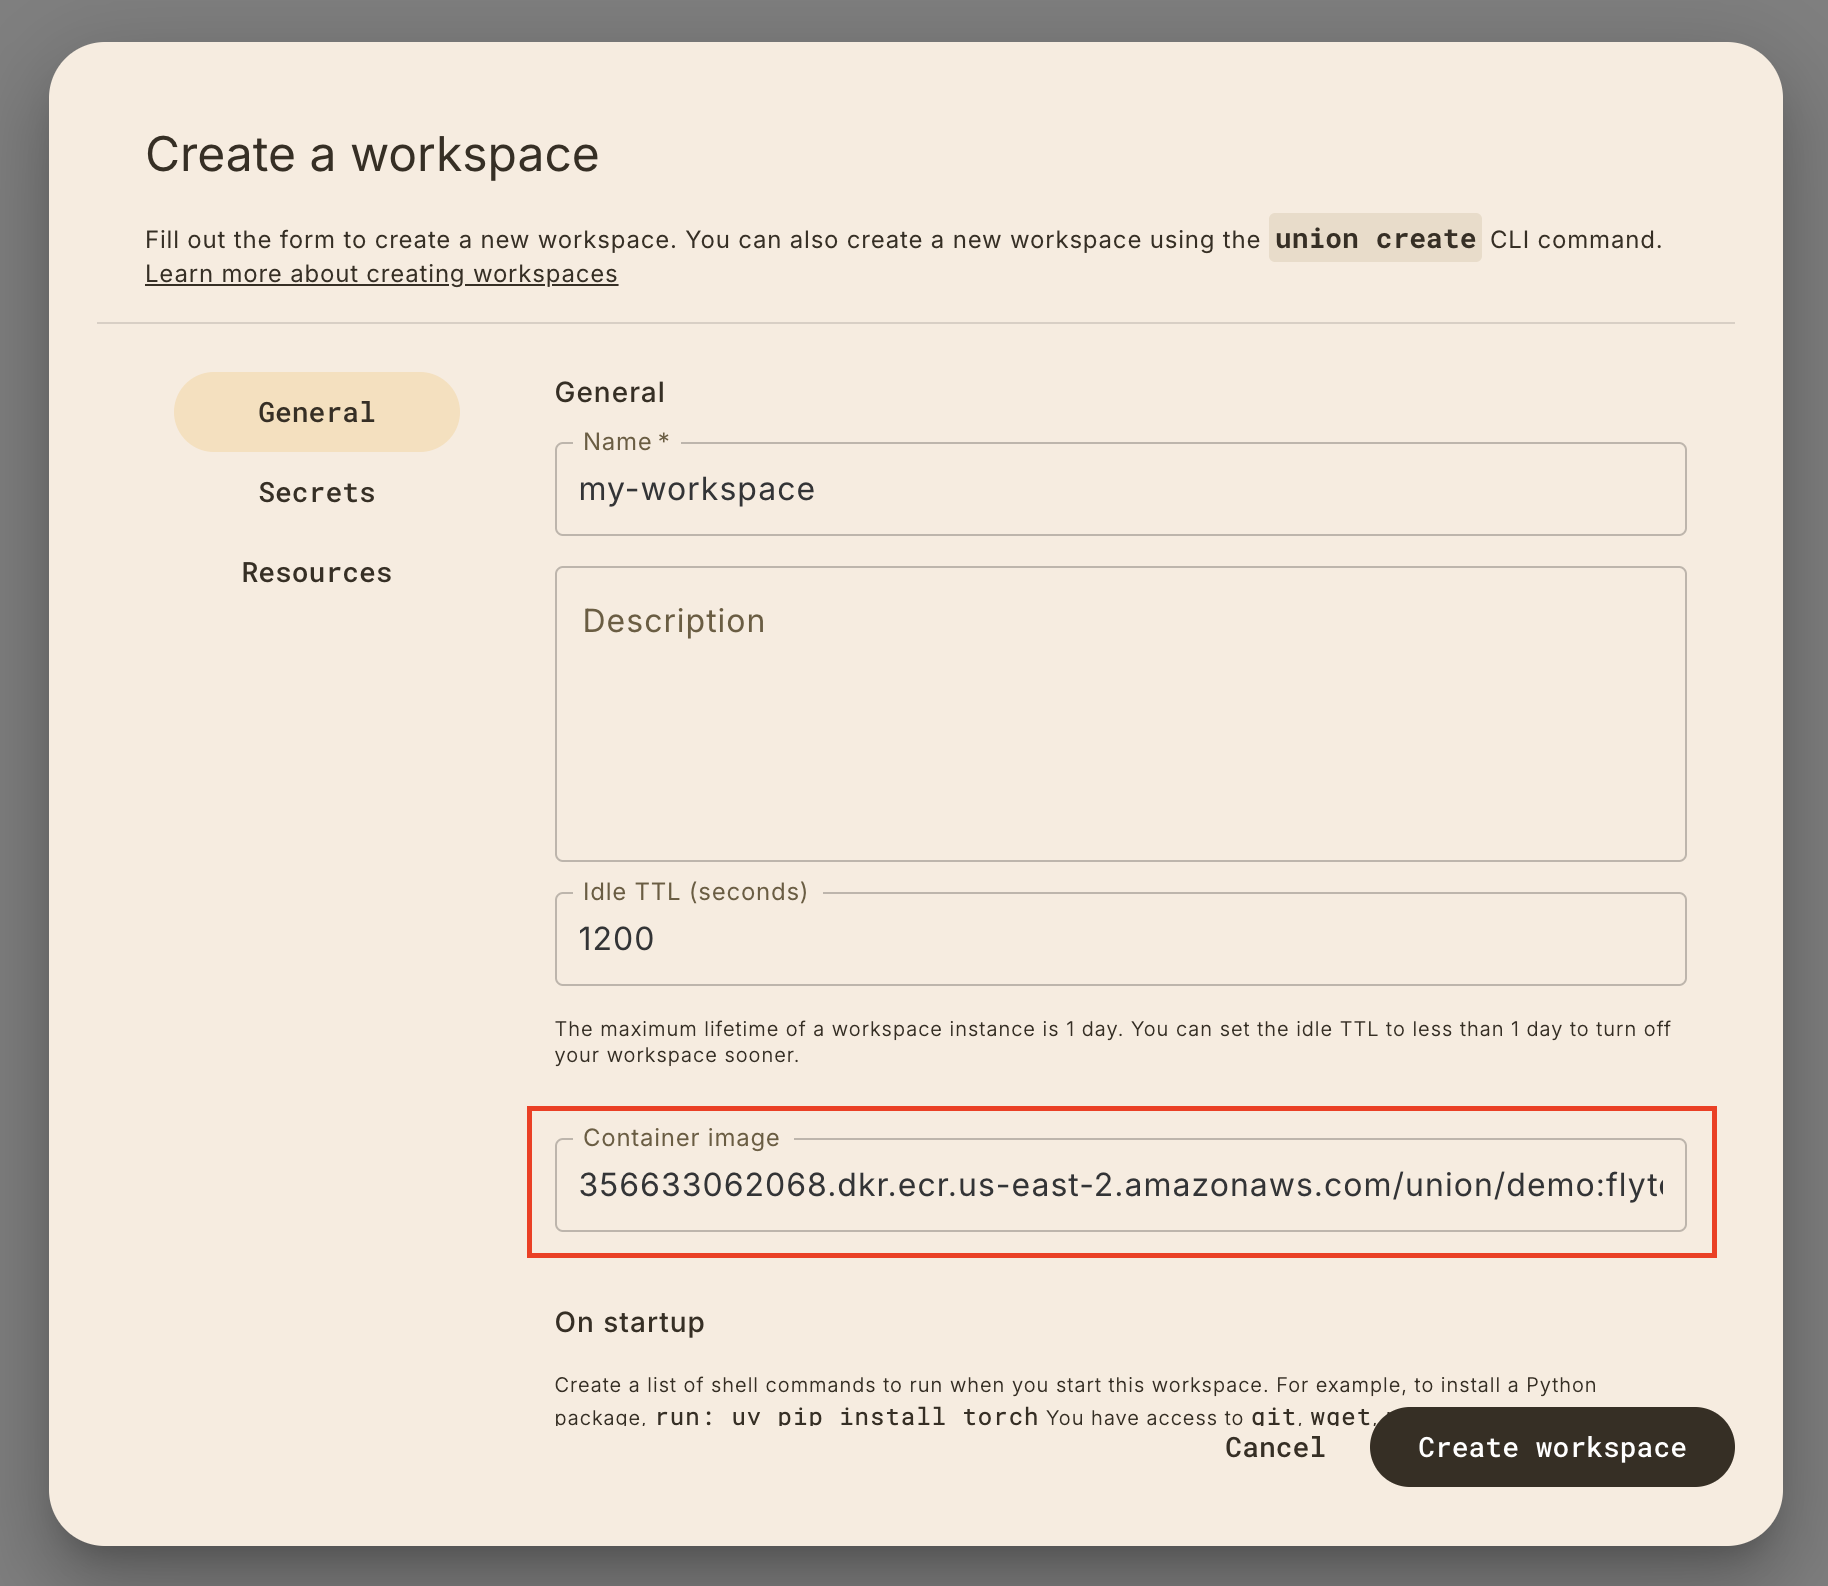
In many cases, you may want to use the same container image as a task execution
that you want to debug. You can find the container image URI by going to the
task execution details page:
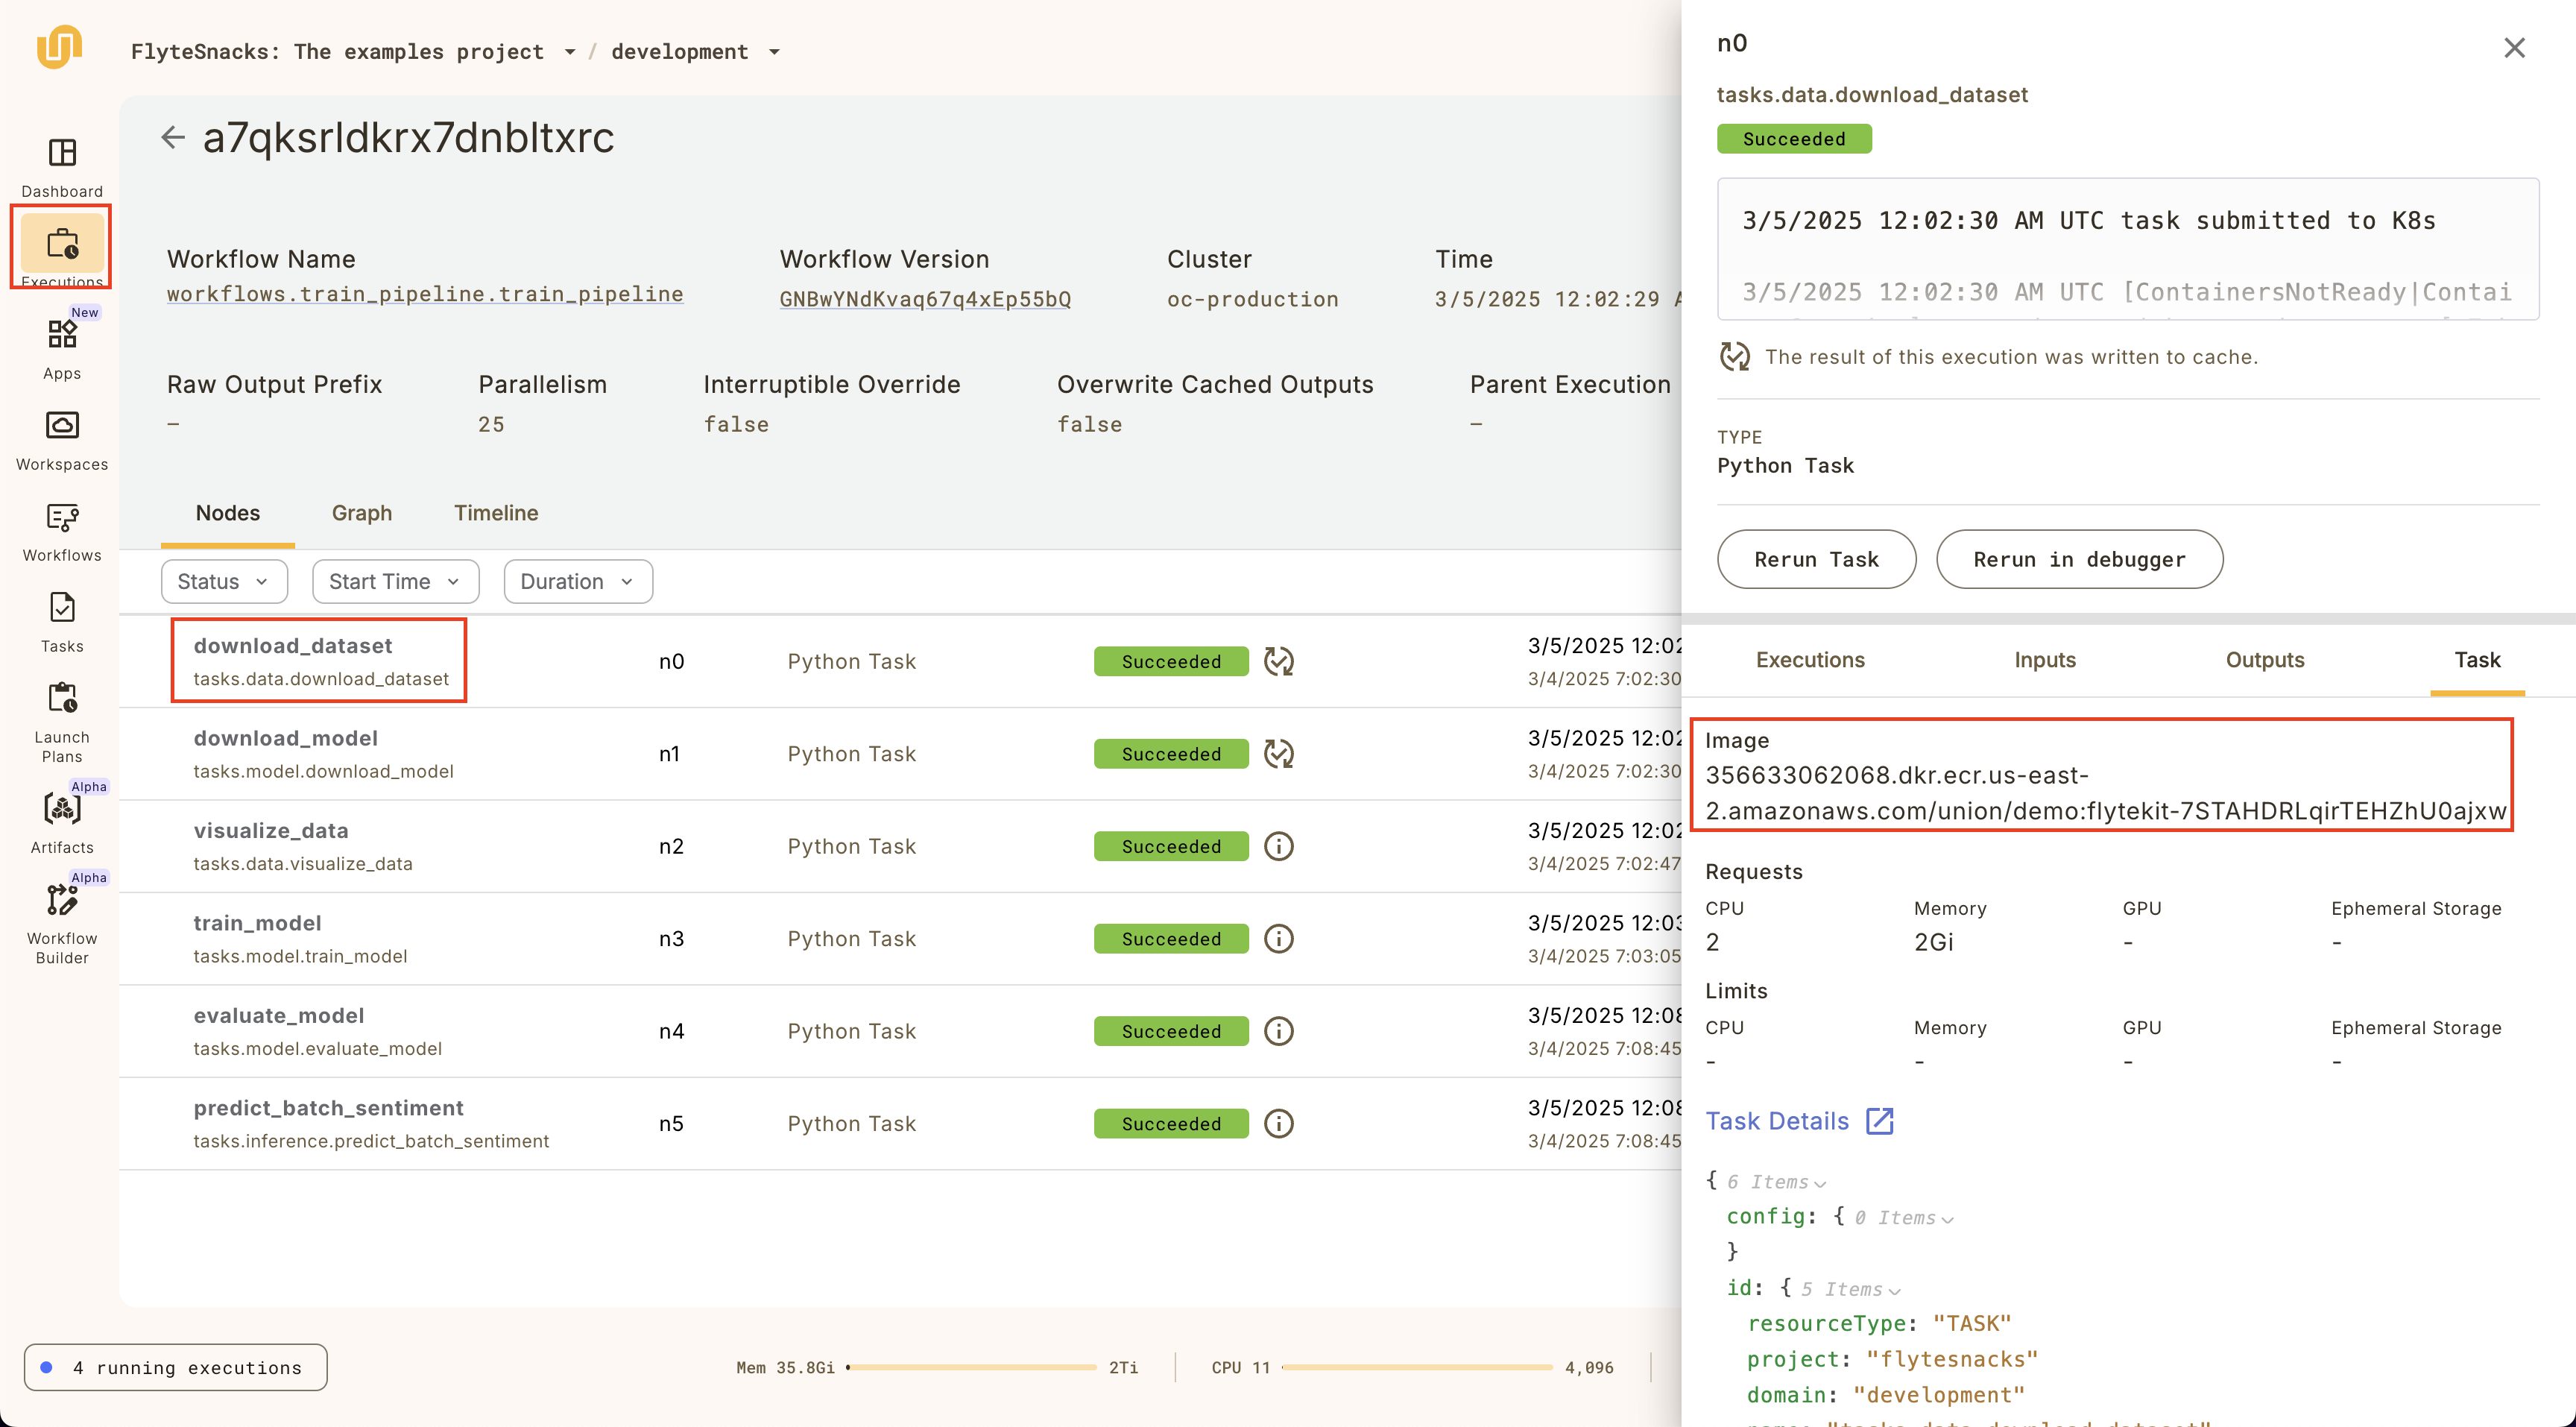
#### Specifying a custom container image in the CLI
The `union` CLI provides a way to specify a custom container image that's built
by Union's image builder service. To do this, run the following command:
```shell
union create workspace-config --init custom_image workspace.yaml
```
This will create a `workspace.yaml` file with a `container_image` image key
that supports the **Development cycle > ImageSpec** arguments.
When you run the `union create workspace` command with this `workspace.yaml` file,
it will first build the image before creating the workspace definition.
#### Example: Specifying a workspace with GPUs
The following example shows a `workspace.yaml` file that specifies a workspace
with a GPU accelerator.
```yaml
# workspace.yaml
name: workspace-with-gpu
description: Workspace that uses GPUs
# Make sure that the project and domain exists
project:
domain:
container_image:
name: custom-image
builder: union
packages:
- torch
resources:
cpu: "2"
mem: "4Gi"
gpu: "1"
accelerator: nvidia-l4
on_startup: null
ttl_seconds: 1200
```
Then run the following command to create the workspace:
```shell
union create workspace workspace.yaml
```
The configuration above will first build a custom container with `torch` installed.
Then, it will create a workspace definition with a single `nvidia-l4` GPU accelerator.
Finally, it will start a workspace session. In the VSCode browser IDE, you can quickly
verify that `torch` has access to GPUs by running the following in a Python REPL:
```python
import torch
print(torch.cuda.is_available())
```
> [!NOTE]
> See the **Core concepts > Workspaces > Customizing a workspace > Setting CPU, memory, and GPU resources**
> section for more details on how to configure specific GPU accelerators.
## Authenticating with GitHub
If you want to clone a private GitHub repository into your workspace, you can
using the pre-installed `gh` CLI to authenticate your workspace session:
```shell
gh auth login
```
You'll be prompted to enter either a GitHub personal access token (PAT) or
authenticate via the browser.
> [!NOTE]
> You can create and set a `GITHUB_TOKEN` secret to set the access token for your
> workspace, but you'll need to authenticate via `gh auth login` in every new
> workspace session:
* Create a secret with the `union create secret` command
* Create a workspace or update an existing one with the `GITHUB_TOKEN` secret,
setting the environment variable to e.g. `GITHUB_TOKEN`
* In the workspace session, run `gh auth login` to authenticate with GitHub and
use the `$GITHUB_TOKEN` environment variable as the personal access token.
## Sorting and filtering workspaces
You can filter workspaces to only the active ones by clicking on the **Active**
toggle on the top left of the workspaces list view.

Sort by recently updated by clicking on the **Recently updated** toggle on the
top right of the workspaces list view, and you can also sort by recently
updated by clicking on the **Recently updated** toggle on the top right of the
workspaces list view.

## Troubleshooting
You may come across issues starting up a workspace due to various reasons,
including:
* Resource requests not being available on your Union cluster.
* Secrets key typpos of not being defined on the project/domain.
* Container image typos or container images not existing.
Under the hood, workspaces are powered by {{< key product_name >}} tasks, so to debug these kinds
of issues, the workspace detail page provides a link to the underlying
task that's hosting the VSCode IDE:
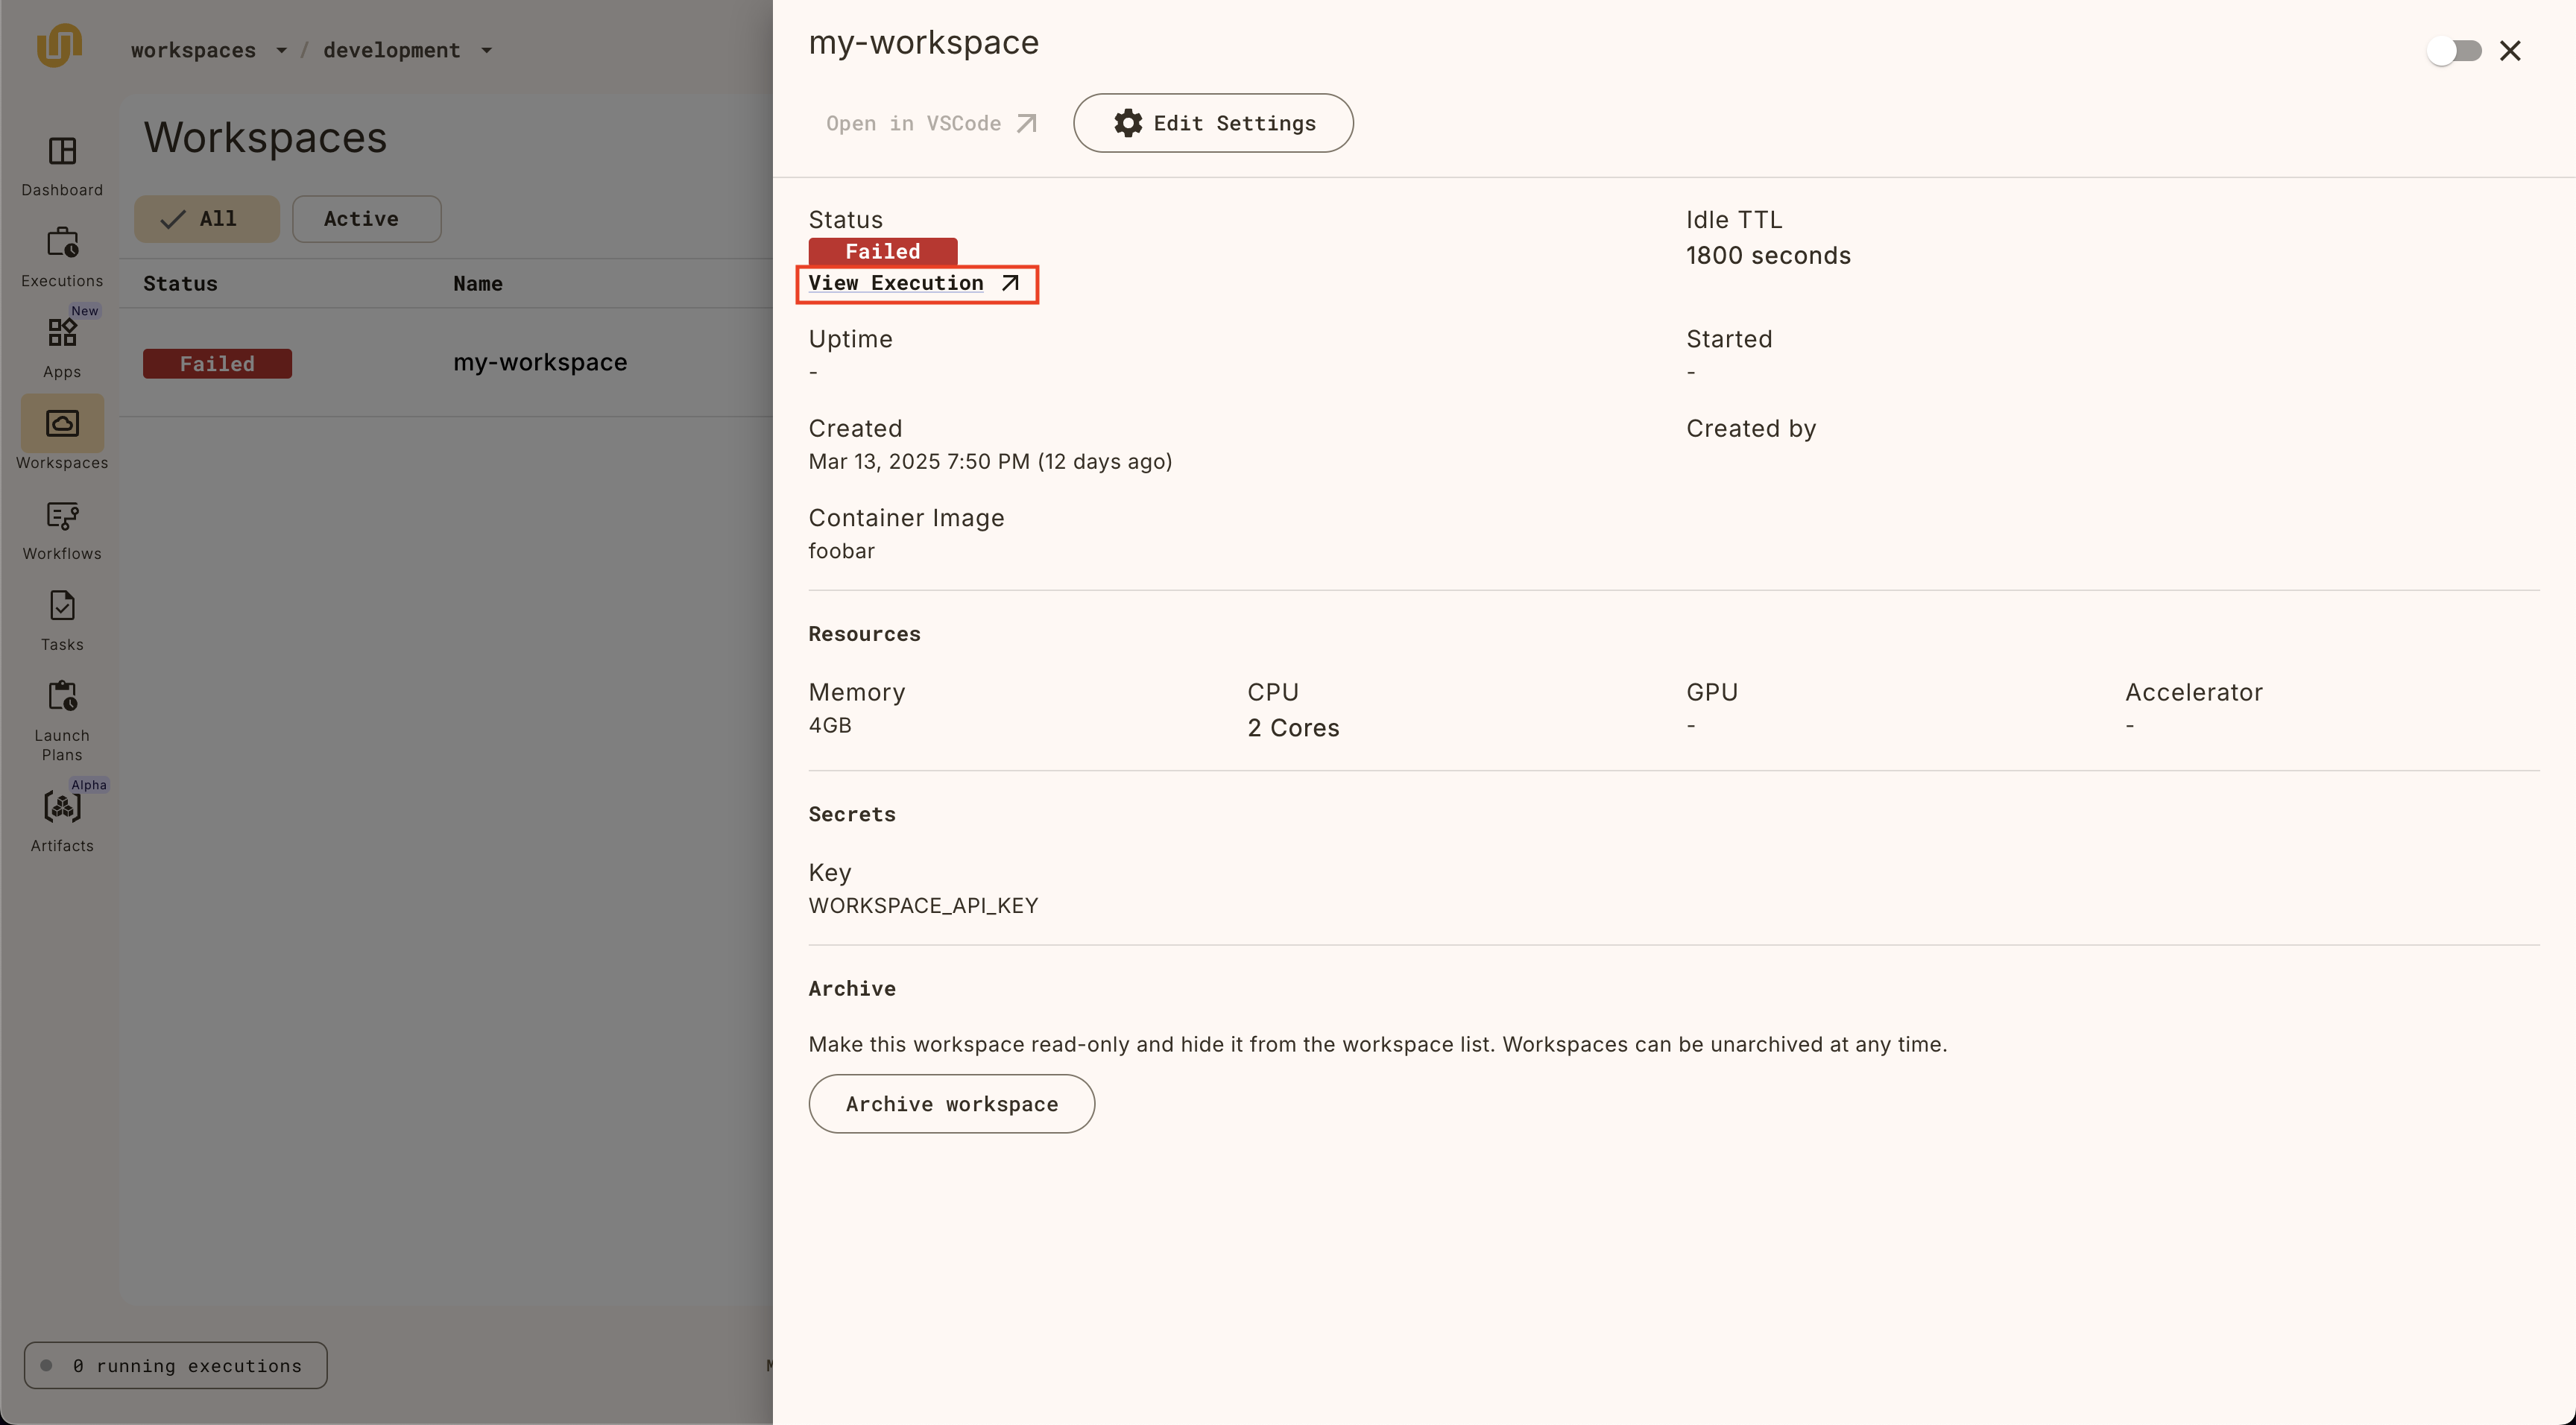
Clicking on the link will open the task details page, where you can see the
underlying task definition, pod events, and logs to debug further.
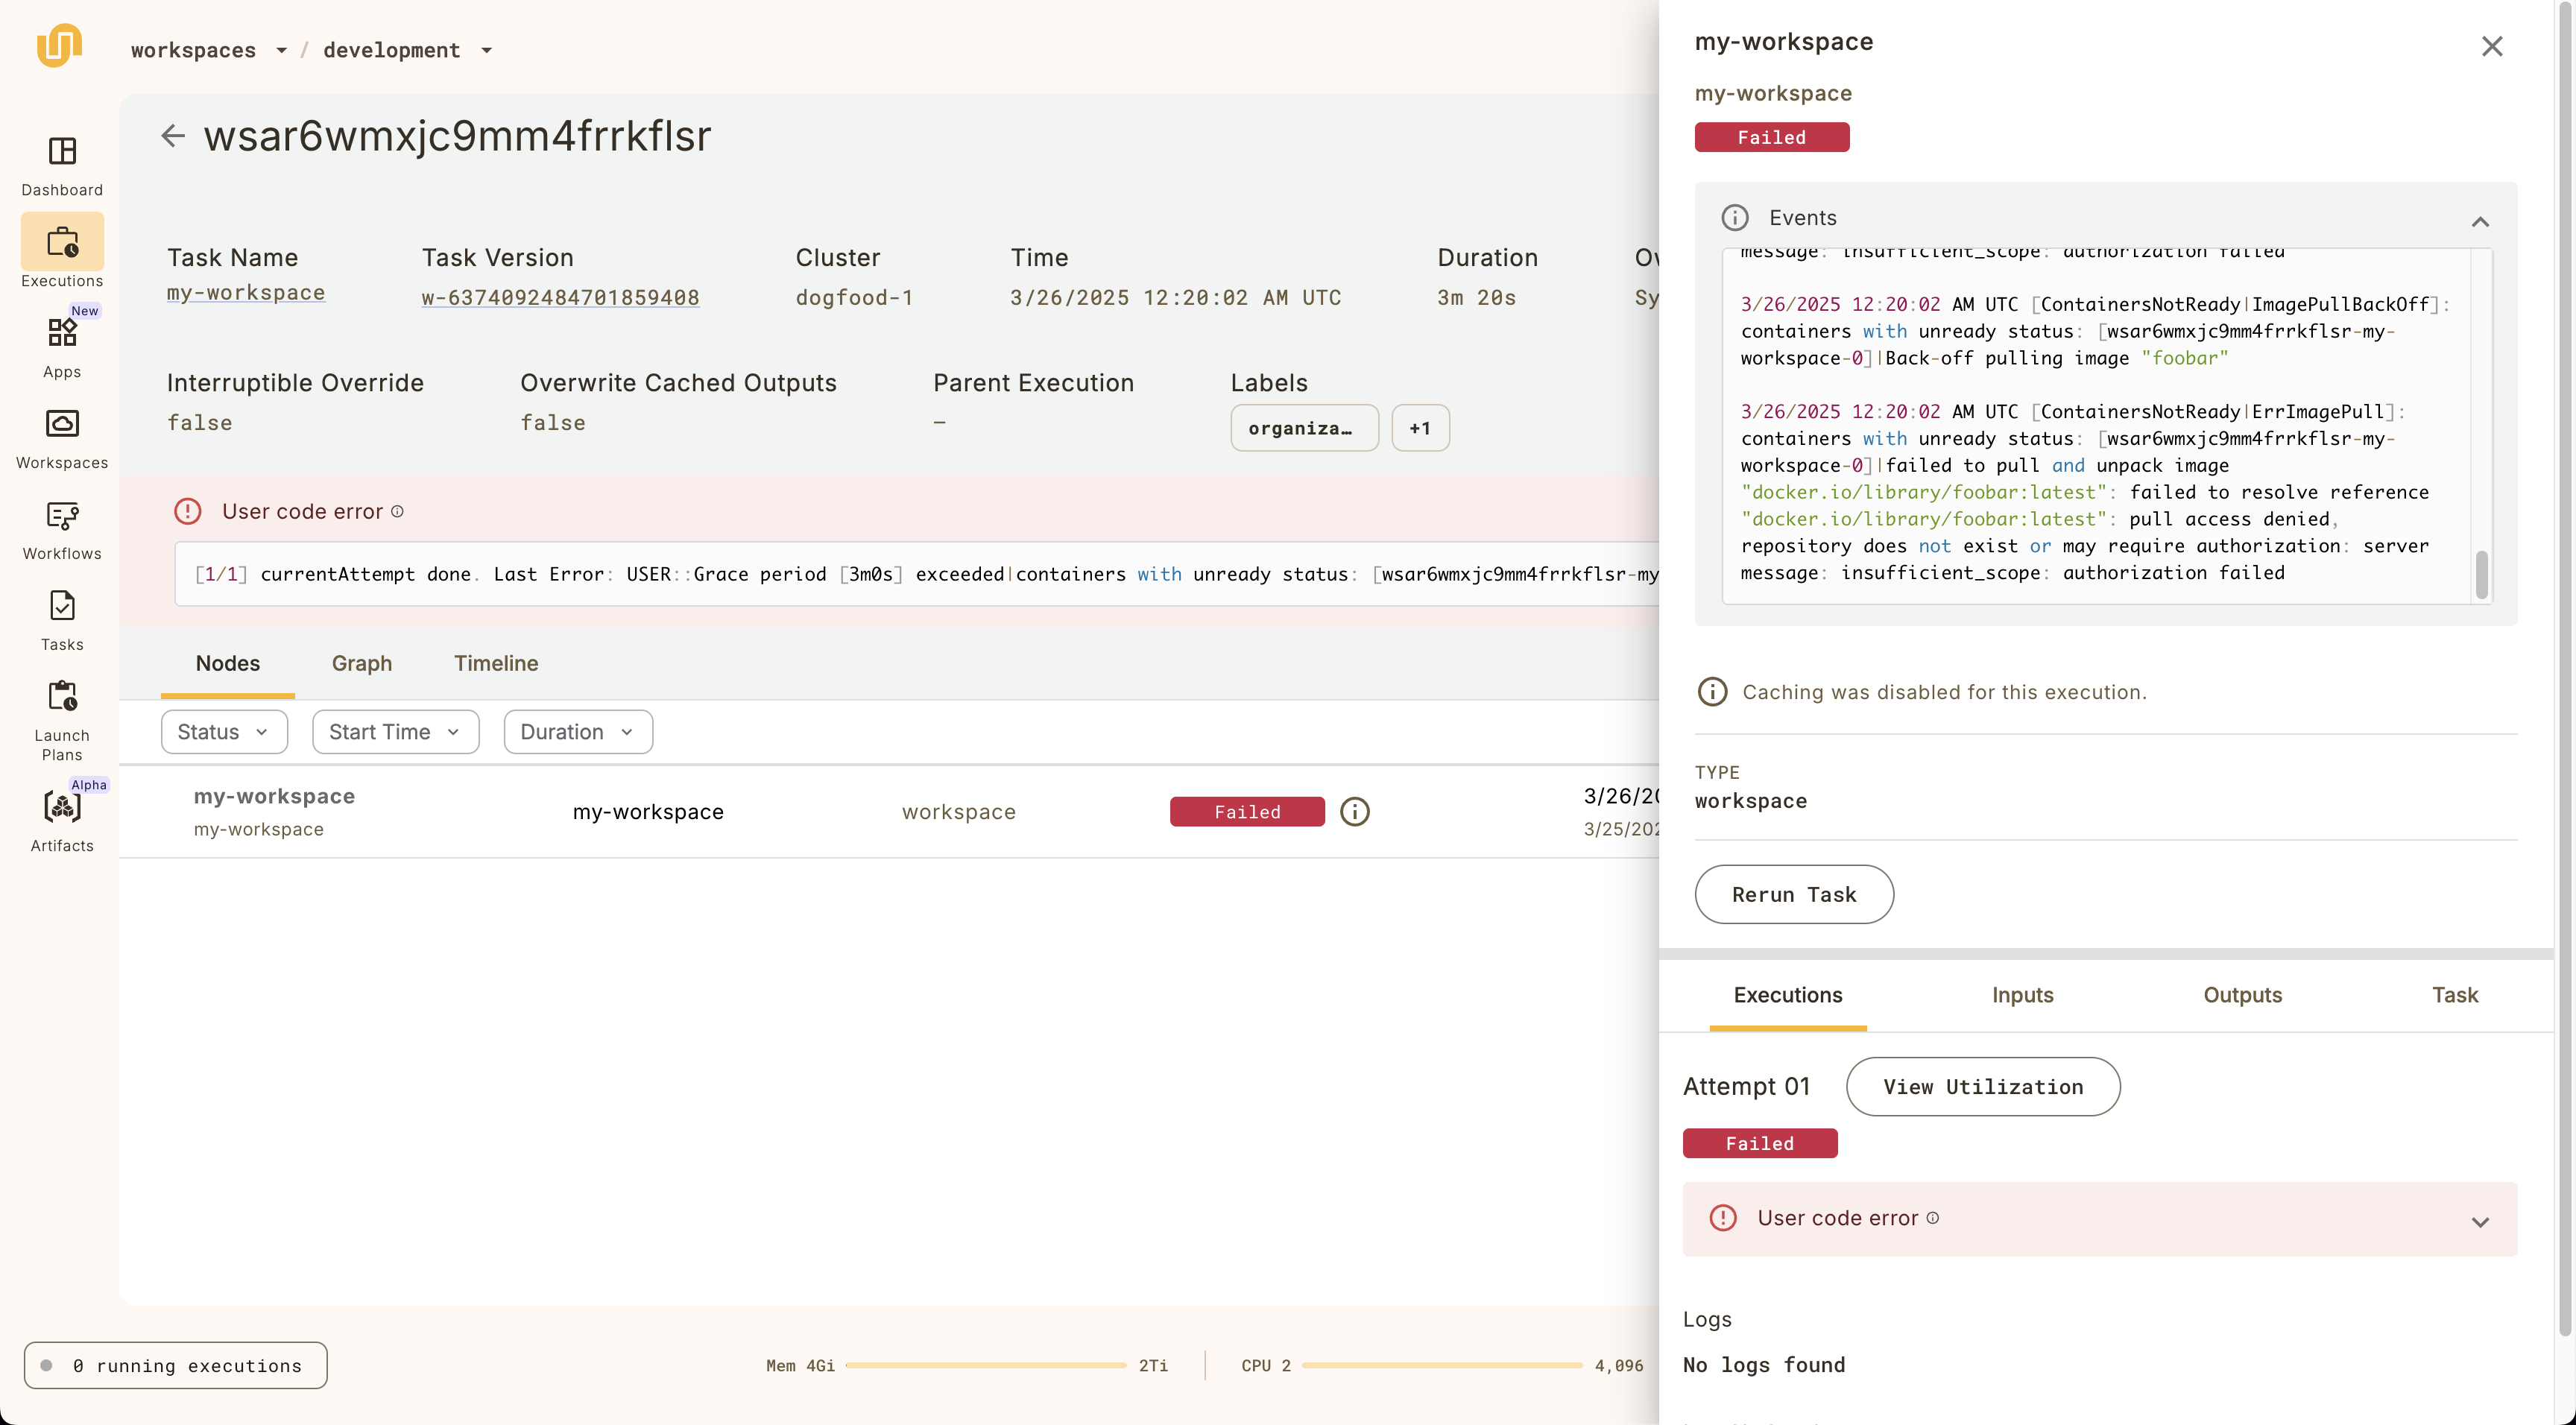
=== PAGE: https://www.union.ai/docs/v1/serverless/user-guide/core-concepts/named-outputs ===
# Named outputs
By default, {{< key product_name >}} employs a standardized convention to assign names to the outputs of tasks or workflows. Each output is sequentially labeled as `o1`, `o2`, `o3`, and so on.
You can, however, customize these output names by using a `NamedTuple`.
To begin, import the required dependencies:
```python
# basics/named_outputs.py
from typing import NamedTuple
import {{< key kit_import >}}
```
Here we define a `NamedTuple` and assign it as an output to a task called `slope`:
```python
slope_value = NamedTuple("slope_value", [("slope", float)])
@{{< key kit_as >}}.task
def slope(x: list[int], y: list[int]) -> slope_value:
sum_xy = sum([x[i] * y[i] for i in range(len(x))])
sum_x_squared = sum([x[i] ** 2 for i in range(len(x))])
n = len(x)
return (n * sum_xy - sum(x) * sum(y)) / (n * sum_x_squared - sum(x) ** 2)
```
Similarly, we define another `NamedTuple` and assign it to the output of another task, `intercept`:
```python
intercept_value = NamedTuple("intercept_value", [("intercept", float)])
@{{< key kit_as >}}.task
def intercept(x: list[int], y: list[int], slope: float) -> intercept_value:
mean_x = sum(x) / len(x)
mean_y = sum(y) / len(y)
intercept = mean_y - slope * mean_x
return intercept
```
> [!Note]
> While it’s possible to create `NamedTuples` directly within the code,
> it’s often better to declare them explicitly.
> This helps prevent potential linting errors in tools like `mypy`.
>
> ```python
> def slope() -> NamedTuple("slope_value", slope=float):
> pass
> ```
You can easily unpack the `NamedTuple` outputs directly within a workflow.
Additionally, you can also have the workflow return a `NamedTuple` as an output.
>[!Note]
> Remember that we are extracting individual task execution outputs by dereferencing them.
> This is necessary because `NamedTuples` function as tuples and require dereferencing.
```python
slope_and_intercept_values = NamedTuple("slope_and_intercept_values", [("slope", float), ("intercept", float)])
@{{< key kit_as >}}.workflow
def simple_wf_with_named_outputs(x: list[int] = [-3, 0, 3], y: list[int] = [7, 4, -2]) -> slope_and_intercept_values:
slope_value = slope(x=x, y=y)
intercept_value = intercept(x=x, y=y, slope=slope_value.slope)
return slope_and_intercept_values(slope=slope_value.slope, intercept=intercept_value.intercept)
```
=== PAGE: https://www.union.ai/docs/v1/serverless/user-guide/core-concepts/image-spec ===
# ImageSpec
In this section, you will uncover how {{< key product_name >}} utilizes Docker images to construct containers under the hood, and you'll learn how to craft your own images to encompass all the necessary dependencies for your tasks or workflows.
You will explore how to execute a raw container with custom commands,
indicate multiple container images within a single workflow,
and get familiar with the ins and outs of `ImageSpec`!
`ImageSpec` allows you to customize the container image for your {{< key product_name >}} tasks without a Dockerfile. `ImageSpec` speeds up the build process by allowing you to reuse previously downloaded packages from the PyPI and APT caches.
By default, the `ImageSpec` will be built using the **Core concepts > ImageSpec > remote builder**, but you can always specify your own e.g. local Docker.
For every `{{< key kit >}}.PythonFunctionTask` task or a task decorated with the `@task` decorator, you can specify rules for binding container images. By default, {{< key kit >}} binds a single container image, i.e.,
the [default Docker image](https://ghcr.io/flyteorg/flytekit), to all tasks. To modify this behavior, use the `container_image` parameter available in the `{{< key kit >}}.task` decorator, and pass an `ImageSpec` definition.
Before building the image, {{< key kit >}} checks the container registry to see if the image already exists. If the image does not exist, {{< key kit >}} will build the image before registering the workflow and replace the image name in the task template with the newly built image name.
## Install Python or APT packages
You can specify Python packages and APT packages in the `ImageSpec`.
These specified packages will be added on top of the [default image](https://github.com/flyteorg/flytekit/blob/master/Dockerfile), which can be found in the {{< key kit >}} Dockerfile.
More specifically, {{< key kit >}} invokes [DefaultImages.default_image()](https://github.com/flyteorg/flytekit/blob/master/flytekit/configuration/default_images.py#L26-L27) function. This function determines and returns the default image based on the Python version and {{< key kit >}} version. For example, if you are using Python 3.8 and flytekit 1.6.0, the default image assigned will be `ghcr.io/flyteorg/flytekit:py3.8-1.6.0`.
```python
from {{< key kit >}} import ImageSpec
sklearn_image_spec = ImageSpec(
packages=["scikit-learn", "tensorflow==2.5.0"],
apt_packages=["curl", "wget"],
)
```
## Install Conda packages
Define the `ImageSpec` to install packages from a specific conda channel.
```python
image_spec = ImageSpec(
conda_packages=["langchain"],
conda_channels=["conda-forge"], # List of channels to pull packages from.
)
```
## Use different Python versions in the image
You can specify the Python version in the `ImageSpec` to build the image with a different Python version.
```python
image_spec = ImageSpec(
packages=["pandas"],
python_version="3.9",
)
```
## Import modules only in a specify imageSpec environment
The `is_container()` method is used to determine whether the task is utilizing the image constructed from the `ImageSpec`. If the task is indeed using the image built from the `ImageSpec`, it will return true. This approach helps minimize module loading time and prevents unnecessary dependency installation within a single image.
In the following example, both `task1` and `task2` will import the `pandas` module. However, `Tensorflow` will only be imported in `task2`.
```python
from flytekit import ImageSpec, task
import pandas as pd
pandas_image_spec = ImageSpec(
packages=["pandas"],
registry="ghcr.io/flyteorg",
)
tensorflow_image_spec = ImageSpec(
packages=["tensorflow", "pandas"],
registry="ghcr.io/flyteorg",
)
# Return if and only if the task is using the image built from tensorflow_image_spec.
if tensorflow_image_spec.is_container():
import tensorflow as tf
@task(container_image=pandas_image_spec)
def task1() -> pd.DataFrame:
return pd.DataFrame({"Name": ["Tom", "Joseph"], "Age": [1, 22]})
@task(container_image=tensorflow_image_spec)
def task2() -> int:
num_gpus = len(tf.config.list_physical_devices('GPU'))
print("Num GPUs Available: ", num_gpus)
return num_gpus
```
## Install CUDA in the image
There are few ways to install CUDA in the image.
### Use Nvidia docker image
CUDA is pre-installed in the Nvidia docker image. You can specify the base image in the `ImageSpec`.
```python
image_spec = ImageSpec(
base_image="nvidia/cuda:12.6.1-cudnn-devel-ubuntu22.04",
packages=["tensorflow", "pandas"],
python_version="3.9",
)
```
### Install packages from extra index
CUDA can be installed by specifying the `pip_extra_index_url` in the `ImageSpec`.
```python
image_spec = ImageSpec(
name="pytorch-mnist",
packages=["torch", "torchvision", "flytekitplugins-kfpytorch"],
pip_extra_index_url=["https://download.pytorch.org/whl/cu118"],
)
```
## Build an image in different architecture
You can specify the platform in the `ImageSpec` to build the image in a different architecture, such as `linux/arm64` or `darwin/arm64`.
```python
image_spec = ImageSpec(
packages=["pandas"],
platform="linux/arm64",
)
```
## Customize the tag of the image
You can customize the tag of the image by specifying the `tag_format` in the `ImageSpec`. In the following example, the tag will be `-dev`.
```python
image_spec = ImageSpec(
name="my-image",
packages=["pandas"],
tag_format="{spec_hash}-dev",
)
```
## Copy additional files or directories
You can specify files or directories to be copied into the container `/root`, allowing users to access the required files. The directory structure will match the relative path. Since Docker only supports relative paths, absolute paths and paths outside the current working directory (e.g., paths with "../") are not allowed.
```python
from {{< key kit >}} import task, workflow, ImageSpec
image_spec = ImageSpec(
name="image_with_copy",
copy=["files/input.txt"],
)
@task(container_image=image_spec)
def my_task() -> str:
with open("/root/files/input.txt", "r") as f:
return f.read()
```
## Define ImageSpec in a YAML File
You can override the container image by providing an ImageSpec YAML file to the `{{< key cli >}} run` or `{{< key cli >}} register` command. This allows for greater flexibility in specifying a custom container image. For example:
```yaml
# imageSpec.yaml
python_version: 3.11
packages:
- sklearn
env:
Debug: "True"
```
Use {{< key cli >}} to register the workflow:
```shell
$ {{< key cli >}} run --remote --image image.yaml image_spec.py wf
```
## Build the image without registering the workflow
If you only want to build the image without registering the workflow, you can use the `{{< key cli >}} build` command.
```shell
$ {{< key cli >}} build --remote image_spec.py wf
```
## Force push an image
In some cases, you may want to force an image to rebuild, even if the ImageSpec hasn’t changed. To overwrite an existing image, pass the `FLYTE_FORCE_PUSH_IMAGE_SPEC=True` to the `{{< key cli >}}` command.
```bash
FLYTE_FORCE_PUSH_IMAGE_SPEC=True {{< key cli >}} run --remote image_spec.py wf
```
You can also force push an image in the Python code by calling the `force_push()` method.
```python
image = ImageSpec(packages=["pandas"]).force_push()
```
## Getting source files into ImageSpec
Typically, getting source code files into a task's image at run time on a live {{< key product_name >}} backend is done through the fast registration mechanism.
However, if your `ImageSpec` constructor specifies a `source_root` and the `copy` argument is set to something other than `CopyFileDetection.NO_COPY`, then files will be copied regardless of fast registration status.
If the `source_root` and `copy` fields to an `ImageSpec` are left blank, then whether or not your source files are copied into the built `ImageSpec` image depends on whether or not you use fast registration. Please see **Development cycle > Running your code** for the full explanation.
Since files are sometimes copied into the built image, the tag that is published for an ImageSpec will change based on whether fast register is enabled, and the contents of any files copied.
=== PAGE: https://www.union.ai/docs/v1/serverless/user-guide/development-cycle ===
# Development cycle
This section covers developing production-ready workflows for {{< key product_name >}}.
## Subpages
- **Development cycle > Project structure**
- **Development cycle > Projects and domains**
- **Development cycle > Building workflows**
- **Development cycle > Setting up a production project**
- **Development cycle > Local dependencies**
- **Development cycle > ImageSpec**
- **Development cycle > Running your code**
- **Development cycle > Overriding parameters**
- **Development cycle > Run details**
- **Development cycle > Debugging with interactive tasks**
- **Development cycle > Managing secrets**
- **Development cycle > Managing API keys**
- **Development cycle > Accessing AWS S3 buckets**
- **Development cycle > Task resource validation**
- **Development cycle > Jupyter notebooks**
- **Development cycle > Decks**
- **Development cycle > {{< key kit_remote >}}**
=== PAGE: https://www.union.ai/docs/v1/serverless/user-guide/development-cycle/project-structure ===
# Project structure
Organizing a workflow project repository effectively is key for ensuring scalability, collaboration, and easy maintenance.
Here are best practices for structuring a {{< key product_name >}} workflow project repo, covering task organization, workflow management, dependency handling, and documentation.
## Recommended Directory Structure
A typical {{< key product_name >}} workflow project structure could look like this:
```shell
├── .github/workflows/
├── .gitignore
├── docs/
│ └── README.md
├── src/
│ ├── core/ # Core logic specific to the use case
│ │ ├── __init__.py
│ │ ├── model.py
│ │ ├── data.py
│ │ └── structs.py
│ ├── tasks/ # Contains individual tasks
│ │ ├── __init__.py
│ │ ├── preprocess.py
│ │ ├── fit.py
│ │ ├── test.py
│ │ └── plot.py
│ ├── workflows/ # Contains workflow definitions
│ │ ├── __init__.py
│ │ ├── inference.py
│ │ └── train.py
│ └── orchestration/ # For helper constructs (e.g., secrets, images)
│ ├── __init__.py
│ └── constants.py
├── uv.lock
└── pyproject.toml
```
This structure is designed to ensure each project component has a clear, logical home, making it easy for team members to find and modify files.
## Organizing Tasks and Workflows
In {{< key product_name >}}, tasks are the building blocks of workflows, so it’s important to structure them intuitively:
* **Tasks**: Store each task in its own file within the `tasks/` directory. If multiple tasks are closely related, consider grouping them within a module. Alternatively, each task can have its own module to allow more granular organization and sub-directories could be used to group similar tasks.
* **Workflows**: Store workflows, which combine tasks into end-to-end processes, in the `workflows/` directory. This separation ensures workflows are organized independently from core task logic, promoting modularity and reuse.
## Orchestration Directory for Helper Constructs
Include a directory, such as `orchestration/` or `union_utils/`, for constructs that facilitate workflow orchestration. This can house helper files like:
* **Secrets**: Definitions for accessing secrets (e.g., API keys) in {{< key product_name >}}.
* **ImageSpec**: A tool that simplifies container management, allowing you to avoid writing Dockerfiles directly.
## Core Logic for Workflow-Specific Functionality
Use a `core/` directory for business logic specific to your workflows. This keeps the core application code separate from workflow orchestration code, improving maintainability and making it easier for new team members to understand core functionality.
## Importance of `__init__.py`
Adding `__init__.py` files within each directory is essential:
* **For Imports**: These files make the directory a Python package, enabling proper imports across modules.
* **For {{< key product_name >}}'s Fast Registration**: When performing fast registration, {{< key product_name >}} considers the first directory without an `__init__.py` as the root. {{< key product_name >}} will then package the root and its contents into a tarball, streamlining the registration process and avoiding the need to rebuild the container image every time you make code changes.
## Monorepo vs Multi-repo: Choosing a structure
When working with multiple teams, you have two main options:
* **Monorepo**: A single repository shared across all teams, which can simplify dependency management and allow for shared constructs. However, it can introduce complexity in permissions and version control for different teams.
* **Multi-repo**: Separate repositories for each team or project can improve isolation and control. In this case, consider creating shared, installable packages for constructs that multiple teams use, ensuring consistency without merging codebases.
## CI/CD
The GitHub action should:
* Register (and promote if needed) on merge to domain branch.
* Execute on merge of input YAML.
* Inject git SHA as entity version.
## Documentation and Docstrings
Writing clear docstrings is encouraged, as they are automatically propagated to the {{< key product_name >}} UI. This provides useful context for anyone viewing the workflows and tasks in the UI, reducing the need to consult source code for explanations.
=== PAGE: https://www.union.ai/docs/v1/serverless/user-guide/development-cycle/projects-and-domains ===
# Projects and domains
Projects and domains are the principle organizational categories into which you group your workflows in {{< key product_name >}}.
Projects define groups of task, workflows, launch plans and other entities that share a functional purpose.
Domains represent distinct steps through which the entities in a project transition as they proceed through the development cycle.
{{< key product_name >}} provides three domains: `development`, `staging`, and `production`.
Projects and domains are orthogonal to each other, meaning that a project has
multiple domains and a domain has multiple projects.
Here is an example arrangement:
| | Development | Staging | Production |
|-----------|-------------------|-------------------|-------------------|
| Project 1 | workflow_1 (v2.0) | workflow_1 (v1.0) | workflow_1 (v1.0) |
| Project 2 | workflow_2 (v2.0) | workflow_2 (v1.0) | workflow_2 (v1.0) |
## Projects
Projects represent independent workflows related to specific teams, business
areas, or applications. Each project is isolated from others, but workflows can
reference entities (workflows or tasks) from other projects to reuse
generalizable resources.
## Domains
Domains represent distinct environments orthogonal to the set of projects in
your org within {{< key product_name >}}, such as development, staging, and production. These
enable dedicated configurations, permissions, secrets, cached execution history,
and resource allocations for each environment, preventing unintended impact on
other projects and/or domains.
Using domains allows for a clear separation between environments, helping ensure
that development and testing don't interfere with production workflows.
A production domain ensures a “clean slate” so that cached development
executions do not result in unexpected behavior. Additionally, secrets may be
configured for external production data sources.
## When to use different {{< key product_name >}} projects?
Projects help group independent workflows related to specific teams, business
areas, or applications. Generally speaking, each independent team or ML product
should have its own {{< key product_name >}} project. Even though these are isolated from one
another, teams may reference entities (workflows or tasks) from other {{< key product_name >}}
projects to reuse generalizable resources. For example, one team may create a
generalizable task to train common model types. However, this requires advanced
collaboration and common coding standards.
When setting up workflows in {{< key product_name >}}, effective use of **projects** and
**domains** is key to managing environments, permissions, and resource
allocation. Below are best practices to consider when organizing workflows in
{{< key product_name >}}.
## Projects and Domains: The Power of the Project-Domain Pair
{{< key product_name >}} uses a project-domain pair to create isolated configurations for
workflows. This pairing allows for:
* **Dedicated Permissions**: Through Role-Based Access Control (RBAC), users can be assigned roles with tailored permissions—such as contributor or admin—specific to individual project-domain pairs. This allows fine-grained control over who can manage or execute workflows within each pair, ensuring that permissions are both targeted and secure. More details **Administration > User management > Custom roles and policies**.
* **Resource and Execution Monitoring**: Track and monitor resource utilization, executions, and performance metrics on a dashboard unique to each project-domain pair. This helps maintain visibility over workflow execution and ensures optimal performance. More details **Administration > Resources**.
* **Resource Allocations and Quotas**: By setting quotas for each project-domain pair, {{< key product_name >}} can ensure that workflows do not exceed designated limits, preventing any project or domain from unintentionally impacting resources available to others. Additionally, you can configure unique resource defaults—such as memory, CPU, and storage allocations—for each project-domain pair. This allows each pair to meet the specific requirements of its workflows, which is particularly valuable given the unique needs across different projects. More details **Core concepts > Tasks > Task hardware environment > Customizing task resources > Execution defaults and resource quotas** and **Administration > Resources**.
* **Configuring Secrets**: {{< key product_name >}} allows you to configure secrets at the project-domain level, ensuring sensitive information, such as API keys and tokens, is accessible only within the specific workflows that need them. This enhances security by isolating secrets according to the project and domain, reducing the risk of unauthorized access across environments. More details **Development cycle > Managing secrets**.
## Domains: Clear Environment Separation
Domains represent distinct environments within {{< key product_name >}}, allowing clear separation between development, staging, and production. This structure helps prevent cross-environment interference, ensuring that changes made in development or testing do not affect production workflows. Using domains for this separation ensures that workflows can evolve in a controlled manner across different stages, from initial development through to production deployment.
## Projects: Organizing Workflows by Teams, Business Areas, or Applications
Projects in {{< key product_name >}} are designed to group independent workflows around specific teams, business functions, or applications. By aligning projects to organizational structure, you can simplify access control and permissions while encouraging a clean separation of workflows across different teams or use cases. Although workflows can reference each other across projects, it's generally cleaner to maintain independent workflows within each project to avoid complexity.
{{< key product_name >}}’s CLI tools and SDKs provide options to specify projects and domains easily:
* **CLI Commands**: In most commands within the `{{< key cli >}}` and `uctl` CLIs, you can specify the project and domain by using the `--project` and `--domain` flags, enabling precise control over which project-domain pair a command applies to. More details **{{< key cli_name >}} CLI** and **Uctl CLI**.
* **Python SDK**: When working with the `{{< key kit >}}` SDK, you can leverage `{{< key kit_remote >}}` to define the project and domain for workflow interactions programmatically, ensuring that all actions occur in the intended environment. More details [here](union-remote).
=== PAGE: https://www.union.ai/docs/v1/serverless/user-guide/development-cycle/building-workflows ===
# Building workflows
## When should I decompose tasks?
There are several reasons why one may choose to decompose a task into smaller tasks.
Doing so may result in better computational performance, improved cache performance, and taking advantage of interruptible tasks.
However, decomposition comes at the cost of the overhead among tasks, including spinning up nodes and downloading data.
In some cases, these costs may be remediated by using **Core concepts > Actors**.
### Differing runtime requirements
Firstly, decomposition provides support for heterogeneous environments among the operations in the task.
For example, you may have some large task that trains a machine learning model and then uses the model to run batch inference on your test data.
However, training a model typically requires significantly more memory than inference.
For that reason, given large enough scale, it could actually be beneficial to decompose this large task into two tasks that (1) train a model and then (2) run batch inference.
By doing so, you could request significantly less memory for the second task in order to save on the expense of this workflow.
If you are working with even more data, then you might benefit from decomposing the batch inference task via `map_task` such that you may further parallelize this operation, substantially reducing the runtime of this step.
Generally speaking, decomposition provides infrastructural flexibility regarding the ability to define resources, dependencies, and execution parallelism.
### Improved cache performance
Secondly, you may decompose large tasks into smaller tasks to enable “fine-grained” caching.
In other words, each unique task provides an automated “checkpoint” system.
Thus, by breaking down a large workflow into its many natural tasks, one may minimize redundant work among multiple serial workflow executions.
This is especially useful during rapid, iterative development, during which a user may attempt to run the same workflow multiple times in a short period of time.
“Fine-grained” caching will dramatically improve productivity while executing workflows both locally and remotely.
### Take advantage of interruptible tasks
Lastly, one may utilize “fine-grained” caching to leverage interruptible tasks.
Interruptible tasks will attempt to run on spot instances or spot VMs, where possible.
These nodes are interruptible, meaning that the task may occasionally fail due to another organization willing to pay more to use it.
However, these spot instances can be substantially cheaper than their non-interruptible counterparts (on-demand instances / VMs).
By utilizing “fine-grained” caching, one may reap the significant cost savings on interruptible tasks while minimizing the effects of having their tasks being interrupted.
## When should I parallelize tasks?
In general, parallelize early and often.
A lot of {{< key product_name >}}’s powerful ergonomics like caching and workflow recovery happen at the task level, as mentioned above.
Decomposing into smaller tasks and parallelizing enables for a performant and fault-tolerant workflow.
One caveat is for very short duration tasks, where the overhead of spinning up a pod and cleaning it up negates any benefits of parallelism.
With reusable containers via **Core concepts > Actors**, however, these overheads are transparently obviated, providing the best of both worlds at the cost of some up-front work in setting up that environment.
In any case, it may be useful to batch the inputs and outputs to amortize any overheads.
Please be mindful to keep the sequencing of inputs within a batch, and of the batches themselves, to ensure reliable cache hits.
### Parallelization constructs
The two main parallelization constructs in {{< key product_name >}} are the **Development cycle > Building workflows > map task** and the **Core concepts > Workflows > Dynamic workflows**.
They accomplish roughly the same goal but are implemented quite differently and have different advantages.
Dynamic tasks are more akin to a `for` loop, iterating over inputs sequentially.
The parallelism is controlled by the overall workflow parallelism.
Map tasks are more efficient and have no such sequencing guarantees.
They also have their own concurrency setting separate from the overall workflow and can have a minimum failure threshold of their constituent tasks.
A deeper explanation of their differences is available [here]() while examples of how to use them together can be found [here]().
## When should I use caching?
Caching should be enabled once the body of a task has stabilized.
Cache keys are implicitly derived from the task signature, most notably the inputs and outputs.
If the body of a task changes without a modification to the signature, and the same inputs are used, it will produce a cache hit.
This can result in unexpected behavior when iterating on the core functionality of the task and expecting different inputs downstream.
Moreover, caching will not introspect the contents of a `FlyteFile` for example.
If the same URI is used as input with completely different contents, it will also produce a cache hit.
For these reasons, it’s wise to add an explicit cache key so that it can be invalidated at any time.
Despite these caveats, caching is a huge time saver during workflow development.
Caching upstream tasks enable a rapid run through of the workflow up to the node you’re iterating on.
Additionally, caching can be valuable in complex parallelization scenarios where you’re debugging the failure state of large map tasks, for example.
In production, if your cluster is under heavy resource constraints, caching can allow a workflow to complete across re-runs as more and more tasks are able to return successfully with each run.
While not an ideal scenario, caching can help soften the blow of production failures.
With these caveats in mind, there are very few scenarios where caching isn’t warranted.
=== PAGE: https://www.union.ai/docs/v1/serverless/user-guide/development-cycle/setting-up-a-project ===
# Setting up a production project
In {{< key product_name >}}, your work is organized in a hierarchy with the following structure:
* **Account**: Your account on {{< key product_name >}}, tied to your GitHub identity.
* **Domains**: Within your account there are three domains, `development`, `staging`, and `production`, used to organize your code during the development process.
* **Projects**: Orthogonal to domains, projects are used to organize your code into logical groups. You can create as many projects as you need.
A given workflow will reside in a specific project. For example, let's say `my_workflow` is a workflow in `my_project`.
When you start working on `my_workflow` you would typically register it in the project-domain `my_project/development`.
As you work on successive iterations of the workflow you might promote `my_workflow` to `my_project/staging` and eventually `my_project/production`.
Promotion is done simply by **Development cycle > Running your code**.
## Terminology
In everyday use, the term "project" is often used to refer to not just the {{< key product_name >}} entity that holds a set of workflows,
but also to the local directory in which you are developing those workflows, and to the GitHub (or other SCM) repository that you are using to store the same workflow code.
To avoid confusion, in this guide we will stick to the following naming conventions:
* **{{< key product_name >}} project**: The entity in your {{< key product_name >}} instance that holds a set of workflows, as described above. Often referred to simply as a **project**.
* **Local project**: The local directory (usually the working directory of a GitHub repository) in which you are developing workflows.
## Create a {{< key product_name >}} project
You can create a new project in the {{< key product_name >}} UI by clicking on the project breadcrumb at the top left and selecting **All projects**:
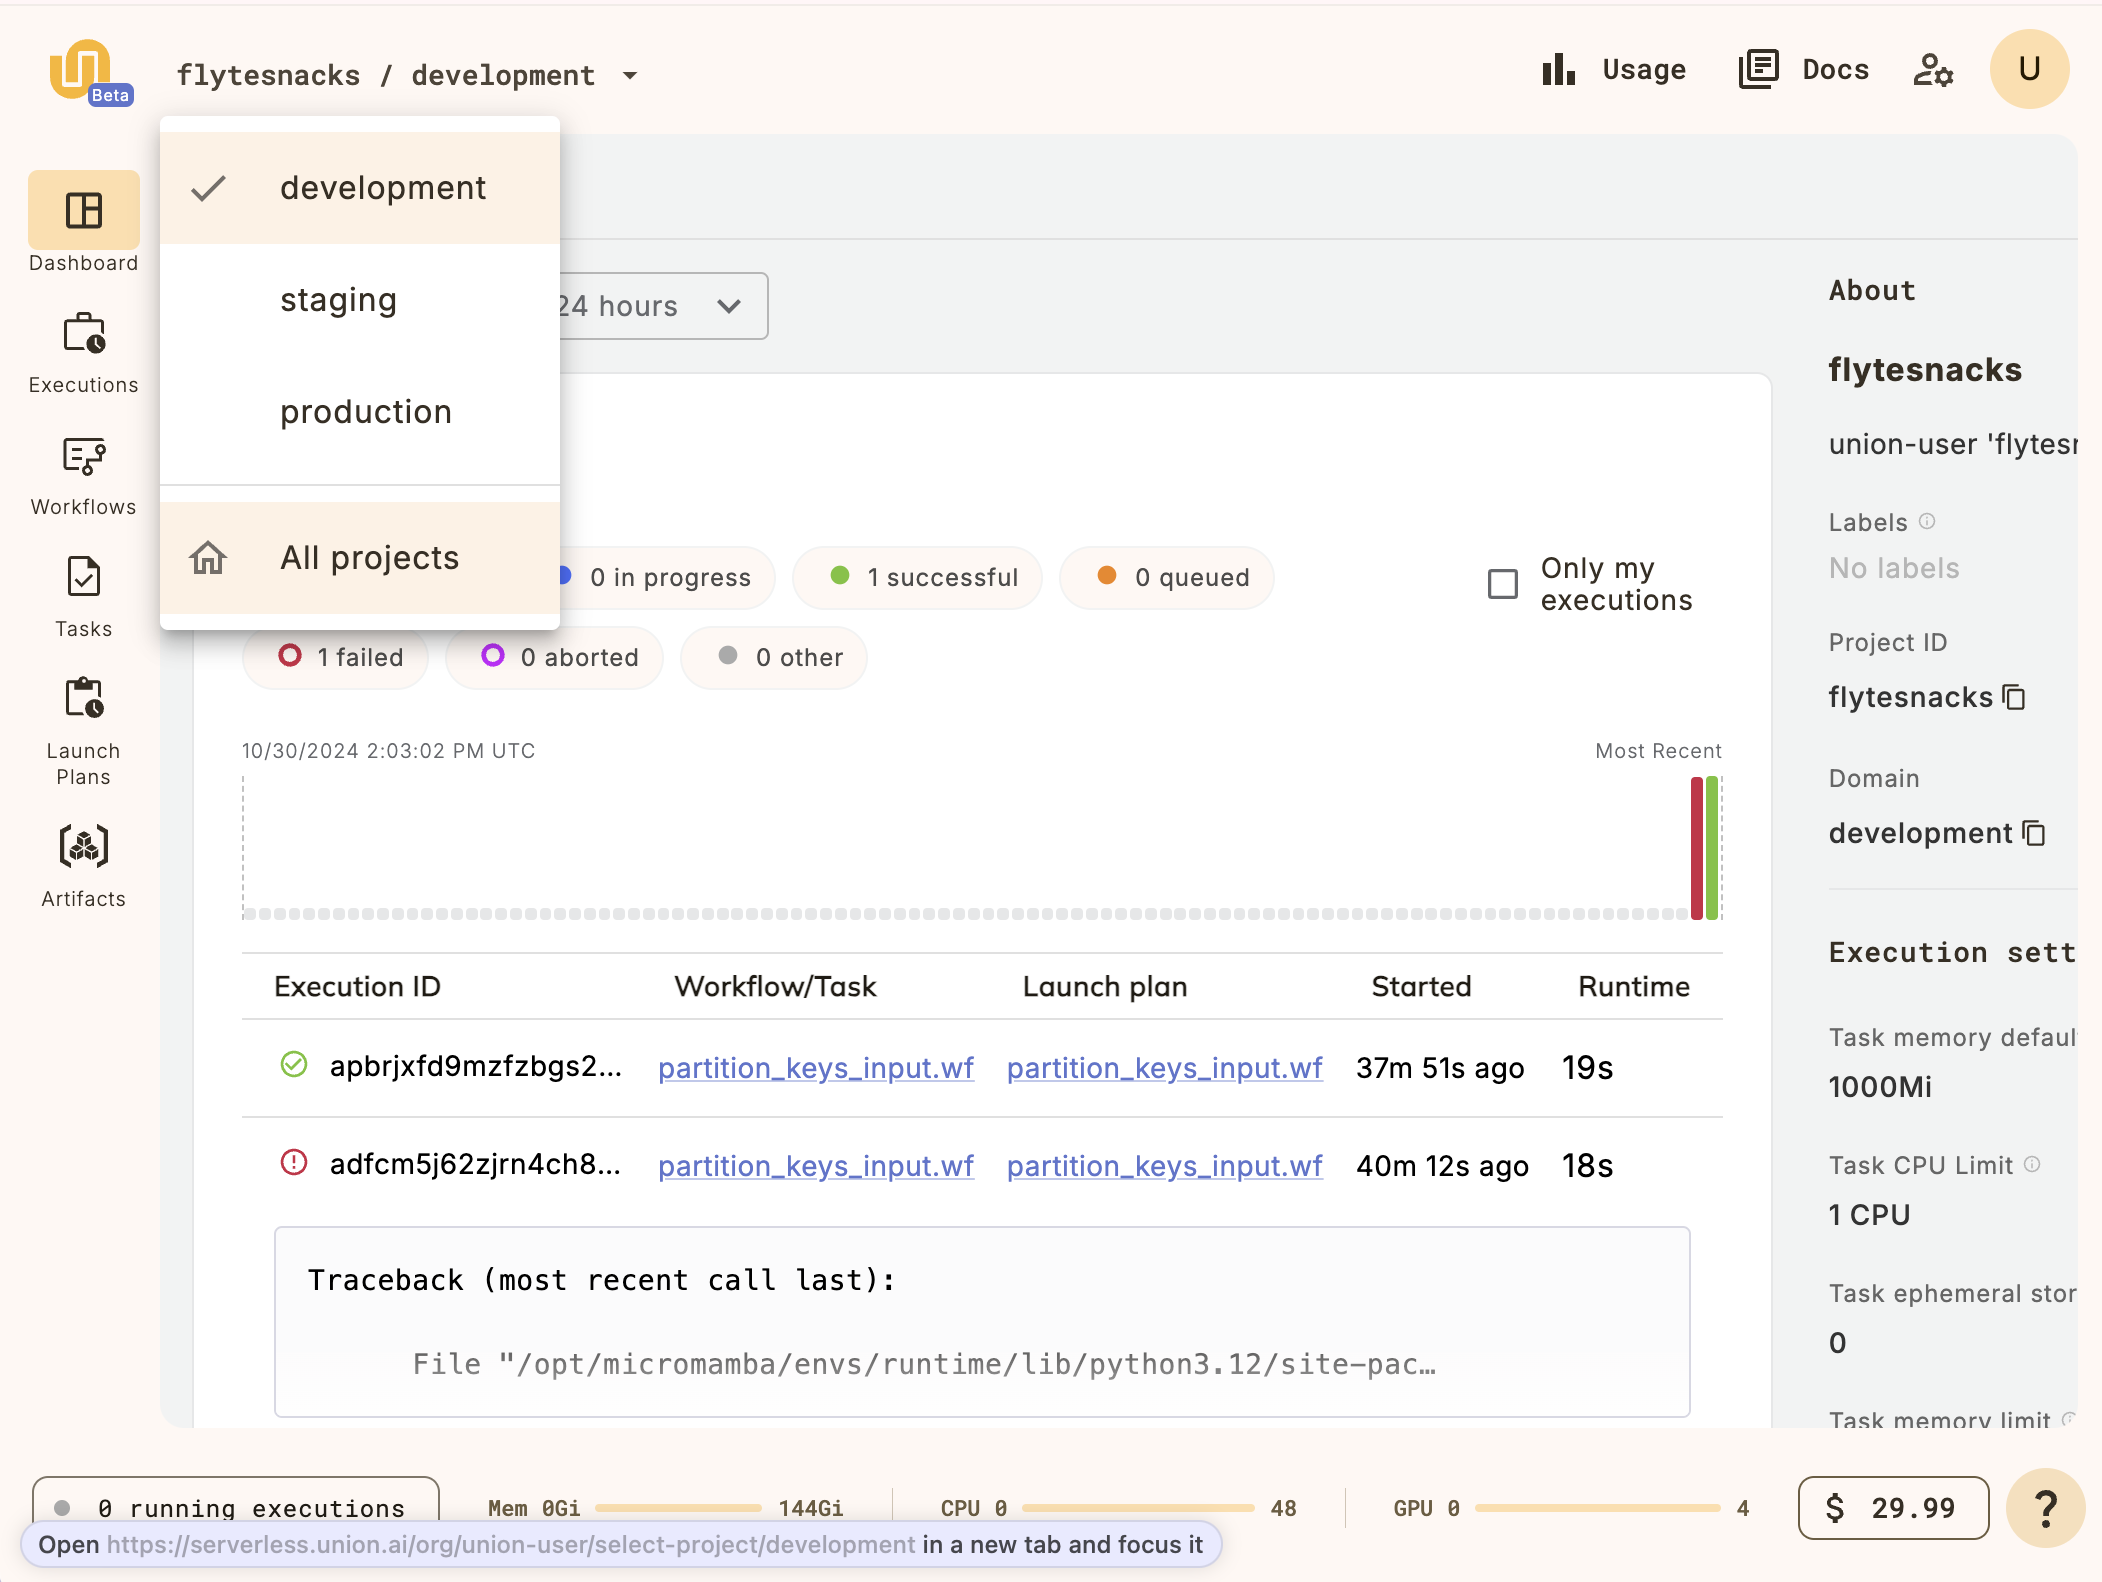
This will take you to the **Projects list**:

Click on the **New Project** button and fill in the details for your new project.
You now have a project on {{< key product_name >}} into which you can register your workflows.
The next step is to set up a local workflow directory.
## Creating a local production project directory using `{{< key cli >}} init`
Earlier, in the [Getting started](../getting-started/_index) section we used `{{< key cli >}} init`
to create a new local project based on the `{{< key product >}}-simple`.
Here, we will do the same, but use the `{{< key product >}}-production` template. Perform the following command:
```shell
$ {{< key cli >}} init --template union-production my-project
```
## Directory structure
In the `basic-example` directory you’ll see the following file structure:
```shell
├── LICENSE
├── README.md
├── docs
│ └── docs.md
├── pyproject.toml
├── src
│ ├── core
│ │ ├── __init__.py
│ │ └── core.py
│ ├── orchestration
│ │ ├── __init__.py
│ │ └── orchestration.py
│ ├── tasks
│ │ ├── __init__.py
│ │ └── say_hello.py
│ └── workflows
│ ├── __init__.py
│ └── hello_world.py
└── uv.lock
```
You can create your own conventions and file structure for your production projects, but this tempkate provides a good starting point.
However, the separate `workflows` subdirectory and the contained `__init__.py` file are significant.
We will discuss them when we cover the **Development cycle > Running your code**.
=== PAGE: https://www.union.ai/docs/v1/serverless/user-guide/development-cycle/local-dependencies ===
# Local dependencies
During the development cycle you will want to be able to run your workflows both locally on your machine and remotely on {{< key product_name >}}.
To enable this, you need to ensure that the required dependencies are installed in both places.
Here we will explain how to install your dependencies locally.
For information on how to make your dependencies available on {{< key product_name >}}, see **Development cycle > ImageSpec**.
## Define your dependencies in your `pyproject.toml`
We recommend using the [`uv` tool](https://docs.astral.sh/uv/) for project and dependency management.
When using the best way declare your dependencies is to list them under `dependencies` in your `pyproject.toml` file, like this:
```toml
[project]
name = "union-simple"
version = "0.1.0"
description = "A simple {{< key product_name >}} project"
readme = "README.md"
requires-python = ">=3.9,<3.13"
dependencies = ["union"]
```
## Create a Python virtual environment
Ensure that your Python virtual environment is properly set up with the required dependencies.
Using `uv`, you can install the dependencies with the command:
```shell
$ uv sync
```
You can then activate the virtual environment with:
```shell
$ source .venv/bin/activate
```
> [!NOTE] `activate` vs `uv run`
> When running the {{< key cli_name >}} CLI within your local project you must run it in the virtual environment _associated with_ that project.
>
> To run `{{< key cli >}}` within your project's virtual environment using `uv`, you can prefix it use the `uv run` command. For example:
>
> `uv run {{< key cli >}} ...`
>
> Alternatively, you can activate the virtual environment with `source .venv/bin/activate` and then run the `{{< key cli >}}` command directly.
> In our examples we assume that you are doing the latter.
Having installed your dependencies in your local environment, you can now **Development cycle > Running your code**.
The next step is to ensure that the same dependencies are also **Development cycle > ImageSpec**.
=== PAGE: https://www.union.ai/docs/v1/serverless/user-guide/development-cycle/image-spec ===
# ImageSpec
During the development cycle you will want to be able to run your workflows both locally on your machine and remotely on {{< key product_name >}},
so you will need to ensure that the required dependencies are installed in both environments.
Here we will explain how to set up the dependencies for your workflow to run remotely on {{< key product_name >}}.
For information on how to make your dependencies available locally, see **Development cycle > Local dependencies**.
When a workflow is deployed to {{< key product_name >}}, each task is set up to run in its own container in the Kubernetes cluster.
You specify the dependencies as part of the definition of the container image to be used for each task using the `ImageSpec` class.
For example::
```python
import {{< key kit_import >}}
image_spec = union.ImageSpec(
name="say-hello-image",
requirements="uv.lock",
)
@{{< key kit_as >}}.task(container_image=image_spec)
def say_hello(name: str) -> str:
return f"Hello, {name}!"
@{{< key kit_as >}}.workflow
def hello_world_wf(name: str = "world") -> str:
greeting = say_hello(name=name)
return greeting
```
Here, the `ImageSpec` class is used to specify the container image to be used for the `say_hello` task.
* The `name` parameter specifies the name of the image. This name will be used to identify the image in the container registry.
* The `requirements` parameter specifies the path to a file (relative to the directory in which the `{{< key cli >}} run` or `{{< key cli >}} register` command is invoked) that specifies the dependencies to be installed in the image.
The file may be:
* A `requirements.txt` file.
* A `uv.lock` file generated by the `uv sync` command.
* A `poetry.lock` file generated by the `poetry install` command.
* A `pyproject.toml` file.
When you execute the `{{< key cli >}} run` or `{{< key cli >}} register` command, {{< key product_name >}} will build the container image defined in `ImageSpec` block
(as well as registering the tasks and workflows defined in your code).
## {{< key product_name >}} cloud image builder {#cloud-image-builder}
{{< key product_name >}} Serverless will build the image using its `ImageBuilder` service in the cloud
and registered the image in {{< key product_name >}}'s own container registry.
From there it will be pulled and installed in the task container when it spins up.
All this is done transparently and does not require any set up by the user.
> [!NOTE] Local image build in BYOC
> In {{< key product_name >}} Serverless images defined by `ImageSpec` are always built using the {{< key product_name >}} cloud image builder.
> In {{< key product_name >}} BYOC, you can optionally build images from the `ImageSpec` on your local machine by specifying `builder="envd"` in the `ImageSpec`.
> See **Development cycle > ImageSpec > Local image builder** in the BYOC documentation for more details.
=== PAGE: https://www.union.ai/docs/v1/serverless/user-guide/development-cycle/running-your-code ===
# Running your code
## Set up your development environment
If you have not already done so, follow the **Getting started** section to sign in to {{< key product_name >}}, and set up your local environment.
## CLI commands for running your code
The {{< key cli_name >}} CLI and {{< key ctl_name >}} CLI provide commands that allow you to deploy and run your code at different stages of the development cycle:
1. `{{< key cli >}} run`: For deploying and running a single script immediately in your local Python environment.
2. `{{< key cli >}} run --remote`: For deploying and running a single script immediately in the cloud on {{< key product_name >}}.
3. `{{< key cli >}} register`: For deploying multiple scripts to {{< key product_name >}} and running them from the Web interface.
4. `{{< key cli >}} package` and `{{< key ctl >}} register`: For deploying workflows to production and for scripting within a CI/CD pipeline.
> [!NOTE]
> In some cases, you may want to test your code in a local cluster before deploying it to {{< key product_name >}}.
> This step corresponds to using the commands 2, 3, or 4, but targeting your local cluster instead of {{< key product_name >}}.
> For more details, see **Development cycle > Running in a local cluster**.
## Running a script in local Python with `{{< key cli >}} run` {#running-a-script-in-local-python}
During the development cycle you will want to run a specific workflow or task in your local Python environment to test it.
To quickly try out the code locally use `{{< key cli >}} run`:
```shell
$ {{< key cli >}} run workflows/example.py wf --name 'Albert'
```
Here you are invoking `{{< key cli >}} run` and passing the name of the Python file and the name of the workflow within that file that you want to run.
In addition, you are passing the named parameter `name` and its value.
This command is useful for quickly testing a workflow locally to check for basic errors.
For more details see [{{< key cli >}} run details](./details-of-union-run).
## Running a script on {{< key product_name >}} with `{{< key cli >}} run --remote`
To quickly run a workflow on {{< key product_name >}}, use `{{< key cli >}} run --remote`:
```shell
$ {{< key cli >}} run --remote --project basic-example --domain development workflows/example.py wf --name 'Albert'
```
Here we are invoking `{{< key cli >}} run --remote` and passing:
* The project, `basic-example`
* The domain, `development`
* The Python file, `workflows/example.py`
* The workflow within that file that you want to run, `wf`
* The named parameter `name`, and its value
This command will:
* Build the container image defined in your `ImageSpec`.
* Package up your code and deploy it to the specified project and domain in {{< key product_name >}}.
* Run the workflow on {{< key product_name >}}.
This command is useful for quickly deploying and running a specific workflow on {{< key product_name >}}.
For more details see [{{< key cli >}} run details](./details-of-union-run).
This command is useful for quickly deploying and running a specific workflow on {{< key product_name >}}.
For more details see [{{< key cli >}} run details](./details-of-union-run).
## Running tasks through {{< key ctl >}}
This is a multi-step process where we create an execution spec file, update the spec file, and then create the execution.
### Generate execution spec file
```shell
$ {{< key ctl >}} launch task --project flytesnacks --domain development --name workflows.example.generate_normal_df --version v1
```
### Update the input spec file for arguments to the workflow
```yaml
iamRoleARN: 'arn:aws:iam::12345678:role/defaultrole'
inputs:
n: 200
mean: 0.0
sigma: 1.0
kubeServiceAcct: ""
targetDomain: ""
targetProject: ""
task: workflows.example.generate_normal_df
version: "v1"
```
### Create execution using the exec spec file
```shell
$ {{< key ctl >}} create execution -p flytesnacks -d development --execFile exec_spec.yaml
```
### Monitor the execution by providing the execution id from create command
```shell
$ {{< key ctl >}} get execution -p flytesnacks -d development
```
## Running workflows through {{< key ctl >}}
Workflows on their own are not runnable directly. However, a launchplan is always bound to a workflow (at least the auto-create default launch plan) and you can use
launchplans to `launch` a workflow. The `default launchplan` for a workflow has the same name as its workflow and all argument defaults are also identical.
Tasks also can be executed using the launch command.
One difference between running a task and a workflow via launchplans is that launchplans cannot be associated with a
task. This is to avoid triggers and scheduling.
## Running launchplans through {{< key ctl >}}
This is multi-step process where we create an execution spec file, update the spec file and then create the execution.
More details can be found **Uctl CLI > uctl create > uctl create execution**.
### Generate an execution spec file
```shell
$ {{< key ctl >}} get launchplan -p flytesnacks -d development myapp.workflows.example.my_wf --execFile exec_spec.yaml
```
### Update the input spec file for arguments to the workflow
```yaml
inputs:
name: "adam"
```
### Create execution using the exec spec file
```shell
$ {{< key ctl >}} create execution -p flytesnacks -d development --execFile exec_spec.yaml
```
### Monitor the execution by providing the execution id from create command
```bash
$ {{< key ctl >}} get execution -p flytesnacks -d development
```
## Deploying your code to {{< key product_name >}} with `{{< key cli >}} register`
```shell
$ {{< key cli >}} register workflows --project basic-example --domain development
```
Here we are registering all the code in the `workflows` directory to the project `basic-example` in the domain `development`.
This command will:
* Build the container image defined in your `ImageSpec`.
* Package up your code and deploy it to the specified project and domain in {{< key product_name >}}.
The package will contain the code in the Python package located in the `workflows` directory.
Note that the presence of the `__init__.py` file in this directory is necessary in order to make it a Python package.
The command will not run the workflow. You can run it from the Web interface.
This command is useful for deploying your full set of workflows to {{< key product_name >}} for testing.
### Fast registration
`{{< key cli >}} register` packages up your code through a mechanism called fast registration.
Fast registration is useful when you already have a container image that’s hosted in your container registry of choice, and you change your workflow/task code without any changes in your system-level/Python dependencies. At a high level, fast registration:
* Packages and zips up the directory/file that you specify as the argument to `{{< key cli >}} register`, along with any files in the root directory of your project. The result of this is a tarball that is packaged into a `.tar.gz` file, which also includes the serialized task (in `protobuf` format) and workflow specifications defined in your workflow code.
* Registers the package to the specified cluster and uploads the tarball containing the user-defined code into the configured blob store (e.g. S3, GCS).
At workflow execution time, {{< key product_name >}} knows to automatically inject the zipped up task/workflow code into the running container, thereby overriding the user-defined tasks/workflows that were originally baked into the image.
> [!NOTE] `WORKDIR`, `PYTHONPATH`, and `PATH`
> When executing any of the above commands, the archive that gets creates is extracted wherever the `WORKDIR` is set.
> This can be handled directly via the `WORKDIR` directive in a `Dockerfile`, or specified via `source_root` if using `ImageSpec`.
> This is important for discovering code and executables via `PATH` or `PYTHONPATH`.
> A common pattern for making your Python packages fully discoverable is to have a top-level `src` folder, adding that to your `PYTHONPATH`,
> and making all your imports absolute.
> This avoids having to “install” your Python project in the image at any point e.g. via `pip install -e`.
## Inspecting executions
{{< key ctl_name >}} supports inspecting execution by retrieving its details. For a deeper dive, refer to the
[Reference](../../api-reference/uctl-cli/_index) guide.
Monitor the execution by providing the execution id from create command which can be task or workflow execution.
```shell
$ {{< key ctl >}} get execution -p flytesnacks -d development
```
For more details use `--details` flag which shows node executions along with task executions on them.
```shell
$ {{< key ctl >}} get execution -p flytesnacks -d development --details
```
If you prefer to see yaml/json view for the details then change the output format using the -o flag.
```shell
$ {{< key ctl >}} get execution -p flytesnacks -d development --details -o yaml
```
To see the results of the execution you can inspect the node closure outputUri in detailed yaml output.
```shell
"outputUri": "s3://my-s3-bucket/metadata/propeller/flytesnacks-development-/n0/data/0/outputs.pb"
```
## Deploying your code to production
### Package your code with `{{< key cli >}} package`
The combination of `{{< key cli >}} package` and `{{< key ctl >}} register` is the standard way of deploying your code to production.
This method is often used in scripts to **Development cycle > CI/CD deployment**.
First, package your workflows:
```shell
$ {{< key cli >}} --pkgs workflows package
```
This will create a tar file called `flyte-package.tgz` of the Python package located in the `workflows` directory.
Note that the presence of the `__init__.py` file in this directory is necessary in order to make it a Python package.
> [!NOTE]
> You can specify multiple workflow directories using the following command:
>
> `{{< key cli >}} --pkgs DIR1 --pkgs DIR2 package ...`
>
> This is useful in cases where you want to register two different projects that you maintain in a single place.
>
> If you encounter a ModuleNotFoundError when packaging, use the --source option to include the correct source paths. For instance:
>
> `{{< key cli >}} --pkgs package --source ./src -f`
### Register the package with `{{< key ctl >}} register`
Once the code is packaged you register it using the `{{< key ctl >}}` CLI:
```shell
$ {{< key ctl >}} register files \
--project basic-example \
--domain development \
--archive flyte-package.tgz \
--version "$(git rev-parse HEAD)"
```
Let’s break down what each flag is doing here:
* `--project`: The target {{< key product_name >}} project.
* `--domain`: The target domain. Usually one of `development`, `staging`, or `production`.
* `--archive`: This argument allows you to pass in a package file, which in this case is the `flyte-package.tgz` produced earlier.
* `--version`: This is a version string that can be any string, but we recommend using the Git SHA in general, especially in production use cases.
See [{{< key ctl_name >}} CLI](../../api-reference/uctl-cli/_index) for more details.
## Using {{< key cli >}} register versus {{< key cli >}} package + {{< key ctl >}} register
As a rule of thumb, `{{< key cli >}} register` works well when you are working on a single cluster and iterating quickly on your task/workflow code.
On the other hand, `{{< key cli >}} package` and `{{< key ctl >}} register` is appropriate if you are:
* Working with multiple clusters, since it uses a portable package
* Deploying workflows to a production context
* Testing your workflows in your CI/CD infrastructure.
> [!NOTE] Programmatic Python API
> You can also perform the equivalent of the three methods of registration using a [{{< key kit_remote >}} object](../development-cycle/union-remote/_index).
## Image management and registration method
The `ImageSpec` construct available in `{{< key kit >}}` also has a mechanism to copy files into the image being built.
Its behavior depends on the type of registration used:
* If fast register is used, then it’s assumed that you don’t also want to copy source files into the built image.
* If fast register is not used (which is the default for `{{< key cli >}} package`, or if `{{< key cli >}} register --copy none` is specified), then it’s assumed that you do want source files copied into the built image.
* If your `ImageSpec` constructor specifies a `source_root` and the `copy` argument is set to something other than `CopyFileDetection.NO_COPY`, then files will be copied regardless of fast registration status.
## Building your own images
While we recommend that you use `ImageSpec` and the `union` cloud image builder, you can, if you wish build and deploy your own images.
You can start with `{{< key cli >}} init --template basic-template-dockerfile`, the resulting template project includes a `docker_build.sh` script that you can use to build and tag a container according to the recommended practice:
```shell
$ ./docker_build.sh
```
By default, the `docker_build.sh` script:
* Uses the `PROJECT_NAME` specified in the {{< key cli >}} command, which in this case is my_project.
* Will not use any remote registry.
* Uses the Git SHA to version your tasks and workflows.
You can override the default values with the following flags:
```shell
$ ./docker_build.sh -p PROJECT_NAME -r REGISTRY -v VERSION
```
For example, if you want to push your Docker image to Github’s container registry you can specify the `-r ghcr.io` flag.
> [!NOTE]
> The `docker_build.sh` script is purely for convenience; you can always roll your own way of building Docker containers.
Once you’ve built the image, you can push it to the specified registry. For example, if you’re using Github container registry, do the following:
```shell
$ docker login ghcr.io
$ docker push TAG
```
## CI/CD with Flyte and GitHub Actions
You can use any of the commands we learned in this guide to register, execute, or test {{< key product_name >}} workflows in your CI/CD process.
{{< key product_name >}} provides two GitHub actions that facilitate this:
* `flyte-setup-action`: This action handles the installation of {{< key ctl >}} in your action runner.
* `flyte-register-action`: This action uses `{{< key ctl >}} register` under the hood to handle registration of packages, for example, the `.tgz` archives that are created by `{{< key cli >}} package`.
### Some CI/CD best practices
In the case where workflows are registered on each commit in your build pipelines, you can consider the following recommendations and approach:
* **Versioning Strategy** : Determining the version of the build for different types of commits makes them consistent and identifiable.
For commits on feature branches, use `{branch-name}-{short-commit-hash}` and for the ones on main branches, use `main-{short-commit-hash}`.
Use version numbers for the released (tagged) versions.
* **Workflow Serialization and Registration** : Workflows should be serialized and registered based on the versioning of the build and the container image.
Depending on whether the build is for a feature branch or `main`, the registration domain should be adjusted accordingly.
* **Container Image Specification** : When managing multiple images across tasks within a workflow, use the `--image` flag during registration to specify which image to use.
This avoids hardcoding the image within the task definition, promoting reusability and flexibility in workflows.
=== PAGE: https://www.union.ai/docs/v1/serverless/user-guide/development-cycle/overriding-parameters ===
# Overriding parameters
The `with_overrides` method allows you to specify parameter overrides on [tasks](../core-concepts/tasks/_index),
**Core concepts > Workflows > Subworkflows and sub-launch plans** at execution time.
This is useful when you want to change the behavior of a task, subworkflow, or sub-launch plan without modifying the original definition.
## Task parameters
When calling a task, you can specify the following parameters in `with_overrides`:
* `accelerator`: Specify **Core concepts > Tasks > Task hardware environment > Accelerators**.
* `cache_serialize`: Enable **Core concepts > Caching**.
* `cache_version`: Specify the **Core concepts > Caching**.
* `cache`: Enable **Core concepts > Caching**.
* `container_image`: Specify a **Core concepts > Tasks > Task software environment > Local image building**.
* `interruptible`: Specify whether the task is **Core concepts > Tasks > Task hardware environment > Interruptible instances**.
* `limits`: Specify **Core concepts > Tasks > Task hardware environment > Customizing task resources**.
* `name`: Give a specific name to this task execution. This will appear in the workflow flowchart in the UI (see **Development cycle > Overriding parameters > below**).
* `node_name`: Give a specific name to the DAG node for this task. This will appear in the workflow flowchart in the UI (see **Development cycle > Overriding parameters > below**).
* `requests`: Specify **Core concepts > Tasks > Task hardware environment > Customizing task resources**.
* `retries`: Specify the **Core concepts > Tasks > Task parameters**.
* `task_config`: Specify a **Core concepts > Tasks > Task parameters**.
* `timeout`: Specify the **Core concepts > Tasks > Task parameters**.
For example, if you have a task that does not have caching enabled, you can use `with_overrides` to enable caching at execution time as follows:
```python
my_task(a=1, b=2, c=3).with_overrides(cache=True)
```
### Using `with_overrides` with `name` and `node_name`
Using `with_overrides` with `name` on a task is a particularly useful feature.
For example, you can use `with_overrides(name="my_task")` to give a specific name to a task execution, which will appear in the UI.
The name specified can be chosen or generated at invocation time without modifying the task definition.
```python
@{{< key kit_as >}}.workflow
def wf() -> int:
my_task(a=1, b=1, c=1).with_overrides(name="my_task_1")
my_task(a=2, b=2, c=2).with_overrides(name="my_task_2", node_name="my_node_2")
return my_task(a=1, b=1, c=1)
```
The above code would produce the following workflow display in the UI:
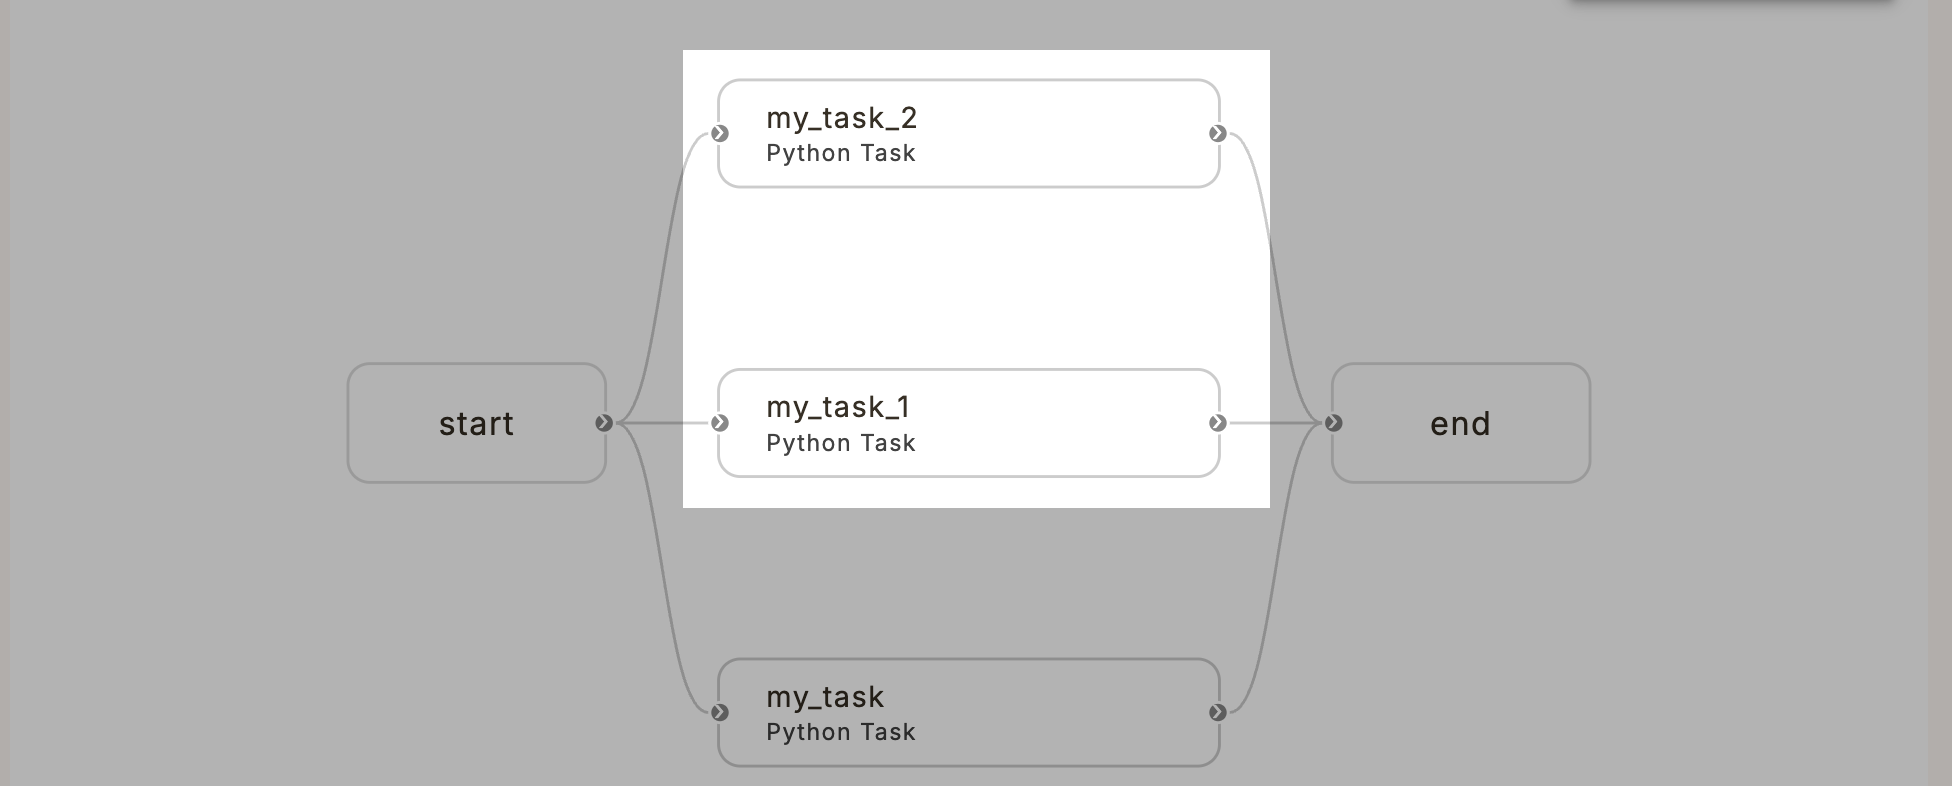
There is also a related parameter called `node_name` that can be used to give a specific name to the DAG node for this task.
The DAG node name is usually autogenerated as `n0`, `n1`, `n2`, etc. It appears in the `node` column of the workflow table.
Overriding `node_name` results in the autogenerated name being replaced by the specified name:
Note that the `node_name` was specified as `my_node_2` in the code but appears as `my_node_2` in the UI. This is to the fact that Kubernetes node names cannot contain underscores. {{< key product_name >}} automatically alters the name to be Kubernetes-compliant.
## Subworkflow and sub-launch plan parameters
When calling a workflow or launch plan from within a high-level workflow
(in other words, when invoking a subworkflow or sub-launch plan),
you can specify the following parameters in `with_overrides`:
* `cache_serialize`: Enable **Core concepts > Caching**.
* `cache_version`: Specify the **Core concepts > Caching**.
* `cache`: Enable **Core concepts > Caching**.
=== PAGE: https://www.union.ai/docs/v1/serverless/user-guide/development-cycle/run-details ===
# Run details
The `{{< key cli >}} run` command is used to run a specific workflow or task in your local Python environment or on {{< key product_name >}}.
In this section we will discuss some details of how and why to use it.
## Passing parameters
`{{< key cli >}} run` enables you to execute a specific workflow using the syntax:
```shell
$ {{< key cli >}} run
```
Keyword arguments can be supplied to `{{< key cli >}} run` by passing them in like this:
```shell
--
```
For example, above we invoked `{{< key cli >}} run` with script `example.py`, workflow `wf`, and named parameter `name`:
```shell
$ {{< key cli >}} run example.py wf --name 'Albert'
```
The value `Albert` is passed for the parameter `name`.
With `snake_case` argument names, you have to convert them to `kebab-case`. For example,
if the code were altered to accept a `last_name` parameter then the following command:
```shell
$ {{< key cli >}} run example.py wf --last-name 'Einstein'
```
This passes the value `Einstein` for that parameter.
## Why `{{< key cli >}} run` rather than `python`?
You could add a `main` guard at the end of the script like this:
```python
if __name__ == "__main__":
training_workflow(hyperparameters={"C": 0.1})
```
This would let you run it with `python example.py`, though you have to hard code your arguments.
It would become even more verbose if you want to pass in your arguments:
```python
if __name__ == "__main__":
import json
from argparse import ArgumentParser
parser = ArgumentParser()
parser.add_argument("--hyperparameters", type=json.loads)
... # add the other options
args = parser.parse_args()
training_workflow(hyperparameters=args.hyperparameters)Py
```
`{{< key cli >}} run` is less verbose and more convenient for running workflows with arguments.
=== PAGE: https://www.union.ai/docs/v1/serverless/user-guide/development-cycle/debugging-with-interactive-tasks ===
# Debugging with interactive tasks
With interactive tasks you can inspect and debug live task code directly in the UI in an embedded Visual Studio Code IDE.
## Enabling interactive tasks in your code
To enable interactive tasks, you need to:
* Include `flytekitplugins-flyteinteractive` as a dependency
* Use the `@vscode` decorator on the tasks you want to make interactive.
The `@vscode` decorator, when applied, converts a task into a Visual Studio Code
server during runtime. This process overrides the standard execution of the
task’s function body, initiating a command to start a Visual Studio Code server
instead.
> [!NOTE] No need for ingress or port forwarding
> The {{< key product_name >}} interactive tasks feature is an adaptation of the open-source
> **External service backend plugins > FlyteInteractive**.
> It improves on the open-source version by removing the need for ingress
> configuration or port forwarding, providing a more seamless debugging
> experience.
## Basic example
The following example demonstrates interactive tasks in a simple workflow.
### requirements.txt
This `requirements.txt` file is used by all the examples in this section:
```text
flytekit
flytekitplugins-flyteinteractive
```
### example.py
```python
"""{{< key product_name >}} workflow example of interactive tasks (@vscode)"""
import {{< key kit_import >}}
from flytekitplugins.flyteinteractive import vscode
image = {{< key kit_as >}}.ImageSpec(
builder="union",
name="interactive-tasks-example",
requirements="requirements.txt"
)
@{{< key kit_as >}}.task(container_image=image)
@vscode
def say_hello(name: str) -> str:
s = f"Hello, {name}!"
return s
@{{< key kit_as >}}.workflow
def wf(name: str = "world") -> str:
greeting = say_hello(name=name)
return greeting
```
## Register and run the workflow
To register the code to a project on {{< key product_name >}} as usual and run the workflow.
## Access the IDE
1. Select the first task in the workflow page (in this example the task is called `say_hello`).
The task info pane will appear on the right side of the page.
2. Wait until the task is in the **Running** state and the **VSCode (User)** link appears.
3. Click the **VSCode (User)** link.
## Inspect the task code
Once the IDE opens, you will be able to see your task code in the editor.
## Interactive debugging
To run the task in VSCode, click the _Run and debug_ symbol on the left rail of the IDE and select the **Interactive Debugging** configuration.
Click the **Play** button beside the configuration drop-down to run the task.
This will run your task with inputs from the previous task. To inspect intermediate states, set breakpoints in the Python code and use the debugger for tracing.
> [!NOTE] No task output written to {{< key product_name >}} storage
> It’s important to note that during the debugging phase the task runs entirely within VSCode and does not write the output to {{< key product_name >}} storage.
## Update your code
You can edit your code in the VSCode environment and run the task again to see the changes.
Note, however, that the changes will not be automatically persisted anywhere.
You will have to manually copy and paste the changes back to your local environment.
## Resume task
After you finish debugging, you can resume your task with updated code by executing the **Resume Task** configuration.
This will terminate the code server, run the task with inputs from the previous task, and write the output to {{< key product_name >}} storage.
> [!NOTE] Remember to persist your code
> Remember to persist your code (for example, by checking it into GitHub) before resuming the task, since you will lose the connection to the VSCode server afterwards.
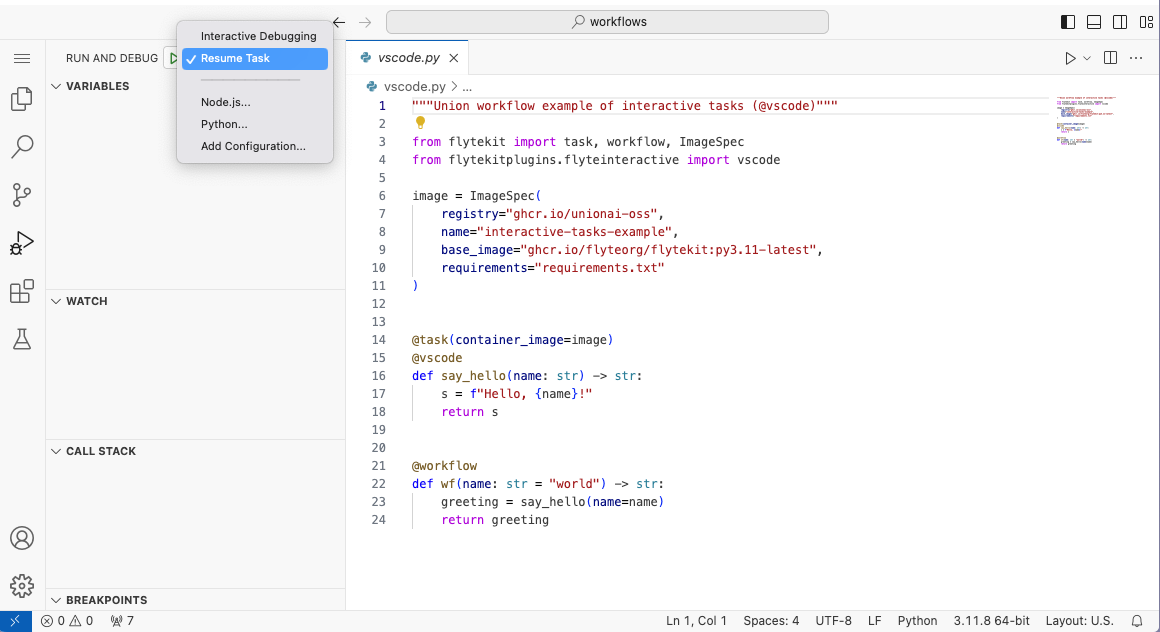
## Auxiliary Python files
You will notice that aside from your code, there are some additional files in the VSCode file explorer that have been automatically generated by the system:
### flyteinteractive_interactive_entrypoint.py
The `flyteinteractive_interactive_entrypoint.py` script implements the **Interactive Debugging** action that we used above:
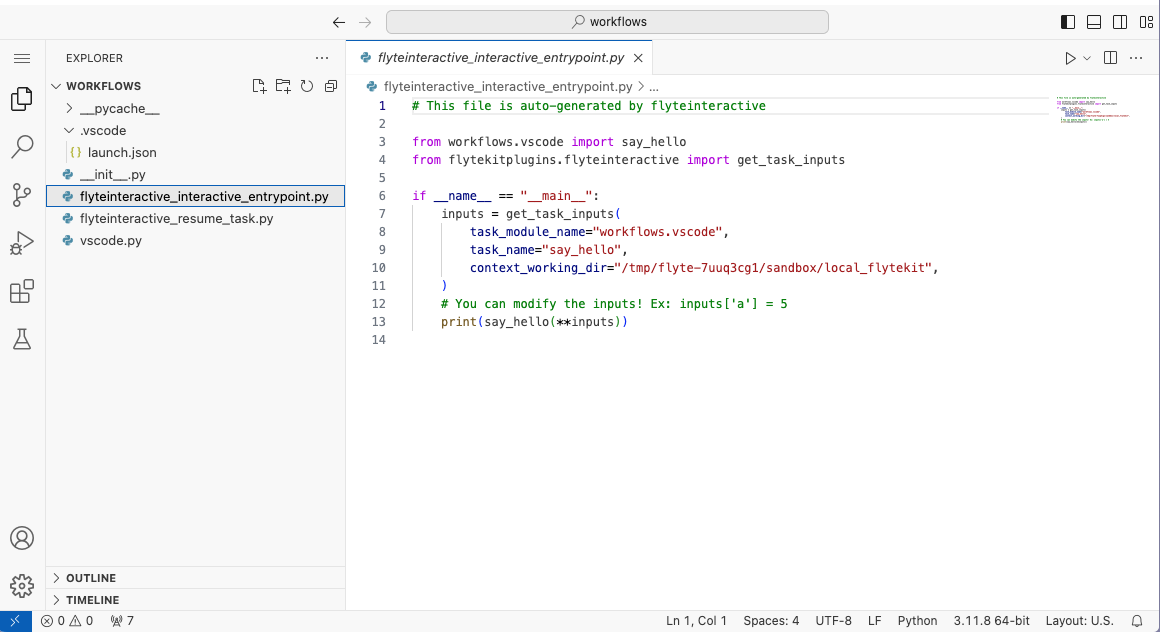
### flyteinteractive_resume_task.py
The `flyteinteractive_resume_task.py` script implements the **Resume Task** action that we used above:
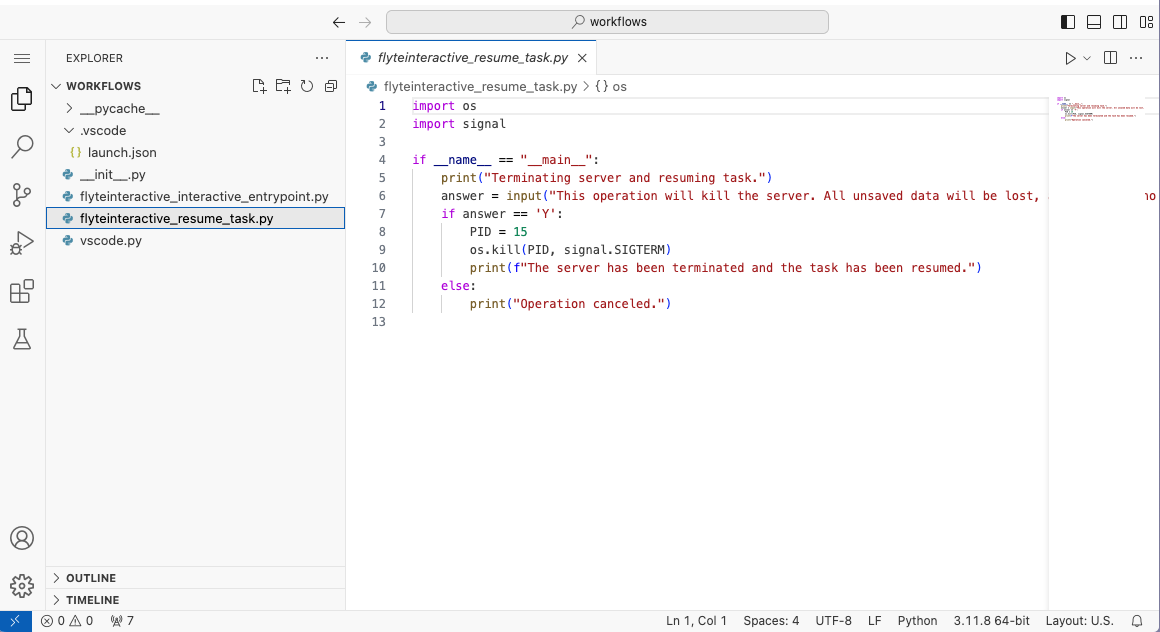
### launch.json
The `launch.json` file in the `.vscode` directory configures the **Interactive Debugging** and **Resume Task** actions.
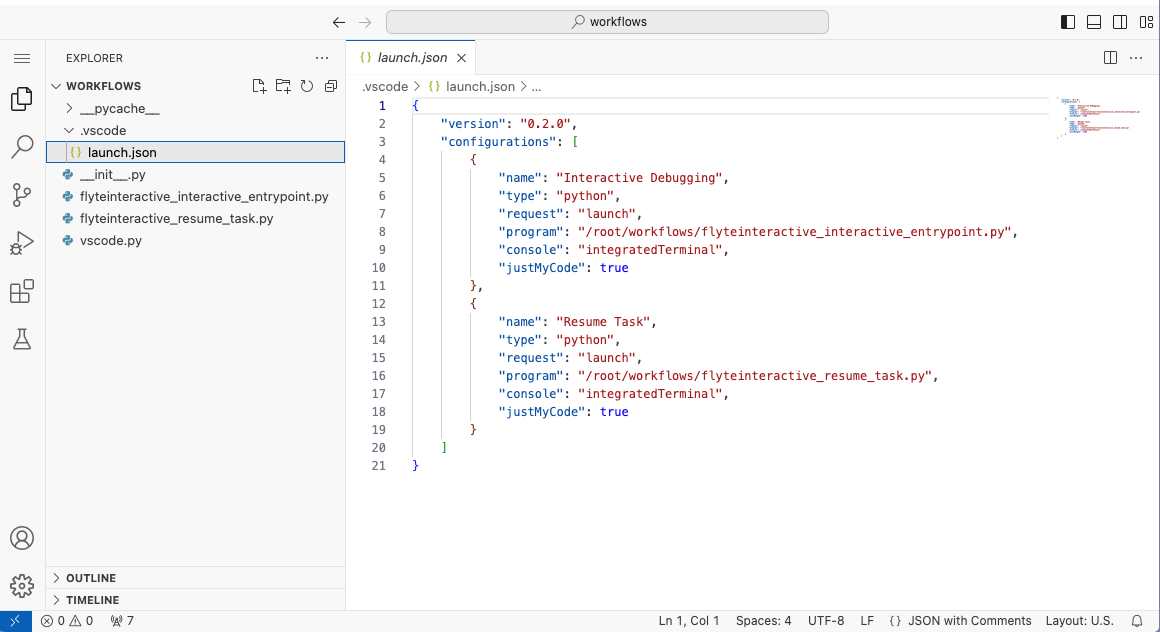
## Integrated terminal
In addition to using the convenience functions defined by the auxiliary files, you can also run your Python code script directly from the integrated terminal using `python .py` (in this example, `python hello.py`).
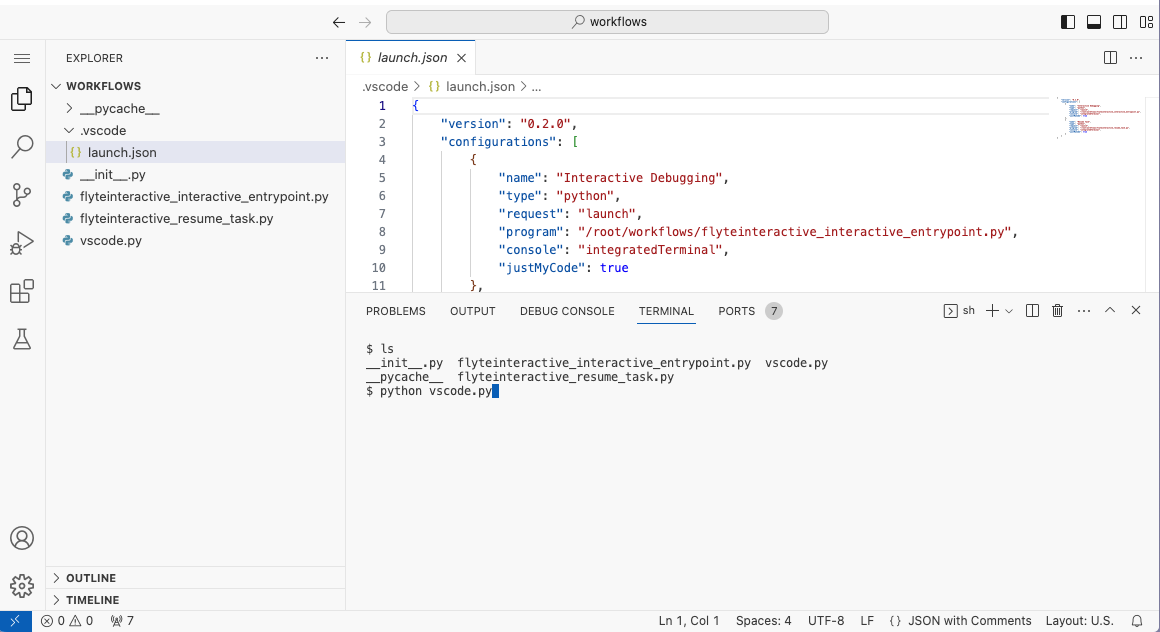
## Install extensions
As with local VSCode, you can install a variety of extensions to assist development.
Available extensions differ from official VSCode for legal reasons and are hosted on the [Open VSX Registry](https://open-vsx.org/).
Python and Jupyter extensions are installed by default.
Additional extensions can be added by defining a configuration object and passing it to the `@vscode` decorator, as shown below:
### example-extensions.py
```python
"""{{< key product_name >}} workflow example of interactive tasks (@vscode) with extensions"""
import {{< key kit_import >}}
from flytekitplugins.flyteinteractive import COPILOT_EXTENSION, VscodeConfig, vscode
image = {{< key kit_as >}}.ImageSpec(
builder="union",
name="interactive-tasks-example",
requirements="requirements.txt"
)
config = VscodeConfig()
config.add_extensions(COPILOT_EXTENSION) # Use predefined URL
config.add_extensions(
"https://open-vsx.org/api/vscodevim/vim/1.27.0/file/vscodevim.vim-1.27.0.vsix"
) # Copy raw URL from Open VSX
@{{< key kit_as >}}.task(container_image=image)
@vscode(config=config)
def say_hello(name: str) -> str:
s = f"Hello, {name}!"
return s
@{{< key kit_as >}}.workflow
def wf(name: str = "world") -> str:
greeting = say_hello(name=name)
return greeting
```
## Manage resources
To manage resources, the VSCode server is terminated after a period of idleness (no active HTTP connections).
Idleness is monitored via a heartbeat file.
The `max_idle_seconds` parameter can be used to set the maximum number of seconds the VSCode server can be idle before it is terminated.
### example-manage-resources.py
```python
"""{{< key product_name >}} workflow example of interactive tasks (@vscode) with max_idle_seconds"""
import {{< key kit_import >}}
from flytekitplugins.flyteinteractive import vscode
image = {{< key kit_as >}}.ImageSpec(
builder="union",
name="interactive-tasks-example",
requirements="requirements.txt"
)
@{{< key kit_as >}}.task(container_image=image)
@vscode(max_idle_seconds=60000)
def say_hello(name: str) -> str:
s = f"Hello, {name}!"
return s
@{{< key kit_as >}}.workflow
def wf(name: str = "world") -> str:
greeting = say_hello(name=name)
return greeting
```
## Pre and post hooks
Interactive tasks also allow the registration of functions to be executed both before and after VSCode starts.
This can be used for tasks requiring setup or cleanup.
### example-pre-post-hooks.py
```python
"""{{< key product_name >}} workflow example of interactive tasks (@vscode) with pre and post hooks"""
import {{< key kit_import >}}
from flytekitplugins.flyteinteractive import vscode
image = {{< key kit_as >}}.ImageSpec(
builder="union",
name="interactive-tasks-example",
requirements="requirements.txt"
)
def set_up_proxy():
print("set up")
def push_code():
print("push code")
@{{< key kit_as >}}.task(container_image=image)
@vscode(pre_execute=set_up_proxy, post_execute=push_code)
def say_hello(name: str) -> str:
s = f"Hello, {name}!"
return s
@{{< key kit_as >}}.workflow
def wf(name: str = "world") -> str:
greeting = say_hello(name=name)
return greeting
```
## Only initiate VSCode on task failure
The system can also be set to only initiate VSCode _after a task failure_, preventing task termination and thus enabling inspection.
This is done by setting the `run_task_first` parameter to `True`.
### example-run-task-first.py
```python
"""{{< key product_name >}} workflow example of interactive tasks (@vscode) with run_task_first"""
import {{< key kit_import >}}
from flytekitplugins.flyteinteractive import vscode
image = {{< key kit_as >}}.ImageSpec(
builder="union",
name="interactive-tasks-example",
requirements="requirements.txt"
)
@{{< key kit_as >}}.task(container_image=image)
@vscode(run_task_first=True)
def say_hello(name: str) -> str:
s = f"Hello, {name}!"
return s
@{{< key kit_as >}}.workflow
def wf(name: str = "world") -> str:
greeting = say_hello(name=name)
return greeting
```
## Debugging execution issues
The inspection of task and workflow execution provides log links to debug things further.
Using `--details` flag you can view node executions with log links.
```shell
└── n1 - FAILED - 2021-06-30 08:51:07.3111846 +0000 UTC - 2021-06-30 08:51:17.192852 +0000 UTC
└── Attempt :0
└── Task - FAILED - 2021-06-30 08:51:07.3111846 +0000 UTC - 2021-06-30 08:51:17.192852 +0000 UTC
└── Logs :
└── Name :Kubernetes Logs (User)
└── URI :http://localhost:30082/#/log/flytectldemo-development/f3a5a4034960f4aa1a09-n1-0/pod?namespace=flytectldemo-development
```
Additionally, you can check the pods launched in `\-\` namespace
```shell
$ kubectl get pods -n -
```
The launched pods will have a prefix of execution name along with suffix of `nodeId`:
```shell
NAME READY STATUS RESTARTS AGE
f65009af77f284e50959-n0-0 0/1 ErrImagePull 0 18h
```
For example, above we see that the `STATUS` indicates an issue with pulling the image.
=== PAGE: https://www.union.ai/docs/v1/serverless/user-guide/development-cycle/managing-secrets ===
# Managing secrets
You can use secrets to interact with external services.
## Creating secrets
### Creating a secret on the command line
To create a secret, use the `{{< key cli >}} create secret` command:
```shell
$ {{< key cli >}} create secret my_secret_name
```
You'll be prompted to enter a secret value in the terminal:
```
Enter secret value: ...
```
### Creating a secret from a file
To create a secret from a file, run the following command:
```shell
$ {{< key cli >}} create secret my_secret_name -f /path/to/secret_file
```
### Scoping secrets
* When you create a secret without specifying a project` or domain, as we did above, the secret will be available across all projects-domain combinations.
* If you specify only a domain, the secret will be available across all projects, but only in that domain.
* If you specify both a project and a domain, the secret will be available in that project-domain combination only.
* If you specify only a project, you will get an error.
For example, to create a secret so that it is only available in `my_project-development`, you would run:
```shell
$ {{< key cli >}} create secret my_secret_name --project my_project --domain development
```
## Listing secrets
You can list existing secrets with the `{{< key cli >}} get secret` command.
For example, the following command will list all secrets in the organization:
```shell
$ {{< key cli >}} get secret
```
Specifying either or both of the `--project` and `--domain` flags will list the secrets that are **only** available in that project and/or domain.
For example, to list the secrets that are only available in `my_project` and domain `development`, you would run:
```shell
$ {{< key cli >}} get secret --project my_project --domain development
```
## Using secrets in workflow code
Note that a workflow can only access secrets whose scope includes the project and domain of the workflow.
### Using a secret created on the command line
To use a secret created on the command line, see the example code below. To run the example code:
1. **Development cycle > Managing secrets > Creating secrets > Creating a secret on the command line** with the key `my_secret`.
2. Copy the following example code to a new file and save it as `using_secrets.py`.
3. Run the script with `{{< key cli >}} run --remote using_secrets.py main`.
```python
import {{< key kit_import >}}
@{{< key kit_as >}}.task(secret_requests=[union.Secret(key="my_secret")])
def t1():
secret_value = union.current_context().secrets.get(key="my_secret")
# do something with the secret. For example, communication with an external API.
...
```
> [!WARNING]
> Do not return secret values from tasks, as this will expose secrets to the control plane.
With `env_var`, you can automatically load the secret into the environment. This is useful
with libraries that expect the secret to have a specific name:
```python
import {{< key kit_import >}}
@{{< key kit_as >}}.task(secret_requests=[union.Secret(key="my_union_api_key", env_var="{{< key env_prefix >}}_API_KEY")])
def t1():
# Authenticates the remote with {{< key env_prefix >}}_API_KEY
remote = union.{{< key kit_remote >}}(default_project="{{< key default_project >}}", default_domain="development")
```
### Using a secret created from a file
To use a secret created from a file in your workflow code, you must mount it as a file. To run the example code below:
1. **Development cycle > Managing secrets > Creating secrets > Creating a secret from a file** with the key `my_secret`.
2. Copy the example code below to a new file and save it as `using_secrets_file.py`.
4. Run the script with `{{< key cli >}} run --remote using_secrets_file.py main`.
```python
import {{< key kit_import >}}
@{{< key kit_as >}}.task(
secret_requests=[
{{< key kit_as >}}.Secret(key="my_file_secret", mount_requirement={{< key kit_as >}}.Secret.MountType.FILE),
]
)
def t1():
path_to_secret_file = union.current_context().secrets.get_secrets_file("my_file_secret")
with open(path_to_secret_file, "r") as f:
secret_value = f.read()
# do something with the secret. For example, communication with an external API.
...
```
> [!WARNING]
> Do not return secret values from tasks, as this will expose secrets to the control plane.
> [!NOTE]
> The `get_secrets_file` method takes the secret key and returns the path to the secret file.
## Updating secrets
To update a secret, run the `{{< key cli >}} update secret` command. You will be prompted to enter a new value:
```shell
$ {{< key cli >}} update secret --project my_project --domain my_domain my_secret
```
## Deleting secrets
To delete a secret, use the `{{< key cli >}} delete secret` command:
```shell
$ {{< key cli >}} delete secret --project my_project --domain my_domain my_secret
```
=== PAGE: https://www.union.ai/docs/v1/serverless/user-guide/development-cycle/managing-api-keys ===
# Managing API keys
You need to create an API key to allow external systems to run compute
on {{< key product_name >}}, e.g. a GitHub action that registers or runs workflows.
## Creating an API key
To create an API key, run the following with the {{< key cli_name >}} CLI with any name.
```shell
$ {{< key cli >}} create api-key admin --name my-custom-name
Client ID: my-custom-name
The following API key will only be shown once. Be sure to keep it safe!
Configure your headless CLI by setting the following environment variable:
export {{< key env_prefix >}}_API_KEY=""
```
Store the `` in a secure location. For `git` development, make sure to not check in the `` into your repository.
Within a GitHub action, you can use [Github Secrets](https://docs.github.com/en/actions/security-guides/using-secrets-in-github-actions) to store the secret.
For this example, copy the following workflow into a file called `hello.py`:
```python
import {{< key kit_import >}}
@{{< key kit_as >}}.task
def welcome(name: str) -> str:
return f"Welcome to {{< key product_name >}}! {name}"
@{{< key kit_as >}}.workflow
def main(name: str) -> str:
return welcome(name=name)
```
You can run this workflow from any machine by setting the `{{< key env_prefix >}}_API_KEY`
environment variable:
```shell
$ export {{< key env_prefix >}}_API_KEY=""
$ {{< key cli >}} run --remote hello.py main --name "{{< key product_name >}}"
```
## Listing and deleting applications
You can list all your application by running:
```shell
$ {{< key cli >}} get api-key admin
```
```shell
┏━━━━━━━━━━━━━━━━┓
┃ client_id ┃
┡━━━━━━━━━━━━━━━━┩
│ my-custom-name │
└────────────────┘
```
The `client_id` contains your custom application name and a prefix that contains your
username.
Finally, you can delete your application by running:
```shell
$ {{< key cli >}} delete api-key admin --name my-custom-name
```
=== PAGE: https://www.union.ai/docs/v1/serverless/user-guide/development-cycle/accessing-aws-s3 ===
# Accessing AWS S3 buckets
Here we will take a look at how to access data on AWS S3 Buckets from {{< key product_name >}}.
As a prerequisite, we assume that our AWS S3 bucket is accessible with API keys: `AWS_ACCESS_KEY_ID` and `AWS_SECRET_ACCESS_KEY`.
## Creating secrets on {{< key product_name >}}
First, we create secrets on {{< key product_name >}} by running the following command:
```shell
$ {{< key cli >}} create secret AWS_ACCESS_KEY_ID
```
This will open a prompt where we paste in our AWS credentials:
```shell
Enter secret value: 🗝️
```
Repeat this process for all other AWS credentials, such as `AWS_SECRET_ACCESS_KEY`.
## Using secrets in a task
Next, we can use the secrets directly in a task! With AWS CLI, we create a small text file and move it to a AWS bucket
```shell
$ aws s3 mb s3://test_bucket
$ echo "Hello {{< key product_name >}}" > my_file.txt
$ aws s3 cp my_file.txt s3://test_bucket/my_file.txt
```
Next, we give a task access to our AWS secrets by supplying them through `secret_requests`. For this guide, save the following snippet as `aws-s3-access.py` and run:
```python
import {{< key kit_import >}}
@{{< key kit_as >}}.task(
secret_requests=[
union.Secret(key="AWS_ACCESS_KEY_ID"),
union.Secret(key="AWS_SECRET_ACCESS_KEY"),
],
)
def read_s3_data() -> str:
import s3fs
secrets = union.current_context().secrets
s3 = s3fs.S3FileSystem(
secret=secrets.get(key="AWS_SECRET_ACCESS_KEY"),
key=secrets.get(key="AWS_ACCESS_KEY_ID"),
)
with s3.open("test_bucket/my_file.txt") as f:
content = f.read().decode("utf-8")
return content
@{{< key kit_as >}}.workflow
def main():
read_s3_data()
```
Within the task, the secrets are available through `current_context().secrets` and passed to `s3fs`. Running the following command to execute the workflow:
```shell
$ {{< key cli >}} run --remote aws-s3-access.py main
```
## Conclusion
You can easily access your AWS S3 buckets by running `{{< key cli >}} create secret` and configuring your tasks to access the secrets!
=== PAGE: https://www.union.ai/docs/v1/serverless/user-guide/development-cycle/task-resource-validation ===
# Task resource validation
In {{< key product_name >}}, when you attempt to execute a workflow with unsatisfiable resource requests, we fail the execution immediately rather than allowing it to queue forever.
We intercept execution creation requests in executions service to validate that their resource requirements can be met and fast-fail if not. A failed validation returns a message similar to
```text
Request failed with status code 400 rpc error: code = InvalidArgument desc = no node satisfies task 'workflows.fotd.fotd_directory' resource requests
```
=== PAGE: https://www.union.ai/docs/v1/serverless/user-guide/development-cycle/jupyter-notebooks ===
# Jupyter notebooks
{{< key product_name >}} supports the development, running, and debugging of tasks and workflows in an interactive Jupyter notebook environment, which accelerates the iteration speed when building data- or machine learning-driven applications.
## Write your workflows and tasks in cells
When building tasks and workflows in a notebook, you write the code in cells as you normally would.
From those cells you can run the code locally (i.e., in the notebook itself, not on {{< key product_name >}}) by clikcing the run button, as you would in any notebook.
## Enable the notebook to register workflows to {{< key product_name >}}
To enable the tasks and workflows in your notebok to be easily registered and run on your {{< key product_name >}} instance, you needdto set up an _interactive_ {{< key kit_remote >}} object and then use to invoke the remote executions:
First, in a cell, create an interactive {{< key kit_remote >}} object:
```python
from flytekit.configuration import Config
from flytekit.remote import FlyteRemote
remote = {{< key kit_remote >}}(
config=Config.auto(),
default_project="default",
default_domain="development",
interactive_mode_enabled=True,
)
```
The `interactive_mode_enabled` flag must be set to `True` when running in a Jupyter notebook environment, enabling interactive registration and execution of workflows.
Next, set up the execution invocation in another cell:
```python
execution = remote.execute(my_task, inputs={"name": "Joe"})
execution = remote.execute(my_wf, inputs={"name": "Anne"})
```
The interactive {{< key kit_remote >}} client re-registers an entity whenever it’s redefined in the notebook, including when you re-execute a cell containing the entity definition, even if the entity remains unchanged. This behavior facilitates iterative development and debugging of tasks and workflows in a Jupyter notebook.
=== PAGE: https://www.union.ai/docs/v1/serverless/user-guide/development-cycle/decks ===
# Decks
Decks lets you display customized data visualizations from within your task code.
Decks are rendered as HTML and appear right in the {{< key product_name >}} UI when you run your workflow.
> [!NOTE]
> Decks is an opt-in feature; to enable it, set `enable_deck` to `True` in the task parameters.
To begin, import the dependencies:
```python
import {{< key kit_import >}}
from flytekit.deck.renderer import MarkdownRenderer
from sklearn.decomposition import PCA
import plotly.express as px
import plotly
```
> [!NOTE]
> The renderers are packaged separately from `flytekit` itself.
> To enable the `MarkdownRenderer` imported above
> you first have to install the package `flytekitplugins-deck-standard`
> in your local Python environment and include it in your `ImageSpec` (as shown below).
We create a new deck named `pca` and render Markdown content along with a
[PCA](https://en.wikipedia.org/wiki/Principal_component_analysis) plot.
Now, declare the required dependnecies in an `ImageSpec`:
```python
custom_image = {{< key kit_as >}}.ImageSpec(
packages=[
"flytekitplugins-deck-standard",
"markdown",
"pandas",
"pillow",
"plotly",
"pyarrow",
"scikit-learn",
"ydata_profiling",
],
builder="union",
)
```
Next, we define the task that will construct the figure and create the Deck:
```python
@{{< key kit_as >}}.task(enable_deck=True, container_image=custom_image)
def pca_plot():
iris_df = px.data.iris()
X = iris_df[["sepal_length", "sepal_width", "petal_length", "petal_width"]]
pca = PCA(n_components=3)
components = pca.fit_transform(X)
total_var = pca.explained_variance_ratio_.sum() * 100
fig = px.scatter_3d(
components,
x=0,
y=1,
z=2,
color=iris_df["species"],
title=f"Total Explained Variance: {total_var:.2f}%",
labels={"0": "PC 1", "1": "PC 2", "2": "PC 3"},
)
main_deck = {{< key kit_as >}}.Deck("pca", MarkdownRenderer().to_html("### Principal Component Analysis"))
main_deck.append(plotly.io.to_html(fig))
```
Note the usage of `append` to append the Plotly figure to the Markdown deck.
The following is the expected output containing the path to the `deck.html` file:
```
{"asctime": "2023-07-11 13:16:04,558", "name": "flytekit", "levelname": "INFO", "message": "pca_plot task creates flyte deck html to file:///var/folders/6f/xcgm46ds59j7g__gfxmkgdf80000gn/T/flyte-0_8qfjdd/sandbox/local_flytekit/c085853af5a175edb17b11cd338cbd61/deck.html"}
```
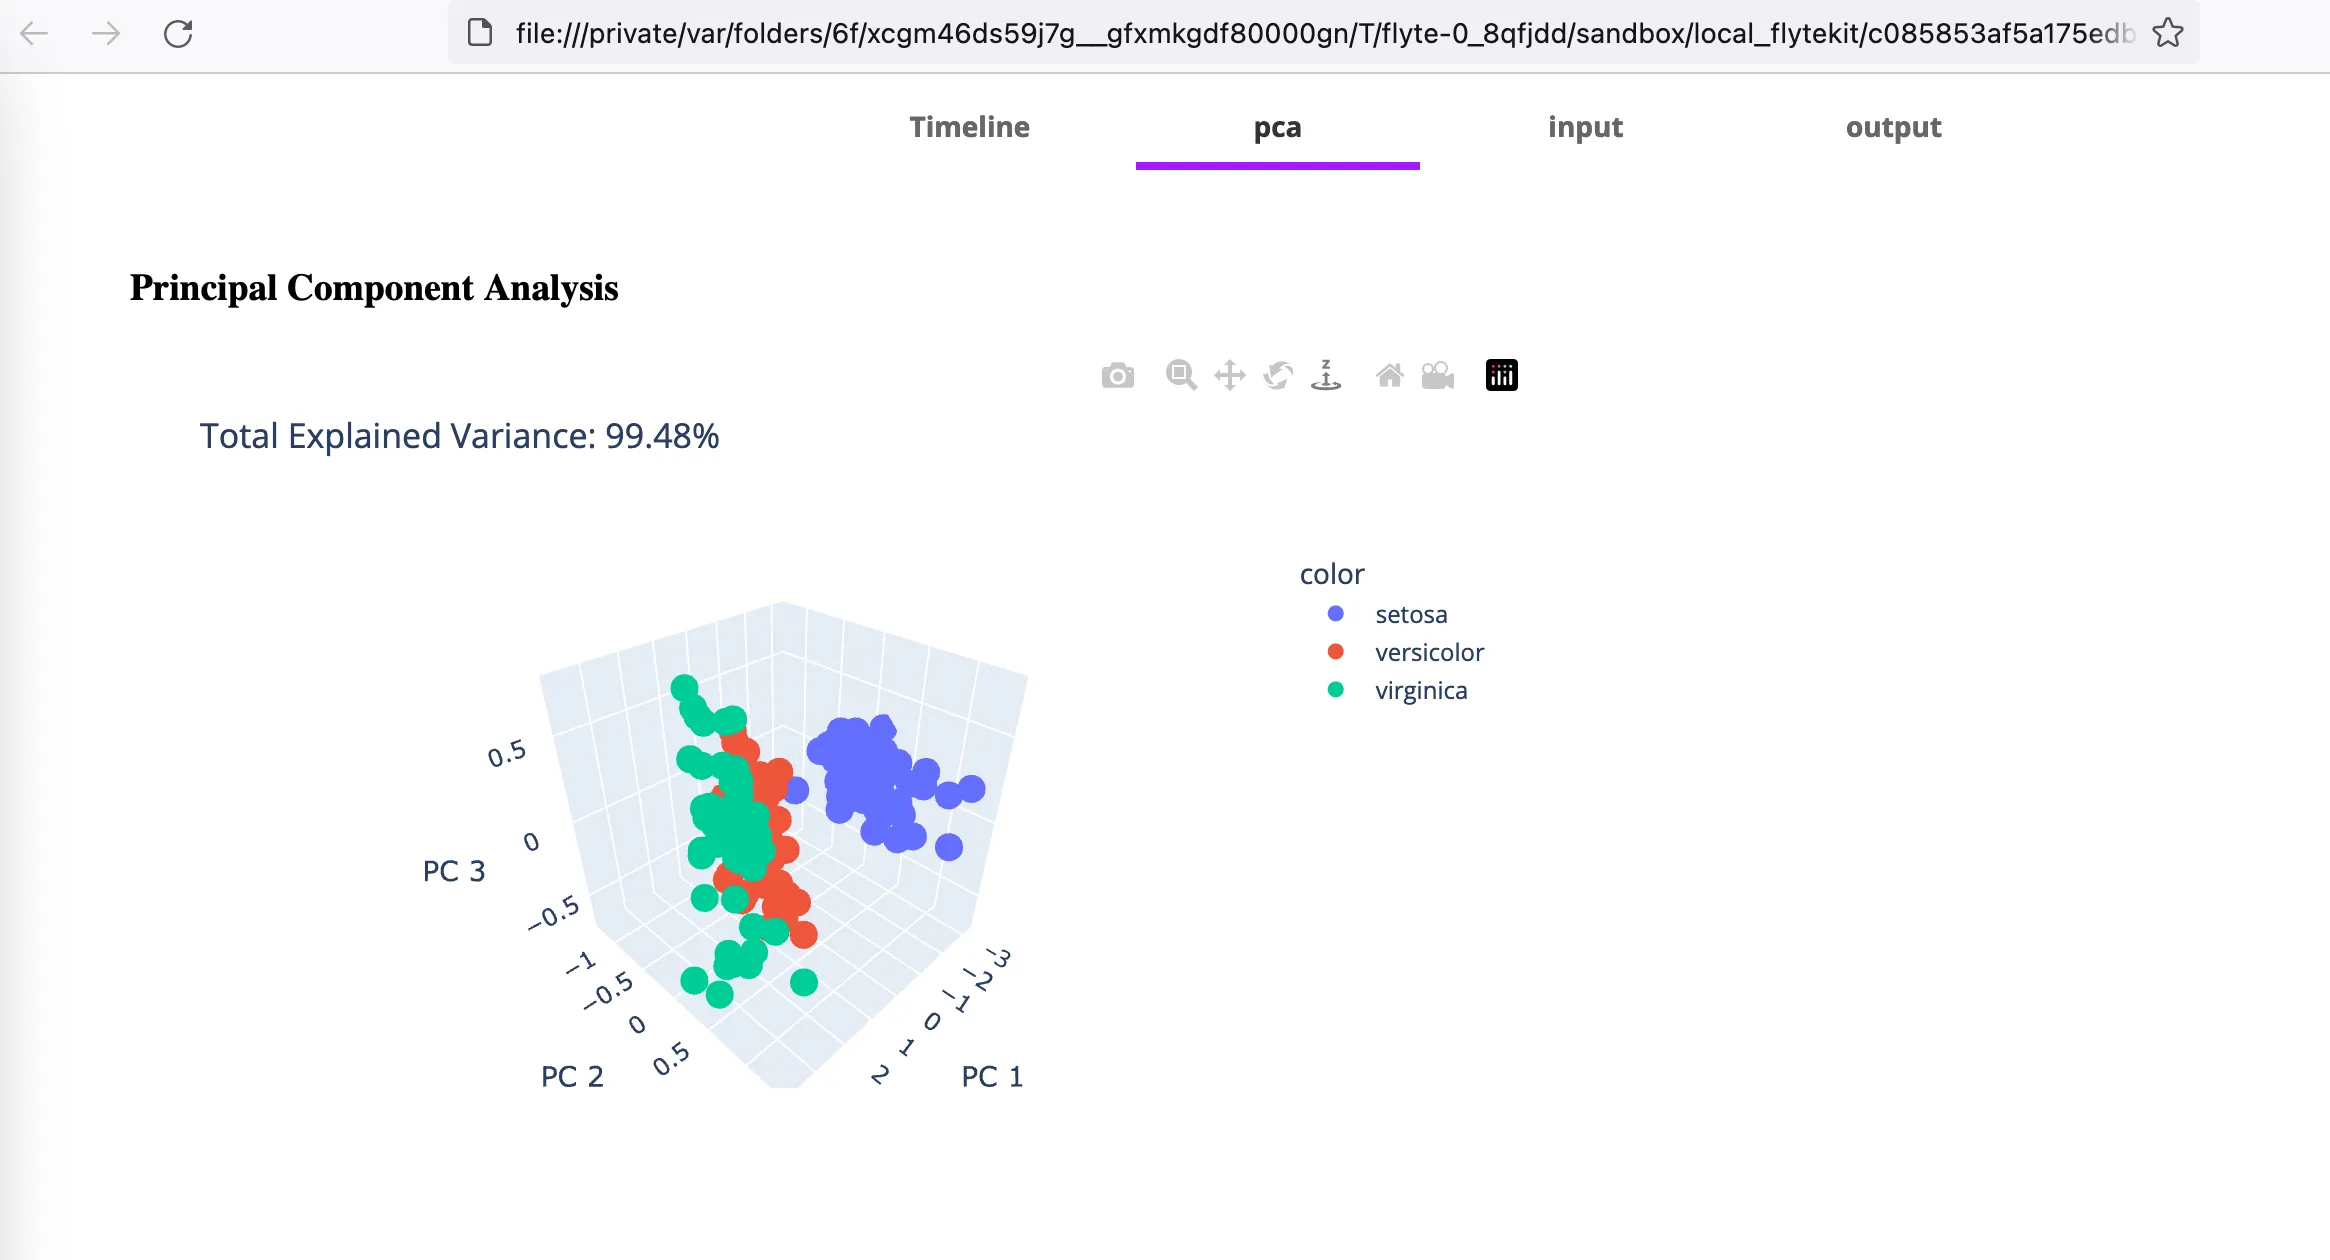
Once you execute this task on the {{< key product_name >}} instance, you can access the deck by going to the task view and clicking the _Deck_ button:
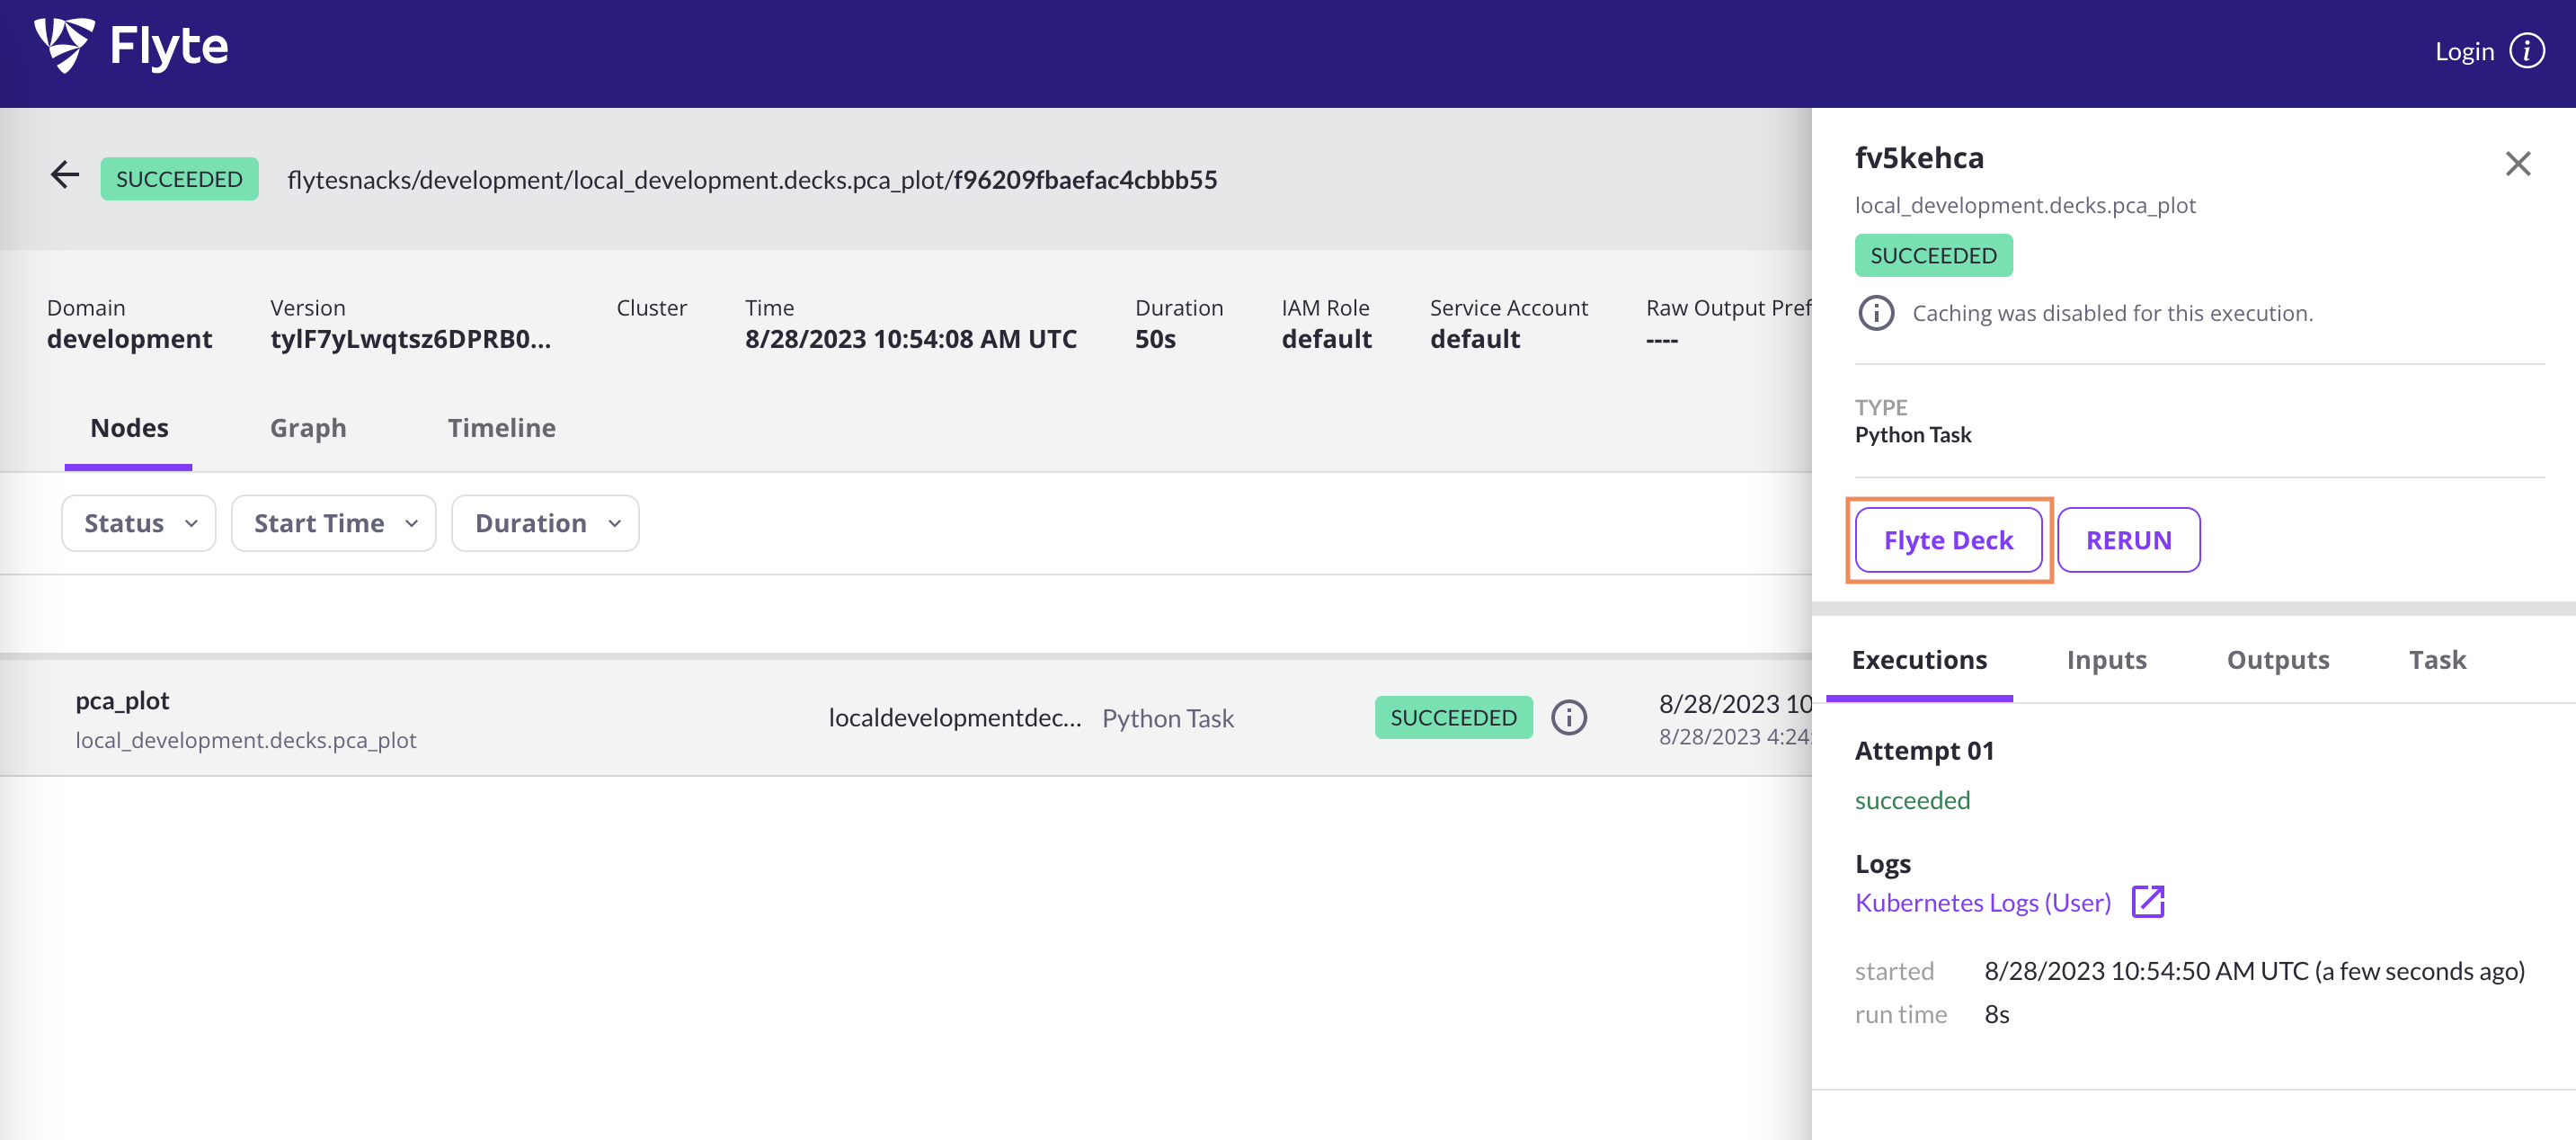
## Deck tabs
Each Deck has a minimum of three tabs: input, output and default.
The input and output tabs are used to render the input and output data of the task,
while the default deck can be used to creta cusom renderings such as line plots, scatter plots, Markdown text, etc.
Additionally, you can create other tabs as well.
## Deck renderers
> [!NOTE]
> The renderers are packaged separately from `flytekit` itself.
> To enable them you first have to install the package `flytekitplugins-deck-standard`
> in your local Python environment and include it in your `ImageSpec`.
### Frame profiling renderer
The frame profiling render creates a profile report from a Pandas DataFrame.
```python
import {{< key kit_import >}}
import pandas as pd
from flytekitplugins.deck.renderer import FrameProfilingRenderer
@{{< key kit_as >}}.task(enable_deck=True, container_image=custom_image)
def frame_renderer() -> None:
df = pd.DataFrame(data={"col1": [1, 2], "col2": [3, 4]})
{{< key kit_as >}}.Deck("Frame Renderer", FrameProfilingRenderer().to_html(df=df))
```
### Top-frame renderer
The top-fram renderer renders a DataFrame as an HTML table.
```python
import {{< key kit_import >}}
from typing import Annotated
from flytekit.deck import TopFrameRenderer
@{{< key kit_as >}}.task(enable_deck=True, container_image=custom_image)
def top_frame_renderer() -> Annotated[pd.DataFrame, TopFrameRenderer(1)]:
return pd.DataFrame(data={"col1": [1, 2], "col2": [3, 4]})
```
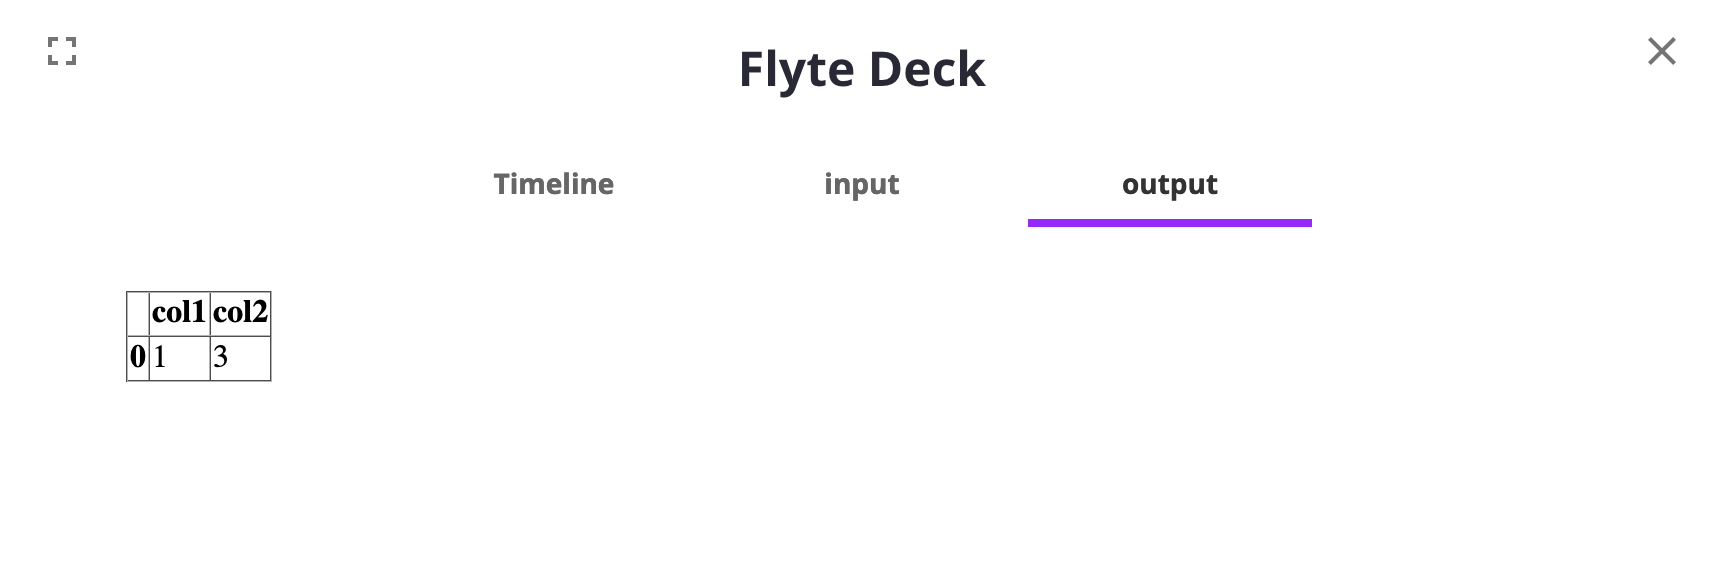
### Markdown renderer
The Markdown renderer converts a Markdown string into HTML.
```python
import {{< key kit_import >}}
from flytekit.deck import MarkdownRenderer
@{{< key kit_as >}}.task(enable_deck=True, container_image=custom_image)
def markdown_renderer() -> None:
{{< key kit_as >}}.current_context().default_deck.append(
MarkdownRenderer().to_html("You can install flytekit using this command: ```import flytekit```")
)
```
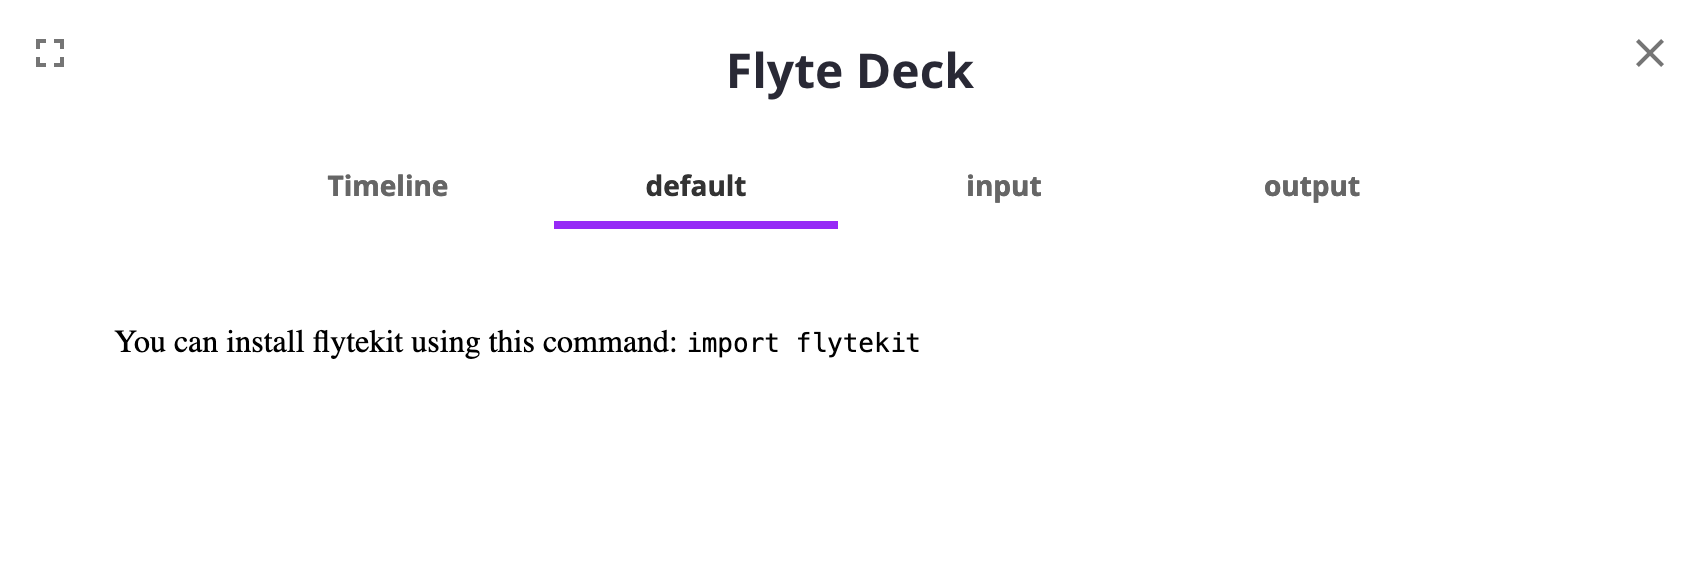
### Box renderer
The box renderer groups rows of a DataFrame together into a
box-and-whisker mark to visualize their distribution.
Each box extends from the first quartile (Q1) to the third quartile (Q3).
The median (Q2) is indicated by a line within the box.
Typically, the whiskers extend to the edges of the box,
plus or minus 1.5 times the interquartile range (IQR: Q3-Q1).
```python
import {{< key kit_import >}}
from flytekitplugins.deck.renderer import BoxRenderer
@{{< key kit_as >}}.task(enable_deck=True, container_image=custom_image)
def box_renderer() -> None:
iris_df = px.data.iris()
{{< key kit_as >}}.Deck("Box Plot", BoxRenderer("sepal_length").to_html(iris_df))
```
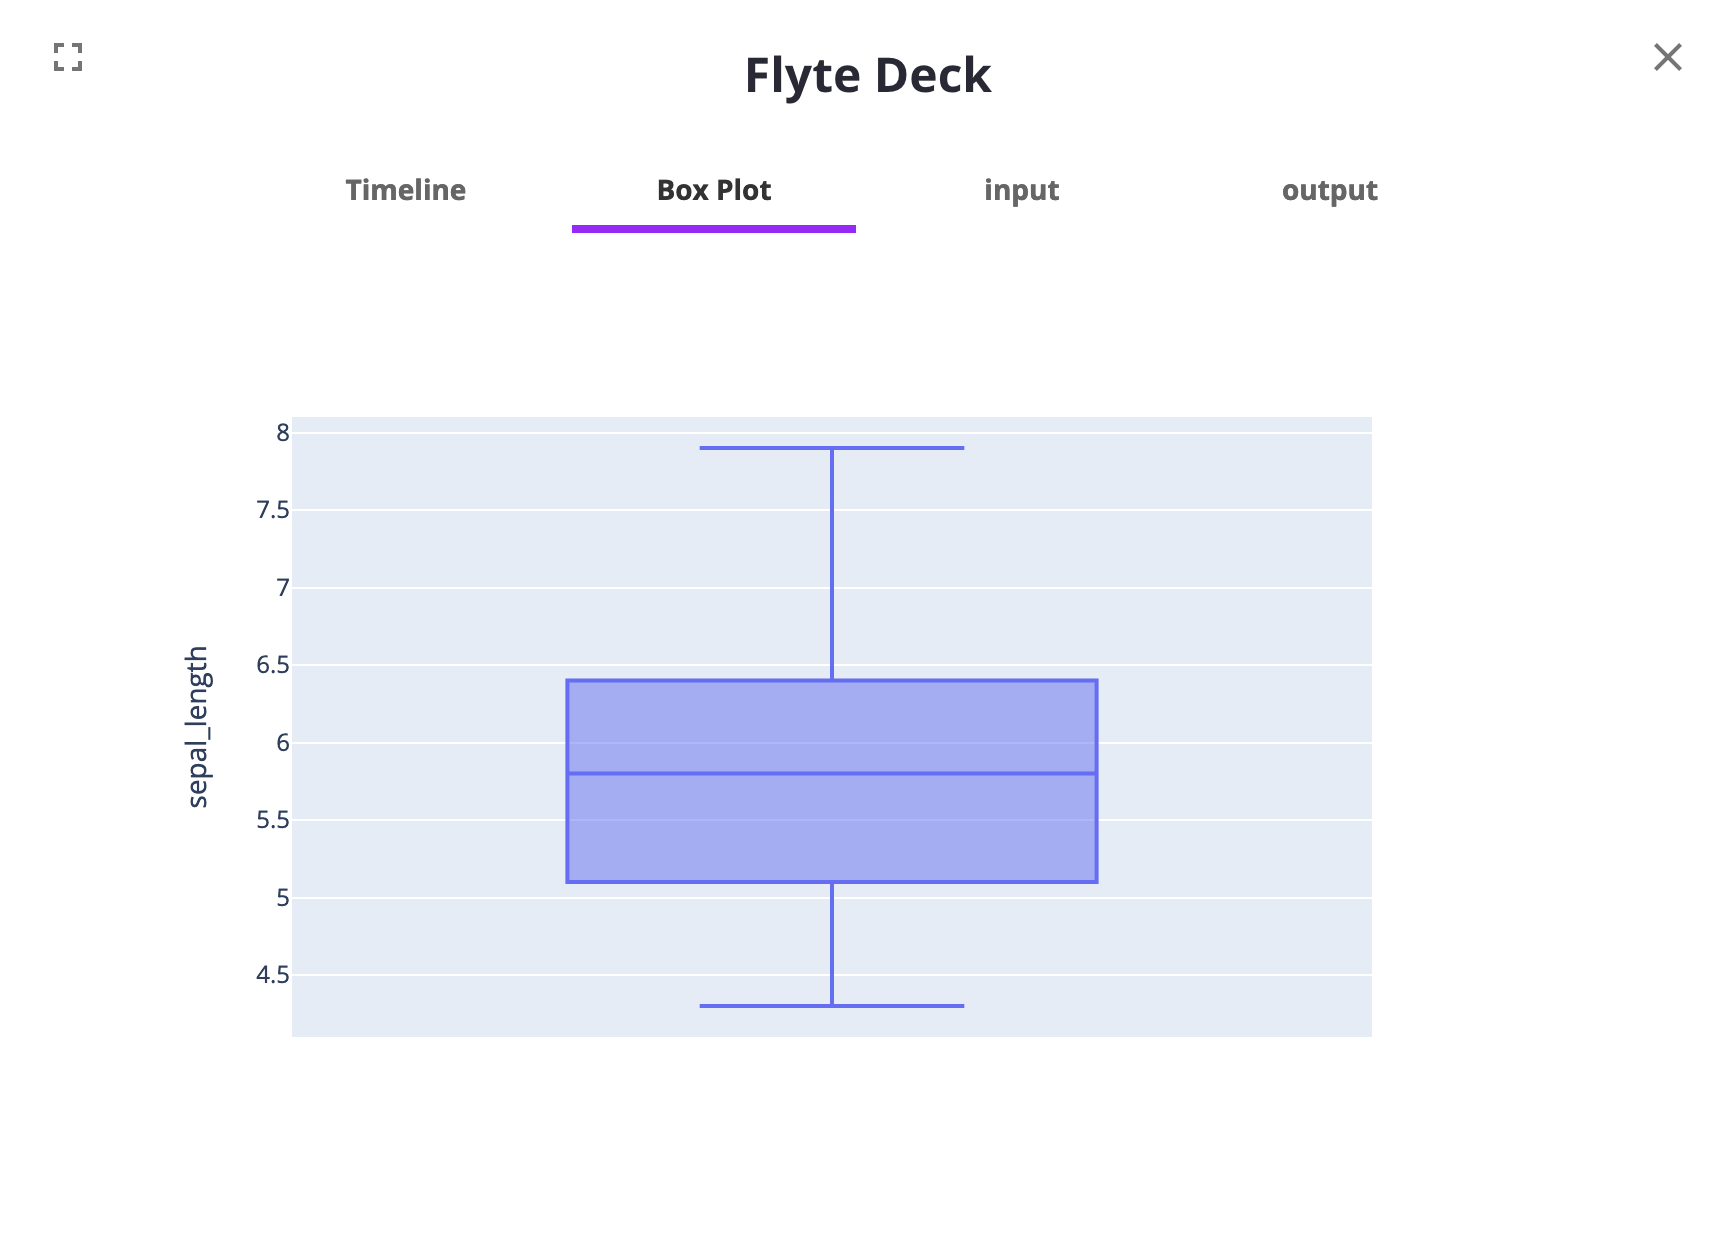
### Image renderer
The image renderer converts a `FlyteFile` or `PIL.Image.Image` object into an HTML displayable image,
where the image data is encoded as a base64 string.
```python
import {{< key kit_import >}}
from flytekitplugins.deck.renderer import ImageRenderer
@{{< key kit_as >}}.task(enable_deck=True, container_image=custom_image)
def image_renderer(image: {{< key kit_as >}}.FlyteFile) -> None:
{{< key kit_as >}}.Deck("Image Renderer", ImageRenderer().to_html(image_src=image))
@{{< key kit_as >}}.workflow
def image_renderer_wf(image: {{< key kit_as >}}.FlyteFile = "https://bit.ly/3KZ95q4",) -> None:
image_renderer(image=image)
```
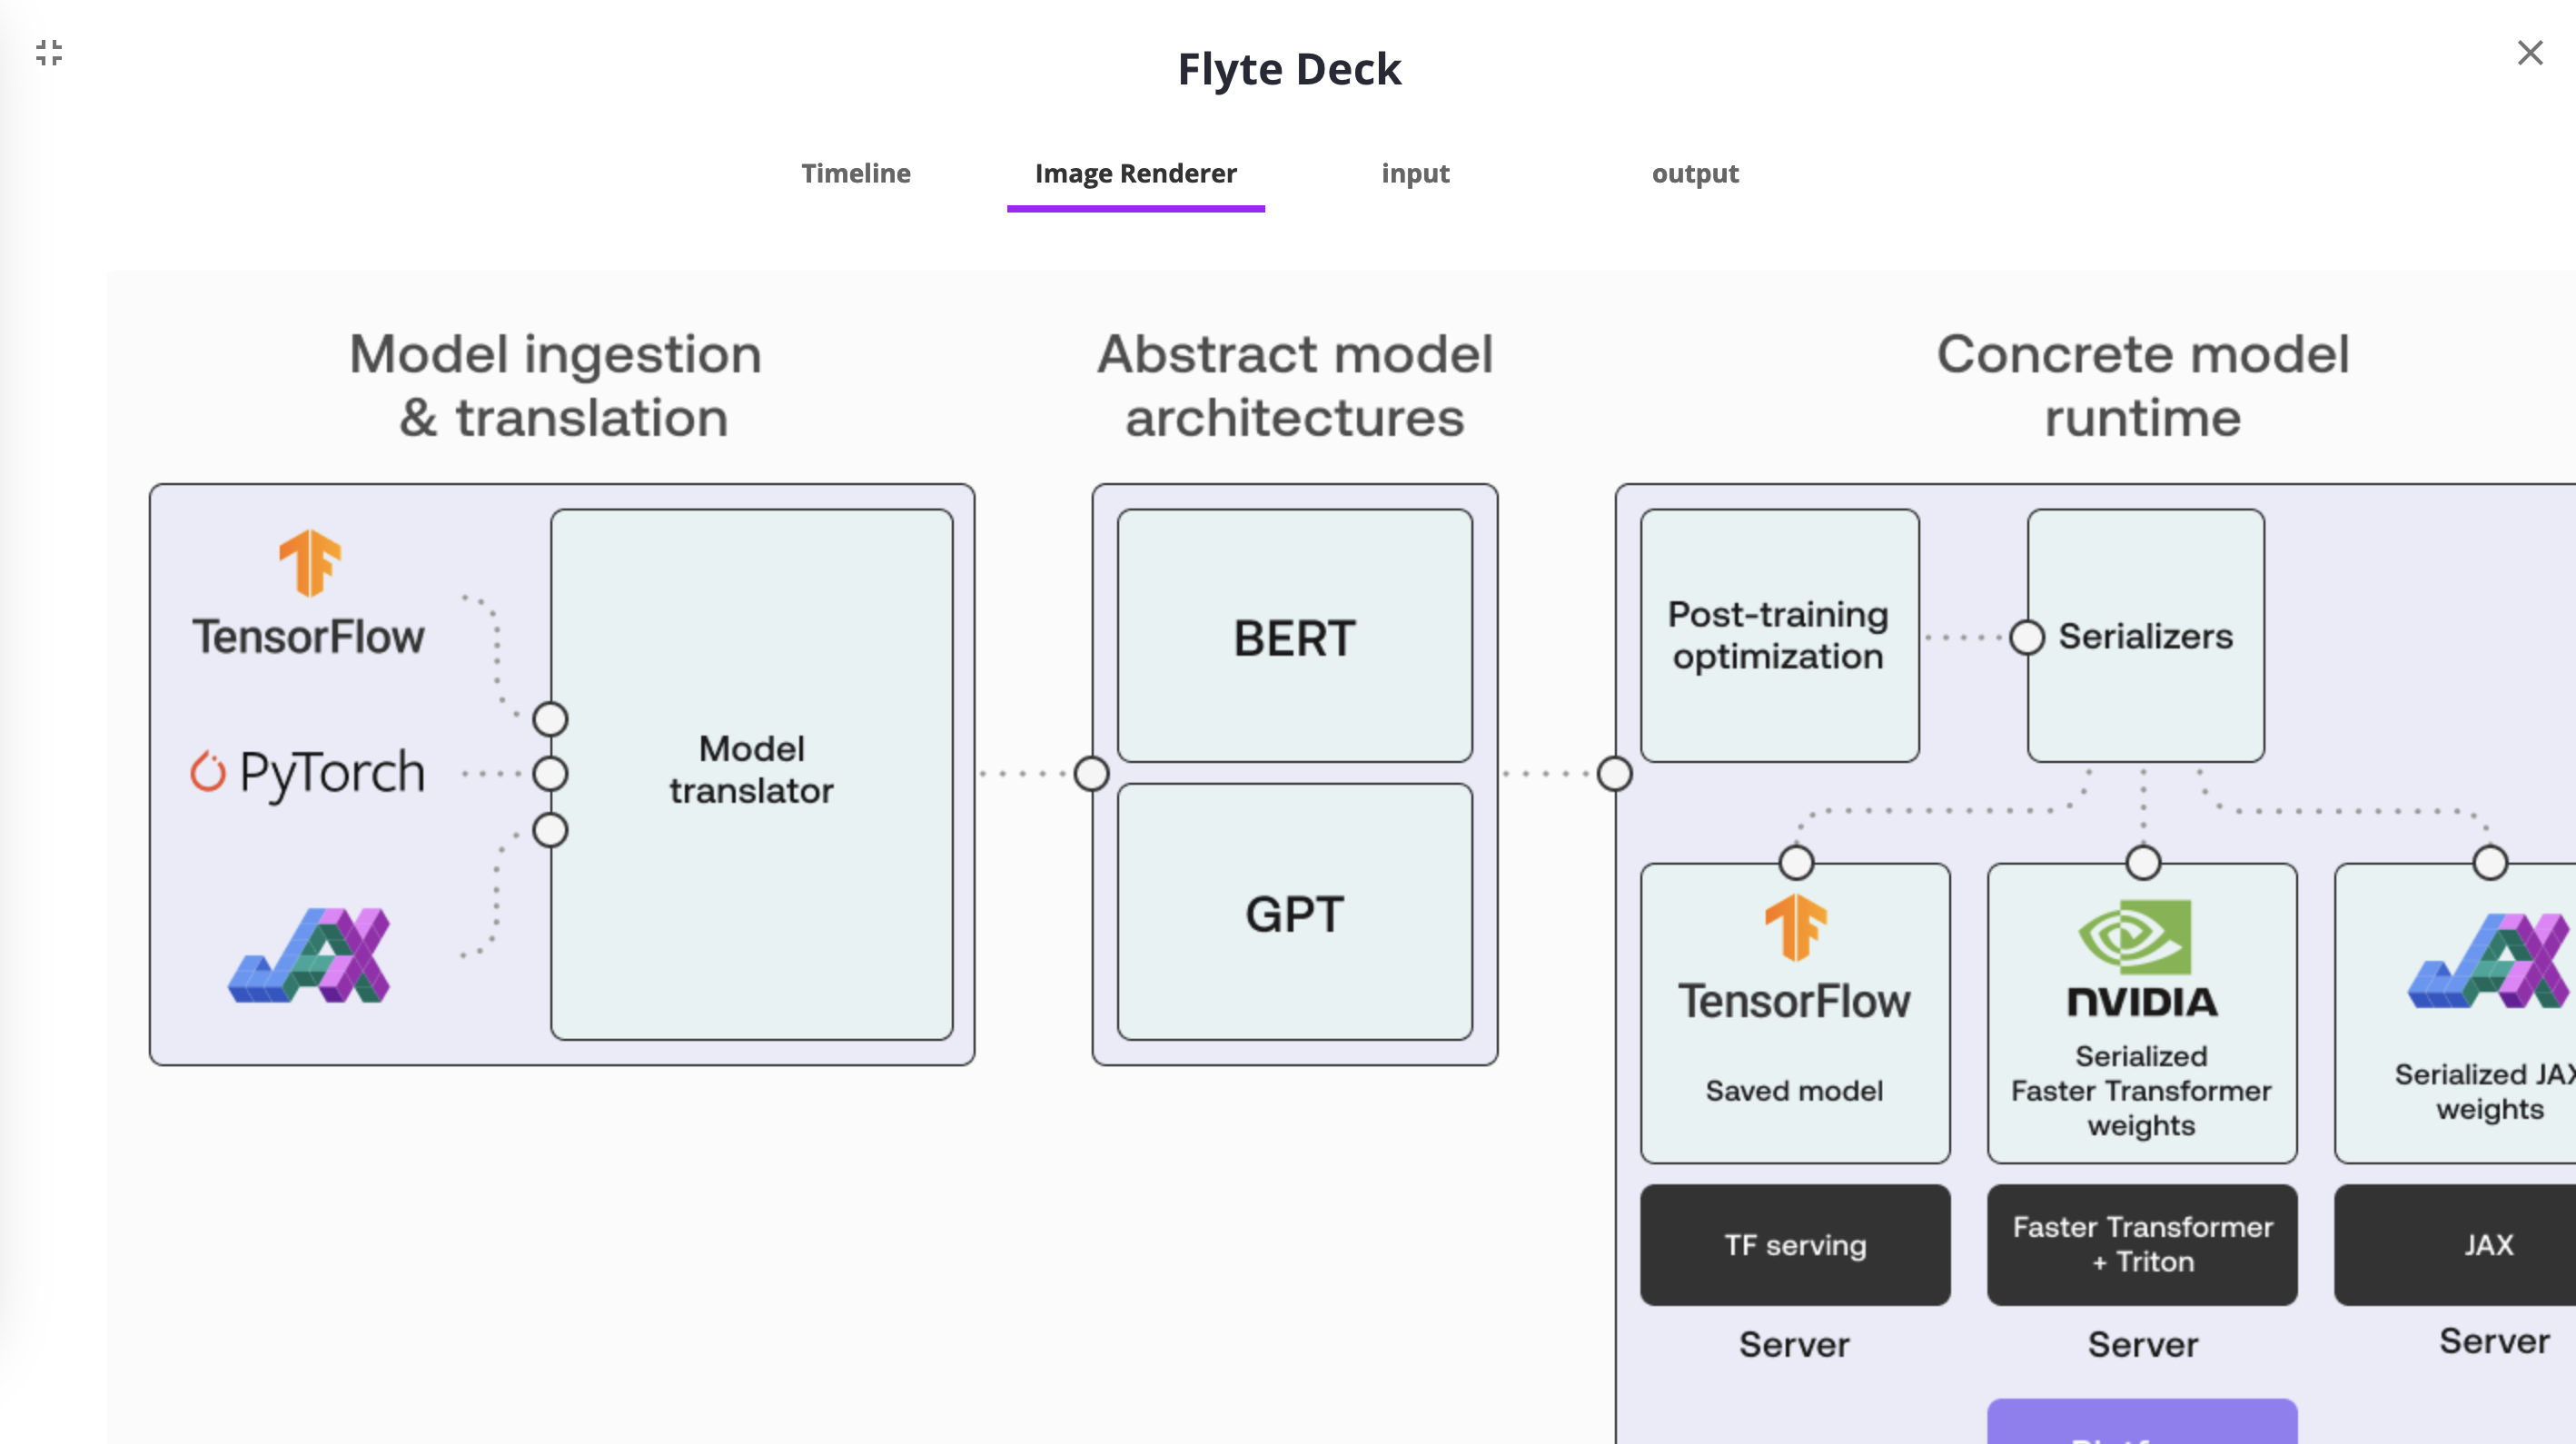
#### Table renderer
The table renderer converts a Pandas DataFrame into an HTML table.
```python
import {{< key kit_import >}}
from flytekitplugins.deck.renderer import TableRenderer
@{{< key kit_as >}}.task(enable_deck=True, container_image=custom_image)
def table_renderer() -> None:
{{< key kit_as >}}.Deck(
"Table Renderer",
TableRenderer().to_html(df=pd.DataFrame(data={"col1": [1, 2], "col2": [3, 4]}), table_width=50),
)
```
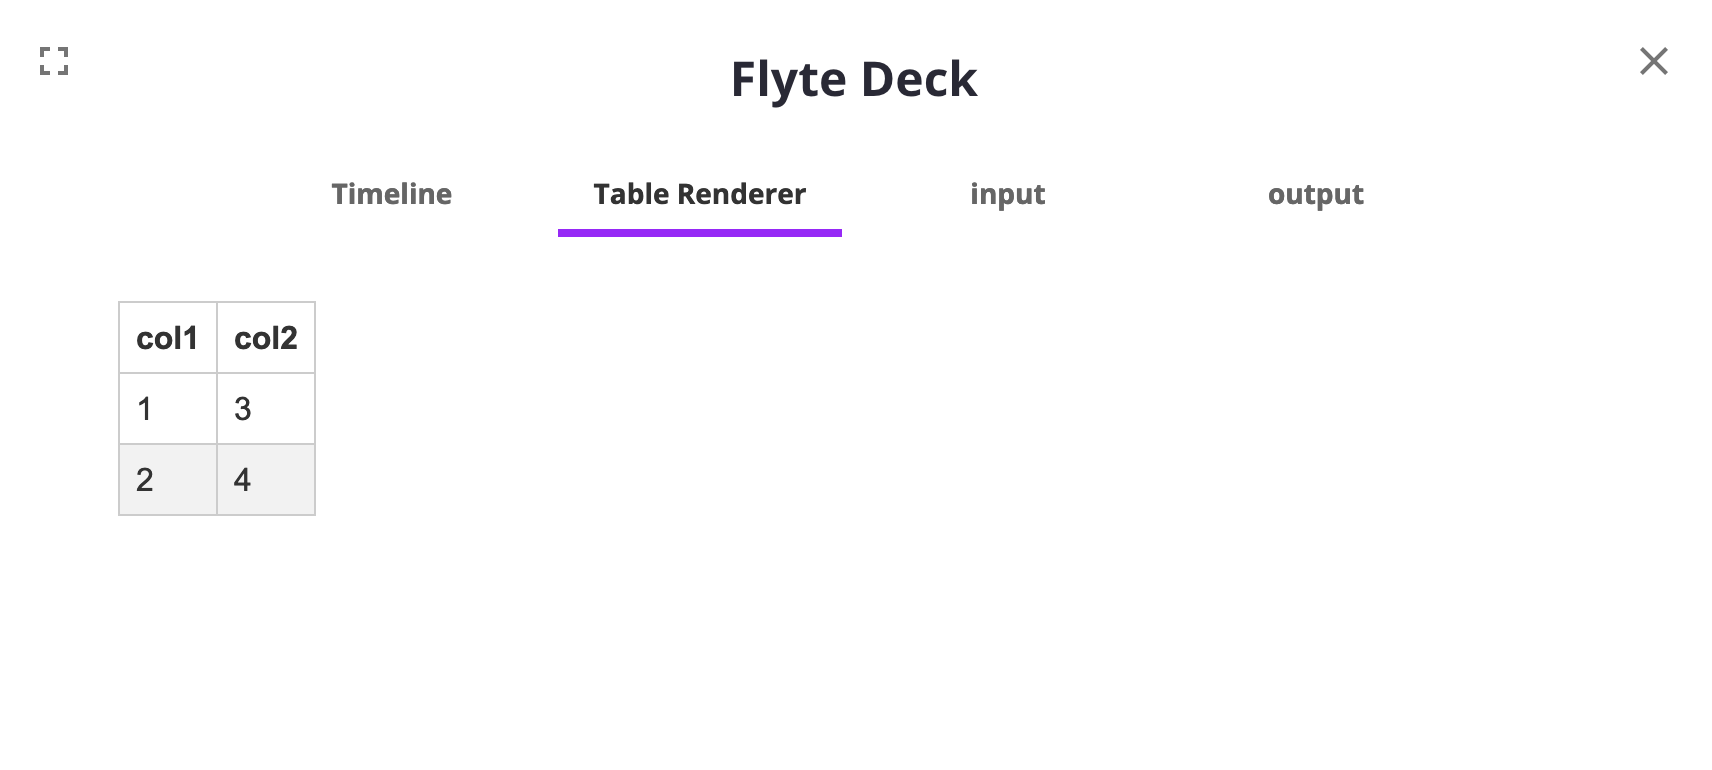
### Custom renderers
You can also create your own custom renderer.
A renderer is essentially a class with a `to_html` method.
Here we create custom renderer that summarizes the data from a Pandas `DataFrame` instead of showing raw values.
```python
class DataFrameSummaryRenderer:
def to_html(self, df: pd.DataFrame) -> str:
assert isinstance(df, pd.DataFrame)
return df.describe().to_html()
```
Then we can use the Annotated type to override the default renderer of the `pandas.DataFrame` type:
```python
try:
from typing import Annotated
except ImportError:
from typing_extensions import Annotated
@task(enable_deck=True)
def iris_data(
sample_frac: Optional[float] = None,
random_state: Optional[int] = None,
) -> Annotated[pd.DataFrame, DataFrameSummaryRenderer()]:
data = px.data.iris()
if sample_frac is not None:
data = data.sample(frac=sample_frac, random_state=random_state)
md_text = (
"# Iris Dataset\n"
"This task loads the iris dataset using the `plotly` package."
)
flytekit.current_context().default_deck.append(MarkdownRenderer().to_html(md_text))
flytekit.Deck("box plot", BoxRenderer("sepal_length").to_html(data))
return data
```
## Streaming Decks
You can stream a Deck directly using `Deck.publish()`:
```python
import {{< key kit_import >}}
@task(enable_deck=True)
def t_deck():
{{< key kit_as >}}.Deck.publish()
```
This will create a live deck that where you can click the refresh button and see the deck update until the task succeeds.
### Union Deck Succeed Video
📺 [Watch on YouTube](https://www.youtube.com/watch?v=LJaBP0mdFeE)
### Union Deck Fail Video
📺 [Watch on YouTube](https://www.youtube.com/watch?v=xaBF6Jlzjq0)
=== PAGE: https://www.union.ai/docs/v1/serverless/user-guide/development-cycle/remote-management ===
# {{< key kit_remote >}}
The `{{< key kit_remote >}}` Python API supports functionality similar to that of the {{< key cli_name >}} CLI, enabling you to manage {{< key product_name >}} workflows, tasks, launch plans and artifacts from within your Python code.
> [!NOTE]
> The primary use case of `{{< key kit_remote >}}` is to automate the deployment of {{< key product_name >}} entities. As such, it is intended for use within scripts *external* to actual {{< key product_name >}} workflow and task code, for example CI/CD pipeline scripts.
>
> In other words: _Do not use `{{< key kit_remote >}}` within task code._
## Creating a `{{< key kit_remote >}}` object
Ensure that you have the {{< key kit_name >}} SDK installed, import the `{{< key kit_remote >}}` class and create the object like this:
```python
import {{< key kit_import >}}
remote = {{< key kit_as >}}.{{< key kit_remote >}}()
```
By default, when created with a no-argument constructor, `{{< key kit_remote >}}` will use the prevailing configuration in the local environment to connect to {{< key product_name >}},
that is, the same configuration as would be used by the {{< key cli_name >}} CLI in that environment
(see **Development cycle > {{< key kit_remote >}} > {{< key cli_name >}} CLI configuration search path**).
In the default case, as with the {{< key cli_name >}} CLI, all operations will be applied to the default project, `{{< key default_project >}}` and default domain, `development`.
Alternatively, you can initialize `{{< key kit_remote >}}` by explicitly specifying a project, and a domain:
```python
import {{< key kit_import >}}
remote = {{< key kit_as >}}.{{< key kit_remote >}}(
default_project="my-project",
default_domain="my-domain",
)
```
## Subpages
- **Development cycle > {{< key kit_remote >}} > {{< key kit_remote >}} examples**
=== PAGE: https://www.union.ai/docs/v1/serverless/user-guide/development-cycle/remote-management/remote-examples ===
# {{< key kit_remote >}} examples
## Registering and running a workflow
In the following example we register and run a workflow and retrieve its output:
```shell
├── remote.py
└── workflow
├── __init__.py
└── example.py
```
The workflow code that will be registered and run on {{< key product_name >}} resides in the `workflow` directory and consists of an empty `__init__.py` file and the workflow and task code in `example.py`:
```python
import os
import {{< key kit_import >}}
@{{< key kit_as >}}.task()
def create_file(message: str) -> {{< key kit_as >}}.FlyteFile:
with open("data.txt", "w") as f:
f.write(message)
return {{< key kit_as >}}.FlyteFile(path="data.txt")
@{{< key kit_as >}}.workflow
def my_workflow(message: str) -> {{< key kit_as >}}.FlyteFile:
f = create_file(message)
return f
```
The file `remote.py` contains the `{{< key kit_remote >}}` logic. It is not part of the workflow code, and is meant to be run on your local machine.
```python
import {{< key kit_import >}}
from workflow.example import my_workflow
def run_workflow():
remote = {{< key kit_as >}}.{{< key kit_remote >}}()
remote.fast_register_workflow(entity=my_workflow)
execution = remote.execute(
entity=my_workflow,
inputs={"message": "Hello, world!"},
wait=True)
output = execution.outputs["o0"]
print(output)
with open(output, "r") as f:
read_lines = f.readlines()
print(read_lines)
```
The `my_workflow` workflow and the `create_file` task is registered and run.
Once the workflow completes, the output is passed back to the `run_workflow` function and printed out.
The output is also be available via the UI, in the **Outputs** tab of the `create_file` task details view:

The steps above demonstrates the simplest way of registering and running a workflow with `{{< key kit_remote >}}`.
For more options and details see **Union SDK > Packages > union**.
## Fetching outputs
By default, `{{< key kit_remote >}}.execute` is non-blocking, but you can also pass in `wait=True` to make it synchronously wait for the task or workflow to complete, as we did above.
You can print out the {{< key product_name >}} console URL corresponding to your execution with:
```python
print(f"Execution url: {remote.generate_console_url(execution)}")
```
And you can synchronize the state of the execution object with the remote state with the `sync()` method:
```python
synced_execution = remote.sync(execution)
print(synced_execution.inputs) # print out the inputs
```
You can also wait for the execution after you’ve launched it and access the outputs:
```shell
completed_execution = remote.wait(execution)
print(completed_execution.outputs) # print out the outputs
```
## Terminating all running executions for a workflow
This example shows how to terminate all running executions in a given workflow name.
```python
import {{< key kit_import >}}
from dataclasses import dataclass
import json
from flytekit.configuration import Config
from flytekit.models.core.execution import NodeExecutionPhase
@dataclass
class Execution:
name: str
link: str
SOME_LARGE_LIMIT = 5000
PHASE = NodeExecutionPhase.RUNNING
WF_NAME = "your_workflow_name"
EXECUTIONS_TO_IGNORE = ["some_execution_name_to_ignore"]
PROJECT = "your_project"
DOMAIN = "production"
ENDPOINT = "union.example.com"
remote = {{< key kit_as >}}.{{< key kit_remote >}}(
config=Config.for_endpoint(endpoint=ENDPOINT),
default_project=PROJECT,
default_domain=DOMAIN,
)
executions_of_interest = []
executions = remote.recent_executions(limit=SOME_LARGE_LIMIT)
for e in executions:
if e.closure.phase == PHASE:
if e.spec.launch_plan.name == WF_NAME:
if e.id.name not in EXECUTIONS_TO_IGNORE:
execution_on_interest = Execution(name=e.id.name, link=f"https://{ENDPOINT}/console/projects/{PROJECT}/domains/{DOMAIN}/executions/{e.id.name}")
executions_of_interest.append(execution_on_interest)
remote.terminate(e, cause="Terminated manually via script.")
with open('terminated_executions.json', 'w') as f:
json.dump([{'name': e.name, 'link': e.link} for e in executions_of_interest], f, indent=2)
print(f"Terminated {len(executions_of_interest)} executions.")
```
## Rerunning all failed executions of a workflow
This example shows how to identify all failed executions from a given workflow since a certain time, and re-run them with the same inputs and a pinned workflow version.
```python
import datetime
import pytz
import {{< key kit_import >}}
from flytekit.models.core.execution import NodeExecutionPhase
SOME_LARGE_LIMIT = 5000
WF_NAME = "your_workflow_name"
PROJECT = "your_project"
DOMAIN = "production"
ENDPOINT = "union.example.com"
VERSION = "your_target_workflow_version"
remote = {{< key kit_as >}}.{{< key kit_remote >}}(
config=Config.for_endpoint(endpoint=ENDPOINT),
default_project=PROJECT,
default_domain=DOMAIN,
)
executions = remote.recent_executions(limit=SOME_LARGE_LIMIT)
failures = [
NodeExecutionPhase.FAILED,
NodeExecutionPhase.ABORTED,
NodeExecutionPhase.FAILING,
]
# time of the last successful execution
date = datetime.datetime(2024, 10, 30, tzinfo=pytz.UTC)
# filter executions by name
filtered = [execution for execution in executions if execution.spec.launch_plan.name == WF_NAME]
# filter executions by phase
failed = [execution for execution in filtered if execution.closure.phase in failures]
# filter executions by time
windowed = [execution for execution in failed if execution.closure.started_at > date]
# get inputs for each execution
inputs = [remote.sync(execution).inputs for execution in windowed]
# get new workflow version entity
workflow = remote.fetch_workflow(name=WF_NAME, version=VERSION)
# execute new workflow for each failed previous execution
[remote.execute(workflow, inputs=X) for X in inputs]
```
## Filtering for executions using a `Filter`
This example shows how to use a `Filter` to only query for the executions you want.
```python
from flytekit.models import filters
import {{< key kit_import >}}
WF_NAME = "your_workflow_name"
LP_NAME = "your_launchplan_name"
PROJECT = "your_project"
DOMAIN = "production"
ENDPOINT = "union.example.com"
remote = {{< key kit_as >}}.{{< key kit_remote >}}.for_endpoint(ENDPOINT)
# Only query executions from your project
project_filter = filters.Filter.from_python_std(f"eq(workflow.name,{WF_NAME})")
project_executions = remote.recent_executions(project=PROJECT, domain=DOMAIN, filters=[project_filter])
# Query for the latest execution that succeeded and was between 8 and 16 minutes
latest_success = remote.recent_executions(
limit=1,
filters=[
filters.Equal("launch_plan.name", LP_NAME),
filters.Equal("phase", "SUCCEEDED"),
filters.GreaterThan("duration", 8 * 60),
filters.LessThan("duration", 16 * 60),
],
)
```
## Launch task via {{< key kit_remote >}} with a new version
```python
import {{< key kit_import >}}
from flytekit.remote import FlyteRemote
from flytekit.configuration import Config, SerializationSettings
# {{< key kit_remote >}} object is the main entrypoint to API
remote = {{< key kit_as >}}.{{< key kit_remote >}}(
config=Config.for_endpoint(endpoint="flyte.example.net"),
default_project="flytesnacks",
default_domain="development",
)
# Get Task
task = remote.fetch_task(name="workflows.example.generate_normal_df", version="v1")
task = remote.register_task(
entity=flyte_task,
serialization_settings=SerializationSettings(image_config=None),
version="v2",
)
# Run Task
execution = remote.execute(
task, inputs={"n": 200, "mean": 0.0, "sigma": 1.0}, execution_name="task-execution", wait=True
)
# Or use execution_name_prefix to avoid repeated execution names
execution = remote.execute(
task, inputs={"n": 200, "mean": 0.0, "sigma": 1.0}, execution_name_prefix="flyte", wait=True
)
# Inspecting execution
# The 'inputs' and 'outputs' correspond to the task execution.
input_keys = execution.inputs.keys()
output_keys = execution.outputs.keys()
```
## Launch workflow via {{< key kit_remote >}}
Workflows can be executed with `{{< key kit_remote >}}` because under the hood it fetches and triggers a default launch plan.
```python
import {{< key kit_import >}}
from flytekit.configuration import Config
# UnionRemote object is the main entrypoint to API
remote = {{< key kit_as >}}.{{< key kit_remote >}}(
config=Config.for_endpoint(endpoint="flyte.example.net"),
default_project="flytesnacks",
default_domain="development",
)
# Fetch workflow
workflow = remote.fetch_workflow(name="workflows.example.wf", version="v1")
# Execute
execution = remote.execute(
workflow, inputs={"mean": 1}, execution_name="workflow-execution", wait=True
)
# Or use execution_name_prefix to avoid repeated execution names
execution = remote.execute(
workflow, inputs={"mean": 1}, execution_name_prefix="flyte", wait=True
)
```
## Launch launchplan via {{< key kit_remote >}}
A launch plan can be launched via {{< key kit_remote >}} programmatically.
```python
import {{< key kit_import >}}
from flytekit.configuration import Config
# UnionRemote object is the main entrypoint to API
remote = {{< key kit_as >}}.{{< key kit_remote >}}(
config=Config.for_endpoint(endpoint="flyte.example.net"),
default_project="flytesnacks",
default_domain="development",
)
# Fetch launch plan
lp = remote.fetch_launch_plan(
name="workflows.example.wf", version="v1", project="flytesnacks", domain="development"
)
# Execute
execution = remote.execute(
lp, inputs={"mean": 1}, execution_name="lp-execution", wait=True
)
# Or use execution_name_prefix to avoid repeated execution names
execution = remote.execute(
lp, inputs={"mean": 1}, execution_name_prefix="flyte", wait=True
)
```
## Inspecting executions
With `{{< key kit_remote >}}`, you can fetch the inputs and outputs of executions and inspect them.
```python
import {{< key kit_import >}}
from flytekit.configuration import Config
# UnionRemote object is the main entrypoint to API
remote = {{< key kit_as >}}.{{< key kit_remote >}}(
config=Config.for_endpoint(endpoint="flyte.example.net"),
default_project="flytesnacks",
default_domain="development",
)
execution = remote.fetch_execution(
name="fb22e306a0d91e1c6000", project="flytesnacks", domain="development"
)
input_keys = execution.inputs.keys()
output_keys = execution.outputs.keys()
# The inputs and outputs correspond to the top-level execution or the workflow itself.
# To fetch a specific output, say, a model file:
model_file = execution.outputs["model_file"]
with open(model_file) as f:
...
# You can use UnionRemote.sync() to sync the entity object's state with the remote state during the execution run.
synced_execution = remote.sync(execution, sync_nodes=True)
node_keys = synced_execution.node_executions.keys()
# node_executions will fetch all the underlying node executions recursively.
# To fetch output of a specific node execution:
node_execution_output = synced_execution.node_executions["n1"].outputs["model_file"]
=== PAGE: https://www.union.ai/docs/v1/serverless/user-guide/data-input-output ===
# Data input/output
This section covers how to manage data input and output in {{< key product_name >}}.
{{< key product_name >}} also supports all the [Data input/output features of Flyte](https://docs-builder.pages.dev/docs/flyte/user-guide/data-input-output/).
| Section | Description |
|----------------------------------------------------|----------------------------------------------------|
| **Data input/output > FlyteFile and FlyteDirectory** | Use `FlyteFile` to easily pass files across tasks. |
| **Data input/output > FlyteFile and FlyteDirectory** | Use `FlyteDirectory` to easily pass directories across tasks. |
| **Data input/output > Downloading with FlyteFile and FlyteDirectory** | Details on how files and directories or downloaded with `FlyteFile` and `FlyteDirectory`. |
| **Data input/output > StructuredDataset** | Details on how `StructuredDataset`is used as a general dataframe type. |
| **Data input/output > Dataclass** | Details on how to uses dataclasses across tasks. |
| **Data input/output > Pydantic BaseModel** | Details on how to use pydantic models across tasks. |
| **Data input/output > Accessing attributes** | Details on how to directly access attributes on output promises for lists, dictionaries, dataclasses, and more. |
| **Data input/output > Enum type** | Details on how use Enums across tasks. |
| **Data input/output > Pickle type** | Details on how use pickled objects across tasks for generalized typing of complex objects. |
| **Data input/output > PyTorch type** | Details on how use torch tensors and models across tasks. |
| **Data input/output > TensorFlow types** | Details on how use tensorflow tensors and models across tasks. |
## Subpages
- **Data input/output > FlyteFile and FlyteDirectory**
- **Data input/output > Downloading with FlyteFile and FlyteDirectory**
- **Data input/output > Accessing attributes**
- **Data input/output > Dataclass**
- **Data input/output > Enum type**
- **Data input/output > Pickle type**
- **Data input/output > Pydantic BaseModel**
- **Data input/output > PyTorch type**
- **Data input/output > StructuredDataset**
- **Data input/output > TensorFlow types**
=== PAGE: https://www.union.ai/docs/v1/serverless/user-guide/data-input-output/flyte-file-and-flyte-directory ===
# FlyteFile and FlyteDirectory
> [!NOTE] Upload location
> With {{< key product_name >}} Serverless, the remote location to which `FlyteFile` and `FlyteDirectory` upload container-local files is always a randomly generated (universally unique) location in {{< key product_name >}}'s internal object store. It cannot be changed.
>
> With {{< key product_name >}} BYOC, the upload location is configurable.
> See **Data input/output > FlyteFile and FlyteDirectory > Changing the data upload location**.
## Remote examples
### Remote file example
In the example above, we started with a local file.
To preserve that file across the task boundary, {{< key product_name >}} uploaded it to the {{< key product_name >}} object store before passing it to the next task.
You can also _start with a remote file_, simply by initializing the `FlyteFile` object with a URI pointing to a remote source. For example:
```python
@{{< key kit_as >}}.task
def task_1() -> {{< key kit_as >}}.FlyteFile:
remote_path = "https://people.sc.fsu.edu/~jburkardt/data/csv/biostats.csv"
return {{< key kit_as >}}.FlyteFile(path=remote_path)
```
In this case, no uploading is needed because the source file is already in a remote location.
When the object is passed out of the task, it is converted into a `Blob` with the remote path as the URI.
After the `FlyteFile` is passed to the next task, you can call `FlyteFile.open()` on it, just as before.
If you don't intend on passing the `FlyteFile` to the next task, and rather intend to open the contents of the remote file within the task, you can use `from_source`.
```python
@{{< key kit_as >}}.task
def load_json():
uri = "gs://my-bucket/my-directory/example.json"
my_json = FlyteFile.from_source(uri)
# Load the JSON file into a dictionary and print it
with open(my_json, "r") as json_file:
data = json.load(json_file)
print(data)
```
When initializing a `FlyteFile` with a remote file location, all URI schemes supported by `fsspec` are supported, including `http`, `https`(Web), `gs` (Google Cloud Storage), `s3` (AWS S3), `abfs`, and `abfss` (Azure Blob Filesystem).
### Remote directory example
Below is an equivalent remote example for `FlyteDirectory`. The process of passing the `FlyteDirectory` between tasks is essentially identical to the `FlyteFile` example above.
```python
@{{< key kit_as >}}.task
def task1() -> {{< key kit_as >}}.FlyteDirectory:
p = "https://people.sc.fsu.edu/~jburkardt/data/csv/"
return {{< key kit_as >}}.FlyteDirectory(p)
@{{< key kit_as >}}.task
def task2(fd: {{< key kit_as >}}.FlyteDirectory): # Get a list of the directory contents and display the first csv
files = {{< key kit_as >}}.FlyteDirectory.listdir(fd)
with open(files[0], mode="r") as f:
d = f.read()
print(f"The first csv is: \n{d}")
@{{< key kit_as >}}.workflow
def workflow():
fd = task1()
task2(fd=fd)
```
## Streaming
In the above examples, we showed how to access the contents of `FlyteFile` by calling `FlyteFile.open()`.
The object returned by `FlyteFile.open()` is a stream. In the above examples, the files were small, so a simple `read()` was used.
But for large files, you can iterate through the contents of the stream:
```python
@{{< key kit_as >}}.task
def task_1() -> {{< key kit_as >}}.FlyteFile:
remote_path = "https://sample-videos.com/csv/Sample-Spreadsheet-100000-rows.csv"
return {{< key kit_as >}}.FlyteFile(path=remote_path)
@{{< key kit_as >}}.task
def task_2(ff: {{< key kit_as >}}.FlyteFile):
with ff.open(mode="r") as f
for row in f:
do_something(row)
```
## Downloading
Alternative, you can download the contents of a `FlyteFile` object to a local file in the task container.
There are two ways to do this: **implicitly** and **explicitly**.
### Implicit downloading
The source file of a `FlyteFile` object is downloaded to the local container file system automatically whenever a function is called that takes the `FlyteFile` object and then calls `FlyteFile`'s `__fspath__()` method.
`FlyteFile` implements the `os.PathLike` interface and therefore the `__fspath__()` method.
`FlyteFile`'s implementation of `__fspath__()` performs a download of the source file to the local container storage and returns the path to that local file.
This enables many common file-related operations in Python to be performed on the `FlyteFile` object.
The most prominent example of such an operation is calling Python's built-in `open()` method with a `FlyteFile`:
```python
@{{< key kit_as >}}.task
def task_2(ff: {{< key kit_as >}}.FlyteFile):
with open(ff, mode="r") as f
file_contents= f.read()
```
> [!NOTE] open() vs ff.open()
> Note the difference between
>
> `ff.open(mode="r")`
>
> and
>
> `open(ff, mode="r")`
>
> The former calls the `FlyteFile.open()` method and returns an iterator without downloading the file.
> The latter calls the built-in Python function `open()`, downloads the specified `FlyteFile` to the local container file system,
> and returns a handle to that file.
>
> Many other Python file operations (essentially, any that accept an `os.PathLike` object) can also be performed on a `FlyteFile`
> object and result in an automatic download.
>
> See **Data input/output > Downloading with FlyteFile and FlyteDirectory** for more information.
### Explicit downloading
You can also explicitly download a `FlyteFile` to the local container file system by calling `FlyteFile.download()`:
```python
@{{< key kit_as >}}.task
def task_2(ff: {{< key kit_as >}}.FlyteFile):
local_path = ff.download()
```
This method is typically used when you want to download the file without immediately reading it.
## Typed aliases
The **Union SDK** defines some aliases of `FlyteFile` with specific type annotations.
Specifically, `FlyteFile` has the following **Flytekit SDK > Packages > flytekit.types.file**:
* `HDF5EncodedFile`
* `HTMLPage`
* `JoblibSerializedFile`
* `JPEGImageFile`
* `PDFFile`
* `PNGImageFile`
* `PythonPickledFile`
* `PythonNotebook`
* `SVGImageFile`
Similarly, `FlyteDirectory` has the following **Flytekit SDK > Packages > flytekit.types.directory**:
* `TensorboardLogs`
* `TFRecordsDirectory`
These aliases can optionally be used when handling a file or directory of the specified type, although the object itself will still be a `FlyteFile` or `FlyteDirectory`.
The aliased versions of the classes are syntactic markers that enforce agreement between type annotations in the signatures of task functions, but they do not perform any checks on the actual contents of the file.
=== PAGE: https://www.union.ai/docs/v1/serverless/user-guide/data-input-output/downloading-with-ff-and-fd ===
# Downloading with FlyteFile and FlyteDirectory
The basic idea behind `FlyteFile` and `FlyteDirectory` is that they represent files and directories in remote storage.
When you work with these objects in your tasks, you are working with references to the remote files and directories.
Of course, at some point you will need to access the actual contents of these files and directories,
which means that they have to be downloaded to the local file system of the task container.
The actual files and directories of a `FlyteFile` or `FlyteDirectory` are downloaded to the local file system of the task container in two ways:
* Explicitly, through a call to the `download` method.
* Implicitly, through automatic downloading.
This occurs when an external function is called on the `FlyteFile` or `FlyteDirectory` that itself calls the `__fspath__` method.
To write efficient and performant task and workflow code, it is particularly important to have a solid understanding of when exactly downloading occurs.
Let's look at some examples showing when the content `FlyteFile` objects and `FlyteDirectory` objects are downloaded to the local task container file system.
## FlyteFile
**Calling `download` on a FlyteFile**
```python
@{{< key kit_as >}}.task
def my_task(ff: FlyteFile):
print(os.path.isfile(ff.path)) # This will print False as nothing has been downloaded
ff.download()
print(os.path.isfile(ff.path)) # This will print True as the FlyteFile was downloaded
```
Note that we use `ff.path` which is of type `typing.Union[str, os.PathLike]` rather than using `ff` in `os.path.isfile` directly.
In the next example, we will see that using `os.path.isfile(ff)` invokes `__fspath__` which downloads the file.
**Implicit downloading by `__fspath__`**
In order to make use of some functions like `os.path.isfile` that you may be used to using with regular file paths, `FlyteFile`
implements a `__fspath__` method that downloads the remote contents to the `path` of `FlyteFile` local to the container.
```python
@{{< key kit_as >}}.task
def my_task(ff: FlyteFile):
print(os.path.isfile(ff.path)) # This will print False as nothing has been downloaded
print(os.path.isfile(ff)) # This will print True as os.path.isfile(ff) downloads via __fspath__
print(os.path.isfile(ff.path)) # This will again print True as the file was downloaded
```
It is important to be aware of any operations on your `FlyteFile` that might call `__fspath__` and result in downloading.
Some examples include, calling `open(ff, mode="r")` directly on a `FlyteFile` (rather than on the `path` attribute) to get the contents of the path,
or similarly calling `shutil.copy` or `pathlib.Path` directly on a `FlyteFile`.
## FlyteDirectory
**Calling `download` on a FlyteDirectory**
```python
@{{< key kit_as >}}.task
def my_task(fd: FlyteDirectory):
print(os.listdir(fd.path)) # This will print nothing as the directory has not been downloaded
fd.download()
print(os.listdir(fd.path)) # This will print the files present in the directory as it has been downloaded
```
Similar to how the `path` argument was used above for the `FlyteFile`, note that we use `fd.path` which is of type `typing.Union[str, os.PathLike]` rather than using `fd` in `os.listdir` directly.
Again, we will see that this is because of the invocation of `__fspath__` when `os.listdir(fd)` is called.
**Implicit downloading by `__fspath__`**
In order to make use of some functions like `os.listdir` that you may be used to using with directories, `FlyteDirectory`
implements a `__fspath__` method that downloads the remote contents to the `path` of `FlyteDirectory` local to the container.
```python
@{{< key kit_as >}}.task
def my_task(fd: FlyteDirectory):
print(os.listdir(fd.path)) # This will print nothing as the directory has not been downloaded
print(os.listdir(fd)) # This will print the files present in the directory as os.listdir(fd) downloads via __fspath__
print(os.listdir(fd.path)) # This will again print the files present in the directory as it has been downloaded
```
It is important to be aware of any operations on your `FlyteDirectory` that might call `__fspath__` and result in downloading.
Some other examples include, calling `os.stat` directly on a `FlyteDirectory` (rather than on the `path` attribute) to get the status of the path,
or similarly calling `os.path.isdir` on a `FlyteDirectory` to check if a directory exists.
**Inspecting the contents of a directory without downloading using `crawl`**
As we saw above, using `os.listdir` on a `FlyteDirectory` to view the contents in remote blob storage
results in the contents being downloaded to the task container. If this should be avoided, the `crawl` method offers a means of inspecting
the contents of the directory without calling `__fspath__` and therefore downloading the directory contents.
```python
@{{< key kit_as >}}.task
def task1() -> FlyteDirectory:
p = os.path.join(current_context().working_directory, "my_new_directory")
os.makedirs(p)
# Create and write to two files
with open(os.path.join(p, "file_1.txt"), 'w') as file1:
file1.write("This is file 1.")
with open(os.path.join(p, "file_2.txt"), 'w') as file2:
file2.write("This is file 2.")
return FlyteDirectory(p)
@{{< key kit_as >}}.task
def task2(fd: FlyteDirectory):
print(os.listdir(fd.path)) # This will print nothing as the directory has not been downloaded
print(list(fd.crawl())) # This will print the files present in the remote blob storage
# e.g. [('s3://union-contoso/ke/fe503def6ebe04fa7bba-n0-0/160e7266dcaffe79df85489771458d80', 'file_1.txt'), ('s3://union-contoso/ke/fe503def6ebe04fa7bba-n0-0/160e7266dcaffe79df85489771458d80', 'file_2.txt')]
print(list(fd.crawl(detail=True))) # This will print the files present in the remote blob storage with details including type, the time it was created, and more
# e.g. [('s3://union-contoso/ke/fe503def6ebe04fa7bba-n0-0/160e7266dcaffe79df85489771458d80', {'file_1.txt': {'Key': 'union-contoso/ke/fe503def6ebe04fa7bba-n0-0/160e7266dcaffe79df85489771458d80/file_1.txt', 'LastModified': datetime.datetime(2024, 7, 9, 16, 16, 21, tzinfo=tzlocal()), 'ETag': '"cfb2a3740155c041d2c3e13ad1d66644"', 'Size': 15, 'StorageClass': 'STANDARD', 'type': 'file', 'size': 15, 'name': 'union-contoso/ke/fe503def6ebe04fa7bba-n0-0/160e7266dcaffe79df85489771458d80/file_1.txt'}}), ('s3://union-contoso/ke/fe503def6ebe04fa7bba-n0-0/160e7266dcaffe79df85489771458d80', {'file_2.txt': {'Key': 'union-contoso/ke/fe503def6ebe04fa7bba-n0-0/160e7266dcaffe79df85489771458d80/file_2.txt', 'LastModified': datetime.datetime(2024, 7, 9, 16, 16, 21, tzinfo=tzlocal()), 'ETag': '"500d703f270d4bc034e159480c83d329"', 'Size': 15, 'StorageClass': 'STANDARD', 'type': 'file', 'size': 15, 'name': 'union-contoso/ke/fe503def6ebe04fa7bba-n0-0/160e7266dcaffe79df85489771458d80/file_2.txt'}})]
print(os.listdir(fd.path)) # This will again print nothing as the directory has not been downloaded
```
=== PAGE: https://www.union.ai/docs/v1/serverless/user-guide/data-input-output/accessing-attributes ===
# Accessing attributes
You can directly access attributes on output promises for lists, dictionaries, dataclasses, and combinations of these types in {{< key product_name >}}.
Note that while this functionality may appear to be the normal behavior of Python, code in `@workflow` functions is not actually Python, but rather a Python-like DSL that is compiled by {{< key product_name >}}.
Consequently, accessing attributes in this manner is, in fact, a specially implemented feature.
This functionality facilitates the direct passing of output attributes within workflows, enhancing the convenience of working with complex data structures.
To begin, import the required dependencies and define a common task for subsequent use:
```python
from dataclasses import dataclass
import {{< key kit_import >}}
@{{< key kit_as >}}.task
def print_message(message: str):
print(message)
return
```
## List
You can access an output list using index notation.
> [!NOTE]
> {{< key product_name >}} currently does not support output promise access through list slicing.
```python
@{{< key kit_as >}}.task
def list_task() -> list[str]:
return ["apple", "banana"]
@{{< key kit_as >}}.workflow
def list_wf():
items = list_task()
first_item = items[0]
print_message(message=first_item)
```
## Dictionary
Access the output dictionary by specifying the key.
```python
@{{< key kit_as >}}.task
def dict_task() -> dict[str, str]:
return {"fruit": "banana"}
@{{< key kit_as >}}.workflow
def dict_wf():
fruit_dict = dict_task()
print_message(message=fruit_dict["fruit"])
```
## Data class
Directly access an attribute of a dataclass.
```python
@dataclass
class Fruit:
name: str
@{{< key kit_as >}}.task
def dataclass_task() -> Fruit:
return Fruit(name="banana")
@{{< key kit_as >}}.workflow
def dataclass_wf():
fruit_instance = dataclass_task()
print_message(message=fruit_instance.name)
```
## Complex type
Combinations of list, dict and dataclass also work effectively.
```python
@{{< key kit_as >}}.task
def advance_task() -> (dict[str, list[str]], list[dict[str, str]], dict[str, Fruit]):
return {"fruits": ["banana"]}, [{"fruit": "banana"}], {"fruit": Fruit(name="banana")}
@{{< key kit_as >}}.task
def print_list(fruits: list[str]):
print(fruits)
@{{< key kit_as >}}.task
def print_dict(fruit_dict: dict[str, str]):
print(fruit_dict)
@{{< key kit_as >}}.workflow
def advanced_workflow():
dictionary_list, list_dict, dict_dataclass = advance_task()
print_message(message=dictionary_list["fruits"][0])
print_message(message=list_dict[0]["fruit"])
print_message(message=dict_dataclass["fruit"].name)
print_list(fruits=dictionary_list["fruits"])
print_dict(fruit_dict=list_dict[0])
```
You can run all the workflows locally as follows:
```python
if __name__ == "__main__":
list_wf()
dict_wf()
dataclass_wf()
advanced_workflow()
```
## Failure scenario
The following workflow fails because it attempts to access indices and keys that are out of range:
```python
from flytekit import WorkflowFailurePolicy
@{{< key kit_as >}}.task
def failed_task() -> (list[str], dict[str, str], Fruit):
return ["apple", "banana"], {"fruit": "banana"}, Fruit(name="banana")
@{{< key kit_as >}}.workflow(
# The workflow remains unaffected if one of the nodes encounters an error, as long as other executable nodes are still available
failure_policy=WorkflowFailurePolicy.FAIL_AFTER_EXECUTABLE_NODES_COMPLETE
)
def failed_workflow():
fruits_list, fruit_dict, fruit_instance = failed_task()
print_message(message=fruits_list[100]) # Accessing an index that doesn't exist
print_message(message=fruit_dict["fruits"]) # Accessing a non-existent key
print_message(message=fruit_instance.fruit) # Accessing a non-existent param
```
=== PAGE: https://www.union.ai/docs/v1/serverless/user-guide/data-input-output/dataclass ===
# Dataclass
When you've multiple values that you want to send across {{< key product_name >}} entities, you can use a `dataclass`.
To begin, import the necessary dependencies:
```python
import os
import tempfile
from dataclasses import dataclass
import pandas as pd
import {{< key kit_import >}}
from flytekit.types.structured import StructuredDataset
```
Build your custom image with ImageSpec:
```python
image_spec = union.ImageSpec(
registry="ghcr.io/flyteorg",
packages=["pandas", "pyarrow"],
)
```
## Python types
We define a `dataclass` with `int`, `str` and `dict` as the data types.
```python
@dataclass
class Datum:
x: int
y: str
z: dict[int, str]
```
You can send a `dataclass` between different tasks written in various languages, and input it through the {{< key product_name >}} UI as raw JSON.
> [!NOTE]
> All variables in a data class should be **annotated with their type**. Failure to do will result in an error.
Once declared, a dataclass can be returned as an output or accepted as an input.
```python
@{{< key kit_as >}}.task(container_image=image_spec)
def stringify(s: int) -> Datum:
"""
A dataclass return will be treated as a single complex JSON return.
"""
return Datum(x=s, y=str(s), z={s: str(s)})
@{{< key kit_as >}}.task(container_image=image_spec)
def add(x: Datum, y: Datum) -> Datum:
x.z.update(y.z)
return Datum(x=x.x + y.x, y=x.y + y.y, z=x.z)
```
## {{< key product_name >}} types
We also define a data class that accepts `StructuredDataset`, `FlyteFile` and `FlyteDirectory`.
```python
@dataclass
class UnionTypes:
dataframe: StructuredDataset
file: union.FlyteFile
directory: union.FlyteDirectory
@{{< key kit_as >}}.task(container_image=image_spec)
def upload_data() -> UnionTypes:
df = pd.DataFrame({"Name": ["Tom", "Joseph"], "Age": [20, 22]})
temp_dir = tempfile.mkdtemp(prefix="union-")
df.to_parquet(temp_dir + "/df.parquet")
file_path = tempfile.NamedTemporaryFile(delete=False)
file_path.write(b"Hello, World!")
fs = UnionTypes(
dataframe=StructuredDataset(dataframe=df),
file=union.FlyteFile(file_path.name),
directory=union.FlyteDirectory(temp_dir),
)
return fs
@{{< key kit_as >}}.task(container_image=image_spec)
def download_data(res: UnionTypes):
assert pd.DataFrame({"Name": ["Tom", "Joseph"], "Age": [20, 22]}).equals(res.dataframe.open(pd.DataFrame).all())
f = open(res.file, "r")
assert f.read() == "Hello, World!"
assert os.listdir(res.directory) == ["df.parquet"]
```
A data class supports the usage of data associated with Python types, data classes,
FlyteFile, FlyteDirectory and structured dataset.
We define a workflow that calls the tasks created above.
```python
@{{< key kit_as >}}.workflow
def dataclass_wf(x: int, y: int) -> (Datum, FlyteTypes):
o1 = add(x=stringify(s=x), y=stringify(s=y))
o2 = upload_data()
download_data(res=o2)
return o1, o2
```
To trigger the above task that accepts a dataclass as an input with `{{< key cli >}} run`, you can provide a JSON file as an input:
```shell
$ {{< key cli >}} run dataclass.py add --x dataclass_input.json --y dataclass_input.json
```
Here is another example of triggering a task that accepts a dataclass as an input with `{{< key cli >}} run`, you can provide a JSON file as an input:
```shell
$ {{< key kit >}} run \
https://raw.githubusercontent.com/flyteorg/flytesnacks/69dbe4840031a85d79d9ded25f80397c6834752d/examples/data_types_and_io/data_types_and_io/dataclass.py \
add --x dataclass_input.json --y dataclass_input.json
```
=== PAGE: https://www.union.ai/docs/v1/serverless/user-guide/data-input-output/enum ===
# Enum type
At times, you might need to limit the acceptable values for inputs or outputs to a predefined set.
This common requirement is usually met by using `Enum` types in programming languages.
You can create a Python `Enum` type and utilize it as an input or output for a task.
{{< key kit_name >}} will automatically convert it and constrain the inputs and outputs to the predefined set of values.
> [!NOTE]
> Currently, only string values are supported as valid `Enum` values.
> {{< key product_name >}} assumes the first value in the list as the default, and `Enum` types cannot be optional.
> Therefore, when defining `Enum`s, it's important to design them with the first value as a valid default.
We define an `Enum` and a simple coffee maker workflow that accepts an order and brews coffee ☕️ accordingly.
The assumption is that the coffee maker only understands `Enum` inputs:
```python
# coffee_maker.py
from enum import Enum
import {{< key kit_import >}}
class Coffee(Enum):
ESPRESSO = "espresso"
AMERICANO = "americano"
LATTE = "latte"
CAPPUCCINO = "cappucccino"
@{{< key kit_as >}}.task
def take_order(coffee: str) -> Coffee:
return Coffee(coffee)
@{{< key kit_as >}}.task
def prep_order(coffee_enum: Coffee) -> str:
return f"Preparing {coffee_enum.value} ..."
@{{< key kit_as >}}.workflow
def coffee_maker(coffee: str) -> str:
coffee_enum = take_order(coffee=coffee)
return prep_order(coffee_enum=coffee_enum)
# The workflow can also accept an enum value
@{{< key kit_as >}}.workflow
def coffee_maker_enum(coffee_enum: Coffee) -> str:
return prep_order(coffee_enum=coffee_enum)
```
You can specify value for the parameter `coffee_enum` on run:
```shell
$ {{< key cli >}} run coffee_maker.py coffee_maker_enum --coffee_enum="latte"
```
=== PAGE: https://www.union.ai/docs/v1/serverless/user-guide/data-input-output/pickle ===
# Pickle type
{{< key product_name >}} enforces type safety by utilizing type information for compiling tasks and workflows,
enabling various features such as static analysis and conditional branching.
However, we also strive to offer flexibility to end-users, so they don't have to invest heavily
in understanding their data structures upfront before experiencing the value {{< key product_name >}} has to offer.
{{< key product_name >}} supports the `FlytePickle` transformer, which converts any unrecognized type hint into `FlytePickle`,
enabling the serialization/deserialization of Python values to/from a pickle file.
> [!NOTE]
> Pickle can only be used to send objects between the exact same Python version.
> For optimal performance, it's advisable to either employ Python types that are supported by {{< key product_name >}}
> or register a custom transformer, as using pickle types can result in lower performance.
This example demonstrates how you can utilize custom objects without registering a transformer.
```python
import {{< key kit_import >}}
```
`Superhero` represents a user-defined complex type that can be serialized to a pickle file by {{< key kit_name >}}
and transferred between tasks as both input and output data.
> [!NOTE]
> Alternatively, you can **Data input/output > Dataclass** for improved performance.
> We have used a simple object here for demonstration purposes.
```python
class Superhero:
def __init__(self, name, power):
self.name = name
self.power = power
@{{< key kit_as >}}.task
def welcome_superhero(name: str, power: str) -> Superhero:
return Superhero(name, power)
@{{< key kit_as >}}.task
def greet_superhero(superhero: Superhero) -> str:
return f"👋 Hello {superhero.name}! Your superpower is {superhero.power}."
@{{< key kit_as >}}.workflow
def superhero_wf(name: str = "Thor", power: str = "Flight") -> str:
superhero = welcome_superhero(name=name, power=power)
return greet_superhero(superhero=superhero)
```
=== PAGE: https://www.union.ai/docs/v1/serverless/user-guide/data-input-output/pydantic ===
# Pydantic BaseModel
> [!NOTE]
> You can put Dataclass and UnionTypes (FlyteFile, FlyteDirectory, FlyteSchema, and StructuredDataset) in a pydantic BaseModel.
To begin, import the necessary dependencies:
```python
import os
import tempfile
import pandas as pd
from {{< key kit >}}
from {{< key kit >}}.types.structured import StructuredDataset
from pydantic import BaseModel
```
Build your custom image with ImageSpec:
```python
image_spec = union.ImageSpec(
registry="ghcr.io/flyteorg",
packages=["pandas", "pyarrow", "pydantic"],
)
```
## Python types
We define a `pydantic basemodel` with `int`, `str` and `dict` as the data types.
```python
class Datum(BaseModel):
x: int
y: str
z: dict[int, str]
```
You can send a `pydantic basemodel` between different tasks written in various
languages, and input it through the {{< key product_name >}} console as raw
JSON.
> [!NOTE]
> All variables in a data class should be **annotated with their type**. Failure
> to do will result in an error.
Once declared, a dataclass can be returned as an output or accepted as an input.
```python
@{{< key kit_as >}}.task(container_image=image_spec)
def stringify(s: int) -> Datum:
"""
A Pydantic model return will be treated as a single complex JSON return.
"""
return Datum(x=s, y=str(s), z={s: str(s)})
@{{< key kit_as >}}.task(container_image=image_spec)
def add(x: Datum, y: Datum) -> Datum:
x.z.update(y.z)
return Datum(x=x.x + y.x, y=x.y + y.y, z=x.z)
```
## {{< key product_name >}} types
We also define a data class that accepts `StructuredDataset`, `FlyteFile` and
`FlyteDirectory`.
```python
class {{< key kit_name >}}Types(BaseModel):
dataframe: StructuredDataset
file: union.FlyteFile
directory: union.FlyteDirectory
@{{< key kit_as >}}.task(container_image=image_spec)
def upload_data() -> FlyteTypes:
df = pd.DataFrame({"Name": ["Tom", "Joseph"], "Age": [20, 22]})
temp_dir = tempfile.mkdtemp(prefix="flyte-")
df.to_parquet(os.path.join(temp_dir, "df.parquet"))
file_path = tempfile.NamedTemporaryFile(delete=False)
file_path.write(b"Hello, World!")
file_path.close()
fs = FlyteTypes(
dataframe=StructuredDataset(dataframe=df),
file={{< key kit_as >}}.FlyteFile(file_path.name),
directory={{< key kit_as >}}.FlyteDirectory(temp_dir),
)
return fs
@{{< key kit_as >}}.task(container_image=image_spec)
def download_data(res: FlyteTypes):
expected_df = pd.DataFrame({"Name": ["Tom", "Joseph"], "Age": [20, 22]})
actual_df = res.dataframe.open(pd.DataFrame).all()
assert expected_df.equals(actual_df), "DataFrames do not match!"
with open(res.file, "r") as f:
assert f.read() == "Hello, World!", "File contents do not match!"
assert os.listdir(res.directory) == ["df.parquet"], "Directory contents do not match!"
```
A data class supports the usage of data associated with Python types, data
classes, FlyteFile, FlyteDirectory and StructuredDataset.
We define a workflow that calls the tasks created above.
```python
@{{< key kit_as >}}.workflow
def basemodel_wf(x: int, y: int) -> tuple[Datum, {{< key kit_name >}}Types]:
o1 = add(x=stringify(s=x), y=stringify(s=y))
o2 = upload_data()
download_data(res=o2)
return o1, o2
```
To trigger a task that accepts a dataclass as an input with `{{< key cli >}} run`, you can provide a JSON file as an input:
```
$ {{< key cli >}} run dataclass.py basemodel_wf --x 1 --y 2
```
To trigger a task that accepts a dataclass as an input with `{{< key cli >}} run`, you can provide a JSON file as an input:
```
{{< key cli >}} run \
https://raw.githubusercontent.com/flyteorg/flytesnacks/b71e01d45037cea883883f33d8d93f258b9a5023/examples/data_types_and_io/data_types_and_io/pydantic_basemodel.py \
basemodel_wf --x 1 --y 2
```
=== PAGE: https://www.union.ai/docs/v1/serverless/user-guide/data-input-output/pytorch ===
# PyTorch type
{{< key product_name >}} advocates for the use of strongly-typed data to simplify the development of robust and testable pipelines. In addition to its application in data engineering, {{< key product_name >}} is primarily used for machine learning.
To streamline the communication between {{< key product_name >}} tasks, particularly when dealing with tensors and models, we have introduced support for PyTorch types.
## Tensors and modules
At times, you may find the need to pass tensors and modules (models) within your workflow. Without native support for PyTorch tensors and modules, {{< key kit_name >}} relies on [pickle](https://docs-builder.pages.dev/docs/byoc/user-guide/data-input-output/pickle/) for serializing and deserializing these entities, as well as any unknown types. However, this approach isn't the most efficient. As a result, we've integrated PyTorch's serialization and deserialization support into the {{< key product_name >}} type system.
```python
@{{< key kit_as >}}.task
def generate_tensor_2d() -> torch.Tensor:
return torch.tensor([[1.0, -1.0, 2], [1.0, -1.0, 9], [0, 7.0, 3]])
@{{< key kit_as >}}.task
def reshape_tensor(tensor: torch.Tensor) -> torch.Tensor:
# convert 2D to 3D
tensor.unsqueeze_(-1)
return tensor.expand(3, 3, 2)
@{{< key kit_as >}}.task
def generate_module() -> torch.nn.Module:
bn = torch.nn.BatchNorm1d(3, track_running_stats=True)
return bn
@{{< key kit_as >}}.task
def get_model_weight(model: torch.nn.Module) -> torch.Tensor:
return model.weight
class MyModel(torch.nn.Module):
def __init__(self):
super(MyModel, self).__init__()
self.l0 = torch.nn.Linear(4, 2)
self.l1 = torch.nn.Linear(2, 1)
def forward(self, input):
out0 = self.l0(input)
out0_relu = torch.nn.functional.relu(out0)
return self.l1(out0_relu)
@{{< key kit_as >}}.task
def get_l1() -> torch.nn.Module:
model = MyModel()
return model.l1
@{{< key kit_as >}}.workflow
def pytorch_native_wf():
reshape_tensor(tensor=generate_tensor_2d())
get_model_weight(model=generate_module())
get_l1()
```
Passing around tensors and modules is no more a hassle!
## Checkpoint
`PyTorchCheckpoint` is a specialized checkpoint used for serializing and deserializing PyTorch models.
It checkpoints `torch.nn.Module`'s state, hyperparameters and optimizer state.
This module checkpoint differs from the standard checkpoint as it specifically captures the module's `state_dict`.
Therefore, when restoring the module, the module's `state_dict` must be used in conjunction with the actual module.
According to the PyTorch [docs](https://pytorch.org/tutorials/beginner/saving_loading_models.html#save-load-entire-model),
it's recommended to store the module's `state_dict` rather than the module itself,
although the serialization should work in either case.
```python
from dataclasses import dataclass
import torch.nn as nn
import torch.nn.functional as F
import torch.optim as optim
from dataclasses_json import dataclass_json
from flytekit.extras.pytorch import PyTorchCheckpoint
@dataclass_json
@dataclass
class Hyperparameters:
epochs: int
loss: float
class Net(nn.Module):
def __init__(self):
super(Net, self).__init__()
self.conv1 = nn.Conv2d(3, 6, 5)
self.pool = nn.MaxPool2d(2, 2)
self.conv2 = nn.Conv2d(6, 16, 5)
self.fc1 = nn.Linear(16 * 5 * 5, 120)
self.fc2 = nn.Linear(120, 84)
self.fc3 = nn.Linear(84, 10)
def forward(self, x):
x = self.pool(F.relu(self.conv1(x)))
x = self.pool(F.relu(self.conv2(x)))
x = x.view(-1, 16 * 5 * 5)
x = F.relu(self.fc1(x))
x = F.relu(self.fc2(x))
x = self.fc3(x)
return x
@{{< key kit_as >}}.task
def generate_model(hyperparameters: Hyperparameters) -> PyTorchCheckpoint:
bn = Net()
optimizer = optim.SGD(bn.parameters(), lr=0.001, momentum=0.9)
return PyTorchCheckpoint(module=bn, hyperparameters=hyperparameters, optimizer=optimizer)
@{{< key kit_as >}}.task
def load(checkpoint: PyTorchCheckpoint):
new_bn = Net()
new_bn.load_state_dict(checkpoint["module_state_dict"])
optimizer = optim.SGD(new_bn.parameters(), lr=0.001, momentum=0.9)
optimizer.load_state_dict(checkpoint["optimizer_state_dict"])
@{{< key kit_as >}}.workflow
def pytorch_checkpoint_wf():
checkpoint = generate_model(hyperparameters=Hyperparameters(epochs=10, loss=0.1))
load(checkpoint=checkpoint)
```
> [!NOTE]
> `PyTorchCheckpoint` supports serializing hyperparameters of types `dict`, `NamedTuple` and `dataclass`.
## Auto GPU to CPU and CPU to GPU conversion
Not all PyTorch computations require a GPU. In some cases, it can be advantageous to transfer the
computation to a CPU, especially after training the model on a GPU.
To utilize the power of a GPU, the typical construct to use is: `to(torch.device("cuda"))`.
When working with GPU variables on a CPU, variables need to be transferred to the CPU using the `to(torch.device("cpu"))` construct.
However, this manual conversion recommended by PyTorch may not be very user-friendly.
To address this, we added support for automatic GPU to CPU conversion (and vice versa) for PyTorch types.
```python
import {{< key kit_import >}}
from typing import Tuple
@{{< key kit_as >}}.task(requests=union.Resources(gpu="1"))
def train() -> Tuple[PyTorchCheckpoint, torch.Tensor, torch.Tensor, torch.Tensor]:
...
device = torch.device("cuda" if torch.cuda.is_available() else "cpu")
model = Model(X_train.shape[1])
model.to(device)
...
X_train, X_test = X_train.to(device), X_test.to(device)
y_train, y_test = y_train.to(device), y_test.to(device)
...
return PyTorchCheckpoint(module=model), X_train, X_test, y_test
@{{< key kit_as >}}.task
def predict(
checkpoint: PyTorchCheckpoint,
X_train: torch.Tensor,
X_test: torch.Tensor,
y_test: torch.Tensor,
):
new_bn = Model(X_train.shape[1])
new_bn.load_state_dict(checkpoint["module_state_dict"])
accuracy_list = np.zeros((5,))
with torch.no_grad():
y_pred = new_bn(X_test)
correct = (torch.argmax(y_pred, dim=1) == y_test).type(torch.FloatTensor)
accuracy_list = correct.mean()
```
The `predict` task will run on a CPU, and
the device conversion from GPU to CPU will be automatically handled by {{< key kit_name >}}.
=== PAGE: https://www.union.ai/docs/v1/serverless/user-guide/data-input-output/structured-dataset ===
# StructuredDataset
As with most type systems, Python has primitives, container types like maps and tuples, and support for user-defined structures. However, while there’s a rich variety of DataFrame classes (Pandas, Spark, Pandera, etc.), there’s no native Python type that represents a DataFrame in the abstract. This is the gap that the `StructuredDataset` type is meant to fill. It offers the following benefits:
- Eliminate boilerplate code you would otherwise need to write to serialize/deserialize from file objects into DataFrame instances,
- Eliminate additional inputs/outputs that convey metadata around the format of the tabular data held in those files,
- Add flexibility around how DataFrame files are loaded,
- Offer a range of DataFrame specific functionality - enforce compatibility of different schemas
(not only at compile time, but also runtime since type information is carried along in the literal),
store third-party schema definitions, and potentially in the future, render sample data, provide summary statistics, etc.
## Usage
To use the `StructuredDataset` type, import `pandas` and define a task that returns a Pandas Dataframe.
{{< key kit_name >}} will detect the Pandas DataFrame return signature and convert the interface for the task to
the `StructuredDataset` type.
## Example
This example demonstrates how to work with a structured dataset using {{< key product_name >}} entities.
> [!NOTE]
> To use the `StructuredDataset` type, you only need to import `pandas`. The other imports specified below are only necessary for this specific example.
To begin, import the dependencies for the example:
```python
import typing
from dataclasses import dataclass
from pathlib import Path
import numpy as np
import pandas as pd
import pyarrow as pa
import pyarrow.parquet as pq
import {{< key kit_import >}}
from flytekit.models import literals
from flytekit.models.literals import StructuredDatasetMetadata
from flytekit.types.structured.structured_dataset import (
PARQUET,
StructuredDataset,
StructuredDatasetDecoder,
StructuredDatasetEncoder,
StructuredDatasetTransformerEngine,
)
from typing_extensions import Annotated
```
Define a task that returns a Pandas DataFrame.
```python
@{{< key kit_as >}}.task(container_image=image_spec)
def generate_pandas_df(a: int) -> pd.DataFrame:
return pd.DataFrame({"Name": ["Tom", "Joseph"], "Age": [a, 22], "Height": [160, 178]})
```
Using this simplest form, however, the user is not able to set the additional DataFrame information alluded to above,
- Column type information
- Serialized byte format
- Storage driver and location
- Additional third party schema information
This is by design as we wanted the default case to suffice for the majority of use-cases, and to require
as few changes to existing code as possible. Specifying these is simple, however, and relies on Python variable annotations,
which is designed explicitly to supplement types with arbitrary metadata.
## Column type information
If you want to extract a subset of actual columns of the DataFrame and specify their types for type validation,
you can just specify the column names and their types in the structured dataset type annotation.
First, initialize column types you want to extract from the `StructuredDataset`.
```python
all_cols = {{< key kit_as >}}.kwtypes(Name=str, Age=int, Height=int)
col = {{< key kit_as >}}.kwtypes(Age=int)
```
Define a task that opens a structured dataset by calling `all()`.
When you invoke `all()` with ``pandas.DataFrame``, the {{< key product_name >}} engine downloads the parquet file on S3, and deserializes it to `pandas.DataFrame`.
Keep in mind that you can invoke ``open()`` with any DataFrame type that's supported or added to structured dataset.
For instance, you can use ``pa.Table`` to convert the Pandas DataFrame to a PyArrow table.
```python
@{{< key kit_as >}}.task(container_image=image_spec)
def get_subset_pandas_df(df: Annotated[StructuredDataset, all_cols]) -> Annotated[StructuredDataset, col]:
df = df.open(pd.DataFrame).all()
df = pd.concat([df, pd.DataFrame([[30]], columns=["Age"])])
return StructuredDataset(dataframe=df)
@{{< key kit_as >}}.workflow
def simple_sd_wf(a: int = 19) -> Annotated[StructuredDataset, col]:
pandas_df = generate_pandas_df(a=a)
return get_subset_pandas_df(df=pandas_df)
```
The code may result in runtime failures if the columns do not match.
The input ``df`` has ``Name``, ``Age`` and ``Height`` columns, whereas the output structured dataset will only have the ``Age`` column.
## Serialized byte format
You can use a custom serialization format to serialize your DataFrames.
Here's how you can register the Pandas to CSV handler, which is already available,
and enable the CSV serialization by annotating the structured dataset with the CSV format:
```python
from flytekit.types.structured import register_csv_handlers
from flytekit.types.structured.structured_dataset import CSV
register_csv_handlers()
@{{< key kit_as >}}.task(container_image=image_spec)
def pandas_to_csv(df: pd.DataFrame) -> Annotated[StructuredDataset, CSV]:
return StructuredDataset(dataframe=df)
@{{< key kit_as >}}.workflow
def pandas_to_csv_wf() -> Annotated[StructuredDataset, CSV]:
pandas_df = generate_pandas_df(a=19)
return pandas_to_csv(df=pandas_df)
```
## Storage driver and location
By default, the data will be written to the same place that all other pointer-types (FlyteFile, FlyteDirectory, etc.) are written to.
This is controlled by the output data prefix option in {{< key product_name >}} which is configurable on multiple levels.
That is to say, in the simple default case, {{< key kit_name >}} will,
- Look up the default format for say, Pandas DataFrames,
- Look up the default storage location based on the raw output prefix setting,
- Use these two settings to select an encoder and invoke it.
So what's an encoder? To understand that, let's look into how the structured dataset plugin works.
## Inner workings of a structured dataset plugin
Two things need to happen with any DataFrame instance when interacting with {{< key product_name >}}:
- Serialization/deserialization from/to the Python instance to bytes (in the format specified above).
- Transmission/retrieval of those bits to/from somewhere.
Each structured dataset plugin (called encoder or decoder) needs to perform both of these steps.
{{< key kit_name >}} decides which of the loaded plugins to invoke based on three attributes:
- The byte format
- The storage location
- The Python type in the task or workflow signature.
These three keys uniquely identify which encoder (used when converting a DataFrame in Python memory to a {{< key product_name >}} value,
e.g. when a task finishes and returns a DataFrame) or decoder (used when hydrating a DataFrame in memory from a {{< key product_name >}} value,
e.g. when a task starts and has a DataFrame input) to invoke.
However, it is awkward to require users to use `typing.Annotated` on every signature.
Therefore, {{< key kit_name >}} has a default byte-format for every registered Python DataFrame type.
## The `uri` argument
BigQuery `uri` allows you to load and retrieve data from cloud using the `uri` argument.
The `uri` comprises of the bucket name and the filename prefixed with `gs://`.
If you specify BigQuery `uri` for structured dataset, BigQuery creates a table in the location specified by the `uri`.
The `uri` in structured dataset reads from or writes to S3, GCP, BigQuery or any storage.
Before writing DataFrame to a BigQuery table,
1. Create a [GCP account](https://cloud.google.com/docs/authentication/getting-started) and create a service account.
2. Create a project and add the `GOOGLE_APPLICATION_CREDENTIALS` environment variable to your `.bashrc` file.
3. Create a dataset in your project.
Here's how you can define a task that converts a pandas DataFrame to a BigQuery table:
```python
@{{< key kit_as >}}.task
def pandas_to_bq() -> StructuredDataset:
df = pd.DataFrame({"Name": ["Tom", "Joseph"], "Age": [20, 22]})
return StructuredDataset(dataframe=df, uri="gs:///")
```
Replace `BUCKET_NAME` with the name of your GCS bucket and `FILE_NAME` with the name of the file the DataFrame should be copied to.
### Note that no format was specified in the structured dataset constructor, or in the signature. So how did the BigQuery encoder get invoked?
This is because the stock BigQuery encoder is loaded into {{< key kit_name >}} with an empty format.
The {{< key kit_name >}} `StructuredDatasetTransformerEngine` interprets that to mean that it is a generic encoder
(or decoder) and can work across formats, if a more specific format is not found.
And here's how you can define a task that converts the BigQuery table to a pandas DataFrame:
```python
@{{< key kit_as >}}.task
def bq_to_pandas(sd: StructuredDataset) -> pd.DataFrame:
return sd.open(pd.DataFrame).all()
```
> [!NOTE]
> {{< key product_name >}} creates a table inside the dataset in the project upon BigQuery query execution.
## How to return multiple DataFrames from a task?
For instance, how would a task return say two DataFrames:
- The first DataFrame be written to BigQuery and serialized by one of their libraries,
- The second needs to be serialized to CSV and written at a specific location in GCS different from the generic pointer-data bucket
If you want the default behavior (which is itself configurable based on which plugins are loaded),
you can work just with your current raw DataFrame classes.
```python
@{{< key kit_as >}}.task
def t1() -> typing.Tuple[StructuredDataset, StructuredDataset]:
...
return StructuredDataset(df1, uri="bq://project:flyte.table"), \
StructuredDataset(df2, uri="gs://auxiliary-bucket/data")
```
If you want to customize the {{< key product_name >}} interaction behavior, you'll need to wrap your DataFrame in a `StructuredDataset` wrapper object.
## How to define a custom structured dataset plugin?
`StructuredDataset` ships with an encoder and a decoder that handles the conversion of a
Python value to a {{< key product_name >}} literal and vice-versa, respectively.
Here is a quick demo showcasing how one might build a NumPy encoder and decoder,
enabling the use of a 2D NumPy array as a valid type within structured datasets.
### NumPy encoder
Extend `StructuredDatasetEncoder` and implement the `encode` function.
The `encode` function converts NumPy array to an intermediate format (parquet file format in this case).
```python
class NumpyEncodingHandler(StructuredDatasetEncoder):
def encode(
self,
ctx: {{< key kit_as >}}.FlyteContext,
structured_dataset: StructuredDataset,
structured_dataset_type: union.StructuredDatasetType,
) -> literals.StructuredDataset:
df = typing.cast(np.ndarray, structured_dataset.dataframe)
name = ["col" + str(i) for i in range(len(df))]
table = pa.Table.from_arrays(df, name)
path = ctx.file_access.get_random_remote_directory()
local_dir = ctx.file_access.get_random_local_directory()
local_path = Path(local_dir) / f"{0:05}"
pq.write_table(table, str(local_path))
ctx.file_access.upload_directory(local_dir, path)
return literals.StructuredDataset(
uri=path,
metadata=StructuredDatasetMetadata(structured_dataset_type=union.StructuredDatasetType(format=PARQUET)),
)
```
### NumPy decoder
Extend `StructuredDatasetDecoder` and implement the `StructuredDatasetDecoder.decode` function.
The `StructuredDatasetDecoder.decode` function converts the parquet file to a `numpy.ndarray`.
```python
class NumpyDecodingHandler(StructuredDatasetDecoder):
def decode(
self,
ctx: {{< key kit_as >}}.FlyteContext,
flyte_value: literals.StructuredDataset,
current_task_metadata: StructuredDatasetMetadata,
) -> np.ndarray:
local_dir = ctx.file_access.get_random_local_directory()
ctx.file_access.get_data(flyte_value.uri, local_dir, is_multipart=True)
table = pq.read_table(local_dir)
return table.to_pandas().to_numpy()
```
### NumPy renderer
Create a default renderer for numpy array, then {{< key kit_name >}} will use this renderer to
display schema of NumPy array on the Deck.
```python
class NumpyRenderer:
def to_html(self, df: np.ndarray) -> str:
assert isinstance(df, np.ndarray)
name = ["col" + str(i) for i in range(len(df))]
table = pa.Table.from_arrays(df, name)
return pd.DataFrame(table.schema).to_html(index=False)
```
In the end, register the encoder, decoder and renderer with the `StructuredDatasetTransformerEngine`.
Specify the Python type you want to register this encoder with (`np.ndarray`),
the storage engine to register this against (if not specified, it is assumed to work for all the storage backends),
and the byte format, which in this case is `PARQUET`.
```python
StructuredDatasetTransformerEngine.register(NumpyEncodingHandler(np.ndarray, None, PARQUET))
StructuredDatasetTransformerEngine.register(NumpyDecodingHandler(np.ndarray, None, PARQUET))
StructuredDatasetTransformerEngine.register_renderer(np.ndarray, NumpyRenderer())
```
You can now use `numpy.ndarray` to deserialize the parquet file to NumPy and serialize a task's output (NumPy array) to a parquet file.
```python
@{{< key kit_as >}}.task(container_image=image_spec)
def generate_pd_df_with_str() -> pd.DataFrame:
return pd.DataFrame({"Name": ["Tom", "Joseph"]})
@{{< key kit_as >}}.task(container_image=image_spec)
def to_numpy(sd: StructuredDataset) -> Annotated[StructuredDataset, None, PARQUET]:
numpy_array = sd.open(np.ndarray).all()
return StructuredDataset(dataframe=numpy_array)
@{{< key kit_as >}}.workflow
def numpy_wf() -> Annotated[StructuredDataset, None, PARQUET]:
return to_numpy(sd=generate_pd_df_with_str())
```
> [!NOTE]
> `pyarrow` raises an `Expected bytes, got a 'int' object` error when the DataFrame contains integers.
You can run the code locally as follows:
```python
if __name__ == "__main__":
sd = simple_sd_wf()
print(f"A simple Pandas DataFrame workflow: {sd.open(pd.DataFrame).all()}")
print(f"Using CSV as the serializer: {pandas_to_csv_wf().open(pd.DataFrame).all()}")
print(f"NumPy encoder and decoder: {numpy_wf().open(np.ndarray).all()}")
```
### The nested typed columns
Like most storage formats (e.g. Avro, Parquet, and BigQuery), StructuredDataset support nested field structures.
```python
data = [
{
"company": "XYZ pvt ltd",
"location": "London",
"info": {"president": "Rakesh Kapoor", "contacts": {"email": "contact@xyz.com", "tel": "9876543210"}},
},
{
"company": "ABC pvt ltd",
"location": "USA",
"info": {"president": "Kapoor Rakesh", "contacts": {"email": "contact@abc.com", "tel": "0123456789"}},
},
]
@dataclass
class ContactsField:
email: str
tel: str
@dataclass
class InfoField:
president: str
contacts: ContactsField
@dataclass
class CompanyField:
location: str
info: InfoField
company: str
MyArgDataset = Annotated[StructuredDataset, union.kwtypes(company=str)]
MyTopDataClassDataset = Annotated[StructuredDataset, CompanyField]
MyTopDictDataset = Annotated[StructuredDataset, {"company": str, "location": str}]
MyDictDataset = Annotated[StructuredDataset, union.kwtypes(info={"contacts": {"tel": str}})]
MyDictListDataset = Annotated[StructuredDataset, union.kwtypes(info={"contacts": {"tel": str, "email": str}})]
MySecondDataClassDataset = Annotated[StructuredDataset, union.kwtypes(info=InfoField)]
MyNestedDataClassDataset = Annotated[StructuredDataset, union.kwtypes(info=union.kwtypes(contacts=ContactsField))]
image = union.ImageSpec(packages=["pandas", "pyarrow", "pandas", "tabulate"], registry="ghcr.io/flyteorg")
@{{< key kit_as >}}.task(container_image=image)
def create_parquet_file() -> StructuredDataset:
from tabulate import tabulate
df = pd.json_normalize(data, max_level=0)
print("original DataFrame: \n", tabulate(df, headers="keys", tablefmt="psql"))
return StructuredDataset(dataframe=df)
@{{< key kit_as >}}.task(container_image=image)
def print_table_by_arg(sd: MyArgDataset) -> pd.DataFrame:
from tabulate import tabulate
t = sd.open(pd.DataFrame).all()
print("MyArgDataset DataFrame: \n", tabulate(t, headers="keys", tablefmt="psql"))
return t
@{{< key kit_as >}}.task(container_image=image)
def print_table_by_dict(sd: MyDictDataset) -> pd.DataFrame:
from tabulate import tabulate
t = sd.open(pd.DataFrame).all()
print("MyDictDataset DataFrame: \n", tabulate(t, headers="keys", tablefmt="psql"))
return t
@{{< key kit_as >}}.task(container_image=image)
def print_table_by_list_dict(sd: MyDictListDataset) -> pd.DataFrame:
from tabulate import tabulate
t = sd.open(pd.DataFrame).all()
print("MyDictListDataset DataFrame: \n", tabulate(t, headers="keys", tablefmt="psql"))
return t
@{{< key kit_as >}}.task(container_image=image)
def print_table_by_top_dataclass(sd: MyTopDataClassDataset) -> pd.DataFrame:
from tabulate import tabulate
t = sd.open(pd.DataFrame).all()
print("MyTopDataClassDataset DataFrame: \n", tabulate(t, headers="keys", tablefmt="psql"))
return t
@{{< key kit_as >}}.task(container_image=image)
def print_table_by_top_dict(sd: MyTopDictDataset) -> pd.DataFrame:
from tabulate import tabulate
t = sd.open(pd.DataFrame).all()
print("MyTopDictDataset DataFrame: \n", tabulate(t, headers="keys", tablefmt="psql"))
return t
@{{< key kit_as >}}.task(container_image=image)
def print_table_by_second_dataclass(sd: MySecondDataClassDataset) -> pd.DataFrame:
from tabulate import tabulate
t = sd.open(pd.DataFrame).all()
print("MySecondDataClassDataset DataFrame: \n", tabulate(t, headers="keys", tablefmt="psql"))
return t
@{{< key kit_as >}}.task(container_image=image)
def print_table_by_nested_dataclass(sd: MyNestedDataClassDataset) -> pd.DataFrame:
from tabulate import tabulate
t = sd.open(pd.DataFrame).all()
print("MyNestedDataClassDataset DataFrame: \n", tabulate(t, headers="keys", tablefmt="psql"))
return t
@{{< key kit_as >}}.workflow
def contacts_wf():
sd = create_parquet_file()
print_table_by_arg(sd=sd)
print_table_by_dict(sd=sd)
print_table_by_list_dict(sd=sd)
print_table_by_top_dataclass(sd=sd)
print_table_by_top_dict(sd=sd)
print_table_by_second_dataclass(sd=sd)
print_table_by_nested_dataclass(sd=sd)
```
=== PAGE: https://www.union.ai/docs/v1/serverless/user-guide/data-input-output/tensorflow ===
# TensorFlow types
This document outlines the TensorFlow types available in {{< key product_name >}}, which facilitate the integration of TensorFlow models and datasets in {{< key product_name >}} workflows.
### Import necessary libraries and modules
```python
import {{< key kit_import >}}
from flytekit.types.directory import TFRecordsDirectory
from flytekit.types.file import TFRecordFile
custom_image = {{< key kit_as >}}.ImageSpec(
packages=["tensorflow", "tensorflow-datasets", "flytekitplugins-kftensorflow"],
registry="ghcr.io/flyteorg",
)
import tensorflow as tf
```
## Tensorflow model
{{< key product_name >}} supports the TensorFlow SavedModel format for serializing and deserializing `tf.keras.Model` instances. The `TensorFlowModelTransformer` is responsible for handling these transformations.
### Transformer
- **Name:** TensorFlow Model
- **Class:** `TensorFlowModelTransformer`
- **Python Type:** `tf.keras.Model`
- **Blob Format:** `TensorFlowModel`
- **Dimensionality:** `MULTIPART`
### Usage
The `TensorFlowModelTransformer` allows you to save a TensorFlow model to a remote location and retrieve it later in your {{< key product_name >}} workflows.
```python
@{{< key kit_as >}}.task(container_image=custom_image)
def train_model() -> tf.keras.Model:
model = tf.keras.Sequential(
[tf.keras.layers.Dense(128, activation="relu"), tf.keras.layers.Dense(10, activation="softmax")]
)
model.compile(optimizer="adam", loss="sparse_categorical_crossentropy", metrics=["accuracy"])
return model
@{{< key kit_as >}}.task(container_image=custom_image)
def evaluate_model(model: tf.keras.Model, x: tf.Tensor, y: tf.Tensor) -> float:
loss, accuracy = model.evaluate(x, y)
return accuracy
@{{< key kit_as >}}.workflow
def training_workflow(x: tf.Tensor, y: tf.Tensor) -> float:
model = train_model()
return evaluate_model(model=model, x=x, y=y)
```
## TFRecord files
{{< key product_name >}} supports TFRecord files through the `TFRecordFile` type, which can handle serialized TensorFlow records. The `TensorFlowRecordFileTransformer` manages the conversion of TFRecord files to and from {{< key product_name >}} literals.
### Transformer
- **Name:** TensorFlow Record File
- **Class:** `TensorFlowRecordFileTransformer`
- **Blob Format:** `TensorFlowRecord`
- **Dimensionality:** `SINGLE`
### Usage
The `TensorFlowRecordFileTransformer` enables you to work with single TFRecord files, making it easy to read and write data in TensorFlow's TFRecord format.
```python
@{{< key kit_as >}}.task(container_image=custom_image)
def process_tfrecord(file: TFRecordFile) -> int:
count = 0
for record in tf.data.TFRecordDataset(file):
count += 1
return count
@{{< key kit_as >}}.workflow
def tfrecord_workflow(file: TFRecordFile) -> int:
return process_tfrecord(file=file)
```
## TFRecord directories
{{< key product_name >}} supports directories containing multiple TFRecord files through the `TFRecordsDirectory` type. The `TensorFlowRecordsDirTransformer` manages the conversion of TFRecord directories to and from {{< key product_name >}} literals.
### Transformer
- **Name:** TensorFlow Record Directory
- **Class:** `TensorFlowRecordsDirTransformer`
- **Python Type:** `TFRecordsDirectory`
- **Blob Format:** `TensorFlowRecord`
- **Dimensionality:** `MULTIPART`
### Usage
The `TensorFlowRecordsDirTransformer` allows you to work with directories of TFRecord files, which is useful for handling large datasets that are split across multiple files.
#### Example
```python
@{{< key kit_as >}}.task(container_image=custom_image)
def process_tfrecords_dir(dir: TFRecordsDirectory) -> int:
count = 0
for record in tf.data.TFRecordDataset(dir.path):
count += 1
return count
@{{< key kit_as >}}.workflow
def tfrecords_dir_workflow(dir: TFRecordsDirectory) -> int:
return process_tfrecords_dir(dir=dir)
```
## Configuration class: `TFRecordDatasetConfig`
The `TFRecordDatasetConfig` class is a data structure used to configure the parameters for creating a `tf.data.TFRecordDataset`, which allows for efficient reading of TFRecord files. This class uses the `DataClassJsonMixin` for easy JSON serialization.
### Attributes
- **compression_type**: (Optional) Specifies the compression method used for the TFRecord files. Possible values include an empty string (no compression), "ZLIB", or "GZIP".
- **buffer_size**: (Optional) Defines the size of the read buffer in bytes. If not set, defaults will be used based on the local or remote file system.
- **num_parallel_reads**: (Optional) Determines the number of files to read in parallel. A value greater than one outputs records in an interleaved order.
- **name**: (Optional) Assigns a name to the operation for easier identification in the pipeline.
This configuration is crucial for optimizing the reading process of TFRecord datasets, especially when dealing with large datasets or when specific performance tuning is required.
=== PAGE: https://www.union.ai/docs/v1/serverless/user-guide/administration ===
# Administration
This section covers the administration of {{< key product_name >}}.
## Subpages
- **Administration > Resources**
=== PAGE: https://www.union.ai/docs/v1/serverless/user-guide/administration/resources ===
# Resources
Select **Resources** in the top right of the {{< key product_name >}} interface to open a view showing the overall health and utilization of your {{< key product_name >}} installation.

Four tabs are available: **Administration > Resources > Executions**, **Administration > Resources > Resource Quotas**, and **Administration > Resources > Compute**.
## Executions
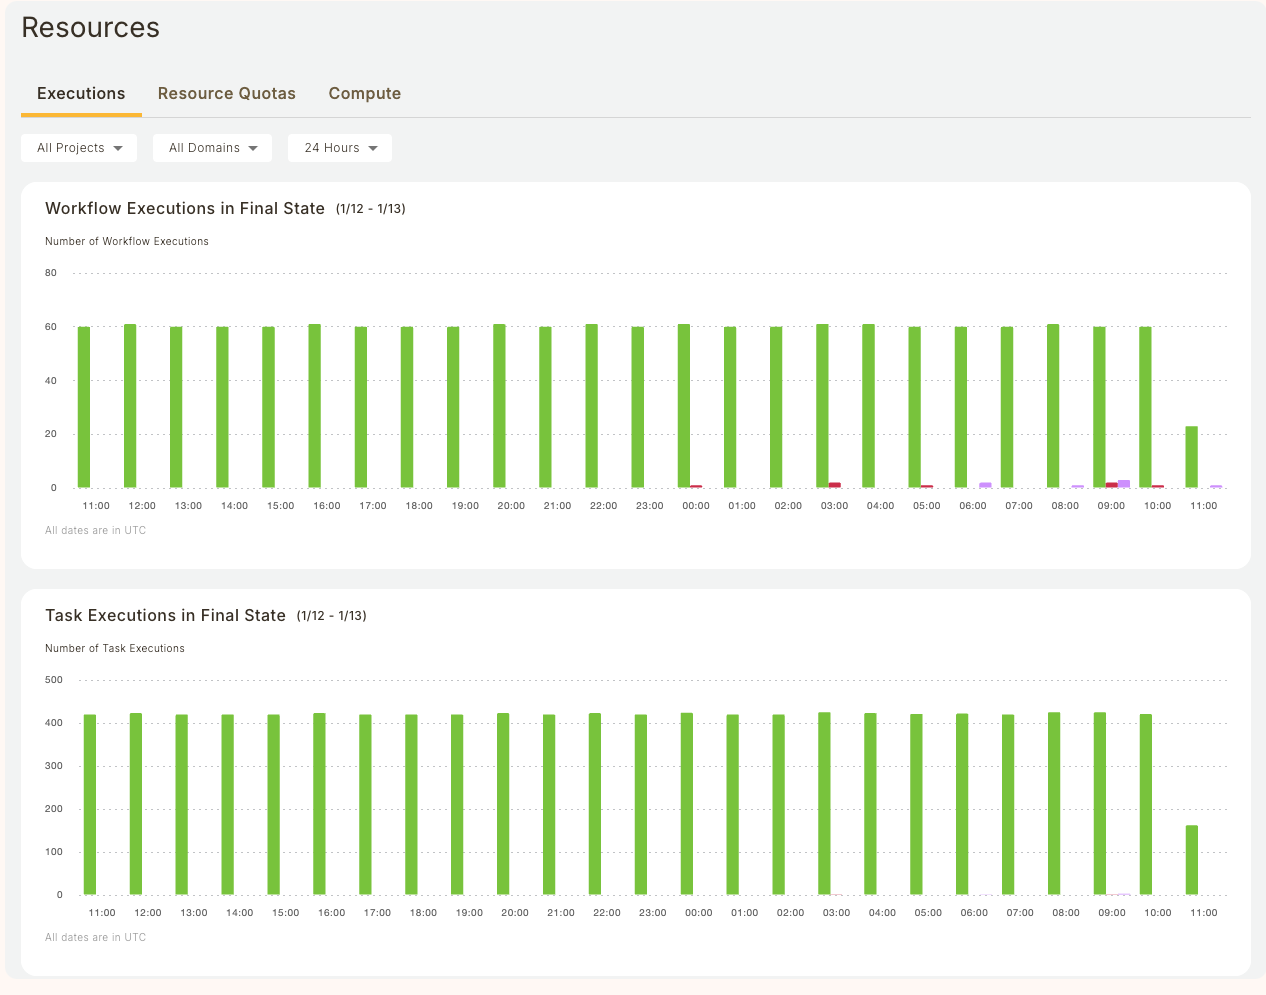
This tab displays information about workflows, tasks, resource consumption, and resource utilization.
### Filter
The drop-downs at the top lets you filter the charts below by project, domain and time period:

* **Project**: Dropdown with multi-select over all projects. Making a selection recalculates the charts accordingly. Defaults to **All Projects**.
* **Domain**: Dropdown with multi-select over all domains (for example, **development**, **staging**, **production**). Making a selection recalculates the charts accordingly. Defaults to **All Domains**.
* **Time Period Selector**: Dropdown to select the period over which the charts are plotted. Making a selection recalculates the charts accordingly. Defaults to **24 Hours**. All times are expressed in UTC.
### Workflow Executions in Final State
This chart shows the overall status of workflows at the project-domain level.
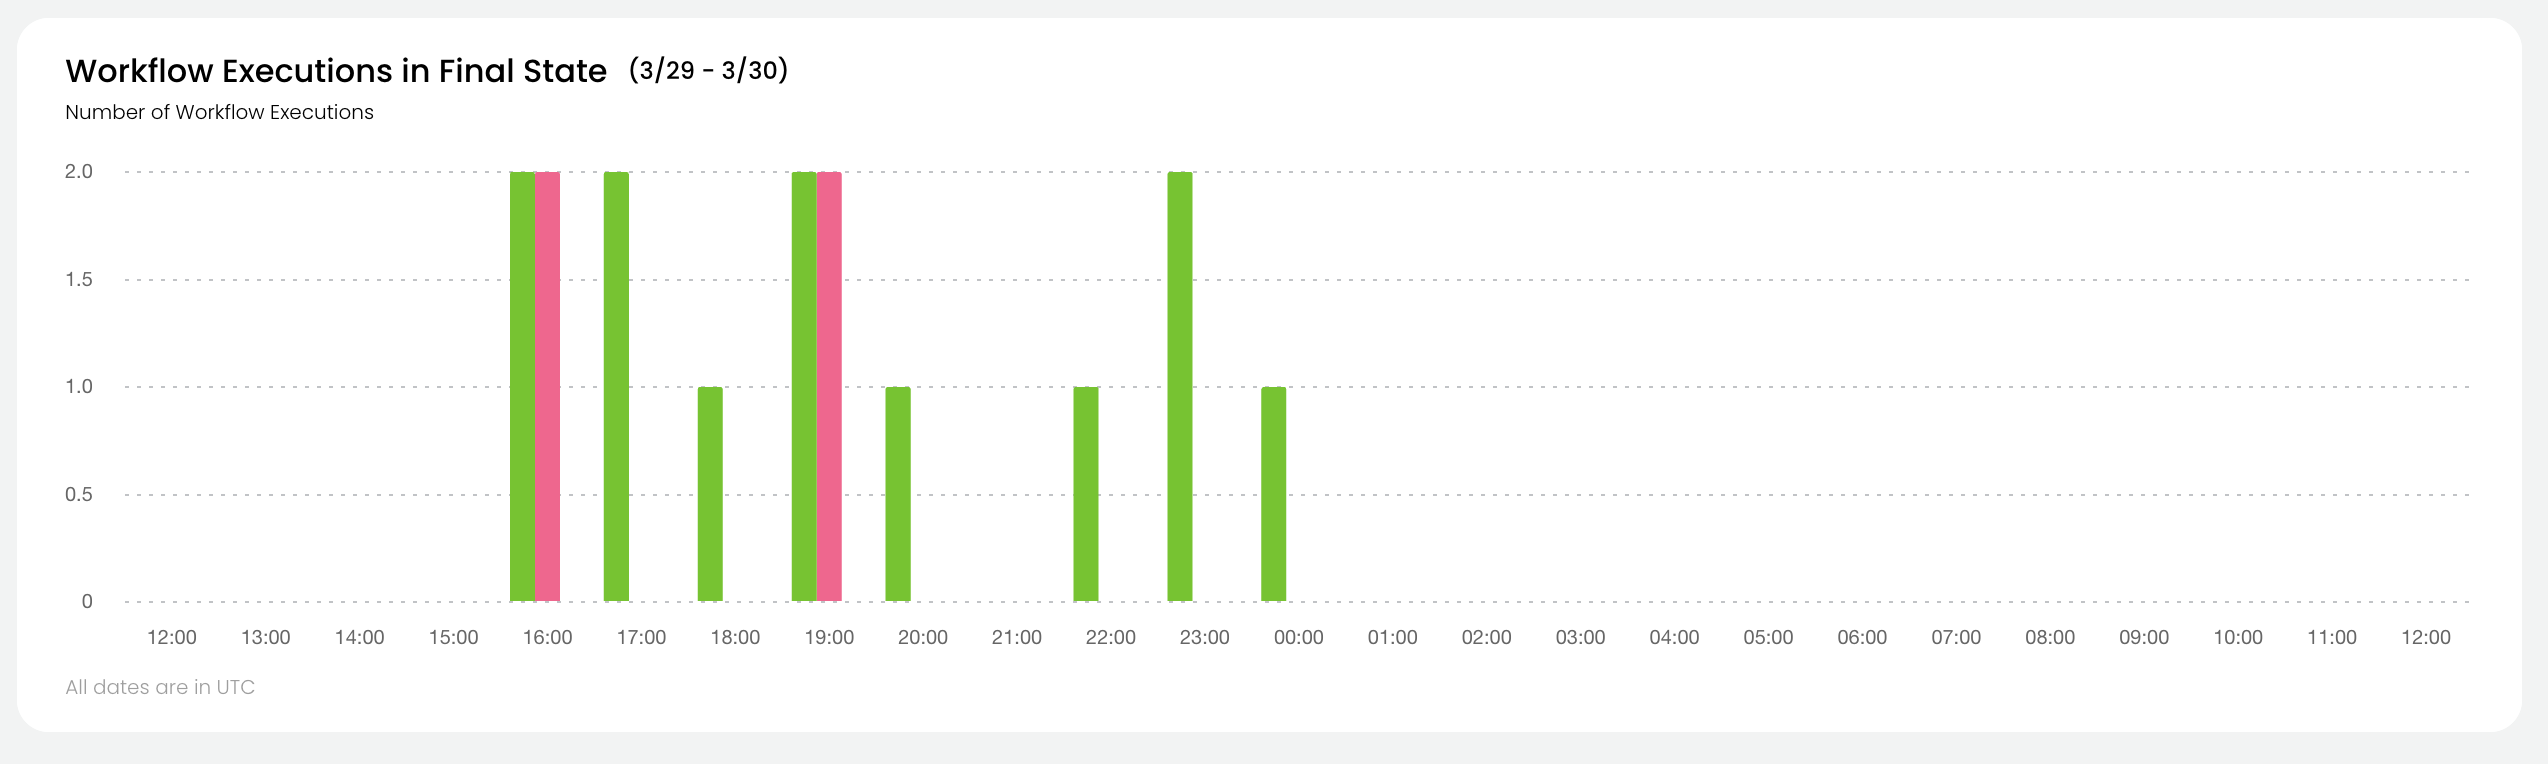
For all workflows in the selected project and domain which reached their final state during the selected time period, the chart shows:
* The number of successful workflows.
* The number of aborted workflows.
* The number of failed workflows.
See [Workflow States](/docs/v1/flyte//architecture/content/workflow-state-transitions#workflow-states) for the precise definitions of these states.
### Task Executions in Final State
This chart shows the overall status of tasks at the project-domain level.
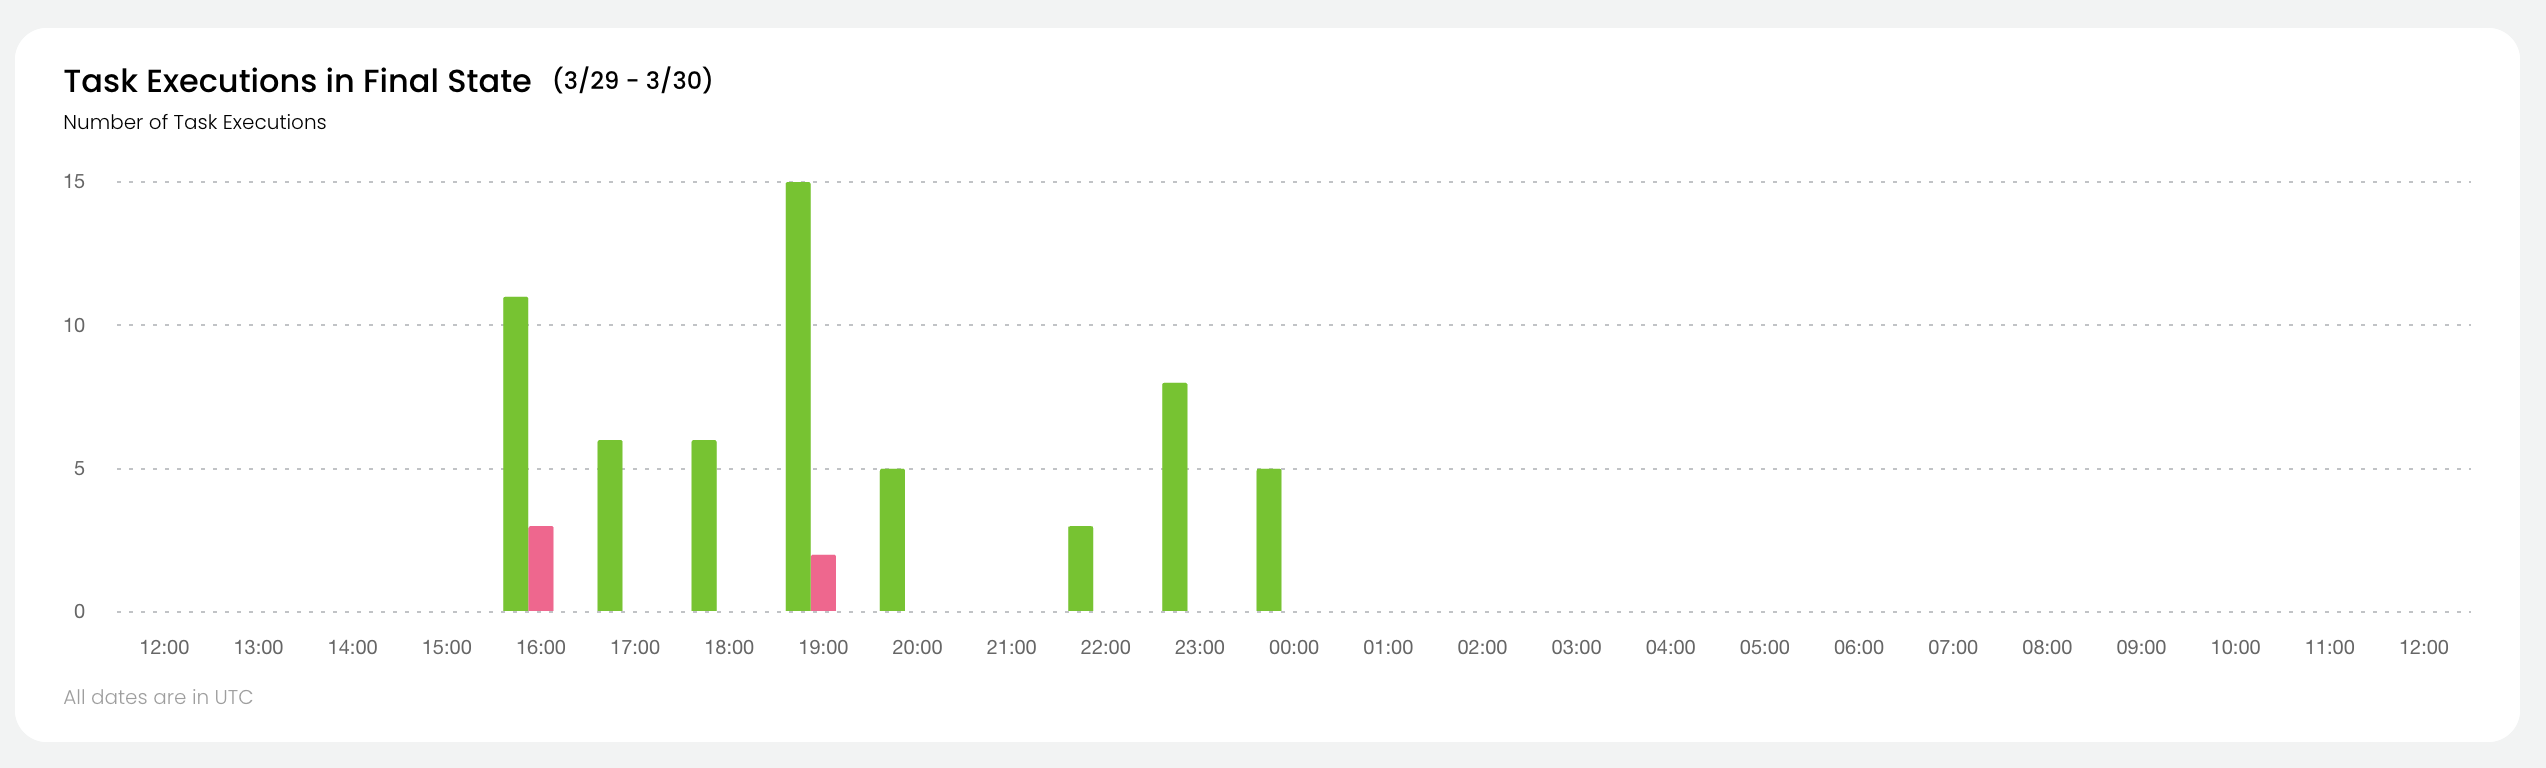
For all tasks in the selected project and domain which reached their final state during the selected time period, the chart shows:
* The number of successful tasks.
* The number of aborted tasks.
* The number of failed tasks.
See [Task States](/docs/v1/flyte//architecture/content/workflow-state-transitions#task-states) for the precise definitions of these states.
### Running Pods
This chart shows the absolute resource consumption for
* Memory (MiB)
* CPU (number of cores)
* GPU (number of cores)
You can select which parameter to show by clicking on the corresponding button at the top of the chart.
You can also select whether to show **Requested**, **Used**, or both.
### Utilization
This chart shows the percent resource utilization for
* Memory
* CPU
You can select which parameter to show by clicking on the corresponding button at the top of the chart.

## Resource Quotas
This dashboard displays the resource quotas for projects and domains in the organization.
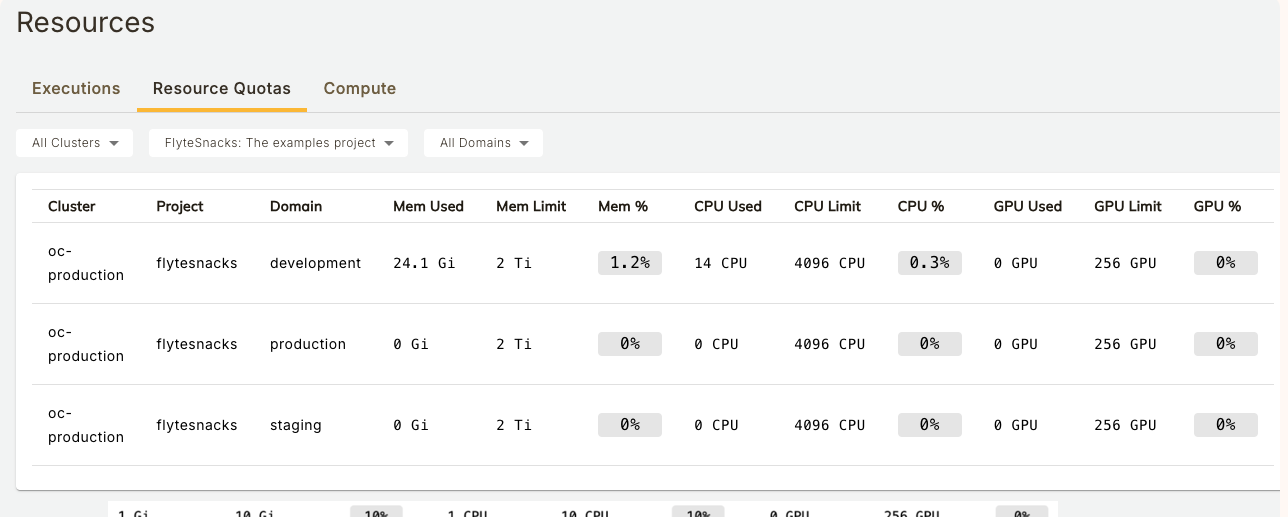
### Namespaces and Quotas
Under the hood, {{< key product_name >}} uses Kubernetes to run workloads. To deliver multi-tenancy, the system uses Kubernetes [namespaces](https://kubernetes.io/docs/concepts/overview/working-with-objects/namespaces/). In AWS based installations, each project-domain pair is mapped to a namespace. In GCP-based installations each domain is mapped to a namespace.
Within each namespace, a [resource quota](https://kubernetes.io/docs/concepts/policy/resource-quotas/) is set for each resource type (memory, CPU, GPU). This dashboard displays the current point-in-time quota consumption for memory, CPU, and GPU. Quotas are defined as part of the set-up of the instance types in your data plane. To change them, talk to the {{< key product_name >}} team.
### Examples
Resource requests and limits are set at the task level like this (see **Core concepts > Tasks > Task hardware environment > Customizing task resources**):
```python
@{{< key kit_as >}}.task(requests=Resources(cpu="1", mem="1Gi"),
limits=Resources(cpu="10", mem="10Gi"))
```
This task requests 1 CPU and 1 gibibyte of memory. It sets a limit of 10 CPUs and 10 gibibytes of memory.
If a task requesting the above resources (1 CPU and 1Gi) is executed in a project (for example **cluster-observability**) and domain (for example, **development**) with 10 CPU and 10Gi of quota for CPU and memory respectively, the dashboard will show that 10% of both memory and CPU quotas have been consumed.
Likewise, if a task requesting 10 CPU and 10 Gi of memory is executed, the dashboard will show that 100% of both memory and CPU quotas have been consumed.
Likewise, if a task requesting 10 CPU and 10Gi of memory is executed, the dashboard will show that 100% of both memory and CPU quotas have been consumed.
### Quota Consumption
For each resource type, the sum of all the `limits` parameters set on all the tasks in a namespace determines quota consumption for that resource. Within a namespace, a given resource’s consumption can never exceed that resource’s quota.
## Compute
This dashboard displays information about configured node pools in the organization.
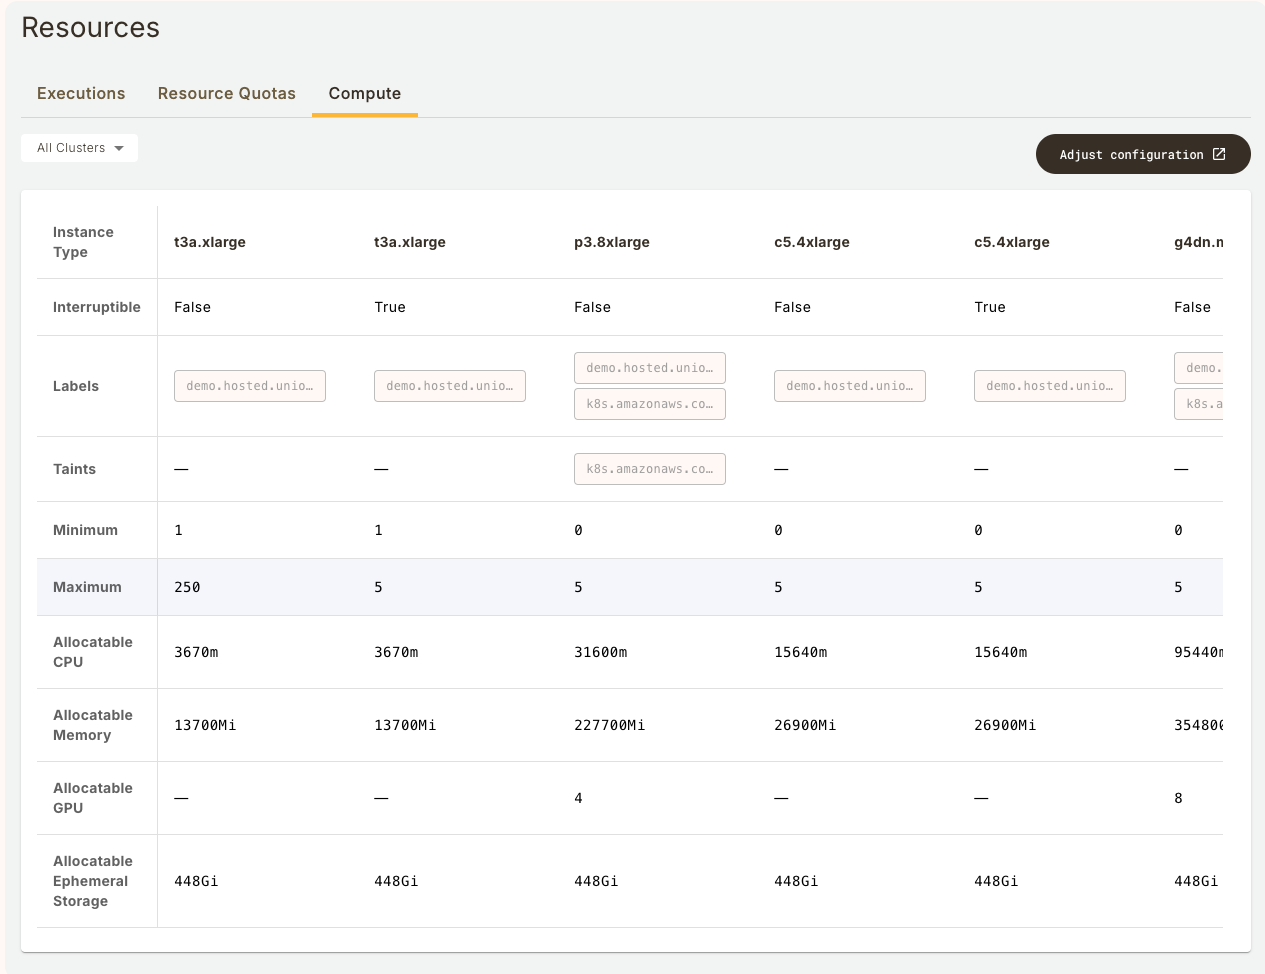

{{< key product_name >}} will schedule tasks on a node pool that meets the requirements of the task (as defined by the `requests` and `limits` parameters in the task definition) and can vertically scale these node pools according to the minimum and maximum configured limits. This dashboard shows all currently-configured node pools, whether they are interruptible, labels and taints, minimum and maximum sizes, and allocatable resources.
The allocatable resource values reflect any compute necessary for {{< key product_name >}} services to function. This is why the value may be slightly lower than the quoted value from the cloud provider. This value, however, does not account for any overhead that may be used by third-party services, like Ray, for example.
### Information displayed
The dashboard provides the following information:
* **Instance Type**: The type of instance/VM/node as defined by your cloud provider.
* **Interruptible:** A boolean. True If the instance is interruptible.
* **Labels:** Node pool labels which can be used to target tasks at specific node types.
* **Taints:** Node pool taints which can be used to avoid tasks landing on a node if they do not have the appropriate toleration.
* **Minimum:** Minimum node pool size. Note that if this is set to zero, the node pool will scale down completely when not in use.
* **Maximum:** Maximum node pool size.
* **Allocatable Resources:**
* **CPU**: The maximum CPU you can request in a task definition after accounting for overheads and other factors.
* **Memory**: The maximum memory you can request in a task definition after accounting for overheads and other factors.
* **GPU**: The maximum number of GPUs you can request in a task definition after accounting for overheads and other factors.
* **Ephemeral Storage**: The maximum storage you can request in a task definition after accounting for overheads and other factors.
* Note that these values are estimates and may not reflect the exact allocatable resources on any node in your cluster.
### Examples
In the screenshot above, there is a `t3a.xlarge` with `3670m` (3670 millicores) of allocatable CPU, and a larger `c5.4xlarge` with `15640m` of allocatable CPU. In order to schedule a workload on the smaller node, you could specify the following in a task definition:
```python
@{{< key kit_as >}}.task(requests=Resources(cpu="3670m", mem="1Gi"),
limits=Resources(cpu="3670m", mem="1Gi"))
```
In the absence of confounding factors (for example, other workloads fully utilizing all `t3a.xlarge` instances), this task will spin up a `t3a.xlarge` instance and run the execution on it, taking all available allocatable CPU resources.
Conversely, if a user requests the following:
```python
@{{< key kit_as >}}.task(requests=Resources(cpu="4000m", mem="1Gi"),
limits=Resources(cpu="4000m", mem="1Gi"))
```
The workload will schedule on a larger instance (like the `c5.4xlarge`) because `4000m` exceeds the allocatable CPU on the `t3a.xlarge`, despite the fact that this instance type is [marketed](https://instances.vantage.sh/aws/ec2/t3a.xlarge) as having 4 CPU cores. The discrepancy is due to overheads and holdbacks introduced by Kubernetes to ensure adequate resources to schedule pods on the node.
=== PAGE: https://www.union.ai/docs/v1/serverless/user-guide/programming ===
# Programming
This section covers the general programming of {{< key product_name >}}.
## Subpages
- **Programming > Chaining Entities**
- **Programming > Conditionals**
- **Programming > Decorating tasks**
- **Programming > Decorating workflows**
- **Programming > Intratask checkpoints**
- **Programming > Waiting for external inputs**
- **Programming > Nested parallelism**
- **Programming > Failure node**
=== PAGE: https://www.union.ai/docs/v1/serverless/user-guide/programming/chaining-entities ===
# Chaining Entities
{{< key product_name >}} offers a mechanism for chaining entities using the `>>` operator. This is particularly valuable when chaining tasks and subworkflows without the need for data flow between the entities.
## Tasks
Let’s establish a sequence where `t1()` occurs after `t0()`, and `t2()` follows `t1()`.
```python
import {{< key kit_import >}}
@{{< key kit_as >}}.task
def t2():
print("Running t2")
return
@{{< key kit_as >}}.task
def t1():
print("Running t1")
return
@{{< key kit_as >}}.task
def t0():
print("Running t0")
return
# Chaining tasks
@{{< key kit_as >}}.workflow
def chain_tasks_wf():
t2_promise = t2()
t1_promise = t1()
t0_promise = t0()
t0_promise >> t1_promise
t1_promise >> t2_promise
```
## Subworkflows
Just like tasks, you can chain subworkflows.
```python
@{{< key kit_as >}}.workflow
def sub_workflow_1():
t1()
@{{< key kit_as >}}.workflow
def sub_workflow_0():
t0()
@{{< key kit_as >}}.workflow
def chain_workflows_wf():
sub_wf1 = sub_workflow_1()
sub_wf0 = sub_workflow_0()
sub_wf0 >> sub_wf1
```
> [!NOTE]
> Chaining tasks and subworkflows is not supported in local Python environments.
=== PAGE: https://www.union.ai/docs/v1/serverless/user-guide/programming/conditionals ===
# Conditionals
{{< key kit_name >}} elevates conditions to a first-class construct named `conditional`, providing a powerful mechanism for selectively
executing branches in a workflow. Conditions leverage static or dynamic data generated by tasks or
received as workflow inputs. While conditions are highly performant in their evaluation,
it's important to note that they are restricted to specific binary and logical operators
and are applicable only to primitive values.
To begin, import the necessary libraries.
```python
import random
import {{< key kit_import >}}
from flytekit import conditional
from flytekit.core.task import Echo
```
## Simple branch
In this example, we introduce two tasks, `calculate_circle_circumference` and
`calculate_circle_area`. The workflow dynamically chooses between these tasks based on whether the input
falls within the fraction range (0-1) or not.
```python
@{{< key kit_as >}}.task
def calculate_circle_circumference(radius: float) -> float:
return 2 * 3.14 * radius # Task to calculate the circumference of a circle
@{{< key kit_as >}}.task
def calculate_circle_area(radius: float) -> float:
return 3.14 * radius * radius # Task to calculate the area of a circle
@{{< key kit_as >}}.workflow
def shape_properties(radius: float) -> float:
return (
conditional("shape_properties")
.if_((radius >= 0.1) & (radius < 1.0))
.then(calculate_circle_circumference(radius=radius))
.else_()
.then(calculate_circle_area(radius=radius))
)
if __name__ == "__main__":
radius_small = 0.5
print(f"Circumference of circle (radius={radius_small}): {shape_properties(radius=radius_small)}")
radius_large = 3.0
print(f"Area of circle (radius={radius_large}): {shape_properties(radius=radius_large)}")
```
## Multiple branches
We establish an `if` condition with multiple branches, which will result in a failure if none of the conditions is met.
It's important to note that any `conditional` statement in Flyte is expected to be complete,
meaning that all possible branches must be accounted for.
```python
@{{< key kit_as >}}.workflow
def shape_properties_with_multiple_branches(radius: float) -> float:
return (
conditional("shape_properties_with_multiple_branches")
.if_((radius >= 0.1) & (radius < 1.0))
.then(calculate_circle_circumference(radius=radius))
.elif_((radius >= 1.0) & (radius <= 10.0))
.then(calculate_circle_area(radius=radius))
.else_()
.fail("The input must be within the range of 0 to 10.")
)
```
> [!NOTE]
> Take note of the usage of bitwise operators (`&`). Due to Python's PEP-335,
> the logical `and`, `or` and `not` operators cannot be overloaded.
> Flytekit employs bitwise `&` and `|` as equivalents for logical `and` and `or` operators,
> a convention also observed in other libraries.
## Consuming the output of a conditional
Here, we write a task that consumes the output returned by a `conditional`.
```python
@{{< key kit_as >}}.workflow
def shape_properties_accept_conditional_output(radius: float) -> float:
result = (
conditional("shape_properties_accept_conditional_output")
.if_((radius >= 0.1) & (radius < 1.0))
.then(calculate_circle_circumference(radius=radius))
.elif_((radius >= 1.0) & (radius <= 10.0))
.then(calculate_circle_area(radius=radius))
.else_()
.fail("The input must exist between 0 and 10.")
)
return calculate_circle_area(radius=result)
if __name__ == "__main__":
radius_small = 0.5
print(
f"Circumference of circle (radius={radius_small}) x Area of circle (radius={calculate_circle_circumference(radius=radius_small)}): {shape_properties_accept_conditional_output(radius=radius_small)}"
)
```
## Using the output of a previous task in a conditional
You can check if a boolean returned from the previous task is `True`,
but unary operations are not supported directly. Instead, use the `is_true`,
`is_false` and `is_none` methods on the result.
```python
@{{< key kit_as >}}..task
def coin_toss(seed: int) -> bool:
"""
Mimic a condition to verify the successful execution of an operation
"""
r = random.Random(seed)
if r.random() < 0.5:
return True
return False
@{{< key kit_as >}}..task
def failed() -> int:
"""
Mimic a task that handles failure
"""
return -1
@{{< key kit_as >}}..task
def success() -> int:
"""
Mimic a task that handles success
"""
return 0
@{{< key kit_as >}}..workflow
def boolean_wf(seed: int = 5) -> int:
result = coin_toss(seed=seed)
return conditional("coin_toss").if_(result.is_true()).then(success()).else_().then(failed())
```
[!NOTE]
> *How do output values acquire these methods?* In a workflow, direct access to outputs is not permitted.
> Inputs and outputs are automatically encapsulated in a special object known as `flytekit.extend.Promise`.
## Using boolean workflow inputs in a conditional
You can directly pass a boolean to a workflow.
```python
@{{< key kit_as >}}.workflow
def boolean_input_wf(boolean_input: bool) -> int:
return conditional("boolean_input_conditional").if_(boolean_input.is_true()).then(success()).else_().then(failed())
```
> [!NOTE]
> Observe that the passed boolean possesses a method called `is_true`.
> This boolean resides within the workflow context and is encapsulated in a specialized Flytekit object.
> This special object enables it to exhibit additional behavior.
You can run the workflows locally as follows:
```python
if __name__ == "__main__":
print("Running boolean_wf a few times...")
for index in range(0, 5):
print(f"The output generated by boolean_wf = {boolean_wf(seed=index)}")
print(
f"Boolean input: {True if index < 2 else False}; workflow output: {boolean_input_wf(boolean_input=True if index < 2 else False)}"
)
```
## Nested conditionals
You can nest conditional sections arbitrarily inside other conditional sections.
However, these nested sections can only be in the `then` part of a `conditional` block.
```python
@{{< key kit_as >}}.workflow
def nested_conditions(radius: float) -> float:
return (
conditional("nested_conditions")
.if_((radius >= 0.1) & (radius < 1.0))
.then(
conditional("inner_nested_conditions")
.if_(radius < 0.5)
.then(calculate_circle_circumference(radius=radius))
.elif_((radius >= 0.5) & (radius < 0.9))
.then(calculate_circle_area(radius=radius))
.else_()
.fail("0.9 is an outlier.")
)
.elif_((radius >= 1.0) & (radius <= 10.0))
.then(calculate_circle_area(radius=radius))
.else_()
.fail("The input must be within the range of 0 to 10.")
)
if __name__ == "__main__":
print(f"nested_conditions(0.4): {nested_conditions(radius=0.4)}")
```
## Using the output of a task in a conditional
Let's write a fun workflow that triggers the `calculate_circle_circumference` task in the event of a "heads" outcome,
and alternatively, runs the `calculate_circle_area` task in the event of a "tail" outcome.
```python
@{{< key kit_as >}}.workflow
def consume_task_output(radius: float, seed: int = 5) -> float:
is_heads = coin_toss(seed=seed)
return (
conditional("double_or_square")
.if_(is_heads.is_true())
.then(calculate_circle_circumference(radius=radius))
.else_()
.then(calculate_circle_area(radius=radius))
)
```
You can run the workflow locally as follows:
```python
if __name__ == "__main__":
default_seed_output = consume_task_output(radius=0.4)
print(
f"Executing consume_task_output(0.4) with default seed=5. Expected output: calculate_circle_area => {default_seed_output}"
)
custom_seed_output = consume_task_output(radius=0.4, seed=7)
print(
f"Executing consume_task_output(0.4, seed=7). Expected output: calculate_circle_circumference => {custom_seed_output}"
)
```
## Running a noop task in a conditional
In some cases, you may want to skip the execution of a conditional workflow if a certain condition is not met.
You can achieve this by using the `echo` task, which simply returns the input value.
> [!NOTE]
> To enable the echo plugin in the backend, add the plugin to Flyte's configuration file.
> ```yaml
> task-plugins:
> enabled-plugins:
> - echo
> ```
```python
echo = Echo(name="echo", inputs={"radius": float})
@{{< key kit_as >}}.workflow
def noop_in_conditional(radius: float, seed: int = 5) -> float:
is_heads = coin_toss(seed=seed)
return (
conditional("noop_in_conditional")
.if_(is_heads.is_true())
.then(calculate_circle_circumference(radius=radius))
.else_()
.then(echo(radius=radius))
)
```
## Run the example on the Flyte cluster
To run the provided workflows on the Flyte cluster, use the following commands:
```shell
$ {{< key cli >}} run --remote \
https://raw.githubusercontent.com/flyteorg/flytesnacks/656e63d1c8dded3e9e7161c7af6425e9fcd43f56/examples/advanced_composition/advanced_composition/conditional.py \
shape_properties --radius 3.0
```
```shell
$ {{< key cli >}} run --remote \
https://raw.githubusercontent.com/flyteorg/flytesnacks/656e63d1c8dded3e9e7161c7af6425e9fcd43f56/examples/advanced_composition/advanced_composition/conditional.py \
shape_properties_with_multiple_branches --radius 11.0
```
```shell
$ {{< key cli >}} run --remote \
https://raw.githubusercontent.com/flyteorg/flytesnacks/656e63d1c8dded3e9e7161c7af6425e9fcd43f56/examples/advanced_composition/advanced_composition/conditional.py \
shape_properties_accept_conditional_output --radius 0.5
```
```shell
$ {{< key cli >}} run --remote \
https://raw.githubusercontent.com/flyteorg/flytesnacks/656e63d1c8dded3e9e7161c7af6425e9fcd43f56/examples/advanced_composition/advanced_composition/conditional.py \
boolean_wf
```
```shell
$ {{< key cli >}} run --remote \
https://raw.githubusercontent.com/flyteorg/flytesnacks/656e63d1c8dded3e9e7161c7af6425e9fcd43f56/examples/advanced_composition/advanced_composition/conditional.py \
boolean_input_wf --boolean_input
```
```shell
$ {{< key cli >}} run --remote \
https://raw.githubusercontent.com/flyteorg/flytesnacks/656e63d1c8dded3e9e7161c7af6425e9fcd43f56/examples/advanced_composition/advanced_composition/conditional.py \
nested_conditions --radius 0.7
```
```shell
$ {{< key cli >}} run --remote \
https://raw.githubusercontent.com/flyteorg/flytesnacks/656e63d1c8dded3e9e7161c7af6425e9fcd43f56/examples/advanced_composition/advanced_composition/conditional.py \
consume_task_output --radius 0.4 --seed 7
```
```shell
$ {{< key cli >}} run --remote \
https://raw.githubusercontent.com/flyteorg/flytesnacks/656e63d1c8dded3e9e7161c7af6425e9fcd43f56/examples/advanced_composition/advanced_composition/conditional.py \
noop_in_conditional --radius 0.4 --seed 5
```
=== PAGE: https://www.union.ai/docs/v1/serverless/user-guide/programming/decorating_tasks ===
# Decorating tasks
You can easily change how tasks behave by using decorators to wrap your task functions.
In order to make sure that your decorated function contains all the type annotation and docstring
information that Flyte needs, you will need to use the built-in `functools.wraps` decorator.
To begin, create a file called `decorating_tasks.py`.
Add the imports:
```python
import logging
import {{< key kit_import >}}
from functools import partial, wraps
```
Create a logger to monitor the execution's progress.
```python
logger = logging.getLogger(__file__)
```
## Using a single decorator
We define a decorator that logs the input and output details for a decorated task.
```python
def log_io(fn):
@wraps(fn)
def wrapper(*args, **kwargs):
logger.info(f"task {fn.__name__} called with args: {args}, kwargs: {kwargs}")
out = fn(*args, **kwargs)
logger.info(f"task {fn.__name__} output: {out}")
return out
return wrapper
```
We create a task named `t1` that is decorated with `log_io`.
> [!NOTE]
> The order of invoking the decorators is important. `@task` should always be the outer-most decorator.
```python
@{{< key kit_as >}}.task
@log_io
def t1(x: int) -> int:
return x + 1
```
## Stacking multiple decorators
You can also stack multiple decorators on top of each other as long as `@task` is the outer-most decorator.
We define a decorator that verifies if the output from the decorated function is a positive number before it's returned.
If this assumption is violated, it raises a `ValueError` exception.
```python
def validate_output(fn=None, *, floor=0):
@wraps(fn)
def wrapper(*args, **kwargs):
out = fn(*args, **kwargs)
if out <= floor:
raise ValueError(f"output of task {fn.__name__} must be a positive number, found {out}")
return out
if fn is None:
return partial(validate_output, floor=floor)
return wrapper
```
> [!NOTE]
> The output of the `validate_output` task uses `functools.partial` to implement parameterized decorators.
We define a function that uses both the logging and validator decorators.
```python
@{{< key kit_as >}}.task
@log_io
@validate_output(floor=10)
def t2(x: int) -> int:
return x + 10
```
Finally, we compose a workflow that calls `t1` and `t2`.
```python
@{{< key kit_as >}}.workflow
def decorating_task_wf(x: int) -> int:
return t2(x=t1(x=x))
```
## Run the example on {{< key product_name >}}
To run the workflow, execute the following command:
```bash
union run --remote decorating_tasks.py decorating_task_wf --x 10
```
=== PAGE: https://www.union.ai/docs/v1/serverless/user-guide/programming/decorating_workflows ===
# Decorating workflows
The behavior of workflows can be modified in a lightweight fashion by using the built-in `functools.wraps`
decorator pattern, similar to using decorators to
**Programming > Decorating workflows > customize task behavior**. However, unlike in the case of
tasks, we need to do a little extra work to make sure that the DAG underlying the workflow executes tasks in the correct order.
## Setup-teardown pattern
The main use case of decorating `@{{< key kit_as >}}.workflow`-decorated functions is to establish a setup-teardown pattern to execute task
before and after your main workflow logic. This is useful when integrating with other external services
like [wandb](https://wandb.ai/site) or [clearml](https://clear.ml/), which enable you to track metrics of model training runs.
To begin, create a file called `decorating_workflows`.
Import the necessary libraries:
```python
from functools import partial, wraps
from unittest.mock import MagicMock
import {{< key kit_import >}}
from flytekit import FlyteContextManager
from flytekit.core.node_creation import create_node
```
Let's define the tasks we need for setup and teardown. In this example, we use the
`unittest.mock.MagicMock` class to create a fake external service that we want to initialize at the
beginning of our workflow and finish at the end.
```python
external_service = MagicMock()
@{{< key kit_as >}}.task
def setup():
print("initializing external service")
external_service.initialize(id=flytekit.current_context().execution_id)
@{{< key kit_as >}}.task
def teardown():
print("finish external service")
external_service.complete(id=flytekit.current_context().execution_id)
```
As you can see, you can even use Flytekit's current context to access the `execution_id` of the current workflow
if you need to link Flyte with the external service so that you reference the same unique identifier in both the
external service and Flyte.
## Workflow decorator
We create a decorator that we want to use to wrap our workflow function.
```python
def setup_teardown(fn=None, *, before, after):
@wraps(fn)
def wrapper(*args, **kwargs):
# get the current flyte context to obtain access to the compilation state of the workflow DAG.
ctx = FlyteContextManager.current_context()
# defines before node
before_node = create_node(before)
# ctx.compilation_state.nodes == [before_node]
# under the hood, flytekit compiler defines and threads
# together nodes within the `my_workflow` function body
outputs = fn(*args, **kwargs)
# ctx.compilation_state.nodes == [before_node, *nodes_created_by_fn]
# defines the after node
after_node = create_node(after)
# ctx.compilation_state.nodes == [before_node, *nodes_created_by_fn, after_node]
# compile the workflow correctly by making sure `before_node`
# runs before the first workflow node and `after_node`
# runs after the last workflow node.
if ctx.compilation_state is not None:
# ctx.compilation_state.nodes is a list of nodes defined in the
# order of execution above
workflow_node0 = ctx.compilation_state.nodes[1]
workflow_node1 = ctx.compilation_state.nodes[-2]
before_node >> workflow_node0
workflow_node1 >> after_node
return outputs
if fn is None:
return partial(setup_teardown, before=before, after=after)
return wrapper
```
There are a few key pieces to note in the `setup_teardown` decorator above:
1. It takes a `before` and `after` argument, both of which need to be `@{{< key kit_as >}}.task`-decorated functions. These
tasks will run before and after the main workflow function body.
2. The [create_node](https://github.com/flyteorg/flytekit/blob/9e156bb0cf3d1441c7d1727729e8f9b4bbc3f168/flytekit/core/node_creation.py#L18) function
to create nodes associated with the `before` and `after` tasks.
3. When `fn` is called, under the hood the system creates all the nodes associated with the workflow function body
4. The code within the `if ctx.compilation_state is not None:` conditional is executed at compile time, which
is where we extract the first and last nodes associated with the workflow function body at index `1` and `-2`.
5. The `>>` right shift operator ensures that `before_node` executes before the
first node and `after_node` executes after the last node of the main workflow function body.
## Defining the DAG
We define two tasks that will constitute the workflow.
```python
@{{< key kit_as >}}.task
def t1(x: float) -> float:
return x - 1
@{{< key kit_as >}}.task
def t2(x: float) -> float:
return x**2
```
And then create our decorated workflow:
```python
@{{< key kit_as >}}.workflow
@setup_teardown(before=setup, after=teardown)
def decorating_workflow(x: float) -> float:
return t2(x=t1(x=x))
```
## Run the example on the Flyte cluster
To run the provided workflow on the Flyte cluster, use the following command:
```bash
union run --remote decorating_workflows.py decorating_workflow --x 10.0
```
=== PAGE: https://www.union.ai/docs/v1/serverless/user-guide/programming/intratask_checkpoints ===
# Intratask checkpoints
A checkpoint in Flyte serves to recover a task from a previous failure by preserving the task's state before the failure
and resuming from the latest recorded state.
## Why intratask checkpoints?
The inherent design of Flyte, being a workflow engine, allows users to break down operations, programs or ideas
into smaller tasks within workflows. In the event of a task failure, the workflow doesn't need to rerun the
previously completed tasks. Instead, it can retry the specific task that encountered an issue.
Once the problematic task succeeds, it won't be rerun. Consequently, the natural boundaries between tasks act as implicit checkpoints.
However, there are scenarios where breaking a task into smaller tasks is either challenging or undesirable due to the associated overhead.
This is especially true when running a substantial computation in a tight loop.
In such cases, users may consider splitting each loop iteration into individual tasks using dynamic workflows.
Yet, the overhead of spawning new tasks, recording intermediate results, and reconstructing the state can incur additional expenses.
### Use case: Model training
An exemplary scenario illustrating the utility of intra-task checkpointing is during model training.
In situations where executing multiple epochs or iterations with the same dataset might be time-consuming,
setting task boundaries can incur a high bootstrap time and be costly.
Flyte addresses this challenge by providing a mechanism to checkpoint progress within a task execution,
saving it as a file or set of files. In the event of a failure, the checkpoint file can be re-read to
resume most of the state without rerunning the entire task.
This feature opens up possibilities to leverage alternate, more cost-effective compute systems,
such as [AWS spot instances](https://aws.amazon.com/ec2/spot/),
[GCP pre-emptible instances](https://cloud.google.com/compute/docs/instances/preemptible) and others.
These instances offer great performance at significantly lower price points compared to their on-demand or reserved counterparts.
This becomes feasible when tasks are constructed in a fault-tolerant manner.
For tasks running within a short duration, e.g., less than 10 minutes, the likelihood of failure is negligible,
and task-boundary-based recovery provides substantial fault tolerance for successful completion.
However, as the task execution time increases, the cost of re-running it also increases,
reducing the chances of successful completion. This is precisely where Flyte's intra-task checkpointing proves to be highly beneficial.
Here's an example illustrating how to develop tasks that leverage intra-task checkpointing.
It's important to note that Flyte currently offers the low-level API for checkpointing.
Future integrations aim to incorporate higher-level checkpointing APIs from popular training frameworks
like Keras, PyTorch, Scikit-learn, and big-data frameworks such as Spark and Flink, enhancing their fault-tolerance capabilities.
Create a file called `checkpoint.py`:
Import the required libraries:
```python
import {{< key kit_import >}}
from flytekit.exceptions.user import FlyteRecoverableException
RETRIES = 3
```
We define a task to iterate precisely `n_iterations`, checkpoint its state, and recover from simulated failures:
```python
# Define a task to iterate precisely `n_iterations`, checkpoint its state, and recover from simulated failures.
@{{< key kit_as >}}.task(retries=RETRIES)
def use_checkpoint(n_iterations: int) -> int:
cp = {{< key kit_as >}}.current_context().checkpoint
prev = cp.read()
start = 0
if prev:
start = int(prev.decode())
# Create a failure interval to simulate failures across 'n' iterations and then succeed after configured retries
failure_interval = n_iterations // RETRIES
index = 0
for index in range(start, n_iterations):
# Simulate a deterministic failure for demonstration. Showcasing how it eventually completes within the given retries
if index > start and index % failure_interval == 0:
raise FlyteRecoverableException(f"Failed at iteration {index}, failure_interval {failure_interval}.")
# Save progress state. It is also entirely possible to save state every few intervals
cp.write(f"{index + 1}".encode())
return index
```
The checkpoint system offers additional APIs. The code can be found at
[checkpointer code](https://github.com/flyteorg/flytekit/blob/master/flytekit/core/checkpointer.py).
Create a workflow that invokes the task:
The task will automatically undergo retries in the event of a [FlyteRecoverableException](../../api-reference/flytekit-sdk/packages/flytekit.exceptions.base#flytekitexceptionsbaseflyterecoverableexception)
```python
@{{< key kit_as >}}.workflow
def checkpointing_example(n_iterations: int) -> int:
return use_checkpoint(n_iterations=n_iterations)
```
The local checkpoint is not utilized here because retries are not supported:
```python
if __name__ == "__main__":
try:
checkpointing_example(n_iterations=10)
except RuntimeError as e: # noqa : F841
# Since no retries are performed, an exception is expected when run locally
pass
```
## Run the example on the Flyte cluster
To run the provided workflow on the Flyte cluster, use the following command:
```bash
pyflyte run --remote \
https://raw.githubusercontent.com/flyteorg/flytesnacks/69dbe4840031a85d79d9ded25f80397c6834752d/examples/advanced_composition/advanced_composition/checkpoint.py \
checkpointing_example --n_iterations 10
```
```bash
union run --remote checkpoint.py checkpointing_example --n_iterations 10
```
=== PAGE: https://www.union.ai/docs/v1/serverless/user-guide/programming/waiting_for_external_inputs ===
# Waiting for external inputs
There are use cases where you may want a workflow execution to pause, only to continue
when some time has passed or when it receives some inputs that are external to
the workflow execution inputs. You can think of these as execution-time inputs,
since they need to be supplied to the workflow after it's launched. Examples of
this use case would be:
1. **Model Deployment**: A hyperparameter-tuning workflow that
trains `n` models, where a human needs to inspect a report before approving
the model for downstream deployment to some serving layer.
2. **Data Labeling**: A workflow that iterates through an image dataset,
presenting individual images to a human annotator for them to label.
3. **Active Learning**: An [active learning](https://en.wikipedia.org/wiki/Active_learning_(machine_learning))
workflow that trains a model, shows examples for a human annotator to label
based on which examples it's least/most certain about or would provide the most
information to the model.
These use cases can be achieved in Flyte with the `flytekit.sleep`,
`flytekit.wait_for_input`, and `flytekit.approve` workflow nodes.
Although all of the examples above are human-in-the-loop processes, these
constructs allow you to pass inputs into a workflow from some arbitrary external
process (human or machine) in order to continue.
> [!NOTE]
> These functions can only be used inside `@{{< key kit_as >}}.workflow`-decorated
> functions, `@{{< key kit_as >}}.dynamic`-decorated functions, or
> imperative workflows.
## Pause executions with the `sleep` node
The simplest case is when you want your workflow to `flytekit.sleep`
for some specified amount of time before continuing.
Though this type of node may not be used often in a production setting,
you might want to use it, for example, if you want to simulate a delay in
your workflow to mock out the behavior of some long-running computation.
```python
from datetime import timedelta
import {{< key kit_import >}}
from flytekit import sleep
@{{< key kit_as >}}.task
def long_running_computation(num: int) -> int:
"""A mock task pretending to be a long-running computation."""
return num
@{{< key kit_as >}}.workflow
def sleep_wf(num: int) -> int:
"""Simulate a "long-running" computation with sleep."""
# increase the sleep duration to actually make it long-running
sleeping = sleep(timedelta(seconds=10))
result = long_running_computation(num=num)
sleeping >> result
return result
```
As you can see above, we define a simple `add_one` task and a `sleep_wf`
workflow. We first create a `sleeping` and `result` node, then
order the dependencies with the `>>` operator such that the workflow sleeps
for 10 seconds before kicking off the `result` computation. Finally, we
return the `result`.
> [!NOTE]
> You can learn more about the `>>` chaining operator **Programming > Chaining Entities**.
Now that you have a general sense of how this works, let's move onto the
`flytekit.wait_for_input` workflow node.
## Supply external inputs with `wait_for_input`
With the `flytekit.wait_for_input` node, you can pause a
workflow execution that requires some external input signal. For example,
suppose that you have a workflow that publishes an automated analytics report,
but before publishing it you want to give it a custom title. You can achieve
this by defining a `wait_for_input` node that takes a `str` input and
finalizes the report:
```python
import typing
from flytekit import wait_for_input
@{{< key kit_as >}}.task
def create_report(data: typing.List[float]) -> dict: # o0
"""A toy report task."""
return {
"mean": sum(data) / len(data),
"length": len(data),
"max": max(data),
"min": min(data),
}
@{{< key kit_as >}}.task
def finalize_report(report: dict, title: str) -> dict:
return {"title": title, **report}
@{{< key kit_as >}}.workflow
def reporting_wf(data: typing.List[float]) -> dict:
report = create_report(data=data)
title_input = wait_for_input("title", timeout=timedelta(hours=1), expected_type=str)
return finalize_report(report=report, title=title_input)
```
Let's break down what's happening in the code above:
- In `reporting_wf` we first create the raw `report`.
- Then, we define a `title` node that will wait for a string to be provided
through the Flyte API, which can be done through the Flyte UI or through
`FlyteRemote` (more on that later). This node will time out after 1 hour.
- Finally, we pass the `title_input` promise into `finalize_report`, which
attaches the custom title to the report.
> [!NOTE]
> The `create_report` task is just a toy example. In a realistic example, this
> report might be an HTML file or set of visualizations. This can be rendered
> in the Flyte UI with **Development cycle > Decks**.
As mentioned in the beginning of this page, this construct can be used for
selecting the best-performing model in cases where there isn't a clear single
metric to determine the best model, or if you're doing data labeling using
a Flyte workflow.
## Continue executions with `approve`
Finally, the `flytekit.approve` workflow node allows you to wait on
an explicit approval signal before continuing execution. Going back to our
report-publishing use case, suppose that we want to block the publishing of
a report for some reason (e.g. if they don't appear to be valid):
```python
from flytekit import approve
@{{< key kit_as >}}.workflow
def reporting_with_approval_wf(data: typing.List[float]) -> dict:
report = create_report(data=data)
title_input = wait_for_input("title", timeout=timedelta(hours=1), expected_type=str)
final_report = finalize_report(report=report, title=title_input)
# approve the final report, where the output of approve is the final_report
# dictionary.
return approve(final_report, "approve-final-report", timeout=timedelta(hours=2))
```
The `approve` node will pass the `final_report` promise through as the
output of the workflow, provided that the `approve-final-report` gets an
approval input via the Flyte UI or Flyte API.
You can also use the output of the `approve` function as a promise, feeding
it to a subsequent task. Let's create a version of our report-publishing
workflow where the approval happens after `create_report`:
```python
@{{< key kit_as >}}.workflow
def approval_as_promise_wf(data: typing.List[float]) -> dict:
report = create_report(data=data)
title_input = wait_for_input("title", timeout=timedelta(hours=1), expected_type=str)
# wait for report to run so that the user can view it before adding a custom
# title to the report
report >> title_input
final_report = finalize_report(
report=approve(report, "raw-report-approval", timeout=timedelta(hours=2)),
title=title_input,
)
return final_report
```
## Working with conditionals
The node constructs by themselves are useful, but they become even more
useful when we combine them with other Flyte constructs, like **Programming > Conditionals**.
To illustrate this, let's extend the report-publishing use case so that we
produce an "invalid report" output in case we don't approve the final report:
```python
from flytekit import conditional
@{{< key kit_as >}}.task
def invalid_report() -> dict:
return {"invalid_report": True}
@{{< key kit_as >}}.workflow
def conditional_wf(data: typing.List[float]) -> dict:
report = create_report(data=data)
title_input = wait_for_input("title-input", timeout=timedelta(hours=1), expected_type=str)
# Define a "review-passes" wait_for_input node so that a human can review
# the report before finalizing it.
review_passed = wait_for_input("review-passes", timeout=timedelta(hours=2), expected_type=bool)
report >> review_passed
# This conditional returns the finalized report if the review passes,
# otherwise it returns an invalid report output.
return (
conditional("final-report-condition")
.if_(review_passed.is_true())
.then(finalize_report(report=report, title=title_input))
.else_()
.then(invalid_report())
)
```
On top of the `approved` node, which we use in the `conditional` to
determine which branch to execute, we also define a `disapprove_reason`
gate node, which will be used as an input to the `invalid_report` task.
## Sending inputs to `wait_for_input` and `approve` nodes
Assuming that you've registered the above workflows on a Flyte cluster that's
been started with **Programming > Waiting for external inputs > flytectl demo start**,
there are two ways of using `wait_for_input` and `approve` nodes:
### Using the Flyte UI
If you launch the `reporting_wf` workflow on the Flyte UI, you'll see a
**Graph** view of the workflow execution like this:
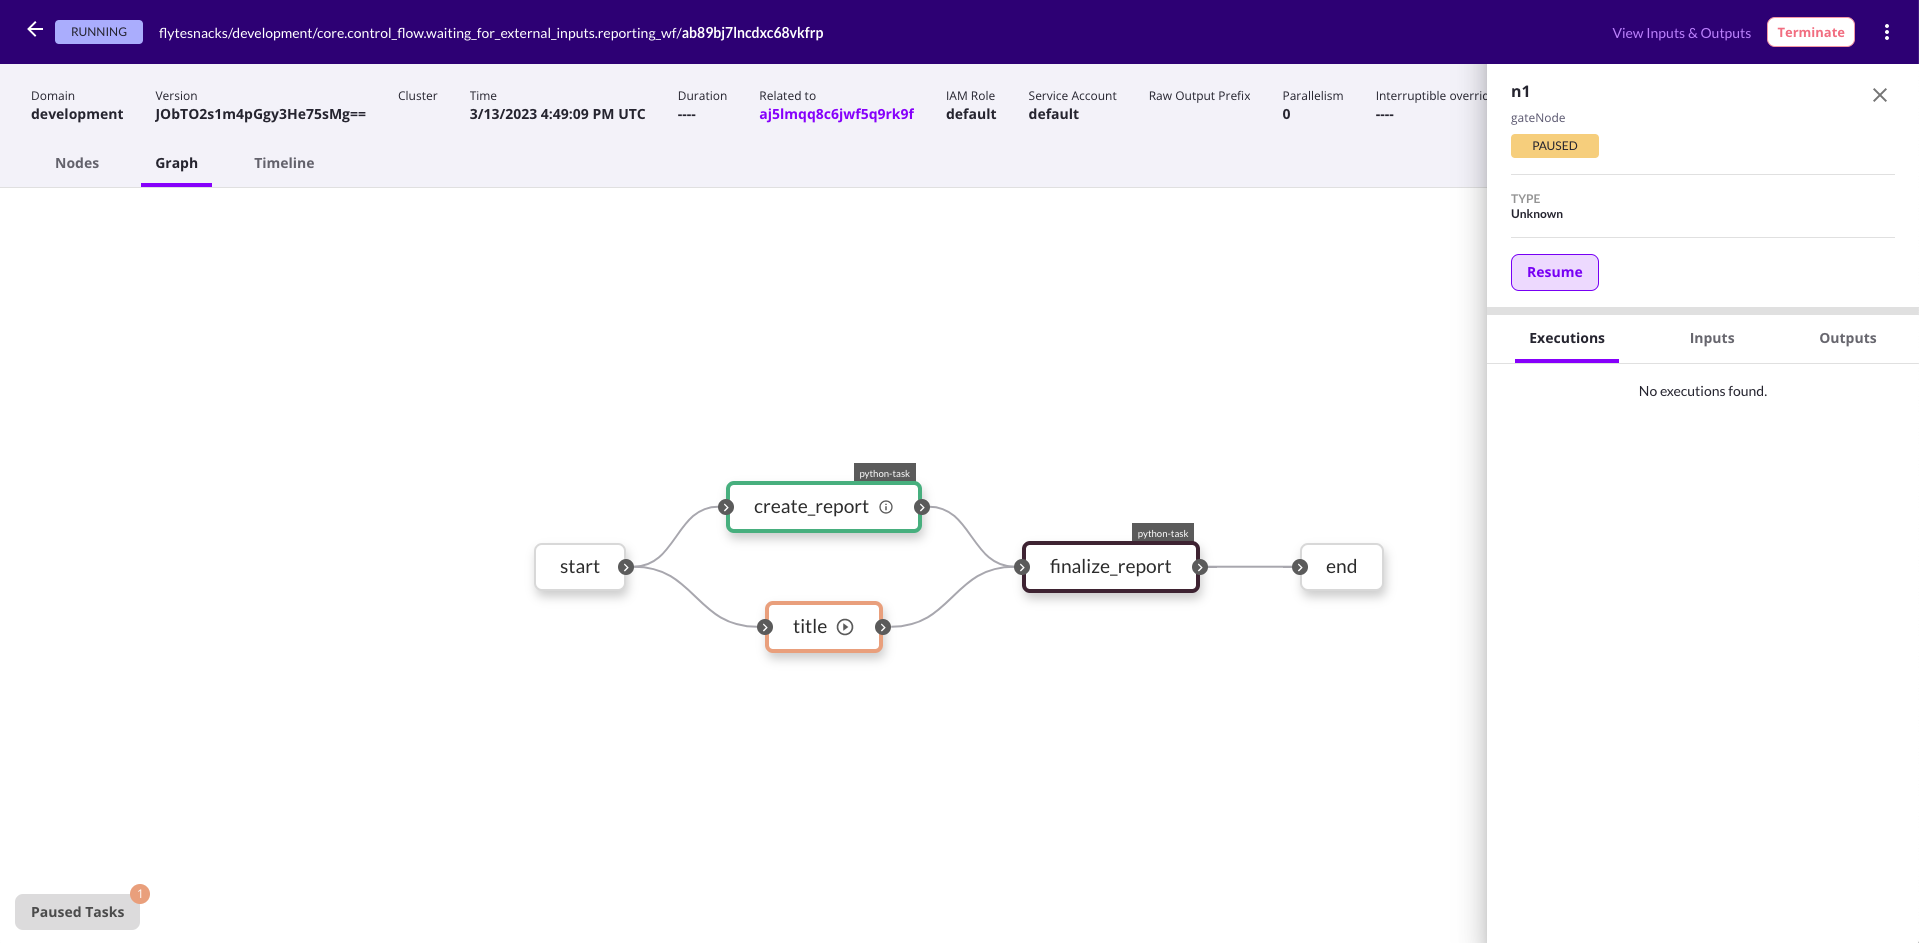
Clicking on the play-circle icon of the `title` task node or the
**Resume** button on the sidebar will create a modal form that you can use to
provide the custom title input.
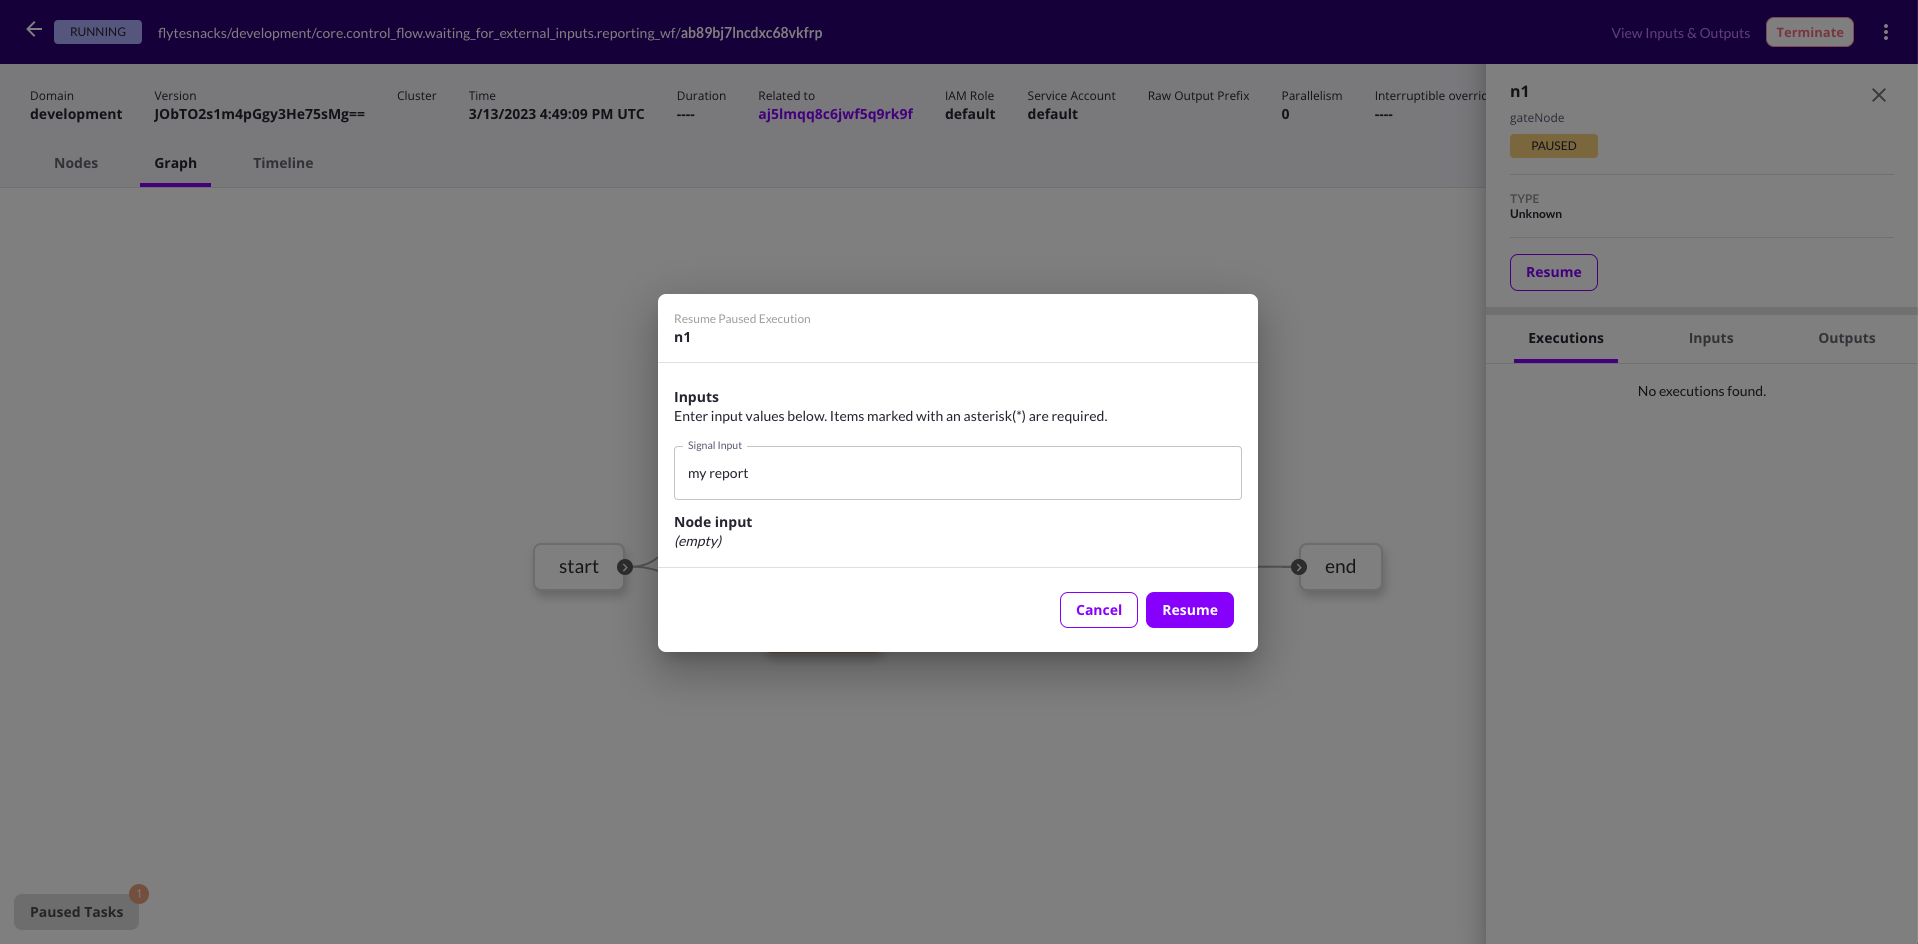
### Using `FlyteRemote`
For many cases it's enough to use Flyte UI to provide inputs/approvals on
gate nodes. However, if you want to pass inputs to `wait_for_input` and
`approve` nodes programmatically, you can use the
`FlyteRemote.set_signal` method. Using the `gate_node_with_conditional_wf` workflow, the example
below allows you to set values for `title-input` and `review-passes` nodes.
```python
import typing
from flytekit.remote.remote import FlyteRemote
from flytekit.configuration import Config
remote = FlyteRemote(
Config.for_sandbox(),
default_project="flytesnacks",
default_domain="development",
)
# First kick off the workflow
flyte_workflow = remote.fetch_workflow(
name="core.control_flow.waiting_for_external_inputs.conditional_wf"
)
# Execute the workflow
execution = remote.execute(flyte_workflow, inputs={"data": [1.0, 2.0, 3.0, 4.0, 5.0]})
# Get a list of signals available for the execution
signals = remote.list_signals(execution.id.name)
# Set a signal value for the "title" node. Make sure that the "title-input"
# node is in the `signals` list above
remote.set_signal("title-input", execution.id.name, "my report")
# Set signal value for the "review-passes" node. Make sure that the "review-passes"
# node is in the `signals` list above
remote.set_signal("review-passes", execution.id.name, True)
```
=== PAGE: https://www.union.ai/docs/v1/serverless/user-guide/programming/nested-parallelism ===
# Nested parallelism
For exceptionally large or complicated workflows that can’t be adequately implemented as dynamic workflows or map tasks, it can be beneficial to have multiple levels of workflow parallelization.
This is useful for multiple reasons:
- Better code organization
- Better code reuse
- Better testing
- Better debugging
- Better monitoring, since each subworkflow can be run independently and monitored independently
- Better performance and scale, since each subworkflow is executed as a separate workflow and thus can be distributed among different propeller workers and shards. This allows for better parallelism and scale.
## Nested dynamic workflows
You can use nested dynamic workflows to break down a large workflow into smaller workflows and then compose them together to form a hierarchy. In this example, a top-level workflow uses two levels of dynamic workflows to process a list through some simple addition tasks and then flatten the list again.
### Example code
```python
"""
A core workflow parallelized as six items with a chunk size of two will be structured as follows:
multi_wf -> level1 -> level2 -> core_wf -> step1 -> step2
-> core_wf -> step1 -> step2
level2 -> core_wf -> step1 -> step2
-> core_wf -> step1 -> step2
level2 -> core_wf -> step1 -> step2
-> core_wf -> step1 -> step2
"""
import {{< key kit_import >}}
@{{< key kit_as >}}.task
def step1(a: int) -> int:
return a + 1
@{{< key kit_as >}}.task
def step2(a: int) -> int:
return a + 2
@{{< key kit_as >}}.workflow
def core_wf(a: int) -> int:
return step2(a=step1(a=a))
core_wf_lp = {{< key kit_as >}}.LaunchPlan.get_or_create(core_wf)
@{{< key kit_as >}}.dynamic
def level2(l: list[int]) -> list[int]:
return [core_wf_lp(a=a) for a in l]
@{{< key kit_as >}}.task
def reduce(l: list[list[int]]) -> list[int]:
f = []
for i in l:
f.extend(i)
return f
@{{< key kit_as >}}.dynamic
def level1(l: list[int], chunk: int) -> list[int]:
v = []
for i in range(0, len(l), chunk):
v.append(level2(l=l[i:i + chunk]))
return reduce(l=v)
@{{< key kit_as >}}.workflow
def multi_wf(l: list[int], chunk: int) -> list[int]:
return level1(l=l, chunk=chunk)
```
Overrides let you add additional arguments to the launch plan you are looping over in the dynamic. Here we add caching:
```python
@{{< key kit_as >}}.task
def increment(num: int) -> int:
return num + 1
@{{< key kit_as >}}.workflow
def child(num: int) -> int:
return increment(num=num)
child_lp = {{< key kit_as >}}.LaunchPlan.get_or_create(child)
@{{< key kit_as >}}.dynamic
def spawn(n: int) -> list[int]:
l = []
for i in [1,2,3,4,5]:
l.append(child_lp(num=i).with_overrides(cache=True, cache_version="1.0.0"))
# you can also pass l to another task if you want
return l
```
## Mixed parallelism
This example is similar to nested dynamic workflows, but instead of using a dynamic workflow to parallelize a core workflow with serial tasks, we use a core workflow to call a map task, which processes both inputs in parallel. This workflow has one less layer of parallelism, so the outputs won’t be the same as those of the nested parallelization example, but it does still demonstrate how you can mix these different approaches to achieve concurrency.
### Example code
```python
"""
A core workflow parallelized as six items with a chunk size of two will be structured as follows:
multi_wf -> level1 -> level2 -> mappable
-> mappable
level2 -> mappable
-> mappable
level2 -> mappable
-> mappable
"""
import {{< key kit_import >}}
@{{< key kit_as >}}.task
def mappable(a: int) -> int:
return a + 2
@{{< key kit_as >}}.workflow
def level2(l: list[int]) -> list[int]:
return {{< key kit_as >}}.{{< key map_func >}}(mappable)(a=l)
@{{< key kit_as >}}.task
def reduce(l: list[list[int]]) -> list[int]:
f = []
for i in l:
f.extend(i)
return f
@{{< key kit_as >}}.dynamic
def level1(l: list[int], chunk: int) -> list[int]:
v = []
for i in range(0, len(l), chunk):
v.append(level2(l=l[i : i + chunk]))
return reduce(l=v)
@{{< key kit_as >}}.workflow
def multi_wf(l: list[int], chunk: int) -> list[int]:
return level1(l=l, chunk=chunk)
```
## Design considerations
While you can nest even further if needed, or incorporate map tasks if your inputs are all the same type, the design of your workflow should be informed by the actual data you’re processing. For example, if you have a big library of music from which you’d like to extract the lyrics, the first level could loop through all the albums, and the second level could process each song.
If you’re just processing an enormous list of the same input, it’s best to keep your code simple and let the scheduler handle optimizing the execution. Additionally, unless you need dynamic workflow features like mixing and matching inputs and outputs, it’s usually most efficient to use a map task, which has the added benefit of keeping the UI clean.
You can also choose to limit the scale of parallel execution at a few levels. The max_parallelism attribute can be applied at the workflow level and will limit the number of parallel tasks being executed. (This is set to 25 by default.) Within map tasks, you can specify a concurrency argument, which will limit the number of mapped tasks that can run in parallel at any given time.
=== PAGE: https://www.union.ai/docs/v1/serverless/user-guide/programming/failure-node ===
# Failure node
The failure node feature enables you to designate a specific node to execute in the event of a failure within your workflow.
For example, a workflow involves creating a cluster at the beginning, followed by the execution of tasks, and concludes with the deletion of the cluster once all tasks are completed.
However, if any task within the workflow encounters an error, the system will abort the entire workflow and won’t delete the cluster.
This poses a challenge if you still need to clean up the cluster even in a task failure.
To address this issue, you can add a failure node into your workflow.
This ensures that critical actions, such as deleting the cluster, are executed even in the event of failures occurring throughout the workflow execution.
```python
import typing
import {{< key kit_import >}}
from flytekit import WorkflowFailurePolicy
from flytekit.types.error.error import FlyteError
@{{< key kit_as >}}.task
def create_cluster(name: str):
print(f"Creating cluster: {name}")
```
Create a task that will fail during execution:
```python
# Create a task that will fail during execution
@{{< key kit_as >}}.task
def t1(a: int, b: str):
print(f"{a} {b}")
raise ValueError("Fail!")
```
Create a task that will be executed if any of the tasks in the workflow fail:
```python
@{{< key kit_as >}}.task
def clean_up(name: str, err: typing.Optional[FlyteError] = None):
print(f"Deleting cluster {name} due to {err}")
```
Specify the `on_failure` to a cleanup task. This task will be executed if any of the tasks in the workflow fail.
The inputs of `clean_up` must exactly match the workflow’s inputs.
Additionally, the `err` parameter will be populated with the error message encountered during execution.
```python
@{{< key kit_as >}}.workflow
def wf(a: int, b: str):
create_cluster(name=f"cluster-{a}")
t1(a=a, b=b)
```
By setting the failure policy to `FAIL_AFTER_EXECUTABLE_NODES_COMPLETE` to ensure that the `wf1` is executed even if the subworkflow fails.
In this case, both parent and child workflows will fail, resulting in the `clean_up` task being executed twice:
```python
# In this case, both parent and child workflows will fail,
# resulting in the `clean_up` task being executed twice.
@{{< key kit_as >}}.workflow(on_failure=clean_up, failure_policy=WorkflowFailurePolicy.FAIL_AFTER_EXECUTABLE_NODES_COMPLETE)
def wf1(name: str = "my_cluster"):
c = create_cluster(name=name)
subwf(name="another_cluster")
t = t1(a=1, b="2")
d = delete_cluster(name=name)
c >> t >> d
```
You can also set the `on_failure` to a workflow.
This workflow will be executed if any of the tasks in the workflow fail:
```python
@{{< key kit_as >}}.workflow(on_failure=clean_up_wf)
def wf2(name: str = "my_cluster"):
c = create_cluster(name=name)
t = t1(a=1, b="2")
d = delete_cluster(name=name)
c >> t >> d
```
=== PAGE: https://www.union.ai/docs/v1/serverless/tutorials ===
# Tutorials
This section provides tutorials that walk you through the process of building AI/ML applications on {{< key product_name >}}.
The example applications range from training XGBoost models in tabular datasets to fine-tuning large language models for text generation tasks.
### 🔗 **Language Models > Sentiment Classifier**
Fine-tune a pre-trained language model in the IMDB dataset for sentiment classification.
### 🔗 [Agentic Retrieval Augmented Generation](language-models/agentic-rag)
Build an agentic retrieval augmented generation system with ChromaDB and Langchain.
### 🔗 **Language Models > Soft Clustering Hdbscan**
Use HDBSCAN soft clustering with headline embeddings and UMAP on GPUs.
### 🔗 [Deploy a Fine-Tuned Llama Model to an iOS App with MLC-LLM](language-models/llama_edge_deployment)
Fine-tune a Llama 3 model on the Cohere Aya Telugu subset and generate a model artifact for deployment as an iOS app.
### 🔗 **Parallel Processing and Job Scheduling > Reddit Slack Bot**
Securely store Reddit and Slack authentication data while pushing relevant Reddit posts to slack on a consistent basis.
### 🔗 **Parallel Processing and Job Scheduling > Wikipedia Embeddings**
Create embeddings for the Wikipedia dataset, powered by {{< key product_name >}} actors.
### 🔗 **Time Series > Time Series Forecaster Comparison**
Visually compare the output of various time series forecasters while
maintaining lineage of the training and forecasted data.
### 🔗 **Time Series > Gluonts Time Series**
Train and evaluate a time series forecasting model with GluonTS.
### 🔗 **Finance > Credit Default Xgboost**
Use NVIDIA RAPIDS `cuDF` DataFrame library and `cuML` machine learning to predict credit default.
### 🔗 **Bioinformatics > Alignment**
Pre-process raw sequencing reads, build an index, and perform alignment to a reference genome using the Bowtie2 aligner.
### 🔗 [Video Dubbing with Open-Source Models](multimodal-ai/video-dubbing)
Use open-source models to dub videos.
### 🔗 [Efficient Named Entity Recognition with vLLM](language-models/vllm-serving-on-actor)
Serve a vLLM model on a warm container and trigger inference automatically with artifacts.
### 🔗 **Diffusion models > Mochi Video Generation**
Run the Mochi 1 text-to-video generation model by Genmo on {{< key product_name >}}.
### 🔗 **Compound AI Systems > Pdf To Podcast Blueprint**
Leverage {{< key product_name >}} to productionize NVIDIA blueprint workflows.
### 🔗 **Retrieval Augmented Generation > Building a Contextual RAG Workflow with Together AI**
Build a contextual RAG workflow for enterprise use.
## Subpages
- **Bioinformatics**
- **Compound AI Systems**
- **Diffusion models**
- **Finance**
- **Language Models**
- **Parallel Processing and Job Scheduling**
- **Retrieval Augmented Generation**
- **Serving**
- **Time Series**
=== PAGE: https://www.union.ai/docs/v1/serverless/tutorials/bioinformatics ===
# Bioinformatics
Bioinformatics encompasses all the ways we aim to solve biological problems
by computational means. {{< key product_name >}} provides a number of excellent
abstractions and features for solving such problems in a reliable, reproducible
and ergonomic way.
## Subpages
- **Bioinformatics > Alignment**
=== PAGE: https://www.union.ai/docs/v1/serverless/tutorials/bioinformatics/alignment ===
---
**Source**: tutorials/bioinformatics/alignment.md
**URL**: /docs/v1/serverless/tutorials/bioinformatics/alignment/
**Weight**: 2
=== PAGE: https://www.union.ai/docs/v1/serverless/tutorials/compound-ai-systems ===
# Compound AI Systems
Compound AI Systems refer to artificial intelligence systems that combine multiple
AI and software components to create a more complex and powerful system. Instead of
focusing on a single model or data type, Compound AI Systems combine models with
different modalities and software components like databases, vector stores, and
more to solve a given task or problem.
In the following examples, you’ll explore how Compound AI Systems can be applied
to manipulate and analyze various types of data.
## Subpages
- **Compound AI Systems > Video Dubbing**
- **Compound AI Systems > Text To Sql Agent**
- **Compound AI Systems > Pdf To Podcast Blueprint**
- **Compound AI Systems > Llama Index Rag**
- **Compound AI Systems > Enterprise Rag Blueprint**
=== PAGE: https://www.union.ai/docs/v1/serverless/tutorials/compound-ai-systems/video-dubbing ===
---
**Source**: tutorials/compound-ai-systems/video-dubbing.md
**URL**: /docs/v1/serverless/tutorials/compound-ai-systems/video-dubbing/
**Weight**: 2
=== PAGE: https://www.union.ai/docs/v1/serverless/tutorials/compound-ai-systems/text_to_sql_agent ===
---
**Source**: tutorials/compound-ai-systems/text_to_sql_agent.md
**URL**: /docs/v1/serverless/tutorials/compound-ai-systems/text_to_sql_agent/
**Weight**: 9
=== PAGE: https://www.union.ai/docs/v1/serverless/tutorials/compound-ai-systems/pdf-to-podcast-blueprint ===
---
**Source**: tutorials/compound-ai-systems/pdf-to-podcast-blueprint.md
**URL**: /docs/v1/serverless/tutorials/compound-ai-systems/pdf-to-podcast-blueprint/
**Weight**: 9
=== PAGE: https://www.union.ai/docs/v1/serverless/tutorials/compound-ai-systems/llama_index_rag ===
---
**Source**: tutorials/compound-ai-systems/llama_index_rag.md
**URL**: /docs/v1/serverless/tutorials/compound-ai-systems/llama_index_rag/
**Weight**: 9
=== PAGE: https://www.union.ai/docs/v1/serverless/tutorials/compound-ai-systems/enterprise-rag-blueprint ===
---
**Source**: tutorials/compound-ai-systems/enterprise-rag-blueprint.md
**URL**: /docs/v1/serverless/tutorials/compound-ai-systems/enterprise-rag-blueprint/
**Weight**: 9
=== PAGE: https://www.union.ai/docs/v1/serverless/tutorials/diffusion-models ===
# Diffusion models
Diffusion models are a class of generative models widely used in image generation
and other computer vision tasks. They are at the forefront of generative AI,
powering popular text-to-image tools such as Stability AI’s Stable Diffusion,
OpenAI’s DALL-E (starting from DALL-E 2), MidJourney, and Google’s Imagen.
These models offer significant improvements in performance and stability over earlier
architectures for image synthesis, including variational autoencoders (VAEs),
generative adversarial networks (GANs), and autoregressive models like PixelCNN.
In the examples provided, you'll explore how to apply diffusion models to various use cases.
## Subpages
- **Diffusion models > Mochi Video Generation**
=== PAGE: https://www.union.ai/docs/v1/serverless/tutorials/diffusion-models/mochi-video-generation ===
---
**Source**: tutorials/diffusion-models/mochi-video-generation.md
**URL**: /docs/v1/serverless/tutorials/diffusion-models/mochi-video-generation/
**Weight**: 2
=== PAGE: https://www.union.ai/docs/v1/serverless/tutorials/finance ===
# Finance
Machine learning (ML) and artificial intelligence (AI) are revolutionizing the finance industry. By processing vast amounts of data, these technologies enable applications such as: risk assessment, fraud detection, and customer segmentation.
In these examples, you'll learn how to use {{< key product_name >}} for finance applications.
## Subpages
- **Finance > Credit Default Xgboost**
=== PAGE: https://www.union.ai/docs/v1/serverless/tutorials/finance/credit-default-xgboost ===
---
**Source**: tutorials/finance/credit-default-xgboost.md
**URL**: /docs/v1/serverless/tutorials/finance/credit-default-xgboost/
**Weight**: 2
=== PAGE: https://www.union.ai/docs/v1/serverless/tutorials/language-models ===
# Language Models
Language models (LMs) are a type of deep learning model that fundamentally predicts
tokens within some context window, either in a [masked](https://huggingface.co/docs/transformers/main/en/tasks/masked_language_modeling) or
[causal](https://huggingface.co/docs/transformers/en/tasks/language_modeling) manner.
Large language models (LLMs) are a type of language model that have many trainable
parameters, which in recent times can be hundreds of millions to trillions of parameters.
LMs can also perform a wider range of inference-time tasks compared to traditional
ML methods because they can operate on structured and unstructured text data. This
means they can perform tasks like text generation, API function calling,
summarization, and question-answering.
In these examples, you'll learn how to use LMs of different sizes for different
use cases, from sentiment analysis to retrieval augmented generation (RAG).
## Subpages
- **Language Models > Sentiment Classifier**
- **Language Models > Soft Clustering Hdbscan**
- **Language Models > Liger Kernel Finetuning**
=== PAGE: https://www.union.ai/docs/v1/serverless/tutorials/language-models/sentiment-classifier ===
---
**Source**: tutorials/language-models/sentiment-classifier.md
**URL**: /docs/v1/serverless/tutorials/language-models/sentiment-classifier/
**Weight**: 2
=== PAGE: https://www.union.ai/docs/v1/serverless/tutorials/language-models/soft-clustering-hdbscan ===
---
**Source**: tutorials/language-models/soft-clustering-hdbscan.md
**URL**: /docs/v1/serverless/tutorials/language-models/soft-clustering-hdbscan/
**Weight**: 4
=== PAGE: https://www.union.ai/docs/v1/serverless/tutorials/language-models/liger-kernel-finetuning ===
---
**Source**: tutorials/language-models/liger-kernel-finetuning.md
**URL**: /docs/v1/serverless/tutorials/language-models/liger-kernel-finetuning/
**Weight**: 5
=== PAGE: https://www.union.ai/docs/v1/serverless/tutorials/parallel-processing-and-job-scheduling ===
# Parallel Processing and Job Scheduling
{{< key product_name >}} offers robust capabilities for parallel processing, providing various parallelization
strategies allowing for the efficient execution of tasks across multiple nodes.
{{< key product_name >}} also has a flexible job scheduling system. You can schedule workflows to run at
specific intervals, or based on external events, ensuring that processes are executed exactly when needed.
In this section, we will see some examples demonstrating these features and capabilities.
## Subpages
- **Parallel Processing and Job Scheduling > Reddit Slack Bot**
- **Parallel Processing and Job Scheduling > Wikipedia Embeddings**
=== PAGE: https://www.union.ai/docs/v1/serverless/tutorials/parallel-processing-and-job-scheduling/reddit-slack-bot ===
---
**Source**: tutorials/parallel-processing-and-job-scheduling/reddit-slack-bot.md
**URL**: /docs/v1/serverless/tutorials/parallel-processing-and-job-scheduling/reddit-slack-bot/
**Weight**: 2
=== PAGE: https://www.union.ai/docs/v1/serverless/tutorials/parallel-processing-and-job-scheduling/wikipedia-embeddings ===
---
**Source**: tutorials/parallel-processing-and-job-scheduling/wikipedia-embeddings.md
**URL**: /docs/v1/serverless/tutorials/parallel-processing-and-job-scheduling/wikipedia-embeddings/
**Weight**: 3
=== PAGE: https://www.union.ai/docs/v1/serverless/tutorials/retrieval-augmented-generation ===
# Retrieval Augmented Generation
{{< key product_name >}} enables production-grade RAG pipelines with a focus on
performance, scalability, and ease of use.
In this section, we will see some examples demonstrating how to extract documents
from various data sources, create in-memory vector databases, and use them to
implement RAG pipelines using LLM providers and Union-hosted LLMs.
## Subpages
- **Retrieval Augmented Generation > Agentic Rag**
- **Retrieval Augmented Generation > Lance Db Rag**
- **Retrieval Augmented Generation > Building a Contextual RAG Workflow with Together AI**
=== PAGE: https://www.union.ai/docs/v1/serverless/tutorials/retrieval-augmented-generation/agentic-rag ===
---
**Source**: tutorials/retrieval-augmented-generation/agentic-rag.md
**URL**: /docs/v1/serverless/tutorials/retrieval-augmented-generation/agentic-rag/
**Weight**: 3
=== PAGE: https://www.union.ai/docs/v1/serverless/tutorials/retrieval-augmented-generation/lance-db-rag ===
---
**Source**: tutorials/retrieval-augmented-generation/lance-db-rag.md
**URL**: /docs/v1/serverless/tutorials/retrieval-augmented-generation/lance-db-rag/
**Weight**: 3
=== PAGE: https://www.union.ai/docs/v1/serverless/tutorials/retrieval-augmented-generation/contextual-rag ===
# Building a Contextual RAG Workflow with Together AI
This notebook walks you through building a Contextual RAG (Retrieval-Augmented Generation) workflow using Together's embedding, reranker, and chat models. It ties together web scraping, embedding generation, and serving into one cohesive application.
We take the [existing Contextual RAG Together app](https://docs.together.ai/docs/how-to-implement-contextual-rag-from-anthropic) and make it "production-grade" with {{< key product_name >}} — ready for enterprise deployment.

## Workflow overview
The workflow follows these steps:
1. Fetches all links to Paul Graham's essays.
2. Scrapes web content to retrieve the full text of the essays.
3. Splits the text into smaller chunks for processing.
4. Appends context from the relevant essay to each chunk.
5. Generates embeddings and stores them in a hosted vector database.
6. Creates a keyword index for efficient retrieval.
7. Serves a FastAPI app to expose the RAG functionality.
8. Provides a Gradio app, using the FastAPI endpoint, for an easy-to-use RAG interface.
## Execution approach
This workflow is designed for local execution first, allowing you to test and validate it before deploying and scaling it on a {{< key product_name >}} cluster. This staged approach ensures smooth transitions from development to production.
Before running the workflow, make sure to install `union`:
```
pip install union
```
### Local execution
First, we import the required dependencies to ensure the workflow runs smoothly. Next, we define an actor environment, as the workflow relies on actor tasks throughout the process.
**Core concepts > Actors** let us reuse a container and its environment across tasks, avoiding the overhead of starting a new container for each task. In this workflow, we define a single actor and reuse it consistently since the underlying components don’t require independent scaling or separate environments.
Within the actor environment, we specify the `ImageSpec`, which defines the container image that tasks in the workflow will use. With {{< key product_name >}}, every task runs in its own dedicated container, requiring a container image. Instead of manually creating a Dockerfile, we define the image specification in Python. When run on {{< key product_name >}} Serverless, the container image is built remotely, simplifying the setup.
We also configure the actor’s replica count to 10, meaning 10 workers are provisioned to handle tasks, allowing up to 10 tasks to run in parallel, provided sufficient resources. The TTL (time to live) is set to 120 seconds, ensuring the actor remains active for this period when no tasks are being processed.
Finally, we create a Pydantic `BaseModel` named `Document` to capture metadata for each document used by the RAG app. This model ensures consistent data structuring and smooth integration throughout the workflow.
NOTE: Add your Together AI API key (`TOGETHER_API_KEY`) to the `.env` file before running the notebook.
```python
import os
from pathlib import Path
from typing import Annotated, Optional
from urllib.parse import urljoin
import numpy as np
import requests
import union
from flytekit.core.artifact import Artifact
from flytekit.exceptions.base import FlyteRecoverableException
from flytekit.types.directory import FlyteDirectory
from flytekit.types.file import FlyteFile
from pydantic import BaseModel
from union.actor import ActorEnvironment
import {{< key kit_import >}}
actor = ActorEnvironment(
name="contextual-rag",
replica_count=10,
ttl_seconds=120,
container_image=union.ImageSpec(
name="contextual-rag",
packages=[
"together==1.3.10",
"beautifulsoup4==4.12.3",
"bm25s==0.2.5",
"pydantic>2",
"pymilvus>=2.5.4",
"union>=0.1.139",
"flytekit>=1.15.0b5",
],
),
secret_requests=[
{{< key kit_as >}}.Secret(
key="together-api-key",
env_var="TOGETHER_API_KEY",
mount_requirement=union.Secret.MountType.ENV_VAR,
),
{{< key kit_as >}}.Secret(
key="milvus-uri",
env_var="MILVUS_URI",
mount_requirement=union.Secret.MountType.ENV_VAR,
),
{{< key kit_as >}}.Secret(
key="milvus-token",
env_var="MILVUS_TOKEN",
mount_requirement=union.Secret.MountType.ENV_VAR,
)
],
)
class Document(BaseModel):
idx: int
title: str
url: str
content: Optional[str] = None
chunks: Optional[list[str]] = None
prompts: Optional[list[str]] = None
contextual_chunks: Optional[list[str]] = None
tokens: Optional[list[list[int]]] = None
```
We begin by defining an actor task to parse the main page of Paul Graham's essays. This task extracts a list of document titles and their respective URLs. Since actor tasks run within the shared actor environment we set up earlier, they efficiently reuse the same container and environment.
```python
@actor.task
def parse_main_page(
base_url: str, articles_url: str, local: bool = False
) -> list[Document]:
from bs4 import BeautifulSoup
assert base_url.endswith("/"), f"Base URL must end with a slash: {base_url}"
response = requests.get(urljoin(base_url, articles_url))
soup = BeautifulSoup(response.text, "html.parser")
td_cells = soup.select("table > tr > td > table > tr > td")
documents = []
idx = 0
for td in td_cells:
img = td.find("img")
if img and int(img.get("width", 0)) <= 15 and int(img.get("height", 0)) <= 15:
a_tag = td.find("font").find("a") if td.find("font") else None
if a_tag:
documents.append(
Document(
idx=idx, title=a_tag.text, url=urljoin(base_url, a_tag["href"])
)
)
idx += 1
if local:
return documents[:3]
return documents
```
Next, we define an actor task to scrape the content of each document. Using the list of URLs gathered in the previous step, this task extracts the full text of the essays, ensuring that all relevant content is retrieved for further processing.
We also set `retries` to `3`, meaning the task will be retried three times before the error is propagated.
```python
@actor.task(retries=3)
def scrape_pg_essays(document: Document) -> Document:
from bs4 import BeautifulSoup
try:
response = requests.get(document.url)
except Exception as e:
raise FlyteRecoverableException(f"Failed to scrape {document.url}: {str(e)}")
response.raise_for_status()
soup = BeautifulSoup(response.text, "html.parser")
content = soup.find("font")
text = None
if content:
text = " ".join(content.get_text().split())
document.content = text
return document
```
Then, define an actor task to create chunks for each document. Chunks are necessary because we need to append context to each chunk, ensuring the RAG app can process the information effectively.
```python
@actor.task(cache=True, cache_version="0.2")
def create_chunks(document: Document, chunk_size: int, overlap: int) -> Document:
if document.content:
content_chunks = [
document.content[i : i + chunk_size]
for i in range(0, len(document.content), chunk_size - overlap)
]
document.chunks = content_chunks
return document
```
Next, we use Together AI to generate context for each chunk of text, using the secret we initialized earlier. The system retrieves relevant context based on the entire document, ensuring accurate and meaningful outputs.
Notice that we set **Core concepts > Caching** to `True` for this task to avoid re-running the execution for the same inputs. This ensures that if the document and model remain unchanged, the outputs are retrieved directly from the cache, improving efficiency.
Once the context is generated, we map the chunks back to their respective documents.
```python
@actor.task(cache=True, cache_version="0.4")
def generate_context(document: Document, model: str) -> Document:
from together import Together
CONTEXTUAL_RAG_PROMPT = """
Given the document below, we want to explain what the chunk captures in the document.
{WHOLE_DOCUMENT}
Here is the chunk we want to explain:
{CHUNK_CONTENT}
Answer ONLY with a succinct explanation of the meaning of the chunk in the context of the whole document above.
"""
client = Together(api_key=os.getenv("TOGETHER_API_KEY"))
contextual_chunks = [
f"{response.choices[0].message.content} {chunk}"
for chunk in (document.chunks or [])
for response in [
client.chat.completions.create(
model=model,
messages=[
{
"role": "user",
"content": CONTEXTUAL_RAG_PROMPT.format(
WHOLE_DOCUMENT=document.content,
CHUNK_CONTENT=chunk,
),
}
],
temperature=1,
)
]
]
# Assign the contextual chunks back to the document
document.contextual_chunks = contextual_chunks if contextual_chunks else None
return document
```
We define an embedding function to generate embeddings for each chunk. This function converts the chunks into vector representations, which we can store in a vector database for efficient retrieval and processing.
Next, we create a vector index and store the embeddings in the [Milvus](https://milvus.io/) vector database. For each embedding, we store the ID, document, and document title. These details ensure the embeddings are ready for efficient retrieval during the RAG process.
By setting `cache` to `True`, we avoid redundant upserts or inserts for the same document. Instead, we can add new records or update existing ones only if the content has changed. This approach keeps the vector database up-to-date efficiently, minimizing resource usage while maintaining accuracy.
Note: We're using the Milvus hosted vector database to store the embeddings. However, you can replace it with any vector database of your choice based on your requirements.
```python
from together import Together
def get_embedding(chunk: str, embedding_model: str):
client = Together(
api_key=os.getenv("TOGETHER_API_KEY")
)
outputs = client.embeddings.create(
input=chunk,
model=embedding_model,
)
return outputs.data[0].embedding
@actor.task(cache=True, cache_version="0.19", retries=5)
def create_vector_index(
document: Document, embedding_model: str, local: bool = False
) -> Document:
from pymilvus import DataType, MilvusClient
if local:
client = MilvusClient("test_milvus.db")
else:
try:
client = MilvusClient(uri=os.getenv("MILVUS_URI"), token=os.getenv("MILVUS_TOKEN"))
except Exception as e:
raise FlyteRecoverableException(
f"Failed to connect to Milvus: {e}"
)
collection_name = "paul_graham_collection"
if not client.has_collection(collection_name):
schema = client.create_schema()
schema.add_field(
"id", DataType.INT64, is_primary=True, auto_id=True
)
schema.add_field("document_index", DataType.VARCHAR, max_length=255)
schema.add_field("embedding", DataType.FLOAT_VECTOR, dim=1024)
schema.add_field("title", DataType.VARCHAR, max_length=255)
index_params = client.prepare_index_params()
index_params.add_index("embedding", metric_type="COSINE")
client.create_collection(collection_name, dimension=512, schema=schema, index_params=index_params)
if not document.contextual_chunks:
return document # Exit early if there are no contextual chunks
# Generate embeddings for chunks
embeddings = [get_embedding(chunk[:512], embedding_model) for chunk in document.contextual_chunks] # NOTE: Trimming the chunk for the embedding model's context window
embeddings_np = np.array(embeddings, dtype=np.float32)
ids = [
f"id{document.idx}_{chunk_idx}"
for chunk_idx, _ in enumerate(document.contextual_chunks)
]
titles = [document.title] * len(document.contextual_chunks)
client.upsert(
collection_name,
[
{"id": index, "document_index": document_index, "embedding": embedding, "title": title}
for index, (document_index, embedding, title) in enumerate(zip(ids, embeddings_np.tolist(), titles))
]
)
return document
```
Lastly, we create a BM25S keyword index to organize the document chunks. This index is great for keyword-based searches and works well alongside vector indexing. We also store a mapping between document IDs and their corresponding contextual chunk data, making it easier to retrieve content during the RAG process.
```python
@actor.task(cache=True, cache_version="0.5")
def create_bm25s_index(documents: list[Document]) -> tuple[FlyteDirectory, FlyteFile]:
import json
import bm25s
# Prepare data for JSON
data = {
f"id{doc_idx}_{chunk_idx}": contextual_chunk
for doc_idx, document in enumerate(documents)
if document.contextual_chunks
for chunk_idx, contextual_chunk in enumerate(document.contextual_chunks)
}
retriever = bm25s.BM25(corpus=list(data.values()))
retriever.index(bm25s.tokenize(list(data.values())))
ctx = union.current_context()
working_dir = Path(ctx.working_directory)
bm25s_index_dir = working_dir / "bm25s_index"
contextual_chunks_json = working_dir / "contextual_chunks.json"
retriever.save(str(bm25s_index_dir))
# Write the data to a JSON file
with open(contextual_chunks_json, "w", encoding="utf-8") as json_file:
json.dump(data, json_file, indent=4, ensure_ascii=False)
return FlyteDirectory(path=bm25s_index_dir), FlyteFile(contextual_chunks_json)
```
We define a **Core concepts > Workflows > Standard workflows** to execute these tasks in sequence. By using **Retrieval Augmented Generation > Building a Contextual RAG Workflow with Together AI > map tasks**, we run operations in parallel while respecting the resource constraints of each task. This approach **significantly improves execution speed**. We set the concurrency to 2, meaning two tasks will run in parallel. Note that the replica count for actors is set to 10, but this can be overridden at the map task level. We're doing this because having too many parallel clients could cause server availability issues.
The final output of this workflow includes the BM25S keyword index and the contextual chunks mapping file, both returned as **Core concepts > Artifacts**. The Artifact Service automatically indexes and assigns semantic meaning to all outputs from {{< key product_name >}} tasks and workflow executions, such as models, files, or other data. This makes it easy to track, access, and orchestrate pipelines directly through their outputs. In this case, the keyword index and file artifacts are directly used during app serving.
We also set up a retrieval task to fetch embeddings for local execution. Once everything’s in place, we run the workflow and the retrieval task locally, producing a set of relevant chunks.
One advantage of running locally is that all tasks and workflows are Python functions, making it easy to test everything before moving to production. This approach allows you to experiment locally and then deploy the same workflow in a production environment, ensuring it’s production-ready. You get the flexibility to test and refine your workflow without compromising on the capabilities needed for deployment.
```python
import functools
from dataclasses import dataclass
from dotenv import load_dotenv
load_dotenv() # Ensure the secret (together API key) is present in the .env file
BM25Index = Artifact(name="bm25s-index")
ContextualChunksJSON = Artifact(name="contextual-chunks-json")
@union.workflow
def build_indices_wf(
base_url: str = "https://paulgraham.com/",
articles_url: str = "articles.html",
embedding_model: str = "BAAI/bge-large-en-v1.5",
chunk_size: int = 250,
overlap: int = 30,
model: str = "deepseek-ai/DeepSeek-R1",
local: bool = True,
) -> tuple[
Annotated[FlyteDirectory, BM25Index], Annotated[FlyteFile, ContextualChunksJSON]
]:
tocs = parse_main_page(base_url=base_url, articles_url=articles_url, local=local)
scraped_content = {{< key kit_as >}}.{{< key map_func >}}(scrape_pg_essays, concurrency=2)(document=tocs)
chunks = {{< key kit_as >}}.{{< key map_func >}}(
functools.partial(create_chunks, chunk_size=chunk_size, overlap=overlap)
)(document=scraped_content)
contextual_chunks = {{< key kit_as >}}.{{< key map_func >}}(functools.partial(generate_context, model=model))(
document=chunks
)
{{< key kit_as >}}.{{< key map_func >}}(
functools.partial(
create_vector_index, embedding_model=embedding_model, local=local
),
concurrency=2
)(document=contextual_chunks)
bm25s_index, contextual_chunks_json_file = create_bm25s_index(
documents=contextual_chunks
)
return bm25s_index, contextual_chunks_json_file
@dataclass
class RetrievalResults:
vector_results: list[list[str]]
bm25s_results: list[list[str]]
@union.task
def retrieve(
bm25s_index: FlyteDirectory,
contextual_chunks_data: FlyteFile,
embedding_model: str = "BAAI/bge-large-en-v1.5",
queries: list[str] = [
"What to do in the face of uncertainty?",
"Why won't people write?",
],
) -> RetrievalResults:
import json
import bm25s
import numpy as np
from pymilvus import MilvusClient
client = MilvusClient("test_milvus.db")
# Generate embeddings for the queries using Together
query_embeddings = [
get_embedding(query, embedding_model) for query in queries
]
query_embeddings_np = np.array(query_embeddings, dtype=np.float32)
collection_name = "paul_graham_collection"
results = client.search(
collection_name,
query_embeddings_np,
limit=5,
search_params={"metric_type": "COSINE"},
anns_field="embedding",
output_fields=["document_index", "title"]
)
# Load BM25S index
retriever = bm25s.BM25()
bm25_index = retriever.load(save_dir=bm25s_index.download())
# Load contextual chunk data
with open(contextual_chunks_data, "r", encoding="utf-8") as json_file:
contextual_chunks_data_dict = json.load(json_file)
# Perform BM25S-based retrieval
bm25s_idx_result = bm25_index.retrieve(
query_tokens=bm25s.tokenize(queries),
k=5,
corpus=np.array(list(contextual_chunks_data_dict.values())),
)
# Return results as a dataclass
return RetrievalResults(
vector_results=results,
bm25s_results=bm25s_idx_result.documents.tolist(),
)
if __name__ == "__main__":
bm25s_index, contextual_chunks_data = build_indices_wf()
results = retrieve(
bm25s_index=bm25s_index, contextual_chunks_data=contextual_chunks_data
)
print(results)
```
### Remote execution
To provide the Together AI API key to the actor during remote execution, we send it as a **Development cycle > Managing secrets > Creating secrets**. We can create this secret using the {{< key product_name >}} CLI before running the workflow. Simply run the following commands:
```
union create secret together-api-key
```
To run the workflow remotely on a {{< key product_name >}} cluster, we start by logging into the cluster.
```python
!union create login --serverless
```
Then, we initialize a {{< key product_name >}} remote object to execute the workflow on the cluster. The [UnionRemote](../../user-guide/development-cycle/union-remote) Python API supports functionality similar to that of the Union CLI, enabling you to manage {{< key product_name >}} workflows, tasks, launch plans and artifacts from within your Python code.
```python
from union.remote import UnionRemote
remote = UnionRemote(default_project="default", default_domain="development")
```
```python
indices_execution = remote.execute(build_indices_wf, inputs={"local": False})
print(indices_execution.execution_url)
```
We define a launch plan to run the workflow daily. A **Core concepts > Launch plans** serves as a template for invoking the workflow.
The scheduled launch plan ensures that the vector database and keyword index are regularly updated, keeping the data fresh and synchronized.
Be sure to note the `version` field when registering the launch plan. Each Union entity (task, workflow, launch plan) is automatically versioned, as every entity is associated with a version by default.
```python
lp = {{< key kit_as >}}.LaunchPlan.get_or_create(
workflow=build_indices_wf,
name="vector_db_ingestion_activate",
schedule={{< key kit_as >}}.CronSchedule(
schedule="0 1 * * *"
), # Run every day to update the databases
auto_activate=True,
)
registered_lp = remote.register_launch_plan(entity=lp)
```
## Deploy apps
We deploy the FastAPI and Gradio applications to serve the RAG app with {{< key product_name >}}. FastAPI is used to define the endpoint for serving the app, while Gradio is used to create the user interface.
When defining the app, we can specify inputs, images (using `ImageSpec`), resources to assign to the app, secrets, replicas, and more. We can organize the app specs into separate files. The FastAPI app spec is available in the `fastapi_app.py` file, and the Gradio app spec is in the `gradio_app.py` file.
We retrieve the artifacts and send them as inputs to the FastAPI app. We can then retrieve the app's endpoint to use in the other app. Finally, we either create the app if it doesn't already exist or update it if it does.
While we’re using FastAPI and Gradio here, you can use any Python-based front-end and API frameworks to define your apps.
```python
import os
from union.app import App, Input
fastapi_app = App(
name="contextual-rag-fastapi",
inputs=[
Input(
name="bm25s_index",
value=BM25Index.query(),
download=True,
env_var="BM25S_INDEX",
),
Input(
name="contextual_chunks_json",
value=ContextualChunksJSON.query(),
download=True,
env_var="CONTEXTUAL_CHUNKS_JSON",
),
],
container_image=union.ImageSpec(
name="contextual-rag-fastapi",
packages=[
"together",
"bm25s",
"pymilvus",
"uvicorn[standard]",
"fastapi[standard]",
"union-runtime>=0.1.10",
"flytekit>=1.15.0b5",
],
),
limits=union.Resources(cpu="1", mem="3Gi"),
port=8080,
include=["fastapi_app.py"],
args=["uvicorn", "fastapi_app:app", "--port", "8080"],
min_replicas=1,
max_replicas=1,
secrets=[
{{< key kit_as >}}.Secret(
key="together-api-key",
env_var="TOGETHER_API_KEY",
mount_requirement=union.Secret.MountType.ENV_VAR
),
{{< key kit_as >}}.Secret(
key="milvus-uri",
env_var="MILVUS_URI",
mount_requirement=union.Secret.MountType.ENV_VAR,
),
{{< key kit_as >}}.Secret(
key="milvus-token",
env_var="MILVUS_TOKEN",
mount_requirement=union.Secret.MountType.ENV_VAR,
),
],
)
gradio_app = App(
name="contextual-rag-gradio",
inputs=[
Input(
name="fastapi_endpoint",
value=fastapi_app.query_endpoint(public=False),
env_var="FASTAPI_ENDPOINT",
)
],
container_image=union.ImageSpec(
name="contextual-rag-gradio",
packages=["gradio", "union-runtime>=0.1.5"],
),
limits=union.Resources(cpu="1", mem="1Gi"),
port=8080,
include=["gradio_app.py"],
args=[
"python",
"gradio_app.py",
],
min_replicas=1,
max_replicas=1,
)
```
```python
from union.remote._app_remote import AppRemote
app_remote = AppRemote(project="default", domain="development")
app_remote.create_or_update(fastapi_app)
app_remote.create_or_update(gradio_app)
```
The apps will be deployed at the URLs provided in the output, which you can access. Below are some example queries to test the Gradio application:
- What did Paul Graham do growing up?
- What did the author do during their time in art school?
- Can you give me a summary of the author's life?
- What did the author do during their time at Yale?
- What did the author do during their time at YC?
```python
# If you want to stop the apps, here’s how you can do it:
# app_remote.stop(name="contextual-rag-fastapi-app")
# app_remote.stop(name="contextual-rag-gradio-app")
```
=== PAGE: https://www.union.ai/docs/v1/serverless/tutorials/serving ===
# Serving
{{< key product_name >}} enables you to implement serving in various contexts:
- High throughput batch inference with NIMs, vLLM, and Actors
- Low latency online inference using frameworks vLLM, SGLang.
- Web endpoints using frameworks like FastAPI and Flask.
- Interactive web apps using your favorite Python-based front-end frameworks like
Streamlit, Gradio, and more.
- Edge inference using MLC-LLM.
In this section, we will see examples demonstrating how to implement serving
in these contexts using constructs like Union Actors, Serving Apps, and
Artifacts.
## Subpages
- **Serving > Custom Webhooks**
- **Serving > Marimo Wasm**
- **Serving > Finetune Unsloth Serve**
- **Serving > Modular Max Qwen**
- **Serving > Llama Edge Deployment**
- **Serving > Vllm Serving On Actor**
=== PAGE: https://www.union.ai/docs/v1/serverless/tutorials/serving/custom-webhooks ===
---
**Source**: tutorials/serving/custom-webhooks.md
**URL**: /docs/v1/serverless/tutorials/serving/custom-webhooks/
**Weight**: 2
=== PAGE: https://www.union.ai/docs/v1/serverless/tutorials/serving/marimo-wasm ===
---
**Source**: tutorials/serving/marimo-wasm.md
**URL**: /docs/v1/serverless/tutorials/serving/marimo-wasm/
**Weight**: 2
=== PAGE: https://www.union.ai/docs/v1/serverless/tutorials/serving/finetune-unsloth-serve ===
---
**Source**: tutorials/serving/finetune-unsloth-serve.md
**URL**: /docs/v1/serverless/tutorials/serving/finetune-unsloth-serve/
**Weight**: 2
=== PAGE: https://www.union.ai/docs/v1/serverless/tutorials/serving/modular-max-qwen ===
---
**Source**: tutorials/serving/modular-max-qwen.md
**URL**: /docs/v1/serverless/tutorials/serving/modular-max-qwen/
**Weight**: 2
=== PAGE: https://www.union.ai/docs/v1/serverless/tutorials/serving/llama_edge_deployment ===
---
**Source**: tutorials/serving/llama_edge_deployment.md
**URL**: /docs/v1/serverless/tutorials/serving/llama_edge_deployment/
**Weight**: 6
=== PAGE: https://www.union.ai/docs/v1/serverless/tutorials/serving/vllm-serving-on-actor ===
---
**Source**: tutorials/serving/vllm-serving-on-actor.md
**URL**: /docs/v1/serverless/tutorials/serving/vllm-serving-on-actor/
**Weight**: 7
=== PAGE: https://www.union.ai/docs/v1/serverless/tutorials/time-series ===
# Time Series
Time series analysis is a statistical method used to analyze data points collected over time. Unlike other data types, time series data has a specific order, and the position of each data point is crucial. This allows us to study patterns, trends, and cycles within the data.
In these examples, you'll learn how to use {{< key product_name >}} to forecast and analyze time series data.
## Subpages
- **Time Series > Gluonts Time Series**
- **Time Series > Time Series Forecaster Comparison**
=== PAGE: https://www.union.ai/docs/v1/serverless/tutorials/time-series/gluonts-time-series ===
---
**Source**: tutorials/time-series/gluonts-time-series.md
**URL**: /docs/v1/serverless/tutorials/time-series/gluonts-time-series/
**Weight**: 2
=== PAGE: https://www.union.ai/docs/v1/serverless/tutorials/time-series/time-series-forecaster-comparison ===
---
**Source**: tutorials/time-series/time-series-forecaster-comparison.md
**URL**: /docs/v1/serverless/tutorials/time-series/time-series-forecaster-comparison/
**Weight**: 3
=== PAGE: https://www.union.ai/docs/v1/serverless/integrations ===
# Integrations
Union supports integration with a variety of third-party services and systems.
## Connectors
{{< key product_name >}} supports [the following connectors out-of-the-box](./connectors/_index).
If you don't see the connector you need below, have a look at **Connectors > Creating a new connector**.
| Agent | Description |
|-------|-------------|
| [SageMaker connector](./connectors/sagemaker-inference-connector/_index) | Deploy models and create, as well as trigger inference endpoints on AWS SageMaker. |
| [Airflow connector](./connectors/airflow-connector/_index) | Run Airflow jobs in your workflows with the Airflow connector. |
| [BigQuery connector](./connectors/bigquery-connector/_index) | Run BigQuery jobs in your workflows with the BigQuery connector. |
| [ChatGPT connector](./connectors/chatgpt-connector/_index) | Run ChatGPT jobs in your workflows with the ChatGPT connector. |
| [Databricks connector](./connectors/databricks-connector/_index) | Run Databricks jobs in your workflows with the Databricks connector. |
| [Memory Machine Cloud connector](./connectors/mmcloud-connector/_index) | Execute tasks using the MemVerge Memory Machine Cloud connector. |
| [OpenAI Batch connector](./connectors/openai-batch-connector/_index) | Submit requests for asynchronous batch processing on OpenAI. |
| [Perian connector](./connectors/perian-connector/_index) | Execute tasks on Perian Job Platform. |
| [Sensor connector](./connectors/sensor/_index) | Run sensor jobs in your workflows with the sensor connector. |
| [Slurm connector](./connectors/slurm-connector/_index) | Run Slurm jobs in your workflows with the Slurm connector. |
| [Snowflake connector](./connectors//snowflake-connector/_index) | Run Snowflake jobs in your workflows with the Snowflake connector. |
## Subpages
=== PAGE: https://www.union.ai/docs/v1/serverless/api-reference ===
# Reference
This section provides the reference material for all {{< key product_name >}} APIs, SDKs and CLIs.
To get started, add `union` to your project
```shell
$ uv add union
```
This will install the Union and Flytekit SDKs and the `union` CLI.
### 🔗 **Flytekit SDK**
The Flytekit SDK provides the core Python API for building Union.ai workflows and apps.
### 🔗 **Union SDK**
The Union SDK provides additional Union.ai-specific capabilities, on top of the core Flytekit SDK.
### 🔗 **{{< key cli_name >}} CLI**
The Union CLI is the command-line interface for interacting with your Union instance.
### 🔗 **Uctl CLI**
The Uctl CLI is an alternative CLI for performing administrative tasks and for use in CI/CD environments.
## Subpages
- **LLM context documents**
- **{{< key cli_name >}} CLI**
- **Uctl CLI**
- **Flytekit SDK**
- **Union SDK**
=== PAGE: https://www.union.ai/docs/v1/serverless/api-reference/flyte-context ===
# LLM context documents
The following documents provide a LLM context for authoring and running Flyte/Union workflows.
They can serve as a reference for LLM-based AI assistants to understand how to properly write, configure, and execute Flyte/Union workflows.
* **Full documentation content**: The entire documentation (this site) for {{< key product_name >}} version 1.0 in a single text file.
* 📥 [llms-full.txt](/_static/public/llms-full.txt)
* **Concise context document**: A concise overview of Flyte 1.0 concepts.
* 📥 [llms-concise.txt](/_static/public/llms-concise.txt)
You can then add either or both to the context window of your LLM-based AI assistant to help it better understand Flyte/Union development.
=== PAGE: https://www.union.ai/docs/v1/serverless/api-reference/union-cli ===
# {{< key cli_name >}} CLI
The `{{< key cli >}}` CLI is the main tool developers use to interact with {{< key product_name >}} on the command line.
## Installation
The recommended way to install the union CLI outside a workflow project is to use [`uv`](https://docs.astral.sh/uv/):
```shell
$ uv tool install {{< key kit >}}
```
This will install the `{{< key cli >}}` CLI globally on your system [as a `uv` tool](https://docs.astral.sh/uv/concepts/tools/).
## Configure the `{{< key cli >}}` CLI
To configure the `{{< key cli >}}` CLI to connect to {{< key product_name >}} Serverless, run the following command:
```shell
$ {{< key cli >}} create login --serverless
```
These command will create the file `~/.{{< key product >}}/config.yaml` with the configuration information to connect to the {{< key product_name >}} instance.
See **Getting started > Local setup** for more details.
## Overriding the configuration file location
By default, the `{{< key cli >}}` CLI will look for a configuration file at `~/.{{< key product >}}/config.yaml`.
You can override this behavior to specify a different configuration file by setting the `{{< key config_env >}} ` environment variable:
```shell
export {{< key config_env >}}=~/.my-config-location/my-config.yaml
```
Alternatively, you can always specify the configuration file on the command line when invoking `{{< key cli >}}` by using the `--config` flag:
```shell
$ {{< key cli >}} --config ~/.my-config-location/my-config.yaml run my_script.py my_workflow
```
## `{{< key cli >}}` CLI configuration search path
The `{{< key cli >}}` CLI will check for configuration files as follows:
First, if a `--config` option is used, it will use the specified config file.
Second, the config files pointed to by the following environment variables (in this order):
* `UNION_CONFIG`
* `UNIONAI_CONFIG`
* `UCTL_CONFIG`
Third, the following hard-coded locations (in this order):
Third, the following hard-coded locations (in this order):
* `~/.union/config.yaml`
* `~/.uctl/config.yaml`
If none of these are present, the CLI will raise an error.
## `{{< key cli >}}` CLI commands
Entrypoint for all the user commands.
```shell
union [OPTIONS] COMMAND [ARGS]...
```
### Options
- `-v`, `--verbose`
Show verbose messages and exception traces.
- `-k`, `--pkgs `
Dot-delineated python packages to operate on. Multiple may be specified (can use commas, or specify the switch multiple times). Please note that this option will override the option specified in the configuration file, or environment variable.
- `-c`, `--config `
Path to config file for use within container.
---
### `backfill`
The backfill command generates and registers a new workflow based on the input launchplan to run an automated backfill. The workflow can be managed using the UI and can be canceled, relaunched, and recovered.
> - `launchplan` refers to the name of the Launchplan.
> - `launchplan_version` is optional and should be a valid version for a Launchplan version.
```shell
union backfill [OPTIONS] LAUNCHPLAN [LAUNCHPLAN_VERSION]
```
#### Options
- `-p`, `--project `
Project for workflow/launchplan. Can also be set through envvar `FLYTE_DEFAULT_PROJECT`.
**Default:** `flytesnacks`
- `-d`, `--domain `
Domain for workflow/launchplan, can also be set through envvar `FLYTE_DEFAULT_DOMAIN`.
**Default:** `'development'`
- `-v`, `--version `
Version for the registered workflow. If not specified, it is auto-derived using the start and end date.
- `-n`, `--execution-name `
Create a named execution for the backfill. This can prevent launching multiple executions.
- `--dry-run`
Just generate the workflow - do not register or execute.
**Default:** `False`
- `--parallel`, `--serial`
All backfill steps can be run in parallel (limited by max-parallelism) if using `--parallel`. Else all steps will be run sequentially (`--serial`).
**Default:** `False`
- `--execute`, `--do-not-execute`
Generate the workflow and register, do not execute.
**Default:** `True`
- `--from-date `
Date from which the backfill should begin. Start date is inclusive.
- `--to-date `
Date to which the backfill should run until. End date is inclusive.
- `--backfill-window `
Timedelta for number of days, minutes, or hours after the from-date or before the to-date to compute the backfills between. This is needed with from-date / to-date. Optional if both from-date and to-date are provided.
- `--fail-fast`, `--no-fail-fast`
If set to true, the backfill will fail immediately if any of the backfill steps fail. If set to false, the backfill will continue to run even if some of the backfill steps fail.
**Default:** `True`
- `--overwrite-cache`
Whether to overwrite the cache if it already exists.
**Default:** `False`
#### Arguments
- `LAUNCHPLAN`
Required argument.
- `LAUNCHPLAN_VERSION`
Optional argument.
---
### `build`
This command can build an image for a workflow or a task from the command line, for fully self-contained scripts.
```shell
union build [OPTIONS] COMMAND [ARGS]...
```
#### Options
- `-p`, `--project `
Project to register and run this workflow in. Can also be set through envvar `FLYTE_DEFAULT_PROJECT`.
**Default:** `flytesnacks`
- `-d`, `--domain `
Domain to register and run this workflow in, can also be set through envvar `FLYTE_DEFAULT_DOMAIN`.
**Default:** `'development'`
- `--destination-dir `
Directory inside the image where the tar file containing the code will be copied to.
**Default:** `'.'`
- `--copy-all`
[Deprecated, see `--copy`] Copy all files in the source root directory to the destination directory. You can specify `--copy all` instead.
**Default:** `False`
- `--copy `
Specifies how to detect which files to copy into the image. `all` will behave as the deprecated copy-all flag, `auto` copies only loaded Python modules.
**Default:** `'auto'`
**Options:** `all | auto`
- `-i`, `--image `
Multiple values allowed. Image used to register and run.
**Default:** `'cr.union.ai/union/unionai:py3.11-latest' (Serverless), 'cr.flyte.org/flyteorg/flytekit:py3.9-latest' (BYOC)`
- `--service-account `
Service account used when executing this workflow.
- `--wait`, `--wait-execution`
Whether to wait for the execution to finish.
**Default:** `False`
- `--poll-interval `
Poll interval in seconds to check the status of the execution.
- `--dump-snippet`
Whether to dump a code snippet instructing how to load the workflow execution using UnionRemote.
**Default:** `False`
- `--overwrite-cache`
Whether to overwrite the cache if it already exists.
**Default:** `False`
- `--envvars`, `--env `
Multiple values allowed. Environment variables to set in the container, of the format `ENV_NAME=ENV_VALUE`.
- `--tags`, `--tag `
Multiple values allowed. Tags to set for the execution.
- `--name `
Name to assign to this execution.
- `--labels`, `--label `
Multiple values allowed. Labels to be attached to the execution of the format `label_key=label_value`.
- `--annotations`, `--annotation `
Multiple values allowed. Annotations to be attached to the execution of the format `key=value`.
- `--raw-output-data-prefix`, `--raw-data-prefix `
File Path prefix to store raw output data. Examples are `file://`, `s3://`, `gs://` etc., as supported by fsspec. If not specified, raw data will be stored in the default configured location in remote or locally to the temp file system.
- `--max-parallelism `
Number of nodes of a workflow that can be executed in parallel. If not specified, project/domain defaults are used. If 0, then it is unlimited.
- `--disable-notifications`
Should notifications be disabled for this execution.
**Default:** `False`
- `-r`, `--remote`
Whether to register and run the workflow on a Union deployment.
**Default:** `False`
- `--limit `
Use this to limit the number of entities to fetch.
**Default:** `50`
- `--cluster-pool `
Assign newly created execution to a given cluster pool.
- `--execution-cluster-label`, `--ecl `
Assign newly created execution to a given execution cluster label.
- `--fast`
Use fast serialization. The image won’t contain the source code.
**Default:** `False`
---
### `build.py`
Build an image for [workflow|task] from build.py
```shell
union build build.py [OPTIONS] COMMAND [ARGS]...
```
---
### `cache`
Cache certain artifacts from remote registries.
```shell
union cache [OPTIONS] COMMAND [ARGS]...
```
#### `model-from-hf`
Create a model with NAME from HuggingFace REPO
```shell
union cache model-from-hf [OPTIONS] REPO
```
##### Options
- `--artifact-name `
Artifact name to use for the cached model. Must only contain alphanumeric characters, underscores, and hyphens. If not provided, the repo name will be used (replacing '.' with '-').
- `--architecture `
Model architecture, as given in HuggingFace config.json, For non transformer models use XGBoost, Custom etc.
- `--task `
Model task, E.g, `generate`, `classify`, `embed`, `score` etc refer to VLLM docs, `auto` will try to discover this automatically
- `--modality `
Modalities supported by Model, E.g, `text`, `image`, `audio`, `video` etc refer to VLLM Docs
- `--format `
Model serialization format, e.g safetensors, onnx, torchscript, joblib, etc
- `--model-type `
Model type, e.g, `transformer`, `xgboost`, `custom` etc. Model Type is important for non-transformer models.For huggingface models, this is auto determined from config.json['model_type']
- `--short-description `
Short description of the model
- `--force `
Force caching of the model, pass `--force=1/2/3...` to force cache invalidation
- `--wait`
Wait for the model to be cached.
- `--hf-token-key `
Union secret key with hugging face token
- `--union-api-key `
Union secret key with admin permissions
- `--cpu `
Amount of CPU to use for downloading, (optionally) sharding, and caching hugging face model
- `--gpu `
Amount of GPU to use for downloading (optionally) sharding, and caching hugging face model
- `--mem `
Amount of Memory to use for downloading, (optionally) sharding, and caching hugging face model
- `--ephemeral-storage `
Amount of Ephemeral Storage to use for downloading, (optionally) sharding, and caching hugging face model
- `--accelerator `
The accelerator to use for downloading, (optionally) sharding, and caching hugging face model.
**Options:**: `nvidia-l4`, `nvidia-l4-vws`, `nvidia-l40s`, `nvidia-a100`, `nvidia-a100-80gb`, `nvidia-a10g`, `nvidia-tesla-k80`, `nvidia-tesla-m60`, `nvidia-tesla-p4`, `nvidia-tesla-p100`, `nvidia-tesla-t4`, `nvidia-tesla-v100`
- `--shard-config `
The engine to shard the model with. A yaml configuration file conforming to [`remote.ShardConfig`](../union-sdk/packages/union.remote#unionremoteshardconfig).
- `-p`, `--project `
Project to operate on
- `-d`, `--domain `
Domain to operate on
**Default:** `development`
- `--help`
Show this message and exit.
### `create`
Create a resource.
```shell
union create [OPTIONS] COMMAND [ARGS]...
```
#### `api-key`
Manage API keys.
```shell
union create api-key [OPTIONS] COMMAND [ARGS]...
```
##### `admin`
Create an api key.
```shell
union create api-key admin [OPTIONS]
```
###### Options
- `--name `
Required Name for API key.
---
#### `artifact`
Create an artifact with NAME.
```shell
union create artifact [OPTIONS] NAME
```
##### Options
- `--version `
Required Version of the artifact.
- `-p`, `--partitions `
Partitions for the artifact.
- `--short-description `
Short description of the artifact.
- `-p`, `--project `
Project to operate on.
**Default:** `functools.partial(, previous_default='default')`
- `-d`, `--domain `
Domain to operate on.
**Default:** `'development'`
- `--from_float `
Create an artifact of type (float).
- `--from_int `
Create an artifact of type (int).
- `--from_str `
Create an artifact of type (str).
- `--from_bool `
Create an artifact of type (bool).
- `--from_datetime `
Create an artifact of type (datetime).
- `--from_duration `
Create an artifact of type (duration).
- `--from_json `
Create an artifact of type (struct).
- `--from_dataframe `
Create an artifact of type (parquet).
- `--from_file `
Create an artifact of type (file).
- `--from_dir `
Create an artifact of type (dir).
###### Arguments
- `NAME`
Required argument.
---
#### `login`
Log into Union.
On Union Serverless run: `union create login --serverless`
On Union BYOC run: `union create login --host UNION_TENANT`
```shell
union create login [OPTIONS]
```
##### Options
- `--auth `
Authorization method to use.
**Options:** `device-flow | pkce`
- `--host `
Host to connect to. Mutually exclusive with serverless.
- `--serverless`
Connect to serverless. Mutually exclusive with host.
---
#### `secret`
Create a secret with NAME.
```shell
union create secret [OPTIONS] NAME
```
##### Options
- `--value `
Secret value. Mutually exclusive with value_file.
- `-f`, `--value-file `
Path to file containing the secret. Mutually exclusive with value.
- `--project `
Project name.
- `--domain `
Domain name.
###### Arguments
- `NAME`
Required argument.
---
#### `workspace`
Create workspace.
```shell
union create workspace [OPTIONS] CONFIG_FILE
```
###### Arguments
- `CONFIG_FILE`
Required argument.
---
#### `workspace-config`
Create workspace config at CONFIG_FILE.
```shell
union create workspace-config [OPTIONS] CONFIG_FILE
```
##### Options
- `--init `
Required.
**Options:** `base_image`
###### Arguments
- `CONFIG_FILE`
Required argument.
---
### `delete`
Delete a resource.
```shell
union delete [OPTIONS] COMMAND [ARGS]...
```
#### `api-key`
Manage API keys.
```shell
union delete api-key [OPTIONS] COMMAND [ARGS]...
```
##### `admin`
Delete api key.
```shell
union delete api-key admin [OPTIONS]
```
###### Options
- `--name `
Required Name for API key.
---
#### `login`
Delete login information.
```shell
union delete login [OPTIONS]
```
---
#### `secret`
Delete secret with NAME.
```shell
union delete secret [OPTIONS] NAME
```
##### Options
- `--project `
Project name.
- `--domain `
Domain name.
###### Arguments
- `NAME`
Required argument.
---
#### `workspace`
Delete workspace with NAME.
```shell
union delete workspace [OPTIONS] NAME
```
##### Options
- `--project `
Project name.
- `--domain `
Domain name.
###### Arguments
- `NAME`
Required argument.
---
### `deploy`
Deploy a resource.
```shell
union deploy [OPTIONS] COMMAND [ARGS]...
```
#### `apps`
Deploy application on Union.
```shell
union deploy apps [OPTIONS] COMMAND [ARGS]...
```
##### Options
- `-p`, `--project `
Project to run deploy.
**Default:** `flytesnacks`
- `-d`, `--domain `
Domain to run deploy.
**Default:** `'development'`
- `-n`, `--name `
Application name to start.
---
#### `build.py`
Deploy application in build.py.
```shell
union deploy apps build.py [OPTIONS] COMMAND [ARGS]...
```
---
### `execution`
The execution command allows you to interact with Union’s execution system, such as recovering/relaunching a failed execution.
```shell
union execution [OPTIONS] COMMAND [ARGS]...
```
##### Options
- `-p`, `--project `
Project for workflow/launchplan. Can also be set through envvar `FLYTE_DEFAULT_PROJECT`.
**Default:** `flytesnacks`
- `-d`, `--domain `
Domain for workflow/launchplan, can also be set through envvar `FLYTE_DEFAULT_DOMAIN`.
**Default:** `'development'`
- `--execution-id `
Required The execution id.
---
#### `recover`
Recover a failed execution.
```shell
union execution recover [OPTIONS]
```
---
#### `relaunch`
Relaunch a failed execution.
```shell
union execution relaunch [OPTIONS]
```
---
### `fetch`
Retrieve Inputs/Outputs for a Union execution or any of the inner node executions from the remote server.
The URI can be retrieved from the UI, or by invoking the get_data API.
```shell
union fetch [OPTIONS] FLYTE-DATA-URI (format flyte://...) DOWNLOAD-TO Local path (optional)
```
##### Options
- `-r`, `--recursive`
Fetch recursively, all variables in the URI. This is not needed for directories as they are automatically recursively downloaded.
###### Arguments
- `FLYTE-DATA-URI (format flyte://...)`
Required argument.
- `DOWNLOAD-TO Local path (optional)`
Optional argument.
---
### `get`
Get a single or multiple remote objects.
```shell
union get [OPTIONS] COMMAND [ARGS]...
```
#### `api-key`
Manage API keys.
```shell
union get api-key [OPTIONS] COMMAND [ARGS]...
```
##### `admin`
Show existing API keys for admin.
```shell
union get api-key admin [OPTIONS]
```
---
#### `apps`
Get apps.
```shell
union get apps [OPTIONS]
```
##### Options
- `--name `
- `--project `
Project name.
- `--domain `
Domain name.
---
#### `launchplan`
Interact with launchplans.
```shell
union get launchplan [OPTIONS] LAUNCHPLAN-NAME LAUNCHPLAN-VERSION
```
##### Options
- `--active-only`, `--scheduled`
Only return active launchplans.
- `-p`, `--project `
Project for workflow/launchplan. Can also be set through envvar `FLYTE_DEFAULT_PROJECT`.
**Default:** `flytesnacks`
- `-d`, `--domain `
Domain for workflow/launchplan, can also be set through envvar `FLYTE_DEFAULT_DOMAIN`.
**Default:** `'development'`
- `-l`, `--limit `
Limit the number of launchplans returned.
###### Arguments
- `LAUNCHPLAN-NAME`
Optional argument.
- `LAUNCHPLAN-VERSION`
Optional argument.
---
#### `secret`
Get secrets.
```shell
union get secret [OPTIONS]
```
##### Options
- `--project `
Project name.
- `--domain `
Domain name.
---
#### `workspace`
Get workspaces.
```shell
union get workspace [OPTIONS]
```
##### Options
- `--name `
- `--project `
Project name.
- `--domain `
Domain name.
- `--show-details`
Show additional details.
---
### `info`
```shell
union info [OPTIONS]
```
---
### `init`
Create Union-ready projects.
```shell
union init [OPTIONS] PROJECT_NAME
```
##### Options
- `--template `
Template folder name to be used in the repo - `flyteorg/flytekit-python-template.git`.
###### Arguments
- `PROJECT_NAME`
Required argument.
---
### `launchplan`
The launchplan command activates or deactivates a specified or the latest version of the launchplan. If `--activate` is chosen then the previous version of the launchplan will be deactivated.
> - `launchplan` refers to the name of the Launchplan.
> - `launchplan_version` is optional and should be a valid version for a Launchplan version. If not specified the latest will be used.
```shell
union launchplan [OPTIONS] LAUNCHPLAN [LAUNCHPLAN_VERSION]
```
##### Options
- `-p`, `--project `
Project for workflow/launchplan. Can also be set through envvar `FLYTE_DEFAULT_PROJECT`.
**Default:** `flytesnacks`
- `-d`, `--domain `
Domain for workflow/launchplan, can also be set through envvar `FLYTE_DEFAULT_DOMAIN`.
**Default:** `'development'`
- `--activate`, `--deactivate`
Required Activate or Deactivate the launchplan.
###### Arguments
- `LAUNCHPLAN`
Required argument.
- `LAUNCHPLAN_VERSION`
Optional argument.
---
### `local-cache`
Interact with the local cache.
```shell
union local-cache [OPTIONS] COMMAND [ARGS]...
```
#### `clear`
This command will remove all stored objects from local cache.
```shell
union local-cache clear [OPTIONS]
```
---
### `metrics`
```shell
union metrics [OPTIONS] COMMAND [ARGS]...
```
##### Options
- `-d`, `--depth `
The depth of Flyte entity hierarchy to traverse when computing metrics for this execution.
- `-p`, `--project `
The project of the workflow execution.
- `-d`, `--domain `
The domain of the workflow execution.
---
#### `dump`
The dump command aggregates workflow execution metrics and displays them. This aggregation is meant to provide an easy to understand breakdown of where time is spent in a hierarchical manner.
> - `execution_id` refers to the id of the workflow execution.
```shell
union metrics dump [OPTIONS] EXECUTION_ID
```
###### Arguments
- `EXECUTION_ID`
Required argument.
---
#### `explain`
The explain command prints each individual execution span and the associated timestamps and Flyte entity reference. This breakdown provides precise information into exactly how and when Flyte processes a workflow execution.
> - `execution_id` refers to the id of the workflow execution.
```shell
union metrics explain [OPTIONS] EXECUTION_ID
```
###### Arguments
- `EXECUTION_ID`
Required argument.
---
### `package`
This command produces a Union backend registrable package of all entities in Union. For tasks, one pb file is produced for each task, representing one TaskTemplate object. For workflows, one pb file is produced for each workflow, representing a WorkflowClosure object. The closure object contains the WorkflowTemplate, along with the relevant tasks for that workflow. This serialization step will set the name of the tasks to the fully qualified name of the task function.
```shell
union package [OPTIONS]
```
##### Options
- `-i`, `--image `
A fully qualified tag for a docker image, for example `somedocker.com/myimage:someversion123`. This is a multi-option and can be of the form `--image xyz.io/docker:latest --image my_image=xyz.io/docker2:latest`. Note, the name=image_uri. The name is optional, if not provided the image will be used as the default image. All the names have to be unique, and thus there can only be one `--image` option with no name.
- `-s`, `--source `
Local filesystem path to the root of the package.
- `-o`, `--output `
Filesystem path to the source of the Python package (from where the pkgs will start).
- `--fast`
[Deprecated, see `--copy`] This flag enables fast packaging, that allows no container build deploys of flyte workflows and tasks. You should specify `--copy all/auto` instead. Note this needs additional configuration, refer to the docs.
- `--copy `
Specify whether local files should be copied and uploaded so task containers have up-to-date code. `all` will behave as the current `fast` flag, copying all files, `auto` copies only loaded Python modules.
**Default:** `'none'`
**Options:** `all | auto | none`
- `-f`, `--force`
This flag enables overriding existing output files. If not specified, package will exit with an error, when an output file already exists.
- `-p`, `--python-interpreter `
Use this to override the default location of the in-container python interpreter that will be used by Flyte to load your program. This is usually where you install union and flytekit within the container.
- `-d`, `--in-container-source-path `
Filesystem path to where the code is copied into within the Dockerfile. look for `COPY . /root` like command.
- `--deref-symlinks`
Enables symlink dereferencing when packaging files in fast registration.
- `--env`, `--envvars `
Environment variables to set in the container, of the format `ENV_NAME=ENV_VALUE`.
---
### `register`
This command is similar to package but instead of producing a zip file, all your Flyte entities are compiled, and then sent to the backend specified by your config file. Think of this as combining the `union package` and the `uctl register` steps in one command. This is why you see switches you’d normally use with `uctl` like service account here.
Note: This command runs “fast” register by default. This means that a zip is created from the detected root of the packages given and uploaded. Just like with `union run`, tasks registered from this command will download and unzip that code package before running.
Note: This command only works on regular Python packages, not namespace packages. When determining the root of your project, it finds the first folder that does not have a `__init__.py` file.
```shell
union register [OPTIONS] [PACKAGE_OR_MODULE]...
```
##### Options
- `-p`, `--project `
Project for workflow/launchplan. Can also be set through envvar `FLYTE_DEFAULT_PROJECT`.
**Default:** `flytesnacks`
- `-d`, `--domain `
Domain for workflow/launchplan, can also be set through envvar `FLYTE_DEFAULT_DOMAIN`.
**Default:** `'development'`
- `-i`, `--image `
A fully qualified tag for a docker image, for example `somedocker.com/myimage:someversion123`. This is a multi-option and can be of the form `--image xyz.io/docker:latest --image my_image=xyz.io/docker2:latest`. Note, the name=image_uri. The name is optional, if not provided the image will be used as the default image. All the names have to be unique, and thus there can only be one `--image` option with no name.
- `-o`, `--output `
Directory to write the output tar file containing the protobuf definitions.
- `-D`, `--destination-dir `
Directory inside the image where the tar file containing the code will be copied to.
- `--service-account `
Service account used when creating launch plans.
- `--raw-data-prefix `
Raw output data prefix when creating launch plans, where offloaded data will be stored.
- `-v`, `--version `
Version the package or module is registered with.
- `--deref-symlinks`
Enables symlink dereferencing when packaging files in fast registration.
- `--non-fast`
[Deprecated, see `--copy`] Skip zipping and uploading the package. You should specify `--copy none` instead.
- `--copy `
Specify how and whether to use fast register. `all` is the current behavior copying all files from root, `auto` copies only loaded Python modules, `none` means no files are copied, i.e. don’t use fast register.
**Default:** `'all'`
**Options:** `all | auto | none`
- `--dry-run`
Execute registration in dry-run mode. Skips actual registration to remote.
- `--activate-launchplans`, `--activate-launchplan`
Activate newly registered Launchplans. This operation deactivates previous versions of Launchplans.
- `--env`, `--envvars `
Environment variables to set in the container, of the format `ENV_NAME=ENV_VALUE`.
- `--skip-errors`, `--skip-error`
Skip errors during registration. This is useful when registering multiple packages and you want to skip errors for some packages.
###### Arguments
- `PACKAGE_OR_MODULE`
Optional argument(s).
---
### `run`
This command can execute either a workflow or a task from the command line, allowing for fully self-contained scripts. Tasks and workflows can be imported from other files.
Note: This command is compatible with regular Python packages, but not with namespace packages. When determining the root of your project, it identifies the first folder without an `__init__.py` file.
```shell
union run [OPTIONS] COMMAND [ARGS]...
```
##### Options
- `-p`, `--project `
Project to register and run this workflow in. Can also be set through envvar `FLYTE_DEFAULT_PROJECT`.
**Default:** `flytesnacks`
- `-d`, `--domain `
Domain to register and run this workflow in, can also be set through envvar `FLYTE_DEFAULT_DOMAIN`.
**Default:** `'development'`
- `--destination-dir `
Directory inside the image where the tar file containing the code will be copied to.
**Default:** `'.'`
- `--copy-all`
[Deprecated, see `--copy`] Copy all files in the source root directory to the destination directory. You can specify `--copy all` instead.
**Default:** `False`
- `--copy `
Specifies how to detect which files to copy into the image. `all` will behave as the deprecated copy-all flag, `auto` copies only loaded Python modules.
**Default:** `'auto'`
**Options:** `all | auto`
- `-i`, `--image `
Multiple values allowed. Image used to register and run.
**Default:** `'cr.union.ai/union/unionai:py3.11-latest' (Serverless), 'cr.flyte.org/flyteorg/flytekit:py3.9-latest' (BYOC)`
- `--service-account `
Service account used when executing this workflow.
- `--wait`, `--wait-execution`
Whether to wait for the execution to finish.
**Default:** `False`
- `--poll-interval `
Poll interval in seconds to check the status of the execution.
- `--dump-snippet`
Whether to dump a code snippet instructing how to load the workflow execution using UnionRemote.
**Default:** `False`
- `--overwrite-cache`
Whether to overwrite the cache if it already exists.
**Default:** `False`
- `--envvars`, `--env `
Multiple values allowed. Environment variables to set in the container, of the format `ENV_NAME=ENV_VALUE`.
- `--tags`, `--tag `
Multiple values allowed. Tags to set for the execution.
- `--name `
Name to assign to this execution.
- `--labels`, `--label `
Multiple values allowed. Labels to be attached to the execution of the format `label_key=label_value`.
- `--annotations`, `--annotation `
Multiple values allowed. Annotations to be attached to the execution of the format `key=value`.
- `--raw-output-data-prefix`, `--raw-data-prefix `
File Path prefix to store raw output data. Examples are `file://`, `s3://`, `gs://` etc., as supported by fsspec. If not specified, raw data will be stored in the default configured location in remote or locally to the temp file system.
- `--max-parallelism `
Number of nodes of a workflow that can be executed in parallel. If not specified, project/domain defaults are used. If 0, then it is unlimited.
- `--disable-notifications`
Should notifications be disabled for this execution.
**Default:** `False`
- `-r`, `--remote`
Whether to register and run the workflow on a Union deployment.
**Default:** `False`
- `--limit `
Use this to limit the number of entities to fetch.
**Default:** `50`
- `--cluster-pool `
Assign newly created execution to a given cluster pool.
- `--execution-cluster-label`, `--ecl `
Assign newly created execution to a given execution cluster label.
---
#### `build.py`
Run a [workflow|task|launch plan] from build.py.
```shell
union run build.py [OPTIONS] COMMAND [ARGS]...
```
---
#### `remote-launchplan`
Retrieve remote-launchplan from a remote Union instance and execute them. The command only lists the names of the entities, but it is possible to pass in a specific version of the entity if known in the format `:`. If version is not provided, the latest version is used for tasks and active or latest version is used for launchplans.
```shell
union run remote-launchplan [OPTIONS] COMMAND [ARGS]...
```
---
#### `remote-task`
Retrieve remote-task from a remote Union instance and execute them. The command only lists the names of the entities, but it is possible to pass in a specific version of the entity if known in the format `:`. If version is not provided, the latest version is used for tasks and active or latest version is used for launchplans.
```shell
union run remote-task [OPTIONS] COMMAND [ARGS]...
```
---
#### `remote-workflow`
Retrieve remote-workflow from a remote Union instance and execute them. The command only lists the names of the entities, but it is possible to pass in a specific version of the entity if known in the format `:`. If version is not provided, the latest version is used for tasks and active or latest version is used for launchplans.
```shell
union run remote-workflow [OPTIONS] COMMAND [ARGS]...
```
---
### `serialize`
This command produces protobufs for tasks and templates. For tasks, one pb file is produced for each task, representing one TaskTemplate object. For workflows, one pb file is produced for each workflow, representing a WorkflowClosure object. The closure object contains the WorkflowTemplate, along with the relevant tasks for that workflow. In lieu of Admin, this serialization step will set the URN of the tasks to the fully qualified name of the task function.
```shell
union serialize [OPTIONS] COMMAND [ARGS]...
```
##### Options
- `-i`, `--image `
A fully qualified tag for a docker image, for example `somedocker.com/myimage:someversion123`. This is a multi-option and can be of the form `--image xyz.io/docker:latest --image my_image=xyz.io/docker2:latest`. Note, the name=image_uri. The name is optional, if not provided the image will be used as the default image. All the names have to be unique, and thus there can only be one `--image` option with no name.
- `--local-source-root `
Root dir for Python code containing workflow definitions to operate on when not the current working directory. Optional when running `union serialize` in out-of-container-mode and your code lies outside of your working directory.
- `--in-container-config-path `
This is where the configuration for your task lives inside the container. The reason it needs to be a separate option is because this union utility cannot know where the Dockerfile writes the config file to. Required for running `union serialize` in out-of-container-mode.
- `--in-container-virtualenv-root `
**DEPRECATED:** This flag is ignored! This is the root of the flytekit virtual env in your container. The reason it needs to be a separate option is because this union utility cannot know where flytekit is installed inside your container. Required for running `union serialize` in out of container mode when your container installs the flytekit virtualenv outside of the default `/opt/venv`.
- `--env`, `--envvars `
Environment variables to set in the container, of the format `ENV_NAME=ENV_VALUE`.
---
#### `fast`
```shell
union serialize fast [OPTIONS] COMMAND [ARGS]...
```
---
#### `workflows`
```shell
union serialize fast workflows [OPTIONS]
```
##### Options
- `--deref-symlinks`
Enables symlink dereferencing when packaging files in fast registration.
- `-f`, `--folder `
---
#### `workflows`
```shell
union serialize workflows [OPTIONS]
```
##### Options
- `-f`, `--folder `
---
### `serve`
Start the specific service.
```shell
union serve [OPTIONS] COMMAND [ARGS]...
```
#### `agent`
Start a grpc server for the agent service.
```shell
union serve agent [OPTIONS]
```
##### Options
- `--port `
Grpc port for the agent service.
- `--worker `
Number of workers for the grpc server.
- `--timeout `
It will wait for the specified number of seconds before shutting down grpc server. It should only be used for testing.
---
### `stop`
Stop a resource.
```shell
union stop [OPTIONS] COMMAND [ARGS]...
```
#### `apps`
```shell
union stop apps [OPTIONS]
```
##### Options
- `--name `
Required.
- `--project `
Project name.
- `--domain `
Domain name.
---
### `update`
Update a resource.
```shell
union update [OPTIONS] COMMAND [ARGS]...
```
#### `secret`
Update secret with NAME.
```shell
union update secret [OPTIONS] NAME
```
##### Options
- `--value `
Secret value. Mutually exclusive with value_file.
- `-f`, `--value-file `
Path to file containing the secret. Mutually exclusive with value.
- `--project `
Project name.
- `--domain `
Domain name.
###### Arguments
- `NAME`
Required argument.
=== PAGE: https://www.union.ai/docs/v1/serverless/api-reference/uctl-cli ===
# Uctl CLI
The `uctl` CLI provides functionality for Union administrators to manage Union-specific entities like users, roles, and Union configuration.
It also includes much of the functionality of the **{{< key cli_name >}} CLI**, but since it is a compiled binary (written in Go), it is faster and more efficient than the Python-based `union` CLI and more suitable for situations like running in a CI/CD environment where you might want to avoid the overhead of large Python dependencies.
> [!NOTE]
> If you are not a Union administrator, or if you will be interacting with Union in an environment where
> Python is installed, you should use the **{{< key cli_name >}} CLI** instead.
## Installation
### macOS
To install `uctl` on a Mac, use [Homebrew](https://brew.sh/), `curl`, or manually download the binary.
**Homebrew**
```shell
$ brew tap unionai/homebrew-tap
$ brew install uctl
```
**curl**
To use `curl`, set `BINDIR` to the install location (it defaults to `./bin`) and run the following command:
```shell
$ curl -sL https://raw.githubusercontent.com/unionai/uctl/main/install.sh | bash
```
**Manual download**
To download the binary manually, see the [`uctl` releases page](https://github.com/unionai/uctl/releases).
### Linux
To install `uctl` on Linux, use `curl` or manually download the binary.
**curl**
To use `curl`, set `BINDIR` to the install location (it defaults to `./bin`) and run the following command:
```shell
$ curl -sL https://raw.githubusercontent.com/unionai/uctl/main/install.sh | bash
```
**Manual download**
To download the binary manually, see the [`uctl` releases page](https://github.com/unionai/uctl/releases).
### Windows
To install `uctl` on Windows, use `curl` or manually download the binary.
**curl**
To use `curl`, in a Linux shell (such as [WSL](https://learn.microsoft.com/en-us/windows/wsl/install)), set `BINDIR` to the install location (it defaults to `./bin`) and run the following command:
```shell
$ curl -sL https://raw.githubusercontent.com/unionai/uctl/main/install.sh | bash
```
**Manual download**
To download the binary manually, see the [`uctl` releases page](https://github.com/unionai/uctl/releases).
## Configuration
`uctl` will automatically connect to Union Serverless. You do not need to create a configuration file.
> [!WARNING]
> If you have previously used Union, you may have existing configuration files that will interfere with command line access to Union Serverless.
>
> To avoid connection errors, remove any configuration files in the `~/.unionai/` or `~/.union/` directories and unset the environment variables `UNIONAI_CONFIG` and `UNION_CONFIG`.
## Options
| Option | Type | Description |
|--------|------|-------------|
| `--admin.audience` | string | Audience to use when initiating OAuth2 authorization requests. |
| `--admin.authType` | string | Type of OAuth2 flow used for communicating with admin.ClientSecret, Pkce, ExternalCommand are valid values (default "ClientSecret") |
| `--admin.authorizationHeader` | string | Custom metadata header to pass JWT |
| `--admin.authorizationServerUrl` | string | This is the URL to your IdP's authorization server. It'll default to Endpoint |
| `--admin.caCertFilePath` | string | Use specified certificate file to verify the admin server peer. |
| `--admin.clientId` | string | Client ID (default "flytepropeller") |
| `--admin.clientSecretEnvVar` | string | Environment variable containing the client secret |
| `--admin.clientSecretLocation` | string | File containing the client secret (default "/etc/secrets/client_secret") |
| `--admin.command` | strings | Command for external authentication token generation |
| `--admin.defaultServiceConfig` | string |
| `--admin.deviceFlowConfig.pollInterval` | string | amount of time the device flow would poll the token endpoint if auth server doesn't return a polling interval. Okta and google IDP do return an interval' (default "5s") |
| `--admin.deviceFlowConfig.refreshTime` | string | grace period from the token expiry after which it would refresh the token. (default "5m0s") |
| `--admin.deviceFlowConfig.timeout` | string | amount of time the device flow should complete or else it will be cancelled. (default "10m0s") |
| `--admin.endpoint` | string | For admin types, specify where the uri of the service is located. |
| `--admin.httpProxyURL` | string | OPTIONAL: HTTP Proxy to be used for OAuth requests. |
| `--admin.insecure` | | Use insecure connection. |
| `--admin.insecureSkipVerify` | | InsecureSkipVerify controls whether a client verifies the server's certificate chain and host name.Caution: shouldn't be use for production usecases' |
| `--admin.maxBackoffDelay` | string | Max delay for grpc backoff (default "8s") |
| `--admin.maxRetries` | int | Max number of gRPC retries (default 4) |
| `--admin.perRetryTimeout` | string | gRPC per retry timeout (default "15s") |
| `--admin.pkceConfig.refreshTime` | string | grace period from the token expiry after which it would refresh the token. (default "5m0s") |
| `--admin.pkceConfig.timeout` | string | Amount of time the browser session would be active for authentication from client app. (default "2m0s") |
| `--admin.scopes` | strings | List of scopes to request |
| `--admin.tokenRefreshWindow` | string | Max duration between token refresh attempt and token expiry. (default "0s") |
| `--admin.tokenUrl` | string | OPTIONAL: Your IdP's token endpoint. It'll be discovered from flyte admin's OAuth Metadata endpoint if not provided. |
| `--admin.useAudienceFromAdmin` | | Use Audience configured from admins public endpoint config. |
| `--admin.useAuth` | | Deprecated: Auth will be enabled/disabled based on admin's dynamically discovered information. |
| `-c`, `--config` | string | config file (default is $HOME/.flyte/config.yaml) |
| `--console.endpoint` | string | Endpoint of console, if different than flyte admin |
| `-d`, `--domain` | string | Specifies the Flyte project's domain. |
| `--files.archive` | | Pass in archive file either an http link or local path. |
| `--files.assumableIamRole` | string | Custom assumable iam auth role to register launch plans with. |
| `--files.continueOnError` | | Continue on error when registering files. |
| `--files.destinationDirectory` | string | Location of source code in container. |
| `--files.dryRun` | | Execute command without making any modifications. |
| `--files.enableSchedule` | | Enable the schedule if the files contain schedulable launchplan. |
| `--files.force` | | Force use of version number on entities registered with flyte. |
| `--files.k8ServiceAccount` | string | Deprecated. Please use `--K8sServiceAccount` |
| `--files.k8sServiceAccount` | string | Custom kubernetes service account auth role to register launch plans with. |
| `--files.outputLocationPrefix` | string | Custom output location prefix for offloaded types (files/schemas). |
| `--files.sourceUploadPath` | string | Deprecated: Update flyte admin to avoid having to configure storage access from uctl. |
| `--files.version` | string | Version of the entity to be registered with flyte which are un-versioned after serialization.
| `-h`, `--help` | | help for uctl |
| `--logger.formatter.type` | string | Sets logging format type. (default "json") |
| `--logger.level` | int | Sets the minimum logging level. (default 3) |
| `--logger.mute` | | Mutes all logs regardless of severity. Intended for benchmarks/tests only. |
| `--logger.show-source` | | Includes source code location in logs. |
| `-o`, `--output` | string | Specifies the output type - supported formats [TABLE JSON YAML DOT DOTURL]. NOTE: dot, doturl are only supported for Workflow (default "TABLE") |
| `-p`, `--project` | string | Specifies the Flyte project.
| `--storage.cache.max_size_mbs` | int | Maximum size of the cache where the Blob store data is cached in-memory. If not specified or set to 0, cache is not used |
| `--storage.cache.target_gc_percent` | int | Sets the garbage collection target percentage. |
| `--storage.connection.access-key` | string | Access key to use. Only required when authtype is set to accesskey. |
| `--storage.connection.auth-type` | string | Auth Type to use [iam, accesskey]. (default "iam") |
| `--storage.connection.disable-ssl` | | Disables SSL connection. Should only be used for development. |
| `--storage.connection.endpoint` | string | URL for storage client to connect to. |
| `--storage.connection.region` | string | Region to connect to. (default "us-east-1") |
| `--storage.connection.secret-key` | string | Secret to use when accesskey is set. |
| `--storage.container` | string | Initial container (in s3 a bucket) to create -if it doesn't exist-.' |
| `--storage.defaultHttpClient.timeout` | string | Sets time out on the http client. (default "0s") |
| `--storage.enable-multicontainer` | | If this is true, then the container argument is overlooked and redundant. This config will automatically open new connections to new containers/buckets as they are encountered |
| `--storage.limits.maxDownloadMBs` | int | Maximum allowed download size (in MBs) per call. (default 2) |
| `--storage.stow.config` | stringToString | Configuration for stow backend. Refer to github/flyteorg/stow (default []) |
| `--storage.stow.kind` | string | Kind of Stow backend to use. Refer to github/flyteorg/stow |
| `--storage.type` | string | Sets the type of storage to configure [s3/minio/local/mem/stow]. (default "s3") |
## Commands
* `uctl create {uctl-create/index}` creates various Flyte resources such as tasks, workflows, launch plans, executions, and projects.
* `uctl delete {uctl-delete/index}` terminates/deletes various Flyte resources, such as executions and resource attributes.
* `uctl demo {uctl-demo/index}` provides commands for starting and interacting with a standalone minimal
local environment for running Flyte.
* `uctl get {uctl-get/index}` fetches various Flyte resources such as tasks, workflows, launch plans, executions, and projects.
* `uctl register {uctl-register/index}` registers tasks, workflows, and launch plans from a list of generated serialized files.
* `uctl update {uctl-update/index}` update Flyte resources e.g., projects.
* `uctl version {uctl-version>` fetches `uctl` version.
## Entities
| Entity | Commands |
|--------|----------|
| Cluster resource attribute | **Uctl CLI > uctl get > uctl get cluster-resource-attribute**
**Uctl CLI > uctl update > uctl update cluster-resource-attribute**
**Uctl CLI > uctl delete > uctl delete cluster-resource-attribute** |
| Config | **Uctl CLI > uctl config > uctl config init**
**Uctl CLI > uctl config > uctl config discover**
**Uctl CLI > uctl config > uctl config docs**
**Uctl CLI > uctl config > uctl config validate** |
| Demo | **Uctl CLI > uctl demo > uctl demo start**
**Uctl CLI > uctl demo > uctl demo status**
**Uctl CLI > uctl demo > uctl demo exec**
**Uctl CLI > uctl demo > uctl demo reload**
**Uctl CLI > uctl demo > uctl demo teardown** |
| Execution | **Uctl CLI > uctl create > uctl create execution**
**Uctl CLI > uctl get > uctl get execution**
**Uctl CLI > uctl update > uctl update execution**
**Uctl CLI > uctl delete > uctl delete execution** |
| Execution cluster label | **Uctl CLI > uctl get > uctl get execution-cluster-label**
**Uctl CLI > uctl update > uctl update execution-cluster-label**
**Uctl CLI > uctl delete > uctl delete execution-cluster-label** |
| Execution queue attribute | **Uctl CLI > uctl get > uctl get execution-queue-attribute**
**Uctl CLI > uctl update > uctl update execution-queue-attribute**
**Uctl CLI > uctl delete > uctl delete execution-queue-attribute** |
| Files | **Uctl CLI > uctl register > uctl register files** |
| Launch plan | **Uctl CLI > uctl get > uctl get launchplan**
**Uctl CLI > uctl update > uctl update launchplan**
**Uctl CLI > uctl update > uctl update launchplan-meta** |
| Plugin override | **Uctl CLI > uctl get > uctl get plugin-override**
**Uctl CLI > uctl update > uctl update plugin-override**
**Uctl CLI > uctl delete > uctl delete plugin-override** |
| Project | **Uctl CLI > uctl create > uctl create project**
**Uctl CLI > uctl get > uctl get project**
**Uctl CLI > uctl update > uctl update project** |
| Task | **Uctl CLI > uctl get > uctl get task**
**Uctl CLI > uctl update > uctl update task-meta** |
| Task resource attribute | **Uctl CLI > uctl get > uctl get task-resource-attribute**
**Uctl CLI > uctl update > uctl update task-resource-attribute**
**Uctl CLI > uctl delete > uctl delete task-resource-attribute** |
| Workflow | **Uctl CLI > uctl get > uctl get workflow**
**Uctl CLI > uctl update > uctl update workflow-meta** |
| Workflow execution config | **Uctl CLI > uctl get > uctl get workflow-execution-config**
**Uctl CLI > uctl update > uctl update workflow-execution-config**
**Uctl CLI > uctl delete > uctl delete workflow-execution-config** |
## Subpages
- **Uctl CLI > uctl**
- **Uctl CLI > uctl version**
- **Uctl CLI > uctl append**
- **Uctl CLI > uctl apply**
- **Uctl CLI > uctl config**
- **Uctl CLI > uctl create**
- **Uctl CLI > uctl delete**
- **Uctl CLI > uctl demo**
- **Uctl CLI > uctl get**
- **Uctl CLI > uctl register**
- **Uctl CLI > uctl update**
=== PAGE: https://www.union.ai/docs/v1/serverless/api-reference/uctl-cli/uctl ===
# uctl
uctl is used to interact with Union.ai Cloud
## Synopsis
uctl is used to interact with Union.ai Cloud
Lets you manage Flyte entities (Projects, Domains, Workflows, Tasks, and
Launch plans), Users, Roles, and Union.ai Cloud configuration.
## Options
| Option | Type | Description |
|--------|------|-------------|
| `--admin.audience` | string | Audience to use when initiating OAuth2 authorization requests. |
| `--admin.authType` | string | Type of OAuth2 flow used for communicating with admin.ClientSecret, Pkce, ExternalCommand are valid values (default "ClientSecret") |
| `--admin.authorizationHeader` | string | Custom metadata header to pass JWT |
| `--admin.authorizationServerUrl` | string | This is the URL to your IdP's authorization server. It'll default to Endpoint |
| `--admin.caCertFilePath` | string | Use specified certificate file to verify the admin server peer. |
| `--admin.clientId` | string | Client ID (default "flytepropeller") |
| `--admin.clientSecretEnvVar` | string | Environment variable containing the client secret |
| `--admin.clientSecretLocation` | string | File containing the client secret (default "/etc/secrets/client_secret") |
| `--admin.command` | strings | Command for external authentication token generation |
| `--admin.defaultOrg` | string | OPTIONAL: Default org to use to support non-org based cli's.'. |
| `--admin.defaultServiceConfig` | string | |
| `--admin.deviceFlowConfig.pollInterval` | string | amount of time the device flow would poll the token endpoint if auth server doesn't return a polling interval. Okta and google IDP do return an interval' (default "5s") |
| `--admin.deviceFlowConfig.refreshTime` | string | grace period from the token expiry after which it would refresh the token. (default "5m0s") |
| `--admin.deviceFlowConfig.timeout` | string | amount of time the device flow should complete or else it will be cancelled. (default "10m0s") |
| `--admin.endpoint` | string | For admin types, specify where the uri of the service is located. |
| `--admin.httpProxyURL` | string | OPTIONAL: HTTP Proxy to be used for OAuth requests. |
| `--admin.insecure` | | Use insecure connection. |
| `--admin.insecureSkipVerify` | | InsecureSkipVerify controls whether a client verifies the server's certificate chain and host name.Caution: shouldn't be use for production usecases' |
| `--admin.maxBackoffDelay` | string | Max delay for grpc backoff (default "8s") |
| `--admin.maxMessageSizeBytes` | int | The max size in bytes for incoming gRPC messages |
| `--admin.maxRetries` | int | Max number of gRPC retries (default 4) |
| `--admin.perRetryTimeout` | string | gRPC per retry timeout (default "15s") |
| `--admin.pkceConfig.refreshTime` | string | grace period from the token expiry after which it would refresh the token. (default "5m0s") |
| `--admin.pkceConfig.timeout` | string | Amount of time the browser session would be active for authentication from client app. (default "2m0s") |
| `--admin.proxyCommand` | strings | Command for external proxy-authorization token generation |
| `--admin.scopes` | strings | List of scopes to request |
| `--admin.tokenRefreshWindow` | string | Max duration between token refresh attempt and token expiry. (default "0s") |
| `--admin.tokenUrl` | string | OPTIONAL: Your IdP's token endpoint. It'll be discovered from flyte admin's OAuth Metadata endpoint if not provided. |
| `--admin.useAudienceFromAdmin` | | Use Audience configured from admins public endpoint config. |
| `--admin.useAuth` | | Deprecated: Auth will be enabled/disabled based on admin's dynamically discovered information. |
| `--auth.appAuth.externalAuthServer.allowedAudience` | strings | Optional: A list of allowed audiences. If not provided, the audience is expected to be the public Uri of the service. |
| `--auth.appAuth.externalAuthServer.baseUrl` | string | This should be the base url of the authorization server that you are trying to hit. With Okta for instance, it will look something like https://company.okta.com/oauth2/abcdef123456789/ |
| `--auth.appAuth.externalAuthServer.httpProxyURL` | string | OPTIONAL: HTTP Proxy to be used for OAuth requests. |
| `--auth.appAuth.externalAuthServer.metadataUrl` | string | Optional: If the server doesn't support /.well-known/oauth-authorization-server, you can set a custom metadata url here.' |
| `--auth.appAuth.externalAuthServer.retryAttempts` | int | Optional: The number of attempted retries on a transient failure to get the OAuth metadata (default 5) |
| `--auth.appAuth.externalAuthServer.retryDelay` | string | Optional, Duration to wait between retries (default "1s") |
| `--auth.appAuth.selfAuthServer.accessTokenLifespan` | string | Defines the lifespan of issued access tokens. (default "30m0s") |
| `--auth.appAuth.selfAuthServer.authorizationCodeLifespan` | string | Defines the lifespan of issued access tokens. (default "5m0s") |
| `--auth.appAuth.selfAuthServer.claimSymmetricEncryptionKeySecretName` | string | OPTIONAL: Secret name to use to encrypt claims in authcode token. (default "claim_symmetric_key") |
| `--auth.appAuth.selfAuthServer.issuer` | string | Defines the issuer to use when issuing and validating tokens. The default value is https://{requestUri.HostAndPort}/ |
| `--auth.appAuth.selfAuthServer.oldTokenSigningRSAKeySecretName` | string | OPTIONAL: Secret name to use to retrieve Old RSA Signing Key. This can be useful during key rotation to continue to accept older tokens. (default "token_rsa_key_old.pem") |
| `--auth.appAuth.selfAuthServer.refreshTokenLifespan` | string | Defines the lifespan of issued access tokens. (default "1h0m0s") |
| `--auth.appAuth.selfAuthServer.tokenSigningRSAKeySecretName` | string | OPTIONAL: Secret name to use to retrieve RSA Signing Key. (default "token_rsa_key.pem") |
| `--auth.appAuth.thirdPartyConfig.flyteClient.audience` | string | Audience to use when initiating OAuth2 authorization requests. |
| `--auth.appAuth.thirdPartyConfig.flyteClient.clientId` | string | public identifier for the app which handles authorization for a Flyte deployment (default "uctl") |
| `--auth.appAuth.thirdPartyConfig.flyteClient.redirectUri` | string | This is the callback uri registered with the app which handles authorization for a Flyte deployment (default "http://localhost:53593/callback") |
| `--auth.appAuth.thirdPartyConfig.flyteClient.scopes` | strings | Recommended scopes for the client to request. (default [all,offline]) |
| `--auth.disableForGrpc` | | Disables auth enforcement on Grpc Endpoints. |
| `--auth.disableForHttp` | | Disables auth enforcement on HTTP Endpoints. |
| `--auth.grpcAuthorizationHeader` | string | (default "flyte-authorization") |
| `--auth.httpAuthorizationHeader` | string | (default "flyte-authorization") |
| `--auth.httpProxyURL` | string | OPTIONAL: HTTP Proxy to be used for OAuth requests. |
| `--auth.tokenEndpointProxyPath` | string | The path used to proxy calls to the TokenURL |
| `--auth.userAuth.cookieBlockKeySecretName` | string | OPTIONAL: Secret name to use for cookie block key. (default "cookie_block_key") |
| `--auth.userAuth.cookieHashKeySecretName` | string | OPTIONAL: Secret name to use for cookie hash key. (default "cookie_hash_key") |
| `--auth.userAuth.cookieSetting.domain` | string | OPTIONAL: Allows you to set the domain attribute on the auth cookies. |
| `--auth.userAuth.cookieSetting.sameSitePolicy` | string | OPTIONAL: Allows you to declare if your cookie should be restricted to a first-party or same-site context.Wrapper around http.SameSite. (default "DefaultMode") |
| `--auth.userAuth.httpProxyURL` | string | OPTIONAL: HTTP Proxy to be used for OAuth requests. |
| `--auth.userAuth.idpQueryParameter` | string | idp query parameter used for selecting a particular IDP for doing user authentication. Eg: for Okta passing idp={IDP-ID} forces the authentication to happen with IDP-ID |
| `--auth.userAuth.openId.baseUrl` | string | |
| `--auth.userAuth.openId.clientId` | string | |
| `--auth.userAuth.openId.clientSecretFile` | string | |
| `--auth.userAuth.openId.clientSecretName` | string | (default "oidc_client_secret") |
| `--auth.userAuth.openId.scopes` | strings | (default [openid,profile]) |
| `--auth.userAuth.redirectUrl` | string | (default "/console") |
| `--authorizer.internalCommunicationConfig.enabled` | | Enables authorization decisions for internal communication. (default true) |
| `--authorizer.internalCommunicationConfig.ingressIdentity` | string | IngressIdentity used in the cluster. Needed to exclude the communication coming from ingress. (default "ingress-nginx.ingress-nginx.serviceaccount.identity.linkerd.cluster.local") |
| `--authorizer.internalCommunicationConfig.tenantUrlPatternIdentity` | string | UrlPatternIdentity of the internal tenant service endpoint identities. (default "{{ service }}.{{ org }}.serviceaccount.identity.linkerd.cluster.local") |
| `--authorizer.internalCommunicationConfig.urlPatternIdentity` | string | UrlPatternIdentity of the internal service endpoint identities. (default "{{ service }}-helmchart.{{ service }}.serviceaccount.identity.linkerd.cluster.local") |
| `--authorizer.mode` | string | (default "Active") |
| `--authorizer.organizationConfig.PolicyConfig.adminPolicyDescription` | string | description for the boilerplate admin policy (default "Contributor permissions and full admin permissions to manage users and view usage dashboards") |
| `--authorizer.organizationConfig.PolicyConfig.contributorPolicyDescription` | string | description for the boilerplate contributor policy (default "Viewer permissions and permissions to create workflows, tasks, launch plans, and executions") |
| `--authorizer.organizationConfig.PolicyConfig.defaultUserPolicyRoleType` | string | name of the role type to determine which default policy new users added to the organization should be assigned (default "Viewer") |
| `--authorizer.organizationConfig.PolicyConfig.serverlessContributorPolicyDescription` | string | description for the boilerplate serverless contributor policy (default "Viewer permissions and permissions to create workflows, tasks, launch plans, and executions") |
| `--authorizer.organizationConfig.PolicyConfig.serverlessViewerPolicyDescription` | string | description for the boilerplate serverless viewer policy (default "Permissions to view Flyte entities") |
| `--authorizer.organizationConfig.PolicyConfig.viewerPolicyDescription` | string | description for the boilerplate viewer policy (default "Permissions to view Flyte entities") |
| `--authorizer.organizationConfig.defaultPolicyCacheDuration` | string | Cache entry duration for the store of the default policy per organization (default "10m0s") |
| `--authorizer.syncRuleRefreshInterval` | string | (default "1m0s") |
| `--authorizer.type` | string | (default "UserClouds") |
| `--authorizer.userCloudsClient.cache.redis.ttl.edgeTypes` | string | Specifies how long edge types remain in the cache.. (default "30m0s") |
| `--authorizer.userCloudsClient.cache.redis.ttl.edges` | string | Specifies how long edges remain in the cache. (default "30m0s") |
| `--authorizer.userCloudsClient.cache.redis.ttl.objectTypes` | string | Specifies how long object types remain in the cache. (default "30m0s") |
| `--authorizer.userCloudsClient.cache.redis.ttl.objects` | string | Specifies how long objects remain in the cache. (default "30m0s") |
| `--authorizer.userCloudsClient.cache.type` | string | Cache type to use. (default "none") |
| `--authorizer.userCloudsClient.clientID` | string | UserClouds client id |
| `--authorizer.userCloudsClient.clientSecretName` | string | UserCloud client secret name to read from the secret manager. (default "userclouds-client-secret") |
| `--authorizer.userCloudsClient.enableLogging` | | Enable userclouds client's internal logging. Calls to post logs take 250-350 ms and will impact p99 latency, enable with caution. |
| `--authorizer.userCloudsClient.tenantID` | string | UserClouds tenant id. Should be a UUID. |
| `--authorizer.userCloudsClient.tenantUrl` | string | Something like https://{yourtenant}.tenant.userclouds.com |
| `--config` | string | config file (default is /Users/andrew/.union/config.yaml) |
| `--connection.environment` | string | |
| `--connection.region` | string | |
| `--connection.rootTenantURLPattern` | string | Pattern for tenant url. (default "dns:///{{ organization }}.cloud-staging.union.ai") |
| `--console.endpoint` | string | Endpoint of console, if different than flyte admin |
| `--database.connMaxLifeTime` | string | sets the maximum amount of time a connection may be reused (default "1h0m0s") |
| `--database.enableForeignKeyConstraintWhenMigrating` | | Whether to enable gorm foreign keys when migrating the db |
| `--database.maxIdleConnections` | int | maxIdleConnections sets the maximum number of connections in the idle connection pool. (default 10) |
| `--database.maxOpenConnections` | int | maxOpenConnections sets the maximum number of open connections to the database. (default 100) |
| `--database.postgres.dbname` | string | The database name (default "postgres") |
| `--database.postgres.debug` | | |
| `--database.postgres.host` | string | The host name of the database server (default "localhost") |
| `--database.postgres.options` | string | See http://gorm.io/docs/connecting_to_the_database.html for available options passed, in addition to the above. (default "sslmode=disable") |
| `--database.postgres.password` | string | The database password. (default "postgres") |
| `--database.postgres.passwordPath` | string | Points to the file containing the database password. |
| `--database.postgres.port` | int | The port name of the database server (default 30001) |
| `--database.postgres.readReplicaHost` | string | The host name of the read replica database server (default "localhost") |
| `--database.postgres.username` | string | The database user who is connecting to the server. (default "postgres") |
| `--database.sqlite.file` | string | The path to the file (existing or new) where the DB should be created / stored. If existing, then this will be re-used, else a new will be created |
| `--db.connectionPool.maxConnectionLifetime` | string | (default "0s") |
| `--db.connectionPool.maxIdleConnections` | int | |
| `--db.connectionPool.maxOpenConnections` | int | |
| `--db.dbname` | string | (default "postgres") |
| `--db.debug` | | |
| `--db.host` | string | (default "postgres") |
| `--db.log_level` | int | (default 4) |
| `--db.options` | string | (default "sslmode=disable") |
| `--db.password` | string | |
| `--db.passwordPath` | string | |
| `--db.port` | int | (default 5432) |
| `--db.username` | string | (default "postgres") |
| `-d`, `--domain` | string | Specifies the Flyte project's domain. |
| `--files.archive` | | Pass in archive file either an http link or local path. |
| `--files.assumableIamRole` | string | Custom assumable iam auth role to register launch plans with. |
| `--files.continueOnError` | | Continue on error when registering files. |
| `--files.destinationDirectory` | string | Location of source code in container. |
| `--files.dryRun` | | Execute command without making any modifications. |
| `--files.enableSchedule` | | Enable the schedule if the files contain schedulable launchplan. |
| `--files.force` | | Force use of version number on entities registered with flyte. |
| `--files.k8ServiceAccount` | string | Deprecated. Please use `--K8sServiceAccount` |
| `--files.k8sServiceAccount` | string | Custom kubernetes service account auth role to register launch plans with. |
| `--files.outputLocationPrefix` | string | Custom output location prefix for offloaded types (files/schemas). |
| `--files.sourceUploadPath` | string | Deprecated: Update flyte admin to avoid having to configure storage access from uctl. |
| `--files.version` | string | Version of the entity to be registered with flyte which are un-versioned after serialization. |
| `-h`, `--help` | help for uctl |
| `--logger.formatter.type` | string | Sets logging format type. (default "json") |
| `--logger.level` | int | Sets the minimum logging level. (default 3) |
| `--logger.mute` | | Mutes all logs regardless of severity. Intended for benchmarks/tests only. |
| `--logger.show-source` | | Includes source code location in logs. |
| `--org` | string | Organization to work on. If not set, default to user's org. |
| `--otel.file.filename` | string | Filename to store exported telemetry traces (default "/tmp/trace.txt") |
| `--otel.jaeger.endpoint` | string | Endpoint for the jaeger telemetry trace ingestor (default "http://localhost:14268/api/traces") |
| `--otel.otlpgrpc.endpoint` | string | Endpoint for the OTLP telemetry trace collector (default "http://localhost:4317") |
| `--otel.otlphttp.endpoint` | string | Endpoint for the OTLP telemetry trace collector (default "http://localhost:4318/v1/traces") |
| `--otel.sampler.parentSampler` | string | Sets the parent sampler to use for the tracer (default "always") |
| `--otel.type` | string | Sets the type of exporter to configure [noop/file/jaeger/otlpgrpc/otlphttp]. (default "noop") |
| `-o`, `--output` | string | Specifies the output type - supported formats [TABLE JSON YAML DOT DOTURL]. NOTE: dot, doturl are only supported for Workflow (default "table") |
| `--plugins.catalogcache.reader.maxItems` | int | Maximum number of entries to keep in the index. (default 10000) |
| `--plugins.catalogcache.reader.maxRetries` | int | Maximum number of retries per item. (default 3) |
| `--plugins.catalogcache.reader.workers` | int | Number of concurrent workers to start processing the queue. (default 10) |
| `--plugins.catalogcache.writer.maxItems` | int | Maximum number of entries to keep in the index. (default 10000) |
| `--plugins.catalogcache.writer.maxRetries` | int | Maximum number of retries per item. (default 3) |
| `--plugins.catalogcache.writer.workers` | int | Number of concurrent workers to start processing the queue. (default 10) |
| `-p`, `--project` | string | Specifies the Flyte project. |
| `--rediscache.passwordSecretName` | string | Name of secret with Redis password. |
| `--rediscache.primaryEndpoint` | string | Primary endpoint for the redis cache that can be used for both reads and writes. |
| `--rediscache.replicaEndpoint` | string | Replica endpoint for the redis cache that can be used for reads. |
| `--secrets.env-prefix` | string | Prefix for environment variables (default "FLYTE_SECRET_") |
| `--secrets.secrets-prefix` | string | Prefix where to look for secrets file (default "/etc/secrets") |
| `--secrets.type` | string | Sets the type of storage to configure [local]. (default "local") |
| `--server.dataProxy.download.maxExpiresIn` | string | Maximum allowed expiration duration. (default "1h0m0s") |
| `--server.dataProxy.upload.defaultFileNameLength` | int | Default length for the generated file name if not provided in the request. (default 20) |
| `--server.dataProxy.upload.maxExpiresIn` | string | Maximum allowed expiration duration. (default "1h0m0s") |
| `--server.dataProxy.upload.maxSize` | string | Maximum allowed upload size. (default "6Mi") |
| `--server.dataProxy.upload.storagePrefix` | string | Storage prefix to use for all upload requests. |
| `--server.grpc.enableGrpcLatencyMetrics` | | Enable grpc latency metrics. Note Histograms metrics can be expensive on Prometheus servers. |
| `--server.grpc.maxMessageSizeBytes` | int | The max size in bytes for incoming gRPC messages |
| `--server.grpc.port` | int | On which grpc port to serve admin (default 8089) |
| `--server.grpc.serverReflection` | | Enable GRPC Server Reflection (default true) |
| `--server.grpcPort` | int | deprecated |
| `--server.grpcServerReflection` | | deprecated |
| `--server.httpPort` | int | On which http port to serve admin (default 8088) |
| `--server.kube-config` | string | Path to kubernetes client config file, default is empty, useful for incluster config. |
| `--server.kubeClientConfig.burst` | int | Max burst rate for throttle. 0 defaults to 10 (default 25) |
| `--server.kubeClientConfig.qps` | int32 | Max QPS to the master for requests to KubeAPI. 0 defaults to 5. (default 100) |
| `--server.kubeClientConfig.timeout` | string | Max duration allowed for every request to KubeAPI before giving up. 0 implies no timeout. (default "30s") |
| `--server.master` | string | The address of the Kubernetes API server. |
| `--server.readHeaderTimeoutSeconds` | int | The amount of time allowed to read request headers. (default 32) |
| `--server.security.allowCors` | | (default true) |
| `--server.security.allowedHeaders` | strings | (default [Content-Type,flyte-authorization]) |
| `--server.security.allowedOrigins` | strings | (default [*]) |
| `--server.security.auditAccess` | | |
| `--server.security.secure` | | |
| `--server.security.ssl.certificateFile` | string | |
| `--server.security.ssl.keyFile` | string | |
| `--server.security.useAuth` | | |
| `--server.thirdPartyConfig.flyteClient.audience` | string | Audience to use when initiating OAuth2 authorization requests. |
| `--server.thirdPartyConfig.flyteClient.clientId` | string | public identifier for the app which handles authorization for a Flyte deployment |
| `--server.thirdPartyConfig.flyteClient.redirectUri` | string | This is the callback uri registered with the app which handles authorization for a Flyte deployment |
| `--server.thirdPartyConfig.flyteClient.scopes` | strings | Recommended scopes for the client to request. |
| `--server.watchService.maxActiveClusterConnections` | int | (default 5) |
| `--server.watchService.maxPageSize` | int | (default 50000) |
| `--server.watchService.nonTerminalStatusUpdatesInterval` | string | (default "1m0s") |
| `--server.watchService.pollInterval` | string | (default "1s") |
| `--sharedservice.connectPort` | string | On which connect port to serve admin (default "8080") |
| `--sharedservice.grpc.grpcMaxResponseStatusBytes` | int32 | specifies the maximum (uncompressed) size of header list that the client is prepared to accept on grpc calls (default 32000) |
| `--sharedservice.grpc.maxConcurrentStreams` | int | Limit on the number of concurrent streams to each ServerTransport. (default 100) |
| `--sharedservice.grpc.maxMessageSizeBytes` | int | Limit on the size of message that can be received on the server. (default 10485760) |
| `--sharedservice.grpcServerReflection` | | Enable GRPC Server Reflection (default true) |
| `--sharedservice.httpPort` | string | On which http port to serve admin (default "8089") |
| `--sharedservice.kubeConfig` | string | Path to kubernetes client config file. |
| `--sharedservice.master` | string | The address of the Kubernetes API server. |
| `--sharedservice.metrics.enableClientGrpcHistograms` | | Enable client grpc histograms (default true) |
| `--sharedservice.metrics.enableGrpcHistograms` | | Enable grpc histograms (default true) |
| `--sharedservice.metrics.scope` | string | Scope to emit metrics under (default "service:") |
| `--sharedservice.port` | string | On which grpc port to serve admin (default "8080") |
| `--sharedservice.profiler.enabled` | | Enable Profiler on server |
| `--sharedservice.profilerPort` | string | Profile port to start listen for pprof and metric handlers on. (default "10254") |
| `--sharedservice.security.allowCors` | | |
| `--sharedservice.security.allowLocalhostAccess` | | Whether to permit localhost unauthenticated access to the server |
| `--sharedservice.security.allowedHeaders` | strings | |
| `--sharedservice.security.allowedOrigins` | strings | |
| `--sharedservice.security.auditAccess` | | |
| `--sharedservice.security.orgOverride` | string | Override org in identity context if localhost access enabled |
| `--sharedservice.security.secure` | | |
| `--sharedservice.security.ssl.certificateAuthorityFile` | string | |
| `--sharedservice.security.ssl.certificateFile` | string | |
| `--sharedservice.security.ssl.keyFile` | string | |
| `--sharedservice.security.useAuth` | | |
| `--sharedservice.sync.syncInterval` | string | Time interval to sync (default "5m0s") |
| `--storage.cache.max_size_mbs` | int | Maximum size of the cache where the Blob store data is cached in-memory. If not specified or set to 0, cache is not used |
| `--storage.cache.target_gc_percent` | int | Sets the garbage collection target percentage. |
| `--storage.connection.access-key` | string | Access key to use. Only required when authtype is set to accesskey. |
| `--storage.connection.auth-type` | string | Auth Type to use [iam, accesskey]. (default "iam") |
| `--storage.connection.disable-ssl` | | Disables SSL connection. Should only be used for development. |
| `--storage.connection.endpoint` | string | URL for storage client to connect to. |
| `--storage.connection.region` | string | Region to connect to. (default "us-east-1") |
| `--storage.connection.secret-key` | string | Secret to use when accesskey is set. |
| `--storage.container` | string | Initial container (in s3 a bucket) to create -if it doesn't exist-.' |
| `--storage.defaultHttpClient.timeout` | string | Sets time out on the http client. (default "0s") |
| `--storage.enable-multicontainer` | | If this is true, then the container argument is overlooked and redundant. This config will automatically open new connections to new containers/buckets as they are encountered |
| `--storage.limits.maxDownloadMBs` | int | Maximum allowed download size (in MBs) per call. (default 2) |
| `--storage.stow.config` | stringToString | Configuration for stow backend. Refer to github/flyteorg/stow (default []) |
| `--storage.stow.kind` | string | Kind of Stow backend to use. Refer to github/flyteorg/stow |
| `--storage.type` | string | Sets the type of storage to configure [s3/minio/local/mem/stow]. (default "s3") |
| `--union.auth.authorizationMetadataKey` | string | Authorization Header to use when passing Access Tokens to the server (default "flyte-authorization") |
| `--union.auth.clientId` | string | Client ID |
| `--union.auth.clientSecretEnvVar` | string | Environment variable containing the client secret |
| `--union.auth.clientSecretLocation` | string | File containing the client secret |
| `--union.auth.deviceFlow.pollInterval` | string | amount of time the device flow would poll the token endpoint if auth server doesn't return a polling interval. Okta and google IDP do return an interval' (default "5s") |
| `--union.auth.deviceFlow.refreshTime` | string | grace period from the token expiry after which it would refresh the token. (default "5m0s") |
| `--union.auth.deviceFlow.timeout` | string | amount of time the device flow should complete or else it will be cancelled. (default "10m0s") |
| `--union.auth.enable` | | Whether to enable an authenticated conenction when communicating with admin. (default true) |
| `--union.auth.externalAuth.command` | strings | Command for external authentication token generation |
| `--union.auth.pkce.refreshTime` | string | grace period from the token expiry after which it would refresh the token. (default "5m0s") |
| `--union.auth.pkce.timeout` | string | Amount of time the browser session would be active for authentication from client app. (default "15s") |
| `--union.auth.scopes` | strings | List of scopes to request |
| `--union.auth.tokenRefreshWindow` | string | Max duration between token refresh attempt and token expiry. (default "1h0m0s") |
| `--union.auth.tokenUrl` | string | OPTIONAL: Your IdP's token endpoint. It'll be discovered from flyte admin's OAuth Metadata endpoint if not provided. |
| `--union.auth.type` | string | Type of OAuth2 flow used for communicating with admin. (default "Pkce") |
| `--union.cache.maxItemsCount` | int | Maximum number of items to keep in the cache before evicting. (default 1000) |
| `--union.connection.host` | string | Host to connect to (default "dns:///utt-mgdp-stg-us-east-2.cloud-staging.union.ai") |
| `--union.connection.insecure` | | Whether to connect over insecure channel |
| `--union.connection.insecureSkipVerify` | | InsecureSkipVerify controls whether a client verifies the server's certificate chain and host name.Caution: shouldn't be use for production usecases' |
| `--union.connection.keepAliveConfig.permitWithoutStream` | | If true, client sends keepalive pings even with no active RPCs. |
| `--union.connection.keepAliveConfig.time` | string | After a duration of this time if the client doesn't see any activity it pings the server to see if the transport is still alive. (default "20s") |
| `--union.connection.keepAliveConfig.timeout` | string | After having pinged for keepalive check, the client waits for a duration of Timeout and if no activity is seen even after that the connection is closed. (default "2m0s") |
| `--union.connection.maxBackoffDelay` | string | Max delay for grpc backoff (default "8s") |
| `--union.connection.maxRecvMsgSize` | int | Maximum size of a message in bytes of a gRPC message (default 10485760) |
| `--union.connection.maxRetries` | int | Max number of gRPC retries (default 4) |
| `--union.connection.minConnectTimeout` | string | Minimum timeout for establishing a connection (default "20s") |
| `--union.connection.perRetryTimeout` | string | gRPC per retry timeout (default "15s") |
| `--union.connection.serviceConfig` | string | Defines gRPC experimental JSON Service Config (default "{"loadBalancingConfig": [{"round_robin":{}}]}") |
| `--union.connection.trustedIdentityClaims.enabled` | | Enables passing of trusted claims while making inter service calls |
| `--union.connection.trustedIdentityClaims.externalIdentityClaim` | string | External identity claim of the service which is authorized to make internal service call. These are verified against userclouds actions |
| `--union.connection.trustedIdentityClaims.externalIdentityTypeClaim` | string | External identity type claim of app or user to use for the current service identity. It should be an 'app' for inter service communication |
| `--union.internalConnectionConfig.-` | stringToString | (default []) |
| `--union.internalConnectionConfig.enabled` | | Enables internal service to service communication instead of going through ingress. |
| `--union.internalConnectionConfig.urlPattern` | string | UrlPattern of the internal service endpoints. (default "{{ service }}-helmchart.{{ service }}.svc.cluster.local:80") |
| `--webhook.awsSecretManager.sidecarImage` | string | Specifies the sidecar docker image to use (default "docker.io/amazon/aws-secrets-manager-secret-sidecar:v0.1.4") |
| `--webhook.certDir` | string | Certificate directory to use to write generated certs. Defaults to /etc/webhook/certs/ (default "/etc/webhook/certs") |
| `--webhook.embeddedSecretManagerConfig.awsConfig.region` | string | AWS region |
| `--webhook.embeddedSecretManagerConfig.fileMountInitContainer.image` | string | Specifies init container image to use for mounting secrets as files. (default "busybox:1.28") |
| `--webhook.embeddedSecretManagerConfig.gcpConfig.project` | string | GCP project to be used for secret manager |
| `--webhook.embeddedSecretManagerConfig.type` | string | (default "AWS") |
| `--webhook.gcpSecretManager.sidecarImage` | string | Specifies the sidecar docker image to use (default "gcr.io/google.com/cloudsdktool/cloud-sdk:alpine") |
| `--webhook.listenPort` | int | The port to use to listen to webhook calls. Defaults to 9443 (default 9443) |
| `--webhook.localCert` | | write certs locally. Defaults to false |
| `--webhook.metrics-prefix` | string | An optional prefix for all published metrics. (default "flyte:") |
| `--webhook.secretName` | string | Secret name to write generated certs to. (default "flyte-pod-webhook") |
| `--webhook.serviceName` | string | The name of the webhook service. (default "flyte-pod-webhook") |
| `--webhook.servicePort` | int32 | The port on the service that hosting webhook. (default 443) |
| `--webhook.vaultSecretManager.role` | string | Specifies the vault role to use (default "flyte") |
=== PAGE: https://www.union.ai/docs/v1/serverless/api-reference/uctl-cli/uctl-version ===
# uctl version
Fetches uctl version
## Synopsis
Fetch uctl version:
```shell
$ uctl version
$ uctl version [flags]
```
## Options
| Option | Type | Description |
|--------|------|-------------|
| `-h`, `--help` | help for version |
## Options inherited from parent commands
| Option | Type | Description |
|--------|------|-------------|
| `--admin.audience` | string | Audience to use when initiating OAuth2 authorization requests. |
| `--admin.authType` | string | Type of OAuth2 flow used for communicating with admin.ClientSecret, Pkce, ExternalCommand are valid values (default "ClientSecret") |
| `--admin.authorizationHeader` | string | Custom metadata header to pass JWT |
| `--admin.authorizationServerUrl` | string | This is the URL to your IdP's authorization server. It'll default to Endpoint |
| `--admin.caCertFilePath` | string | Use specified certificate file to verify the admin server peer. |
| `--admin.clientId` | string | Client ID (default "flytepropeller") |
| `--admin.clientSecretEnvVar` | string | Environment variable containing the client secret |
| `--admin.clientSecretLocation` | string | File containing the client secret (default "/etc/secrets/client_secret") |
| `--admin.command` | strings | Command for external authentication token generation |
| `--admin.defaultOrg` | string | OPTIONAL: Default org to use to support non-org based cli's.'. |
| `--admin.defaultServiceConfig` | string | |
| `--admin.deviceFlowConfig.pollInterval` | string | amount of time the device flow would poll the token endpoint if auth server doesn't return a polling interval. Okta and google IDP do return an interval' (default "5s") |
| `--admin.deviceFlowConfig.refreshTime` | string | grace period from the token expiry after which it would refresh the token. (default "5m0s") |
| `--admin.deviceFlowConfig.timeout` | string | amount of time the device flow should complete or else it will be cancelled. (default "10m0s") |
| `--admin.endpoint` | string | For admin types, specify where the uri of the service is located. |
| `--admin.httpProxyURL` | string | OPTIONAL: HTTP Proxy to be used for OAuth requests. |
| `--admin.insecure` | | Use insecure connection. |
| `--admin.insecureSkipVerify` | | InsecureSkipVerify controls whether a client verifies the server's certificate chain and host name.Caution: shouldn't be use for production usecases' |
| `--admin.maxBackoffDelay` | string | Max delay for grpc backoff (default "8s") |
| `--admin.maxMessageSizeBytes` | int | The max size in bytes for incoming gRPC messages |
| `--admin.maxRetries` | int | Max number of gRPC retries (default 4) |
| `--admin.perRetryTimeout` | string | gRPC per retry timeout (default "15s") |
| `--admin.pkceConfig.refreshTime` | string | grace period from the token expiry after which it would refresh the token. (default "5m0s") |
| `--admin.pkceConfig.timeout` | string | Amount of time the browser session would be active for authentication from client app. (default "2m0s") |
| `--admin.proxyCommand` | strings | Command for external proxy-authorization token generation |
| `--admin.scopes` | strings | List of scopes to request |
| `--admin.tokenRefreshWindow` | string | Max duration between token refresh attempt and token expiry. (default "0s") |
| `--admin.tokenUrl` | string | OPTIONAL: Your IdP's token endpoint. It'll be discovered from flyte admin's OAuth Metadata endpoint if not provided. |
| `--admin.useAudienceFromAdmin` | | Use Audience configured from admins public endpoint config. |
| `--admin.useAuth` | | Deprecated: Auth will be enabled/disabled based on admin's dynamically discovered information. |
| `--auth.appAuth.externalAuthServer.allowedAudience` | strings | Optional: A list of allowed audiences. If not provided, the audience is expected to be the public Uri of the service. |
| `--auth.appAuth.externalAuthServer.baseUrl` | string | This should be the base url of the authorization server that you are trying to hit. With Okta for instance, it will look something like https://company.okta.com/oauth2/abcdef123456789/ |
| `--auth.appAuth.externalAuthServer.httpProxyURL` | string | OPTIONAL: HTTP Proxy to be used for OAuth requests. |
| `--auth.appAuth.externalAuthServer.metadataUrl` | string | Optional: If the server doesn't support /.well-known/oauth-authorization-server, you can set a custom metadata url here.' |
| `--auth.appAuth.externalAuthServer.retryAttempts` | int | Optional: The number of attempted retries on a transient failure to get the OAuth metadata (default 5) |
| `--auth.appAuth.externalAuthServer.retryDelay` | string | Optional, Duration to wait between retries (default "1s") |
| `--auth.appAuth.selfAuthServer.accessTokenLifespan` | string | Defines the lifespan of issued access tokens. (default "30m0s") |
| `--auth.appAuth.selfAuthServer.authorizationCodeLifespan` | string | Defines the lifespan of issued access tokens. (default "5m0s") |
| `--auth.appAuth.selfAuthServer.claimSymmetricEncryptionKeySecretName` | string | OPTIONAL: Secret name to use to encrypt claims in authcode token. (default "claim_symmetric_key") |
| `--auth.appAuth.selfAuthServer.issuer` | string | Defines the issuer to use when issuing and validating tokens. The default value is https://{requestUri.HostAndPort}/ |
| `--auth.appAuth.selfAuthServer.oldTokenSigningRSAKeySecretName` | string | OPTIONAL: Secret name to use to retrieve Old RSA Signing Key. This can be useful during key rotation to continue to accept older tokens. (default "token_rsa_key_old.pem") |
| `--auth.appAuth.selfAuthServer.refreshTokenLifespan` | string | Defines the lifespan of issued access tokens. (default "1h0m0s") |
| `--auth.appAuth.selfAuthServer.tokenSigningRSAKeySecretName` | string | OPTIONAL: Secret name to use to retrieve RSA Signing Key. (default "token_rsa_key.pem") |
| `--auth.appAuth.thirdPartyConfig.flyteClient.audience` | string | Audience to use when initiating OAuth2 authorization requests. |
| `--auth.appAuth.thirdPartyConfig.flyteClient.clientId` | string | public identifier for the app which handles authorization for a Flyte deployment (default "uctl") |
| `--auth.appAuth.thirdPartyConfig.flyteClient.redirectUri` | string | This is the callback uri registered with the app which handles authorization for a Flyte deployment (default "http://localhost:53593/callback") |
| `--auth.appAuth.thirdPartyConfig.flyteClient.scopes` | strings | Recommended scopes for the client to request. (default [all,offline]) |
| `--auth.disableForGrpc` | | Disables auth enforcement on Grpc Endpoints. |
| `--auth.disableForHttp` | | Disables auth enforcement on HTTP Endpoints. |
| `--auth.grpcAuthorizationHeader` | string | (default "flyte-authorization") |
| `--auth.httpAuthorizationHeader` | string | (default "flyte-authorization") |
| `--auth.httpProxyURL` | string | OPTIONAL: HTTP Proxy to be used for OAuth requests. |
| `--auth.tokenEndpointProxyPath` | string | The path used to proxy calls to the TokenURL |
| `--auth.userAuth.cookieBlockKeySecretName` | string | OPTIONAL: Secret name to use for cookie block key. (default "cookie_block_key") |
| `--auth.userAuth.cookieHashKeySecretName` | string | OPTIONAL: Secret name to use for cookie hash key. (default "cookie_hash_key") |
| `--auth.userAuth.cookieSetting.domain` | string | OPTIONAL: Allows you to set the domain attribute on the auth cookies. |
| `--auth.userAuth.cookieSetting.sameSitePolicy` | string | OPTIONAL: Allows you to declare if your cookie should be restricted to a first-party or same-site context.Wrapper around http.SameSite. (default "DefaultMode") |
| `--auth.userAuth.httpProxyURL` | string | OPTIONAL: HTTP Proxy to be used for OAuth requests. |
| `--auth.userAuth.idpQueryParameter` | string | idp query parameter used for selecting a particular IDP for doing user authentication. Eg: for Okta passing idp={IDP-ID} forces the authentication to happen with IDP-ID |
| `--auth.userAuth.openId.baseUrl` | string | |
| `--auth.userAuth.openId.clientId` | string | |
| `--auth.userAuth.openId.clientSecretFile` | string | |
| `--auth.userAuth.openId.clientSecretName` | string | (default "oidc_client_secret") |
| `--auth.userAuth.openId.scopes` | strings | (default [openid,profile]) |
| `--auth.userAuth.redirectUrl` | string | (default "/console") |
| `--authorizer.internalCommunicationConfig.enabled` | | Enables authorization decisions for internal communication. (default true) |
| `--authorizer.internalCommunicationConfig.ingressIdentity` | string | IngressIdentity used in the cluster. Needed to exclude the communication coming from ingress. (default "ingress-nginx.ingress-nginx.serviceaccount.identity.linkerd.cluster.local") |
| `--authorizer.internalCommunicationConfig.tenantUrlPatternIdentity` | string | UrlPatternIdentity of the internal tenant service endpoint identities. (default "{{ service }}.{{ org }}.serviceaccount.identity.linkerd.cluster.local") |
| `--authorizer.internalCommunicationConfig.urlPatternIdentity` | string | UrlPatternIdentity of the internal service endpoint identities. (default "{{ service }}-helmchart.{{ service }}.serviceaccount.identity.linkerd.cluster.local") |
| `--authorizer.mode` | string | (default "Active") |
| `--authorizer.organizationConfig.PolicyConfig.adminPolicyDescription` | string | description for the boilerplate admin policy (default "Contributor permissions and full admin permissions to manage users and view usage dashboards") |
| `--authorizer.organizationConfig.PolicyConfig.contributorPolicyDescription` | string | description for the boilerplate contributor policy (default "Viewer permissions and permissions to create workflows, tasks, launch plans, and executions") |
| `--authorizer.organizationConfig.PolicyConfig.defaultUserPolicyRoleType` | string | name of the role type to determine which default policy new users added to the organization should be assigned (default "Viewer") |
| `--authorizer.organizationConfig.PolicyConfig.serverlessContributorPolicyDescription` | string | description for the boilerplate serverless contributor policy (default "Viewer permissions and permissions to create workflows, tasks, launch plans, and executions") |
| `--authorizer.organizationConfig.PolicyConfig.serverlessViewerPolicyDescription` | string | description for the boilerplate serverless viewer policy (default "Permissions to view Flyte entities") |
| `--authorizer.organizationConfig.PolicyConfig.viewerPolicyDescription` | string | description for the boilerplate viewer policy (default "Permissions to view Flyte entities") |
| `--authorizer.organizationConfig.defaultPolicyCacheDuration` | string | Cache entry duration for the store of the default policy per organization (default "10m0s") |
| `--authorizer.syncRuleRefreshInterval` | string | (default "1m0s") |
| `--authorizer.type` | string | (default "UserClouds") |
| `--authorizer.userCloudsClient.cache.redis.ttl.edgeTypes` | string | Specifies how long edge types remain in the cache.. (default "30m0s") |
| `--authorizer.userCloudsClient.cache.redis.ttl.edges` | string | Specifies how long edges remain in the cache. (default "30m0s") |
| `--authorizer.userCloudsClient.cache.redis.ttl.objectTypes` | string | Specifies how long object types remain in the cache. (default "30m0s") |
| `--authorizer.userCloudsClient.cache.redis.ttl.objects` | string | Specifies how long objects remain in the cache. (default "30m0s") |
| `--authorizer.userCloudsClient.cache.type` | string | Cache type to use. (default "none") |
| `--authorizer.userCloudsClient.clientID` | string | UserClouds client id |
| `--authorizer.userCloudsClient.clientSecretName` | string | UserCloud client secret name to read from the secret manager. (default "userclouds-client-secret") |
| `--authorizer.userCloudsClient.enableLogging` | | Enable userclouds client's internal logging. Calls to post logs take 250-350 ms and will impact p99 latency, enable with caution. |
| `--authorizer.userCloudsClient.tenantID` | string | UserClouds tenant id. Should be a UUID. |
| `--authorizer.userCloudsClient.tenantUrl` | string | Something like https://{yourtenant}.tenant.userclouds.com |
| `--config` | string | config file (default is /Users/andrew/.union/config.yaml) |
| `--connection.environment` | string | |
| `--connection.region` | string | |
| `--connection.rootTenantURLPattern` | string | Pattern for tenant url. (default "dns:///{{ organization }}.cloud-staging.union.ai") |
| `--console.endpoint` | string | Endpoint of console, if different than flyte admin |
| `--database.connMaxLifeTime` | string | sets the maximum amount of time a connection may be reused (default "1h0m0s") |
| `--database.enableForeignKeyConstraintWhenMigrating` | | Whether to enable gorm foreign keys when migrating the db |
| `--database.maxIdleConnections` | int | maxIdleConnections sets the maximum number of connections in the idle connection pool. (default 10) |
| `--database.maxOpenConnections` | int | maxOpenConnections sets the maximum number of open connections to the database. (default 100) |
| `--database.postgres.dbname` | string | The database name (default "postgres") |
| `--database.postgres.debug` | | |
| `--database.postgres.host` | string | The host name of the database server (default "localhost") |
| `--database.postgres.options` | string | See http://gorm.io/docs/connecting_to_the_database.html for available options passed, in addition to the above. (default "sslmode=disable") |
| `--database.postgres.password` | string | The database password. (default "postgres") |
| `--database.postgres.passwordPath` | string | Points to the file containing the database password. |
| `--database.postgres.port` | int | The port name of the database server (default 30001) |
| `--database.postgres.readReplicaHost` | string | The host name of the read replica database server (default "localhost") |
| `--database.postgres.username` | string | The database user who is connecting to the server. (default "postgres") |
| `--database.sqlite.file` | string | The path to the file (existing or new) where the DB should be created / stored. If existing, then this will be re-used, else a new will be created |
| `--db.connectionPool.maxConnectionLifetime` | string | (default "0s") |
| `--db.connectionPool.maxIdleConnections` | int | |
| `--db.connectionPool.maxOpenConnections` | int | |
| `--db.dbname` | string | (default "postgres") |
| `--db.debug` | | |
| `--db.host` | string | (default "postgres") |
| `--db.log_level` | int | (default 4) |
| `--db.options` | string | (default "sslmode=disable") |
| `--db.password` | string | |
| `--db.passwordPath` | string | |
| `--db.port` | int | (default 5432) |
| `--db.username` | string | (default "postgres") |
| `-d`, `--domain` | string | Specifies the Flyte project's domain. |
| `--files.archive` | | Pass in archive file either an http link or local path. |
| `--files.assumableIamRole` | string | Custom assumable iam auth role to register launch plans with. |
| `--files.continueOnError` | | Continue on error when registering files. |
| `--files.destinationDirectory` | string | Location of source code in container. |
| `--files.dryRun` | | Execute command without making any modifications. |
| `--files.enableSchedule` | | Enable the schedule if the files contain schedulable launchplan. |
| `--files.force` | | Force use of version number on entities registered with flyte. |
| `--files.k8ServiceAccount` | string | Deprecated. Please use `--K8sServiceAccount` |
| `--files.k8sServiceAccount` | string | Custom kubernetes service account auth role to register launch plans with. |
| `--files.outputLocationPrefix` | string | Custom output location prefix for offloaded types (files/schemas). |
| `--files.sourceUploadPath` | string | Deprecated: Update flyte admin to avoid having to configure storage access from uctl. |
| `--files.version` | string | Version of the entity to be registered with flyte which are un-versioned after serialization. |
| `--logger.formatter.type` | string | Sets logging format type. (default "json") |
| `--logger.level` | int | Sets the minimum logging level. (default 3) |
| `--logger.mute` | | Mutes all logs regardless of severity. Intended for benchmarks/tests only. |
| `--logger.show-source` | | Includes source code location in logs. |
| `--org` | string | Organization to work on. If not set, default to user's org. |
| `--otel.file.filename` | string | Filename to store exported telemetry traces (default "/tmp/trace.txt") |
| `--otel.jaeger.endpoint` | string | Endpoint for the jaeger telemetry trace ingestor (default "http://localhost:14268/api/traces") |
| `--otel.otlpgrpc.endpoint` | string | Endpoint for the OTLP telemetry trace collector (default "http://localhost:4317") |
| `--otel.otlphttp.endpoint` | string | Endpoint for the OTLP telemetry trace collector (default "http://localhost:4318/v1/traces") |
| `--otel.sampler.parentSampler` | string | Sets the parent sampler to use for the tracer (default "always") |
| `--otel.type` | string | Sets the type of exporter to configure [noop/file/jaeger/otlpgrpc/otlphttp]. (default "noop") |
| `-o`, `--output` | string | Specifies the output type - supported formats [TABLE JSON YAML DOT DOTURL]. NOTE: dot, doturl are only supported for Workflow (default "table") |
| `--plugins.catalogcache.reader.maxItems` | int | Maximum number of entries to keep in the index. (default 10000) |
| `--plugins.catalogcache.reader.maxRetries` | int | Maximum number of retries per item. (default 3) |
| `--plugins.catalogcache.reader.workers` | int | Number of concurrent workers to start processing the queue. (default 10) |
| `--plugins.catalogcache.writer.maxItems` | int | Maximum number of entries to keep in the index. (default 10000) |
| `--plugins.catalogcache.writer.maxRetries` | int | Maximum number of retries per item. (default 3) |
| `--plugins.catalogcache.writer.workers` | int | Number of concurrent workers to start processing the queue. (default 10) |
| `-p`, `--project` | string | Specifies the Flyte project. |
| `--rediscache.passwordSecretName` | string | Name of secret with Redis password. |
| `--rediscache.primaryEndpoint` | string | Primary endpoint for the redis cache that can be used for both reads and writes. |
| `--rediscache.replicaEndpoint` | string | Replica endpoint for the redis cache that can be used for reads. |
| `--secrets.env-prefix` | string | Prefix for environment variables (default "FLYTE_SECRET_") |
| `--secrets.secrets-prefix` | string | Prefix where to look for secrets file (default "/etc/secrets") |
| `--secrets.type` | string | Sets the type of storage to configure [local]. (default "local") |
| `--server.dataProxy.download.maxExpiresIn` | string | Maximum allowed expiration duration. (default "1h0m0s") |
| `--server.dataProxy.upload.defaultFileNameLength` | int | Default length for the generated file name if not provided in the request. (default 20) |
| `--server.dataProxy.upload.maxExpiresIn` | string | Maximum allowed expiration duration. (default "1h0m0s") |
| `--server.dataProxy.upload.maxSize` | string | Maximum allowed upload size. (default "6Mi") |
| `--server.dataProxy.upload.storagePrefix` | string | Storage prefix to use for all upload requests. |
| `--server.grpc.enableGrpcLatencyMetrics` | | Enable grpc latency metrics. Note Histograms metrics can be expensive on Prometheus servers. |
| `--server.grpc.maxMessageSizeBytes` | int | The max size in bytes for incoming gRPC messages |
| `--server.grpc.port` | int | On which grpc port to serve admin (default 8089) |
| `--server.grpc.serverReflection` | | Enable GRPC Server Reflection (default true) |
| `--server.grpcPort` | int | deprecated |
| `--server.grpcServerReflection` | | deprecated |
| `--server.httpPort` | int | On which http port to serve admin (default 8088) |
| `--server.kube-config` | string | Path to kubernetes client config file, default is empty, useful for incluster config. |
| `--server.kubeClientConfig.burst` | int | Max burst rate for throttle. 0 defaults to 10 (default 25) |
| `--server.kubeClientConfig.qps` | int32 | Max QPS to the master for requests to KubeAPI. 0 defaults to 5. (default 100) |
| `--server.kubeClientConfig.timeout` | string | Max duration allowed for every request to KubeAPI before giving up. 0 implies no timeout. (default "30s") |
| `--server.master` | string | The address of the Kubernetes API server. |
| `--server.readHeaderTimeoutSeconds` | int | The amount of time allowed to read request headers. (default 32) |
| `--server.security.allowCors` | | (default true) |
| `--server.security.allowedHeaders` | strings | (default [Content-Type,flyte-authorization]) |
| `--server.security.allowedOrigins` | strings | (default [*]) |
| `--server.security.auditAccess` | | |
| `--server.security.secure` | | |
| `--server.security.ssl.certificateFile` | string | |
| `--server.security.ssl.keyFile` | string | |
| `--server.security.useAuth` | | |
| `--server.thirdPartyConfig.flyteClient.audience` | string | Audience to use when initiating OAuth2 authorization requests. |
| `--server.thirdPartyConfig.flyteClient.clientId` | string | public identifier for the app which handles authorization for a Flyte deployment |
| `--server.thirdPartyConfig.flyteClient.redirectUri` | string | This is the callback uri registered with the app which handles authorization for a Flyte deployment |
| `--server.thirdPartyConfig.flyteClient.scopes` | strings | Recommended scopes for the client to request. |
| `--server.watchService.maxActiveClusterConnections` | int | (default 5) |
| `--server.watchService.maxPageSize` | int | (default 50000) |
| `--server.watchService.nonTerminalStatusUpdatesInterval` | string | (default "1m0s") |
| `--server.watchService.pollInterval` | string | (default "1s") |
| `--sharedservice.connectPort` | string | On which connect port to serve admin (default "8080") |
| `--sharedservice.grpc.grpcMaxResponseStatusBytes` | int32 | specifies the maximum (uncompressed) size of header list that the client is prepared to accept on grpc calls (default 32000) |
| `--sharedservice.grpc.maxConcurrentStreams` | int | Limit on the number of concurrent streams to each ServerTransport. (default 100) |
| `--sharedservice.grpc.maxMessageSizeBytes` | int | Limit on the size of message that can be received on the server. (default 10485760) |
| `--sharedservice.grpcServerReflection` | | Enable GRPC Server Reflection (default true) |
| `--sharedservice.httpPort` | string | On which http port to serve admin (default "8089") |
| `--sharedservice.kubeConfig` | string | Path to kubernetes client config file. |
| `--sharedservice.master` | string | The address of the Kubernetes API server. |
| `--sharedservice.metrics.enableClientGrpcHistograms` | | Enable client grpc histograms (default true) |
| `--sharedservice.metrics.enableGrpcHistograms` | | Enable grpc histograms (default true) |
| `--sharedservice.metrics.scope` | string | Scope to emit metrics under (default "service:") |
| `--sharedservice.port` | string | On which grpc port to serve admin (default "8080") |
| `--sharedservice.profiler.enabled` | | Enable Profiler on server |
| `--sharedservice.profilerPort` | string | Profile port to start listen for pprof and metric handlers on. (default "10254") |
| `--sharedservice.security.allowCors` | | |
| `--sharedservice.security.allowLocalhostAccess` | | Whether to permit localhost unauthenticated access to the server |
| `--sharedservice.security.allowedHeaders` | strings | |
| `--sharedservice.security.allowedOrigins` | strings | |
| `--sharedservice.security.auditAccess` | | |
| `--sharedservice.security.orgOverride` | string | Override org in identity context if localhost access enabled |
| `--sharedservice.security.secure` | | |
| `--sharedservice.security.ssl.certificateAuthorityFile` | string | |
| `--sharedservice.security.ssl.certificateFile` | string | |
| `--sharedservice.security.ssl.keyFile` | string | |
| `--sharedservice.security.useAuth` | | |
| `--sharedservice.sync.syncInterval` | string | Time interval to sync (default "5m0s") |
| `--storage.cache.max_size_mbs` | int | Maximum size of the cache where the Blob store data is cached in-memory. If not specified or set to 0, cache is not used |
| `--storage.cache.target_gc_percent` | int | Sets the garbage collection target percentage. |
| `--storage.connection.access-key` | string | Access key to use. Only required when authtype is set to accesskey. |
| `--storage.connection.auth-type` | string | Auth Type to use [iam, accesskey]. (default "iam") |
| `--storage.connection.disable-ssl` | | Disables SSL connection. Should only be used for development. |
| `--storage.connection.endpoint` | string | URL for storage client to connect to. |
| `--storage.connection.region` | string | Region to connect to. (default "us-east-1") |
| `--storage.connection.secret-key` | string | Secret to use when accesskey is set. |
| `--storage.container` | string | Initial container (in s3 a bucket) to create -if it doesn't exist-.' |
| `--storage.defaultHttpClient.timeout` | string | Sets time out on the http client. (default "0s") |
| `--storage.enable-multicontainer` | | If this is true, then the container argument is overlooked and redundant. This config will automatically open new connections to new containers/buckets as they are encountered |
| `--storage.limits.maxDownloadMBs` | int | Maximum allowed download size (in MBs) per call. (default 2) |
| `--storage.stow.config` | stringToString | Configuration for stow backend. Refer to github/flyteorg/stow (default []) |
| `--storage.stow.kind` | string | Kind of Stow backend to use. Refer to github/flyteorg/stow |
| `--storage.type` | string | Sets the type of storage to configure [s3/minio/local/mem/stow]. (default "s3") |
| `--union.auth.authorizationMetadataKey` | string | Authorization Header to use when passing Access Tokens to the server (default "flyte-authorization") |
| `--union.auth.clientId` | string | Client ID |
| `--union.auth.clientSecretEnvVar` | string | Environment variable containing the client secret |
| `--union.auth.clientSecretLocation` | string | File containing the client secret |
| `--union.auth.deviceFlow.pollInterval` | string | amount of time the device flow would poll the token endpoint if auth server doesn't return a polling interval. Okta and google IDP do return an interval' (default "5s") |
| `--union.auth.deviceFlow.refreshTime` | string | grace period from the token expiry after which it would refresh the token. (default "5m0s") |
| `--union.auth.deviceFlow.timeout` | string | amount of time the device flow should complete or else it will be cancelled. (default "10m0s") |
| `--union.auth.enable` | | Whether to enable an authenticated conenction when communicating with admin. (default true) |
| `--union.auth.externalAuth.command` | strings | Command for external authentication token generation |
| `--union.auth.pkce.refreshTime` | string | grace period from the token expiry after which it would refresh the token. (default "5m0s") |
| `--union.auth.pkce.timeout` | string | Amount of time the browser session would be active for authentication from client app. (default "15s") |
| `--union.auth.scopes` | strings | List of scopes to request |
| `--union.auth.tokenRefreshWindow` | string | Max duration between token refresh attempt and token expiry. (default "1h0m0s") |
| `--union.auth.tokenUrl` | string | OPTIONAL: Your IdP's token endpoint. It'll be discovered from flyte admin's OAuth Metadata endpoint if not provided. |
| `--union.auth.type` | string | Type of OAuth2 flow used for communicating with admin. (default "Pkce") |
| `--union.cache.maxItemsCount` | int | Maximum number of items to keep in the cache before evicting. (default 1000) |
| `--union.connection.host` | string | Host to connect to (default "dns:///utt-mgdp-stg-us-east-2.cloud-staging.union.ai") |
| `--union.connection.insecure` | | Whether to connect over insecure channel |
| `--union.connection.insecureSkipVerify` | | InsecureSkipVerify controls whether a client verifies the server's certificate chain and host name.Caution: shouldn't be use for production usecases' |
| `--union.connection.keepAliveConfig.permitWithoutStream` | | If true, client sends keepalive pings even with no active RPCs. |
| `--union.connection.keepAliveConfig.time` | string | After a duration of this time if the client doesn't see any activity it pings the server to see if the transport is still alive. (default "20s") |
| `--union.connection.keepAliveConfig.timeout` | string | After having pinged for keepalive check, the client waits for a duration of Timeout and if no activity is seen even after that the connection is closed. (default "2m0s") |
| `--union.connection.maxBackoffDelay` | string | Max delay for grpc backoff (default "8s") |
| `--union.connection.maxRecvMsgSize` | int | Maximum size of a message in bytes of a gRPC message (default 10485760) |
| `--union.connection.maxRetries` | int | Max number of gRPC retries (default 4) |
| `--union.connection.minConnectTimeout` | string | Minimum timeout for establishing a connection (default "20s") |
| `--union.connection.perRetryTimeout` | string | gRPC per retry timeout (default "15s") |
| `--union.connection.serviceConfig` | string | Defines gRPC experimental JSON Service Config (default "{"loadBalancingConfig": [{"round_robin":{}}]}") |
| `--union.connection.trustedIdentityClaims.enabled` | | Enables passing of trusted claims while making inter service calls |
| `--union.connection.trustedIdentityClaims.externalIdentityClaim` | string | External identity claim of the service which is authorized to make internal service call. These are verified against userclouds actions |
| `--union.connection.trustedIdentityClaims.externalIdentityTypeClaim` | string | External identity type claim of app or user to use for the current service identity. It should be an 'app' for inter service communication |
| `--union.internalConnectionConfig.-` | stringToString | (default []) |
| `--union.internalConnectionConfig.enabled` | | Enables internal service to service communication instead of going through ingress. |
| `--union.internalConnectionConfig.urlPattern` | string | UrlPattern of the internal service endpoints. (default "{{ service }}-helmchart.{{ service }}.svc.cluster.local:80") |
| `--webhook.awsSecretManager.sidecarImage` | string | Specifies the sidecar docker image to use (default "docker.io/amazon/aws-secrets-manager-secret-sidecar:v0.1.4") |
| `--webhook.certDir` | string | Certificate directory to use to write generated certs. Defaults to /etc/webhook/certs/ (default "/etc/webhook/certs") |
| `--webhook.embeddedSecretManagerConfig.awsConfig.region` | string | AWS region |
| `--webhook.embeddedSecretManagerConfig.fileMountInitContainer.image` | string | Specifies init container image to use for mounting secrets as files. (default "busybox:1.28") |
| `--webhook.embeddedSecretManagerConfig.gcpConfig.project` | string | GCP project to be used for secret manager |
| `--webhook.embeddedSecretManagerConfig.type` | string | (default "AWS") |
| `--webhook.gcpSecretManager.sidecarImage` | string | Specifies the sidecar docker image to use (default "gcr.io/google.com/cloudsdktool/cloud-sdk:alpine") |
| `--webhook.listenPort` | int | The port to use to listen to webhook calls. Defaults to 9443 (default 9443) |
| `--webhook.localCert` | | write certs locally. Defaults to false |
| `--webhook.metrics-prefix` | string | An optional prefix for all published metrics. (default "flyte:") |
| `--webhook.secretName` | string | Secret name to write generated certs to. (default "flyte-pod-webhook") |
| `--webhook.serviceName` | string | The name of the webhook service. (default "flyte-pod-webhook") |
| `--webhook.servicePort` | int32 | The port on the service that hosting webhook. (default 443) |
| `--webhook.vaultSecretManager.role` | string | Specifies the vault role to use (default "flyte") |
=== PAGE: https://www.union.ai/docs/v1/serverless/api-reference/uctl-cli/uctl-append ===
# uctl append
Used for updating various Union resources including
tasks/workflows/launchplans/executions/project.
# Synopsis
Used for updating various union/flyte resources including
tasks/workflows/launchplans/executions/project.
## Options
| Option | Type | Description |
|--------|------|-------------|
| `-h`, `--help` | help for append |
### Options inherited from parent commands
| Option | Type | Description |
|--------|------|-------------|
| `--admin.audience` | string | Audience to use when initiating OAuth2 authorization requests. |
| `--admin.authType` | string | Type of OAuth2 flow used for communicating with admin.ClientSecret, Pkce, ExternalCommand are valid values (default "ClientSecret") |
| `--admin.authorizationHeader` | string | Custom metadata header to pass JWT |
| `--admin.authorizationServerUrl` | string | This is the URL to your IdP's authorization server. It'll default to Endpoint |
| `--admin.caCertFilePath` | string | Use specified certificate file to verify the admin server peer. |
| `--admin.clientId` | string | Client ID (default "flytepropeller") |
| `--admin.clientSecretEnvVar` | string | Environment variable containing the client secret |
| `--admin.clientSecretLocation` | string | File containing the client secret (default "/etc/secrets/client_secret") |
| `--admin.command` | strings | Command for external authentication token generation |
| `--admin.defaultOrg` | string | OPTIONAL: Default org to use to support non-org based cli's.'. |
| `--admin.defaultServiceConfig` | string | |
| `--admin.deviceFlowConfig.pollInterval` | string | amount of time the device flow would poll the token endpoint if auth server doesn't return a polling interval. Okta and google IDP do return an interval' (default "5s") |
| `--admin.deviceFlowConfig.refreshTime` | string | grace period from the token expiry after which it would refresh the token. (default "5m0s") |
| `--admin.deviceFlowConfig.timeout` | string | amount of time the device flow should complete or else it will be cancelled. (default "10m0s") |
| `--admin.endpoint` | string | For admin types, specify where the uri of the service is located. |
| `--admin.httpProxyURL` | string | OPTIONAL: HTTP Proxy to be used for OAuth requests. |
| `--admin.insecure` | | Use insecure connection. |
| `--admin.insecureSkipVerify` | | InsecureSkipVerify controls whether a client verifies the server's certificate chain and host name.Caution: shouldn't be use for production usecases' |
| `--admin.maxBackoffDelay` | string | Max delay for grpc backoff (default "8s") |
| `--admin.maxMessageSizeBytes` | int | The max size in bytes for incoming gRPC messages |
| `--admin.maxRetries` | int | Max number of gRPC retries (default 4) |
| `--admin.perRetryTimeout` | string | gRPC per retry timeout (default "15s") |
| `--admin.pkceConfig.refreshTime` | string | grace period from the token expiry after which it would refresh the token. (default "5m0s") |
| `--admin.pkceConfig.timeout` | string | Amount of time the browser session would be active for authentication from client app. (default "2m0s") |
| `--admin.proxyCommand` | strings | Command for external proxy-authorization token generation |
| `--admin.scopes` | strings | List of scopes to request |
| `--admin.tokenRefreshWindow` | string | Max duration between token refresh attempt and token expiry. (default "0s") |
| `--admin.tokenUrl` | string | OPTIONAL: Your IdP's token endpoint. It'll be discovered from flyte admin's OAuth Metadata endpoint if not provided. |
| `--admin.useAudienceFromAdmin` | | Use Audience configured from admins public endpoint config. |
| `--admin.useAuth` | | Deprecated: Auth will be enabled/disabled based on admin's dynamically discovered information. |
| `--auth.appAuth.externalAuthServer.allowedAudience` | strings | Optional: A list of allowed audiences. If not provided, the audience is expected to be the public Uri of the service. |
| `--auth.appAuth.externalAuthServer.baseUrl` | string | This should be the base url of the authorization server that you are trying to hit. With Okta for instance, it will look something like https://company.okta.com/oauth2/abcdef123456789/ |
| `--auth.appAuth.externalAuthServer.httpProxyURL` | string | OPTIONAL: HTTP Proxy to be used for OAuth requests. |
| `--auth.appAuth.externalAuthServer.metadataUrl` | string | Optional: If the server doesn't support /.well-known/oauth-authorization-server, you can set a custom metadata url here.' |
| `--auth.appAuth.externalAuthServer.retryAttempts` | int | Optional: The number of attempted retries on a transient failure to get the OAuth metadata (default 5) |
| `--auth.appAuth.externalAuthServer.retryDelay` | string | Optional, Duration to wait between retries (default "1s") |
| `--auth.appAuth.selfAuthServer.accessTokenLifespan` | string | Defines the lifespan of issued access tokens. (default "30m0s") |
| `--auth.appAuth.selfAuthServer.authorizationCodeLifespan` | string | Defines the lifespan of issued access tokens. (default "5m0s") |
| `--auth.appAuth.selfAuthServer.claimSymmetricEncryptionKeySecretName` | string | OPTIONAL: Secret name to use to encrypt claims in authcode token. (default "claim_symmetric_key") |
| `--auth.appAuth.selfAuthServer.issuer` | string | Defines the issuer to use when issuing and validating tokens. The default value is https://{requestUri.HostAndPort}/ |
| `--auth.appAuth.selfAuthServer.oldTokenSigningRSAKeySecretName` | string | OPTIONAL: Secret name to use to retrieve Old RSA Signing Key. This can be useful during key rotation to continue to accept older tokens. (default "token_rsa_key_old.pem") |
| `--auth.appAuth.selfAuthServer.refreshTokenLifespan` | string | Defines the lifespan of issued access tokens. (default "1h0m0s") |
| `--auth.appAuth.selfAuthServer.tokenSigningRSAKeySecretName` | string | OPTIONAL: Secret name to use to retrieve RSA Signing Key. (default "token_rsa_key.pem") |
| `--auth.appAuth.thirdPartyConfig.flyteClient.audience` | string | Audience to use when initiating OAuth2 authorization requests. |
| `--auth.appAuth.thirdPartyConfig.flyteClient.clientId` | string | public identifier for the app which handles authorization for a Flyte deployment (default "uctl") |
| `--auth.appAuth.thirdPartyConfig.flyteClient.redirectUri` | string | This is the callback uri registered with the app which handles authorization for a Flyte deployment (default "http://localhost:53593/callback") |
| `--auth.appAuth.thirdPartyConfig.flyteClient.scopes` | strings | Recommended scopes for the client to request. (default [all,offline]) |
| `--auth.disableForGrpc` | | Disables auth enforcement on Grpc Endpoints. |
| `--auth.disableForHttp` | | Disables auth enforcement on HTTP Endpoints. |
| `--auth.grpcAuthorizationHeader` | string | (default "flyte-authorization") |
| `--auth.httpAuthorizationHeader` | string | (default "flyte-authorization") |
| `--auth.httpProxyURL` | string | OPTIONAL: HTTP Proxy to be used for OAuth requests. |
| `--auth.tokenEndpointProxyPath` | string | The path used to proxy calls to the TokenURL |
| `--auth.userAuth.cookieBlockKeySecretName` | string | OPTIONAL: Secret name to use for cookie block key. (default "cookie_block_key") |
| `--auth.userAuth.cookieHashKeySecretName` | string | OPTIONAL: Secret name to use for cookie hash key. (default "cookie_hash_key") |
| `--auth.userAuth.cookieSetting.domain` | string | OPTIONAL: Allows you to set the domain attribute on the auth cookies. |
| `--auth.userAuth.cookieSetting.sameSitePolicy` | string | OPTIONAL: Allows you to declare if your cookie should be restricted to a first-party or same-site context.Wrapper around http.SameSite. (default "DefaultMode") |
| `--auth.userAuth.httpProxyURL` | string | OPTIONAL: HTTP Proxy to be used for OAuth requests. |
| `--auth.userAuth.idpQueryParameter` | string | idp query parameter used for selecting a particular IDP for doing user authentication. Eg: for Okta passing idp={IDP-ID} forces the authentication to happen with IDP-ID |
| `--auth.userAuth.openId.baseUrl` | string | |
| `--auth.userAuth.openId.clientId` | string | |
| `--auth.userAuth.openId.clientSecretFile` | string | |
| `--auth.userAuth.openId.clientSecretName` | string | (default "oidc_client_secret") |
| `--auth.userAuth.openId.scopes` | strings | (default [openid,profile]) |
| `--auth.userAuth.redirectUrl` | string | (default "/console") |
| `--authorizer.internalCommunicationConfig.enabled` | | Enables authorization decisions for internal communication. (default true) |
| `--authorizer.internalCommunicationConfig.ingressIdentity` | string | IngressIdentity used in the cluster. Needed to exclude the communication coming from ingress. (default "ingress-nginx.ingress-nginx.serviceaccount.identity.linkerd.cluster.local") |
| `--authorizer.internalCommunicationConfig.tenantUrlPatternIdentity` | string | UrlPatternIdentity of the internal tenant service endpoint identities. (default "{{ service }}.{{ org }}.serviceaccount.identity.linkerd.cluster.local") |
| `--authorizer.internalCommunicationConfig.urlPatternIdentity` | string | UrlPatternIdentity of the internal service endpoint identities. (default "{{ service }}-helmchart.{{ service }}.serviceaccount.identity.linkerd.cluster.local") |
| `--authorizer.mode` | string | (default "Active") |
| `--authorizer.organizationConfig.PolicyConfig.adminPolicyDescription` | string | description for the boilerplate admin policy (default "Contributor permissions and full admin permissions to manage users and view usage dashboards") |
| `--authorizer.organizationConfig.PolicyConfig.contributorPolicyDescription` | string | description for the boilerplate contributor policy (default "Viewer permissions and permissions to create workflows, tasks, launch plans, and executions") |
| `--authorizer.organizationConfig.PolicyConfig.defaultUserPolicyRoleType` | string | name of the role type to determine which default policy new users added to the organization should be assigned (default "Viewer") |
| `--authorizer.organizationConfig.PolicyConfig.serverlessContributorPolicyDescription` | string | description for the boilerplate serverless contributor policy (default "Viewer permissions and permissions to create workflows, tasks, launch plans, and executions") |
| `--authorizer.organizationConfig.PolicyConfig.serverlessViewerPolicyDescription` | string | description for the boilerplate serverless viewer policy (default "Permissions to view Flyte entities") |
| `--authorizer.organizationConfig.PolicyConfig.viewerPolicyDescription` | string | description for the boilerplate viewer policy (default "Permissions to view Flyte entities") |
| `--authorizer.organizationConfig.defaultPolicyCacheDuration` | string | Cache entry duration for the store of the default policy per organization (default "10m0s") |
| `--authorizer.syncRuleRefreshInterval` | string | (default "1m0s") |
| `--authorizer.type` | string | (default "UserClouds") |
| `--authorizer.userCloudsClient.cache.redis.ttl.edgeTypes` | string | Specifies how long edge types remain in the cache.. (default "30m0s") |
| `--authorizer.userCloudsClient.cache.redis.ttl.edges` | string | Specifies how long edges remain in the cache. (default "30m0s") |
| `--authorizer.userCloudsClient.cache.redis.ttl.objectTypes` | string | Specifies how long object types remain in the cache. (default "30m0s") |
| `--authorizer.userCloudsClient.cache.redis.ttl.objects` | string | Specifies how long objects remain in the cache. (default "30m0s") |
| `--authorizer.userCloudsClient.cache.type` | string | Cache type to use. (default "none") |
| `--authorizer.userCloudsClient.clientID` | string | UserClouds client id |
| `--authorizer.userCloudsClient.clientSecretName` | string | UserCloud client secret name to read from the secret manager. (default "userclouds-client-secret") |
| `--authorizer.userCloudsClient.enableLogging` | | Enable userclouds client's internal logging. Calls to post logs take 250-350 ms and will impact p99 latency, enable with caution. |
| `--authorizer.userCloudsClient.tenantID` | string | UserClouds tenant id. Should be a UUID. |
| `--authorizer.userCloudsClient.tenantUrl` | string | Something like https://{yourtenant}.tenant.userclouds.com |
| `--config` | string | config file (default is /Users/andrew/.union/config.yaml) |
| `--connection.environment` | string | |
| `--connection.region` | string | |
| `--connection.rootTenantURLPattern` | string | Pattern for tenant url. (default "dns:///{{ organization }}.cloud-staging.union.ai") |
| `--console.endpoint` | string | Endpoint of console, if different than flyte admin |
| `--database.connMaxLifeTime` | string | sets the maximum amount of time a connection may be reused (default "1h0m0s") |
| `--database.enableForeignKeyConstraintWhenMigrating` | | Whether to enable gorm foreign keys when migrating the db |
| `--database.maxIdleConnections` | int | maxIdleConnections sets the maximum number of connections in the idle connection pool. (default 10) |
| `--database.maxOpenConnections` | int | maxOpenConnections sets the maximum number of open connections to the database. (default 100) |
| `--database.postgres.dbname` | string | The database name (default "postgres") |
| `--database.postgres.debug` | | |
| `--database.postgres.host` | string | The host name of the database server (default "localhost") |
| `--database.postgres.options` | string | See http://gorm.io/docs/connecting_to_the_database.html for available options passed, in addition to the above. (default "sslmode=disable") |
| `--database.postgres.password` | string | The database password. (default "postgres") |
| `--database.postgres.passwordPath` | string | Points to the file containing the database password. |
| `--database.postgres.port` | int | The port name of the database server (default 30001) |
| `--database.postgres.readReplicaHost` | string | The host name of the read replica database server (default "localhost") |
| `--database.postgres.username` | string | The database user who is connecting to the server. (default "postgres") |
| `--database.sqlite.file` | string | The path to the file (existing or new) where the DB should be created / stored. If existing, then this will be re-used, else a new will be created |
| `--db.connectionPool.maxConnectionLifetime` | string | (default "0s") |
| `--db.connectionPool.maxIdleConnections` | int | |
| `--db.connectionPool.maxOpenConnections` | int | |
| `--db.dbname` | string | (default "postgres") |
| `--db.debug` | | |
| `--db.host` | string | (default "postgres") |
| `--db.log_level` | int | (default 4) |
| `--db.options` | string | (default "sslmode=disable") |
| `--db.password` | string | |
| `--db.passwordPath` | string | |
| `--db.port` | int | (default 5432) |
| `--db.username` | string | (default "postgres") |
| `-d`, `--domain` | string | Specifies the Flyte project's domain. |
| `--files.archive` | | Pass in archive file either an http link or local path. |
| `--files.assumableIamRole` | string | Custom assumable iam auth role to register launch plans with. |
| `--files.continueOnError` | | Continue on error when registering files. |
| `--files.destinationDirectory` | string | Location of source code in container. |
| `--files.dryRun` | | Execute command without making any modifications. |
| `--files.enableSchedule` | | Enable the schedule if the files contain schedulable launchplan. |
| `--files.force` | | Force use of version number on entities registered with flyte. |
| `--files.k8ServiceAccount` | string | Deprecated. Please use `--K8sServiceAccount` |
| `--files.k8sServiceAccount` | string | Custom kubernetes service account auth role to register launch plans with. |
| `--files.outputLocationPrefix` | string | Custom output location prefix for offloaded types (files/schemas). |
| `--files.sourceUploadPath` | string | Deprecated: Update flyte admin to avoid having to configure storage access from uctl. |
| `--files.version` | string | Version of the entity to be registered with flyte which are un-versioned after serialization. |
| `--logger.formatter.type` | string | Sets logging format type. (default "json") |
| `--logger.level` | int | Sets the minimum logging level. (default 3) |
| `--logger.mute` | | Mutes all logs regardless of severity. Intended for benchmarks/tests only. |
| `--logger.show-source` | | Includes source code location in logs. |
| `--org` | string | Organization to work on. If not set, default to user's org. |
| `--otel.file.filename` | string | Filename to store exported telemetry traces (default "/tmp/trace.txt") |
| `--otel.jaeger.endpoint` | string | Endpoint for the jaeger telemetry trace ingestor (default "http://localhost:14268/api/traces") |
| `--otel.otlpgrpc.endpoint` | string | Endpoint for the OTLP telemetry trace collector (default "http://localhost:4317") |
| `--otel.otlphttp.endpoint` | string | Endpoint for the OTLP telemetry trace collector (default "http://localhost:4318/v1/traces") |
| `--otel.sampler.parentSampler` | string | Sets the parent sampler to use for the tracer (default "always") |
| `--otel.type` | string | Sets the type of exporter to configure [noop/file/jaeger/otlpgrpc/otlphttp]. (default "noop") |
| `-o`, `--output` | string | Specifies the output type - supported formats [TABLE JSON YAML DOT DOTURL]. NOTE: dot, doturl are only supported for Workflow (default "table") |
| `--plugins.catalogcache.reader.maxItems` | int | Maximum number of entries to keep in the index. (default 10000) |
| `--plugins.catalogcache.reader.maxRetries` | int | Maximum number of retries per item. (default 3) |
| `--plugins.catalogcache.reader.workers` | int | Number of concurrent workers to start processing the queue. (default 10) |
| `--plugins.catalogcache.writer.maxItems` | int | Maximum number of entries to keep in the index. (default 10000) |
| `--plugins.catalogcache.writer.maxRetries` | int | Maximum number of retries per item. (default 3) |
| `--plugins.catalogcache.writer.workers` | int | Number of concurrent workers to start processing the queue. (default 10) |
| `-p`, `--project` | string | Specifies the Flyte project. |
| `--rediscache.passwordSecretName` | string | Name of secret with Redis password. |
| `--rediscache.primaryEndpoint` | string | Primary endpoint for the redis cache that can be used for both reads and writes. |
| `--rediscache.replicaEndpoint` | string | Replica endpoint for the redis cache that can be used for reads. |
| `--secrets.env-prefix` | string | Prefix for environment variables (default "FLYTE_SECRET_") |
| `--secrets.secrets-prefix` | string | Prefix where to look for secrets file (default "/etc/secrets") |
| `--secrets.type` | string | Sets the type of storage to configure [local]. (default "local") |
| `--server.dataProxy.download.maxExpiresIn` | string | Maximum allowed expiration duration. (default "1h0m0s") |
| `--server.dataProxy.upload.defaultFileNameLength` | int | Default length for the generated file name if not provided in the request. (default 20) |
| `--server.dataProxy.upload.maxExpiresIn` | string | Maximum allowed expiration duration. (default "1h0m0s") |
| `--server.dataProxy.upload.maxSize` | string | Maximum allowed upload size. (default "6Mi") |
| `--server.dataProxy.upload.storagePrefix` | string | Storage prefix to use for all upload requests. |
| `--server.grpc.enableGrpcLatencyMetrics` | | Enable grpc latency metrics. Note Histograms metrics can be expensive on Prometheus servers. |
| `--server.grpc.maxMessageSizeBytes` | int | The max size in bytes for incoming gRPC messages |
| `--server.grpc.port` | int | On which grpc port to serve admin (default 8089) |
| `--server.grpc.serverReflection` | | Enable GRPC Server Reflection (default true) |
| `--server.grpcPort` | int | deprecated |
| `--server.grpcServerReflection` | | deprecated |
| `--server.httpPort` | int | On which http port to serve admin (default 8088) |
| `--server.kube-config` | string | Path to kubernetes client config file, default is empty, useful for incluster config. |
| `--server.kubeClientConfig.burst` | int | Max burst rate for throttle. 0 defaults to 10 (default 25) |
| `--server.kubeClientConfig.qps` | int32 | Max QPS to the master for requests to KubeAPI. 0 defaults to 5. (default 100) |
| `--server.kubeClientConfig.timeout` | string | Max duration allowed for every request to KubeAPI before giving up. 0 implies no timeout. (default "30s") |
| `--server.master` | string | The address of the Kubernetes API server. |
| `--server.readHeaderTimeoutSeconds` | int | The amount of time allowed to read request headers. (default 32) |
| `--server.security.allowCors` | | (default true) |
| `--server.security.allowedHeaders` | strings | (default [Content-Type,flyte-authorization]) |
| `--server.security.allowedOrigins` | strings | (default [*]) |
| `--server.security.auditAccess` | | |
| `--server.security.secure` | | |
| `--server.security.ssl.certificateFile` | string | |
| `--server.security.ssl.keyFile` | string | |
| `--server.security.useAuth` | | |
| `--server.thirdPartyConfig.flyteClient.audience` | string | Audience to use when initiating OAuth2 authorization requests. |
| `--server.thirdPartyConfig.flyteClient.clientId` | string | public identifier for the app which handles authorization for a Flyte deployment |
| `--server.thirdPartyConfig.flyteClient.redirectUri` | string | This is the callback uri registered with the app which handles authorization for a Flyte deployment |
| `--server.thirdPartyConfig.flyteClient.scopes` | strings | Recommended scopes for the client to request. |
| `--server.watchService.maxActiveClusterConnections` | int | (default 5) |
| `--server.watchService.maxPageSize` | int | (default 50000) |
| `--server.watchService.nonTerminalStatusUpdatesInterval` | string | (default "1m0s") |
| `--server.watchService.pollInterval` | string | (default "1s") |
| `--sharedservice.connectPort` | string | On which connect port to serve admin (default "8080") |
| `--sharedservice.grpc.grpcMaxResponseStatusBytes` | int32 | specifies the maximum (uncompressed) size of header list that the client is prepared to accept on grpc calls (default 32000) |
| `--sharedservice.grpc.maxConcurrentStreams` | int | Limit on the number of concurrent streams to each ServerTransport. (default 100) |
| `--sharedservice.grpc.maxMessageSizeBytes` | int | Limit on the size of message that can be received on the server. (default 10485760) |
| `--sharedservice.grpcServerReflection` | | Enable GRPC Server Reflection (default true) |
| `--sharedservice.httpPort` | string | On which http port to serve admin (default "8089") |
| `--sharedservice.kubeConfig` | string | Path to kubernetes client config file. |
| `--sharedservice.master` | string | The address of the Kubernetes API server. |
| `--sharedservice.metrics.enableClientGrpcHistograms` | | Enable client grpc histograms (default true) |
| `--sharedservice.metrics.enableGrpcHistograms` | | Enable grpc histograms (default true) |
| `--sharedservice.metrics.scope` | string | Scope to emit metrics under (default "service:") |
| `--sharedservice.port` | string | On which grpc port to serve admin (default "8080") |
| `--sharedservice.profiler.enabled` | | Enable Profiler on server |
| `--sharedservice.profilerPort` | string | Profile port to start listen for pprof and metric handlers on. (default "10254") |
| `--sharedservice.security.allowCors` | | |
| `--sharedservice.security.allowLocalhostAccess` | | Whether to permit localhost unauthenticated access to the server |
| `--sharedservice.security.allowedHeaders` | strings | |
| `--sharedservice.security.allowedOrigins` | strings | |
| `--sharedservice.security.auditAccess` | | |
| `--sharedservice.security.orgOverride` | string | Override org in identity context if localhost access enabled |
| `--sharedservice.security.secure` | | |
| `--sharedservice.security.ssl.certificateAuthorityFile` | string | |
| `--sharedservice.security.ssl.certificateFile` | string | |
| `--sharedservice.security.ssl.keyFile` | string | |
| `--sharedservice.security.useAuth` | | |
| `--sharedservice.sync.syncInterval` | string | Time interval to sync (default "5m0s") |
| `--storage.cache.max_size_mbs` | int | Maximum size of the cache where the Blob store data is cached in-memory. If not specified or set to 0, cache is not used |
| `--storage.cache.target_gc_percent` | int | Sets the garbage collection target percentage. |
| `--storage.connection.access-key` | string | Access key to use. Only required when authtype is set to accesskey. |
| `--storage.connection.auth-type` | string | Auth Type to use [iam, accesskey]. (default "iam") |
| `--storage.connection.disable-ssl` | | Disables SSL connection. Should only be used for development. |
| `--storage.connection.endpoint` | string | URL for storage client to connect to. |
| `--storage.connection.region` | string | Region to connect to. (default "us-east-1") |
| `--storage.connection.secret-key` | string | Secret to use when accesskey is set. |
| `--storage.container` | string | Initial container (in s3 a bucket) to create -if it doesn't exist-.' |
| `--storage.defaultHttpClient.timeout` | string | Sets time out on the http client. (default "0s") |
| `--storage.enable-multicontainer` | | If this is true, then the container argument is overlooked and redundant. This config will automatically open new connections to new containers/buckets as they are encountered |
| `--storage.limits.maxDownloadMBs` | int | Maximum allowed download size (in MBs) per call. (default 2) |
| `--storage.stow.config` | stringToString | Configuration for stow backend. Refer to github/flyteorg/stow (default []) |
| `--storage.stow.kind` | string | Kind of Stow backend to use. Refer to github/flyteorg/stow |
| `--storage.type` | string | Sets the type of storage to configure [s3/minio/local/mem/stow]. (default "s3") |
| `--union.auth.authorizationMetadataKey` | string | Authorization Header to use when passing Access Tokens to the server (default "flyte-authorization") |
| `--union.auth.clientId` | string | Client ID |
| `--union.auth.clientSecretEnvVar` | string | Environment variable containing the client secret |
| `--union.auth.clientSecretLocation` | string | File containing the client secret |
| `--union.auth.deviceFlow.pollInterval` | string | amount of time the device flow would poll the token endpoint if auth server doesn't return a polling interval. Okta and google IDP do return an interval' (default "5s") |
| `--union.auth.deviceFlow.refreshTime` | string | grace period from the token expiry after which it would refresh the token. (default "5m0s") |
| `--union.auth.deviceFlow.timeout` | string | amount of time the device flow should complete or else it will be cancelled. (default "10m0s") |
| `--union.auth.enable` | | Whether to enable an authenticated conenction when communicating with admin. (default true) |
| `--union.auth.externalAuth.command` | strings | Command for external authentication token generation |
| `--union.auth.pkce.refreshTime` | string | grace period from the token expiry after which it would refresh the token. (default "5m0s") |
| `--union.auth.pkce.timeout` | string | Amount of time the browser session would be active for authentication from client app. (default "15s") |
| `--union.auth.scopes` | strings | List of scopes to request |
| `--union.auth.tokenRefreshWindow` | string | Max duration between token refresh attempt and token expiry. (default "1h0m0s") |
| `--union.auth.tokenUrl` | string | OPTIONAL: Your IdP's token endpoint. It'll be discovered from flyte admin's OAuth Metadata endpoint if not provided. |
| `--union.auth.type` | string | Type of OAuth2 flow used for communicating with admin. (default "Pkce") |
| `--union.cache.maxItemsCount` | int | Maximum number of items to keep in the cache before evicting. (default 1000) |
| `--union.connection.host` | string | Host to connect to (default "dns:///utt-mgdp-stg-us-east-2.cloud-staging.union.ai") |
| `--union.connection.insecure` | | Whether to connect over insecure channel |
| `--union.connection.insecureSkipVerify` | | InsecureSkipVerify controls whether a client verifies the server's certificate chain and host name.Caution: shouldn't be use for production usecases' |
| `--union.connection.keepAliveConfig.permitWithoutStream` | | If true, client sends keepalive pings even with no active RPCs. |
| `--union.connection.keepAliveConfig.time` | string | After a duration of this time if the client doesn't see any activity it pings the server to see if the transport is still alive. (default "20s") |
| `--union.connection.keepAliveConfig.timeout` | string | After having pinged for keepalive check, the client waits for a duration of Timeout and if no activity is seen even after that the connection is closed. (default "2m0s") |
| `--union.connection.maxBackoffDelay` | string | Max delay for grpc backoff (default "8s") |
| `--union.connection.maxRecvMsgSize` | int | Maximum size of a message in bytes of a gRPC message (default 10485760) |
| `--union.connection.maxRetries` | int | Max number of gRPC retries (default 4) |
| `--union.connection.minConnectTimeout` | string | Minimum timeout for establishing a connection (default "20s") |
| `--union.connection.perRetryTimeout` | string | gRPC per retry timeout (default "15s") |
| `--union.connection.serviceConfig` | string | Defines gRPC experimental JSON Service Config (default "{"loadBalancingConfig": [{"round_robin":{}}]}") |
| `--union.connection.trustedIdentityClaims.enabled` | | Enables passing of trusted claims while making inter service calls |
| `--union.connection.trustedIdentityClaims.externalIdentityClaim` | string | External identity claim of the service which is authorized to make internal service call. These are verified against userclouds actions |
| `--union.connection.trustedIdentityClaims.externalIdentityTypeClaim` | string | External identity type claim of app or user to use for the current service identity. It should be an 'app' for inter service communication |
| `--union.internalConnectionConfig.-` | stringToString | (default []) |
| `--union.internalConnectionConfig.enabled` | | Enables internal service to service communication instead of going through ingress. |
| `--union.internalConnectionConfig.urlPattern` | string | UrlPattern of the internal service endpoints. (default "{{ service }}-helmchart.{{ service }}.svc.cluster.local:80") |
| `--webhook.awsSecretManager.sidecarImage` | string | Specifies the sidecar docker image to use (default "docker.io/amazon/aws-secrets-manager-secret-sidecar:v0.1.4") |
| `--webhook.certDir` | string | Certificate directory to use to write generated certs. Defaults to /etc/webhook/certs/ (default "/etc/webhook/certs") |
| `--webhook.embeddedSecretManagerConfig.awsConfig.region` | string | AWS region |
| `--webhook.embeddedSecretManagerConfig.fileMountInitContainer.image` | string | Specifies init container image to use for mounting secrets as files. (default "busybox:1.28") |
| `--webhook.embeddedSecretManagerConfig.gcpConfig.project` | string | GCP project to be used for secret manager |
| `--webhook.embeddedSecretManagerConfig.type` | string | (default "AWS") |
| `--webhook.gcpSecretManager.sidecarImage` | string | Specifies the sidecar docker image to use (default "gcr.io/google.com/cloudsdktool/cloud-sdk:alpine") |
| `--webhook.listenPort` | int | The port to use to listen to webhook calls. Defaults to 9443 (default 9443) |
| `--webhook.localCert` | | write certs locally. Defaults to false |
| `--webhook.metrics-prefix` | string | An optional prefix for all published metrics. (default "flyte:") |
| `--webhook.secretName` | string | Secret name to write generated certs to. (default "flyte-pod-webhook") |
| `--webhook.serviceName` | string | The name of the webhook service. (default "flyte-pod-webhook") |
| `--webhook.servicePort` | int32 | The port on the service that hosting webhook. (default 443) |
| `--webhook.vaultSecretManager.role` | string | Specifies the vault role to use (default "flyte") |
## Subpages
- **Uctl CLI > uctl append > uctl append identityassignments**
=== PAGE: https://www.union.ai/docs/v1/serverless/api-reference/uctl-cli/uctl-append/uctl-append-identityassignments ===
# uctl append identityassignments
Assigns a role to a specific user or application
## Synopsis
Assigns a policy to a specific user or application.
A policy must already exist within your organization.
Default policies include
* `viewer`: Permissions to view Flyte entities:
* `contributor`: Permissions to create workflows, tasks, launch plans, and executions, plus all `viewer` permissions.
* `admin`: Permissions to manage users and view usage dashboards, plus all `contributor`permissions.
To append to a user's identity assignments, specify them by their email
and run:
```shell
$ uctl append identityassignments --user bob@contoso.com --policy contributor
```
To append a policy assignment to an application, specify the application
by its unique client id and run:
```shell
$ uctl append identityassignments --application "contoso-operator" --policy admin
```
Hint: you can fetch an application's ID by listing apps:
```shell
$ uctl get apps
```
You can list the existing policies in your org with:
```shell
$ uctl get policies
```
You can list existing policy assignments with:
```shell
$ uctl get identityassignments --user bob@contoso.com
$ uctl get identityassignments --application "contoso-operator"
$ uctl append identityassignments [flags]
```
## Options
| Option | Type | Description |
|--------|------|-------------|
| `--application` | string | Application id to fetch identity assignments for |
| `-h`, `--help` | help for identityassignments |
| `--policy` | string | Policy name with which to update the identity assignment |
| `--user` | string | Human user email to fetch identity assignments for |
### Options inherited from parent commands
| Option | Type | Description |
|--------|------|-------------|
| `--admin.audience` | string | Audience to use when initiating OAuth2 authorization requests. |
| `--admin.authType` | string | Type of OAuth2 flow used for communicating with admin.ClientSecret, Pkce, ExternalCommand are valid values (default "ClientSecret") |
| `--admin.authorizationHeader` | string | Custom metadata header to pass JWT |
| `--admin.authorizationServerUrl` | string | This is the URL to your IdP's authorization server. It'll default to Endpoint |
| `--admin.caCertFilePath` | string | Use specified certificate file to verify the admin server peer. |
| `--admin.clientId` | string | Client ID (default "flytepropeller") |
| `--admin.clientSecretEnvVar` | string | Environment variable containing the client secret |
| `--admin.clientSecretLocation` | string | File containing the client secret (default "/etc/secrets/client_secret") |
| `--admin.command` | strings | Command for external authentication token generation |
| `--admin.defaultOrg` | string | OPTIONAL: Default org to use to support non-org based cli's.'. |
| `--admin.defaultServiceConfig` | string | |
| `--admin.deviceFlowConfig.pollInterval` | string | amount of time the device flow would poll the token endpoint if auth server doesn't return a polling interval. Okta and google IDP do return an interval' (default "5s") |
| `--admin.deviceFlowConfig.refreshTime` | string | grace period from the token expiry after which it would refresh the token. (default "5m0s") |
| `--admin.deviceFlowConfig.timeout` | string | amount of time the device flow should complete or else it will be cancelled. (default "10m0s") |
| `--admin.endpoint` | string | For admin types, specify where the uri of the service is located. |
| `--admin.httpProxyURL` | string | OPTIONAL: HTTP Proxy to be used for OAuth requests. |
| `--admin.insecure` | | Use insecure connection. |
| `--admin.insecureSkipVerify` | | InsecureSkipVerify controls whether a client verifies the server's certificate chain and host name.Caution: shouldn't be use for production usecases' |
| `--admin.maxBackoffDelay` | string | Max delay for grpc backoff (default "8s") |
| `--admin.maxMessageSizeBytes` | int | The max size in bytes for incoming gRPC messages |
| `--admin.maxRetries` | int | Max number of gRPC retries (default 4) |
| `--admin.perRetryTimeout` | string | gRPC per retry timeout (default "15s") |
| `--admin.pkceConfig.refreshTime` | string | grace period from the token expiry after which it would refresh the token. (default "5m0s") |
| `--admin.pkceConfig.timeout` | string | Amount of time the browser session would be active for authentication from client app. (default "2m0s") |
| `--admin.proxyCommand` | strings | Command for external proxy-authorization token generation |
| `--admin.scopes` | strings | List of scopes to request |
| `--admin.tokenRefreshWindow` | string | Max duration between token refresh attempt and token expiry. (default "0s") |
| `--admin.tokenUrl` | string | OPTIONAL: Your IdP's token endpoint. It'll be discovered from flyte admin's OAuth Metadata endpoint if not provided. |
| `--admin.useAudienceFromAdmin` | | Use Audience configured from admins public endpoint config. |
| `--admin.useAuth` | | Deprecated: Auth will be enabled/disabled based on admin's dynamically discovered information. |
| `--auth.appAuth.externalAuthServer.allowedAudience` | strings | Optional: A list of allowed audiences. If not provided, the audience is expected to be the public Uri of the service. |
| `--auth.appAuth.externalAuthServer.baseUrl` | string | This should be the base url of the authorization server that you are trying to hit. With Okta for instance, it will look something like https://company.okta.com/oauth2/abcdef123456789/ |
| `--auth.appAuth.externalAuthServer.httpProxyURL` | string | OPTIONAL: HTTP Proxy to be used for OAuth requests. |
| `--auth.appAuth.externalAuthServer.metadataUrl` | string | Optional: If the server doesn't support /.well-known/oauth-authorization-server, you can set a custom metadata url here.' |
| `--auth.appAuth.externalAuthServer.retryAttempts` | int | Optional: The number of attempted retries on a transient failure to get the OAuth metadata (default 5) |
| `--auth.appAuth.externalAuthServer.retryDelay` | string | Optional, Duration to wait between retries (default "1s") |
| `--auth.appAuth.selfAuthServer.accessTokenLifespan` | string | Defines the lifespan of issued access tokens. (default "30m0s") |
| `--auth.appAuth.selfAuthServer.authorizationCodeLifespan` | string | Defines the lifespan of issued access tokens. (default "5m0s") |
| `--auth.appAuth.selfAuthServer.claimSymmetricEncryptionKeySecretName` | string | OPTIONAL: Secret name to use to encrypt claims in authcode token. (default "claim_symmetric_key") |
| `--auth.appAuth.selfAuthServer.issuer` | string | Defines the issuer to use when issuing and validating tokens. The default value is https://{requestUri.HostAndPort}/ |
| `--auth.appAuth.selfAuthServer.oldTokenSigningRSAKeySecretName` | string | OPTIONAL: Secret name to use to retrieve Old RSA Signing Key. This can be useful during key rotation to continue to accept older tokens. (default "token_rsa_key_old.pem") |
| `--auth.appAuth.selfAuthServer.refreshTokenLifespan` | string | Defines the lifespan of issued access tokens. (default "1h0m0s") |
| `--auth.appAuth.selfAuthServer.tokenSigningRSAKeySecretName` | string | OPTIONAL: Secret name to use to retrieve RSA Signing Key. (default "token_rsa_key.pem") |
| `--auth.appAuth.thirdPartyConfig.flyteClient.audience` | string | Audience to use when initiating OAuth2 authorization requests. |
| `--auth.appAuth.thirdPartyConfig.flyteClient.clientId` | string | public identifier for the app which handles authorization for a Flyte deployment (default "uctl") |
| `--auth.appAuth.thirdPartyConfig.flyteClient.redirectUri` | string | This is the callback uri registered with the app which handles authorization for a Flyte deployment (default "http://localhost:53593/callback") |
| `--auth.appAuth.thirdPartyConfig.flyteClient.scopes` | strings | Recommended scopes for the client to request. (default [all,offline]) |
| `--auth.disableForGrpc` | | Disables auth enforcement on Grpc Endpoints. |
| `--auth.disableForHttp` | | Disables auth enforcement on HTTP Endpoints. |
| `--auth.grpcAuthorizationHeader` | string | (default "flyte-authorization") |
| `--auth.httpAuthorizationHeader` | string | (default "flyte-authorization") |
| `--auth.httpProxyURL` | string | OPTIONAL: HTTP Proxy to be used for OAuth requests. |
| `--auth.tokenEndpointProxyPath` | string | The path used to proxy calls to the TokenURL |
| `--auth.userAuth.cookieBlockKeySecretName` | string | OPTIONAL: Secret name to use for cookie block key. (default "cookie_block_key") |
| `--auth.userAuth.cookieHashKeySecretName` | string | OPTIONAL: Secret name to use for cookie hash key. (default "cookie_hash_key") |
| `--auth.userAuth.cookieSetting.domain` | string | OPTIONAL: Allows you to set the domain attribute on the auth cookies. |
| `--auth.userAuth.cookieSetting.sameSitePolicy` | string | OPTIONAL: Allows you to declare if your cookie should be restricted to a first-party or same-site context.Wrapper around http.SameSite. (default "DefaultMode") |
| `--auth.userAuth.httpProxyURL` | string | OPTIONAL: HTTP Proxy to be used for OAuth requests. |
| `--auth.userAuth.idpQueryParameter` | string | idp query parameter used for selecting a particular IDP for doing user authentication. Eg: for Okta passing idp={IDP-ID} forces the authentication to happen with IDP-ID |
| `--auth.userAuth.openId.baseUrl` | string | |
| `--auth.userAuth.openId.clientId` | string | |
| `--auth.userAuth.openId.clientSecretFile` | string | |
| `--auth.userAuth.openId.clientSecretName` | string | (default "oidc_client_secret") |
| `--auth.userAuth.openId.scopes` | strings | (default [openid,profile]) |
| `--auth.userAuth.redirectUrl` | string | (default "/console") |
| `--authorizer.internalCommunicationConfig.enabled` | | Enables authorization decisions for internal communication. (default true) |
| `--authorizer.internalCommunicationConfig.ingressIdentity` | string | IngressIdentity used in the cluster. Needed to exclude the communication coming from ingress. (default "ingress-nginx.ingress-nginx.serviceaccount.identity.linkerd.cluster.local") |
| `--authorizer.internalCommunicationConfig.tenantUrlPatternIdentity` | string | UrlPatternIdentity of the internal tenant service endpoint identities. (default "{{ service }}.{{ org }}.serviceaccount.identity.linkerd.cluster.local") |
| `--authorizer.internalCommunicationConfig.urlPatternIdentity` | string | UrlPatternIdentity of the internal service endpoint identities. (default "{{ service }}-helmchart.{{ service }}.serviceaccount.identity.linkerd.cluster.local") |
| `--authorizer.mode` | string | (default "Active") |
| `--authorizer.organizationConfig.PolicyConfig.adminPolicyDescription` | string | description for the boilerplate admin policy (default "Contributor permissions and full admin permissions to manage users and view usage dashboards") |
| `--authorizer.organizationConfig.PolicyConfig.contributorPolicyDescription` | string | description for the boilerplate contributor policy (default "Viewer permissions and permissions to create workflows, tasks, launch plans, and executions") |
| `--authorizer.organizationConfig.PolicyConfig.defaultUserPolicyRoleType` | string | name of the role type to determine which default policy new users added to the organization should be assigned (default "Viewer") |
| `--authorizer.organizationConfig.PolicyConfig.serverlessContributorPolicyDescription` | string | description for the boilerplate serverless contributor policy (default "Viewer permissions and permissions to create workflows, tasks, launch plans, and executions") |
| `--authorizer.organizationConfig.PolicyConfig.serverlessViewerPolicyDescription` | string | description for the boilerplate serverless viewer policy (default "Permissions to view Flyte entities") |
| `--authorizer.organizationConfig.PolicyConfig.viewerPolicyDescription` | string | description for the boilerplate viewer policy (default "Permissions to view Flyte entities") |
| `--authorizer.organizationConfig.defaultPolicyCacheDuration` | string | Cache entry duration for the store of the default policy per organization (default "10m0s") |
| `--authorizer.syncRuleRefreshInterval` | string | (default "1m0s") |
| `--authorizer.type` | string | (default "UserClouds") |
| `--authorizer.userCloudsClient.cache.redis.ttl.edgeTypes` | string | Specifies how long edge types remain in the cache.. (default "30m0s") |
| `--authorizer.userCloudsClient.cache.redis.ttl.edges` | string | Specifies how long edges remain in the cache. (default "30m0s") |
| `--authorizer.userCloudsClient.cache.redis.ttl.objectTypes` | string | Specifies how long object types remain in the cache. (default "30m0s") |
| `--authorizer.userCloudsClient.cache.redis.ttl.objects` | string | Specifies how long objects remain in the cache. (default "30m0s") |
| `--authorizer.userCloudsClient.cache.type` | string | Cache type to use. (default "none") |
| `--authorizer.userCloudsClient.clientID` | string | UserClouds client id |
| `--authorizer.userCloudsClient.clientSecretName` | string | UserCloud client secret name to read from the secret manager. (default "userclouds-client-secret") |
| `--authorizer.userCloudsClient.enableLogging` | | Enable userclouds client's internal logging. Calls to post logs take 250-350 ms and will impact p99 latency, enable with caution. |
| `--authorizer.userCloudsClient.tenantID` | string | UserClouds tenant id. Should be a UUID. |
| `--authorizer.userCloudsClient.tenantUrl` | string | Something like https://{yourtenant}.tenant.userclouds.com |
| `--config` | string | config file (default is /Users/andrew/.union/config.yaml) |
| `--connection.environment` | string | |
| `--connection.region` | string | |
| `--connection.rootTenantURLPattern` | string | Pattern for tenant url. (default "dns:///{{ organization }}.cloud-staging.union.ai") |
| `--console.endpoint` | string | Endpoint of console, if different than flyte admin |
| `--database.connMaxLifeTime` | string | sets the maximum amount of time a connection may be reused (default "1h0m0s") |
| `--database.enableForeignKeyConstraintWhenMigrating` | | Whether to enable gorm foreign keys when migrating the db |
| `--database.maxIdleConnections` | int | maxIdleConnections sets the maximum number of connections in the idle connection pool. (default 10) |
| `--database.maxOpenConnections` | int | maxOpenConnections sets the maximum number of open connections to the database. (default 100) |
| `--database.postgres.dbname` | string | The database name (default "postgres") |
| `--database.postgres.debug` | | |
| `--database.postgres.host` | string | The host name of the database server (default "localhost") |
| `--database.postgres.options` | string | See http://gorm.io/docs/connecting_to_the_database.html for available options passed, in addition to the above. (default "sslmode=disable") |
| `--database.postgres.password` | string | The database password. (default "postgres") |
| `--database.postgres.passwordPath` | string | Points to the file containing the database password. |
| `--database.postgres.port` | int | The port name of the database server (default 30001) |
| `--database.postgres.readReplicaHost` | string | The host name of the read replica database server (default "localhost") |
| `--database.postgres.username` | string | The database user who is connecting to the server. (default "postgres") |
| `--database.sqlite.file` | string | The path to the file (existing or new) where the DB should be created / stored. If existing, then this will be re-used, else a new will be created |
| `--db.connectionPool.maxConnectionLifetime` | string | (default "0s") |
| `--db.connectionPool.maxIdleConnections` | int | |
| `--db.connectionPool.maxOpenConnections` | int | |
| `--db.dbname` | string | (default "postgres") |
| `--db.debug` | | |
| `--db.host` | string | (default "postgres") |
| `--db.log_level` | int | (default 4) |
| `--db.options` | string | (default "sslmode=disable") |
| `--db.password` | string | |
| `--db.passwordPath` | string | |
| `--db.port` | int | (default 5432) |
| `--db.username` | string | (default "postgres") |
| `-d`, `--domain` | string | Specifies the Flyte project's domain. |
| `--files.archive` | | Pass in archive file either an http link or local path. |
| `--files.assumableIamRole` | string | Custom assumable iam auth role to register launch plans with. |
| `--files.continueOnError` | | Continue on error when registering files. |
| `--files.destinationDirectory` | string | Location of source code in container. |
| `--files.dryRun` | | Execute command without making any modifications. |
| `--files.enableSchedule` | | Enable the schedule if the files contain schedulable launchplan. |
| `--files.force` | | Force use of version number on entities registered with flyte. |
| `--files.k8ServiceAccount` | string | Deprecated. Please use `--K8sServiceAccount`|
| `--files.k8sServiceAccount` | string | Custom kubernetes service account auth role to register launch plans with. |
| `--files.outputLocationPrefix` | string | Custom output location prefix for offloaded types (files/schemas). |
| `--files.sourceUploadPath` | string | Deprecated: Update flyte admin to avoid having to configure storage access from uctl. |
| `--files.version` | string | Version of the entity to be registered with flyte which are un-versioned after serialization. |
| `--logger.formatter.type` | string | Sets logging format type. (default "json") |
| `--logger.level` | int | Sets the minimum logging level. (default 3) |
| `--logger.mute` | | Mutes all logs regardless of severity. Intended for benchmarks/tests only. |
| `--logger.show-source` | | Includes source code location in logs. |
| `--org` | string | Organization to work on. If not set, default to user's org. |
| `--otel.file.filename` | string | Filename to store exported telemetry traces (default "/tmp/trace.txt") |
| `--otel.jaeger.endpoint` | string | Endpoint for the jaeger telemetry trace ingestor (default "http://localhost:14268/api/traces") |
| `--otel.otlpgrpc.endpoint` | string | Endpoint for the OTLP telemetry trace collector (default "http://localhost:4317") |
| `--otel.otlphttp.endpoint` | string | Endpoint for the OTLP telemetry trace collector (default "http://localhost:4318/v1/traces") |
| `--otel.sampler.parentSampler` | string | Sets the parent sampler to use for the tracer (default "always") |
| `--otel.type` | string | Sets the type of exporter to configure [noop/file/jaeger/otlpgrpc/otlphttp]. (default "noop") |
| `-o`, `--output` | string | Specifies the output type - supported formats [TABLE JSON YAML DOT DOTURL]. NOTE: dot, doturl are only supported for Workflow (default "table") |
| `--plugins.catalogcache.reader.maxItems` | int | Maximum number of entries to keep in the index. (default 10000) |
| `--plugins.catalogcache.reader.maxRetries` | int | Maximum number of retries per item. (default 3) |
| `--plugins.catalogcache.reader.workers` | int | Number of concurrent workers to start processing the queue. (default 10) |
| `--plugins.catalogcache.writer.maxItems` | int | Maximum number of entries to keep in the index. (default 10000) |
| `--plugins.catalogcache.writer.maxRetries` | int | Maximum number of retries per item. (default 3) |
| `--plugins.catalogcache.writer.workers` | int | Number of concurrent workers to start processing the queue. (default 10) |
| `-p`, `--project` | string | Specifies the Flyte project. |
| `--rediscache.passwordSecretName` | string | Name of secret with Redis password. |
| `--rediscache.primaryEndpoint` | string | Primary endpoint for the redis cache that can be used for both reads and writes. |
| `--rediscache.replicaEndpoint` | string | Replica endpoint for the redis cache that can be used for reads. |
| `--secrets.env-prefix` | string | Prefix for environment variables (default "FLYTE_SECRET_") |
| `--secrets.secrets-prefix` | string | Prefix where to look for secrets file (default "/etc/secrets") |
| `--secrets.type` | string | Sets the type of storage to configure [local]. (default "local") |
| `--server.dataProxy.download.maxExpiresIn` | string | Maximum allowed expiration duration. (default "1h0m0s") |
| `--server.dataProxy.upload.defaultFileNameLength` | int | Default length for the generated file name if not provided in the request. (default 20) |
| `--server.dataProxy.upload.maxExpiresIn` | string | Maximum allowed expiration duration. (default "1h0m0s") |
| `--server.dataProxy.upload.maxSize` | string | Maximum allowed upload size. (default "6Mi") |
| `--server.dataProxy.upload.storagePrefix` | string | Storage prefix to use for all upload requests. |
| `--server.grpc.enableGrpcLatencyMetrics` | | Enable grpc latency metrics. Note Histograms metrics can be expensive on Prometheus servers. |
| `--server.grpc.maxMessageSizeBytes` | int | The max size in bytes for incoming gRPC messages |
| `--server.grpc.port` | int | On which grpc port to serve admin (default 8089) |
| `--server.grpc.serverReflection` | | Enable GRPC Server Reflection (default true) |
| `--server.grpcPort` | int | deprecated |
| `--server.grpcServerReflection` | | deprecated |
| `--server.httpPort` | int | On which http port to serve admin (default 8088) |
| `--server.kube-config` | string | Path to kubernetes client config file, default is empty, useful for incluster config. |
| `--server.kubeClientConfig.burst` | int | Max burst rate for throttle. 0 defaults to 10 (default 25) |
| `--server.kubeClientConfig.qps` | int32 | Max QPS to the master for requests to KubeAPI. 0 defaults to 5. (default 100) |
| `--server.kubeClientConfig.timeout` | string | Max duration allowed for every request to KubeAPI before giving up. 0 implies no timeout. (default "30s") |
| `--server.master` | string | The address of the Kubernetes API server. |
| `--server.readHeaderTimeoutSeconds` | int | The amount of time allowed to read request headers. (default 32) |
| `--server.security.allowCors` | | (default true) |
| `--server.security.allowedHeaders` | strings | (default [Content-Type,flyte-authorization]) |
| `--server.security.allowedOrigins` | strings | (default [*]) |
| `--server.security.auditAccess` | | |
| `--server.security.secure` | | |
| `--server.security.ssl.certificateFile` | string | |
| `--server.security.ssl.keyFile` | string | |
| `--server.security.useAuth` | | |
| `--server.thirdPartyConfig.flyteClient.audience` | string | Audience to use when initiating OAuth2 authorization requests. |
| `--server.thirdPartyConfig.flyteClient.clientId` | string | public identifier for the app which handles authorization for a Flyte deployment |
| `--server.thirdPartyConfig.flyteClient.redirectUri` | string | This is the callback uri registered with the app which handles authorization for a Flyte deployment |
| `--server.thirdPartyConfig.flyteClient.scopes` | strings | Recommended scopes for the client to request. |
| `--server.watchService.maxActiveClusterConnections` | int | (default 5) |
| `--server.watchService.maxPageSize` | int | (default 50000) |
| `--server.watchService.nonTerminalStatusUpdatesInterval` | string | (default "1m0s") |
| `--server.watchService.pollInterval` | string | (default "1s") |
| `--sharedservice.connectPort` | string | On which connect port to serve admin (default "8080") |
| `--sharedservice.grpc.grpcMaxResponseStatusBytes` | int32 | specifies the maximum (uncompressed) size of header list that the client is prepared to accept on grpc calls (default 32000) |
| `--sharedservice.grpc.maxConcurrentStreams` | int | Limit on the number of concurrent streams to each ServerTransport. (default 100) |
| `--sharedservice.grpc.maxMessageSizeBytes` | int | Limit on the size of message that can be received on the server. (default 10485760) |
| `--sharedservice.grpcServerReflection` | | Enable GRPC Server Reflection (default true) |
| `--sharedservice.httpPort` | string | On which http port to serve admin (default "8089") |
| `--sharedservice.kubeConfig` | string | Path to kubernetes client config file. |
| `--sharedservice.master` | string | The address of the Kubernetes API server. |
| `--sharedservice.metrics.enableClientGrpcHistograms` | | Enable client grpc histograms (default true) |
| `--sharedservice.metrics.enableGrpcHistograms` | | Enable grpc histograms (default true) |
| `--sharedservice.metrics.scope` | string | Scope to emit metrics under (default "service:") |
| `--sharedservice.port` | string | On which grpc port to serve admin (default "8080") |
| `--sharedservice.profiler.enabled` | | Enable Profiler on server |
| `--sharedservice.profilerPort` | string | Profile port to start listen for pprof and metric handlers on. (default "10254") |
| `--sharedservice.security.allowCors` | | |
| `--sharedservice.security.allowLocalhostAccess` | | Whether to permit localhost unauthenticated access to the server |
| `--sharedservice.security.allowedHeaders` | strings | |
| `--sharedservice.security.allowedOrigins` | strings | |
| `--sharedservice.security.auditAccess` | | |
| `--sharedservice.security.orgOverride` | string | Override org in identity context if localhost access enabled |
| `--sharedservice.security.secure` | | |
| `--sharedservice.security.ssl.certificateAuthorityFile` | string | |
| `--sharedservice.security.ssl.certificateFile` | string | |
| `--sharedservice.security.ssl.keyFile` | string | |
| `--sharedservice.security.useAuth` | | |
| `--sharedservice.sync.syncInterval` | string | Time interval to sync (default "5m0s") |
| `--storage.cache.max_size_mbs` | int | Maximum size of the cache where the Blob store data is cached in-memory. If not specified or set to 0, cache is not used |
| `--storage.cache.target_gc_percent` | int | Sets the garbage collection target percentage. |
| `--storage.connection.access-key` | string | Access key to use. Only required when authtype is set to accesskey. |
| `--storage.connection.auth-type` | string | Auth Type to use [iam, accesskey]. (default "iam") |
| `--storage.connection.disable-ssl` | | Disables SSL connection. Should only be used for development. |
| `--storage.connection.endpoint` | string | URL for storage client to connect to. |
| `--storage.connection.region` | string | Region to connect to. (default "us-east-1") |
| `--storage.connection.secret-key` | string | Secret to use when accesskey is set. |
| `--storage.container` | string | Initial container (in s3 a bucket) to create -if it doesn't exist-.' |
| `--storage.defaultHttpClient.timeout` | string | Sets time out on the http client. (default "0s") |
| `--storage.enable-multicontainer` | | If this is true, then the container argument is overlooked and redundant. This config will automatically open new connections to new containers/buckets as they are encountered |
| `--storage.limits.maxDownloadMBs` | int | Maximum allowed download size (in MBs) per call. (default 2) |
| `--storage.stow.config` | stringToString | Configuration for stow backend. Refer to github/flyteorg/stow (default []) |
| `--storage.stow.kind` | string | Kind of Stow backend to use. Refer to github/flyteorg/stow |
| `--storage.type` | string | Sets the type of storage to configure [s3/minio/local/mem/stow]. (default "s3") |
| `--union.auth.authorizationMetadataKey` | string | Authorization Header to use when passing Access Tokens to the server (default "flyte-authorization") |
| `--union.auth.clientId` | string | Client ID |
| `--union.auth.clientSecretEnvVar` | string | Environment variable containing the client secret |
| `--union.auth.clientSecretLocation` | string | File containing the client secret |
| `--union.auth.deviceFlow.pollInterval` | string | amount of time the device flow would poll the token endpoint if auth server doesn't return a polling interval. Okta and google IDP do return an interval' (default "5s") |
| `--union.auth.deviceFlow.refreshTime` | string | grace period from the token expiry after which it would refresh the token. (default "5m0s") |
| `--union.auth.deviceFlow.timeout` | string | amount of time the device flow should complete or else it will be cancelled. (default "10m0s") |
| `--union.auth.enable` | | Whether to enable an authenticated conenction when communicating with admin. (default true) |
| `--union.auth.externalAuth.command` | strings | Command for external authentication token generation |
| `--union.auth.pkce.refreshTime` | string | grace period from the token expiry after which it would refresh the token. (default "5m0s") |
| `--union.auth.pkce.timeout` | string | Amount of time the browser session would be active for authentication from client app. (default "15s") |
| `--union.auth.scopes` | strings | List of scopes to request |
| `--union.auth.tokenRefreshWindow` | string | Max duration between token refresh attempt and token expiry. (default "1h0m0s") |
| `--union.auth.tokenUrl` | string | OPTIONAL: Your IdP's token endpoint. It'll be discovered from flyte admin's OAuth Metadata endpoint if not provided. |
| `--union.auth.type` | string | Type of OAuth2 flow used for communicating with admin. (default "Pkce") |
| `--union.cache.maxItemsCount` | int | Maximum number of items to keep in the cache before evicting. (default 1000) |
| `--union.connection.host` | string | Host to connect to (default "dns:///utt-mgdp-stg-us-east-2.cloud-staging.union.ai") |
| `--union.connection.insecure` | | Whether to connect over insecure channel |
| `--union.connection.insecureSkipVerify` | | InsecureSkipVerify controls whether a client verifies the server's certificate chain and host name.Caution: shouldn't be use for production usecases' |
| `--union.connection.keepAliveConfig.permitWithoutStream` | | If true, client sends keepalive pings even with no active RPCs. |
| `--union.connection.keepAliveConfig.time` | string | After a duration of this time if the client doesn't see any activity it pings the server to see if the transport is still alive. (default "20s") |
| `--union.connection.keepAliveConfig.timeout` | string | After having pinged for keepalive check, the client waits for a duration of Timeout and if no activity is seen even after that the connection is closed. (default "2m0s") |
| `--union.connection.maxBackoffDelay` | string | Max delay for grpc backoff (default "8s") |
| `--union.connection.maxRecvMsgSize` | int | Maximum size of a message in bytes of a gRPC message (default 10485760) |
| `--union.connection.maxRetries` | int | Max number of gRPC retries (default 4) |
| `--union.connection.minConnectTimeout` | string | Minimum timeout for establishing a connection (default "20s") |
| `--union.connection.perRetryTimeout` | string | gRPC per retry timeout (default "15s") |
| `--union.connection.serviceConfig` | string | Defines gRPC experimental JSON Service Config (default "{"loadBalancingConfig": [{"round_robin":{}}]}") |
| `--union.connection.trustedIdentityClaims.enabled` | | Enables passing of trusted claims while making inter service calls |
| `--union.connection.trustedIdentityClaims.externalIdentityClaim` | string | External identity claim of the service which is authorized to make internal service call. These are verified against userclouds actions |
| `--union.connection.trustedIdentityClaims.externalIdentityTypeClaim` | string | External identity type claim of app or user to use for the current service identity. It should be an 'app' for inter service communication |
| `--union.internalConnectionConfig.-` | stringToString | (default []) |
| `--union.internalConnectionConfig.enabled` | | Enables internal service to service communication instead of going through ingress. |
| `--union.internalConnectionConfig.urlPattern` | string | UrlPattern of the internal service endpoints. (default "{{ service }}-helmchart.{{ service }}.svc.cluster.local:80") |
| `--webhook.awsSecretManager.sidecarImage` | string | Specifies the sidecar docker image to use (default "docker.io/amazon/aws-secrets-manager-secret-sidecar:v0.1.4") |
| `--webhook.certDir` | string | Certificate directory to use to write generated certs. Defaults to /etc/webhook/certs/ (default "/etc/webhook/certs") |
| `--webhook.embeddedSecretManagerConfig.awsConfig.region` | string | AWS region |
| `--webhook.embeddedSecretManagerConfig.fileMountInitContainer.image` | string | Specifies init container image to use for mounting secrets as files. (default "busybox:1.28") |
| `--webhook.embeddedSecretManagerConfig.gcpConfig.project` | string | GCP project to be used for secret manager |
| `--webhook.embeddedSecretManagerConfig.type` | string | (default "AWS") |
| `--webhook.gcpSecretManager.sidecarImage` | string | Specifies the sidecar docker image to use (default "gcr.io/google.com/cloudsdktool/cloud-sdk:alpine") |
| `--webhook.listenPort` | int | The port to use to listen to webhook calls. Defaults to 9443 (default 9443) |
| `--webhook.localCert` | | write certs locally. Defaults to false |
| `--webhook.metrics-prefix` | string | An optional prefix for all published metrics. (default "flyte:") |
| `--webhook.secretName` | string | Secret name to write generated certs to. (default "flyte-pod-webhook") |
| `--webhook.serviceName` | string | The name of the webhook service. (default "flyte-pod-webhook") |
| `--webhook.servicePort` | int32 | The port on the service that hosting webhook. (default 443) |
| `--webhook.vaultSecretManager.role` | string | Specifies the vault role to use (default "flyte") |
=== PAGE: https://www.union.ai/docs/v1/serverless/api-reference/uctl-cli/uctl-apply ===
# uctl apply
Used for updating various union/flyte resources including
tasks/workflows/launchplans/executions/project.
## Synopsis
Eg: Update Union.ai resources of app for a tenant:
```shell
$ uctl apply app --appSpecFile Tenant-AppSpec.yaml
```
## Options
| Option | Type | Description |
|--------|------|-------------|
| `-h`, `--help` | help for apply |
### Options inherited from parent commands
| Option | Type | Description |
|--------|------|-------------|
| `--admin.audience` | string | Audience to use when initiating OAuth2 authorization requests. |
| `--admin.authType` | string | Type of OAuth2 flow used for communicating with admin.ClientSecret, Pkce, ExternalCommand are valid values (default "ClientSecret") |
| `--admin.authorizationHeader` | string | Custom metadata header to pass JWT |
| `--admin.authorizationServerUrl` | string | This is the URL to your IdP's authorization server. It'll default to Endpoint |
| `--admin.caCertFilePath` | string | Use specified certificate file to verify the admin server peer. |
| `--admin.clientId` | string | Client ID (default "flytepropeller") |
| `--admin.clientSecretEnvVar` | string | Environment variable containing the client secret |
| `--admin.clientSecretLocation` | string | File containing the client secret (default "/etc/secrets/client_secret") |
| `--admin.command` | strings | Command for external authentication token generation |
| `--admin.defaultOrg` | string | OPTIONAL: Default org to use to support non-org based cli's.'. |
| `--admin.defaultServiceConfig` | string | |
| `--admin.deviceFlowConfig.pollInterval` | string | amount of time the device flow would poll the token endpoint if auth server doesn't return a polling interval. Okta and google IDP do return an interval' (default "5s") |
| `--admin.deviceFlowConfig.refreshTime` | string | grace period from the token expiry after which it would refresh the token. (default "5m0s") |
| `--admin.deviceFlowConfig.timeout` | string | amount of time the device flow should complete or else it will be cancelled. (default "10m0s") |
| `--admin.endpoint` | string | For admin types, specify where the uri of the service is located. |
| `--admin.httpProxyURL` | string | OPTIONAL: HTTP Proxy to be used for OAuth requests. |
| `--admin.insecure` | | Use insecure connection. |
| `--admin.insecureSkipVerify` | | InsecureSkipVerify controls whether a client verifies the server's certificate chain and host name.Caution: shouldn't be use for production usecases' |
| `--admin.maxBackoffDelay` | string | Max delay for grpc backoff (default "8s") |
| `--admin.maxMessageSizeBytes` | int | The max size in bytes for incoming gRPC messages |
| `--admin.maxRetries` | int | Max number of gRPC retries (default 4) |
| `--admin.perRetryTimeout` | string | gRPC per retry timeout (default "15s") |
| `--admin.pkceConfig.refreshTime` | string | grace period from the token expiry after which it would refresh the token. (default "5m0s") |
| `--admin.pkceConfig.timeout` | string | Amount of time the browser session would be active for authentication from client app. (default "2m0s") |
| `--admin.proxyCommand` | strings | Command for external proxy-authorization token generation |
| `--admin.scopes` | strings | List of scopes to request |
| `--admin.tokenRefreshWindow` | string | Max duration between token refresh attempt and token expiry. (default "0s") |
| `--admin.tokenUrl` | string | OPTIONAL: Your IdP's token endpoint. It'll be discovered from flyte admin's OAuth Metadata endpoint if not provided. |
| `--admin.useAudienceFromAdmin` | | Use Audience configured from admins public endpoint config. |
| `--admin.useAuth` | | Deprecated: Auth will be enabled/disabled based on admin's dynamically discovered information. |
| `--auth.appAuth.externalAuthServer.allowedAudience` | strings | Optional: A list of allowed audiences. If not provided, the audience is expected to be the public Uri of the service. |
| `--auth.appAuth.externalAuthServer.baseUrl` | string | This should be the base url of the authorization server that you are trying to hit. With Okta for instance, it will look something like https://company.okta.com/oauth2/abcdef123456789/ |
| `--auth.appAuth.externalAuthServer.httpProxyURL` | string | OPTIONAL: HTTP Proxy to be used for OAuth requests. |
| `--auth.appAuth.externalAuthServer.metadataUrl` | string | Optional: If the server doesn't support /.well-known/oauth-authorization-server, you can set a custom metadata url here.' |
| `--auth.appAuth.externalAuthServer.retryAttempts` | int | Optional: The number of attempted retries on a transient failure to get the OAuth metadata (default 5) |
| `--auth.appAuth.externalAuthServer.retryDelay` | string | Optional, Duration to wait between retries (default "1s") |
| `--auth.appAuth.selfAuthServer.accessTokenLifespan` | string | Defines the lifespan of issued access tokens. (default "30m0s") |
| `--auth.appAuth.selfAuthServer.authorizationCodeLifespan` | string | Defines the lifespan of issued access tokens. (default "5m0s") |
| `--auth.appAuth.selfAuthServer.claimSymmetricEncryptionKeySecretName` | string | OPTIONAL: Secret name to use to encrypt claims in authcode token. (default "claim_symmetric_key") |
| `--auth.appAuth.selfAuthServer.issuer` | string | Defines the issuer to use when issuing and validating tokens. The default value is https://{requestUri.HostAndPort}/ |
| `--auth.appAuth.selfAuthServer.oldTokenSigningRSAKeySecretName` | string | OPTIONAL: Secret name to use to retrieve Old RSA Signing Key. This can be useful during key rotation to continue to accept older tokens. (default "token_rsa_key_old.pem") |
| `--auth.appAuth.selfAuthServer.refreshTokenLifespan` | string | Defines the lifespan of issued access tokens. (default "1h0m0s") |
| `--auth.appAuth.selfAuthServer.tokenSigningRSAKeySecretName` | string | OPTIONAL: Secret name to use to retrieve RSA Signing Key. (default "token_rsa_key.pem") |
| `--auth.appAuth.thirdPartyConfig.flyteClient.audience` | string | Audience to use when initiating OAuth2 authorization requests. |
| `--auth.appAuth.thirdPartyConfig.flyteClient.clientId` | string | public identifier for the app which handles authorization for a Flyte deployment (default "uctl") |
| `--auth.appAuth.thirdPartyConfig.flyteClient.redirectUri` | string | This is the callback uri registered with the app which handles authorization for a Flyte deployment (default "http://localhost:53593/callback") |
| `--auth.appAuth.thirdPartyConfig.flyteClient.scopes` | strings | Recommended scopes for the client to request. (default [all,offline]) |
| `--auth.disableForGrpc` | | Disables auth enforcement on Grpc Endpoints. |
| `--auth.disableForHttp` | | Disables auth enforcement on HTTP Endpoints. |
| `--auth.grpcAuthorizationHeader` | string | (default "flyte-authorization") |
| `--auth.httpAuthorizationHeader` | string | (default "flyte-authorization") |
| `--auth.httpProxyURL` | string | OPTIONAL: HTTP Proxy to be used for OAuth requests. |
| `--auth.tokenEndpointProxyPath` | string | The path used to proxy calls to the TokenURL |
| `--auth.userAuth.cookieBlockKeySecretName` | string | OPTIONAL: Secret name to use for cookie block key. (default "cookie_block_key") |
| `--auth.userAuth.cookieHashKeySecretName` | string | OPTIONAL: Secret name to use for cookie hash key. (default "cookie_hash_key") |
| `--auth.userAuth.cookieSetting.domain` | string | OPTIONAL: Allows you to set the domain attribute on the auth cookies. |
| `--auth.userAuth.cookieSetting.sameSitePolicy` | string | OPTIONAL: Allows you to declare if your cookie should be restricted to a first-party or same-site context.Wrapper around http.SameSite. (default "DefaultMode") |
| `--auth.userAuth.httpProxyURL` | string | OPTIONAL: HTTP Proxy to be used for OAuth requests. |
| `--auth.userAuth.idpQueryParameter` | string | idp query parameter used for selecting a particular IDP for doing user authentication. Eg: for Okta passing idp={IDP-ID} forces the authentication to happen with IDP-ID |
| `--auth.userAuth.openId.baseUrl` | string | |
| `--auth.userAuth.openId.clientId` | string | |
| `--auth.userAuth.openId.clientSecretFile` | string | |
| `--auth.userAuth.openId.clientSecretName` | string | (default "oidc_client_secret") |
| `--auth.userAuth.openId.scopes` | strings | (default [openid,profile]) |
| `--auth.userAuth.redirectUrl` | string | (default "/console") |
| `--authorizer.internalCommunicationConfig.enabled` | | Enables authorization decisions for internal communication. (default true) |
| `--authorizer.internalCommunicationConfig.ingressIdentity` | string | IngressIdentity used in the cluster. Needed to exclude the communication coming from ingress. (default "ingress-nginx.ingress-nginx.serviceaccount.identity.linkerd.cluster.local") |
| `--authorizer.internalCommunicationConfig.tenantUrlPatternIdentity` | string | UrlPatternIdentity of the internal tenant service endpoint identities. (default "{{ service }}.{{ org }}.serviceaccount.identity.linkerd.cluster.local") |
| `--authorizer.internalCommunicationConfig.urlPatternIdentity` | string | UrlPatternIdentity of the internal service endpoint identities. (default "{{ service }}-helmchart.{{ service }}.serviceaccount.identity.linkerd.cluster.local") |
| `--authorizer.mode` | string | (default "Active") |
| `--authorizer.organizationConfig.PolicyConfig.adminPolicyDescription` | string | description for the boilerplate admin policy (default "Contributor permissions and full admin permissions to manage users and view usage dashboards") |
| `--authorizer.organizationConfig.PolicyConfig.contributorPolicyDescription` | string | description for the boilerplate contributor policy (default "Viewer permissions and permissions to create workflows, tasks, launch plans, and executions") |
| `--authorizer.organizationConfig.PolicyConfig.defaultUserPolicyRoleType` | string | name of the role type to determine which default policy new users added to the organization should be assigned (default "Viewer") |
| `--authorizer.organizationConfig.PolicyConfig.serverlessContributorPolicyDescription` | string | description for the boilerplate serverless contributor policy (default "Viewer permissions and permissions to create workflows, tasks, launch plans, and executions") |
| `--authorizer.organizationConfig.PolicyConfig.serverlessViewerPolicyDescription` | string | description for the boilerplate serverless viewer policy (default "Permissions to view Flyte entities") |
| `--authorizer.organizationConfig.PolicyConfig.viewerPolicyDescription` | string | description for the boilerplate viewer policy (default "Permissions to view Flyte entities") |
| `--authorizer.organizationConfig.defaultPolicyCacheDuration` | string | Cache entry duration for the store of the default policy per organization (default "10m0s") |
| `--authorizer.syncRuleRefreshInterval` | string | (default "1m0s") |
| `--authorizer.type` | string | (default "UserClouds") |
| `--authorizer.userCloudsClient.cache.redis.ttl.edgeTypes` | string | Specifies how long edge types remain in the cache.. (default "30m0s") |
| `--authorizer.userCloudsClient.cache.redis.ttl.edges` | string | Specifies how long edges remain in the cache. (default "30m0s") |
| `--authorizer.userCloudsClient.cache.redis.ttl.objectTypes` | string | Specifies how long object types remain in the cache. (default "30m0s") |
| `--authorizer.userCloudsClient.cache.redis.ttl.objects` | string | Specifies how long objects remain in the cache. (default "30m0s") |
| `--authorizer.userCloudsClient.cache.type` | string | Cache type to use. (default "none") |
| `--authorizer.userCloudsClient.clientID` | string | UserClouds client id |
| `--authorizer.userCloudsClient.clientSecretName` | string | UserCloud client secret name to read from the secret manager. (default "userclouds-client-secret") |
| `--authorizer.userCloudsClient.enableLogging` | | Enable userclouds client's internal logging. Calls to post logs take 250-350 ms and will impact p99 latency, enable with caution. |
| `--authorizer.userCloudsClient.tenantID` | string | UserClouds tenant id. Should be a UUID. |
| `--authorizer.userCloudsClient.tenantUrl` | string | Something like https://{yourtenant}.tenant.userclouds.com |
| `--config` | string | config file (default is /Users/andrew/.union/config.yaml) |
| `--connection.environment` | string | |
| `--connection.region` | string | |
| `--connection.rootTenantURLPattern` | string | Pattern for tenant url. (default "dns:///{{ organization }}.cloud-staging.union.ai") |
| `--console.endpoint` | string | Endpoint of console, if different than flyte admin |
| `--database.connMaxLifeTime` | string | sets the maximum amount of time a connection may be reused (default "1h0m0s") |
| `--database.enableForeignKeyConstraintWhenMigrating` | | Whether to enable gorm foreign keys when migrating the db |
| `--database.maxIdleConnections` | int | maxIdleConnections sets the maximum number of connections in the idle connection pool. (default 10) |
| `--database.maxOpenConnections` | int | maxOpenConnections sets the maximum number of open connections to the database. (default 100) |
| `--database.postgres.dbname` | string | The database name (default "postgres") |
| `--database.postgres.debug` | | |
| `--database.postgres.host` | string | The host name of the database server (default "localhost") |
| `--database.postgres.options` | string | See http://gorm.io/docs/connecting_to_the_database.html for available options passed, in addition to the above. (default "sslmode=disable") |
| `--database.postgres.password` | string | The database password. (default "postgres") |
| `--database.postgres.passwordPath` | string | Points to the file containing the database password. |
| `--database.postgres.port` | int | The port name of the database server (default 30001) |
| `--database.postgres.readReplicaHost` | string | The host name of the read replica database server (default "localhost") |
| `--database.postgres.username` | string | The database user who is connecting to the server. (default "postgres") |
| `--database.sqlite.file` | string | The path to the file (existing or new) where the DB should be created / stored. If existing, then this will be re-used, else a new will be created |
| `--db.connectionPool.maxConnectionLifetime` | string | (default "0s") |
| `--db.connectionPool.maxIdleConnections` | int | |
| `--db.connectionPool.maxOpenConnections` | int | |
| `--db.dbname` | string | (default "postgres") |
| `--db.debug` | | |
| `--db.host` | string | (default "postgres") |
| `--db.log_level` | int | (default 4) |
| `--db.options` | string | (default "sslmode=disable") |
| `--db.password` | string | |
| `--db.passwordPath` | string | |
| `--db.port` | int | (default 5432) |
| `--db.username` | string | (default "postgres") |
| `-d`, `--domain` | string | Specifies the Flyte project's domain. |
| `--files.archive` | | Pass in archive file either an http link or local path. |
| `--files.assumableIamRole` | string | Custom assumable iam auth role to register launch plans with. |
| `--files.continueOnError` | | Continue on error when registering files. |
| `--files.destinationDirectory` | string | Location of source code in container. |
| `--files.dryRun` | | Execute command without making any modifications. |
| `--files.enableSchedule` | | Enable the schedule if the files contain schedulable launchplan. |
| `--files.force` | | Force use of version number on entities registered with flyte. |
| `--files.k8ServiceAccount` | string | Deprecated. Please use `--K8sServiceAccount`|
| `--files.k8sServiceAccount` | string | Custom kubernetes service account auth role to register launch plans with. |
| `--files.outputLocationPrefix` | string | Custom output location prefix for offloaded types (files/schemas). |
| `--files.sourceUploadPath` | string | Deprecated: Update flyte admin to avoid having to configure storage access from uctl. |
| `--files.version` | string | Version of the entity to be registered with flyte which are un-versioned after serialization. |
| `--logger.formatter.type` | string | Sets logging format type. (default "json") |
| `--logger.level` | int | Sets the minimum logging level. (default 3) |
| `--logger.mute` | | Mutes all logs regardless of severity. Intended for benchmarks/tests only. |
| `--logger.show-source` | | Includes source code location in logs. |
| `--org` | string | Organization to work on. If not set, default to user's org. |
| `--otel.file.filename` | string | Filename to store exported telemetry traces (default "/tmp/trace.txt") |
| `--otel.jaeger.endpoint` | string | Endpoint for the jaeger telemetry trace ingestor (default "http://localhost:14268/api/traces") |
| `--otel.otlpgrpc.endpoint` | string | Endpoint for the OTLP telemetry trace collector (default "http://localhost:4317") |
| `--otel.otlphttp.endpoint` | string | Endpoint for the OTLP telemetry trace collector (default "http://localhost:4318/v1/traces") |
| `--otel.sampler.parentSampler` | string | Sets the parent sampler to use for the tracer (default "always") |
| `--otel.type` | string | Sets the type of exporter to configure [noop/file/jaeger/otlpgrpc/otlphttp]. (default "noop") |
| `-o`, `--output` | string | Specifies the output type - supported formats [TABLE JSON YAML DOT DOTURL]. NOTE: dot, doturl are only supported for Workflow (default "table") |
| `--plugins.catalogcache.reader.maxItems` | int | Maximum number of entries to keep in the index. (default 10000) |
| `--plugins.catalogcache.reader.maxRetries` | int | Maximum number of retries per item. (default 3) |
| `--plugins.catalogcache.reader.workers` | int | Number of concurrent workers to start processing the queue. (default 10) |
| `--plugins.catalogcache.writer.maxItems` | int | Maximum number of entries to keep in the index. (default 10000) |
| `--plugins.catalogcache.writer.maxRetries` | int | Maximum number of retries per item. (default 3) |
| `--plugins.catalogcache.writer.workers` | int | Number of concurrent workers to start processing the queue. (default 10) |
| `-p`, `--project` | string | Specifies the Flyte project. |
| `--rediscache.passwordSecretName` | string | Name of secret with Redis password. |
| `--rediscache.primaryEndpoint` | string | Primary endpoint for the redis cache that can be used for both reads and writes. |
| `--rediscache.replicaEndpoint` | string | Replica endpoint for the redis cache that can be used for reads. |
| `--secrets.env-prefix` | string | Prefix for environment variables (default "FLYTE_SECRET_") |
| `--secrets.secrets-prefix` | string | Prefix where to look for secrets file (default "/etc/secrets") |
| `--secrets.type` | string | Sets the type of storage to configure [local]. (default "local") |
| `--server.dataProxy.download.maxExpiresIn` | string | Maximum allowed expiration duration. (default "1h0m0s") |
| `--server.dataProxy.upload.defaultFileNameLength` | int | Default length for the generated file name if not provided in the request. (default 20) |
| `--server.dataProxy.upload.maxExpiresIn` | string | Maximum allowed expiration duration. (default "1h0m0s") |
| `--server.dataProxy.upload.maxSize` | string | Maximum allowed upload size. (default "6Mi") |
| `--server.dataProxy.upload.storagePrefix` | string | Storage prefix to use for all upload requests. |
| `--server.grpc.enableGrpcLatencyMetrics` | | Enable grpc latency metrics. Note Histograms metrics can be expensive on Prometheus servers. |
| `--server.grpc.maxMessageSizeBytes` | int | The max size in bytes for incoming gRPC messages |
| `--server.grpc.port` | int | On which grpc port to serve admin (default 8089) |
| `--server.grpc.serverReflection` | | Enable GRPC Server Reflection (default true) |
| `--server.grpcPort` | int | deprecated |
| `--server.grpcServerReflection` | | deprecated |
| `--server.httpPort` | int | On which http port to serve admin (default 8088) |
| `--server.kube-config` | string | Path to kubernetes client config file, default is empty, useful for incluster config. |
| `--server.kubeClientConfig.burst` | int | Max burst rate for throttle. 0 defaults to 10 (default 25) |
| `--server.kubeClientConfig.qps` | int32 | Max QPS to the master for requests to KubeAPI. 0 defaults to 5. (default 100) |
| `--server.kubeClientConfig.timeout` | string | Max duration allowed for every request to KubeAPI before giving up. 0 implies no timeout. (default "30s") |
| `--server.master` | string | The address of the Kubernetes API server. |
| `--server.readHeaderTimeoutSeconds` | int | The amount of time allowed to read request headers. (default 32) |
| `--server.security.allowCors` | | (default true) |
| `--server.security.allowedHeaders` | strings | (default [Content-Type,flyte-authorization]) |
| `--server.security.allowedOrigins` | strings | (default [*]) |
| `--server.security.auditAccess` | | |
| `--server.security.secure` | | |
| `--server.security.ssl.certificateFile` | string | |
| `--server.security.ssl.keyFile` | string | |
| `--server.security.useAuth` | | |
| `--server.thirdPartyConfig.flyteClient.audience` | string | Audience to use when initiating OAuth2 authorization requests. |
| `--server.thirdPartyConfig.flyteClient.clientId` | string | public identifier for the app which handles authorization for a Flyte deployment |
| `--server.thirdPartyConfig.flyteClient.redirectUri` | string | This is the callback uri registered with the app which handles authorization for a Flyte deployment |
| `--server.thirdPartyConfig.flyteClient.scopes` | strings | Recommended scopes for the client to request. |
| `--server.watchService.maxActiveClusterConnections` | int | (default 5) |
| `--server.watchService.maxPageSize` | int | (default 50000) |
| `--server.watchService.nonTerminalStatusUpdatesInterval` | string | (default "1m0s") |
| `--server.watchService.pollInterval` | string | (default "1s") |
| `--sharedservice.connectPort` | string | On which connect port to serve admin (default "8080") |
| `--sharedservice.grpc.grpcMaxResponseStatusBytes` | int32 | specifies the maximum (uncompressed) size of header list that the client is prepared to accept on grpc calls (default 32000) |
| `--sharedservice.grpc.maxConcurrentStreams` | int | Limit on the number of concurrent streams to each ServerTransport. (default 100) |
| `--sharedservice.grpc.maxMessageSizeBytes` | int | Limit on the size of message that can be received on the server. (default 10485760) |
| `--sharedservice.grpcServerReflection` | | Enable GRPC Server Reflection (default true) |
| `--sharedservice.httpPort` | string | On which http port to serve admin (default "8089") |
| `--sharedservice.kubeConfig` | string | Path to kubernetes client config file. |
| `--sharedservice.master` | string | The address of the Kubernetes API server. |
| `--sharedservice.metrics.enableClientGrpcHistograms` | | Enable client grpc histograms (default true) |
| `--sharedservice.metrics.enableGrpcHistograms` | | Enable grpc histograms (default true) |
| `--sharedservice.metrics.scope` | string | Scope to emit metrics under (default "service:") |
| `--sharedservice.port` | string | On which grpc port to serve admin (default "8080") |
| `--sharedservice.profiler.enabled` | | Enable Profiler on server |
| `--sharedservice.profilerPort` | string | Profile port to start listen for pprof and metric handlers on. (default "10254") |
| `--sharedservice.security.allowCors` | | |
| `--sharedservice.security.allowLocalhostAccess` | | Whether to permit localhost unauthenticated access to the server |
| `--sharedservice.security.allowedHeaders` | strings | |
| `--sharedservice.security.allowedOrigins` | strings | |
| `--sharedservice.security.auditAccess` | | |
| `--sharedservice.security.orgOverride` | string | Override org in identity context if localhost access enabled |
| `--sharedservice.security.secure` | | |
| `--sharedservice.security.ssl.certificateAuthorityFile` | string | |
| `--sharedservice.security.ssl.certificateFile` | string | |
| `--sharedservice.security.ssl.keyFile` | string | |
| `--sharedservice.security.useAuth` | | |
| `--sharedservice.sync.syncInterval` | string | Time interval to sync (default "5m0s") |
| `--storage.cache.max_size_mbs` | int | Maximum size of the cache where the Blob store data is cached in-memory. If not specified or set to 0, cache is not used |
| `--storage.cache.target_gc_percent` | int | Sets the garbage collection target percentage. |
| `--storage.connection.access-key` | string | Access key to use. Only required when authtype is set to accesskey. |
| `--storage.connection.auth-type` | string | Auth Type to use [iam, accesskey]. (default "iam") |
| `--storage.connection.disable-ssl` | | Disables SSL connection. Should only be used for development. |
| `--storage.connection.endpoint` | string | URL for storage client to connect to. |
| `--storage.connection.region` | string | Region to connect to. (default "us-east-1") |
| `--storage.connection.secret-key` | string | Secret to use when accesskey is set. |
| `--storage.container` | string | Initial container (in s3 a bucket) to create -if it doesn't exist-.' |
| `--storage.defaultHttpClient.timeout` | string | Sets time out on the http client. (default "0s") |
| `--storage.enable-multicontainer` | | If this is true, then the container argument is overlooked and redundant. This config will automatically open new connections to new containers/buckets as they are encountered |
| `--storage.limits.maxDownloadMBs` | int | Maximum allowed download size (in MBs) per call. (default 2) |
| `--storage.stow.config` | stringToString | Configuration for stow backend. Refer to github/flyteorg/stow (default []) |
| `--storage.stow.kind` | string | Kind of Stow backend to use. Refer to github/flyteorg/stow |
| `--storage.type` | string | Sets the type of storage to configure [s3/minio/local/mem/stow]. (default "s3") |
| `--union.auth.authorizationMetadataKey` | string | Authorization Header to use when passing Access Tokens to the server (default "flyte-authorization") |
| `--union.auth.clientId` | string | Client ID |
| `--union.auth.clientSecretEnvVar` | string | Environment variable containing the client secret |
| `--union.auth.clientSecretLocation` | string | File containing the client secret |
| `--union.auth.deviceFlow.pollInterval` | string | amount of time the device flow would poll the token endpoint if auth server doesn't return a polling interval. Okta and google IDP do return an interval' (default "5s") |
| `--union.auth.deviceFlow.refreshTime` | string | grace period from the token expiry after which it would refresh the token. (default "5m0s") |
| `--union.auth.deviceFlow.timeout` | string | amount of time the device flow should complete or else it will be cancelled. (default "10m0s") |
| `--union.auth.enable` | | Whether to enable an authenticated conenction when communicating with admin. (default true) |
| `--union.auth.externalAuth.command` | strings | Command for external authentication token generation |
| `--union.auth.pkce.refreshTime` | string | grace period from the token expiry after which it would refresh the token. (default "5m0s") |
| `--union.auth.pkce.timeout` | string | Amount of time the browser session would be active for authentication from client app. (default "15s") |
| `--union.auth.scopes` | strings | List of scopes to request |
| `--union.auth.tokenRefreshWindow` | string | Max duration between token refresh attempt and token expiry. (default "1h0m0s") |
| `--union.auth.tokenUrl` | string | OPTIONAL: Your IdP's token endpoint. It'll be discovered from flyte admin's OAuth Metadata endpoint if not provided. |
| `--union.auth.type` | string | Type of OAuth2 flow used for communicating with admin. (default "Pkce") |
| `--union.cache.maxItemsCount` | int | Maximum number of items to keep in the cache before evicting. (default 1000) |
| `--union.connection.host` | string | Host to connect to (default "dns:///utt-mgdp-stg-us-east-2.cloud-staging.union.ai") |
| `--union.connection.insecure` | | Whether to connect over insecure channel |
| `--union.connection.insecureSkipVerify` | | InsecureSkipVerify controls whether a client verifies the server's certificate chain and host name.Caution: shouldn't be use for production usecases' |
| `--union.connection.keepAliveConfig.permitWithoutStream` | | If true, client sends keepalive pings even with no active RPCs. |
| `--union.connection.keepAliveConfig.time` | string | After a duration of this time if the client doesn't see any activity it pings the server to see if the transport is still alive. (default "20s") |
| `--union.connection.keepAliveConfig.timeout` | string | After having pinged for keepalive check, the client waits for a duration of Timeout and if no activity is seen even after that the connection is closed. (default "2m0s") |
| `--union.connection.maxBackoffDelay` | string | Max delay for grpc backoff (default "8s") |
| `--union.connection.maxRecvMsgSize` | int | Maximum size of a message in bytes of a gRPC message (default 10485760) |
| `--union.connection.maxRetries` | int | Max number of gRPC retries (default 4) |
| `--union.connection.minConnectTimeout` | string | Minimum timeout for establishing a connection (default "20s") |
| `--union.connection.perRetryTimeout` | string | gRPC per retry timeout (default "15s") |
| `--union.connection.serviceConfig` | string | Defines gRPC experimental JSON Service Config (default "{"loadBalancingConfig": [{"round_robin":{}}]}") |
| `--union.connection.trustedIdentityClaims.enabled` | | Enables passing of trusted claims while making inter service calls |
| `--union.connection.trustedIdentityClaims.externalIdentityClaim` | string | External identity claim of the service which is authorized to make internal service call. These are verified against userclouds actions |
| `--union.connection.trustedIdentityClaims.externalIdentityTypeClaim` | string | External identity type claim of app or user to use for the current service identity. It should be an 'app' for inter service communication |
| `--union.internalConnectionConfig.-` | stringToString | (default []) |
| `--union.internalConnectionConfig.enabled` | | Enables internal service to service communication instead of going through ingress. |
| `--union.internalConnectionConfig.urlPattern` | string | UrlPattern of the internal service endpoints. (default "{{ service }}-helmchart.{{ service }}.svc.cluster.local:80") |
| `--webhook.awsSecretManager.sidecarImage` | string | Specifies the sidecar docker image to use (default "docker.io/amazon/aws-secrets-manager-secret-sidecar:v0.1.4") |
| `--webhook.certDir` | string | Certificate directory to use to write generated certs. Defaults to /etc/webhook/certs/ (default "/etc/webhook/certs") |
| `--webhook.embeddedSecretManagerConfig.awsConfig.region` | string | AWS region |
| `--webhook.embeddedSecretManagerConfig.fileMountInitContainer.image` | string | Specifies init container image to use for mounting secrets as files. (default "busybox:1.28") |
| `--webhook.embeddedSecretManagerConfig.gcpConfig.project` | string | GCP project to be used for secret manager |
| `--webhook.embeddedSecretManagerConfig.type` | string | (default "AWS") |
| `--webhook.gcpSecretManager.sidecarImage` | string | Specifies the sidecar docker image to use (default "gcr.io/google.com/cloudsdktool/cloud-sdk:alpine") |
| `--webhook.listenPort` | int | The port to use to listen to webhook calls. Defaults to 9443 (default 9443) |
| `--webhook.localCert` | | write certs locally. Defaults to false |
| `--webhook.metrics-prefix` | string | An optional prefix for all published metrics. (default "flyte:") |
| `--webhook.secretName` | string | Secret name to write generated certs to. (default "flyte-pod-webhook") |
| `--webhook.serviceName` | string | The name of the webhook service. (default "flyte-pod-webhook") |
| `--webhook.servicePort` | int32 | The port on the service that hosting webhook. (default 443) |
| `--webhook.vaultSecretManager.role` | string | Specifies the vault role to use (default "flyte") |
## Subpages
- **Uctl CLI > uctl apply > uctl apply app**
- **Uctl CLI > uctl apply > uctl apply clusterconfig**
- **Uctl CLI > uctl apply > uctl apply clusterconfigid**
- **Uctl CLI > uctl apply > uctl apply clusterpoolconfig**
=== PAGE: https://www.union.ai/docs/v1/serverless/api-reference/uctl-cli/uctl-apply/uctl-apply-app ===
# uctl apply app
Updates apps config in configured OAuthProvider
## Synopsis
Updates apps config in configured OAuthProvider:
```shell
$ uctl apply app [flags]
```
## Options
| Option | Type | Description |
|--------|------|-------------|
| `--appSpecFile` | string | app spec file to be used for updating app. |
| `--dryRun` | | execute command without making any modifications. |
| `-h`, `--help` | help for app |
### Options inherited from parent commands
| Option | Type | Description |
|--------|------|-------------|
| `--admin.audience` | string | Audience to use when initiating OAuth2 authorization requests. |
| `--admin.authType` | string | Type of OAuth2 flow used for communicating with admin.ClientSecret, Pkce, ExternalCommand are valid values (default "ClientSecret") |
| `--admin.authorizationHeader` | string | Custom metadata header to pass JWT |
| `--admin.authorizationServerUrl` | string | This is the URL to your IdP's authorization server. It'll default to Endpoint |
| `--admin.caCertFilePath` | string | Use specified certificate file to verify the admin server peer. |
| `--admin.clientId` | string | Client ID (default "flytepropeller") |
| `--admin.clientSecretEnvVar` | string | Environment variable containing the client secret |
| `--admin.clientSecretLocation` | string | File containing the client secret (default "/etc/secrets/client_secret") |
| `--admin.command` | strings | Command for external authentication token generation |
| `--admin.defaultOrg` | string | OPTIONAL: Default org to use to support non-org based cli's.'. |
| `--admin.defaultServiceConfig` | string | |
| `--admin.deviceFlowConfig.pollInterval` | string | amount of time the device flow would poll the token endpoint if auth server doesn't return a polling interval. Okta and google IDP do return an interval' (default "5s") |
| `--admin.deviceFlowConfig.refreshTime` | string | grace period from the token expiry after which it would refresh the token. (default "5m0s") |
| `--admin.deviceFlowConfig.timeout` | string | amount of time the device flow should complete or else it will be cancelled. (default "10m0s") |
| `--admin.endpoint` | string | For admin types, specify where the uri of the service is located. |
| `--admin.httpProxyURL` | string | OPTIONAL: HTTP Proxy to be used for OAuth requests. |
| `--admin.insecure` | | Use insecure connection. |
| `--admin.insecureSkipVerify` | | InsecureSkipVerify controls whether a client verifies the server's certificate chain and host name.Caution: shouldn't be use for production usecases' |
| `--admin.maxBackoffDelay` | string | Max delay for grpc backoff (default "8s") |
| `--admin.maxMessageSizeBytes` | int | The max size in bytes for incoming gRPC messages |
| `--admin.maxRetries` | int | Max number of gRPC retries (default 4) |
| `--admin.perRetryTimeout` | string | gRPC per retry timeout (default "15s") |
| `--admin.pkceConfig.refreshTime` | string | grace period from the token expiry after which it would refresh the token. (default "5m0s") |
| `--admin.pkceConfig.timeout` | string | Amount of time the browser session would be active for authentication from client app. (default "2m0s") |
| `--admin.proxyCommand` | strings | Command for external proxy-authorization token generation |
| `--admin.scopes` | strings | List of scopes to request |
| `--admin.tokenRefreshWindow` | string | Max duration between token refresh attempt and token expiry. (default "0s") |
| `--admin.tokenUrl` | string | OPTIONAL: Your IdP's token endpoint. It'll be discovered from flyte admin's OAuth Metadata endpoint if not provided. |
| `--admin.useAudienceFromAdmin` | | Use Audience configured from admins public endpoint config. |
| `--admin.useAuth` | | Deprecated: Auth will be enabled/disabled based on admin's dynamically discovered information. |
| `--auth.appAuth.externalAuthServer.allowedAudience` | strings | Optional: A list of allowed audiences. If not provided, the audience is expected to be the public Uri of the service. |
| `--auth.appAuth.externalAuthServer.baseUrl` | string | This should be the base url of the authorization server that you are trying to hit. With Okta for instance, it will look something like https://company.okta.com/oauth2/abcdef123456789/ |
| `--auth.appAuth.externalAuthServer.httpProxyURL` | string | OPTIONAL: HTTP Proxy to be used for OAuth requests. |
| `--auth.appAuth.externalAuthServer.metadataUrl` | string | Optional: If the server doesn't support /.well-known/oauth-authorization-server, you can set a custom metadata url here.' |
| `--auth.appAuth.externalAuthServer.retryAttempts` | int | Optional: The number of attempted retries on a transient failure to get the OAuth metadata (default 5) |
| `--auth.appAuth.externalAuthServer.retryDelay` | string | Optional, Duration to wait between retries (default "1s") |
| `--auth.appAuth.selfAuthServer.accessTokenLifespan` | string | Defines the lifespan of issued access tokens. (default "30m0s") |
| `--auth.appAuth.selfAuthServer.authorizationCodeLifespan` | string | Defines the lifespan of issued access tokens. (default "5m0s") |
| `--auth.appAuth.selfAuthServer.claimSymmetricEncryptionKeySecretName` | string | OPTIONAL: Secret name to use to encrypt claims in authcode token. (default "claim_symmetric_key") |
| `--auth.appAuth.selfAuthServer.issuer` | string | Defines the issuer to use when issuing and validating tokens. The default value is https://{requestUri.HostAndPort}/ |
| `--auth.appAuth.selfAuthServer.oldTokenSigningRSAKeySecretName` | string | OPTIONAL: Secret name to use to retrieve Old RSA Signing Key. This can be useful during key rotation to continue to accept older tokens. (default "token_rsa_key_old.pem") |
| `--auth.appAuth.selfAuthServer.refreshTokenLifespan` | string | Defines the lifespan of issued access tokens. (default "1h0m0s") |
| `--auth.appAuth.selfAuthServer.tokenSigningRSAKeySecretName` | string | OPTIONAL: Secret name to use to retrieve RSA Signing Key. (default "token_rsa_key.pem") |
| `--auth.appAuth.thirdPartyConfig.flyteClient.audience` | string | Audience to use when initiating OAuth2 authorization requests. |
| `--auth.appAuth.thirdPartyConfig.flyteClient.clientId` | string | public identifier for the app which handles authorization for a Flyte deployment (default "uctl") |
| `--auth.appAuth.thirdPartyConfig.flyteClient.redirectUri` | string | This is the callback uri registered with the app which handles authorization for a Flyte deployment (default "http://localhost:53593/callback") |
| `--auth.appAuth.thirdPartyConfig.flyteClient.scopes` | strings | Recommended scopes for the client to request. (default [all,offline]) |
| `--auth.disableForGrpc` | | Disables auth enforcement on Grpc Endpoints. |
| `--auth.disableForHttp` | | Disables auth enforcement on HTTP Endpoints. |
| `--auth.grpcAuthorizationHeader` | string | (default "flyte-authorization") |
| `--auth.httpAuthorizationHeader` | string | (default "flyte-authorization") |
| `--auth.httpProxyURL` | string | OPTIONAL: HTTP Proxy to be used for OAuth requests. |
| `--auth.tokenEndpointProxyPath` | string | The path used to proxy calls to the TokenURL |
| `--auth.userAuth.cookieBlockKeySecretName` | string | OPTIONAL: Secret name to use for cookie block key. (default "cookie_block_key") |
| `--auth.userAuth.cookieHashKeySecretName` | string | OPTIONAL: Secret name to use for cookie hash key. (default "cookie_hash_key") |
| `--auth.userAuth.cookieSetting.domain` | string | OPTIONAL: Allows you to set the domain attribute on the auth cookies. |
| `--auth.userAuth.cookieSetting.sameSitePolicy` | string | OPTIONAL: Allows you to declare if your cookie should be restricted to a first-party or same-site context.Wrapper around http.SameSite. (default "DefaultMode") |
| `--auth.userAuth.httpProxyURL` | string | OPTIONAL: HTTP Proxy to be used for OAuth requests. |
| `--auth.userAuth.idpQueryParameter` | string | idp query parameter used for selecting a particular IDP for doing user authentication. Eg: for Okta passing idp={IDP-ID} forces the authentication to happen with IDP-ID |
| `--auth.userAuth.openId.baseUrl` | string | |
| `--auth.userAuth.openId.clientId` | string | |
| `--auth.userAuth.openId.clientSecretFile` | string | |
| `--auth.userAuth.openId.clientSecretName` | string | (default "oidc_client_secret") |
| `--auth.userAuth.openId.scopes` | strings | (default [openid,profile]) |
| `--auth.userAuth.redirectUrl` | string | (default "/console") |
| `--authorizer.internalCommunicationConfig.enabled` | | Enables authorization decisions for internal communication. (default true) |
| `--authorizer.internalCommunicationConfig.ingressIdentity` | string | IngressIdentity used in the cluster. Needed to exclude the communication coming from ingress. (default "ingress-nginx.ingress-nginx.serviceaccount.identity.linkerd.cluster.local") |
| `--authorizer.internalCommunicationConfig.tenantUrlPatternIdentity` | string | UrlPatternIdentity of the internal tenant service endpoint identities. (default "{{ service }}.{{ org }}.serviceaccount.identity.linkerd.cluster.local") |
| `--authorizer.internalCommunicationConfig.urlPatternIdentity` | string | UrlPatternIdentity of the internal service endpoint identities. (default "{{ service }}-helmchart.{{ service }}.serviceaccount.identity.linkerd.cluster.local") |
| `--authorizer.mode` | string | (default "Active") |
| `--authorizer.organizationConfig.PolicyConfig.adminPolicyDescription` | string | description for the boilerplate admin policy (default "Contributor permissions and full admin permissions to manage users and view usage dashboards") |
| `--authorizer.organizationConfig.PolicyConfig.contributorPolicyDescription` | string | description for the boilerplate contributor policy (default "Viewer permissions and permissions to create workflows, tasks, launch plans, and executions") |
| `--authorizer.organizationConfig.PolicyConfig.defaultUserPolicyRoleType` | string | name of the role type to determine which default policy new users added to the organization should be assigned (default "Viewer") |
| `--authorizer.organizationConfig.PolicyConfig.serverlessContributorPolicyDescription` | string | description for the boilerplate serverless contributor policy (default "Viewer permissions and permissions to create workflows, tasks, launch plans, and executions") |
| `--authorizer.organizationConfig.PolicyConfig.serverlessViewerPolicyDescription` | string | description for the boilerplate serverless viewer policy (default "Permissions to view Flyte entities") |
| `--authorizer.organizationConfig.PolicyConfig.viewerPolicyDescription` | string | description for the boilerplate viewer policy (default "Permissions to view Flyte entities") |
| `--authorizer.organizationConfig.defaultPolicyCacheDuration` | string | Cache entry duration for the store of the default policy per organization (default "10m0s") |
| `--authorizer.syncRuleRefreshInterval` | string | (default "1m0s") |
| `--authorizer.type` | string | (default "UserClouds") |
| `--authorizer.userCloudsClient.cache.redis.ttl.edgeTypes` | string | Specifies how long edge types remain in the cache.. (default "30m0s") |
| `--authorizer.userCloudsClient.cache.redis.ttl.edges` | string | Specifies how long edges remain in the cache. (default "30m0s") |
| `--authorizer.userCloudsClient.cache.redis.ttl.objectTypes` | string | Specifies how long object types remain in the cache. (default "30m0s") |
| `--authorizer.userCloudsClient.cache.redis.ttl.objects` | string | Specifies how long objects remain in the cache. (default "30m0s") |
| `--authorizer.userCloudsClient.cache.type` | string | Cache type to use. (default "none") |
| `--authorizer.userCloudsClient.clientID` | string | UserClouds client id |
| `--authorizer.userCloudsClient.clientSecretName` | string | UserCloud client secret name to read from the secret manager. (default "userclouds-client-secret") |
| `--authorizer.userCloudsClient.enableLogging` | | Enable userclouds client's internal logging. Calls to post logs take 250-350 ms and will impact p99 latency, enable with caution. |
| `--authorizer.userCloudsClient.tenantID` | string | UserClouds tenant id. Should be a UUID. |
| `--authorizer.userCloudsClient.tenantUrl` | string | Something like https://{yourtenant}.tenant.userclouds.com |
| `--config` | string | config file (default is /Users/andrew/.union/config.yaml) |
| `--connection.environment` | string | |
| `--connection.region` | string | |
| `--connection.rootTenantURLPattern` | string | Pattern for tenant url. (default "dns:///{{ organization }}.cloud-staging.union.ai") |
| `--console.endpoint` | string | Endpoint of console, if different than flyte admin |
| `--database.connMaxLifeTime` | string | sets the maximum amount of time a connection may be reused (default "1h0m0s") |
| `--database.enableForeignKeyConstraintWhenMigrating` | | Whether to enable gorm foreign keys when migrating the db |
| `--database.maxIdleConnections` | int | maxIdleConnections sets the maximum number of connections in the idle connection pool. (default 10) |
| `--database.maxOpenConnections` | int | maxOpenConnections sets the maximum number of open connections to the database. (default 100) |
| `--database.postgres.dbname` | string | The database name (default "postgres") |
| `--database.postgres.debug` | | |
| `--database.postgres.host` | string | The host name of the database server (default "localhost") |
| `--database.postgres.options` | string | See http://gorm.io/docs/connecting_to_the_database.html for available options passed, in addition to the above. (default "sslmode=disable") |
| `--database.postgres.password` | string | The database password. (default "postgres") |
| `--database.postgres.passwordPath` | string | Points to the file containing the database password. |
| `--database.postgres.port` | int | The port name of the database server (default 30001) |
| `--database.postgres.readReplicaHost` | string | The host name of the read replica database server (default "localhost") |
| `--database.postgres.username` | string | The database user who is connecting to the server. (default "postgres") |
| `--database.sqlite.file` | string | The path to the file (existing or new) where the DB should be created / stored. If existing, then this will be re-used, else a new will be created |
| `--db.connectionPool.maxConnectionLifetime` | string | (default "0s") |
| `--db.connectionPool.maxIdleConnections` | int | |
| `--db.connectionPool.maxOpenConnections` | int | |
| `--db.dbname` | string | (default "postgres") |
| `--db.debug` | | |
| `--db.host` | string | (default "postgres") |
| `--db.log_level` | int | (default 4) |
| `--db.options` | string | (default "sslmode=disable") |
| `--db.password` | string | |
| `--db.passwordPath` | string | |
| `--db.port` | int | (default 5432) |
| `--db.username` | string | (default "postgres") |
| `-d`, `--domain` | string | Specifies the Flyte project's domain. |
| `--files.archive` | | Pass in archive file either an http link or local path. |
| `--files.assumableIamRole` | string | Custom assumable iam auth role to register launch plans with. |
| `--files.continueOnError` | | Continue on error when registering files. |
| `--files.destinationDirectory` | string | Location of source code in container. |
| `--files.dryRun` | | Execute command without making any modifications. |
| `--files.enableSchedule` | | Enable the schedule if the files contain schedulable launchplan. |
| `--files.force` | | Force use of version number on entities registered with flyte. |
| `--files.k8ServiceAccount` | string | Deprecated. Please use `--K8sServiceAccount`|
| `--files.k8sServiceAccount` | string | Custom kubernetes service account auth role to register launch plans with. |
| `--files.outputLocationPrefix` | string | Custom output location prefix for offloaded types (files/schemas). |
| `--files.sourceUploadPath` | string | Deprecated: Update flyte admin to avoid having to configure storage access from uctl. |
| `--files.version` | string | Version of the entity to be registered with flyte which are un-versioned after serialization. |
| `--logger.formatter.type` | string | Sets logging format type. (default "json") |
| `--logger.level` | int | Sets the minimum logging level. (default 3) |
| `--logger.mute` | | Mutes all logs regardless of severity. Intended for benchmarks/tests only. |
| `--logger.show-source` | | Includes source code location in logs. |
| `--org` | string | Organization to work on. If not set, default to user's org. |
| `--otel.file.filename` | string | Filename to store exported telemetry traces (default "/tmp/trace.txt") |
| `--otel.jaeger.endpoint` | string | Endpoint for the jaeger telemetry trace ingestor (default "http://localhost:14268/api/traces") |
| `--otel.otlpgrpc.endpoint` | string | Endpoint for the OTLP telemetry trace collector (default "http://localhost:4317") |
| `--otel.otlphttp.endpoint` | string | Endpoint for the OTLP telemetry trace collector (default "http://localhost:4318/v1/traces") |
| `--otel.sampler.parentSampler` | string | Sets the parent sampler to use for the tracer (default "always") |
| `--otel.type` | string | Sets the type of exporter to configure [noop/file/jaeger/otlpgrpc/otlphttp]. (default "noop") |
| `-o`, `--output` | string | Specifies the output type - supported formats [TABLE JSON YAML DOT DOTURL]. NOTE: dot, doturl are only supported for Workflow (default "table") |
| `--plugins.catalogcache.reader.maxItems` | int | Maximum number of entries to keep in the index. (default 10000) |
| `--plugins.catalogcache.reader.maxRetries` | int | Maximum number of retries per item. (default 3) |
| `--plugins.catalogcache.reader.workers` | int | Number of concurrent workers to start processing the queue. (default 10) |
| `--plugins.catalogcache.writer.maxItems` | int | Maximum number of entries to keep in the index. (default 10000) |
| `--plugins.catalogcache.writer.maxRetries` | int | Maximum number of retries per item. (default 3) |
| `--plugins.catalogcache.writer.workers` | int | Number of concurrent workers to start processing the queue. (default 10) |
| `-p`, `--project` | string | Specifies the Flyte project. |
| `--rediscache.passwordSecretName` | string | Name of secret with Redis password. |
| `--rediscache.primaryEndpoint` | string | Primary endpoint for the redis cache that can be used for both reads and writes. |
| `--rediscache.replicaEndpoint` | string | Replica endpoint for the redis cache that can be used for reads. |
| `--secrets.env-prefix` | string | Prefix for environment variables (default "FLYTE_SECRET_") |
| `--secrets.secrets-prefix` | string | Prefix where to look for secrets file (default "/etc/secrets") |
| `--secrets.type` | string | Sets the type of storage to configure [local]. (default "local") |
| `--server.dataProxy.download.maxExpiresIn` | string | Maximum allowed expiration duration. (default "1h0m0s") |
| `--server.dataProxy.upload.defaultFileNameLength` | int | Default length for the generated file name if not provided in the request. (default 20) |
| `--server.dataProxy.upload.maxExpiresIn` | string | Maximum allowed expiration duration. (default "1h0m0s") |
| `--server.dataProxy.upload.maxSize` | string | Maximum allowed upload size. (default "6Mi") |
| `--server.dataProxy.upload.storagePrefix` | string | Storage prefix to use for all upload requests. |
| `--server.grpc.enableGrpcLatencyMetrics` | | Enable grpc latency metrics. Note Histograms metrics can be expensive on Prometheus servers. |
| `--server.grpc.maxMessageSizeBytes` | int | The max size in bytes for incoming gRPC messages |
| `--server.grpc.port` | int | On which grpc port to serve admin (default 8089) |
| `--server.grpc.serverReflection` | | Enable GRPC Server Reflection (default true) |
| `--server.grpcPort` | int | deprecated |
| `--server.grpcServerReflection` | | deprecated |
| `--server.httpPort` | int | On which http port to serve admin (default 8088) |
| `--server.kube-config` | string | Path to kubernetes client config file, default is empty, useful for incluster config. |
| `--server.kubeClientConfig.burst` | int | Max burst rate for throttle. 0 defaults to 10 (default 25) |
| `--server.kubeClientConfig.qps` | int32 | Max QPS to the master for requests to KubeAPI. 0 defaults to 5. (default 100) |
| `--server.kubeClientConfig.timeout` | string | Max duration allowed for every request to KubeAPI before giving up. 0 implies no timeout. (default "30s") |
| `--server.master` | string | The address of the Kubernetes API server. |
| `--server.readHeaderTimeoutSeconds` | int | The amount of time allowed to read request headers. (default 32) |
| `--server.security.allowCors` | | (default true) |
| `--server.security.allowedHeaders` | strings | (default [Content-Type,flyte-authorization]) |
| `--server.security.allowedOrigins` | strings | (default [*]) |
| `--server.security.auditAccess` | | |
| `--server.security.secure` | | |
| `--server.security.ssl.certificateFile` | string | |
| `--server.security.ssl.keyFile` | string | |
| `--server.security.useAuth` | | |
| `--server.thirdPartyConfig.flyteClient.audience` | string | Audience to use when initiating OAuth2 authorization requests. |
| `--server.thirdPartyConfig.flyteClient.clientId` | string | public identifier for the app which handles authorization for a Flyte deployment |
| `--server.thirdPartyConfig.flyteClient.redirectUri` | string | This is the callback uri registered with the app which handles authorization for a Flyte deployment |
| `--server.thirdPartyConfig.flyteClient.scopes` | strings | Recommended scopes for the client to request. |
| `--server.watchService.maxActiveClusterConnections` | int | (default 5) |
| `--server.watchService.maxPageSize` | int | (default 50000) |
| `--server.watchService.nonTerminalStatusUpdatesInterval` | string | (default "1m0s") |
| `--server.watchService.pollInterval` | string | (default "1s") |
| `--sharedservice.connectPort` | string | On which connect port to serve admin (default "8080") |
| `--sharedservice.grpc.grpcMaxResponseStatusBytes` | int32 | specifies the maximum (uncompressed) size of header list that the client is prepared to accept on grpc calls (default 32000) |
| `--sharedservice.grpc.maxConcurrentStreams` | int | Limit on the number of concurrent streams to each ServerTransport. (default 100) |
| `--sharedservice.grpc.maxMessageSizeBytes` | int | Limit on the size of message that can be received on the server. (default 10485760) |
| `--sharedservice.grpcServerReflection` | | Enable GRPC Server Reflection (default true) |
| `--sharedservice.httpPort` | string | On which http port to serve admin (default "8089") |
| `--sharedservice.kubeConfig` | string | Path to kubernetes client config file. |
| `--sharedservice.master` | string | The address of the Kubernetes API server. |
| `--sharedservice.metrics.enableClientGrpcHistograms` | | Enable client grpc histograms (default true) |
| `--sharedservice.metrics.enableGrpcHistograms` | | Enable grpc histograms (default true) |
| `--sharedservice.metrics.scope` | string | Scope to emit metrics under (default "service:") |
| `--sharedservice.port` | string | On which grpc port to serve admin (default "8080") |
| `--sharedservice.profiler.enabled` | | Enable Profiler on server |
| `--sharedservice.profilerPort` | string | Profile port to start listen for pprof and metric handlers on. (default "10254") |
| `--sharedservice.security.allowCors` | | |
| `--sharedservice.security.allowLocalhostAccess` | | Whether to permit localhost unauthenticated access to the server |
| `--sharedservice.security.allowedHeaders` | strings | |
| `--sharedservice.security.allowedOrigins` | strings | |
| `--sharedservice.security.auditAccess` | | |
| `--sharedservice.security.orgOverride` | string | Override org in identity context if localhost access enabled |
| `--sharedservice.security.secure` | | |
| `--sharedservice.security.ssl.certificateAuthorityFile` | string | |
| `--sharedservice.security.ssl.certificateFile` | string | |
| `--sharedservice.security.ssl.keyFile` | string | |
| `--sharedservice.security.useAuth` | | |
| `--sharedservice.sync.syncInterval` | string | Time interval to sync (default "5m0s") |
| `--storage.cache.max_size_mbs` | int | Maximum size of the cache where the Blob store data is cached in-memory. If not specified or set to 0, cache is not used |
| `--storage.cache.target_gc_percent` | int | Sets the garbage collection target percentage. |
| `--storage.connection.access-key` | string | Access key to use. Only required when authtype is set to accesskey. |
| `--storage.connection.auth-type` | string | Auth Type to use [iam, accesskey]. (default "iam") |
| `--storage.connection.disable-ssl` | | Disables SSL connection. Should only be used for development. |
| `--storage.connection.endpoint` | string | URL for storage client to connect to. |
| `--storage.connection.region` | string | Region to connect to. (default "us-east-1") |
| `--storage.connection.secret-key` | string | Secret to use when accesskey is set. |
| `--storage.container` | string | Initial container (in s3 a bucket) to create -if it doesn't exist-.' |
| `--storage.defaultHttpClient.timeout` | string | Sets time out on the http client. (default "0s") |
| `--storage.enable-multicontainer` | | If this is true, then the container argument is overlooked and redundant. This config will automatically open new connections to new containers/buckets as they are encountered |
| `--storage.limits.maxDownloadMBs` | int | Maximum allowed download size (in MBs) per call. (default 2) |
| `--storage.stow.config` | stringToString | Configuration for stow backend. Refer to github/flyteorg/stow (default []) |
| `--storage.stow.kind` | string | Kind of Stow backend to use. Refer to github/flyteorg/stow |
| `--storage.type` | string | Sets the type of storage to configure [s3/minio/local/mem/stow]. (default "s3") |
| `--union.auth.authorizationMetadataKey` | string | Authorization Header to use when passing Access Tokens to the server (default "flyte-authorization") |
| `--union.auth.clientId` | string | Client ID |
| `--union.auth.clientSecretEnvVar` | string | Environment variable containing the client secret |
| `--union.auth.clientSecretLocation` | string | File containing the client secret |
| `--union.auth.deviceFlow.pollInterval` | string | amount of time the device flow would poll the token endpoint if auth server doesn't return a polling interval. Okta and google IDP do return an interval' (default "5s") |
| `--union.auth.deviceFlow.refreshTime` | string | grace period from the token expiry after which it would refresh the token. (default "5m0s") |
| `--union.auth.deviceFlow.timeout` | string | amount of time the device flow should complete or else it will be cancelled. (default "10m0s") |
| `--union.auth.enable` | | Whether to enable an authenticated conenction when communicating with admin. (default true) |
| `--union.auth.externalAuth.command` | strings | Command for external authentication token generation |
| `--union.auth.pkce.refreshTime` | string | grace period from the token expiry after which it would refresh the token. (default "5m0s") |
| `--union.auth.pkce.timeout` | string | Amount of time the browser session would be active for authentication from client app. (default "15s") |
| `--union.auth.scopes` | strings | List of scopes to request |
| `--union.auth.tokenRefreshWindow` | string | Max duration between token refresh attempt and token expiry. (default "1h0m0s") |
| `--union.auth.tokenUrl` | string | OPTIONAL: Your IdP's token endpoint. It'll be discovered from flyte admin's OAuth Metadata endpoint if not provided. |
| `--union.auth.type` | string | Type of OAuth2 flow used for communicating with admin. (default "Pkce") |
| `--union.cache.maxItemsCount` | int | Maximum number of items to keep in the cache before evicting. (default 1000) |
| `--union.connection.host` | string | Host to connect to (default "dns:///utt-mgdp-stg-us-east-2.cloud-staging.union.ai") |
| `--union.connection.insecure` | | Whether to connect over insecure channel |
| `--union.connection.insecureSkipVerify` | | InsecureSkipVerify controls whether a client verifies the server's certificate chain and host name.Caution: shouldn't be use for production usecases' |
| `--union.connection.keepAliveConfig.permitWithoutStream` | | If true, client sends keepalive pings even with no active RPCs. |
| `--union.connection.keepAliveConfig.time` | string | After a duration of this time if the client doesn't see any activity it pings the server to see if the transport is still alive. (default "20s") |
| `--union.connection.keepAliveConfig.timeout` | string | After having pinged for keepalive check, the client waits for a duration of Timeout and if no activity is seen even after that the connection is closed. (default "2m0s") |
| `--union.connection.maxBackoffDelay` | string | Max delay for grpc backoff (default "8s") |
| `--union.connection.maxRecvMsgSize` | int | Maximum size of a message in bytes of a gRPC message (default 10485760) |
| `--union.connection.maxRetries` | int | Max number of gRPC retries (default 4) |
| `--union.connection.minConnectTimeout` | string | Minimum timeout for establishing a connection (default "20s") |
| `--union.connection.perRetryTimeout` | string | gRPC per retry timeout (default "15s") |
| `--union.connection.serviceConfig` | string | Defines gRPC experimental JSON Service Config (default "{"loadBalancingConfig": [{"round_robin":{}}]}") |
| `--union.connection.trustedIdentityClaims.enabled` | | Enables passing of trusted claims while making inter service calls |
| `--union.connection.trustedIdentityClaims.externalIdentityClaim` | string | External identity claim of the service which is authorized to make internal service call. These are verified against userclouds actions |
| `--union.connection.trustedIdentityClaims.externalIdentityTypeClaim` | string | External identity type claim of app or user to use for the current service identity. It should be an 'app' for inter service communication |
| `--union.internalConnectionConfig.-` | stringToString | (default []) |
| `--union.internalConnectionConfig.enabled` | | Enables internal service to service communication instead of going through ingress. |
| `--union.internalConnectionConfig.urlPattern` | string | UrlPattern of the internal service endpoints. (default "{{ service }}-helmchart.{{ service }}.svc.cluster.local:80") |
| `--webhook.awsSecretManager.sidecarImage` | string | Specifies the sidecar docker image to use (default "docker.io/amazon/aws-secrets-manager-secret-sidecar:v0.1.4") |
| `--webhook.certDir` | string | Certificate directory to use to write generated certs. Defaults to /etc/webhook/certs/ (default "/etc/webhook/certs") |
| `--webhook.embeddedSecretManagerConfig.awsConfig.region` | string | AWS region |
| `--webhook.embeddedSecretManagerConfig.fileMountInitContainer.image` | string | Specifies init container image to use for mounting secrets as files. (default "busybox:1.28") |
| `--webhook.embeddedSecretManagerConfig.gcpConfig.project` | string | GCP project to be used for secret manager |
| `--webhook.embeddedSecretManagerConfig.type` | string | (default "AWS") |
| `--webhook.gcpSecretManager.sidecarImage` | string | Specifies the sidecar docker image to use (default "gcr.io/google.com/cloudsdktool/cloud-sdk:alpine") |
| `--webhook.listenPort` | int | The port to use to listen to webhook calls. Defaults to 9443 (default 9443) |
| `--webhook.localCert` | | write certs locally. Defaults to false |
| `--webhook.metrics-prefix` | string | An optional prefix for all published metrics. (default "flyte:") |
| `--webhook.secretName` | string | Secret name to write generated certs to. (default "flyte-pod-webhook") |
| `--webhook.serviceName` | string | The name of the webhook service. (default "flyte-pod-webhook") |
| `--webhook.servicePort` | int32 | The port on the service that hosting webhook. (default 443) |
| `--webhook.vaultSecretManager.role` | string | Specifies the vault role to use (default "flyte") |
=== PAGE: https://www.union.ai/docs/v1/serverless/api-reference/uctl-cli/uctl-apply/uctl-apply-clusterconfig ===
# uctl apply clusterconfig
Updates cluster config
## Synopsis
Updates cluster config:
```shell
$ uctl apply clusterconfig [flags]
```
## Options
| Option | Type | Description |
|--------|------|-------------|
| `--dryRun` | | execute command without making any modifications. |
| Option | Type | Description |
|--------|------|-------------|
| `-h`, `--help` | help for clusterconfig |
| `--specFile` | string | spec file to be used to update cluster config. |
### Options inherited from parent commands
| Option | Type | Description |
|--------|------|-------------|
| `--admin.audience` | string | Audience to use when initiating OAuth2 authorization requests. |
| `--admin.authType` | string | Type of OAuth2 flow used for communicating with admin.ClientSecret, Pkce, ExternalCommand are valid values (default "ClientSecret") |
| `--admin.authorizationHeader` | string | Custom metadata header to pass JWT |
| `--admin.authorizationServerUrl` | string | This is the URL to your IdP's authorization server. It'll default to Endpoint |
| `--admin.caCertFilePath` | string | Use specified certificate file to verify the admin server peer. |
| `--admin.clientId` | string | Client ID (default "flytepropeller") |
| `--admin.clientSecretEnvVar` | string | Environment variable containing the client secret |
| `--admin.clientSecretLocation` | string | File containing the client secret (default "/etc/secrets/client_secret") |
| `--admin.command` | strings | Command for external authentication token generation |
| `--admin.defaultOrg` | string | OPTIONAL: Default org to use to support non-org based cli's.'. |
| `--admin.defaultServiceConfig` | string | |
| `--admin.deviceFlowConfig.pollInterval` | string | amount of time the device flow would poll the token endpoint if auth server doesn't return a polling interval. Okta and google IDP do return an interval' (default "5s") |
| `--admin.deviceFlowConfig.refreshTime` | string | grace period from the token expiry after which it would refresh the token. (default "5m0s") |
| `--admin.deviceFlowConfig.timeout` | string | amount of time the device flow should complete or else it will be cancelled. (default "10m0s") |
| `--admin.endpoint` | string | For admin types, specify where the uri of the service is located. |
| `--admin.httpProxyURL` | string | OPTIONAL: HTTP Proxy to be used for OAuth requests. |
| `--admin.insecure` | | Use insecure connection. |
| `--admin.insecureSkipVerify` | | InsecureSkipVerify controls whether a client verifies the server's certificate chain and host name.Caution: shouldn't be use for production usecases' |
| `--admin.maxBackoffDelay` | string | Max delay for grpc backoff (default "8s") |
| `--admin.maxMessageSizeBytes` | int | The max size in bytes for incoming gRPC messages |
| `--admin.maxRetries` | int | Max number of gRPC retries (default 4) |
| `--admin.perRetryTimeout` | string | gRPC per retry timeout (default "15s") |
| `--admin.pkceConfig.refreshTime` | string | grace period from the token expiry after which it would refresh the token. (default "5m0s") |
| `--admin.pkceConfig.timeout` | string | Amount of time the browser session would be active for authentication from client app. (default "2m0s") |
| `--admin.proxyCommand` | strings | Command for external proxy-authorization token generation |
| `--admin.scopes` | strings | List of scopes to request |
| `--admin.tokenRefreshWindow` | string | Max duration between token refresh attempt and token expiry. (default "0s") |
| `--admin.tokenUrl` | string | OPTIONAL: Your IdP's token endpoint. It'll be discovered from flyte admin's OAuth Metadata endpoint if not provided. |
| `--admin.useAudienceFromAdmin` | | Use Audience configured from admins public endpoint config. |
| `--admin.useAuth` | | Deprecated: Auth will be enabled/disabled based on admin's dynamically discovered information. |
| `--auth.appAuth.externalAuthServer.allowedAudience` | strings | Optional: A list of allowed audiences. If not provided, the audience is expected to be the public Uri of the service. |
| `--auth.appAuth.externalAuthServer.baseUrl` | string | This should be the base url of the authorization server that you are trying to hit. With Okta for instance, it will look something like https://company.okta.com/oauth2/abcdef123456789/ |
| `--auth.appAuth.externalAuthServer.httpProxyURL` | string | OPTIONAL: HTTP Proxy to be used for OAuth requests. |
| `--auth.appAuth.externalAuthServer.metadataUrl` | string | Optional: If the server doesn't support /.well-known/oauth-authorization-server, you can set a custom metadata url here.' |
| `--auth.appAuth.externalAuthServer.retryAttempts` | int | Optional: The number of attempted retries on a transient failure to get the OAuth metadata (default 5) |
| `--auth.appAuth.externalAuthServer.retryDelay` | string | Optional, Duration to wait between retries (default "1s") |
| `--auth.appAuth.selfAuthServer.accessTokenLifespan` | string | Defines the lifespan of issued access tokens. (default "30m0s") |
| `--auth.appAuth.selfAuthServer.authorizationCodeLifespan` | string | Defines the lifespan of issued access tokens. (default "5m0s") |
| `--auth.appAuth.selfAuthServer.claimSymmetricEncryptionKeySecretName` | string | OPTIONAL: Secret name to use to encrypt claims in authcode token. (default "claim_symmetric_key") |
| `--auth.appAuth.selfAuthServer.issuer` | string | Defines the issuer to use when issuing and validating tokens. The default value is https://{requestUri.HostAndPort}/ |
| `--auth.appAuth.selfAuthServer.oldTokenSigningRSAKeySecretName` | string | OPTIONAL: Secret name to use to retrieve Old RSA Signing Key. This can be useful during key rotation to continue to accept older tokens. (default "token_rsa_key_old.pem") |
| `--auth.appAuth.selfAuthServer.refreshTokenLifespan` | string | Defines the lifespan of issued access tokens. (default "1h0m0s") |
| `--auth.appAuth.selfAuthServer.tokenSigningRSAKeySecretName` | string | OPTIONAL: Secret name to use to retrieve RSA Signing Key. (default "token_rsa_key.pem") |
| `--auth.appAuth.thirdPartyConfig.flyteClient.audience` | string | Audience to use when initiating OAuth2 authorization requests. |
| `--auth.appAuth.thirdPartyConfig.flyteClient.clientId` | string | public identifier for the app which handles authorization for a Flyte deployment (default "uctl") |
| `--auth.appAuth.thirdPartyConfig.flyteClient.redirectUri` | string | This is the callback uri registered with the app which handles authorization for a Flyte deployment (default "http://localhost:53593/callback") |
| `--auth.appAuth.thirdPartyConfig.flyteClient.scopes` | strings | Recommended scopes for the client to request. (default [all,offline]) |
| `--auth.disableForGrpc` | | Disables auth enforcement on Grpc Endpoints. |
| `--auth.disableForHttp` | | Disables auth enforcement on HTTP Endpoints. |
| `--auth.grpcAuthorizationHeader` | string | (default "flyte-authorization") |
| `--auth.httpAuthorizationHeader` | string | (default "flyte-authorization") |
| `--auth.httpProxyURL` | string | OPTIONAL: HTTP Proxy to be used for OAuth requests. |
| `--auth.tokenEndpointProxyPath` | string | The path used to proxy calls to the TokenURL |
| `--auth.userAuth.cookieBlockKeySecretName` | string | OPTIONAL: Secret name to use for cookie block key. (default "cookie_block_key") |
| `--auth.userAuth.cookieHashKeySecretName` | string | OPTIONAL: Secret name to use for cookie hash key. (default "cookie_hash_key") |
| `--auth.userAuth.cookieSetting.domain` | string | OPTIONAL: Allows you to set the domain attribute on the auth cookies. |
| `--auth.userAuth.cookieSetting.sameSitePolicy` | string | OPTIONAL: Allows you to declare if your cookie should be restricted to a first-party or same-site context.Wrapper around http.SameSite. (default "DefaultMode") |
| `--auth.userAuth.httpProxyURL` | string | OPTIONAL: HTTP Proxy to be used for OAuth requests. |
| `--auth.userAuth.idpQueryParameter` | string | idp query parameter used for selecting a particular IDP for doing user authentication. Eg: for Okta passing idp={IDP-ID} forces the authentication to happen with IDP-ID |
| `--auth.userAuth.openId.baseUrl` | string | |
| `--auth.userAuth.openId.clientId` | string | |
| `--auth.userAuth.openId.clientSecretFile` | string | |
| `--auth.userAuth.openId.clientSecretName` | string | (default "oidc_client_secret") |
| `--auth.userAuth.openId.scopes` | strings | (default [openid,profile]) |
| `--auth.userAuth.redirectUrl` | string | (default "/console") |
| `--authorizer.internalCommunicationConfig.enabled` | | Enables authorization decisions for internal communication. (default true) |
| `--authorizer.internalCommunicationConfig.ingressIdentity` | string | IngressIdentity used in the cluster. Needed to exclude the communication coming from ingress. (default "ingress-nginx.ingress-nginx.serviceaccount.identity.linkerd.cluster.local") |
| `--authorizer.internalCommunicationConfig.tenantUrlPatternIdentity` | string | UrlPatternIdentity of the internal tenant service endpoint identities. (default "{{ service }}.{{ org }}.serviceaccount.identity.linkerd.cluster.local") |
| `--authorizer.internalCommunicationConfig.urlPatternIdentity` | string | UrlPatternIdentity of the internal service endpoint identities. (default "{{ service }}-helmchart.{{ service }}.serviceaccount.identity.linkerd.cluster.local") |
| `--authorizer.mode` | string | (default "Active") |
| `--authorizer.organizationConfig.PolicyConfig.adminPolicyDescription` | string | description for the boilerplate admin policy (default "Contributor permissions and full admin permissions to manage users and view usage dashboards") |
| `--authorizer.organizationConfig.PolicyConfig.contributorPolicyDescription` | string | description for the boilerplate contributor policy (default "Viewer permissions and permissions to create workflows, tasks, launch plans, and executions") |
| `--authorizer.organizationConfig.PolicyConfig.defaultUserPolicyRoleType` | string | name of the role type to determine which default policy new users added to the organization should be assigned (default "Viewer") |
| `--authorizer.organizationConfig.PolicyConfig.serverlessContributorPolicyDescription` | string | description for the boilerplate serverless contributor policy (default "Viewer permissions and permissions to create workflows, tasks, launch plans, and executions") |
| `--authorizer.organizationConfig.PolicyConfig.serverlessViewerPolicyDescription` | string | description for the boilerplate serverless viewer policy (default "Permissions to view Flyte entities") |
| `--authorizer.organizationConfig.PolicyConfig.viewerPolicyDescription` | string | description for the boilerplate viewer policy (default "Permissions to view Flyte entities") |
| `--authorizer.organizationConfig.defaultPolicyCacheDuration` | string | Cache entry duration for the store of the default policy per organization (default "10m0s") |
| `--authorizer.syncRuleRefreshInterval` | string | (default "1m0s") |
| `--authorizer.type` | string | (default "UserClouds") |
| `--authorizer.userCloudsClient.cache.redis.ttl.edgeTypes` | string | Specifies how long edge types remain in the cache.. (default "30m0s") |
| `--authorizer.userCloudsClient.cache.redis.ttl.edges` | string | Specifies how long edges remain in the cache. (default "30m0s") |
| `--authorizer.userCloudsClient.cache.redis.ttl.objectTypes` | string | Specifies how long object types remain in the cache. (default "30m0s") |
| `--authorizer.userCloudsClient.cache.redis.ttl.objects` | string | Specifies how long objects remain in the cache. (default "30m0s") |
| `--authorizer.userCloudsClient.cache.type` | string | Cache type to use. (default "none") |
| `--authorizer.userCloudsClient.clientID` | string | UserClouds client id |
| `--authorizer.userCloudsClient.clientSecretName` | string | UserCloud client secret name to read from the secret manager. (default "userclouds-client-secret") |
| `--authorizer.userCloudsClient.enableLogging` | | Enable userclouds client's internal logging. Calls to post logs take 250-350 ms and will impact p99 latency, enable with caution. |
| `--authorizer.userCloudsClient.tenantID` | string | UserClouds tenant id. Should be a UUID. |
| `--authorizer.userCloudsClient.tenantUrl` | string | Something like https://{yourtenant}.tenant.userclouds.com |
| `--config` | string | config file (default is /Users/andrew/.union/config.yaml) |
| `--connection.environment` | string | |
| `--connection.region` | string | |
| `--connection.rootTenantURLPattern` | string | Pattern for tenant url. (default "dns:///{{ organization }}.cloud-staging.union.ai") |
| `--console.endpoint` | string | Endpoint of console, if different than flyte admin |
| `--database.connMaxLifeTime` | string | sets the maximum amount of time a connection may be reused (default "1h0m0s") |
| `--database.enableForeignKeyConstraintWhenMigrating` | | Whether to enable gorm foreign keys when migrating the db |
| `--database.maxIdleConnections` | int | maxIdleConnections sets the maximum number of connections in the idle connection pool. (default 10) |
| `--database.maxOpenConnections` | int | maxOpenConnections sets the maximum number of open connections to the database. (default 100) |
| `--database.postgres.dbname` | string | The database name (default "postgres") |
| `--database.postgres.debug` | | |
| `--database.postgres.host` | string | The host name of the database server (default "localhost") |
| `--database.postgres.options` | string | See http://gorm.io/docs/connecting_to_the_database.html for available options passed, in addition to the above. (default "sslmode=disable") |
| `--database.postgres.password` | string | The database password. (default "postgres") |
| `--database.postgres.passwordPath` | string | Points to the file containing the database password. |
| `--database.postgres.port` | int | The port name of the database server (default 30001) |
| `--database.postgres.readReplicaHost` | string | The host name of the read replica database server (default "localhost") |
| `--database.postgres.username` | string | The database user who is connecting to the server. (default "postgres") |
| `--database.sqlite.file` | string | The path to the file (existing or new) where the DB should be created / stored. If existing, then this will be re-used, else a new will be created |
| `--db.connectionPool.maxConnectionLifetime` | string | (default "0s") |
| `--db.connectionPool.maxIdleConnections` | int | |
| `--db.connectionPool.maxOpenConnections` | int | |
| `--db.dbname` | string | (default "postgres") |
| `--db.debug` | | |
| `--db.host` | string | (default "postgres") |
| `--db.log_level` | int | (default 4) |
| `--db.options` | string | (default "sslmode=disable") |
| `--db.password` | string | |
| `--db.passwordPath` | string | |
| `--db.port` | int | (default 5432) |
| `--db.username` | string | (default "postgres") |
| `-d`, `--domain` | string | Specifies the Flyte project's domain. |
| `--files.archive` | | Pass in archive file either an http link or local path. |
| `--files.assumableIamRole` | string | Custom assumable iam auth role to register launch plans with. |
| `--files.continueOnError` | | Continue on error when registering files. |
| `--files.destinationDirectory` | string | Location of source code in container. |
| `--files.dryRun` | | Execute command without making any modifications. |
| `--files.enableSchedule` | | Enable the schedule if the files contain schedulable launchplan. |
| `--files.force` | | Force use of version number on entities registered with flyte. |
| `--files.k8ServiceAccount` | string | Deprecated. Please use `--K8sServiceAccount`|
| `--files.k8sServiceAccount` | string | Custom kubernetes service account auth role to register launch plans with. |
| `--files.outputLocationPrefix` | string | Custom output location prefix for offloaded types (files/schemas). |
| `--files.sourceUploadPath` | string | Deprecated: Update flyte admin to avoid having to configure storage access from uctl. |
| `--files.version` | string | Version of the entity to be registered with flyte which are un-versioned after serialization. |
| `--logger.formatter.type` | string | Sets logging format type. (default "json") |
| `--logger.level` | int | Sets the minimum logging level. (default 3) |
| `--logger.mute` | | Mutes all logs regardless of severity. Intended for benchmarks/tests only. |
| `--logger.show-source` | | Includes source code location in logs. |
| `--org` | string | Organization to work on. If not set, default to user's org. |
| `--otel.file.filename` | string | Filename to store exported telemetry traces (default "/tmp/trace.txt") |
| `--otel.jaeger.endpoint` | string | Endpoint for the jaeger telemetry trace ingestor (default "http://localhost:14268/api/traces") |
| `--otel.otlpgrpc.endpoint` | string | Endpoint for the OTLP telemetry trace collector (default "http://localhost:4317") |
| `--otel.otlphttp.endpoint` | string | Endpoint for the OTLP telemetry trace collector (default "http://localhost:4318/v1/traces") |
| `--otel.sampler.parentSampler` | string | Sets the parent sampler to use for the tracer (default "always") |
| `--otel.type` | string | Sets the type of exporter to configure [noop/file/jaeger/otlpgrpc/otlphttp]. (default "noop") |
| `-o`, `--output` | string | Specifies the output type - supported formats [TABLE JSON YAML DOT DOTURL]. NOTE: dot, doturl are only supported for Workflow (default "table") |
| `--plugins.catalogcache.reader.maxItems` | int | Maximum number of entries to keep in the index. (default 10000) |
| `--plugins.catalogcache.reader.maxRetries` | int | Maximum number of retries per item. (default 3) |
| `--plugins.catalogcache.reader.workers` | int | Number of concurrent workers to start processing the queue. (default 10) |
| `--plugins.catalogcache.writer.maxItems` | int | Maximum number of entries to keep in the index. (default 10000) |
| `--plugins.catalogcache.writer.maxRetries` | int | Maximum number of retries per item. (default 3) |
| `--plugins.catalogcache.writer.workers` | int | Number of concurrent workers to start processing the queue. (default 10) |
| `-p`, `--project` | string | Specifies the Flyte project. |
| `--rediscache.passwordSecretName` | string | Name of secret with Redis password. |
| `--rediscache.primaryEndpoint` | string | Primary endpoint for the redis cache that can be used for both reads and writes. |
| `--rediscache.replicaEndpoint` | string | Replica endpoint for the redis cache that can be used for reads. |
| `--secrets.env-prefix` | string | Prefix for environment variables (default "FLYTE_SECRET_") |
| `--secrets.secrets-prefix` | string | Prefix where to look for secrets file (default "/etc/secrets") |
| `--secrets.type` | string | Sets the type of storage to configure [local]. (default "local") |
| `--server.dataProxy.download.maxExpiresIn` | string | Maximum allowed expiration duration. (default "1h0m0s") |
| `--server.dataProxy.upload.defaultFileNameLength` | int | Default length for the generated file name if not provided in the request. (default 20) |
| `--server.dataProxy.upload.maxExpiresIn` | string | Maximum allowed expiration duration. (default "1h0m0s") |
| `--server.dataProxy.upload.maxSize` | string | Maximum allowed upload size. (default "6Mi") |
| `--server.dataProxy.upload.storagePrefix` | string | Storage prefix to use for all upload requests. |
| `--server.grpc.enableGrpcLatencyMetrics` | | Enable grpc latency metrics. Note Histograms metrics can be expensive on Prometheus servers. |
| `--server.grpc.maxMessageSizeBytes` | int | The max size in bytes for incoming gRPC messages |
| `--server.grpc.port` | int | On which grpc port to serve admin (default 8089) |
| `--server.grpc.serverReflection` | | Enable GRPC Server Reflection (default true) |
| `--server.grpcPort` | int | deprecated |
| `--server.grpcServerReflection` | | deprecated |
| `--server.httpPort` | int | On which http port to serve admin (default 8088) |
| `--server.kube-config` | string | Path to kubernetes client config file, default is empty, useful for incluster config. |
| `--server.kubeClientConfig.burst` | int | Max burst rate for throttle. 0 defaults to 10 (default 25) |
| `--server.kubeClientConfig.qps` | int32 | Max QPS to the master for requests to KubeAPI. 0 defaults to 5. (default 100) |
| `--server.kubeClientConfig.timeout` | string | Max duration allowed for every request to KubeAPI before giving up. 0 implies no timeout. (default "30s") |
| `--server.master` | string | The address of the Kubernetes API server. |
| `--server.readHeaderTimeoutSeconds` | int | The amount of time allowed to read request headers. (default 32) |
| `--server.security.allowCors` | | (default true) |
| `--server.security.allowedHeaders` | strings | (default [Content-Type,flyte-authorization]) |
| `--server.security.allowedOrigins` | strings | (default [*]) |
| `--server.security.auditAccess` | | |
| `--server.security.secure` | | |
| `--server.security.ssl.certificateFile` | string | |
| `--server.security.ssl.keyFile` | string | |
| `--server.security.useAuth` | | |
| `--server.thirdPartyConfig.flyteClient.audience` | string | Audience to use when initiating OAuth2 authorization requests. |
| `--server.thirdPartyConfig.flyteClient.clientId` | string | public identifier for the app which handles authorization for a Flyte deployment |
| `--server.thirdPartyConfig.flyteClient.redirectUri` | string | This is the callback uri registered with the app which handles authorization for a Flyte deployment |
| `--server.thirdPartyConfig.flyteClient.scopes` | strings | Recommended scopes for the client to request. |
| `--server.watchService.maxActiveClusterConnections` | int | (default 5) |
| `--server.watchService.maxPageSize` | int | (default 50000) |
| `--server.watchService.nonTerminalStatusUpdatesInterval` | string | (default "1m0s") |
| `--server.watchService.pollInterval` | string | (default "1s") |
| `--sharedservice.connectPort` | string | On which connect port to serve admin (default "8080") |
| `--sharedservice.grpc.grpcMaxResponseStatusBytes` | int32 | specifies the maximum (uncompressed) size of header list that the client is prepared to accept on grpc calls (default 32000) |
| `--sharedservice.grpc.maxConcurrentStreams` | int | Limit on the number of concurrent streams to each ServerTransport. (default 100) |
| `--sharedservice.grpc.maxMessageSizeBytes` | int | Limit on the size of message that can be received on the server. (default 10485760) |
| `--sharedservice.grpcServerReflection` | | Enable GRPC Server Reflection (default true) |
| `--sharedservice.httpPort` | string | On which http port to serve admin (default "8089") |
| `--sharedservice.kubeConfig` | string | Path to kubernetes client config file. |
| `--sharedservice.master` | string | The address of the Kubernetes API server. |
| `--sharedservice.metrics.enableClientGrpcHistograms` | | Enable client grpc histograms (default true) |
| `--sharedservice.metrics.enableGrpcHistograms` | | Enable grpc histograms (default true) |
| `--sharedservice.metrics.scope` | string | Scope to emit metrics under (default "service:") |
| `--sharedservice.port` | string | On which grpc port to serve admin (default "8080") |
| `--sharedservice.profiler.enabled` | | Enable Profiler on server |
| `--sharedservice.profilerPort` | string | Profile port to start listen for pprof and metric handlers on. (default "10254") |
| `--sharedservice.security.allowCors` | | |
| `--sharedservice.security.allowLocalhostAccess` | | Whether to permit localhost unauthenticated access to the server |
| `--sharedservice.security.allowedHeaders` | strings | |
| `--sharedservice.security.allowedOrigins` | strings | |
| `--sharedservice.security.auditAccess` | | |
| `--sharedservice.security.orgOverride` | string | Override org in identity context if localhost access enabled |
| `--sharedservice.security.secure` | | |
| `--sharedservice.security.ssl.certificateAuthorityFile` | string | |
| `--sharedservice.security.ssl.certificateFile` | string | |
| `--sharedservice.security.ssl.keyFile` | string | |
| `--sharedservice.security.useAuth` | | |
| `--sharedservice.sync.syncInterval` | string | Time interval to sync (default "5m0s") |
| `--storage.cache.max_size_mbs` | int | Maximum size of the cache where the Blob store data is cached in-memory. If not specified or set to 0, cache is not used |
| `--storage.cache.target_gc_percent` | int | Sets the garbage collection target percentage. |
| `--storage.connection.access-key` | string | Access key to use. Only required when authtype is set to accesskey. |
| `--storage.connection.auth-type` | string | Auth Type to use [iam, accesskey]. (default "iam") |
| `--storage.connection.disable-ssl` | | Disables SSL connection. Should only be used for development. |
| `--storage.connection.endpoint` | string | URL for storage client to connect to. |
| `--storage.connection.region` | string | Region to connect to. (default "us-east-1") |
| `--storage.connection.secret-key` | string | Secret to use when accesskey is set. |
| `--storage.container` | string | Initial container (in s3 a bucket) to create -if it doesn't exist-.' |
| `--storage.defaultHttpClient.timeout` | string | Sets time out on the http client. (default "0s") |
| `--storage.enable-multicontainer` | | If this is true, then the container argument is overlooked and redundant. This config will automatically open new connections to new containers/buckets as they are encountered |
| `--storage.limits.maxDownloadMBs` | int | Maximum allowed download size (in MBs) per call. (default 2) |
| `--storage.stow.config` | stringToString | Configuration for stow backend. Refer to github/flyteorg/stow (default []) |
| `--storage.stow.kind` | string | Kind of Stow backend to use. Refer to github/flyteorg/stow |
| `--storage.type` | string | Sets the type of storage to configure [s3/minio/local/mem/stow]. (default "s3") |
| `--union.auth.authorizationMetadataKey` | string | Authorization Header to use when passing Access Tokens to the server (default "flyte-authorization") |
| `--union.auth.clientId` | string | Client ID |
| `--union.auth.clientSecretEnvVar` | string | Environment variable containing the client secret |
| `--union.auth.clientSecretLocation` | string | File containing the client secret |
| `--union.auth.deviceFlow.pollInterval` | string | amount of time the device flow would poll the token endpoint if auth server doesn't return a polling interval. Okta and google IDP do return an interval' (default "5s") |
| `--union.auth.deviceFlow.refreshTime` | string | grace period from the token expiry after which it would refresh the token. (default "5m0s") |
| `--union.auth.deviceFlow.timeout` | string | amount of time the device flow should complete or else it will be cancelled. (default "10m0s") |
| `--union.auth.enable` | | Whether to enable an authenticated conenction when communicating with admin. (default true) |
| `--union.auth.externalAuth.command` | strings | Command for external authentication token generation |
| `--union.auth.pkce.refreshTime` | string | grace period from the token expiry after which it would refresh the token. (default "5m0s") |
| `--union.auth.pkce.timeout` | string | Amount of time the browser session would be active for authentication from client app. (default "15s") |
| `--union.auth.scopes` | strings | List of scopes to request |
| `--union.auth.tokenRefreshWindow` | string | Max duration between token refresh attempt and token expiry. (default "1h0m0s") |
| `--union.auth.tokenUrl` | string | OPTIONAL: Your IdP's token endpoint. It'll be discovered from flyte admin's OAuth Metadata endpoint if not provided. |
| `--union.auth.type` | string | Type of OAuth2 flow used for communicating with admin. (default "Pkce") |
| `--union.cache.maxItemsCount` | int | Maximum number of items to keep in the cache before evicting. (default 1000) |
| `--union.connection.host` | string | Host to connect to (default "dns:///utt-mgdp-stg-us-east-2.cloud-staging.union.ai") |
| `--union.connection.insecure` | | Whether to connect over insecure channel |
| `--union.connection.insecureSkipVerify` | | InsecureSkipVerify controls whether a client verifies the server's certificate chain and host name.Caution: shouldn't be use for production usecases' |
| `--union.connection.keepAliveConfig.permitWithoutStream` | | If true, client sends keepalive pings even with no active RPCs. |
| `--union.connection.keepAliveConfig.time` | string | After a duration of this time if the client doesn't see any activity it pings the server to see if the transport is still alive. (default "20s") |
| `--union.connection.keepAliveConfig.timeout` | string | After having pinged for keepalive check, the client waits for a duration of Timeout and if no activity is seen even after that the connection is closed. (default "2m0s") |
| `--union.connection.maxBackoffDelay` | string | Max delay for grpc backoff (default "8s") |
| `--union.connection.maxRecvMsgSize` | int | Maximum size of a message in bytes of a gRPC message (default 10485760) |
| `--union.connection.maxRetries` | int | Max number of gRPC retries (default 4) |
| `--union.connection.minConnectTimeout` | string | Minimum timeout for establishing a connection (default "20s") |
| `--union.connection.perRetryTimeout` | string | gRPC per retry timeout (default "15s") |
| `--union.connection.serviceConfig` | string | Defines gRPC experimental JSON Service Config (default "{"loadBalancingConfig": [{"round_robin":{}}]}") |
| `--union.connection.trustedIdentityClaims.enabled` | | Enables passing of trusted claims while making inter service calls |
| `--union.connection.trustedIdentityClaims.externalIdentityClaim` | string | External identity claim of the service which is authorized to make internal service call. These are verified against userclouds actions |
| `--union.connection.trustedIdentityClaims.externalIdentityTypeClaim` | string | External identity type claim of app or user to use for the current service identity. It should be an 'app' for inter service communication |
| `--union.internalConnectionConfig.-` | stringToString | (default []) |
| `--union.internalConnectionConfig.enabled` | | Enables internal service to service communication instead of going through ingress. |
| `--union.internalConnectionConfig.urlPattern` | string | UrlPattern of the internal service endpoints. (default "{{ service }}-helmchart.{{ service }}.svc.cluster.local:80") |
| `--webhook.awsSecretManager.sidecarImage` | string | Specifies the sidecar docker image to use (default "docker.io/amazon/aws-secrets-manager-secret-sidecar:v0.1.4") |
| `--webhook.certDir` | string | Certificate directory to use to write generated certs. Defaults to /etc/webhook/certs/ (default "/etc/webhook/certs") |
| `--webhook.embeddedSecretManagerConfig.awsConfig.region` | string | AWS region |
| `--webhook.embeddedSecretManagerConfig.fileMountInitContainer.image` | string | Specifies init container image to use for mounting secrets as files. (default "busybox:1.28") |
| `--webhook.embeddedSecretManagerConfig.gcpConfig.project` | string | GCP project to be used for secret manager |
| `--webhook.embeddedSecretManagerConfig.type` | string | (default "AWS") |
| `--webhook.gcpSecretManager.sidecarImage` | string | Specifies the sidecar docker image to use (default "gcr.io/google.com/cloudsdktool/cloud-sdk:alpine") |
| `--webhook.listenPort` | int | The port to use to listen to webhook calls. Defaults to 9443 (default 9443) |
| `--webhook.localCert` | | write certs locally. Defaults to false |
| `--webhook.metrics-prefix` | string | An optional prefix for all published metrics. (default "flyte:") |
| `--webhook.secretName` | string | Secret name to write generated certs to. (default "flyte-pod-webhook") |
| `--webhook.serviceName` | string | The name of the webhook service. (default "flyte-pod-webhook") |
| `--webhook.servicePort` | int32 | The port on the service that hosting webhook. (default 443) |
| `--webhook.vaultSecretManager.role` | string | Specifies the vault role to use (default "flyte") |
=== PAGE: https://www.union.ai/docs/v1/serverless/api-reference/uctl-cli/uctl-apply/uctl-apply-clusterconfigid ===
# uctl apply clusterconfigid
Assign cluster config
## Synopsis
Assign cluster config:
```shell
$ uctl apply clusterconfigid [flags]
```
## Options
| Option | Type | Description |
|--------|------|-------------|
| `--clusterName` | string | Specifies cluster name which config to update |
| `--configID` | string | Specifies config ID to assign to the cluster |
| `--dryRun` | | execute command without making any modifications. |
| `-h`, `--help` | help for clusterconfigid |
### Options inherited from parent commands
| Option | Type | Description |
|--------|------|-------------|
| `--admin.audience` | string | Audience to use when initiating OAuth2 authorization requests. |
| `--admin.authType` | string | Type of OAuth2 flow used for communicating with admin.ClientSecret, Pkce, ExternalCommand are valid values (default "ClientSecret") |
| `--admin.authorizationHeader` | string | Custom metadata header to pass JWT |
| `--admin.authorizationServerUrl` | string | This is the URL to your IdP's authorization server. It'll default to Endpoint |
| `--admin.caCertFilePath` | string | Use specified certificate file to verify the admin server peer. |
| `--admin.clientId` | string | Client ID (default "flytepropeller") |
| `--admin.clientSecretEnvVar` | string | Environment variable containing the client secret |
| `--admin.clientSecretLocation` | string | File containing the client secret (default "/etc/secrets/client_secret") |
| `--admin.command` | strings | Command for external authentication token generation |
| `--admin.defaultOrg` | string | OPTIONAL: Default org to use to support non-org based cli's.'. |
| `--admin.defaultServiceConfig` | string | |
| `--admin.deviceFlowConfig.pollInterval` | string | amount of time the device flow would poll the token endpoint if auth server doesn't return a polling interval. Okta and google IDP do return an interval' (default "5s") |
| `--admin.deviceFlowConfig.refreshTime` | string | grace period from the token expiry after which it would refresh the token. (default "5m0s") |
| `--admin.deviceFlowConfig.timeout` | string | amount of time the device flow should complete or else it will be cancelled. (default "10m0s") |
| `--admin.endpoint` | string | For admin types, specify where the uri of the service is located. |
| `--admin.httpProxyURL` | string | OPTIONAL: HTTP Proxy to be used for OAuth requests. |
| `--admin.insecure` | | Use insecure connection. |
| `--admin.insecureSkipVerify` | | InsecureSkipVerify controls whether a client verifies the server's certificate chain and host name.Caution: shouldn't be use for production usecases' |
| `--admin.maxBackoffDelay` | string | Max delay for grpc backoff (default "8s") |
| `--admin.maxMessageSizeBytes` | int | The max size in bytes for incoming gRPC messages |
| `--admin.maxRetries` | int | Max number of gRPC retries (default 4) |
| `--admin.perRetryTimeout` | string | gRPC per retry timeout (default "15s") |
| `--admin.pkceConfig.refreshTime` | string | grace period from the token expiry after which it would refresh the token. (default "5m0s") |
| `--admin.pkceConfig.timeout` | string | Amount of time the browser session would be active for authentication from client app. (default "2m0s") |
| `--admin.proxyCommand` | strings | Command for external proxy-authorization token generation |
| `--admin.scopes` | strings | List of scopes to request |
| `--admin.tokenRefreshWindow` | string | Max duration between token refresh attempt and token expiry. (default "0s") |
| `--admin.tokenUrl` | string | OPTIONAL: Your IdP's token endpoint. It'll be discovered from flyte admin's OAuth Metadata endpoint if not provided. |
| `--admin.useAudienceFromAdmin` | | Use Audience configured from admins public endpoint config. |
| `--admin.useAuth` | | Deprecated: Auth will be enabled/disabled based on admin's dynamically discovered information. |
| `--auth.appAuth.externalAuthServer.allowedAudience` | strings | Optional: A list of allowed audiences. If not provided, the audience is expected to be the public Uri of the service. |
| `--auth.appAuth.externalAuthServer.baseUrl` | string | This should be the base url of the authorization server that you are trying to hit. With Okta for instance, it will look something like https://company.okta.com/oauth2/abcdef123456789/ |
| `--auth.appAuth.externalAuthServer.httpProxyURL` | string | OPTIONAL: HTTP Proxy to be used for OAuth requests. |
| `--auth.appAuth.externalAuthServer.metadataUrl` | string | Optional: If the server doesn't support /.well-known/oauth-authorization-server, you can set a custom metadata url here.' |
| `--auth.appAuth.externalAuthServer.retryAttempts` | int | Optional: The number of attempted retries on a transient failure to get the OAuth metadata (default 5) |
| `--auth.appAuth.externalAuthServer.retryDelay` | string | Optional, Duration to wait between retries (default "1s") |
| `--auth.appAuth.selfAuthServer.accessTokenLifespan` | string | Defines the lifespan of issued access tokens. (default "30m0s") |
| `--auth.appAuth.selfAuthServer.authorizationCodeLifespan` | string | Defines the lifespan of issued access tokens. (default "5m0s") |
| `--auth.appAuth.selfAuthServer.claimSymmetricEncryptionKeySecretName` | string | OPTIONAL: Secret name to use to encrypt claims in authcode token. (default "claim_symmetric_key") |
| `--auth.appAuth.selfAuthServer.issuer` | string | Defines the issuer to use when issuing and validating tokens. The default value is https://{requestUri.HostAndPort}/ |
| `--auth.appAuth.selfAuthServer.oldTokenSigningRSAKeySecretName` | string | OPTIONAL: Secret name to use to retrieve Old RSA Signing Key. This can be useful during key rotation to continue to accept older tokens. (default "token_rsa_key_old.pem") |
| `--auth.appAuth.selfAuthServer.refreshTokenLifespan` | string | Defines the lifespan of issued access tokens. (default "1h0m0s") |
| `--auth.appAuth.selfAuthServer.tokenSigningRSAKeySecretName` | string | OPTIONAL: Secret name to use to retrieve RSA Signing Key. (default "token_rsa_key.pem") |
| `--auth.appAuth.thirdPartyConfig.flyteClient.audience` | string | Audience to use when initiating OAuth2 authorization requests. |
| `--auth.appAuth.thirdPartyConfig.flyteClient.clientId` | string | public identifier for the app which handles authorization for a Flyte deployment (default "uctl") |
| `--auth.appAuth.thirdPartyConfig.flyteClient.redirectUri` | string | This is the callback uri registered with the app which handles authorization for a Flyte deployment (default "http://localhost:53593/callback") |
| `--auth.appAuth.thirdPartyConfig.flyteClient.scopes` | strings | Recommended scopes for the client to request. (default [all,offline]) |
| `--auth.disableForGrpc` | | Disables auth enforcement on Grpc Endpoints. |
| `--auth.disableForHttp` | | Disables auth enforcement on HTTP Endpoints. |
| `--auth.grpcAuthorizationHeader` | string | (default "flyte-authorization") |
| `--auth.httpAuthorizationHeader` | string | (default "flyte-authorization") |
| `--auth.httpProxyURL` | string | OPTIONAL: HTTP Proxy to be used for OAuth requests. |
| `--auth.tokenEndpointProxyPath` | string | The path used to proxy calls to the TokenURL |
| `--auth.userAuth.cookieBlockKeySecretName` | string | OPTIONAL: Secret name to use for cookie block key. (default "cookie_block_key") |
| `--auth.userAuth.cookieHashKeySecretName` | string | OPTIONAL: Secret name to use for cookie hash key. (default "cookie_hash_key") |
| `--auth.userAuth.cookieSetting.domain` | string | OPTIONAL: Allows you to set the domain attribute on the auth cookies. |
| `--auth.userAuth.cookieSetting.sameSitePolicy` | string | OPTIONAL: Allows you to declare if your cookie should be restricted to a first-party or same-site context.Wrapper around http.SameSite. (default "DefaultMode") |
| `--auth.userAuth.httpProxyURL` | string | OPTIONAL: HTTP Proxy to be used for OAuth requests. |
| `--auth.userAuth.idpQueryParameter` | string | idp query parameter used for selecting a particular IDP for doing user authentication. Eg: for Okta passing idp={IDP-ID} forces the authentication to happen with IDP-ID |
| `--auth.userAuth.openId.baseUrl` | string | |
| `--auth.userAuth.openId.clientId` | string | |
| `--auth.userAuth.openId.clientSecretFile` | string | |
| `--auth.userAuth.openId.clientSecretName` | string | (default "oidc_client_secret") |
| `--auth.userAuth.openId.scopes` | strings | (default [openid,profile]) |
| `--auth.userAuth.redirectUrl` | string | (default "/console") |
| `--authorizer.internalCommunicationConfig.enabled` | | Enables authorization decisions for internal communication. (default true) |
| `--authorizer.internalCommunicationConfig.ingressIdentity` | string | IngressIdentity used in the cluster. Needed to exclude the communication coming from ingress. (default "ingress-nginx.ingress-nginx.serviceaccount.identity.linkerd.cluster.local") |
| `--authorizer.internalCommunicationConfig.tenantUrlPatternIdentity` | string | UrlPatternIdentity of the internal tenant service endpoint identities. (default "{{ service }}.{{ org }}.serviceaccount.identity.linkerd.cluster.local") |
| `--authorizer.internalCommunicationConfig.urlPatternIdentity` | string | UrlPatternIdentity of the internal service endpoint identities. (default "{{ service }}-helmchart.{{ service }}.serviceaccount.identity.linkerd.cluster.local") |
| `--authorizer.mode` | string | (default "Active") |
| `--authorizer.organizationConfig.PolicyConfig.adminPolicyDescription` | string | description for the boilerplate admin policy (default "Contributor permissions and full admin permissions to manage users and view usage dashboards") |
| `--authorizer.organizationConfig.PolicyConfig.contributorPolicyDescription` | string | description for the boilerplate contributor policy (default "Viewer permissions and permissions to create workflows, tasks, launch plans, and executions") |
| `--authorizer.organizationConfig.PolicyConfig.defaultUserPolicyRoleType` | string | name of the role type to determine which default policy new users added to the organization should be assigned (default "Viewer") |
| `--authorizer.organizationConfig.PolicyConfig.serverlessContributorPolicyDescription` | string | description for the boilerplate serverless contributor policy (default "Viewer permissions and permissions to create workflows, tasks, launch plans, and executions") |
| `--authorizer.organizationConfig.PolicyConfig.serverlessViewerPolicyDescription` | string | description for the boilerplate serverless viewer policy (default "Permissions to view Flyte entities") |
| `--authorizer.organizationConfig.PolicyConfig.viewerPolicyDescription` | string | description for the boilerplate viewer policy (default "Permissions to view Flyte entities") |
| `--authorizer.organizationConfig.defaultPolicyCacheDuration` | string | Cache entry duration for the store of the default policy per organization (default "10m0s") |
| `--authorizer.syncRuleRefreshInterval` | string | (default "1m0s") |
| `--authorizer.type` | string | (default "UserClouds") |
| `--authorizer.userCloudsClient.cache.redis.ttl.edgeTypes` | string | Specifies how long edge types remain in the cache.. (default "30m0s") |
| `--authorizer.userCloudsClient.cache.redis.ttl.edges` | string | Specifies how long edges remain in the cache. (default "30m0s") |
| `--authorizer.userCloudsClient.cache.redis.ttl.objectTypes` | string | Specifies how long object types remain in the cache. (default "30m0s") |
| `--authorizer.userCloudsClient.cache.redis.ttl.objects` | string | Specifies how long objects remain in the cache. (default "30m0s") |
| `--authorizer.userCloudsClient.cache.type` | string | Cache type to use. (default "none") |
| `--authorizer.userCloudsClient.clientID` | string | UserClouds client id |
| `--authorizer.userCloudsClient.clientSecretName` | string | UserCloud client secret name to read from the secret manager. (default "userclouds-client-secret") |
| `--authorizer.userCloudsClient.enableLogging` | | Enable userclouds client's internal logging. Calls to post logs take 250-350 ms and will impact p99 latency, enable with caution. |
| `--authorizer.userCloudsClient.tenantID` | string | UserClouds tenant id. Should be a UUID. |
| `--authorizer.userCloudsClient.tenantUrl` | string | Something like https://{yourtenant}.tenant.userclouds.com |
| `--config` | string | config file (default is /Users/andrew/.union/config.yaml) |
| `--connection.environment` | string | |
| `--connection.region` | string | |
| `--connection.rootTenantURLPattern` | string | Pattern for tenant url. (default "dns:///{{ organization }}.cloud-staging.union.ai") |
| `--console.endpoint` | string | Endpoint of console, if different than flyte admin |
| `--database.connMaxLifeTime` | string | sets the maximum amount of time a connection may be reused (default "1h0m0s") |
| `--database.enableForeignKeyConstraintWhenMigrating` | | Whether to enable gorm foreign keys when migrating the db |
| `--database.maxIdleConnections` | int | maxIdleConnections sets the maximum number of connections in the idle connection pool. (default 10) |
| `--database.maxOpenConnections` | int | maxOpenConnections sets the maximum number of open connections to the database. (default 100) |
| `--database.postgres.dbname` | string | The database name (default "postgres") |
| `--database.postgres.debug` | | |
| `--database.postgres.host` | string | The host name of the database server (default "localhost") |
| `--database.postgres.options` | string | See http://gorm.io/docs/connecting_to_the_database.html for available options passed, in addition to the above. (default "sslmode=disable") |
| `--database.postgres.password` | string | The database password. (default "postgres") |
| `--database.postgres.passwordPath` | string | Points to the file containing the database password. |
| `--database.postgres.port` | int | The port name of the database server (default 30001) |
| `--database.postgres.readReplicaHost` | string | The host name of the read replica database server (default "localhost") |
| `--database.postgres.username` | string | The database user who is connecting to the server. (default "postgres") |
| `--database.sqlite.file` | string | The path to the file (existing or new) where the DB should be created / stored. If existing, then this will be re-used, else a new will be created |
| `--db.connectionPool.maxConnectionLifetime` | string | (default "0s") |
| `--db.connectionPool.maxIdleConnections` | int | |
| `--db.connectionPool.maxOpenConnections` | int | |
| `--db.dbname` | string | (default "postgres") |
| `--db.debug` | | |
| `--db.host` | string | (default "postgres") |
| `--db.log_level` | int | (default 4) |
| `--db.options` | string | (default "sslmode=disable") |
| `--db.password` | string | |
| `--db.passwordPath` | string | |
| `--db.port` | int | (default 5432) |
| `--db.username` | string | (default "postgres") |
| `-d`, `--domain` | string | Specifies the Flyte project's domain. |
| `--files.archive` | | Pass in archive file either an http link or local path. |
| `--files.assumableIamRole` | string | Custom assumable iam auth role to register launch plans with. |
| `--files.continueOnError` | | Continue on error when registering files. |
| `--files.destinationDirectory` | string | Location of source code in container. |
| `--files.dryRun` | | Execute command without making any modifications. |
| `--files.enableSchedule` | | Enable the schedule if the files contain schedulable launchplan. |
| `--files.force` | | Force use of version number on entities registered with flyte. |
| `--files.k8ServiceAccount` | string | Deprecated. Please use `--K8sServiceAccount`|
| `--files.k8sServiceAccount` | string | Custom kubernetes service account auth role to register launch plans with. |
| `--files.outputLocationPrefix` | string | Custom output location prefix for offloaded types (files/schemas). |
| `--files.sourceUploadPath` | string | Deprecated: Update flyte admin to avoid having to configure storage access from uctl. |
| `--files.version` | string | Version of the entity to be registered with flyte which are un-versioned after serialization. |
| `--logger.formatter.type` | string | Sets logging format type. (default "json") |
| `--logger.level` | int | Sets the minimum logging level. (default 3) |
| `--logger.mute` | | Mutes all logs regardless of severity. Intended for benchmarks/tests only. |
| `--logger.show-source` | | Includes source code location in logs. |
| `--org` | string | Organization to work on. If not set, default to user's org. |
| `--otel.file.filename` | string | Filename to store exported telemetry traces (default "/tmp/trace.txt") |
| `--otel.jaeger.endpoint` | string | Endpoint for the jaeger telemetry trace ingestor (default "http://localhost:14268/api/traces") |
| `--otel.otlpgrpc.endpoint` | string | Endpoint for the OTLP telemetry trace collector (default "http://localhost:4317") |
| `--otel.otlphttp.endpoint` | string | Endpoint for the OTLP telemetry trace collector (default "http://localhost:4318/v1/traces") |
| `--otel.sampler.parentSampler` | string | Sets the parent sampler to use for the tracer (default "always") |
| `--otel.type` | string | Sets the type of exporter to configure [noop/file/jaeger/otlpgrpc/otlphttp]. (default "noop") |
| `-o`, `--output` | string | Specifies the output type - supported formats [TABLE JSON YAML DOT DOTURL]. NOTE: dot, doturl are only supported for Workflow (default "table") |
| `--plugins.catalogcache.reader.maxItems` | int | Maximum number of entries to keep in the index. (default 10000) |
| `--plugins.catalogcache.reader.maxRetries` | int | Maximum number of retries per item. (default 3) |
| `--plugins.catalogcache.reader.workers` | int | Number of concurrent workers to start processing the queue. (default 10) |
| `--plugins.catalogcache.writer.maxItems` | int | Maximum number of entries to keep in the index. (default 10000) |
| `--plugins.catalogcache.writer.maxRetries` | int | Maximum number of retries per item. (default 3) |
| `--plugins.catalogcache.writer.workers` | int | Number of concurrent workers to start processing the queue. (default 10) |
| `-p`, `--project` | string | Specifies the Flyte project. |
| `--rediscache.passwordSecretName` | string | Name of secret with Redis password. |
| `--rediscache.primaryEndpoint` | string | Primary endpoint for the redis cache that can be used for both reads and writes. |
| `--rediscache.replicaEndpoint` | string | Replica endpoint for the redis cache that can be used for reads. |
| `--secrets.env-prefix` | string | Prefix for environment variables (default "FLYTE_SECRET_") |
| `--secrets.secrets-prefix` | string | Prefix where to look for secrets file (default "/etc/secrets") |
| `--secrets.type` | string | Sets the type of storage to configure [local]. (default "local") |
| `--server.dataProxy.download.maxExpiresIn` | string | Maximum allowed expiration duration. (default "1h0m0s") |
| `--server.dataProxy.upload.defaultFileNameLength` | int | Default length for the generated file name if not provided in the request. (default 20) |
| `--server.dataProxy.upload.maxExpiresIn` | string | Maximum allowed expiration duration. (default "1h0m0s") |
| `--server.dataProxy.upload.maxSize` | string | Maximum allowed upload size. (default "6Mi") |
| `--server.dataProxy.upload.storagePrefix` | string | Storage prefix to use for all upload requests. |
| `--server.grpc.enableGrpcLatencyMetrics` | | Enable grpc latency metrics. Note Histograms metrics can be expensive on Prometheus servers. |
| `--server.grpc.maxMessageSizeBytes` | int | The max size in bytes for incoming gRPC messages |
| `--server.grpc.port` | int | On which grpc port to serve admin (default 8089) |
| `--server.grpc.serverReflection` | | Enable GRPC Server Reflection (default true) |
| `--server.grpcPort` | int | deprecated |
| `--server.grpcServerReflection` | | deprecated |
| `--server.httpPort` | int | On which http port to serve admin (default 8088) |
| `--server.kube-config` | string | Path to kubernetes client config file, default is empty, useful for incluster config. |
| `--server.kubeClientConfig.burst` | int | Max burst rate for throttle. 0 defaults to 10 (default 25) |
| `--server.kubeClientConfig.qps` | int32 | Max QPS to the master for requests to KubeAPI. 0 defaults to 5. (default 100) |
| `--server.kubeClientConfig.timeout` | string | Max duration allowed for every request to KubeAPI before giving up. 0 implies no timeout. (default "30s") |
| `--server.master` | string | The address of the Kubernetes API server. |
| `--server.readHeaderTimeoutSeconds` | int | The amount of time allowed to read request headers. (default 32) |
| `--server.security.allowCors` | | (default true) |
| `--server.security.allowedHeaders` | strings | (default [Content-Type,flyte-authorization]) |
| `--server.security.allowedOrigins` | strings | (default [*]) |
| `--server.security.auditAccess` | | |
| `--server.security.secure` | | |
| `--server.security.ssl.certificateFile` | string | |
| `--server.security.ssl.keyFile` | string | |
| `--server.security.useAuth` | | |
| `--server.thirdPartyConfig.flyteClient.audience` | string | Audience to use when initiating OAuth2 authorization requests. |
| `--server.thirdPartyConfig.flyteClient.clientId` | string | public identifier for the app which handles authorization for a Flyte deployment |
| `--server.thirdPartyConfig.flyteClient.redirectUri` | string | This is the callback uri registered with the app which handles authorization for a Flyte deployment |
| `--server.thirdPartyConfig.flyteClient.scopes` | strings | Recommended scopes for the client to request. |
| `--server.watchService.maxActiveClusterConnections` | int | (default 5) |
| `--server.watchService.maxPageSize` | int | (default 50000) |
| `--server.watchService.nonTerminalStatusUpdatesInterval` | string | (default "1m0s") |
| `--server.watchService.pollInterval` | string | (default "1s") |
| `--sharedservice.connectPort` | string | On which connect port to serve admin (default "8080") |
| `--sharedservice.grpc.grpcMaxResponseStatusBytes` | int32 | specifies the maximum (uncompressed) size of header list that the client is prepared to accept on grpc calls (default 32000) |
| `--sharedservice.grpc.maxConcurrentStreams` | int | Limit on the number of concurrent streams to each ServerTransport. (default 100) |
| `--sharedservice.grpc.maxMessageSizeBytes` | int | Limit on the size of message that can be received on the server. (default 10485760) |
| `--sharedservice.grpcServerReflection` | | Enable GRPC Server Reflection (default true) |
| `--sharedservice.httpPort` | string | On which http port to serve admin (default "8089") |
| `--sharedservice.kubeConfig` | string | Path to kubernetes client config file. |
| `--sharedservice.master` | string | The address of the Kubernetes API server. |
| `--sharedservice.metrics.enableClientGrpcHistograms` | | Enable client grpc histograms (default true) |
| `--sharedservice.metrics.enableGrpcHistograms` | | Enable grpc histograms (default true) |
| `--sharedservice.metrics.scope` | string | Scope to emit metrics under (default "service:") |
| `--sharedservice.port` | string | On which grpc port to serve admin (default "8080") |
| `--sharedservice.profiler.enabled` | | Enable Profiler on server |
| `--sharedservice.profilerPort` | string | Profile port to start listen for pprof and metric handlers on. (default "10254") |
| `--sharedservice.security.allowCors` | | |
| `--sharedservice.security.allowLocalhostAccess` | | Whether to permit localhost unauthenticated access to the server |
| `--sharedservice.security.allowedHeaders` | strings | |
| `--sharedservice.security.allowedOrigins` | strings | |
| `--sharedservice.security.auditAccess` | | |
| `--sharedservice.security.orgOverride` | string | Override org in identity context if localhost access enabled |
| `--sharedservice.security.secure` | | |
| `--sharedservice.security.ssl.certificateAuthorityFile` | string | |
| `--sharedservice.security.ssl.certificateFile` | string | |
| `--sharedservice.security.ssl.keyFile` | string | |
| `--sharedservice.security.useAuth` | | |
| `--sharedservice.sync.syncInterval` | string | Time interval to sync (default "5m0s") |
| `--storage.cache.max_size_mbs` | int | Maximum size of the cache where the Blob store data is cached in-memory. If not specified or set to 0, cache is not used |
| `--storage.cache.target_gc_percent` | int | Sets the garbage collection target percentage. |
| `--storage.connection.access-key` | string | Access key to use. Only required when authtype is set to accesskey. |
| `--storage.connection.auth-type` | string | Auth Type to use [iam, accesskey]. (default "iam") |
| `--storage.connection.disable-ssl` | | Disables SSL connection. Should only be used for development. |
| `--storage.connection.endpoint` | string | URL for storage client to connect to. |
| `--storage.connection.region` | string | Region to connect to. (default "us-east-1") |
| `--storage.connection.secret-key` | string | Secret to use when accesskey is set. |
| `--storage.container` | string | Initial container (in s3 a bucket) to create -if it doesn't exist-.' |
| `--storage.defaultHttpClient.timeout` | string | Sets time out on the http client. (default "0s") |
| `--storage.enable-multicontainer` | | If this is true, then the container argument is overlooked and redundant. This config will automatically open new connections to new containers/buckets as they are encountered |
| `--storage.limits.maxDownloadMBs` | int | Maximum allowed download size (in MBs) per call. (default 2) |
| `--storage.stow.config` | stringToString | Configuration for stow backend. Refer to github/flyteorg/stow (default []) |
| `--storage.stow.kind` | string | Kind of Stow backend to use. Refer to github/flyteorg/stow |
| `--storage.type` | string | Sets the type of storage to configure [s3/minio/local/mem/stow]. (default "s3") |
| `--union.auth.authorizationMetadataKey` | string | Authorization Header to use when passing Access Tokens to the server (default "flyte-authorization") |
| `--union.auth.clientId` | string | Client ID |
| `--union.auth.clientSecretEnvVar` | string | Environment variable containing the client secret |
| `--union.auth.clientSecretLocation` | string | File containing the client secret |
| `--union.auth.deviceFlow.pollInterval` | string | amount of time the device flow would poll the token endpoint if auth server doesn't return a polling interval. Okta and google IDP do return an interval' (default "5s") |
| `--union.auth.deviceFlow.refreshTime` | string | grace period from the token expiry after which it would refresh the token. (default "5m0s") |
| `--union.auth.deviceFlow.timeout` | string | amount of time the device flow should complete or else it will be cancelled. (default "10m0s") |
| `--union.auth.enable` | | Whether to enable an authenticated conenction when communicating with admin. (default true) |
| `--union.auth.externalAuth.command` | strings | Command for external authentication token generation |
| `--union.auth.pkce.refreshTime` | string | grace period from the token expiry after which it would refresh the token. (default "5m0s") |
| `--union.auth.pkce.timeout` | string | Amount of time the browser session would be active for authentication from client app. (default "15s") |
| `--union.auth.scopes` | strings | List of scopes to request |
| `--union.auth.tokenRefreshWindow` | string | Max duration between token refresh attempt and token expiry. (default "1h0m0s") |
| `--union.auth.tokenUrl` | string | OPTIONAL: Your IdP's token endpoint. It'll be discovered from flyte admin's OAuth Metadata endpoint if not provided. |
| `--union.auth.type` | string | Type of OAuth2 flow used for communicating with admin. (default "Pkce") |
| `--union.cache.maxItemsCount` | int | Maximum number of items to keep in the cache before evicting. (default 1000) |
| `--union.connection.host` | string | Host to connect to (default "dns:///utt-mgdp-stg-us-east-2.cloud-staging.union.ai") |
| `--union.connection.insecure` | | Whether to connect over insecure channel |
| `--union.connection.insecureSkipVerify` | | InsecureSkipVerify controls whether a client verifies the server's certificate chain and host name.Caution: shouldn't be use for production usecases' |
| `--union.connection.keepAliveConfig.permitWithoutStream` | | If true, client sends keepalive pings even with no active RPCs. |
| `--union.connection.keepAliveConfig.time` | string | After a duration of this time if the client doesn't see any activity it pings the server to see if the transport is still alive. (default "20s") |
| `--union.connection.keepAliveConfig.timeout` | string | After having pinged for keepalive check, the client waits for a duration of Timeout and if no activity is seen even after that the connection is closed. (default "2m0s") |
| `--union.connection.maxBackoffDelay` | string | Max delay for grpc backoff (default "8s") |
| `--union.connection.maxRecvMsgSize` | int | Maximum size of a message in bytes of a gRPC message (default 10485760) |
| `--union.connection.maxRetries` | int | Max number of gRPC retries (default 4) |
| `--union.connection.minConnectTimeout` | string | Minimum timeout for establishing a connection (default "20s") |
| `--union.connection.perRetryTimeout` | string | gRPC per retry timeout (default "15s") |
| `--union.connection.serviceConfig` | string | Defines gRPC experimental JSON Service Config (default "{"loadBalancingConfig": [{"round_robin":{}}]}") |
| `--union.connection.trustedIdentityClaims.enabled` | | Enables passing of trusted claims while making inter service calls |
| `--union.connection.trustedIdentityClaims.externalIdentityClaim` | string | External identity claim of the service which is authorized to make internal service call. These are verified against userclouds actions |
| `--union.connection.trustedIdentityClaims.externalIdentityTypeClaim` | string | External identity type claim of app or user to use for the current service identity. It should be an 'app' for inter service communication |
| `--union.internalConnectionConfig.-` | stringToString | (default []) |
| `--union.internalConnectionConfig.enabled` | | Enables internal service to service communication instead of going through ingress. |
| `--union.internalConnectionConfig.urlPattern` | string | UrlPattern of the internal service endpoints. (default "{{ service }}-helmchart.{{ service }}.svc.cluster.local:80") |
| `--webhook.awsSecretManager.sidecarImage` | string | Specifies the sidecar docker image to use (default "docker.io/amazon/aws-secrets-manager-secret-sidecar:v0.1.4") |
| `--webhook.certDir` | string | Certificate directory to use to write generated certs. Defaults to /etc/webhook/certs/ (default "/etc/webhook/certs") |
| `--webhook.embeddedSecretManagerConfig.awsConfig.region` | string | AWS region |
| `--webhook.embeddedSecretManagerConfig.fileMountInitContainer.image` | string | Specifies init container image to use for mounting secrets as files. (default "busybox:1.28") |
| `--webhook.embeddedSecretManagerConfig.gcpConfig.project` | string | GCP project to be used for secret manager |
| `--webhook.embeddedSecretManagerConfig.type` | string | (default "AWS") |
| `--webhook.gcpSecretManager.sidecarImage` | string | Specifies the sidecar docker image to use (default "gcr.io/google.com/cloudsdktool/cloud-sdk:alpine") |
| `--webhook.listenPort` | int | The port to use to listen to webhook calls. Defaults to 9443 (default 9443) |
| `--webhook.localCert` | | write certs locally. Defaults to false |
| `--webhook.metrics-prefix` | string | An optional prefix for all published metrics. (default "flyte:") |
| `--webhook.secretName` | string | Secret name to write generated certs to. (default "flyte-pod-webhook") |
| `--webhook.serviceName` | string | The name of the webhook service. (default "flyte-pod-webhook") |
| `--webhook.servicePort` | int32 | The port on the service that hosting webhook. (default 443) |
| `--webhook.vaultSecretManager.role` | string | Specifies the vault role to use (default "flyte") |
=== PAGE: https://www.union.ai/docs/v1/serverless/api-reference/uctl-cli/uctl-apply/uctl-apply-clusterpoolconfig ===
# uctl apply clusterpoolconfig
Updates cluster pool config
## Synopsis
Updates cluster pool config:
```shell
$ uctl apply clusterpoolconfig [flags]
```
## Options
| Option | Type | Description |
|--------|------|-------------|
| `--clusterPoolSpecFile` | string | cluster pool spec file to be used for updating cluster pool. |
| `--dryRun` | | execute command without making any modifications. |
| `-h`, `--help` | help for clusterpoolconfig |
### Options inherited from parent commands
| Option | Type | Description |
|--------|------|-------------|
| `--admin.audience` | string | Audience to use when initiating OAuth2 authorization requests. |
| `--admin.authType` | string | Type of OAuth2 flow used for communicating with admin.ClientSecret, Pkce, ExternalCommand are valid values (default "ClientSecret") |
| `--admin.authorizationHeader` | string | Custom metadata header to pass JWT |
| `--admin.authorizationServerUrl` | string | This is the URL to your IdP's authorization server. It'll default to Endpoint |
| `--admin.caCertFilePath` | string | Use specified certificate file to verify the admin server peer. |
| `--admin.clientId` | string | Client ID (default "flytepropeller") |
| `--admin.clientSecretEnvVar` | string | Environment variable containing the client secret |
| `--admin.clientSecretLocation` | string | File containing the client secret (default "/etc/secrets/client_secret") |
| `--admin.command` | strings | Command for external authentication token generation |
| `--admin.defaultOrg` | string | OPTIONAL: Default org to use to support non-org based cli's.'. |
| `--admin.defaultServiceConfig` | string | |
| `--admin.deviceFlowConfig.pollInterval` | string | amount of time the device flow would poll the token endpoint if auth server doesn't return a polling interval. Okta and google IDP do return an interval' (default "5s") |
| `--admin.deviceFlowConfig.refreshTime` | string | grace period from the token expiry after which it would refresh the token. (default "5m0s") |
| `--admin.deviceFlowConfig.timeout` | string | amount of time the device flow should complete or else it will be cancelled. (default "10m0s") |
| `--admin.endpoint` | string | For admin types, specify where the uri of the service is located. |
| `--admin.httpProxyURL` | string | OPTIONAL: HTTP Proxy to be used for OAuth requests. |
| `--admin.insecure` | | Use insecure connection. |
| `--admin.insecureSkipVerify` | | InsecureSkipVerify controls whether a client verifies the server's certificate chain and host name.Caution: shouldn't be use for production usecases' |
| `--admin.maxBackoffDelay` | string | Max delay for grpc backoff (default "8s") |
| `--admin.maxMessageSizeBytes` | int | The max size in bytes for incoming gRPC messages |
| `--admin.maxRetries` | int | Max number of gRPC retries (default 4) |
| `--admin.perRetryTimeout` | string | gRPC per retry timeout (default "15s") |
| `--admin.pkceConfig.refreshTime` | string | grace period from the token expiry after which it would refresh the token. (default "5m0s") |
| `--admin.pkceConfig.timeout` | string | Amount of time the browser session would be active for authentication from client app. (default "2m0s") |
| `--admin.proxyCommand` | strings | Command for external proxy-authorization token generation |
| `--admin.scopes` | strings | List of scopes to request |
| `--admin.tokenRefreshWindow` | string | Max duration between token refresh attempt and token expiry. (default "0s") |
| `--admin.tokenUrl` | string | OPTIONAL: Your IdP's token endpoint. It'll be discovered from flyte admin's OAuth Metadata endpoint if not provided. |
| `--admin.useAudienceFromAdmin` | | Use Audience configured from admins public endpoint config. |
| `--admin.useAuth` | | Deprecated: Auth will be enabled/disabled based on admin's dynamically discovered information. |
| `--auth.appAuth.externalAuthServer.allowedAudience` | strings | Optional: A list of allowed audiences. If not provided, the audience is expected to be the public Uri of the service. |
| `--auth.appAuth.externalAuthServer.baseUrl` | string | This should be the base url of the authorization server that you are trying to hit. With Okta for instance, it will look something like https://company.okta.com/oauth2/abcdef123456789/ |
| `--auth.appAuth.externalAuthServer.httpProxyURL` | string | OPTIONAL: HTTP Proxy to be used for OAuth requests. |
| `--auth.appAuth.externalAuthServer.metadataUrl` | string | Optional: If the server doesn't support /.well-known/oauth-authorization-server, you can set a custom metadata url here.' |
| `--auth.appAuth.externalAuthServer.retryAttempts` | int | Optional: The number of attempted retries on a transient failure to get the OAuth metadata (default 5) |
| `--auth.appAuth.externalAuthServer.retryDelay` | string | Optional, Duration to wait between retries (default "1s") |
| `--auth.appAuth.selfAuthServer.accessTokenLifespan` | string | Defines the lifespan of issued access tokens. (default "30m0s") |
| `--auth.appAuth.selfAuthServer.authorizationCodeLifespan` | string | Defines the lifespan of issued access tokens. (default "5m0s") |
| `--auth.appAuth.selfAuthServer.claimSymmetricEncryptionKeySecretName` | string | OPTIONAL: Secret name to use to encrypt claims in authcode token. (default "claim_symmetric_key") |
| `--auth.appAuth.selfAuthServer.issuer` | string | Defines the issuer to use when issuing and validating tokens. The default value is https://{requestUri.HostAndPort}/ |
| `--auth.appAuth.selfAuthServer.oldTokenSigningRSAKeySecretName` | string | OPTIONAL: Secret name to use to retrieve Old RSA Signing Key. This can be useful during key rotation to continue to accept older tokens. (default "token_rsa_key_old.pem") |
| `--auth.appAuth.selfAuthServer.refreshTokenLifespan` | string | Defines the lifespan of issued access tokens. (default "1h0m0s") |
| `--auth.appAuth.selfAuthServer.tokenSigningRSAKeySecretName` | string | OPTIONAL: Secret name to use to retrieve RSA Signing Key. (default "token_rsa_key.pem") |
| `--auth.appAuth.thirdPartyConfig.flyteClient.audience` | string | Audience to use when initiating OAuth2 authorization requests. |
| `--auth.appAuth.thirdPartyConfig.flyteClient.clientId` | string | public identifier for the app which handles authorization for a Flyte deployment (default "uctl") |
| `--auth.appAuth.thirdPartyConfig.flyteClient.redirectUri` | string | This is the callback uri registered with the app which handles authorization for a Flyte deployment (default "http://localhost:53593/callback") |
| `--auth.appAuth.thirdPartyConfig.flyteClient.scopes` | strings | Recommended scopes for the client to request. (default [all,offline]) |
| `--auth.disableForGrpc` | | Disables auth enforcement on Grpc Endpoints. |
| `--auth.disableForHttp` | | Disables auth enforcement on HTTP Endpoints. |
| `--auth.grpcAuthorizationHeader` | string | (default "flyte-authorization") |
| `--auth.httpAuthorizationHeader` | string | (default "flyte-authorization") |
| `--auth.httpProxyURL` | string | OPTIONAL: HTTP Proxy to be used for OAuth requests. |
| `--auth.tokenEndpointProxyPath` | string | The path used to proxy calls to the TokenURL |
| `--auth.userAuth.cookieBlockKeySecretName` | string | OPTIONAL: Secret name to use for cookie block key. (default "cookie_block_key") |
| `--auth.userAuth.cookieHashKeySecretName` | string | OPTIONAL: Secret name to use for cookie hash key. (default "cookie_hash_key") |
| `--auth.userAuth.cookieSetting.domain` | string | OPTIONAL: Allows you to set the domain attribute on the auth cookies. |
| `--auth.userAuth.cookieSetting.sameSitePolicy` | string | OPTIONAL: Allows you to declare if your cookie should be restricted to a first-party or same-site context.Wrapper around http.SameSite. (default "DefaultMode") |
| `--auth.userAuth.httpProxyURL` | string | OPTIONAL: HTTP Proxy to be used for OAuth requests. |
| `--auth.userAuth.idpQueryParameter` | string | idp query parameter used for selecting a particular IDP for doing user authentication. Eg: for Okta passing idp={IDP-ID} forces the authentication to happen with IDP-ID |
| `--auth.userAuth.openId.baseUrl` | string | |
| `--auth.userAuth.openId.clientId` | string | |
| `--auth.userAuth.openId.clientSecretFile` | string | |
| `--auth.userAuth.openId.clientSecretName` | string | (default "oidc_client_secret") |
| `--auth.userAuth.openId.scopes` | strings | (default [openid,profile]) |
| `--auth.userAuth.redirectUrl` | string | (default "/console") |
| `--authorizer.internalCommunicationConfig.enabled` | | Enables authorization decisions for internal communication. (default true) |
| `--authorizer.internalCommunicationConfig.ingressIdentity` | string | IngressIdentity used in the cluster. Needed to exclude the communication coming from ingress. (default "ingress-nginx.ingress-nginx.serviceaccount.identity.linkerd.cluster.local") |
| `--authorizer.internalCommunicationConfig.tenantUrlPatternIdentity` | string | UrlPatternIdentity of the internal tenant service endpoint identities. (default "{{ service }}.{{ org }}.serviceaccount.identity.linkerd.cluster.local") |
| `--authorizer.internalCommunicationConfig.urlPatternIdentity` | string | UrlPatternIdentity of the internal service endpoint identities. (default "{{ service }}-helmchart.{{ service }}.serviceaccount.identity.linkerd.cluster.local") |
| `--authorizer.mode` | string | (default "Active") |
| `--authorizer.organizationConfig.PolicyConfig.adminPolicyDescription` | string | description for the boilerplate admin policy (default "Contributor permissions and full admin permissions to manage users and view usage dashboards") |
| `--authorizer.organizationConfig.PolicyConfig.contributorPolicyDescription` | string | description for the boilerplate contributor policy (default "Viewer permissions and permissions to create workflows, tasks, launch plans, and executions") |
| `--authorizer.organizationConfig.PolicyConfig.defaultUserPolicyRoleType` | string | name of the role type to determine which default policy new users added to the organization should be assigned (default "Viewer") |
| `--authorizer.organizationConfig.PolicyConfig.serverlessContributorPolicyDescription` | string | description for the boilerplate serverless contributor policy (default "Viewer permissions and permissions to create workflows, tasks, launch plans, and executions") |
| `--authorizer.organizationConfig.PolicyConfig.serverlessViewerPolicyDescription` | string | description for the boilerplate serverless viewer policy (default "Permissions to view Flyte entities") |
| `--authorizer.organizationConfig.PolicyConfig.viewerPolicyDescription` | string | description for the boilerplate viewer policy (default "Permissions to view Flyte entities") |
| `--authorizer.organizationConfig.defaultPolicyCacheDuration` | string | Cache entry duration for the store of the default policy per organization (default "10m0s") |
| `--authorizer.syncRuleRefreshInterval` | string | (default "1m0s") |
| `--authorizer.type` | string | (default "UserClouds") |
| `--authorizer.userCloudsClient.cache.redis.ttl.edgeTypes` | string | Specifies how long edge types remain in the cache.. (default "30m0s") |
| `--authorizer.userCloudsClient.cache.redis.ttl.edges` | string | Specifies how long edges remain in the cache. (default "30m0s") |
| `--authorizer.userCloudsClient.cache.redis.ttl.objectTypes` | string | Specifies how long object types remain in the cache. (default "30m0s") |
| `--authorizer.userCloudsClient.cache.redis.ttl.objects` | string | Specifies how long objects remain in the cache. (default "30m0s") |
| `--authorizer.userCloudsClient.cache.type` | string | Cache type to use. (default "none") |
| `--authorizer.userCloudsClient.clientID` | string | UserClouds client id |
| `--authorizer.userCloudsClient.clientSecretName` | string | UserCloud client secret name to read from the secret manager. (default "userclouds-client-secret") |
| `--authorizer.userCloudsClient.enableLogging` | | Enable userclouds client's internal logging. Calls to post logs take 250-350 ms and will impact p99 latency, enable with caution. |
| `--authorizer.userCloudsClient.tenantID` | string | UserClouds tenant id. Should be a UUID. |
| `--authorizer.userCloudsClient.tenantUrl` | string | Something like https://{yourtenant}.tenant.userclouds.com |
| `--config` | string | config file (default is /Users/andrew/.union/config.yaml) |
| `--connection.environment` | string | |
| `--connection.region` | string | |
| `--connection.rootTenantURLPattern` | string | Pattern for tenant url. (default "dns:///{{ organization }}.cloud-staging.union.ai") |
| `--console.endpoint` | string | Endpoint of console, if different than flyte admin |
| `--database.connMaxLifeTime` | string | sets the maximum amount of time a connection may be reused (default "1h0m0s") |
| `--database.enableForeignKeyConstraintWhenMigrating` | | Whether to enable gorm foreign keys when migrating the db |
| `--database.maxIdleConnections` | int | maxIdleConnections sets the maximum number of connections in the idle connection pool. (default 10) |
| `--database.maxOpenConnections` | int | maxOpenConnections sets the maximum number of open connections to the database. (default 100) |
| `--database.postgres.dbname` | string | The database name (default "postgres") |
| `--database.postgres.debug` | | |
| `--database.postgres.host` | string | The host name of the database server (default "localhost") |
| `--database.postgres.options` | string | See http://gorm.io/docs/connecting_to_the_database.html for available options passed, in addition to the above. (default "sslmode=disable") |
| `--database.postgres.password` | string | The database password. (default "postgres") |
| `--database.postgres.passwordPath` | string | Points to the file containing the database password. |
| `--database.postgres.port` | int | The port name of the database server (default 30001) |
| `--database.postgres.readReplicaHost` | string | The host name of the read replica database server (default "localhost") |
| `--database.postgres.username` | string | The database user who is connecting to the server. (default "postgres") |
| `--database.sqlite.file` | string | The path to the file (existing or new) where the DB should be created / stored. If existing, then this will be re-used, else a new will be created |
| `--db.connectionPool.maxConnectionLifetime` | string | (default "0s") |
| `--db.connectionPool.maxIdleConnections` | int | |
| `--db.connectionPool.maxOpenConnections` | int | |
| `--db.dbname` | string | (default "postgres") |
| `--db.debug` | | |
| `--db.host` | string | (default "postgres") |
| `--db.log_level` | int | (default 4) |
| `--db.options` | string | (default "sslmode=disable") |
| `--db.password` | string | |
| `--db.passwordPath` | string | |
| `--db.port` | int | (default 5432) |
| `--db.username` | string | (default "postgres") |
| `-d`, `--domain` | string | Specifies the Flyte project's domain. |
| `--files.archive` | | Pass in archive file either an http link or local path. |
| `--files.assumableIamRole` | string | Custom assumable iam auth role to register launch plans with. |
| `--files.continueOnError` | | Continue on error when registering files. |
| `--files.destinationDirectory` | string | Location of source code in container. |
| `--files.dryRun` | | Execute command without making any modifications. |
| `--files.enableSchedule` | | Enable the schedule if the files contain schedulable launchplan. |
| `--files.force` | | Force use of version number on entities registered with flyte. |
| `--files.k8ServiceAccount` | string | Deprecated. Please use `--K8sServiceAccount`|
| `--files.k8sServiceAccount` | string | Custom kubernetes service account auth role to register launch plans with. |
| `--files.outputLocationPrefix` | string | Custom output location prefix for offloaded types (files/schemas). |
| `--files.sourceUploadPath` | string | Deprecated: Update flyte admin to avoid having to configure storage access from uctl. |
| `--files.version` | string | Version of the entity to be registered with flyte which are un-versioned after serialization. |
| `--logger.formatter.type` | string | Sets logging format type. (default "json") |
| `--logger.level` | int | Sets the minimum logging level. (default 3) |
| `--logger.mute` | | Mutes all logs regardless of severity. Intended for benchmarks/tests only. |
| `--logger.show-source` | | Includes source code location in logs. |
| `--org` | string | Organization to work on. If not set, default to user's org. |
| `--otel.file.filename` | string | Filename to store exported telemetry traces (default "/tmp/trace.txt") |
| `--otel.jaeger.endpoint` | string | Endpoint for the jaeger telemetry trace ingestor (default "http://localhost:14268/api/traces") |
| `--otel.otlpgrpc.endpoint` | string | Endpoint for the OTLP telemetry trace collector (default "http://localhost:4317") |
| `--otel.otlphttp.endpoint` | string | Endpoint for the OTLP telemetry trace collector (default "http://localhost:4318/v1/traces") |
| `--otel.sampler.parentSampler` | string | Sets the parent sampler to use for the tracer (default "always") |
| `--otel.type` | string | Sets the type of exporter to configure [noop/file/jaeger/otlpgrpc/otlphttp]. (default "noop") |
| `-o`, `--output` | string | Specifies the output type - supported formats [TABLE JSON YAML DOT DOTURL]. NOTE: dot, doturl are only supported for Workflow (default "table") |
| `--plugins.catalogcache.reader.maxItems` | int | Maximum number of entries to keep in the index. (default 10000) |
| `--plugins.catalogcache.reader.maxRetries` | int | Maximum number of retries per item. (default 3) |
| `--plugins.catalogcache.reader.workers` | int | Number of concurrent workers to start processing the queue. (default 10) |
| `--plugins.catalogcache.writer.maxItems` | int | Maximum number of entries to keep in the index. (default 10000) |
| `--plugins.catalogcache.writer.maxRetries` | int | Maximum number of retries per item. (default 3) |
| `--plugins.catalogcache.writer.workers` | int | Number of concurrent workers to start processing the queue. (default 10) |
| `-p`, `--project` | string | Specifies the Flyte project. |
| `--rediscache.passwordSecretName` | string | Name of secret with Redis password. |
| `--rediscache.primaryEndpoint` | string | Primary endpoint for the redis cache that can be used for both reads and writes. |
| `--rediscache.replicaEndpoint` | string | Replica endpoint for the redis cache that can be used for reads. |
| `--secrets.env-prefix` | string | Prefix for environment variables (default "FLYTE_SECRET_") |
| `--secrets.secrets-prefix` | string | Prefix where to look for secrets file (default "/etc/secrets") |
| `--secrets.type` | string | Sets the type of storage to configure [local]. (default "local") |
| `--server.dataProxy.download.maxExpiresIn` | string | Maximum allowed expiration duration. (default "1h0m0s") |
| `--server.dataProxy.upload.defaultFileNameLength` | int | Default length for the generated file name if not provided in the request. (default 20) |
| `--server.dataProxy.upload.maxExpiresIn` | string | Maximum allowed expiration duration. (default "1h0m0s") |
| `--server.dataProxy.upload.maxSize` | string | Maximum allowed upload size. (default "6Mi") |
| `--server.dataProxy.upload.storagePrefix` | string | Storage prefix to use for all upload requests. |
| `--server.grpc.enableGrpcLatencyMetrics` | | Enable grpc latency metrics. Note Histograms metrics can be expensive on Prometheus servers. |
| `--server.grpc.maxMessageSizeBytes` | int | The max size in bytes for incoming gRPC messages |
| `--server.grpc.port` | int | On which grpc port to serve admin (default 8089) |
| `--server.grpc.serverReflection` | | Enable GRPC Server Reflection (default true) |
| `--server.grpcPort` | int | deprecated |
| `--server.grpcServerReflection` | | deprecated |
| `--server.httpPort` | int | On which http port to serve admin (default 8088) |
| `--server.kube-config` | string | Path to kubernetes client config file, default is empty, useful for incluster config. |
| `--server.kubeClientConfig.burst` | int | Max burst rate for throttle. 0 defaults to 10 (default 25) |
| `--server.kubeClientConfig.qps` | int32 | Max QPS to the master for requests to KubeAPI. 0 defaults to 5. (default 100) |
| `--server.kubeClientConfig.timeout` | string | Max duration allowed for every request to KubeAPI before giving up. 0 implies no timeout. (default "30s") |
| `--server.master` | string | The address of the Kubernetes API server. |
| `--server.readHeaderTimeoutSeconds` | int | The amount of time allowed to read request headers. (default 32) |
| `--server.security.allowCors` | | (default true) |
| `--server.security.allowedHeaders` | strings | (default [Content-Type,flyte-authorization]) |
| `--server.security.allowedOrigins` | strings | (default [*]) |
| `--server.security.auditAccess` | | |
| `--server.security.secure` | | |
| `--server.security.ssl.certificateFile` | string | |
| `--server.security.ssl.keyFile` | string | |
| `--server.security.useAuth` | | |
| `--server.thirdPartyConfig.flyteClient.audience` | string | Audience to use when initiating OAuth2 authorization requests. |
| `--server.thirdPartyConfig.flyteClient.clientId` | string | public identifier for the app which handles authorization for a Flyte deployment |
| `--server.thirdPartyConfig.flyteClient.redirectUri` | string | This is the callback uri registered with the app which handles authorization for a Flyte deployment |
| `--server.thirdPartyConfig.flyteClient.scopes` | strings | Recommended scopes for the client to request. |
| `--server.watchService.maxActiveClusterConnections` | int | (default 5) |
| `--server.watchService.maxPageSize` | int | (default 50000) |
| `--server.watchService.nonTerminalStatusUpdatesInterval` | string | (default "1m0s") |
| `--server.watchService.pollInterval` | string | (default "1s") |
| `--sharedservice.connectPort` | string | On which connect port to serve admin (default "8080") |
| `--sharedservice.grpc.grpcMaxResponseStatusBytes` | int32 | specifies the maximum (uncompressed) size of header list that the client is prepared to accept on grpc calls (default 32000) |
| `--sharedservice.grpc.maxConcurrentStreams` | int | Limit on the number of concurrent streams to each ServerTransport. (default 100) |
| `--sharedservice.grpc.maxMessageSizeBytes` | int | Limit on the size of message that can be received on the server. (default 10485760) |
| `--sharedservice.grpcServerReflection` | | Enable GRPC Server Reflection (default true) |
| `--sharedservice.httpPort` | string | On which http port to serve admin (default "8089") |
| `--sharedservice.kubeConfig` | string | Path to kubernetes client config file. |
| `--sharedservice.master` | string | The address of the Kubernetes API server. |
| `--sharedservice.metrics.enableClientGrpcHistograms` | | Enable client grpc histograms (default true) |
| `--sharedservice.metrics.enableGrpcHistograms` | | Enable grpc histograms (default true) |
| `--sharedservice.metrics.scope` | string | Scope to emit metrics under (default "service:") |
| `--sharedservice.port` | string | On which grpc port to serve admin (default "8080") |
| `--sharedservice.profiler.enabled` | | Enable Profiler on server |
| `--sharedservice.profilerPort` | string | Profile port to start listen for pprof and metric handlers on. (default "10254") |
| `--sharedservice.security.allowCors` | | |
| `--sharedservice.security.allowLocalhostAccess` | | Whether to permit localhost unauthenticated access to the server |
| `--sharedservice.security.allowedHeaders` | strings | |
| `--sharedservice.security.allowedOrigins` | strings | |
| `--sharedservice.security.auditAccess` | | |
| `--sharedservice.security.orgOverride` | string | Override org in identity context if localhost access enabled |
| `--sharedservice.security.secure` | | |
| `--sharedservice.security.ssl.certificateAuthorityFile` | string | |
| `--sharedservice.security.ssl.certificateFile` | string | |
| `--sharedservice.security.ssl.keyFile` | string | |
| `--sharedservice.security.useAuth` | | |
| `--sharedservice.sync.syncInterval` | string | Time interval to sync (default "5m0s") |
| `--storage.cache.max_size_mbs` | int | Maximum size of the cache where the Blob store data is cached in-memory. If not specified or set to 0, cache is not used |
| `--storage.cache.target_gc_percent` | int | Sets the garbage collection target percentage. |
| `--storage.connection.access-key` | string | Access key to use. Only required when authtype is set to accesskey. |
| `--storage.connection.auth-type` | string | Auth Type to use [iam, accesskey]. (default "iam") |
| `--storage.connection.disable-ssl` | | Disables SSL connection. Should only be used for development. |
| `--storage.connection.endpoint` | string | URL for storage client to connect to. |
| `--storage.connection.region` | string | Region to connect to. (default "us-east-1") |
| `--storage.connection.secret-key` | string | Secret to use when accesskey is set. |
| `--storage.container` | string | Initial container (in s3 a bucket) to create -if it doesn't exist-.' |
| `--storage.defaultHttpClient.timeout` | string | Sets time out on the http client. (default "0s") |
| `--storage.enable-multicontainer` | | If this is true, then the container argument is overlooked and redundant. This config will automatically open new connections to new containers/buckets as they are encountered |
| `--storage.limits.maxDownloadMBs` | int | Maximum allowed download size (in MBs) per call. (default 2) |
| `--storage.stow.config` | stringToString | Configuration for stow backend. Refer to github/flyteorg/stow (default []) |
| `--storage.stow.kind` | string | Kind of Stow backend to use. Refer to github/flyteorg/stow |
| `--storage.type` | string | Sets the type of storage to configure [s3/minio/local/mem/stow]. (default "s3") |
| `--union.auth.authorizationMetadataKey` | string | Authorization Header to use when passing Access Tokens to the server (default "flyte-authorization") |
| `--union.auth.clientId` | string | Client ID |
| `--union.auth.clientSecretEnvVar` | string | Environment variable containing the client secret |
| `--union.auth.clientSecretLocation` | string | File containing the client secret |
| `--union.auth.deviceFlow.pollInterval` | string | amount of time the device flow would poll the token endpoint if auth server doesn't return a polling interval. Okta and google IDP do return an interval' (default "5s") |
| `--union.auth.deviceFlow.refreshTime` | string | grace period from the token expiry after which it would refresh the token. (default "5m0s") |
| `--union.auth.deviceFlow.timeout` | string | amount of time the device flow should complete or else it will be cancelled. (default "10m0s") |
| `--union.auth.enable` | | Whether to enable an authenticated conenction when communicating with admin. (default true) |
| `--union.auth.externalAuth.command` | strings | Command for external authentication token generation |
| `--union.auth.pkce.refreshTime` | string | grace period from the token expiry after which it would refresh the token. (default "5m0s") |
| `--union.auth.pkce.timeout` | string | Amount of time the browser session would be active for authentication from client app. (default "15s") |
| `--union.auth.scopes` | strings | List of scopes to request |
| `--union.auth.tokenRefreshWindow` | string | Max duration between token refresh attempt and token expiry. (default "1h0m0s") |
| `--union.auth.tokenUrl` | string | OPTIONAL: Your IdP's token endpoint. It'll be discovered from flyte admin's OAuth Metadata endpoint if not provided. |
| `--union.auth.type` | string | Type of OAuth2 flow used for communicating with admin. (default "Pkce") |
| `--union.cache.maxItemsCount` | int | Maximum number of items to keep in the cache before evicting. (default 1000) |
| `--union.connection.host` | string | Host to connect to (default "dns:///utt-mgdp-stg-us-east-2.cloud-staging.union.ai") |
| `--union.connection.insecure` | | Whether to connect over insecure channel |
| `--union.connection.insecureSkipVerify` | | InsecureSkipVerify controls whether a client verifies the server's certificate chain and host name.Caution: shouldn't be use for production usecases' |
| `--union.connection.keepAliveConfig.permitWithoutStream` | | If true, client sends keepalive pings even with no active RPCs. |
| `--union.connection.keepAliveConfig.time` | string | After a duration of this time if the client doesn't see any activity it pings the server to see if the transport is still alive. (default "20s") |
| `--union.connection.keepAliveConfig.timeout` | string | After having pinged for keepalive check, the client waits for a duration of Timeout and if no activity is seen even after that the connection is closed. (default "2m0s") |
| `--union.connection.maxBackoffDelay` | string | Max delay for grpc backoff (default "8s") |
| `--union.connection.maxRecvMsgSize` | int | Maximum size of a message in bytes of a gRPC message (default 10485760) |
| `--union.connection.maxRetries` | int | Max number of gRPC retries (default 4) |
| `--union.connection.minConnectTimeout` | string | Minimum timeout for establishing a connection (default "20s") |
| `--union.connection.perRetryTimeout` | string | gRPC per retry timeout (default "15s") |
| `--union.connection.serviceConfig` | string | Defines gRPC experimental JSON Service Config (default "{"loadBalancingConfig": [{"round_robin":{}}]}") |
| `--union.connection.trustedIdentityClaims.enabled` | | Enables passing of trusted claims while making inter service calls |
| `--union.connection.trustedIdentityClaims.externalIdentityClaim` | string | External identity claim of the service which is authorized to make internal service call. These are verified against userclouds actions |
| `--union.connection.trustedIdentityClaims.externalIdentityTypeClaim` | string | External identity type claim of app or user to use for the current service identity. It should be an 'app' for inter service communication |
| `--union.internalConnectionConfig.-` | stringToString | (default []) |
| `--union.internalConnectionConfig.enabled` | | Enables internal service to service communication instead of going through ingress. |
| `--union.internalConnectionConfig.urlPattern` | string | UrlPattern of the internal service endpoints. (default "{{ service }}-helmchart.{{ service }}.svc.cluster.local:80") |
| `--webhook.awsSecretManager.sidecarImage` | string | Specifies the sidecar docker image to use (default "docker.io/amazon/aws-secrets-manager-secret-sidecar:v0.1.4") |
| `--webhook.certDir` | string | Certificate directory to use to write generated certs. Defaults to /etc/webhook/certs/ (default "/etc/webhook/certs") |
| `--webhook.embeddedSecretManagerConfig.awsConfig.region` | string | AWS region |
| `--webhook.embeddedSecretManagerConfig.fileMountInitContainer.image` | string | Specifies init container image to use for mounting secrets as files. (default "busybox:1.28") |
| `--webhook.embeddedSecretManagerConfig.gcpConfig.project` | string | GCP project to be used for secret manager |
| `--webhook.embeddedSecretManagerConfig.type` | string | (default "AWS") |
| `--webhook.gcpSecretManager.sidecarImage` | string | Specifies the sidecar docker image to use (default "gcr.io/google.com/cloudsdktool/cloud-sdk:alpine") |
| `--webhook.listenPort` | int | The port to use to listen to webhook calls. Defaults to 9443 (default 9443) |
| `--webhook.localCert` | | write certs locally. Defaults to false |
| `--webhook.metrics-prefix` | string | An optional prefix for all published metrics. (default "flyte:") |
| `--webhook.secretName` | string | Secret name to write generated certs to. (default "flyte-pod-webhook") |
| `--webhook.serviceName` | string | The name of the webhook service. (default "flyte-pod-webhook") |
| `--webhook.servicePort` | int32 | The port on the service that hosting webhook. (default 443) |
| `--webhook.vaultSecretManager.role` | string | Specifies the vault role to use (default "flyte") |
=== PAGE: https://www.union.ai/docs/v1/serverless/api-reference/uctl-cli/uctl-config ===
# uctl config
Runs various config commands, look at the help of this command to get a
list of available commands..
## Synopsis
Runs various config commands, look at the help of this command to get a
list of available commands..
## Options
| Option | Type | Description |
|--------|------|-------------|
| `--file` | stringArray | Passes the config file to load. |
If empty, it'll first search for the config file path then, if found, will load config from there.
| `--force` | | Force to overwrite the default config file without confirmation |
| `-h`, `--help` | help for config |
### Options inherited from parent commands
| Option | Type | Description |
|--------|------|-------------|
| `--admin.audience` | string | Audience to use when initiating OAuth2 authorization requests. |
| `--admin.authType` | string | Type of OAuth2 flow used for communicating with admin.ClientSecret, Pkce, ExternalCommand are valid values (default "ClientSecret") |
| `--admin.authorizationHeader` | string | Custom metadata header to pass JWT |
| `--admin.authorizationServerUrl` | string | This is the URL to your IdP's authorization server. It'll default to Endpoint |
| `--admin.caCertFilePath` | string | Use specified certificate file to verify the admin server peer. |
| `--admin.clientId` | string | Client ID (default "flytepropeller") |
| `--admin.clientSecretEnvVar` | string | Environment variable containing the client secret |
| `--admin.clientSecretLocation` | string | File containing the client secret (default "/etc/secrets/client_secret") |
| `--admin.command` | strings | Command for external authentication token generation |
| `--admin.defaultOrg` | string | OPTIONAL: Default org to use to support non-org based cli's.'. |
| `--admin.defaultServiceConfig` | string | |
| `--admin.deviceFlowConfig.pollInterval` | string | amount of time the device flow would poll the token endpoint if auth server doesn't return a polling interval. Okta and google IDP do return an interval' (default "5s") |
| `--admin.deviceFlowConfig.refreshTime` | string | grace period from the token expiry after which it would refresh the token. (default "5m0s") |
| `--admin.deviceFlowConfig.timeout` | string | amount of time the device flow should complete or else it will be cancelled. (default "10m0s") |
| `--admin.endpoint` | string | For admin types, specify where the uri of the service is located. |
| `--admin.httpProxyURL` | string | OPTIONAL: HTTP Proxy to be used for OAuth requests. |
| `--admin.insecure` | | Use insecure connection. |
| `--admin.insecureSkipVerify` | | InsecureSkipVerify controls whether a client verifies the server's certificate chain and host name.Caution: shouldn't be use for production usecases' |
| `--admin.maxBackoffDelay` | string | Max delay for grpc backoff (default "8s") |
| `--admin.maxMessageSizeBytes` | int | The max size in bytes for incoming gRPC messages |
| `--admin.maxRetries` | int | Max number of gRPC retries (default 4) |
| `--admin.perRetryTimeout` | string | gRPC per retry timeout (default "15s") |
| `--admin.pkceConfig.refreshTime` | string | grace period from the token expiry after which it would refresh the token. (default "5m0s") |
| `--admin.pkceConfig.timeout` | string | Amount of time the browser session would be active for authentication from client app. (default "2m0s") |
| `--admin.proxyCommand` | strings | Command for external proxy-authorization token generation |
| `--admin.scopes` | strings | List of scopes to request |
| `--admin.tokenRefreshWindow` | string | Max duration between token refresh attempt and token expiry. (default "0s") |
| `--admin.tokenUrl` | string | OPTIONAL: Your IdP's token endpoint. It'll be discovered from flyte admin's OAuth Metadata endpoint if not provided. |
| `--admin.useAudienceFromAdmin` | | Use Audience configured from admins public endpoint config. |
| `--admin.useAuth` | | Deprecated: Auth will be enabled/disabled based on admin's dynamically discovered information. |
| `--auth.appAuth.externalAuthServer.allowedAudience` | strings | Optional: A list of allowed audiences. If not provided, the audience is expected to be the public Uri of the service. |
| `--auth.appAuth.externalAuthServer.baseUrl` | string | This should be the base url of the authorization server that you are trying to hit. With Okta for instance, it will look something like https://company.okta.com/oauth2/abcdef123456789/ |
| `--auth.appAuth.externalAuthServer.httpProxyURL` | string | OPTIONAL: HTTP Proxy to be used for OAuth requests. |
| `--auth.appAuth.externalAuthServer.metadataUrl` | string | Optional: If the server doesn't support /.well-known/oauth-authorization-server, you can set a custom metadata url here.' |
| `--auth.appAuth.externalAuthServer.retryAttempts` | int | Optional: The number of attempted retries on a transient failure to get the OAuth metadata (default 5) |
| `--auth.appAuth.externalAuthServer.retryDelay` | string | Optional, Duration to wait between retries (default "1s") |
| `--auth.appAuth.selfAuthServer.accessTokenLifespan` | string | Defines the lifespan of issued access tokens. (default "30m0s") |
| `--auth.appAuth.selfAuthServer.authorizationCodeLifespan` | string | Defines the lifespan of issued access tokens. (default "5m0s") |
| `--auth.appAuth.selfAuthServer.claimSymmetricEncryptionKeySecretName` | string | OPTIONAL: Secret name to use to encrypt claims in authcode token. (default "claim_symmetric_key") |
| `--auth.appAuth.selfAuthServer.issuer` | string | Defines the issuer to use when issuing and validating tokens. The default value is https://{requestUri.HostAndPort}/ |
| `--auth.appAuth.selfAuthServer.oldTokenSigningRSAKeySecretName` | string | OPTIONAL: Secret name to use to retrieve Old RSA Signing Key. This can be useful during key rotation to continue to accept older tokens. (default "token_rsa_key_old.pem") |
| `--auth.appAuth.selfAuthServer.refreshTokenLifespan` | string | Defines the lifespan of issued access tokens. (default "1h0m0s") |
| `--auth.appAuth.selfAuthServer.tokenSigningRSAKeySecretName` | string | OPTIONAL: Secret name to use to retrieve RSA Signing Key. (default "token_rsa_key.pem") |
| `--auth.appAuth.thirdPartyConfig.flyteClient.audience` | string | Audience to use when initiating OAuth2 authorization requests. |
| `--auth.appAuth.thirdPartyConfig.flyteClient.clientId` | string | public identifier for the app which handles authorization for a Flyte deployment (default "uctl") |
| `--auth.appAuth.thirdPartyConfig.flyteClient.redirectUri` | string | This is the callback uri registered with the app which handles authorization for a Flyte deployment (default "http://localhost:53593/callback") |
| `--auth.appAuth.thirdPartyConfig.flyteClient.scopes` | strings | Recommended scopes for the client to request. (default [all,offline]) |
| `--auth.disableForGrpc` | | Disables auth enforcement on Grpc Endpoints. |
| `--auth.disableForHttp` | | Disables auth enforcement on HTTP Endpoints. |
| `--auth.grpcAuthorizationHeader` | string | (default "flyte-authorization") |
| `--auth.httpAuthorizationHeader` | string | (default "flyte-authorization") |
| `--auth.httpProxyURL` | string | OPTIONAL: HTTP Proxy to be used for OAuth requests. |
| `--auth.tokenEndpointProxyPath` | string | The path used to proxy calls to the TokenURL |
| `--auth.userAuth.cookieBlockKeySecretName` | string | OPTIONAL: Secret name to use for cookie block key. (default "cookie_block_key") |
| `--auth.userAuth.cookieHashKeySecretName` | string | OPTIONAL: Secret name to use for cookie hash key. (default "cookie_hash_key") |
| `--auth.userAuth.cookieSetting.domain` | string | OPTIONAL: Allows you to set the domain attribute on the auth cookies. |
| `--auth.userAuth.cookieSetting.sameSitePolicy` | string | OPTIONAL: Allows you to declare if your cookie should be restricted to a first-party or same-site context.Wrapper around http.SameSite. (default "DefaultMode") |
| `--auth.userAuth.httpProxyURL` | string | OPTIONAL: HTTP Proxy to be used for OAuth requests. |
| `--auth.userAuth.idpQueryParameter` | string | idp query parameter used for selecting a particular IDP for doing user authentication. Eg: for Okta passing idp={IDP-ID} forces the authentication to happen with IDP-ID |
| `--auth.userAuth.openId.baseUrl` | string | |
| `--auth.userAuth.openId.clientId` | string | |
| `--auth.userAuth.openId.clientSecretFile` | string | |
| `--auth.userAuth.openId.clientSecretName` | string | (default "oidc_client_secret") |
| `--auth.userAuth.openId.scopes` | strings | (default [openid,profile]) |
| `--auth.userAuth.redirectUrl` | string | (default "/console") |
| `--authorizer.internalCommunicationConfig.enabled` | | Enables authorization decisions for internal communication. (default true) |
| `--authorizer.internalCommunicationConfig.ingressIdentity` | string | IngressIdentity used in the cluster. Needed to exclude the communication coming from ingress. (default "ingress-nginx.ingress-nginx.serviceaccount.identity.linkerd.cluster.local") |
| `--authorizer.internalCommunicationConfig.tenantUrlPatternIdentity` | string | UrlPatternIdentity of the internal tenant service endpoint identities. (default "{{ service }}.{{ org }}.serviceaccount.identity.linkerd.cluster.local") |
| `--authorizer.internalCommunicationConfig.urlPatternIdentity` | string | UrlPatternIdentity of the internal service endpoint identities. (default "{{ service }}-helmchart.{{ service }}.serviceaccount.identity.linkerd.cluster.local") |
| `--authorizer.mode` | string | (default "Active") |
| `--authorizer.organizationConfig.PolicyConfig.adminPolicyDescription` | string | description for the boilerplate admin policy (default "Contributor permissions and full admin permissions to manage users and view usage dashboards") |
| `--authorizer.organizationConfig.PolicyConfig.contributorPolicyDescription` | string | description for the boilerplate contributor policy (default "Viewer permissions and permissions to create workflows, tasks, launch plans, and executions") |
| `--authorizer.organizationConfig.PolicyConfig.defaultUserPolicyRoleType` | string | name of the role type to determine which default policy new users added to the organization should be assigned (default "Viewer") |
| `--authorizer.organizationConfig.PolicyConfig.serverlessContributorPolicyDescription` | string | description for the boilerplate serverless contributor policy (default "Viewer permissions and permissions to create workflows, tasks, launch plans, and executions") |
| `--authorizer.organizationConfig.PolicyConfig.serverlessViewerPolicyDescription` | string | description for the boilerplate serverless viewer policy (default "Permissions to view Flyte entities") |
| `--authorizer.organizationConfig.PolicyConfig.viewerPolicyDescription` | string | description for the boilerplate viewer policy (default "Permissions to view Flyte entities") |
| `--authorizer.organizationConfig.defaultPolicyCacheDuration` | string | Cache entry duration for the store of the default policy per organization (default "10m0s") |
| `--authorizer.syncRuleRefreshInterval` | string | (default "1m0s") |
| `--authorizer.type` | string | (default "UserClouds") |
| `--authorizer.userCloudsClient.cache.redis.ttl.edgeTypes` | string | Specifies how long edge types remain in the cache.. (default "30m0s") |
| `--authorizer.userCloudsClient.cache.redis.ttl.edges` | string | Specifies how long edges remain in the cache. (default "30m0s") |
| `--authorizer.userCloudsClient.cache.redis.ttl.objectTypes` | string | Specifies how long object types remain in the cache. (default "30m0s") |
| `--authorizer.userCloudsClient.cache.redis.ttl.objects` | string | Specifies how long objects remain in the cache. (default "30m0s") |
| `--authorizer.userCloudsClient.cache.type` | string | Cache type to use. (default "none") |
| `--authorizer.userCloudsClient.clientID` | string | UserClouds client id |
| `--authorizer.userCloudsClient.clientSecretName` | string | UserCloud client secret name to read from the secret manager. (default "userclouds-client-secret") |
| `--authorizer.userCloudsClient.enableLogging` | | Enable userclouds client's internal logging. Calls to post logs take 250-350 ms and will impact p99 latency, enable with caution. |
| `--authorizer.userCloudsClient.tenantID` | string | UserClouds tenant id. Should be a UUID. |
| `--authorizer.userCloudsClient.tenantUrl` | string | Something like https://{yourtenant}.tenant.userclouds.com |
| `--config` | string | config file (default is /Users/andrew/.union/config.yaml) |
| `--connection.environment` | string | |
| `--connection.region` | string | |
| `--connection.rootTenantURLPattern` | string | Pattern for tenant url. (default "dns:///{{ organization }}.cloud-staging.union.ai") |
| `--console.endpoint` | string | Endpoint of console, if different than flyte admin |
| `--database.connMaxLifeTime` | string | sets the maximum amount of time a connection may be reused (default "1h0m0s") |
| `--database.enableForeignKeyConstraintWhenMigrating` | | Whether to enable gorm foreign keys when migrating the db |
| `--database.maxIdleConnections` | int | maxIdleConnections sets the maximum number of connections in the idle connection pool. (default 10) |
| `--database.maxOpenConnections` | int | maxOpenConnections sets the maximum number of open connections to the database. (default 100) |
| `--database.postgres.dbname` | string | The database name (default "postgres") |
| `--database.postgres.debug` | | |
| `--database.postgres.host` | string | The host name of the database server (default "localhost") |
| `--database.postgres.options` | string | See http://gorm.io/docs/connecting_to_the_database.html for available options passed, in addition to the above. (default "sslmode=disable") |
| `--database.postgres.password` | string | The database password. (default "postgres") |
| `--database.postgres.passwordPath` | string | Points to the file containing the database password. |
| `--database.postgres.port` | int | The port name of the database server (default 30001) |
| `--database.postgres.readReplicaHost` | string | The host name of the read replica database server (default "localhost") |
| `--database.postgres.username` | string | The database user who is connecting to the server. (default "postgres") |
| `--database.sqlite.file` | string | The path to the file (existing or new) where the DB should be created / stored. If existing, then this will be re-used, else a new will be created |
| `--db.connectionPool.maxConnectionLifetime` | string | (default "0s") |
| `--db.connectionPool.maxIdleConnections` | int | |
| `--db.connectionPool.maxOpenConnections` | int | |
| `--db.dbname` | string | (default "postgres") |
| `--db.debug` | | |
| `--db.host` | string | (default "postgres") |
| `--db.log_level` | int | (default 4) |
| `--db.options` | string | (default "sslmode=disable") |
| `--db.password` | string | |
| `--db.passwordPath` | string | |
| `--db.port` | int | (default 5432) |
| `--db.username` | string | (default "postgres") |
| `-d`, `--domain` | string | Specifies the Flyte project's domain. |
| `--files.archive` | | Pass in archive file either an http link or local path. |
| `--files.assumableIamRole` | string | Custom assumable iam auth role to register launch plans with. |
| `--files.continueOnError` | | Continue on error when registering files. |
| `--files.destinationDirectory` | string | Location of source code in container. |
| `--files.dryRun` | | Execute command without making any modifications. |
| `--files.enableSchedule` | | Enable the schedule if the files contain schedulable launchplan. |
| `--files.force` | | Force use of version number on entities registered with flyte. |
| `--files.k8ServiceAccount` | string | Deprecated. Please use `--K8sServiceAccount`|
| `--files.k8sServiceAccount` | string | Custom kubernetes service account auth role to register launch plans with. |
| `--files.outputLocationPrefix` | string | Custom output location prefix for offloaded types (files/schemas). |
| `--files.sourceUploadPath` | string | Deprecated: Update flyte admin to avoid having to configure storage access from uctl. |
| `--files.version` | string | Version of the entity to be registered with flyte which are un-versioned after serialization. |
| `--logger.formatter.type` | string | Sets logging format type. (default "json") |
| `--logger.level` | int | Sets the minimum logging level. (default 3) |
| `--logger.mute` | | Mutes all logs regardless of severity. Intended for benchmarks/tests only. |
| `--logger.show-source` | | Includes source code location in logs. |
| `--org` | string | Organization to work on. If not set, default to user's org. |
| `--otel.file.filename` | string | Filename to store exported telemetry traces (default "/tmp/trace.txt") |
| `--otel.jaeger.endpoint` | string | Endpoint for the jaeger telemetry trace ingestor (default "http://localhost:14268/api/traces") |
| `--otel.otlpgrpc.endpoint` | string | Endpoint for the OTLP telemetry trace collector (default "http://localhost:4317") |
| `--otel.otlphttp.endpoint` | string | Endpoint for the OTLP telemetry trace collector (default "http://localhost:4318/v1/traces") |
| `--otel.sampler.parentSampler` | string | Sets the parent sampler to use for the tracer (default "always") |
| `--otel.type` | string | Sets the type of exporter to configure [noop/file/jaeger/otlpgrpc/otlphttp]. (default "noop") |
| `-o`, `--output` | string | Specifies the output type - supported formats [TABLE JSON YAML DOT DOTURL]. NOTE: dot, doturl are only supported for Workflow (default "table") |
| `--plugins.catalogcache.reader.maxItems` | int | Maximum number of entries to keep in the index. (default 10000) |
| `--plugins.catalogcache.reader.maxRetries` | int | Maximum number of retries per item. (default 3) |
| `--plugins.catalogcache.reader.workers` | int | Number of concurrent workers to start processing the queue. (default 10) |
| `--plugins.catalogcache.writer.maxItems` | int | Maximum number of entries to keep in the index. (default 10000) |
| `--plugins.catalogcache.writer.maxRetries` | int | Maximum number of retries per item. (default 3) |
| `--plugins.catalogcache.writer.workers` | int | Number of concurrent workers to start processing the queue. (default 10) |
| `-p`, `--project` | string | Specifies the Flyte project. |
| `--rediscache.passwordSecretName` | string | Name of secret with Redis password. |
| `--rediscache.primaryEndpoint` | string | Primary endpoint for the redis cache that can be used for both reads and writes. |
| `--rediscache.replicaEndpoint` | string | Replica endpoint for the redis cache that can be used for reads. |
| `--secrets.env-prefix` | string | Prefix for environment variables (default "FLYTE_SECRET_") |
| `--secrets.secrets-prefix` | string | Prefix where to look for secrets file (default "/etc/secrets") |
| `--secrets.type` | string | Sets the type of storage to configure [local]. (default "local") |
| `--server.dataProxy.download.maxExpiresIn` | string | Maximum allowed expiration duration. (default "1h0m0s") |
| `--server.dataProxy.upload.defaultFileNameLength` | int | Default length for the generated file name if not provided in the request. (default 20) |
| `--server.dataProxy.upload.maxExpiresIn` | string | Maximum allowed expiration duration. (default "1h0m0s") |
| `--server.dataProxy.upload.maxSize` | string | Maximum allowed upload size. (default "6Mi") |
| `--server.dataProxy.upload.storagePrefix` | string | Storage prefix to use for all upload requests. |
| `--server.grpc.enableGrpcLatencyMetrics` | | Enable grpc latency metrics. Note Histograms metrics can be expensive on Prometheus servers. |
| `--server.grpc.maxMessageSizeBytes` | int | The max size in bytes for incoming gRPC messages |
| `--server.grpc.port` | int | On which grpc port to serve admin (default 8089) |
| `--server.grpc.serverReflection` | | Enable GRPC Server Reflection (default true) |
| `--server.grpcPort` | int | deprecated |
| `--server.grpcServerReflection` | | deprecated |
| `--server.httpPort` | int | On which http port to serve admin (default 8088) |
| `--server.kube-config` | string | Path to kubernetes client config file, default is empty, useful for incluster config. |
| `--server.kubeClientConfig.burst` | int | Max burst rate for throttle. 0 defaults to 10 (default 25) |
| `--server.kubeClientConfig.qps` | int32 | Max QPS to the master for requests to KubeAPI. 0 defaults to 5. (default 100) |
| `--server.kubeClientConfig.timeout` | string | Max duration allowed for every request to KubeAPI before giving up. 0 implies no timeout. (default "30s") |
| `--server.master` | string | The address of the Kubernetes API server. |
| `--server.readHeaderTimeoutSeconds` | int | The amount of time allowed to read request headers. (default 32) |
| `--server.security.allowCors` | | (default true) |
| `--server.security.allowedHeaders` | strings | (default [Content-Type,flyte-authorization]) |
| `--server.security.allowedOrigins` | strings | (default [*]) |
| `--server.security.auditAccess` | | |
| `--server.security.secure` | | |
| `--server.security.ssl.certificateFile` | string | |
| `--server.security.ssl.keyFile` | string | |
| `--server.security.useAuth` | | |
| `--server.thirdPartyConfig.flyteClient.audience` | string | Audience to use when initiating OAuth2 authorization requests. |
| `--server.thirdPartyConfig.flyteClient.clientId` | string | public identifier for the app which handles authorization for a Flyte deployment |
| `--server.thirdPartyConfig.flyteClient.redirectUri` | string | This is the callback uri registered with the app which handles authorization for a Flyte deployment |
| `--server.thirdPartyConfig.flyteClient.scopes` | strings | Recommended scopes for the client to request. |
| `--server.watchService.maxActiveClusterConnections` | int | (default 5) |
| `--server.watchService.maxPageSize` | int | (default 50000) |
| `--server.watchService.nonTerminalStatusUpdatesInterval` | string | (default "1m0s") |
| `--server.watchService.pollInterval` | string | (default "1s") |
| `--sharedservice.connectPort` | string | On which connect port to serve admin (default "8080") |
| `--sharedservice.grpc.grpcMaxResponseStatusBytes` | int32 | specifies the maximum (uncompressed) size of header list that the client is prepared to accept on grpc calls (default 32000) |
| `--sharedservice.grpc.maxConcurrentStreams` | int | Limit on the number of concurrent streams to each ServerTransport. (default 100) |
| `--sharedservice.grpc.maxMessageSizeBytes` | int | Limit on the size of message that can be received on the server. (default 10485760) |
| `--sharedservice.grpcServerReflection` | | Enable GRPC Server Reflection (default true) |
| `--sharedservice.httpPort` | string | On which http port to serve admin (default "8089") |
| `--sharedservice.kubeConfig` | string | Path to kubernetes client config file. |
| `--sharedservice.master` | string | The address of the Kubernetes API server. |
| `--sharedservice.metrics.enableClientGrpcHistograms` | | Enable client grpc histograms (default true) |
| `--sharedservice.metrics.enableGrpcHistograms` | | Enable grpc histograms (default true) |
| `--sharedservice.metrics.scope` | string | Scope to emit metrics under (default "service:") |
| `--sharedservice.port` | string | On which grpc port to serve admin (default "8080") |
| `--sharedservice.profiler.enabled` | | Enable Profiler on server |
| `--sharedservice.profilerPort` | string | Profile port to start listen for pprof and metric handlers on. (default "10254") |
| `--sharedservice.security.allowCors` | | |
| `--sharedservice.security.allowLocalhostAccess` | | Whether to permit localhost unauthenticated access to the server |
| `--sharedservice.security.allowedHeaders` | strings | |
| `--sharedservice.security.allowedOrigins` | strings | |
| `--sharedservice.security.auditAccess` | | |
| `--sharedservice.security.orgOverride` | string | Override org in identity context if localhost access enabled |
| `--sharedservice.security.secure` | | |
| `--sharedservice.security.ssl.certificateAuthorityFile` | string | |
| `--sharedservice.security.ssl.certificateFile` | string | |
| `--sharedservice.security.ssl.keyFile` | string | |
| `--sharedservice.security.useAuth` | | |
| `--sharedservice.sync.syncInterval` | string | Time interval to sync (default "5m0s") |
| `--storage.cache.max_size_mbs` | int | Maximum size of the cache where the Blob store data is cached in-memory. If not specified or set to 0, cache is not used |
| `--storage.cache.target_gc_percent` | int | Sets the garbage collection target percentage. |
| `--storage.connection.access-key` | string | Access key to use. Only required when authtype is set to accesskey. |
| `--storage.connection.auth-type` | string | Auth Type to use [iam, accesskey]. (default "iam") |
| `--storage.connection.disable-ssl` | | Disables SSL connection. Should only be used for development. |
| `--storage.connection.endpoint` | string | URL for storage client to connect to. |
| `--storage.connection.region` | string | Region to connect to. (default "us-east-1") |
| `--storage.connection.secret-key` | string | Secret to use when accesskey is set. |
| `--storage.container` | string | Initial container (in s3 a bucket) to create -if it doesn't exist-.' |
| `--storage.defaultHttpClient.timeout` | string | Sets time out on the http client. (default "0s") |
| `--storage.enable-multicontainer` | | If this is true, then the container argument is overlooked and redundant. This config will automatically open new connections to new containers/buckets as they are encountered |
| `--storage.limits.maxDownloadMBs` | int | Maximum allowed download size (in MBs) per call. (default 2) |
| `--storage.stow.config` | stringToString | Configuration for stow backend. Refer to github/flyteorg/stow (default []) |
| `--storage.stow.kind` | string | Kind of Stow backend to use. Refer to github/flyteorg/stow |
| `--storage.type` | string | Sets the type of storage to configure [s3/minio/local/mem/stow]. (default "s3") |
| `--union.auth.authorizationMetadataKey` | string | Authorization Header to use when passing Access Tokens to the server (default "flyte-authorization") |
| `--union.auth.clientId` | string | Client ID |
| `--union.auth.clientSecretEnvVar` | string | Environment variable containing the client secret |
| `--union.auth.clientSecretLocation` | string | File containing the client secret |
| `--union.auth.deviceFlow.pollInterval` | string | amount of time the device flow would poll the token endpoint if auth server doesn't return a polling interval. Okta and google IDP do return an interval' (default "5s") |
| `--union.auth.deviceFlow.refreshTime` | string | grace period from the token expiry after which it would refresh the token. (default "5m0s") |
| `--union.auth.deviceFlow.timeout` | string | amount of time the device flow should complete or else it will be cancelled. (default "10m0s") |
| `--union.auth.enable` | | Whether to enable an authenticated conenction when communicating with admin. (default true) |
| `--union.auth.externalAuth.command` | strings | Command for external authentication token generation |
| `--union.auth.pkce.refreshTime` | string | grace period from the token expiry after which it would refresh the token. (default "5m0s") |
| `--union.auth.pkce.timeout` | string | Amount of time the browser session would be active for authentication from client app. (default "15s") |
| `--union.auth.scopes` | strings | List of scopes to request |
| `--union.auth.tokenRefreshWindow` | string | Max duration between token refresh attempt and token expiry. (default "1h0m0s") |
| `--union.auth.tokenUrl` | string | OPTIONAL: Your IdP's token endpoint. It'll be discovered from flyte admin's OAuth Metadata endpoint if not provided. |
| `--union.auth.type` | string | Type of OAuth2 flow used for communicating with admin. (default "Pkce") |
| `--union.cache.maxItemsCount` | int | Maximum number of items to keep in the cache before evicting. (default 1000) |
| `--union.connection.host` | string | Host to connect to (default "dns:///utt-mgdp-stg-us-east-2.cloud-staging.union.ai") |
| `--union.connection.insecure` | | Whether to connect over insecure channel |
| `--union.connection.insecureSkipVerify` | | InsecureSkipVerify controls whether a client verifies the server's certificate chain and host name.Caution: shouldn't be use for production usecases' |
| `--union.connection.keepAliveConfig.permitWithoutStream` | | If true, client sends keepalive pings even with no active RPCs. |
| `--union.connection.keepAliveConfig.time` | string | After a duration of this time if the client doesn't see any activity it pings the server to see if the transport is still alive. (default "20s") |
| `--union.connection.keepAliveConfig.timeout` | string | After having pinged for keepalive check, the client waits for a duration of Timeout and if no activity is seen even after that the connection is closed. (default "2m0s") |
| `--union.connection.maxBackoffDelay` | string | Max delay for grpc backoff (default "8s") |
| `--union.connection.maxRecvMsgSize` | int | Maximum size of a message in bytes of a gRPC message (default 10485760) |
| `--union.connection.maxRetries` | int | Max number of gRPC retries (default 4) |
| `--union.connection.minConnectTimeout` | string | Minimum timeout for establishing a connection (default "20s") |
| `--union.connection.perRetryTimeout` | string | gRPC per retry timeout (default "15s") |
| `--union.connection.serviceConfig` | string | Defines gRPC experimental JSON Service Config (default "{"loadBalancingConfig": [{"round_robin":{}}]}") |
| `--union.connection.trustedIdentityClaims.enabled` | | Enables passing of trusted claims while making inter service calls |
| `--union.connection.trustedIdentityClaims.externalIdentityClaim` | string | External identity claim of the service which is authorized to make internal service call. These are verified against userclouds actions |
| `--union.connection.trustedIdentityClaims.externalIdentityTypeClaim` | string | External identity type claim of app or user to use for the current service identity. It should be an 'app' for inter service communication |
| `--union.internalConnectionConfig.-` | stringToString | (default []) |
| `--union.internalConnectionConfig.enabled` | | Enables internal service to service communication instead of going through ingress. |
| `--union.internalConnectionConfig.urlPattern` | string | UrlPattern of the internal service endpoints. (default "{{ service }}-helmchart.{{ service }}.svc.cluster.local:80") |
| `--webhook.awsSecretManager.sidecarImage` | string | Specifies the sidecar docker image to use (default "docker.io/amazon/aws-secrets-manager-secret-sidecar:v0.1.4") |
| `--webhook.certDir` | string | Certificate directory to use to write generated certs. Defaults to /etc/webhook/certs/ (default "/etc/webhook/certs") |
| `--webhook.embeddedSecretManagerConfig.awsConfig.region` | string | AWS region |
| `--webhook.embeddedSecretManagerConfig.fileMountInitContainer.image` | string | Specifies init container image to use for mounting secrets as files. (default "busybox:1.28") |
| `--webhook.embeddedSecretManagerConfig.gcpConfig.project` | string | GCP project to be used for secret manager |
| `--webhook.embeddedSecretManagerConfig.type` | string | (default "AWS") |
| `--webhook.gcpSecretManager.sidecarImage` | string | Specifies the sidecar docker image to use (default "gcr.io/google.com/cloudsdktool/cloud-sdk:alpine") |
| `--webhook.listenPort` | int | The port to use to listen to webhook calls. Defaults to 9443 (default 9443) |
| `--webhook.localCert` | | write certs locally. Defaults to false |
| `--webhook.metrics-prefix` | string | An optional prefix for all published metrics. (default "flyte:") |
| `--webhook.secretName` | string | Secret name to write generated certs to. (default "flyte-pod-webhook") |
| `--webhook.serviceName` | string | The name of the webhook service. (default "flyte-pod-webhook") |
| `--webhook.servicePort` | int32 | The port on the service that hosting webhook. (default 443) |
| `--webhook.vaultSecretManager.role` | string | Specifies the vault role to use (default "flyte") |
## Subpages
- **Uctl CLI > uctl config > uctl config discover**
- **Uctl CLI > uctl config > uctl config docs**
- **Uctl CLI > uctl config > uctl config init**
- **Uctl CLI > uctl config > uctl config validate**
=== PAGE: https://www.union.ai/docs/v1/serverless/api-reference/uctl-cli/uctl-config/uctl-config-discover ===
# uctl config discover
Searches for a config in one of the default search paths.
## Synopsis
Searches for a config in one of the default search paths.
```shell
$ uctl config discover [flags]
```
## Options
| Option | Type | Description |
|--------|------|-------------|
| `-h`, `--help` | help for discover |
### Options inherited from parent commands
| Option | Type | Description |
|--------|------|-------------|
| `--admin.audience` | string | Audience to use when initiating OAuth2 authorization requests. |
| `--admin.authType` | string | Type of OAuth2 flow used for communicating with admin.ClientSecret, Pkce, ExternalCommand are valid values (default "ClientSecret") |
| `--admin.authorizationHeader` | string | Custom metadata header to pass JWT |
| `--admin.authorizationServerUrl` | string | This is the URL to your IdP's authorization server. It'll default to Endpoint |
| `--admin.caCertFilePath` | string | Use specified certificate file to verify the admin server peer. |
| `--admin.clientId` | string | Client ID (default "flytepropeller") |
| `--admin.clientSecretEnvVar` | string | Environment variable containing the client secret |
| `--admin.clientSecretLocation` | string | File containing the client secret (default "/etc/secrets/client_secret") |
| `--admin.command` | strings | Command for external authentication token generation |
| `--admin.defaultOrg` | string | OPTIONAL: Default org to use to support non-org based cli's.'. |
| `--admin.defaultServiceConfig` | string | |
| `--admin.deviceFlowConfig.pollInterval` | string | amount of time the device flow would poll the token endpoint if auth server doesn't return a polling interval. Okta and google IDP do return an interval' (default "5s") |
| `--admin.deviceFlowConfig.refreshTime` | string | grace period from the token expiry after which it would refresh the token. (default "5m0s") |
| `--admin.deviceFlowConfig.timeout` | string | amount of time the device flow should complete or else it will be cancelled. (default "10m0s") |
| `--admin.endpoint` | string | For admin types, specify where the uri of the service is located. |
| `--admin.httpProxyURL` | string | OPTIONAL: HTTP Proxy to be used for OAuth requests. |
| `--admin.insecure` | | Use insecure connection. |
| `--admin.insecureSkipVerify` | | InsecureSkipVerify controls whether a client verifies the server's certificate chain and host name.Caution: shouldn't be use for production usecases' |
| `--admin.maxBackoffDelay` | string | Max delay for grpc backoff (default "8s") |
| `--admin.maxMessageSizeBytes` | int | The max size in bytes for incoming gRPC messages |
| `--admin.maxRetries` | int | Max number of gRPC retries (default 4) |
| `--admin.perRetryTimeout` | string | gRPC per retry timeout (default "15s") |
| `--admin.pkceConfig.refreshTime` | string | grace period from the token expiry after which it would refresh the token. (default "5m0s") |
| `--admin.pkceConfig.timeout` | string | Amount of time the browser session would be active for authentication from client app. (default "2m0s") |
| `--admin.proxyCommand` | strings | Command for external proxy-authorization token generation |
| `--admin.scopes` | strings | List of scopes to request |
| `--admin.tokenRefreshWindow` | string | Max duration between token refresh attempt and token expiry. (default "0s") |
| `--admin.tokenUrl` | string | OPTIONAL: Your IdP's token endpoint. It'll be discovered from flyte admin's OAuth Metadata endpoint if not provided. |
| `--admin.useAudienceFromAdmin` | | Use Audience configured from admins public endpoint config. |
| `--admin.useAuth` | | Deprecated: Auth will be enabled/disabled based on admin's dynamically discovered information. |
| `--auth.appAuth.externalAuthServer.allowedAudience` | strings | Optional: A list of allowed audiences. If not provided, the audience is expected to be the public Uri of the service. |
| `--auth.appAuth.externalAuthServer.baseUrl` | string | This should be the base url of the authorization server that you are trying to hit. With Okta for instance, it will look something like https://company.okta.com/oauth2/abcdef123456789/ |
| `--auth.appAuth.externalAuthServer.httpProxyURL` | string | OPTIONAL: HTTP Proxy to be used for OAuth requests. |
| `--auth.appAuth.externalAuthServer.metadataUrl` | string | Optional: If the server doesn't support /.well-known/oauth-authorization-server, you can set a custom metadata url here.' |
| `--auth.appAuth.externalAuthServer.retryAttempts` | int | Optional: The number of attempted retries on a transient failure to get the OAuth metadata (default 5) |
| `--auth.appAuth.externalAuthServer.retryDelay` | string | Optional, Duration to wait between retries (default "1s") |
| `--auth.appAuth.selfAuthServer.accessTokenLifespan` | string | Defines the lifespan of issued access tokens. (default "30m0s") |
| `--auth.appAuth.selfAuthServer.authorizationCodeLifespan` | string | Defines the lifespan of issued access tokens. (default "5m0s") |
| `--auth.appAuth.selfAuthServer.claimSymmetricEncryptionKeySecretName` | string | OPTIONAL: Secret name to use to encrypt claims in authcode token. (default "claim_symmetric_key") |
| `--auth.appAuth.selfAuthServer.issuer` | string | Defines the issuer to use when issuing and validating tokens. The default value is https://{requestUri.HostAndPort}/ |
| `--auth.appAuth.selfAuthServer.oldTokenSigningRSAKeySecretName` | string | OPTIONAL: Secret name to use to retrieve Old RSA Signing Key. This can be useful during key rotation to continue to accept older tokens. (default "token_rsa_key_old.pem") |
| `--auth.appAuth.selfAuthServer.refreshTokenLifespan` | string | Defines the lifespan of issued access tokens. (default "1h0m0s") |
| `--auth.appAuth.selfAuthServer.tokenSigningRSAKeySecretName` | string | OPTIONAL: Secret name to use to retrieve RSA Signing Key. (default "token_rsa_key.pem") |
| `--auth.appAuth.thirdPartyConfig.flyteClient.audience` | string | Audience to use when initiating OAuth2 authorization requests. |
| `--auth.appAuth.thirdPartyConfig.flyteClient.clientId` | string | public identifier for the app which handles authorization for a Flyte deployment (default "uctl") |
| `--auth.appAuth.thirdPartyConfig.flyteClient.redirectUri` | string | This is the callback uri registered with the app which handles authorization for a Flyte deployment (default "http://localhost:53593/callback") |
| `--auth.appAuth.thirdPartyConfig.flyteClient.scopes` | strings | Recommended scopes for the client to request. (default [all,offline]) |
| `--auth.disableForGrpc` | | Disables auth enforcement on Grpc Endpoints. |
| `--auth.disableForHttp` | | Disables auth enforcement on HTTP Endpoints. |
| `--auth.grpcAuthorizationHeader` | string | (default "flyte-authorization") |
| `--auth.httpAuthorizationHeader` | string | (default "flyte-authorization") |
| `--auth.httpProxyURL` | string | OPTIONAL: HTTP Proxy to be used for OAuth requests. |
| `--auth.tokenEndpointProxyPath` | string | The path used to proxy calls to the TokenURL |
| `--auth.userAuth.cookieBlockKeySecretName` | string | OPTIONAL: Secret name to use for cookie block key. (default "cookie_block_key") |
| `--auth.userAuth.cookieHashKeySecretName` | string | OPTIONAL: Secret name to use for cookie hash key. (default "cookie_hash_key") |
| `--auth.userAuth.cookieSetting.domain` | string | OPTIONAL: Allows you to set the domain attribute on the auth cookies. |
| `--auth.userAuth.cookieSetting.sameSitePolicy` | string | OPTIONAL: Allows you to declare if your cookie should be restricted to a first-party or same-site context.Wrapper around http.SameSite. (default "DefaultMode") |
| `--auth.userAuth.httpProxyURL` | string | OPTIONAL: HTTP Proxy to be used for OAuth requests. |
| `--auth.userAuth.idpQueryParameter` | string | idp query parameter used for selecting a particular IDP for doing user authentication. Eg: for Okta passing idp={IDP-ID} forces the authentication to happen with IDP-ID |
| `--auth.userAuth.openId.baseUrl` | string | |
| `--auth.userAuth.openId.clientId` | string | |
| `--auth.userAuth.openId.clientSecretFile` | string | |
| `--auth.userAuth.openId.clientSecretName` | string | (default "oidc_client_secret") |
| `--auth.userAuth.openId.scopes` | strings | (default [openid,profile]) |
| `--auth.userAuth.redirectUrl` | string | (default "/console") |
| `--authorizer.internalCommunicationConfig.enabled` | | Enables authorization decisions for internal communication. (default true) |
| `--authorizer.internalCommunicationConfig.ingressIdentity` | string | IngressIdentity used in the cluster. Needed to exclude the communication coming from ingress. (default "ingress-nginx.ingress-nginx.serviceaccount.identity.linkerd.cluster.local") |
| `--authorizer.internalCommunicationConfig.tenantUrlPatternIdentity` | string | UrlPatternIdentity of the internal tenant service endpoint identities. (default "{{ service }}.{{ org }}.serviceaccount.identity.linkerd.cluster.local") |
| `--authorizer.internalCommunicationConfig.urlPatternIdentity` | string | UrlPatternIdentity of the internal service endpoint identities. (default "{{ service }}-helmchart.{{ service }}.serviceaccount.identity.linkerd.cluster.local") |
| `--authorizer.mode` | string | (default "Active") |
| `--authorizer.organizationConfig.PolicyConfig.adminPolicyDescription` | string | description for the boilerplate admin policy (default "Contributor permissions and full admin permissions to manage users and view usage dashboards") |
| `--authorizer.organizationConfig.PolicyConfig.contributorPolicyDescription` | string | description for the boilerplate contributor policy (default "Viewer permissions and permissions to create workflows, tasks, launch plans, and executions") |
| `--authorizer.organizationConfig.PolicyConfig.defaultUserPolicyRoleType` | string | name of the role type to determine which default policy new users added to the organization should be assigned (default "Viewer") |
| `--authorizer.organizationConfig.PolicyConfig.serverlessContributorPolicyDescription` | string | description for the boilerplate serverless contributor policy (default "Viewer permissions and permissions to create workflows, tasks, launch plans, and executions") |
| `--authorizer.organizationConfig.PolicyConfig.serverlessViewerPolicyDescription` | string | description for the boilerplate serverless viewer policy (default "Permissions to view Flyte entities") |
| `--authorizer.organizationConfig.PolicyConfig.viewerPolicyDescription` | string | description for the boilerplate viewer policy (default "Permissions to view Flyte entities") |
| `--authorizer.organizationConfig.defaultPolicyCacheDuration` | string | Cache entry duration for the store of the default policy per organization (default "10m0s") |
| `--authorizer.syncRuleRefreshInterval` | string | (default "1m0s") |
| `--authorizer.type` | string | (default "UserClouds") |
| `--authorizer.userCloudsClient.cache.redis.ttl.edgeTypes` | string | Specifies how long edge types remain in the cache.. (default "30m0s") |
| `--authorizer.userCloudsClient.cache.redis.ttl.edges` | string | Specifies how long edges remain in the cache. (default "30m0s") |
| `--authorizer.userCloudsClient.cache.redis.ttl.objectTypes` | string | Specifies how long object types remain in the cache. (default "30m0s") |
| `--authorizer.userCloudsClient.cache.redis.ttl.objects` | string | Specifies how long objects remain in the cache. (default "30m0s") |
| `--authorizer.userCloudsClient.cache.type` | string | Cache type to use. (default "none") |
| `--authorizer.userCloudsClient.clientID` | string | UserClouds client id |
| `--authorizer.userCloudsClient.clientSecretName` | string | UserCloud client secret name to read from the secret manager. (default "userclouds-client-secret") |
| `--authorizer.userCloudsClient.enableLogging` | | Enable userclouds client's internal logging. Calls to post logs take 250-350 ms and will impact p99 latency, enable with caution. |
| `--authorizer.userCloudsClient.tenantID` | string | UserClouds tenant id. Should be a UUID. |
| `--authorizer.userCloudsClient.tenantUrl` | string | Something like https://{yourtenant}.tenant.userclouds.com |
| `--config` | string | config file (default is /Users/andrew/.union/config.yaml) |
| `--connection.environment` | string | |
| `--connection.region` | string | |
| `--connection.rootTenantURLPattern` | string | Pattern for tenant url. (default "dns:///{{ organization }}.cloud-staging.union.ai") |
| `--console.endpoint` | string | Endpoint of console, if different than flyte admin |
| `--database.connMaxLifeTime` | string | sets the maximum amount of time a connection may be reused (default "1h0m0s") |
| `--database.enableForeignKeyConstraintWhenMigrating` | | Whether to enable gorm foreign keys when migrating the db |
| `--database.maxIdleConnections` | int | maxIdleConnections sets the maximum number of connections in the idle connection pool. (default 10) |
| `--database.maxOpenConnections` | int | maxOpenConnections sets the maximum number of open connections to the database. (default 100) |
| `--database.postgres.dbname` | string | The database name (default "postgres") |
| `--database.postgres.debug` | | |
| `--database.postgres.host` | string | The host name of the database server (default "localhost") |
| `--database.postgres.options` | string | See http://gorm.io/docs/connecting_to_the_database.html for available options passed, in addition to the above. (default "sslmode=disable") |
| `--database.postgres.password` | string | The database password. (default "postgres") |
| `--database.postgres.passwordPath` | string | Points to the file containing the database password. |
| `--database.postgres.port` | int | The port name of the database server (default 30001) |
| `--database.postgres.readReplicaHost` | string | The host name of the read replica database server (default "localhost") |
| `--database.postgres.username` | string | The database user who is connecting to the server. (default "postgres") |
| `--database.sqlite.file` | string | The path to the file (existing or new) where the DB should be created / stored. If existing, then this will be re-used, else a new will be created |
| `--db.connectionPool.maxConnectionLifetime` | string | (default "0s") |
| `--db.connectionPool.maxIdleConnections` | int | |
| `--db.connectionPool.maxOpenConnections` | int | |
| `--db.dbname` | string | (default "postgres") |
| `--db.debug` | | |
| `--db.host` | string | (default "postgres") |
| `--db.log_level` | int | (default 4) |
| `--db.options` | string | (default "sslmode=disable") |
| `--db.password` | string | |
| `--db.passwordPath` | string | |
| `--db.port` | int | (default 5432) |
| `--db.username` | string | (default "postgres") |
| `-d`, `--domain` | string | Specifies the Flyte project's domain. |
| `--file` | stringArray | Passes the config file to load. |
| `--files.archive` | | Pass in archive file either an http link or local path. |
| `--files.assumableIamRole` | string | Custom assumable iam auth role to register launch plans with. |
| `--files.continueOnError` | | Continue on error when registering files. |
| `--files.destinationDirectory` | string | Location of source code in container. |
| `--files.dryRun` | | Execute command without making any modifications. |
| `--files.enableSchedule` | | Enable the schedule if the files contain schedulable launchplan. |
| `--files.force` | | Force use of version number on entities registered with flyte. |
| `--files.k8ServiceAccount` | string | Deprecated. Please use `--K8sServiceAccount`|
| `--files.k8sServiceAccount` | string | Custom kubernetes service account auth role to register launch plans with. |
| `--files.outputLocationPrefix` | string | Custom output location prefix for offloaded types (files/schemas). |
| `--files.sourceUploadPath` | string | Deprecated: Update flyte admin to avoid having to configure storage access from uctl. |
| `--files.version` | string | Version of the entity to be registered with flyte which are un-versioned after serialization. |
| `--logger.formatter.type` | string | Sets logging format type. (default "json") |
| `--logger.level` | int | Sets the minimum logging level. (default 3) |
| `--logger.mute` | | Mutes all logs regardless of severity. Intended for benchmarks/tests only. |
| `--logger.show-source` | | Includes source code location in logs. |
| `--org` | string | Organization to work on. If not set, default to user's org. |
| `--otel.file.filename` | string | Filename to store exported telemetry traces (default "/tmp/trace.txt") |
| `--otel.jaeger.endpoint` | string | Endpoint for the jaeger telemetry trace ingestor (default "http://localhost:14268/api/traces") |
| `--otel.otlpgrpc.endpoint` | string | Endpoint for the OTLP telemetry trace collector (default "http://localhost:4317") |
| `--otel.otlphttp.endpoint` | string | Endpoint for the OTLP telemetry trace collector (default "http://localhost:4318/v1/traces") |
| `--otel.sampler.parentSampler` | string | Sets the parent sampler to use for the tracer (default "always") |
| `--otel.type` | string | Sets the type of exporter to configure [noop/file/jaeger/otlpgrpc/otlphttp]. (default "noop") |
| `-o`, `--output` | string | Specifies the output type - supported formats [TABLE JSON YAML DOT DOTURL]. NOTE: dot, doturl are only supported for Workflow (default "table") |
| `--plugins.catalogcache.reader.maxItems` | int | Maximum number of entries to keep in the index. (default 10000) |
| `--plugins.catalogcache.reader.maxRetries` | int | Maximum number of retries per item. (default 3) |
| `--plugins.catalogcache.reader.workers` | int | Number of concurrent workers to start processing the queue. (default 10) |
| `--plugins.catalogcache.writer.maxItems` | int | Maximum number of entries to keep in the index. (default 10000) |
| `--plugins.catalogcache.writer.maxRetries` | int | Maximum number of retries per item. (default 3) |
| `--plugins.catalogcache.writer.workers` | int | Number of concurrent workers to start processing the queue. (default 10) |
| `-p`, `--project` | string | Specifies the Flyte project. |
| `--rediscache.passwordSecretName` | string | Name of secret with Redis password. |
| `--rediscache.primaryEndpoint` | string | Primary endpoint for the redis cache that can be used for both reads and writes. |
| `--rediscache.replicaEndpoint` | string | Replica endpoint for the redis cache that can be used for reads. |
| `--secrets.env-prefix` | string | Prefix for environment variables (default "FLYTE_SECRET_") |
| `--secrets.secrets-prefix` | string | Prefix where to look for secrets file (default "/etc/secrets") |
| `--secrets.type` | string | Sets the type of storage to configure [local]. (default "local") |
| `--server.dataProxy.download.maxExpiresIn` | string | Maximum allowed expiration duration. (default "1h0m0s") |
| `--server.dataProxy.upload.defaultFileNameLength` | int | Default length for the generated file name if not provided in the request. (default 20) |
| `--server.dataProxy.upload.maxExpiresIn` | string | Maximum allowed expiration duration. (default "1h0m0s") |
| `--server.dataProxy.upload.maxSize` | string | Maximum allowed upload size. (default "6Mi") |
| `--server.dataProxy.upload.storagePrefix` | string | Storage prefix to use for all upload requests. |
| `--server.grpc.enableGrpcLatencyMetrics` | | Enable grpc latency metrics. Note Histograms metrics can be expensive on Prometheus servers. |
| `--server.grpc.maxMessageSizeBytes` | int | The max size in bytes for incoming gRPC messages |
| `--server.grpc.port` | int | On which grpc port to serve admin (default 8089) |
| `--server.grpc.serverReflection` | | Enable GRPC Server Reflection (default true) |
| `--server.grpcPort` | int | deprecated |
| `--server.grpcServerReflection` | | deprecated |
| `--server.httpPort` | int | On which http port to serve admin (default 8088) |
| `--server.kube-config` | string | Path to kubernetes client config file, default is empty, useful for incluster config. |
| `--server.kubeClientConfig.burst` | int | Max burst rate for throttle. 0 defaults to 10 (default 25) |
| `--server.kubeClientConfig.qps` | int32 | Max QPS to the master for requests to KubeAPI. 0 defaults to 5. (default 100) |
| `--server.kubeClientConfig.timeout` | string | Max duration allowed for every request to KubeAPI before giving up. 0 implies no timeout. (default "30s") |
| `--server.master` | string | The address of the Kubernetes API server. |
| `--server.readHeaderTimeoutSeconds` | int | The amount of time allowed to read request headers. (default 32) |
| `--server.security.allowCors` | | (default true) |
| `--server.security.allowedHeaders` | strings | (default [Content-Type,flyte-authorization]) |
| `--server.security.allowedOrigins` | strings | (default [*]) |
| `--server.security.auditAccess` | | |
| `--server.security.secure` | | |
| `--server.security.ssl.certificateFile` | string | |
| `--server.security.ssl.keyFile` | string | |
| `--server.security.useAuth` | | |
| `--server.thirdPartyConfig.flyteClient.audience` | string | Audience to use when initiating OAuth2 authorization requests. |
| `--server.thirdPartyConfig.flyteClient.clientId` | string | public identifier for the app which handles authorization for a Flyte deployment |
| `--server.thirdPartyConfig.flyteClient.redirectUri` | string | This is the callback uri registered with the app which handles authorization for a Flyte deployment |
| `--server.thirdPartyConfig.flyteClient.scopes` | strings | Recommended scopes for the client to request. |
| `--server.watchService.maxActiveClusterConnections` | int | (default 5) |
| `--server.watchService.maxPageSize` | int | (default 50000) |
| `--server.watchService.nonTerminalStatusUpdatesInterval` | string | (default "1m0s") |
| `--server.watchService.pollInterval` | string | (default "1s") |
| `--sharedservice.connectPort` | string | On which connect port to serve admin (default "8080") |
| `--sharedservice.grpc.grpcMaxResponseStatusBytes` | int32 | specifies the maximum (uncompressed) size of header list that the client is prepared to accept on grpc calls (default 32000) |
| `--sharedservice.grpc.maxConcurrentStreams` | int | Limit on the number of concurrent streams to each ServerTransport. (default 100) |
| `--sharedservice.grpc.maxMessageSizeBytes` | int | Limit on the size of message that can be received on the server. (default 10485760) |
| `--sharedservice.grpcServerReflection` | | Enable GRPC Server Reflection (default true) |
| `--sharedservice.httpPort` | string | On which http port to serve admin (default "8089") |
| `--sharedservice.kubeConfig` | string | Path to kubernetes client config file. |
| `--sharedservice.master` | string | The address of the Kubernetes API server. |
| `--sharedservice.metrics.enableClientGrpcHistograms` | | Enable client grpc histograms (default true) |
| `--sharedservice.metrics.enableGrpcHistograms` | | Enable grpc histograms (default true) |
| `--sharedservice.metrics.scope` | string | Scope to emit metrics under (default "service:") |
| `--sharedservice.port` | string | On which grpc port to serve admin (default "8080") |
| `--sharedservice.profiler.enabled` | | Enable Profiler on server |
| `--sharedservice.profilerPort` | string | Profile port to start listen for pprof and metric handlers on. (default "10254") |
| `--sharedservice.security.allowCors` | | |
| `--sharedservice.security.allowLocalhostAccess` | | Whether to permit localhost unauthenticated access to the server |
| `--sharedservice.security.allowedHeaders` | strings | |
| `--sharedservice.security.allowedOrigins` | strings | |
| `--sharedservice.security.auditAccess` | | |
| `--sharedservice.security.orgOverride` | string | Override org in identity context if localhost access enabled |
| `--sharedservice.security.secure` | | |
| `--sharedservice.security.ssl.certificateAuthorityFile` | string | |
| `--sharedservice.security.ssl.certificateFile` | string | |
| `--sharedservice.security.ssl.keyFile` | string | |
| `--sharedservice.security.useAuth` | | |
| `--sharedservice.sync.syncInterval` | string | Time interval to sync (default "5m0s") |
| `--storage.cache.max_size_mbs` | int | Maximum size of the cache where the Blob store data is cached in-memory. If not specified or set to 0, cache is not used |
| `--storage.cache.target_gc_percent` | int | Sets the garbage collection target percentage. |
| `--storage.connection.access-key` | string | Access key to use. Only required when authtype is set to accesskey. |
| `--storage.connection.auth-type` | string | Auth Type to use [iam, accesskey]. (default "iam") |
| `--storage.connection.disable-ssl` | | Disables SSL connection. Should only be used for development. |
| `--storage.connection.endpoint` | string | URL for storage client to connect to. |
| `--storage.connection.region` | string | Region to connect to. (default "us-east-1") |
| `--storage.connection.secret-key` | string | Secret to use when accesskey is set. |
| `--storage.container` | string | Initial container (in s3 a bucket) to create -if it doesn't exist-.' |
| `--storage.defaultHttpClient.timeout` | string | Sets time out on the http client. (default "0s") |
| `--storage.enable-multicontainer` | | If this is true, then the container argument is overlooked and redundant. This config will automatically open new connections to new containers/buckets as they are encountered |
| `--storage.limits.maxDownloadMBs` | int | Maximum allowed download size (in MBs) per call. (default 2) |
| `--storage.stow.config` | stringToString | Configuration for stow backend. Refer to github/flyteorg/stow (default []) |
| `--storage.stow.kind` | string | Kind of Stow backend to use. Refer to github/flyteorg/stow |
| `--storage.type` | string | Sets the type of storage to configure [s3/minio/local/mem/stow]. (default "s3") |
| `--union.auth.authorizationMetadataKey` | string | Authorization Header to use when passing Access Tokens to the server (default "flyte-authorization") |
| `--union.auth.clientId` | string | Client ID |
| `--union.auth.clientSecretEnvVar` | string | Environment variable containing the client secret |
| `--union.auth.clientSecretLocation` | string | File containing the client secret |
| `--union.auth.deviceFlow.pollInterval` | string | amount of time the device flow would poll the token endpoint if auth server doesn't return a polling interval. Okta and google IDP do return an interval' (default "5s") |
| `--union.auth.deviceFlow.refreshTime` | string | grace period from the token expiry after which it would refresh the token. (default "5m0s") |
| `--union.auth.deviceFlow.timeout` | string | amount of time the device flow should complete or else it will be cancelled. (default "10m0s") |
| `--union.auth.enable` | | Whether to enable an authenticated conenction when communicating with admin. (default true) |
| `--union.auth.externalAuth.command` | strings | Command for external authentication token generation |
| `--union.auth.pkce.refreshTime` | string | grace period from the token expiry after which it would refresh the token. (default "5m0s") |
| `--union.auth.pkce.timeout` | string | Amount of time the browser session would be active for authentication from client app. (default "15s") |
| `--union.auth.scopes` | strings | List of scopes to request |
| `--union.auth.tokenRefreshWindow` | string | Max duration between token refresh attempt and token expiry. (default "1h0m0s") |
| `--union.auth.tokenUrl` | string | OPTIONAL: Your IdP's token endpoint. It'll be discovered from flyte admin's OAuth Metadata endpoint if not provided. |
| `--union.auth.type` | string | Type of OAuth2 flow used for communicating with admin. (default "Pkce") |
| `--union.cache.maxItemsCount` | int | Maximum number of items to keep in the cache before evicting. (default 1000) |
| `--union.connection.host` | string | Host to connect to (default "dns:///utt-mgdp-stg-us-east-2.cloud-staging.union.ai") |
| `--union.connection.insecure` | | Whether to connect over insecure channel |
| `--union.connection.insecureSkipVerify` | | InsecureSkipVerify controls whether a client verifies the server's certificate chain and host name.Caution: shouldn't be use for production usecases' |
| `--union.connection.keepAliveConfig.permitWithoutStream` | | If true, client sends keepalive pings even with no active RPCs. |
| `--union.connection.keepAliveConfig.time` | string | After a duration of this time if the client doesn't see any activity it pings the server to see if the transport is still alive. (default "20s") |
| `--union.connection.keepAliveConfig.timeout` | string | After having pinged for keepalive check, the client waits for a duration of Timeout and if no activity is seen even after that the connection is closed. (default "2m0s") |
| `--union.connection.maxBackoffDelay` | string | Max delay for grpc backoff (default "8s") |
| `--union.connection.maxRecvMsgSize` | int | Maximum size of a message in bytes of a gRPC message (default 10485760) |
| `--union.connection.maxRetries` | int | Max number of gRPC retries (default 4) |
| `--union.connection.minConnectTimeout` | string | Minimum timeout for establishing a connection (default "20s") |
| `--union.connection.perRetryTimeout` | string | gRPC per retry timeout (default "15s") |
| `--union.connection.serviceConfig` | string | Defines gRPC experimental JSON Service Config (default "{"loadBalancingConfig": [{"round_robin":{}}]}") |
| `--union.connection.trustedIdentityClaims.enabled` | | Enables passing of trusted claims while making inter service calls |
| `--union.connection.trustedIdentityClaims.externalIdentityClaim` | string | External identity claim of the service which is authorized to make internal service call. These are verified against userclouds actions |
| `--union.connection.trustedIdentityClaims.externalIdentityTypeClaim` | string | External identity type claim of app or user to use for the current service identity. It should be an 'app' for inter service communication |
| `--union.internalConnectionConfig.-` | stringToString | (default []) |
| `--union.internalConnectionConfig.enabled` | | Enables internal service to service communication instead of going through ingress. |
| `--union.internalConnectionConfig.urlPattern` | string | UrlPattern of the internal service endpoints. (default "{{ service }}-helmchart.{{ service }}.svc.cluster.local:80") |
| `--webhook.awsSecretManager.sidecarImage` | string | Specifies the sidecar docker image to use (default "docker.io/amazon/aws-secrets-manager-secret-sidecar:v0.1.4") |
| `--webhook.certDir` | string | Certificate directory to use to write generated certs. Defaults to /etc/webhook/certs/ (default "/etc/webhook/certs") |
| `--webhook.embeddedSecretManagerConfig.awsConfig.region` | string | AWS region |
| `--webhook.embeddedSecretManagerConfig.fileMountInitContainer.image` | string | Specifies init container image to use for mounting secrets as files. (default "busybox:1.28") |
| `--webhook.embeddedSecretManagerConfig.gcpConfig.project` | string | GCP project to be used for secret manager |
| `--webhook.embeddedSecretManagerConfig.type` | string | (default "AWS") |
| `--webhook.gcpSecretManager.sidecarImage` | string | Specifies the sidecar docker image to use (default "gcr.io/google.com/cloudsdktool/cloud-sdk:alpine") |
| `--webhook.listenPort` | int | The port to use to listen to webhook calls. Defaults to 9443 (default 9443) |
| `--webhook.localCert` | | write certs locally. Defaults to false |
| `--webhook.metrics-prefix` | string | An optional prefix for all published metrics. (default "flyte:") |
| `--webhook.secretName` | string | Secret name to write generated certs to. (default "flyte-pod-webhook") |
| `--webhook.serviceName` | string | The name of the webhook service. (default "flyte-pod-webhook") |
| `--webhook.servicePort` | int32 | The port on the service that hosting webhook. (default 443) |
| `--webhook.vaultSecretManager.role` | string | Specifies the vault role to use (default "flyte") |
=== PAGE: https://www.union.ai/docs/v1/serverless/api-reference/uctl-cli/uctl-config/uctl-config-docs ===
# uctl config docs
Generate configuration documentation in rst format
## Synopsis
Generate configuration documentation in rst format
```shell
$ uctl config docs [flags]
```
## Options
| Option | Type | Description |
|--------|------|-------------|
| `-h`, `--help` | help for docs |
### Options inherited from parent commands
| Option | Type | Description |
|--------|------|-------------|
| `--admin.audience` | string | Audience to use when initiating OAuth2 authorization requests. |
| `--admin.authType` | string | Type of OAuth2 flow used for communicating with admin.ClientSecret, Pkce, ExternalCommand are valid values (default "ClientSecret") |
| `--admin.authorizationHeader` | string | Custom metadata header to pass JWT |
| `--admin.authorizationServerUrl` | string | This is the URL to your IdP's authorization server. It'll default to Endpoint |
| `--admin.caCertFilePath` | string | Use specified certificate file to verify the admin server peer. |
| `--admin.clientId` | string | Client ID (default "flytepropeller") |
| `--admin.clientSecretEnvVar` | string | Environment variable containing the client secret |
| `--admin.clientSecretLocation` | string | File containing the client secret (default "/etc/secrets/client_secret") |
| `--admin.command` | strings | Command for external authentication token generation |
| `--admin.defaultOrg` | string | OPTIONAL: Default org to use to support non-org based cli's.'. |
| `--admin.defaultServiceConfig` | string | |
| `--admin.deviceFlowConfig.pollInterval` | string | amount of time the device flow would poll the token endpoint if auth server doesn't return a polling interval. Okta and google IDP do return an interval' (default "5s") |
| `--admin.deviceFlowConfig.refreshTime` | string | grace period from the token expiry after which it would refresh the token. (default "5m0s") |
| `--admin.deviceFlowConfig.timeout` | string | amount of time the device flow should complete or else it will be cancelled. (default "10m0s") |
| `--admin.endpoint` | string | For admin types, specify where the uri of the service is located. |
| `--admin.httpProxyURL` | string | OPTIONAL: HTTP Proxy to be used for OAuth requests. |
| `--admin.insecure` | | Use insecure connection. |
| `--admin.insecureSkipVerify` | | InsecureSkipVerify controls whether a client verifies the server's certificate chain and host name.Caution: shouldn't be use for production usecases' |
| `--admin.maxBackoffDelay` | string | Max delay for grpc backoff (default "8s") |
| `--admin.maxMessageSizeBytes` | int | The max size in bytes for incoming gRPC messages |
| `--admin.maxRetries` | int | Max number of gRPC retries (default 4) |
| `--admin.perRetryTimeout` | string | gRPC per retry timeout (default "15s") |
| `--admin.pkceConfig.refreshTime` | string | grace period from the token expiry after which it would refresh the token. (default "5m0s") |
| `--admin.pkceConfig.timeout` | string | Amount of time the browser session would be active for authentication from client app. (default "2m0s") |
| `--admin.proxyCommand` | strings | Command for external proxy-authorization token generation |
| `--admin.scopes` | strings | List of scopes to request |
| `--admin.tokenRefreshWindow` | string | Max duration between token refresh attempt and token expiry. (default "0s") |
| `--admin.tokenUrl` | string | OPTIONAL: Your IdP's token endpoint. It'll be discovered from flyte admin's OAuth Metadata endpoint if not provided. |
| `--admin.useAudienceFromAdmin` | | Use Audience configured from admins public endpoint config. |
| `--admin.useAuth` | | Deprecated: Auth will be enabled/disabled based on admin's dynamically discovered information. |
| `--auth.appAuth.externalAuthServer.allowedAudience` | strings | Optional: A list of allowed audiences. If not provided, the audience is expected to be the public Uri of the service. |
| `--auth.appAuth.externalAuthServer.baseUrl` | string | This should be the base url of the authorization server that you are trying to hit. With Okta for instance, it will look something like https://company.okta.com/oauth2/abcdef123456789/ |
| `--auth.appAuth.externalAuthServer.httpProxyURL` | string | OPTIONAL: HTTP Proxy to be used for OAuth requests. |
| `--auth.appAuth.externalAuthServer.metadataUrl` | string | Optional: If the server doesn't support /.well-known/oauth-authorization-server, you can set a custom metadata url here.' |
| `--auth.appAuth.externalAuthServer.retryAttempts` | int | Optional: The number of attempted retries on a transient failure to get the OAuth metadata (default 5) |
| `--auth.appAuth.externalAuthServer.retryDelay` | string | Optional, Duration to wait between retries (default "1s") |
| `--auth.appAuth.selfAuthServer.accessTokenLifespan` | string | Defines the lifespan of issued access tokens. (default "30m0s") |
| `--auth.appAuth.selfAuthServer.authorizationCodeLifespan` | string | Defines the lifespan of issued access tokens. (default "5m0s") |
| `--auth.appAuth.selfAuthServer.claimSymmetricEncryptionKeySecretName` | string | OPTIONAL: Secret name to use to encrypt claims in authcode token. (default "claim_symmetric_key") |
| `--auth.appAuth.selfAuthServer.issuer` | string | Defines the issuer to use when issuing and validating tokens. The default value is https://{requestUri.HostAndPort}/ |
| `--auth.appAuth.selfAuthServer.oldTokenSigningRSAKeySecretName` | string | OPTIONAL: Secret name to use to retrieve Old RSA Signing Key. This can be useful during key rotation to continue to accept older tokens. (default "token_rsa_key_old.pem") |
| `--auth.appAuth.selfAuthServer.refreshTokenLifespan` | string | Defines the lifespan of issued access tokens. (default "1h0m0s") |
| `--auth.appAuth.selfAuthServer.tokenSigningRSAKeySecretName` | string | OPTIONAL: Secret name to use to retrieve RSA Signing Key. (default "token_rsa_key.pem") |
| `--auth.appAuth.thirdPartyConfig.flyteClient.audience` | string | Audience to use when initiating OAuth2 authorization requests. |
| `--auth.appAuth.thirdPartyConfig.flyteClient.clientId` | string | public identifier for the app which handles authorization for a Flyte deployment (default "uctl") |
| `--auth.appAuth.thirdPartyConfig.flyteClient.redirectUri` | string | This is the callback uri registered with the app which handles authorization for a Flyte deployment (default "http://localhost:53593/callback") |
| `--auth.appAuth.thirdPartyConfig.flyteClient.scopes` | strings | Recommended scopes for the client to request. (default [all,offline]) |
| `--auth.disableForGrpc` | | Disables auth enforcement on Grpc Endpoints. |
| `--auth.disableForHttp` | | Disables auth enforcement on HTTP Endpoints. |
| `--auth.grpcAuthorizationHeader` | string | (default "flyte-authorization") |
| `--auth.httpAuthorizationHeader` | string | (default "flyte-authorization") |
| `--auth.httpProxyURL` | string | OPTIONAL: HTTP Proxy to be used for OAuth requests. |
| `--auth.tokenEndpointProxyPath` | string | The path used to proxy calls to the TokenURL |
| `--auth.userAuth.cookieBlockKeySecretName` | string | OPTIONAL: Secret name to use for cookie block key. (default "cookie_block_key") |
| `--auth.userAuth.cookieHashKeySecretName` | string | OPTIONAL: Secret name to use for cookie hash key. (default "cookie_hash_key") |
| `--auth.userAuth.cookieSetting.domain` | string | OPTIONAL: Allows you to set the domain attribute on the auth cookies. |
| `--auth.userAuth.cookieSetting.sameSitePolicy` | string | OPTIONAL: Allows you to declare if your cookie should be restricted to a first-party or same-site context.Wrapper around http.SameSite. (default "DefaultMode") |
| `--auth.userAuth.httpProxyURL` | string | OPTIONAL: HTTP Proxy to be used for OAuth requests. |
| `--auth.userAuth.idpQueryParameter` | string | idp query parameter used for selecting a particular IDP for doing user authentication. Eg: for Okta passing idp={IDP-ID} forces the authentication to happen with IDP-ID |
| `--auth.userAuth.openId.baseUrl` | string | |
| `--auth.userAuth.openId.clientId` | string | |
| `--auth.userAuth.openId.clientSecretFile` | string | |
| `--auth.userAuth.openId.clientSecretName` | string | (default "oidc_client_secret") |
| `--auth.userAuth.openId.scopes` | strings | (default [openid,profile]) |
| `--auth.userAuth.redirectUrl` | string | (default "/console") |
| `--authorizer.internalCommunicationConfig.enabled` | | Enables authorization decisions for internal communication. (default true) |
| `--authorizer.internalCommunicationConfig.ingressIdentity` | string | IngressIdentity used in the cluster. Needed to exclude the communication coming from ingress. (default "ingress-nginx.ingress-nginx.serviceaccount.identity.linkerd.cluster.local") |
| `--authorizer.internalCommunicationConfig.tenantUrlPatternIdentity` | string | UrlPatternIdentity of the internal tenant service endpoint identities. (default "{{ service }}.{{ org }}.serviceaccount.identity.linkerd.cluster.local") |
| `--authorizer.internalCommunicationConfig.urlPatternIdentity` | string | UrlPatternIdentity of the internal service endpoint identities. (default "{{ service }}-helmchart.{{ service }}.serviceaccount.identity.linkerd.cluster.local") |
| `--authorizer.mode` | string | (default "Active") |
| `--authorizer.organizationConfig.PolicyConfig.adminPolicyDescription` | string | description for the boilerplate admin policy (default "Contributor permissions and full admin permissions to manage users and view usage dashboards") |
| `--authorizer.organizationConfig.PolicyConfig.contributorPolicyDescription` | string | description for the boilerplate contributor policy (default "Viewer permissions and permissions to create workflows, tasks, launch plans, and executions") |
| `--authorizer.organizationConfig.PolicyConfig.defaultUserPolicyRoleType` | string | name of the role type to determine which default policy new users added to the organization should be assigned (default "Viewer") |
| `--authorizer.organizationConfig.PolicyConfig.serverlessContributorPolicyDescription` | string | description for the boilerplate serverless contributor policy (default "Viewer permissions and permissions to create workflows, tasks, launch plans, and executions") |
| `--authorizer.organizationConfig.PolicyConfig.serverlessViewerPolicyDescription` | string | description for the boilerplate serverless viewer policy (default "Permissions to view Flyte entities") |
| `--authorizer.organizationConfig.PolicyConfig.viewerPolicyDescription` | string | description for the boilerplate viewer policy (default "Permissions to view Flyte entities") |
| `--authorizer.organizationConfig.defaultPolicyCacheDuration` | string | Cache entry duration for the store of the default policy per organization (default "10m0s") |
| `--authorizer.syncRuleRefreshInterval` | string | (default "1m0s") |
| `--authorizer.type` | string | (default "UserClouds") |
| `--authorizer.userCloudsClient.cache.redis.ttl.edgeTypes` | string | Specifies how long edge types remain in the cache.. (default "30m0s") |
| `--authorizer.userCloudsClient.cache.redis.ttl.edges` | string | Specifies how long edges remain in the cache. (default "30m0s") |
| `--authorizer.userCloudsClient.cache.redis.ttl.objectTypes` | string | Specifies how long object types remain in the cache. (default "30m0s") |
| `--authorizer.userCloudsClient.cache.redis.ttl.objects` | string | Specifies how long objects remain in the cache. (default "30m0s") |
| `--authorizer.userCloudsClient.cache.type` | string | Cache type to use. (default "none") |
| `--authorizer.userCloudsClient.clientID` | string | UserClouds client id |
| `--authorizer.userCloudsClient.clientSecretName` | string | UserCloud client secret name to read from the secret manager. (default "userclouds-client-secret") |
| `--authorizer.userCloudsClient.enableLogging` | | Enable userclouds client's internal logging. Calls to post logs take 250-350 ms and will impact p99 latency, enable with caution. |
| `--authorizer.userCloudsClient.tenantID` | string | UserClouds tenant id. Should be a UUID. |
| `--authorizer.userCloudsClient.tenantUrl` | string | Something like https://{yourtenant}.tenant.userclouds.com |
| `--config` | string | config file (default is /Users/andrew/.union/config.yaml) |
| `--connection.environment` | string | |
| `--connection.region` | string | |
| `--connection.rootTenantURLPattern` | string | Pattern for tenant url. (default "dns:///{{ organization }}.cloud-staging.union.ai") |
| `--console.endpoint` | string | Endpoint of console, if different than flyte admin |
| `--database.connMaxLifeTime` | string | sets the maximum amount of time a connection may be reused (default "1h0m0s") |
| `--database.enableForeignKeyConstraintWhenMigrating` | | Whether to enable gorm foreign keys when migrating the db |
| `--database.maxIdleConnections` | int | maxIdleConnections sets the maximum number of connections in the idle connection pool. (default 10) |
| `--database.maxOpenConnections` | int | maxOpenConnections sets the maximum number of open connections to the database. (default 100) |
| `--database.postgres.dbname` | string | The database name (default "postgres") |
| `--database.postgres.debug` | | |
| `--database.postgres.host` | string | The host name of the database server (default "localhost") |
| `--database.postgres.options` | string | See http://gorm.io/docs/connecting_to_the_database.html for available options passed, in addition to the above. (default "sslmode=disable") |
| `--database.postgres.password` | string | The database password. (default "postgres") |
| `--database.postgres.passwordPath` | string | Points to the file containing the database password. |
| `--database.postgres.port` | int | The port name of the database server (default 30001) |
| `--database.postgres.readReplicaHost` | string | The host name of the read replica database server (default "localhost") |
| `--database.postgres.username` | string | The database user who is connecting to the server. (default "postgres") |
| `--database.sqlite.file` | string | The path to the file (existing or new) where the DB should be created / stored. If existing, then this will be re-used, else a new will be created |
| `--db.connectionPool.maxConnectionLifetime` | string | (default "0s") |
| `--db.connectionPool.maxIdleConnections` | int | |
| `--db.connectionPool.maxOpenConnections` | int | |
| `--db.dbname` | string | (default "postgres") |
| `--db.debug` | | |
| `--db.host` | string | (default "postgres") |
| `--db.log_level` | int | (default 4) |
| `--db.options` | string | (default "sslmode=disable") |
| `--db.password` | string | |
| `--db.passwordPath` | string | |
| `--db.port` | int | (default 5432) |
| `--db.username` | string | (default "postgres") |
| `-d`, `--domain` | string | Specifies the Flyte project's domain. |
| `--file` | stringArray | Passes the config file to load. |
| `--files.archive` | | Pass in archive file either an http link or local path. |
| `--files.assumableIamRole` | string | Custom assumable iam auth role to register launch plans with. |
| `--files.continueOnError` | | Continue on error when registering files. |
| `--files.destinationDirectory` | string | Location of source code in container. |
| `--files.dryRun` | | Execute command without making any modifications. |
| `--files.enableSchedule` | | Enable the schedule if the files contain schedulable launchplan. |
| `--files.force` | | Force use of version number on entities registered with flyte. |
| `--files.k8ServiceAccount` | string | Deprecated. Please use `--K8sServiceAccount`|
| `--files.k8sServiceAccount` | string | Custom kubernetes service account auth role to register launch plans with. |
| `--files.outputLocationPrefix` | string | Custom output location prefix for offloaded types (files/schemas). |
| `--files.sourceUploadPath` | string | Deprecated: Update flyte admin to avoid having to configure storage access from uctl. |
| `--files.version` | string | Version of the entity to be registered with flyte which are un-versioned after serialization. |
| `--logger.formatter.type` | string | Sets logging format type. (default "json") |
| `--logger.level` | int | Sets the minimum logging level. (default 3) |
| `--logger.mute` | | Mutes all logs regardless of severity. Intended for benchmarks/tests only. |
| `--logger.show-source` | | Includes source code location in logs. |
| `--org` | string | Organization to work on. If not set, default to user's org. |
| `--otel.file.filename` | string | Filename to store exported telemetry traces (default "/tmp/trace.txt") |
| `--otel.jaeger.endpoint` | string | Endpoint for the jaeger telemetry trace ingestor (default "http://localhost:14268/api/traces") |
| `--otel.otlpgrpc.endpoint` | string | Endpoint for the OTLP telemetry trace collector (default "http://localhost:4317") |
| `--otel.otlphttp.endpoint` | string | Endpoint for the OTLP telemetry trace collector (default "http://localhost:4318/v1/traces") |
| `--otel.sampler.parentSampler` | string | Sets the parent sampler to use for the tracer (default "always") |
| `--otel.type` | string | Sets the type of exporter to configure [noop/file/jaeger/otlpgrpc/otlphttp]. (default "noop") |
| `-o`, `--output` | string | Specifies the output type - supported formats [TABLE JSON YAML DOT DOTURL]. NOTE: dot, doturl are only supported for Workflow (default "table") |
| `--plugins.catalogcache.reader.maxItems` | int | Maximum number of entries to keep in the index. (default 10000) |
| `--plugins.catalogcache.reader.maxRetries` | int | Maximum number of retries per item. (default 3) |
| `--plugins.catalogcache.reader.workers` | int | Number of concurrent workers to start processing the queue. (default 10) |
| `--plugins.catalogcache.writer.maxItems` | int | Maximum number of entries to keep in the index. (default 10000) |
| `--plugins.catalogcache.writer.maxRetries` | int | Maximum number of retries per item. (default 3) |
| `--plugins.catalogcache.writer.workers` | int | Number of concurrent workers to start processing the queue. (default 10) |
| `-p`, `--project` | string | Specifies the Flyte project. |
| `--rediscache.passwordSecretName` | string | Name of secret with Redis password. |
| `--rediscache.primaryEndpoint` | string | Primary endpoint for the redis cache that can be used for both reads and writes. |
| `--rediscache.replicaEndpoint` | string | Replica endpoint for the redis cache that can be used for reads. |
| `--secrets.env-prefix` | string | Prefix for environment variables (default "FLYTE_SECRET_") |
| `--secrets.secrets-prefix` | string | Prefix where to look for secrets file (default "/etc/secrets") |
| `--secrets.type` | string | Sets the type of storage to configure [local]. (default "local") |
| `--server.dataProxy.download.maxExpiresIn` | string | Maximum allowed expiration duration. (default "1h0m0s") |
| `--server.dataProxy.upload.defaultFileNameLength` | int | Default length for the generated file name if not provided in the request. (default 20) |
| `--server.dataProxy.upload.maxExpiresIn` | string | Maximum allowed expiration duration. (default "1h0m0s") |
| `--server.dataProxy.upload.maxSize` | string | Maximum allowed upload size. (default "6Mi") |
| `--server.dataProxy.upload.storagePrefix` | string | Storage prefix to use for all upload requests. |
| `--server.grpc.enableGrpcLatencyMetrics` | | Enable grpc latency metrics. Note Histograms metrics can be expensive on Prometheus servers. |
| `--server.grpc.maxMessageSizeBytes` | int | The max size in bytes for incoming gRPC messages |
| `--server.grpc.port` | int | On which grpc port to serve admin (default 8089) |
| `--server.grpc.serverReflection` | | Enable GRPC Server Reflection (default true) |
| `--server.grpcPort` | int | deprecated |
| `--server.grpcServerReflection` | | deprecated |
| `--server.httpPort` | int | On which http port to serve admin (default 8088) |
| `--server.kube-config` | string | Path to kubernetes client config file, default is empty, useful for incluster config. |
| `--server.kubeClientConfig.burst` | int | Max burst rate for throttle. 0 defaults to 10 (default 25) |
| `--server.kubeClientConfig.qps` | int32 | Max QPS to the master for requests to KubeAPI. 0 defaults to 5. (default 100) |
| `--server.kubeClientConfig.timeout` | string | Max duration allowed for every request to KubeAPI before giving up. 0 implies no timeout. (default "30s") |
| `--server.master` | string | The address of the Kubernetes API server. |
| `--server.readHeaderTimeoutSeconds` | int | The amount of time allowed to read request headers. (default 32) |
| `--server.security.allowCors` | | (default true) |
| `--server.security.allowedHeaders` | strings | (default [Content-Type,flyte-authorization]) |
| `--server.security.allowedOrigins` | strings | (default [*]) |
| `--server.security.auditAccess` | | |
| `--server.security.secure` | | |
| `--server.security.ssl.certificateFile` | string | |
| `--server.security.ssl.keyFile` | string | |
| `--server.security.useAuth` | | |
| `--server.thirdPartyConfig.flyteClient.audience` | string | Audience to use when initiating OAuth2 authorization requests. |
| `--server.thirdPartyConfig.flyteClient.clientId` | string | public identifier for the app which handles authorization for a Flyte deployment |
| `--server.thirdPartyConfig.flyteClient.redirectUri` | string | This is the callback uri registered with the app which handles authorization for a Flyte deployment |
| `--server.thirdPartyConfig.flyteClient.scopes` | strings | Recommended scopes for the client to request. |
| `--server.watchService.maxActiveClusterConnections` | int | (default 5) |
| `--server.watchService.maxPageSize` | int | (default 50000) |
| `--server.watchService.nonTerminalStatusUpdatesInterval` | string | (default "1m0s") |
| `--server.watchService.pollInterval` | string | (default "1s") |
| `--sharedservice.connectPort` | string | On which connect port to serve admin (default "8080") |
| `--sharedservice.grpc.grpcMaxResponseStatusBytes` | int32 | specifies the maximum (uncompressed) size of header list that the client is prepared to accept on grpc calls (default 32000) |
| `--sharedservice.grpc.maxConcurrentStreams` | int | Limit on the number of concurrent streams to each ServerTransport. (default 100) |
| `--sharedservice.grpc.maxMessageSizeBytes` | int | Limit on the size of message that can be received on the server. (default 10485760) |
| `--sharedservice.grpcServerReflection` | | Enable GRPC Server Reflection (default true) |
| `--sharedservice.httpPort` | string | On which http port to serve admin (default "8089") |
| `--sharedservice.kubeConfig` | string | Path to kubernetes client config file. |
| `--sharedservice.master` | string | The address of the Kubernetes API server. |
| `--sharedservice.metrics.enableClientGrpcHistograms` | | Enable client grpc histograms (default true) |
| `--sharedservice.metrics.enableGrpcHistograms` | | Enable grpc histograms (default true) |
| `--sharedservice.metrics.scope` | string | Scope to emit metrics under (default "service:") |
| `--sharedservice.port` | string | On which grpc port to serve admin (default "8080") |
| `--sharedservice.profiler.enabled` | | Enable Profiler on server |
| `--sharedservice.profilerPort` | string | Profile port to start listen for pprof and metric handlers on. (default "10254") |
| `--sharedservice.security.allowCors` | | |
| `--sharedservice.security.allowLocalhostAccess` | | Whether to permit localhost unauthenticated access to the server |
| `--sharedservice.security.allowedHeaders` | strings | |
| `--sharedservice.security.allowedOrigins` | strings | |
| `--sharedservice.security.auditAccess` | | |
| `--sharedservice.security.orgOverride` | string | Override org in identity context if localhost access enabled |
| `--sharedservice.security.secure` | | |
| `--sharedservice.security.ssl.certificateAuthorityFile` | string | |
| `--sharedservice.security.ssl.certificateFile` | string | |
| `--sharedservice.security.ssl.keyFile` | string | |
| `--sharedservice.security.useAuth` | | |
| `--sharedservice.sync.syncInterval` | string | Time interval to sync (default "5m0s") |
| `--storage.cache.max_size_mbs` | int | Maximum size of the cache where the Blob store data is cached in-memory. If not specified or set to 0, cache is not used |
| `--storage.cache.target_gc_percent` | int | Sets the garbage collection target percentage. |
| `--storage.connection.access-key` | string | Access key to use. Only required when authtype is set to accesskey. |
| `--storage.connection.auth-type` | string | Auth Type to use [iam, accesskey]. (default "iam") |
| `--storage.connection.disable-ssl` | | Disables SSL connection. Should only be used for development. |
| `--storage.connection.endpoint` | string | URL for storage client to connect to. |
| `--storage.connection.region` | string | Region to connect to. (default "us-east-1") |
| `--storage.connection.secret-key` | string | Secret to use when accesskey is set. |
| `--storage.container` | string | Initial container (in s3 a bucket) to create -if it doesn't exist-.' |
| `--storage.defaultHttpClient.timeout` | string | Sets time out on the http client. (default "0s") |
| `--storage.enable-multicontainer` | | If this is true, then the container argument is overlooked and redundant. This config will automatically open new connections to new containers/buckets as they are encountered |
| `--storage.limits.maxDownloadMBs` | int | Maximum allowed download size (in MBs) per call. (default 2) |
| `--storage.stow.config` | stringToString | Configuration for stow backend. Refer to github/flyteorg/stow (default []) |
| `--storage.stow.kind` | string | Kind of Stow backend to use. Refer to github/flyteorg/stow |
| `--storage.type` | string | Sets the type of storage to configure [s3/minio/local/mem/stow]. (default "s3") |
| `--union.auth.authorizationMetadataKey` | string | Authorization Header to use when passing Access Tokens to the server (default "flyte-authorization") |
| `--union.auth.clientId` | string | Client ID |
| `--union.auth.clientSecretEnvVar` | string | Environment variable containing the client secret |
| `--union.auth.clientSecretLocation` | string | File containing the client secret |
| `--union.auth.deviceFlow.pollInterval` | string | amount of time the device flow would poll the token endpoint if auth server doesn't return a polling interval. Okta and google IDP do return an interval' (default "5s") |
| `--union.auth.deviceFlow.refreshTime` | string | grace period from the token expiry after which it would refresh the token. (default "5m0s") |
| `--union.auth.deviceFlow.timeout` | string | amount of time the device flow should complete or else it will be cancelled. (default "10m0s") |
| `--union.auth.enable` | | Whether to enable an authenticated conenction when communicating with admin. (default true) |
| `--union.auth.externalAuth.command` | strings | Command for external authentication token generation |
| `--union.auth.pkce.refreshTime` | string | grace period from the token expiry after which it would refresh the token. (default "5m0s") |
| `--union.auth.pkce.timeout` | string | Amount of time the browser session would be active for authentication from client app. (default "15s") |
| `--union.auth.scopes` | strings | List of scopes to request |
| `--union.auth.tokenRefreshWindow` | string | Max duration between token refresh attempt and token expiry. (default "1h0m0s") |
| `--union.auth.tokenUrl` | string | OPTIONAL: Your IdP's token endpoint. It'll be discovered from flyte admin's OAuth Metadata endpoint if not provided. |
| `--union.auth.type` | string | Type of OAuth2 flow used for communicating with admin. (default "Pkce") |
| `--union.cache.maxItemsCount` | int | Maximum number of items to keep in the cache before evicting. (default 1000) |
| `--union.connection.host` | string | Host to connect to (default "dns:///utt-mgdp-stg-us-east-2.cloud-staging.union.ai") |
| `--union.connection.insecure` | | Whether to connect over insecure channel |
| `--union.connection.insecureSkipVerify` | | InsecureSkipVerify controls whether a client verifies the server's certificate chain and host name.Caution: shouldn't be use for production usecases' |
| `--union.connection.keepAliveConfig.permitWithoutStream` | | If true, client sends keepalive pings even with no active RPCs. |
| `--union.connection.keepAliveConfig.time` | string | After a duration of this time if the client doesn't see any activity it pings the server to see if the transport is still alive. (default "20s") |
| `--union.connection.keepAliveConfig.timeout` | string | After having pinged for keepalive check, the client waits for a duration of Timeout and if no activity is seen even after that the connection is closed. (default "2m0s") |
| `--union.connection.maxBackoffDelay` | string | Max delay for grpc backoff (default "8s") |
| `--union.connection.maxRecvMsgSize` | int | Maximum size of a message in bytes of a gRPC message (default 10485760) |
| `--union.connection.maxRetries` | int | Max number of gRPC retries (default 4) |
| `--union.connection.minConnectTimeout` | string | Minimum timeout for establishing a connection (default "20s") |
| `--union.connection.perRetryTimeout` | string | gRPC per retry timeout (default "15s") |
| `--union.connection.serviceConfig` | string | Defines gRPC experimental JSON Service Config (default "{"loadBalancingConfig": [{"round_robin":{}}]}") |
| `--union.connection.trustedIdentityClaims.enabled` | | Enables passing of trusted claims while making inter service calls |
| `--union.connection.trustedIdentityClaims.externalIdentityClaim` | string | External identity claim of the service which is authorized to make internal service call. These are verified against userclouds actions |
| `--union.connection.trustedIdentityClaims.externalIdentityTypeClaim` | string | External identity type claim of app or user to use for the current service identity. It should be an 'app' for inter service communication |
| `--union.internalConnectionConfig.-` | stringToString | (default []) |
| `--union.internalConnectionConfig.enabled` | | Enables internal service to service communication instead of going through ingress. |
| `--union.internalConnectionConfig.urlPattern` | string | UrlPattern of the internal service endpoints. (default "{{ service }}-helmchart.{{ service }}.svc.cluster.local:80") |
| `--webhook.awsSecretManager.sidecarImage` | string | Specifies the sidecar docker image to use (default "docker.io/amazon/aws-secrets-manager-secret-sidecar:v0.1.4") |
| `--webhook.certDir` | string | Certificate directory to use to write generated certs. Defaults to /etc/webhook/certs/ (default "/etc/webhook/certs") |
| `--webhook.embeddedSecretManagerConfig.awsConfig.region` | string | AWS region |
| `--webhook.embeddedSecretManagerConfig.fileMountInitContainer.image` | string | Specifies init container image to use for mounting secrets as files. (default "busybox:1.28") |
| `--webhook.embeddedSecretManagerConfig.gcpConfig.project` | string | GCP project to be used for secret manager |
| `--webhook.embeddedSecretManagerConfig.type` | string | (default "AWS") |
| `--webhook.gcpSecretManager.sidecarImage` | string | Specifies the sidecar docker image to use (default "gcr.io/google.com/cloudsdktool/cloud-sdk:alpine") |
| `--webhook.listenPort` | int | The port to use to listen to webhook calls. Defaults to 9443 (default 9443) |
| `--webhook.localCert` | | write certs locally. Defaults to false |
| `--webhook.metrics-prefix` | string | An optional prefix for all published metrics. (default "flyte:") |
| `--webhook.secretName` | string | Secret name to write generated certs to. (default "flyte-pod-webhook") |
| `--webhook.serviceName` | string | The name of the webhook service. (default "flyte-pod-webhook") |
| `--webhook.servicePort` | int32 | The port on the service that hosting webhook. (default 443) |
| `--webhook.vaultSecretManager.role` | string | Specifies the vault role to use (default "flyte") |
=== PAGE: https://www.union.ai/docs/v1/serverless/api-reference/uctl-cli/uctl-config/uctl-config-init ===
# uctl config init
Generates a Flytectl config file in the user's home directory.
## Synopsis
Creates a Flytectl config file in Flyte directory i.e `~/.flyte`.
Generate Sandbox config:
```shell
$ uctl config init
```
Flyte Sandbox is a fully standalone minimal environment for running
Flyte.
Generate remote cluster config:
```shell
$ uctl config init --host=flyte.myexample.com
```
By default, the connection is secure.
Generate remote cluster config with insecure connection:
```shell
$ uctl config init --host=flyte.myexample.com --insecure
```
Generate remote cluster config with separate console endpoint:
```shell
$ uctl config init --host=flyte.myexample.com --console=console.myexample.com
```
Generate Flytectl config with a storage provider:
```shell
$ uctl config init --host=flyte.myexample.com --storage
```
```shell
$ uctl config init [flags]
```
## Options
| Option | Type | Description |
|--------|------|-------------|
| `--console` | string | Endpoint of console, if different than flyte admin |
| `--force` | | Force to overwrite the default config file without confirmation |
| `-h`, `--help` | help for init |
| `--host` | string | Endpoint of flyte admin |
| `--insecure` | | Enable insecure mode |
### Options inherited from parent commands
| Option | Type | Description |
|--------|------|-------------|
| `--admin.audience` | string | Audience to use when initiating OAuth2 authorization requests. |
| `--admin.authType` | string | Type of OAuth2 flow used for communicating with admin.ClientSecret, Pkce, ExternalCommand are valid values (default "ClientSecret") |
| `--admin.authorizationHeader` | string | Custom metadata header to pass JWT |
| `--admin.authorizationServerUrl` | string | This is the URL to your IdP's authorization server. It'll default to Endpoint |
| `--admin.caCertFilePath` | string | Use specified certificate file to verify the admin server peer. |
| `--admin.clientId` | string | Client ID (default "flytepropeller") |
| `--admin.clientSecretEnvVar` | string | Environment variable containing the client secret |
| `--admin.clientSecretLocation` | string | File containing the client secret (default "/etc/secrets/client_secret") |
| `--admin.command` | strings | Command for external authentication token generation |
| `--admin.defaultOrg` | string | OPTIONAL: Default org to use to support non-org based cli's.'. |
| `--admin.defaultServiceConfig` | string | |
| `--admin.deviceFlowConfig.pollInterval` | string | amount of time the device flow would poll the token endpoint if auth server doesn't return a polling interval. Okta and google IDP do return an interval' (default "5s") |
| `--admin.deviceFlowConfig.refreshTime` | string | grace period from the token expiry after which it would refresh the token. (default "5m0s") |
| `--admin.deviceFlowConfig.timeout` | string | amount of time the device flow should complete or else it will be cancelled. (default "10m0s") |
| `--admin.endpoint` | string | For admin types, specify where the uri of the service is located. |
| `--admin.httpProxyURL` | string | OPTIONAL: HTTP Proxy to be used for OAuth requests. |
| `--admin.insecure` | | Use insecure connection. |
| `--admin.insecureSkipVerify` | | InsecureSkipVerify controls whether a client verifies the server's certificate chain and host name.Caution: shouldn't be use for production usecases' |
| `--admin.maxBackoffDelay` | string | Max delay for grpc backoff (default "8s") |
| `--admin.maxMessageSizeBytes` | int | The max size in bytes for incoming gRPC messages |
| `--admin.maxRetries` | int | Max number of gRPC retries (default 4) |
| `--admin.perRetryTimeout` | string | gRPC per retry timeout (default "15s") |
| `--admin.pkceConfig.refreshTime` | string | grace period from the token expiry after which it would refresh the token. (default "5m0s") |
| `--admin.pkceConfig.timeout` | string | Amount of time the browser session would be active for authentication from client app. (default "2m0s") |
| `--admin.proxyCommand` | strings | Command for external proxy-authorization token generation |
| `--admin.scopes` | strings | List of scopes to request |
| `--admin.tokenRefreshWindow` | string | Max duration between token refresh attempt and token expiry. (default "0s") |
| `--admin.tokenUrl` | string | OPTIONAL: Your IdP's token endpoint. It'll be discovered from flyte admin's OAuth Metadata endpoint if not provided. |
| `--admin.useAudienceFromAdmin` | | Use Audience configured from admins public endpoint config. |
| `--admin.useAuth` | | Deprecated: Auth will be enabled/disabled based on admin's dynamically discovered information. |
| `--auth.appAuth.externalAuthServer.allowedAudience` | strings | Optional: A list of allowed audiences. If not provided, the audience is expected to be the public Uri of the service. |
| `--auth.appAuth.externalAuthServer.baseUrl` | string | This should be the base url of the authorization server that you are trying to hit. With Okta for instance, it will look something like https://company.okta.com/oauth2/abcdef123456789/ |
| `--auth.appAuth.externalAuthServer.httpProxyURL` | string | OPTIONAL: HTTP Proxy to be used for OAuth requests. |
| `--auth.appAuth.externalAuthServer.metadataUrl` | string | Optional: If the server doesn't support /.well-known/oauth-authorization-server, you can set a custom metadata url here.' |
| `--auth.appAuth.externalAuthServer.retryAttempts` | int | Optional: The number of attempted retries on a transient failure to get the OAuth metadata (default 5) |
| `--auth.appAuth.externalAuthServer.retryDelay` | string | Optional, Duration to wait between retries (default "1s") |
| `--auth.appAuth.selfAuthServer.accessTokenLifespan` | string | Defines the lifespan of issued access tokens. (default "30m0s") |
| `--auth.appAuth.selfAuthServer.authorizationCodeLifespan` | string | Defines the lifespan of issued access tokens. (default "5m0s") |
| `--auth.appAuth.selfAuthServer.claimSymmetricEncryptionKeySecretName` | string | OPTIONAL: Secret name to use to encrypt claims in authcode token. (default "claim_symmetric_key") |
| `--auth.appAuth.selfAuthServer.issuer` | string | Defines the issuer to use when issuing and validating tokens. The default value is https://{requestUri.HostAndPort}/ |
| `--auth.appAuth.selfAuthServer.oldTokenSigningRSAKeySecretName` | string | OPTIONAL: Secret name to use to retrieve Old RSA Signing Key. This can be useful during key rotation to continue to accept older tokens. (default "token_rsa_key_old.pem") |
| `--auth.appAuth.selfAuthServer.refreshTokenLifespan` | string | Defines the lifespan of issued access tokens. (default "1h0m0s") |
| `--auth.appAuth.selfAuthServer.tokenSigningRSAKeySecretName` | string | OPTIONAL: Secret name to use to retrieve RSA Signing Key. (default "token_rsa_key.pem") |
| `--auth.appAuth.thirdPartyConfig.flyteClient.audience` | string | Audience to use when initiating OAuth2 authorization requests. |
| `--auth.appAuth.thirdPartyConfig.flyteClient.clientId` | string | public identifier for the app which handles authorization for a Flyte deployment (default "uctl") |
| `--auth.appAuth.thirdPartyConfig.flyteClient.redirectUri` | string | This is the callback uri registered with the app which handles authorization for a Flyte deployment (default "http://localhost:53593/callback") |
| `--auth.appAuth.thirdPartyConfig.flyteClient.scopes` | strings | Recommended scopes for the client to request. (default [all,offline]) |
| `--auth.disableForGrpc` | | Disables auth enforcement on Grpc Endpoints. |
| `--auth.disableForHttp` | | Disables auth enforcement on HTTP Endpoints. |
| `--auth.grpcAuthorizationHeader` | string | (default "flyte-authorization") |
| `--auth.httpAuthorizationHeader` | string | (default "flyte-authorization") |
| `--auth.httpProxyURL` | string | OPTIONAL: HTTP Proxy to be used for OAuth requests. |
| `--auth.tokenEndpointProxyPath` | string | The path used to proxy calls to the TokenURL |
| `--auth.userAuth.cookieBlockKeySecretName` | string | OPTIONAL: Secret name to use for cookie block key. (default "cookie_block_key") |
| `--auth.userAuth.cookieHashKeySecretName` | string | OPTIONAL: Secret name to use for cookie hash key. (default "cookie_hash_key") |
| `--auth.userAuth.cookieSetting.domain` | string | OPTIONAL: Allows you to set the domain attribute on the auth cookies. |
| `--auth.userAuth.cookieSetting.sameSitePolicy` | string | OPTIONAL: Allows you to declare if your cookie should be restricted to a first-party or same-site context.Wrapper around http.SameSite. (default "DefaultMode") |
| `--auth.userAuth.httpProxyURL` | string | OPTIONAL: HTTP Proxy to be used for OAuth requests. |
| `--auth.userAuth.idpQueryParameter` | string | idp query parameter used for selecting a particular IDP for doing user authentication. Eg: for Okta passing idp={IDP-ID} forces the authentication to happen with IDP-ID |
| `--auth.userAuth.openId.baseUrl` | string | |
| `--auth.userAuth.openId.clientId` | string | |
| `--auth.userAuth.openId.clientSecretFile` | string | |
| `--auth.userAuth.openId.clientSecretName` | string | (default "oidc_client_secret") |
| `--auth.userAuth.openId.scopes` | strings | (default [openid,profile]) |
| `--auth.userAuth.redirectUrl` | string | (default "/console") |
| `--authorizer.internalCommunicationConfig.enabled` | | Enables authorization decisions for internal communication. (default true) |
| `--authorizer.internalCommunicationConfig.ingressIdentity` | string | IngressIdentity used in the cluster. Needed to exclude the communication coming from ingress. (default "ingress-nginx.ingress-nginx.serviceaccount.identity.linkerd.cluster.local") |
| `--authorizer.internalCommunicationConfig.tenantUrlPatternIdentity` | string | UrlPatternIdentity of the internal tenant service endpoint identities. (default "{{ service }}.{{ org }}.serviceaccount.identity.linkerd.cluster.local") |
| `--authorizer.internalCommunicationConfig.urlPatternIdentity` | string | UrlPatternIdentity of the internal service endpoint identities. (default "{{ service }}-helmchart.{{ service }}.serviceaccount.identity.linkerd.cluster.local") |
| `--authorizer.mode` | string | (default "Active") |
| `--authorizer.organizationConfig.PolicyConfig.adminPolicyDescription` | string | description for the boilerplate admin policy (default "Contributor permissions and full admin permissions to manage users and view usage dashboards") |
| `--authorizer.organizationConfig.PolicyConfig.contributorPolicyDescription` | string | description for the boilerplate contributor policy (default "Viewer permissions and permissions to create workflows, tasks, launch plans, and executions") |
| `--authorizer.organizationConfig.PolicyConfig.defaultUserPolicyRoleType` | string | name of the role type to determine which default policy new users added to the organization should be assigned (default "Viewer") |
| `--authorizer.organizationConfig.PolicyConfig.serverlessContributorPolicyDescription` | string | description for the boilerplate serverless contributor policy (default "Viewer permissions and permissions to create workflows, tasks, launch plans, and executions") |
| `--authorizer.organizationConfig.PolicyConfig.serverlessViewerPolicyDescription` | string | description for the boilerplate serverless viewer policy (default "Permissions to view Flyte entities") |
| `--authorizer.organizationConfig.PolicyConfig.viewerPolicyDescription` | string | description for the boilerplate viewer policy (default "Permissions to view Flyte entities") |
| `--authorizer.organizationConfig.defaultPolicyCacheDuration` | string | Cache entry duration for the store of the default policy per organization (default "10m0s") |
| `--authorizer.syncRuleRefreshInterval` | string | (default "1m0s") |
| `--authorizer.type` | string | (default "UserClouds") |
| `--authorizer.userCloudsClient.cache.redis.ttl.edgeTypes` | string | Specifies how long edge types remain in the cache.. (default "30m0s") |
| `--authorizer.userCloudsClient.cache.redis.ttl.edges` | string | Specifies how long edges remain in the cache. (default "30m0s") |
| `--authorizer.userCloudsClient.cache.redis.ttl.objectTypes` | string | Specifies how long object types remain in the cache. (default "30m0s") |
| `--authorizer.userCloudsClient.cache.redis.ttl.objects` | string | Specifies how long objects remain in the cache. (default "30m0s") |
| `--authorizer.userCloudsClient.cache.type` | string | Cache type to use. (default "none") |
| `--authorizer.userCloudsClient.clientID` | string | UserClouds client id |
| `--authorizer.userCloudsClient.clientSecretName` | string | UserCloud client secret name to read from the secret manager. (default "userclouds-client-secret") |
| `--authorizer.userCloudsClient.enableLogging` | | Enable userclouds client's internal logging. Calls to post logs take 250-350 ms and will impact p99 latency, enable with caution. |
| `--authorizer.userCloudsClient.tenantID` | string | UserClouds tenant id. Should be a UUID. |
| `--authorizer.userCloudsClient.tenantUrl` | string | Something like https://{yourtenant}.tenant.userclouds.com |
| `--config` | string | config file (default is /Users/andrew/.union/config.yaml) |
| `--connection.environment` | string | |
| `--connection.region` | string | |
| `--connection.rootTenantURLPattern` | string | Pattern for tenant url. (default "dns:///{{ organization }}.cloud-staging.union.ai") |
| `--console.endpoint` | string | Endpoint of console, if different than flyte admin |
| `--database.connMaxLifeTime` | string | sets the maximum amount of time a connection may be reused (default "1h0m0s") |
| `--database.enableForeignKeyConstraintWhenMigrating` | | Whether to enable gorm foreign keys when migrating the db |
| `--database.maxIdleConnections` | int | maxIdleConnections sets the maximum number of connections in the idle connection pool. (default 10) |
| `--database.maxOpenConnections` | int | maxOpenConnections sets the maximum number of open connections to the database. (default 100) |
| `--database.postgres.dbname` | string | The database name (default "postgres") |
| `--database.postgres.debug` | | |
| `--database.postgres.host` | string | The host name of the database server (default "localhost") |
| `--database.postgres.options` | string | See http://gorm.io/docs/connecting_to_the_database.html for available options passed, in addition to the above. (default "sslmode=disable") |
| `--database.postgres.password` | string | The database password. (default "postgres") |
| `--database.postgres.passwordPath` | string | Points to the file containing the database password. |
| `--database.postgres.port` | int | The port name of the database server (default 30001) |
| `--database.postgres.readReplicaHost` | string | The host name of the read replica database server (default "localhost") |
| `--database.postgres.username` | string | The database user who is connecting to the server. (default "postgres") |
| `--database.sqlite.file` | string | The path to the file (existing or new) where the DB should be created / stored. If existing, then this will be re-used, else a new will be created |
| `--db.connectionPool.maxConnectionLifetime` | string | (default "0s") |
| `--db.connectionPool.maxIdleConnections` | int | |
| `--db.connectionPool.maxOpenConnections` | int | |
| `--db.dbname` | string | (default "postgres") |
| `--db.debug` | | |
| `--db.host` | string | (default "postgres") |
| `--db.log_level` | int | (default 4) |
| `--db.options` | string | (default "sslmode=disable") |
| `--db.password` | string | |
| `--db.passwordPath` | string | |
| `--db.port` | int | (default 5432) |
| `--db.username` | string | (default "postgres") |
| `-d`, `--domain` | string | Specifies the Flyte project's domain. |
| `--file` | stringArray | Passes the config file to load. |
| `--files.archive` | | Pass in archive file either an http link or local path. |
| `--files.assumableIamRole` | string | Custom assumable iam auth role to register launch plans with. |
| `--files.continueOnError` | | Continue on error when registering files. |
| `--files.destinationDirectory` | string | Location of source code in container. |
| `--files.dryRun` | | Execute command without making any modifications. |
| `--files.enableSchedule` | | Enable the schedule if the files contain schedulable launchplan. |
| `--files.force` | | Force use of version number on entities registered with flyte. |
| `--files.k8ServiceAccount` | string | Deprecated. Please use `--K8sServiceAccount`|
| `--files.k8sServiceAccount` | string | Custom kubernetes service account auth role to register launch plans with. |
| `--files.outputLocationPrefix` | string | Custom output location prefix for offloaded types (files/schemas). |
| `--files.sourceUploadPath` | string | Deprecated: Update flyte admin to avoid having to configure storage access from uctl. |
| `--files.version` | string | Version of the entity to be registered with flyte which are un-versioned after serialization. |
| `--logger.formatter.type` | string | Sets logging format type. (default "json") |
| `--logger.level` | int | Sets the minimum logging level. (default 3) |
| `--logger.mute` | | Mutes all logs regardless of severity. Intended for benchmarks/tests only. |
| `--logger.show-source` | | Includes source code location in logs. |
| `--org` | string | Organization to work on. If not set, default to user's org. |
| `--otel.file.filename` | string | Filename to store exported telemetry traces (default "/tmp/trace.txt") |
| `--otel.jaeger.endpoint` | string | Endpoint for the jaeger telemetry trace ingestor (default "http://localhost:14268/api/traces") |
| `--otel.otlpgrpc.endpoint` | string | Endpoint for the OTLP telemetry trace collector (default "http://localhost:4317") |
| `--otel.otlphttp.endpoint` | string | Endpoint for the OTLP telemetry trace collector (default "http://localhost:4318/v1/traces") |
| `--otel.sampler.parentSampler` | string | Sets the parent sampler to use for the tracer (default "always") |
| `--otel.type` | string | Sets the type of exporter to configure [noop/file/jaeger/otlpgrpc/otlphttp]. (default "noop") |
| `-o`, `--output` | string | Specifies the output type - supported formats [TABLE JSON YAML DOT DOTURL]. NOTE: dot, doturl are only supported for Workflow (default "table") |
| `--plugins.catalogcache.reader.maxItems` | int | Maximum number of entries to keep in the index. (default 10000) |
| `--plugins.catalogcache.reader.maxRetries` | int | Maximum number of retries per item. (default 3) |
| `--plugins.catalogcache.reader.workers` | int | Number of concurrent workers to start processing the queue. (default 10) |
| `--plugins.catalogcache.writer.maxItems` | int | Maximum number of entries to keep in the index. (default 10000) |
| `--plugins.catalogcache.writer.maxRetries` | int | Maximum number of retries per item. (default 3) |
| `--plugins.catalogcache.writer.workers` | int | Number of concurrent workers to start processing the queue. (default 10) |
| `-p`, `--project` | string | Specifies the Flyte project. |
| `--rediscache.passwordSecretName` | string | Name of secret with Redis password. |
| `--rediscache.primaryEndpoint` | string | Primary endpoint for the redis cache that can be used for both reads and writes. |
| `--rediscache.replicaEndpoint` | string | Replica endpoint for the redis cache that can be used for reads. |
| `--secrets.env-prefix` | string | Prefix for environment variables (default "FLYTE_SECRET_") |
| `--secrets.secrets-prefix` | string | Prefix where to look for secrets file (default "/etc/secrets") |
| `--secrets.type` | string | Sets the type of storage to configure [local]. (default "local") |
| `--server.dataProxy.download.maxExpiresIn` | string | Maximum allowed expiration duration. (default "1h0m0s") |
| `--server.dataProxy.upload.defaultFileNameLength` | int | Default length for the generated file name if not provided in the request. (default 20) |
| `--server.dataProxy.upload.maxExpiresIn` | string | Maximum allowed expiration duration. (default "1h0m0s") |
| `--server.dataProxy.upload.maxSize` | string | Maximum allowed upload size. (default "6Mi") |
| `--server.dataProxy.upload.storagePrefix` | string | Storage prefix to use for all upload requests. |
| `--server.grpc.enableGrpcLatencyMetrics` | | Enable grpc latency metrics. Note Histograms metrics can be expensive on Prometheus servers. |
| `--server.grpc.maxMessageSizeBytes` | int | The max size in bytes for incoming gRPC messages |
| `--server.grpc.port` | int | On which grpc port to serve admin (default 8089) |
| `--server.grpc.serverReflection` | | Enable GRPC Server Reflection (default true) |
| `--server.grpcPort` | int | deprecated |
| `--server.grpcServerReflection` | | deprecated |
| `--server.httpPort` | int | On which http port to serve admin (default 8088) |
| `--server.kube-config` | string | Path to kubernetes client config file, default is empty, useful for incluster config. |
| `--server.kubeClientConfig.burst` | int | Max burst rate for throttle. 0 defaults to 10 (default 25) |
| `--server.kubeClientConfig.qps` | int32 | Max QPS to the master for requests to KubeAPI. 0 defaults to 5. (default 100) |
| `--server.kubeClientConfig.timeout` | string | Max duration allowed for every request to KubeAPI before giving up. 0 implies no timeout. (default "30s") |
| `--server.master` | string | The address of the Kubernetes API server. |
| `--server.readHeaderTimeoutSeconds` | int | The amount of time allowed to read request headers. (default 32) |
| `--server.security.allowCors` | | (default true) |
| `--server.security.allowedHeaders` | strings | (default [Content-Type,flyte-authorization]) |
| `--server.security.allowedOrigins` | strings | (default [*]) |
| `--server.security.auditAccess` | | |
| `--server.security.secure` | | |
| `--server.security.ssl.certificateFile` | string | |
| `--server.security.ssl.keyFile` | string | |
| `--server.security.useAuth` | | |
| `--server.thirdPartyConfig.flyteClient.audience` | string | Audience to use when initiating OAuth2 authorization requests. |
| `--server.thirdPartyConfig.flyteClient.clientId` | string | public identifier for the app which handles authorization for a Flyte deployment |
| `--server.thirdPartyConfig.flyteClient.redirectUri` | string | This is the callback uri registered with the app which handles authorization for a Flyte deployment |
| `--server.thirdPartyConfig.flyteClient.scopes` | strings | Recommended scopes for the client to request. |
| `--server.watchService.maxActiveClusterConnections` | int | (default 5) |
| `--server.watchService.maxPageSize` | int | (default 50000) |
| `--server.watchService.nonTerminalStatusUpdatesInterval` | string | (default "1m0s") |
| `--server.watchService.pollInterval` | string | (default "1s") |
| `--sharedservice.connectPort` | string | On which connect port to serve admin (default "8080") |
| `--sharedservice.grpc.grpcMaxResponseStatusBytes` | int32 | specifies the maximum (uncompressed) size of header list that the client is prepared to accept on grpc calls (default 32000) |
| `--sharedservice.grpc.maxConcurrentStreams` | int | Limit on the number of concurrent streams to each ServerTransport. (default 100) |
| `--sharedservice.grpc.maxMessageSizeBytes` | int | Limit on the size of message that can be received on the server. (default 10485760) |
| `--sharedservice.grpcServerReflection` | | Enable GRPC Server Reflection (default true) |
| `--sharedservice.httpPort` | string | On which http port to serve admin (default "8089") |
| `--sharedservice.kubeConfig` | string | Path to kubernetes client config file. |
| `--sharedservice.master` | string | The address of the Kubernetes API server. |
| `--sharedservice.metrics.enableClientGrpcHistograms` | | Enable client grpc histograms (default true) |
| `--sharedservice.metrics.enableGrpcHistograms` | | Enable grpc histograms (default true) |
| `--sharedservice.metrics.scope` | string | Scope to emit metrics under (default "service:") |
| `--sharedservice.port` | string | On which grpc port to serve admin (default "8080") |
| `--sharedservice.profiler.enabled` | | Enable Profiler on server |
| `--sharedservice.profilerPort` | string | Profile port to start listen for pprof and metric handlers on. (default "10254") |
| `--sharedservice.security.allowCors` | | |
| `--sharedservice.security.allowLocalhostAccess` | | Whether to permit localhost unauthenticated access to the server |
| `--sharedservice.security.allowedHeaders` | strings | |
| `--sharedservice.security.allowedOrigins` | strings | |
| `--sharedservice.security.auditAccess` | | |
| `--sharedservice.security.orgOverride` | string | Override org in identity context if localhost access enabled |
| `--sharedservice.security.secure` | | |
| `--sharedservice.security.ssl.certificateAuthorityFile` | string | |
| `--sharedservice.security.ssl.certificateFile` | string | |
| `--sharedservice.security.ssl.keyFile` | string | |
| `--sharedservice.security.useAuth` | | |
| `--sharedservice.sync.syncInterval` | string | Time interval to sync (default "5m0s") |
| `--storage.cache.max_size_mbs` | int | Maximum size of the cache where the Blob store data is cached in-memory. If not specified or set to 0, cache is not used |
| `--storage.cache.target_gc_percent` | int | Sets the garbage collection target percentage. |
| `--storage.connection.access-key` | string | Access key to use. Only required when authtype is set to accesskey. |
| `--storage.connection.auth-type` | string | Auth Type to use [iam, accesskey]. (default "iam") |
| `--storage.connection.disable-ssl` | | Disables SSL connection. Should only be used for development. |
| `--storage.connection.endpoint` | string | URL for storage client to connect to. |
| `--storage.connection.region` | string | Region to connect to. (default "us-east-1") |
| `--storage.connection.secret-key` | string | Secret to use when accesskey is set. |
| `--storage.container` | string | Initial container (in s3 a bucket) to create -if it doesn't exist-.' |
| `--storage.defaultHttpClient.timeout` | string | Sets time out on the http client. (default "0s") |
| `--storage.enable-multicontainer` | | If this is true, then the container argument is overlooked and redundant. This config will automatically open new connections to new containers/buckets as they are encountered |
| `--storage.limits.maxDownloadMBs` | int | Maximum allowed download size (in MBs) per call. (default 2) |
| `--storage.stow.config` | stringToString | Configuration for stow backend. Refer to github/flyteorg/stow (default []) |
| `--storage.stow.kind` | string | Kind of Stow backend to use. Refer to github/flyteorg/stow |
| `--storage.type` | string | Sets the type of storage to configure [s3/minio/local/mem/stow]. (default "s3") |
| `--union.auth.authorizationMetadataKey` | string | Authorization Header to use when passing Access Tokens to the server (default "flyte-authorization") |
| `--union.auth.clientId` | string | Client ID |
| `--union.auth.clientSecretEnvVar` | string | Environment variable containing the client secret |
| `--union.auth.clientSecretLocation` | string | File containing the client secret |
| `--union.auth.deviceFlow.pollInterval` | string | amount of time the device flow would poll the token endpoint if auth server doesn't return a polling interval. Okta and google IDP do return an interval' (default "5s") |
| `--union.auth.deviceFlow.refreshTime` | string | grace period from the token expiry after which it would refresh the token. (default "5m0s") |
| `--union.auth.deviceFlow.timeout` | string | amount of time the device flow should complete or else it will be cancelled. (default "10m0s") |
| `--union.auth.enable` | | Whether to enable an authenticated conenction when communicating with admin. (default true) |
| `--union.auth.externalAuth.command` | strings | Command for external authentication token generation |
| `--union.auth.pkce.refreshTime` | string | grace period from the token expiry after which it would refresh the token. (default "5m0s") |
| `--union.auth.pkce.timeout` | string | Amount of time the browser session would be active for authentication from client app. (default "15s") |
| `--union.auth.scopes` | strings | List of scopes to request |
| `--union.auth.tokenRefreshWindow` | string | Max duration between token refresh attempt and token expiry. (default "1h0m0s") |
| `--union.auth.tokenUrl` | string | OPTIONAL: Your IdP's token endpoint. It'll be discovered from flyte admin's OAuth Metadata endpoint if not provided. |
| `--union.auth.type` | string | Type of OAuth2 flow used for communicating with admin. (default "Pkce") |
| `--union.cache.maxItemsCount` | int | Maximum number of items to keep in the cache before evicting. (default 1000) |
| `--union.connection.host` | string | Host to connect to (default "dns:///utt-mgdp-stg-us-east-2.cloud-staging.union.ai") |
| `--union.connection.insecure` | | Whether to connect over insecure channel |
| `--union.connection.insecureSkipVerify` | | InsecureSkipVerify controls whether a client verifies the server's certificate chain and host name.Caution: shouldn't be use for production usecases' |
| `--union.connection.keepAliveConfig.permitWithoutStream` | | If true, client sends keepalive pings even with no active RPCs. |
| `--union.connection.keepAliveConfig.time` | string | After a duration of this time if the client doesn't see any activity it pings the server to see if the transport is still alive. (default "20s") |
| `--union.connection.keepAliveConfig.timeout` | string | After having pinged for keepalive check, the client waits for a duration of Timeout and if no activity is seen even after that the connection is closed. (default "2m0s") |
| `--union.connection.maxBackoffDelay` | string | Max delay for grpc backoff (default "8s") |
| `--union.connection.maxRecvMsgSize` | int | Maximum size of a message in bytes of a gRPC message (default 10485760) |
| `--union.connection.maxRetries` | int | Max number of gRPC retries (default 4) |
| `--union.connection.minConnectTimeout` | string | Minimum timeout for establishing a connection (default "20s") |
| `--union.connection.perRetryTimeout` | string | gRPC per retry timeout (default "15s") |
| `--union.connection.serviceConfig` | string | Defines gRPC experimental JSON Service Config (default "{"loadBalancingConfig": [{"round_robin":{}}]}") |
| `--union.connection.trustedIdentityClaims.enabled` | | Enables passing of trusted claims while making inter service calls |
| `--union.connection.trustedIdentityClaims.externalIdentityClaim` | string | External identity claim of the service which is authorized to make internal service call. These are verified against userclouds actions |
| `--union.connection.trustedIdentityClaims.externalIdentityTypeClaim` | string | External identity type claim of app or user to use for the current service identity. It should be an 'app' for inter service communication |
| `--union.internalConnectionConfig.-` | stringToString | (default []) |
| `--union.internalConnectionConfig.enabled` | | Enables internal service to service communication instead of going through ingress. |
| `--union.internalConnectionConfig.urlPattern` | string | UrlPattern of the internal service endpoints. (default "{{ service }}-helmchart.{{ service }}.svc.cluster.local:80") |
| `--webhook.awsSecretManager.sidecarImage` | string | Specifies the sidecar docker image to use (default "docker.io/amazon/aws-secrets-manager-secret-sidecar:v0.1.4") |
| `--webhook.certDir` | string | Certificate directory to use to write generated certs. Defaults to /etc/webhook/certs/ (default "/etc/webhook/certs") |
| `--webhook.embeddedSecretManagerConfig.awsConfig.region` | string | AWS region |
| `--webhook.embeddedSecretManagerConfig.fileMountInitContainer.image` | string | Specifies init container image to use for mounting secrets as files. (default "busybox:1.28") |
| `--webhook.embeddedSecretManagerConfig.gcpConfig.project` | string | GCP project to be used for secret manager |
| `--webhook.embeddedSecretManagerConfig.type` | string | (default "AWS") |
| `--webhook.gcpSecretManager.sidecarImage` | string | Specifies the sidecar docker image to use (default "gcr.io/google.com/cloudsdktool/cloud-sdk:alpine") |
| `--webhook.listenPort` | int | The port to use to listen to webhook calls. Defaults to 9443 (default 9443) |
| `--webhook.localCert` | | write certs locally. Defaults to false |
| `--webhook.metrics-prefix` | string | An optional prefix for all published metrics. (default "flyte:") |
| `--webhook.secretName` | string | Secret name to write generated certs to. (default "flyte-pod-webhook") |
| `--webhook.serviceName` | string | The name of the webhook service. (default "flyte-pod-webhook") |
| `--webhook.servicePort` | int32 | The port on the service that hosting webhook. (default 443) |
| `--webhook.vaultSecretManager.role` | string | Specifies the vault role to use (default "flyte") |
=== PAGE: https://www.union.ai/docs/v1/serverless/api-reference/uctl-cli/uctl-config/uctl-config-validate ===
# uctl config validate
Validates the loaded config.
## Synopsis
Validates the loaded config.
```shell
$ uctl config validate [flags]
```
## Options
| Option | Type | Description |
|--------|------|-------------|
| `-h`, `--help` | help for validate |
| `--strict` | | Validates that all keys in loaded config |
map to already registered sections.
### Options inherited from parent commands
| Option | Type | Description |
|--------|------|-------------|
| `--admin.audience` | string | Audience to use when initiating OAuth2 authorization requests. |
| `--admin.authType` | string | Type of OAuth2 flow used for communicating with admin.ClientSecret, Pkce, ExternalCommand are valid values (default "ClientSecret") |
| `--admin.authorizationHeader` | string | Custom metadata header to pass JWT |
| `--admin.authorizationServerUrl` | string | This is the URL to your IdP's authorization server. It'll default to Endpoint |
| `--admin.caCertFilePath` | string | Use specified certificate file to verify the admin server peer. |
| `--admin.clientId` | string | Client ID (default "flytepropeller") |
| `--admin.clientSecretEnvVar` | string | Environment variable containing the client secret |
| `--admin.clientSecretLocation` | string | File containing the client secret (default "/etc/secrets/client_secret") |
| `--admin.command` | strings | Command for external authentication token generation |
| `--admin.defaultOrg` | string | OPTIONAL: Default org to use to support non-org based cli's.'. |
| `--admin.defaultServiceConfig` | string | |
| `--admin.deviceFlowConfig.pollInterval` | string | amount of time the device flow would poll the token endpoint if auth server doesn't return a polling interval. Okta and google IDP do return an interval' (default "5s") |
| `--admin.deviceFlowConfig.refreshTime` | string | grace period from the token expiry after which it would refresh the token. (default "5m0s") |
| `--admin.deviceFlowConfig.timeout` | string | amount of time the device flow should complete or else it will be cancelled. (default "10m0s") |
| `--admin.endpoint` | string | For admin types, specify where the uri of the service is located. |
| `--admin.httpProxyURL` | string | OPTIONAL: HTTP Proxy to be used for OAuth requests. |
| `--admin.insecure` | | Use insecure connection. |
| `--admin.insecureSkipVerify` | | InsecureSkipVerify controls whether a client verifies the server's certificate chain and host name.Caution: shouldn't be use for production usecases' |
| `--admin.maxBackoffDelay` | string | Max delay for grpc backoff (default "8s") |
| `--admin.maxMessageSizeBytes` | int | The max size in bytes for incoming gRPC messages |
| `--admin.maxRetries` | int | Max number of gRPC retries (default 4) |
| `--admin.perRetryTimeout` | string | gRPC per retry timeout (default "15s") |
| `--admin.pkceConfig.refreshTime` | string | grace period from the token expiry after which it would refresh the token. (default "5m0s") |
| `--admin.pkceConfig.timeout` | string | Amount of time the browser session would be active for authentication from client app. (default "2m0s") |
| `--admin.proxyCommand` | strings | Command for external proxy-authorization token generation |
| `--admin.scopes` | strings | List of scopes to request |
| `--admin.tokenRefreshWindow` | string | Max duration between token refresh attempt and token expiry. (default "0s") |
| `--admin.tokenUrl` | string | OPTIONAL: Your IdP's token endpoint. It'll be discovered from flyte admin's OAuth Metadata endpoint if not provided. |
| `--admin.useAudienceFromAdmin` | | Use Audience configured from admins public endpoint config. |
| `--admin.useAuth` | | Deprecated: Auth will be enabled/disabled based on admin's dynamically discovered information. |
| `--auth.appAuth.externalAuthServer.allowedAudience` | strings | Optional: A list of allowed audiences. If not provided, the audience is expected to be the public Uri of the service. |
| `--auth.appAuth.externalAuthServer.baseUrl` | string | This should be the base url of the authorization server that you are trying to hit. With Okta for instance, it will look something like https://company.okta.com/oauth2/abcdef123456789/ |
| `--auth.appAuth.externalAuthServer.httpProxyURL` | string | OPTIONAL: HTTP Proxy to be used for OAuth requests. |
| `--auth.appAuth.externalAuthServer.metadataUrl` | string | Optional: If the server doesn't support /.well-known/oauth-authorization-server, you can set a custom metadata url here.' |
| `--auth.appAuth.externalAuthServer.retryAttempts` | int | Optional: The number of attempted retries on a transient failure to get the OAuth metadata (default 5) |
| `--auth.appAuth.externalAuthServer.retryDelay` | string | Optional, Duration to wait between retries (default "1s") |
| `--auth.appAuth.selfAuthServer.accessTokenLifespan` | string | Defines the lifespan of issued access tokens. (default "30m0s") |
| `--auth.appAuth.selfAuthServer.authorizationCodeLifespan` | string | Defines the lifespan of issued access tokens. (default "5m0s") |
| `--auth.appAuth.selfAuthServer.claimSymmetricEncryptionKeySecretName` | string | OPTIONAL: Secret name to use to encrypt claims in authcode token. (default "claim_symmetric_key") |
| `--auth.appAuth.selfAuthServer.issuer` | string | Defines the issuer to use when issuing and validating tokens. The default value is https://{requestUri.HostAndPort}/ |
| `--auth.appAuth.selfAuthServer.oldTokenSigningRSAKeySecretName` | string | OPTIONAL: Secret name to use to retrieve Old RSA Signing Key. This can be useful during key rotation to continue to accept older tokens. (default "token_rsa_key_old.pem") |
| `--auth.appAuth.selfAuthServer.refreshTokenLifespan` | string | Defines the lifespan of issued access tokens. (default "1h0m0s") |
| `--auth.appAuth.selfAuthServer.tokenSigningRSAKeySecretName` | string | OPTIONAL: Secret name to use to retrieve RSA Signing Key. (default "token_rsa_key.pem") |
| `--auth.appAuth.thirdPartyConfig.flyteClient.audience` | string | Audience to use when initiating OAuth2 authorization requests. |
| `--auth.appAuth.thirdPartyConfig.flyteClient.clientId` | string | public identifier for the app which handles authorization for a Flyte deployment (default "uctl") |
| `--auth.appAuth.thirdPartyConfig.flyteClient.redirectUri` | string | This is the callback uri registered with the app which handles authorization for a Flyte deployment (default "http://localhost:53593/callback") |
| `--auth.appAuth.thirdPartyConfig.flyteClient.scopes` | strings | Recommended scopes for the client to request. (default [all,offline]) |
| `--auth.disableForGrpc` | | Disables auth enforcement on Grpc Endpoints. |
| `--auth.disableForHttp` | | Disables auth enforcement on HTTP Endpoints. |
| `--auth.grpcAuthorizationHeader` | string | (default "flyte-authorization") |
| `--auth.httpAuthorizationHeader` | string | (default "flyte-authorization") |
| `--auth.httpProxyURL` | string | OPTIONAL: HTTP Proxy to be used for OAuth requests. |
| `--auth.tokenEndpointProxyPath` | string | The path used to proxy calls to the TokenURL |
| `--auth.userAuth.cookieBlockKeySecretName` | string | OPTIONAL: Secret name to use for cookie block key. (default "cookie_block_key") |
| `--auth.userAuth.cookieHashKeySecretName` | string | OPTIONAL: Secret name to use for cookie hash key. (default "cookie_hash_key") |
| `--auth.userAuth.cookieSetting.domain` | string | OPTIONAL: Allows you to set the domain attribute on the auth cookies. |
| `--auth.userAuth.cookieSetting.sameSitePolicy` | string | OPTIONAL: Allows you to declare if your cookie should be restricted to a first-party or same-site context.Wrapper around http.SameSite. (default "DefaultMode") |
| `--auth.userAuth.httpProxyURL` | string | OPTIONAL: HTTP Proxy to be used for OAuth requests. |
| `--auth.userAuth.idpQueryParameter` | string | idp query parameter used for selecting a particular IDP for doing user authentication. Eg: for Okta passing idp={IDP-ID} forces the authentication to happen with IDP-ID |
| `--auth.userAuth.openId.baseUrl` | string | |
| `--auth.userAuth.openId.clientId` | string | |
| `--auth.userAuth.openId.clientSecretFile` | string | |
| `--auth.userAuth.openId.clientSecretName` | string | (default "oidc_client_secret") |
| `--auth.userAuth.openId.scopes` | strings | (default [openid,profile]) |
| `--auth.userAuth.redirectUrl` | string | (default "/console") |
| `--authorizer.internalCommunicationConfig.enabled` | | Enables authorization decisions for internal communication. (default true) |
| `--authorizer.internalCommunicationConfig.ingressIdentity` | string | IngressIdentity used in the cluster. Needed to exclude the communication coming from ingress. (default "ingress-nginx.ingress-nginx.serviceaccount.identity.linkerd.cluster.local") |
| `--authorizer.internalCommunicationConfig.tenantUrlPatternIdentity` | string | UrlPatternIdentity of the internal tenant service endpoint identities. (default "{{ service }}.{{ org }}.serviceaccount.identity.linkerd.cluster.local") |
| `--authorizer.internalCommunicationConfig.urlPatternIdentity` | string | UrlPatternIdentity of the internal service endpoint identities. (default "{{ service }}-helmchart.{{ service }}.serviceaccount.identity.linkerd.cluster.local") |
| `--authorizer.mode` | string | (default "Active") |
| `--authorizer.organizationConfig.PolicyConfig.adminPolicyDescription` | string | description for the boilerplate admin policy (default "Contributor permissions and full admin permissions to manage users and view usage dashboards") |
| `--authorizer.organizationConfig.PolicyConfig.contributorPolicyDescription` | string | description for the boilerplate contributor policy (default "Viewer permissions and permissions to create workflows, tasks, launch plans, and executions") |
| `--authorizer.organizationConfig.PolicyConfig.defaultUserPolicyRoleType` | string | name of the role type to determine which default policy new users added to the organization should be assigned (default "Viewer") |
| `--authorizer.organizationConfig.PolicyConfig.serverlessContributorPolicyDescription` | string | description for the boilerplate serverless contributor policy (default "Viewer permissions and permissions to create workflows, tasks, launch plans, and executions") |
| `--authorizer.organizationConfig.PolicyConfig.serverlessViewerPolicyDescription` | string | description for the boilerplate serverless viewer policy (default "Permissions to view Flyte entities") |
| `--authorizer.organizationConfig.PolicyConfig.viewerPolicyDescription` | string | description for the boilerplate viewer policy (default "Permissions to view Flyte entities") |
| `--authorizer.organizationConfig.defaultPolicyCacheDuration` | string | Cache entry duration for the store of the default policy per organization (default "10m0s") |
| `--authorizer.syncRuleRefreshInterval` | string | (default "1m0s") |
| `--authorizer.type` | string | (default "UserClouds") |
| `--authorizer.userCloudsClient.cache.redis.ttl.edgeTypes` | string | Specifies how long edge types remain in the cache.. (default "30m0s") |
| `--authorizer.userCloudsClient.cache.redis.ttl.edges` | string | Specifies how long edges remain in the cache. (default "30m0s") |
| `--authorizer.userCloudsClient.cache.redis.ttl.objectTypes` | string | Specifies how long object types remain in the cache. (default "30m0s") |
| `--authorizer.userCloudsClient.cache.redis.ttl.objects` | string | Specifies how long objects remain in the cache. (default "30m0s") |
| `--authorizer.userCloudsClient.cache.type` | string | Cache type to use. (default "none") |
| `--authorizer.userCloudsClient.clientID` | string | UserClouds client id |
| `--authorizer.userCloudsClient.clientSecretName` | string | UserCloud client secret name to read from the secret manager. (default "userclouds-client-secret") |
| `--authorizer.userCloudsClient.enableLogging` | | Enable userclouds client's internal logging. Calls to post logs take 250-350 ms and will impact p99 latency, enable with caution. |
| `--authorizer.userCloudsClient.tenantID` | string | UserClouds tenant id. Should be a UUID. |
| `--authorizer.userCloudsClient.tenantUrl` | string | Something like https://{yourtenant}.tenant.userclouds.com |
| `--config` | string | config file (default is /Users/andrew/.union/config.yaml) |
| `--connection.environment` | string | |
| `--connection.region` | string | |
| `--connection.rootTenantURLPattern` | string | Pattern for tenant url. (default "dns:///{{ organization }}.cloud-staging.union.ai") |
| `--console.endpoint` | string | Endpoint of console, if different than flyte admin |
| `--database.connMaxLifeTime` | string | sets the maximum amount of time a connection may be reused (default "1h0m0s") |
| `--database.enableForeignKeyConstraintWhenMigrating` | | Whether to enable gorm foreign keys when migrating the db |
| `--database.maxIdleConnections` | int | maxIdleConnections sets the maximum number of connections in the idle connection pool. (default 10) |
| `--database.maxOpenConnections` | int | maxOpenConnections sets the maximum number of open connections to the database. (default 100) |
| `--database.postgres.dbname` | string | The database name (default "postgres") |
| `--database.postgres.debug` | | |
| `--database.postgres.host` | string | The host name of the database server (default "localhost") |
| `--database.postgres.options` | string | See http://gorm.io/docs/connecting_to_the_database.html for available options passed, in addition to the above. (default "sslmode=disable") |
| `--database.postgres.password` | string | The database password. (default "postgres") |
| `--database.postgres.passwordPath` | string | Points to the file containing the database password. |
| `--database.postgres.port` | int | The port name of the database server (default 30001) |
| `--database.postgres.readReplicaHost` | string | The host name of the read replica database server (default "localhost") |
| `--database.postgres.username` | string | The database user who is connecting to the server. (default "postgres") |
| `--database.sqlite.file` | string | The path to the file (existing or new) where the DB should be created / stored. If existing, then this will be re-used, else a new will be created |
| `--db.connectionPool.maxConnectionLifetime` | string | (default "0s") |
| `--db.connectionPool.maxIdleConnections` | int | |
| `--db.connectionPool.maxOpenConnections` | int | |
| `--db.dbname` | string | (default "postgres") |
| `--db.debug` | | |
| `--db.host` | string | (default "postgres") |
| `--db.log_level` | int | (default 4) |
| `--db.options` | string | (default "sslmode=disable") |
| `--db.password` | string | |
| `--db.passwordPath` | string | |
| `--db.port` | int | (default 5432) |
| `--db.username` | string | (default "postgres") |
| `-d`, `--domain` | string | Specifies the Flyte project's domain. |
| `--file` | stringArray | Passes the config file to load. |
| `--files.archive` | | Pass in archive file either an http link or local path. |
| `--files.assumableIamRole` | string | Custom assumable iam auth role to register launch plans with. |
| `--files.continueOnError` | | Continue on error when registering files. |
| `--files.destinationDirectory` | string | Location of source code in container. |
| `--files.dryRun` | | Execute command without making any modifications. |
| `--files.enableSchedule` | | Enable the schedule if the files contain schedulable launchplan. |
| `--files.force` | | Force use of version number on entities registered with flyte. |
| `--files.k8ServiceAccount` | string | Deprecated. Please use `--K8sServiceAccount`|
| `--files.k8sServiceAccount` | string | Custom kubernetes service account auth role to register launch plans with. |
| `--files.outputLocationPrefix` | string | Custom output location prefix for offloaded types (files/schemas). |
| `--files.sourceUploadPath` | string | Deprecated: Update flyte admin to avoid having to configure storage access from uctl. |
| `--files.version` | string | Version of the entity to be registered with flyte which are un-versioned after serialization. |
| `--logger.formatter.type` | string | Sets logging format type. (default "json") |
| `--logger.level` | int | Sets the minimum logging level. (default 3) |
| `--logger.mute` | | Mutes all logs regardless of severity. Intended for benchmarks/tests only. |
| `--logger.show-source` | | Includes source code location in logs. |
| `--org` | string | Organization to work on. If not set, default to user's org. |
| `--otel.file.filename` | string | Filename to store exported telemetry traces (default "/tmp/trace.txt") |
| `--otel.jaeger.endpoint` | string | Endpoint for the jaeger telemetry trace ingestor (default "http://localhost:14268/api/traces") |
| `--otel.otlpgrpc.endpoint` | string | Endpoint for the OTLP telemetry trace collector (default "http://localhost:4317") |
| `--otel.otlphttp.endpoint` | string | Endpoint for the OTLP telemetry trace collector (default "http://localhost:4318/v1/traces") |
| `--otel.sampler.parentSampler` | string | Sets the parent sampler to use for the tracer (default "always") |
| `--otel.type` | string | Sets the type of exporter to configure [noop/file/jaeger/otlpgrpc/otlphttp]. (default "noop") |
| `-o`, `--output` | string | Specifies the output type - supported formats [TABLE JSON YAML DOT DOTURL]. NOTE: dot, doturl are only supported for Workflow (default "table") |
| `--plugins.catalogcache.reader.maxItems` | int | Maximum number of entries to keep in the index. (default 10000) |
| `--plugins.catalogcache.reader.maxRetries` | int | Maximum number of retries per item. (default 3) |
| `--plugins.catalogcache.reader.workers` | int | Number of concurrent workers to start processing the queue. (default 10) |
| `--plugins.catalogcache.writer.maxItems` | int | Maximum number of entries to keep in the index. (default 10000) |
| `--plugins.catalogcache.writer.maxRetries` | int | Maximum number of retries per item. (default 3) |
| `--plugins.catalogcache.writer.workers` | int | Number of concurrent workers to start processing the queue. (default 10) |
| `-p`, `--project` | string | Specifies the Flyte project. |
| `--rediscache.passwordSecretName` | string | Name of secret with Redis password. |
| `--rediscache.primaryEndpoint` | string | Primary endpoint for the redis cache that can be used for both reads and writes. |
| `--rediscache.replicaEndpoint` | string | Replica endpoint for the redis cache that can be used for reads. |
| `--secrets.env-prefix` | string | Prefix for environment variables (default "FLYTE_SECRET_") |
| `--secrets.secrets-prefix` | string | Prefix where to look for secrets file (default "/etc/secrets") |
| `--secrets.type` | string | Sets the type of storage to configure [local]. (default "local") |
| `--server.dataProxy.download.maxExpiresIn` | string | Maximum allowed expiration duration. (default "1h0m0s") |
| `--server.dataProxy.upload.defaultFileNameLength` | int | Default length for the generated file name if not provided in the request. (default 20) |
| `--server.dataProxy.upload.maxExpiresIn` | string | Maximum allowed expiration duration. (default "1h0m0s") |
| `--server.dataProxy.upload.maxSize` | string | Maximum allowed upload size. (default "6Mi") |
| `--server.dataProxy.upload.storagePrefix` | string | Storage prefix to use for all upload requests. |
| `--server.grpc.enableGrpcLatencyMetrics` | | Enable grpc latency metrics. Note Histograms metrics can be expensive on Prometheus servers. |
| `--server.grpc.maxMessageSizeBytes` | int | The max size in bytes for incoming gRPC messages |
| `--server.grpc.port` | int | On which grpc port to serve admin (default 8089) |
| `--server.grpc.serverReflection` | | Enable GRPC Server Reflection (default true) |
| `--server.grpcPort` | int | deprecated |
| `--server.grpcServerReflection` | | deprecated |
| `--server.httpPort` | int | On which http port to serve admin (default 8088) |
| `--server.kube-config` | string | Path to kubernetes client config file, default is empty, useful for incluster config. |
| `--server.kubeClientConfig.burst` | int | Max burst rate for throttle. 0 defaults to 10 (default 25) |
| `--server.kubeClientConfig.qps` | int32 | Max QPS to the master for requests to KubeAPI. 0 defaults to 5. (default 100) |
| `--server.kubeClientConfig.timeout` | string | Max duration allowed for every request to KubeAPI before giving up. 0 implies no timeout. (default "30s") |
| `--server.master` | string | The address of the Kubernetes API server. |
| `--server.readHeaderTimeoutSeconds` | int | The amount of time allowed to read request headers. (default 32) |
| `--server.security.allowCors` | | (default true) |
| `--server.security.allowedHeaders` | strings | (default [Content-Type,flyte-authorization]) |
| `--server.security.allowedOrigins` | strings | (default [*]) |
| `--server.security.auditAccess` | | |
| `--server.security.secure` | | |
| `--server.security.ssl.certificateFile` | string | |
| `--server.security.ssl.keyFile` | string | |
| `--server.security.useAuth` | | |
| `--server.thirdPartyConfig.flyteClient.audience` | string | Audience to use when initiating OAuth2 authorization requests. |
| `--server.thirdPartyConfig.flyteClient.clientId` | string | public identifier for the app which handles authorization for a Flyte deployment |
| `--server.thirdPartyConfig.flyteClient.redirectUri` | string | This is the callback uri registered with the app which handles authorization for a Flyte deployment |
| `--server.thirdPartyConfig.flyteClient.scopes` | strings | Recommended scopes for the client to request. |
| `--server.watchService.maxActiveClusterConnections` | int | (default 5) |
| `--server.watchService.maxPageSize` | int | (default 50000) |
| `--server.watchService.nonTerminalStatusUpdatesInterval` | string | (default "1m0s") |
| `--server.watchService.pollInterval` | string | (default "1s") |
| `--sharedservice.connectPort` | string | On which connect port to serve admin (default "8080") |
| `--sharedservice.grpc.grpcMaxResponseStatusBytes` | int32 | specifies the maximum (uncompressed) size of header list that the client is prepared to accept on grpc calls (default 32000) |
| `--sharedservice.grpc.maxConcurrentStreams` | int | Limit on the number of concurrent streams to each ServerTransport. (default 100) |
| `--sharedservice.grpc.maxMessageSizeBytes` | int | Limit on the size of message that can be received on the server. (default 10485760) |
| `--sharedservice.grpcServerReflection` | | Enable GRPC Server Reflection (default true) |
| `--sharedservice.httpPort` | string | On which http port to serve admin (default "8089") |
| `--sharedservice.kubeConfig` | string | Path to kubernetes client config file. |
| `--sharedservice.master` | string | The address of the Kubernetes API server. |
| `--sharedservice.metrics.enableClientGrpcHistograms` | | Enable client grpc histograms (default true) |
| `--sharedservice.metrics.enableGrpcHistograms` | | Enable grpc histograms (default true) |
| `--sharedservice.metrics.scope` | string | Scope to emit metrics under (default "service:") |
| `--sharedservice.port` | string | On which grpc port to serve admin (default "8080") |
| `--sharedservice.profiler.enabled` | | Enable Profiler on server |
| `--sharedservice.profilerPort` | string | Profile port to start listen for pprof and metric handlers on. (default "10254") |
| `--sharedservice.security.allowCors` | | |
| `--sharedservice.security.allowLocalhostAccess` | | Whether to permit localhost unauthenticated access to the server |
| `--sharedservice.security.allowedHeaders` | strings | |
| `--sharedservice.security.allowedOrigins` | strings | |
| `--sharedservice.security.auditAccess` | | |
| `--sharedservice.security.orgOverride` | string | Override org in identity context if localhost access enabled |
| `--sharedservice.security.secure` | | |
| `--sharedservice.security.ssl.certificateAuthorityFile` | string | |
| `--sharedservice.security.ssl.certificateFile` | string | |
| `--sharedservice.security.ssl.keyFile` | string | |
| `--sharedservice.security.useAuth` | | |
| `--sharedservice.sync.syncInterval` | string | Time interval to sync (default "5m0s") |
| `--storage.cache.max_size_mbs` | int | Maximum size of the cache where the Blob store data is cached in-memory. If not specified or set to 0, cache is not used |
| `--storage.cache.target_gc_percent` | int | Sets the garbage collection target percentage. |
| `--storage.connection.access-key` | string | Access key to use. Only required when authtype is set to accesskey. |
| `--storage.connection.auth-type` | string | Auth Type to use [iam, accesskey]. (default "iam") |
| `--storage.connection.disable-ssl` | | Disables SSL connection. Should only be used for development. |
| `--storage.connection.endpoint` | string | URL for storage client to connect to. |
| `--storage.connection.region` | string | Region to connect to. (default "us-east-1") |
| `--storage.connection.secret-key` | string | Secret to use when accesskey is set. |
| `--storage.container` | string | Initial container (in s3 a bucket) to create -if it doesn't exist-.' |
| `--storage.defaultHttpClient.timeout` | string | Sets time out on the http client. (default "0s") |
| `--storage.enable-multicontainer` | | If this is true, then the container argument is overlooked and redundant. This config will automatically open new connections to new containers/buckets as they are encountered |
| `--storage.limits.maxDownloadMBs` | int | Maximum allowed download size (in MBs) per call. (default 2) |
| `--storage.stow.config` | stringToString | Configuration for stow backend. Refer to github/flyteorg/stow (default []) |
| `--storage.stow.kind` | string | Kind of Stow backend to use. Refer to github/flyteorg/stow |
| `--storage.type` | string | Sets the type of storage to configure [s3/minio/local/mem/stow]. (default "s3") |
| `--union.auth.authorizationMetadataKey` | string | Authorization Header to use when passing Access Tokens to the server (default "flyte-authorization") |
| `--union.auth.clientId` | string | Client ID |
| `--union.auth.clientSecretEnvVar` | string | Environment variable containing the client secret |
| `--union.auth.clientSecretLocation` | string | File containing the client secret |
| `--union.auth.deviceFlow.pollInterval` | string | amount of time the device flow would poll the token endpoint if auth server doesn't return a polling interval. Okta and google IDP do return an interval' (default "5s") |
| `--union.auth.deviceFlow.refreshTime` | string | grace period from the token expiry after which it would refresh the token. (default "5m0s") |
| `--union.auth.deviceFlow.timeout` | string | amount of time the device flow should complete or else it will be cancelled. (default "10m0s") |
| `--union.auth.enable` | | Whether to enable an authenticated conenction when communicating with admin. (default true) |
| `--union.auth.externalAuth.command` | strings | Command for external authentication token generation |
| `--union.auth.pkce.refreshTime` | string | grace period from the token expiry after which it would refresh the token. (default "5m0s") |
| `--union.auth.pkce.timeout` | string | Amount of time the browser session would be active for authentication from client app. (default "15s") |
| `--union.auth.scopes` | strings | List of scopes to request |
| `--union.auth.tokenRefreshWindow` | string | Max duration between token refresh attempt and token expiry. (default "1h0m0s") |
| `--union.auth.tokenUrl` | string | OPTIONAL: Your IdP's token endpoint. It'll be discovered from flyte admin's OAuth Metadata endpoint if not provided. |
| `--union.auth.type` | string | Type of OAuth2 flow used for communicating with admin. (default "Pkce") |
| `--union.cache.maxItemsCount` | int | Maximum number of items to keep in the cache before evicting. (default 1000) |
| `--union.connection.host` | string | Host to connect to (default "dns:///utt-mgdp-stg-us-east-2.cloud-staging.union.ai") |
| `--union.connection.insecure` | | Whether to connect over insecure channel |
| `--union.connection.insecureSkipVerify` | | InsecureSkipVerify controls whether a client verifies the server's certificate chain and host name.Caution: shouldn't be use for production usecases' |
| `--union.connection.keepAliveConfig.permitWithoutStream` | | If true, client sends keepalive pings even with no active RPCs. |
| `--union.connection.keepAliveConfig.time` | string | After a duration of this time if the client doesn't see any activity it pings the server to see if the transport is still alive. (default "20s") |
| `--union.connection.keepAliveConfig.timeout` | string | After having pinged for keepalive check, the client waits for a duration of Timeout and if no activity is seen even after that the connection is closed. (default "2m0s") |
| `--union.connection.maxBackoffDelay` | string | Max delay for grpc backoff (default "8s") |
| `--union.connection.maxRecvMsgSize` | int | Maximum size of a message in bytes of a gRPC message (default 10485760) |
| `--union.connection.maxRetries` | int | Max number of gRPC retries (default 4) |
| `--union.connection.minConnectTimeout` | string | Minimum timeout for establishing a connection (default "20s") |
| `--union.connection.perRetryTimeout` | string | gRPC per retry timeout (default "15s") |
| `--union.connection.serviceConfig` | string | Defines gRPC experimental JSON Service Config (default "{"loadBalancingConfig": [{"round_robin":{}}]}") |
| `--union.connection.trustedIdentityClaims.enabled` | | Enables passing of trusted claims while making inter service calls |
| `--union.connection.trustedIdentityClaims.externalIdentityClaim` | string | External identity claim of the service which is authorized to make internal service call. These are verified against userclouds actions |
| `--union.connection.trustedIdentityClaims.externalIdentityTypeClaim` | string | External identity type claim of app or user to use for the current service identity. It should be an 'app' for inter service communication |
| `--union.internalConnectionConfig.-` | stringToString | (default []) |
| `--union.internalConnectionConfig.enabled` | | Enables internal service to service communication instead of going through ingress. |
| `--union.internalConnectionConfig.urlPattern` | string | UrlPattern of the internal service endpoints. (default "{{ service }}-helmchart.{{ service }}.svc.cluster.local:80") |
| `--webhook.awsSecretManager.sidecarImage` | string | Specifies the sidecar docker image to use (default "docker.io/amazon/aws-secrets-manager-secret-sidecar:v0.1.4") |
| `--webhook.certDir` | string | Certificate directory to use to write generated certs. Defaults to /etc/webhook/certs/ (default "/etc/webhook/certs") |
| `--webhook.embeddedSecretManagerConfig.awsConfig.region` | string | AWS region |
| `--webhook.embeddedSecretManagerConfig.fileMountInitContainer.image` | string | Specifies init container image to use for mounting secrets as files. (default "busybox:1.28") |
| `--webhook.embeddedSecretManagerConfig.gcpConfig.project` | string | GCP project to be used for secret manager |
| `--webhook.embeddedSecretManagerConfig.type` | string | (default "AWS") |
| `--webhook.gcpSecretManager.sidecarImage` | string | Specifies the sidecar docker image to use (default "gcr.io/google.com/cloudsdktool/cloud-sdk:alpine") |
| `--webhook.listenPort` | int | The port to use to listen to webhook calls. Defaults to 9443 (default 9443) |
| `--webhook.localCert` | | write certs locally. Defaults to false |
| `--webhook.metrics-prefix` | string | An optional prefix for all published metrics. (default "flyte:") |
| `--webhook.secretName` | string | Secret name to write generated certs to. (default "flyte-pod-webhook") |
| `--webhook.serviceName` | string | The name of the webhook service. (default "flyte-pod-webhook") |
| `--webhook.servicePort` | int32 | The port on the service that hosting webhook. (default 443) |
| `--webhook.vaultSecretManager.role` | string | Specifies the vault role to use (default "flyte") |
=== PAGE: https://www.union.ai/docs/v1/serverless/api-reference/uctl-cli/uctl-create ===
# uctl create
Used for creating various union/flyte resources including apps, cluster
pools, cluster configs
## Synopsis
Create Flyte resource; if a project:
```shell
$ uctl create project --file project.yaml
```
## Options
| Option | Type | Description |
|--------|------|-------------|
| `-h`, `--help` | help for create |
### Options inherited from parent commands
| Option | Type | Description |
|--------|------|-------------|
| `--admin.audience` | string | Audience to use when initiating OAuth2 authorization requests. |
| `--admin.authType` | string | Type of OAuth2 flow used for communicating with admin.ClientSecret, Pkce, ExternalCommand are valid values (default "ClientSecret") |
| `--admin.authorizationHeader` | string | Custom metadata header to pass JWT |
| `--admin.authorizationServerUrl` | string | This is the URL to your IdP's authorization server. It'll default to Endpoint |
| `--admin.caCertFilePath` | string | Use specified certificate file to verify the admin server peer. |
| `--admin.clientId` | string | Client ID (default "flytepropeller") |
| `--admin.clientSecretEnvVar` | string | Environment variable containing the client secret |
| `--admin.clientSecretLocation` | string | File containing the client secret (default "/etc/secrets/client_secret") |
| `--admin.command` | strings | Command for external authentication token generation |
| `--admin.defaultOrg` | string | OPTIONAL: Default org to use to support non-org based cli's.'. |
| `--admin.defaultServiceConfig` | string | |
| `--admin.deviceFlowConfig.pollInterval` | string | amount of time the device flow would poll the token endpoint if auth server doesn't return a polling interval. Okta and google IDP do return an interval' (default "5s") |
| `--admin.deviceFlowConfig.refreshTime` | string | grace period from the token expiry after which it would refresh the token. (default "5m0s") |
| `--admin.deviceFlowConfig.timeout` | string | amount of time the device flow should complete or else it will be cancelled. (default "10m0s") |
| `--admin.endpoint` | string | For admin types, specify where the uri of the service is located. |
| `--admin.httpProxyURL` | string | OPTIONAL: HTTP Proxy to be used for OAuth requests. |
| `--admin.insecure` | | Use insecure connection. |
| `--admin.insecureSkipVerify` | | InsecureSkipVerify controls whether a client verifies the server's certificate chain and host name.Caution: shouldn't be use for production usecases' |
| `--admin.maxBackoffDelay` | string | Max delay for grpc backoff (default "8s") |
| `--admin.maxMessageSizeBytes` | int | The max size in bytes for incoming gRPC messages |
| `--admin.maxRetries` | int | Max number of gRPC retries (default 4) |
| `--admin.perRetryTimeout` | string | gRPC per retry timeout (default "15s") |
| `--admin.pkceConfig.refreshTime` | string | grace period from the token expiry after which it would refresh the token. (default "5m0s") |
| `--admin.pkceConfig.timeout` | string | Amount of time the browser session would be active for authentication from client app. (default "2m0s") |
| `--admin.proxyCommand` | strings | Command for external proxy-authorization token generation |
| `--admin.scopes` | strings | List of scopes to request |
| `--admin.tokenRefreshWindow` | string | Max duration between token refresh attempt and token expiry. (default "0s") |
| `--admin.tokenUrl` | string | OPTIONAL: Your IdP's token endpoint. It'll be discovered from flyte admin's OAuth Metadata endpoint if not provided. |
| `--admin.useAudienceFromAdmin` | | Use Audience configured from admins public endpoint config. |
| `--admin.useAuth` | | Deprecated: Auth will be enabled/disabled based on admin's dynamically discovered information. |
| `--auth.appAuth.externalAuthServer.allowedAudience` | strings | Optional: A list of allowed audiences. If not provided, the audience is expected to be the public Uri of the service. |
| `--auth.appAuth.externalAuthServer.baseUrl` | string | This should be the base url of the authorization server that you are trying to hit. With Okta for instance, it will look something like https://company.okta.com/oauth2/abcdef123456789/ |
| `--auth.appAuth.externalAuthServer.httpProxyURL` | string | OPTIONAL: HTTP Proxy to be used for OAuth requests. |
| `--auth.appAuth.externalAuthServer.metadataUrl` | string | Optional: If the server doesn't support /.well-known/oauth-authorization-server, you can set a custom metadata url here.' |
| `--auth.appAuth.externalAuthServer.retryAttempts` | int | Optional: The number of attempted retries on a transient failure to get the OAuth metadata (default 5) |
| `--auth.appAuth.externalAuthServer.retryDelay` | string | Optional, Duration to wait between retries (default "1s") |
| `--auth.appAuth.selfAuthServer.accessTokenLifespan` | string | Defines the lifespan of issued access tokens. (default "30m0s") |
| `--auth.appAuth.selfAuthServer.authorizationCodeLifespan` | string | Defines the lifespan of issued access tokens. (default "5m0s") |
| `--auth.appAuth.selfAuthServer.claimSymmetricEncryptionKeySecretName` | string | OPTIONAL: Secret name to use to encrypt claims in authcode token. (default "claim_symmetric_key") |
| `--auth.appAuth.selfAuthServer.issuer` | string | Defines the issuer to use when issuing and validating tokens. The default value is https://{requestUri.HostAndPort}/ |
| `--auth.appAuth.selfAuthServer.oldTokenSigningRSAKeySecretName` | string | OPTIONAL: Secret name to use to retrieve Old RSA Signing Key. This can be useful during key rotation to continue to accept older tokens. (default "token_rsa_key_old.pem") |
| `--auth.appAuth.selfAuthServer.refreshTokenLifespan` | string | Defines the lifespan of issued access tokens. (default "1h0m0s") |
| `--auth.appAuth.selfAuthServer.tokenSigningRSAKeySecretName` | string | OPTIONAL: Secret name to use to retrieve RSA Signing Key. (default "token_rsa_key.pem") |
| `--auth.appAuth.thirdPartyConfig.flyteClient.audience` | string | Audience to use when initiating OAuth2 authorization requests. |
| `--auth.appAuth.thirdPartyConfig.flyteClient.clientId` | string | public identifier for the app which handles authorization for a Flyte deployment (default "uctl") |
| `--auth.appAuth.thirdPartyConfig.flyteClient.redirectUri` | string | This is the callback uri registered with the app which handles authorization for a Flyte deployment (default "http://localhost:53593/callback") |
| `--auth.appAuth.thirdPartyConfig.flyteClient.scopes` | strings | Recommended scopes for the client to request. (default [all,offline]) |
| `--auth.disableForGrpc` | | Disables auth enforcement on Grpc Endpoints. |
| `--auth.disableForHttp` | | Disables auth enforcement on HTTP Endpoints. |
| `--auth.grpcAuthorizationHeader` | string | (default "flyte-authorization") |
| `--auth.httpAuthorizationHeader` | string | (default "flyte-authorization") |
| `--auth.httpProxyURL` | string | OPTIONAL: HTTP Proxy to be used for OAuth requests. |
| `--auth.tokenEndpointProxyPath` | string | The path used to proxy calls to the TokenURL |
| `--auth.userAuth.cookieBlockKeySecretName` | string | OPTIONAL: Secret name to use for cookie block key. (default "cookie_block_key") |
| `--auth.userAuth.cookieHashKeySecretName` | string | OPTIONAL: Secret name to use for cookie hash key. (default "cookie_hash_key") |
| `--auth.userAuth.cookieSetting.domain` | string | OPTIONAL: Allows you to set the domain attribute on the auth cookies. |
| `--auth.userAuth.cookieSetting.sameSitePolicy` | string | OPTIONAL: Allows you to declare if your cookie should be restricted to a first-party or same-site context.Wrapper around http.SameSite. (default "DefaultMode") |
| `--auth.userAuth.httpProxyURL` | string | OPTIONAL: HTTP Proxy to be used for OAuth requests. |
| `--auth.userAuth.idpQueryParameter` | string | idp query parameter used for selecting a particular IDP for doing user authentication. Eg: for Okta passing idp={IDP-ID} forces the authentication to happen with IDP-ID |
| `--auth.userAuth.openId.baseUrl` | string | |
| `--auth.userAuth.openId.clientId` | string | |
| `--auth.userAuth.openId.clientSecretFile` | string | |
| `--auth.userAuth.openId.clientSecretName` | string | (default "oidc_client_secret") |
| `--auth.userAuth.openId.scopes` | strings | (default [openid,profile]) |
| `--auth.userAuth.redirectUrl` | string | (default "/console") |
| `--authorizer.internalCommunicationConfig.enabled` | | Enables authorization decisions for internal communication. (default true) |
| `--authorizer.internalCommunicationConfig.ingressIdentity` | string | IngressIdentity used in the cluster. Needed to exclude the communication coming from ingress. (default "ingress-nginx.ingress-nginx.serviceaccount.identity.linkerd.cluster.local") |
| `--authorizer.internalCommunicationConfig.tenantUrlPatternIdentity` | string | UrlPatternIdentity of the internal tenant service endpoint identities. (default "{{ service }}.{{ org }}.serviceaccount.identity.linkerd.cluster.local") |
| `--authorizer.internalCommunicationConfig.urlPatternIdentity` | string | UrlPatternIdentity of the internal service endpoint identities. (default "{{ service }}-helmchart.{{ service }}.serviceaccount.identity.linkerd.cluster.local") |
| `--authorizer.mode` | string | (default "Active") |
| `--authorizer.organizationConfig.PolicyConfig.adminPolicyDescription` | string | description for the boilerplate admin policy (default "Contributor permissions and full admin permissions to manage users and view usage dashboards") |
| `--authorizer.organizationConfig.PolicyConfig.contributorPolicyDescription` | string | description for the boilerplate contributor policy (default "Viewer permissions and permissions to create workflows, tasks, launch plans, and executions") |
| `--authorizer.organizationConfig.PolicyConfig.defaultUserPolicyRoleType` | string | name of the role type to determine which default policy new users added to the organization should be assigned (default "Viewer") |
| `--authorizer.organizationConfig.PolicyConfig.serverlessContributorPolicyDescription` | string | description for the boilerplate serverless contributor policy (default "Viewer permissions and permissions to create workflows, tasks, launch plans, and executions") |
| `--authorizer.organizationConfig.PolicyConfig.serverlessViewerPolicyDescription` | string | description for the boilerplate serverless viewer policy (default "Permissions to view Flyte entities") |
| `--authorizer.organizationConfig.PolicyConfig.viewerPolicyDescription` | string | description for the boilerplate viewer policy (default "Permissions to view Flyte entities") |
| `--authorizer.organizationConfig.defaultPolicyCacheDuration` | string | Cache entry duration for the store of the default policy per organization (default "10m0s") |
| `--authorizer.syncRuleRefreshInterval` | string | (default "1m0s") |
| `--authorizer.type` | string | (default "UserClouds") |
| `--authorizer.userCloudsClient.cache.redis.ttl.edgeTypes` | string | Specifies how long edge types remain in the cache.. (default "30m0s") |
| `--authorizer.userCloudsClient.cache.redis.ttl.edges` | string | Specifies how long edges remain in the cache. (default "30m0s") |
| `--authorizer.userCloudsClient.cache.redis.ttl.objectTypes` | string | Specifies how long object types remain in the cache. (default "30m0s") |
| `--authorizer.userCloudsClient.cache.redis.ttl.objects` | string | Specifies how long objects remain in the cache. (default "30m0s") |
| `--authorizer.userCloudsClient.cache.type` | string | Cache type to use. (default "none") |
| `--authorizer.userCloudsClient.clientID` | string | UserClouds client id |
| `--authorizer.userCloudsClient.clientSecretName` | string | UserCloud client secret name to read from the secret manager. (default "userclouds-client-secret") |
| `--authorizer.userCloudsClient.enableLogging` | | Enable userclouds client's internal logging. Calls to post logs take 250-350 ms and will impact p99 latency, enable with caution. |
| `--authorizer.userCloudsClient.tenantID` | string | UserClouds tenant id. Should be a UUID. |
| `--authorizer.userCloudsClient.tenantUrl` | string | Something like https://{yourtenant}.tenant.userclouds.com |
| `--config` | string | config file (default is /Users/andrew/.union/config.yaml) |
| `--connection.environment` | string | |
| `--connection.region` | string | |
| `--connection.rootTenantURLPattern` | string | Pattern for tenant url. (default "dns:///{{ organization }}.cloud-staging.union.ai") |
| `--console.endpoint` | string | Endpoint of console, if different than flyte admin |
| `--database.connMaxLifeTime` | string | sets the maximum amount of time a connection may be reused (default "1h0m0s") |
| `--database.enableForeignKeyConstraintWhenMigrating` | | Whether to enable gorm foreign keys when migrating the db |
| `--database.maxIdleConnections` | int | maxIdleConnections sets the maximum number of connections in the idle connection pool. (default 10) |
| `--database.maxOpenConnections` | int | maxOpenConnections sets the maximum number of open connections to the database. (default 100) |
| `--database.postgres.dbname` | string | The database name (default "postgres") |
| `--database.postgres.debug` | | |
| `--database.postgres.host` | string | The host name of the database server (default "localhost") |
| `--database.postgres.options` | string | See http://gorm.io/docs/connecting_to_the_database.html for available options passed, in addition to the above. (default "sslmode=disable") |
| `--database.postgres.password` | string | The database password. (default "postgres") |
| `--database.postgres.passwordPath` | string | Points to the file containing the database password. |
| `--database.postgres.port` | int | The port name of the database server (default 30001) |
| `--database.postgres.readReplicaHost` | string | The host name of the read replica database server (default "localhost") |
| `--database.postgres.username` | string | The database user who is connecting to the server. (default "postgres") |
| `--database.sqlite.file` | string | The path to the file (existing or new) where the DB should be created / stored. If existing, then this will be re-used, else a new will be created |
| `--db.connectionPool.maxConnectionLifetime` | string | (default "0s") |
| `--db.connectionPool.maxIdleConnections` | int | |
| `--db.connectionPool.maxOpenConnections` | int | |
| `--db.dbname` | string | (default "postgres") |
| `--db.debug` | | |
| `--db.host` | string | (default "postgres") |
| `--db.log_level` | int | (default 4) |
| `--db.options` | string | (default "sslmode=disable") |
| `--db.password` | string | |
| `--db.passwordPath` | string | |
| `--db.port` | int | (default 5432) |
| `--db.username` | string | (default "postgres") |
| `-d`, `--domain` | string | Specifies the Flyte project's domain. |
| `--files.archive` | | Pass in archive file either an http link or local path. |
| `--files.assumableIamRole` | string | Custom assumable iam auth role to register launch plans with. |
| `--files.continueOnError` | | Continue on error when registering files. |
| `--files.destinationDirectory` | string | Location of source code in container. |
| `--files.dryRun` | | Execute command without making any modifications. |
| `--files.enableSchedule` | | Enable the schedule if the files contain schedulable launchplan. |
| `--files.force` | | Force use of version number on entities registered with flyte. |
| `--files.k8ServiceAccount` | string | Deprecated. Please use `--K8sServiceAccount`|
| `--files.k8sServiceAccount` | string | Custom kubernetes service account auth role to register launch plans with. |
| `--files.outputLocationPrefix` | string | Custom output location prefix for offloaded types (files/schemas). |
| `--files.sourceUploadPath` | string | Deprecated: Update flyte admin to avoid having to configure storage access from uctl. |
| `--files.version` | string | Version of the entity to be registered with flyte which are un-versioned after serialization. |
| `--logger.formatter.type` | string | Sets logging format type. (default "json") |
| `--logger.level` | int | Sets the minimum logging level. (default 3) |
| `--logger.mute` | | Mutes all logs regardless of severity. Intended for benchmarks/tests only. |
| `--logger.show-source` | | Includes source code location in logs. |
| `--org` | string | Organization to work on. If not set, default to user's org. |
| `--otel.file.filename` | string | Filename to store exported telemetry traces (default "/tmp/trace.txt") |
| `--otel.jaeger.endpoint` | string | Endpoint for the jaeger telemetry trace ingestor (default "http://localhost:14268/api/traces") |
| `--otel.otlpgrpc.endpoint` | string | Endpoint for the OTLP telemetry trace collector (default "http://localhost:4317") |
| `--otel.otlphttp.endpoint` | string | Endpoint for the OTLP telemetry trace collector (default "http://localhost:4318/v1/traces") |
| `--otel.sampler.parentSampler` | string | Sets the parent sampler to use for the tracer (default "always") |
| `--otel.type` | string | Sets the type of exporter to configure [noop/file/jaeger/otlpgrpc/otlphttp]. (default "noop") |
| `-o`, `--output` | string | Specifies the output type - supported formats [TABLE JSON YAML DOT DOTURL]. NOTE: dot, doturl are only supported for Workflow (default "table") |
| `--plugins.catalogcache.reader.maxItems` | int | Maximum number of entries to keep in the index. (default 10000) |
| `--plugins.catalogcache.reader.maxRetries` | int | Maximum number of retries per item. (default 3) |
| `--plugins.catalogcache.reader.workers` | int | Number of concurrent workers to start processing the queue. (default 10) |
| `--plugins.catalogcache.writer.maxItems` | int | Maximum number of entries to keep in the index. (default 10000) |
| `--plugins.catalogcache.writer.maxRetries` | int | Maximum number of retries per item. (default 3) |
| `--plugins.catalogcache.writer.workers` | int | Number of concurrent workers to start processing the queue. (default 10) |
| `-p`, `--project` | string | Specifies the Flyte project. |
| `--rediscache.passwordSecretName` | string | Name of secret with Redis password. |
| `--rediscache.primaryEndpoint` | string | Primary endpoint for the redis cache that can be used for both reads and writes. |
| `--rediscache.replicaEndpoint` | string | Replica endpoint for the redis cache that can be used for reads. |
| `--secrets.env-prefix` | string | Prefix for environment variables (default "FLYTE_SECRET_") |
| `--secrets.secrets-prefix` | string | Prefix where to look for secrets file (default "/etc/secrets") |
| `--secrets.type` | string | Sets the type of storage to configure [local]. (default "local") |
| `--server.dataProxy.download.maxExpiresIn` | string | Maximum allowed expiration duration. (default "1h0m0s") |
| `--server.dataProxy.upload.defaultFileNameLength` | int | Default length for the generated file name if not provided in the request. (default 20) |
| `--server.dataProxy.upload.maxExpiresIn` | string | Maximum allowed expiration duration. (default "1h0m0s") |
| `--server.dataProxy.upload.maxSize` | string | Maximum allowed upload size. (default "6Mi") |
| `--server.dataProxy.upload.storagePrefix` | string | Storage prefix to use for all upload requests. |
| `--server.grpc.enableGrpcLatencyMetrics` | | Enable grpc latency metrics. Note Histograms metrics can be expensive on Prometheus servers. |
| `--server.grpc.maxMessageSizeBytes` | int | The max size in bytes for incoming gRPC messages |
| `--server.grpc.port` | int | On which grpc port to serve admin (default 8089) |
| `--server.grpc.serverReflection` | | Enable GRPC Server Reflection (default true) |
| `--server.grpcPort` | int | deprecated |
| `--server.grpcServerReflection` | | deprecated |
| `--server.httpPort` | int | On which http port to serve admin (default 8088) |
| `--server.kube-config` | string | Path to kubernetes client config file, default is empty, useful for incluster config. |
| `--server.kubeClientConfig.burst` | int | Max burst rate for throttle. 0 defaults to 10 (default 25) |
| `--server.kubeClientConfig.qps` | int32 | Max QPS to the master for requests to KubeAPI. 0 defaults to 5. (default 100) |
| `--server.kubeClientConfig.timeout` | string | Max duration allowed for every request to KubeAPI before giving up. 0 implies no timeout. (default "30s") |
| `--server.master` | string | The address of the Kubernetes API server. |
| `--server.readHeaderTimeoutSeconds` | int | The amount of time allowed to read request headers. (default 32) |
| `--server.security.allowCors` | | (default true) |
| `--server.security.allowedHeaders` | strings | (default [Content-Type,flyte-authorization]) |
| `--server.security.allowedOrigins` | strings | (default [*]) |
| `--server.security.auditAccess` | | |
| `--server.security.secure` | | |
| `--server.security.ssl.certificateFile` | string | |
| `--server.security.ssl.keyFile` | string | |
| `--server.security.useAuth` | | |
| `--server.thirdPartyConfig.flyteClient.audience` | string | Audience to use when initiating OAuth2 authorization requests. |
| `--server.thirdPartyConfig.flyteClient.clientId` | string | public identifier for the app which handles authorization for a Flyte deployment |
| `--server.thirdPartyConfig.flyteClient.redirectUri` | string | This is the callback uri registered with the app which handles authorization for a Flyte deployment |
| `--server.thirdPartyConfig.flyteClient.scopes` | strings | Recommended scopes for the client to request. |
| `--server.watchService.maxActiveClusterConnections` | int | (default 5) |
| `--server.watchService.maxPageSize` | int | (default 50000) |
| `--server.watchService.nonTerminalStatusUpdatesInterval` | string | (default "1m0s") |
| `--server.watchService.pollInterval` | string | (default "1s") |
| `--sharedservice.connectPort` | string | On which connect port to serve admin (default "8080") |
| `--sharedservice.grpc.grpcMaxResponseStatusBytes` | int32 | specifies the maximum (uncompressed) size of header list that the client is prepared to accept on grpc calls (default 32000) |
| `--sharedservice.grpc.maxConcurrentStreams` | int | Limit on the number of concurrent streams to each ServerTransport. (default 100) |
| `--sharedservice.grpc.maxMessageSizeBytes` | int | Limit on the size of message that can be received on the server. (default 10485760) |
| `--sharedservice.grpcServerReflection` | | Enable GRPC Server Reflection (default true) |
| `--sharedservice.httpPort` | string | On which http port to serve admin (default "8089") |
| `--sharedservice.kubeConfig` | string | Path to kubernetes client config file. |
| `--sharedservice.master` | string | The address of the Kubernetes API server. |
| `--sharedservice.metrics.enableClientGrpcHistograms` | | Enable client grpc histograms (default true) |
| `--sharedservice.metrics.enableGrpcHistograms` | | Enable grpc histograms (default true) |
| `--sharedservice.metrics.scope` | string | Scope to emit metrics under (default "service:") |
| `--sharedservice.port` | string | On which grpc port to serve admin (default "8080") |
| `--sharedservice.profiler.enabled` | | Enable Profiler on server |
| `--sharedservice.profilerPort` | string | Profile port to start listen for pprof and metric handlers on. (default "10254") |
| `--sharedservice.security.allowCors` | | |
| `--sharedservice.security.allowLocalhostAccess` | | Whether to permit localhost unauthenticated access to the server |
| `--sharedservice.security.allowedHeaders` | strings | |
| `--sharedservice.security.allowedOrigins` | strings | |
| `--sharedservice.security.auditAccess` | | |
| `--sharedservice.security.orgOverride` | string | Override org in identity context if localhost access enabled |
| `--sharedservice.security.secure` | | |
| `--sharedservice.security.ssl.certificateAuthorityFile` | string | |
| `--sharedservice.security.ssl.certificateFile` | string | |
| `--sharedservice.security.ssl.keyFile` | string | |
| `--sharedservice.security.useAuth` | | |
| `--sharedservice.sync.syncInterval` | string | Time interval to sync (default "5m0s") |
| `--storage.cache.max_size_mbs` | int | Maximum size of the cache where the Blob store data is cached in-memory. If not specified or set to 0, cache is not used |
| `--storage.cache.target_gc_percent` | int | Sets the garbage collection target percentage. |
| `--storage.connection.access-key` | string | Access key to use. Only required when authtype is set to accesskey. |
| `--storage.connection.auth-type` | string | Auth Type to use [iam, accesskey]. (default "iam") |
| `--storage.connection.disable-ssl` | | Disables SSL connection. Should only be used for development. |
| `--storage.connection.endpoint` | string | URL for storage client to connect to. |
| `--storage.connection.region` | string | Region to connect to. (default "us-east-1") |
| `--storage.connection.secret-key` | string | Secret to use when accesskey is set. |
| `--storage.container` | string | Initial container (in s3 a bucket) to create -if it doesn't exist-.' |
| `--storage.defaultHttpClient.timeout` | string | Sets time out on the http client. (default "0s") |
| `--storage.enable-multicontainer` | | If this is true, then the container argument is overlooked and redundant. This config will automatically open new connections to new containers/buckets as they are encountered |
| `--storage.limits.maxDownloadMBs` | int | Maximum allowed download size (in MBs) per call. (default 2) |
| `--storage.stow.config` | stringToString | Configuration for stow backend. Refer to github/flyteorg/stow (default []) |
| `--storage.stow.kind` | string | Kind of Stow backend to use. Refer to github/flyteorg/stow |
| `--storage.type` | string | Sets the type of storage to configure [s3/minio/local/mem/stow]. (default "s3") |
| `--union.auth.authorizationMetadataKey` | string | Authorization Header to use when passing Access Tokens to the server (default "flyte-authorization") |
| `--union.auth.clientId` | string | Client ID |
| `--union.auth.clientSecretEnvVar` | string | Environment variable containing the client secret |
| `--union.auth.clientSecretLocation` | string | File containing the client secret |
| `--union.auth.deviceFlow.pollInterval` | string | amount of time the device flow would poll the token endpoint if auth server doesn't return a polling interval. Okta and google IDP do return an interval' (default "5s") |
| `--union.auth.deviceFlow.refreshTime` | string | grace period from the token expiry after which it would refresh the token. (default "5m0s") |
| `--union.auth.deviceFlow.timeout` | string | amount of time the device flow should complete or else it will be cancelled. (default "10m0s") |
| `--union.auth.enable` | | Whether to enable an authenticated conenction when communicating with admin. (default true) |
| `--union.auth.externalAuth.command` | strings | Command for external authentication token generation |
| `--union.auth.pkce.refreshTime` | string | grace period from the token expiry after which it would refresh the token. (default "5m0s") |
| `--union.auth.pkce.timeout` | string | Amount of time the browser session would be active for authentication from client app. (default "15s") |
| `--union.auth.scopes` | strings | List of scopes to request |
| `--union.auth.tokenRefreshWindow` | string | Max duration between token refresh attempt and token expiry. (default "1h0m0s") |
| `--union.auth.tokenUrl` | string | OPTIONAL: Your IdP's token endpoint. It'll be discovered from flyte admin's OAuth Metadata endpoint if not provided. |
| `--union.auth.type` | string | Type of OAuth2 flow used for communicating with admin. (default "Pkce") |
| `--union.cache.maxItemsCount` | int | Maximum number of items to keep in the cache before evicting. (default 1000) |
| `--union.connection.host` | string | Host to connect to (default "dns:///utt-mgdp-stg-us-east-2.cloud-staging.union.ai") |
| `--union.connection.insecure` | | Whether to connect over insecure channel |
| `--union.connection.insecureSkipVerify` | | InsecureSkipVerify controls whether a client verifies the server's certificate chain and host name.Caution: shouldn't be use for production usecases' |
| `--union.connection.keepAliveConfig.permitWithoutStream` | | If true, client sends keepalive pings even with no active RPCs. |
| `--union.connection.keepAliveConfig.time` | string | After a duration of this time if the client doesn't see any activity it pings the server to see if the transport is still alive. (default "20s") |
| `--union.connection.keepAliveConfig.timeout` | string | After having pinged for keepalive check, the client waits for a duration of Timeout and if no activity is seen even after that the connection is closed. (default "2m0s") |
| `--union.connection.maxBackoffDelay` | string | Max delay for grpc backoff (default "8s") |
| `--union.connection.maxRecvMsgSize` | int | Maximum size of a message in bytes of a gRPC message (default 10485760) |
| `--union.connection.maxRetries` | int | Max number of gRPC retries (default 4) |
| `--union.connection.minConnectTimeout` | string | Minimum timeout for establishing a connection (default "20s") |
| `--union.connection.perRetryTimeout` | string | gRPC per retry timeout (default "15s") |
| `--union.connection.serviceConfig` | string | Defines gRPC experimental JSON Service Config (default "{"loadBalancingConfig": [{"round_robin":{}}]}") |
| `--union.connection.trustedIdentityClaims.enabled` | | Enables passing of trusted claims while making inter service calls |
| `--union.connection.trustedIdentityClaims.externalIdentityClaim` | string | External identity claim of the service which is authorized to make internal service call. These are verified against userclouds actions |
| `--union.connection.trustedIdentityClaims.externalIdentityTypeClaim` | string | External identity type claim of app or user to use for the current service identity. It should be an 'app' for inter service communication |
| `--union.internalConnectionConfig.-` | stringToString | (default []) |
| `--union.internalConnectionConfig.enabled` | | Enables internal service to service communication instead of going through ingress. |
| `--union.internalConnectionConfig.urlPattern` | string | UrlPattern of the internal service endpoints. (default "{{ service }}-helmchart.{{ service }}.svc.cluster.local:80") |
| `--webhook.awsSecretManager.sidecarImage` | string | Specifies the sidecar docker image to use (default "docker.io/amazon/aws-secrets-manager-secret-sidecar:v0.1.4") |
| `--webhook.certDir` | string | Certificate directory to use to write generated certs. Defaults to /etc/webhook/certs/ (default "/etc/webhook/certs") |
| `--webhook.embeddedSecretManagerConfig.awsConfig.region` | string | AWS region |
| `--webhook.embeddedSecretManagerConfig.fileMountInitContainer.image` | string | Specifies init container image to use for mounting secrets as files. (default "busybox:1.28") |
| `--webhook.embeddedSecretManagerConfig.gcpConfig.project` | string | GCP project to be used for secret manager |
| `--webhook.embeddedSecretManagerConfig.type` | string | (default "AWS") |
| `--webhook.gcpSecretManager.sidecarImage` | string | Specifies the sidecar docker image to use (default "gcr.io/google.com/cloudsdktool/cloud-sdk:alpine") |
| `--webhook.listenPort` | int | The port to use to listen to webhook calls. Defaults to 9443 (default 9443) |
| `--webhook.localCert` | | write certs locally. Defaults to false |
| `--webhook.metrics-prefix` | string | An optional prefix for all published metrics. (default "flyte:") |
| `--webhook.secretName` | string | Secret name to write generated certs to. (default "flyte-pod-webhook") |
| `--webhook.serviceName` | string | The name of the webhook service. (default "flyte-pod-webhook") |
| `--webhook.servicePort` | int32 | The port on the service that hosting webhook. (default 443) |
| `--webhook.vaultSecretManager.role` | string | Specifies the vault role to use (default "flyte") |
## Subpages
- **Uctl CLI > uctl create > uctl create app**
- **Uctl CLI > uctl create > uctl create clusterpool**
- **Uctl CLI > uctl create > uctl create clusterpoolassignment**
- **Uctl CLI > uctl create > uctl create execution**
- **Uctl CLI > uctl create > uctl create policy**
- **Uctl CLI > uctl create > uctl create project**
- **Uctl CLI > uctl create > uctl create role**
=== PAGE: https://www.union.ai/docs/v1/serverless/api-reference/uctl-cli/uctl-create/uctl-create-app ===
# uctl create app
Create apps
## Synopsis
Create apps
```shell
$ uctl create app [flags]
```
## Options
| Option | Type | Description |
|--------|------|-------------|
| `--appSpecFile` | string | app spec file to be used for creating app. |
| `--dryRun` | | execute command without making any modifications. |
| `--gen` | | generates an empty app config file with conformance to the api format. |
| `-h`, `--help` | help for app |
### Options inherited from parent commands
| Option | Type | Description |
|--------|------|-------------|
| `--admin.audience` | string | Audience to use when initiating OAuth2 authorization requests. |
| `--admin.authType` | string | Type of OAuth2 flow used for communicating with admin.ClientSecret, Pkce, ExternalCommand are valid values (default "ClientSecret") |
| `--admin.authorizationHeader` | string | Custom metadata header to pass JWT |
| `--admin.authorizationServerUrl` | string | This is the URL to your IdP's authorization server. It'll default to Endpoint |
| `--admin.caCertFilePath` | string | Use specified certificate file to verify the admin server peer. |
| `--admin.clientId` | string | Client ID (default "flytepropeller") |
| `--admin.clientSecretEnvVar` | string | Environment variable containing the client secret |
| `--admin.clientSecretLocation` | string | File containing the client secret (default "/etc/secrets/client_secret") |
| `--admin.command` | strings | Command for external authentication token generation |
| `--admin.defaultOrg` | string | OPTIONAL: Default org to use to support non-org based cli's.'. |
| `--admin.defaultServiceConfig` | string | |
| `--admin.deviceFlowConfig.pollInterval` | string | amount of time the device flow would poll the token endpoint if auth server doesn't return a polling interval. Okta and google IDP do return an interval' (default "5s") |
| `--admin.deviceFlowConfig.refreshTime` | string | grace period from the token expiry after which it would refresh the token. (default "5m0s") |
| `--admin.deviceFlowConfig.timeout` | string | amount of time the device flow should complete or else it will be cancelled. (default "10m0s") |
| `--admin.endpoint` | string | For admin types, specify where the uri of the service is located. |
| `--admin.httpProxyURL` | string | OPTIONAL: HTTP Proxy to be used for OAuth requests. |
| `--admin.insecure` | | Use insecure connection. |
| `--admin.insecureSkipVerify` | | InsecureSkipVerify controls whether a client verifies the server's certificate chain and host name.Caution: shouldn't be use for production usecases' |
| `--admin.maxBackoffDelay` | string | Max delay for grpc backoff (default "8s") |
| `--admin.maxMessageSizeBytes` | int | The max size in bytes for incoming gRPC messages |
| `--admin.maxRetries` | int | Max number of gRPC retries (default 4) |
| `--admin.perRetryTimeout` | string | gRPC per retry timeout (default "15s") |
| `--admin.pkceConfig.refreshTime` | string | grace period from the token expiry after which it would refresh the token. (default "5m0s") |
| `--admin.pkceConfig.timeout` | string | Amount of time the browser session would be active for authentication from client app. (default "2m0s") |
| `--admin.proxyCommand` | strings | Command for external proxy-authorization token generation |
| `--admin.scopes` | strings | List of scopes to request |
| `--admin.tokenRefreshWindow` | string | Max duration between token refresh attempt and token expiry. (default "0s") |
| `--admin.tokenUrl` | string | OPTIONAL: Your IdP's token endpoint. It'll be discovered from flyte admin's OAuth Metadata endpoint if not provided. |
| `--admin.useAudienceFromAdmin` | | Use Audience configured from admins public endpoint config. |
| `--admin.useAuth` | | Deprecated: Auth will be enabled/disabled based on admin's dynamically discovered information. |
| `--auth.appAuth.externalAuthServer.allowedAudience` | strings | Optional: A list of allowed audiences. If not provided, the audience is expected to be the public Uri of the service. |
| `--auth.appAuth.externalAuthServer.baseUrl` | string | This should be the base url of the authorization server that you are trying to hit. With Okta for instance, it will look something like https://company.okta.com/oauth2/abcdef123456789/ |
| `--auth.appAuth.externalAuthServer.httpProxyURL` | string | OPTIONAL: HTTP Proxy to be used for OAuth requests. |
| `--auth.appAuth.externalAuthServer.metadataUrl` | string | Optional: If the server doesn't support /.well-known/oauth-authorization-server, you can set a custom metadata url here.' |
| `--auth.appAuth.externalAuthServer.retryAttempts` | int | Optional: The number of attempted retries on a transient failure to get the OAuth metadata (default 5) |
| `--auth.appAuth.externalAuthServer.retryDelay` | string | Optional, Duration to wait between retries (default "1s") |
| `--auth.appAuth.selfAuthServer.accessTokenLifespan` | string | Defines the lifespan of issued access tokens. (default "30m0s") |
| `--auth.appAuth.selfAuthServer.authorizationCodeLifespan` | string | Defines the lifespan of issued access tokens. (default "5m0s") |
| `--auth.appAuth.selfAuthServer.claimSymmetricEncryptionKeySecretName` | string | OPTIONAL: Secret name to use to encrypt claims in authcode token. (default "claim_symmetric_key") |
| `--auth.appAuth.selfAuthServer.issuer` | string | Defines the issuer to use when issuing and validating tokens. The default value is https://{requestUri.HostAndPort}/ |
| `--auth.appAuth.selfAuthServer.oldTokenSigningRSAKeySecretName` | string | OPTIONAL: Secret name to use to retrieve Old RSA Signing Key. This can be useful during key rotation to continue to accept older tokens. (default "token_rsa_key_old.pem") |
| `--auth.appAuth.selfAuthServer.refreshTokenLifespan` | string | Defines the lifespan of issued access tokens. (default "1h0m0s") |
| `--auth.appAuth.selfAuthServer.tokenSigningRSAKeySecretName` | string | OPTIONAL: Secret name to use to retrieve RSA Signing Key. (default "token_rsa_key.pem") |
| `--auth.appAuth.thirdPartyConfig.flyteClient.audience` | string | Audience to use when initiating OAuth2 authorization requests. |
| `--auth.appAuth.thirdPartyConfig.flyteClient.clientId` | string | public identifier for the app which handles authorization for a Flyte deployment (default "uctl") |
| `--auth.appAuth.thirdPartyConfig.flyteClient.redirectUri` | string | This is the callback uri registered with the app which handles authorization for a Flyte deployment (default "http://localhost:53593/callback") |
| `--auth.appAuth.thirdPartyConfig.flyteClient.scopes` | strings | Recommended scopes for the client to request. (default [all,offline]) |
| `--auth.disableForGrpc` | | Disables auth enforcement on Grpc Endpoints. |
| `--auth.disableForHttp` | | Disables auth enforcement on HTTP Endpoints. |
| `--auth.grpcAuthorizationHeader` | string | (default "flyte-authorization") |
| `--auth.httpAuthorizationHeader` | string | (default "flyte-authorization") |
| `--auth.httpProxyURL` | string | OPTIONAL: HTTP Proxy to be used for OAuth requests. |
| `--auth.tokenEndpointProxyPath` | string | The path used to proxy calls to the TokenURL |
| `--auth.userAuth.cookieBlockKeySecretName` | string | OPTIONAL: Secret name to use for cookie block key. (default "cookie_block_key") |
| `--auth.userAuth.cookieHashKeySecretName` | string | OPTIONAL: Secret name to use for cookie hash key. (default "cookie_hash_key") |
| `--auth.userAuth.cookieSetting.domain` | string | OPTIONAL: Allows you to set the domain attribute on the auth cookies. |
| `--auth.userAuth.cookieSetting.sameSitePolicy` | string | OPTIONAL: Allows you to declare if your cookie should be restricted to a first-party or same-site context.Wrapper around http.SameSite. (default "DefaultMode") |
| `--auth.userAuth.httpProxyURL` | string | OPTIONAL: HTTP Proxy to be used for OAuth requests. |
| `--auth.userAuth.idpQueryParameter` | string | idp query parameter used for selecting a particular IDP for doing user authentication. Eg: for Okta passing idp={IDP-ID} forces the authentication to happen with IDP-ID |
| `--auth.userAuth.openId.baseUrl` | string | |
| `--auth.userAuth.openId.clientId` | string | |
| `--auth.userAuth.openId.clientSecretFile` | string | |
| `--auth.userAuth.openId.clientSecretName` | string | (default "oidc_client_secret") |
| `--auth.userAuth.openId.scopes` | strings | (default [openid,profile]) |
| `--auth.userAuth.redirectUrl` | string | (default "/console") |
| `--authorizer.internalCommunicationConfig.enabled` | | Enables authorization decisions for internal communication. (default true) |
| `--authorizer.internalCommunicationConfig.ingressIdentity` | string | IngressIdentity used in the cluster. Needed to exclude the communication coming from ingress. (default "ingress-nginx.ingress-nginx.serviceaccount.identity.linkerd.cluster.local") |
| `--authorizer.internalCommunicationConfig.tenantUrlPatternIdentity` | string | UrlPatternIdentity of the internal tenant service endpoint identities. (default "{{ service }}.{{ org }}.serviceaccount.identity.linkerd.cluster.local") |
| `--authorizer.internalCommunicationConfig.urlPatternIdentity` | string | UrlPatternIdentity of the internal service endpoint identities. (default "{{ service }}-helmchart.{{ service }}.serviceaccount.identity.linkerd.cluster.local") |
| `--authorizer.mode` | string | (default "Active") |
| `--authorizer.organizationConfig.PolicyConfig.adminPolicyDescription` | string | description for the boilerplate admin policy (default "Contributor permissions and full admin permissions to manage users and view usage dashboards") |
| `--authorizer.organizationConfig.PolicyConfig.contributorPolicyDescription` | string | description for the boilerplate contributor policy (default "Viewer permissions and permissions to create workflows, tasks, launch plans, and executions") |
| `--authorizer.organizationConfig.PolicyConfig.defaultUserPolicyRoleType` | string | name of the role type to determine which default policy new users added to the organization should be assigned (default "Viewer") |
| `--authorizer.organizationConfig.PolicyConfig.serverlessContributorPolicyDescription` | string | description for the boilerplate serverless contributor policy (default "Viewer permissions and permissions to create workflows, tasks, launch plans, and executions") |
| `--authorizer.organizationConfig.PolicyConfig.serverlessViewerPolicyDescription` | string | description for the boilerplate serverless viewer policy (default "Permissions to view Flyte entities") |
| `--authorizer.organizationConfig.PolicyConfig.viewerPolicyDescription` | string | description for the boilerplate viewer policy (default "Permissions to view Flyte entities") |
| `--authorizer.organizationConfig.defaultPolicyCacheDuration` | string | Cache entry duration for the store of the default policy per organization (default "10m0s") |
| `--authorizer.syncRuleRefreshInterval` | string | (default "1m0s") |
| `--authorizer.type` | string | (default "UserClouds") |
| `--authorizer.userCloudsClient.cache.redis.ttl.edgeTypes` | string | Specifies how long edge types remain in the cache.. (default "30m0s") |
| `--authorizer.userCloudsClient.cache.redis.ttl.edges` | string | Specifies how long edges remain in the cache. (default "30m0s") |
| `--authorizer.userCloudsClient.cache.redis.ttl.objectTypes` | string | Specifies how long object types remain in the cache. (default "30m0s") |
| `--authorizer.userCloudsClient.cache.redis.ttl.objects` | string | Specifies how long objects remain in the cache. (default "30m0s") |
| `--authorizer.userCloudsClient.cache.type` | string | Cache type to use. (default "none") |
| `--authorizer.userCloudsClient.clientID` | string | UserClouds client id |
| `--authorizer.userCloudsClient.clientSecretName` | string | UserCloud client secret name to read from the secret manager. (default "userclouds-client-secret") |
| `--authorizer.userCloudsClient.enableLogging` | | Enable userclouds client's internal logging. Calls to post logs take 250-350 ms and will impact p99 latency, enable with caution. |
| `--authorizer.userCloudsClient.tenantID` | string | UserClouds tenant id. Should be a UUID. |
| `--authorizer.userCloudsClient.tenantUrl` | string | Something like https://{yourtenant}.tenant.userclouds.com |
| `--config` | string | config file (default is /Users/andrew/.union/config.yaml) |
| `--connection.environment` | string | |
| `--connection.region` | string | |
| `--connection.rootTenantURLPattern` | string | Pattern for tenant url. (default "dns:///{{ organization }}.cloud-staging.union.ai") |
| `--console.endpoint` | string | Endpoint of console, if different than flyte admin |
| `--database.connMaxLifeTime` | string | sets the maximum amount of time a connection may be reused (default "1h0m0s") |
| `--database.enableForeignKeyConstraintWhenMigrating` | | Whether to enable gorm foreign keys when migrating the db |
| `--database.maxIdleConnections` | int | maxIdleConnections sets the maximum number of connections in the idle connection pool. (default 10) |
| `--database.maxOpenConnections` | int | maxOpenConnections sets the maximum number of open connections to the database. (default 100) |
| `--database.postgres.dbname` | string | The database name (default "postgres") |
| `--database.postgres.debug` | | |
| `--database.postgres.host` | string | The host name of the database server (default "localhost") |
| `--database.postgres.options` | string | See http://gorm.io/docs/connecting_to_the_database.html for available options passed, in addition to the above. (default "sslmode=disable") |
| `--database.postgres.password` | string | The database password. (default "postgres") |
| `--database.postgres.passwordPath` | string | Points to the file containing the database password. |
| `--database.postgres.port` | int | The port name of the database server (default 30001) |
| `--database.postgres.readReplicaHost` | string | The host name of the read replica database server (default "localhost") |
| `--database.postgres.username` | string | The database user who is connecting to the server. (default "postgres") |
| `--database.sqlite.file` | string | The path to the file (existing or new) where the DB should be created / stored. If existing, then this will be re-used, else a new will be created |
| `--db.connectionPool.maxConnectionLifetime` | string | (default "0s") |
| `--db.connectionPool.maxIdleConnections` | int | |
| `--db.connectionPool.maxOpenConnections` | int | |
| `--db.dbname` | string | (default "postgres") |
| `--db.debug` | | |
| `--db.host` | string | (default "postgres") |
| `--db.log_level` | int | (default 4) |
| `--db.options` | string | (default "sslmode=disable") |
| `--db.password` | string | |
| `--db.passwordPath` | string | |
| `--db.port` | int | (default 5432) |
| `--db.username` | string | (default "postgres") |
| `-d`, `--domain` | string | Specifies the Flyte project's domain. |
| `--files.archive` | | Pass in archive file either an http link or local path. |
| `--files.assumableIamRole` | string | Custom assumable iam auth role to register launch plans with. |
| `--files.continueOnError` | | Continue on error when registering files. |
| `--files.destinationDirectory` | string | Location of source code in container. |
| `--files.dryRun` | | Execute command without making any modifications. |
| `--files.enableSchedule` | | Enable the schedule if the files contain schedulable launchplan. |
| `--files.force` | | Force use of version number on entities registered with flyte. |
| `--files.k8ServiceAccount` | string | Deprecated. Please use `--K8sServiceAccount`|
| `--files.k8sServiceAccount` | string | Custom kubernetes service account auth role to register launch plans with. |
| `--files.outputLocationPrefix` | string | Custom output location prefix for offloaded types (files/schemas). |
| `--files.sourceUploadPath` | string | Deprecated: Update flyte admin to avoid having to configure storage access from uctl. |
| `--files.version` | string | Version of the entity to be registered with flyte which are un-versioned after serialization. |
| `--logger.formatter.type` | string | Sets logging format type. (default "json") |
| `--logger.level` | int | Sets the minimum logging level. (default 3) |
| `--logger.mute` | | Mutes all logs regardless of severity. Intended for benchmarks/tests only. |
| `--logger.show-source` | | Includes source code location in logs. |
| `--org` | string | Organization to work on. If not set, default to user's org. |
| `--otel.file.filename` | string | Filename to store exported telemetry traces (default "/tmp/trace.txt") |
| `--otel.jaeger.endpoint` | string | Endpoint for the jaeger telemetry trace ingestor (default "http://localhost:14268/api/traces") |
| `--otel.otlpgrpc.endpoint` | string | Endpoint for the OTLP telemetry trace collector (default "http://localhost:4317") |
| `--otel.otlphttp.endpoint` | string | Endpoint for the OTLP telemetry trace collector (default "http://localhost:4318/v1/traces") |
| `--otel.sampler.parentSampler` | string | Sets the parent sampler to use for the tracer (default "always") |
| `--otel.type` | string | Sets the type of exporter to configure [noop/file/jaeger/otlpgrpc/otlphttp]. (default "noop") |
| `-o`, `--output` | string | Specifies the output type - supported formats [TABLE JSON YAML DOT DOTURL]. NOTE: dot, doturl are only supported for Workflow (default "table") |
| `--plugins.catalogcache.reader.maxItems` | int | Maximum number of entries to keep in the index. (default 10000) |
| `--plugins.catalogcache.reader.maxRetries` | int | Maximum number of retries per item. (default 3) |
| `--plugins.catalogcache.reader.workers` | int | Number of concurrent workers to start processing the queue. (default 10) |
| `--plugins.catalogcache.writer.maxItems` | int | Maximum number of entries to keep in the index. (default 10000) |
| `--plugins.catalogcache.writer.maxRetries` | int | Maximum number of retries per item. (default 3) |
| `--plugins.catalogcache.writer.workers` | int | Number of concurrent workers to start processing the queue. (default 10) |
| `-p`, `--project` | string | Specifies the Flyte project. |
| `--rediscache.passwordSecretName` | string | Name of secret with Redis password. |
| `--rediscache.primaryEndpoint` | string | Primary endpoint for the redis cache that can be used for both reads and writes. |
| `--rediscache.replicaEndpoint` | string | Replica endpoint for the redis cache that can be used for reads. |
| `--secrets.env-prefix` | string | Prefix for environment variables (default "FLYTE_SECRET_") |
| `--secrets.secrets-prefix` | string | Prefix where to look for secrets file (default "/etc/secrets") |
| `--secrets.type` | string | Sets the type of storage to configure [local]. (default "local") |
| `--server.dataProxy.download.maxExpiresIn` | string | Maximum allowed expiration duration. (default "1h0m0s") |
| `--server.dataProxy.upload.defaultFileNameLength` | int | Default length for the generated file name if not provided in the request. (default 20) |
| `--server.dataProxy.upload.maxExpiresIn` | string | Maximum allowed expiration duration. (default "1h0m0s") |
| `--server.dataProxy.upload.maxSize` | string | Maximum allowed upload size. (default "6Mi") |
| `--server.dataProxy.upload.storagePrefix` | string | Storage prefix to use for all upload requests. |
| `--server.grpc.enableGrpcLatencyMetrics` | | Enable grpc latency metrics. Note Histograms metrics can be expensive on Prometheus servers. |
| `--server.grpc.maxMessageSizeBytes` | int | The max size in bytes for incoming gRPC messages |
| `--server.grpc.port` | int | On which grpc port to serve admin (default 8089) |
| `--server.grpc.serverReflection` | | Enable GRPC Server Reflection (default true) |
| `--server.grpcPort` | int | deprecated |
| `--server.grpcServerReflection` | | deprecated |
| `--server.httpPort` | int | On which http port to serve admin (default 8088) |
| `--server.kube-config` | string | Path to kubernetes client config file, default is empty, useful for incluster config. |
| `--server.kubeClientConfig.burst` | int | Max burst rate for throttle. 0 defaults to 10 (default 25) |
| `--server.kubeClientConfig.qps` | int32 | Max QPS to the master for requests to KubeAPI. 0 defaults to 5. (default 100) |
| `--server.kubeClientConfig.timeout` | string | Max duration allowed for every request to KubeAPI before giving up. 0 implies no timeout. (default "30s") |
| `--server.master` | string | The address of the Kubernetes API server. |
| `--server.readHeaderTimeoutSeconds` | int | The amount of time allowed to read request headers. (default 32) |
| `--server.security.allowCors` | | (default true) |
| `--server.security.allowedHeaders` | strings | (default [Content-Type,flyte-authorization]) |
| `--server.security.allowedOrigins` | strings | (default [*]) |
| `--server.security.auditAccess` | | |
| `--server.security.secure` | | |
| `--server.security.ssl.certificateFile` | string | |
| `--server.security.ssl.keyFile` | string | |
| `--server.security.useAuth` | | |
| `--server.thirdPartyConfig.flyteClient.audience` | string | Audience to use when initiating OAuth2 authorization requests. |
| `--server.thirdPartyConfig.flyteClient.clientId` | string | public identifier for the app which handles authorization for a Flyte deployment |
| `--server.thirdPartyConfig.flyteClient.redirectUri` | string | This is the callback uri registered with the app which handles authorization for a Flyte deployment |
| `--server.thirdPartyConfig.flyteClient.scopes` | strings | Recommended scopes for the client to request. |
| `--server.watchService.maxActiveClusterConnections` | int | (default 5) |
| `--server.watchService.maxPageSize` | int | (default 50000) |
| `--server.watchService.nonTerminalStatusUpdatesInterval` | string | (default "1m0s") |
| `--server.watchService.pollInterval` | string | (default "1s") |
| `--sharedservice.connectPort` | string | On which connect port to serve admin (default "8080") |
| `--sharedservice.grpc.grpcMaxResponseStatusBytes` | int32 | specifies the maximum (uncompressed) size of header list that the client is prepared to accept on grpc calls (default 32000) |
| `--sharedservice.grpc.maxConcurrentStreams` | int | Limit on the number of concurrent streams to each ServerTransport. (default 100) |
| `--sharedservice.grpc.maxMessageSizeBytes` | int | Limit on the size of message that can be received on the server. (default 10485760) |
| `--sharedservice.grpcServerReflection` | | Enable GRPC Server Reflection (default true) |
| `--sharedservice.httpPort` | string | On which http port to serve admin (default "8089") |
| `--sharedservice.kubeConfig` | string | Path to kubernetes client config file. |
| `--sharedservice.master` | string | The address of the Kubernetes API server. |
| `--sharedservice.metrics.enableClientGrpcHistograms` | | Enable client grpc histograms (default true) |
| `--sharedservice.metrics.enableGrpcHistograms` | | Enable grpc histograms (default true) |
| `--sharedservice.metrics.scope` | string | Scope to emit metrics under (default "service:") |
| `--sharedservice.port` | string | On which grpc port to serve admin (default "8080") |
| `--sharedservice.profiler.enabled` | | Enable Profiler on server |
| `--sharedservice.profilerPort` | string | Profile port to start listen for pprof and metric handlers on. (default "10254") |
| `--sharedservice.security.allowCors` | | |
| `--sharedservice.security.allowLocalhostAccess` | | Whether to permit localhost unauthenticated access to the server |
| `--sharedservice.security.allowedHeaders` | strings | |
| `--sharedservice.security.allowedOrigins` | strings | |
| `--sharedservice.security.auditAccess` | | |
| `--sharedservice.security.orgOverride` | string | Override org in identity context if localhost access enabled |
| `--sharedservice.security.secure` | | |
| `--sharedservice.security.ssl.certificateAuthorityFile` | string | |
| `--sharedservice.security.ssl.certificateFile` | string | |
| `--sharedservice.security.ssl.keyFile` | string | |
| `--sharedservice.security.useAuth` | | |
| `--sharedservice.sync.syncInterval` | string | Time interval to sync (default "5m0s") |
| `--storage.cache.max_size_mbs` | int | Maximum size of the cache where the Blob store data is cached in-memory. If not specified or set to 0, cache is not used |
| `--storage.cache.target_gc_percent` | int | Sets the garbage collection target percentage. |
| `--storage.connection.access-key` | string | Access key to use. Only required when authtype is set to accesskey. |
| `--storage.connection.auth-type` | string | Auth Type to use [iam, accesskey]. (default "iam") |
| `--storage.connection.disable-ssl` | | Disables SSL connection. Should only be used for development. |
| `--storage.connection.endpoint` | string | URL for storage client to connect to. |
| `--storage.connection.region` | string | Region to connect to. (default "us-east-1") |
| `--storage.connection.secret-key` | string | Secret to use when accesskey is set. |
| `--storage.container` | string | Initial container (in s3 a bucket) to create -if it doesn't exist-.' |
| `--storage.defaultHttpClient.timeout` | string | Sets time out on the http client. (default "0s") |
| `--storage.enable-multicontainer` | | If this is true, then the container argument is overlooked and redundant. This config will automatically open new connections to new containers/buckets as they are encountered |
| `--storage.limits.maxDownloadMBs` | int | Maximum allowed download size (in MBs) per call. (default 2) |
| `--storage.stow.config` | stringToString | Configuration for stow backend. Refer to github/flyteorg/stow (default []) |
| `--storage.stow.kind` | string | Kind of Stow backend to use. Refer to github/flyteorg/stow |
| `--storage.type` | string | Sets the type of storage to configure [s3/minio/local/mem/stow]. (default "s3") |
| `--union.auth.authorizationMetadataKey` | string | Authorization Header to use when passing Access Tokens to the server (default "flyte-authorization") |
| `--union.auth.clientId` | string | Client ID |
| `--union.auth.clientSecretEnvVar` | string | Environment variable containing the client secret |
| `--union.auth.clientSecretLocation` | string | File containing the client secret |
| `--union.auth.deviceFlow.pollInterval` | string | amount of time the device flow would poll the token endpoint if auth server doesn't return a polling interval. Okta and google IDP do return an interval' (default "5s") |
| `--union.auth.deviceFlow.refreshTime` | string | grace period from the token expiry after which it would refresh the token. (default "5m0s") |
| `--union.auth.deviceFlow.timeout` | string | amount of time the device flow should complete or else it will be cancelled. (default "10m0s") |
| `--union.auth.enable` | | Whether to enable an authenticated conenction when communicating with admin. (default true) |
| `--union.auth.externalAuth.command` | strings | Command for external authentication token generation |
| `--union.auth.pkce.refreshTime` | string | grace period from the token expiry after which it would refresh the token. (default "5m0s") |
| `--union.auth.pkce.timeout` | string | Amount of time the browser session would be active for authentication from client app. (default "15s") |
| `--union.auth.scopes` | strings | List of scopes to request |
| `--union.auth.tokenRefreshWindow` | string | Max duration between token refresh attempt and token expiry. (default "1h0m0s") |
| `--union.auth.tokenUrl` | string | OPTIONAL: Your IdP's token endpoint. It'll be discovered from flyte admin's OAuth Metadata endpoint if not provided. |
| `--union.auth.type` | string | Type of OAuth2 flow used for communicating with admin. (default "Pkce") |
| `--union.cache.maxItemsCount` | int | Maximum number of items to keep in the cache before evicting. (default 1000) |
| `--union.connection.host` | string | Host to connect to (default "dns:///utt-mgdp-stg-us-east-2.cloud-staging.union.ai") |
| `--union.connection.insecure` | | Whether to connect over insecure channel |
| `--union.connection.insecureSkipVerify` | | InsecureSkipVerify controls whether a client verifies the server's certificate chain and host name.Caution: shouldn't be use for production usecases' |
| `--union.connection.keepAliveConfig.permitWithoutStream` | | If true, client sends keepalive pings even with no active RPCs. |
| `--union.connection.keepAliveConfig.time` | string | After a duration of this time if the client doesn't see any activity it pings the server to see if the transport is still alive. (default "20s") |
| `--union.connection.keepAliveConfig.timeout` | string | After having pinged for keepalive check, the client waits for a duration of Timeout and if no activity is seen even after that the connection is closed. (default "2m0s") |
| `--union.connection.maxBackoffDelay` | string | Max delay for grpc backoff (default "8s") |
| `--union.connection.maxRecvMsgSize` | int | Maximum size of a message in bytes of a gRPC message (default 10485760) |
| `--union.connection.maxRetries` | int | Max number of gRPC retries (default 4) |
| `--union.connection.minConnectTimeout` | string | Minimum timeout for establishing a connection (default "20s") |
| `--union.connection.perRetryTimeout` | string | gRPC per retry timeout (default "15s") |
| `--union.connection.serviceConfig` | string | Defines gRPC experimental JSON Service Config (default "{"loadBalancingConfig": [{"round_robin":{}}]}") |
| `--union.connection.trustedIdentityClaims.enabled` | | Enables passing of trusted claims while making inter service calls |
| `--union.connection.trustedIdentityClaims.externalIdentityClaim` | string | External identity claim of the service which is authorized to make internal service call. These are verified against userclouds actions |
| `--union.connection.trustedIdentityClaims.externalIdentityTypeClaim` | string | External identity type claim of app or user to use for the current service identity. It should be an 'app' for inter service communication |
| `--union.internalConnectionConfig.-` | stringToString | (default []) |
| `--union.internalConnectionConfig.enabled` | | Enables internal service to service communication instead of going through ingress. |
| `--union.internalConnectionConfig.urlPattern` | string | UrlPattern of the internal service endpoints. (default "{{ service }}-helmchart.{{ service }}.svc.cluster.local:80") |
| `--webhook.awsSecretManager.sidecarImage` | string | Specifies the sidecar docker image to use (default "docker.io/amazon/aws-secrets-manager-secret-sidecar:v0.1.4") |
| `--webhook.certDir` | string | Certificate directory to use to write generated certs. Defaults to /etc/webhook/certs/ (default "/etc/webhook/certs") |
| `--webhook.embeddedSecretManagerConfig.awsConfig.region` | string | AWS region |
| `--webhook.embeddedSecretManagerConfig.fileMountInitContainer.image` | string | Specifies init container image to use for mounting secrets as files. (default "busybox:1.28") |
| `--webhook.embeddedSecretManagerConfig.gcpConfig.project` | string | GCP project to be used for secret manager |
| `--webhook.embeddedSecretManagerConfig.type` | string | (default "AWS") |
| `--webhook.gcpSecretManager.sidecarImage` | string | Specifies the sidecar docker image to use (default "gcr.io/google.com/cloudsdktool/cloud-sdk:alpine") |
| `--webhook.listenPort` | int | The port to use to listen to webhook calls. Defaults to 9443 (default 9443) |
| `--webhook.localCert` | | write certs locally. Defaults to false |
| `--webhook.metrics-prefix` | string | An optional prefix for all published metrics. (default "flyte:") |
| `--webhook.secretName` | string | Secret name to write generated certs to. (default "flyte-pod-webhook") |
| `--webhook.serviceName` | string | The name of the webhook service. (default "flyte-pod-webhook") |
| `--webhook.servicePort` | int32 | The port on the service that hosting webhook. (default 443) |
| `--webhook.vaultSecretManager.role` | string | Specifies the vault role to use (default "flyte") |
=== PAGE: https://www.union.ai/docs/v1/serverless/api-reference/uctl-cli/uctl-create/uctl-create-clusterpool ===
# uctl create clusterpool
Create cluster pools
## Synopsis
Create cluster pools
```shell
$ uctl create clusterpool [flags]
```
## Options
| Option | Type | Description |
|--------|------|-------------|
| `--clusterPoolSpecFile` | string | cluster pool spec file to be used for creating cluster pool. |
| `--dryRun` | | execute command without making any modifications. |
| `--genSkeleton` | | generates a skeleton cluster pool config file with templatized values in full conformance with the api format. |
| `-h`, `--help` | help for clusterpool |
### Options inherited from parent commands
| Option | Type | Description |
|--------|------|-------------|
| `--admin.audience` | string | Audience to use when initiating OAuth2 authorization requests. |
| `--admin.authType` | string | Type of OAuth2 flow used for communicating with admin.ClientSecret, Pkce, ExternalCommand are valid values (default "ClientSecret") |
| `--admin.authorizationHeader` | string | Custom metadata header to pass JWT |
| `--admin.authorizationServerUrl` | string | This is the URL to your IdP's authorization server. It'll default to Endpoint |
| `--admin.caCertFilePath` | string | Use specified certificate file to verify the admin server peer. |
| `--admin.clientId` | string | Client ID (default "flytepropeller") |
| `--admin.clientSecretEnvVar` | string | Environment variable containing the client secret |
| `--admin.clientSecretLocation` | string | File containing the client secret (default "/etc/secrets/client_secret") |
| `--admin.command` | strings | Command for external authentication token generation |
| `--admin.defaultOrg` | string | OPTIONAL: Default org to use to support non-org based cli's.'. |
| `--admin.defaultServiceConfig` | string | |
| `--admin.deviceFlowConfig.pollInterval` | string | amount of time the device flow would poll the token endpoint if auth server doesn't return a polling interval. Okta and google IDP do return an interval' (default "5s") |
| `--admin.deviceFlowConfig.refreshTime` | string | grace period from the token expiry after which it would refresh the token. (default "5m0s") |
| `--admin.deviceFlowConfig.timeout` | string | amount of time the device flow should complete or else it will be cancelled. (default "10m0s") |
| `--admin.endpoint` | string | For admin types, specify where the uri of the service is located. |
| `--admin.httpProxyURL` | string | OPTIONAL: HTTP Proxy to be used for OAuth requests. |
| `--admin.insecure` | | Use insecure connection. |
| `--admin.insecureSkipVerify` | | InsecureSkipVerify controls whether a client verifies the server's certificate chain and host name.Caution: shouldn't be use for production usecases' |
| `--admin.maxBackoffDelay` | string | Max delay for grpc backoff (default "8s") |
| `--admin.maxMessageSizeBytes` | int | The max size in bytes for incoming gRPC messages |
| `--admin.maxRetries` | int | Max number of gRPC retries (default 4) |
| `--admin.perRetryTimeout` | string | gRPC per retry timeout (default "15s") |
| `--admin.pkceConfig.refreshTime` | string | grace period from the token expiry after which it would refresh the token. (default "5m0s") |
| `--admin.pkceConfig.timeout` | string | Amount of time the browser session would be active for authentication from client app. (default "2m0s") |
| `--admin.proxyCommand` | strings | Command for external proxy-authorization token generation |
| `--admin.scopes` | strings | List of scopes to request |
| `--admin.tokenRefreshWindow` | string | Max duration between token refresh attempt and token expiry. (default "0s") |
| `--admin.tokenUrl` | string | OPTIONAL: Your IdP's token endpoint. It'll be discovered from flyte admin's OAuth Metadata endpoint if not provided. |
| `--admin.useAudienceFromAdmin` | | Use Audience configured from admins public endpoint config. |
| `--admin.useAuth` | | Deprecated: Auth will be enabled/disabled based on admin's dynamically discovered information. |
| `--auth.appAuth.externalAuthServer.allowedAudience` | strings | Optional: A list of allowed audiences. If not provided, the audience is expected to be the public Uri of the service. |
| `--auth.appAuth.externalAuthServer.baseUrl` | string | This should be the base url of the authorization server that you are trying to hit. With Okta for instance, it will look something like https://company.okta.com/oauth2/abcdef123456789/ |
| `--auth.appAuth.externalAuthServer.httpProxyURL` | string | OPTIONAL: HTTP Proxy to be used for OAuth requests. |
| `--auth.appAuth.externalAuthServer.metadataUrl` | string | Optional: If the server doesn't support /.well-known/oauth-authorization-server, you can set a custom metadata url here.' |
| `--auth.appAuth.externalAuthServer.retryAttempts` | int | Optional: The number of attempted retries on a transient failure to get the OAuth metadata (default 5) |
| `--auth.appAuth.externalAuthServer.retryDelay` | string | Optional, Duration to wait between retries (default "1s") |
| `--auth.appAuth.selfAuthServer.accessTokenLifespan` | string | Defines the lifespan of issued access tokens. (default "30m0s") |
| `--auth.appAuth.selfAuthServer.authorizationCodeLifespan` | string | Defines the lifespan of issued access tokens. (default "5m0s") |
| `--auth.appAuth.selfAuthServer.claimSymmetricEncryptionKeySecretName` | string | OPTIONAL: Secret name to use to encrypt claims in authcode token. (default "claim_symmetric_key") |
| `--auth.appAuth.selfAuthServer.issuer` | string | Defines the issuer to use when issuing and validating tokens. The default value is https://{requestUri.HostAndPort}/ |
| `--auth.appAuth.selfAuthServer.oldTokenSigningRSAKeySecretName` | string | OPTIONAL: Secret name to use to retrieve Old RSA Signing Key. This can be useful during key rotation to continue to accept older tokens. (default "token_rsa_key_old.pem") |
| `--auth.appAuth.selfAuthServer.refreshTokenLifespan` | string | Defines the lifespan of issued access tokens. (default "1h0m0s") |
| `--auth.appAuth.selfAuthServer.tokenSigningRSAKeySecretName` | string | OPTIONAL: Secret name to use to retrieve RSA Signing Key. (default "token_rsa_key.pem") |
| `--auth.appAuth.thirdPartyConfig.flyteClient.audience` | string | Audience to use when initiating OAuth2 authorization requests. |
| `--auth.appAuth.thirdPartyConfig.flyteClient.clientId` | string | public identifier for the app which handles authorization for a Flyte deployment (default "uctl") |
| `--auth.appAuth.thirdPartyConfig.flyteClient.redirectUri` | string | This is the callback uri registered with the app which handles authorization for a Flyte deployment (default "http://localhost:53593/callback") |
| `--auth.appAuth.thirdPartyConfig.flyteClient.scopes` | strings | Recommended scopes for the client to request. (default [all,offline]) |
| `--auth.disableForGrpc` | | Disables auth enforcement on Grpc Endpoints. |
| `--auth.disableForHttp` | | Disables auth enforcement on HTTP Endpoints. |
| `--auth.grpcAuthorizationHeader` | string | (default "flyte-authorization") |
| `--auth.httpAuthorizationHeader` | string | (default "flyte-authorization") |
| `--auth.httpProxyURL` | string | OPTIONAL: HTTP Proxy to be used for OAuth requests. |
| `--auth.tokenEndpointProxyPath` | string | The path used to proxy calls to the TokenURL |
| `--auth.userAuth.cookieBlockKeySecretName` | string | OPTIONAL: Secret name to use for cookie block key. (default "cookie_block_key") |
| `--auth.userAuth.cookieHashKeySecretName` | string | OPTIONAL: Secret name to use for cookie hash key. (default "cookie_hash_key") |
| `--auth.userAuth.cookieSetting.domain` | string | OPTIONAL: Allows you to set the domain attribute on the auth cookies. |
| `--auth.userAuth.cookieSetting.sameSitePolicy` | string | OPTIONAL: Allows you to declare if your cookie should be restricted to a first-party or same-site context.Wrapper around http.SameSite. (default "DefaultMode") |
| `--auth.userAuth.httpProxyURL` | string | OPTIONAL: HTTP Proxy to be used for OAuth requests. |
| `--auth.userAuth.idpQueryParameter` | string | idp query parameter used for selecting a particular IDP for doing user authentication. Eg: for Okta passing idp={IDP-ID} forces the authentication to happen with IDP-ID |
| `--auth.userAuth.openId.baseUrl` | string | |
| `--auth.userAuth.openId.clientId` | string | |
| `--auth.userAuth.openId.clientSecretFile` | string | |
| `--auth.userAuth.openId.clientSecretName` | string | (default "oidc_client_secret") |
| `--auth.userAuth.openId.scopes` | strings | (default [openid,profile]) |
| `--auth.userAuth.redirectUrl` | string | (default "/console") |
| `--authorizer.internalCommunicationConfig.enabled` | | Enables authorization decisions for internal communication. (default true) |
| `--authorizer.internalCommunicationConfig.ingressIdentity` | string | IngressIdentity used in the cluster. Needed to exclude the communication coming from ingress. (default "ingress-nginx.ingress-nginx.serviceaccount.identity.linkerd.cluster.local") |
| `--authorizer.internalCommunicationConfig.tenantUrlPatternIdentity` | string | UrlPatternIdentity of the internal tenant service endpoint identities. (default "{{ service }}.{{ org }}.serviceaccount.identity.linkerd.cluster.local") |
| `--authorizer.internalCommunicationConfig.urlPatternIdentity` | string | UrlPatternIdentity of the internal service endpoint identities. (default "{{ service }}-helmchart.{{ service }}.serviceaccount.identity.linkerd.cluster.local") |
| `--authorizer.mode` | string | (default "Active") |
| `--authorizer.organizationConfig.PolicyConfig.adminPolicyDescription` | string | description for the boilerplate admin policy (default "Contributor permissions and full admin permissions to manage users and view usage dashboards") |
| `--authorizer.organizationConfig.PolicyConfig.contributorPolicyDescription` | string | description for the boilerplate contributor policy (default "Viewer permissions and permissions to create workflows, tasks, launch plans, and executions") |
| `--authorizer.organizationConfig.PolicyConfig.defaultUserPolicyRoleType` | string | name of the role type to determine which default policy new users added to the organization should be assigned (default "Viewer") |
| `--authorizer.organizationConfig.PolicyConfig.serverlessContributorPolicyDescription` | string | description for the boilerplate serverless contributor policy (default "Viewer permissions and permissions to create workflows, tasks, launch plans, and executions") |
| `--authorizer.organizationConfig.PolicyConfig.serverlessViewerPolicyDescription` | string | description for the boilerplate serverless viewer policy (default "Permissions to view Flyte entities") |
| `--authorizer.organizationConfig.PolicyConfig.viewerPolicyDescription` | string | description for the boilerplate viewer policy (default "Permissions to view Flyte entities") |
| `--authorizer.organizationConfig.defaultPolicyCacheDuration` | string | Cache entry duration for the store of the default policy per organization (default "10m0s") |
| `--authorizer.syncRuleRefreshInterval` | string | (default "1m0s") |
| `--authorizer.type` | string | (default "UserClouds") |
| `--authorizer.userCloudsClient.cache.redis.ttl.edgeTypes` | string | Specifies how long edge types remain in the cache.. (default "30m0s") |
| `--authorizer.userCloudsClient.cache.redis.ttl.edges` | string | Specifies how long edges remain in the cache. (default "30m0s") |
| `--authorizer.userCloudsClient.cache.redis.ttl.objectTypes` | string | Specifies how long object types remain in the cache. (default "30m0s") |
| `--authorizer.userCloudsClient.cache.redis.ttl.objects` | string | Specifies how long objects remain in the cache. (default "30m0s") |
| `--authorizer.userCloudsClient.cache.type` | string | Cache type to use. (default "none") |
| `--authorizer.userCloudsClient.clientID` | string | UserClouds client id |
| `--authorizer.userCloudsClient.clientSecretName` | string | UserCloud client secret name to read from the secret manager. (default "userclouds-client-secret") |
| `--authorizer.userCloudsClient.enableLogging` | | Enable userclouds client's internal logging. Calls to post logs take 250-350 ms and will impact p99 latency, enable with caution. |
| `--authorizer.userCloudsClient.tenantID` | string | UserClouds tenant id. Should be a UUID. |
| `--authorizer.userCloudsClient.tenantUrl` | string | Something like https://{yourtenant}.tenant.userclouds.com |
| `--config` | string | config file (default is /Users/andrew/.union/config.yaml) |
| `--connection.environment` | string | |
| `--connection.region` | string | |
| `--connection.rootTenantURLPattern` | string | Pattern for tenant url. (default "dns:///{{ organization }}.cloud-staging.union.ai") |
| `--console.endpoint` | string | Endpoint of console, if different than flyte admin |
| `--database.connMaxLifeTime` | string | sets the maximum amount of time a connection may be reused (default "1h0m0s") |
| `--database.enableForeignKeyConstraintWhenMigrating` | | Whether to enable gorm foreign keys when migrating the db |
| `--database.maxIdleConnections` | int | maxIdleConnections sets the maximum number of connections in the idle connection pool. (default 10) |
| `--database.maxOpenConnections` | int | maxOpenConnections sets the maximum number of open connections to the database. (default 100) |
| `--database.postgres.dbname` | string | The database name (default "postgres") |
| `--database.postgres.debug` | | |
| `--database.postgres.host` | string | The host name of the database server (default "localhost") |
| `--database.postgres.options` | string | See http://gorm.io/docs/connecting_to_the_database.html for available options passed, in addition to the above. (default "sslmode=disable") |
| `--database.postgres.password` | string | The database password. (default "postgres") |
| `--database.postgres.passwordPath` | string | Points to the file containing the database password. |
| `--database.postgres.port` | int | The port name of the database server (default 30001) |
| `--database.postgres.readReplicaHost` | string | The host name of the read replica database server (default "localhost") |
| `--database.postgres.username` | string | The database user who is connecting to the server. (default "postgres") |
| `--database.sqlite.file` | string | The path to the file (existing or new) where the DB should be created / stored. If existing, then this will be re-used, else a new will be created |
| `--db.connectionPool.maxConnectionLifetime` | string | (default "0s") |
| `--db.connectionPool.maxIdleConnections` | int | |
| `--db.connectionPool.maxOpenConnections` | int | |
| `--db.dbname` | string | (default "postgres") |
| `--db.debug` | | |
| `--db.host` | string | (default "postgres") |
| `--db.log_level` | int | (default 4) |
| `--db.options` | string | (default "sslmode=disable") |
| `--db.password` | string | |
| `--db.passwordPath` | string | |
| `--db.port` | int | (default 5432) |
| `--db.username` | string | (default "postgres") |
| `-d`, `--domain` | string | Specifies the Flyte project's domain. |
| `--files.archive` | | Pass in archive file either an http link or local path. |
| `--files.assumableIamRole` | string | Custom assumable iam auth role to register launch plans with. |
| `--files.continueOnError` | | Continue on error when registering files. |
| `--files.destinationDirectory` | string | Location of source code in container. |
| `--files.dryRun` | | Execute command without making any modifications. |
| `--files.enableSchedule` | | Enable the schedule if the files contain schedulable launchplan. |
| `--files.force` | | Force use of version number on entities registered with flyte. |
| `--files.k8ServiceAccount` | string | Deprecated. Please use `--K8sServiceAccount`|
| `--files.k8sServiceAccount` | string | Custom kubernetes service account auth role to register launch plans with. |
| `--files.outputLocationPrefix` | string | Custom output location prefix for offloaded types (files/schemas). |
| `--files.sourceUploadPath` | string | Deprecated: Update flyte admin to avoid having to configure storage access from uctl. |
| `--files.version` | string | Version of the entity to be registered with flyte which are un-versioned after serialization. |
| `--logger.formatter.type` | string | Sets logging format type. (default "json") |
| `--logger.level` | int | Sets the minimum logging level. (default 3) |
| `--logger.mute` | | Mutes all logs regardless of severity. Intended for benchmarks/tests only. |
| `--logger.show-source` | | Includes source code location in logs. |
| `--org` | string | Organization to work on. If not set, default to user's org. |
| `--otel.file.filename` | string | Filename to store exported telemetry traces (default "/tmp/trace.txt") |
| `--otel.jaeger.endpoint` | string | Endpoint for the jaeger telemetry trace ingestor (default "http://localhost:14268/api/traces") |
| `--otel.otlpgrpc.endpoint` | string | Endpoint for the OTLP telemetry trace collector (default "http://localhost:4317") |
| `--otel.otlphttp.endpoint` | string | Endpoint for the OTLP telemetry trace collector (default "http://localhost:4318/v1/traces") |
| `--otel.sampler.parentSampler` | string | Sets the parent sampler to use for the tracer (default "always") |
| `--otel.type` | string | Sets the type of exporter to configure [noop/file/jaeger/otlpgrpc/otlphttp]. (default "noop") |
| `-o`, `--output` | string | Specifies the output type - supported formats [TABLE JSON YAML DOT DOTURL]. NOTE: dot, doturl are only supported for Workflow (default "table") |
| `--plugins.catalogcache.reader.maxItems` | int | Maximum number of entries to keep in the index. (default 10000) |
| `--plugins.catalogcache.reader.maxRetries` | int | Maximum number of retries per item. (default 3) |
| `--plugins.catalogcache.reader.workers` | int | Number of concurrent workers to start processing the queue. (default 10) |
| `--plugins.catalogcache.writer.maxItems` | int | Maximum number of entries to keep in the index. (default 10000) |
| `--plugins.catalogcache.writer.maxRetries` | int | Maximum number of retries per item. (default 3) |
| `--plugins.catalogcache.writer.workers` | int | Number of concurrent workers to start processing the queue. (default 10) |
| `-p`, `--project` | string | Specifies the Flyte project. |
| `--rediscache.passwordSecretName` | string | Name of secret with Redis password. |
| `--rediscache.primaryEndpoint` | string | Primary endpoint for the redis cache that can be used for both reads and writes. |
| `--rediscache.replicaEndpoint` | string | Replica endpoint for the redis cache that can be used for reads. |
| `--secrets.env-prefix` | string | Prefix for environment variables (default "FLYTE_SECRET_") |
| `--secrets.secrets-prefix` | string | Prefix where to look for secrets file (default "/etc/secrets") |
| `--secrets.type` | string | Sets the type of storage to configure [local]. (default "local") |
| `--server.dataProxy.download.maxExpiresIn` | string | Maximum allowed expiration duration. (default "1h0m0s") |
| `--server.dataProxy.upload.defaultFileNameLength` | int | Default length for the generated file name if not provided in the request. (default 20) |
| `--server.dataProxy.upload.maxExpiresIn` | string | Maximum allowed expiration duration. (default "1h0m0s") |
| `--server.dataProxy.upload.maxSize` | string | Maximum allowed upload size. (default "6Mi") |
| `--server.dataProxy.upload.storagePrefix` | string | Storage prefix to use for all upload requests. |
| `--server.grpc.enableGrpcLatencyMetrics` | | Enable grpc latency metrics. Note Histograms metrics can be expensive on Prometheus servers. |
| `--server.grpc.maxMessageSizeBytes` | int | The max size in bytes for incoming gRPC messages |
| `--server.grpc.port` | int | On which grpc port to serve admin (default 8089) |
| `--server.grpc.serverReflection` | | Enable GRPC Server Reflection (default true) |
| `--server.grpcPort` | int | deprecated |
| `--server.grpcServerReflection` | | deprecated |
| `--server.httpPort` | int | On which http port to serve admin (default 8088) |
| `--server.kube-config` | string | Path to kubernetes client config file, default is empty, useful for incluster config. |
| `--server.kubeClientConfig.burst` | int | Max burst rate for throttle. 0 defaults to 10 (default 25) |
| `--server.kubeClientConfig.qps` | int32 | Max QPS to the master for requests to KubeAPI. 0 defaults to 5. (default 100) |
| `--server.kubeClientConfig.timeout` | string | Max duration allowed for every request to KubeAPI before giving up. 0 implies no timeout. (default "30s") |
| `--server.master` | string | The address of the Kubernetes API server. |
| `--server.readHeaderTimeoutSeconds` | int | The amount of time allowed to read request headers. (default 32) |
| `--server.security.allowCors` | | (default true) |
| `--server.security.allowedHeaders` | strings | (default [Content-Type,flyte-authorization]) |
| `--server.security.allowedOrigins` | strings | (default [*]) |
| `--server.security.auditAccess` | | |
| `--server.security.secure` | | |
| `--server.security.ssl.certificateFile` | string | |
| `--server.security.ssl.keyFile` | string | |
| `--server.security.useAuth` | | |
| `--server.thirdPartyConfig.flyteClient.audience` | string | Audience to use when initiating OAuth2 authorization requests. |
| `--server.thirdPartyConfig.flyteClient.clientId` | string | public identifier for the app which handles authorization for a Flyte deployment |
| `--server.thirdPartyConfig.flyteClient.redirectUri` | string | This is the callback uri registered with the app which handles authorization for a Flyte deployment |
| `--server.thirdPartyConfig.flyteClient.scopes` | strings | Recommended scopes for the client to request. |
| `--server.watchService.maxActiveClusterConnections` | int | (default 5) |
| `--server.watchService.maxPageSize` | int | (default 50000) |
| `--server.watchService.nonTerminalStatusUpdatesInterval` | string | (default "1m0s") |
| `--server.watchService.pollInterval` | string | (default "1s") |
| `--sharedservice.connectPort` | string | On which connect port to serve admin (default "8080") |
| `--sharedservice.grpc.grpcMaxResponseStatusBytes` | int32 | specifies the maximum (uncompressed) size of header list that the client is prepared to accept on grpc calls (default 32000) |
| `--sharedservice.grpc.maxConcurrentStreams` | int | Limit on the number of concurrent streams to each ServerTransport. (default 100) |
| `--sharedservice.grpc.maxMessageSizeBytes` | int | Limit on the size of message that can be received on the server. (default 10485760) |
| `--sharedservice.grpcServerReflection` | | Enable GRPC Server Reflection (default true) |
| `--sharedservice.httpPort` | string | On which http port to serve admin (default "8089") |
| `--sharedservice.kubeConfig` | string | Path to kubernetes client config file. |
| `--sharedservice.master` | string | The address of the Kubernetes API server. |
| `--sharedservice.metrics.enableClientGrpcHistograms` | | Enable client grpc histograms (default true) |
| `--sharedservice.metrics.enableGrpcHistograms` | | Enable grpc histograms (default true) |
| `--sharedservice.metrics.scope` | string | Scope to emit metrics under (default "service:") |
| `--sharedservice.port` | string | On which grpc port to serve admin (default "8080") |
| `--sharedservice.profiler.enabled` | | Enable Profiler on server |
| `--sharedservice.profilerPort` | string | Profile port to start listen for pprof and metric handlers on. (default "10254") |
| `--sharedservice.security.allowCors` | | |
| `--sharedservice.security.allowLocalhostAccess` | | Whether to permit localhost unauthenticated access to the server |
| `--sharedservice.security.allowedHeaders` | strings | |
| `--sharedservice.security.allowedOrigins` | strings | |
| `--sharedservice.security.auditAccess` | | |
| `--sharedservice.security.orgOverride` | string | Override org in identity context if localhost access enabled |
| `--sharedservice.security.secure` | | |
| `--sharedservice.security.ssl.certificateAuthorityFile` | string | |
| `--sharedservice.security.ssl.certificateFile` | string | |
| `--sharedservice.security.ssl.keyFile` | string | |
| `--sharedservice.security.useAuth` | | |
| `--sharedservice.sync.syncInterval` | string | Time interval to sync (default "5m0s") |
| `--storage.cache.max_size_mbs` | int | Maximum size of the cache where the Blob store data is cached in-memory. If not specified or set to 0, cache is not used |
| `--storage.cache.target_gc_percent` | int | Sets the garbage collection target percentage. |
| `--storage.connection.access-key` | string | Access key to use. Only required when authtype is set to accesskey. |
| `--storage.connection.auth-type` | string | Auth Type to use [iam, accesskey]. (default "iam") |
| `--storage.connection.disable-ssl` | | Disables SSL connection. Should only be used for development. |
| `--storage.connection.endpoint` | string | URL for storage client to connect to. |
| `--storage.connection.region` | string | Region to connect to. (default "us-east-1") |
| `--storage.connection.secret-key` | string | Secret to use when accesskey is set. |
| `--storage.container` | string | Initial container (in s3 a bucket) to create -if it doesn't exist-.' |
| `--storage.defaultHttpClient.timeout` | string | Sets time out on the http client. (default "0s") |
| `--storage.enable-multicontainer` | | If this is true, then the container argument is overlooked and redundant. This config will automatically open new connections to new containers/buckets as they are encountered |
| `--storage.limits.maxDownloadMBs` | int | Maximum allowed download size (in MBs) per call. (default 2) |
| `--storage.stow.config` | stringToString | Configuration for stow backend. Refer to github/flyteorg/stow (default []) |
| `--storage.stow.kind` | string | Kind of Stow backend to use. Refer to github/flyteorg/stow |
| `--storage.type` | string | Sets the type of storage to configure [s3/minio/local/mem/stow]. (default "s3") |
| `--union.auth.authorizationMetadataKey` | string | Authorization Header to use when passing Access Tokens to the server (default "flyte-authorization") |
| `--union.auth.clientId` | string | Client ID |
| `--union.auth.clientSecretEnvVar` | string | Environment variable containing the client secret |
| `--union.auth.clientSecretLocation` | string | File containing the client secret |
| `--union.auth.deviceFlow.pollInterval` | string | amount of time the device flow would poll the token endpoint if auth server doesn't return a polling interval. Okta and google IDP do return an interval' (default "5s") |
| `--union.auth.deviceFlow.refreshTime` | string | grace period from the token expiry after which it would refresh the token. (default "5m0s") |
| `--union.auth.deviceFlow.timeout` | string | amount of time the device flow should complete or else it will be cancelled. (default "10m0s") |
| `--union.auth.enable` | | Whether to enable an authenticated conenction when communicating with admin. (default true) |
| `--union.auth.externalAuth.command` | strings | Command for external authentication token generation |
| `--union.auth.pkce.refreshTime` | string | grace period from the token expiry after which it would refresh the token. (default "5m0s") |
| `--union.auth.pkce.timeout` | string | Amount of time the browser session would be active for authentication from client app. (default "15s") |
| `--union.auth.scopes` | strings | List of scopes to request |
| `--union.auth.tokenRefreshWindow` | string | Max duration between token refresh attempt and token expiry. (default "1h0m0s") |
| `--union.auth.tokenUrl` | string | OPTIONAL: Your IdP's token endpoint. It'll be discovered from flyte admin's OAuth Metadata endpoint if not provided. |
| `--union.auth.type` | string | Type of OAuth2 flow used for communicating with admin. (default "Pkce") |
| `--union.cache.maxItemsCount` | int | Maximum number of items to keep in the cache before evicting. (default 1000) |
| `--union.connection.host` | string | Host to connect to (default "dns:///utt-mgdp-stg-us-east-2.cloud-staging.union.ai") |
| `--union.connection.insecure` | | Whether to connect over insecure channel |
| `--union.connection.insecureSkipVerify` | | InsecureSkipVerify controls whether a client verifies the server's certificate chain and host name.Caution: shouldn't be use for production usecases' |
| `--union.connection.keepAliveConfig.permitWithoutStream` | | If true, client sends keepalive pings even with no active RPCs. |
| `--union.connection.keepAliveConfig.time` | string | After a duration of this time if the client doesn't see any activity it pings the server to see if the transport is still alive. (default "20s") |
| `--union.connection.keepAliveConfig.timeout` | string | After having pinged for keepalive check, the client waits for a duration of Timeout and if no activity is seen even after that the connection is closed. (default "2m0s") |
| `--union.connection.maxBackoffDelay` | string | Max delay for grpc backoff (default "8s") |
| `--union.connection.maxRecvMsgSize` | int | Maximum size of a message in bytes of a gRPC message (default 10485760) |
| `--union.connection.maxRetries` | int | Max number of gRPC retries (default 4) |
| `--union.connection.minConnectTimeout` | string | Minimum timeout for establishing a connection (default "20s") |
| `--union.connection.perRetryTimeout` | string | gRPC per retry timeout (default "15s") |
| `--union.connection.serviceConfig` | string | Defines gRPC experimental JSON Service Config (default "{"loadBalancingConfig": [{"round_robin":{}}]}") |
| `--union.connection.trustedIdentityClaims.enabled` | | Enables passing of trusted claims while making inter service calls |
| `--union.connection.trustedIdentityClaims.externalIdentityClaim` | string | External identity claim of the service which is authorized to make internal service call. These are verified against userclouds actions |
| `--union.connection.trustedIdentityClaims.externalIdentityTypeClaim` | string | External identity type claim of app or user to use for the current service identity. It should be an 'app' for inter service communication |
| `--union.internalConnectionConfig.-` | stringToString | (default []) |
| `--union.internalConnectionConfig.enabled` | | Enables internal service to service communication instead of going through ingress. |
| `--union.internalConnectionConfig.urlPattern` | string | UrlPattern of the internal service endpoints. (default "{{ service }}-helmchart.{{ service }}.svc.cluster.local:80") |
| `--webhook.awsSecretManager.sidecarImage` | string | Specifies the sidecar docker image to use (default "docker.io/amazon/aws-secrets-manager-secret-sidecar:v0.1.4") |
| `--webhook.certDir` | string | Certificate directory to use to write generated certs. Defaults to /etc/webhook/certs/ (default "/etc/webhook/certs") |
| `--webhook.embeddedSecretManagerConfig.awsConfig.region` | string | AWS region |
| `--webhook.embeddedSecretManagerConfig.fileMountInitContainer.image` | string | Specifies init container image to use for mounting secrets as files. (default "busybox:1.28") |
| `--webhook.embeddedSecretManagerConfig.gcpConfig.project` | string | GCP project to be used for secret manager |
| `--webhook.embeddedSecretManagerConfig.type` | string | (default "AWS") |
| `--webhook.gcpSecretManager.sidecarImage` | string | Specifies the sidecar docker image to use (default "gcr.io/google.com/cloudsdktool/cloud-sdk:alpine") |
| `--webhook.listenPort` | int | The port to use to listen to webhook calls. Defaults to 9443 (default 9443) |
| `--webhook.localCert` | | write certs locally. Defaults to false |
| `--webhook.metrics-prefix` | string | An optional prefix for all published metrics. (default "flyte:") |
| `--webhook.secretName` | string | Secret name to write generated certs to. (default "flyte-pod-webhook") |
| `--webhook.serviceName` | string | The name of the webhook service. (default "flyte-pod-webhook") |
| `--webhook.servicePort` | int32 | The port on the service that hosting webhook. (default 443) |
| `--webhook.vaultSecretManager.role` | string | Specifies the vault role to use (default "flyte") |
=== PAGE: https://www.union.ai/docs/v1/serverless/api-reference/uctl-cli/uctl-create/uctl-create-clusterpoolassignment ===
# uctl create clusterpoolassignment
Create cluster pool assignments
## Synopsis
Create cluster pool assignments
```shell
$ uctl create clusterpoolassignment [flags]
```
## Options
| Option | Type | Description |
|--------|------|-------------|
| `--clusterName` | string | Assign cluster with this name |
| `-h`, `--help` | help for clusterpoolassignment |
| `--poolName` | string | Assign cluster to this pool |
### Options inherited from parent commands
| Option | Type | Description |
|--------|------|-------------|
| `--admin.audience` | string | Audience to use when initiating OAuth2 authorization requests. |
| `--admin.authType` | string | Type of OAuth2 flow used for communicating with admin.ClientSecret, Pkce, ExternalCommand are valid values (default "ClientSecret") |
| `--admin.authorizationHeader` | string | Custom metadata header to pass JWT |
| `--admin.authorizationServerUrl` | string | This is the URL to your IdP's authorization server. It'll default to Endpoint |
| `--admin.caCertFilePath` | string | Use specified certificate file to verify the admin server peer. |
| `--admin.clientId` | string | Client ID (default "flytepropeller") |
| `--admin.clientSecretEnvVar` | string | Environment variable containing the client secret |
| `--admin.clientSecretLocation` | string | File containing the client secret (default "/etc/secrets/client_secret") |
| `--admin.command` | strings | Command for external authentication token generation |
| `--admin.defaultOrg` | string | OPTIONAL: Default org to use to support non-org based cli's.'. |
| `--admin.defaultServiceConfig` | string | |
| `--admin.deviceFlowConfig.pollInterval` | string | amount of time the device flow would poll the token endpoint if auth server doesn't return a polling interval. Okta and google IDP do return an interval' (default "5s") |
| `--admin.deviceFlowConfig.refreshTime` | string | grace period from the token expiry after which it would refresh the token. (default "5m0s") |
| `--admin.deviceFlowConfig.timeout` | string | amount of time the device flow should complete or else it will be cancelled. (default "10m0s") |
| `--admin.endpoint` | string | For admin types, specify where the uri of the service is located. |
| `--admin.httpProxyURL` | string | OPTIONAL: HTTP Proxy to be used for OAuth requests. |
| `--admin.insecure` | | Use insecure connection. |
| `--admin.insecureSkipVerify` | | InsecureSkipVerify controls whether a client verifies the server's certificate chain and host name.Caution: shouldn't be use for production usecases' |
| `--admin.maxBackoffDelay` | string | Max delay for grpc backoff (default "8s") |
| `--admin.maxMessageSizeBytes` | int | The max size in bytes for incoming gRPC messages |
| `--admin.maxRetries` | int | Max number of gRPC retries (default 4) |
| `--admin.perRetryTimeout` | string | gRPC per retry timeout (default "15s") |
| `--admin.pkceConfig.refreshTime` | string | grace period from the token expiry after which it would refresh the token. (default "5m0s") |
| `--admin.pkceConfig.timeout` | string | Amount of time the browser session would be active for authentication from client app. (default "2m0s") |
| `--admin.proxyCommand` | strings | Command for external proxy-authorization token generation |
| `--admin.scopes` | strings | List of scopes to request |
| `--admin.tokenRefreshWindow` | string | Max duration between token refresh attempt and token expiry. (default "0s") |
| `--admin.tokenUrl` | string | OPTIONAL: Your IdP's token endpoint. It'll be discovered from flyte admin's OAuth Metadata endpoint if not provided. |
| `--admin.useAudienceFromAdmin` | | Use Audience configured from admins public endpoint config. |
| `--admin.useAuth` | | Deprecated: Auth will be enabled/disabled based on admin's dynamically discovered information. |
| `--auth.appAuth.externalAuthServer.allowedAudience` | strings | Optional: A list of allowed audiences. If not provided, the audience is expected to be the public Uri of the service. |
| `--auth.appAuth.externalAuthServer.baseUrl` | string | This should be the base url of the authorization server that you are trying to hit. With Okta for instance, it will look something like https://company.okta.com/oauth2/abcdef123456789/ |
| `--auth.appAuth.externalAuthServer.httpProxyURL` | string | OPTIONAL: HTTP Proxy to be used for OAuth requests. |
| `--auth.appAuth.externalAuthServer.metadataUrl` | string | Optional: If the server doesn't support /.well-known/oauth-authorization-server, you can set a custom metadata url here.' |
| `--auth.appAuth.externalAuthServer.retryAttempts` | int | Optional: The number of attempted retries on a transient failure to get the OAuth metadata (default 5) |
| `--auth.appAuth.externalAuthServer.retryDelay` | string | Optional, Duration to wait between retries (default "1s") |
| `--auth.appAuth.selfAuthServer.accessTokenLifespan` | string | Defines the lifespan of issued access tokens. (default "30m0s") |
| `--auth.appAuth.selfAuthServer.authorizationCodeLifespan` | string | Defines the lifespan of issued access tokens. (default "5m0s") |
| `--auth.appAuth.selfAuthServer.claimSymmetricEncryptionKeySecretName` | string | OPTIONAL: Secret name to use to encrypt claims in authcode token. (default "claim_symmetric_key") |
| `--auth.appAuth.selfAuthServer.issuer` | string | Defines the issuer to use when issuing and validating tokens. The default value is https://{requestUri.HostAndPort}/ |
| `--auth.appAuth.selfAuthServer.oldTokenSigningRSAKeySecretName` | string | OPTIONAL: Secret name to use to retrieve Old RSA Signing Key. This can be useful during key rotation to continue to accept older tokens. (default "token_rsa_key_old.pem") |
| `--auth.appAuth.selfAuthServer.refreshTokenLifespan` | string | Defines the lifespan of issued access tokens. (default "1h0m0s") |
| `--auth.appAuth.selfAuthServer.tokenSigningRSAKeySecretName` | string | OPTIONAL: Secret name to use to retrieve RSA Signing Key. (default "token_rsa_key.pem") |
| `--auth.appAuth.thirdPartyConfig.flyteClient.audience` | string | Audience to use when initiating OAuth2 authorization requests. |
| `--auth.appAuth.thirdPartyConfig.flyteClient.clientId` | string | public identifier for the app which handles authorization for a Flyte deployment (default "uctl") |
| `--auth.appAuth.thirdPartyConfig.flyteClient.redirectUri` | string | This is the callback uri registered with the app which handles authorization for a Flyte deployment (default "http://localhost:53593/callback") |
| `--auth.appAuth.thirdPartyConfig.flyteClient.scopes` | strings | Recommended scopes for the client to request. (default [all,offline]) |
| `--auth.disableForGrpc` | | Disables auth enforcement on Grpc Endpoints. |
| `--auth.disableForHttp` | | Disables auth enforcement on HTTP Endpoints. |
| `--auth.grpcAuthorizationHeader` | string | (default "flyte-authorization") |
| `--auth.httpAuthorizationHeader` | string | (default "flyte-authorization") |
| `--auth.httpProxyURL` | string | OPTIONAL: HTTP Proxy to be used for OAuth requests. |
| `--auth.tokenEndpointProxyPath` | string | The path used to proxy calls to the TokenURL |
| `--auth.userAuth.cookieBlockKeySecretName` | string | OPTIONAL: Secret name to use for cookie block key. (default "cookie_block_key") |
| `--auth.userAuth.cookieHashKeySecretName` | string | OPTIONAL: Secret name to use for cookie hash key. (default "cookie_hash_key") |
| `--auth.userAuth.cookieSetting.domain` | string | OPTIONAL: Allows you to set the domain attribute on the auth cookies. |
| `--auth.userAuth.cookieSetting.sameSitePolicy` | string | OPTIONAL: Allows you to declare if your cookie should be restricted to a first-party or same-site context.Wrapper around http.SameSite. (default "DefaultMode") |
| `--auth.userAuth.httpProxyURL` | string | OPTIONAL: HTTP Proxy to be used for OAuth requests. |
| `--auth.userAuth.idpQueryParameter` | string | idp query parameter used for selecting a particular IDP for doing user authentication. Eg: for Okta passing idp={IDP-ID} forces the authentication to happen with IDP-ID |
| `--auth.userAuth.openId.baseUrl` | string | |
| `--auth.userAuth.openId.clientId` | string | |
| `--auth.userAuth.openId.clientSecretFile` | string | |
| `--auth.userAuth.openId.clientSecretName` | string | (default "oidc_client_secret") |
| `--auth.userAuth.openId.scopes` | strings | (default [openid,profile]) |
| `--auth.userAuth.redirectUrl` | string | (default "/console") |
| `--authorizer.internalCommunicationConfig.enabled` | | Enables authorization decisions for internal communication. (default true) |
| `--authorizer.internalCommunicationConfig.ingressIdentity` | string | IngressIdentity used in the cluster. Needed to exclude the communication coming from ingress. (default "ingress-nginx.ingress-nginx.serviceaccount.identity.linkerd.cluster.local") |
| `--authorizer.internalCommunicationConfig.tenantUrlPatternIdentity` | string | UrlPatternIdentity of the internal tenant service endpoint identities. (default "{{ service }}.{{ org }}.serviceaccount.identity.linkerd.cluster.local") |
| `--authorizer.internalCommunicationConfig.urlPatternIdentity` | string | UrlPatternIdentity of the internal service endpoint identities. (default "{{ service }}-helmchart.{{ service }}.serviceaccount.identity.linkerd.cluster.local") |
| `--authorizer.mode` | string | (default "Active") |
| `--authorizer.organizationConfig.PolicyConfig.adminPolicyDescription` | string | description for the boilerplate admin policy (default "Contributor permissions and full admin permissions to manage users and view usage dashboards") |
| `--authorizer.organizationConfig.PolicyConfig.contributorPolicyDescription` | string | description for the boilerplate contributor policy (default "Viewer permissions and permissions to create workflows, tasks, launch plans, and executions") |
| `--authorizer.organizationConfig.PolicyConfig.defaultUserPolicyRoleType` | string | name of the role type to determine which default policy new users added to the organization should be assigned (default "Viewer") |
| `--authorizer.organizationConfig.PolicyConfig.serverlessContributorPolicyDescription` | string | description for the boilerplate serverless contributor policy (default "Viewer permissions and permissions to create workflows, tasks, launch plans, and executions") |
| `--authorizer.organizationConfig.PolicyConfig.serverlessViewerPolicyDescription` | string | description for the boilerplate serverless viewer policy (default "Permissions to view Flyte entities") |
| `--authorizer.organizationConfig.PolicyConfig.viewerPolicyDescription` | string | description for the boilerplate viewer policy (default "Permissions to view Flyte entities") |
| `--authorizer.organizationConfig.defaultPolicyCacheDuration` | string | Cache entry duration for the store of the default policy per organization (default "10m0s") |
| `--authorizer.syncRuleRefreshInterval` | string | (default "1m0s") |
| `--authorizer.type` | string | (default "UserClouds") |
| `--authorizer.userCloudsClient.cache.redis.ttl.edgeTypes` | string | Specifies how long edge types remain in the cache.. (default "30m0s") |
| `--authorizer.userCloudsClient.cache.redis.ttl.edges` | string | Specifies how long edges remain in the cache. (default "30m0s") |
| `--authorizer.userCloudsClient.cache.redis.ttl.objectTypes` | string | Specifies how long object types remain in the cache. (default "30m0s") |
| `--authorizer.userCloudsClient.cache.redis.ttl.objects` | string | Specifies how long objects remain in the cache. (default "30m0s") |
| `--authorizer.userCloudsClient.cache.type` | string | Cache type to use. (default "none") |
| `--authorizer.userCloudsClient.clientID` | string | UserClouds client id |
| `--authorizer.userCloudsClient.clientSecretName` | string | UserCloud client secret name to read from the secret manager. (default "userclouds-client-secret") |
| `--authorizer.userCloudsClient.enableLogging` | | Enable userclouds client's internal logging. Calls to post logs take 250-350 ms and will impact p99 latency, enable with caution. |
| `--authorizer.userCloudsClient.tenantID` | string | UserClouds tenant id. Should be a UUID. |
| `--authorizer.userCloudsClient.tenantUrl` | string | Something like https://{yourtenant}.tenant.userclouds.com |
| `--config` | string | config file (default is /Users/andrew/.union/config.yaml) |
| `--connection.environment` | string | |
| `--connection.region` | string | |
| `--connection.rootTenantURLPattern` | string | Pattern for tenant url. (default "dns:///{{ organization }}.cloud-staging.union.ai") |
| `--console.endpoint` | string | Endpoint of console, if different than flyte admin |
| `--database.connMaxLifeTime` | string | sets the maximum amount of time a connection may be reused (default "1h0m0s") |
| `--database.enableForeignKeyConstraintWhenMigrating` | | Whether to enable gorm foreign keys when migrating the db |
| `--database.maxIdleConnections` | int | maxIdleConnections sets the maximum number of connections in the idle connection pool. (default 10) |
| `--database.maxOpenConnections` | int | maxOpenConnections sets the maximum number of open connections to the database. (default 100) |
| `--database.postgres.dbname` | string | The database name (default "postgres") |
| `--database.postgres.debug` | | |
| `--database.postgres.host` | string | The host name of the database server (default "localhost") |
| `--database.postgres.options` | string | See http://gorm.io/docs/connecting_to_the_database.html for available options passed, in addition to the above. (default "sslmode=disable") |
| `--database.postgres.password` | string | The database password. (default "postgres") |
| `--database.postgres.passwordPath` | string | Points to the file containing the database password. |
| `--database.postgres.port` | int | The port name of the database server (default 30001) |
| `--database.postgres.readReplicaHost` | string | The host name of the read replica database server (default "localhost") |
| `--database.postgres.username` | string | The database user who is connecting to the server. (default "postgres") |
| `--database.sqlite.file` | string | The path to the file (existing or new) where the DB should be created / stored. If existing, then this will be re-used, else a new will be created |
| `--db.connectionPool.maxConnectionLifetime` | string | (default "0s") |
| `--db.connectionPool.maxIdleConnections` | int | |
| `--db.connectionPool.maxOpenConnections` | int | |
| `--db.dbname` | string | (default "postgres") |
| `--db.debug` | | |
| `--db.host` | string | (default "postgres") |
| `--db.log_level` | int | (default 4) |
| `--db.options` | string | (default "sslmode=disable") |
| `--db.password` | string | |
| `--db.passwordPath` | string | |
| `--db.port` | int | (default 5432) |
| `--db.username` | string | (default "postgres") |
| `-d`, `--domain` | string | Specifies the Flyte project's domain. |
| `--files.archive` | | Pass in archive file either an http link or local path. |
| `--files.assumableIamRole` | string | Custom assumable iam auth role to register launch plans with. |
| `--files.continueOnError` | | Continue on error when registering files. |
| `--files.destinationDirectory` | string | Location of source code in container. |
| `--files.dryRun` | | Execute command without making any modifications. |
| `--files.enableSchedule` | | Enable the schedule if the files contain schedulable launchplan. |
| `--files.force` | | Force use of version number on entities registered with flyte. |
| `--files.k8ServiceAccount` | string | Deprecated. Please use `--K8sServiceAccount`|
| `--files.k8sServiceAccount` | string | Custom kubernetes service account auth role to register launch plans with. |
| `--files.outputLocationPrefix` | string | Custom output location prefix for offloaded types (files/schemas). |
| `--files.sourceUploadPath` | string | Deprecated: Update flyte admin to avoid having to configure storage access from uctl. |
| `--files.version` | string | Version of the entity to be registered with flyte which are un-versioned after serialization. |
| `--logger.formatter.type` | string | Sets logging format type. (default "json") |
| `--logger.level` | int | Sets the minimum logging level. (default 3) |
| `--logger.mute` | | Mutes all logs regardless of severity. Intended for benchmarks/tests only. |
| `--logger.show-source` | | Includes source code location in logs. |
| `--org` | string | Organization to work on. If not set, default to user's org. |
| `--otel.file.filename` | string | Filename to store exported telemetry traces (default "/tmp/trace.txt") |
| `--otel.jaeger.endpoint` | string | Endpoint for the jaeger telemetry trace ingestor (default "http://localhost:14268/api/traces") |
| `--otel.otlpgrpc.endpoint` | string | Endpoint for the OTLP telemetry trace collector (default "http://localhost:4317") |
| `--otel.otlphttp.endpoint` | string | Endpoint for the OTLP telemetry trace collector (default "http://localhost:4318/v1/traces") |
| `--otel.sampler.parentSampler` | string | Sets the parent sampler to use for the tracer (default "always") |
| `--otel.type` | string | Sets the type of exporter to configure [noop/file/jaeger/otlpgrpc/otlphttp]. (default "noop") |
| `-o`, `--output` | string | Specifies the output type - supported formats [TABLE JSON YAML DOT DOTURL]. NOTE: dot, doturl are only supported for Workflow (default "table") |
| `--plugins.catalogcache.reader.maxItems` | int | Maximum number of entries to keep in the index. (default 10000) |
| `--plugins.catalogcache.reader.maxRetries` | int | Maximum number of retries per item. (default 3) |
| `--plugins.catalogcache.reader.workers` | int | Number of concurrent workers to start processing the queue. (default 10) |
| `--plugins.catalogcache.writer.maxItems` | int | Maximum number of entries to keep in the index. (default 10000) |
| `--plugins.catalogcache.writer.maxRetries` | int | Maximum number of retries per item. (default 3) |
| `--plugins.catalogcache.writer.workers` | int | Number of concurrent workers to start processing the queue. (default 10) |
| `-p`, `--project` | string | Specifies the Flyte project. |
| `--rediscache.passwordSecretName` | string | Name of secret with Redis password. |
| `--rediscache.primaryEndpoint` | string | Primary endpoint for the redis cache that can be used for both reads and writes. |
| `--rediscache.replicaEndpoint` | string | Replica endpoint for the redis cache that can be used for reads. |
| `--secrets.env-prefix` | string | Prefix for environment variables (default "FLYTE_SECRET_") |
| `--secrets.secrets-prefix` | string | Prefix where to look for secrets file (default "/etc/secrets") |
| `--secrets.type` | string | Sets the type of storage to configure [local]. (default "local") |
| `--server.dataProxy.download.maxExpiresIn` | string | Maximum allowed expiration duration. (default "1h0m0s") |
| `--server.dataProxy.upload.defaultFileNameLength` | int | Default length for the generated file name if not provided in the request. (default 20) |
| `--server.dataProxy.upload.maxExpiresIn` | string | Maximum allowed expiration duration. (default "1h0m0s") |
| `--server.dataProxy.upload.maxSize` | string | Maximum allowed upload size. (default "6Mi") |
| `--server.dataProxy.upload.storagePrefix` | string | Storage prefix to use for all upload requests. |
| `--server.grpc.enableGrpcLatencyMetrics` | | Enable grpc latency metrics. Note Histograms metrics can be expensive on Prometheus servers. |
| `--server.grpc.maxMessageSizeBytes` | int | The max size in bytes for incoming gRPC messages |
| `--server.grpc.port` | int | On which grpc port to serve admin (default 8089) |
| `--server.grpc.serverReflection` | | Enable GRPC Server Reflection (default true) |
| `--server.grpcPort` | int | deprecated |
| `--server.grpcServerReflection` | | deprecated |
| `--server.httpPort` | int | On which http port to serve admin (default 8088) |
| `--server.kube-config` | string | Path to kubernetes client config file, default is empty, useful for incluster config. |
| `--server.kubeClientConfig.burst` | int | Max burst rate for throttle. 0 defaults to 10 (default 25) |
| `--server.kubeClientConfig.qps` | int32 | Max QPS to the master for requests to KubeAPI. 0 defaults to 5. (default 100) |
| `--server.kubeClientConfig.timeout` | string | Max duration allowed for every request to KubeAPI before giving up. 0 implies no timeout. (default "30s") |
| `--server.master` | string | The address of the Kubernetes API server. |
| `--server.readHeaderTimeoutSeconds` | int | The amount of time allowed to read request headers. (default 32) |
| `--server.security.allowCors` | | (default true) |
| `--server.security.allowedHeaders` | strings | (default [Content-Type,flyte-authorization]) |
| `--server.security.allowedOrigins` | strings | (default [*]) |
| `--server.security.auditAccess` | | |
| `--server.security.secure` | | |
| `--server.security.ssl.certificateFile` | string | |
| `--server.security.ssl.keyFile` | string | |
| `--server.security.useAuth` | | |
| `--server.thirdPartyConfig.flyteClient.audience` | string | Audience to use when initiating OAuth2 authorization requests. |
| `--server.thirdPartyConfig.flyteClient.clientId` | string | public identifier for the app which handles authorization for a Flyte deployment |
| `--server.thirdPartyConfig.flyteClient.redirectUri` | string | This is the callback uri registered with the app which handles authorization for a Flyte deployment |
| `--server.thirdPartyConfig.flyteClient.scopes` | strings | Recommended scopes for the client to request. |
| `--server.watchService.maxActiveClusterConnections` | int | (default 5) |
| `--server.watchService.maxPageSize` | int | (default 50000) |
| `--server.watchService.nonTerminalStatusUpdatesInterval` | string | (default "1m0s") |
| `--server.watchService.pollInterval` | string | (default "1s") |
| `--sharedservice.connectPort` | string | On which connect port to serve admin (default "8080") |
| `--sharedservice.grpc.grpcMaxResponseStatusBytes` | int32 | specifies the maximum (uncompressed) size of header list that the client is prepared to accept on grpc calls (default 32000) |
| `--sharedservice.grpc.maxConcurrentStreams` | int | Limit on the number of concurrent streams to each ServerTransport. (default 100) |
| `--sharedservice.grpc.maxMessageSizeBytes` | int | Limit on the size of message that can be received on the server. (default 10485760) |
| `--sharedservice.grpcServerReflection` | | Enable GRPC Server Reflection (default true) |
| `--sharedservice.httpPort` | string | On which http port to serve admin (default "8089") |
| `--sharedservice.kubeConfig` | string | Path to kubernetes client config file. |
| `--sharedservice.master` | string | The address of the Kubernetes API server. |
| `--sharedservice.metrics.enableClientGrpcHistograms` | | Enable client grpc histograms (default true) |
| `--sharedservice.metrics.enableGrpcHistograms` | | Enable grpc histograms (default true) |
| `--sharedservice.metrics.scope` | string | Scope to emit metrics under (default "service:") |
| `--sharedservice.port` | string | On which grpc port to serve admin (default "8080") |
| `--sharedservice.profiler.enabled` | | Enable Profiler on server |
| `--sharedservice.profilerPort` | string | Profile port to start listen for pprof and metric handlers on. (default "10254") |
| `--sharedservice.security.allowCors` | | |
| `--sharedservice.security.allowLocalhostAccess` | | Whether to permit localhost unauthenticated access to the server |
| `--sharedservice.security.allowedHeaders` | strings | |
| `--sharedservice.security.allowedOrigins` | strings | |
| `--sharedservice.security.auditAccess` | | |
| `--sharedservice.security.orgOverride` | string | Override org in identity context if localhost access enabled |
| `--sharedservice.security.secure` | | |
| `--sharedservice.security.ssl.certificateAuthorityFile` | string | |
| `--sharedservice.security.ssl.certificateFile` | string | |
| `--sharedservice.security.ssl.keyFile` | string | |
| `--sharedservice.security.useAuth` | | |
| `--sharedservice.sync.syncInterval` | string | Time interval to sync (default "5m0s") |
| `--storage.cache.max_size_mbs` | int | Maximum size of the cache where the Blob store data is cached in-memory. If not specified or set to 0, cache is not used |
| `--storage.cache.target_gc_percent` | int | Sets the garbage collection target percentage. |
| `--storage.connection.access-key` | string | Access key to use. Only required when authtype is set to accesskey. |
| `--storage.connection.auth-type` | string | Auth Type to use [iam, accesskey]. (default "iam") |
| `--storage.connection.disable-ssl` | | Disables SSL connection. Should only be used for development. |
| `--storage.connection.endpoint` | string | URL for storage client to connect to. |
| `--storage.connection.region` | string | Region to connect to. (default "us-east-1") |
| `--storage.connection.secret-key` | string | Secret to use when accesskey is set. |
| `--storage.container` | string | Initial container (in s3 a bucket) to create -if it doesn't exist-.' |
| `--storage.defaultHttpClient.timeout` | string | Sets time out on the http client. (default "0s") |
| `--storage.enable-multicontainer` | | If this is true, then the container argument is overlooked and redundant. This config will automatically open new connections to new containers/buckets as they are encountered |
| `--storage.limits.maxDownloadMBs` | int | Maximum allowed download size (in MBs) per call. (default 2) |
| `--storage.stow.config` | stringToString | Configuration for stow backend. Refer to github/flyteorg/stow (default []) |
| `--storage.stow.kind` | string | Kind of Stow backend to use. Refer to github/flyteorg/stow |
| `--storage.type` | string | Sets the type of storage to configure [s3/minio/local/mem/stow]. (default "s3") |
| `--union.auth.authorizationMetadataKey` | string | Authorization Header to use when passing Access Tokens to the server (default "flyte-authorization") |
| `--union.auth.clientId` | string | Client ID |
| `--union.auth.clientSecretEnvVar` | string | Environment variable containing the client secret |
| `--union.auth.clientSecretLocation` | string | File containing the client secret |
| `--union.auth.deviceFlow.pollInterval` | string | amount of time the device flow would poll the token endpoint if auth server doesn't return a polling interval. Okta and google IDP do return an interval' (default "5s") |
| `--union.auth.deviceFlow.refreshTime` | string | grace period from the token expiry after which it would refresh the token. (default "5m0s") |
| `--union.auth.deviceFlow.timeout` | string | amount of time the device flow should complete or else it will be cancelled. (default "10m0s") |
| `--union.auth.enable` | | Whether to enable an authenticated conenction when communicating with admin. (default true) |
| `--union.auth.externalAuth.command` | strings | Command for external authentication token generation |
| `--union.auth.pkce.refreshTime` | string | grace period from the token expiry after which it would refresh the token. (default "5m0s") |
| `--union.auth.pkce.timeout` | string | Amount of time the browser session would be active for authentication from client app. (default "15s") |
| `--union.auth.scopes` | strings | List of scopes to request |
| `--union.auth.tokenRefreshWindow` | string | Max duration between token refresh attempt and token expiry. (default "1h0m0s") |
| `--union.auth.tokenUrl` | string | OPTIONAL: Your IdP's token endpoint. It'll be discovered from flyte admin's OAuth Metadata endpoint if not provided. |
| `--union.auth.type` | string | Type of OAuth2 flow used for communicating with admin. (default "Pkce") |
| `--union.cache.maxItemsCount` | int | Maximum number of items to keep in the cache before evicting. (default 1000) |
| `--union.connection.host` | string | Host to connect to (default "dns:///utt-mgdp-stg-us-east-2.cloud-staging.union.ai") |
| `--union.connection.insecure` | | Whether to connect over insecure channel |
| `--union.connection.insecureSkipVerify` | | InsecureSkipVerify controls whether a client verifies the server's certificate chain and host name.Caution: shouldn't be use for production usecases' |
| `--union.connection.keepAliveConfig.permitWithoutStream` | | If true, client sends keepalive pings even with no active RPCs. |
| `--union.connection.keepAliveConfig.time` | string | After a duration of this time if the client doesn't see any activity it pings the server to see if the transport is still alive. (default "20s") |
| `--union.connection.keepAliveConfig.timeout` | string | After having pinged for keepalive check, the client waits for a duration of Timeout and if no activity is seen even after that the connection is closed. (default "2m0s") |
| `--union.connection.maxBackoffDelay` | string | Max delay for grpc backoff (default "8s") |
| `--union.connection.maxRecvMsgSize` | int | Maximum size of a message in bytes of a gRPC message (default 10485760) |
| `--union.connection.maxRetries` | int | Max number of gRPC retries (default 4) |
| `--union.connection.minConnectTimeout` | string | Minimum timeout for establishing a connection (default "20s") |
| `--union.connection.perRetryTimeout` | string | gRPC per retry timeout (default "15s") |
| `--union.connection.serviceConfig` | string | Defines gRPC experimental JSON Service Config (default "{"loadBalancingConfig": [{"round_robin":{}}]}") |
| `--union.connection.trustedIdentityClaims.enabled` | | Enables passing of trusted claims while making inter service calls |
| `--union.connection.trustedIdentityClaims.externalIdentityClaim` | string | External identity claim of the service which is authorized to make internal service call. These are verified against userclouds actions |
| `--union.connection.trustedIdentityClaims.externalIdentityTypeClaim` | string | External identity type claim of app or user to use for the current service identity. It should be an 'app' for inter service communication |
| `--union.internalConnectionConfig.-` | stringToString | (default []) |
| `--union.internalConnectionConfig.enabled` | | Enables internal service to service communication instead of going through ingress. |
| `--union.internalConnectionConfig.urlPattern` | string | UrlPattern of the internal service endpoints. (default "{{ service }}-helmchart.{{ service }}.svc.cluster.local:80") |
| `--webhook.awsSecretManager.sidecarImage` | string | Specifies the sidecar docker image to use (default "docker.io/amazon/aws-secrets-manager-secret-sidecar:v0.1.4") |
| `--webhook.certDir` | string | Certificate directory to use to write generated certs. Defaults to /etc/webhook/certs/ (default "/etc/webhook/certs") |
| `--webhook.embeddedSecretManagerConfig.awsConfig.region` | string | AWS region |
| `--webhook.embeddedSecretManagerConfig.fileMountInitContainer.image` | string | Specifies init container image to use for mounting secrets as files. (default "busybox:1.28") |
| `--webhook.embeddedSecretManagerConfig.gcpConfig.project` | string | GCP project to be used for secret manager |
| `--webhook.embeddedSecretManagerConfig.type` | string | (default "AWS") |
| `--webhook.gcpSecretManager.sidecarImage` | string | Specifies the sidecar docker image to use (default "gcr.io/google.com/cloudsdktool/cloud-sdk:alpine") |
| `--webhook.listenPort` | int | The port to use to listen to webhook calls. Defaults to 9443 (default 9443) |
| `--webhook.localCert` | | write certs locally. Defaults to false |
| `--webhook.metrics-prefix` | string | An optional prefix for all published metrics. (default "flyte:") |
| `--webhook.secretName` | string | Secret name to write generated certs to. (default "flyte-pod-webhook") |
| `--webhook.serviceName` | string | The name of the webhook service. (default "flyte-pod-webhook") |
| `--webhook.servicePort` | int32 | The port on the service that hosting webhook. (default 443) |
| `--webhook.vaultSecretManager.role` | string | Specifies the vault role to use (default "flyte") |
=== PAGE: https://www.union.ai/docs/v1/serverless/api-reference/uctl-cli/uctl-create/uctl-create-execution ===
# uctl create execution
Creates execution resources.
## Synopsis
Create execution resources for a given workflow or task in a project and
domain.
There are three steps to generate an execution, as outlined below:
1. Generate the execution spec file using the
`get task` command:
```shell
$ uctl get tasks -d development -p flytesnacks core.control_flow.merge_sort.merge --version v2 --execFile execution_spec.yaml
````
The generated file would look similar to the following:
``` yaml
iamRoleARN: ""
inputs:
sorted_list1:
- 0
sorted_list2:
- 0
kubeServiceAcct: ""
targetDomain: ""
targetProject: ""
task: core.control_flow.merge_sort.merge
version: "v2"
```
2. [Optional] Update the inputs for the execution, if needed. The
generated spec file can be modified to change the input values, as shown
below:
``` yaml
iamRoleARN: 'arn:aws:iam::12345678:role/defaultrole'
inputs:
sorted_list1:
- 2
- 4
- 6
sorted_list2:
- 1
- 3
- 5
kubeServiceAcct: ""
targetDomain: ""
targetProject: ""
task: core.control_flow.merge_sort.merge
version: "v2"
```
3. [Optional] Update the envs for the execution, if needed. The
generated spec file can be modified to change the envs values, as shown
below:
``` yaml
iamRoleARN: ""
inputs:
sorted_list1:
- 0
sorted_list2:
- 0
envs:
foo: bar
kubeServiceAcct: ""
targetDomain: ""
targetProject: ""
task: core.control_flow.merge_sort.merge
version: "v2"
```
1. Run the execution by passing the generated YAML file. The file can
then be passed through the command line. It is worth noting that the
source's and target's project and domain can be different:
```shell
$ uctl create execution --execFile execution_spec.yaml -p flytesnacks -d staging --targetProject flytesnacks
```
1. To relaunch an execution, pass the current execution ID as follows:
```shell
$ uctl create execution --relaunch ffb31066a0f8b4d52b77 -p flytesnacks -d development
```
6. To recover an execution, i.e., recreate it from the last known
failure point for previously-run workflow execution, run:
```shell
$ uctl create execution --recover ffb31066a0f8b4d52b77 -p flytesnacks -d development
```
1. You can create executions idempotently by naming them. This is also
a way to *name* an execution for discovery. Note, an execution id has to
be unique within a project domain. So if the *name* matches an existing
execution an already exists exceptioj will be raised.
```shell
$ uctl create execution --recover ffb31066a0f8b4d52b77 -p flytesnacks -d development custom_name
```
1. Generic/Struct/Dataclass/JSON types are supported for execution in a
similar manner. The following is an example of how generic data can be
specified while creating the execution.
```shell
$ uctl get task -d development -p flytesnacks core.type_system.custom_objects.add --execFile adddatanum.yaml
```
The generated file would look similar to this. Here, empty values have
been dumped for generic data types `x` and `y`:
```yaml
iamRoleARN: ""
inputs:
"x": {}
"y": {}
kubeServiceAcct: ""
targetDomain: ""
targetProject: ""
task: core.type_system.custom_objects.add
version: v3
```
9. Modified file with struct data populated for 'x' and 'y'
parameters for the task "core.type_system.custom_objects.add":
```yaml
iamRoleARN: "arn:aws:iam::123456789:role/dummy"
inputs:
"x":
"x": 2
"y": ydatafory
"z":
1: "foo"
2: "bar"
"y":
"x": 3
"y": ydataforx
"z":
3: "buzz"
4: "lightyear"
kubeServiceAcct: ""
targetDomain: ""
targetProject: ""
task: core.type_system.custom_objects.add
version: v3
```
1. If you have configured a plugin that implements `WorkflowExecutor`
that supports cluster pools, then when creating a new execution, you
can assign it to a specific cluster pool:
```shell
$ uctl create execution --execFile execution_spec.yaml -p flytesnacks -d development --clusterPool my-gpu-cluster
```
## Options
| Option | Type | Description |
|--------|------|-------------|
| `--clusterPool` | string | specify which cluster pool to assign execution to. |
| `--dryRun` | | execute command without making any modifications. |
| `--execFile` | string | file for the execution params. If not specified defaults to {_name}.execution_spec.yaml |
| `-h`, `--help` | help for execution |
| `--iamRoleARN` | string | iam role ARN AuthRole for launching execution. |
| `--kubeServiceAcct` | string | kubernetes service account AuthRole for launching execution. |
| `--overwriteCache` | | skip cached results when performing execution, causing all outputs to be re-calculated and stored data to be overwritten. Does not work for recovered executions. |
| `--recover` | string | execution id to be recreated from the last known failure point. |
| `--relaunch` | string | execution id to be relaunched. |
| `--targetDomain` | string | project where execution needs to be created. If not specified configured domain would be used. |
| `--targetProject` | string | project where execution needs to be created. If not specified configured project would be used. |
| `--task` | string | |
| `--version` | string | specify version of execution workflow/task. |
| `--workflow` | string | |
### Options inherited from parent commands
| Option | Type | Description |
|--------|------|-------------|
| `--admin.audience` | string | Audience to use when initiating OAuth2 authorization requests. |
| `--admin.authType` | string | Type of OAuth2 flow used for communicating with admin.ClientSecret, Pkce, ExternalCommand are valid values (default "ClientSecret") |
| `--admin.authorizationHeader` | string | Custom metadata header to pass JWT |
| `--admin.authorizationServerUrl` | string | This is the URL to your IdP's authorization server. It'll default to Endpoint |
| `--admin.caCertFilePath` | string | Use specified certificate file to verify the admin server peer. |
| `--admin.clientId` | string | Client ID (default "flytepropeller") |
| `--admin.clientSecretEnvVar` | string | Environment variable containing the client secret |
| `--admin.clientSecretLocation` | string | File containing the client secret (default "/etc/secrets/client_secret") |
| `--admin.command` | strings | Command for external authentication token generation |
| `--admin.defaultOrg` | string | OPTIONAL: Default org to use to support non-org based cli's.'. |
| `--admin.defaultServiceConfig` | string | |
| `--admin.deviceFlowConfig.pollInterval` | string | amount of time the device flow would poll the token endpoint if auth server doesn't return a polling interval. Okta and google IDP do return an interval' (default "5s") |
| `--admin.deviceFlowConfig.refreshTime` | string | grace period from the token expiry after which it would refresh the token. (default "5m0s") |
| `--admin.deviceFlowConfig.timeout` | string | amount of time the device flow should complete or else it will be cancelled. (default "10m0s") |
| `--admin.endpoint` | string | For admin types, specify where the uri of the service is located. |
| `--admin.httpProxyURL` | string | OPTIONAL: HTTP Proxy to be used for OAuth requests. |
| `--admin.insecure` | | Use insecure connection. |
| `--admin.insecureSkipVerify` | | InsecureSkipVerify controls whether a client verifies the server's certificate chain and host name.Caution: shouldn't be use for production usecases' |
| `--admin.maxBackoffDelay` | string | Max delay for grpc backoff (default "8s") |
| `--admin.maxMessageSizeBytes` | int | The max size in bytes for incoming gRPC messages |
| `--admin.maxRetries` | int | Max number of gRPC retries (default 4) |
| `--admin.perRetryTimeout` | string | gRPC per retry timeout (default "15s") |
| `--admin.pkceConfig.refreshTime` | string | grace period from the token expiry after which it would refresh the token. (default "5m0s") |
| `--admin.pkceConfig.timeout` | string | Amount of time the browser session would be active for authentication from client app. (default "2m0s") |
| `--admin.proxyCommand` | strings | Command for external proxy-authorization token generation |
| `--admin.scopes` | strings | List of scopes to request |
| `--admin.tokenRefreshWindow` | string | Max duration between token refresh attempt and token expiry. (default "0s") |
| `--admin.tokenUrl` | string | OPTIONAL: Your IdP's token endpoint. It'll be discovered from flyte admin's OAuth Metadata endpoint if not provided. |
| `--admin.useAudienceFromAdmin` | | Use Audience configured from admins public endpoint config. |
| `--admin.useAuth` | | Deprecated: Auth will be enabled/disabled based on admin's dynamically discovered information. |
| `--auth.appAuth.externalAuthServer.allowedAudience` | strings | Optional: A list of allowed audiences. If not provided, the audience is expected to be the public Uri of the service. |
| `--auth.appAuth.externalAuthServer.baseUrl` | string | This should be the base url of the authorization server that you are trying to hit. With Okta for instance, it will look something like https://company.okta.com/oauth2/abcdef123456789/ |
| `--auth.appAuth.externalAuthServer.httpProxyURL` | string | OPTIONAL: HTTP Proxy to be used for OAuth requests. |
| `--auth.appAuth.externalAuthServer.metadataUrl` | string | Optional: If the server doesn't support /.well-known/oauth-authorization-server, you can set a custom metadata url here.' |
| `--auth.appAuth.externalAuthServer.retryAttempts` | int | Optional: The number of attempted retries on a transient failure to get the OAuth metadata (default 5) |
| `--auth.appAuth.externalAuthServer.retryDelay` | string | Optional, Duration to wait between retries (default "1s") |
| `--auth.appAuth.selfAuthServer.accessTokenLifespan` | string | Defines the lifespan of issued access tokens. (default "30m0s") |
| `--auth.appAuth.selfAuthServer.authorizationCodeLifespan` | string | Defines the lifespan of issued access tokens. (default "5m0s") |
| `--auth.appAuth.selfAuthServer.claimSymmetricEncryptionKeySecretName` | string | OPTIONAL: Secret name to use to encrypt claims in authcode token. (default "claim_symmetric_key") |
| `--auth.appAuth.selfAuthServer.issuer` | string | Defines the issuer to use when issuing and validating tokens. The default value is https://{requestUri.HostAndPort}/ |
| `--auth.appAuth.selfAuthServer.oldTokenSigningRSAKeySecretName` | string | OPTIONAL: Secret name to use to retrieve Old RSA Signing Key. This can be useful during key rotation to continue to accept older tokens. (default "token_rsa_key_old.pem") |
| `--auth.appAuth.selfAuthServer.refreshTokenLifespan` | string | Defines the lifespan of issued access tokens. (default "1h0m0s") |
| `--auth.appAuth.selfAuthServer.tokenSigningRSAKeySecretName` | string | OPTIONAL: Secret name to use to retrieve RSA Signing Key. (default "token_rsa_key.pem") |
| `--auth.appAuth.thirdPartyConfig.flyteClient.audience` | string | Audience to use when initiating OAuth2 authorization requests. |
| `--auth.appAuth.thirdPartyConfig.flyteClient.clientId` | string | public identifier for the app which handles authorization for a Flyte deployment (default "uctl") |
| `--auth.appAuth.thirdPartyConfig.flyteClient.redirectUri` | string | This is the callback uri registered with the app which handles authorization for a Flyte deployment (default "http://localhost:53593/callback") |
| `--auth.appAuth.thirdPartyConfig.flyteClient.scopes` | strings | Recommended scopes for the client to request. (default [all,offline]) |
| `--auth.disableForGrpc` | | Disables auth enforcement on Grpc Endpoints. |
| `--auth.disableForHttp` | | Disables auth enforcement on HTTP Endpoints. |
| `--auth.grpcAuthorizationHeader` | string | (default "flyte-authorization") |
| `--auth.httpAuthorizationHeader` | string | (default "flyte-authorization") |
| `--auth.httpProxyURL` | string | OPTIONAL: HTTP Proxy to be used for OAuth requests. |
| `--auth.tokenEndpointProxyPath` | string | The path used to proxy calls to the TokenURL |
| `--auth.userAuth.cookieBlockKeySecretName` | string | OPTIONAL: Secret name to use for cookie block key. (default "cookie_block_key") |
| `--auth.userAuth.cookieHashKeySecretName` | string | OPTIONAL: Secret name to use for cookie hash key. (default "cookie_hash_key") |
| `--auth.userAuth.cookieSetting.domain` | string | OPTIONAL: Allows you to set the domain attribute on the auth cookies. |
| `--auth.userAuth.cookieSetting.sameSitePolicy` | string | OPTIONAL: Allows you to declare if your cookie should be restricted to a first-party or same-site context.Wrapper around http.SameSite. (default "DefaultMode") |
| `--auth.userAuth.httpProxyURL` | string | OPTIONAL: HTTP Proxy to be used for OAuth requests. |
| `--auth.userAuth.idpQueryParameter` | string | idp query parameter used for selecting a particular IDP for doing user authentication. Eg: for Okta passing idp={IDP-ID} forces the authentication to happen with IDP-ID |
| `--auth.userAuth.openId.baseUrl` | string | |
| `--auth.userAuth.openId.clientId` | string | |
| `--auth.userAuth.openId.clientSecretFile` | string | |
| `--auth.userAuth.openId.clientSecretName` | string | (default "oidc_client_secret") |
| `--auth.userAuth.openId.scopes` | strings | (default [openid,profile]) |
| `--auth.userAuth.redirectUrl` | string | (default "/console") |
| `--authorizer.internalCommunicationConfig.enabled` | | Enables authorization decisions for internal communication. (default true) |
| `--authorizer.internalCommunicationConfig.ingressIdentity` | string | IngressIdentity used in the cluster. Needed to exclude the communication coming from ingress. (default "ingress-nginx.ingress-nginx.serviceaccount.identity.linkerd.cluster.local") |
| `--authorizer.internalCommunicationConfig.tenantUrlPatternIdentity` | string | UrlPatternIdentity of the internal tenant service endpoint identities. (default "{{ service }}.{{ org }}.serviceaccount.identity.linkerd.cluster.local") |
| `--authorizer.internalCommunicationConfig.urlPatternIdentity` | string | UrlPatternIdentity of the internal service endpoint identities. (default "{{ service }}-helmchart.{{ service }}.serviceaccount.identity.linkerd.cluster.local") |
| `--authorizer.mode` | string | (default "Active") |
| `--authorizer.organizationConfig.PolicyConfig.adminPolicyDescription` | string | description for the boilerplate admin policy (default "Contributor permissions and full admin permissions to manage users and view usage dashboards") |
| `--authorizer.organizationConfig.PolicyConfig.contributorPolicyDescription` | string | description for the boilerplate contributor policy (default "Viewer permissions and permissions to create workflows, tasks, launch plans, and executions") |
| `--authorizer.organizationConfig.PolicyConfig.defaultUserPolicyRoleType` | string | name of the role type to determine which default policy new users added to the organization should be assigned (default "Viewer") |
| `--authorizer.organizationConfig.PolicyConfig.serverlessContributorPolicyDescription` | string | description for the boilerplate serverless contributor policy (default "Viewer permissions and permissions to create workflows, tasks, launch plans, and executions") |
| `--authorizer.organizationConfig.PolicyConfig.serverlessViewerPolicyDescription` | string | description for the boilerplate serverless viewer policy (default "Permissions to view Flyte entities") |
| `--authorizer.organizationConfig.PolicyConfig.viewerPolicyDescription` | string | description for the boilerplate viewer policy (default "Permissions to view Flyte entities") |
| `--authorizer.organizationConfig.defaultPolicyCacheDuration` | string | Cache entry duration for the store of the default policy per organization (default "10m0s") |
| `--authorizer.syncRuleRefreshInterval` | string | (default "1m0s") |
| `--authorizer.type` | string | (default "UserClouds") |
| `--authorizer.userCloudsClient.cache.redis.ttl.edgeTypes` | string | Specifies how long edge types remain in the cache.. (default "30m0s") |
| `--authorizer.userCloudsClient.cache.redis.ttl.edges` | string | Specifies how long edges remain in the cache. (default "30m0s") |
| `--authorizer.userCloudsClient.cache.redis.ttl.objectTypes` | string | Specifies how long object types remain in the cache. (default "30m0s") |
| `--authorizer.userCloudsClient.cache.redis.ttl.objects` | string | Specifies how long objects remain in the cache. (default "30m0s") |
| `--authorizer.userCloudsClient.cache.type` | string | Cache type to use. (default "none") |
| `--authorizer.userCloudsClient.clientID` | string | UserClouds client id |
| `--authorizer.userCloudsClient.clientSecretName` | string | UserCloud client secret name to read from the secret manager. (default "userclouds-client-secret") |
| `--authorizer.userCloudsClient.enableLogging` | | Enable userclouds client's internal logging. Calls to post logs take 250-350 ms and will impact p99 latency, enable with caution. |
| `--authorizer.userCloudsClient.tenantID` | string | UserClouds tenant id. Should be a UUID. |
| `--authorizer.userCloudsClient.tenantUrl` | string | Something like https://{yourtenant}.tenant.userclouds.com |
| `--config` | string | config file (default is /Users/andrew/.union/config.yaml) |
| `--connection.environment` | string | |
| `--connection.region` | string | |
| `--connection.rootTenantURLPattern` | string | Pattern for tenant url. (default "dns:///{{ organization }}.cloud-staging.union.ai") |
| `--console.endpoint` | string | Endpoint of console, if different than flyte admin |
| `--database.connMaxLifeTime` | string | sets the maximum amount of time a connection may be reused (default "1h0m0s") |
| `--database.enableForeignKeyConstraintWhenMigrating` | | Whether to enable gorm foreign keys when migrating the db |
| `--database.maxIdleConnections` | int | maxIdleConnections sets the maximum number of connections in the idle connection pool. (default 10) |
| `--database.maxOpenConnections` | int | maxOpenConnections sets the maximum number of open connections to the database. (default 100) |
| `--database.postgres.dbname` | string | The database name (default "postgres") |
| `--database.postgres.debug` | | |
| `--database.postgres.host` | string | The host name of the database server (default "localhost") |
| `--database.postgres.options` | string | See http://gorm.io/docs/connecting_to_the_database.html for available options passed, in addition to the above. (default "sslmode=disable") |
| `--database.postgres.password` | string | The database password. (default "postgres") |
| `--database.postgres.passwordPath` | string | Points to the file containing the database password. |
| `--database.postgres.port` | int | The port name of the database server (default 30001) |
| `--database.postgres.readReplicaHost` | string | The host name of the read replica database server (default "localhost") |
| `--database.postgres.username` | string | The database user who is connecting to the server. (default "postgres") |
| `--database.sqlite.file` | string | The path to the file (existing or new) where the DB should be created / stored. If existing, then this will be re-used, else a new will be created |
| `--db.connectionPool.maxConnectionLifetime` | string | (default "0s") |
| `--db.connectionPool.maxIdleConnections` | int | |
| `--db.connectionPool.maxOpenConnections` | int | |
| `--db.dbname` | string | (default "postgres") |
| `--db.debug` | | |
| `--db.host` | string | (default "postgres") |
| `--db.log_level` | int | (default 4) |
| `--db.options` | string | (default "sslmode=disable") |
| `--db.password` | string | |
| `--db.passwordPath` | string | |
| `--db.port` | int | (default 5432) |
| `--db.username` | string | (default "postgres") |
| `-d`, `--domain` | string | Specifies the Flyte project's domain. |
| `--files.archive` | | Pass in archive file either an http link or local path. |
| `--files.assumableIamRole` | string | Custom assumable iam auth role to register launch plans with. |
| `--files.continueOnError` | | Continue on error when registering files. |
| `--files.destinationDirectory` | string | Location of source code in container. |
| `--files.dryRun` | | Execute command without making any modifications. |
| `--files.enableSchedule` | | Enable the schedule if the files contain schedulable launchplan. |
| `--files.force` | | Force use of version number on entities registered with flyte. |
| `--files.k8ServiceAccount` | string | Deprecated. Please use `--K8sServiceAccount`|
| `--files.k8sServiceAccount` | string | Custom kubernetes service account auth role to register launch plans with. |
| `--files.outputLocationPrefix` | string | Custom output location prefix for offloaded types (files/schemas). |
| `--files.sourceUploadPath` | string | Deprecated: Update flyte admin to avoid having to configure storage access from uctl. |
| `--files.version` | string | Version of the entity to be registered with flyte which are un-versioned after serialization. |
| `--logger.formatter.type` | string | Sets logging format type. (default "json") |
| `--logger.level` | int | Sets the minimum logging level. (default 3) |
| `--logger.mute` | | Mutes all logs regardless of severity. Intended for benchmarks/tests only. |
| `--logger.show-source` | | Includes source code location in logs. |
| `--org` | string | Organization to work on. If not set, default to user's org. |
| `--otel.file.filename` | string | Filename to store exported telemetry traces (default "/tmp/trace.txt") |
| `--otel.jaeger.endpoint` | string | Endpoint for the jaeger telemetry trace ingestor (default "http://localhost:14268/api/traces") |
| `--otel.otlpgrpc.endpoint` | string | Endpoint for the OTLP telemetry trace collector (default "http://localhost:4317") |
| `--otel.otlphttp.endpoint` | string | Endpoint for the OTLP telemetry trace collector (default "http://localhost:4318/v1/traces") |
| `--otel.sampler.parentSampler` | string | Sets the parent sampler to use for the tracer (default "always") |
| `--otel.type` | string | Sets the type of exporter to configure [noop/file/jaeger/otlpgrpc/otlphttp]. (default "noop") |
| `-o`, `--output` | string | Specifies the output type - supported formats [TABLE JSON YAML DOT DOTURL]. NOTE: dot, doturl are only supported for Workflow (default "table") |
| `--plugins.catalogcache.reader.maxItems` | int | Maximum number of entries to keep in the index. (default 10000) |
| `--plugins.catalogcache.reader.maxRetries` | int | Maximum number of retries per item. (default 3) |
| `--plugins.catalogcache.reader.workers` | int | Number of concurrent workers to start processing the queue. (default 10) |
| `--plugins.catalogcache.writer.maxItems` | int | Maximum number of entries to keep in the index. (default 10000) |
| `--plugins.catalogcache.writer.maxRetries` | int | Maximum number of retries per item. (default 3) |
| `--plugins.catalogcache.writer.workers` | int | Number of concurrent workers to start processing the queue. (default 10) |
| `-p`, `--project` | string | Specifies the Flyte project. |
| `--rediscache.passwordSecretName` | string | Name of secret with Redis password. |
| `--rediscache.primaryEndpoint` | string | Primary endpoint for the redis cache that can be used for both reads and writes. |
| `--rediscache.replicaEndpoint` | string | Replica endpoint for the redis cache that can be used for reads. |
| `--secrets.env-prefix` | string | Prefix for environment variables (default "FLYTE_SECRET_") |
| `--secrets.secrets-prefix` | string | Prefix where to look for secrets file (default "/etc/secrets") |
| `--secrets.type` | string | Sets the type of storage to configure [local]. (default "local") |
| `--server.dataProxy.download.maxExpiresIn` | string | Maximum allowed expiration duration. (default "1h0m0s") |
| `--server.dataProxy.upload.defaultFileNameLength` | int | Default length for the generated file name if not provided in the request. (default 20) |
| `--server.dataProxy.upload.maxExpiresIn` | string | Maximum allowed expiration duration. (default "1h0m0s") |
| `--server.dataProxy.upload.maxSize` | string | Maximum allowed upload size. (default "6Mi") |
| `--server.dataProxy.upload.storagePrefix` | string | Storage prefix to use for all upload requests. |
| `--server.grpc.enableGrpcLatencyMetrics` | | Enable grpc latency metrics. Note Histograms metrics can be expensive on Prometheus servers. |
| `--server.grpc.maxMessageSizeBytes` | int | The max size in bytes for incoming gRPC messages |
| `--server.grpc.port` | int | On which grpc port to serve admin (default 8089) |
| `--server.grpc.serverReflection` | | Enable GRPC Server Reflection (default true) |
| `--server.grpcPort` | int | deprecated |
| `--server.grpcServerReflection` | | deprecated |
| `--server.httpPort` | int | On which http port to serve admin (default 8088) |
| `--server.kube-config` | string | Path to kubernetes client config file, default is empty, useful for incluster config. |
| `--server.kubeClientConfig.burst` | int | Max burst rate for throttle. 0 defaults to 10 (default 25) |
| `--server.kubeClientConfig.qps` | int32 | Max QPS to the master for requests to KubeAPI. 0 defaults to 5. (default 100) |
| `--server.kubeClientConfig.timeout` | string | Max duration allowed for every request to KubeAPI before giving up. 0 implies no timeout. (default "30s") |
| `--server.master` | string | The address of the Kubernetes API server. |
| `--server.readHeaderTimeoutSeconds` | int | The amount of time allowed to read request headers. (default 32) |
| `--server.security.allowCors` | | (default true) |
| `--server.security.allowedHeaders` | strings | (default [Content-Type,flyte-authorization]) |
| `--server.security.allowedOrigins` | strings | (default [*]) |
| `--server.security.auditAccess` | | |
| `--server.security.secure` | | |
| `--server.security.ssl.certificateFile` | string | |
| `--server.security.ssl.keyFile` | string | |
| `--server.security.useAuth` | | |
| `--server.thirdPartyConfig.flyteClient.audience` | string | Audience to use when initiating OAuth2 authorization requests. |
| `--server.thirdPartyConfig.flyteClient.clientId` | string | public identifier for the app which handles authorization for a Flyte deployment |
| `--server.thirdPartyConfig.flyteClient.redirectUri` | string | This is the callback uri registered with the app which handles authorization for a Flyte deployment |
| `--server.thirdPartyConfig.flyteClient.scopes` | strings | Recommended scopes for the client to request. |
| `--server.watchService.maxActiveClusterConnections` | int | (default 5) |
| `--server.watchService.maxPageSize` | int | (default 50000) |
| `--server.watchService.nonTerminalStatusUpdatesInterval` | string | (default "1m0s") |
| `--server.watchService.pollInterval` | string | (default "1s") |
| `--sharedservice.connectPort` | string | On which connect port to serve admin (default "8080") |
| `--sharedservice.grpc.grpcMaxResponseStatusBytes` | int32 | specifies the maximum (uncompressed) size of header list that the client is prepared to accept on grpc calls (default 32000) |
| `--sharedservice.grpc.maxConcurrentStreams` | int | Limit on the number of concurrent streams to each ServerTransport. (default 100) |
| `--sharedservice.grpc.maxMessageSizeBytes` | int | Limit on the size of message that can be received on the server. (default 10485760) |
| `--sharedservice.grpcServerReflection` | | Enable GRPC Server Reflection (default true) |
| `--sharedservice.httpPort` | string | On which http port to serve admin (default "8089") |
| `--sharedservice.kubeConfig` | string | Path to kubernetes client config file. |
| `--sharedservice.master` | string | The address of the Kubernetes API server. |
| `--sharedservice.metrics.enableClientGrpcHistograms` | | Enable client grpc histograms (default true) |
| `--sharedservice.metrics.enableGrpcHistograms` | | Enable grpc histograms (default true) |
| `--sharedservice.metrics.scope` | string | Scope to emit metrics under (default "service:") |
| `--sharedservice.port` | string | On which grpc port to serve admin (default "8080") |
| `--sharedservice.profiler.enabled` | | Enable Profiler on server |
| `--sharedservice.profilerPort` | string | Profile port to start listen for pprof and metric handlers on. (default "10254") |
| `--sharedservice.security.allowCors` | | |
| `--sharedservice.security.allowLocalhostAccess` | | Whether to permit localhost unauthenticated access to the server |
| `--sharedservice.security.allowedHeaders` | strings | |
| `--sharedservice.security.allowedOrigins` | strings | |
| `--sharedservice.security.auditAccess` | | |
| `--sharedservice.security.orgOverride` | string | Override org in identity context if localhost access enabled |
| `--sharedservice.security.secure` | | |
| `--sharedservice.security.ssl.certificateAuthorityFile` | string | |
| `--sharedservice.security.ssl.certificateFile` | string | |
| `--sharedservice.security.ssl.keyFile` | string | |
| `--sharedservice.security.useAuth` | | |
| `--sharedservice.sync.syncInterval` | string | Time interval to sync (default "5m0s") |
| `--storage.cache.max_size_mbs` | int | Maximum size of the cache where the Blob store data is cached in-memory. If not specified or set to 0, cache is not used |
| `--storage.cache.target_gc_percent` | int | Sets the garbage collection target percentage. |
| `--storage.connection.access-key` | string | Access key to use. Only required when authtype is set to accesskey. |
| `--storage.connection.auth-type` | string | Auth Type to use [iam, accesskey]. (default "iam") |
| `--storage.connection.disable-ssl` | | Disables SSL connection. Should only be used for development. |
| `--storage.connection.endpoint` | string | URL for storage client to connect to. |
| `--storage.connection.region` | string | Region to connect to. (default "us-east-1") |
| `--storage.connection.secret-key` | string | Secret to use when accesskey is set. |
| `--storage.container` | string | Initial container (in s3 a bucket) to create -if it doesn't exist-.' |
| `--storage.defaultHttpClient.timeout` | string | Sets time out on the http client. (default "0s") |
| `--storage.enable-multicontainer` | | If this is true, then the container argument is overlooked and redundant. This config will automatically open new connections to new containers/buckets as they are encountered |
| `--storage.limits.maxDownloadMBs` | int | Maximum allowed download size (in MBs) per call. (default 2) |
| `--storage.stow.config` | stringToString | Configuration for stow backend. Refer to github/flyteorg/stow (default []) |
| `--storage.stow.kind` | string | Kind of Stow backend to use. Refer to github/flyteorg/stow |
| `--storage.type` | string | Sets the type of storage to configure [s3/minio/local/mem/stow]. (default "s3") |
| `--union.auth.authorizationMetadataKey` | string | Authorization Header to use when passing Access Tokens to the server (default "flyte-authorization") |
| `--union.auth.clientId` | string | Client ID |
| `--union.auth.clientSecretEnvVar` | string | Environment variable containing the client secret |
| `--union.auth.clientSecretLocation` | string | File containing the client secret |
| `--union.auth.deviceFlow.pollInterval` | string | amount of time the device flow would poll the token endpoint if auth server doesn't return a polling interval. Okta and google IDP do return an interval' (default "5s") |
| `--union.auth.deviceFlow.refreshTime` | string | grace period from the token expiry after which it would refresh the token. (default "5m0s") |
| `--union.auth.deviceFlow.timeout` | string | amount of time the device flow should complete or else it will be cancelled. (default "10m0s") |
| `--union.auth.enable` | | Whether to enable an authenticated conenction when communicating with admin. (default true) |
| `--union.auth.externalAuth.command` | strings | Command for external authentication token generation |
| `--union.auth.pkce.refreshTime` | string | grace period from the token expiry after which it would refresh the token. (default "5m0s") |
| `--union.auth.pkce.timeout` | string | Amount of time the browser session would be active for authentication from client app. (default "15s") |
| `--union.auth.scopes` | strings | List of scopes to request |
| `--union.auth.tokenRefreshWindow` | string | Max duration between token refresh attempt and token expiry. (default "1h0m0s") |
| `--union.auth.tokenUrl` | string | OPTIONAL: Your IdP's token endpoint. It'll be discovered from flyte admin's OAuth Metadata endpoint if not provided. |
| `--union.auth.type` | string | Type of OAuth2 flow used for communicating with admin. (default "Pkce") |
| `--union.cache.maxItemsCount` | int | Maximum number of items to keep in the cache before evicting. (default 1000) |
| `--union.connection.host` | string | Host to connect to (default "dns:///utt-mgdp-stg-us-east-2.cloud-staging.union.ai") |
| `--union.connection.insecure` | | Whether to connect over insecure channel |
| `--union.connection.insecureSkipVerify` | | InsecureSkipVerify controls whether a client verifies the server's certificate chain and host name.Caution: shouldn't be use for production usecases' |
| `--union.connection.keepAliveConfig.permitWithoutStream` | | If true, client sends keepalive pings even with no active RPCs. |
| `--union.connection.keepAliveConfig.time` | string | After a duration of this time if the client doesn't see any activity it pings the server to see if the transport is still alive. (default "20s") |
| `--union.connection.keepAliveConfig.timeout` | string | After having pinged for keepalive check, the client waits for a duration of Timeout and if no activity is seen even after that the connection is closed. (default "2m0s") |
| `--union.connection.maxBackoffDelay` | string | Max delay for grpc backoff (default "8s") |
| `--union.connection.maxRecvMsgSize` | int | Maximum size of a message in bytes of a gRPC message (default 10485760) |
| `--union.connection.maxRetries` | int | Max number of gRPC retries (default 4) |
| `--union.connection.minConnectTimeout` | string | Minimum timeout for establishing a connection (default "20s") |
| `--union.connection.perRetryTimeout` | string | gRPC per retry timeout (default "15s") |
| `--union.connection.serviceConfig` | string | Defines gRPC experimental JSON Service Config (default "{"loadBalancingConfig": [{"round_robin":{}}]}") |
| `--union.connection.trustedIdentityClaims.enabled` | | Enables passing of trusted claims while making inter service calls |
| `--union.connection.trustedIdentityClaims.externalIdentityClaim` | string | External identity claim of the service which is authorized to make internal service call. These are verified against userclouds actions |
| `--union.connection.trustedIdentityClaims.externalIdentityTypeClaim` | string | External identity type claim of app or user to use for the current service identity. It should be an 'app' for inter service communication |
| `--union.internalConnectionConfig.-` | stringToString | (default []) |
| `--union.internalConnectionConfig.enabled` | | Enables internal service to service communication instead of going through ingress. |
| `--union.internalConnectionConfig.urlPattern` | string | UrlPattern of the internal service endpoints. (default "{{ service }}-helmchart.{{ service }}.svc.cluster.local:80") |
| `--webhook.awsSecretManager.sidecarImage` | string | Specifies the sidecar docker image to use (default "docker.io/amazon/aws-secrets-manager-secret-sidecar:v0.1.4") |
| `--webhook.certDir` | string | Certificate directory to use to write generated certs. Defaults to /etc/webhook/certs/ (default "/etc/webhook/certs") |
| `--webhook.embeddedSecretManagerConfig.awsConfig.region` | string | AWS region |
| `--webhook.embeddedSecretManagerConfig.fileMountInitContainer.image` | string | Specifies init container image to use for mounting secrets as files. (default "busybox:1.28") |
| `--webhook.embeddedSecretManagerConfig.gcpConfig.project` | string | GCP project to be used for secret manager |
| `--webhook.embeddedSecretManagerConfig.type` | string | (default "AWS") |
| `--webhook.gcpSecretManager.sidecarImage` | string | Specifies the sidecar docker image to use (default "gcr.io/google.com/cloudsdktool/cloud-sdk:alpine") |
| `--webhook.listenPort` | int | The port to use to listen to webhook calls. Defaults to 9443 (default 9443) |
| `--webhook.localCert` | | write certs locally. Defaults to false |
| `--webhook.metrics-prefix` | string | An optional prefix for all published metrics. (default "flyte:") |
| `--webhook.secretName` | string | Secret name to write generated certs to. (default "flyte-pod-webhook") |
| `--webhook.serviceName` | string | The name of the webhook service. (default "flyte-pod-webhook") |
| `--webhook.servicePort` | int32 | The port on the service that hosting webhook. (default 443) |
| `--webhook.vaultSecretManager.role` | string | Specifies the vault role to use (default "flyte") |
=== PAGE: https://www.union.ai/docs/v1/serverless/api-reference/uctl-cli/uctl-create/uctl-create-policy ===
# uctl create policy
Create a policy which binds a role to one or more resources
## Synopsis
Creates a policy which binds roles to specific resources (your whole
organization, a domain, a project + domain)
Use a policy.yaml file to define your policy. You can generate a
template file using
::
: bin/uctl create policy --genFile --policyFile policy.yaml
When defining a policy, you can re-use existing roles within your
organization or define custom roles using
::
: bin/uctl create role --help
The existing roles in your organization include: - admin - contributor -
viewer
Please refer to the existing documentation for what each predefined role
has permissions to do.
To create a policy for every project and domain within your
organization, create a policy.yaml like so:
name: MyOrgWideExamplePolicy
bindings:
- role: MyExampleRole
To create a policy for a specific domain within your organization,
create a policy.yaml like so:
name: MyOrgWideExamplePolicy
bindings:
- role: MyExampleRole
resource:
domain: development
To create a policy for a specific project within your organization,
create a policy.yaml like so:
name: MyExamplePolicy
bindings:
- role: MyExampleRole
resource:
domain: development
project: flytesnacks
- role: MyExampleRole
resource:
domain: staging
project: flytesnacks
- role: MyExampleRole
resource:
domain: production
project: flytesnacks
A policy can mix and match roles and resources. For example, to grant
admin privileges to the flytesnacks development domain and custom role
privileges in flytesnacks production, define a policy.yaml like so:
name: MyExamplePolicy
bindings:
- role: admin
resource:
domain: development
project: flytesnacks
- role: MyExampleRole
resource:
domain: production
project: flytesnacks
```shell
$ uctl create policy [flags]
```
## Options
| Option | Type | Description |
|--------|------|-------------|
| `--genFile` | | Optional, if you want to create a policy using a file as a specification, this will generate a template example |
| Option | Type | Description |
|--------|------|-------------|
| `-h`, `--help` | help for policy |
| `--name` | string | Name to assign to the policy. Must be unique |
| `--policyFile` | string | Optional, use a file for defining more complicated policies (default "policy.yaml") |
### Options inherited from parent commands
| Option | Type | Description |
|--------|------|-------------|
| `--admin.audience` | string | Audience to use when initiating OAuth2 authorization requests. |
| `--admin.authType` | string | Type of OAuth2 flow used for communicating with admin.ClientSecret, Pkce, ExternalCommand are valid values (default "ClientSecret") |
| `--admin.authorizationHeader` | string | Custom metadata header to pass JWT |
| `--admin.authorizationServerUrl` | string | This is the URL to your IdP's authorization server. It'll default to Endpoint |
| `--admin.caCertFilePath` | string | Use specified certificate file to verify the admin server peer. |
| `--admin.clientId` | string | Client ID (default "flytepropeller") |
| `--admin.clientSecretEnvVar` | string | Environment variable containing the client secret |
| `--admin.clientSecretLocation` | string | File containing the client secret (default "/etc/secrets/client_secret") |
| `--admin.command` | strings | Command for external authentication token generation |
| `--admin.defaultOrg` | string | OPTIONAL: Default org to use to support non-org based cli's.'. |
| `--admin.defaultServiceConfig` | string | |
| `--admin.deviceFlowConfig.pollInterval` | string | amount of time the device flow would poll the token endpoint if auth server doesn't return a polling interval. Okta and google IDP do return an interval' (default "5s") |
| `--admin.deviceFlowConfig.refreshTime` | string | grace period from the token expiry after which it would refresh the token. (default "5m0s") |
| `--admin.deviceFlowConfig.timeout` | string | amount of time the device flow should complete or else it will be cancelled. (default "10m0s") |
| `--admin.endpoint` | string | For admin types, specify where the uri of the service is located. |
| `--admin.httpProxyURL` | string | OPTIONAL: HTTP Proxy to be used for OAuth requests. |
| `--admin.insecure` | | Use insecure connection. |
| `--admin.insecureSkipVerify` | | InsecureSkipVerify controls whether a client verifies the server's certificate chain and host name.Caution: shouldn't be use for production usecases' |
| `--admin.maxBackoffDelay` | string | Max delay for grpc backoff (default "8s") |
| `--admin.maxMessageSizeBytes` | int | The max size in bytes for incoming gRPC messages |
| `--admin.maxRetries` | int | Max number of gRPC retries (default 4) |
| `--admin.perRetryTimeout` | string | gRPC per retry timeout (default "15s") |
| `--admin.pkceConfig.refreshTime` | string | grace period from the token expiry after which it would refresh the token. (default "5m0s") |
| `--admin.pkceConfig.timeout` | string | Amount of time the browser session would be active for authentication from client app. (default "2m0s") |
| `--admin.proxyCommand` | strings | Command for external proxy-authorization token generation |
| `--admin.scopes` | strings | List of scopes to request |
| `--admin.tokenRefreshWindow` | string | Max duration between token refresh attempt and token expiry. (default "0s") |
| `--admin.tokenUrl` | string | OPTIONAL: Your IdP's token endpoint. It'll be discovered from flyte admin's OAuth Metadata endpoint if not provided. |
| `--admin.useAudienceFromAdmin` | | Use Audience configured from admins public endpoint config. |
| `--admin.useAuth` | | Deprecated: Auth will be enabled/disabled based on admin's dynamically discovered information. |
| `--auth.appAuth.externalAuthServer.allowedAudience` | strings | Optional: A list of allowed audiences. If not provided, the audience is expected to be the public Uri of the service. |
| `--auth.appAuth.externalAuthServer.baseUrl` | string | This should be the base url of the authorization server that you are trying to hit. With Okta for instance, it will look something like https://company.okta.com/oauth2/abcdef123456789/ |
| `--auth.appAuth.externalAuthServer.httpProxyURL` | string | OPTIONAL: HTTP Proxy to be used for OAuth requests. |
| `--auth.appAuth.externalAuthServer.metadataUrl` | string | Optional: If the server doesn't support /.well-known/oauth-authorization-server, you can set a custom metadata url here.' |
| `--auth.appAuth.externalAuthServer.retryAttempts` | int | Optional: The number of attempted retries on a transient failure to get the OAuth metadata (default 5) |
| `--auth.appAuth.externalAuthServer.retryDelay` | string | Optional, Duration to wait between retries (default "1s") |
| `--auth.appAuth.selfAuthServer.accessTokenLifespan` | string | Defines the lifespan of issued access tokens. (default "30m0s") |
| `--auth.appAuth.selfAuthServer.authorizationCodeLifespan` | string | Defines the lifespan of issued access tokens. (default "5m0s") |
| `--auth.appAuth.selfAuthServer.claimSymmetricEncryptionKeySecretName` | string | OPTIONAL: Secret name to use to encrypt claims in authcode token. (default "claim_symmetric_key") |
| `--auth.appAuth.selfAuthServer.issuer` | string | Defines the issuer to use when issuing and validating tokens. The default value is https://{requestUri.HostAndPort}/ |
| `--auth.appAuth.selfAuthServer.oldTokenSigningRSAKeySecretName` | string | OPTIONAL: Secret name to use to retrieve Old RSA Signing Key. This can be useful during key rotation to continue to accept older tokens. (default "token_rsa_key_old.pem") |
| `--auth.appAuth.selfAuthServer.refreshTokenLifespan` | string | Defines the lifespan of issued access tokens. (default "1h0m0s") |
| `--auth.appAuth.selfAuthServer.tokenSigningRSAKeySecretName` | string | OPTIONAL: Secret name to use to retrieve RSA Signing Key. (default "token_rsa_key.pem") |
| `--auth.appAuth.thirdPartyConfig.flyteClient.audience` | string | Audience to use when initiating OAuth2 authorization requests. |
| `--auth.appAuth.thirdPartyConfig.flyteClient.clientId` | string | public identifier for the app which handles authorization for a Flyte deployment (default "uctl") |
| `--auth.appAuth.thirdPartyConfig.flyteClient.redirectUri` | string | This is the callback uri registered with the app which handles authorization for a Flyte deployment (default "http://localhost:53593/callback") |
| `--auth.appAuth.thirdPartyConfig.flyteClient.scopes` | strings | Recommended scopes for the client to request. (default [all,offline]) |
| `--auth.disableForGrpc` | | Disables auth enforcement on Grpc Endpoints. |
| `--auth.disableForHttp` | | Disables auth enforcement on HTTP Endpoints. |
| `--auth.grpcAuthorizationHeader` | string | (default "flyte-authorization") |
| `--auth.httpAuthorizationHeader` | string | (default "flyte-authorization") |
| `--auth.httpProxyURL` | string | OPTIONAL: HTTP Proxy to be used for OAuth requests. |
| `--auth.tokenEndpointProxyPath` | string | The path used to proxy calls to the TokenURL |
| `--auth.userAuth.cookieBlockKeySecretName` | string | OPTIONAL: Secret name to use for cookie block key. (default "cookie_block_key") |
| `--auth.userAuth.cookieHashKeySecretName` | string | OPTIONAL: Secret name to use for cookie hash key. (default "cookie_hash_key") |
| `--auth.userAuth.cookieSetting.domain` | string | OPTIONAL: Allows you to set the domain attribute on the auth cookies. |
| `--auth.userAuth.cookieSetting.sameSitePolicy` | string | OPTIONAL: Allows you to declare if your cookie should be restricted to a first-party or same-site context.Wrapper around http.SameSite. (default "DefaultMode") |
| `--auth.userAuth.httpProxyURL` | string | OPTIONAL: HTTP Proxy to be used for OAuth requests. |
| `--auth.userAuth.idpQueryParameter` | string | idp query parameter used for selecting a particular IDP for doing user authentication. Eg: for Okta passing idp={IDP-ID} forces the authentication to happen with IDP-ID |
| `--auth.userAuth.openId.baseUrl` | string | |
| `--auth.userAuth.openId.clientId` | string | |
| `--auth.userAuth.openId.clientSecretFile` | string | |
| `--auth.userAuth.openId.clientSecretName` | string | (default "oidc_client_secret") |
| `--auth.userAuth.openId.scopes` | strings | (default [openid,profile]) |
| `--auth.userAuth.redirectUrl` | string | (default "/console") |
| `--authorizer.internalCommunicationConfig.enabled` | | Enables authorization decisions for internal communication. (default true) |
| `--authorizer.internalCommunicationConfig.ingressIdentity` | string | IngressIdentity used in the cluster. Needed to exclude the communication coming from ingress. (default "ingress-nginx.ingress-nginx.serviceaccount.identity.linkerd.cluster.local") |
| `--authorizer.internalCommunicationConfig.tenantUrlPatternIdentity` | string | UrlPatternIdentity of the internal tenant service endpoint identities. (default "{{ service }}.{{ org }}.serviceaccount.identity.linkerd.cluster.local") |
| `--authorizer.internalCommunicationConfig.urlPatternIdentity` | string | UrlPatternIdentity of the internal service endpoint identities. (default "{{ service }}-helmchart.{{ service }}.serviceaccount.identity.linkerd.cluster.local") |
| `--authorizer.mode` | string | (default "Active") |
| `--authorizer.organizationConfig.PolicyConfig.adminPolicyDescription` | string | description for the boilerplate admin policy (default "Contributor permissions and full admin permissions to manage users and view usage dashboards") |
| `--authorizer.organizationConfig.PolicyConfig.contributorPolicyDescription` | string | description for the boilerplate contributor policy (default "Viewer permissions and permissions to create workflows, tasks, launch plans, and executions") |
| `--authorizer.organizationConfig.PolicyConfig.defaultUserPolicyRoleType` | string | name of the role type to determine which default policy new users added to the organization should be assigned (default "Viewer") |
| `--authorizer.organizationConfig.PolicyConfig.serverlessContributorPolicyDescription` | string | description for the boilerplate serverless contributor policy (default "Viewer permissions and permissions to create workflows, tasks, launch plans, and executions") |
| `--authorizer.organizationConfig.PolicyConfig.serverlessViewerPolicyDescription` | string | description for the boilerplate serverless viewer policy (default "Permissions to view Flyte entities") |
| `--authorizer.organizationConfig.PolicyConfig.viewerPolicyDescription` | string | description for the boilerplate viewer policy (default "Permissions to view Flyte entities") |
| `--authorizer.organizationConfig.defaultPolicyCacheDuration` | string | Cache entry duration for the store of the default policy per organization (default "10m0s") |
| `--authorizer.syncRuleRefreshInterval` | string | (default "1m0s") |
| `--authorizer.type` | string | (default "UserClouds") |
| `--authorizer.userCloudsClient.cache.redis.ttl.edgeTypes` | string | Specifies how long edge types remain in the cache.. (default "30m0s") |
| `--authorizer.userCloudsClient.cache.redis.ttl.edges` | string | Specifies how long edges remain in the cache. (default "30m0s") |
| `--authorizer.userCloudsClient.cache.redis.ttl.objectTypes` | string | Specifies how long object types remain in the cache. (default "30m0s") |
| `--authorizer.userCloudsClient.cache.redis.ttl.objects` | string | Specifies how long objects remain in the cache. (default "30m0s") |
| `--authorizer.userCloudsClient.cache.type` | string | Cache type to use. (default "none") |
| `--authorizer.userCloudsClient.clientID` | string | UserClouds client id |
| `--authorizer.userCloudsClient.clientSecretName` | string | UserCloud client secret name to read from the secret manager. (default "userclouds-client-secret") |
| `--authorizer.userCloudsClient.enableLogging` | | Enable userclouds client's internal logging. Calls to post logs take 250-350 ms and will impact p99 latency, enable with caution. |
| `--authorizer.userCloudsClient.tenantID` | string | UserClouds tenant id. Should be a UUID. |
| `--authorizer.userCloudsClient.tenantUrl` | string | Something like https://{yourtenant}.tenant.userclouds.com |
| `--config` | string | config file (default is /Users/andrew/.union/config.yaml) |
| `--connection.environment` | string | |
| `--connection.region` | string | |
| `--connection.rootTenantURLPattern` | string | Pattern for tenant url. (default "dns:///{{ organization }}.cloud-staging.union.ai") |
| `--console.endpoint` | string | Endpoint of console, if different than flyte admin |
| `--database.connMaxLifeTime` | string | sets the maximum amount of time a connection may be reused (default "1h0m0s") |
| `--database.enableForeignKeyConstraintWhenMigrating` | | Whether to enable gorm foreign keys when migrating the db |
| `--database.maxIdleConnections` | int | maxIdleConnections sets the maximum number of connections in the idle connection pool. (default 10) |
| `--database.maxOpenConnections` | int | maxOpenConnections sets the maximum number of open connections to the database. (default 100) |
| `--database.postgres.dbname` | string | The database name (default "postgres") |
| `--database.postgres.debug` | | |
| `--database.postgres.host` | string | The host name of the database server (default "localhost") |
| `--database.postgres.options` | string | See http://gorm.io/docs/connecting_to_the_database.html for available options passed, in addition to the above. (default "sslmode=disable") |
| `--database.postgres.password` | string | The database password. (default "postgres") |
| `--database.postgres.passwordPath` | string | Points to the file containing the database password. |
| `--database.postgres.port` | int | The port name of the database server (default 30001) |
| `--database.postgres.readReplicaHost` | string | The host name of the read replica database server (default "localhost") |
| `--database.postgres.username` | string | The database user who is connecting to the server. (default "postgres") |
| `--database.sqlite.file` | string | The path to the file (existing or new) where the DB should be created / stored. If existing, then this will be re-used, else a new will be created |
| `--db.connectionPool.maxConnectionLifetime` | string | (default "0s") |
| `--db.connectionPool.maxIdleConnections` | int | |
| `--db.connectionPool.maxOpenConnections` | int | |
| `--db.dbname` | string | (default "postgres") |
| `--db.debug` | | |
| `--db.host` | string | (default "postgres") |
| `--db.log_level` | int | (default 4) |
| `--db.options` | string | (default "sslmode=disable") |
| `--db.password` | string | |
| `--db.passwordPath` | string | |
| `--db.port` | int | (default 5432) |
| `--db.username` | string | (default "postgres") |
| `-d`, `--domain` | string | Specifies the Flyte project's domain. |
| `--files.archive` | | Pass in archive file either an http link or local path. |
| `--files.assumableIamRole` | string | Custom assumable iam auth role to register launch plans with. |
| `--files.continueOnError` | | Continue on error when registering files. |
| `--files.destinationDirectory` | string | Location of source code in container. |
| `--files.dryRun` | | Execute command without making any modifications. |
| `--files.enableSchedule` | | Enable the schedule if the files contain schedulable launchplan. |
| `--files.force` | | Force use of version number on entities registered with flyte. |
| `--files.k8ServiceAccount` | string | Deprecated. Please use `--K8sServiceAccount`|
| `--files.k8sServiceAccount` | string | Custom kubernetes service account auth role to register launch plans with. |
| `--files.outputLocationPrefix` | string | Custom output location prefix for offloaded types (files/schemas). |
| `--files.sourceUploadPath` | string | Deprecated: Update flyte admin to avoid having to configure storage access from uctl. |
| `--files.version` | string | Version of the entity to be registered with flyte which are un-versioned after serialization. |
| `--logger.formatter.type` | string | Sets logging format type. (default "json") |
| `--logger.level` | int | Sets the minimum logging level. (default 3) |
| `--logger.mute` | | Mutes all logs regardless of severity. Intended for benchmarks/tests only. |
| `--logger.show-source` | | Includes source code location in logs. |
| `--org` | string | Organization to work on. If not set, default to user's org. |
| `--otel.file.filename` | string | Filename to store exported telemetry traces (default "/tmp/trace.txt") |
| `--otel.jaeger.endpoint` | string | Endpoint for the jaeger telemetry trace ingestor (default "http://localhost:14268/api/traces") |
| `--otel.otlpgrpc.endpoint` | string | Endpoint for the OTLP telemetry trace collector (default "http://localhost:4317") |
| `--otel.otlphttp.endpoint` | string | Endpoint for the OTLP telemetry trace collector (default "http://localhost:4318/v1/traces") |
| `--otel.sampler.parentSampler` | string | Sets the parent sampler to use for the tracer (default "always") |
| `--otel.type` | string | Sets the type of exporter to configure [noop/file/jaeger/otlpgrpc/otlphttp]. (default "noop") |
| `-o`, `--output` | string | Specifies the output type - supported formats [TABLE JSON YAML DOT DOTURL]. NOTE: dot, doturl are only supported for Workflow (default "table") |
| `--plugins.catalogcache.reader.maxItems` | int | Maximum number of entries to keep in the index. (default 10000) |
| `--plugins.catalogcache.reader.maxRetries` | int | Maximum number of retries per item. (default 3) |
| `--plugins.catalogcache.reader.workers` | int | Number of concurrent workers to start processing the queue. (default 10) |
| `--plugins.catalogcache.writer.maxItems` | int | Maximum number of entries to keep in the index. (default 10000) |
| `--plugins.catalogcache.writer.maxRetries` | int | Maximum number of retries per item. (default 3) |
| `--plugins.catalogcache.writer.workers` | int | Number of concurrent workers to start processing the queue. (default 10) |
| `-p`, `--project` | string | Specifies the Flyte project. |
| `--rediscache.passwordSecretName` | string | Name of secret with Redis password. |
| `--rediscache.primaryEndpoint` | string | Primary endpoint for the redis cache that can be used for both reads and writes. |
| `--rediscache.replicaEndpoint` | string | Replica endpoint for the redis cache that can be used for reads. |
| `--secrets.env-prefix` | string | Prefix for environment variables (default "FLYTE_SECRET_") |
| `--secrets.secrets-prefix` | string | Prefix where to look for secrets file (default "/etc/secrets") |
| `--secrets.type` | string | Sets the type of storage to configure [local]. (default "local") |
| `--server.dataProxy.download.maxExpiresIn` | string | Maximum allowed expiration duration. (default "1h0m0s") |
| `--server.dataProxy.upload.defaultFileNameLength` | int | Default length for the generated file name if not provided in the request. (default 20) |
| `--server.dataProxy.upload.maxExpiresIn` | string | Maximum allowed expiration duration. (default "1h0m0s") |
| `--server.dataProxy.upload.maxSize` | string | Maximum allowed upload size. (default "6Mi") |
| `--server.dataProxy.upload.storagePrefix` | string | Storage prefix to use for all upload requests. |
| `--server.grpc.enableGrpcLatencyMetrics` | | Enable grpc latency metrics. Note Histograms metrics can be expensive on Prometheus servers. |
| `--server.grpc.maxMessageSizeBytes` | int | The max size in bytes for incoming gRPC messages |
| `--server.grpc.port` | int | On which grpc port to serve admin (default 8089) |
| `--server.grpc.serverReflection` | | Enable GRPC Server Reflection (default true) |
| `--server.grpcPort` | int | deprecated |
| `--server.grpcServerReflection` | | deprecated |
| `--server.httpPort` | int | On which http port to serve admin (default 8088) |
| `--server.kube-config` | string | Path to kubernetes client config file, default is empty, useful for incluster config. |
| `--server.kubeClientConfig.burst` | int | Max burst rate for throttle. 0 defaults to 10 (default 25) |
| `--server.kubeClientConfig.qps` | int32 | Max QPS to the master for requests to KubeAPI. 0 defaults to 5. (default 100) |
| `--server.kubeClientConfig.timeout` | string | Max duration allowed for every request to KubeAPI before giving up. 0 implies no timeout. (default "30s") |
| `--server.master` | string | The address of the Kubernetes API server. |
| `--server.readHeaderTimeoutSeconds` | int | The amount of time allowed to read request headers. (default 32) |
| `--server.security.allowCors` | | (default true) |
| `--server.security.allowedHeaders` | strings | (default [Content-Type,flyte-authorization]) |
| `--server.security.allowedOrigins` | strings | (default [*]) |
| `--server.security.auditAccess` | | |
| `--server.security.secure` | | |
| `--server.security.ssl.certificateFile` | string | |
| `--server.security.ssl.keyFile` | string | |
| `--server.security.useAuth` | | |
| `--server.thirdPartyConfig.flyteClient.audience` | string | Audience to use when initiating OAuth2 authorization requests. |
| `--server.thirdPartyConfig.flyteClient.clientId` | string | public identifier for the app which handles authorization for a Flyte deployment |
| `--server.thirdPartyConfig.flyteClient.redirectUri` | string | This is the callback uri registered with the app which handles authorization for a Flyte deployment |
| `--server.thirdPartyConfig.flyteClient.scopes` | strings | Recommended scopes for the client to request. |
| `--server.watchService.maxActiveClusterConnections` | int | (default 5) |
| `--server.watchService.maxPageSize` | int | (default 50000) |
| `--server.watchService.nonTerminalStatusUpdatesInterval` | string | (default "1m0s") |
| `--server.watchService.pollInterval` | string | (default "1s") |
| `--sharedservice.connectPort` | string | On which connect port to serve admin (default "8080") |
| `--sharedservice.grpc.grpcMaxResponseStatusBytes` | int32 | specifies the maximum (uncompressed) size of header list that the client is prepared to accept on grpc calls (default 32000) |
| `--sharedservice.grpc.maxConcurrentStreams` | int | Limit on the number of concurrent streams to each ServerTransport. (default 100) |
| `--sharedservice.grpc.maxMessageSizeBytes` | int | Limit on the size of message that can be received on the server. (default 10485760) |
| `--sharedservice.grpcServerReflection` | | Enable GRPC Server Reflection (default true) |
| `--sharedservice.httpPort` | string | On which http port to serve admin (default "8089") |
| `--sharedservice.kubeConfig` | string | Path to kubernetes client config file. |
| `--sharedservice.master` | string | The address of the Kubernetes API server. |
| `--sharedservice.metrics.enableClientGrpcHistograms` | | Enable client grpc histograms (default true) |
| `--sharedservice.metrics.enableGrpcHistograms` | | Enable grpc histograms (default true) |
| `--sharedservice.metrics.scope` | string | Scope to emit metrics under (default "service:") |
| `--sharedservice.port` | string | On which grpc port to serve admin (default "8080") |
| `--sharedservice.profiler.enabled` | | Enable Profiler on server |
| `--sharedservice.profilerPort` | string | Profile port to start listen for pprof and metric handlers on. (default "10254") |
| `--sharedservice.security.allowCors` | | |
| `--sharedservice.security.allowLocalhostAccess` | | Whether to permit localhost unauthenticated access to the server |
| `--sharedservice.security.allowedHeaders` | strings | |
| `--sharedservice.security.allowedOrigins` | strings | |
| `--sharedservice.security.auditAccess` | | |
| `--sharedservice.security.orgOverride` | string | Override org in identity context if localhost access enabled |
| `--sharedservice.security.secure` | | |
| `--sharedservice.security.ssl.certificateAuthorityFile` | string | |
| `--sharedservice.security.ssl.certificateFile` | string | |
| `--sharedservice.security.ssl.keyFile` | string | |
| `--sharedservice.security.useAuth` | | |
| `--sharedservice.sync.syncInterval` | string | Time interval to sync (default "5m0s") |
| `--storage.cache.max_size_mbs` | int | Maximum size of the cache where the Blob store data is cached in-memory. If not specified or set to 0, cache is not used |
| `--storage.cache.target_gc_percent` | int | Sets the garbage collection target percentage. |
| `--storage.connection.access-key` | string | Access key to use. Only required when authtype is set to accesskey. |
| `--storage.connection.auth-type` | string | Auth Type to use [iam, accesskey]. (default "iam") |
| `--storage.connection.disable-ssl` | | Disables SSL connection. Should only be used for development. |
| `--storage.connection.endpoint` | string | URL for storage client to connect to. |
| `--storage.connection.region` | string | Region to connect to. (default "us-east-1") |
| `--storage.connection.secret-key` | string | Secret to use when accesskey is set. |
| `--storage.container` | string | Initial container (in s3 a bucket) to create -if it doesn't exist-.' |
| `--storage.defaultHttpClient.timeout` | string | Sets time out on the http client. (default "0s") |
| `--storage.enable-multicontainer` | | If this is true, then the container argument is overlooked and redundant. This config will automatically open new connections to new containers/buckets as they are encountered |
| `--storage.limits.maxDownloadMBs` | int | Maximum allowed download size (in MBs) per call. (default 2) |
| `--storage.stow.config` | stringToString | Configuration for stow backend. Refer to github/flyteorg/stow (default []) |
| `--storage.stow.kind` | string | Kind of Stow backend to use. Refer to github/flyteorg/stow |
| `--storage.type` | string | Sets the type of storage to configure [s3/minio/local/mem/stow]. (default "s3") |
| `--union.auth.authorizationMetadataKey` | string | Authorization Header to use when passing Access Tokens to the server (default "flyte-authorization") |
| `--union.auth.clientId` | string | Client ID |
| `--union.auth.clientSecretEnvVar` | string | Environment variable containing the client secret |
| `--union.auth.clientSecretLocation` | string | File containing the client secret |
| `--union.auth.deviceFlow.pollInterval` | string | amount of time the device flow would poll the token endpoint if auth server doesn't return a polling interval. Okta and google IDP do return an interval' (default "5s") |
| `--union.auth.deviceFlow.refreshTime` | string | grace period from the token expiry after which it would refresh the token. (default "5m0s") |
| `--union.auth.deviceFlow.timeout` | string | amount of time the device flow should complete or else it will be cancelled. (default "10m0s") |
| `--union.auth.enable` | | Whether to enable an authenticated conenction when communicating with admin. (default true) |
| `--union.auth.externalAuth.command` | strings | Command for external authentication token generation |
| `--union.auth.pkce.refreshTime` | string | grace period from the token expiry after which it would refresh the token. (default "5m0s") |
| `--union.auth.pkce.timeout` | string | Amount of time the browser session would be active for authentication from client app. (default "15s") |
| `--union.auth.scopes` | strings | List of scopes to request |
| `--union.auth.tokenRefreshWindow` | string | Max duration between token refresh attempt and token expiry. (default "1h0m0s") |
| `--union.auth.tokenUrl` | string | OPTIONAL: Your IdP's token endpoint. It'll be discovered from flyte admin's OAuth Metadata endpoint if not provided. |
| `--union.auth.type` | string | Type of OAuth2 flow used for communicating with admin. (default "Pkce") |
| `--union.cache.maxItemsCount` | int | Maximum number of items to keep in the cache before evicting. (default 1000) |
| `--union.connection.host` | string | Host to connect to (default "dns:///utt-mgdp-stg-us-east-2.cloud-staging.union.ai") |
| `--union.connection.insecure` | | Whether to connect over insecure channel |
| `--union.connection.insecureSkipVerify` | | InsecureSkipVerify controls whether a client verifies the server's certificate chain and host name.Caution: shouldn't be use for production usecases' |
| `--union.connection.keepAliveConfig.permitWithoutStream` | | If true, client sends keepalive pings even with no active RPCs. |
| `--union.connection.keepAliveConfig.time` | string | After a duration of this time if the client doesn't see any activity it pings the server to see if the transport is still alive. (default "20s") |
| `--union.connection.keepAliveConfig.timeout` | string | After having pinged for keepalive check, the client waits for a duration of Timeout and if no activity is seen even after that the connection is closed. (default "2m0s") |
| `--union.connection.maxBackoffDelay` | string | Max delay for grpc backoff (default "8s") |
| `--union.connection.maxRecvMsgSize` | int | Maximum size of a message in bytes of a gRPC message (default 10485760) |
| `--union.connection.maxRetries` | int | Max number of gRPC retries (default 4) |
| `--union.connection.minConnectTimeout` | string | Minimum timeout for establishing a connection (default "20s") |
| `--union.connection.perRetryTimeout` | string | gRPC per retry timeout (default "15s") |
| `--union.connection.serviceConfig` | string | Defines gRPC experimental JSON Service Config (default "{"loadBalancingConfig": [{"round_robin":{}}]}") |
| `--union.connection.trustedIdentityClaims.enabled` | | Enables passing of trusted claims while making inter service calls |
| `--union.connection.trustedIdentityClaims.externalIdentityClaim` | string | External identity claim of the service which is authorized to make internal service call. These are verified against userclouds actions |
| `--union.connection.trustedIdentityClaims.externalIdentityTypeClaim` | string | External identity type claim of app or user to use for the current service identity. It should be an 'app' for inter service communication |
| `--union.internalConnectionConfig.-` | stringToString | (default []) |
| `--union.internalConnectionConfig.enabled` | | Enables internal service to service communication instead of going through ingress. |
| `--union.internalConnectionConfig.urlPattern` | string | UrlPattern of the internal service endpoints. (default "{{ service }}-helmchart.{{ service }}.svc.cluster.local:80") |
| `--webhook.awsSecretManager.sidecarImage` | string | Specifies the sidecar docker image to use (default "docker.io/amazon/aws-secrets-manager-secret-sidecar:v0.1.4") |
| `--webhook.certDir` | string | Certificate directory to use to write generated certs. Defaults to /etc/webhook/certs/ (default "/etc/webhook/certs") |
| `--webhook.embeddedSecretManagerConfig.awsConfig.region` | string | AWS region |
| `--webhook.embeddedSecretManagerConfig.fileMountInitContainer.image` | string | Specifies init container image to use for mounting secrets as files. (default "busybox:1.28") |
| `--webhook.embeddedSecretManagerConfig.gcpConfig.project` | string | GCP project to be used for secret manager |
| `--webhook.embeddedSecretManagerConfig.type` | string | (default "AWS") |
| `--webhook.gcpSecretManager.sidecarImage` | string | Specifies the sidecar docker image to use (default "gcr.io/google.com/cloudsdktool/cloud-sdk:alpine") |
| `--webhook.listenPort` | int | The port to use to listen to webhook calls. Defaults to 9443 (default 9443) |
| `--webhook.localCert` | | write certs locally. Defaults to false |
| `--webhook.metrics-prefix` | string | An optional prefix for all published metrics. (default "flyte:") |
| `--webhook.secretName` | string | Secret name to write generated certs to. (default "flyte-pod-webhook") |
| `--webhook.serviceName` | string | The name of the webhook service. (default "flyte-pod-webhook") |
| `--webhook.servicePort` | int32 | The port on the service that hosting webhook. (default 443) |
| `--webhook.vaultSecretManager.role` | string | Specifies the vault role to use (default "flyte") |
=== PAGE: https://www.union.ai/docs/v1/serverless/api-reference/uctl-cli/uctl-create/uctl-create-project ===
# uctl create project
Creates project resources.
## Synopsis
Create a project given its name and id.
```shell
$ uctl create project --name flytesnacks --id flytesnacks --description "flytesnacks description" --labels app=flyte
```
> [!NOTE]
> The terms project/projects are interchangeable in these commands.
Create a project by definition file.
```shell
$ uctl create project --file project.yaml
```
``` yaml
id: "project-unique-id"
name: "Name"
labels:
values:
app: flyte
description: "Some description for the project."
```
> [!NOTE]
> The project name shouldn't contain any whitespace characters.
```shell
$ uctl create project [flags]
```
## Options
| Option | Type | Description |
|--------|------|-------------|
| `--activate` | | Activates the project specified as argument. Only used in update |
| Option | Type | Description |
|--------|------|-------------|
| `--activateProject` | | (Deprecated) Activates the project specified as argument. Only used in update |
| Option | Type | Description |
|--------|------|-------------|
| `--archive` | | Archives the project specified as argument. Only used in update |
| Option | Type | Description |
|--------|------|-------------|
| `--archiveProject` | | (Deprecated) Archives the project specified as argument. Only used in update |
| Option | Type | Description |
|--------|------|-------------|
| `--description` | string | description for the project specified as argument. |
| `--dryRun` | | execute command without making any modifications. |
| `--file` | string | file for the project definition. |
| `--force` | | Skips asking for an acknowledgement during an update operation. Only used in update |
| `-h`, `--help` | help for project |
| `--id` | string | id for the project specified as argument. |
| `--labels` | stringToString | labels for the project specified as argument. (default []) |
| `--name` | string | name for the project specified as argument. |
### Options inherited from parent commands
| Option | Type | Description |
|--------|------|-------------|
| `--admin.audience` | string | Audience to use when initiating OAuth2 authorization requests. |
| `--admin.authType` | string | Type of OAuth2 flow used for communicating with admin.ClientSecret, Pkce, ExternalCommand are valid values (default "ClientSecret") |
| `--admin.authorizationHeader` | string | Custom metadata header to pass JWT |
| `--admin.authorizationServerUrl` | string | This is the URL to your IdP's authorization server. It'll default to Endpoint |
| `--admin.caCertFilePath` | string | Use specified certificate file to verify the admin server peer. |
| `--admin.clientId` | string | Client ID (default "flytepropeller") |
| `--admin.clientSecretEnvVar` | string | Environment variable containing the client secret |
| `--admin.clientSecretLocation` | string | File containing the client secret (default "/etc/secrets/client_secret") |
| `--admin.command` | strings | Command for external authentication token generation |
| `--admin.defaultOrg` | string | OPTIONAL: Default org to use to support non-org based cli's.'. |
| `--admin.defaultServiceConfig` | string | |
| `--admin.deviceFlowConfig.pollInterval` | string | amount of time the device flow would poll the token endpoint if auth server doesn't return a polling interval. Okta and google IDP do return an interval' (default "5s") |
| `--admin.deviceFlowConfig.refreshTime` | string | grace period from the token expiry after which it would refresh the token. (default "5m0s") |
| `--admin.deviceFlowConfig.timeout` | string | amount of time the device flow should complete or else it will be cancelled. (default "10m0s") |
| `--admin.endpoint` | string | For admin types, specify where the uri of the service is located. |
| `--admin.httpProxyURL` | string | OPTIONAL: HTTP Proxy to be used for OAuth requests. |
| `--admin.insecure` | | Use insecure connection. |
| `--admin.insecureSkipVerify` | | InsecureSkipVerify controls whether a client verifies the server's certificate chain and host name.Caution: shouldn't be use for production usecases' |
| `--admin.maxBackoffDelay` | string | Max delay for grpc backoff (default "8s") |
| `--admin.maxMessageSizeBytes` | int | The max size in bytes for incoming gRPC messages |
| `--admin.maxRetries` | int | Max number of gRPC retries (default 4) |
| `--admin.perRetryTimeout` | string | gRPC per retry timeout (default "15s") |
| `--admin.pkceConfig.refreshTime` | string | grace period from the token expiry after which it would refresh the token. (default "5m0s") |
| `--admin.pkceConfig.timeout` | string | Amount of time the browser session would be active for authentication from client app. (default "2m0s") |
| `--admin.proxyCommand` | strings | Command for external proxy-authorization token generation |
| `--admin.scopes` | strings | List of scopes to request |
| `--admin.tokenRefreshWindow` | string | Max duration between token refresh attempt and token expiry. (default "0s") |
| `--admin.tokenUrl` | string | OPTIONAL: Your IdP's token endpoint. It'll be discovered from flyte admin's OAuth Metadata endpoint if not provided. |
| `--admin.useAudienceFromAdmin` | | Use Audience configured from admins public endpoint config. |
| `--admin.useAuth` | | Deprecated: Auth will be enabled/disabled based on admin's dynamically discovered information. |
| `--auth.appAuth.externalAuthServer.allowedAudience` | strings | Optional: A list of allowed audiences. If not provided, the audience is expected to be the public Uri of the service. |
| `--auth.appAuth.externalAuthServer.baseUrl` | string | This should be the base url of the authorization server that you are trying to hit. With Okta for instance, it will look something like https://company.okta.com/oauth2/abcdef123456789/ |
| `--auth.appAuth.externalAuthServer.httpProxyURL` | string | OPTIONAL: HTTP Proxy to be used for OAuth requests. |
| `--auth.appAuth.externalAuthServer.metadataUrl` | string | Optional: If the server doesn't support /.well-known/oauth-authorization-server, you can set a custom metadata url here.' |
| `--auth.appAuth.externalAuthServer.retryAttempts` | int | Optional: The number of attempted retries on a transient failure to get the OAuth metadata (default 5) |
| `--auth.appAuth.externalAuthServer.retryDelay` | string | Optional, Duration to wait between retries (default "1s") |
| `--auth.appAuth.selfAuthServer.accessTokenLifespan` | string | Defines the lifespan of issued access tokens. (default "30m0s") |
| `--auth.appAuth.selfAuthServer.authorizationCodeLifespan` | string | Defines the lifespan of issued access tokens. (default "5m0s") |
| `--auth.appAuth.selfAuthServer.claimSymmetricEncryptionKeySecretName` | string | OPTIONAL: Secret name to use to encrypt claims in authcode token. (default "claim_symmetric_key") |
| `--auth.appAuth.selfAuthServer.issuer` | string | Defines the issuer to use when issuing and validating tokens. The default value is https://{requestUri.HostAndPort}/ |
| `--auth.appAuth.selfAuthServer.oldTokenSigningRSAKeySecretName` | string | OPTIONAL: Secret name to use to retrieve Old RSA Signing Key. This can be useful during key rotation to continue to accept older tokens. (default "token_rsa_key_old.pem") |
| `--auth.appAuth.selfAuthServer.refreshTokenLifespan` | string | Defines the lifespan of issued access tokens. (default "1h0m0s") |
| `--auth.appAuth.selfAuthServer.tokenSigningRSAKeySecretName` | string | OPTIONAL: Secret name to use to retrieve RSA Signing Key. (default "token_rsa_key.pem") |
| `--auth.appAuth.thirdPartyConfig.flyteClient.audience` | string | Audience to use when initiating OAuth2 authorization requests. |
| `--auth.appAuth.thirdPartyConfig.flyteClient.clientId` | string | public identifier for the app which handles authorization for a Flyte deployment (default "uctl") |
| `--auth.appAuth.thirdPartyConfig.flyteClient.redirectUri` | string | This is the callback uri registered with the app which handles authorization for a Flyte deployment (default "http://localhost:53593/callback") |
| `--auth.appAuth.thirdPartyConfig.flyteClient.scopes` | strings | Recommended scopes for the client to request. (default [all,offline]) |
| `--auth.disableForGrpc` | | Disables auth enforcement on Grpc Endpoints. |
| `--auth.disableForHttp` | | Disables auth enforcement on HTTP Endpoints. |
| `--auth.grpcAuthorizationHeader` | string | (default "flyte-authorization") |
| `--auth.httpAuthorizationHeader` | string | (default "flyte-authorization") |
| `--auth.httpProxyURL` | string | OPTIONAL: HTTP Proxy to be used for OAuth requests. |
| `--auth.tokenEndpointProxyPath` | string | The path used to proxy calls to the TokenURL |
| `--auth.userAuth.cookieBlockKeySecretName` | string | OPTIONAL: Secret name to use for cookie block key. (default "cookie_block_key") |
| `--auth.userAuth.cookieHashKeySecretName` | string | OPTIONAL: Secret name to use for cookie hash key. (default "cookie_hash_key") |
| `--auth.userAuth.cookieSetting.domain` | string | OPTIONAL: Allows you to set the domain attribute on the auth cookies. |
| `--auth.userAuth.cookieSetting.sameSitePolicy` | string | OPTIONAL: Allows you to declare if your cookie should be restricted to a first-party or same-site context.Wrapper around http.SameSite. (default "DefaultMode") |
| `--auth.userAuth.httpProxyURL` | string | OPTIONAL: HTTP Proxy to be used for OAuth requests. |
| `--auth.userAuth.idpQueryParameter` | string | idp query parameter used for selecting a particular IDP for doing user authentication. Eg: for Okta passing idp={IDP-ID} forces the authentication to happen with IDP-ID |
| `--auth.userAuth.openId.baseUrl` | string | |
| `--auth.userAuth.openId.clientId` | string | |
| `--auth.userAuth.openId.clientSecretFile` | string | |
| `--auth.userAuth.openId.clientSecretName` | string | (default "oidc_client_secret") |
| `--auth.userAuth.openId.scopes` | strings | (default [openid,profile]) |
| `--auth.userAuth.redirectUrl` | string | (default "/console") |
| `--authorizer.internalCommunicationConfig.enabled` | | Enables authorization decisions for internal communication. (default true) |
| `--authorizer.internalCommunicationConfig.ingressIdentity` | string | IngressIdentity used in the cluster. Needed to exclude the communication coming from ingress. (default "ingress-nginx.ingress-nginx.serviceaccount.identity.linkerd.cluster.local") |
| `--authorizer.internalCommunicationConfig.tenantUrlPatternIdentity` | string | UrlPatternIdentity of the internal tenant service endpoint identities. (default "{{ service }}.{{ org }}.serviceaccount.identity.linkerd.cluster.local") |
| `--authorizer.internalCommunicationConfig.urlPatternIdentity` | string | UrlPatternIdentity of the internal service endpoint identities. (default "{{ service }}-helmchart.{{ service }}.serviceaccount.identity.linkerd.cluster.local") |
| `--authorizer.mode` | string | (default "Active") |
| `--authorizer.organizationConfig.PolicyConfig.adminPolicyDescription` | string | description for the boilerplate admin policy (default "Contributor permissions and full admin permissions to manage users and view usage dashboards") |
| `--authorizer.organizationConfig.PolicyConfig.contributorPolicyDescription` | string | description for the boilerplate contributor policy (default "Viewer permissions and permissions to create workflows, tasks, launch plans, and executions") |
| `--authorizer.organizationConfig.PolicyConfig.defaultUserPolicyRoleType` | string | name of the role type to determine which default policy new users added to the organization should be assigned (default "Viewer") |
| `--authorizer.organizationConfig.PolicyConfig.serverlessContributorPolicyDescription` | string | description for the boilerplate serverless contributor policy (default "Viewer permissions and permissions to create workflows, tasks, launch plans, and executions") |
| `--authorizer.organizationConfig.PolicyConfig.serverlessViewerPolicyDescription` | string | description for the boilerplate serverless viewer policy (default "Permissions to view Flyte entities") |
| `--authorizer.organizationConfig.PolicyConfig.viewerPolicyDescription` | string | description for the boilerplate viewer policy (default "Permissions to view Flyte entities") |
| `--authorizer.organizationConfig.defaultPolicyCacheDuration` | string | Cache entry duration for the store of the default policy per organization (default "10m0s") |
| `--authorizer.syncRuleRefreshInterval` | string | (default "1m0s") |
| `--authorizer.type` | string | (default "UserClouds") |
| `--authorizer.userCloudsClient.cache.redis.ttl.edgeTypes` | string | Specifies how long edge types remain in the cache.. (default "30m0s") |
| `--authorizer.userCloudsClient.cache.redis.ttl.edges` | string | Specifies how long edges remain in the cache. (default "30m0s") |
| `--authorizer.userCloudsClient.cache.redis.ttl.objectTypes` | string | Specifies how long object types remain in the cache. (default "30m0s") |
| `--authorizer.userCloudsClient.cache.redis.ttl.objects` | string | Specifies how long objects remain in the cache. (default "30m0s") |
| `--authorizer.userCloudsClient.cache.type` | string | Cache type to use. (default "none") |
| `--authorizer.userCloudsClient.clientID` | string | UserClouds client id |
| `--authorizer.userCloudsClient.clientSecretName` | string | UserCloud client secret name to read from the secret manager. (default "userclouds-client-secret") |
| `--authorizer.userCloudsClient.enableLogging` | | Enable userclouds client's internal logging. Calls to post logs take 250-350 ms and will impact p99 latency, enable with caution. |
| `--authorizer.userCloudsClient.tenantID` | string | UserClouds tenant id. Should be a UUID. |
| `--authorizer.userCloudsClient.tenantUrl` | string | Something like https://{yourtenant}.tenant.userclouds.com |
| `--config` | string | config file (default is /Users/andrew/.union/config.yaml) |
| `--connection.environment` | string | |
| `--connection.region` | string | |
| `--connection.rootTenantURLPattern` | string | Pattern for tenant url. (default "dns:///{{ organization }}.cloud-staging.union.ai") |
| `--console.endpoint` | string | Endpoint of console, if different than flyte admin |
| `--database.connMaxLifeTime` | string | sets the maximum amount of time a connection may be reused (default "1h0m0s") |
| `--database.enableForeignKeyConstraintWhenMigrating` | | Whether to enable gorm foreign keys when migrating the db |
| `--database.maxIdleConnections` | int | maxIdleConnections sets the maximum number of connections in the idle connection pool. (default 10) |
| `--database.maxOpenConnections` | int | maxOpenConnections sets the maximum number of open connections to the database. (default 100) |
| `--database.postgres.dbname` | string | The database name (default "postgres") |
| `--database.postgres.debug` | | |
| `--database.postgres.host` | string | The host name of the database server (default "localhost") |
| `--database.postgres.options` | string | See http://gorm.io/docs/connecting_to_the_database.html for available options passed, in addition to the above. (default "sslmode=disable") |
| `--database.postgres.password` | string | The database password. (default "postgres") |
| `--database.postgres.passwordPath` | string | Points to the file containing the database password. |
| `--database.postgres.port` | int | The port name of the database server (default 30001) |
| `--database.postgres.readReplicaHost` | string | The host name of the read replica database server (default "localhost") |
| `--database.postgres.username` | string | The database user who is connecting to the server. (default "postgres") |
| `--database.sqlite.file` | string | The path to the file (existing or new) where the DB should be created / stored. If existing, then this will be re-used, else a new will be created |
| `--db.connectionPool.maxConnectionLifetime` | string | (default "0s") |
| `--db.connectionPool.maxIdleConnections` | int | |
| `--db.connectionPool.maxOpenConnections` | int | |
| `--db.dbname` | string | (default "postgres") |
| `--db.debug` | | |
| `--db.host` | string | (default "postgres") |
| `--db.log_level` | int | (default 4) |
| `--db.options` | string | (default "sslmode=disable") |
| `--db.password` | string | |
| `--db.passwordPath` | string | |
| `--db.port` | int | (default 5432) |
| `--db.username` | string | (default "postgres") |
| `-d`, `--domain` | string | Specifies the Flyte project's domain. |
| `--files.archive` | | Pass in archive file either an http link or local path. |
| `--files.assumableIamRole` | string | Custom assumable iam auth role to register launch plans with. |
| `--files.continueOnError` | | Continue on error when registering files. |
| `--files.destinationDirectory` | string | Location of source code in container. |
| `--files.dryRun` | | Execute command without making any modifications. |
| `--files.enableSchedule` | | Enable the schedule if the files contain schedulable launchplan. |
| `--files.force` | | Force use of version number on entities registered with flyte. |
| `--files.k8ServiceAccount` | string | Deprecated. Please use `--K8sServiceAccount`|
| `--files.k8sServiceAccount` | string | Custom kubernetes service account auth role to register launch plans with. |
| `--files.outputLocationPrefix` | string | Custom output location prefix for offloaded types (files/schemas). |
| `--files.sourceUploadPath` | string | Deprecated: Update flyte admin to avoid having to configure storage access from uctl. |
| `--files.version` | string | Version of the entity to be registered with flyte which are un-versioned after serialization. |
| `--logger.formatter.type` | string | Sets logging format type. (default "json") |
| `--logger.level` | int | Sets the minimum logging level. (default 3) |
| `--logger.mute` | | Mutes all logs regardless of severity. Intended for benchmarks/tests only. |
| `--logger.show-source` | | Includes source code location in logs. |
| `--org` | string | Organization to work on. If not set, default to user's org. |
| `--otel.file.filename` | string | Filename to store exported telemetry traces (default "/tmp/trace.txt") |
| `--otel.jaeger.endpoint` | string | Endpoint for the jaeger telemetry trace ingestor (default "http://localhost:14268/api/traces") |
| `--otel.otlpgrpc.endpoint` | string | Endpoint for the OTLP telemetry trace collector (default "http://localhost:4317") |
| `--otel.otlphttp.endpoint` | string | Endpoint for the OTLP telemetry trace collector (default "http://localhost:4318/v1/traces") |
| `--otel.sampler.parentSampler` | string | Sets the parent sampler to use for the tracer (default "always") |
| `--otel.type` | string | Sets the type of exporter to configure [noop/file/jaeger/otlpgrpc/otlphttp]. (default "noop") |
| `-o`, `--output` | string | Specifies the output type - supported formats [TABLE JSON YAML DOT DOTURL]. NOTE: dot, doturl are only supported for Workflow (default "table") |
| `--plugins.catalogcache.reader.maxItems` | int | Maximum number of entries to keep in the index. (default 10000) |
| `--plugins.catalogcache.reader.maxRetries` | int | Maximum number of retries per item. (default 3) |
| `--plugins.catalogcache.reader.workers` | int | Number of concurrent workers to start processing the queue. (default 10) |
| `--plugins.catalogcache.writer.maxItems` | int | Maximum number of entries to keep in the index. (default 10000) |
| `--plugins.catalogcache.writer.maxRetries` | int | Maximum number of retries per item. (default 3) |
| `--plugins.catalogcache.writer.workers` | int | Number of concurrent workers to start processing the queue. (default 10) |
| `-p`, `--project` | string | Specifies the Flyte project. |
| `--rediscache.passwordSecretName` | string | Name of secret with Redis password. |
| `--rediscache.primaryEndpoint` | string | Primary endpoint for the redis cache that can be used for both reads and writes. |
| `--rediscache.replicaEndpoint` | string | Replica endpoint for the redis cache that can be used for reads. |
| `--secrets.env-prefix` | string | Prefix for environment variables (default "FLYTE_SECRET_") |
| `--secrets.secrets-prefix` | string | Prefix where to look for secrets file (default "/etc/secrets") |
| `--secrets.type` | string | Sets the type of storage to configure [local]. (default "local") |
| `--server.dataProxy.download.maxExpiresIn` | string | Maximum allowed expiration duration. (default "1h0m0s") |
| `--server.dataProxy.upload.defaultFileNameLength` | int | Default length for the generated file name if not provided in the request. (default 20) |
| `--server.dataProxy.upload.maxExpiresIn` | string | Maximum allowed expiration duration. (default "1h0m0s") |
| `--server.dataProxy.upload.maxSize` | string | Maximum allowed upload size. (default "6Mi") |
| `--server.dataProxy.upload.storagePrefix` | string | Storage prefix to use for all upload requests. |
| `--server.grpc.enableGrpcLatencyMetrics` | | Enable grpc latency metrics. Note Histograms metrics can be expensive on Prometheus servers. |
| `--server.grpc.maxMessageSizeBytes` | int | The max size in bytes for incoming gRPC messages |
| `--server.grpc.port` | int | On which grpc port to serve admin (default 8089) |
| `--server.grpc.serverReflection` | | Enable GRPC Server Reflection (default true) |
| `--server.grpcPort` | int | deprecated |
| `--server.grpcServerReflection` | | deprecated |
| `--server.httpPort` | int | On which http port to serve admin (default 8088) |
| `--server.kube-config` | string | Path to kubernetes client config file, default is empty, useful for incluster config. |
| `--server.kubeClientConfig.burst` | int | Max burst rate for throttle. 0 defaults to 10 (default 25) |
| `--server.kubeClientConfig.qps` | int32 | Max QPS to the master for requests to KubeAPI. 0 defaults to 5. (default 100) |
| `--server.kubeClientConfig.timeout` | string | Max duration allowed for every request to KubeAPI before giving up. 0 implies no timeout. (default "30s") |
| `--server.master` | string | The address of the Kubernetes API server. |
| `--server.readHeaderTimeoutSeconds` | int | The amount of time allowed to read request headers. (default 32) |
| `--server.security.allowCors` | | (default true) |
| `--server.security.allowedHeaders` | strings | (default [Content-Type,flyte-authorization]) |
| `--server.security.allowedOrigins` | strings | (default [*]) |
| `--server.security.auditAccess` | | |
| `--server.security.secure` | | |
| `--server.security.ssl.certificateFile` | string | |
| `--server.security.ssl.keyFile` | string | |
| `--server.security.useAuth` | | |
| `--server.thirdPartyConfig.flyteClient.audience` | string | Audience to use when initiating OAuth2 authorization requests. |
| `--server.thirdPartyConfig.flyteClient.clientId` | string | public identifier for the app which handles authorization for a Flyte deployment |
| `--server.thirdPartyConfig.flyteClient.redirectUri` | string | This is the callback uri registered with the app which handles authorization for a Flyte deployment |
| `--server.thirdPartyConfig.flyteClient.scopes` | strings | Recommended scopes for the client to request. |
| `--server.watchService.maxActiveClusterConnections` | int | (default 5) |
| `--server.watchService.maxPageSize` | int | (default 50000) |
| `--server.watchService.nonTerminalStatusUpdatesInterval` | string | (default "1m0s") |
| `--server.watchService.pollInterval` | string | (default "1s") |
| `--sharedservice.connectPort` | string | On which connect port to serve admin (default "8080") |
| `--sharedservice.grpc.grpcMaxResponseStatusBytes` | int32 | specifies the maximum (uncompressed) size of header list that the client is prepared to accept on grpc calls (default 32000) |
| `--sharedservice.grpc.maxConcurrentStreams` | int | Limit on the number of concurrent streams to each ServerTransport. (default 100) |
| `--sharedservice.grpc.maxMessageSizeBytes` | int | Limit on the size of message that can be received on the server. (default 10485760) |
| `--sharedservice.grpcServerReflection` | | Enable GRPC Server Reflection (default true) |
| `--sharedservice.httpPort` | string | On which http port to serve admin (default "8089") |
| `--sharedservice.kubeConfig` | string | Path to kubernetes client config file. |
| `--sharedservice.master` | string | The address of the Kubernetes API server. |
| `--sharedservice.metrics.enableClientGrpcHistograms` | | Enable client grpc histograms (default true) |
| `--sharedservice.metrics.enableGrpcHistograms` | | Enable grpc histograms (default true) |
| `--sharedservice.metrics.scope` | string | Scope to emit metrics under (default "service:") |
| `--sharedservice.port` | string | On which grpc port to serve admin (default "8080") |
| `--sharedservice.profiler.enabled` | | Enable Profiler on server |
| `--sharedservice.profilerPort` | string | Profile port to start listen for pprof and metric handlers on. (default "10254") |
| `--sharedservice.security.allowCors` | | |
| `--sharedservice.security.allowLocalhostAccess` | | Whether to permit localhost unauthenticated access to the server |
| `--sharedservice.security.allowedHeaders` | strings | |
| `--sharedservice.security.allowedOrigins` | strings | |
| `--sharedservice.security.auditAccess` | | |
| `--sharedservice.security.orgOverride` | string | Override org in identity context if localhost access enabled |
| `--sharedservice.security.secure` | | |
| `--sharedservice.security.ssl.certificateAuthorityFile` | string | |
| `--sharedservice.security.ssl.certificateFile` | string | |
| `--sharedservice.security.ssl.keyFile` | string | |
| `--sharedservice.security.useAuth` | | |
| `--sharedservice.sync.syncInterval` | string | Time interval to sync (default "5m0s") |
| `--storage.cache.max_size_mbs` | int | Maximum size of the cache where the Blob store data is cached in-memory. If not specified or set to 0, cache is not used |
| `--storage.cache.target_gc_percent` | int | Sets the garbage collection target percentage. |
| `--storage.connection.access-key` | string | Access key to use. Only required when authtype is set to accesskey. |
| `--storage.connection.auth-type` | string | Auth Type to use [iam, accesskey]. (default "iam") |
| `--storage.connection.disable-ssl` | | Disables SSL connection. Should only be used for development. |
| `--storage.connection.endpoint` | string | URL for storage client to connect to. |
| `--storage.connection.region` | string | Region to connect to. (default "us-east-1") |
| `--storage.connection.secret-key` | string | Secret to use when accesskey is set. |
| `--storage.container` | string | Initial container (in s3 a bucket) to create -if it doesn't exist-.' |
| `--storage.defaultHttpClient.timeout` | string | Sets time out on the http client. (default "0s") |
| `--storage.enable-multicontainer` | | If this is true, then the container argument is overlooked and redundant. This config will automatically open new connections to new containers/buckets as they are encountered |
| `--storage.limits.maxDownloadMBs` | int | Maximum allowed download size (in MBs) per call. (default 2) |
| `--storage.stow.config` | stringToString | Configuration for stow backend. Refer to github/flyteorg/stow (default []) |
| `--storage.stow.kind` | string | Kind of Stow backend to use. Refer to github/flyteorg/stow |
| `--storage.type` | string | Sets the type of storage to configure [s3/minio/local/mem/stow]. (default "s3") |
| `--union.auth.authorizationMetadataKey` | string | Authorization Header to use when passing Access Tokens to the server (default "flyte-authorization") |
| `--union.auth.clientId` | string | Client ID |
| `--union.auth.clientSecretEnvVar` | string | Environment variable containing the client secret |
| `--union.auth.clientSecretLocation` | string | File containing the client secret |
| `--union.auth.deviceFlow.pollInterval` | string | amount of time the device flow would poll the token endpoint if auth server doesn't return a polling interval. Okta and google IDP do return an interval' (default "5s") |
| `--union.auth.deviceFlow.refreshTime` | string | grace period from the token expiry after which it would refresh the token. (default "5m0s") |
| `--union.auth.deviceFlow.timeout` | string | amount of time the device flow should complete or else it will be cancelled. (default "10m0s") |
| `--union.auth.enable` | | Whether to enable an authenticated conenction when communicating with admin. (default true) |
| `--union.auth.externalAuth.command` | strings | Command for external authentication token generation |
| `--union.auth.pkce.refreshTime` | string | grace period from the token expiry after which it would refresh the token. (default "5m0s") |
| `--union.auth.pkce.timeout` | string | Amount of time the browser session would be active for authentication from client app. (default "15s") |
| `--union.auth.scopes` | strings | List of scopes to request |
| `--union.auth.tokenRefreshWindow` | string | Max duration between token refresh attempt and token expiry. (default "1h0m0s") |
| `--union.auth.tokenUrl` | string | OPTIONAL: Your IdP's token endpoint. It'll be discovered from flyte admin's OAuth Metadata endpoint if not provided. |
| `--union.auth.type` | string | Type of OAuth2 flow used for communicating with admin. (default "Pkce") |
| `--union.cache.maxItemsCount` | int | Maximum number of items to keep in the cache before evicting. (default 1000) |
| `--union.connection.host` | string | Host to connect to (default "dns:///utt-mgdp-stg-us-east-2.cloud-staging.union.ai") |
| `--union.connection.insecure` | | Whether to connect over insecure channel |
| `--union.connection.insecureSkipVerify` | | InsecureSkipVerify controls whether a client verifies the server's certificate chain and host name.Caution: shouldn't be use for production usecases' |
| `--union.connection.keepAliveConfig.permitWithoutStream` | | If true, client sends keepalive pings even with no active RPCs. |
| `--union.connection.keepAliveConfig.time` | string | After a duration of this time if the client doesn't see any activity it pings the server to see if the transport is still alive. (default "20s") |
| `--union.connection.keepAliveConfig.timeout` | string | After having pinged for keepalive check, the client waits for a duration of Timeout and if no activity is seen even after that the connection is closed. (default "2m0s") |
| `--union.connection.maxBackoffDelay` | string | Max delay for grpc backoff (default "8s") |
| `--union.connection.maxRecvMsgSize` | int | Maximum size of a message in bytes of a gRPC message (default 10485760) |
| `--union.connection.maxRetries` | int | Max number of gRPC retries (default 4) |
| `--union.connection.minConnectTimeout` | string | Minimum timeout for establishing a connection (default "20s") |
| `--union.connection.perRetryTimeout` | string | gRPC per retry timeout (default "15s") |
| `--union.connection.serviceConfig` | string | Defines gRPC experimental JSON Service Config (default "{"loadBalancingConfig": [{"round_robin":{}}]}") |
| `--union.connection.trustedIdentityClaims.enabled` | | Enables passing of trusted claims while making inter service calls |
| `--union.connection.trustedIdentityClaims.externalIdentityClaim` | string | External identity claim of the service which is authorized to make internal service call. These are verified against userclouds actions |
| `--union.connection.trustedIdentityClaims.externalIdentityTypeClaim` | string | External identity type claim of app or user to use for the current service identity. It should be an 'app' for inter service communication |
| `--union.internalConnectionConfig.-` | stringToString | (default []) |
| `--union.internalConnectionConfig.enabled` | | Enables internal service to service communication instead of going through ingress. |
| `--union.internalConnectionConfig.urlPattern` | string | UrlPattern of the internal service endpoints. (default "{{ service }}-helmchart.{{ service }}.svc.cluster.local:80") |
| `--webhook.awsSecretManager.sidecarImage` | string | Specifies the sidecar docker image to use (default "docker.io/amazon/aws-secrets-manager-secret-sidecar:v0.1.4") |
| `--webhook.certDir` | string | Certificate directory to use to write generated certs. Defaults to /etc/webhook/certs/ (default "/etc/webhook/certs") |
| `--webhook.embeddedSecretManagerConfig.awsConfig.region` | string | AWS region |
| `--webhook.embeddedSecretManagerConfig.fileMountInitContainer.image` | string | Specifies init container image to use for mounting secrets as files. (default "busybox:1.28") |
| `--webhook.embeddedSecretManagerConfig.gcpConfig.project` | string | GCP project to be used for secret manager |
| `--webhook.embeddedSecretManagerConfig.type` | string | (default "AWS") |
| `--webhook.gcpSecretManager.sidecarImage` | string | Specifies the sidecar docker image to use (default "gcr.io/google.com/cloudsdktool/cloud-sdk:alpine") |
| `--webhook.listenPort` | int | The port to use to listen to webhook calls. Defaults to 9443 (default 9443) |
| `--webhook.localCert` | | write certs locally. Defaults to false |
| `--webhook.metrics-prefix` | string | An optional prefix for all published metrics. (default "flyte:") |
| `--webhook.secretName` | string | Secret name to write generated certs to. (default "flyte-pod-webhook") |
| `--webhook.serviceName` | string | The name of the webhook service. (default "flyte-pod-webhook") |
| `--webhook.servicePort` | int32 | The port on the service that hosting webhook. (default 443) |
| `--webhook.vaultSecretManager.role` | string | Specifies the vault role to use (default "flyte") |
=== PAGE: https://www.union.ai/docs/v1/serverless/api-reference/uctl-cli/uctl-create/uctl-create-role ===
# uctl create role
Create a role, which defines a set of allowable actions on a resource
## Synopsis
Create a role which defines a set of permitted actions.
For example, create a new role to view and register flyte inventory:
bin/uctl create role --name "Registration Role" --actions view_flyte_inventory,view_flyte_executions,register_flyte_inventory
You can also define roles using a template file
Define a role.yaml like so:
name: Registration Role
actions:
- view_flyte_inventory
- view_flyte_executions
- register_flyte_inventory
And pass this into create role
```shell
$ uctl/bin create role --roleFile role.yaml
```
You can optionally generate a skeleton file to fill out with your custom
permissions like so:
```shell
$ uctl/bin create role --genFile --roleFile role.yaml
```
And pass this into create role
```shell
$ uctl/bin create role --roleFile role.yaml
```
All available actions are:
: - administer_account
- administer_project
- create_flyte_executions
- edit_cluster_related_attributes
- edit_execution_related_attributes
- edit_unused_attributes
- manage_cluster
- manage_permissions
- register_flyte_inventory
- view_flyte_executions
- view_flyte_inventory
Please refer to the official documentation for what these do.
You can define policies which apply already-created roles to specific
resources using
```shell
$ uctl/bin create policy --help
```
## Options
| Option | Type | Description |
|--------|------|-------------|
| `--actions` | strings | Actions permitted by holders of the role |
| `--genFile` | | Optional, if you want to create a role using a file as a specification, this will generate a template example |
| `-h`, `--help` | help for role |
| `--name` | string | Name to assign to the role. Must be unique |
| `--roleFile` | string | Optional, use a file for defining more complicated roles (default "role.yaml") |
### Options inherited from parent commands
| Option | Type | Description |
|--------|------|-------------|
| `--admin.audience` | string | Audience to use when initiating OAuth2 authorization requests. |
| `--admin.authType` | string | Type of OAuth2 flow used for communicating with admin.ClientSecret, Pkce, ExternalCommand are valid values (default "ClientSecret") |
| `--admin.authorizationHeader` | string | Custom metadata header to pass JWT |
| `--admin.authorizationServerUrl` | string | This is the URL to your IdP's authorization server. It'll default to Endpoint |
| `--admin.caCertFilePath` | string | Use specified certificate file to verify the admin server peer. |
| `--admin.clientId` | string | Client ID (default "flytepropeller") |
| `--admin.clientSecretEnvVar` | string | Environment variable containing the client secret |
| `--admin.clientSecretLocation` | string | File containing the client secret (default "/etc/secrets/client_secret") |
| `--admin.command` | strings | Command for external authentication token generation |
| `--admin.defaultOrg` | string | OPTIONAL: Default org to use to support non-org based cli's.'. |
| `--admin.defaultServiceConfig` | string | |
| `--admin.deviceFlowConfig.pollInterval` | string | amount of time the device flow would poll the token endpoint if auth server doesn't return a polling interval. Okta and google IDP do return an interval' (default "5s") |
| `--admin.deviceFlowConfig.refreshTime` | string | grace period from the token expiry after which it would refresh the token. (default "5m0s") |
| `--admin.deviceFlowConfig.timeout` | string | amount of time the device flow should complete or else it will be cancelled. (default "10m0s") |
| `--admin.endpoint` | string | For admin types, specify where the uri of the service is located. |
| `--admin.httpProxyURL` | string | OPTIONAL: HTTP Proxy to be used for OAuth requests. |
| `--admin.insecure` | | Use insecure connection. |
| `--admin.insecureSkipVerify` | | InsecureSkipVerify controls whether a client verifies the server's certificate chain and host name.Caution: shouldn't be use for production usecases' |
| `--admin.maxBackoffDelay` | string | Max delay for grpc backoff (default "8s") |
| `--admin.maxMessageSizeBytes` | int | The max size in bytes for incoming gRPC messages |
| `--admin.maxRetries` | int | Max number of gRPC retries (default 4) |
| `--admin.perRetryTimeout` | string | gRPC per retry timeout (default "15s") |
| `--admin.pkceConfig.refreshTime` | string | grace period from the token expiry after which it would refresh the token. (default "5m0s") |
| `--admin.pkceConfig.timeout` | string | Amount of time the browser session would be active for authentication from client app. (default "2m0s") |
| `--admin.proxyCommand` | strings | Command for external proxy-authorization token generation |
| `--admin.scopes` | strings | List of scopes to request |
| `--admin.tokenRefreshWindow` | string | Max duration between token refresh attempt and token expiry. (default "0s") |
| `--admin.tokenUrl` | string | OPTIONAL: Your IdP's token endpoint. It'll be discovered from flyte admin's OAuth Metadata endpoint if not provided. |
| `--admin.useAudienceFromAdmin` | | Use Audience configured from admins public endpoint config. |
| `--admin.useAuth` | | Deprecated: Auth will be enabled/disabled based on admin's dynamically discovered information. |
| `--auth.appAuth.externalAuthServer.allowedAudience` | strings | Optional: A list of allowed audiences. If not provided, the audience is expected to be the public Uri of the service. |
| `--auth.appAuth.externalAuthServer.baseUrl` | string | This should be the base url of the authorization server that you are trying to hit. With Okta for instance, it will look something like https://company.okta.com/oauth2/abcdef123456789/ |
| `--auth.appAuth.externalAuthServer.httpProxyURL` | string | OPTIONAL: HTTP Proxy to be used for OAuth requests. |
| `--auth.appAuth.externalAuthServer.metadataUrl` | string | Optional: If the server doesn't support /.well-known/oauth-authorization-server, you can set a custom metadata url here.' |
| `--auth.appAuth.externalAuthServer.retryAttempts` | int | Optional: The number of attempted retries on a transient failure to get the OAuth metadata (default 5) |
| `--auth.appAuth.externalAuthServer.retryDelay` | string | Optional, Duration to wait between retries (default "1s") |
| `--auth.appAuth.selfAuthServer.accessTokenLifespan` | string | Defines the lifespan of issued access tokens. (default "30m0s") |
| `--auth.appAuth.selfAuthServer.authorizationCodeLifespan` | string | Defines the lifespan of issued access tokens. (default "5m0s") |
| `--auth.appAuth.selfAuthServer.claimSymmetricEncryptionKeySecretName` | string | OPTIONAL: Secret name to use to encrypt claims in authcode token. (default "claim_symmetric_key") |
| `--auth.appAuth.selfAuthServer.issuer` | string | Defines the issuer to use when issuing and validating tokens. The default value is https://{requestUri.HostAndPort}/ |
| `--auth.appAuth.selfAuthServer.oldTokenSigningRSAKeySecretName` | string | OPTIONAL: Secret name to use to retrieve Old RSA Signing Key. This can be useful during key rotation to continue to accept older tokens. (default "token_rsa_key_old.pem") |
| `--auth.appAuth.selfAuthServer.refreshTokenLifespan` | string | Defines the lifespan of issued access tokens. (default "1h0m0s") |
| `--auth.appAuth.selfAuthServer.tokenSigningRSAKeySecretName` | string | OPTIONAL: Secret name to use to retrieve RSA Signing Key. (default "token_rsa_key.pem") |
| `--auth.appAuth.thirdPartyConfig.flyteClient.audience` | string | Audience to use when initiating OAuth2 authorization requests. |
| `--auth.appAuth.thirdPartyConfig.flyteClient.clientId` | string | public identifier for the app which handles authorization for a Flyte deployment (default "uctl") |
| `--auth.appAuth.thirdPartyConfig.flyteClient.redirectUri` | string | This is the callback uri registered with the app which handles authorization for a Flyte deployment (default "http://localhost:53593/callback") |
| `--auth.appAuth.thirdPartyConfig.flyteClient.scopes` | strings | Recommended scopes for the client to request. (default [all,offline]) |
| `--auth.disableForGrpc` | | Disables auth enforcement on Grpc Endpoints. |
| `--auth.disableForHttp` | | Disables auth enforcement on HTTP Endpoints. |
| `--auth.grpcAuthorizationHeader` | string | (default "flyte-authorization") |
| `--auth.httpAuthorizationHeader` | string | (default "flyte-authorization") |
| `--auth.httpProxyURL` | string | OPTIONAL: HTTP Proxy to be used for OAuth requests. |
| `--auth.tokenEndpointProxyPath` | string | The path used to proxy calls to the TokenURL |
| `--auth.userAuth.cookieBlockKeySecretName` | string | OPTIONAL: Secret name to use for cookie block key. (default "cookie_block_key") |
| `--auth.userAuth.cookieHashKeySecretName` | string | OPTIONAL: Secret name to use for cookie hash key. (default "cookie_hash_key") |
| `--auth.userAuth.cookieSetting.domain` | string | OPTIONAL: Allows you to set the domain attribute on the auth cookies. |
| `--auth.userAuth.cookieSetting.sameSitePolicy` | string | OPTIONAL: Allows you to declare if your cookie should be restricted to a first-party or same-site context.Wrapper around http.SameSite. (default "DefaultMode") |
| `--auth.userAuth.httpProxyURL` | string | OPTIONAL: HTTP Proxy to be used for OAuth requests. |
| `--auth.userAuth.idpQueryParameter` | string | idp query parameter used for selecting a particular IDP for doing user authentication. Eg: for Okta passing idp={IDP-ID} forces the authentication to happen with IDP-ID |
| `--auth.userAuth.openId.baseUrl` | string | |
| `--auth.userAuth.openId.clientId` | string | |
| `--auth.userAuth.openId.clientSecretFile` | string | |
| `--auth.userAuth.openId.clientSecretName` | string | (default "oidc_client_secret") |
| `--auth.userAuth.openId.scopes` | strings | (default [openid,profile]) |
| `--auth.userAuth.redirectUrl` | string | (default "/console") |
| `--authorizer.internalCommunicationConfig.enabled` | | Enables authorization decisions for internal communication. (default true) |
| `--authorizer.internalCommunicationConfig.ingressIdentity` | string | IngressIdentity used in the cluster. Needed to exclude the communication coming from ingress. (default "ingress-nginx.ingress-nginx.serviceaccount.identity.linkerd.cluster.local") |
| `--authorizer.internalCommunicationConfig.tenantUrlPatternIdentity` | string | UrlPatternIdentity of the internal tenant service endpoint identities. (default "{{ service }}.{{ org }}.serviceaccount.identity.linkerd.cluster.local") |
| `--authorizer.internalCommunicationConfig.urlPatternIdentity` | string | UrlPatternIdentity of the internal service endpoint identities. (default "{{ service }}-helmchart.{{ service }}.serviceaccount.identity.linkerd.cluster.local") |
| `--authorizer.mode` | string | (default "Active") |
| `--authorizer.organizationConfig.PolicyConfig.adminPolicyDescription` | string | description for the boilerplate admin policy (default "Contributor permissions and full admin permissions to manage users and view usage dashboards") |
| `--authorizer.organizationConfig.PolicyConfig.contributorPolicyDescription` | string | description for the boilerplate contributor policy (default "Viewer permissions and permissions to create workflows, tasks, launch plans, and executions") |
| `--authorizer.organizationConfig.PolicyConfig.defaultUserPolicyRoleType` | string | name of the role type to determine which default policy new users added to the organization should be assigned (default "Viewer") |
| `--authorizer.organizationConfig.PolicyConfig.serverlessContributorPolicyDescription` | string | description for the boilerplate serverless contributor policy (default "Viewer permissions and permissions to create workflows, tasks, launch plans, and executions") |
| `--authorizer.organizationConfig.PolicyConfig.serverlessViewerPolicyDescription` | string | description for the boilerplate serverless viewer policy (default "Permissions to view Flyte entities") |
| `--authorizer.organizationConfig.PolicyConfig.viewerPolicyDescription` | string | description for the boilerplate viewer policy (default "Permissions to view Flyte entities") |
| `--authorizer.organizationConfig.defaultPolicyCacheDuration` | string | Cache entry duration for the store of the default policy per organization (default "10m0s") |
| `--authorizer.syncRuleRefreshInterval` | string | (default "1m0s") |
| `--authorizer.type` | string | (default "UserClouds") |
| `--authorizer.userCloudsClient.cache.redis.ttl.edgeTypes` | string | Specifies how long edge types remain in the cache.. (default "30m0s") |
| `--authorizer.userCloudsClient.cache.redis.ttl.edges` | string | Specifies how long edges remain in the cache. (default "30m0s") |
| `--authorizer.userCloudsClient.cache.redis.ttl.objectTypes` | string | Specifies how long object types remain in the cache. (default "30m0s") |
| `--authorizer.userCloudsClient.cache.redis.ttl.objects` | string | Specifies how long objects remain in the cache. (default "30m0s") |
| `--authorizer.userCloudsClient.cache.type` | string | Cache type to use. (default "none") |
| `--authorizer.userCloudsClient.clientID` | string | UserClouds client id |
| `--authorizer.userCloudsClient.clientSecretName` | string | UserCloud client secret name to read from the secret manager. (default "userclouds-client-secret") |
| `--authorizer.userCloudsClient.enableLogging` | | Enable userclouds client's internal logging. Calls to post logs take 250-350 ms and will impact p99 latency, enable with caution. |
| `--authorizer.userCloudsClient.tenantID` | string | UserClouds tenant id. Should be a UUID. |
| `--authorizer.userCloudsClient.tenantUrl` | string | Something like https://{yourtenant}.tenant.userclouds.com |
| `--config` | string | config file (default is /Users/andrew/.union/config.yaml) |
| `--connection.environment` | string | |
| `--connection.region` | string | |
| `--connection.rootTenantURLPattern` | string | Pattern for tenant url. (default "dns:///{{ organization }}.cloud-staging.union.ai") |
| `--console.endpoint` | string | Endpoint of console, if different than flyte admin |
| `--database.connMaxLifeTime` | string | sets the maximum amount of time a connection may be reused (default "1h0m0s") |
| `--database.enableForeignKeyConstraintWhenMigrating` | | Whether to enable gorm foreign keys when migrating the db |
| `--database.maxIdleConnections` | int | maxIdleConnections sets the maximum number of connections in the idle connection pool. (default 10) |
| `--database.maxOpenConnections` | int | maxOpenConnections sets the maximum number of open connections to the database. (default 100) |
| `--database.postgres.dbname` | string | The database name (default "postgres") |
| `--database.postgres.debug` | | |
| `--database.postgres.host` | string | The host name of the database server (default "localhost") |
| `--database.postgres.options` | string | See http://gorm.io/docs/connecting_to_the_database.html for available options passed, in addition to the above. (default "sslmode=disable") |
| `--database.postgres.password` | string | The database password. (default "postgres") |
| `--database.postgres.passwordPath` | string | Points to the file containing the database password. |
| `--database.postgres.port` | int | The port name of the database server (default 30001) |
| `--database.postgres.readReplicaHost` | string | The host name of the read replica database server (default "localhost") |
| `--database.postgres.username` | string | The database user who is connecting to the server. (default "postgres") |
| `--database.sqlite.file` | string | The path to the file (existing or new) where the DB should be created / stored. If existing, then this will be re-used, else a new will be created |
| `--db.connectionPool.maxConnectionLifetime` | string | (default "0s") |
| `--db.connectionPool.maxIdleConnections` | int | |
| `--db.connectionPool.maxOpenConnections` | int | |
| `--db.dbname` | string | (default "postgres") |
| `--db.debug` | | |
| `--db.host` | string | (default "postgres") |
| `--db.log_level` | int | (default 4) |
| `--db.options` | string | (default "sslmode=disable") |
| `--db.password` | string | |
| `--db.passwordPath` | string | |
| `--db.port` | int | (default 5432) |
| `--db.username` | string | (default "postgres") |
| `-d`, `--domain` | string | Specifies the Flyte project's domain. |
| `--files.archive` | | Pass in archive file either an http link or local path. |
| `--files.assumableIamRole` | string | Custom assumable iam auth role to register launch plans with. |
| `--files.continueOnError` | | Continue on error when registering files. |
| `--files.destinationDirectory` | string | Location of source code in container. |
| `--files.dryRun` | | Execute command without making any modifications. |
| `--files.enableSchedule` | | Enable the schedule if the files contain schedulable launchplan. |
| `--files.force` | | Force use of version number on entities registered with flyte. |
| `--files.k8ServiceAccount` | string | Deprecated. Please use `--K8sServiceAccount`|
| `--files.k8sServiceAccount` | string | Custom kubernetes service account auth role to register launch plans with. |
| `--files.outputLocationPrefix` | string | Custom output location prefix for offloaded types (files/schemas). |
| `--files.sourceUploadPath` | string | Deprecated: Update flyte admin to avoid having to configure storage access from uctl. |
| `--files.version` | string | Version of the entity to be registered with flyte which are un-versioned after serialization. |
| `--logger.formatter.type` | string | Sets logging format type. (default "json") |
| `--logger.level` | int | Sets the minimum logging level. (default 3) |
| `--logger.mute` | | Mutes all logs regardless of severity. Intended for benchmarks/tests only. |
| `--logger.show-source` | | Includes source code location in logs. |
| `--org` | string | Organization to work on. If not set, default to user's org. |
| `--otel.file.filename` | string | Filename to store exported telemetry traces (default "/tmp/trace.txt") |
| `--otel.jaeger.endpoint` | string | Endpoint for the jaeger telemetry trace ingestor (default "http://localhost:14268/api/traces") |
| `--otel.otlpgrpc.endpoint` | string | Endpoint for the OTLP telemetry trace collector (default "http://localhost:4317") |
| `--otel.otlphttp.endpoint` | string | Endpoint for the OTLP telemetry trace collector (default "http://localhost:4318/v1/traces") |
| `--otel.sampler.parentSampler` | string | Sets the parent sampler to use for the tracer (default "always") |
| `--otel.type` | string | Sets the type of exporter to configure [noop/file/jaeger/otlpgrpc/otlphttp]. (default "noop") |
| `-o`, `--output` | string | Specifies the output type - supported formats [TABLE JSON YAML DOT DOTURL]. NOTE: dot, doturl are only supported for Workflow (default "table") |
| `--plugins.catalogcache.reader.maxItems` | int | Maximum number of entries to keep in the index. (default 10000) |
| `--plugins.catalogcache.reader.maxRetries` | int | Maximum number of retries per item. (default 3) |
| `--plugins.catalogcache.reader.workers` | int | Number of concurrent workers to start processing the queue. (default 10) |
| `--plugins.catalogcache.writer.maxItems` | int | Maximum number of entries to keep in the index. (default 10000) |
| `--plugins.catalogcache.writer.maxRetries` | int | Maximum number of retries per item. (default 3) |
| `--plugins.catalogcache.writer.workers` | int | Number of concurrent workers to start processing the queue. (default 10) |
| `-p`, `--project` | string | Specifies the Flyte project. |
| `--rediscache.passwordSecretName` | string | Name of secret with Redis password. |
| `--rediscache.primaryEndpoint` | string | Primary endpoint for the redis cache that can be used for both reads and writes. |
| `--rediscache.replicaEndpoint` | string | Replica endpoint for the redis cache that can be used for reads. |
| `--secrets.env-prefix` | string | Prefix for environment variables (default "FLYTE_SECRET_") |
| `--secrets.secrets-prefix` | string | Prefix where to look for secrets file (default "/etc/secrets") |
| `--secrets.type` | string | Sets the type of storage to configure [local]. (default "local") |
| `--server.dataProxy.download.maxExpiresIn` | string | Maximum allowed expiration duration. (default "1h0m0s") |
| `--server.dataProxy.upload.defaultFileNameLength` | int | Default length for the generated file name if not provided in the request. (default 20) |
| `--server.dataProxy.upload.maxExpiresIn` | string | Maximum allowed expiration duration. (default "1h0m0s") |
| `--server.dataProxy.upload.maxSize` | string | Maximum allowed upload size. (default "6Mi") |
| `--server.dataProxy.upload.storagePrefix` | string | Storage prefix to use for all upload requests. |
| `--server.grpc.enableGrpcLatencyMetrics` | | Enable grpc latency metrics. Note Histograms metrics can be expensive on Prometheus servers. |
| `--server.grpc.maxMessageSizeBytes` | int | The max size in bytes for incoming gRPC messages |
| `--server.grpc.port` | int | On which grpc port to serve admin (default 8089) |
| `--server.grpc.serverReflection` | | Enable GRPC Server Reflection (default true) |
| `--server.grpcPort` | int | deprecated |
| `--server.grpcServerReflection` | | deprecated |
| `--server.httpPort` | int | On which http port to serve admin (default 8088) |
| `--server.kube-config` | string | Path to kubernetes client config file, default is empty, useful for incluster config. |
| `--server.kubeClientConfig.burst` | int | Max burst rate for throttle. 0 defaults to 10 (default 25) |
| `--server.kubeClientConfig.qps` | int32 | Max QPS to the master for requests to KubeAPI. 0 defaults to 5. (default 100) |
| `--server.kubeClientConfig.timeout` | string | Max duration allowed for every request to KubeAPI before giving up. 0 implies no timeout. (default "30s") |
| `--server.master` | string | The address of the Kubernetes API server. |
| `--server.readHeaderTimeoutSeconds` | int | The amount of time allowed to read request headers. (default 32) |
| `--server.security.allowCors` | | (default true) |
| `--server.security.allowedHeaders` | strings | (default [Content-Type,flyte-authorization]) |
| `--server.security.allowedOrigins` | strings | (default [*]) |
| `--server.security.auditAccess` | | |
| `--server.security.secure` | | |
| `--server.security.ssl.certificateFile` | string | |
| `--server.security.ssl.keyFile` | string | |
| `--server.security.useAuth` | | |
| `--server.thirdPartyConfig.flyteClient.audience` | string | Audience to use when initiating OAuth2 authorization requests. |
| `--server.thirdPartyConfig.flyteClient.clientId` | string | public identifier for the app which handles authorization for a Flyte deployment |
| `--server.thirdPartyConfig.flyteClient.redirectUri` | string | This is the callback uri registered with the app which handles authorization for a Flyte deployment |
| `--server.thirdPartyConfig.flyteClient.scopes` | strings | Recommended scopes for the client to request. |
| `--server.watchService.maxActiveClusterConnections` | int | (default 5) |
| `--server.watchService.maxPageSize` | int | (default 50000) |
| `--server.watchService.nonTerminalStatusUpdatesInterval` | string | (default "1m0s") |
| `--server.watchService.pollInterval` | string | (default "1s") |
| `--sharedservice.connectPort` | string | On which connect port to serve admin (default "8080") |
| `--sharedservice.grpc.grpcMaxResponseStatusBytes` | int32 | specifies the maximum (uncompressed) size of header list that the client is prepared to accept on grpc calls (default 32000) |
| `--sharedservice.grpc.maxConcurrentStreams` | int | Limit on the number of concurrent streams to each ServerTransport. (default 100) |
| `--sharedservice.grpc.maxMessageSizeBytes` | int | Limit on the size of message that can be received on the server. (default 10485760) |
| `--sharedservice.grpcServerReflection` | | Enable GRPC Server Reflection (default true) |
| `--sharedservice.httpPort` | string | On which http port to serve admin (default "8089") |
| `--sharedservice.kubeConfig` | string | Path to kubernetes client config file. |
| `--sharedservice.master` | string | The address of the Kubernetes API server. |
| `--sharedservice.metrics.enableClientGrpcHistograms` | | Enable client grpc histograms (default true) |
| `--sharedservice.metrics.enableGrpcHistograms` | | Enable grpc histograms (default true) |
| `--sharedservice.metrics.scope` | string | Scope to emit metrics under (default "service:") |
| `--sharedservice.port` | string | On which grpc port to serve admin (default "8080") |
| `--sharedservice.profiler.enabled` | | Enable Profiler on server |
| `--sharedservice.profilerPort` | string | Profile port to start listen for pprof and metric handlers on. (default "10254") |
| `--sharedservice.security.allowCors` | | |
| `--sharedservice.security.allowLocalhostAccess` | | Whether to permit localhost unauthenticated access to the server |
| `--sharedservice.security.allowedHeaders` | strings | |
| `--sharedservice.security.allowedOrigins` | strings | |
| `--sharedservice.security.auditAccess` | | |
| `--sharedservice.security.orgOverride` | string | Override org in identity context if localhost access enabled |
| `--sharedservice.security.secure` | | |
| `--sharedservice.security.ssl.certificateAuthorityFile` | string | |
| `--sharedservice.security.ssl.certificateFile` | string | |
| `--sharedservice.security.ssl.keyFile` | string | |
| `--sharedservice.security.useAuth` | | |
| `--sharedservice.sync.syncInterval` | string | Time interval to sync (default "5m0s") |
| `--storage.cache.max_size_mbs` | int | Maximum size of the cache where the Blob store data is cached in-memory. If not specified or set to 0, cache is not used |
| `--storage.cache.target_gc_percent` | int | Sets the garbage collection target percentage. |
| `--storage.connection.access-key` | string | Access key to use. Only required when authtype is set to accesskey. |
| `--storage.connection.auth-type` | string | Auth Type to use [iam, accesskey]. (default "iam") |
| `--storage.connection.disable-ssl` | | Disables SSL connection. Should only be used for development. |
| `--storage.connection.endpoint` | string | URL for storage client to connect to. |
| `--storage.connection.region` | string | Region to connect to. (default "us-east-1") |
| `--storage.connection.secret-key` | string | Secret to use when accesskey is set. |
| `--storage.container` | string | Initial container (in s3 a bucket) to create -if it doesn't exist-.' |
| `--storage.defaultHttpClient.timeout` | string | Sets time out on the http client. (default "0s") |
| `--storage.enable-multicontainer` | | If this is true, then the container argument is overlooked and redundant. This config will automatically open new connections to new containers/buckets as they are encountered |
| `--storage.limits.maxDownloadMBs` | int | Maximum allowed download size (in MBs) per call. (default 2) |
| `--storage.stow.config` | stringToString | Configuration for stow backend. Refer to github/flyteorg/stow (default []) |
| `--storage.stow.kind` | string | Kind of Stow backend to use. Refer to github/flyteorg/stow |
| `--storage.type` | string | Sets the type of storage to configure [s3/minio/local/mem/stow]. (default "s3") |
| `--union.auth.authorizationMetadataKey` | string | Authorization Header to use when passing Access Tokens to the server (default "flyte-authorization") |
| `--union.auth.clientId` | string | Client ID |
| `--union.auth.clientSecretEnvVar` | string | Environment variable containing the client secret |
| `--union.auth.clientSecretLocation` | string | File containing the client secret |
| `--union.auth.deviceFlow.pollInterval` | string | amount of time the device flow would poll the token endpoint if auth server doesn't return a polling interval. Okta and google IDP do return an interval' (default "5s") |
| `--union.auth.deviceFlow.refreshTime` | string | grace period from the token expiry after which it would refresh the token. (default "5m0s") |
| `--union.auth.deviceFlow.timeout` | string | amount of time the device flow should complete or else it will be cancelled. (default "10m0s") |
| `--union.auth.enable` | | Whether to enable an authenticated conenction when communicating with admin. (default true) |
| `--union.auth.externalAuth.command` | strings | Command for external authentication token generation |
| `--union.auth.pkce.refreshTime` | string | grace period from the token expiry after which it would refresh the token. (default "5m0s") |
| `--union.auth.pkce.timeout` | string | Amount of time the browser session would be active for authentication from client app. (default "15s") |
| `--union.auth.scopes` | strings | List of scopes to request |
| `--union.auth.tokenRefreshWindow` | string | Max duration between token refresh attempt and token expiry. (default "1h0m0s") |
| `--union.auth.tokenUrl` | string | OPTIONAL: Your IdP's token endpoint. It'll be discovered from flyte admin's OAuth Metadata endpoint if not provided. |
| `--union.auth.type` | string | Type of OAuth2 flow used for communicating with admin. (default "Pkce") |
| `--union.cache.maxItemsCount` | int | Maximum number of items to keep in the cache before evicting. (default 1000) |
| `--union.connection.host` | string | Host to connect to (default "dns:///utt-mgdp-stg-us-east-2.cloud-staging.union.ai") |
| `--union.connection.insecure` | | Whether to connect over insecure channel |
| `--union.connection.insecureSkipVerify` | | InsecureSkipVerify controls whether a client verifies the server's certificate chain and host name.Caution: shouldn't be use for production usecases' |
| `--union.connection.keepAliveConfig.permitWithoutStream` | | If true, client sends keepalive pings even with no active RPCs. |
| `--union.connection.keepAliveConfig.time` | string | After a duration of this time if the client doesn't see any activity it pings the server to see if the transport is still alive. (default "20s") |
| `--union.connection.keepAliveConfig.timeout` | string | After having pinged for keepalive check, the client waits for a duration of Timeout and if no activity is seen even after that the connection is closed. (default "2m0s") |
| `--union.connection.maxBackoffDelay` | string | Max delay for grpc backoff (default "8s") |
| `--union.connection.maxRecvMsgSize` | int | Maximum size of a message in bytes of a gRPC message (default 10485760) |
| `--union.connection.maxRetries` | int | Max number of gRPC retries (default 4) |
| `--union.connection.minConnectTimeout` | string | Minimum timeout for establishing a connection (default "20s") |
| `--union.connection.perRetryTimeout` | string | gRPC per retry timeout (default "15s") |
| `--union.connection.serviceConfig` | string | Defines gRPC experimental JSON Service Config (default "{"loadBalancingConfig": [{"round_robin":{}}]}") |
| `--union.connection.trustedIdentityClaims.enabled` | | Enables passing of trusted claims while making inter service calls |
| `--union.connection.trustedIdentityClaims.externalIdentityClaim` | string | External identity claim of the service which is authorized to make internal service call. These are verified against userclouds actions |
| `--union.connection.trustedIdentityClaims.externalIdentityTypeClaim` | string | External identity type claim of app or user to use for the current service identity. It should be an 'app' for inter service communication |
| `--union.internalConnectionConfig.-` | stringToString | (default []) |
| `--union.internalConnectionConfig.enabled` | | Enables internal service to service communication instead of going through ingress. |
| `--union.internalConnectionConfig.urlPattern` | string | UrlPattern of the internal service endpoints. (default "{{ service }}-helmchart.{{ service }}.svc.cluster.local:80") |
| `--webhook.awsSecretManager.sidecarImage` | string | Specifies the sidecar docker image to use (default "docker.io/amazon/aws-secrets-manager-secret-sidecar:v0.1.4") |
| `--webhook.certDir` | string | Certificate directory to use to write generated certs. Defaults to /etc/webhook/certs/ (default "/etc/webhook/certs") |
| `--webhook.embeddedSecretManagerConfig.awsConfig.region` | string | AWS region |
| `--webhook.embeddedSecretManagerConfig.fileMountInitContainer.image` | string | Specifies init container image to use for mounting secrets as files. (default "busybox:1.28") |
| `--webhook.embeddedSecretManagerConfig.gcpConfig.project` | string | GCP project to be used for secret manager |
| `--webhook.embeddedSecretManagerConfig.type` | string | (default "AWS") |
| `--webhook.gcpSecretManager.sidecarImage` | string | Specifies the sidecar docker image to use (default "gcr.io/google.com/cloudsdktool/cloud-sdk:alpine") |
| `--webhook.listenPort` | int | The port to use to listen to webhook calls. Defaults to 9443 (default 9443) |
| `--webhook.localCert` | | write certs locally. Defaults to false |
| `--webhook.metrics-prefix` | string | An optional prefix for all published metrics. (default "flyte:") |
| `--webhook.secretName` | string | Secret name to write generated certs to. (default "flyte-pod-webhook") |
| `--webhook.serviceName` | string | The name of the webhook service. (default "flyte-pod-webhook") |
| `--webhook.servicePort` | int32 | The port on the service that hosting webhook. (default 443) |
| `--webhook.vaultSecretManager.role` | string | Specifies the vault role to use (default "flyte") |
=== PAGE: https://www.union.ai/docs/v1/serverless/api-reference/uctl-cli/uctl-delete ===
# uctl delete
Used for terminating/deleting various union/flyte resources including
tasks/workflows/launchplans/executions/project
## Synopsis
Delete a resource; if an execution:
```shell
$ uctl delete execution kxd1i72850 -d development -p flytesnacks
```
## Options
| Option | Type | Description |
|--------|------|-------------|
| `-h`, `--help` | help for delete |
### Options inherited from parent commands
| Option | Type | Description |
|--------|------|-------------|
| `--admin.audience` | string | Audience to use when initiating OAuth2 authorization requests. |
| `--admin.authType` | string | Type of OAuth2 flow used for communicating with admin.ClientSecret, Pkce, ExternalCommand are valid values (default "ClientSecret") |
| `--admin.authorizationHeader` | string | Custom metadata header to pass JWT |
| `--admin.authorizationServerUrl` | string | This is the URL to your IdP's authorization server. It'll default to Endpoint |
| `--admin.caCertFilePath` | string | Use specified certificate file to verify the admin server peer. |
| `--admin.clientId` | string | Client ID (default "flytepropeller") |
| `--admin.clientSecretEnvVar` | string | Environment variable containing the client secret |
| `--admin.clientSecretLocation` | string | File containing the client secret (default "/etc/secrets/client_secret") |
| `--admin.command` | strings | Command for external authentication token generation |
| `--admin.defaultOrg` | string | OPTIONAL: Default org to use to support non-org based cli's.'. |
| `--admin.defaultServiceConfig` | string | |
| `--admin.deviceFlowConfig.pollInterval` | string | amount of time the device flow would poll the token endpoint if auth server doesn't return a polling interval. Okta and google IDP do return an interval' (default "5s") |
| `--admin.deviceFlowConfig.refreshTime` | string | grace period from the token expiry after which it would refresh the token. (default "5m0s") |
| `--admin.deviceFlowConfig.timeout` | string | amount of time the device flow should complete or else it will be cancelled. (default "10m0s") |
| `--admin.endpoint` | string | For admin types, specify where the uri of the service is located. |
| `--admin.httpProxyURL` | string | OPTIONAL: HTTP Proxy to be used for OAuth requests. |
| `--admin.insecure` | | Use insecure connection. |
| `--admin.insecureSkipVerify` | | InsecureSkipVerify controls whether a client verifies the server's certificate chain and host name.Caution: shouldn't be use for production usecases' |
| `--admin.maxBackoffDelay` | string | Max delay for grpc backoff (default "8s") |
| `--admin.maxMessageSizeBytes` | int | The max size in bytes for incoming gRPC messages |
| `--admin.maxRetries` | int | Max number of gRPC retries (default 4) |
| `--admin.perRetryTimeout` | string | gRPC per retry timeout (default "15s") |
| `--admin.pkceConfig.refreshTime` | string | grace period from the token expiry after which it would refresh the token. (default "5m0s") |
| `--admin.pkceConfig.timeout` | string | Amount of time the browser session would be active for authentication from client app. (default "2m0s") |
| `--admin.proxyCommand` | strings | Command for external proxy-authorization token generation |
| `--admin.scopes` | strings | List of scopes to request |
| `--admin.tokenRefreshWindow` | string | Max duration between token refresh attempt and token expiry. (default "0s") |
| `--admin.tokenUrl` | string | OPTIONAL: Your IdP's token endpoint. It'll be discovered from flyte admin's OAuth Metadata endpoint if not provided. |
| `--admin.useAudienceFromAdmin` | | Use Audience configured from admins public endpoint config. |
| `--admin.useAuth` | | Deprecated: Auth will be enabled/disabled based on admin's dynamically discovered information. |
| `--auth.appAuth.externalAuthServer.allowedAudience` | strings | Optional: A list of allowed audiences. If not provided, the audience is expected to be the public Uri of the service. |
| `--auth.appAuth.externalAuthServer.baseUrl` | string | This should be the base url of the authorization server that you are trying to hit. With Okta for instance, it will look something like https://company.okta.com/oauth2/abcdef123456789/ |
| `--auth.appAuth.externalAuthServer.httpProxyURL` | string | OPTIONAL: HTTP Proxy to be used for OAuth requests. |
| `--auth.appAuth.externalAuthServer.metadataUrl` | string | Optional: If the server doesn't support /.well-known/oauth-authorization-server, you can set a custom metadata url here.' |
| `--auth.appAuth.externalAuthServer.retryAttempts` | int | Optional: The number of attempted retries on a transient failure to get the OAuth metadata (default 5) |
| `--auth.appAuth.externalAuthServer.retryDelay` | string | Optional, Duration to wait between retries (default "1s") |
| `--auth.appAuth.selfAuthServer.accessTokenLifespan` | string | Defines the lifespan of issued access tokens. (default "30m0s") |
| `--auth.appAuth.selfAuthServer.authorizationCodeLifespan` | string | Defines the lifespan of issued access tokens. (default "5m0s") |
| `--auth.appAuth.selfAuthServer.claimSymmetricEncryptionKeySecretName` | string | OPTIONAL: Secret name to use to encrypt claims in authcode token. (default "claim_symmetric_key") |
| `--auth.appAuth.selfAuthServer.issuer` | string | Defines the issuer to use when issuing and validating tokens. The default value is https://{requestUri.HostAndPort}/ |
| `--auth.appAuth.selfAuthServer.oldTokenSigningRSAKeySecretName` | string | OPTIONAL: Secret name to use to retrieve Old RSA Signing Key. This can be useful during key rotation to continue to accept older tokens. (default "token_rsa_key_old.pem") |
| `--auth.appAuth.selfAuthServer.refreshTokenLifespan` | string | Defines the lifespan of issued access tokens. (default "1h0m0s") |
| `--auth.appAuth.selfAuthServer.tokenSigningRSAKeySecretName` | string | OPTIONAL: Secret name to use to retrieve RSA Signing Key. (default "token_rsa_key.pem") |
| `--auth.appAuth.thirdPartyConfig.flyteClient.audience` | string | Audience to use when initiating OAuth2 authorization requests. |
| `--auth.appAuth.thirdPartyConfig.flyteClient.clientId` | string | public identifier for the app which handles authorization for a Flyte deployment (default "uctl") |
| `--auth.appAuth.thirdPartyConfig.flyteClient.redirectUri` | string | This is the callback uri registered with the app which handles authorization for a Flyte deployment (default "http://localhost:53593/callback") |
| `--auth.appAuth.thirdPartyConfig.flyteClient.scopes` | strings | Recommended scopes for the client to request. (default [all,offline]) |
| `--auth.disableForGrpc` | | Disables auth enforcement on Grpc Endpoints. |
| `--auth.disableForHttp` | | Disables auth enforcement on HTTP Endpoints. |
| `--auth.grpcAuthorizationHeader` | string | (default "flyte-authorization") |
| `--auth.httpAuthorizationHeader` | string | (default "flyte-authorization") |
| `--auth.httpProxyURL` | string | OPTIONAL: HTTP Proxy to be used for OAuth requests. |
| `--auth.tokenEndpointProxyPath` | string | The path used to proxy calls to the TokenURL |
| `--auth.userAuth.cookieBlockKeySecretName` | string | OPTIONAL: Secret name to use for cookie block key. (default "cookie_block_key") |
| `--auth.userAuth.cookieHashKeySecretName` | string | OPTIONAL: Secret name to use for cookie hash key. (default "cookie_hash_key") |
| `--auth.userAuth.cookieSetting.domain` | string | OPTIONAL: Allows you to set the domain attribute on the auth cookies. |
| `--auth.userAuth.cookieSetting.sameSitePolicy` | string | OPTIONAL: Allows you to declare if your cookie should be restricted to a first-party or same-site context.Wrapper around http.SameSite. (default "DefaultMode") |
| `--auth.userAuth.httpProxyURL` | string | OPTIONAL: HTTP Proxy to be used for OAuth requests. |
| `--auth.userAuth.idpQueryParameter` | string | idp query parameter used for selecting a particular IDP for doing user authentication. Eg: for Okta passing idp={IDP-ID} forces the authentication to happen with IDP-ID |
| `--auth.userAuth.openId.baseUrl` | string | |
| `--auth.userAuth.openId.clientId` | string | |
| `--auth.userAuth.openId.clientSecretFile` | string | |
| `--auth.userAuth.openId.clientSecretName` | string | (default "oidc_client_secret") |
| `--auth.userAuth.openId.scopes` | strings | (default [openid,profile]) |
| `--auth.userAuth.redirectUrl` | string | (default "/console") |
| `--authorizer.internalCommunicationConfig.enabled` | | Enables authorization decisions for internal communication. (default true) |
| `--authorizer.internalCommunicationConfig.ingressIdentity` | string | IngressIdentity used in the cluster. Needed to exclude the communication coming from ingress. (default "ingress-nginx.ingress-nginx.serviceaccount.identity.linkerd.cluster.local") |
| `--authorizer.internalCommunicationConfig.tenantUrlPatternIdentity` | string | UrlPatternIdentity of the internal tenant service endpoint identities. (default "{{ service }}.{{ org }}.serviceaccount.identity.linkerd.cluster.local") |
| `--authorizer.internalCommunicationConfig.urlPatternIdentity` | string | UrlPatternIdentity of the internal service endpoint identities. (default "{{ service }}-helmchart.{{ service }}.serviceaccount.identity.linkerd.cluster.local") |
| `--authorizer.mode` | string | (default "Active") |
| `--authorizer.organizationConfig.PolicyConfig.adminPolicyDescription` | string | description for the boilerplate admin policy (default "Contributor permissions and full admin permissions to manage users and view usage dashboards") |
| `--authorizer.organizationConfig.PolicyConfig.contributorPolicyDescription` | string | description for the boilerplate contributor policy (default "Viewer permissions and permissions to create workflows, tasks, launch plans, and executions") |
| `--authorizer.organizationConfig.PolicyConfig.defaultUserPolicyRoleType` | string | name of the role type to determine which default policy new users added to the organization should be assigned (default "Viewer") |
| `--authorizer.organizationConfig.PolicyConfig.serverlessContributorPolicyDescription` | string | description for the boilerplate serverless contributor policy (default "Viewer permissions and permissions to create workflows, tasks, launch plans, and executions") |
| `--authorizer.organizationConfig.PolicyConfig.serverlessViewerPolicyDescription` | string | description for the boilerplate serverless viewer policy (default "Permissions to view Flyte entities") |
| `--authorizer.organizationConfig.PolicyConfig.viewerPolicyDescription` | string | description for the boilerplate viewer policy (default "Permissions to view Flyte entities") |
| `--authorizer.organizationConfig.defaultPolicyCacheDuration` | string | Cache entry duration for the store of the default policy per organization (default "10m0s") |
| `--authorizer.syncRuleRefreshInterval` | string | (default "1m0s") |
| `--authorizer.type` | string | (default "UserClouds") |
| `--authorizer.userCloudsClient.cache.redis.ttl.edgeTypes` | string | Specifies how long edge types remain in the cache.. (default "30m0s") |
| `--authorizer.userCloudsClient.cache.redis.ttl.edges` | string | Specifies how long edges remain in the cache. (default "30m0s") |
| `--authorizer.userCloudsClient.cache.redis.ttl.objectTypes` | string | Specifies how long object types remain in the cache. (default "30m0s") |
| `--authorizer.userCloudsClient.cache.redis.ttl.objects` | string | Specifies how long objects remain in the cache. (default "30m0s") |
| `--authorizer.userCloudsClient.cache.type` | string | Cache type to use. (default "none") |
| `--authorizer.userCloudsClient.clientID` | string | UserClouds client id |
| `--authorizer.userCloudsClient.clientSecretName` | string | UserCloud client secret name to read from the secret manager. (default "userclouds-client-secret") |
| `--authorizer.userCloudsClient.enableLogging` | | Enable userclouds client's internal logging. Calls to post logs take 250-350 ms and will impact p99 latency, enable with caution. |
| `--authorizer.userCloudsClient.tenantID` | string | UserClouds tenant id. Should be a UUID. |
| `--authorizer.userCloudsClient.tenantUrl` | string | Something like https://{yourtenant}.tenant.userclouds.com |
| `--config` | string | config file (default is /Users/andrew/.union/config.yaml) |
| `--connection.environment` | string | |
| `--connection.region` | string | |
| `--connection.rootTenantURLPattern` | string | Pattern for tenant url. (default "dns:///{{ organization }}.cloud-staging.union.ai") |
| `--console.endpoint` | string | Endpoint of console, if different than flyte admin |
| `--database.connMaxLifeTime` | string | sets the maximum amount of time a connection may be reused (default "1h0m0s") |
| `--database.enableForeignKeyConstraintWhenMigrating` | | Whether to enable gorm foreign keys when migrating the db |
| `--database.maxIdleConnections` | int | maxIdleConnections sets the maximum number of connections in the idle connection pool. (default 10) |
| `--database.maxOpenConnections` | int | maxOpenConnections sets the maximum number of open connections to the database. (default 100) |
| `--database.postgres.dbname` | string | The database name (default "postgres") |
| `--database.postgres.debug` | | |
| `--database.postgres.host` | string | The host name of the database server (default "localhost") |
| `--database.postgres.options` | string | See http://gorm.io/docs/connecting_to_the_database.html for available options passed, in addition to the above. (default "sslmode=disable") |
| `--database.postgres.password` | string | The database password. (default "postgres") |
| `--database.postgres.passwordPath` | string | Points to the file containing the database password. |
| `--database.postgres.port` | int | The port name of the database server (default 30001) |
| `--database.postgres.readReplicaHost` | string | The host name of the read replica database server (default "localhost") |
| `--database.postgres.username` | string | The database user who is connecting to the server. (default "postgres") |
| `--database.sqlite.file` | string | The path to the file (existing or new) where the DB should be created / stored. If existing, then this will be re-used, else a new will be created |
| `--db.connectionPool.maxConnectionLifetime` | string | (default "0s") |
| `--db.connectionPool.maxIdleConnections` | int | |
| `--db.connectionPool.maxOpenConnections` | int | |
| `--db.dbname` | string | (default "postgres") |
| `--db.debug` | | |
| `--db.host` | string | (default "postgres") |
| `--db.log_level` | int | (default 4) |
| `--db.options` | string | (default "sslmode=disable") |
| `--db.password` | string | |
| `--db.passwordPath` | string | |
| `--db.port` | int | (default 5432) |
| `--db.username` | string | (default "postgres") |
| `-d`, `--domain` | string | Specifies the Flyte project's domain. |
| `--files.archive` | | Pass in archive file either an http link or local path. |
| `--files.assumableIamRole` | string | Custom assumable iam auth role to register launch plans with. |
| `--files.continueOnError` | | Continue on error when registering files. |
| `--files.destinationDirectory` | string | Location of source code in container. |
| `--files.dryRun` | | Execute command without making any modifications. |
| `--files.enableSchedule` | | Enable the schedule if the files contain schedulable launchplan. |
| `--files.force` | | Force use of version number on entities registered with flyte. |
| `--files.k8ServiceAccount` | string | Deprecated. Please use `--K8sServiceAccount`|
| `--files.k8sServiceAccount` | string | Custom kubernetes service account auth role to register launch plans with. |
| `--files.outputLocationPrefix` | string | Custom output location prefix for offloaded types (files/schemas). |
| `--files.sourceUploadPath` | string | Deprecated: Update flyte admin to avoid having to configure storage access from uctl. |
| `--files.version` | string | Version of the entity to be registered with flyte which are un-versioned after serialization. |
| `--logger.formatter.type` | string | Sets logging format type. (default "json") |
| `--logger.level` | int | Sets the minimum logging level. (default 3) |
| `--logger.mute` | | Mutes all logs regardless of severity. Intended for benchmarks/tests only. |
| `--logger.show-source` | | Includes source code location in logs. |
| `--org` | string | Organization to work on. If not set, default to user's org. |
| `--otel.file.filename` | string | Filename to store exported telemetry traces (default "/tmp/trace.txt") |
| `--otel.jaeger.endpoint` | string | Endpoint for the jaeger telemetry trace ingestor (default "http://localhost:14268/api/traces") |
| `--otel.otlpgrpc.endpoint` | string | Endpoint for the OTLP telemetry trace collector (default "http://localhost:4317") |
| `--otel.otlphttp.endpoint` | string | Endpoint for the OTLP telemetry trace collector (default "http://localhost:4318/v1/traces") |
| `--otel.sampler.parentSampler` | string | Sets the parent sampler to use for the tracer (default "always") |
| `--otel.type` | string | Sets the type of exporter to configure [noop/file/jaeger/otlpgrpc/otlphttp]. (default "noop") |
| `-o`, `--output` | string | Specifies the output type - supported formats [TABLE JSON YAML DOT DOTURL]. NOTE: dot, doturl are only supported for Workflow (default "table") |
| `--plugins.catalogcache.reader.maxItems` | int | Maximum number of entries to keep in the index. (default 10000) |
| `--plugins.catalogcache.reader.maxRetries` | int | Maximum number of retries per item. (default 3) |
| `--plugins.catalogcache.reader.workers` | int | Number of concurrent workers to start processing the queue. (default 10) |
| `--plugins.catalogcache.writer.maxItems` | int | Maximum number of entries to keep in the index. (default 10000) |
| `--plugins.catalogcache.writer.maxRetries` | int | Maximum number of retries per item. (default 3) |
| `--plugins.catalogcache.writer.workers` | int | Number of concurrent workers to start processing the queue. (default 10) |
| `-p`, `--project` | string | Specifies the Flyte project. |
| `--rediscache.passwordSecretName` | string | Name of secret with Redis password. |
| `--rediscache.primaryEndpoint` | string | Primary endpoint for the redis cache that can be used for both reads and writes. |
| `--rediscache.replicaEndpoint` | string | Replica endpoint for the redis cache that can be used for reads. |
| `--secrets.env-prefix` | string | Prefix for environment variables (default "FLYTE_SECRET_") |
| `--secrets.secrets-prefix` | string | Prefix where to look for secrets file (default "/etc/secrets") |
| `--secrets.type` | string | Sets the type of storage to configure [local]. (default "local") |
| `--server.dataProxy.download.maxExpiresIn` | string | Maximum allowed expiration duration. (default "1h0m0s") |
| `--server.dataProxy.upload.defaultFileNameLength` | int | Default length for the generated file name if not provided in the request. (default 20) |
| `--server.dataProxy.upload.maxExpiresIn` | string | Maximum allowed expiration duration. (default "1h0m0s") |
| `--server.dataProxy.upload.maxSize` | string | Maximum allowed upload size. (default "6Mi") |
| `--server.dataProxy.upload.storagePrefix` | string | Storage prefix to use for all upload requests. |
| `--server.grpc.enableGrpcLatencyMetrics` | | Enable grpc latency metrics. Note Histograms metrics can be expensive on Prometheus servers. |
| `--server.grpc.maxMessageSizeBytes` | int | The max size in bytes for incoming gRPC messages |
| `--server.grpc.port` | int | On which grpc port to serve admin (default 8089) |
| `--server.grpc.serverReflection` | | Enable GRPC Server Reflection (default true) |
| `--server.grpcPort` | int | deprecated |
| `--server.grpcServerReflection` | | deprecated |
| `--server.httpPort` | int | On which http port to serve admin (default 8088) |
| `--server.kube-config` | string | Path to kubernetes client config file, default is empty, useful for incluster config. |
| `--server.kubeClientConfig.burst` | int | Max burst rate for throttle. 0 defaults to 10 (default 25) |
| `--server.kubeClientConfig.qps` | int32 | Max QPS to the master for requests to KubeAPI. 0 defaults to 5. (default 100) |
| `--server.kubeClientConfig.timeout` | string | Max duration allowed for every request to KubeAPI before giving up. 0 implies no timeout. (default "30s") |
| `--server.master` | string | The address of the Kubernetes API server. |
| `--server.readHeaderTimeoutSeconds` | int | The amount of time allowed to read request headers. (default 32) |
| `--server.security.allowCors` | | (default true) |
| `--server.security.allowedHeaders` | strings | (default [Content-Type,flyte-authorization]) |
| `--server.security.allowedOrigins` | strings | (default [*]) |
| `--server.security.auditAccess` | | |
| `--server.security.secure` | | |
| `--server.security.ssl.certificateFile` | string | |
| `--server.security.ssl.keyFile` | string | |
| `--server.security.useAuth` | | |
| `--server.thirdPartyConfig.flyteClient.audience` | string | Audience to use when initiating OAuth2 authorization requests. |
| `--server.thirdPartyConfig.flyteClient.clientId` | string | public identifier for the app which handles authorization for a Flyte deployment |
| `--server.thirdPartyConfig.flyteClient.redirectUri` | string | This is the callback uri registered with the app which handles authorization for a Flyte deployment |
| `--server.thirdPartyConfig.flyteClient.scopes` | strings | Recommended scopes for the client to request. |
| `--server.watchService.maxActiveClusterConnections` | int | (default 5) |
| `--server.watchService.maxPageSize` | int | (default 50000) |
| `--server.watchService.nonTerminalStatusUpdatesInterval` | string | (default "1m0s") |
| `--server.watchService.pollInterval` | string | (default "1s") |
| `--sharedservice.connectPort` | string | On which connect port to serve admin (default "8080") |
| `--sharedservice.grpc.grpcMaxResponseStatusBytes` | int32 | specifies the maximum (uncompressed) size of header list that the client is prepared to accept on grpc calls (default 32000) |
| `--sharedservice.grpc.maxConcurrentStreams` | int | Limit on the number of concurrent streams to each ServerTransport. (default 100) |
| `--sharedservice.grpc.maxMessageSizeBytes` | int | Limit on the size of message that can be received on the server. (default 10485760) |
| `--sharedservice.grpcServerReflection` | | Enable GRPC Server Reflection (default true) |
| `--sharedservice.httpPort` | string | On which http port to serve admin (default "8089") |
| `--sharedservice.kubeConfig` | string | Path to kubernetes client config file. |
| `--sharedservice.master` | string | The address of the Kubernetes API server. |
| `--sharedservice.metrics.enableClientGrpcHistograms` | | Enable client grpc histograms (default true) |
| `--sharedservice.metrics.enableGrpcHistograms` | | Enable grpc histograms (default true) |
| `--sharedservice.metrics.scope` | string | Scope to emit metrics under (default "service:") |
| `--sharedservice.port` | string | On which grpc port to serve admin (default "8080") |
| `--sharedservice.profiler.enabled` | | Enable Profiler on server |
| `--sharedservice.profilerPort` | string | Profile port to start listen for pprof and metric handlers on. (default "10254") |
| `--sharedservice.security.allowCors` | | |
| `--sharedservice.security.allowLocalhostAccess` | | Whether to permit localhost unauthenticated access to the server |
| `--sharedservice.security.allowedHeaders` | strings | |
| `--sharedservice.security.allowedOrigins` | strings | |
| `--sharedservice.security.auditAccess` | | |
| `--sharedservice.security.orgOverride` | string | Override org in identity context if localhost access enabled |
| `--sharedservice.security.secure` | | |
| `--sharedservice.security.ssl.certificateAuthorityFile` | string | |
| `--sharedservice.security.ssl.certificateFile` | string | |
| `--sharedservice.security.ssl.keyFile` | string | |
| `--sharedservice.security.useAuth` | | |
| `--sharedservice.sync.syncInterval` | string | Time interval to sync (default "5m0s") |
| `--storage.cache.max_size_mbs` | int | Maximum size of the cache where the Blob store data is cached in-memory. If not specified or set to 0, cache is not used |
| `--storage.cache.target_gc_percent` | int | Sets the garbage collection target percentage. |
| `--storage.connection.access-key` | string | Access key to use. Only required when authtype is set to accesskey. |
| `--storage.connection.auth-type` | string | Auth Type to use [iam, accesskey]. (default "iam") |
| `--storage.connection.disable-ssl` | | Disables SSL connection. Should only be used for development. |
| `--storage.connection.endpoint` | string | URL for storage client to connect to. |
| `--storage.connection.region` | string | Region to connect to. (default "us-east-1") |
| `--storage.connection.secret-key` | string | Secret to use when accesskey is set. |
| `--storage.container` | string | Initial container (in s3 a bucket) to create -if it doesn't exist-.' |
| `--storage.defaultHttpClient.timeout` | string | Sets time out on the http client. (default "0s") |
| `--storage.enable-multicontainer` | | If this is true, then the container argument is overlooked and redundant. This config will automatically open new connections to new containers/buckets as they are encountered |
| `--storage.limits.maxDownloadMBs` | int | Maximum allowed download size (in MBs) per call. (default 2) |
| `--storage.stow.config` | stringToString | Configuration for stow backend. Refer to github/flyteorg/stow (default []) |
| `--storage.stow.kind` | string | Kind of Stow backend to use. Refer to github/flyteorg/stow |
| `--storage.type` | string | Sets the type of storage to configure [s3/minio/local/mem/stow]. (default "s3") |
| `--union.auth.authorizationMetadataKey` | string | Authorization Header to use when passing Access Tokens to the server (default "flyte-authorization") |
| `--union.auth.clientId` | string | Client ID |
| `--union.auth.clientSecretEnvVar` | string | Environment variable containing the client secret |
| `--union.auth.clientSecretLocation` | string | File containing the client secret |
| `--union.auth.deviceFlow.pollInterval` | string | amount of time the device flow would poll the token endpoint if auth server doesn't return a polling interval. Okta and google IDP do return an interval' (default "5s") |
| `--union.auth.deviceFlow.refreshTime` | string | grace period from the token expiry after which it would refresh the token. (default "5m0s") |
| `--union.auth.deviceFlow.timeout` | string | amount of time the device flow should complete or else it will be cancelled. (default "10m0s") |
| `--union.auth.enable` | | Whether to enable an authenticated conenction when communicating with admin. (default true) |
| `--union.auth.externalAuth.command` | strings | Command for external authentication token generation |
| `--union.auth.pkce.refreshTime` | string | grace period from the token expiry after which it would refresh the token. (default "5m0s") |
| `--union.auth.pkce.timeout` | string | Amount of time the browser session would be active for authentication from client app. (default "15s") |
| `--union.auth.scopes` | strings | List of scopes to request |
| `--union.auth.tokenRefreshWindow` | string | Max duration between token refresh attempt and token expiry. (default "1h0m0s") |
| `--union.auth.tokenUrl` | string | OPTIONAL: Your IdP's token endpoint. It'll be discovered from flyte admin's OAuth Metadata endpoint if not provided. |
| `--union.auth.type` | string | Type of OAuth2 flow used for communicating with admin. (default "Pkce") |
| `--union.cache.maxItemsCount` | int | Maximum number of items to keep in the cache before evicting. (default 1000) |
| `--union.connection.host` | string | Host to connect to (default "dns:///utt-mgdp-stg-us-east-2.cloud-staging.union.ai") |
| `--union.connection.insecure` | | Whether to connect over insecure channel |
| `--union.connection.insecureSkipVerify` | | InsecureSkipVerify controls whether a client verifies the server's certificate chain and host name.Caution: shouldn't be use for production usecases' |
| `--union.connection.keepAliveConfig.permitWithoutStream` | | If true, client sends keepalive pings even with no active RPCs. |
| `--union.connection.keepAliveConfig.time` | string | After a duration of this time if the client doesn't see any activity it pings the server to see if the transport is still alive. (default "20s") |
| `--union.connection.keepAliveConfig.timeout` | string | After having pinged for keepalive check, the client waits for a duration of Timeout and if no activity is seen even after that the connection is closed. (default "2m0s") |
| `--union.connection.maxBackoffDelay` | string | Max delay for grpc backoff (default "8s") |
| `--union.connection.maxRecvMsgSize` | int | Maximum size of a message in bytes of a gRPC message (default 10485760) |
| `--union.connection.maxRetries` | int | Max number of gRPC retries (default 4) |
| `--union.connection.minConnectTimeout` | string | Minimum timeout for establishing a connection (default "20s") |
| `--union.connection.perRetryTimeout` | string | gRPC per retry timeout (default "15s") |
| `--union.connection.serviceConfig` | string | Defines gRPC experimental JSON Service Config (default "{"loadBalancingConfig": [{"round_robin":{}}]}") |
| `--union.connection.trustedIdentityClaims.enabled` | | Enables passing of trusted claims while making inter service calls |
| `--union.connection.trustedIdentityClaims.externalIdentityClaim` | string | External identity claim of the service which is authorized to make internal service call. These are verified against userclouds actions |
| `--union.connection.trustedIdentityClaims.externalIdentityTypeClaim` | string | External identity type claim of app or user to use for the current service identity. It should be an 'app' for inter service communication |
| `--union.internalConnectionConfig.-` | stringToString | (default []) |
| `--union.internalConnectionConfig.enabled` | | Enables internal service to service communication instead of going through ingress. |
| `--union.internalConnectionConfig.urlPattern` | string | UrlPattern of the internal service endpoints. (default "{{ service }}-helmchart.{{ service }}.svc.cluster.local:80") |
| `--webhook.awsSecretManager.sidecarImage` | string | Specifies the sidecar docker image to use (default "docker.io/amazon/aws-secrets-manager-secret-sidecar:v0.1.4") |
| `--webhook.certDir` | string | Certificate directory to use to write generated certs. Defaults to /etc/webhook/certs/ (default "/etc/webhook/certs") |
| `--webhook.embeddedSecretManagerConfig.awsConfig.region` | string | AWS region |
| `--webhook.embeddedSecretManagerConfig.fileMountInitContainer.image` | string | Specifies init container image to use for mounting secrets as files. (default "busybox:1.28") |
| `--webhook.embeddedSecretManagerConfig.gcpConfig.project` | string | GCP project to be used for secret manager |
| `--webhook.embeddedSecretManagerConfig.type` | string | (default "AWS") |
| `--webhook.gcpSecretManager.sidecarImage` | string | Specifies the sidecar docker image to use (default "gcr.io/google.com/cloudsdktool/cloud-sdk:alpine") |
| `--webhook.listenPort` | int | The port to use to listen to webhook calls. Defaults to 9443 (default 9443) |
| `--webhook.localCert` | | write certs locally. Defaults to false |
| `--webhook.metrics-prefix` | string | An optional prefix for all published metrics. (default "flyte:") |
| `--webhook.secretName` | string | Secret name to write generated certs to. (default "flyte-pod-webhook") |
| `--webhook.serviceName` | string | The name of the webhook service. (default "flyte-pod-webhook") |
| `--webhook.servicePort` | int32 | The port on the service that hosting webhook. (default 443) |
| `--webhook.vaultSecretManager.role` | string | Specifies the vault role to use (default "flyte") |
## Subpages
- **Uctl CLI > uctl delete > uctl delete app**
- **Uctl CLI > uctl delete > uctl delete cluster**
- **Uctl CLI > uctl delete > uctl delete cluster-pool-attributes**
- **Uctl CLI > uctl delete > uctl delete cluster-resource-attribute**
- **Uctl CLI > uctl delete > uctl delete clusterconfig**
- **Uctl CLI > uctl delete > uctl delete clusterpool**
- **Uctl CLI > uctl delete > uctl delete clusterpoolassignment**
- **Uctl CLI > uctl delete > uctl delete execution**
- **Uctl CLI > uctl delete > uctl delete execution-cluster-label**
- **Uctl CLI > uctl delete > uctl delete execution-queue-attribute**
- **Uctl CLI > uctl delete > uctl delete identityassignments**
- **Uctl CLI > uctl delete > uctl delete plugin-override**
- **Uctl CLI > uctl delete > uctl delete policy**
- **Uctl CLI > uctl delete > uctl delete role**
- **Uctl CLI > uctl delete > uctl delete task-resource-attribute**
- **Uctl CLI > uctl delete > uctl delete workflow-execution-config**
=== PAGE: https://www.union.ai/docs/v1/serverless/api-reference/uctl-cli/uctl-delete/uctl-delete-app ===
# uctl delete app
Delete application
## Synopsis
Delete application
```shell
$ uctl delete app [flags]
```
## Options
| Option | Type | Description |
|--------|------|-------------|
| `--dryRun` | | execute command without making any modifications. |
| Option | Type | Description |
|--------|------|-------------|
| `-h`, `--help` | help for app |
### Options inherited from parent commands
| Option | Type | Description |
|--------|------|-------------|
| `--admin.audience` | string | Audience to use when initiating OAuth2 authorization requests. |
| `--admin.authType` | string | Type of OAuth2 flow used for communicating with admin.ClientSecret, Pkce, ExternalCommand are valid values (default "ClientSecret") |
| `--admin.authorizationHeader` | string | Custom metadata header to pass JWT |
| `--admin.authorizationServerUrl` | string | This is the URL to your IdP's authorization server. It'll default to Endpoint |
| `--admin.caCertFilePath` | string | Use specified certificate file to verify the admin server peer. |
| `--admin.clientId` | string | Client ID (default "flytepropeller") |
| `--admin.clientSecretEnvVar` | string | Environment variable containing the client secret |
| `--admin.clientSecretLocation` | string | File containing the client secret (default "/etc/secrets/client_secret") |
| `--admin.command` | strings | Command for external authentication token generation |
| `--admin.defaultOrg` | string | OPTIONAL: Default org to use to support non-org based cli's.'. |
| `--admin.defaultServiceConfig` | string | |
| `--admin.deviceFlowConfig.pollInterval` | string | amount of time the device flow would poll the token endpoint if auth server doesn't return a polling interval. Okta and google IDP do return an interval' (default "5s") |
| `--admin.deviceFlowConfig.refreshTime` | string | grace period from the token expiry after which it would refresh the token. (default "5m0s") |
| `--admin.deviceFlowConfig.timeout` | string | amount of time the device flow should complete or else it will be cancelled. (default "10m0s") |
| `--admin.endpoint` | string | For admin types, specify where the uri of the service is located. |
| `--admin.httpProxyURL` | string | OPTIONAL: HTTP Proxy to be used for OAuth requests. |
| `--admin.insecure` | | Use insecure connection. |
| `--admin.insecureSkipVerify` | | InsecureSkipVerify controls whether a client verifies the server's certificate chain and host name.Caution: shouldn't be use for production usecases' |
| `--admin.maxBackoffDelay` | string | Max delay for grpc backoff (default "8s") |
| `--admin.maxMessageSizeBytes` | int | The max size in bytes for incoming gRPC messages |
| `--admin.maxRetries` | int | Max number of gRPC retries (default 4) |
| `--admin.perRetryTimeout` | string | gRPC per retry timeout (default "15s") |
| `--admin.pkceConfig.refreshTime` | string | grace period from the token expiry after which it would refresh the token. (default "5m0s") |
| `--admin.pkceConfig.timeout` | string | Amount of time the browser session would be active for authentication from client app. (default "2m0s") |
| `--admin.proxyCommand` | strings | Command for external proxy-authorization token generation |
| `--admin.scopes` | strings | List of scopes to request |
| `--admin.tokenRefreshWindow` | string | Max duration between token refresh attempt and token expiry. (default "0s") |
| `--admin.tokenUrl` | string | OPTIONAL: Your IdP's token endpoint. It'll be discovered from flyte admin's OAuth Metadata endpoint if not provided. |
| `--admin.useAudienceFromAdmin` | | Use Audience configured from admins public endpoint config. |
| `--admin.useAuth` | | Deprecated: Auth will be enabled/disabled based on admin's dynamically discovered information. |
| `--auth.appAuth.externalAuthServer.allowedAudience` | strings | Optional: A list of allowed audiences. If not provided, the audience is expected to be the public Uri of the service. |
| `--auth.appAuth.externalAuthServer.baseUrl` | string | This should be the base url of the authorization server that you are trying to hit. With Okta for instance, it will look something like https://company.okta.com/oauth2/abcdef123456789/ |
| `--auth.appAuth.externalAuthServer.httpProxyURL` | string | OPTIONAL: HTTP Proxy to be used for OAuth requests. |
| `--auth.appAuth.externalAuthServer.metadataUrl` | string | Optional: If the server doesn't support /.well-known/oauth-authorization-server, you can set a custom metadata url here.' |
| `--auth.appAuth.externalAuthServer.retryAttempts` | int | Optional: The number of attempted retries on a transient failure to get the OAuth metadata (default 5) |
| `--auth.appAuth.externalAuthServer.retryDelay` | string | Optional, Duration to wait between retries (default "1s") |
| `--auth.appAuth.selfAuthServer.accessTokenLifespan` | string | Defines the lifespan of issued access tokens. (default "30m0s") |
| `--auth.appAuth.selfAuthServer.authorizationCodeLifespan` | string | Defines the lifespan of issued access tokens. (default "5m0s") |
| `--auth.appAuth.selfAuthServer.claimSymmetricEncryptionKeySecretName` | string | OPTIONAL: Secret name to use to encrypt claims in authcode token. (default "claim_symmetric_key") |
| `--auth.appAuth.selfAuthServer.issuer` | string | Defines the issuer to use when issuing and validating tokens. The default value is https://{requestUri.HostAndPort}/ |
| `--auth.appAuth.selfAuthServer.oldTokenSigningRSAKeySecretName` | string | OPTIONAL: Secret name to use to retrieve Old RSA Signing Key. This can be useful during key rotation to continue to accept older tokens. (default "token_rsa_key_old.pem") |
| `--auth.appAuth.selfAuthServer.refreshTokenLifespan` | string | Defines the lifespan of issued access tokens. (default "1h0m0s") |
| `--auth.appAuth.selfAuthServer.tokenSigningRSAKeySecretName` | string | OPTIONAL: Secret name to use to retrieve RSA Signing Key. (default "token_rsa_key.pem") |
| `--auth.appAuth.thirdPartyConfig.flyteClient.audience` | string | Audience to use when initiating OAuth2 authorization requests. |
| `--auth.appAuth.thirdPartyConfig.flyteClient.clientId` | string | public identifier for the app which handles authorization for a Flyte deployment (default "uctl") |
| `--auth.appAuth.thirdPartyConfig.flyteClient.redirectUri` | string | This is the callback uri registered with the app which handles authorization for a Flyte deployment (default "http://localhost:53593/callback") |
| `--auth.appAuth.thirdPartyConfig.flyteClient.scopes` | strings | Recommended scopes for the client to request. (default [all,offline]) |
| `--auth.disableForGrpc` | | Disables auth enforcement on Grpc Endpoints. |
| `--auth.disableForHttp` | | Disables auth enforcement on HTTP Endpoints. |
| `--auth.grpcAuthorizationHeader` | string | (default "flyte-authorization") |
| `--auth.httpAuthorizationHeader` | string | (default "flyte-authorization") |
| `--auth.httpProxyURL` | string | OPTIONAL: HTTP Proxy to be used for OAuth requests. |
| `--auth.tokenEndpointProxyPath` | string | The path used to proxy calls to the TokenURL |
| `--auth.userAuth.cookieBlockKeySecretName` | string | OPTIONAL: Secret name to use for cookie block key. (default "cookie_block_key") |
| `--auth.userAuth.cookieHashKeySecretName` | string | OPTIONAL: Secret name to use for cookie hash key. (default "cookie_hash_key") |
| `--auth.userAuth.cookieSetting.domain` | string | OPTIONAL: Allows you to set the domain attribute on the auth cookies. |
| `--auth.userAuth.cookieSetting.sameSitePolicy` | string | OPTIONAL: Allows you to declare if your cookie should be restricted to a first-party or same-site context.Wrapper around http.SameSite. (default "DefaultMode") |
| `--auth.userAuth.httpProxyURL` | string | OPTIONAL: HTTP Proxy to be used for OAuth requests. |
| `--auth.userAuth.idpQueryParameter` | string | idp query parameter used for selecting a particular IDP for doing user authentication. Eg: for Okta passing idp={IDP-ID} forces the authentication to happen with IDP-ID |
| `--auth.userAuth.openId.baseUrl` | string | |
| `--auth.userAuth.openId.clientId` | string | |
| `--auth.userAuth.openId.clientSecretFile` | string | |
| `--auth.userAuth.openId.clientSecretName` | string | (default "oidc_client_secret") |
| `--auth.userAuth.openId.scopes` | strings | (default [openid,profile]) |
| `--auth.userAuth.redirectUrl` | string | (default "/console") |
| `--authorizer.internalCommunicationConfig.enabled` | | Enables authorization decisions for internal communication. (default true) |
| `--authorizer.internalCommunicationConfig.ingressIdentity` | string | IngressIdentity used in the cluster. Needed to exclude the communication coming from ingress. (default "ingress-nginx.ingress-nginx.serviceaccount.identity.linkerd.cluster.local") |
| `--authorizer.internalCommunicationConfig.tenantUrlPatternIdentity` | string | UrlPatternIdentity of the internal tenant service endpoint identities. (default "{{ service }}.{{ org }}.serviceaccount.identity.linkerd.cluster.local") |
| `--authorizer.internalCommunicationConfig.urlPatternIdentity` | string | UrlPatternIdentity of the internal service endpoint identities. (default "{{ service }}-helmchart.{{ service }}.serviceaccount.identity.linkerd.cluster.local") |
| `--authorizer.mode` | string | (default "Active") |
| `--authorizer.organizationConfig.PolicyConfig.adminPolicyDescription` | string | description for the boilerplate admin policy (default "Contributor permissions and full admin permissions to manage users and view usage dashboards") |
| `--authorizer.organizationConfig.PolicyConfig.contributorPolicyDescription` | string | description for the boilerplate contributor policy (default "Viewer permissions and permissions to create workflows, tasks, launch plans, and executions") |
| `--authorizer.organizationConfig.PolicyConfig.defaultUserPolicyRoleType` | string | name of the role type to determine which default policy new users added to the organization should be assigned (default "Viewer") |
| `--authorizer.organizationConfig.PolicyConfig.serverlessContributorPolicyDescription` | string | description for the boilerplate serverless contributor policy (default "Viewer permissions and permissions to create workflows, tasks, launch plans, and executions") |
| `--authorizer.organizationConfig.PolicyConfig.serverlessViewerPolicyDescription` | string | description for the boilerplate serverless viewer policy (default "Permissions to view Flyte entities") |
| `--authorizer.organizationConfig.PolicyConfig.viewerPolicyDescription` | string | description for the boilerplate viewer policy (default "Permissions to view Flyte entities") |
| `--authorizer.organizationConfig.defaultPolicyCacheDuration` | string | Cache entry duration for the store of the default policy per organization (default "10m0s") |
| `--authorizer.syncRuleRefreshInterval` | string | (default "1m0s") |
| `--authorizer.type` | string | (default "UserClouds") |
| `--authorizer.userCloudsClient.cache.redis.ttl.edgeTypes` | string | Specifies how long edge types remain in the cache.. (default "30m0s") |
| `--authorizer.userCloudsClient.cache.redis.ttl.edges` | string | Specifies how long edges remain in the cache. (default "30m0s") |
| `--authorizer.userCloudsClient.cache.redis.ttl.objectTypes` | string | Specifies how long object types remain in the cache. (default "30m0s") |
| `--authorizer.userCloudsClient.cache.redis.ttl.objects` | string | Specifies how long objects remain in the cache. (default "30m0s") |
| `--authorizer.userCloudsClient.cache.type` | string | Cache type to use. (default "none") |
| `--authorizer.userCloudsClient.clientID` | string | UserClouds client id |
| `--authorizer.userCloudsClient.clientSecretName` | string | UserCloud client secret name to read from the secret manager. (default "userclouds-client-secret") |
| `--authorizer.userCloudsClient.enableLogging` | | Enable userclouds client's internal logging. Calls to post logs take 250-350 ms and will impact p99 latency, enable with caution. |
| `--authorizer.userCloudsClient.tenantID` | string | UserClouds tenant id. Should be a UUID. |
| `--authorizer.userCloudsClient.tenantUrl` | string | Something like https://{yourtenant}.tenant.userclouds.com |
| `--config` | string | config file (default is /Users/andrew/.union/config.yaml) |
| `--connection.environment` | string | |
| `--connection.region` | string | |
| `--connection.rootTenantURLPattern` | string | Pattern for tenant url. (default "dns:///{{ organization }}.cloud-staging.union.ai") |
| `--console.endpoint` | string | Endpoint of console, if different than flyte admin |
| `--database.connMaxLifeTime` | string | sets the maximum amount of time a connection may be reused (default "1h0m0s") |
| `--database.enableForeignKeyConstraintWhenMigrating` | | Whether to enable gorm foreign keys when migrating the db |
| `--database.maxIdleConnections` | int | maxIdleConnections sets the maximum number of connections in the idle connection pool. (default 10) |
| `--database.maxOpenConnections` | int | maxOpenConnections sets the maximum number of open connections to the database. (default 100) |
| `--database.postgres.dbname` | string | The database name (default "postgres") |
| `--database.postgres.debug` | | |
| `--database.postgres.host` | string | The host name of the database server (default "localhost") |
| `--database.postgres.options` | string | See http://gorm.io/docs/connecting_to_the_database.html for available options passed, in addition to the above. (default "sslmode=disable") |
| `--database.postgres.password` | string | The database password. (default "postgres") |
| `--database.postgres.passwordPath` | string | Points to the file containing the database password. |
| `--database.postgres.port` | int | The port name of the database server (default 30001) |
| `--database.postgres.readReplicaHost` | string | The host name of the read replica database server (default "localhost") |
| `--database.postgres.username` | string | The database user who is connecting to the server. (default "postgres") |
| `--database.sqlite.file` | string | The path to the file (existing or new) where the DB should be created / stored. If existing, then this will be re-used, else a new will be created |
| `--db.connectionPool.maxConnectionLifetime` | string | (default "0s") |
| `--db.connectionPool.maxIdleConnections` | int | |
| `--db.connectionPool.maxOpenConnections` | int | |
| `--db.dbname` | string | (default "postgres") |
| `--db.debug` | | |
| `--db.host` | string | (default "postgres") |
| `--db.log_level` | int | (default 4) |
| `--db.options` | string | (default "sslmode=disable") |
| `--db.password` | string | |
| `--db.passwordPath` | string | |
| `--db.port` | int | (default 5432) |
| `--db.username` | string | (default "postgres") |
| `-d`, `--domain` | string | Specifies the Flyte project's domain. |
| `--files.archive` | | Pass in archive file either an http link or local path. |
| `--files.assumableIamRole` | string | Custom assumable iam auth role to register launch plans with. |
| `--files.continueOnError` | | Continue on error when registering files. |
| `--files.destinationDirectory` | string | Location of source code in container. |
| `--files.dryRun` | | Execute command without making any modifications. |
| `--files.enableSchedule` | | Enable the schedule if the files contain schedulable launchplan. |
| `--files.force` | | Force use of version number on entities registered with flyte. |
| `--files.k8ServiceAccount` | string | Deprecated. Please use `--K8sServiceAccount`|
| `--files.k8sServiceAccount` | string | Custom kubernetes service account auth role to register launch plans with. |
| `--files.outputLocationPrefix` | string | Custom output location prefix for offloaded types (files/schemas). |
| `--files.sourceUploadPath` | string | Deprecated: Update flyte admin to avoid having to configure storage access from uctl. |
| `--files.version` | string | Version of the entity to be registered with flyte which are un-versioned after serialization. |
| `--logger.formatter.type` | string | Sets logging format type. (default "json") |
| `--logger.level` | int | Sets the minimum logging level. (default 3) |
| `--logger.mute` | | Mutes all logs regardless of severity. Intended for benchmarks/tests only. |
| `--logger.show-source` | | Includes source code location in logs. |
| `--org` | string | Organization to work on. If not set, default to user's org. |
| `--otel.file.filename` | string | Filename to store exported telemetry traces (default "/tmp/trace.txt") |
| `--otel.jaeger.endpoint` | string | Endpoint for the jaeger telemetry trace ingestor (default "http://localhost:14268/api/traces") |
| `--otel.otlpgrpc.endpoint` | string | Endpoint for the OTLP telemetry trace collector (default "http://localhost:4317") |
| `--otel.otlphttp.endpoint` | string | Endpoint for the OTLP telemetry trace collector (default "http://localhost:4318/v1/traces") |
| `--otel.sampler.parentSampler` | string | Sets the parent sampler to use for the tracer (default "always") |
| `--otel.type` | string | Sets the type of exporter to configure [noop/file/jaeger/otlpgrpc/otlphttp]. (default "noop") |
| `-o`, `--output` | string | Specifies the output type - supported formats [TABLE JSON YAML DOT DOTURL]. NOTE: dot, doturl are only supported for Workflow (default "table") |
| `--plugins.catalogcache.reader.maxItems` | int | Maximum number of entries to keep in the index. (default 10000) |
| `--plugins.catalogcache.reader.maxRetries` | int | Maximum number of retries per item. (default 3) |
| `--plugins.catalogcache.reader.workers` | int | Number of concurrent workers to start processing the queue. (default 10) |
| `--plugins.catalogcache.writer.maxItems` | int | Maximum number of entries to keep in the index. (default 10000) |
| `--plugins.catalogcache.writer.maxRetries` | int | Maximum number of retries per item. (default 3) |
| `--plugins.catalogcache.writer.workers` | int | Number of concurrent workers to start processing the queue. (default 10) |
| `-p`, `--project` | string | Specifies the Flyte project. |
| `--rediscache.passwordSecretName` | string | Name of secret with Redis password. |
| `--rediscache.primaryEndpoint` | string | Primary endpoint for the redis cache that can be used for both reads and writes. |
| `--rediscache.replicaEndpoint` | string | Replica endpoint for the redis cache that can be used for reads. |
| `--secrets.env-prefix` | string | Prefix for environment variables (default "FLYTE_SECRET_") |
| `--secrets.secrets-prefix` | string | Prefix where to look for secrets file (default "/etc/secrets") |
| `--secrets.type` | string | Sets the type of storage to configure [local]. (default "local") |
| `--server.dataProxy.download.maxExpiresIn` | string | Maximum allowed expiration duration. (default "1h0m0s") |
| `--server.dataProxy.upload.defaultFileNameLength` | int | Default length for the generated file name if not provided in the request. (default 20) |
| `--server.dataProxy.upload.maxExpiresIn` | string | Maximum allowed expiration duration. (default "1h0m0s") |
| `--server.dataProxy.upload.maxSize` | string | Maximum allowed upload size. (default "6Mi") |
| `--server.dataProxy.upload.storagePrefix` | string | Storage prefix to use for all upload requests. |
| `--server.grpc.enableGrpcLatencyMetrics` | | Enable grpc latency metrics. Note Histograms metrics can be expensive on Prometheus servers. |
| `--server.grpc.maxMessageSizeBytes` | int | The max size in bytes for incoming gRPC messages |
| `--server.grpc.port` | int | On which grpc port to serve admin (default 8089) |
| `--server.grpc.serverReflection` | | Enable GRPC Server Reflection (default true) |
| `--server.grpcPort` | int | deprecated |
| `--server.grpcServerReflection` | | deprecated |
| `--server.httpPort` | int | On which http port to serve admin (default 8088) |
| `--server.kube-config` | string | Path to kubernetes client config file, default is empty, useful for incluster config. |
| `--server.kubeClientConfig.burst` | int | Max burst rate for throttle. 0 defaults to 10 (default 25) |
| `--server.kubeClientConfig.qps` | int32 | Max QPS to the master for requests to KubeAPI. 0 defaults to 5. (default 100) |
| `--server.kubeClientConfig.timeout` | string | Max duration allowed for every request to KubeAPI before giving up. 0 implies no timeout. (default "30s") |
| `--server.master` | string | The address of the Kubernetes API server. |
| `--server.readHeaderTimeoutSeconds` | int | The amount of time allowed to read request headers. (default 32) |
| `--server.security.allowCors` | | (default true) |
| `--server.security.allowedHeaders` | strings | (default [Content-Type,flyte-authorization]) |
| `--server.security.allowedOrigins` | strings | (default [*]) |
| `--server.security.auditAccess` | | |
| `--server.security.secure` | | |
| `--server.security.ssl.certificateFile` | string | |
| `--server.security.ssl.keyFile` | string | |
| `--server.security.useAuth` | | |
| `--server.thirdPartyConfig.flyteClient.audience` | string | Audience to use when initiating OAuth2 authorization requests. |
| `--server.thirdPartyConfig.flyteClient.clientId` | string | public identifier for the app which handles authorization for a Flyte deployment |
| `--server.thirdPartyConfig.flyteClient.redirectUri` | string | This is the callback uri registered with the app which handles authorization for a Flyte deployment |
| `--server.thirdPartyConfig.flyteClient.scopes` | strings | Recommended scopes for the client to request. |
| `--server.watchService.maxActiveClusterConnections` | int | (default 5) |
| `--server.watchService.maxPageSize` | int | (default 50000) |
| `--server.watchService.nonTerminalStatusUpdatesInterval` | string | (default "1m0s") |
| `--server.watchService.pollInterval` | string | (default "1s") |
| `--sharedservice.connectPort` | string | On which connect port to serve admin (default "8080") |
| `--sharedservice.grpc.grpcMaxResponseStatusBytes` | int32 | specifies the maximum (uncompressed) size of header list that the client is prepared to accept on grpc calls (default 32000) |
| `--sharedservice.grpc.maxConcurrentStreams` | int | Limit on the number of concurrent streams to each ServerTransport. (default 100) |
| `--sharedservice.grpc.maxMessageSizeBytes` | int | Limit on the size of message that can be received on the server. (default 10485760) |
| `--sharedservice.grpcServerReflection` | | Enable GRPC Server Reflection (default true) |
| `--sharedservice.httpPort` | string | On which http port to serve admin (default "8089") |
| `--sharedservice.kubeConfig` | string | Path to kubernetes client config file. |
| `--sharedservice.master` | string | The address of the Kubernetes API server. |
| `--sharedservice.metrics.enableClientGrpcHistograms` | | Enable client grpc histograms (default true) |
| `--sharedservice.metrics.enableGrpcHistograms` | | Enable grpc histograms (default true) |
| `--sharedservice.metrics.scope` | string | Scope to emit metrics under (default "service:") |
| `--sharedservice.port` | string | On which grpc port to serve admin (default "8080") |
| `--sharedservice.profiler.enabled` | | Enable Profiler on server |
| `--sharedservice.profilerPort` | string | Profile port to start listen for pprof and metric handlers on. (default "10254") |
| `--sharedservice.security.allowCors` | | |
| `--sharedservice.security.allowLocalhostAccess` | | Whether to permit localhost unauthenticated access to the server |
| `--sharedservice.security.allowedHeaders` | strings | |
| `--sharedservice.security.allowedOrigins` | strings | |
| `--sharedservice.security.auditAccess` | | |
| `--sharedservice.security.orgOverride` | string | Override org in identity context if localhost access enabled |
| `--sharedservice.security.secure` | | |
| `--sharedservice.security.ssl.certificateAuthorityFile` | string | |
| `--sharedservice.security.ssl.certificateFile` | string | |
| `--sharedservice.security.ssl.keyFile` | string | |
| `--sharedservice.security.useAuth` | | |
| `--sharedservice.sync.syncInterval` | string | Time interval to sync (default "5m0s") |
| `--storage.cache.max_size_mbs` | int | Maximum size of the cache where the Blob store data is cached in-memory. If not specified or set to 0, cache is not used |
| `--storage.cache.target_gc_percent` | int | Sets the garbage collection target percentage. |
| `--storage.connection.access-key` | string | Access key to use. Only required when authtype is set to accesskey. |
| `--storage.connection.auth-type` | string | Auth Type to use [iam, accesskey]. (default "iam") |
| `--storage.connection.disable-ssl` | | Disables SSL connection. Should only be used for development. |
| `--storage.connection.endpoint` | string | URL for storage client to connect to. |
| `--storage.connection.region` | string | Region to connect to. (default "us-east-1") |
| `--storage.connection.secret-key` | string | Secret to use when accesskey is set. |
| `--storage.container` | string | Initial container (in s3 a bucket) to create -if it doesn't exist-.' |
| `--storage.defaultHttpClient.timeout` | string | Sets time out on the http client. (default "0s") |
| `--storage.enable-multicontainer` | | If this is true, then the container argument is overlooked and redundant. This config will automatically open new connections to new containers/buckets as they are encountered |
| `--storage.limits.maxDownloadMBs` | int | Maximum allowed download size (in MBs) per call. (default 2) |
| `--storage.stow.config` | stringToString | Configuration for stow backend. Refer to github/flyteorg/stow (default []) |
| `--storage.stow.kind` | string | Kind of Stow backend to use. Refer to github/flyteorg/stow |
| `--storage.type` | string | Sets the type of storage to configure [s3/minio/local/mem/stow]. (default "s3") |
| `--union.auth.authorizationMetadataKey` | string | Authorization Header to use when passing Access Tokens to the server (default "flyte-authorization") |
| `--union.auth.clientId` | string | Client ID |
| `--union.auth.clientSecretEnvVar` | string | Environment variable containing the client secret |
| `--union.auth.clientSecretLocation` | string | File containing the client secret |
| `--union.auth.deviceFlow.pollInterval` | string | amount of time the device flow would poll the token endpoint if auth server doesn't return a polling interval. Okta and google IDP do return an interval' (default "5s") |
| `--union.auth.deviceFlow.refreshTime` | string | grace period from the token expiry after which it would refresh the token. (default "5m0s") |
| `--union.auth.deviceFlow.timeout` | string | amount of time the device flow should complete or else it will be cancelled. (default "10m0s") |
| `--union.auth.enable` | | Whether to enable an authenticated conenction when communicating with admin. (default true) |
| `--union.auth.externalAuth.command` | strings | Command for external authentication token generation |
| `--union.auth.pkce.refreshTime` | string | grace period from the token expiry after which it would refresh the token. (default "5m0s") |
| `--union.auth.pkce.timeout` | string | Amount of time the browser session would be active for authentication from client app. (default "15s") |
| `--union.auth.scopes` | strings | List of scopes to request |
| `--union.auth.tokenRefreshWindow` | string | Max duration between token refresh attempt and token expiry. (default "1h0m0s") |
| `--union.auth.tokenUrl` | string | OPTIONAL: Your IdP's token endpoint. It'll be discovered from flyte admin's OAuth Metadata endpoint if not provided. |
| `--union.auth.type` | string | Type of OAuth2 flow used for communicating with admin. (default "Pkce") |
| `--union.cache.maxItemsCount` | int | Maximum number of items to keep in the cache before evicting. (default 1000) |
| `--union.connection.host` | string | Host to connect to (default "dns:///utt-mgdp-stg-us-east-2.cloud-staging.union.ai") |
| `--union.connection.insecure` | | Whether to connect over insecure channel |
| `--union.connection.insecureSkipVerify` | | InsecureSkipVerify controls whether a client verifies the server's certificate chain and host name.Caution: shouldn't be use for production usecases' |
| `--union.connection.keepAliveConfig.permitWithoutStream` | | If true, client sends keepalive pings even with no active RPCs. |
| `--union.connection.keepAliveConfig.time` | string | After a duration of this time if the client doesn't see any activity it pings the server to see if the transport is still alive. (default "20s") |
| `--union.connection.keepAliveConfig.timeout` | string | After having pinged for keepalive check, the client waits for a duration of Timeout and if no activity is seen even after that the connection is closed. (default "2m0s") |
| `--union.connection.maxBackoffDelay` | string | Max delay for grpc backoff (default "8s") |
| `--union.connection.maxRecvMsgSize` | int | Maximum size of a message in bytes of a gRPC message (default 10485760) |
| `--union.connection.maxRetries` | int | Max number of gRPC retries (default 4) |
| `--union.connection.minConnectTimeout` | string | Minimum timeout for establishing a connection (default "20s") |
| `--union.connection.perRetryTimeout` | string | gRPC per retry timeout (default "15s") |
| `--union.connection.serviceConfig` | string | Defines gRPC experimental JSON Service Config (default "{"loadBalancingConfig": [{"round_robin":{}}]}") |
| `--union.connection.trustedIdentityClaims.enabled` | | Enables passing of trusted claims while making inter service calls |
| `--union.connection.trustedIdentityClaims.externalIdentityClaim` | string | External identity claim of the service which is authorized to make internal service call. These are verified against userclouds actions |
| `--union.connection.trustedIdentityClaims.externalIdentityTypeClaim` | string | External identity type claim of app or user to use for the current service identity. It should be an 'app' for inter service communication |
| `--union.internalConnectionConfig.-` | stringToString | (default []) |
| `--union.internalConnectionConfig.enabled` | | Enables internal service to service communication instead of going through ingress. |
| `--union.internalConnectionConfig.urlPattern` | string | UrlPattern of the internal service endpoints. (default "{{ service }}-helmchart.{{ service }}.svc.cluster.local:80") |
| `--webhook.awsSecretManager.sidecarImage` | string | Specifies the sidecar docker image to use (default "docker.io/amazon/aws-secrets-manager-secret-sidecar:v0.1.4") |
| `--webhook.certDir` | string | Certificate directory to use to write generated certs. Defaults to /etc/webhook/certs/ (default "/etc/webhook/certs") |
| `--webhook.embeddedSecretManagerConfig.awsConfig.region` | string | AWS region |
| `--webhook.embeddedSecretManagerConfig.fileMountInitContainer.image` | string | Specifies init container image to use for mounting secrets as files. (default "busybox:1.28") |
| `--webhook.embeddedSecretManagerConfig.gcpConfig.project` | string | GCP project to be used for secret manager |
| `--webhook.embeddedSecretManagerConfig.type` | string | (default "AWS") |
| `--webhook.gcpSecretManager.sidecarImage` | string | Specifies the sidecar docker image to use (default "gcr.io/google.com/cloudsdktool/cloud-sdk:alpine") |
| `--webhook.listenPort` | int | The port to use to listen to webhook calls. Defaults to 9443 (default 9443) |
| `--webhook.localCert` | | write certs locally. Defaults to false |
| `--webhook.metrics-prefix` | string | An optional prefix for all published metrics. (default "flyte:") |
| `--webhook.secretName` | string | Secret name to write generated certs to. (default "flyte-pod-webhook") |
| `--webhook.serviceName` | string | The name of the webhook service. (default "flyte-pod-webhook") |
| `--webhook.servicePort` | int32 | The port on the service that hosting webhook. (default 443) |
| `--webhook.vaultSecretManager.role` | string | Specifies the vault role to use (default "flyte") |
=== PAGE: https://www.union.ai/docs/v1/serverless/api-reference/uctl-cli/uctl-delete/uctl-delete-cluster ===
# uctl delete cluster
Delete clusters
## Synopsis
Delete clusters
```shell
$ uctl delete cluster [flags]
```
## Options
| Option | Type | Description |
|--------|------|-------------|
| `--dryRun` | | execute command without making any modifications. |
| Option | Type | Description |
|--------|------|-------------|
| `-h`, `--help` | help for cluster |
### Options inherited from parent commands
| Option | Type | Description |
|--------|------|-------------|
| `--admin.audience` | string | Audience to use when initiating OAuth2 authorization requests. |
| `--admin.authType` | string | Type of OAuth2 flow used for communicating with admin.ClientSecret, Pkce, ExternalCommand are valid values (default "ClientSecret") |
| `--admin.authorizationHeader` | string | Custom metadata header to pass JWT |
| `--admin.authorizationServerUrl` | string | This is the URL to your IdP's authorization server. It'll default to Endpoint |
| `--admin.caCertFilePath` | string | Use specified certificate file to verify the admin server peer. |
| `--admin.clientId` | string | Client ID (default "flytepropeller") |
| `--admin.clientSecretEnvVar` | string | Environment variable containing the client secret |
| `--admin.clientSecretLocation` | string | File containing the client secret (default "/etc/secrets/client_secret") |
| `--admin.command` | strings | Command for external authentication token generation |
| `--admin.defaultOrg` | string | OPTIONAL: Default org to use to support non-org based cli's.'. |
| `--admin.defaultServiceConfig` | string | |
| `--admin.deviceFlowConfig.pollInterval` | string | amount of time the device flow would poll the token endpoint if auth server doesn't return a polling interval. Okta and google IDP do return an interval' (default "5s") |
| `--admin.deviceFlowConfig.refreshTime` | string | grace period from the token expiry after which it would refresh the token. (default "5m0s") |
| `--admin.deviceFlowConfig.timeout` | string | amount of time the device flow should complete or else it will be cancelled. (default "10m0s") |
| `--admin.endpoint` | string | For admin types, specify where the uri of the service is located. |
| `--admin.httpProxyURL` | string | OPTIONAL: HTTP Proxy to be used for OAuth requests. |
| `--admin.insecure` | | Use insecure connection. |
| `--admin.insecureSkipVerify` | | InsecureSkipVerify controls whether a client verifies the server's certificate chain and host name.Caution: shouldn't be use for production usecases' |
| `--admin.maxBackoffDelay` | string | Max delay for grpc backoff (default "8s") |
| `--admin.maxMessageSizeBytes` | int | The max size in bytes for incoming gRPC messages |
| `--admin.maxRetries` | int | Max number of gRPC retries (default 4) |
| `--admin.perRetryTimeout` | string | gRPC per retry timeout (default "15s") |
| `--admin.pkceConfig.refreshTime` | string | grace period from the token expiry after which it would refresh the token. (default "5m0s") |
| `--admin.pkceConfig.timeout` | string | Amount of time the browser session would be active for authentication from client app. (default "2m0s") |
| `--admin.proxyCommand` | strings | Command for external proxy-authorization token generation |
| `--admin.scopes` | strings | List of scopes to request |
| `--admin.tokenRefreshWindow` | string | Max duration between token refresh attempt and token expiry. (default "0s") |
| `--admin.tokenUrl` | string | OPTIONAL: Your IdP's token endpoint. It'll be discovered from flyte admin's OAuth Metadata endpoint if not provided. |
| `--admin.useAudienceFromAdmin` | | Use Audience configured from admins public endpoint config. |
| `--admin.useAuth` | | Deprecated: Auth will be enabled/disabled based on admin's dynamically discovered information. |
| `--auth.appAuth.externalAuthServer.allowedAudience` | strings | Optional: A list of allowed audiences. If not provided, the audience is expected to be the public Uri of the service. |
| `--auth.appAuth.externalAuthServer.baseUrl` | string | This should be the base url of the authorization server that you are trying to hit. With Okta for instance, it will look something like https://company.okta.com/oauth2/abcdef123456789/ |
| `--auth.appAuth.externalAuthServer.httpProxyURL` | string | OPTIONAL: HTTP Proxy to be used for OAuth requests. |
| `--auth.appAuth.externalAuthServer.metadataUrl` | string | Optional: If the server doesn't support /.well-known/oauth-authorization-server, you can set a custom metadata url here.' |
| `--auth.appAuth.externalAuthServer.retryAttempts` | int | Optional: The number of attempted retries on a transient failure to get the OAuth metadata (default 5) |
| `--auth.appAuth.externalAuthServer.retryDelay` | string | Optional, Duration to wait between retries (default "1s") |
| `--auth.appAuth.selfAuthServer.accessTokenLifespan` | string | Defines the lifespan of issued access tokens. (default "30m0s") |
| `--auth.appAuth.selfAuthServer.authorizationCodeLifespan` | string | Defines the lifespan of issued access tokens. (default "5m0s") |
| `--auth.appAuth.selfAuthServer.claimSymmetricEncryptionKeySecretName` | string | OPTIONAL: Secret name to use to encrypt claims in authcode token. (default "claim_symmetric_key") |
| `--auth.appAuth.selfAuthServer.issuer` | string | Defines the issuer to use when issuing and validating tokens. The default value is https://{requestUri.HostAndPort}/ |
| `--auth.appAuth.selfAuthServer.oldTokenSigningRSAKeySecretName` | string | OPTIONAL: Secret name to use to retrieve Old RSA Signing Key. This can be useful during key rotation to continue to accept older tokens. (default "token_rsa_key_old.pem") |
| `--auth.appAuth.selfAuthServer.refreshTokenLifespan` | string | Defines the lifespan of issued access tokens. (default "1h0m0s") |
| `--auth.appAuth.selfAuthServer.tokenSigningRSAKeySecretName` | string | OPTIONAL: Secret name to use to retrieve RSA Signing Key. (default "token_rsa_key.pem") |
| `--auth.appAuth.thirdPartyConfig.flyteClient.audience` | string | Audience to use when initiating OAuth2 authorization requests. |
| `--auth.appAuth.thirdPartyConfig.flyteClient.clientId` | string | public identifier for the app which handles authorization for a Flyte deployment (default "uctl") |
| `--auth.appAuth.thirdPartyConfig.flyteClient.redirectUri` | string | This is the callback uri registered with the app which handles authorization for a Flyte deployment (default "http://localhost:53593/callback") |
| `--auth.appAuth.thirdPartyConfig.flyteClient.scopes` | strings | Recommended scopes for the client to request. (default [all,offline]) |
| `--auth.disableForGrpc` | | Disables auth enforcement on Grpc Endpoints. |
| `--auth.disableForHttp` | | Disables auth enforcement on HTTP Endpoints. |
| `--auth.grpcAuthorizationHeader` | string | (default "flyte-authorization") |
| `--auth.httpAuthorizationHeader` | string | (default "flyte-authorization") |
| `--auth.httpProxyURL` | string | OPTIONAL: HTTP Proxy to be used for OAuth requests. |
| `--auth.tokenEndpointProxyPath` | string | The path used to proxy calls to the TokenURL |
| `--auth.userAuth.cookieBlockKeySecretName` | string | OPTIONAL: Secret name to use for cookie block key. (default "cookie_block_key") |
| `--auth.userAuth.cookieHashKeySecretName` | string | OPTIONAL: Secret name to use for cookie hash key. (default "cookie_hash_key") |
| `--auth.userAuth.cookieSetting.domain` | string | OPTIONAL: Allows you to set the domain attribute on the auth cookies. |
| `--auth.userAuth.cookieSetting.sameSitePolicy` | string | OPTIONAL: Allows you to declare if your cookie should be restricted to a first-party or same-site context.Wrapper around http.SameSite. (default "DefaultMode") |
| `--auth.userAuth.httpProxyURL` | string | OPTIONAL: HTTP Proxy to be used for OAuth requests. |
| `--auth.userAuth.idpQueryParameter` | string | idp query parameter used for selecting a particular IDP for doing user authentication. Eg: for Okta passing idp={IDP-ID} forces the authentication to happen with IDP-ID |
| `--auth.userAuth.openId.baseUrl` | string | |
| `--auth.userAuth.openId.clientId` | string | |
| `--auth.userAuth.openId.clientSecretFile` | string | |
| `--auth.userAuth.openId.clientSecretName` | string | (default "oidc_client_secret") |
| `--auth.userAuth.openId.scopes` | strings | (default [openid,profile]) |
| `--auth.userAuth.redirectUrl` | string | (default "/console") |
| `--authorizer.internalCommunicationConfig.enabled` | | Enables authorization decisions for internal communication. (default true) |
| `--authorizer.internalCommunicationConfig.ingressIdentity` | string | IngressIdentity used in the cluster. Needed to exclude the communication coming from ingress. (default "ingress-nginx.ingress-nginx.serviceaccount.identity.linkerd.cluster.local") |
| `--authorizer.internalCommunicationConfig.tenantUrlPatternIdentity` | string | UrlPatternIdentity of the internal tenant service endpoint identities. (default "{{ service }}.{{ org }}.serviceaccount.identity.linkerd.cluster.local") |
| `--authorizer.internalCommunicationConfig.urlPatternIdentity` | string | UrlPatternIdentity of the internal service endpoint identities. (default "{{ service }}-helmchart.{{ service }}.serviceaccount.identity.linkerd.cluster.local") |
| `--authorizer.mode` | string | (default "Active") |
| `--authorizer.organizationConfig.PolicyConfig.adminPolicyDescription` | string | description for the boilerplate admin policy (default "Contributor permissions and full admin permissions to manage users and view usage dashboards") |
| `--authorizer.organizationConfig.PolicyConfig.contributorPolicyDescription` | string | description for the boilerplate contributor policy (default "Viewer permissions and permissions to create workflows, tasks, launch plans, and executions") |
| `--authorizer.organizationConfig.PolicyConfig.defaultUserPolicyRoleType` | string | name of the role type to determine which default policy new users added to the organization should be assigned (default "Viewer") |
| `--authorizer.organizationConfig.PolicyConfig.serverlessContributorPolicyDescription` | string | description for the boilerplate serverless contributor policy (default "Viewer permissions and permissions to create workflows, tasks, launch plans, and executions") |
| `--authorizer.organizationConfig.PolicyConfig.serverlessViewerPolicyDescription` | string | description for the boilerplate serverless viewer policy (default "Permissions to view Flyte entities") |
| `--authorizer.organizationConfig.PolicyConfig.viewerPolicyDescription` | string | description for the boilerplate viewer policy (default "Permissions to view Flyte entities") |
| `--authorizer.organizationConfig.defaultPolicyCacheDuration` | string | Cache entry duration for the store of the default policy per organization (default "10m0s") |
| `--authorizer.syncRuleRefreshInterval` | string | (default "1m0s") |
| `--authorizer.type` | string | (default "UserClouds") |
| `--authorizer.userCloudsClient.cache.redis.ttl.edgeTypes` | string | Specifies how long edge types remain in the cache.. (default "30m0s") |
| `--authorizer.userCloudsClient.cache.redis.ttl.edges` | string | Specifies how long edges remain in the cache. (default "30m0s") |
| `--authorizer.userCloudsClient.cache.redis.ttl.objectTypes` | string | Specifies how long object types remain in the cache. (default "30m0s") |
| `--authorizer.userCloudsClient.cache.redis.ttl.objects` | string | Specifies how long objects remain in the cache. (default "30m0s") |
| `--authorizer.userCloudsClient.cache.type` | string | Cache type to use. (default "none") |
| `--authorizer.userCloudsClient.clientID` | string | UserClouds client id |
| `--authorizer.userCloudsClient.clientSecretName` | string | UserCloud client secret name to read from the secret manager. (default "userclouds-client-secret") |
| `--authorizer.userCloudsClient.enableLogging` | | Enable userclouds client's internal logging. Calls to post logs take 250-350 ms and will impact p99 latency, enable with caution. |
| `--authorizer.userCloudsClient.tenantID` | string | UserClouds tenant id. Should be a UUID. |
| `--authorizer.userCloudsClient.tenantUrl` | string | Something like https://{yourtenant}.tenant.userclouds.com |
| `--config` | string | config file (default is /Users/andrew/.union/config.yaml) |
| `--connection.environment` | string | |
| `--connection.region` | string | |
| `--connection.rootTenantURLPattern` | string | Pattern for tenant url. (default "dns:///{{ organization }}.cloud-staging.union.ai") |
| `--console.endpoint` | string | Endpoint of console, if different than flyte admin |
| `--database.connMaxLifeTime` | string | sets the maximum amount of time a connection may be reused (default "1h0m0s") |
| `--database.enableForeignKeyConstraintWhenMigrating` | | Whether to enable gorm foreign keys when migrating the db |
| `--database.maxIdleConnections` | int | maxIdleConnections sets the maximum number of connections in the idle connection pool. (default 10) |
| `--database.maxOpenConnections` | int | maxOpenConnections sets the maximum number of open connections to the database. (default 100) |
| `--database.postgres.dbname` | string | The database name (default "postgres") |
| `--database.postgres.debug` | | |
| `--database.postgres.host` | string | The host name of the database server (default "localhost") |
| `--database.postgres.options` | string | See http://gorm.io/docs/connecting_to_the_database.html for available options passed, in addition to the above. (default "sslmode=disable") |
| `--database.postgres.password` | string | The database password. (default "postgres") |
| `--database.postgres.passwordPath` | string | Points to the file containing the database password. |
| `--database.postgres.port` | int | The port name of the database server (default 30001) |
| `--database.postgres.readReplicaHost` | string | The host name of the read replica database server (default "localhost") |
| `--database.postgres.username` | string | The database user who is connecting to the server. (default "postgres") |
| `--database.sqlite.file` | string | The path to the file (existing or new) where the DB should be created / stored. If existing, then this will be re-used, else a new will be created |
| `--db.connectionPool.maxConnectionLifetime` | string | (default "0s") |
| `--db.connectionPool.maxIdleConnections` | int | |
| `--db.connectionPool.maxOpenConnections` | int | |
| `--db.dbname` | string | (default "postgres") |
| `--db.debug` | | |
| `--db.host` | string | (default "postgres") |
| `--db.log_level` | int | (default 4) |
| `--db.options` | string | (default "sslmode=disable") |
| `--db.password` | string | |
| `--db.passwordPath` | string | |
| `--db.port` | int | (default 5432) |
| `--db.username` | string | (default "postgres") |
| `-d`, `--domain` | string | Specifies the Flyte project's domain. |
| `--files.archive` | | Pass in archive file either an http link or local path. |
| `--files.assumableIamRole` | string | Custom assumable iam auth role to register launch plans with. |
| `--files.continueOnError` | | Continue on error when registering files. |
| `--files.destinationDirectory` | string | Location of source code in container. |
| `--files.dryRun` | | Execute command without making any modifications. |
| `--files.enableSchedule` | | Enable the schedule if the files contain schedulable launchplan. |
| `--files.force` | | Force use of version number on entities registered with flyte. |
| `--files.k8ServiceAccount` | string | Deprecated. Please use `--K8sServiceAccount`|
| `--files.k8sServiceAccount` | string | Custom kubernetes service account auth role to register launch plans with. |
| `--files.outputLocationPrefix` | string | Custom output location prefix for offloaded types (files/schemas). |
| `--files.sourceUploadPath` | string | Deprecated: Update flyte admin to avoid having to configure storage access from uctl. |
| `--files.version` | string | Version of the entity to be registered with flyte which are un-versioned after serialization. |
| `--logger.formatter.type` | string | Sets logging format type. (default "json") |
| `--logger.level` | int | Sets the minimum logging level. (default 3) |
| `--logger.mute` | | Mutes all logs regardless of severity. Intended for benchmarks/tests only. |
| `--logger.show-source` | | Includes source code location in logs. |
| `--org` | string | Organization to work on. If not set, default to user's org. |
| `--otel.file.filename` | string | Filename to store exported telemetry traces (default "/tmp/trace.txt") |
| `--otel.jaeger.endpoint` | string | Endpoint for the jaeger telemetry trace ingestor (default "http://localhost:14268/api/traces") |
| `--otel.otlpgrpc.endpoint` | string | Endpoint for the OTLP telemetry trace collector (default "http://localhost:4317") |
| `--otel.otlphttp.endpoint` | string | Endpoint for the OTLP telemetry trace collector (default "http://localhost:4318/v1/traces") |
| `--otel.sampler.parentSampler` | string | Sets the parent sampler to use for the tracer (default "always") |
| `--otel.type` | string | Sets the type of exporter to configure [noop/file/jaeger/otlpgrpc/otlphttp]. (default "noop") |
| `-o`, `--output` | string | Specifies the output type - supported formats [TABLE JSON YAML DOT DOTURL]. NOTE: dot, doturl are only supported for Workflow (default "table") |
| `--plugins.catalogcache.reader.maxItems` | int | Maximum number of entries to keep in the index. (default 10000) |
| `--plugins.catalogcache.reader.maxRetries` | int | Maximum number of retries per item. (default 3) |
| `--plugins.catalogcache.reader.workers` | int | Number of concurrent workers to start processing the queue. (default 10) |
| `--plugins.catalogcache.writer.maxItems` | int | Maximum number of entries to keep in the index. (default 10000) |
| `--plugins.catalogcache.writer.maxRetries` | int | Maximum number of retries per item. (default 3) |
| `--plugins.catalogcache.writer.workers` | int | Number of concurrent workers to start processing the queue. (default 10) |
| `-p`, `--project` | string | Specifies the Flyte project. |
| `--rediscache.passwordSecretName` | string | Name of secret with Redis password. |
| `--rediscache.primaryEndpoint` | string | Primary endpoint for the redis cache that can be used for both reads and writes. |
| `--rediscache.replicaEndpoint` | string | Replica endpoint for the redis cache that can be used for reads. |
| `--secrets.env-prefix` | string | Prefix for environment variables (default "FLYTE_SECRET_") |
| `--secrets.secrets-prefix` | string | Prefix where to look for secrets file (default "/etc/secrets") |
| `--secrets.type` | string | Sets the type of storage to configure [local]. (default "local") |
| `--server.dataProxy.download.maxExpiresIn` | string | Maximum allowed expiration duration. (default "1h0m0s") |
| `--server.dataProxy.upload.defaultFileNameLength` | int | Default length for the generated file name if not provided in the request. (default 20) |
| `--server.dataProxy.upload.maxExpiresIn` | string | Maximum allowed expiration duration. (default "1h0m0s") |
| `--server.dataProxy.upload.maxSize` | string | Maximum allowed upload size. (default "6Mi") |
| `--server.dataProxy.upload.storagePrefix` | string | Storage prefix to use for all upload requests. |
| `--server.grpc.enableGrpcLatencyMetrics` | | Enable grpc latency metrics. Note Histograms metrics can be expensive on Prometheus servers. |
| `--server.grpc.maxMessageSizeBytes` | int | The max size in bytes for incoming gRPC messages |
| `--server.grpc.port` | int | On which grpc port to serve admin (default 8089) |
| `--server.grpc.serverReflection` | | Enable GRPC Server Reflection (default true) |
| `--server.grpcPort` | int | deprecated |
| `--server.grpcServerReflection` | | deprecated |
| `--server.httpPort` | int | On which http port to serve admin (default 8088) |
| `--server.kube-config` | string | Path to kubernetes client config file, default is empty, useful for incluster config. |
| `--server.kubeClientConfig.burst` | int | Max burst rate for throttle. 0 defaults to 10 (default 25) |
| `--server.kubeClientConfig.qps` | int32 | Max QPS to the master for requests to KubeAPI. 0 defaults to 5. (default 100) |
| `--server.kubeClientConfig.timeout` | string | Max duration allowed for every request to KubeAPI before giving up. 0 implies no timeout. (default "30s") |
| `--server.master` | string | The address of the Kubernetes API server. |
| `--server.readHeaderTimeoutSeconds` | int | The amount of time allowed to read request headers. (default 32) |
| `--server.security.allowCors` | | (default true) |
| `--server.security.allowedHeaders` | strings | (default [Content-Type,flyte-authorization]) |
| `--server.security.allowedOrigins` | strings | (default [*]) |
| `--server.security.auditAccess` | | |
| `--server.security.secure` | | |
| `--server.security.ssl.certificateFile` | string | |
| `--server.security.ssl.keyFile` | string | |
| `--server.security.useAuth` | | |
| `--server.thirdPartyConfig.flyteClient.audience` | string | Audience to use when initiating OAuth2 authorization requests. |
| `--server.thirdPartyConfig.flyteClient.clientId` | string | public identifier for the app which handles authorization for a Flyte deployment |
| `--server.thirdPartyConfig.flyteClient.redirectUri` | string | This is the callback uri registered with the app which handles authorization for a Flyte deployment |
| `--server.thirdPartyConfig.flyteClient.scopes` | strings | Recommended scopes for the client to request. |
| `--server.watchService.maxActiveClusterConnections` | int | (default 5) |
| `--server.watchService.maxPageSize` | int | (default 50000) |
| `--server.watchService.nonTerminalStatusUpdatesInterval` | string | (default "1m0s") |
| `--server.watchService.pollInterval` | string | (default "1s") |
| `--sharedservice.connectPort` | string | On which connect port to serve admin (default "8080") |
| `--sharedservice.grpc.grpcMaxResponseStatusBytes` | int32 | specifies the maximum (uncompressed) size of header list that the client is prepared to accept on grpc calls (default 32000) |
| `--sharedservice.grpc.maxConcurrentStreams` | int | Limit on the number of concurrent streams to each ServerTransport. (default 100) |
| `--sharedservice.grpc.maxMessageSizeBytes` | int | Limit on the size of message that can be received on the server. (default 10485760) |
| `--sharedservice.grpcServerReflection` | | Enable GRPC Server Reflection (default true) |
| `--sharedservice.httpPort` | string | On which http port to serve admin (default "8089") |
| `--sharedservice.kubeConfig` | string | Path to kubernetes client config file. |
| `--sharedservice.master` | string | The address of the Kubernetes API server. |
| `--sharedservice.metrics.enableClientGrpcHistograms` | | Enable client grpc histograms (default true) |
| `--sharedservice.metrics.enableGrpcHistograms` | | Enable grpc histograms (default true) |
| `--sharedservice.metrics.scope` | string | Scope to emit metrics under (default "service:") |
| `--sharedservice.port` | string | On which grpc port to serve admin (default "8080") |
| `--sharedservice.profiler.enabled` | | Enable Profiler on server |
| `--sharedservice.profilerPort` | string | Profile port to start listen for pprof and metric handlers on. (default "10254") |
| `--sharedservice.security.allowCors` | | |
| `--sharedservice.security.allowLocalhostAccess` | | Whether to permit localhost unauthenticated access to the server |
| `--sharedservice.security.allowedHeaders` | strings | |
| `--sharedservice.security.allowedOrigins` | strings | |
| `--sharedservice.security.auditAccess` | | |
| `--sharedservice.security.orgOverride` | string | Override org in identity context if localhost access enabled |
| `--sharedservice.security.secure` | | |
| `--sharedservice.security.ssl.certificateAuthorityFile` | string | |
| `--sharedservice.security.ssl.certificateFile` | string | |
| `--sharedservice.security.ssl.keyFile` | string | |
| `--sharedservice.security.useAuth` | | |
| `--sharedservice.sync.syncInterval` | string | Time interval to sync (default "5m0s") |
| `--storage.cache.max_size_mbs` | int | Maximum size of the cache where the Blob store data is cached in-memory. If not specified or set to 0, cache is not used |
| `--storage.cache.target_gc_percent` | int | Sets the garbage collection target percentage. |
| `--storage.connection.access-key` | string | Access key to use. Only required when authtype is set to accesskey. |
| `--storage.connection.auth-type` | string | Auth Type to use [iam, accesskey]. (default "iam") |
| `--storage.connection.disable-ssl` | | Disables SSL connection. Should only be used for development. |
| `--storage.connection.endpoint` | string | URL for storage client to connect to. |
| `--storage.connection.region` | string | Region to connect to. (default "us-east-1") |
| `--storage.connection.secret-key` | string | Secret to use when accesskey is set. |
| `--storage.container` | string | Initial container (in s3 a bucket) to create -if it doesn't exist-.' |
| `--storage.defaultHttpClient.timeout` | string | Sets time out on the http client. (default "0s") |
| `--storage.enable-multicontainer` | | If this is true, then the container argument is overlooked and redundant. This config will automatically open new connections to new containers/buckets as they are encountered |
| `--storage.limits.maxDownloadMBs` | int | Maximum allowed download size (in MBs) per call. (default 2) |
| `--storage.stow.config` | stringToString | Configuration for stow backend. Refer to github/flyteorg/stow (default []) |
| `--storage.stow.kind` | string | Kind of Stow backend to use. Refer to github/flyteorg/stow |
| `--storage.type` | string | Sets the type of storage to configure [s3/minio/local/mem/stow]. (default "s3") |
| `--union.auth.authorizationMetadataKey` | string | Authorization Header to use when passing Access Tokens to the server (default "flyte-authorization") |
| `--union.auth.clientId` | string | Client ID |
| `--union.auth.clientSecretEnvVar` | string | Environment variable containing the client secret |
| `--union.auth.clientSecretLocation` | string | File containing the client secret |
| `--union.auth.deviceFlow.pollInterval` | string | amount of time the device flow would poll the token endpoint if auth server doesn't return a polling interval. Okta and google IDP do return an interval' (default "5s") |
| `--union.auth.deviceFlow.refreshTime` | string | grace period from the token expiry after which it would refresh the token. (default "5m0s") |
| `--union.auth.deviceFlow.timeout` | string | amount of time the device flow should complete or else it will be cancelled. (default "10m0s") |
| `--union.auth.enable` | | Whether to enable an authenticated conenction when communicating with admin. (default true) |
| `--union.auth.externalAuth.command` | strings | Command for external authentication token generation |
| `--union.auth.pkce.refreshTime` | string | grace period from the token expiry after which it would refresh the token. (default "5m0s") |
| `--union.auth.pkce.timeout` | string | Amount of time the browser session would be active for authentication from client app. (default "15s") |
| `--union.auth.scopes` | strings | List of scopes to request |
| `--union.auth.tokenRefreshWindow` | string | Max duration between token refresh attempt and token expiry. (default "1h0m0s") |
| `--union.auth.tokenUrl` | string | OPTIONAL: Your IdP's token endpoint. It'll be discovered from flyte admin's OAuth Metadata endpoint if not provided. |
| `--union.auth.type` | string | Type of OAuth2 flow used for communicating with admin. (default "Pkce") |
| `--union.cache.maxItemsCount` | int | Maximum number of items to keep in the cache before evicting. (default 1000) |
| `--union.connection.host` | string | Host to connect to (default "dns:///utt-mgdp-stg-us-east-2.cloud-staging.union.ai") |
| `--union.connection.insecure` | | Whether to connect over insecure channel |
| `--union.connection.insecureSkipVerify` | | InsecureSkipVerify controls whether a client verifies the server's certificate chain and host name.Caution: shouldn't be use for production usecases' |
| `--union.connection.keepAliveConfig.permitWithoutStream` | | If true, client sends keepalive pings even with no active RPCs. |
| `--union.connection.keepAliveConfig.time` | string | After a duration of this time if the client doesn't see any activity it pings the server to see if the transport is still alive. (default "20s") |
| `--union.connection.keepAliveConfig.timeout` | string | After having pinged for keepalive check, the client waits for a duration of Timeout and if no activity is seen even after that the connection is closed. (default "2m0s") |
| `--union.connection.maxBackoffDelay` | string | Max delay for grpc backoff (default "8s") |
| `--union.connection.maxRecvMsgSize` | int | Maximum size of a message in bytes of a gRPC message (default 10485760) |
| `--union.connection.maxRetries` | int | Max number of gRPC retries (default 4) |
| `--union.connection.minConnectTimeout` | string | Minimum timeout for establishing a connection (default "20s") |
| `--union.connection.perRetryTimeout` | string | gRPC per retry timeout (default "15s") |
| `--union.connection.serviceConfig` | string | Defines gRPC experimental JSON Service Config (default "{"loadBalancingConfig": [{"round_robin":{}}]}") |
| `--union.connection.trustedIdentityClaims.enabled` | | Enables passing of trusted claims while making inter service calls |
| `--union.connection.trustedIdentityClaims.externalIdentityClaim` | string | External identity claim of the service which is authorized to make internal service call. These are verified against userclouds actions |
| `--union.connection.trustedIdentityClaims.externalIdentityTypeClaim` | string | External identity type claim of app or user to use for the current service identity. It should be an 'app' for inter service communication |
| `--union.internalConnectionConfig.-` | stringToString | (default []) |
| `--union.internalConnectionConfig.enabled` | | Enables internal service to service communication instead of going through ingress. |
| `--union.internalConnectionConfig.urlPattern` | string | UrlPattern of the internal service endpoints. (default "{{ service }}-helmchart.{{ service }}.svc.cluster.local:80") |
| `--webhook.awsSecretManager.sidecarImage` | string | Specifies the sidecar docker image to use (default "docker.io/amazon/aws-secrets-manager-secret-sidecar:v0.1.4") |
| `--webhook.certDir` | string | Certificate directory to use to write generated certs. Defaults to /etc/webhook/certs/ (default "/etc/webhook/certs") |
| `--webhook.embeddedSecretManagerConfig.awsConfig.region` | string | AWS region |
| `--webhook.embeddedSecretManagerConfig.fileMountInitContainer.image` | string | Specifies init container image to use for mounting secrets as files. (default "busybox:1.28") |
| `--webhook.embeddedSecretManagerConfig.gcpConfig.project` | string | GCP project to be used for secret manager |
| `--webhook.embeddedSecretManagerConfig.type` | string | (default "AWS") |
| `--webhook.gcpSecretManager.sidecarImage` | string | Specifies the sidecar docker image to use (default "gcr.io/google.com/cloudsdktool/cloud-sdk:alpine") |
| `--webhook.listenPort` | int | The port to use to listen to webhook calls. Defaults to 9443 (default 9443) |
| `--webhook.localCert` | | write certs locally. Defaults to false |
| `--webhook.metrics-prefix` | string | An optional prefix for all published metrics. (default "flyte:") |
| `--webhook.secretName` | string | Secret name to write generated certs to. (default "flyte-pod-webhook") |
| `--webhook.serviceName` | string | The name of the webhook service. (default "flyte-pod-webhook") |
| `--webhook.servicePort` | int32 | The port on the service that hosting webhook. (default 443) |
| `--webhook.vaultSecretManager.role` | string | Specifies the vault role to use (default "flyte") |
=== PAGE: https://www.union.ai/docs/v1/serverless/api-reference/uctl-cli/uctl-delete/uctl-delete-cluster-pool-attributes ===
# uctl delete cluster-pool-attributes
Deletes matchable resources of cluster pool attribute
## Synopsis
Delete project and domain cluster pool attributes:
```shell
$ uctl delete cluster-pool-attributes -p flytesnacks -d staging
```
Delete workflow cluster pool attributes:
```shell
$ uctl delete cluster-pool-attributes -p flytesnacks -d staging --workflow my_wf
```
## Options
| Option | Type | Description |
|--------|------|-------------|
| `-h`, `--help` | help for cluster-pool-attributes |
| `--workflow` | string | optional, workflow name for the matchable attributes to delete |
### Options inherited from parent commands
| Option | Type | Description |
|--------|------|-------------|
| `--admin.audience` | string | Audience to use when initiating OAuth2 authorization requests. |
| `--admin.authType` | string | Type of OAuth2 flow used for communicating with admin.ClientSecret, Pkce, ExternalCommand are valid values (default "ClientSecret") |
| `--admin.authorizationHeader` | string | Custom metadata header to pass JWT |
| `--admin.authorizationServerUrl` | string | This is the URL to your IdP's authorization server. It'll default to Endpoint |
| `--admin.caCertFilePath` | string | Use specified certificate file to verify the admin server peer. |
| `--admin.clientId` | string | Client ID (default "flytepropeller") |
| `--admin.clientSecretEnvVar` | string | Environment variable containing the client secret |
| `--admin.clientSecretLocation` | string | File containing the client secret (default "/etc/secrets/client_secret") |
| `--admin.command` | strings | Command for external authentication token generation |
| `--admin.defaultOrg` | string | OPTIONAL: Default org to use to support non-org based cli's.'. |
| `--admin.defaultServiceConfig` | string | |
| `--admin.deviceFlowConfig.pollInterval` | string | amount of time the device flow would poll the token endpoint if auth server doesn't return a polling interval. Okta and google IDP do return an interval' (default "5s") |
| `--admin.deviceFlowConfig.refreshTime` | string | grace period from the token expiry after which it would refresh the token. (default "5m0s") |
| `--admin.deviceFlowConfig.timeout` | string | amount of time the device flow should complete or else it will be cancelled. (default "10m0s") |
| `--admin.endpoint` | string | For admin types, specify where the uri of the service is located. |
| `--admin.httpProxyURL` | string | OPTIONAL: HTTP Proxy to be used for OAuth requests. |
| `--admin.insecure` | | Use insecure connection. |
| `--admin.insecureSkipVerify` | | InsecureSkipVerify controls whether a client verifies the server's certificate chain and host name.Caution: shouldn't be use for production usecases' |
| `--admin.maxBackoffDelay` | string | Max delay for grpc backoff (default "8s") |
| `--admin.maxMessageSizeBytes` | int | The max size in bytes for incoming gRPC messages |
| `--admin.maxRetries` | int | Max number of gRPC retries (default 4) |
| `--admin.perRetryTimeout` | string | gRPC per retry timeout (default "15s") |
| `--admin.pkceConfig.refreshTime` | string | grace period from the token expiry after which it would refresh the token. (default "5m0s") |
| `--admin.pkceConfig.timeout` | string | Amount of time the browser session would be active for authentication from client app. (default "2m0s") |
| `--admin.proxyCommand` | strings | Command for external proxy-authorization token generation |
| `--admin.scopes` | strings | List of scopes to request |
| `--admin.tokenRefreshWindow` | string | Max duration between token refresh attempt and token expiry. (default "0s") |
| `--admin.tokenUrl` | string | OPTIONAL: Your IdP's token endpoint. It'll be discovered from flyte admin's OAuth Metadata endpoint if not provided. |
| `--admin.useAudienceFromAdmin` | | Use Audience configured from admins public endpoint config. |
| `--admin.useAuth` | | Deprecated: Auth will be enabled/disabled based on admin's dynamically discovered information. |
| `--auth.appAuth.externalAuthServer.allowedAudience` | strings | Optional: A list of allowed audiences. If not provided, the audience is expected to be the public Uri of the service. |
| `--auth.appAuth.externalAuthServer.baseUrl` | string | This should be the base url of the authorization server that you are trying to hit. With Okta for instance, it will look something like https://company.okta.com/oauth2/abcdef123456789/ |
| `--auth.appAuth.externalAuthServer.httpProxyURL` | string | OPTIONAL: HTTP Proxy to be used for OAuth requests. |
| `--auth.appAuth.externalAuthServer.metadataUrl` | string | Optional: If the server doesn't support /.well-known/oauth-authorization-server, you can set a custom metadata url here.' |
| `--auth.appAuth.externalAuthServer.retryAttempts` | int | Optional: The number of attempted retries on a transient failure to get the OAuth metadata (default 5) |
| `--auth.appAuth.externalAuthServer.retryDelay` | string | Optional, Duration to wait between retries (default "1s") |
| `--auth.appAuth.selfAuthServer.accessTokenLifespan` | string | Defines the lifespan of issued access tokens. (default "30m0s") |
| `--auth.appAuth.selfAuthServer.authorizationCodeLifespan` | string | Defines the lifespan of issued access tokens. (default "5m0s") |
| `--auth.appAuth.selfAuthServer.claimSymmetricEncryptionKeySecretName` | string | OPTIONAL: Secret name to use to encrypt claims in authcode token. (default "claim_symmetric_key") |
| `--auth.appAuth.selfAuthServer.issuer` | string | Defines the issuer to use when issuing and validating tokens. The default value is https://{requestUri.HostAndPort}/ |
| `--auth.appAuth.selfAuthServer.oldTokenSigningRSAKeySecretName` | string | OPTIONAL: Secret name to use to retrieve Old RSA Signing Key. This can be useful during key rotation to continue to accept older tokens. (default "token_rsa_key_old.pem") |
| `--auth.appAuth.selfAuthServer.refreshTokenLifespan` | string | Defines the lifespan of issued access tokens. (default "1h0m0s") |
| `--auth.appAuth.selfAuthServer.tokenSigningRSAKeySecretName` | string | OPTIONAL: Secret name to use to retrieve RSA Signing Key. (default "token_rsa_key.pem") |
| `--auth.appAuth.thirdPartyConfig.flyteClient.audience` | string | Audience to use when initiating OAuth2 authorization requests. |
| `--auth.appAuth.thirdPartyConfig.flyteClient.clientId` | string | public identifier for the app which handles authorization for a Flyte deployment (default "uctl") |
| `--auth.appAuth.thirdPartyConfig.flyteClient.redirectUri` | string | This is the callback uri registered with the app which handles authorization for a Flyte deployment (default "http://localhost:53593/callback") |
| `--auth.appAuth.thirdPartyConfig.flyteClient.scopes` | strings | Recommended scopes for the client to request. (default [all,offline]) |
| `--auth.disableForGrpc` | | Disables auth enforcement on Grpc Endpoints. |
| `--auth.disableForHttp` | | Disables auth enforcement on HTTP Endpoints. |
| `--auth.grpcAuthorizationHeader` | string | (default "flyte-authorization") |
| `--auth.httpAuthorizationHeader` | string | (default "flyte-authorization") |
| `--auth.httpProxyURL` | string | OPTIONAL: HTTP Proxy to be used for OAuth requests. |
| `--auth.tokenEndpointProxyPath` | string | The path used to proxy calls to the TokenURL |
| `--auth.userAuth.cookieBlockKeySecretName` | string | OPTIONAL: Secret name to use for cookie block key. (default "cookie_block_key") |
| `--auth.userAuth.cookieHashKeySecretName` | string | OPTIONAL: Secret name to use for cookie hash key. (default "cookie_hash_key") |
| `--auth.userAuth.cookieSetting.domain` | string | OPTIONAL: Allows you to set the domain attribute on the auth cookies. |
| `--auth.userAuth.cookieSetting.sameSitePolicy` | string | OPTIONAL: Allows you to declare if your cookie should be restricted to a first-party or same-site context.Wrapper around http.SameSite. (default "DefaultMode") |
| `--auth.userAuth.httpProxyURL` | string | OPTIONAL: HTTP Proxy to be used for OAuth requests. |
| `--auth.userAuth.idpQueryParameter` | string | idp query parameter used for selecting a particular IDP for doing user authentication. Eg: for Okta passing idp={IDP-ID} forces the authentication to happen with IDP-ID |
| `--auth.userAuth.openId.baseUrl` | string | |
| `--auth.userAuth.openId.clientId` | string | |
| `--auth.userAuth.openId.clientSecretFile` | string | |
| `--auth.userAuth.openId.clientSecretName` | string | (default "oidc_client_secret") |
| `--auth.userAuth.openId.scopes` | strings | (default [openid,profile]) |
| `--auth.userAuth.redirectUrl` | string | (default "/console") |
| `--authorizer.internalCommunicationConfig.enabled` | | Enables authorization decisions for internal communication. (default true) |
| `--authorizer.internalCommunicationConfig.ingressIdentity` | string | IngressIdentity used in the cluster. Needed to exclude the communication coming from ingress. (default "ingress-nginx.ingress-nginx.serviceaccount.identity.linkerd.cluster.local") |
| `--authorizer.internalCommunicationConfig.tenantUrlPatternIdentity` | string | UrlPatternIdentity of the internal tenant service endpoint identities. (default "{{ service }}.{{ org }}.serviceaccount.identity.linkerd.cluster.local") |
| `--authorizer.internalCommunicationConfig.urlPatternIdentity` | string | UrlPatternIdentity of the internal service endpoint identities. (default "{{ service }}-helmchart.{{ service }}.serviceaccount.identity.linkerd.cluster.local") |
| `--authorizer.mode` | string | (default "Active") |
| `--authorizer.organizationConfig.PolicyConfig.adminPolicyDescription` | string | description for the boilerplate admin policy (default "Contributor permissions and full admin permissions to manage users and view usage dashboards") |
| `--authorizer.organizationConfig.PolicyConfig.contributorPolicyDescription` | string | description for the boilerplate contributor policy (default "Viewer permissions and permissions to create workflows, tasks, launch plans, and executions") |
| `--authorizer.organizationConfig.PolicyConfig.defaultUserPolicyRoleType` | string | name of the role type to determine which default policy new users added to the organization should be assigned (default "Viewer") |
| `--authorizer.organizationConfig.PolicyConfig.serverlessContributorPolicyDescription` | string | description for the boilerplate serverless contributor policy (default "Viewer permissions and permissions to create workflows, tasks, launch plans, and executions") |
| `--authorizer.organizationConfig.PolicyConfig.serverlessViewerPolicyDescription` | string | description for the boilerplate serverless viewer policy (default "Permissions to view Flyte entities") |
| `--authorizer.organizationConfig.PolicyConfig.viewerPolicyDescription` | string | description for the boilerplate viewer policy (default "Permissions to view Flyte entities") |
| `--authorizer.organizationConfig.defaultPolicyCacheDuration` | string | Cache entry duration for the store of the default policy per organization (default "10m0s") |
| `--authorizer.syncRuleRefreshInterval` | string | (default "1m0s") |
| `--authorizer.type` | string | (default "UserClouds") |
| `--authorizer.userCloudsClient.cache.redis.ttl.edgeTypes` | string | Specifies how long edge types remain in the cache.. (default "30m0s") |
| `--authorizer.userCloudsClient.cache.redis.ttl.edges` | string | Specifies how long edges remain in the cache. (default "30m0s") |
| `--authorizer.userCloudsClient.cache.redis.ttl.objectTypes` | string | Specifies how long object types remain in the cache. (default "30m0s") |
| `--authorizer.userCloudsClient.cache.redis.ttl.objects` | string | Specifies how long objects remain in the cache. (default "30m0s") |
| `--authorizer.userCloudsClient.cache.type` | string | Cache type to use. (default "none") |
| `--authorizer.userCloudsClient.clientID` | string | UserClouds client id |
| `--authorizer.userCloudsClient.clientSecretName` | string | UserCloud client secret name to read from the secret manager. (default "userclouds-client-secret") |
| `--authorizer.userCloudsClient.enableLogging` | | Enable userclouds client's internal logging. Calls to post logs take 250-350 ms and will impact p99 latency, enable with caution. |
| `--authorizer.userCloudsClient.tenantID` | string | UserClouds tenant id. Should be a UUID. |
| `--authorizer.userCloudsClient.tenantUrl` | string | Something like https://{yourtenant}.tenant.userclouds.com |
| `--config` | string | config file (default is /Users/andrew/.union/config.yaml) |
| `--connection.environment` | string | |
| `--connection.region` | string | |
| `--connection.rootTenantURLPattern` | string | Pattern for tenant url. (default "dns:///{{ organization }}.cloud-staging.union.ai") |
| `--console.endpoint` | string | Endpoint of console, if different than flyte admin |
| `--database.connMaxLifeTime` | string | sets the maximum amount of time a connection may be reused (default "1h0m0s") |
| `--database.enableForeignKeyConstraintWhenMigrating` | | Whether to enable gorm foreign keys when migrating the db |
| `--database.maxIdleConnections` | int | maxIdleConnections sets the maximum number of connections in the idle connection pool. (default 10) |
| `--database.maxOpenConnections` | int | maxOpenConnections sets the maximum number of open connections to the database. (default 100) |
| `--database.postgres.dbname` | string | The database name (default "postgres") |
| `--database.postgres.debug` | | |
| `--database.postgres.host` | string | The host name of the database server (default "localhost") |
| `--database.postgres.options` | string | See http://gorm.io/docs/connecting_to_the_database.html for available options passed, in addition to the above. (default "sslmode=disable") |
| `--database.postgres.password` | string | The database password. (default "postgres") |
| `--database.postgres.passwordPath` | string | Points to the file containing the database password. |
| `--database.postgres.port` | int | The port name of the database server (default 30001) |
| `--database.postgres.readReplicaHost` | string | The host name of the read replica database server (default "localhost") |
| `--database.postgres.username` | string | The database user who is connecting to the server. (default "postgres") |
| `--database.sqlite.file` | string | The path to the file (existing or new) where the DB should be created / stored. If existing, then this will be re-used, else a new will be created |
| `--db.connectionPool.maxConnectionLifetime` | string | (default "0s") |
| `--db.connectionPool.maxIdleConnections` | int | |
| `--db.connectionPool.maxOpenConnections` | int | |
| `--db.dbname` | string | (default "postgres") |
| `--db.debug` | | |
| `--db.host` | string | (default "postgres") |
| `--db.log_level` | int | (default 4) |
| `--db.options` | string | (default "sslmode=disable") |
| `--db.password` | string | |
| `--db.passwordPath` | string | |
| `--db.port` | int | (default 5432) |
| `--db.username` | string | (default "postgres") |
| `-d`, `--domain` | string | Specifies the Flyte project's domain. |
| `--files.archive` | | Pass in archive file either an http link or local path. |
| `--files.assumableIamRole` | string | Custom assumable iam auth role to register launch plans with. |
| `--files.continueOnError` | | Continue on error when registering files. |
| `--files.destinationDirectory` | string | Location of source code in container. |
| `--files.dryRun` | | Execute command without making any modifications. |
| `--files.enableSchedule` | | Enable the schedule if the files contain schedulable launchplan. |
| `--files.force` | | Force use of version number on entities registered with flyte. |
| `--files.k8ServiceAccount` | string | Deprecated. Please use `--K8sServiceAccount`|
| `--files.k8sServiceAccount` | string | Custom kubernetes service account auth role to register launch plans with. |
| `--files.outputLocationPrefix` | string | Custom output location prefix for offloaded types (files/schemas). |
| `--files.sourceUploadPath` | string | Deprecated: Update flyte admin to avoid having to configure storage access from uctl. |
| `--files.version` | string | Version of the entity to be registered with flyte which are un-versioned after serialization. |
| `--logger.formatter.type` | string | Sets logging format type. (default "json") |
| `--logger.level` | int | Sets the minimum logging level. (default 3) |
| `--logger.mute` | | Mutes all logs regardless of severity. Intended for benchmarks/tests only. |
| `--logger.show-source` | | Includes source code location in logs. |
| `--org` | string | Organization to work on. If not set, default to user's org. |
| `--otel.file.filename` | string | Filename to store exported telemetry traces (default "/tmp/trace.txt") |
| `--otel.jaeger.endpoint` | string | Endpoint for the jaeger telemetry trace ingestor (default "http://localhost:14268/api/traces") |
| `--otel.otlpgrpc.endpoint` | string | Endpoint for the OTLP telemetry trace collector (default "http://localhost:4317") |
| `--otel.otlphttp.endpoint` | string | Endpoint for the OTLP telemetry trace collector (default "http://localhost:4318/v1/traces") |
| `--otel.sampler.parentSampler` | string | Sets the parent sampler to use for the tracer (default "always") |
| `--otel.type` | string | Sets the type of exporter to configure [noop/file/jaeger/otlpgrpc/otlphttp]. (default "noop") |
| `-o`, `--output` | string | Specifies the output type - supported formats [TABLE JSON YAML DOT DOTURL]. NOTE: dot, doturl are only supported for Workflow (default "table") |
| `--plugins.catalogcache.reader.maxItems` | int | Maximum number of entries to keep in the index. (default 10000) |
| `--plugins.catalogcache.reader.maxRetries` | int | Maximum number of retries per item. (default 3) |
| `--plugins.catalogcache.reader.workers` | int | Number of concurrent workers to start processing the queue. (default 10) |
| `--plugins.catalogcache.writer.maxItems` | int | Maximum number of entries to keep in the index. (default 10000) |
| `--plugins.catalogcache.writer.maxRetries` | int | Maximum number of retries per item. (default 3) |
| `--plugins.catalogcache.writer.workers` | int | Number of concurrent workers to start processing the queue. (default 10) |
| `-p`, `--project` | string | Specifies the Flyte project. |
| `--rediscache.passwordSecretName` | string | Name of secret with Redis password. |
| `--rediscache.primaryEndpoint` | string | Primary endpoint for the redis cache that can be used for both reads and writes. |
| `--rediscache.replicaEndpoint` | string | Replica endpoint for the redis cache that can be used for reads. |
| `--secrets.env-prefix` | string | Prefix for environment variables (default "FLYTE_SECRET_") |
| `--secrets.secrets-prefix` | string | Prefix where to look for secrets file (default "/etc/secrets") |
| `--secrets.type` | string | Sets the type of storage to configure [local]. (default "local") |
| `--server.dataProxy.download.maxExpiresIn` | string | Maximum allowed expiration duration. (default "1h0m0s") |
| `--server.dataProxy.upload.defaultFileNameLength` | int | Default length for the generated file name if not provided in the request. (default 20) |
| `--server.dataProxy.upload.maxExpiresIn` | string | Maximum allowed expiration duration. (default "1h0m0s") |
| `--server.dataProxy.upload.maxSize` | string | Maximum allowed upload size. (default "6Mi") |
| `--server.dataProxy.upload.storagePrefix` | string | Storage prefix to use for all upload requests. |
| `--server.grpc.enableGrpcLatencyMetrics` | | Enable grpc latency metrics. Note Histograms metrics can be expensive on Prometheus servers. |
| `--server.grpc.maxMessageSizeBytes` | int | The max size in bytes for incoming gRPC messages |
| `--server.grpc.port` | int | On which grpc port to serve admin (default 8089) |
| `--server.grpc.serverReflection` | | Enable GRPC Server Reflection (default true) |
| `--server.grpcPort` | int | deprecated |
| `--server.grpcServerReflection` | | deprecated |
| `--server.httpPort` | int | On which http port to serve admin (default 8088) |
| `--server.kube-config` | string | Path to kubernetes client config file, default is empty, useful for incluster config. |
| `--server.kubeClientConfig.burst` | int | Max burst rate for throttle. 0 defaults to 10 (default 25) |
| `--server.kubeClientConfig.qps` | int32 | Max QPS to the master for requests to KubeAPI. 0 defaults to 5. (default 100) |
| `--server.kubeClientConfig.timeout` | string | Max duration allowed for every request to KubeAPI before giving up. 0 implies no timeout. (default "30s") |
| `--server.master` | string | The address of the Kubernetes API server. |
| `--server.readHeaderTimeoutSeconds` | int | The amount of time allowed to read request headers. (default 32) |
| `--server.security.allowCors` | | (default true) |
| `--server.security.allowedHeaders` | strings | (default [Content-Type,flyte-authorization]) |
| `--server.security.allowedOrigins` | strings | (default [*]) |
| `--server.security.auditAccess` | | |
| `--server.security.secure` | | |
| `--server.security.ssl.certificateFile` | string | |
| `--server.security.ssl.keyFile` | string | |
| `--server.security.useAuth` | | |
| `--server.thirdPartyConfig.flyteClient.audience` | string | Audience to use when initiating OAuth2 authorization requests. |
| `--server.thirdPartyConfig.flyteClient.clientId` | string | public identifier for the app which handles authorization for a Flyte deployment |
| `--server.thirdPartyConfig.flyteClient.redirectUri` | string | This is the callback uri registered with the app which handles authorization for a Flyte deployment |
| `--server.thirdPartyConfig.flyteClient.scopes` | strings | Recommended scopes for the client to request. |
| `--server.watchService.maxActiveClusterConnections` | int | (default 5) |
| `--server.watchService.maxPageSize` | int | (default 50000) |
| `--server.watchService.nonTerminalStatusUpdatesInterval` | string | (default "1m0s") |
| `--server.watchService.pollInterval` | string | (default "1s") |
| `--sharedservice.connectPort` | string | On which connect port to serve admin (default "8080") |
| `--sharedservice.grpc.grpcMaxResponseStatusBytes` | int32 | specifies the maximum (uncompressed) size of header list that the client is prepared to accept on grpc calls (default 32000) |
| `--sharedservice.grpc.maxConcurrentStreams` | int | Limit on the number of concurrent streams to each ServerTransport. (default 100) |
| `--sharedservice.grpc.maxMessageSizeBytes` | int | Limit on the size of message that can be received on the server. (default 10485760) |
| `--sharedservice.grpcServerReflection` | | Enable GRPC Server Reflection (default true) |
| `--sharedservice.httpPort` | string | On which http port to serve admin (default "8089") |
| `--sharedservice.kubeConfig` | string | Path to kubernetes client config file. |
| `--sharedservice.master` | string | The address of the Kubernetes API server. |
| `--sharedservice.metrics.enableClientGrpcHistograms` | | Enable client grpc histograms (default true) |
| `--sharedservice.metrics.enableGrpcHistograms` | | Enable grpc histograms (default true) |
| `--sharedservice.metrics.scope` | string | Scope to emit metrics under (default "service:") |
| `--sharedservice.port` | string | On which grpc port to serve admin (default "8080") |
| `--sharedservice.profiler.enabled` | | Enable Profiler on server |
| `--sharedservice.profilerPort` | string | Profile port to start listen for pprof and metric handlers on. (default "10254") |
| `--sharedservice.security.allowCors` | | |
| `--sharedservice.security.allowLocalhostAccess` | | Whether to permit localhost unauthenticated access to the server |
| `--sharedservice.security.allowedHeaders` | strings | |
| `--sharedservice.security.allowedOrigins` | strings | |
| `--sharedservice.security.auditAccess` | | |
| `--sharedservice.security.orgOverride` | string | Override org in identity context if localhost access enabled |
| `--sharedservice.security.secure` | | |
| `--sharedservice.security.ssl.certificateAuthorityFile` | string | |
| `--sharedservice.security.ssl.certificateFile` | string | |
| `--sharedservice.security.ssl.keyFile` | string | |
| `--sharedservice.security.useAuth` | | |
| `--sharedservice.sync.syncInterval` | string | Time interval to sync (default "5m0s") |
| `--storage.cache.max_size_mbs` | int | Maximum size of the cache where the Blob store data is cached in-memory. If not specified or set to 0, cache is not used |
| `--storage.cache.target_gc_percent` | int | Sets the garbage collection target percentage. |
| `--storage.connection.access-key` | string | Access key to use. Only required when authtype is set to accesskey. |
| `--storage.connection.auth-type` | string | Auth Type to use [iam, accesskey]. (default "iam") |
| `--storage.connection.disable-ssl` | | Disables SSL connection. Should only be used for development. |
| `--storage.connection.endpoint` | string | URL for storage client to connect to. |
| `--storage.connection.region` | string | Region to connect to. (default "us-east-1") |
| `--storage.connection.secret-key` | string | Secret to use when accesskey is set. |
| `--storage.container` | string | Initial container (in s3 a bucket) to create -if it doesn't exist-.' |
| `--storage.defaultHttpClient.timeout` | string | Sets time out on the http client. (default "0s") |
| `--storage.enable-multicontainer` | | If this is true, then the container argument is overlooked and redundant. This config will automatically open new connections to new containers/buckets as they are encountered |
| `--storage.limits.maxDownloadMBs` | int | Maximum allowed download size (in MBs) per call. (default 2) |
| `--storage.stow.config` | stringToString | Configuration for stow backend. Refer to github/flyteorg/stow (default []) |
| `--storage.stow.kind` | string | Kind of Stow backend to use. Refer to github/flyteorg/stow |
| `--storage.type` | string | Sets the type of storage to configure [s3/minio/local/mem/stow]. (default "s3") |
| `--union.auth.authorizationMetadataKey` | string | Authorization Header to use when passing Access Tokens to the server (default "flyte-authorization") |
| `--union.auth.clientId` | string | Client ID |
| `--union.auth.clientSecretEnvVar` | string | Environment variable containing the client secret |
| `--union.auth.clientSecretLocation` | string | File containing the client secret |
| `--union.auth.deviceFlow.pollInterval` | string | amount of time the device flow would poll the token endpoint if auth server doesn't return a polling interval. Okta and google IDP do return an interval' (default "5s") |
| `--union.auth.deviceFlow.refreshTime` | string | grace period from the token expiry after which it would refresh the token. (default "5m0s") |
| `--union.auth.deviceFlow.timeout` | string | amount of time the device flow should complete or else it will be cancelled. (default "10m0s") |
| `--union.auth.enable` | | Whether to enable an authenticated conenction when communicating with admin. (default true) |
| `--union.auth.externalAuth.command` | strings | Command for external authentication token generation |
| `--union.auth.pkce.refreshTime` | string | grace period from the token expiry after which it would refresh the token. (default "5m0s") |
| `--union.auth.pkce.timeout` | string | Amount of time the browser session would be active for authentication from client app. (default "15s") |
| `--union.auth.scopes` | strings | List of scopes to request |
| `--union.auth.tokenRefreshWindow` | string | Max duration between token refresh attempt and token expiry. (default "1h0m0s") |
| `--union.auth.tokenUrl` | string | OPTIONAL: Your IdP's token endpoint. It'll be discovered from flyte admin's OAuth Metadata endpoint if not provided. |
| `--union.auth.type` | string | Type of OAuth2 flow used for communicating with admin. (default "Pkce") |
| `--union.cache.maxItemsCount` | int | Maximum number of items to keep in the cache before evicting. (default 1000) |
| `--union.connection.host` | string | Host to connect to (default "dns:///utt-mgdp-stg-us-east-2.cloud-staging.union.ai") |
| `--union.connection.insecure` | | Whether to connect over insecure channel |
| `--union.connection.insecureSkipVerify` | | InsecureSkipVerify controls whether a client verifies the server's certificate chain and host name.Caution: shouldn't be use for production usecases' |
| `--union.connection.keepAliveConfig.permitWithoutStream` | | If true, client sends keepalive pings even with no active RPCs. |
| `--union.connection.keepAliveConfig.time` | string | After a duration of this time if the client doesn't see any activity it pings the server to see if the transport is still alive. (default "20s") |
| `--union.connection.keepAliveConfig.timeout` | string | After having pinged for keepalive check, the client waits for a duration of Timeout and if no activity is seen even after that the connection is closed. (default "2m0s") |
| `--union.connection.maxBackoffDelay` | string | Max delay for grpc backoff (default "8s") |
| `--union.connection.maxRecvMsgSize` | int | Maximum size of a message in bytes of a gRPC message (default 10485760) |
| `--union.connection.maxRetries` | int | Max number of gRPC retries (default 4) |
| `--union.connection.minConnectTimeout` | string | Minimum timeout for establishing a connection (default "20s") |
| `--union.connection.perRetryTimeout` | string | gRPC per retry timeout (default "15s") |
| `--union.connection.serviceConfig` | string | Defines gRPC experimental JSON Service Config (default "{"loadBalancingConfig": [{"round_robin":{}}]}") |
| `--union.connection.trustedIdentityClaims.enabled` | | Enables passing of trusted claims while making inter service calls |
| `--union.connection.trustedIdentityClaims.externalIdentityClaim` | string | External identity claim of the service which is authorized to make internal service call. These are verified against userclouds actions |
| `--union.connection.trustedIdentityClaims.externalIdentityTypeClaim` | string | External identity type claim of app or user to use for the current service identity. It should be an 'app' for inter service communication |
| `--union.internalConnectionConfig.-` | stringToString | (default []) |
| `--union.internalConnectionConfig.enabled` | | Enables internal service to service communication instead of going through ingress. |
| `--union.internalConnectionConfig.urlPattern` | string | UrlPattern of the internal service endpoints. (default "{{ service }}-helmchart.{{ service }}.svc.cluster.local:80") |
| `--webhook.awsSecretManager.sidecarImage` | string | Specifies the sidecar docker image to use (default "docker.io/amazon/aws-secrets-manager-secret-sidecar:v0.1.4") |
| `--webhook.certDir` | string | Certificate directory to use to write generated certs. Defaults to /etc/webhook/certs/ (default "/etc/webhook/certs") |
| `--webhook.embeddedSecretManagerConfig.awsConfig.region` | string | AWS region |
| `--webhook.embeddedSecretManagerConfig.fileMountInitContainer.image` | string | Specifies init container image to use for mounting secrets as files. (default "busybox:1.28") |
| `--webhook.embeddedSecretManagerConfig.gcpConfig.project` | string | GCP project to be used for secret manager |
| `--webhook.embeddedSecretManagerConfig.type` | string | (default "AWS") |
| `--webhook.gcpSecretManager.sidecarImage` | string | Specifies the sidecar docker image to use (default "gcr.io/google.com/cloudsdktool/cloud-sdk:alpine") |
| `--webhook.listenPort` | int | The port to use to listen to webhook calls. Defaults to 9443 (default 9443) |
| `--webhook.localCert` | | write certs locally. Defaults to false |
| `--webhook.metrics-prefix` | string | An optional prefix for all published metrics. (default "flyte:") |
| `--webhook.secretName` | string | Secret name to write generated certs to. (default "flyte-pod-webhook") |
| `--webhook.serviceName` | string | The name of the webhook service. (default "flyte-pod-webhook") |
| `--webhook.servicePort` | int32 | The port on the service that hosting webhook. (default 443) |
| `--webhook.vaultSecretManager.role` | string | Specifies the vault role to use (default "flyte") |
=== PAGE: https://www.union.ai/docs/v1/serverless/api-reference/uctl-cli/uctl-delete/uctl-delete-cluster-resource-attribute ===
# uctl delete cluster-resource-attribute
Deletes matchable resources of cluster attributes.
## Synopsis
Delete cluster resource attributes for the given project and domain, in
combination with the workflow name.
For project flytesnacks and development domain, run:
```shell
$ uctl delete cluster-resource-attribute -p flytesnacks -d development
```
To delete cluster resource attribute using the config file that was used
to create it, run:
```shell
$ uctl delete cluster-resource-attribute --attrFile cra.yaml
```
For example, here's the config file cra.yaml:
``` yaml
domain: development
project: flytesnacks
attributes:
foo: "bar"
buzz: "lightyear"
```
Attributes are optional in the file, which are unread during the
`delete` command but can be retained since the same file can be used
for `get`, `update` and `delete` commands.
To delete cluster resource attribute for the workflow
`core.control_flow.merge_sort.merge_sort`, run:
```shell
$ uctl delete cluster-resource-attribute -p flytesnacks -d development core.control_flow.merge_sort.merge_sort
```
Usage:
```shell
$ uctl delete cluster-resource-attribute [flags]
```
## Options
| Option | Type | Description |
|--------|------|-------------|
| `--attrFile` | string | attribute file name to be used for delete attribute for the resource type. |
| `--dryRun` | | execute command without making any modifications. |
| `-h`, `--help` | help for cluster-resource-attribute |
### Options inherited from parent commands
| Option | Type | Description |
|--------|------|-------------|
| `--admin.audience` | string | Audience to use when initiating OAuth2 authorization requests. |
| `--admin.authType` | string | Type of OAuth2 flow used for communicating with admin.ClientSecret, Pkce, ExternalCommand are valid values (default "ClientSecret") |
| `--admin.authorizationHeader` | string | Custom metadata header to pass JWT |
| `--admin.authorizationServerUrl` | string | This is the URL to your IdP's authorization server. It'll default to Endpoint |
| `--admin.caCertFilePath` | string | Use specified certificate file to verify the admin server peer. |
| `--admin.clientId` | string | Client ID (default "flytepropeller") |
| `--admin.clientSecretEnvVar` | string | Environment variable containing the client secret |
| `--admin.clientSecretLocation` | string | File containing the client secret (default "/etc/secrets/client_secret") |
| `--admin.command` | strings | Command for external authentication token generation |
| `--admin.defaultOrg` | string | OPTIONAL: Default org to use to support non-org based cli's.'. |
| `--admin.defaultServiceConfig` | string | |
| `--admin.deviceFlowConfig.pollInterval` | string | amount of time the device flow would poll the token endpoint if auth server doesn't return a polling interval. Okta and google IDP do return an interval' (default "5s") |
| `--admin.deviceFlowConfig.refreshTime` | string | grace period from the token expiry after which it would refresh the token. (default "5m0s") |
| `--admin.deviceFlowConfig.timeout` | string | amount of time the device flow should complete or else it will be cancelled. (default "10m0s") |
| `--admin.endpoint` | string | For admin types, specify where the uri of the service is located. |
| `--admin.httpProxyURL` | string | OPTIONAL: HTTP Proxy to be used for OAuth requests. |
| `--admin.insecure` | | Use insecure connection. |
| `--admin.insecureSkipVerify` | | InsecureSkipVerify controls whether a client verifies the server's certificate chain and host name.Caution: shouldn't be use for production usecases' |
| `--admin.maxBackoffDelay` | string | Max delay for grpc backoff (default "8s") |
| `--admin.maxMessageSizeBytes` | int | The max size in bytes for incoming gRPC messages |
| `--admin.maxRetries` | int | Max number of gRPC retries (default 4) |
| `--admin.perRetryTimeout` | string | gRPC per retry timeout (default "15s") |
| `--admin.pkceConfig.refreshTime` | string | grace period from the token expiry after which it would refresh the token. (default "5m0s") |
| `--admin.pkceConfig.timeout` | string | Amount of time the browser session would be active for authentication from client app. (default "2m0s") |
| `--admin.proxyCommand` | strings | Command for external proxy-authorization token generation |
| `--admin.scopes` | strings | List of scopes to request |
| `--admin.tokenRefreshWindow` | string | Max duration between token refresh attempt and token expiry. (default "0s") |
| `--admin.tokenUrl` | string | OPTIONAL: Your IdP's token endpoint. It'll be discovered from flyte admin's OAuth Metadata endpoint if not provided. |
| `--admin.useAudienceFromAdmin` | | Use Audience configured from admins public endpoint config. |
| `--admin.useAuth` | | Deprecated: Auth will be enabled/disabled based on admin's dynamically discovered information. |
| `--auth.appAuth.externalAuthServer.allowedAudience` | strings | Optional: A list of allowed audiences. If not provided, the audience is expected to be the public Uri of the service. |
| `--auth.appAuth.externalAuthServer.baseUrl` | string | This should be the base url of the authorization server that you are trying to hit. With Okta for instance, it will look something like https://company.okta.com/oauth2/abcdef123456789/ |
| `--auth.appAuth.externalAuthServer.httpProxyURL` | string | OPTIONAL: HTTP Proxy to be used for OAuth requests. |
| `--auth.appAuth.externalAuthServer.metadataUrl` | string | Optional: If the server doesn't support /.well-known/oauth-authorization-server, you can set a custom metadata url here.' |
| `--auth.appAuth.externalAuthServer.retryAttempts` | int | Optional: The number of attempted retries on a transient failure to get the OAuth metadata (default 5) |
| `--auth.appAuth.externalAuthServer.retryDelay` | string | Optional, Duration to wait between retries (default "1s") |
| `--auth.appAuth.selfAuthServer.accessTokenLifespan` | string | Defines the lifespan of issued access tokens. (default "30m0s") |
| `--auth.appAuth.selfAuthServer.authorizationCodeLifespan` | string | Defines the lifespan of issued access tokens. (default "5m0s") |
| `--auth.appAuth.selfAuthServer.claimSymmetricEncryptionKeySecretName` | string | OPTIONAL: Secret name to use to encrypt claims in authcode token. (default "claim_symmetric_key") |
| `--auth.appAuth.selfAuthServer.issuer` | string | Defines the issuer to use when issuing and validating tokens. The default value is https://{requestUri.HostAndPort}/ |
| `--auth.appAuth.selfAuthServer.oldTokenSigningRSAKeySecretName` | string | OPTIONAL: Secret name to use to retrieve Old RSA Signing Key. This can be useful during key rotation to continue to accept older tokens. (default "token_rsa_key_old.pem") |
| `--auth.appAuth.selfAuthServer.refreshTokenLifespan` | string | Defines the lifespan of issued access tokens. (default "1h0m0s") |
| `--auth.appAuth.selfAuthServer.tokenSigningRSAKeySecretName` | string | OPTIONAL: Secret name to use to retrieve RSA Signing Key. (default "token_rsa_key.pem") |
| `--auth.appAuth.thirdPartyConfig.flyteClient.audience` | string | Audience to use when initiating OAuth2 authorization requests. |
| `--auth.appAuth.thirdPartyConfig.flyteClient.clientId` | string | public identifier for the app which handles authorization for a Flyte deployment (default "uctl") |
| `--auth.appAuth.thirdPartyConfig.flyteClient.redirectUri` | string | This is the callback uri registered with the app which handles authorization for a Flyte deployment (default "http://localhost:53593/callback") |
| `--auth.appAuth.thirdPartyConfig.flyteClient.scopes` | strings | Recommended scopes for the client to request. (default [all,offline]) |
| `--auth.disableForGrpc` | | Disables auth enforcement on Grpc Endpoints. |
| `--auth.disableForHttp` | | Disables auth enforcement on HTTP Endpoints. |
| `--auth.grpcAuthorizationHeader` | string | (default "flyte-authorization") |
| `--auth.httpAuthorizationHeader` | string | (default "flyte-authorization") |
| `--auth.httpProxyURL` | string | OPTIONAL: HTTP Proxy to be used for OAuth requests. |
| `--auth.tokenEndpointProxyPath` | string | The path used to proxy calls to the TokenURL |
| `--auth.userAuth.cookieBlockKeySecretName` | string | OPTIONAL: Secret name to use for cookie block key. (default "cookie_block_key") |
| `--auth.userAuth.cookieHashKeySecretName` | string | OPTIONAL: Secret name to use for cookie hash key. (default "cookie_hash_key") |
| `--auth.userAuth.cookieSetting.domain` | string | OPTIONAL: Allows you to set the domain attribute on the auth cookies. |
| `--auth.userAuth.cookieSetting.sameSitePolicy` | string | OPTIONAL: Allows you to declare if your cookie should be restricted to a first-party or same-site context.Wrapper around http.SameSite. (default "DefaultMode") |
| `--auth.userAuth.httpProxyURL` | string | OPTIONAL: HTTP Proxy to be used for OAuth requests. |
| `--auth.userAuth.idpQueryParameter` | string | idp query parameter used for selecting a particular IDP for doing user authentication. Eg: for Okta passing idp={IDP-ID} forces the authentication to happen with IDP-ID |
| `--auth.userAuth.openId.baseUrl` | string | |
| `--auth.userAuth.openId.clientId` | string | |
| `--auth.userAuth.openId.clientSecretFile` | string | |
| `--auth.userAuth.openId.clientSecretName` | string | (default "oidc_client_secret") |
| `--auth.userAuth.openId.scopes` | strings | (default [openid,profile]) |
| `--auth.userAuth.redirectUrl` | string | (default "/console") |
| `--authorizer.internalCommunicationConfig.enabled` | | Enables authorization decisions for internal communication. (default true) |
| `--authorizer.internalCommunicationConfig.ingressIdentity` | string | IngressIdentity used in the cluster. Needed to exclude the communication coming from ingress. (default "ingress-nginx.ingress-nginx.serviceaccount.identity.linkerd.cluster.local") |
| `--authorizer.internalCommunicationConfig.tenantUrlPatternIdentity` | string | UrlPatternIdentity of the internal tenant service endpoint identities. (default "{{ service }}.{{ org }}.serviceaccount.identity.linkerd.cluster.local") |
| `--authorizer.internalCommunicationConfig.urlPatternIdentity` | string | UrlPatternIdentity of the internal service endpoint identities. (default "{{ service }}-helmchart.{{ service }}.serviceaccount.identity.linkerd.cluster.local") |
| `--authorizer.mode` | string | (default "Active") |
| `--authorizer.organizationConfig.PolicyConfig.adminPolicyDescription` | string | description for the boilerplate admin policy (default "Contributor permissions and full admin permissions to manage users and view usage dashboards") |
| `--authorizer.organizationConfig.PolicyConfig.contributorPolicyDescription` | string | description for the boilerplate contributor policy (default "Viewer permissions and permissions to create workflows, tasks, launch plans, and executions") |
| `--authorizer.organizationConfig.PolicyConfig.defaultUserPolicyRoleType` | string | name of the role type to determine which default policy new users added to the organization should be assigned (default "Viewer") |
| `--authorizer.organizationConfig.PolicyConfig.serverlessContributorPolicyDescription` | string | description for the boilerplate serverless contributor policy (default "Viewer permissions and permissions to create workflows, tasks, launch plans, and executions") |
| `--authorizer.organizationConfig.PolicyConfig.serverlessViewerPolicyDescription` | string | description for the boilerplate serverless viewer policy (default "Permissions to view Flyte entities") |
| `--authorizer.organizationConfig.PolicyConfig.viewerPolicyDescription` | string | description for the boilerplate viewer policy (default "Permissions to view Flyte entities") |
| `--authorizer.organizationConfig.defaultPolicyCacheDuration` | string | Cache entry duration for the store of the default policy per organization (default "10m0s") |
| `--authorizer.syncRuleRefreshInterval` | string | (default "1m0s") |
| `--authorizer.type` | string | (default "UserClouds") |
| `--authorizer.userCloudsClient.cache.redis.ttl.edgeTypes` | string | Specifies how long edge types remain in the cache.. (default "30m0s") |
| `--authorizer.userCloudsClient.cache.redis.ttl.edges` | string | Specifies how long edges remain in the cache. (default "30m0s") |
| `--authorizer.userCloudsClient.cache.redis.ttl.objectTypes` | string | Specifies how long object types remain in the cache. (default "30m0s") |
| `--authorizer.userCloudsClient.cache.redis.ttl.objects` | string | Specifies how long objects remain in the cache. (default "30m0s") |
| `--authorizer.userCloudsClient.cache.type` | string | Cache type to use. (default "none") |
| `--authorizer.userCloudsClient.clientID` | string | UserClouds client id |
| `--authorizer.userCloudsClient.clientSecretName` | string | UserCloud client secret name to read from the secret manager. (default "userclouds-client-secret") |
| `--authorizer.userCloudsClient.enableLogging` | | Enable userclouds client's internal logging. Calls to post logs take 250-350 ms and will impact p99 latency, enable with caution. |
| `--authorizer.userCloudsClient.tenantID` | string | UserClouds tenant id. Should be a UUID. |
| `--authorizer.userCloudsClient.tenantUrl` | string | Something like https://{yourtenant}.tenant.userclouds.com |
| `--config` | string | config file (default is /Users/andrew/.union/config.yaml) |
| `--connection.environment` | string | |
| `--connection.region` | string | |
| `--connection.rootTenantURLPattern` | string | Pattern for tenant url. (default "dns:///{{ organization }}.cloud-staging.union.ai") |
| `--console.endpoint` | string | Endpoint of console, if different than flyte admin |
| `--database.connMaxLifeTime` | string | sets the maximum amount of time a connection may be reused (default "1h0m0s") |
| `--database.enableForeignKeyConstraintWhenMigrating` | | Whether to enable gorm foreign keys when migrating the db |
| `--database.maxIdleConnections` | int | maxIdleConnections sets the maximum number of connections in the idle connection pool. (default 10) |
| `--database.maxOpenConnections` | int | maxOpenConnections sets the maximum number of open connections to the database. (default 100) |
| `--database.postgres.dbname` | string | The database name (default "postgres") |
| `--database.postgres.debug` | | |
| `--database.postgres.host` | string | The host name of the database server (default "localhost") |
| `--database.postgres.options` | string | See http://gorm.io/docs/connecting_to_the_database.html for available options passed, in addition to the above. (default "sslmode=disable") |
| `--database.postgres.password` | string | The database password. (default "postgres") |
| `--database.postgres.passwordPath` | string | Points to the file containing the database password. |
| `--database.postgres.port` | int | The port name of the database server (default 30001) |
| `--database.postgres.readReplicaHost` | string | The host name of the read replica database server (default "localhost") |
| `--database.postgres.username` | string | The database user who is connecting to the server. (default "postgres") |
| `--database.sqlite.file` | string | The path to the file (existing or new) where the DB should be created / stored. If existing, then this will be re-used, else a new will be created |
| `--db.connectionPool.maxConnectionLifetime` | string | (default "0s") |
| `--db.connectionPool.maxIdleConnections` | int | |
| `--db.connectionPool.maxOpenConnections` | int | |
| `--db.dbname` | string | (default "postgres") |
| `--db.debug` | | |
| `--db.host` | string | (default "postgres") |
| `--db.log_level` | int | (default 4) |
| `--db.options` | string | (default "sslmode=disable") |
| `--db.password` | string | |
| `--db.passwordPath` | string | |
| `--db.port` | int | (default 5432) |
| `--db.username` | string | (default "postgres") |
| `-d`, `--domain` | string | Specifies the Flyte project's domain. |
| `--files.archive` | | Pass in archive file either an http link or local path. |
| `--files.assumableIamRole` | string | Custom assumable iam auth role to register launch plans with. |
| `--files.continueOnError` | | Continue on error when registering files. |
| `--files.destinationDirectory` | string | Location of source code in container. |
| `--files.dryRun` | | Execute command without making any modifications. |
| `--files.enableSchedule` | | Enable the schedule if the files contain schedulable launchplan. |
| `--files.force` | | Force use of version number on entities registered with flyte. |
| `--files.k8ServiceAccount` | string | Deprecated. Please use `--K8sServiceAccount`|
| `--files.k8sServiceAccount` | string | Custom kubernetes service account auth role to register launch plans with. |
| `--files.outputLocationPrefix` | string | Custom output location prefix for offloaded types (files/schemas). |
| `--files.sourceUploadPath` | string | Deprecated: Update flyte admin to avoid having to configure storage access from uctl. |
| `--files.version` | string | Version of the entity to be registered with flyte which are un-versioned after serialization. |
| `--logger.formatter.type` | string | Sets logging format type. (default "json") |
| `--logger.level` | int | Sets the minimum logging level. (default 3) |
| `--logger.mute` | | Mutes all logs regardless of severity. Intended for benchmarks/tests only. |
| `--logger.show-source` | | Includes source code location in logs. |
| `--org` | string | Organization to work on. If not set, default to user's org. |
| `--otel.file.filename` | string | Filename to store exported telemetry traces (default "/tmp/trace.txt") |
| `--otel.jaeger.endpoint` | string | Endpoint for the jaeger telemetry trace ingestor (default "http://localhost:14268/api/traces") |
| `--otel.otlpgrpc.endpoint` | string | Endpoint for the OTLP telemetry trace collector (default "http://localhost:4317") |
| `--otel.otlphttp.endpoint` | string | Endpoint for the OTLP telemetry trace collector (default "http://localhost:4318/v1/traces") |
| `--otel.sampler.parentSampler` | string | Sets the parent sampler to use for the tracer (default "always") |
| `--otel.type` | string | Sets the type of exporter to configure [noop/file/jaeger/otlpgrpc/otlphttp]. (default "noop") |
| `-o`, `--output` | string | Specifies the output type - supported formats [TABLE JSON YAML DOT DOTURL]. NOTE: dot, doturl are only supported for Workflow (default "table") |
| `--plugins.catalogcache.reader.maxItems` | int | Maximum number of entries to keep in the index. (default 10000) |
| `--plugins.catalogcache.reader.maxRetries` | int | Maximum number of retries per item. (default 3) |
| `--plugins.catalogcache.reader.workers` | int | Number of concurrent workers to start processing the queue. (default 10) |
| `--plugins.catalogcache.writer.maxItems` | int | Maximum number of entries to keep in the index. (default 10000) |
| `--plugins.catalogcache.writer.maxRetries` | int | Maximum number of retries per item. (default 3) |
| `--plugins.catalogcache.writer.workers` | int | Number of concurrent workers to start processing the queue. (default 10) |
| `-p`, `--project` | string | Specifies the Flyte project. |
| `--rediscache.passwordSecretName` | string | Name of secret with Redis password. |
| `--rediscache.primaryEndpoint` | string | Primary endpoint for the redis cache that can be used for both reads and writes. |
| `--rediscache.replicaEndpoint` | string | Replica endpoint for the redis cache that can be used for reads. |
| `--secrets.env-prefix` | string | Prefix for environment variables (default "FLYTE_SECRET_") |
| `--secrets.secrets-prefix` | string | Prefix where to look for secrets file (default "/etc/secrets") |
| `--secrets.type` | string | Sets the type of storage to configure [local]. (default "local") |
| `--server.dataProxy.download.maxExpiresIn` | string | Maximum allowed expiration duration. (default "1h0m0s") |
| `--server.dataProxy.upload.defaultFileNameLength` | int | Default length for the generated file name if not provided in the request. (default 20) |
| `--server.dataProxy.upload.maxExpiresIn` | string | Maximum allowed expiration duration. (default "1h0m0s") |
| `--server.dataProxy.upload.maxSize` | string | Maximum allowed upload size. (default "6Mi") |
| `--server.dataProxy.upload.storagePrefix` | string | Storage prefix to use for all upload requests. |
| `--server.grpc.enableGrpcLatencyMetrics` | | Enable grpc latency metrics. Note Histograms metrics can be expensive on Prometheus servers. |
| `--server.grpc.maxMessageSizeBytes` | int | The max size in bytes for incoming gRPC messages |
| `--server.grpc.port` | int | On which grpc port to serve admin (default 8089) |
| `--server.grpc.serverReflection` | | Enable GRPC Server Reflection (default true) |
| `--server.grpcPort` | int | deprecated |
| `--server.grpcServerReflection` | | deprecated |
| `--server.httpPort` | int | On which http port to serve admin (default 8088) |
| `--server.kube-config` | string | Path to kubernetes client config file, default is empty, useful for incluster config. |
| `--server.kubeClientConfig.burst` | int | Max burst rate for throttle. 0 defaults to 10 (default 25) |
| `--server.kubeClientConfig.qps` | int32 | Max QPS to the master for requests to KubeAPI. 0 defaults to 5. (default 100) |
| `--server.kubeClientConfig.timeout` | string | Max duration allowed for every request to KubeAPI before giving up. 0 implies no timeout. (default "30s") |
| `--server.master` | string | The address of the Kubernetes API server. |
| `--server.readHeaderTimeoutSeconds` | int | The amount of time allowed to read request headers. (default 32) |
| `--server.security.allowCors` | | (default true) |
| `--server.security.allowedHeaders` | strings | (default [Content-Type,flyte-authorization]) |
| `--server.security.allowedOrigins` | strings | (default [*]) |
| `--server.security.auditAccess` | | |
| `--server.security.secure` | | |
| `--server.security.ssl.certificateFile` | string | |
| `--server.security.ssl.keyFile` | string | |
| `--server.security.useAuth` | | |
| `--server.thirdPartyConfig.flyteClient.audience` | string | Audience to use when initiating OAuth2 authorization requests. |
| `--server.thirdPartyConfig.flyteClient.clientId` | string | public identifier for the app which handles authorization for a Flyte deployment |
| `--server.thirdPartyConfig.flyteClient.redirectUri` | string | This is the callback uri registered with the app which handles authorization for a Flyte deployment |
| `--server.thirdPartyConfig.flyteClient.scopes` | strings | Recommended scopes for the client to request. |
| `--server.watchService.maxActiveClusterConnections` | int | (default 5) |
| `--server.watchService.maxPageSize` | int | (default 50000) |
| `--server.watchService.nonTerminalStatusUpdatesInterval` | string | (default "1m0s") |
| `--server.watchService.pollInterval` | string | (default "1s") |
| `--sharedservice.connectPort` | string | On which connect port to serve admin (default "8080") |
| `--sharedservice.grpc.grpcMaxResponseStatusBytes` | int32 | specifies the maximum (uncompressed) size of header list that the client is prepared to accept on grpc calls (default 32000) |
| `--sharedservice.grpc.maxConcurrentStreams` | int | Limit on the number of concurrent streams to each ServerTransport. (default 100) |
| `--sharedservice.grpc.maxMessageSizeBytes` | int | Limit on the size of message that can be received on the server. (default 10485760) |
| `--sharedservice.grpcServerReflection` | | Enable GRPC Server Reflection (default true) |
| `--sharedservice.httpPort` | string | On which http port to serve admin (default "8089") |
| `--sharedservice.kubeConfig` | string | Path to kubernetes client config file. |
| `--sharedservice.master` | string | The address of the Kubernetes API server. |
| `--sharedservice.metrics.enableClientGrpcHistograms` | | Enable client grpc histograms (default true) |
| `--sharedservice.metrics.enableGrpcHistograms` | | Enable grpc histograms (default true) |
| `--sharedservice.metrics.scope` | string | Scope to emit metrics under (default "service:") |
| `--sharedservice.port` | string | On which grpc port to serve admin (default "8080") |
| `--sharedservice.profiler.enabled` | | Enable Profiler on server |
| `--sharedservice.profilerPort` | string | Profile port to start listen for pprof and metric handlers on. (default "10254") |
| `--sharedservice.security.allowCors` | | |
| `--sharedservice.security.allowLocalhostAccess` | | Whether to permit localhost unauthenticated access to the server |
| `--sharedservice.security.allowedHeaders` | strings | |
| `--sharedservice.security.allowedOrigins` | strings | |
| `--sharedservice.security.auditAccess` | | |
| `--sharedservice.security.orgOverride` | string | Override org in identity context if localhost access enabled |
| `--sharedservice.security.secure` | | |
| `--sharedservice.security.ssl.certificateAuthorityFile` | string | |
| `--sharedservice.security.ssl.certificateFile` | string | |
| `--sharedservice.security.ssl.keyFile` | string | |
| `--sharedservice.security.useAuth` | | |
| `--sharedservice.sync.syncInterval` | string | Time interval to sync (default "5m0s") |
| `--storage.cache.max_size_mbs` | int | Maximum size of the cache where the Blob store data is cached in-memory. If not specified or set to 0, cache is not used |
| `--storage.cache.target_gc_percent` | int | Sets the garbage collection target percentage. |
| `--storage.connection.access-key` | string | Access key to use. Only required when authtype is set to accesskey. |
| `--storage.connection.auth-type` | string | Auth Type to use [iam, accesskey]. (default "iam") |
| `--storage.connection.disable-ssl` | | Disables SSL connection. Should only be used for development. |
| `--storage.connection.endpoint` | string | URL for storage client to connect to. |
| `--storage.connection.region` | string | Region to connect to. (default "us-east-1") |
| `--storage.connection.secret-key` | string | Secret to use when accesskey is set. |
| `--storage.container` | string | Initial container (in s3 a bucket) to create -if it doesn't exist-.' |
| `--storage.defaultHttpClient.timeout` | string | Sets time out on the http client. (default "0s") |
| `--storage.enable-multicontainer` | | If this is true, then the container argument is overlooked and redundant. This config will automatically open new connections to new containers/buckets as they are encountered |
| `--storage.limits.maxDownloadMBs` | int | Maximum allowed download size (in MBs) per call. (default 2) |
| `--storage.stow.config` | stringToString | Configuration for stow backend. Refer to github/flyteorg/stow (default []) |
| `--storage.stow.kind` | string | Kind of Stow backend to use. Refer to github/flyteorg/stow |
| `--storage.type` | string | Sets the type of storage to configure [s3/minio/local/mem/stow]. (default "s3") |
| `--union.auth.authorizationMetadataKey` | string | Authorization Header to use when passing Access Tokens to the server (default "flyte-authorization") |
| `--union.auth.clientId` | string | Client ID |
| `--union.auth.clientSecretEnvVar` | string | Environment variable containing the client secret |
| `--union.auth.clientSecretLocation` | string | File containing the client secret |
| `--union.auth.deviceFlow.pollInterval` | string | amount of time the device flow would poll the token endpoint if auth server doesn't return a polling interval. Okta and google IDP do return an interval' (default "5s") |
| `--union.auth.deviceFlow.refreshTime` | string | grace period from the token expiry after which it would refresh the token. (default "5m0s") |
| `--union.auth.deviceFlow.timeout` | string | amount of time the device flow should complete or else it will be cancelled. (default "10m0s") |
| `--union.auth.enable` | | Whether to enable an authenticated conenction when communicating with admin. (default true) |
| `--union.auth.externalAuth.command` | strings | Command for external authentication token generation |
| `--union.auth.pkce.refreshTime` | string | grace period from the token expiry after which it would refresh the token. (default "5m0s") |
| `--union.auth.pkce.timeout` | string | Amount of time the browser session would be active for authentication from client app. (default "15s") |
| `--union.auth.scopes` | strings | List of scopes to request |
| `--union.auth.tokenRefreshWindow` | string | Max duration between token refresh attempt and token expiry. (default "1h0m0s") |
| `--union.auth.tokenUrl` | string | OPTIONAL: Your IdP's token endpoint. It'll be discovered from flyte admin's OAuth Metadata endpoint if not provided. |
| `--union.auth.type` | string | Type of OAuth2 flow used for communicating with admin. (default "Pkce") |
| `--union.cache.maxItemsCount` | int | Maximum number of items to keep in the cache before evicting. (default 1000) |
| `--union.connection.host` | string | Host to connect to (default "dns:///utt-mgdp-stg-us-east-2.cloud-staging.union.ai") |
| `--union.connection.insecure` | | Whether to connect over insecure channel |
| `--union.connection.insecureSkipVerify` | | InsecureSkipVerify controls whether a client verifies the server's certificate chain and host name.Caution: shouldn't be use for production usecases' |
| `--union.connection.keepAliveConfig.permitWithoutStream` | | If true, client sends keepalive pings even with no active RPCs. |
| `--union.connection.keepAliveConfig.time` | string | After a duration of this time if the client doesn't see any activity it pings the server to see if the transport is still alive. (default "20s") |
| `--union.connection.keepAliveConfig.timeout` | string | After having pinged for keepalive check, the client waits for a duration of Timeout and if no activity is seen even after that the connection is closed. (default "2m0s") |
| `--union.connection.maxBackoffDelay` | string | Max delay for grpc backoff (default "8s") |
| `--union.connection.maxRecvMsgSize` | int | Maximum size of a message in bytes of a gRPC message (default 10485760) |
| `--union.connection.maxRetries` | int | Max number of gRPC retries (default 4) |
| `--union.connection.minConnectTimeout` | string | Minimum timeout for establishing a connection (default "20s") |
| `--union.connection.perRetryTimeout` | string | gRPC per retry timeout (default "15s") |
| `--union.connection.serviceConfig` | string | Defines gRPC experimental JSON Service Config (default "{"loadBalancingConfig": [{"round_robin":{}}]}") |
| `--union.connection.trustedIdentityClaims.enabled` | | Enables passing of trusted claims while making inter service calls |
| `--union.connection.trustedIdentityClaims.externalIdentityClaim` | string | External identity claim of the service which is authorized to make internal service call. These are verified against userclouds actions |
| `--union.connection.trustedIdentityClaims.externalIdentityTypeClaim` | string | External identity type claim of app or user to use for the current service identity. It should be an 'app' for inter service communication |
| `--union.internalConnectionConfig.-` | stringToString | (default []) |
| `--union.internalConnectionConfig.enabled` | | Enables internal service to service communication instead of going through ingress. |
| `--union.internalConnectionConfig.urlPattern` | string | UrlPattern of the internal service endpoints. (default "{{ service }}-helmchart.{{ service }}.svc.cluster.local:80") |
| `--webhook.awsSecretManager.sidecarImage` | string | Specifies the sidecar docker image to use (default "docker.io/amazon/aws-secrets-manager-secret-sidecar:v0.1.4") |
| `--webhook.certDir` | string | Certificate directory to use to write generated certs. Defaults to /etc/webhook/certs/ (default "/etc/webhook/certs") |
| `--webhook.embeddedSecretManagerConfig.awsConfig.region` | string | AWS region |
| `--webhook.embeddedSecretManagerConfig.fileMountInitContainer.image` | string | Specifies init container image to use for mounting secrets as files. (default "busybox:1.28") |
| `--webhook.embeddedSecretManagerConfig.gcpConfig.project` | string | GCP project to be used for secret manager |
| `--webhook.embeddedSecretManagerConfig.type` | string | (default "AWS") |
| `--webhook.gcpSecretManager.sidecarImage` | string | Specifies the sidecar docker image to use (default "gcr.io/google.com/cloudsdktool/cloud-sdk:alpine") |
| `--webhook.listenPort` | int | The port to use to listen to webhook calls. Defaults to 9443 (default 9443) |
| `--webhook.localCert` | | write certs locally. Defaults to false |
| `--webhook.metrics-prefix` | string | An optional prefix for all published metrics. (default "flyte:") |
| `--webhook.secretName` | string | Secret name to write generated certs to. (default "flyte-pod-webhook") |
| `--webhook.serviceName` | string | The name of the webhook service. (default "flyte-pod-webhook") |
| `--webhook.servicePort` | int32 | The port on the service that hosting webhook. (default 443) |
| `--webhook.vaultSecretManager.role` | string | Specifies the vault role to use (default "flyte") |
=== PAGE: https://www.union.ai/docs/v1/serverless/api-reference/uctl-cli/uctl-delete/uctl-delete-clusterconfig ===
# uctl delete clusterconfig
Delete cluster config
## Synopsis
Delete cluster config
```shell
$ uctl delete clusterconfig [flags]
```
## Options
| Option | Type | Description |
|--------|------|-------------|
| `--dryRun` | | execute command without making any modifications. |
| Option | Type | Description |
|--------|------|-------------|
| `-h`, `--help` | help for clusterconfig |
### Options inherited from parent commands
| Option | Type | Description |
|--------|------|-------------|
| `--admin.audience` | string | Audience to use when initiating OAuth2 authorization requests. |
| `--admin.authType` | string | Type of OAuth2 flow used for communicating with admin.ClientSecret, Pkce, ExternalCommand are valid values (default "ClientSecret") |
| `--admin.authorizationHeader` | string | Custom metadata header to pass JWT |
| `--admin.authorizationServerUrl` | string | This is the URL to your IdP's authorization server. It'll default to Endpoint |
| `--admin.caCertFilePath` | string | Use specified certificate file to verify the admin server peer. |
| `--admin.clientId` | string | Client ID (default "flytepropeller") |
| `--admin.clientSecretEnvVar` | string | Environment variable containing the client secret |
| `--admin.clientSecretLocation` | string | File containing the client secret (default "/etc/secrets/client_secret") |
| `--admin.command` | strings | Command for external authentication token generation |
| `--admin.defaultOrg` | string | OPTIONAL: Default org to use to support non-org based cli's.'. |
| `--admin.defaultServiceConfig` | string | |
| `--admin.deviceFlowConfig.pollInterval` | string | amount of time the device flow would poll the token endpoint if auth server doesn't return a polling interval. Okta and google IDP do return an interval' (default "5s") |
| `--admin.deviceFlowConfig.refreshTime` | string | grace period from the token expiry after which it would refresh the token. (default "5m0s") |
| `--admin.deviceFlowConfig.timeout` | string | amount of time the device flow should complete or else it will be cancelled. (default "10m0s") |
| `--admin.endpoint` | string | For admin types, specify where the uri of the service is located. |
| `--admin.httpProxyURL` | string | OPTIONAL: HTTP Proxy to be used for OAuth requests. |
| `--admin.insecure` | | Use insecure connection. |
| `--admin.insecureSkipVerify` | | InsecureSkipVerify controls whether a client verifies the server's certificate chain and host name.Caution: shouldn't be use for production usecases' |
| `--admin.maxBackoffDelay` | string | Max delay for grpc backoff (default "8s") |
| `--admin.maxMessageSizeBytes` | int | The max size in bytes for incoming gRPC messages |
| `--admin.maxRetries` | int | Max number of gRPC retries (default 4) |
| `--admin.perRetryTimeout` | string | gRPC per retry timeout (default "15s") |
| `--admin.pkceConfig.refreshTime` | string | grace period from the token expiry after which it would refresh the token. (default "5m0s") |
| `--admin.pkceConfig.timeout` | string | Amount of time the browser session would be active for authentication from client app. (default "2m0s") |
| `--admin.proxyCommand` | strings | Command for external proxy-authorization token generation |
| `--admin.scopes` | strings | List of scopes to request |
| `--admin.tokenRefreshWindow` | string | Max duration between token refresh attempt and token expiry. (default "0s") |
| `--admin.tokenUrl` | string | OPTIONAL: Your IdP's token endpoint. It'll be discovered from flyte admin's OAuth Metadata endpoint if not provided. |
| `--admin.useAudienceFromAdmin` | | Use Audience configured from admins public endpoint config. |
| `--admin.useAuth` | | Deprecated: Auth will be enabled/disabled based on admin's dynamically discovered information. |
| `--auth.appAuth.externalAuthServer.allowedAudience` | strings | Optional: A list of allowed audiences. If not provided, the audience is expected to be the public Uri of the service. |
| `--auth.appAuth.externalAuthServer.baseUrl` | string | This should be the base url of the authorization server that you are trying to hit. With Okta for instance, it will look something like https://company.okta.com/oauth2/abcdef123456789/ |
| `--auth.appAuth.externalAuthServer.httpProxyURL` | string | OPTIONAL: HTTP Proxy to be used for OAuth requests. |
| `--auth.appAuth.externalAuthServer.metadataUrl` | string | Optional: If the server doesn't support /.well-known/oauth-authorization-server, you can set a custom metadata url here.' |
| `--auth.appAuth.externalAuthServer.retryAttempts` | int | Optional: The number of attempted retries on a transient failure to get the OAuth metadata (default 5) |
| `--auth.appAuth.externalAuthServer.retryDelay` | string | Optional, Duration to wait between retries (default "1s") |
| `--auth.appAuth.selfAuthServer.accessTokenLifespan` | string | Defines the lifespan of issued access tokens. (default "30m0s") |
| `--auth.appAuth.selfAuthServer.authorizationCodeLifespan` | string | Defines the lifespan of issued access tokens. (default "5m0s") |
| `--auth.appAuth.selfAuthServer.claimSymmetricEncryptionKeySecretName` | string | OPTIONAL: Secret name to use to encrypt claims in authcode token. (default "claim_symmetric_key") |
| `--auth.appAuth.selfAuthServer.issuer` | string | Defines the issuer to use when issuing and validating tokens. The default value is https://{requestUri.HostAndPort}/ |
| `--auth.appAuth.selfAuthServer.oldTokenSigningRSAKeySecretName` | string | OPTIONAL: Secret name to use to retrieve Old RSA Signing Key. This can be useful during key rotation to continue to accept older tokens. (default "token_rsa_key_old.pem") |
| `--auth.appAuth.selfAuthServer.refreshTokenLifespan` | string | Defines the lifespan of issued access tokens. (default "1h0m0s") |
| `--auth.appAuth.selfAuthServer.tokenSigningRSAKeySecretName` | string | OPTIONAL: Secret name to use to retrieve RSA Signing Key. (default "token_rsa_key.pem") |
| `--auth.appAuth.thirdPartyConfig.flyteClient.audience` | string | Audience to use when initiating OAuth2 authorization requests. |
| `--auth.appAuth.thirdPartyConfig.flyteClient.clientId` | string | public identifier for the app which handles authorization for a Flyte deployment (default "uctl") |
| `--auth.appAuth.thirdPartyConfig.flyteClient.redirectUri` | string | This is the callback uri registered with the app which handles authorization for a Flyte deployment (default "http://localhost:53593/callback") |
| `--auth.appAuth.thirdPartyConfig.flyteClient.scopes` | strings | Recommended scopes for the client to request. (default [all,offline]) |
| `--auth.disableForGrpc` | | Disables auth enforcement on Grpc Endpoints. |
| `--auth.disableForHttp` | | Disables auth enforcement on HTTP Endpoints. |
| `--auth.grpcAuthorizationHeader` | string | (default "flyte-authorization") |
| `--auth.httpAuthorizationHeader` | string | (default "flyte-authorization") |
| `--auth.httpProxyURL` | string | OPTIONAL: HTTP Proxy to be used for OAuth requests. |
| `--auth.tokenEndpointProxyPath` | string | The path used to proxy calls to the TokenURL |
| `--auth.userAuth.cookieBlockKeySecretName` | string | OPTIONAL: Secret name to use for cookie block key. (default "cookie_block_key") |
| `--auth.userAuth.cookieHashKeySecretName` | string | OPTIONAL: Secret name to use for cookie hash key. (default "cookie_hash_key") |
| `--auth.userAuth.cookieSetting.domain` | string | OPTIONAL: Allows you to set the domain attribute on the auth cookies. |
| `--auth.userAuth.cookieSetting.sameSitePolicy` | string | OPTIONAL: Allows you to declare if your cookie should be restricted to a first-party or same-site context.Wrapper around http.SameSite. (default "DefaultMode") |
| `--auth.userAuth.httpProxyURL` | string | OPTIONAL: HTTP Proxy to be used for OAuth requests. |
| `--auth.userAuth.idpQueryParameter` | string | idp query parameter used for selecting a particular IDP for doing user authentication. Eg: for Okta passing idp={IDP-ID} forces the authentication to happen with IDP-ID |
| `--auth.userAuth.openId.baseUrl` | string | |
| `--auth.userAuth.openId.clientId` | string | |
| `--auth.userAuth.openId.clientSecretFile` | string | |
| `--auth.userAuth.openId.clientSecretName` | string | (default "oidc_client_secret") |
| `--auth.userAuth.openId.scopes` | strings | (default [openid,profile]) |
| `--auth.userAuth.redirectUrl` | string | (default "/console") |
| `--authorizer.internalCommunicationConfig.enabled` | | Enables authorization decisions for internal communication. (default true) |
| `--authorizer.internalCommunicationConfig.ingressIdentity` | string | IngressIdentity used in the cluster. Needed to exclude the communication coming from ingress. (default "ingress-nginx.ingress-nginx.serviceaccount.identity.linkerd.cluster.local") |
| `--authorizer.internalCommunicationConfig.tenantUrlPatternIdentity` | string | UrlPatternIdentity of the internal tenant service endpoint identities. (default "{{ service }}.{{ org }}.serviceaccount.identity.linkerd.cluster.local") |
| `--authorizer.internalCommunicationConfig.urlPatternIdentity` | string | UrlPatternIdentity of the internal service endpoint identities. (default "{{ service }}-helmchart.{{ service }}.serviceaccount.identity.linkerd.cluster.local") |
| `--authorizer.mode` | string | (default "Active") |
| `--authorizer.organizationConfig.PolicyConfig.adminPolicyDescription` | string | description for the boilerplate admin policy (default "Contributor permissions and full admin permissions to manage users and view usage dashboards") |
| `--authorizer.organizationConfig.PolicyConfig.contributorPolicyDescription` | string | description for the boilerplate contributor policy (default "Viewer permissions and permissions to create workflows, tasks, launch plans, and executions") |
| `--authorizer.organizationConfig.PolicyConfig.defaultUserPolicyRoleType` | string | name of the role type to determine which default policy new users added to the organization should be assigned (default "Viewer") |
| `--authorizer.organizationConfig.PolicyConfig.serverlessContributorPolicyDescription` | string | description for the boilerplate serverless contributor policy (default "Viewer permissions and permissions to create workflows, tasks, launch plans, and executions") |
| `--authorizer.organizationConfig.PolicyConfig.serverlessViewerPolicyDescription` | string | description for the boilerplate serverless viewer policy (default "Permissions to view Flyte entities") |
| `--authorizer.organizationConfig.PolicyConfig.viewerPolicyDescription` | string | description for the boilerplate viewer policy (default "Permissions to view Flyte entities") |
| `--authorizer.organizationConfig.defaultPolicyCacheDuration` | string | Cache entry duration for the store of the default policy per organization (default "10m0s") |
| `--authorizer.syncRuleRefreshInterval` | string | (default "1m0s") |
| `--authorizer.type` | string | (default "UserClouds") |
| `--authorizer.userCloudsClient.cache.redis.ttl.edgeTypes` | string | Specifies how long edge types remain in the cache.. (default "30m0s") |
| `--authorizer.userCloudsClient.cache.redis.ttl.edges` | string | Specifies how long edges remain in the cache. (default "30m0s") |
| `--authorizer.userCloudsClient.cache.redis.ttl.objectTypes` | string | Specifies how long object types remain in the cache. (default "30m0s") |
| `--authorizer.userCloudsClient.cache.redis.ttl.objects` | string | Specifies how long objects remain in the cache. (default "30m0s") |
| `--authorizer.userCloudsClient.cache.type` | string | Cache type to use. (default "none") |
| `--authorizer.userCloudsClient.clientID` | string | UserClouds client id |
| `--authorizer.userCloudsClient.clientSecretName` | string | UserCloud client secret name to read from the secret manager. (default "userclouds-client-secret") |
| `--authorizer.userCloudsClient.enableLogging` | | Enable userclouds client's internal logging. Calls to post logs take 250-350 ms and will impact p99 latency, enable with caution. |
| `--authorizer.userCloudsClient.tenantID` | string | UserClouds tenant id. Should be a UUID. |
| `--authorizer.userCloudsClient.tenantUrl` | string | Something like https://{yourtenant}.tenant.userclouds.com |
| `--config` | string | config file (default is /Users/andrew/.union/config.yaml) |
| `--connection.environment` | string | |
| `--connection.region` | string | |
| `--connection.rootTenantURLPattern` | string | Pattern for tenant url. (default "dns:///{{ organization }}.cloud-staging.union.ai") |
| `--console.endpoint` | string | Endpoint of console, if different than flyte admin |
| `--database.connMaxLifeTime` | string | sets the maximum amount of time a connection may be reused (default "1h0m0s") |
| `--database.enableForeignKeyConstraintWhenMigrating` | | Whether to enable gorm foreign keys when migrating the db |
| `--database.maxIdleConnections` | int | maxIdleConnections sets the maximum number of connections in the idle connection pool. (default 10) |
| `--database.maxOpenConnections` | int | maxOpenConnections sets the maximum number of open connections to the database. (default 100) |
| `--database.postgres.dbname` | string | The database name (default "postgres") |
| `--database.postgres.debug` | | |
| `--database.postgres.host` | string | The host name of the database server (default "localhost") |
| `--database.postgres.options` | string | See http://gorm.io/docs/connecting_to_the_database.html for available options passed, in addition to the above. (default "sslmode=disable") |
| `--database.postgres.password` | string | The database password. (default "postgres") |
| `--database.postgres.passwordPath` | string | Points to the file containing the database password. |
| `--database.postgres.port` | int | The port name of the database server (default 30001) |
| `--database.postgres.readReplicaHost` | string | The host name of the read replica database server (default "localhost") |
| `--database.postgres.username` | string | The database user who is connecting to the server. (default "postgres") |
| `--database.sqlite.file` | string | The path to the file (existing or new) where the DB should be created / stored. If existing, then this will be re-used, else a new will be created |
| `--db.connectionPool.maxConnectionLifetime` | string | (default "0s") |
| `--db.connectionPool.maxIdleConnections` | int | |
| `--db.connectionPool.maxOpenConnections` | int | |
| `--db.dbname` | string | (default "postgres") |
| `--db.debug` | | |
| `--db.host` | string | (default "postgres") |
| `--db.log_level` | int | (default 4) |
| `--db.options` | string | (default "sslmode=disable") |
| `--db.password` | string | |
| `--db.passwordPath` | string | |
| `--db.port` | int | (default 5432) |
| `--db.username` | string | (default "postgres") |
| `-d`, `--domain` | string | Specifies the Flyte project's domain. |
| `--files.archive` | | Pass in archive file either an http link or local path. |
| `--files.assumableIamRole` | string | Custom assumable iam auth role to register launch plans with. |
| `--files.continueOnError` | | Continue on error when registering files. |
| `--files.destinationDirectory` | string | Location of source code in container. |
| `--files.dryRun` | | Execute command without making any modifications. |
| `--files.enableSchedule` | | Enable the schedule if the files contain schedulable launchplan. |
| `--files.force` | | Force use of version number on entities registered with flyte. |
| `--files.k8ServiceAccount` | string | Deprecated. Please use `--K8sServiceAccount`|
| `--files.k8sServiceAccount` | string | Custom kubernetes service account auth role to register launch plans with. |
| `--files.outputLocationPrefix` | string | Custom output location prefix for offloaded types (files/schemas). |
| `--files.sourceUploadPath` | string | Deprecated: Update flyte admin to avoid having to configure storage access from uctl. |
| `--files.version` | string | Version of the entity to be registered with flyte which are un-versioned after serialization. |
| `--logger.formatter.type` | string | Sets logging format type. (default "json") |
| `--logger.level` | int | Sets the minimum logging level. (default 3) |
| `--logger.mute` | | Mutes all logs regardless of severity. Intended for benchmarks/tests only. |
| `--logger.show-source` | | Includes source code location in logs. |
| `--org` | string | Organization to work on. If not set, default to user's org. |
| `--otel.file.filename` | string | Filename to store exported telemetry traces (default "/tmp/trace.txt") |
| `--otel.jaeger.endpoint` | string | Endpoint for the jaeger telemetry trace ingestor (default "http://localhost:14268/api/traces") |
| `--otel.otlpgrpc.endpoint` | string | Endpoint for the OTLP telemetry trace collector (default "http://localhost:4317") |
| `--otel.otlphttp.endpoint` | string | Endpoint for the OTLP telemetry trace collector (default "http://localhost:4318/v1/traces") |
| `--otel.sampler.parentSampler` | string | Sets the parent sampler to use for the tracer (default "always") |
| `--otel.type` | string | Sets the type of exporter to configure [noop/file/jaeger/otlpgrpc/otlphttp]. (default "noop") |
| `-o`, `--output` | string | Specifies the output type - supported formats [TABLE JSON YAML DOT DOTURL]. NOTE: dot, doturl are only supported for Workflow (default "table") |
| `--plugins.catalogcache.reader.maxItems` | int | Maximum number of entries to keep in the index. (default 10000) |
| `--plugins.catalogcache.reader.maxRetries` | int | Maximum number of retries per item. (default 3) |
| `--plugins.catalogcache.reader.workers` | int | Number of concurrent workers to start processing the queue. (default 10) |
| `--plugins.catalogcache.writer.maxItems` | int | Maximum number of entries to keep in the index. (default 10000) |
| `--plugins.catalogcache.writer.maxRetries` | int | Maximum number of retries per item. (default 3) |
| `--plugins.catalogcache.writer.workers` | int | Number of concurrent workers to start processing the queue. (default 10) |
| `-p`, `--project` | string | Specifies the Flyte project. |
| `--rediscache.passwordSecretName` | string | Name of secret with Redis password. |
| `--rediscache.primaryEndpoint` | string | Primary endpoint for the redis cache that can be used for both reads and writes. |
| `--rediscache.replicaEndpoint` | string | Replica endpoint for the redis cache that can be used for reads. |
| `--secrets.env-prefix` | string | Prefix for environment variables (default "FLYTE_SECRET_") |
| `--secrets.secrets-prefix` | string | Prefix where to look for secrets file (default "/etc/secrets") |
| `--secrets.type` | string | Sets the type of storage to configure [local]. (default "local") |
| `--server.dataProxy.download.maxExpiresIn` | string | Maximum allowed expiration duration. (default "1h0m0s") |
| `--server.dataProxy.upload.defaultFileNameLength` | int | Default length for the generated file name if not provided in the request. (default 20) |
| `--server.dataProxy.upload.maxExpiresIn` | string | Maximum allowed expiration duration. (default "1h0m0s") |
| `--server.dataProxy.upload.maxSize` | string | Maximum allowed upload size. (default "6Mi") |
| `--server.dataProxy.upload.storagePrefix` | string | Storage prefix to use for all upload requests. |
| `--server.grpc.enableGrpcLatencyMetrics` | | Enable grpc latency metrics. Note Histograms metrics can be expensive on Prometheus servers. |
| `--server.grpc.maxMessageSizeBytes` | int | The max size in bytes for incoming gRPC messages |
| `--server.grpc.port` | int | On which grpc port to serve admin (default 8089) |
| `--server.grpc.serverReflection` | | Enable GRPC Server Reflection (default true) |
| `--server.grpcPort` | int | deprecated |
| `--server.grpcServerReflection` | | deprecated |
| `--server.httpPort` | int | On which http port to serve admin (default 8088) |
| `--server.kube-config` | string | Path to kubernetes client config file, default is empty, useful for incluster config. |
| `--server.kubeClientConfig.burst` | int | Max burst rate for throttle. 0 defaults to 10 (default 25) |
| `--server.kubeClientConfig.qps` | int32 | Max QPS to the master for requests to KubeAPI. 0 defaults to 5. (default 100) |
| `--server.kubeClientConfig.timeout` | string | Max duration allowed for every request to KubeAPI before giving up. 0 implies no timeout. (default "30s") |
| `--server.master` | string | The address of the Kubernetes API server. |
| `--server.readHeaderTimeoutSeconds` | int | The amount of time allowed to read request headers. (default 32) |
| `--server.security.allowCors` | | (default true) |
| `--server.security.allowedHeaders` | strings | (default [Content-Type,flyte-authorization]) |
| `--server.security.allowedOrigins` | strings | (default [*]) |
| `--server.security.auditAccess` | | |
| `--server.security.secure` | | |
| `--server.security.ssl.certificateFile` | string | |
| `--server.security.ssl.keyFile` | string | |
| `--server.security.useAuth` | | |
| `--server.thirdPartyConfig.flyteClient.audience` | string | Audience to use when initiating OAuth2 authorization requests. |
| `--server.thirdPartyConfig.flyteClient.clientId` | string | public identifier for the app which handles authorization for a Flyte deployment |
| `--server.thirdPartyConfig.flyteClient.redirectUri` | string | This is the callback uri registered with the app which handles authorization for a Flyte deployment |
| `--server.thirdPartyConfig.flyteClient.scopes` | strings | Recommended scopes for the client to request. |
| `--server.watchService.maxActiveClusterConnections` | int | (default 5) |
| `--server.watchService.maxPageSize` | int | (default 50000) |
| `--server.watchService.nonTerminalStatusUpdatesInterval` | string | (default "1m0s") |
| `--server.watchService.pollInterval` | string | (default "1s") |
| `--sharedservice.connectPort` | string | On which connect port to serve admin (default "8080") |
| `--sharedservice.grpc.grpcMaxResponseStatusBytes` | int32 | specifies the maximum (uncompressed) size of header list that the client is prepared to accept on grpc calls (default 32000) |
| `--sharedservice.grpc.maxConcurrentStreams` | int | Limit on the number of concurrent streams to each ServerTransport. (default 100) |
| `--sharedservice.grpc.maxMessageSizeBytes` | int | Limit on the size of message that can be received on the server. (default 10485760) |
| `--sharedservice.grpcServerReflection` | | Enable GRPC Server Reflection (default true) |
| `--sharedservice.httpPort` | string | On which http port to serve admin (default "8089") |
| `--sharedservice.kubeConfig` | string | Path to kubernetes client config file. |
| `--sharedservice.master` | string | The address of the Kubernetes API server. |
| `--sharedservice.metrics.enableClientGrpcHistograms` | | Enable client grpc histograms (default true) |
| `--sharedservice.metrics.enableGrpcHistograms` | | Enable grpc histograms (default true) |
| `--sharedservice.metrics.scope` | string | Scope to emit metrics under (default "service:") |
| `--sharedservice.port` | string | On which grpc port to serve admin (default "8080") |
| `--sharedservice.profiler.enabled` | | Enable Profiler on server |
| `--sharedservice.profilerPort` | string | Profile port to start listen for pprof and metric handlers on. (default "10254") |
| `--sharedservice.security.allowCors` | | |
| `--sharedservice.security.allowLocalhostAccess` | | Whether to permit localhost unauthenticated access to the server |
| `--sharedservice.security.allowedHeaders` | strings | |
| `--sharedservice.security.allowedOrigins` | strings | |
| `--sharedservice.security.auditAccess` | | |
| `--sharedservice.security.orgOverride` | string | Override org in identity context if localhost access enabled |
| `--sharedservice.security.secure` | | |
| `--sharedservice.security.ssl.certificateAuthorityFile` | string | |
| `--sharedservice.security.ssl.certificateFile` | string | |
| `--sharedservice.security.ssl.keyFile` | string | |
| `--sharedservice.security.useAuth` | | |
| `--sharedservice.sync.syncInterval` | string | Time interval to sync (default "5m0s") |
| `--storage.cache.max_size_mbs` | int | Maximum size of the cache where the Blob store data is cached in-memory. If not specified or set to 0, cache is not used |
| `--storage.cache.target_gc_percent` | int | Sets the garbage collection target percentage. |
| `--storage.connection.access-key` | string | Access key to use. Only required when authtype is set to accesskey. |
| `--storage.connection.auth-type` | string | Auth Type to use [iam, accesskey]. (default "iam") |
| `--storage.connection.disable-ssl` | | Disables SSL connection. Should only be used for development. |
| `--storage.connection.endpoint` | string | URL for storage client to connect to. |
| `--storage.connection.region` | string | Region to connect to. (default "us-east-1") |
| `--storage.connection.secret-key` | string | Secret to use when accesskey is set. |
| `--storage.container` | string | Initial container (in s3 a bucket) to create -if it doesn't exist-.' |
| `--storage.defaultHttpClient.timeout` | string | Sets time out on the http client. (default "0s") |
| `--storage.enable-multicontainer` | | If this is true, then the container argument is overlooked and redundant. This config will automatically open new connections to new containers/buckets as they are encountered |
| `--storage.limits.maxDownloadMBs` | int | Maximum allowed download size (in MBs) per call. (default 2) |
| `--storage.stow.config` | stringToString | Configuration for stow backend. Refer to github/flyteorg/stow (default []) |
| `--storage.stow.kind` | string | Kind of Stow backend to use. Refer to github/flyteorg/stow |
| `--storage.type` | string | Sets the type of storage to configure [s3/minio/local/mem/stow]. (default "s3") |
| `--union.auth.authorizationMetadataKey` | string | Authorization Header to use when passing Access Tokens to the server (default "flyte-authorization") |
| `--union.auth.clientId` | string | Client ID |
| `--union.auth.clientSecretEnvVar` | string | Environment variable containing the client secret |
| `--union.auth.clientSecretLocation` | string | File containing the client secret |
| `--union.auth.deviceFlow.pollInterval` | string | amount of time the device flow would poll the token endpoint if auth server doesn't return a polling interval. Okta and google IDP do return an interval' (default "5s") |
| `--union.auth.deviceFlow.refreshTime` | string | grace period from the token expiry after which it would refresh the token. (default "5m0s") |
| `--union.auth.deviceFlow.timeout` | string | amount of time the device flow should complete or else it will be cancelled. (default "10m0s") |
| `--union.auth.enable` | | Whether to enable an authenticated conenction when communicating with admin. (default true) |
| `--union.auth.externalAuth.command` | strings | Command for external authentication token generation |
| `--union.auth.pkce.refreshTime` | string | grace period from the token expiry after which it would refresh the token. (default "5m0s") |
| `--union.auth.pkce.timeout` | string | Amount of time the browser session would be active for authentication from client app. (default "15s") |
| `--union.auth.scopes` | strings | List of scopes to request |
| `--union.auth.tokenRefreshWindow` | string | Max duration between token refresh attempt and token expiry. (default "1h0m0s") |
| `--union.auth.tokenUrl` | string | OPTIONAL: Your IdP's token endpoint. It'll be discovered from flyte admin's OAuth Metadata endpoint if not provided. |
| `--union.auth.type` | string | Type of OAuth2 flow used for communicating with admin. (default "Pkce") |
| `--union.cache.maxItemsCount` | int | Maximum number of items to keep in the cache before evicting. (default 1000) |
| `--union.connection.host` | string | Host to connect to (default "dns:///utt-mgdp-stg-us-east-2.cloud-staging.union.ai") |
| `--union.connection.insecure` | | Whether to connect over insecure channel |
| `--union.connection.insecureSkipVerify` | | InsecureSkipVerify controls whether a client verifies the server's certificate chain and host name.Caution: shouldn't be use for production usecases' |
| `--union.connection.keepAliveConfig.permitWithoutStream` | | If true, client sends keepalive pings even with no active RPCs. |
| `--union.connection.keepAliveConfig.time` | string | After a duration of this time if the client doesn't see any activity it pings the server to see if the transport is still alive. (default "20s") |
| `--union.connection.keepAliveConfig.timeout` | string | After having pinged for keepalive check, the client waits for a duration of Timeout and if no activity is seen even after that the connection is closed. (default "2m0s") |
| `--union.connection.maxBackoffDelay` | string | Max delay for grpc backoff (default "8s") |
| `--union.connection.maxRecvMsgSize` | int | Maximum size of a message in bytes of a gRPC message (default 10485760) |
| `--union.connection.maxRetries` | int | Max number of gRPC retries (default 4) |
| `--union.connection.minConnectTimeout` | string | Minimum timeout for establishing a connection (default "20s") |
| `--union.connection.perRetryTimeout` | string | gRPC per retry timeout (default "15s") |
| `--union.connection.serviceConfig` | string | Defines gRPC experimental JSON Service Config (default "{"loadBalancingConfig": [{"round_robin":{}}]}") |
| `--union.connection.trustedIdentityClaims.enabled` | | Enables passing of trusted claims while making inter service calls |
| `--union.connection.trustedIdentityClaims.externalIdentityClaim` | string | External identity claim of the service which is authorized to make internal service call. These are verified against userclouds actions |
| `--union.connection.trustedIdentityClaims.externalIdentityTypeClaim` | string | External identity type claim of app or user to use for the current service identity. It should be an 'app' for inter service communication |
| `--union.internalConnectionConfig.-` | stringToString | (default []) |
| `--union.internalConnectionConfig.enabled` | | Enables internal service to service communication instead of going through ingress. |
| `--union.internalConnectionConfig.urlPattern` | string | UrlPattern of the internal service endpoints. (default "{{ service }}-helmchart.{{ service }}.svc.cluster.local:80") |
| `--webhook.awsSecretManager.sidecarImage` | string | Specifies the sidecar docker image to use (default "docker.io/amazon/aws-secrets-manager-secret-sidecar:v0.1.4") |
| `--webhook.certDir` | string | Certificate directory to use to write generated certs. Defaults to /etc/webhook/certs/ (default "/etc/webhook/certs") |
| `--webhook.embeddedSecretManagerConfig.awsConfig.region` | string | AWS region |
| `--webhook.embeddedSecretManagerConfig.fileMountInitContainer.image` | string | Specifies init container image to use for mounting secrets as files. (default "busybox:1.28") |
| `--webhook.embeddedSecretManagerConfig.gcpConfig.project` | string | GCP project to be used for secret manager |
| `--webhook.embeddedSecretManagerConfig.type` | string | (default "AWS") |
| `--webhook.gcpSecretManager.sidecarImage` | string | Specifies the sidecar docker image to use (default "gcr.io/google.com/cloudsdktool/cloud-sdk:alpine") |
| `--webhook.listenPort` | int | The port to use to listen to webhook calls. Defaults to 9443 (default 9443) |
| `--webhook.localCert` | | write certs locally. Defaults to false |
| `--webhook.metrics-prefix` | string | An optional prefix for all published metrics. (default "flyte:") |
| `--webhook.secretName` | string | Secret name to write generated certs to. (default "flyte-pod-webhook") |
| `--webhook.serviceName` | string | The name of the webhook service. (default "flyte-pod-webhook") |
| `--webhook.servicePort` | int32 | The port on the service that hosting webhook. (default 443) |
| `--webhook.vaultSecretManager.role` | string | Specifies the vault role to use (default "flyte") |
=== PAGE: https://www.union.ai/docs/v1/serverless/api-reference/uctl-cli/uctl-delete/uctl-delete-clusterpool ===
# uctl delete clusterpool
Delete cluster pool
## Synopsis
Delete cluster pool
```shell
$ uctl delete clusterpool [flags]
```
## Options
| Option | Type | Description |
|--------|------|-------------|
| `--dryRun` | | execute command without making any modifications. |
| Option | Type | Description |
|--------|------|-------------|
| `-h`, `--help` | help for clusterpool |
### Options inherited from parent commands
| Option | Type | Description |
|--------|------|-------------|
| `--admin.audience` | string | Audience to use when initiating OAuth2 authorization requests. |
| `--admin.authType` | string | Type of OAuth2 flow used for communicating with admin.ClientSecret, Pkce, ExternalCommand are valid values (default "ClientSecret") |
| `--admin.authorizationHeader` | string | Custom metadata header to pass JWT |
| `--admin.authorizationServerUrl` | string | This is the URL to your IdP's authorization server. It'll default to Endpoint |
| `--admin.caCertFilePath` | string | Use specified certificate file to verify the admin server peer. |
| `--admin.clientId` | string | Client ID (default "flytepropeller") |
| `--admin.clientSecretEnvVar` | string | Environment variable containing the client secret |
| `--admin.clientSecretLocation` | string | File containing the client secret (default "/etc/secrets/client_secret") |
| `--admin.command` | strings | Command for external authentication token generation |
| `--admin.defaultOrg` | string | OPTIONAL: Default org to use to support non-org based cli's.'. |
| `--admin.defaultServiceConfig` | string | |
| `--admin.deviceFlowConfig.pollInterval` | string | amount of time the device flow would poll the token endpoint if auth server doesn't return a polling interval. Okta and google IDP do return an interval' (default "5s") |
| `--admin.deviceFlowConfig.refreshTime` | string | grace period from the token expiry after which it would refresh the token. (default "5m0s") |
| `--admin.deviceFlowConfig.timeout` | string | amount of time the device flow should complete or else it will be cancelled. (default "10m0s") |
| `--admin.endpoint` | string | For admin types, specify where the uri of the service is located. |
| `--admin.httpProxyURL` | string | OPTIONAL: HTTP Proxy to be used for OAuth requests. |
| `--admin.insecure` | | Use insecure connection. |
| `--admin.insecureSkipVerify` | | InsecureSkipVerify controls whether a client verifies the server's certificate chain and host name.Caution: shouldn't be use for production usecases' |
| `--admin.maxBackoffDelay` | string | Max delay for grpc backoff (default "8s") |
| `--admin.maxMessageSizeBytes` | int | The max size in bytes for incoming gRPC messages |
| `--admin.maxRetries` | int | Max number of gRPC retries (default 4) |
| `--admin.perRetryTimeout` | string | gRPC per retry timeout (default "15s") |
| `--admin.pkceConfig.refreshTime` | string | grace period from the token expiry after which it would refresh the token. (default "5m0s") |
| `--admin.pkceConfig.timeout` | string | Amount of time the browser session would be active for authentication from client app. (default "2m0s") |
| `--admin.proxyCommand` | strings | Command for external proxy-authorization token generation |
| `--admin.scopes` | strings | List of scopes to request |
| `--admin.tokenRefreshWindow` | string | Max duration between token refresh attempt and token expiry. (default "0s") |
| `--admin.tokenUrl` | string | OPTIONAL: Your IdP's token endpoint. It'll be discovered from flyte admin's OAuth Metadata endpoint if not provided. |
| `--admin.useAudienceFromAdmin` | | Use Audience configured from admins public endpoint config. |
| `--admin.useAuth` | | Deprecated: Auth will be enabled/disabled based on admin's dynamically discovered information. |
| `--auth.appAuth.externalAuthServer.allowedAudience` | strings | Optional: A list of allowed audiences. If not provided, the audience is expected to be the public Uri of the service. |
| `--auth.appAuth.externalAuthServer.baseUrl` | string | This should be the base url of the authorization server that you are trying to hit. With Okta for instance, it will look something like https://company.okta.com/oauth2/abcdef123456789/ |
| `--auth.appAuth.externalAuthServer.httpProxyURL` | string | OPTIONAL: HTTP Proxy to be used for OAuth requests. |
| `--auth.appAuth.externalAuthServer.metadataUrl` | string | Optional: If the server doesn't support /.well-known/oauth-authorization-server, you can set a custom metadata url here.' |
| `--auth.appAuth.externalAuthServer.retryAttempts` | int | Optional: The number of attempted retries on a transient failure to get the OAuth metadata (default 5) |
| `--auth.appAuth.externalAuthServer.retryDelay` | string | Optional, Duration to wait between retries (default "1s") |
| `--auth.appAuth.selfAuthServer.accessTokenLifespan` | string | Defines the lifespan of issued access tokens. (default "30m0s") |
| `--auth.appAuth.selfAuthServer.authorizationCodeLifespan` | string | Defines the lifespan of issued access tokens. (default "5m0s") |
| `--auth.appAuth.selfAuthServer.claimSymmetricEncryptionKeySecretName` | string | OPTIONAL: Secret name to use to encrypt claims in authcode token. (default "claim_symmetric_key") |
| `--auth.appAuth.selfAuthServer.issuer` | string | Defines the issuer to use when issuing and validating tokens. The default value is https://{requestUri.HostAndPort}/ |
| `--auth.appAuth.selfAuthServer.oldTokenSigningRSAKeySecretName` | string | OPTIONAL: Secret name to use to retrieve Old RSA Signing Key. This can be useful during key rotation to continue to accept older tokens. (default "token_rsa_key_old.pem") |
| `--auth.appAuth.selfAuthServer.refreshTokenLifespan` | string | Defines the lifespan of issued access tokens. (default "1h0m0s") |
| `--auth.appAuth.selfAuthServer.tokenSigningRSAKeySecretName` | string | OPTIONAL: Secret name to use to retrieve RSA Signing Key. (default "token_rsa_key.pem") |
| `--auth.appAuth.thirdPartyConfig.flyteClient.audience` | string | Audience to use when initiating OAuth2 authorization requests. |
| `--auth.appAuth.thirdPartyConfig.flyteClient.clientId` | string | public identifier for the app which handles authorization for a Flyte deployment (default "uctl") |
| `--auth.appAuth.thirdPartyConfig.flyteClient.redirectUri` | string | This is the callback uri registered with the app which handles authorization for a Flyte deployment (default "http://localhost:53593/callback") |
| `--auth.appAuth.thirdPartyConfig.flyteClient.scopes` | strings | Recommended scopes for the client to request. (default [all,offline]) |
| `--auth.disableForGrpc` | | Disables auth enforcement on Grpc Endpoints. |
| `--auth.disableForHttp` | | Disables auth enforcement on HTTP Endpoints. |
| `--auth.grpcAuthorizationHeader` | string | (default "flyte-authorization") |
| `--auth.httpAuthorizationHeader` | string | (default "flyte-authorization") |
| `--auth.httpProxyURL` | string | OPTIONAL: HTTP Proxy to be used for OAuth requests. |
| `--auth.tokenEndpointProxyPath` | string | The path used to proxy calls to the TokenURL |
| `--auth.userAuth.cookieBlockKeySecretName` | string | OPTIONAL: Secret name to use for cookie block key. (default "cookie_block_key") |
| `--auth.userAuth.cookieHashKeySecretName` | string | OPTIONAL: Secret name to use for cookie hash key. (default "cookie_hash_key") |
| `--auth.userAuth.cookieSetting.domain` | string | OPTIONAL: Allows you to set the domain attribute on the auth cookies. |
| `--auth.userAuth.cookieSetting.sameSitePolicy` | string | OPTIONAL: Allows you to declare if your cookie should be restricted to a first-party or same-site context.Wrapper around http.SameSite. (default "DefaultMode") |
| `--auth.userAuth.httpProxyURL` | string | OPTIONAL: HTTP Proxy to be used for OAuth requests. |
| `--auth.userAuth.idpQueryParameter` | string | idp query parameter used for selecting a particular IDP for doing user authentication. Eg: for Okta passing idp={IDP-ID} forces the authentication to happen with IDP-ID |
| `--auth.userAuth.openId.baseUrl` | string | |
| `--auth.userAuth.openId.clientId` | string | |
| `--auth.userAuth.openId.clientSecretFile` | string | |
| `--auth.userAuth.openId.clientSecretName` | string | (default "oidc_client_secret") |
| `--auth.userAuth.openId.scopes` | strings | (default [openid,profile]) |
| `--auth.userAuth.redirectUrl` | string | (default "/console") |
| `--authorizer.internalCommunicationConfig.enabled` | | Enables authorization decisions for internal communication. (default true) |
| `--authorizer.internalCommunicationConfig.ingressIdentity` | string | IngressIdentity used in the cluster. Needed to exclude the communication coming from ingress. (default "ingress-nginx.ingress-nginx.serviceaccount.identity.linkerd.cluster.local") |
| `--authorizer.internalCommunicationConfig.tenantUrlPatternIdentity` | string | UrlPatternIdentity of the internal tenant service endpoint identities. (default "{{ service }}.{{ org }}.serviceaccount.identity.linkerd.cluster.local") |
| `--authorizer.internalCommunicationConfig.urlPatternIdentity` | string | UrlPatternIdentity of the internal service endpoint identities. (default "{{ service }}-helmchart.{{ service }}.serviceaccount.identity.linkerd.cluster.local") |
| `--authorizer.mode` | string | (default "Active") |
| `--authorizer.organizationConfig.PolicyConfig.adminPolicyDescription` | string | description for the boilerplate admin policy (default "Contributor permissions and full admin permissions to manage users and view usage dashboards") |
| `--authorizer.organizationConfig.PolicyConfig.contributorPolicyDescription` | string | description for the boilerplate contributor policy (default "Viewer permissions and permissions to create workflows, tasks, launch plans, and executions") |
| `--authorizer.organizationConfig.PolicyConfig.defaultUserPolicyRoleType` | string | name of the role type to determine which default policy new users added to the organization should be assigned (default "Viewer") |
| `--authorizer.organizationConfig.PolicyConfig.serverlessContributorPolicyDescription` | string | description for the boilerplate serverless contributor policy (default "Viewer permissions and permissions to create workflows, tasks, launch plans, and executions") |
| `--authorizer.organizationConfig.PolicyConfig.serverlessViewerPolicyDescription` | string | description for the boilerplate serverless viewer policy (default "Permissions to view Flyte entities") |
| `--authorizer.organizationConfig.PolicyConfig.viewerPolicyDescription` | string | description for the boilerplate viewer policy (default "Permissions to view Flyte entities") |
| `--authorizer.organizationConfig.defaultPolicyCacheDuration` | string | Cache entry duration for the store of the default policy per organization (default "10m0s") |
| `--authorizer.syncRuleRefreshInterval` | string | (default "1m0s") |
| `--authorizer.type` | string | (default "UserClouds") |
| `--authorizer.userCloudsClient.cache.redis.ttl.edgeTypes` | string | Specifies how long edge types remain in the cache.. (default "30m0s") |
| `--authorizer.userCloudsClient.cache.redis.ttl.edges` | string | Specifies how long edges remain in the cache. (default "30m0s") |
| `--authorizer.userCloudsClient.cache.redis.ttl.objectTypes` | string | Specifies how long object types remain in the cache. (default "30m0s") |
| `--authorizer.userCloudsClient.cache.redis.ttl.objects` | string | Specifies how long objects remain in the cache. (default "30m0s") |
| `--authorizer.userCloudsClient.cache.type` | string | Cache type to use. (default "none") |
| `--authorizer.userCloudsClient.clientID` | string | UserClouds client id |
| `--authorizer.userCloudsClient.clientSecretName` | string | UserCloud client secret name to read from the secret manager. (default "userclouds-client-secret") |
| `--authorizer.userCloudsClient.enableLogging` | | Enable userclouds client's internal logging. Calls to post logs take 250-350 ms and will impact p99 latency, enable with caution. |
| `--authorizer.userCloudsClient.tenantID` | string | UserClouds tenant id. Should be a UUID. |
| `--authorizer.userCloudsClient.tenantUrl` | string | Something like https://{yourtenant}.tenant.userclouds.com |
| `--config` | string | config file (default is /Users/andrew/.union/config.yaml) |
| `--connection.environment` | string | |
| `--connection.region` | string | |
| `--connection.rootTenantURLPattern` | string | Pattern for tenant url. (default "dns:///{{ organization }}.cloud-staging.union.ai") |
| `--console.endpoint` | string | Endpoint of console, if different than flyte admin |
| `--database.connMaxLifeTime` | string | sets the maximum amount of time a connection may be reused (default "1h0m0s") |
| `--database.enableForeignKeyConstraintWhenMigrating` | | Whether to enable gorm foreign keys when migrating the db |
| `--database.maxIdleConnections` | int | maxIdleConnections sets the maximum number of connections in the idle connection pool. (default 10) |
| `--database.maxOpenConnections` | int | maxOpenConnections sets the maximum number of open connections to the database. (default 100) |
| `--database.postgres.dbname` | string | The database name (default "postgres") |
| `--database.postgres.debug` | | |
| `--database.postgres.host` | string | The host name of the database server (default "localhost") |
| `--database.postgres.options` | string | See http://gorm.io/docs/connecting_to_the_database.html for available options passed, in addition to the above. (default "sslmode=disable") |
| `--database.postgres.password` | string | The database password. (default "postgres") |
| `--database.postgres.passwordPath` | string | Points to the file containing the database password. |
| `--database.postgres.port` | int | The port name of the database server (default 30001) |
| `--database.postgres.readReplicaHost` | string | The host name of the read replica database server (default "localhost") |
| `--database.postgres.username` | string | The database user who is connecting to the server. (default "postgres") |
| `--database.sqlite.file` | string | The path to the file (existing or new) where the DB should be created / stored. If existing, then this will be re-used, else a new will be created |
| `--db.connectionPool.maxConnectionLifetime` | string | (default "0s") |
| `--db.connectionPool.maxIdleConnections` | int | |
| `--db.connectionPool.maxOpenConnections` | int | |
| `--db.dbname` | string | (default "postgres") |
| `--db.debug` | | |
| `--db.host` | string | (default "postgres") |
| `--db.log_level` | int | (default 4) |
| `--db.options` | string | (default "sslmode=disable") |
| `--db.password` | string | |
| `--db.passwordPath` | string | |
| `--db.port` | int | (default 5432) |
| `--db.username` | string | (default "postgres") |
| `-d`, `--domain` | string | Specifies the Flyte project's domain. |
| `--files.archive` | | Pass in archive file either an http link or local path. |
| `--files.assumableIamRole` | string | Custom assumable iam auth role to register launch plans with. |
| `--files.continueOnError` | | Continue on error when registering files. |
| `--files.destinationDirectory` | string | Location of source code in container. |
| `--files.dryRun` | | Execute command without making any modifications. |
| `--files.enableSchedule` | | Enable the schedule if the files contain schedulable launchplan. |
| `--files.force` | | Force use of version number on entities registered with flyte. |
| `--files.k8ServiceAccount` | string | Deprecated. Please use `--K8sServiceAccount`|
| `--files.k8sServiceAccount` | string | Custom kubernetes service account auth role to register launch plans with. |
| `--files.outputLocationPrefix` | string | Custom output location prefix for offloaded types (files/schemas). |
| `--files.sourceUploadPath` | string | Deprecated: Update flyte admin to avoid having to configure storage access from uctl. |
| `--files.version` | string | Version of the entity to be registered with flyte which are un-versioned after serialization. |
| `--logger.formatter.type` | string | Sets logging format type. (default "json") |
| `--logger.level` | int | Sets the minimum logging level. (default 3) |
| `--logger.mute` | | Mutes all logs regardless of severity. Intended for benchmarks/tests only. |
| `--logger.show-source` | | Includes source code location in logs. |
| `--org` | string | Organization to work on. If not set, default to user's org. |
| `--otel.file.filename` | string | Filename to store exported telemetry traces (default "/tmp/trace.txt") |
| `--otel.jaeger.endpoint` | string | Endpoint for the jaeger telemetry trace ingestor (default "http://localhost:14268/api/traces") |
| `--otel.otlpgrpc.endpoint` | string | Endpoint for the OTLP telemetry trace collector (default "http://localhost:4317") |
| `--otel.otlphttp.endpoint` | string | Endpoint for the OTLP telemetry trace collector (default "http://localhost:4318/v1/traces") |
| `--otel.sampler.parentSampler` | string | Sets the parent sampler to use for the tracer (default "always") |
| `--otel.type` | string | Sets the type of exporter to configure [noop/file/jaeger/otlpgrpc/otlphttp]. (default "noop") |
| `-o`, `--output` | string | Specifies the output type - supported formats [TABLE JSON YAML DOT DOTURL]. NOTE: dot, doturl are only supported for Workflow (default "table") |
| `--plugins.catalogcache.reader.maxItems` | int | Maximum number of entries to keep in the index. (default 10000) |
| `--plugins.catalogcache.reader.maxRetries` | int | Maximum number of retries per item. (default 3) |
| `--plugins.catalogcache.reader.workers` | int | Number of concurrent workers to start processing the queue. (default 10) |
| `--plugins.catalogcache.writer.maxItems` | int | Maximum number of entries to keep in the index. (default 10000) |
| `--plugins.catalogcache.writer.maxRetries` | int | Maximum number of retries per item. (default 3) |
| `--plugins.catalogcache.writer.workers` | int | Number of concurrent workers to start processing the queue. (default 10) |
| `-p`, `--project` | string | Specifies the Flyte project. |
| `--rediscache.passwordSecretName` | string | Name of secret with Redis password. |
| `--rediscache.primaryEndpoint` | string | Primary endpoint for the redis cache that can be used for both reads and writes. |
| `--rediscache.replicaEndpoint` | string | Replica endpoint for the redis cache that can be used for reads. |
| `--secrets.env-prefix` | string | Prefix for environment variables (default "FLYTE_SECRET_") |
| `--secrets.secrets-prefix` | string | Prefix where to look for secrets file (default "/etc/secrets") |
| `--secrets.type` | string | Sets the type of storage to configure [local]. (default "local") |
| `--server.dataProxy.download.maxExpiresIn` | string | Maximum allowed expiration duration. (default "1h0m0s") |
| `--server.dataProxy.upload.defaultFileNameLength` | int | Default length for the generated file name if not provided in the request. (default 20) |
| `--server.dataProxy.upload.maxExpiresIn` | string | Maximum allowed expiration duration. (default "1h0m0s") |
| `--server.dataProxy.upload.maxSize` | string | Maximum allowed upload size. (default "6Mi") |
| `--server.dataProxy.upload.storagePrefix` | string | Storage prefix to use for all upload requests. |
| `--server.grpc.enableGrpcLatencyMetrics` | | Enable grpc latency metrics. Note Histograms metrics can be expensive on Prometheus servers. |
| `--server.grpc.maxMessageSizeBytes` | int | The max size in bytes for incoming gRPC messages |
| `--server.grpc.port` | int | On which grpc port to serve admin (default 8089) |
| `--server.grpc.serverReflection` | | Enable GRPC Server Reflection (default true) |
| `--server.grpcPort` | int | deprecated |
| `--server.grpcServerReflection` | | deprecated |
| `--server.httpPort` | int | On which http port to serve admin (default 8088) |
| `--server.kube-config` | string | Path to kubernetes client config file, default is empty, useful for incluster config. |
| `--server.kubeClientConfig.burst` | int | Max burst rate for throttle. 0 defaults to 10 (default 25) |
| `--server.kubeClientConfig.qps` | int32 | Max QPS to the master for requests to KubeAPI. 0 defaults to 5. (default 100) |
| `--server.kubeClientConfig.timeout` | string | Max duration allowed for every request to KubeAPI before giving up. 0 implies no timeout. (default "30s") |
| `--server.master` | string | The address of the Kubernetes API server. |
| `--server.readHeaderTimeoutSeconds` | int | The amount of time allowed to read request headers. (default 32) |
| `--server.security.allowCors` | | (default true) |
| `--server.security.allowedHeaders` | strings | (default [Content-Type,flyte-authorization]) |
| `--server.security.allowedOrigins` | strings | (default [*]) |
| `--server.security.auditAccess` | | |
| `--server.security.secure` | | |
| `--server.security.ssl.certificateFile` | string | |
| `--server.security.ssl.keyFile` | string | |
| `--server.security.useAuth` | | |
| `--server.thirdPartyConfig.flyteClient.audience` | string | Audience to use when initiating OAuth2 authorization requests. |
| `--server.thirdPartyConfig.flyteClient.clientId` | string | public identifier for the app which handles authorization for a Flyte deployment |
| `--server.thirdPartyConfig.flyteClient.redirectUri` | string | This is the callback uri registered with the app which handles authorization for a Flyte deployment |
| `--server.thirdPartyConfig.flyteClient.scopes` | strings | Recommended scopes for the client to request. |
| `--server.watchService.maxActiveClusterConnections` | int | (default 5) |
| `--server.watchService.maxPageSize` | int | (default 50000) |
| `--server.watchService.nonTerminalStatusUpdatesInterval` | string | (default "1m0s") |
| `--server.watchService.pollInterval` | string | (default "1s") |
| `--sharedservice.connectPort` | string | On which connect port to serve admin (default "8080") |
| `--sharedservice.grpc.grpcMaxResponseStatusBytes` | int32 | specifies the maximum (uncompressed) size of header list that the client is prepared to accept on grpc calls (default 32000) |
| `--sharedservice.grpc.maxConcurrentStreams` | int | Limit on the number of concurrent streams to each ServerTransport. (default 100) |
| `--sharedservice.grpc.maxMessageSizeBytes` | int | Limit on the size of message that can be received on the server. (default 10485760) |
| `--sharedservice.grpcServerReflection` | | Enable GRPC Server Reflection (default true) |
| `--sharedservice.httpPort` | string | On which http port to serve admin (default "8089") |
| `--sharedservice.kubeConfig` | string | Path to kubernetes client config file. |
| `--sharedservice.master` | string | The address of the Kubernetes API server. |
| `--sharedservice.metrics.enableClientGrpcHistograms` | | Enable client grpc histograms (default true) |
| `--sharedservice.metrics.enableGrpcHistograms` | | Enable grpc histograms (default true) |
| `--sharedservice.metrics.scope` | string | Scope to emit metrics under (default "service:") |
| `--sharedservice.port` | string | On which grpc port to serve admin (default "8080") |
| `--sharedservice.profiler.enabled` | | Enable Profiler on server |
| `--sharedservice.profilerPort` | string | Profile port to start listen for pprof and metric handlers on. (default "10254") |
| `--sharedservice.security.allowCors` | | |
| `--sharedservice.security.allowLocalhostAccess` | | Whether to permit localhost unauthenticated access to the server |
| `--sharedservice.security.allowedHeaders` | strings | |
| `--sharedservice.security.allowedOrigins` | strings | |
| `--sharedservice.security.auditAccess` | | |
| `--sharedservice.security.orgOverride` | string | Override org in identity context if localhost access enabled |
| `--sharedservice.security.secure` | | |
| `--sharedservice.security.ssl.certificateAuthorityFile` | string | |
| `--sharedservice.security.ssl.certificateFile` | string | |
| `--sharedservice.security.ssl.keyFile` | string | |
| `--sharedservice.security.useAuth` | | |
| `--sharedservice.sync.syncInterval` | string | Time interval to sync (default "5m0s") |
| `--storage.cache.max_size_mbs` | int | Maximum size of the cache where the Blob store data is cached in-memory. If not specified or set to 0, cache is not used |
| `--storage.cache.target_gc_percent` | int | Sets the garbage collection target percentage. |
| `--storage.connection.access-key` | string | Access key to use. Only required when authtype is set to accesskey. |
| `--storage.connection.auth-type` | string | Auth Type to use [iam, accesskey]. (default "iam") |
| `--storage.connection.disable-ssl` | | Disables SSL connection. Should only be used for development. |
| `--storage.connection.endpoint` | string | URL for storage client to connect to. |
| `--storage.connection.region` | string | Region to connect to. (default "us-east-1") |
| `--storage.connection.secret-key` | string | Secret to use when accesskey is set. |
| `--storage.container` | string | Initial container (in s3 a bucket) to create -if it doesn't exist-.' |
| `--storage.defaultHttpClient.timeout` | string | Sets time out on the http client. (default "0s") |
| `--storage.enable-multicontainer` | | If this is true, then the container argument is overlooked and redundant. This config will automatically open new connections to new containers/buckets as they are encountered |
| `--storage.limits.maxDownloadMBs` | int | Maximum allowed download size (in MBs) per call. (default 2) |
| `--storage.stow.config` | stringToString | Configuration for stow backend. Refer to github/flyteorg/stow (default []) |
| `--storage.stow.kind` | string | Kind of Stow backend to use. Refer to github/flyteorg/stow |
| `--storage.type` | string | Sets the type of storage to configure [s3/minio/local/mem/stow]. (default "s3") |
| `--union.auth.authorizationMetadataKey` | string | Authorization Header to use when passing Access Tokens to the server (default "flyte-authorization") |
| `--union.auth.clientId` | string | Client ID |
| `--union.auth.clientSecretEnvVar` | string | Environment variable containing the client secret |
| `--union.auth.clientSecretLocation` | string | File containing the client secret |
| `--union.auth.deviceFlow.pollInterval` | string | amount of time the device flow would poll the token endpoint if auth server doesn't return a polling interval. Okta and google IDP do return an interval' (default "5s") |
| `--union.auth.deviceFlow.refreshTime` | string | grace period from the token expiry after which it would refresh the token. (default "5m0s") |
| `--union.auth.deviceFlow.timeout` | string | amount of time the device flow should complete or else it will be cancelled. (default "10m0s") |
| `--union.auth.enable` | | Whether to enable an authenticated conenction when communicating with admin. (default true) |
| `--union.auth.externalAuth.command` | strings | Command for external authentication token generation |
| `--union.auth.pkce.refreshTime` | string | grace period from the token expiry after which it would refresh the token. (default "5m0s") |
| `--union.auth.pkce.timeout` | string | Amount of time the browser session would be active for authentication from client app. (default "15s") |
| `--union.auth.scopes` | strings | List of scopes to request |
| `--union.auth.tokenRefreshWindow` | string | Max duration between token refresh attempt and token expiry. (default "1h0m0s") |
| `--union.auth.tokenUrl` | string | OPTIONAL: Your IdP's token endpoint. It'll be discovered from flyte admin's OAuth Metadata endpoint if not provided. |
| `--union.auth.type` | string | Type of OAuth2 flow used for communicating with admin. (default "Pkce") |
| `--union.cache.maxItemsCount` | int | Maximum number of items to keep in the cache before evicting. (default 1000) |
| `--union.connection.host` | string | Host to connect to (default "dns:///utt-mgdp-stg-us-east-2.cloud-staging.union.ai") |
| `--union.connection.insecure` | | Whether to connect over insecure channel |
| `--union.connection.insecureSkipVerify` | | InsecureSkipVerify controls whether a client verifies the server's certificate chain and host name.Caution: shouldn't be use for production usecases' |
| `--union.connection.keepAliveConfig.permitWithoutStream` | | If true, client sends keepalive pings even with no active RPCs. |
| `--union.connection.keepAliveConfig.time` | string | After a duration of this time if the client doesn't see any activity it pings the server to see if the transport is still alive. (default "20s") |
| `--union.connection.keepAliveConfig.timeout` | string | After having pinged for keepalive check, the client waits for a duration of Timeout and if no activity is seen even after that the connection is closed. (default "2m0s") |
| `--union.connection.maxBackoffDelay` | string | Max delay for grpc backoff (default "8s") |
| `--union.connection.maxRecvMsgSize` | int | Maximum size of a message in bytes of a gRPC message (default 10485760) |
| `--union.connection.maxRetries` | int | Max number of gRPC retries (default 4) |
| `--union.connection.minConnectTimeout` | string | Minimum timeout for establishing a connection (default "20s") |
| `--union.connection.perRetryTimeout` | string | gRPC per retry timeout (default "15s") |
| `--union.connection.serviceConfig` | string | Defines gRPC experimental JSON Service Config (default "{"loadBalancingConfig": [{"round_robin":{}}]}") |
| `--union.connection.trustedIdentityClaims.enabled` | | Enables passing of trusted claims while making inter service calls |
| `--union.connection.trustedIdentityClaims.externalIdentityClaim` | string | External identity claim of the service which is authorized to make internal service call. These are verified against userclouds actions |
| `--union.connection.trustedIdentityClaims.externalIdentityTypeClaim` | string | External identity type claim of app or user to use for the current service identity. It should be an 'app' for inter service communication |
| `--union.internalConnectionConfig.-` | stringToString | (default []) |
| `--union.internalConnectionConfig.enabled` | | Enables internal service to service communication instead of going through ingress. |
| `--union.internalConnectionConfig.urlPattern` | string | UrlPattern of the internal service endpoints. (default "{{ service }}-helmchart.{{ service }}.svc.cluster.local:80") |
| `--webhook.awsSecretManager.sidecarImage` | string | Specifies the sidecar docker image to use (default "docker.io/amazon/aws-secrets-manager-secret-sidecar:v0.1.4") |
| `--webhook.certDir` | string | Certificate directory to use to write generated certs. Defaults to /etc/webhook/certs/ (default "/etc/webhook/certs") |
| `--webhook.embeddedSecretManagerConfig.awsConfig.region` | string | AWS region |
| `--webhook.embeddedSecretManagerConfig.fileMountInitContainer.image` | string | Specifies init container image to use for mounting secrets as files. (default "busybox:1.28") |
| `--webhook.embeddedSecretManagerConfig.gcpConfig.project` | string | GCP project to be used for secret manager |
| `--webhook.embeddedSecretManagerConfig.type` | string | (default "AWS") |
| `--webhook.gcpSecretManager.sidecarImage` | string | Specifies the sidecar docker image to use (default "gcr.io/google.com/cloudsdktool/cloud-sdk:alpine") |
| `--webhook.listenPort` | int | The port to use to listen to webhook calls. Defaults to 9443 (default 9443) |
| `--webhook.localCert` | | write certs locally. Defaults to false |
| `--webhook.metrics-prefix` | string | An optional prefix for all published metrics. (default "flyte:") |
| `--webhook.secretName` | string | Secret name to write generated certs to. (default "flyte-pod-webhook") |
| `--webhook.serviceName` | string | The name of the webhook service. (default "flyte-pod-webhook") |
| `--webhook.servicePort` | int32 | The port on the service that hosting webhook. (default 443) |
| `--webhook.vaultSecretManager.role` | string | Specifies the vault role to use (default "flyte") |
=== PAGE: https://www.union.ai/docs/v1/serverless/api-reference/uctl-cli/uctl-delete/uctl-delete-clusterpoolassignment ===
# uctl delete clusterpoolassignment
Delete cluster pool assignment
## Synopsis
Delete cluster pool assignment
```shell
$ uctl delete clusterpoolassignment [flags]
```
## Options
| Option | Type | Description |
|--------|------|-------------|
| `--clusterName` | string | Assign cluster with this name |
| `-h`, `--help` | help for clusterpoolassignment |
| `--poolName` | string | Assign cluster to this pool |
### Options inherited from parent commands
| Option | Type | Description |
|--------|------|-------------|
| `--admin.audience` | string | Audience to use when initiating OAuth2 authorization requests. |
| `--admin.authType` | string | Type of OAuth2 flow used for communicating with admin.ClientSecret, Pkce, ExternalCommand are valid values (default "ClientSecret") |
| `--admin.authorizationHeader` | string | Custom metadata header to pass JWT |
| `--admin.authorizationServerUrl` | string | This is the URL to your IdP's authorization server. It'll default to Endpoint |
| `--admin.caCertFilePath` | string | Use specified certificate file to verify the admin server peer. |
| `--admin.clientId` | string | Client ID (default "flytepropeller") |
| `--admin.clientSecretEnvVar` | string | Environment variable containing the client secret |
| `--admin.clientSecretLocation` | string | File containing the client secret (default "/etc/secrets/client_secret") |
| `--admin.command` | strings | Command for external authentication token generation |
| `--admin.defaultOrg` | string | OPTIONAL: Default org to use to support non-org based cli's.'. |
| `--admin.defaultServiceConfig` | string | |
| `--admin.deviceFlowConfig.pollInterval` | string | amount of time the device flow would poll the token endpoint if auth server doesn't return a polling interval. Okta and google IDP do return an interval' (default "5s") |
| `--admin.deviceFlowConfig.refreshTime` | string | grace period from the token expiry after which it would refresh the token. (default "5m0s") |
| `--admin.deviceFlowConfig.timeout` | string | amount of time the device flow should complete or else it will be cancelled. (default "10m0s") |
| `--admin.endpoint` | string | For admin types, specify where the uri of the service is located. |
| `--admin.httpProxyURL` | string | OPTIONAL: HTTP Proxy to be used for OAuth requests. |
| `--admin.insecure` | | Use insecure connection. |
| `--admin.insecureSkipVerify` | | InsecureSkipVerify controls whether a client verifies the server's certificate chain and host name.Caution: shouldn't be use for production usecases' |
| `--admin.maxBackoffDelay` | string | Max delay for grpc backoff (default "8s") |
| `--admin.maxMessageSizeBytes` | int | The max size in bytes for incoming gRPC messages |
| `--admin.maxRetries` | int | Max number of gRPC retries (default 4) |
| `--admin.perRetryTimeout` | string | gRPC per retry timeout (default "15s") |
| `--admin.pkceConfig.refreshTime` | string | grace period from the token expiry after which it would refresh the token. (default "5m0s") |
| `--admin.pkceConfig.timeout` | string | Amount of time the browser session would be active for authentication from client app. (default "2m0s") |
| `--admin.proxyCommand` | strings | Command for external proxy-authorization token generation |
| `--admin.scopes` | strings | List of scopes to request |
| `--admin.tokenRefreshWindow` | string | Max duration between token refresh attempt and token expiry. (default "0s") |
| `--admin.tokenUrl` | string | OPTIONAL: Your IdP's token endpoint. It'll be discovered from flyte admin's OAuth Metadata endpoint if not provided. |
| `--admin.useAudienceFromAdmin` | | Use Audience configured from admins public endpoint config. |
| `--admin.useAuth` | | Deprecated: Auth will be enabled/disabled based on admin's dynamically discovered information. |
| `--auth.appAuth.externalAuthServer.allowedAudience` | strings | Optional: A list of allowed audiences. If not provided, the audience is expected to be the public Uri of the service. |
| `--auth.appAuth.externalAuthServer.baseUrl` | string | This should be the base url of the authorization server that you are trying to hit. With Okta for instance, it will look something like https://company.okta.com/oauth2/abcdef123456789/ |
| `--auth.appAuth.externalAuthServer.httpProxyURL` | string | OPTIONAL: HTTP Proxy to be used for OAuth requests. |
| `--auth.appAuth.externalAuthServer.metadataUrl` | string | Optional: If the server doesn't support /.well-known/oauth-authorization-server, you can set a custom metadata url here.' |
| `--auth.appAuth.externalAuthServer.retryAttempts` | int | Optional: The number of attempted retries on a transient failure to get the OAuth metadata (default 5) |
| `--auth.appAuth.externalAuthServer.retryDelay` | string | Optional, Duration to wait between retries (default "1s") |
| `--auth.appAuth.selfAuthServer.accessTokenLifespan` | string | Defines the lifespan of issued access tokens. (default "30m0s") |
| `--auth.appAuth.selfAuthServer.authorizationCodeLifespan` | string | Defines the lifespan of issued access tokens. (default "5m0s") |
| `--auth.appAuth.selfAuthServer.claimSymmetricEncryptionKeySecretName` | string | OPTIONAL: Secret name to use to encrypt claims in authcode token. (default "claim_symmetric_key") |
| `--auth.appAuth.selfAuthServer.issuer` | string | Defines the issuer to use when issuing and validating tokens. The default value is https://{requestUri.HostAndPort}/ |
| `--auth.appAuth.selfAuthServer.oldTokenSigningRSAKeySecretName` | string | OPTIONAL: Secret name to use to retrieve Old RSA Signing Key. This can be useful during key rotation to continue to accept older tokens. (default "token_rsa_key_old.pem") |
| `--auth.appAuth.selfAuthServer.refreshTokenLifespan` | string | Defines the lifespan of issued access tokens. (default "1h0m0s") |
| `--auth.appAuth.selfAuthServer.tokenSigningRSAKeySecretName` | string | OPTIONAL: Secret name to use to retrieve RSA Signing Key. (default "token_rsa_key.pem") |
| `--auth.appAuth.thirdPartyConfig.flyteClient.audience` | string | Audience to use when initiating OAuth2 authorization requests. |
| `--auth.appAuth.thirdPartyConfig.flyteClient.clientId` | string | public identifier for the app which handles authorization for a Flyte deployment (default "uctl") |
| `--auth.appAuth.thirdPartyConfig.flyteClient.redirectUri` | string | This is the callback uri registered with the app which handles authorization for a Flyte deployment (default "http://localhost:53593/callback") |
| `--auth.appAuth.thirdPartyConfig.flyteClient.scopes` | strings | Recommended scopes for the client to request. (default [all,offline]) |
| `--auth.disableForGrpc` | | Disables auth enforcement on Grpc Endpoints. |
| `--auth.disableForHttp` | | Disables auth enforcement on HTTP Endpoints. |
| `--auth.grpcAuthorizationHeader` | string | (default "flyte-authorization") |
| `--auth.httpAuthorizationHeader` | string | (default "flyte-authorization") |
| `--auth.httpProxyURL` | string | OPTIONAL: HTTP Proxy to be used for OAuth requests. |
| `--auth.tokenEndpointProxyPath` | string | The path used to proxy calls to the TokenURL |
| `--auth.userAuth.cookieBlockKeySecretName` | string | OPTIONAL: Secret name to use for cookie block key. (default "cookie_block_key") |
| `--auth.userAuth.cookieHashKeySecretName` | string | OPTIONAL: Secret name to use for cookie hash key. (default "cookie_hash_key") |
| `--auth.userAuth.cookieSetting.domain` | string | OPTIONAL: Allows you to set the domain attribute on the auth cookies. |
| `--auth.userAuth.cookieSetting.sameSitePolicy` | string | OPTIONAL: Allows you to declare if your cookie should be restricted to a first-party or same-site context.Wrapper around http.SameSite. (default "DefaultMode") |
| `--auth.userAuth.httpProxyURL` | string | OPTIONAL: HTTP Proxy to be used for OAuth requests. |
| `--auth.userAuth.idpQueryParameter` | string | idp query parameter used for selecting a particular IDP for doing user authentication. Eg: for Okta passing idp={IDP-ID} forces the authentication to happen with IDP-ID |
| `--auth.userAuth.openId.baseUrl` | string | |
| `--auth.userAuth.openId.clientId` | string | |
| `--auth.userAuth.openId.clientSecretFile` | string | |
| `--auth.userAuth.openId.clientSecretName` | string | (default "oidc_client_secret") |
| `--auth.userAuth.openId.scopes` | strings | (default [openid,profile]) |
| `--auth.userAuth.redirectUrl` | string | (default "/console") |
| `--authorizer.internalCommunicationConfig.enabled` | | Enables authorization decisions for internal communication. (default true) |
| `--authorizer.internalCommunicationConfig.ingressIdentity` | string | IngressIdentity used in the cluster. Needed to exclude the communication coming from ingress. (default "ingress-nginx.ingress-nginx.serviceaccount.identity.linkerd.cluster.local") |
| `--authorizer.internalCommunicationConfig.tenantUrlPatternIdentity` | string | UrlPatternIdentity of the internal tenant service endpoint identities. (default "{{ service }}.{{ org }}.serviceaccount.identity.linkerd.cluster.local") |
| `--authorizer.internalCommunicationConfig.urlPatternIdentity` | string | UrlPatternIdentity of the internal service endpoint identities. (default "{{ service }}-helmchart.{{ service }}.serviceaccount.identity.linkerd.cluster.local") |
| `--authorizer.mode` | string | (default "Active") |
| `--authorizer.organizationConfig.PolicyConfig.adminPolicyDescription` | string | description for the boilerplate admin policy (default "Contributor permissions and full admin permissions to manage users and view usage dashboards") |
| `--authorizer.organizationConfig.PolicyConfig.contributorPolicyDescription` | string | description for the boilerplate contributor policy (default "Viewer permissions and permissions to create workflows, tasks, launch plans, and executions") |
| `--authorizer.organizationConfig.PolicyConfig.defaultUserPolicyRoleType` | string | name of the role type to determine which default policy new users added to the organization should be assigned (default "Viewer") |
| `--authorizer.organizationConfig.PolicyConfig.serverlessContributorPolicyDescription` | string | description for the boilerplate serverless contributor policy (default "Viewer permissions and permissions to create workflows, tasks, launch plans, and executions") |
| `--authorizer.organizationConfig.PolicyConfig.serverlessViewerPolicyDescription` | string | description for the boilerplate serverless viewer policy (default "Permissions to view Flyte entities") |
| `--authorizer.organizationConfig.PolicyConfig.viewerPolicyDescription` | string | description for the boilerplate viewer policy (default "Permissions to view Flyte entities") |
| `--authorizer.organizationConfig.defaultPolicyCacheDuration` | string | Cache entry duration for the store of the default policy per organization (default "10m0s") |
| `--authorizer.syncRuleRefreshInterval` | string | (default "1m0s") |
| `--authorizer.type` | string | (default "UserClouds") |
| `--authorizer.userCloudsClient.cache.redis.ttl.edgeTypes` | string | Specifies how long edge types remain in the cache.. (default "30m0s") |
| `--authorizer.userCloudsClient.cache.redis.ttl.edges` | string | Specifies how long edges remain in the cache. (default "30m0s") |
| `--authorizer.userCloudsClient.cache.redis.ttl.objectTypes` | string | Specifies how long object types remain in the cache. (default "30m0s") |
| `--authorizer.userCloudsClient.cache.redis.ttl.objects` | string | Specifies how long objects remain in the cache. (default "30m0s") |
| `--authorizer.userCloudsClient.cache.type` | string | Cache type to use. (default "none") |
| `--authorizer.userCloudsClient.clientID` | string | UserClouds client id |
| `--authorizer.userCloudsClient.clientSecretName` | string | UserCloud client secret name to read from the secret manager. (default "userclouds-client-secret") |
| `--authorizer.userCloudsClient.enableLogging` | | Enable userclouds client's internal logging. Calls to post logs take 250-350 ms and will impact p99 latency, enable with caution. |
| `--authorizer.userCloudsClient.tenantID` | string | UserClouds tenant id. Should be a UUID. |
| `--authorizer.userCloudsClient.tenantUrl` | string | Something like https://{yourtenant}.tenant.userclouds.com |
| `--config` | string | config file (default is /Users/andrew/.union/config.yaml) |
| `--connection.environment` | string | |
| `--connection.region` | string | |
| `--connection.rootTenantURLPattern` | string | Pattern for tenant url. (default "dns:///{{ organization }}.cloud-staging.union.ai") |
| `--console.endpoint` | string | Endpoint of console, if different than flyte admin |
| `--database.connMaxLifeTime` | string | sets the maximum amount of time a connection may be reused (default "1h0m0s") |
| `--database.enableForeignKeyConstraintWhenMigrating` | | Whether to enable gorm foreign keys when migrating the db |
| `--database.maxIdleConnections` | int | maxIdleConnections sets the maximum number of connections in the idle connection pool. (default 10) |
| `--database.maxOpenConnections` | int | maxOpenConnections sets the maximum number of open connections to the database. (default 100) |
| `--database.postgres.dbname` | string | The database name (default "postgres") |
| `--database.postgres.debug` | | |
| `--database.postgres.host` | string | The host name of the database server (default "localhost") |
| `--database.postgres.options` | string | See http://gorm.io/docs/connecting_to_the_database.html for available options passed, in addition to the above. (default "sslmode=disable") |
| `--database.postgres.password` | string | The database password. (default "postgres") |
| `--database.postgres.passwordPath` | string | Points to the file containing the database password. |
| `--database.postgres.port` | int | The port name of the database server (default 30001) |
| `--database.postgres.readReplicaHost` | string | The host name of the read replica database server (default "localhost") |
| `--database.postgres.username` | string | The database user who is connecting to the server. (default "postgres") |
| `--database.sqlite.file` | string | The path to the file (existing or new) where the DB should be created / stored. If existing, then this will be re-used, else a new will be created |
| `--db.connectionPool.maxConnectionLifetime` | string | (default "0s") |
| `--db.connectionPool.maxIdleConnections` | int | |
| `--db.connectionPool.maxOpenConnections` | int | |
| `--db.dbname` | string | (default "postgres") |
| `--db.debug` | | |
| `--db.host` | string | (default "postgres") |
| `--db.log_level` | int | (default 4) |
| `--db.options` | string | (default "sslmode=disable") |
| `--db.password` | string | |
| `--db.passwordPath` | string | |
| `--db.port` | int | (default 5432) |
| `--db.username` | string | (default "postgres") |
| `-d`, `--domain` | string | Specifies the Flyte project's domain. |
| `--files.archive` | | Pass in archive file either an http link or local path. |
| `--files.assumableIamRole` | string | Custom assumable iam auth role to register launch plans with. |
| `--files.continueOnError` | | Continue on error when registering files. |
| `--files.destinationDirectory` | string | Location of source code in container. |
| `--files.dryRun` | | Execute command without making any modifications. |
| `--files.enableSchedule` | | Enable the schedule if the files contain schedulable launchplan. |
| `--files.force` | | Force use of version number on entities registered with flyte. |
| `--files.k8ServiceAccount` | string | Deprecated. Please use `--K8sServiceAccount`|
| `--files.k8sServiceAccount` | string | Custom kubernetes service account auth role to register launch plans with. |
| `--files.outputLocationPrefix` | string | Custom output location prefix for offloaded types (files/schemas). |
| `--files.sourceUploadPath` | string | Deprecated: Update flyte admin to avoid having to configure storage access from uctl. |
| `--files.version` | string | Version of the entity to be registered with flyte which are un-versioned after serialization. |
| `--logger.formatter.type` | string | Sets logging format type. (default "json") |
| `--logger.level` | int | Sets the minimum logging level. (default 3) |
| `--logger.mute` | | Mutes all logs regardless of severity. Intended for benchmarks/tests only. |
| `--logger.show-source` | | Includes source code location in logs. |
| `--org` | string | Organization to work on. If not set, default to user's org. |
| `--otel.file.filename` | string | Filename to store exported telemetry traces (default "/tmp/trace.txt") |
| `--otel.jaeger.endpoint` | string | Endpoint for the jaeger telemetry trace ingestor (default "http://localhost:14268/api/traces") |
| `--otel.otlpgrpc.endpoint` | string | Endpoint for the OTLP telemetry trace collector (default "http://localhost:4317") |
| `--otel.otlphttp.endpoint` | string | Endpoint for the OTLP telemetry trace collector (default "http://localhost:4318/v1/traces") |
| `--otel.sampler.parentSampler` | string | Sets the parent sampler to use for the tracer (default "always") |
| `--otel.type` | string | Sets the type of exporter to configure [noop/file/jaeger/otlpgrpc/otlphttp]. (default "noop") |
| `-o`, `--output` | string | Specifies the output type - supported formats [TABLE JSON YAML DOT DOTURL]. NOTE: dot, doturl are only supported for Workflow (default "table") |
| `--plugins.catalogcache.reader.maxItems` | int | Maximum number of entries to keep in the index. (default 10000) |
| `--plugins.catalogcache.reader.maxRetries` | int | Maximum number of retries per item. (default 3) |
| `--plugins.catalogcache.reader.workers` | int | Number of concurrent workers to start processing the queue. (default 10) |
| `--plugins.catalogcache.writer.maxItems` | int | Maximum number of entries to keep in the index. (default 10000) |
| `--plugins.catalogcache.writer.maxRetries` | int | Maximum number of retries per item. (default 3) |
| `--plugins.catalogcache.writer.workers` | int | Number of concurrent workers to start processing the queue. (default 10) |
| `-p`, `--project` | string | Specifies the Flyte project. |
| `--rediscache.passwordSecretName` | string | Name of secret with Redis password. |
| `--rediscache.primaryEndpoint` | string | Primary endpoint for the redis cache that can be used for both reads and writes. |
| `--rediscache.replicaEndpoint` | string | Replica endpoint for the redis cache that can be used for reads. |
| `--secrets.env-prefix` | string | Prefix for environment variables (default "FLYTE_SECRET_") |
| `--secrets.secrets-prefix` | string | Prefix where to look for secrets file (default "/etc/secrets") |
| `--secrets.type` | string | Sets the type of storage to configure [local]. (default "local") |
| `--server.dataProxy.download.maxExpiresIn` | string | Maximum allowed expiration duration. (default "1h0m0s") |
| `--server.dataProxy.upload.defaultFileNameLength` | int | Default length for the generated file name if not provided in the request. (default 20) |
| `--server.dataProxy.upload.maxExpiresIn` | string | Maximum allowed expiration duration. (default "1h0m0s") |
| `--server.dataProxy.upload.maxSize` | string | Maximum allowed upload size. (default "6Mi") |
| `--server.dataProxy.upload.storagePrefix` | string | Storage prefix to use for all upload requests. |
| `--server.grpc.enableGrpcLatencyMetrics` | | Enable grpc latency metrics. Note Histograms metrics can be expensive on Prometheus servers. |
| `--server.grpc.maxMessageSizeBytes` | int | The max size in bytes for incoming gRPC messages |
| `--server.grpc.port` | int | On which grpc port to serve admin (default 8089) |
| `--server.grpc.serverReflection` | | Enable GRPC Server Reflection (default true) |
| `--server.grpcPort` | int | deprecated |
| `--server.grpcServerReflection` | | deprecated |
| `--server.httpPort` | int | On which http port to serve admin (default 8088) |
| `--server.kube-config` | string | Path to kubernetes client config file, default is empty, useful for incluster config. |
| `--server.kubeClientConfig.burst` | int | Max burst rate for throttle. 0 defaults to 10 (default 25) |
| `--server.kubeClientConfig.qps` | int32 | Max QPS to the master for requests to KubeAPI. 0 defaults to 5. (default 100) |
| `--server.kubeClientConfig.timeout` | string | Max duration allowed for every request to KubeAPI before giving up. 0 implies no timeout. (default "30s") |
| `--server.master` | string | The address of the Kubernetes API server. |
| `--server.readHeaderTimeoutSeconds` | int | The amount of time allowed to read request headers. (default 32) |
| `--server.security.allowCors` | | (default true) |
| `--server.security.allowedHeaders` | strings | (default [Content-Type,flyte-authorization]) |
| `--server.security.allowedOrigins` | strings | (default [*]) |
| `--server.security.auditAccess` | | |
| `--server.security.secure` | | |
| `--server.security.ssl.certificateFile` | string | |
| `--server.security.ssl.keyFile` | string | |
| `--server.security.useAuth` | | |
| `--server.thirdPartyConfig.flyteClient.audience` | string | Audience to use when initiating OAuth2 authorization requests. |
| `--server.thirdPartyConfig.flyteClient.clientId` | string | public identifier for the app which handles authorization for a Flyte deployment |
| `--server.thirdPartyConfig.flyteClient.redirectUri` | string | This is the callback uri registered with the app which handles authorization for a Flyte deployment |
| `--server.thirdPartyConfig.flyteClient.scopes` | strings | Recommended scopes for the client to request. |
| `--server.watchService.maxActiveClusterConnections` | int | (default 5) |
| `--server.watchService.maxPageSize` | int | (default 50000) |
| `--server.watchService.nonTerminalStatusUpdatesInterval` | string | (default "1m0s") |
| `--server.watchService.pollInterval` | string | (default "1s") |
| `--sharedservice.connectPort` | string | On which connect port to serve admin (default "8080") |
| `--sharedservice.grpc.grpcMaxResponseStatusBytes` | int32 | specifies the maximum (uncompressed) size of header list that the client is prepared to accept on grpc calls (default 32000) |
| `--sharedservice.grpc.maxConcurrentStreams` | int | Limit on the number of concurrent streams to each ServerTransport. (default 100) |
| `--sharedservice.grpc.maxMessageSizeBytes` | int | Limit on the size of message that can be received on the server. (default 10485760) |
| `--sharedservice.grpcServerReflection` | | Enable GRPC Server Reflection (default true) |
| `--sharedservice.httpPort` | string | On which http port to serve admin (default "8089") |
| `--sharedservice.kubeConfig` | string | Path to kubernetes client config file. |
| `--sharedservice.master` | string | The address of the Kubernetes API server. |
| `--sharedservice.metrics.enableClientGrpcHistograms` | | Enable client grpc histograms (default true) |
| `--sharedservice.metrics.enableGrpcHistograms` | | Enable grpc histograms (default true) |
| `--sharedservice.metrics.scope` | string | Scope to emit metrics under (default "service:") |
| `--sharedservice.port` | string | On which grpc port to serve admin (default "8080") |
| `--sharedservice.profiler.enabled` | | Enable Profiler on server |
| `--sharedservice.profilerPort` | string | Profile port to start listen for pprof and metric handlers on. (default "10254") |
| `--sharedservice.security.allowCors` | | |
| `--sharedservice.security.allowLocalhostAccess` | | Whether to permit localhost unauthenticated access to the server |
| `--sharedservice.security.allowedHeaders` | strings | |
| `--sharedservice.security.allowedOrigins` | strings | |
| `--sharedservice.security.auditAccess` | | |
| `--sharedservice.security.orgOverride` | string | Override org in identity context if localhost access enabled |
| `--sharedservice.security.secure` | | |
| `--sharedservice.security.ssl.certificateAuthorityFile` | string | |
| `--sharedservice.security.ssl.certificateFile` | string | |
| `--sharedservice.security.ssl.keyFile` | string | |
| `--sharedservice.security.useAuth` | | |
| `--sharedservice.sync.syncInterval` | string | Time interval to sync (default "5m0s") |
| `--storage.cache.max_size_mbs` | int | Maximum size of the cache where the Blob store data is cached in-memory. If not specified or set to 0, cache is not used |
| `--storage.cache.target_gc_percent` | int | Sets the garbage collection target percentage. |
| `--storage.connection.access-key` | string | Access key to use. Only required when authtype is set to accesskey. |
| `--storage.connection.auth-type` | string | Auth Type to use [iam, accesskey]. (default "iam") |
| `--storage.connection.disable-ssl` | | Disables SSL connection. Should only be used for development. |
| `--storage.connection.endpoint` | string | URL for storage client to connect to. |
| `--storage.connection.region` | string | Region to connect to. (default "us-east-1") |
| `--storage.connection.secret-key` | string | Secret to use when accesskey is set. |
| `--storage.container` | string | Initial container (in s3 a bucket) to create -if it doesn't exist-.' |
| `--storage.defaultHttpClient.timeout` | string | Sets time out on the http client. (default "0s") |
| `--storage.enable-multicontainer` | | If this is true, then the container argument is overlooked and redundant. This config will automatically open new connections to new containers/buckets as they are encountered |
| `--storage.limits.maxDownloadMBs` | int | Maximum allowed download size (in MBs) per call. (default 2) |
| `--storage.stow.config` | stringToString | Configuration for stow backend. Refer to github/flyteorg/stow (default []) |
| `--storage.stow.kind` | string | Kind of Stow backend to use. Refer to github/flyteorg/stow |
| `--storage.type` | string | Sets the type of storage to configure [s3/minio/local/mem/stow]. (default "s3") |
| `--union.auth.authorizationMetadataKey` | string | Authorization Header to use when passing Access Tokens to the server (default "flyte-authorization") |
| `--union.auth.clientId` | string | Client ID |
| `--union.auth.clientSecretEnvVar` | string | Environment variable containing the client secret |
| `--union.auth.clientSecretLocation` | string | File containing the client secret |
| `--union.auth.deviceFlow.pollInterval` | string | amount of time the device flow would poll the token endpoint if auth server doesn't return a polling interval. Okta and google IDP do return an interval' (default "5s") |
| `--union.auth.deviceFlow.refreshTime` | string | grace period from the token expiry after which it would refresh the token. (default "5m0s") |
| `--union.auth.deviceFlow.timeout` | string | amount of time the device flow should complete or else it will be cancelled. (default "10m0s") |
| `--union.auth.enable` | | Whether to enable an authenticated conenction when communicating with admin. (default true) |
| `--union.auth.externalAuth.command` | strings | Command for external authentication token generation |
| `--union.auth.pkce.refreshTime` | string | grace period from the token expiry after which it would refresh the token. (default "5m0s") |
| `--union.auth.pkce.timeout` | string | Amount of time the browser session would be active for authentication from client app. (default "15s") |
| `--union.auth.scopes` | strings | List of scopes to request |
| `--union.auth.tokenRefreshWindow` | string | Max duration between token refresh attempt and token expiry. (default "1h0m0s") |
| `--union.auth.tokenUrl` | string | OPTIONAL: Your IdP's token endpoint. It'll be discovered from flyte admin's OAuth Metadata endpoint if not provided. |
| `--union.auth.type` | string | Type of OAuth2 flow used for communicating with admin. (default "Pkce") |
| `--union.cache.maxItemsCount` | int | Maximum number of items to keep in the cache before evicting. (default 1000) |
| `--union.connection.host` | string | Host to connect to (default "dns:///utt-mgdp-stg-us-east-2.cloud-staging.union.ai") |
| `--union.connection.insecure` | | Whether to connect over insecure channel |
| `--union.connection.insecureSkipVerify` | | InsecureSkipVerify controls whether a client verifies the server's certificate chain and host name.Caution: shouldn't be use for production usecases' |
| `--union.connection.keepAliveConfig.permitWithoutStream` | | If true, client sends keepalive pings even with no active RPCs. |
| `--union.connection.keepAliveConfig.time` | string | After a duration of this time if the client doesn't see any activity it pings the server to see if the transport is still alive. (default "20s") |
| `--union.connection.keepAliveConfig.timeout` | string | After having pinged for keepalive check, the client waits for a duration of Timeout and if no activity is seen even after that the connection is closed. (default "2m0s") |
| `--union.connection.maxBackoffDelay` | string | Max delay for grpc backoff (default "8s") |
| `--union.connection.maxRecvMsgSize` | int | Maximum size of a message in bytes of a gRPC message (default 10485760) |
| `--union.connection.maxRetries` | int | Max number of gRPC retries (default 4) |
| `--union.connection.minConnectTimeout` | string | Minimum timeout for establishing a connection (default "20s") |
| `--union.connection.perRetryTimeout` | string | gRPC per retry timeout (default "15s") |
| `--union.connection.serviceConfig` | string | Defines gRPC experimental JSON Service Config (default "{"loadBalancingConfig": [{"round_robin":{}}]}") |
| `--union.connection.trustedIdentityClaims.enabled` | | Enables passing of trusted claims while making inter service calls |
| `--union.connection.trustedIdentityClaims.externalIdentityClaim` | string | External identity claim of the service which is authorized to make internal service call. These are verified against userclouds actions |
| `--union.connection.trustedIdentityClaims.externalIdentityTypeClaim` | string | External identity type claim of app or user to use for the current service identity. It should be an 'app' for inter service communication |
| `--union.internalConnectionConfig.-` | stringToString | (default []) |
| `--union.internalConnectionConfig.enabled` | | Enables internal service to service communication instead of going through ingress. |
| `--union.internalConnectionConfig.urlPattern` | string | UrlPattern of the internal service endpoints. (default "{{ service }}-helmchart.{{ service }}.svc.cluster.local:80") |
| `--webhook.awsSecretManager.sidecarImage` | string | Specifies the sidecar docker image to use (default "docker.io/amazon/aws-secrets-manager-secret-sidecar:v0.1.4") |
| `--webhook.certDir` | string | Certificate directory to use to write generated certs. Defaults to /etc/webhook/certs/ (default "/etc/webhook/certs") |
| `--webhook.embeddedSecretManagerConfig.awsConfig.region` | string | AWS region |
| `--webhook.embeddedSecretManagerConfig.fileMountInitContainer.image` | string | Specifies init container image to use for mounting secrets as files. (default "busybox:1.28") |
| `--webhook.embeddedSecretManagerConfig.gcpConfig.project` | string | GCP project to be used for secret manager |
| `--webhook.embeddedSecretManagerConfig.type` | string | (default "AWS") |
| `--webhook.gcpSecretManager.sidecarImage` | string | Specifies the sidecar docker image to use (default "gcr.io/google.com/cloudsdktool/cloud-sdk:alpine") |
| `--webhook.listenPort` | int | The port to use to listen to webhook calls. Defaults to 9443 (default 9443) |
| `--webhook.localCert` | | write certs locally. Defaults to false |
| `--webhook.metrics-prefix` | string | An optional prefix for all published metrics. (default "flyte:") |
| `--webhook.secretName` | string | Secret name to write generated certs to. (default "flyte-pod-webhook") |
| `--webhook.serviceName` | string | The name of the webhook service. (default "flyte-pod-webhook") |
| `--webhook.servicePort` | int32 | The port on the service that hosting webhook. (default 443) |
| `--webhook.vaultSecretManager.role` | string | Specifies the vault role to use (default "flyte") |
=== PAGE: https://www.union.ai/docs/v1/serverless/api-reference/uctl-cli/uctl-delete/uctl-delete-execution ===
# uctl delete execution
Terminates/deletes execution resources.
## Synopsis
Task executions can be aborted only if they are in non-terminal state.
If they are FAILED, ABORTED, or SUCCEEDED, calling terminate on them has
no effect. Terminate a single execution with its name:
```shell
$ uctl delete execution c6a51x2l9e -d development -p flytesnacks
```
> [!NOTE]
> The terms execution/executions are interchangeable in these commands.
Get an execution to check its state:
```shell
$ uctl get execution -d development -p flytesnacks
```
| NAME | WORKFLOW NAME | TYPE | PHASE | STARTED | ELAPSED TIME |
|------------|--------------------------------|----------|---------|--------------------------------|---------------|
| c6a51x2l9e | recipes.core.basic.lp.go_greet | WORKFLOW | ABORTED | 2021-02-17T08:13:04.680476300Z | 15.540361300s |
Terminate multiple executions with their names:
```shell
$ uctl delete execution eeam9s8sny p4wv4hwgc4 -d development -p flytesnacks
```
Get an execution to find the state of previously terminated executions:
```shell
$ uctl get execution -d development -p flytesnacks
```
| NAME | WORKFLOW NAME | TYPE | PHASE | STARTED | ELAPSED TIME |
|------------|--------------------------------|----------|---------|--------------------------------|---------------|
| c6a51x2l9e | recipes.core.basic.lp.go_greet | WORKFLOW | ABORTED | 2021-02-17T08:13:04.680476300Z | 15.540361300s |
| eeam9s8sny | recipes.core.basic.lp.go_greet | WORKFLOW | ABORTED | 2021-02-17T08:14:04.803084100Z | 42.306385500s |
| p4wv4hwgc4 | recipes.core.basic.lp.go_greet | WORKFLOW | ABORTED | 2021-02-17T08:14:27.476307400Z | 19.727504400s |
Usage:
```shell
$ uctl delete execution [flags]
```
## Options
| `--dryRun` | | execute command without making any modifications. |
| `-h`, `--help` | help for execution |
### Options inherited from parent commands
| Option | Type | Description |
|--------|------|-------------|
| `--admin.audience` | string | Audience to use when initiating OAuth2 authorization requests. |
| `--admin.authType` | string | Type of OAuth2 flow used for communicating with admin.ClientSecret, Pkce, ExternalCommand are valid values (default "ClientSecret") |
| `--admin.authorizationHeader` | string | Custom metadata header to pass JWT |
| `--admin.authorizationServerUrl` | string | This is the URL to your IdP's authorization server. It'll default to Endpoint |
| `--admin.caCertFilePath` | string | Use specified certificate file to verify the admin server peer. |
| `--admin.clientId` | string | Client ID (default "flytepropeller") |
| `--admin.clientSecretEnvVar` | string | Environment variable containing the client secret |
| `--admin.clientSecretLocation` | string | File containing the client secret (default "/etc/secrets/client_secret") |
| `--admin.command` | strings | Command for external authentication token generation |
| `--admin.defaultOrg` | string | OPTIONAL: Default org to use to support non-org based cli's.'. |
| `--admin.defaultServiceConfig` | string | |
| `--admin.deviceFlowConfig.pollInterval` | string | amount of time the device flow would poll the token endpoint if auth server doesn't return a polling interval. Okta and google IDP do return an interval' (default "5s") |
| `--admin.deviceFlowConfig.refreshTime` | string | grace period from the token expiry after which it would refresh the token. (default "5m0s") |
| `--admin.deviceFlowConfig.timeout` | string | amount of time the device flow should complete or else it will be cancelled. (default "10m0s") |
| `--admin.endpoint` | string | For admin types, specify where the uri of the service is located. |
| `--admin.httpProxyURL` | string | OPTIONAL: HTTP Proxy to be used for OAuth requests. |
| `--admin.insecure` | | Use insecure connection. |
| `--admin.insecureSkipVerify` | | InsecureSkipVerify controls whether a client verifies the server's certificate chain and host name.Caution: shouldn't be use for production usecases' |
| `--admin.maxBackoffDelay` | string | Max delay for grpc backoff (default "8s") |
| `--admin.maxMessageSizeBytes` | int | The max size in bytes for incoming gRPC messages |
| `--admin.maxRetries` | int | Max number of gRPC retries (default 4) |
| `--admin.perRetryTimeout` | string | gRPC per retry timeout (default "15s") |
| `--admin.pkceConfig.refreshTime` | string | grace period from the token expiry after which it would refresh the token. (default "5m0s") |
| `--admin.pkceConfig.timeout` | string | Amount of time the browser session would be active for authentication from client app. (default "2m0s") |
| `--admin.proxyCommand` | strings | Command for external proxy-authorization token generation |
| `--admin.scopes` | strings | List of scopes to request |
| `--admin.tokenRefreshWindow` | string | Max duration between token refresh attempt and token expiry. (default "0s") |
| `--admin.tokenUrl` | string | OPTIONAL: Your IdP's token endpoint. It'll be discovered from flyte admin's OAuth Metadata endpoint if not provided. |
| `--admin.useAudienceFromAdmin` | | Use Audience configured from admins public endpoint config. |
| `--admin.useAuth` | | Deprecated: Auth will be enabled/disabled based on admin's dynamically discovered information. |
| `--auth.appAuth.externalAuthServer.allowedAudience` | strings | Optional: A list of allowed audiences. If not provided, the audience is expected to be the public Uri of the service. |
| `--auth.appAuth.externalAuthServer.baseUrl` | string | This should be the base url of the authorization server that you are trying to hit. With Okta for instance, it will look something like https://company.okta.com/oauth2/abcdef123456789/ |
| `--auth.appAuth.externalAuthServer.httpProxyURL` | string | OPTIONAL: HTTP Proxy to be used for OAuth requests. |
| `--auth.appAuth.externalAuthServer.metadataUrl` | string | Optional: If the server doesn't support /.well-known/oauth-authorization-server, you can set a custom metadata url here.' |
| `--auth.appAuth.externalAuthServer.retryAttempts` | int | Optional: The number of attempted retries on a transient failure to get the OAuth metadata (default 5) |
| `--auth.appAuth.externalAuthServer.retryDelay` | string | Optional, Duration to wait between retries (default "1s") |
| `--auth.appAuth.selfAuthServer.accessTokenLifespan` | string | Defines the lifespan of issued access tokens. (default "30m0s") |
| `--auth.appAuth.selfAuthServer.authorizationCodeLifespan` | string | Defines the lifespan of issued access tokens. (default "5m0s") |
| `--auth.appAuth.selfAuthServer.claimSymmetricEncryptionKeySecretName` | string | OPTIONAL: Secret name to use to encrypt claims in authcode token. (default "claim_symmetric_key") |
| `--auth.appAuth.selfAuthServer.issuer` | string | Defines the issuer to use when issuing and validating tokens. The default value is https://{requestUri.HostAndPort}/ |
| `--auth.appAuth.selfAuthServer.oldTokenSigningRSAKeySecretName` | string | OPTIONAL: Secret name to use to retrieve Old RSA Signing Key. This can be useful during key rotation to continue to accept older tokens. (default "token_rsa_key_old.pem") |
| `--auth.appAuth.selfAuthServer.refreshTokenLifespan` | string | Defines the lifespan of issued access tokens. (default "1h0m0s") |
| `--auth.appAuth.selfAuthServer.tokenSigningRSAKeySecretName` | string | OPTIONAL: Secret name to use to retrieve RSA Signing Key. (default "token_rsa_key.pem") |
| `--auth.appAuth.thirdPartyConfig.flyteClient.audience` | string | Audience to use when initiating OAuth2 authorization requests. |
| `--auth.appAuth.thirdPartyConfig.flyteClient.clientId` | string | public identifier for the app which handles authorization for a Flyte deployment (default "uctl") |
| `--auth.appAuth.thirdPartyConfig.flyteClient.redirectUri` | string | This is the callback uri registered with the app which handles authorization for a Flyte deployment (default "http://localhost:53593/callback") |
| `--auth.appAuth.thirdPartyConfig.flyteClient.scopes` | strings | Recommended scopes for the client to request. (default [all,offline]) |
| `--auth.disableForGrpc` | | Disables auth enforcement on Grpc Endpoints. |
| `--auth.disableForHttp` | | Disables auth enforcement on HTTP Endpoints. |
| `--auth.grpcAuthorizationHeader` | string | (default "flyte-authorization") |
| `--auth.httpAuthorizationHeader` | string | (default "flyte-authorization") |
| `--auth.httpProxyURL` | string | OPTIONAL: HTTP Proxy to be used for OAuth requests. |
| `--auth.tokenEndpointProxyPath` | string | The path used to proxy calls to the TokenURL |
| `--auth.userAuth.cookieBlockKeySecretName` | string | OPTIONAL: Secret name to use for cookie block key. (default "cookie_block_key") |
| `--auth.userAuth.cookieHashKeySecretName` | string | OPTIONAL: Secret name to use for cookie hash key. (default "cookie_hash_key") |
| `--auth.userAuth.cookieSetting.domain` | string | OPTIONAL: Allows you to set the domain attribute on the auth cookies. |
| `--auth.userAuth.cookieSetting.sameSitePolicy` | string | OPTIONAL: Allows you to declare if your cookie should be restricted to a first-party or same-site context.Wrapper around http.SameSite. (default "DefaultMode") |
| `--auth.userAuth.httpProxyURL` | string | OPTIONAL: HTTP Proxy to be used for OAuth requests. |
| `--auth.userAuth.idpQueryParameter` | string | idp query parameter used for selecting a particular IDP for doing user authentication. Eg: for Okta passing idp={IDP-ID} forces the authentication to happen with IDP-ID |
| `--auth.userAuth.openId.baseUrl` | string | |
| `--auth.userAuth.openId.clientId` | string | |
| `--auth.userAuth.openId.clientSecretFile` | string | |
| `--auth.userAuth.openId.clientSecretName` | string | (default "oidc_client_secret") |
| `--auth.userAuth.openId.scopes` | strings | (default [openid,profile]) |
| `--auth.userAuth.redirectUrl` | string | (default "/console") |
| `--authorizer.internalCommunicationConfig.enabled` | | Enables authorization decisions for internal communication. (default true) |
| `--authorizer.internalCommunicationConfig.ingressIdentity` | string | IngressIdentity used in the cluster. Needed to exclude the communication coming from ingress. (default "ingress-nginx.ingress-nginx.serviceaccount.identity.linkerd.cluster.local") |
| `--authorizer.internalCommunicationConfig.tenantUrlPatternIdentity` | string | UrlPatternIdentity of the internal tenant service endpoint identities. (default "{{ service }}.{{ org }}.serviceaccount.identity.linkerd.cluster.local") |
| `--authorizer.internalCommunicationConfig.urlPatternIdentity` | string | UrlPatternIdentity of the internal service endpoint identities. (default "{{ service }}-helmchart.{{ service }}.serviceaccount.identity.linkerd.cluster.local") |
| `--authorizer.mode` | string | (default "Active") |
| `--authorizer.organizationConfig.PolicyConfig.adminPolicyDescription` | string | description for the boilerplate admin policy (default "Contributor permissions and full admin permissions to manage users and view usage dashboards") |
| `--authorizer.organizationConfig.PolicyConfig.contributorPolicyDescription` | string | description for the boilerplate contributor policy (default "Viewer permissions and permissions to create workflows, tasks, launch plans, and executions") |
| `--authorizer.organizationConfig.PolicyConfig.defaultUserPolicyRoleType` | string | name of the role type to determine which default policy new users added to the organization should be assigned (default "Viewer") |
| `--authorizer.organizationConfig.PolicyConfig.serverlessContributorPolicyDescription` | string | description for the boilerplate serverless contributor policy (default "Viewer permissions and permissions to create workflows, tasks, launch plans, and executions") |
| `--authorizer.organizationConfig.PolicyConfig.serverlessViewerPolicyDescription` | string | description for the boilerplate serverless viewer policy (default "Permissions to view Flyte entities") |
| `--authorizer.organizationConfig.PolicyConfig.viewerPolicyDescription` | string | description for the boilerplate viewer policy (default "Permissions to view Flyte entities") |
| `--authorizer.organizationConfig.defaultPolicyCacheDuration` | string | Cache entry duration for the store of the default policy per organization (default "10m0s") |
| `--authorizer.syncRuleRefreshInterval` | string | (default "1m0s") |
| `--authorizer.type` | string | (default "UserClouds") |
| `--authorizer.userCloudsClient.cache.redis.ttl.edgeTypes` | string | Specifies how long edge types remain in the cache.. (default "30m0s") |
| `--authorizer.userCloudsClient.cache.redis.ttl.edges` | string | Specifies how long edges remain in the cache. (default "30m0s") |
| `--authorizer.userCloudsClient.cache.redis.ttl.objectTypes` | string | Specifies how long object types remain in the cache. (default "30m0s") |
| `--authorizer.userCloudsClient.cache.redis.ttl.objects` | string | Specifies how long objects remain in the cache. (default "30m0s") |
| `--authorizer.userCloudsClient.cache.type` | string | Cache type to use. (default "none") |
| `--authorizer.userCloudsClient.clientID` | string | UserClouds client id |
| `--authorizer.userCloudsClient.clientSecretName` | string | UserCloud client secret name to read from the secret manager. (default "userclouds-client-secret") |
| `--authorizer.userCloudsClient.enableLogging` | | Enable userclouds client's internal logging. Calls to post logs take 250-350 ms and will impact p99 latency, enable with caution. |
| `--authorizer.userCloudsClient.tenantID` | string | UserClouds tenant id. Should be a UUID. |
| `--authorizer.userCloudsClient.tenantUrl` | string | Something like https://{yourtenant}.tenant.userclouds.com |
| `--config` | string | config file (default is /Users/andrew/.union/config.yaml) |
| `--connection.environment` | string | |
| `--connection.region` | string | |
| `--connection.rootTenantURLPattern` | string | Pattern for tenant url. (default "dns:///{{ organization }}.cloud-staging.union.ai") |
| `--console.endpoint` | string | Endpoint of console, if different than flyte admin |
| `--database.connMaxLifeTime` | string | sets the maximum amount of time a connection may be reused (default "1h0m0s") |
| `--database.enableForeignKeyConstraintWhenMigrating` | | Whether to enable gorm foreign keys when migrating the db |
| `--database.maxIdleConnections` | int | maxIdleConnections sets the maximum number of connections in the idle connection pool. (default 10) |
| `--database.maxOpenConnections` | int | maxOpenConnections sets the maximum number of open connections to the database. (default 100) |
| `--database.postgres.dbname` | string | The database name (default "postgres") |
| `--database.postgres.debug` | | |
| `--database.postgres.host` | string | The host name of the database server (default "localhost") |
| `--database.postgres.options` | string | See http://gorm.io/docs/connecting_to_the_database.html for available options passed, in addition to the above. (default "sslmode=disable") |
| `--database.postgres.password` | string | The database password. (default "postgres") |
| `--database.postgres.passwordPath` | string | Points to the file containing the database password. |
| `--database.postgres.port` | int | The port name of the database server (default 30001) |
| `--database.postgres.readReplicaHost` | string | The host name of the read replica database server (default "localhost") |
| `--database.postgres.username` | string | The database user who is connecting to the server. (default "postgres") |
| `--database.sqlite.file` | string | The path to the file (existing or new) where the DB should be created / stored. If existing, then this will be re-used, else a new will be created |
| `--db.connectionPool.maxConnectionLifetime` | string | (default "0s") |
| `--db.connectionPool.maxIdleConnections` | int | |
| `--db.connectionPool.maxOpenConnections` | int | |
| `--db.dbname` | string | (default "postgres") |
| `--db.debug` | | |
| `--db.host` | string | (default "postgres") |
| `--db.log_level` | int | (default 4) |
| `--db.options` | string | (default "sslmode=disable") |
| `--db.password` | string | |
| `--db.passwordPath` | string | |
| `--db.port` | int | (default 5432) |
| `--db.username` | string | (default "postgres") |
| `-d`, `--domain` | string | Specifies the Flyte project's domain. |
| `--files.archive` | | Pass in archive file either an http link or local path. |
| `--files.assumableIamRole` | string | Custom assumable iam auth role to register launch plans with. |
| `--files.continueOnError` | | Continue on error when registering files. |
| `--files.destinationDirectory` | string | Location of source code in container. |
| `--files.dryRun` | | Execute command without making any modifications. |
| `--files.enableSchedule` | | Enable the schedule if the files contain schedulable launchplan. |
| `--files.force` | | Force use of version number on entities registered with flyte. |
| `--files.k8ServiceAccount` | string | Deprecated. Please use `--K8sServiceAccount`|
| `--files.k8sServiceAccount` | string | Custom kubernetes service account auth role to register launch plans with. |
| `--files.outputLocationPrefix` | string | Custom output location prefix for offloaded types (files/schemas). |
| `--files.sourceUploadPath` | string | Deprecated: Update flyte admin to avoid having to configure storage access from uctl. |
| `--files.version` | string | Version of the entity to be registered with flyte which are un-versioned after serialization. |
| `--logger.formatter.type` | string | Sets logging format type. (default "json") |
| `--logger.level` | int | Sets the minimum logging level. (default 3) |
| `--logger.mute` | | Mutes all logs regardless of severity. Intended for benchmarks/tests only. |
| `--logger.show-source` | | Includes source code location in logs. |
| `--org` | string | Organization to work on. If not set, default to user's org. |
| `--otel.file.filename` | string | Filename to store exported telemetry traces (default "/tmp/trace.txt") |
| `--otel.jaeger.endpoint` | string | Endpoint for the jaeger telemetry trace ingestor (default "http://localhost:14268/api/traces") |
| `--otel.otlpgrpc.endpoint` | string | Endpoint for the OTLP telemetry trace collector (default "http://localhost:4317") |
| `--otel.otlphttp.endpoint` | string | Endpoint for the OTLP telemetry trace collector (default "http://localhost:4318/v1/traces") |
| `--otel.sampler.parentSampler` | string | Sets the parent sampler to use for the tracer (default "always") |
| `--otel.type` | string | Sets the type of exporter to configure [noop/file/jaeger/otlpgrpc/otlphttp]. (default "noop") |
| `-o`, `--output` | string | Specifies the output type - supported formats [TABLE JSON YAML DOT DOTURL]. NOTE: dot, doturl are only supported for Workflow (default "table") |
| `--plugins.catalogcache.reader.maxItems` | int | Maximum number of entries to keep in the index. (default 10000) |
| `--plugins.catalogcache.reader.maxRetries` | int | Maximum number of retries per item. (default 3) |
| `--plugins.catalogcache.reader.workers` | int | Number of concurrent workers to start processing the queue. (default 10) |
| `--plugins.catalogcache.writer.maxItems` | int | Maximum number of entries to keep in the index. (default 10000) |
| `--plugins.catalogcache.writer.maxRetries` | int | Maximum number of retries per item. (default 3) |
| `--plugins.catalogcache.writer.workers` | int | Number of concurrent workers to start processing the queue. (default 10) |
| `-p`, `--project` | string | Specifies the Flyte project. |
| `--rediscache.passwordSecretName` | string | Name of secret with Redis password. |
| `--rediscache.primaryEndpoint` | string | Primary endpoint for the redis cache that can be used for both reads and writes. |
| `--rediscache.replicaEndpoint` | string | Replica endpoint for the redis cache that can be used for reads. |
| `--secrets.env-prefix` | string | Prefix for environment variables (default "FLYTE_SECRET_") |
| `--secrets.secrets-prefix` | string | Prefix where to look for secrets file (default "/etc/secrets") |
| `--secrets.type` | string | Sets the type of storage to configure [local]. (default "local") |
| `--server.dataProxy.download.maxExpiresIn` | string | Maximum allowed expiration duration. (default "1h0m0s") |
| `--server.dataProxy.upload.defaultFileNameLength` | int | Default length for the generated file name if not provided in the request. (default 20) |
| `--server.dataProxy.upload.maxExpiresIn` | string | Maximum allowed expiration duration. (default "1h0m0s") |
| `--server.dataProxy.upload.maxSize` | string | Maximum allowed upload size. (default "6Mi") |
| `--server.dataProxy.upload.storagePrefix` | string | Storage prefix to use for all upload requests. |
| `--server.grpc.enableGrpcLatencyMetrics` | | Enable grpc latency metrics. Note Histograms metrics can be expensive on Prometheus servers. |
| `--server.grpc.maxMessageSizeBytes` | int | The max size in bytes for incoming gRPC messages |
| `--server.grpc.port` | int | On which grpc port to serve admin (default 8089) |
| `--server.grpc.serverReflection` | | Enable GRPC Server Reflection (default true) |
| `--server.grpcPort` | int | deprecated |
| `--server.grpcServerReflection` | | deprecated |
| `--server.httpPort` | int | On which http port to serve admin (default 8088) |
| `--server.kube-config` | string | Path to kubernetes client config file, default is empty, useful for incluster config. |
| `--server.kubeClientConfig.burst` | int | Max burst rate for throttle. 0 defaults to 10 (default 25) |
| `--server.kubeClientConfig.qps` | int32 | Max QPS to the master for requests to KubeAPI. 0 defaults to 5. (default 100) |
| `--server.kubeClientConfig.timeout` | string | Max duration allowed for every request to KubeAPI before giving up. 0 implies no timeout. (default "30s") |
| `--server.master` | string | The address of the Kubernetes API server. |
| `--server.readHeaderTimeoutSeconds` | int | The amount of time allowed to read request headers. (default 32) |
| `--server.security.allowCors` | | (default true) |
| `--server.security.allowedHeaders` | strings | (default [Content-Type,flyte-authorization]) |
| `--server.security.allowedOrigins` | strings | (default [*]) |
| `--server.security.auditAccess` | | |
| `--server.security.secure` | | |
| `--server.security.ssl.certificateFile` | string | |
| `--server.security.ssl.keyFile` | string | |
| `--server.security.useAuth` | | |
| `--server.thirdPartyConfig.flyteClient.audience` | string | Audience to use when initiating OAuth2 authorization requests. |
| `--server.thirdPartyConfig.flyteClient.clientId` | string | public identifier for the app which handles authorization for a Flyte deployment |
| `--server.thirdPartyConfig.flyteClient.redirectUri` | string | This is the callback uri registered with the app which handles authorization for a Flyte deployment |
| `--server.thirdPartyConfig.flyteClient.scopes` | strings | Recommended scopes for the client to request. |
| `--server.watchService.maxActiveClusterConnections` | int | (default 5) |
| `--server.watchService.maxPageSize` | int | (default 50000) |
| `--server.watchService.nonTerminalStatusUpdatesInterval` | string | (default "1m0s") |
| `--server.watchService.pollInterval` | string | (default "1s") |
| `--sharedservice.connectPort` | string | On which connect port to serve admin (default "8080") |
| `--sharedservice.grpc.grpcMaxResponseStatusBytes` | int32 | specifies the maximum (uncompressed) size of header list that the client is prepared to accept on grpc calls (default 32000) |
| `--sharedservice.grpc.maxConcurrentStreams` | int | Limit on the number of concurrent streams to each ServerTransport. (default 100) |
| `--sharedservice.grpc.maxMessageSizeBytes` | int | Limit on the size of message that can be received on the server. (default 10485760) |
| `--sharedservice.grpcServerReflection` | | Enable GRPC Server Reflection (default true) |
| `--sharedservice.httpPort` | string | On which http port to serve admin (default "8089") |
| `--sharedservice.kubeConfig` | string | Path to kubernetes client config file. |
| `--sharedservice.master` | string | The address of the Kubernetes API server. |
| `--sharedservice.metrics.enableClientGrpcHistograms` | | Enable client grpc histograms (default true) |
| `--sharedservice.metrics.enableGrpcHistograms` | | Enable grpc histograms (default true) |
| `--sharedservice.metrics.scope` | string | Scope to emit metrics under (default "service:") |
| `--sharedservice.port` | string | On which grpc port to serve admin (default "8080") |
| `--sharedservice.profiler.enabled` | | Enable Profiler on server |
| `--sharedservice.profilerPort` | string | Profile port to start listen for pprof and metric handlers on. (default "10254") |
| `--sharedservice.security.allowCors` | | |
| `--sharedservice.security.allowLocalhostAccess` | | Whether to permit localhost unauthenticated access to the server |
| `--sharedservice.security.allowedHeaders` | strings | |
| `--sharedservice.security.allowedOrigins` | strings | |
| `--sharedservice.security.auditAccess` | | |
| `--sharedservice.security.orgOverride` | string | Override org in identity context if localhost access enabled |
| `--sharedservice.security.secure` | | |
| `--sharedservice.security.ssl.certificateAuthorityFile` | string | |
| `--sharedservice.security.ssl.certificateFile` | string | |
| `--sharedservice.security.ssl.keyFile` | string | |
| `--sharedservice.security.useAuth` | | |
| `--sharedservice.sync.syncInterval` | string | Time interval to sync (default "5m0s") |
| `--storage.cache.max_size_mbs` | int | Maximum size of the cache where the Blob store data is cached in-memory. If not specified or set to 0, cache is not used |
| `--storage.cache.target_gc_percent` | int | Sets the garbage collection target percentage. |
| `--storage.connection.access-key` | string | Access key to use. Only required when authtype is set to accesskey. |
| `--storage.connection.auth-type` | string | Auth Type to use [iam, accesskey]. (default "iam") |
| `--storage.connection.disable-ssl` | | Disables SSL connection. Should only be used for development. |
| `--storage.connection.endpoint` | string | URL for storage client to connect to. |
| `--storage.connection.region` | string | Region to connect to. (default "us-east-1") |
| `--storage.connection.secret-key` | string | Secret to use when accesskey is set. |
| `--storage.container` | string | Initial container (in s3 a bucket) to create -if it doesn't exist-.' |
| `--storage.defaultHttpClient.timeout` | string | Sets time out on the http client. (default "0s") |
| `--storage.enable-multicontainer` | | If this is true, then the container argument is overlooked and redundant. This config will automatically open new connections to new containers/buckets as they are encountered |
| `--storage.limits.maxDownloadMBs` | int | Maximum allowed download size (in MBs) per call. (default 2) |
| `--storage.stow.config` | stringToString | Configuration for stow backend. Refer to github/flyteorg/stow (default []) |
| `--storage.stow.kind` | string | Kind of Stow backend to use. Refer to github/flyteorg/stow |
| `--storage.type` | string | Sets the type of storage to configure [s3/minio/local/mem/stow]. (default "s3") |
| `--union.auth.authorizationMetadataKey` | string | Authorization Header to use when passing Access Tokens to the server (default "flyte-authorization") |
| `--union.auth.clientId` | string | Client ID |
| `--union.auth.clientSecretEnvVar` | string | Environment variable containing the client secret |
| `--union.auth.clientSecretLocation` | string | File containing the client secret |
| `--union.auth.deviceFlow.pollInterval` | string | amount of time the device flow would poll the token endpoint if auth server doesn't return a polling interval. Okta and google IDP do return an interval' (default "5s") |
| `--union.auth.deviceFlow.refreshTime` | string | grace period from the token expiry after which it would refresh the token. (default "5m0s") |
| `--union.auth.deviceFlow.timeout` | string | amount of time the device flow should complete or else it will be cancelled. (default "10m0s") |
| `--union.auth.enable` | | Whether to enable an authenticated conenction when communicating with admin. (default true) |
| `--union.auth.externalAuth.command` | strings | Command for external authentication token generation |
| `--union.auth.pkce.refreshTime` | string | grace period from the token expiry after which it would refresh the token. (default "5m0s") |
| `--union.auth.pkce.timeout` | string | Amount of time the browser session would be active for authentication from client app. (default "15s") |
| `--union.auth.scopes` | strings | List of scopes to request |
| `--union.auth.tokenRefreshWindow` | string | Max duration between token refresh attempt and token expiry. (default "1h0m0s") |
| `--union.auth.tokenUrl` | string | OPTIONAL: Your IdP's token endpoint. It'll be discovered from flyte admin's OAuth Metadata endpoint if not provided. |
| `--union.auth.type` | string | Type of OAuth2 flow used for communicating with admin. (default "Pkce") |
| `--union.cache.maxItemsCount` | int | Maximum number of items to keep in the cache before evicting. (default 1000) |
| `--union.connection.host` | string | Host to connect to (default "dns:///utt-mgdp-stg-us-east-2.cloud-staging.union.ai") |
| `--union.connection.insecure` | | Whether to connect over insecure channel |
| `--union.connection.insecureSkipVerify` | | InsecureSkipVerify controls whether a client verifies the server's certificate chain and host name.Caution: shouldn't be use for production usecases' |
| `--union.connection.keepAliveConfig.permitWithoutStream` | | If true, client sends keepalive pings even with no active RPCs. |
| `--union.connection.keepAliveConfig.time` | string | After a duration of this time if the client doesn't see any activity it pings the server to see if the transport is still alive. (default "20s") |
| `--union.connection.keepAliveConfig.timeout` | string | After having pinged for keepalive check, the client waits for a duration of Timeout and if no activity is seen even after that the connection is closed. (default "2m0s") |
| `--union.connection.maxBackoffDelay` | string | Max delay for grpc backoff (default "8s") |
| `--union.connection.maxRecvMsgSize` | int | Maximum size of a message in bytes of a gRPC message (default 10485760) |
| `--union.connection.maxRetries` | int | Max number of gRPC retries (default 4) |
| `--union.connection.minConnectTimeout` | string | Minimum timeout for establishing a connection (default "20s") |
| `--union.connection.perRetryTimeout` | string | gRPC per retry timeout (default "15s") |
| `--union.connection.serviceConfig` | string | Defines gRPC experimental JSON Service Config (default "{"loadBalancingConfig": [{"round_robin":{}}]}") |
| `--union.connection.trustedIdentityClaims.enabled` | | Enables passing of trusted claims while making inter service calls |
| `--union.connection.trustedIdentityClaims.externalIdentityClaim` | string | External identity claim of the service which is authorized to make internal service call. These are verified against userclouds actions |
| `--union.connection.trustedIdentityClaims.externalIdentityTypeClaim` | string | External identity type claim of app or user to use for the current service identity. It should be an 'app' for inter service communication |
| `--union.internalConnectionConfig.-` | stringToString | (default []) |
| `--union.internalConnectionConfig.enabled` | | Enables internal service to service communication instead of going through ingress. |
| `--union.internalConnectionConfig.urlPattern` | string | UrlPattern of the internal service endpoints. (default "{{ service }}-helmchart.{{ service }}.svc.cluster.local:80") |
| `--webhook.awsSecretManager.sidecarImage` | string | Specifies the sidecar docker image to use (default "docker.io/amazon/aws-secrets-manager-secret-sidecar:v0.1.4") |
| `--webhook.certDir` | string | Certificate directory to use to write generated certs. Defaults to /etc/webhook/certs/ (default "/etc/webhook/certs") |
| `--webhook.embeddedSecretManagerConfig.awsConfig.region` | string | AWS region |
| `--webhook.embeddedSecretManagerConfig.fileMountInitContainer.image` | string | Specifies init container image to use for mounting secrets as files. (default "busybox:1.28") |
| `--webhook.embeddedSecretManagerConfig.gcpConfig.project` | string | GCP project to be used for secret manager |
| `--webhook.embeddedSecretManagerConfig.type` | string | (default "AWS") |
| `--webhook.gcpSecretManager.sidecarImage` | string | Specifies the sidecar docker image to use (default "gcr.io/google.com/cloudsdktool/cloud-sdk:alpine") |
| `--webhook.listenPort` | int | The port to use to listen to webhook calls. Defaults to 9443 (default 9443) |
| `--webhook.localCert` | | write certs locally. Defaults to false |
| `--webhook.metrics-prefix` | string | An optional prefix for all published metrics. (default "flyte:") |
| `--webhook.secretName` | string | Secret name to write generated certs to. (default "flyte-pod-webhook") |
| `--webhook.serviceName` | string | The name of the webhook service. (default "flyte-pod-webhook") |
| `--webhook.servicePort` | int32 | The port on the service that hosting webhook. (default 443) |
| `--webhook.vaultSecretManager.role` | string | Specifies the vault role to use (default "flyte") |
=== PAGE: https://www.union.ai/docs/v1/serverless/api-reference/uctl-cli/uctl-delete/uctl-delete-execution-cluster-label ===
# uctl delete execution-cluster-label
Deletes matchable resources of execution cluster label.
## Synopsis
Delete execution cluster label for a given project and domain, in
combination with the workflow name.
For project flytesnacks and development domain, run:
```shell
$ uctl delete execution-cluster-label -p flytesnacks -d development
```
To delete execution cluster label using the config file that was used to
create it, run:
```shell
$ uctl delete execution-cluster-label --attrFile ecl.yaml
```
For example, here's the config file ecl.yaml:
``` yaml
domain: development
project: flytesnacks
value: foo
```
Value is optional in the file as it is unread during the delete command,
but it can be retained since the same file can be used for `get`,
`update` and `delete` commands.
To delete the execution cluster label of the workflow
`core.control_flow.merge_sort.merge_sort`, run the following:
```shell
$ uctl delete execution-cluster-label -p flytesnacks -d development core.control_flow.merge_sort.merge_sort
```
Usage:
```shell
$ uctl delete execution-cluster-label [flags]
```
## Options
| Option | Type | Description |
|--------|------|-------------|
| `--attrFile` | string | attribute file name to be used for delete attribute for the resource type. |
| `--dryRun` | | execute command without making any modifications. |
| `-h`, `--help` | help for execution-cluster-label |
### Options inherited from parent commands
| Option | Type | Description |
|--------|------|-------------|
| `--admin.audience` | string | Audience to use when initiating OAuth2 authorization requests. |
| `--admin.authType` | string | Type of OAuth2 flow used for communicating with admin.ClientSecret, Pkce, ExternalCommand are valid values (default "ClientSecret") |
| `--admin.authorizationHeader` | string | Custom metadata header to pass JWT |
| `--admin.authorizationServerUrl` | string | This is the URL to your IdP's authorization server. It'll default to Endpoint |
| `--admin.caCertFilePath` | string | Use specified certificate file to verify the admin server peer. |
| `--admin.clientId` | string | Client ID (default "flytepropeller") |
| `--admin.clientSecretEnvVar` | string | Environment variable containing the client secret |
| `--admin.clientSecretLocation` | string | File containing the client secret (default "/etc/secrets/client_secret") |
| `--admin.command` | strings | Command for external authentication token generation |
| `--admin.defaultOrg` | string | OPTIONAL: Default org to use to support non-org based cli's.'. |
| `--admin.defaultServiceConfig` | string | |
| `--admin.deviceFlowConfig.pollInterval` | string | amount of time the device flow would poll the token endpoint if auth server doesn't return a polling interval. Okta and google IDP do return an interval' (default "5s") |
| `--admin.deviceFlowConfig.refreshTime` | string | grace period from the token expiry after which it would refresh the token. (default "5m0s") |
| `--admin.deviceFlowConfig.timeout` | string | amount of time the device flow should complete or else it will be cancelled. (default "10m0s") |
| `--admin.endpoint` | string | For admin types, specify where the uri of the service is located. |
| `--admin.httpProxyURL` | string | OPTIONAL: HTTP Proxy to be used for OAuth requests. |
| `--admin.insecure` | | Use insecure connection. |
| `--admin.insecureSkipVerify` | | InsecureSkipVerify controls whether a client verifies the server's certificate chain and host name.Caution: shouldn't be use for production usecases' |
| `--admin.maxBackoffDelay` | string | Max delay for grpc backoff (default "8s") |
| `--admin.maxMessageSizeBytes` | int | The max size in bytes for incoming gRPC messages |
| `--admin.maxRetries` | int | Max number of gRPC retries (default 4) |
| `--admin.perRetryTimeout` | string | gRPC per retry timeout (default "15s") |
| `--admin.pkceConfig.refreshTime` | string | grace period from the token expiry after which it would refresh the token. (default "5m0s") |
| `--admin.pkceConfig.timeout` | string | Amount of time the browser session would be active for authentication from client app. (default "2m0s") |
| `--admin.proxyCommand` | strings | Command for external proxy-authorization token generation |
| `--admin.scopes` | strings | List of scopes to request |
| `--admin.tokenRefreshWindow` | string | Max duration between token refresh attempt and token expiry. (default "0s") |
| `--admin.tokenUrl` | string | OPTIONAL: Your IdP's token endpoint. It'll be discovered from flyte admin's OAuth Metadata endpoint if not provided. |
| `--admin.useAudienceFromAdmin` | | Use Audience configured from admins public endpoint config. |
| `--admin.useAuth` | | Deprecated: Auth will be enabled/disabled based on admin's dynamically discovered information. |
| `--auth.appAuth.externalAuthServer.allowedAudience` | strings | Optional: A list of allowed audiences. If not provided, the audience is expected to be the public Uri of the service. |
| `--auth.appAuth.externalAuthServer.baseUrl` | string | This should be the base url of the authorization server that you are trying to hit. With Okta for instance, it will look something like https://company.okta.com/oauth2/abcdef123456789/ |
| `--auth.appAuth.externalAuthServer.httpProxyURL` | string | OPTIONAL: HTTP Proxy to be used for OAuth requests. |
| `--auth.appAuth.externalAuthServer.metadataUrl` | string | Optional: If the server doesn't support /.well-known/oauth-authorization-server, you can set a custom metadata url here.' |
| `--auth.appAuth.externalAuthServer.retryAttempts` | int | Optional: The number of attempted retries on a transient failure to get the OAuth metadata (default 5) |
| `--auth.appAuth.externalAuthServer.retryDelay` | string | Optional, Duration to wait between retries (default "1s") |
| `--auth.appAuth.selfAuthServer.accessTokenLifespan` | string | Defines the lifespan of issued access tokens. (default "30m0s") |
| `--auth.appAuth.selfAuthServer.authorizationCodeLifespan` | string | Defines the lifespan of issued access tokens. (default "5m0s") |
| `--auth.appAuth.selfAuthServer.claimSymmetricEncryptionKeySecretName` | string | OPTIONAL: Secret name to use to encrypt claims in authcode token. (default "claim_symmetric_key") |
| `--auth.appAuth.selfAuthServer.issuer` | string | Defines the issuer to use when issuing and validating tokens. The default value is https://{requestUri.HostAndPort}/ |
| `--auth.appAuth.selfAuthServer.oldTokenSigningRSAKeySecretName` | string | OPTIONAL: Secret name to use to retrieve Old RSA Signing Key. This can be useful during key rotation to continue to accept older tokens. (default "token_rsa_key_old.pem") |
| `--auth.appAuth.selfAuthServer.refreshTokenLifespan` | string | Defines the lifespan of issued access tokens. (default "1h0m0s") |
| `--auth.appAuth.selfAuthServer.tokenSigningRSAKeySecretName` | string | OPTIONAL: Secret name to use to retrieve RSA Signing Key. (default "token_rsa_key.pem") |
| `--auth.appAuth.thirdPartyConfig.flyteClient.audience` | string | Audience to use when initiating OAuth2 authorization requests. |
| `--auth.appAuth.thirdPartyConfig.flyteClient.clientId` | string | public identifier for the app which handles authorization for a Flyte deployment (default "uctl") |
| `--auth.appAuth.thirdPartyConfig.flyteClient.redirectUri` | string | This is the callback uri registered with the app which handles authorization for a Flyte deployment (default "http://localhost:53593/callback") |
| `--auth.appAuth.thirdPartyConfig.flyteClient.scopes` | strings | Recommended scopes for the client to request. (default [all,offline]) |
| `--auth.disableForGrpc` | | Disables auth enforcement on Grpc Endpoints. |
| `--auth.disableForHttp` | | Disables auth enforcement on HTTP Endpoints. |
| `--auth.grpcAuthorizationHeader` | string | (default "flyte-authorization") |
| `--auth.httpAuthorizationHeader` | string | (default "flyte-authorization") |
| `--auth.httpProxyURL` | string | OPTIONAL: HTTP Proxy to be used for OAuth requests. |
| `--auth.tokenEndpointProxyPath` | string | The path used to proxy calls to the TokenURL |
| `--auth.userAuth.cookieBlockKeySecretName` | string | OPTIONAL: Secret name to use for cookie block key. (default "cookie_block_key") |
| `--auth.userAuth.cookieHashKeySecretName` | string | OPTIONAL: Secret name to use for cookie hash key. (default "cookie_hash_key") |
| `--auth.userAuth.cookieSetting.domain` | string | OPTIONAL: Allows you to set the domain attribute on the auth cookies. |
| `--auth.userAuth.cookieSetting.sameSitePolicy` | string | OPTIONAL: Allows you to declare if your cookie should be restricted to a first-party or same-site context.Wrapper around http.SameSite. (default "DefaultMode") |
| `--auth.userAuth.httpProxyURL` | string | OPTIONAL: HTTP Proxy to be used for OAuth requests. |
| `--auth.userAuth.idpQueryParameter` | string | idp query parameter used for selecting a particular IDP for doing user authentication. Eg: for Okta passing idp={IDP-ID} forces the authentication to happen with IDP-ID |
| `--auth.userAuth.openId.baseUrl` | string | |
| `--auth.userAuth.openId.clientId` | string | |
| `--auth.userAuth.openId.clientSecretFile` | string | |
| `--auth.userAuth.openId.clientSecretName` | string | (default "oidc_client_secret") |
| `--auth.userAuth.openId.scopes` | strings | (default [openid,profile]) |
| `--auth.userAuth.redirectUrl` | string | (default "/console") |
| `--authorizer.internalCommunicationConfig.enabled` | | Enables authorization decisions for internal communication. (default true) |
| `--authorizer.internalCommunicationConfig.ingressIdentity` | string | IngressIdentity used in the cluster. Needed to exclude the communication coming from ingress. (default "ingress-nginx.ingress-nginx.serviceaccount.identity.linkerd.cluster.local") |
| `--authorizer.internalCommunicationConfig.tenantUrlPatternIdentity` | string | UrlPatternIdentity of the internal tenant service endpoint identities. (default "{{ service }}.{{ org }}.serviceaccount.identity.linkerd.cluster.local") |
| `--authorizer.internalCommunicationConfig.urlPatternIdentity` | string | UrlPatternIdentity of the internal service endpoint identities. (default "{{ service }}-helmchart.{{ service }}.serviceaccount.identity.linkerd.cluster.local") |
| `--authorizer.mode` | string | (default "Active") |
| `--authorizer.organizationConfig.PolicyConfig.adminPolicyDescription` | string | description for the boilerplate admin policy (default "Contributor permissions and full admin permissions to manage users and view usage dashboards") |
| `--authorizer.organizationConfig.PolicyConfig.contributorPolicyDescription` | string | description for the boilerplate contributor policy (default "Viewer permissions and permissions to create workflows, tasks, launch plans, and executions") |
| `--authorizer.organizationConfig.PolicyConfig.defaultUserPolicyRoleType` | string | name of the role type to determine which default policy new users added to the organization should be assigned (default "Viewer") |
| `--authorizer.organizationConfig.PolicyConfig.serverlessContributorPolicyDescription` | string | description for the boilerplate serverless contributor policy (default "Viewer permissions and permissions to create workflows, tasks, launch plans, and executions") |
| `--authorizer.organizationConfig.PolicyConfig.serverlessViewerPolicyDescription` | string | description for the boilerplate serverless viewer policy (default "Permissions to view Flyte entities") |
| `--authorizer.organizationConfig.PolicyConfig.viewerPolicyDescription` | string | description for the boilerplate viewer policy (default "Permissions to view Flyte entities") |
| `--authorizer.organizationConfig.defaultPolicyCacheDuration` | string | Cache entry duration for the store of the default policy per organization (default "10m0s") |
| `--authorizer.syncRuleRefreshInterval` | string | (default "1m0s") |
| `--authorizer.type` | string | (default "UserClouds") |
| `--authorizer.userCloudsClient.cache.redis.ttl.edgeTypes` | string | Specifies how long edge types remain in the cache.. (default "30m0s") |
| `--authorizer.userCloudsClient.cache.redis.ttl.edges` | string | Specifies how long edges remain in the cache. (default "30m0s") |
| `--authorizer.userCloudsClient.cache.redis.ttl.objectTypes` | string | Specifies how long object types remain in the cache. (default "30m0s") |
| `--authorizer.userCloudsClient.cache.redis.ttl.objects` | string | Specifies how long objects remain in the cache. (default "30m0s") |
| `--authorizer.userCloudsClient.cache.type` | string | Cache type to use. (default "none") |
| `--authorizer.userCloudsClient.clientID` | string | UserClouds client id |
| `--authorizer.userCloudsClient.clientSecretName` | string | UserCloud client secret name to read from the secret manager. (default "userclouds-client-secret") |
| `--authorizer.userCloudsClient.enableLogging` | | Enable userclouds client's internal logging. Calls to post logs take 250-350 ms and will impact p99 latency, enable with caution. |
| `--authorizer.userCloudsClient.tenantID` | string | UserClouds tenant id. Should be a UUID. |
| `--authorizer.userCloudsClient.tenantUrl` | string | Something like https://{yourtenant}.tenant.userclouds.com |
| `--config` | string | config file (default is /Users/andrew/.union/config.yaml) |
| `--connection.environment` | string | |
| `--connection.region` | string | |
| `--connection.rootTenantURLPattern` | string | Pattern for tenant url. (default "dns:///{{ organization }}.cloud-staging.union.ai") |
| `--console.endpoint` | string | Endpoint of console, if different than flyte admin |
| `--database.connMaxLifeTime` | string | sets the maximum amount of time a connection may be reused (default "1h0m0s") |
| `--database.enableForeignKeyConstraintWhenMigrating` | | Whether to enable gorm foreign keys when migrating the db |
| `--database.maxIdleConnections` | int | maxIdleConnections sets the maximum number of connections in the idle connection pool. (default 10) |
| `--database.maxOpenConnections` | int | maxOpenConnections sets the maximum number of open connections to the database. (default 100) |
| `--database.postgres.dbname` | string | The database name (default "postgres") |
| `--database.postgres.debug` | | |
| `--database.postgres.host` | string | The host name of the database server (default "localhost") |
| `--database.postgres.options` | string | See http://gorm.io/docs/connecting_to_the_database.html for available options passed, in addition to the above. (default "sslmode=disable") |
| `--database.postgres.password` | string | The database password. (default "postgres") |
| `--database.postgres.passwordPath` | string | Points to the file containing the database password. |
| `--database.postgres.port` | int | The port name of the database server (default 30001) |
| `--database.postgres.readReplicaHost` | string | The host name of the read replica database server (default "localhost") |
| `--database.postgres.username` | string | The database user who is connecting to the server. (default "postgres") |
| `--database.sqlite.file` | string | The path to the file (existing or new) where the DB should be created / stored. If existing, then this will be re-used, else a new will be created |
| `--db.connectionPool.maxConnectionLifetime` | string | (default "0s") |
| `--db.connectionPool.maxIdleConnections` | int | |
| `--db.connectionPool.maxOpenConnections` | int | |
| `--db.dbname` | string | (default "postgres") |
| `--db.debug` | | |
| `--db.host` | string | (default "postgres") |
| `--db.log_level` | int | (default 4) |
| `--db.options` | string | (default "sslmode=disable") |
| `--db.password` | string | |
| `--db.passwordPath` | string | |
| `--db.port` | int | (default 5432) |
| `--db.username` | string | (default "postgres") |
| `-d`, `--domain` | string | Specifies the Flyte project's domain. |
| `--files.archive` | | Pass in archive file either an http link or local path. |
| `--files.assumableIamRole` | string | Custom assumable iam auth role to register launch plans with. |
| `--files.continueOnError` | | Continue on error when registering files. |
| `--files.destinationDirectory` | string | Location of source code in container. |
| `--files.dryRun` | | Execute command without making any modifications. |
| `--files.enableSchedule` | | Enable the schedule if the files contain schedulable launchplan. |
| `--files.force` | | Force use of version number on entities registered with flyte. |
| `--files.k8ServiceAccount` | string | Deprecated. Please use `--K8sServiceAccount`|
| `--files.k8sServiceAccount` | string | Custom kubernetes service account auth role to register launch plans with. |
| `--files.outputLocationPrefix` | string | Custom output location prefix for offloaded types (files/schemas). |
| `--files.sourceUploadPath` | string | Deprecated: Update flyte admin to avoid having to configure storage access from uctl. |
| `--files.version` | string | Version of the entity to be registered with flyte which are un-versioned after serialization. |
| `--logger.formatter.type` | string | Sets logging format type. (default "json") |
| `--logger.level` | int | Sets the minimum logging level. (default 3) |
| `--logger.mute` | | Mutes all logs regardless of severity. Intended for benchmarks/tests only. |
| `--logger.show-source` | | Includes source code location in logs. |
| `--org` | string | Organization to work on. If not set, default to user's org. |
| `--otel.file.filename` | string | Filename to store exported telemetry traces (default "/tmp/trace.txt") |
| `--otel.jaeger.endpoint` | string | Endpoint for the jaeger telemetry trace ingestor (default "http://localhost:14268/api/traces") |
| `--otel.otlpgrpc.endpoint` | string | Endpoint for the OTLP telemetry trace collector (default "http://localhost:4317") |
| `--otel.otlphttp.endpoint` | string | Endpoint for the OTLP telemetry trace collector (default "http://localhost:4318/v1/traces") |
| `--otel.sampler.parentSampler` | string | Sets the parent sampler to use for the tracer (default "always") |
| `--otel.type` | string | Sets the type of exporter to configure [noop/file/jaeger/otlpgrpc/otlphttp]. (default "noop") |
| `-o`, `--output` | string | Specifies the output type - supported formats [TABLE JSON YAML DOT DOTURL]. NOTE: dot, doturl are only supported for Workflow (default "table") |
| `--plugins.catalogcache.reader.maxItems` | int | Maximum number of entries to keep in the index. (default 10000) |
| `--plugins.catalogcache.reader.maxRetries` | int | Maximum number of retries per item. (default 3) |
| `--plugins.catalogcache.reader.workers` | int | Number of concurrent workers to start processing the queue. (default 10) |
| `--plugins.catalogcache.writer.maxItems` | int | Maximum number of entries to keep in the index. (default 10000) |
| `--plugins.catalogcache.writer.maxRetries` | int | Maximum number of retries per item. (default 3) |
| `--plugins.catalogcache.writer.workers` | int | Number of concurrent workers to start processing the queue. (default 10) |
| `-p`, `--project` | string | Specifies the Flyte project. |
| `--rediscache.passwordSecretName` | string | Name of secret with Redis password. |
| `--rediscache.primaryEndpoint` | string | Primary endpoint for the redis cache that can be used for both reads and writes. |
| `--rediscache.replicaEndpoint` | string | Replica endpoint for the redis cache that can be used for reads. |
| `--secrets.env-prefix` | string | Prefix for environment variables (default "FLYTE_SECRET_") |
| `--secrets.secrets-prefix` | string | Prefix where to look for secrets file (default "/etc/secrets") |
| `--secrets.type` | string | Sets the type of storage to configure [local]. (default "local") |
| `--server.dataProxy.download.maxExpiresIn` | string | Maximum allowed expiration duration. (default "1h0m0s") |
| `--server.dataProxy.upload.defaultFileNameLength` | int | Default length for the generated file name if not provided in the request. (default 20) |
| `--server.dataProxy.upload.maxExpiresIn` | string | Maximum allowed expiration duration. (default "1h0m0s") |
| `--server.dataProxy.upload.maxSize` | string | Maximum allowed upload size. (default "6Mi") |
| `--server.dataProxy.upload.storagePrefix` | string | Storage prefix to use for all upload requests. |
| `--server.grpc.enableGrpcLatencyMetrics` | | Enable grpc latency metrics. Note Histograms metrics can be expensive on Prometheus servers. |
| `--server.grpc.maxMessageSizeBytes` | int | The max size in bytes for incoming gRPC messages |
| `--server.grpc.port` | int | On which grpc port to serve admin (default 8089) |
| `--server.grpc.serverReflection` | | Enable GRPC Server Reflection (default true) |
| `--server.grpcPort` | int | deprecated |
| `--server.grpcServerReflection` | | deprecated |
| `--server.httpPort` | int | On which http port to serve admin (default 8088) |
| `--server.kube-config` | string | Path to kubernetes client config file, default is empty, useful for incluster config. |
| `--server.kubeClientConfig.burst` | int | Max burst rate for throttle. 0 defaults to 10 (default 25) |
| `--server.kubeClientConfig.qps` | int32 | Max QPS to the master for requests to KubeAPI. 0 defaults to 5. (default 100) |
| `--server.kubeClientConfig.timeout` | string | Max duration allowed for every request to KubeAPI before giving up. 0 implies no timeout. (default "30s") |
| `--server.master` | string | The address of the Kubernetes API server. |
| `--server.readHeaderTimeoutSeconds` | int | The amount of time allowed to read request headers. (default 32) |
| `--server.security.allowCors` | | (default true) |
| `--server.security.allowedHeaders` | strings | (default [Content-Type,flyte-authorization]) |
| `--server.security.allowedOrigins` | strings | (default [*]) |
| `--server.security.auditAccess` | | |
| `--server.security.secure` | | |
| `--server.security.ssl.certificateFile` | string | |
| `--server.security.ssl.keyFile` | string | |
| `--server.security.useAuth` | | |
| `--server.thirdPartyConfig.flyteClient.audience` | string | Audience to use when initiating OAuth2 authorization requests. |
| `--server.thirdPartyConfig.flyteClient.clientId` | string | public identifier for the app which handles authorization for a Flyte deployment |
| `--server.thirdPartyConfig.flyteClient.redirectUri` | string | This is the callback uri registered with the app which handles authorization for a Flyte deployment |
| `--server.thirdPartyConfig.flyteClient.scopes` | strings | Recommended scopes for the client to request. |
| `--server.watchService.maxActiveClusterConnections` | int | (default 5) |
| `--server.watchService.maxPageSize` | int | (default 50000) |
| `--server.watchService.nonTerminalStatusUpdatesInterval` | string | (default "1m0s") |
| `--server.watchService.pollInterval` | string | (default "1s") |
| `--sharedservice.connectPort` | string | On which connect port to serve admin (default "8080") |
| `--sharedservice.grpc.grpcMaxResponseStatusBytes` | int32 | specifies the maximum (uncompressed) size of header list that the client is prepared to accept on grpc calls (default 32000) |
| `--sharedservice.grpc.maxConcurrentStreams` | int | Limit on the number of concurrent streams to each ServerTransport. (default 100) |
| `--sharedservice.grpc.maxMessageSizeBytes` | int | Limit on the size of message that can be received on the server. (default 10485760) |
| `--sharedservice.grpcServerReflection` | | Enable GRPC Server Reflection (default true) |
| `--sharedservice.httpPort` | string | On which http port to serve admin (default "8089") |
| `--sharedservice.kubeConfig` | string | Path to kubernetes client config file. |
| `--sharedservice.master` | string | The address of the Kubernetes API server. |
| `--sharedservice.metrics.enableClientGrpcHistograms` | | Enable client grpc histograms (default true) |
| `--sharedservice.metrics.enableGrpcHistograms` | | Enable grpc histograms (default true) |
| `--sharedservice.metrics.scope` | string | Scope to emit metrics under (default "service:") |
| `--sharedservice.port` | string | On which grpc port to serve admin (default "8080") |
| `--sharedservice.profiler.enabled` | | Enable Profiler on server |
| `--sharedservice.profilerPort` | string | Profile port to start listen for pprof and metric handlers on. (default "10254") |
| `--sharedservice.security.allowCors` | | |
| `--sharedservice.security.allowLocalhostAccess` | | Whether to permit localhost unauthenticated access to the server |
| `--sharedservice.security.allowedHeaders` | strings | |
| `--sharedservice.security.allowedOrigins` | strings | |
| `--sharedservice.security.auditAccess` | | |
| `--sharedservice.security.orgOverride` | string | Override org in identity context if localhost access enabled |
| `--sharedservice.security.secure` | | |
| `--sharedservice.security.ssl.certificateAuthorityFile` | string | |
| `--sharedservice.security.ssl.certificateFile` | string | |
| `--sharedservice.security.ssl.keyFile` | string | |
| `--sharedservice.security.useAuth` | | |
| `--sharedservice.sync.syncInterval` | string | Time interval to sync (default "5m0s") |
| `--storage.cache.max_size_mbs` | int | Maximum size of the cache where the Blob store data is cached in-memory. If not specified or set to 0, cache is not used |
| `--storage.cache.target_gc_percent` | int | Sets the garbage collection target percentage. |
| `--storage.connection.access-key` | string | Access key to use. Only required when authtype is set to accesskey. |
| `--storage.connection.auth-type` | string | Auth Type to use [iam, accesskey]. (default "iam") |
| `--storage.connection.disable-ssl` | | Disables SSL connection. Should only be used for development. |
| `--storage.connection.endpoint` | string | URL for storage client to connect to. |
| `--storage.connection.region` | string | Region to connect to. (default "us-east-1") |
| `--storage.connection.secret-key` | string | Secret to use when accesskey is set. |
| `--storage.container` | string | Initial container (in s3 a bucket) to create -if it doesn't exist-.' |
| `--storage.defaultHttpClient.timeout` | string | Sets time out on the http client. (default "0s") |
| `--storage.enable-multicontainer` | | If this is true, then the container argument is overlooked and redundant. This config will automatically open new connections to new containers/buckets as they are encountered |
| `--storage.limits.maxDownloadMBs` | int | Maximum allowed download size (in MBs) per call. (default 2) |
| `--storage.stow.config` | stringToString | Configuration for stow backend. Refer to github/flyteorg/stow (default []) |
| `--storage.stow.kind` | string | Kind of Stow backend to use. Refer to github/flyteorg/stow |
| `--storage.type` | string | Sets the type of storage to configure [s3/minio/local/mem/stow]. (default "s3") |
| `--union.auth.authorizationMetadataKey` | string | Authorization Header to use when passing Access Tokens to the server (default "flyte-authorization") |
| `--union.auth.clientId` | string | Client ID |
| `--union.auth.clientSecretEnvVar` | string | Environment variable containing the client secret |
| `--union.auth.clientSecretLocation` | string | File containing the client secret |
| `--union.auth.deviceFlow.pollInterval` | string | amount of time the device flow would poll the token endpoint if auth server doesn't return a polling interval. Okta and google IDP do return an interval' (default "5s") |
| `--union.auth.deviceFlow.refreshTime` | string | grace period from the token expiry after which it would refresh the token. (default "5m0s") |
| `--union.auth.deviceFlow.timeout` | string | amount of time the device flow should complete or else it will be cancelled. (default "10m0s") |
| `--union.auth.enable` | | Whether to enable an authenticated conenction when communicating with admin. (default true) |
| `--union.auth.externalAuth.command` | strings | Command for external authentication token generation |
| `--union.auth.pkce.refreshTime` | string | grace period from the token expiry after which it would refresh the token. (default "5m0s") |
| `--union.auth.pkce.timeout` | string | Amount of time the browser session would be active for authentication from client app. (default "15s") |
| `--union.auth.scopes` | strings | List of scopes to request |
| `--union.auth.tokenRefreshWindow` | string | Max duration between token refresh attempt and token expiry. (default "1h0m0s") |
| `--union.auth.tokenUrl` | string | OPTIONAL: Your IdP's token endpoint. It'll be discovered from flyte admin's OAuth Metadata endpoint if not provided. |
| `--union.auth.type` | string | Type of OAuth2 flow used for communicating with admin. (default "Pkce") |
| `--union.cache.maxItemsCount` | int | Maximum number of items to keep in the cache before evicting. (default 1000) |
| `--union.connection.host` | string | Host to connect to (default "dns:///utt-mgdp-stg-us-east-2.cloud-staging.union.ai") |
| `--union.connection.insecure` | | Whether to connect over insecure channel |
| `--union.connection.insecureSkipVerify` | | InsecureSkipVerify controls whether a client verifies the server's certificate chain and host name.Caution: shouldn't be use for production usecases' |
| `--union.connection.keepAliveConfig.permitWithoutStream` | | If true, client sends keepalive pings even with no active RPCs. |
| `--union.connection.keepAliveConfig.time` | string | After a duration of this time if the client doesn't see any activity it pings the server to see if the transport is still alive. (default "20s") |
| `--union.connection.keepAliveConfig.timeout` | string | After having pinged for keepalive check, the client waits for a duration of Timeout and if no activity is seen even after that the connection is closed. (default "2m0s") |
| `--union.connection.maxBackoffDelay` | string | Max delay for grpc backoff (default "8s") |
| `--union.connection.maxRecvMsgSize` | int | Maximum size of a message in bytes of a gRPC message (default 10485760) |
| `--union.connection.maxRetries` | int | Max number of gRPC retries (default 4) |
| `--union.connection.minConnectTimeout` | string | Minimum timeout for establishing a connection (default "20s") |
| `--union.connection.perRetryTimeout` | string | gRPC per retry timeout (default "15s") |
| `--union.connection.serviceConfig` | string | Defines gRPC experimental JSON Service Config (default "{"loadBalancingConfig": [{"round_robin":{}}]}") |
| `--union.connection.trustedIdentityClaims.enabled` | | Enables passing of trusted claims while making inter service calls |
| `--union.connection.trustedIdentityClaims.externalIdentityClaim` | string | External identity claim of the service which is authorized to make internal service call. These are verified against userclouds actions |
| `--union.connection.trustedIdentityClaims.externalIdentityTypeClaim` | string | External identity type claim of app or user to use for the current service identity. It should be an 'app' for inter service communication |
| `--union.internalConnectionConfig.-` | stringToString | (default []) |
| `--union.internalConnectionConfig.enabled` | | Enables internal service to service communication instead of going through ingress. |
| `--union.internalConnectionConfig.urlPattern` | string | UrlPattern of the internal service endpoints. (default "{{ service }}-helmchart.{{ service }}.svc.cluster.local:80") |
| `--webhook.awsSecretManager.sidecarImage` | string | Specifies the sidecar docker image to use (default "docker.io/amazon/aws-secrets-manager-secret-sidecar:v0.1.4") |
| `--webhook.certDir` | string | Certificate directory to use to write generated certs. Defaults to /etc/webhook/certs/ (default "/etc/webhook/certs") |
| `--webhook.embeddedSecretManagerConfig.awsConfig.region` | string | AWS region |
| `--webhook.embeddedSecretManagerConfig.fileMountInitContainer.image` | string | Specifies init container image to use for mounting secrets as files. (default "busybox:1.28") |
| `--webhook.embeddedSecretManagerConfig.gcpConfig.project` | string | GCP project to be used for secret manager |
| `--webhook.embeddedSecretManagerConfig.type` | string | (default "AWS") |
| `--webhook.gcpSecretManager.sidecarImage` | string | Specifies the sidecar docker image to use (default "gcr.io/google.com/cloudsdktool/cloud-sdk:alpine") |
| `--webhook.listenPort` | int | The port to use to listen to webhook calls. Defaults to 9443 (default 9443) |
| `--webhook.localCert` | | write certs locally. Defaults to false |
| `--webhook.metrics-prefix` | string | An optional prefix for all published metrics. (default "flyte:") |
| `--webhook.secretName` | string | Secret name to write generated certs to. (default "flyte-pod-webhook") |
| `--webhook.serviceName` | string | The name of the webhook service. (default "flyte-pod-webhook") |
| `--webhook.servicePort` | int32 | The port on the service that hosting webhook. (default 443) |
| `--webhook.vaultSecretManager.role` | string | Specifies the vault role to use (default "flyte") |
=== PAGE: https://www.union.ai/docs/v1/serverless/api-reference/uctl-cli/uctl-delete/uctl-delete-execution-queue-attribute ===
# uctl delete execution-queue-attribute
Deletes matchable resources of execution queue attributes.
## Synopsis
Delete execution queue attributes for the given project and domain, in
combination with the workflow name.
For project flytesnacks and development domain, run:
```shell
$ uctl delete execution-queue-attribute -p flytesnacks -d development
```
Delete execution queue attribute using the config file which was used to
create it.
```shell
$ uctl delete execution-queue-attribute --attrFile era.yaml
```
For example, here's the config file era.yaml:
``` yaml
domain: development
project: flytesnacks
tags:
- foo
- bar
- buzz
- lightyear
```
Value is optional in the file as it is unread during the delete command
but it can be retained since the same file can be used for get, update
and delete commands.
To delete the execution queue attribute for the workflow
`core.control_flow.merge_sort.merge_sort`, run the following command:
```shell
$ uctl delete execution-queue-attribute -p flytesnacks -d development core.control_flow.merge_sort.merge_sort
```
Usage:
```shell
$ uctl delete execution-queue-attribute [flags]
```
## Options
| Option | Type | Description |
|--------|------|-------------|
| `--attrFile` | string | attribute file name to be used for delete attribute for the resource type. |
| `--dryRun` | | execute command without making any modifications. |
| `-h`, `--help` | help for execution-queue-attribute |
### Options inherited from parent commands
| Option | Type | Description |
|--------|------|-------------|
| `--admin.audience` | string | Audience to use when initiating OAuth2 authorization requests. |
| `--admin.authType` | string | Type of OAuth2 flow used for communicating with admin.ClientSecret, Pkce, ExternalCommand are valid values (default "ClientSecret") |
| `--admin.authorizationHeader` | string | Custom metadata header to pass JWT |
| `--admin.authorizationServerUrl` | string | This is the URL to your IdP's authorization server. It'll default to Endpoint |
| `--admin.caCertFilePath` | string | Use specified certificate file to verify the admin server peer. |
| `--admin.clientId` | string | Client ID (default "flytepropeller") |
| `--admin.clientSecretEnvVar` | string | Environment variable containing the client secret |
| `--admin.clientSecretLocation` | string | File containing the client secret (default "/etc/secrets/client_secret") |
| `--admin.command` | strings | Command for external authentication token generation |
| `--admin.defaultOrg` | string | OPTIONAL: Default org to use to support non-org based cli's.'. |
| `--admin.defaultServiceConfig` | string | |
| `--admin.deviceFlowConfig.pollInterval` | string | amount of time the device flow would poll the token endpoint if auth server doesn't return a polling interval. Okta and google IDP do return an interval' (default "5s") |
| `--admin.deviceFlowConfig.refreshTime` | string | grace period from the token expiry after which it would refresh the token. (default "5m0s") |
| `--admin.deviceFlowConfig.timeout` | string | amount of time the device flow should complete or else it will be cancelled. (default "10m0s") |
| `--admin.endpoint` | string | For admin types, specify where the uri of the service is located. |
| `--admin.httpProxyURL` | string | OPTIONAL: HTTP Proxy to be used for OAuth requests. |
| `--admin.insecure` | | Use insecure connection. |
| `--admin.insecureSkipVerify` | | InsecureSkipVerify controls whether a client verifies the server's certificate chain and host name.Caution: shouldn't be use for production usecases' |
| `--admin.maxBackoffDelay` | string | Max delay for grpc backoff (default "8s") |
| `--admin.maxMessageSizeBytes` | int | The max size in bytes for incoming gRPC messages |
| `--admin.maxRetries` | int | Max number of gRPC retries (default 4) |
| `--admin.perRetryTimeout` | string | gRPC per retry timeout (default "15s") |
| `--admin.pkceConfig.refreshTime` | string | grace period from the token expiry after which it would refresh the token. (default "5m0s") |
| `--admin.pkceConfig.timeout` | string | Amount of time the browser session would be active for authentication from client app. (default "2m0s") |
| `--admin.proxyCommand` | strings | Command for external proxy-authorization token generation |
| `--admin.scopes` | strings | List of scopes to request |
| `--admin.tokenRefreshWindow` | string | Max duration between token refresh attempt and token expiry. (default "0s") |
| `--admin.tokenUrl` | string | OPTIONAL: Your IdP's token endpoint. It'll be discovered from flyte admin's OAuth Metadata endpoint if not provided. |
| `--admin.useAudienceFromAdmin` | | Use Audience configured from admins public endpoint config. |
| `--admin.useAuth` | | Deprecated: Auth will be enabled/disabled based on admin's dynamically discovered information. |
| `--auth.appAuth.externalAuthServer.allowedAudience` | strings | Optional: A list of allowed audiences. If not provided, the audience is expected to be the public Uri of the service. |
| `--auth.appAuth.externalAuthServer.baseUrl` | string | This should be the base url of the authorization server that you are trying to hit. With Okta for instance, it will look something like https://company.okta.com/oauth2/abcdef123456789/ |
| `--auth.appAuth.externalAuthServer.httpProxyURL` | string | OPTIONAL: HTTP Proxy to be used for OAuth requests. |
| `--auth.appAuth.externalAuthServer.metadataUrl` | string | Optional: If the server doesn't support /.well-known/oauth-authorization-server, you can set a custom metadata url here.' |
| `--auth.appAuth.externalAuthServer.retryAttempts` | int | Optional: The number of attempted retries on a transient failure to get the OAuth metadata (default 5) |
| `--auth.appAuth.externalAuthServer.retryDelay` | string | Optional, Duration to wait between retries (default "1s") |
| `--auth.appAuth.selfAuthServer.accessTokenLifespan` | string | Defines the lifespan of issued access tokens. (default "30m0s") |
| `--auth.appAuth.selfAuthServer.authorizationCodeLifespan` | string | Defines the lifespan of issued access tokens. (default "5m0s") |
| `--auth.appAuth.selfAuthServer.claimSymmetricEncryptionKeySecretName` | string | OPTIONAL: Secret name to use to encrypt claims in authcode token. (default "claim_symmetric_key") |
| `--auth.appAuth.selfAuthServer.issuer` | string | Defines the issuer to use when issuing and validating tokens. The default value is https://{requestUri.HostAndPort}/ |
| `--auth.appAuth.selfAuthServer.oldTokenSigningRSAKeySecretName` | string | OPTIONAL: Secret name to use to retrieve Old RSA Signing Key. This can be useful during key rotation to continue to accept older tokens. (default "token_rsa_key_old.pem") |
| `--auth.appAuth.selfAuthServer.refreshTokenLifespan` | string | Defines the lifespan of issued access tokens. (default "1h0m0s") |
| `--auth.appAuth.selfAuthServer.tokenSigningRSAKeySecretName` | string | OPTIONAL: Secret name to use to retrieve RSA Signing Key. (default "token_rsa_key.pem") |
| `--auth.appAuth.thirdPartyConfig.flyteClient.audience` | string | Audience to use when initiating OAuth2 authorization requests. |
| `--auth.appAuth.thirdPartyConfig.flyteClient.clientId` | string | public identifier for the app which handles authorization for a Flyte deployment (default "uctl") |
| `--auth.appAuth.thirdPartyConfig.flyteClient.redirectUri` | string | This is the callback uri registered with the app which handles authorization for a Flyte deployment (default "http://localhost:53593/callback") |
| `--auth.appAuth.thirdPartyConfig.flyteClient.scopes` | strings | Recommended scopes for the client to request. (default [all,offline]) |
| `--auth.disableForGrpc` | | Disables auth enforcement on Grpc Endpoints. |
| `--auth.disableForHttp` | | Disables auth enforcement on HTTP Endpoints. |
| `--auth.grpcAuthorizationHeader` | string | (default "flyte-authorization") |
| `--auth.httpAuthorizationHeader` | string | (default "flyte-authorization") |
| `--auth.httpProxyURL` | string | OPTIONAL: HTTP Proxy to be used for OAuth requests. |
| `--auth.tokenEndpointProxyPath` | string | The path used to proxy calls to the TokenURL |
| `--auth.userAuth.cookieBlockKeySecretName` | string | OPTIONAL: Secret name to use for cookie block key. (default "cookie_block_key") |
| `--auth.userAuth.cookieHashKeySecretName` | string | OPTIONAL: Secret name to use for cookie hash key. (default "cookie_hash_key") |
| `--auth.userAuth.cookieSetting.domain` | string | OPTIONAL: Allows you to set the domain attribute on the auth cookies. |
| `--auth.userAuth.cookieSetting.sameSitePolicy` | string | OPTIONAL: Allows you to declare if your cookie should be restricted to a first-party or same-site context.Wrapper around http.SameSite. (default "DefaultMode") |
| `--auth.userAuth.httpProxyURL` | string | OPTIONAL: HTTP Proxy to be used for OAuth requests. |
| `--auth.userAuth.idpQueryParameter` | string | idp query parameter used for selecting a particular IDP for doing user authentication. Eg: for Okta passing idp={IDP-ID} forces the authentication to happen with IDP-ID |
| `--auth.userAuth.openId.baseUrl` | string | |
| `--auth.userAuth.openId.clientId` | string | |
| `--auth.userAuth.openId.clientSecretFile` | string | |
| `--auth.userAuth.openId.clientSecretName` | string | (default "oidc_client_secret") |
| `--auth.userAuth.openId.scopes` | strings | (default [openid,profile]) |
| `--auth.userAuth.redirectUrl` | string | (default "/console") |
| `--authorizer.internalCommunicationConfig.enabled` | | Enables authorization decisions for internal communication. (default true) |
| `--authorizer.internalCommunicationConfig.ingressIdentity` | string | IngressIdentity used in the cluster. Needed to exclude the communication coming from ingress. (default "ingress-nginx.ingress-nginx.serviceaccount.identity.linkerd.cluster.local") |
| `--authorizer.internalCommunicationConfig.tenantUrlPatternIdentity` | string | UrlPatternIdentity of the internal tenant service endpoint identities. (default "{{ service }}.{{ org }}.serviceaccount.identity.linkerd.cluster.local") |
| `--authorizer.internalCommunicationConfig.urlPatternIdentity` | string | UrlPatternIdentity of the internal service endpoint identities. (default "{{ service }}-helmchart.{{ service }}.serviceaccount.identity.linkerd.cluster.local") |
| `--authorizer.mode` | string | (default "Active") |
| `--authorizer.organizationConfig.PolicyConfig.adminPolicyDescription` | string | description for the boilerplate admin policy (default "Contributor permissions and full admin permissions to manage users and view usage dashboards") |
| `--authorizer.organizationConfig.PolicyConfig.contributorPolicyDescription` | string | description for the boilerplate contributor policy (default "Viewer permissions and permissions to create workflows, tasks, launch plans, and executions") |
| `--authorizer.organizationConfig.PolicyConfig.defaultUserPolicyRoleType` | string | name of the role type to determine which default policy new users added to the organization should be assigned (default "Viewer") |
| `--authorizer.organizationConfig.PolicyConfig.serverlessContributorPolicyDescription` | string | description for the boilerplate serverless contributor policy (default "Viewer permissions and permissions to create workflows, tasks, launch plans, and executions") |
| `--authorizer.organizationConfig.PolicyConfig.serverlessViewerPolicyDescription` | string | description for the boilerplate serverless viewer policy (default "Permissions to view Flyte entities") |
| `--authorizer.organizationConfig.PolicyConfig.viewerPolicyDescription` | string | description for the boilerplate viewer policy (default "Permissions to view Flyte entities") |
| `--authorizer.organizationConfig.defaultPolicyCacheDuration` | string | Cache entry duration for the store of the default policy per organization (default "10m0s") |
| `--authorizer.syncRuleRefreshInterval` | string | (default "1m0s") |
| `--authorizer.type` | string | (default "UserClouds") |
| `--authorizer.userCloudsClient.cache.redis.ttl.edgeTypes` | string | Specifies how long edge types remain in the cache.. (default "30m0s") |
| `--authorizer.userCloudsClient.cache.redis.ttl.edges` | string | Specifies how long edges remain in the cache. (default "30m0s") |
| `--authorizer.userCloudsClient.cache.redis.ttl.objectTypes` | string | Specifies how long object types remain in the cache. (default "30m0s") |
| `--authorizer.userCloudsClient.cache.redis.ttl.objects` | string | Specifies how long objects remain in the cache. (default "30m0s") |
| `--authorizer.userCloudsClient.cache.type` | string | Cache type to use. (default "none") |
| `--authorizer.userCloudsClient.clientID` | string | UserClouds client id |
| `--authorizer.userCloudsClient.clientSecretName` | string | UserCloud client secret name to read from the secret manager. (default "userclouds-client-secret") |
| `--authorizer.userCloudsClient.enableLogging` | | Enable userclouds client's internal logging. Calls to post logs take 250-350 ms and will impact p99 latency, enable with caution. |
| `--authorizer.userCloudsClient.tenantID` | string | UserClouds tenant id. Should be a UUID. |
| `--authorizer.userCloudsClient.tenantUrl` | string | Something like https://{yourtenant}.tenant.userclouds.com |
| `--config` | string | config file (default is /Users/andrew/.union/config.yaml) |
| `--connection.environment` | string | |
| `--connection.region` | string | |
| `--connection.rootTenantURLPattern` | string | Pattern for tenant url. (default "dns:///{{ organization }}.cloud-staging.union.ai") |
| `--console.endpoint` | string | Endpoint of console, if different than flyte admin |
| `--database.connMaxLifeTime` | string | sets the maximum amount of time a connection may be reused (default "1h0m0s") |
| `--database.enableForeignKeyConstraintWhenMigrating` | | Whether to enable gorm foreign keys when migrating the db |
| `--database.maxIdleConnections` | int | maxIdleConnections sets the maximum number of connections in the idle connection pool. (default 10) |
| `--database.maxOpenConnections` | int | maxOpenConnections sets the maximum number of open connections to the database. (default 100) |
| `--database.postgres.dbname` | string | The database name (default "postgres") |
| `--database.postgres.debug` | | |
| `--database.postgres.host` | string | The host name of the database server (default "localhost") |
| `--database.postgres.options` | string | See http://gorm.io/docs/connecting_to_the_database.html for available options passed, in addition to the above. (default "sslmode=disable") |
| `--database.postgres.password` | string | The database password. (default "postgres") |
| `--database.postgres.passwordPath` | string | Points to the file containing the database password. |
| `--database.postgres.port` | int | The port name of the database server (default 30001) |
| `--database.postgres.readReplicaHost` | string | The host name of the read replica database server (default "localhost") |
| `--database.postgres.username` | string | The database user who is connecting to the server. (default "postgres") |
| `--database.sqlite.file` | string | The path to the file (existing or new) where the DB should be created / stored. If existing, then this will be re-used, else a new will be created |
| `--db.connectionPool.maxConnectionLifetime` | string | (default "0s") |
| `--db.connectionPool.maxIdleConnections` | int | |
| `--db.connectionPool.maxOpenConnections` | int | |
| `--db.dbname` | string | (default "postgres") |
| `--db.debug` | | |
| `--db.host` | string | (default "postgres") |
| `--db.log_level` | int | (default 4) |
| `--db.options` | string | (default "sslmode=disable") |
| `--db.password` | string | |
| `--db.passwordPath` | string | |
| `--db.port` | int | (default 5432) |
| `--db.username` | string | (default "postgres") |
| `-d`, `--domain` | string | Specifies the Flyte project's domain. |
| `--files.archive` | | Pass in archive file either an http link or local path. |
| `--files.assumableIamRole` | string | Custom assumable iam auth role to register launch plans with. |
| `--files.continueOnError` | | Continue on error when registering files. |
| `--files.destinationDirectory` | string | Location of source code in container. |
| `--files.dryRun` | | Execute command without making any modifications. |
| `--files.enableSchedule` | | Enable the schedule if the files contain schedulable launchplan. |
| `--files.force` | | Force use of version number on entities registered with flyte. |
| `--files.k8ServiceAccount` | string | Deprecated. Please use `--K8sServiceAccount`|
| `--files.k8sServiceAccount` | string | Custom kubernetes service account auth role to register launch plans with. |
| `--files.outputLocationPrefix` | string | Custom output location prefix for offloaded types (files/schemas). |
| `--files.sourceUploadPath` | string | Deprecated: Update flyte admin to avoid having to configure storage access from uctl. |
| `--files.version` | string | Version of the entity to be registered with flyte which are un-versioned after serialization. |
| `--logger.formatter.type` | string | Sets logging format type. (default "json") |
| `--logger.level` | int | Sets the minimum logging level. (default 3) |
| `--logger.mute` | | Mutes all logs regardless of severity. Intended for benchmarks/tests only. |
| `--logger.show-source` | | Includes source code location in logs. |
| `--org` | string | Organization to work on. If not set, default to user's org. |
| `--otel.file.filename` | string | Filename to store exported telemetry traces (default "/tmp/trace.txt") |
| `--otel.jaeger.endpoint` | string | Endpoint for the jaeger telemetry trace ingestor (default "http://localhost:14268/api/traces") |
| `--otel.otlpgrpc.endpoint` | string | Endpoint for the OTLP telemetry trace collector (default "http://localhost:4317") |
| `--otel.otlphttp.endpoint` | string | Endpoint for the OTLP telemetry trace collector (default "http://localhost:4318/v1/traces") |
| `--otel.sampler.parentSampler` | string | Sets the parent sampler to use for the tracer (default "always") |
| `--otel.type` | string | Sets the type of exporter to configure [noop/file/jaeger/otlpgrpc/otlphttp]. (default "noop") |
| `-o`, `--output` | string | Specifies the output type - supported formats [TABLE JSON YAML DOT DOTURL]. NOTE: dot, doturl are only supported for Workflow (default "table") |
| `--plugins.catalogcache.reader.maxItems` | int | Maximum number of entries to keep in the index. (default 10000) |
| `--plugins.catalogcache.reader.maxRetries` | int | Maximum number of retries per item. (default 3) |
| `--plugins.catalogcache.reader.workers` | int | Number of concurrent workers to start processing the queue. (default 10) |
| `--plugins.catalogcache.writer.maxItems` | int | Maximum number of entries to keep in the index. (default 10000) |
| `--plugins.catalogcache.writer.maxRetries` | int | Maximum number of retries per item. (default 3) |
| `--plugins.catalogcache.writer.workers` | int | Number of concurrent workers to start processing the queue. (default 10) |
| `-p`, `--project` | string | Specifies the Flyte project. |
| `--rediscache.passwordSecretName` | string | Name of secret with Redis password. |
| `--rediscache.primaryEndpoint` | string | Primary endpoint for the redis cache that can be used for both reads and writes. |
| `--rediscache.replicaEndpoint` | string | Replica endpoint for the redis cache that can be used for reads. |
| `--secrets.env-prefix` | string | Prefix for environment variables (default "FLYTE_SECRET_") |
| `--secrets.secrets-prefix` | string | Prefix where to look for secrets file (default "/etc/secrets") |
| `--secrets.type` | string | Sets the type of storage to configure [local]. (default "local") |
| `--server.dataProxy.download.maxExpiresIn` | string | Maximum allowed expiration duration. (default "1h0m0s") |
| `--server.dataProxy.upload.defaultFileNameLength` | int | Default length for the generated file name if not provided in the request. (default 20) |
| `--server.dataProxy.upload.maxExpiresIn` | string | Maximum allowed expiration duration. (default "1h0m0s") |
| `--server.dataProxy.upload.maxSize` | string | Maximum allowed upload size. (default "6Mi") |
| `--server.dataProxy.upload.storagePrefix` | string | Storage prefix to use for all upload requests. |
| `--server.grpc.enableGrpcLatencyMetrics` | | Enable grpc latency metrics. Note Histograms metrics can be expensive on Prometheus servers. |
| `--server.grpc.maxMessageSizeBytes` | int | The max size in bytes for incoming gRPC messages |
| `--server.grpc.port` | int | On which grpc port to serve admin (default 8089) |
| `--server.grpc.serverReflection` | | Enable GRPC Server Reflection (default true) |
| `--server.grpcPort` | int | deprecated |
| `--server.grpcServerReflection` | | deprecated |
| `--server.httpPort` | int | On which http port to serve admin (default 8088) |
| `--server.kube-config` | string | Path to kubernetes client config file, default is empty, useful for incluster config. |
| `--server.kubeClientConfig.burst` | int | Max burst rate for throttle. 0 defaults to 10 (default 25) |
| `--server.kubeClientConfig.qps` | int32 | Max QPS to the master for requests to KubeAPI. 0 defaults to 5. (default 100) |
| `--server.kubeClientConfig.timeout` | string | Max duration allowed for every request to KubeAPI before giving up. 0 implies no timeout. (default "30s") |
| `--server.master` | string | The address of the Kubernetes API server. |
| `--server.readHeaderTimeoutSeconds` | int | The amount of time allowed to read request headers. (default 32) |
| `--server.security.allowCors` | | (default true) |
| `--server.security.allowedHeaders` | strings | (default [Content-Type,flyte-authorization]) |
| `--server.security.allowedOrigins` | strings | (default [*]) |
| `--server.security.auditAccess` | | |
| `--server.security.secure` | | |
| `--server.security.ssl.certificateFile` | string | |
| `--server.security.ssl.keyFile` | string | |
| `--server.security.useAuth` | | |
| `--server.thirdPartyConfig.flyteClient.audience` | string | Audience to use when initiating OAuth2 authorization requests. |
| `--server.thirdPartyConfig.flyteClient.clientId` | string | public identifier for the app which handles authorization for a Flyte deployment |
| `--server.thirdPartyConfig.flyteClient.redirectUri` | string | This is the callback uri registered with the app which handles authorization for a Flyte deployment |
| `--server.thirdPartyConfig.flyteClient.scopes` | strings | Recommended scopes for the client to request. |
| `--server.watchService.maxActiveClusterConnections` | int | (default 5) |
| `--server.watchService.maxPageSize` | int | (default 50000) |
| `--server.watchService.nonTerminalStatusUpdatesInterval` | string | (default "1m0s") |
| `--server.watchService.pollInterval` | string | (default "1s") |
| `--sharedservice.connectPort` | string | On which connect port to serve admin (default "8080") |
| `--sharedservice.grpc.grpcMaxResponseStatusBytes` | int32 | specifies the maximum (uncompressed) size of header list that the client is prepared to accept on grpc calls (default 32000) |
| `--sharedservice.grpc.maxConcurrentStreams` | int | Limit on the number of concurrent streams to each ServerTransport. (default 100) |
| `--sharedservice.grpc.maxMessageSizeBytes` | int | Limit on the size of message that can be received on the server. (default 10485760) |
| `--sharedservice.grpcServerReflection` | | Enable GRPC Server Reflection (default true) |
| `--sharedservice.httpPort` | string | On which http port to serve admin (default "8089") |
| `--sharedservice.kubeConfig` | string | Path to kubernetes client config file. |
| `--sharedservice.master` | string | The address of the Kubernetes API server. |
| `--sharedservice.metrics.enableClientGrpcHistograms` | | Enable client grpc histograms (default true) |
| `--sharedservice.metrics.enableGrpcHistograms` | | Enable grpc histograms (default true) |
| `--sharedservice.metrics.scope` | string | Scope to emit metrics under (default "service:") |
| `--sharedservice.port` | string | On which grpc port to serve admin (default "8080") |
| `--sharedservice.profiler.enabled` | | Enable Profiler on server |
| `--sharedservice.profilerPort` | string | Profile port to start listen for pprof and metric handlers on. (default "10254") |
| `--sharedservice.security.allowCors` | | |
| `--sharedservice.security.allowLocalhostAccess` | | Whether to permit localhost unauthenticated access to the server |
| `--sharedservice.security.allowedHeaders` | strings | |
| `--sharedservice.security.allowedOrigins` | strings | |
| `--sharedservice.security.auditAccess` | | |
| `--sharedservice.security.orgOverride` | string | Override org in identity context if localhost access enabled |
| `--sharedservice.security.secure` | | |
| `--sharedservice.security.ssl.certificateAuthorityFile` | string | |
| `--sharedservice.security.ssl.certificateFile` | string | |
| `--sharedservice.security.ssl.keyFile` | string | |
| `--sharedservice.security.useAuth` | | |
| `--sharedservice.sync.syncInterval` | string | Time interval to sync (default "5m0s") |
| `--storage.cache.max_size_mbs` | int | Maximum size of the cache where the Blob store data is cached in-memory. If not specified or set to 0, cache is not used |
| `--storage.cache.target_gc_percent` | int | Sets the garbage collection target percentage. |
| `--storage.connection.access-key` | string | Access key to use. Only required when authtype is set to accesskey. |
| `--storage.connection.auth-type` | string | Auth Type to use [iam, accesskey]. (default "iam") |
| `--storage.connection.disable-ssl` | | Disables SSL connection. Should only be used for development. |
| `--storage.connection.endpoint` | string | URL for storage client to connect to. |
| `--storage.connection.region` | string | Region to connect to. (default "us-east-1") |
| `--storage.connection.secret-key` | string | Secret to use when accesskey is set. |
| `--storage.container` | string | Initial container (in s3 a bucket) to create -if it doesn't exist-.' |
| `--storage.defaultHttpClient.timeout` | string | Sets time out on the http client. (default "0s") |
| `--storage.enable-multicontainer` | | If this is true, then the container argument is overlooked and redundant. This config will automatically open new connections to new containers/buckets as they are encountered |
| `--storage.limits.maxDownloadMBs` | int | Maximum allowed download size (in MBs) per call. (default 2) |
| `--storage.stow.config` | stringToString | Configuration for stow backend. Refer to github/flyteorg/stow (default []) |
| `--storage.stow.kind` | string | Kind of Stow backend to use. Refer to github/flyteorg/stow |
| `--storage.type` | string | Sets the type of storage to configure [s3/minio/local/mem/stow]. (default "s3") |
| `--union.auth.authorizationMetadataKey` | string | Authorization Header to use when passing Access Tokens to the server (default "flyte-authorization") |
| `--union.auth.clientId` | string | Client ID |
| `--union.auth.clientSecretEnvVar` | string | Environment variable containing the client secret |
| `--union.auth.clientSecretLocation` | string | File containing the client secret |
| `--union.auth.deviceFlow.pollInterval` | string | amount of time the device flow would poll the token endpoint if auth server doesn't return a polling interval. Okta and google IDP do return an interval' (default "5s") |
| `--union.auth.deviceFlow.refreshTime` | string | grace period from the token expiry after which it would refresh the token. (default "5m0s") |
| `--union.auth.deviceFlow.timeout` | string | amount of time the device flow should complete or else it will be cancelled. (default "10m0s") |
| `--union.auth.enable` | | Whether to enable an authenticated conenction when communicating with admin. (default true) |
| `--union.auth.externalAuth.command` | strings | Command for external authentication token generation |
| `--union.auth.pkce.refreshTime` | string | grace period from the token expiry after which it would refresh the token. (default "5m0s") |
| `--union.auth.pkce.timeout` | string | Amount of time the browser session would be active for authentication from client app. (default "15s") |
| `--union.auth.scopes` | strings | List of scopes to request |
| `--union.auth.tokenRefreshWindow` | string | Max duration between token refresh attempt and token expiry. (default "1h0m0s") |
| `--union.auth.tokenUrl` | string | OPTIONAL: Your IdP's token endpoint. It'll be discovered from flyte admin's OAuth Metadata endpoint if not provided. |
| `--union.auth.type` | string | Type of OAuth2 flow used for communicating with admin. (default "Pkce") |
| `--union.cache.maxItemsCount` | int | Maximum number of items to keep in the cache before evicting. (default 1000) |
| `--union.connection.host` | string | Host to connect to (default "dns:///utt-mgdp-stg-us-east-2.cloud-staging.union.ai") |
| `--union.connection.insecure` | | Whether to connect over insecure channel |
| `--union.connection.insecureSkipVerify` | | InsecureSkipVerify controls whether a client verifies the server's certificate chain and host name.Caution: shouldn't be use for production usecases' |
| `--union.connection.keepAliveConfig.permitWithoutStream` | | If true, client sends keepalive pings even with no active RPCs. |
| `--union.connection.keepAliveConfig.time` | string | After a duration of this time if the client doesn't see any activity it pings the server to see if the transport is still alive. (default "20s") |
| `--union.connection.keepAliveConfig.timeout` | string | After having pinged for keepalive check, the client waits for a duration of Timeout and if no activity is seen even after that the connection is closed. (default "2m0s") |
| `--union.connection.maxBackoffDelay` | string | Max delay for grpc backoff (default "8s") |
| `--union.connection.maxRecvMsgSize` | int | Maximum size of a message in bytes of a gRPC message (default 10485760) |
| `--union.connection.maxRetries` | int | Max number of gRPC retries (default 4) |
| `--union.connection.minConnectTimeout` | string | Minimum timeout for establishing a connection (default "20s") |
| `--union.connection.perRetryTimeout` | string | gRPC per retry timeout (default "15s") |
| `--union.connection.serviceConfig` | string | Defines gRPC experimental JSON Service Config (default "{"loadBalancingConfig": [{"round_robin":{}}]}") |
| `--union.connection.trustedIdentityClaims.enabled` | | Enables passing of trusted claims while making inter service calls |
| `--union.connection.trustedIdentityClaims.externalIdentityClaim` | string | External identity claim of the service which is authorized to make internal service call. These are verified against userclouds actions |
| `--union.connection.trustedIdentityClaims.externalIdentityTypeClaim` | string | External identity type claim of app or user to use for the current service identity. It should be an 'app' for inter service communication |
| `--union.internalConnectionConfig.-` | stringToString | (default []) |
| `--union.internalConnectionConfig.enabled` | | Enables internal service to service communication instead of going through ingress. |
| `--union.internalConnectionConfig.urlPattern` | string | UrlPattern of the internal service endpoints. (default "{{ service }}-helmchart.{{ service }}.svc.cluster.local:80") |
| `--webhook.awsSecretManager.sidecarImage` | string | Specifies the sidecar docker image to use (default "docker.io/amazon/aws-secrets-manager-secret-sidecar:v0.1.4") |
| `--webhook.certDir` | string | Certificate directory to use to write generated certs. Defaults to /etc/webhook/certs/ (default "/etc/webhook/certs") |
| `--webhook.embeddedSecretManagerConfig.awsConfig.region` | string | AWS region |
| `--webhook.embeddedSecretManagerConfig.fileMountInitContainer.image` | string | Specifies init container image to use for mounting secrets as files. (default "busybox:1.28") |
| `--webhook.embeddedSecretManagerConfig.gcpConfig.project` | string | GCP project to be used for secret manager |
| `--webhook.embeddedSecretManagerConfig.type` | string | (default "AWS") |
| `--webhook.gcpSecretManager.sidecarImage` | string | Specifies the sidecar docker image to use (default "gcr.io/google.com/cloudsdktool/cloud-sdk:alpine") |
| `--webhook.listenPort` | int | The port to use to listen to webhook calls. Defaults to 9443 (default 9443) |
| `--webhook.localCert` | | write certs locally. Defaults to false |
| `--webhook.metrics-prefix` | string | An optional prefix for all published metrics. (default "flyte:") |
| `--webhook.secretName` | string | Secret name to write generated certs to. (default "flyte-pod-webhook") |
| `--webhook.serviceName` | string | The name of the webhook service. (default "flyte-pod-webhook") |
| `--webhook.servicePort` | int32 | The port on the service that hosting webhook. (default 443) |
| `--webhook.vaultSecretManager.role` | string | Specifies the vault role to use (default "flyte") |
=== PAGE: https://www.union.ai/docs/v1/serverless/api-reference/uctl-cli/uctl-delete/uctl-delete-identityassignments ===
# uctl delete identityassignments
Removes a role assignment from a user or application
## Synopsis
Assigns a policy to a specific user or application.
To update a user, specify them by their email and run:
```shell
$ uctl delete identityassignments --user.email bob@contoso.com --policy contributor
```
This removes their contributor policy assignment.
To update an application, specify the application by its unique client
id and run:
```shell
$ uctl delete identityassignments --application.id "contoso-operator" --policy admin
```
This removes the application's admin policy assignment.
Hint: you can fetch an application's ID by listing apps:
```shell
$ uctl get apps
```
You can list existing policy assignments with:
```shell
$ uctl get identityassignments --user bob@contoso.com
$ uctl get identityassignments --application "contoso-operator"
```
## Options
| Option | Type | Description |
|--------|------|-------------|
| `--application` | string | Application id to fetch identity assignments for |
| `-h`, `--help` | help for identityassignments |
| `--policy` | string | Policy name with which to update the identity assignment |
| `--user` | string | Human user email to fetch identity assignments for |
### Options inherited from parent commands
| Option | Type | Description |
|--------|------|-------------|
| `--admin.audience` | string | Audience to use when initiating OAuth2 authorization requests. |
| `--admin.authType` | string | Type of OAuth2 flow used for communicating with admin.ClientSecret, Pkce, ExternalCommand are valid values (default "ClientSecret") |
| `--admin.authorizationHeader` | string | Custom metadata header to pass JWT |
| `--admin.authorizationServerUrl` | string | This is the URL to your IdP's authorization server. It'll default to Endpoint |
| `--admin.caCertFilePath` | string | Use specified certificate file to verify the admin server peer. |
| `--admin.clientId` | string | Client ID (default "flytepropeller") |
| `--admin.clientSecretEnvVar` | string | Environment variable containing the client secret |
| `--admin.clientSecretLocation` | string | File containing the client secret (default "/etc/secrets/client_secret") |
| `--admin.command` | strings | Command for external authentication token generation |
| `--admin.defaultOrg` | string | OPTIONAL: Default org to use to support non-org based cli's.'. |
| `--admin.defaultServiceConfig` | string | |
| `--admin.deviceFlowConfig.pollInterval` | string | amount of time the device flow would poll the token endpoint if auth server doesn't return a polling interval. Okta and google IDP do return an interval' (default "5s") |
| `--admin.deviceFlowConfig.refreshTime` | string | grace period from the token expiry after which it would refresh the token. (default "5m0s") |
| `--admin.deviceFlowConfig.timeout` | string | amount of time the device flow should complete or else it will be cancelled. (default "10m0s") |
| `--admin.endpoint` | string | For admin types, specify where the uri of the service is located. |
| `--admin.httpProxyURL` | string | OPTIONAL: HTTP Proxy to be used for OAuth requests. |
| `--admin.insecure` | | Use insecure connection. |
| `--admin.insecureSkipVerify` | | InsecureSkipVerify controls whether a client verifies the server's certificate chain and host name.Caution: shouldn't be use for production usecases' |
| `--admin.maxBackoffDelay` | string | Max delay for grpc backoff (default "8s") |
| `--admin.maxMessageSizeBytes` | int | The max size in bytes for incoming gRPC messages |
| `--admin.maxRetries` | int | Max number of gRPC retries (default 4) |
| `--admin.perRetryTimeout` | string | gRPC per retry timeout (default "15s") |
| `--admin.pkceConfig.refreshTime` | string | grace period from the token expiry after which it would refresh the token. (default "5m0s") |
| `--admin.pkceConfig.timeout` | string | Amount of time the browser session would be active for authentication from client app. (default "2m0s") |
| `--admin.proxyCommand` | strings | Command for external proxy-authorization token generation |
| `--admin.scopes` | strings | List of scopes to request |
| `--admin.tokenRefreshWindow` | string | Max duration between token refresh attempt and token expiry. (default "0s") |
| `--admin.tokenUrl` | string | OPTIONAL: Your IdP's token endpoint. It'll be discovered from flyte admin's OAuth Metadata endpoint if not provided. |
| `--admin.useAudienceFromAdmin` | | Use Audience configured from admins public endpoint config. |
| `--admin.useAuth` | | Deprecated: Auth will be enabled/disabled based on admin's dynamically discovered information. |
| `--auth.appAuth.externalAuthServer.allowedAudience` | strings | Optional: A list of allowed audiences. If not provided, the audience is expected to be the public Uri of the service. |
| `--auth.appAuth.externalAuthServer.baseUrl` | string | This should be the base url of the authorization server that you are trying to hit. With Okta for instance, it will look something like https://company.okta.com/oauth2/abcdef123456789/ |
| `--auth.appAuth.externalAuthServer.httpProxyURL` | string | OPTIONAL: HTTP Proxy to be used for OAuth requests. |
| `--auth.appAuth.externalAuthServer.metadataUrl` | string | Optional: If the server doesn't support /.well-known/oauth-authorization-server, you can set a custom metadata url here.' |
| `--auth.appAuth.externalAuthServer.retryAttempts` | int | Optional: The number of attempted retries on a transient failure to get the OAuth metadata (default 5) |
| `--auth.appAuth.externalAuthServer.retryDelay` | string | Optional, Duration to wait between retries (default "1s") |
| `--auth.appAuth.selfAuthServer.accessTokenLifespan` | string | Defines the lifespan of issued access tokens. (default "30m0s") |
| `--auth.appAuth.selfAuthServer.authorizationCodeLifespan` | string | Defines the lifespan of issued access tokens. (default "5m0s") |
| `--auth.appAuth.selfAuthServer.claimSymmetricEncryptionKeySecretName` | string | OPTIONAL: Secret name to use to encrypt claims in authcode token. (default "claim_symmetric_key") |
| `--auth.appAuth.selfAuthServer.issuer` | string | Defines the issuer to use when issuing and validating tokens. The default value is https://{requestUri.HostAndPort}/ |
| `--auth.appAuth.selfAuthServer.oldTokenSigningRSAKeySecretName` | string | OPTIONAL: Secret name to use to retrieve Old RSA Signing Key. This can be useful during key rotation to continue to accept older tokens. (default "token_rsa_key_old.pem") |
| `--auth.appAuth.selfAuthServer.refreshTokenLifespan` | string | Defines the lifespan of issued access tokens. (default "1h0m0s") |
| `--auth.appAuth.selfAuthServer.tokenSigningRSAKeySecretName` | string | OPTIONAL: Secret name to use to retrieve RSA Signing Key. (default "token_rsa_key.pem") |
| `--auth.appAuth.thirdPartyConfig.flyteClient.audience` | string | Audience to use when initiating OAuth2 authorization requests. |
| `--auth.appAuth.thirdPartyConfig.flyteClient.clientId` | string | public identifier for the app which handles authorization for a Flyte deployment (default "uctl") |
| `--auth.appAuth.thirdPartyConfig.flyteClient.redirectUri` | string | This is the callback uri registered with the app which handles authorization for a Flyte deployment (default "http://localhost:53593/callback") |
| `--auth.appAuth.thirdPartyConfig.flyteClient.scopes` | strings | Recommended scopes for the client to request. (default [all,offline]) |
| `--auth.disableForGrpc` | | Disables auth enforcement on Grpc Endpoints. |
| `--auth.disableForHttp` | | Disables auth enforcement on HTTP Endpoints. |
| `--auth.grpcAuthorizationHeader` | string | (default "flyte-authorization") |
| `--auth.httpAuthorizationHeader` | string | (default "flyte-authorization") |
| `--auth.httpProxyURL` | string | OPTIONAL: HTTP Proxy to be used for OAuth requests. |
| `--auth.tokenEndpointProxyPath` | string | The path used to proxy calls to the TokenURL |
| `--auth.userAuth.cookieBlockKeySecretName` | string | OPTIONAL: Secret name to use for cookie block key. (default "cookie_block_key") |
| `--auth.userAuth.cookieHashKeySecretName` | string | OPTIONAL: Secret name to use for cookie hash key. (default "cookie_hash_key") |
| `--auth.userAuth.cookieSetting.domain` | string | OPTIONAL: Allows you to set the domain attribute on the auth cookies. |
| `--auth.userAuth.cookieSetting.sameSitePolicy` | string | OPTIONAL: Allows you to declare if your cookie should be restricted to a first-party or same-site context.Wrapper around http.SameSite. (default "DefaultMode") |
| `--auth.userAuth.httpProxyURL` | string | OPTIONAL: HTTP Proxy to be used for OAuth requests. |
| `--auth.userAuth.idpQueryParameter` | string | idp query parameter used for selecting a particular IDP for doing user authentication. Eg: for Okta passing idp={IDP-ID} forces the authentication to happen with IDP-ID |
| `--auth.userAuth.openId.baseUrl` | string | |
| `--auth.userAuth.openId.clientId` | string | |
| `--auth.userAuth.openId.clientSecretFile` | string | |
| `--auth.userAuth.openId.clientSecretName` | string | (default "oidc_client_secret") |
| `--auth.userAuth.openId.scopes` | strings | (default [openid,profile]) |
| `--auth.userAuth.redirectUrl` | string | (default "/console") |
| `--authorizer.internalCommunicationConfig.enabled` | | Enables authorization decisions for internal communication. (default true) |
| `--authorizer.internalCommunicationConfig.ingressIdentity` | string | IngressIdentity used in the cluster. Needed to exclude the communication coming from ingress. (default "ingress-nginx.ingress-nginx.serviceaccount.identity.linkerd.cluster.local") |
| `--authorizer.internalCommunicationConfig.tenantUrlPatternIdentity` | string | UrlPatternIdentity of the internal tenant service endpoint identities. (default "{{ service }}.{{ org }}.serviceaccount.identity.linkerd.cluster.local") |
| `--authorizer.internalCommunicationConfig.urlPatternIdentity` | string | UrlPatternIdentity of the internal service endpoint identities. (default "{{ service }}-helmchart.{{ service }}.serviceaccount.identity.linkerd.cluster.local") |
| `--authorizer.mode` | string | (default "Active") |
| `--authorizer.organizationConfig.PolicyConfig.adminPolicyDescription` | string | description for the boilerplate admin policy (default "Contributor permissions and full admin permissions to manage users and view usage dashboards") |
| `--authorizer.organizationConfig.PolicyConfig.contributorPolicyDescription` | string | description for the boilerplate contributor policy (default "Viewer permissions and permissions to create workflows, tasks, launch plans, and executions") |
| `--authorizer.organizationConfig.PolicyConfig.defaultUserPolicyRoleType` | string | name of the role type to determine which default policy new users added to the organization should be assigned (default "Viewer") |
| `--authorizer.organizationConfig.PolicyConfig.serverlessContributorPolicyDescription` | string | description for the boilerplate serverless contributor policy (default "Viewer permissions and permissions to create workflows, tasks, launch plans, and executions") |
| `--authorizer.organizationConfig.PolicyConfig.serverlessViewerPolicyDescription` | string | description for the boilerplate serverless viewer policy (default "Permissions to view Flyte entities") |
| `--authorizer.organizationConfig.PolicyConfig.viewerPolicyDescription` | string | description for the boilerplate viewer policy (default "Permissions to view Flyte entities") |
| `--authorizer.organizationConfig.defaultPolicyCacheDuration` | string | Cache entry duration for the store of the default policy per organization (default "10m0s") |
| `--authorizer.syncRuleRefreshInterval` | string | (default "1m0s") |
| `--authorizer.type` | string | (default "UserClouds") |
| `--authorizer.userCloudsClient.cache.redis.ttl.edgeTypes` | string | Specifies how long edge types remain in the cache.. (default "30m0s") |
| `--authorizer.userCloudsClient.cache.redis.ttl.edges` | string | Specifies how long edges remain in the cache. (default "30m0s") |
| `--authorizer.userCloudsClient.cache.redis.ttl.objectTypes` | string | Specifies how long object types remain in the cache. (default "30m0s") |
| `--authorizer.userCloudsClient.cache.redis.ttl.objects` | string | Specifies how long objects remain in the cache. (default "30m0s") |
| `--authorizer.userCloudsClient.cache.type` | string | Cache type to use. (default "none") |
| `--authorizer.userCloudsClient.clientID` | string | UserClouds client id |
| `--authorizer.userCloudsClient.clientSecretName` | string | UserCloud client secret name to read from the secret manager. (default "userclouds-client-secret") |
| `--authorizer.userCloudsClient.enableLogging` | | Enable userclouds client's internal logging. Calls to post logs take 250-350 ms and will impact p99 latency, enable with caution. |
| `--authorizer.userCloudsClient.tenantID` | string | UserClouds tenant id. Should be a UUID. |
| `--authorizer.userCloudsClient.tenantUrl` | string | Something like https://{yourtenant}.tenant.userclouds.com |
| `--config` | string | config file (default is /Users/andrew/.union/config.yaml) |
| `--connection.environment` | string | |
| `--connection.region` | string | |
| `--connection.rootTenantURLPattern` | string | Pattern for tenant url. (default "dns:///{{ organization }}.cloud-staging.union.ai") |
| `--console.endpoint` | string | Endpoint of console, if different than flyte admin |
| `--database.connMaxLifeTime` | string | sets the maximum amount of time a connection may be reused (default "1h0m0s") |
| `--database.enableForeignKeyConstraintWhenMigrating` | | Whether to enable gorm foreign keys when migrating the db |
| `--database.maxIdleConnections` | int | maxIdleConnections sets the maximum number of connections in the idle connection pool. (default 10) |
| `--database.maxOpenConnections` | int | maxOpenConnections sets the maximum number of open connections to the database. (default 100) |
| `--database.postgres.dbname` | string | The database name (default "postgres") |
| `--database.postgres.debug` | | |
| `--database.postgres.host` | string | The host name of the database server (default "localhost") |
| `--database.postgres.options` | string | See http://gorm.io/docs/connecting_to_the_database.html for available options passed, in addition to the above. (default "sslmode=disable") |
| `--database.postgres.password` | string | The database password. (default "postgres") |
| `--database.postgres.passwordPath` | string | Points to the file containing the database password. |
| `--database.postgres.port` | int | The port name of the database server (default 30001) |
| `--database.postgres.readReplicaHost` | string | The host name of the read replica database server (default "localhost") |
| `--database.postgres.username` | string | The database user who is connecting to the server. (default "postgres") |
| `--database.sqlite.file` | string | The path to the file (existing or new) where the DB should be created / stored. If existing, then this will be re-used, else a new will be created |
| `--db.connectionPool.maxConnectionLifetime` | string | (default "0s") |
| `--db.connectionPool.maxIdleConnections` | int | |
| `--db.connectionPool.maxOpenConnections` | int | |
| `--db.dbname` | string | (default "postgres") |
| `--db.debug` | | |
| `--db.host` | string | (default "postgres") |
| `--db.log_level` | int | (default 4) |
| `--db.options` | string | (default "sslmode=disable") |
| `--db.password` | string | |
| `--db.passwordPath` | string | |
| `--db.port` | int | (default 5432) |
| `--db.username` | string | (default "postgres") |
| `-d`, `--domain` | string | Specifies the Flyte project's domain. |
| `--files.archive` | | Pass in archive file either an http link or local path. |
| `--files.assumableIamRole` | string | Custom assumable iam auth role to register launch plans with. |
| `--files.continueOnError` | | Continue on error when registering files. |
| `--files.destinationDirectory` | string | Location of source code in container. |
| `--files.dryRun` | | Execute command without making any modifications. |
| `--files.enableSchedule` | | Enable the schedule if the files contain schedulable launchplan. |
| `--files.force` | | Force use of version number on entities registered with flyte. |
| `--files.k8ServiceAccount` | string | Deprecated. Please use `--K8sServiceAccount`|
| `--files.k8sServiceAccount` | string | Custom kubernetes service account auth role to register launch plans with. |
| `--files.outputLocationPrefix` | string | Custom output location prefix for offloaded types (files/schemas). |
| `--files.sourceUploadPath` | string | Deprecated: Update flyte admin to avoid having to configure storage access from uctl. |
| `--files.version` | string | Version of the entity to be registered with flyte which are un-versioned after serialization. |
| `--logger.formatter.type` | string | Sets logging format type. (default "json") |
| `--logger.level` | int | Sets the minimum logging level. (default 3) |
| `--logger.mute` | | Mutes all logs regardless of severity. Intended for benchmarks/tests only. |
| `--logger.show-source` | | Includes source code location in logs. |
| `--org` | string | Organization to work on. If not set, default to user's org. |
| `--otel.file.filename` | string | Filename to store exported telemetry traces (default "/tmp/trace.txt") |
| `--otel.jaeger.endpoint` | string | Endpoint for the jaeger telemetry trace ingestor (default "http://localhost:14268/api/traces") |
| `--otel.otlpgrpc.endpoint` | string | Endpoint for the OTLP telemetry trace collector (default "http://localhost:4317") |
| `--otel.otlphttp.endpoint` | string | Endpoint for the OTLP telemetry trace collector (default "http://localhost:4318/v1/traces") |
| `--otel.sampler.parentSampler` | string | Sets the parent sampler to use for the tracer (default "always") |
| `--otel.type` | string | Sets the type of exporter to configure [noop/file/jaeger/otlpgrpc/otlphttp]. (default "noop") |
| `-o`, `--output` | string | Specifies the output type - supported formats [TABLE JSON YAML DOT DOTURL]. NOTE: dot, doturl are only supported for Workflow (default "table") |
| `--plugins.catalogcache.reader.maxItems` | int | Maximum number of entries to keep in the index. (default 10000) |
| `--plugins.catalogcache.reader.maxRetries` | int | Maximum number of retries per item. (default 3) |
| `--plugins.catalogcache.reader.workers` | int | Number of concurrent workers to start processing the queue. (default 10) |
| `--plugins.catalogcache.writer.maxItems` | int | Maximum number of entries to keep in the index. (default 10000) |
| `--plugins.catalogcache.writer.maxRetries` | int | Maximum number of retries per item. (default 3) |
| `--plugins.catalogcache.writer.workers` | int | Number of concurrent workers to start processing the queue. (default 10) |
| `-p`, `--project` | string | Specifies the Flyte project. |
| `--rediscache.passwordSecretName` | string | Name of secret with Redis password. |
| `--rediscache.primaryEndpoint` | string | Primary endpoint for the redis cache that can be used for both reads and writes. |
| `--rediscache.replicaEndpoint` | string | Replica endpoint for the redis cache that can be used for reads. |
| `--secrets.env-prefix` | string | Prefix for environment variables (default "FLYTE_SECRET_") |
| `--secrets.secrets-prefix` | string | Prefix where to look for secrets file (default "/etc/secrets") |
| `--secrets.type` | string | Sets the type of storage to configure [local]. (default "local") |
| `--server.dataProxy.download.maxExpiresIn` | string | Maximum allowed expiration duration. (default "1h0m0s") |
| `--server.dataProxy.upload.defaultFileNameLength` | int | Default length for the generated file name if not provided in the request. (default 20) |
| `--server.dataProxy.upload.maxExpiresIn` | string | Maximum allowed expiration duration. (default "1h0m0s") |
| `--server.dataProxy.upload.maxSize` | string | Maximum allowed upload size. (default "6Mi") |
| `--server.dataProxy.upload.storagePrefix` | string | Storage prefix to use for all upload requests. |
| `--server.grpc.enableGrpcLatencyMetrics` | | Enable grpc latency metrics. Note Histograms metrics can be expensive on Prometheus servers. |
| `--server.grpc.maxMessageSizeBytes` | int | The max size in bytes for incoming gRPC messages |
| `--server.grpc.port` | int | On which grpc port to serve admin (default 8089) |
| `--server.grpc.serverReflection` | | Enable GRPC Server Reflection (default true) |
| `--server.grpcPort` | int | deprecated |
| `--server.grpcServerReflection` | | deprecated |
| `--server.httpPort` | int | On which http port to serve admin (default 8088) |
| `--server.kube-config` | string | Path to kubernetes client config file, default is empty, useful for incluster config. |
| `--server.kubeClientConfig.burst` | int | Max burst rate for throttle. 0 defaults to 10 (default 25) |
| `--server.kubeClientConfig.qps` | int32 | Max QPS to the master for requests to KubeAPI. 0 defaults to 5. (default 100) |
| `--server.kubeClientConfig.timeout` | string | Max duration allowed for every request to KubeAPI before giving up. 0 implies no timeout. (default "30s") |
| `--server.master` | string | The address of the Kubernetes API server. |
| `--server.readHeaderTimeoutSeconds` | int | The amount of time allowed to read request headers. (default 32) |
| `--server.security.allowCors` | | (default true) |
| `--server.security.allowedHeaders` | strings | (default [Content-Type,flyte-authorization]) |
| `--server.security.allowedOrigins` | strings | (default [*]) |
| `--server.security.auditAccess` | | |
| `--server.security.secure` | | |
| `--server.security.ssl.certificateFile` | string | |
| `--server.security.ssl.keyFile` | string | |
| `--server.security.useAuth` | | |
| `--server.thirdPartyConfig.flyteClient.audience` | string | Audience to use when initiating OAuth2 authorization requests. |
| `--server.thirdPartyConfig.flyteClient.clientId` | string | public identifier for the app which handles authorization for a Flyte deployment |
| `--server.thirdPartyConfig.flyteClient.redirectUri` | string | This is the callback uri registered with the app which handles authorization for a Flyte deployment |
| `--server.thirdPartyConfig.flyteClient.scopes` | strings | Recommended scopes for the client to request. |
| `--server.watchService.maxActiveClusterConnections` | int | (default 5) |
| `--server.watchService.maxPageSize` | int | (default 50000) |
| `--server.watchService.nonTerminalStatusUpdatesInterval` | string | (default "1m0s") |
| `--server.watchService.pollInterval` | string | (default "1s") |
| `--sharedservice.connectPort` | string | On which connect port to serve admin (default "8080") |
| `--sharedservice.grpc.grpcMaxResponseStatusBytes` | int32 | specifies the maximum (uncompressed) size of header list that the client is prepared to accept on grpc calls (default 32000) |
| `--sharedservice.grpc.maxConcurrentStreams` | int | Limit on the number of concurrent streams to each ServerTransport. (default 100) |
| `--sharedservice.grpc.maxMessageSizeBytes` | int | Limit on the size of message that can be received on the server. (default 10485760) |
| `--sharedservice.grpcServerReflection` | | Enable GRPC Server Reflection (default true) |
| `--sharedservice.httpPort` | string | On which http port to serve admin (default "8089") |
| `--sharedservice.kubeConfig` | string | Path to kubernetes client config file. |
| `--sharedservice.master` | string | The address of the Kubernetes API server. |
| `--sharedservice.metrics.enableClientGrpcHistograms` | | Enable client grpc histograms (default true) |
| `--sharedservice.metrics.enableGrpcHistograms` | | Enable grpc histograms (default true) |
| `--sharedservice.metrics.scope` | string | Scope to emit metrics under (default "service:") |
| `--sharedservice.port` | string | On which grpc port to serve admin (default "8080") |
| `--sharedservice.profiler.enabled` | | Enable Profiler on server |
| `--sharedservice.profilerPort` | string | Profile port to start listen for pprof and metric handlers on. (default "10254") |
| `--sharedservice.security.allowCors` | | |
| `--sharedservice.security.allowLocalhostAccess` | | Whether to permit localhost unauthenticated access to the server |
| `--sharedservice.security.allowedHeaders` | strings | |
| `--sharedservice.security.allowedOrigins` | strings | |
| `--sharedservice.security.auditAccess` | | |
| `--sharedservice.security.orgOverride` | string | Override org in identity context if localhost access enabled |
| `--sharedservice.security.secure` | | |
| `--sharedservice.security.ssl.certificateAuthorityFile` | string | |
| `--sharedservice.security.ssl.certificateFile` | string | |
| `--sharedservice.security.ssl.keyFile` | string | |
| `--sharedservice.security.useAuth` | | |
| `--sharedservice.sync.syncInterval` | string | Time interval to sync (default "5m0s") |
| `--storage.cache.max_size_mbs` | int | Maximum size of the cache where the Blob store data is cached in-memory. If not specified or set to 0, cache is not used |
| `--storage.cache.target_gc_percent` | int | Sets the garbage collection target percentage. |
| `--storage.connection.access-key` | string | Access key to use. Only required when authtype is set to accesskey. |
| `--storage.connection.auth-type` | string | Auth Type to use [iam, accesskey]. (default "iam") |
| `--storage.connection.disable-ssl` | | Disables SSL connection. Should only be used for development. |
| `--storage.connection.endpoint` | string | URL for storage client to connect to. |
| `--storage.connection.region` | string | Region to connect to. (default "us-east-1") |
| `--storage.connection.secret-key` | string | Secret to use when accesskey is set. |
| `--storage.container` | string | Initial container (in s3 a bucket) to create -if it doesn't exist-.' |
| `--storage.defaultHttpClient.timeout` | string | Sets time out on the http client. (default "0s") |
| `--storage.enable-multicontainer` | | If this is true, then the container argument is overlooked and redundant. This config will automatically open new connections to new containers/buckets as they are encountered |
| `--storage.limits.maxDownloadMBs` | int | Maximum allowed download size (in MBs) per call. (default 2) |
| `--storage.stow.config` | stringToString | Configuration for stow backend. Refer to github/flyteorg/stow (default []) |
| `--storage.stow.kind` | string | Kind of Stow backend to use. Refer to github/flyteorg/stow |
| `--storage.type` | string | Sets the type of storage to configure [s3/minio/local/mem/stow]. (default "s3") |
| `--union.auth.authorizationMetadataKey` | string | Authorization Header to use when passing Access Tokens to the server (default "flyte-authorization") |
| `--union.auth.clientId` | string | Client ID |
| `--union.auth.clientSecretEnvVar` | string | Environment variable containing the client secret |
| `--union.auth.clientSecretLocation` | string | File containing the client secret |
| `--union.auth.deviceFlow.pollInterval` | string | amount of time the device flow would poll the token endpoint if auth server doesn't return a polling interval. Okta and google IDP do return an interval' (default "5s") |
| `--union.auth.deviceFlow.refreshTime` | string | grace period from the token expiry after which it would refresh the token. (default "5m0s") |
| `--union.auth.deviceFlow.timeout` | string | amount of time the device flow should complete or else it will be cancelled. (default "10m0s") |
| `--union.auth.enable` | | Whether to enable an authenticated conenction when communicating with admin. (default true) |
| `--union.auth.externalAuth.command` | strings | Command for external authentication token generation |
| `--union.auth.pkce.refreshTime` | string | grace period from the token expiry after which it would refresh the token. (default "5m0s") |
| `--union.auth.pkce.timeout` | string | Amount of time the browser session would be active for authentication from client app. (default "15s") |
| `--union.auth.scopes` | strings | List of scopes to request |
| `--union.auth.tokenRefreshWindow` | string | Max duration between token refresh attempt and token expiry. (default "1h0m0s") |
| `--union.auth.tokenUrl` | string | OPTIONAL: Your IdP's token endpoint. It'll be discovered from flyte admin's OAuth Metadata endpoint if not provided. |
| `--union.auth.type` | string | Type of OAuth2 flow used for communicating with admin. (default "Pkce") |
| `--union.cache.maxItemsCount` | int | Maximum number of items to keep in the cache before evicting. (default 1000) |
| `--union.connection.host` | string | Host to connect to (default "dns:///utt-mgdp-stg-us-east-2.cloud-staging.union.ai") |
| `--union.connection.insecure` | | Whether to connect over insecure channel |
| `--union.connection.insecureSkipVerify` | | InsecureSkipVerify controls whether a client verifies the server's certificate chain and host name.Caution: shouldn't be use for production usecases' |
| `--union.connection.keepAliveConfig.permitWithoutStream` | | If true, client sends keepalive pings even with no active RPCs. |
| `--union.connection.keepAliveConfig.time` | string | After a duration of this time if the client doesn't see any activity it pings the server to see if the transport is still alive. (default "20s") |
| `--union.connection.keepAliveConfig.timeout` | string | After having pinged for keepalive check, the client waits for a duration of Timeout and if no activity is seen even after that the connection is closed. (default "2m0s") |
| `--union.connection.maxBackoffDelay` | string | Max delay for grpc backoff (default "8s") |
| `--union.connection.maxRecvMsgSize` | int | Maximum size of a message in bytes of a gRPC message (default 10485760) |
| `--union.connection.maxRetries` | int | Max number of gRPC retries (default 4) |
| `--union.connection.minConnectTimeout` | string | Minimum timeout for establishing a connection (default "20s") |
| `--union.connection.perRetryTimeout` | string | gRPC per retry timeout (default "15s") |
| `--union.connection.serviceConfig` | string | Defines gRPC experimental JSON Service Config (default "{"loadBalancingConfig": [{"round_robin":{}}]}") |
| `--union.connection.trustedIdentityClaims.enabled` | | Enables passing of trusted claims while making inter service calls |
| `--union.connection.trustedIdentityClaims.externalIdentityClaim` | string | External identity claim of the service which is authorized to make internal service call. These are verified against userclouds actions |
| `--union.connection.trustedIdentityClaims.externalIdentityTypeClaim` | string | External identity type claim of app or user to use for the current service identity. It should be an 'app' for inter service communication |
| `--union.internalConnectionConfig.-` | stringToString | (default []) |
| `--union.internalConnectionConfig.enabled` | | Enables internal service to service communication instead of going through ingress. |
| `--union.internalConnectionConfig.urlPattern` | string | UrlPattern of the internal service endpoints. (default "{{ service }}-helmchart.{{ service }}.svc.cluster.local:80") |
| `--webhook.awsSecretManager.sidecarImage` | string | Specifies the sidecar docker image to use (default "docker.io/amazon/aws-secrets-manager-secret-sidecar:v0.1.4") |
| `--webhook.certDir` | string | Certificate directory to use to write generated certs. Defaults to /etc/webhook/certs/ (default "/etc/webhook/certs") |
| `--webhook.embeddedSecretManagerConfig.awsConfig.region` | string | AWS region |
| `--webhook.embeddedSecretManagerConfig.fileMountInitContainer.image` | string | Specifies init container image to use for mounting secrets as files. (default "busybox:1.28") |
| `--webhook.embeddedSecretManagerConfig.gcpConfig.project` | string | GCP project to be used for secret manager |
| `--webhook.embeddedSecretManagerConfig.type` | string | (default "AWS") |
| `--webhook.gcpSecretManager.sidecarImage` | string | Specifies the sidecar docker image to use (default "gcr.io/google.com/cloudsdktool/cloud-sdk:alpine") |
| `--webhook.listenPort` | int | The port to use to listen to webhook calls. Defaults to 9443 (default 9443) |
| `--webhook.localCert` | | write certs locally. Defaults to false |
| `--webhook.metrics-prefix` | string | An optional prefix for all published metrics. (default "flyte:") |
| `--webhook.secretName` | string | Secret name to write generated certs to. (default "flyte-pod-webhook") |
| `--webhook.serviceName` | string | The name of the webhook service. (default "flyte-pod-webhook") |
| `--webhook.servicePort` | int32 | The port on the service that hosting webhook. (default 443) |
| `--webhook.vaultSecretManager.role` | string | Specifies the vault role to use (default "flyte") |
=== PAGE: https://www.union.ai/docs/v1/serverless/api-reference/uctl-cli/uctl-delete/uctl-delete-plugin-override ===
# uctl delete plugin-override
Deletes matchable resources of plugin overrides.
## Synopsis
Delete plugin override for the given project and domain, in combination
with the workflow name.
For project flytesnacks and development domain, run:
```shell
$ uctl delete plugin-override -p flytesnacks -d development
```
To delete plugin override using the config file which was used to create
it, run:
```shell
$ uctl delete plugin-override --attrFile po.yaml
```
For example, here's the config file po.yaml:
``` yaml
domain: development
project: flytesnacks
overrides:
- task_type: python_task # Task type for which to apply plugin implementation overrides
plugin_id: # Plugin id(s) to be used in place of the default for the task type.
- plugin_override1
- plugin_override2
missing_plugin_behavior: 1 # Behavior when no specified plugin_id has an associated handler. 0: FAIL , 1: DEFAULT
```
Overrides are optional in the file as they are unread during the delete
command but can be retained since the same file can be used for get,
update and delete commands.
To delete plugin override for the workflow
`core.control_flow.merge_sort.merge_sort`, run the following command:
```shell
$ uctl delete plugin-override -p flytesnacks -d development core.control_flow.merge_sort.merge_sort
```
Usage:
```shell
$ uctl delete plugin-override [flags]
```
## Options
| Option | Type | Description |
|--------|------|-------------|
| `--attrFile` | string | attribute file name to be used for delete attribute for the resource type. |
| `--dryRun` | | execute command without making any modifications. |
| `-h`, `--help` | help for plugin-override |
### Options inherited from parent commands
| Option | Type | Description |
|--------|------|-------------|
| `--admin.audience` | string | Audience to use when initiating OAuth2 authorization requests. |
| `--admin.authType` | string | Type of OAuth2 flow used for communicating with admin.ClientSecret, Pkce, ExternalCommand are valid values (default "ClientSecret") |
| `--admin.authorizationHeader` | string | Custom metadata header to pass JWT |
| `--admin.authorizationServerUrl` | string | This is the URL to your IdP's authorization server. It'll default to Endpoint |
| `--admin.caCertFilePath` | string | Use specified certificate file to verify the admin server peer. |
| `--admin.clientId` | string | Client ID (default "flytepropeller") |
| `--admin.clientSecretEnvVar` | string | Environment variable containing the client secret |
| `--admin.clientSecretLocation` | string | File containing the client secret (default "/etc/secrets/client_secret") |
| `--admin.command` | strings | Command for external authentication token generation |
| `--admin.defaultOrg` | string | OPTIONAL: Default org to use to support non-org based cli's.'. |
| `--admin.defaultServiceConfig` | string | |
| `--admin.deviceFlowConfig.pollInterval` | string | amount of time the device flow would poll the token endpoint if auth server doesn't return a polling interval. Okta and google IDP do return an interval' (default "5s") |
| `--admin.deviceFlowConfig.refreshTime` | string | grace period from the token expiry after which it would refresh the token. (default "5m0s") |
| `--admin.deviceFlowConfig.timeout` | string | amount of time the device flow should complete or else it will be cancelled. (default "10m0s") |
| `--admin.endpoint` | string | For admin types, specify where the uri of the service is located. |
| `--admin.httpProxyURL` | string | OPTIONAL: HTTP Proxy to be used for OAuth requests. |
| `--admin.insecure` | | Use insecure connection. |
| `--admin.insecureSkipVerify` | | InsecureSkipVerify controls whether a client verifies the server's certificate chain and host name.Caution: shouldn't be use for production usecases' |
| `--admin.maxBackoffDelay` | string | Max delay for grpc backoff (default "8s") |
| `--admin.maxMessageSizeBytes` | int | The max size in bytes for incoming gRPC messages |
| `--admin.maxRetries` | int | Max number of gRPC retries (default 4) |
| `--admin.perRetryTimeout` | string | gRPC per retry timeout (default "15s") |
| `--admin.pkceConfig.refreshTime` | string | grace period from the token expiry after which it would refresh the token. (default "5m0s") |
| `--admin.pkceConfig.timeout` | string | Amount of time the browser session would be active for authentication from client app. (default "2m0s") |
| `--admin.proxyCommand` | strings | Command for external proxy-authorization token generation |
| `--admin.scopes` | strings | List of scopes to request |
| `--admin.tokenRefreshWindow` | string | Max duration between token refresh attempt and token expiry. (default "0s") |
| `--admin.tokenUrl` | string | OPTIONAL: Your IdP's token endpoint. It'll be discovered from flyte admin's OAuth Metadata endpoint if not provided. |
| `--admin.useAudienceFromAdmin` | | Use Audience configured from admins public endpoint config. |
| `--admin.useAuth` | | Deprecated: Auth will be enabled/disabled based on admin's dynamically discovered information. |
| `--auth.appAuth.externalAuthServer.allowedAudience` | strings | Optional: A list of allowed audiences. If not provided, the audience is expected to be the public Uri of the service. |
| `--auth.appAuth.externalAuthServer.baseUrl` | string | This should be the base url of the authorization server that you are trying to hit. With Okta for instance, it will look something like https://company.okta.com/oauth2/abcdef123456789/ |
| `--auth.appAuth.externalAuthServer.httpProxyURL` | string | OPTIONAL: HTTP Proxy to be used for OAuth requests. |
| `--auth.appAuth.externalAuthServer.metadataUrl` | string | Optional: If the server doesn't support /.well-known/oauth-authorization-server, you can set a custom metadata url here.' |
| `--auth.appAuth.externalAuthServer.retryAttempts` | int | Optional: The number of attempted retries on a transient failure to get the OAuth metadata (default 5) |
| `--auth.appAuth.externalAuthServer.retryDelay` | string | Optional, Duration to wait between retries (default "1s") |
| `--auth.appAuth.selfAuthServer.accessTokenLifespan` | string | Defines the lifespan of issued access tokens. (default "30m0s") |
| `--auth.appAuth.selfAuthServer.authorizationCodeLifespan` | string | Defines the lifespan of issued access tokens. (default "5m0s") |
| `--auth.appAuth.selfAuthServer.claimSymmetricEncryptionKeySecretName` | string | OPTIONAL: Secret name to use to encrypt claims in authcode token. (default "claim_symmetric_key") |
| `--auth.appAuth.selfAuthServer.issuer` | string | Defines the issuer to use when issuing and validating tokens. The default value is https://{requestUri.HostAndPort}/ |
| `--auth.appAuth.selfAuthServer.oldTokenSigningRSAKeySecretName` | string | OPTIONAL: Secret name to use to retrieve Old RSA Signing Key. This can be useful during key rotation to continue to accept older tokens. (default "token_rsa_key_old.pem") |
| `--auth.appAuth.selfAuthServer.refreshTokenLifespan` | string | Defines the lifespan of issued access tokens. (default "1h0m0s") |
| `--auth.appAuth.selfAuthServer.tokenSigningRSAKeySecretName` | string | OPTIONAL: Secret name to use to retrieve RSA Signing Key. (default "token_rsa_key.pem") |
| `--auth.appAuth.thirdPartyConfig.flyteClient.audience` | string | Audience to use when initiating OAuth2 authorization requests. |
| `--auth.appAuth.thirdPartyConfig.flyteClient.clientId` | string | public identifier for the app which handles authorization for a Flyte deployment (default "uctl") |
| `--auth.appAuth.thirdPartyConfig.flyteClient.redirectUri` | string | This is the callback uri registered with the app which handles authorization for a Flyte deployment (default "http://localhost:53593/callback") |
| `--auth.appAuth.thirdPartyConfig.flyteClient.scopes` | strings | Recommended scopes for the client to request. (default [all,offline]) |
| `--auth.disableForGrpc` | | Disables auth enforcement on Grpc Endpoints. |
| `--auth.disableForHttp` | | Disables auth enforcement on HTTP Endpoints. |
| `--auth.grpcAuthorizationHeader` | string | (default "flyte-authorization") |
| `--auth.httpAuthorizationHeader` | string | (default "flyte-authorization") |
| `--auth.httpProxyURL` | string | OPTIONAL: HTTP Proxy to be used for OAuth requests. |
| `--auth.tokenEndpointProxyPath` | string | The path used to proxy calls to the TokenURL |
| `--auth.userAuth.cookieBlockKeySecretName` | string | OPTIONAL: Secret name to use for cookie block key. (default "cookie_block_key") |
| `--auth.userAuth.cookieHashKeySecretName` | string | OPTIONAL: Secret name to use for cookie hash key. (default "cookie_hash_key") |
| `--auth.userAuth.cookieSetting.domain` | string | OPTIONAL: Allows you to set the domain attribute on the auth cookies. |
| `--auth.userAuth.cookieSetting.sameSitePolicy` | string | OPTIONAL: Allows you to declare if your cookie should be restricted to a first-party or same-site context.Wrapper around http.SameSite. (default "DefaultMode") |
| `--auth.userAuth.httpProxyURL` | string | OPTIONAL: HTTP Proxy to be used for OAuth requests. |
| `--auth.userAuth.idpQueryParameter` | string | idp query parameter used for selecting a particular IDP for doing user authentication. Eg: for Okta passing idp={IDP-ID} forces the authentication to happen with IDP-ID |
| `--auth.userAuth.openId.baseUrl` | string | |
| `--auth.userAuth.openId.clientId` | string | |
| `--auth.userAuth.openId.clientSecretFile` | string | |
| `--auth.userAuth.openId.clientSecretName` | string | (default "oidc_client_secret") |
| `--auth.userAuth.openId.scopes` | strings | (default [openid,profile]) |
| `--auth.userAuth.redirectUrl` | string | (default "/console") |
| `--authorizer.internalCommunicationConfig.enabled` | | Enables authorization decisions for internal communication. (default true) |
| `--authorizer.internalCommunicationConfig.ingressIdentity` | string | IngressIdentity used in the cluster. Needed to exclude the communication coming from ingress. (default "ingress-nginx.ingress-nginx.serviceaccount.identity.linkerd.cluster.local") |
| `--authorizer.internalCommunicationConfig.tenantUrlPatternIdentity` | string | UrlPatternIdentity of the internal tenant service endpoint identities. (default "{{ service }}.{{ org }}.serviceaccount.identity.linkerd.cluster.local") |
| `--authorizer.internalCommunicationConfig.urlPatternIdentity` | string | UrlPatternIdentity of the internal service endpoint identities. (default "{{ service }}-helmchart.{{ service }}.serviceaccount.identity.linkerd.cluster.local") |
| `--authorizer.mode` | string | (default "Active") |
| `--authorizer.organizationConfig.PolicyConfig.adminPolicyDescription` | string | description for the boilerplate admin policy (default "Contributor permissions and full admin permissions to manage users and view usage dashboards") |
| `--authorizer.organizationConfig.PolicyConfig.contributorPolicyDescription` | string | description for the boilerplate contributor policy (default "Viewer permissions and permissions to create workflows, tasks, launch plans, and executions") |
| `--authorizer.organizationConfig.PolicyConfig.defaultUserPolicyRoleType` | string | name of the role type to determine which default policy new users added to the organization should be assigned (default "Viewer") |
| `--authorizer.organizationConfig.PolicyConfig.serverlessContributorPolicyDescription` | string | description for the boilerplate serverless contributor policy (default "Viewer permissions and permissions to create workflows, tasks, launch plans, and executions") |
| `--authorizer.organizationConfig.PolicyConfig.serverlessViewerPolicyDescription` | string | description for the boilerplate serverless viewer policy (default "Permissions to view Flyte entities") |
| `--authorizer.organizationConfig.PolicyConfig.viewerPolicyDescription` | string | description for the boilerplate viewer policy (default "Permissions to view Flyte entities") |
| `--authorizer.organizationConfig.defaultPolicyCacheDuration` | string | Cache entry duration for the store of the default policy per organization (default "10m0s") |
| `--authorizer.syncRuleRefreshInterval` | string | (default "1m0s") |
| `--authorizer.type` | string | (default "UserClouds") |
| `--authorizer.userCloudsClient.cache.redis.ttl.edgeTypes` | string | Specifies how long edge types remain in the cache.. (default "30m0s") |
| `--authorizer.userCloudsClient.cache.redis.ttl.edges` | string | Specifies how long edges remain in the cache. (default "30m0s") |
| `--authorizer.userCloudsClient.cache.redis.ttl.objectTypes` | string | Specifies how long object types remain in the cache. (default "30m0s") |
| `--authorizer.userCloudsClient.cache.redis.ttl.objects` | string | Specifies how long objects remain in the cache. (default "30m0s") |
| `--authorizer.userCloudsClient.cache.type` | string | Cache type to use. (default "none") |
| `--authorizer.userCloudsClient.clientID` | string | UserClouds client id |
| `--authorizer.userCloudsClient.clientSecretName` | string | UserCloud client secret name to read from the secret manager. (default "userclouds-client-secret") |
| `--authorizer.userCloudsClient.enableLogging` | | Enable userclouds client's internal logging. Calls to post logs take 250-350 ms and will impact p99 latency, enable with caution. |
| `--authorizer.userCloudsClient.tenantID` | string | UserClouds tenant id. Should be a UUID. |
| `--authorizer.userCloudsClient.tenantUrl` | string | Something like https://{yourtenant}.tenant.userclouds.com |
| `--config` | string | config file (default is /Users/andrew/.union/config.yaml) |
| `--connection.environment` | string | |
| `--connection.region` | string | |
| `--connection.rootTenantURLPattern` | string | Pattern for tenant url. (default "dns:///{{ organization }}.cloud-staging.union.ai") |
| `--console.endpoint` | string | Endpoint of console, if different than flyte admin |
| `--database.connMaxLifeTime` | string | sets the maximum amount of time a connection may be reused (default "1h0m0s") |
| `--database.enableForeignKeyConstraintWhenMigrating` | | Whether to enable gorm foreign keys when migrating the db |
| `--database.maxIdleConnections` | int | maxIdleConnections sets the maximum number of connections in the idle connection pool. (default 10) |
| `--database.maxOpenConnections` | int | maxOpenConnections sets the maximum number of open connections to the database. (default 100) |
| `--database.postgres.dbname` | string | The database name (default "postgres") |
| `--database.postgres.debug` | | |
| `--database.postgres.host` | string | The host name of the database server (default "localhost") |
| `--database.postgres.options` | string | See http://gorm.io/docs/connecting_to_the_database.html for available options passed, in addition to the above. (default "sslmode=disable") |
| `--database.postgres.password` | string | The database password. (default "postgres") |
| `--database.postgres.passwordPath` | string | Points to the file containing the database password. |
| `--database.postgres.port` | int | The port name of the database server (default 30001) |
| `--database.postgres.readReplicaHost` | string | The host name of the read replica database server (default "localhost") |
| `--database.postgres.username` | string | The database user who is connecting to the server. (default "postgres") |
| `--database.sqlite.file` | string | The path to the file (existing or new) where the DB should be created / stored. If existing, then this will be re-used, else a new will be created |
| `--db.connectionPool.maxConnectionLifetime` | string | (default "0s") |
| `--db.connectionPool.maxIdleConnections` | int | |
| `--db.connectionPool.maxOpenConnections` | int | |
| `--db.dbname` | string | (default "postgres") |
| `--db.debug` | | |
| `--db.host` | string | (default "postgres") |
| `--db.log_level` | int | (default 4) |
| `--db.options` | string | (default "sslmode=disable") |
| `--db.password` | string | |
| `--db.passwordPath` | string | |
| `--db.port` | int | (default 5432) |
| `--db.username` | string | (default "postgres") |
| `-d`, `--domain` | string | Specifies the Flyte project's domain. |
| `--files.archive` | | Pass in archive file either an http link or local path. |
| `--files.assumableIamRole` | string | Custom assumable iam auth role to register launch plans with. |
| `--files.continueOnError` | | Continue on error when registering files. |
| `--files.destinationDirectory` | string | Location of source code in container. |
| `--files.dryRun` | | Execute command without making any modifications. |
| `--files.enableSchedule` | | Enable the schedule if the files contain schedulable launchplan. |
| `--files.force` | | Force use of version number on entities registered with flyte. |
| `--files.k8ServiceAccount` | string | Deprecated. Please use `--K8sServiceAccount`|
| `--files.k8sServiceAccount` | string | Custom kubernetes service account auth role to register launch plans with. |
| `--files.outputLocationPrefix` | string | Custom output location prefix for offloaded types (files/schemas). |
| `--files.sourceUploadPath` | string | Deprecated: Update flyte admin to avoid having to configure storage access from uctl. |
| `--files.version` | string | Version of the entity to be registered with flyte which are un-versioned after serialization. |
| `--logger.formatter.type` | string | Sets logging format type. (default "json") |
| `--logger.level` | int | Sets the minimum logging level. (default 3) |
| `--logger.mute` | | Mutes all logs regardless of severity. Intended for benchmarks/tests only. |
| `--logger.show-source` | | Includes source code location in logs. |
| `--org` | string | Organization to work on. If not set, default to user's org. |
| `--otel.file.filename` | string | Filename to store exported telemetry traces (default "/tmp/trace.txt") |
| `--otel.jaeger.endpoint` | string | Endpoint for the jaeger telemetry trace ingestor (default "http://localhost:14268/api/traces") |
| `--otel.otlpgrpc.endpoint` | string | Endpoint for the OTLP telemetry trace collector (default "http://localhost:4317") |
| `--otel.otlphttp.endpoint` | string | Endpoint for the OTLP telemetry trace collector (default "http://localhost:4318/v1/traces") |
| `--otel.sampler.parentSampler` | string | Sets the parent sampler to use for the tracer (default "always") |
| `--otel.type` | string | Sets the type of exporter to configure [noop/file/jaeger/otlpgrpc/otlphttp]. (default "noop") |
| `-o`, `--output` | string | Specifies the output type - supported formats [TABLE JSON YAML DOT DOTURL]. NOTE: dot, doturl are only supported for Workflow (default "table") |
| `--plugins.catalogcache.reader.maxItems` | int | Maximum number of entries to keep in the index. (default 10000) |
| `--plugins.catalogcache.reader.maxRetries` | int | Maximum number of retries per item. (default 3) |
| `--plugins.catalogcache.reader.workers` | int | Number of concurrent workers to start processing the queue. (default 10) |
| `--plugins.catalogcache.writer.maxItems` | int | Maximum number of entries to keep in the index. (default 10000) |
| `--plugins.catalogcache.writer.maxRetries` | int | Maximum number of retries per item. (default 3) |
| `--plugins.catalogcache.writer.workers` | int | Number of concurrent workers to start processing the queue. (default 10) |
| `-p`, `--project` | string | Specifies the Flyte project. |
| `--rediscache.passwordSecretName` | string | Name of secret with Redis password. |
| `--rediscache.primaryEndpoint` | string | Primary endpoint for the redis cache that can be used for both reads and writes. |
| `--rediscache.replicaEndpoint` | string | Replica endpoint for the redis cache that can be used for reads. |
| `--secrets.env-prefix` | string | Prefix for environment variables (default "FLYTE_SECRET_") |
| `--secrets.secrets-prefix` | string | Prefix where to look for secrets file (default "/etc/secrets") |
| `--secrets.type` | string | Sets the type of storage to configure [local]. (default "local") |
| `--server.dataProxy.download.maxExpiresIn` | string | Maximum allowed expiration duration. (default "1h0m0s") |
| `--server.dataProxy.upload.defaultFileNameLength` | int | Default length for the generated file name if not provided in the request. (default 20) |
| `--server.dataProxy.upload.maxExpiresIn` | string | Maximum allowed expiration duration. (default "1h0m0s") |
| `--server.dataProxy.upload.maxSize` | string | Maximum allowed upload size. (default "6Mi") |
| `--server.dataProxy.upload.storagePrefix` | string | Storage prefix to use for all upload requests. |
| `--server.grpc.enableGrpcLatencyMetrics` | | Enable grpc latency metrics. Note Histograms metrics can be expensive on Prometheus servers. |
| `--server.grpc.maxMessageSizeBytes` | int | The max size in bytes for incoming gRPC messages |
| `--server.grpc.port` | int | On which grpc port to serve admin (default 8089) |
| `--server.grpc.serverReflection` | | Enable GRPC Server Reflection (default true) |
| `--server.grpcPort` | int | deprecated |
| `--server.grpcServerReflection` | | deprecated |
| `--server.httpPort` | int | On which http port to serve admin (default 8088) |
| `--server.kube-config` | string | Path to kubernetes client config file, default is empty, useful for incluster config. |
| `--server.kubeClientConfig.burst` | int | Max burst rate for throttle. 0 defaults to 10 (default 25) |
| `--server.kubeClientConfig.qps` | int32 | Max QPS to the master for requests to KubeAPI. 0 defaults to 5. (default 100) |
| `--server.kubeClientConfig.timeout` | string | Max duration allowed for every request to KubeAPI before giving up. 0 implies no timeout. (default "30s") |
| `--server.master` | string | The address of the Kubernetes API server. |
| `--server.readHeaderTimeoutSeconds` | int | The amount of time allowed to read request headers. (default 32) |
| `--server.security.allowCors` | | (default true) |
| `--server.security.allowedHeaders` | strings | (default [Content-Type,flyte-authorization]) |
| `--server.security.allowedOrigins` | strings | (default [*]) |
| `--server.security.auditAccess` | | |
| `--server.security.secure` | | |
| `--server.security.ssl.certificateFile` | string | |
| `--server.security.ssl.keyFile` | string | |
| `--server.security.useAuth` | | |
| `--server.thirdPartyConfig.flyteClient.audience` | string | Audience to use when initiating OAuth2 authorization requests. |
| `--server.thirdPartyConfig.flyteClient.clientId` | string | public identifier for the app which handles authorization for a Flyte deployment |
| `--server.thirdPartyConfig.flyteClient.redirectUri` | string | This is the callback uri registered with the app which handles authorization for a Flyte deployment |
| `--server.thirdPartyConfig.flyteClient.scopes` | strings | Recommended scopes for the client to request. |
| `--server.watchService.maxActiveClusterConnections` | int | (default 5) |
| `--server.watchService.maxPageSize` | int | (default 50000) |
| `--server.watchService.nonTerminalStatusUpdatesInterval` | string | (default "1m0s") |
| `--server.watchService.pollInterval` | string | (default "1s") |
| `--sharedservice.connectPort` | string | On which connect port to serve admin (default "8080") |
| `--sharedservice.grpc.grpcMaxResponseStatusBytes` | int32 | specifies the maximum (uncompressed) size of header list that the client is prepared to accept on grpc calls (default 32000) |
| `--sharedservice.grpc.maxConcurrentStreams` | int | Limit on the number of concurrent streams to each ServerTransport. (default 100) |
| `--sharedservice.grpc.maxMessageSizeBytes` | int | Limit on the size of message that can be received on the server. (default 10485760) |
| `--sharedservice.grpcServerReflection` | | Enable GRPC Server Reflection (default true) |
| `--sharedservice.httpPort` | string | On which http port to serve admin (default "8089") |
| `--sharedservice.kubeConfig` | string | Path to kubernetes client config file. |
| `--sharedservice.master` | string | The address of the Kubernetes API server. |
| `--sharedservice.metrics.enableClientGrpcHistograms` | | Enable client grpc histograms (default true) |
| `--sharedservice.metrics.enableGrpcHistograms` | | Enable grpc histograms (default true) |
| `--sharedservice.metrics.scope` | string | Scope to emit metrics under (default "service:") |
| `--sharedservice.port` | string | On which grpc port to serve admin (default "8080") |
| `--sharedservice.profiler.enabled` | | Enable Profiler on server |
| `--sharedservice.profilerPort` | string | Profile port to start listen for pprof and metric handlers on. (default "10254") |
| `--sharedservice.security.allowCors` | | |
| `--sharedservice.security.allowLocalhostAccess` | | Whether to permit localhost unauthenticated access to the server |
| `--sharedservice.security.allowedHeaders` | strings | |
| `--sharedservice.security.allowedOrigins` | strings | |
| `--sharedservice.security.auditAccess` | | |
| `--sharedservice.security.orgOverride` | string | Override org in identity context if localhost access enabled |
| `--sharedservice.security.secure` | | |
| `--sharedservice.security.ssl.certificateAuthorityFile` | string | |
| `--sharedservice.security.ssl.certificateFile` | string | |
| `--sharedservice.security.ssl.keyFile` | string | |
| `--sharedservice.security.useAuth` | | |
| `--sharedservice.sync.syncInterval` | string | Time interval to sync (default "5m0s") |
| `--storage.cache.max_size_mbs` | int | Maximum size of the cache where the Blob store data is cached in-memory. If not specified or set to 0, cache is not used |
| `--storage.cache.target_gc_percent` | int | Sets the garbage collection target percentage. |
| `--storage.connection.access-key` | string | Access key to use. Only required when authtype is set to accesskey. |
| `--storage.connection.auth-type` | string | Auth Type to use [iam, accesskey]. (default "iam") |
| `--storage.connection.disable-ssl` | | Disables SSL connection. Should only be used for development. |
| `--storage.connection.endpoint` | string | URL for storage client to connect to. |
| `--storage.connection.region` | string | Region to connect to. (default "us-east-1") |
| `--storage.connection.secret-key` | string | Secret to use when accesskey is set. |
| `--storage.container` | string | Initial container (in s3 a bucket) to create -if it doesn't exist-.' |
| `--storage.defaultHttpClient.timeout` | string | Sets time out on the http client. (default "0s") |
| `--storage.enable-multicontainer` | | If this is true, then the container argument is overlooked and redundant. This config will automatically open new connections to new containers/buckets as they are encountered |
| `--storage.limits.maxDownloadMBs` | int | Maximum allowed download size (in MBs) per call. (default 2) |
| `--storage.stow.config` | stringToString | Configuration for stow backend. Refer to github/flyteorg/stow (default []) |
| `--storage.stow.kind` | string | Kind of Stow backend to use. Refer to github/flyteorg/stow |
| `--storage.type` | string | Sets the type of storage to configure [s3/minio/local/mem/stow]. (default "s3") |
| `--union.auth.authorizationMetadataKey` | string | Authorization Header to use when passing Access Tokens to the server (default "flyte-authorization") |
| `--union.auth.clientId` | string | Client ID |
| `--union.auth.clientSecretEnvVar` | string | Environment variable containing the client secret |
| `--union.auth.clientSecretLocation` | string | File containing the client secret |
| `--union.auth.deviceFlow.pollInterval` | string | amount of time the device flow would poll the token endpoint if auth server doesn't return a polling interval. Okta and google IDP do return an interval' (default "5s") |
| `--union.auth.deviceFlow.refreshTime` | string | grace period from the token expiry after which it would refresh the token. (default "5m0s") |
| `--union.auth.deviceFlow.timeout` | string | amount of time the device flow should complete or else it will be cancelled. (default "10m0s") |
| `--union.auth.enable` | | Whether to enable an authenticated conenction when communicating with admin. (default true) |
| `--union.auth.externalAuth.command` | strings | Command for external authentication token generation |
| `--union.auth.pkce.refreshTime` | string | grace period from the token expiry after which it would refresh the token. (default "5m0s") |
| `--union.auth.pkce.timeout` | string | Amount of time the browser session would be active for authentication from client app. (default "15s") |
| `--union.auth.scopes` | strings | List of scopes to request |
| `--union.auth.tokenRefreshWindow` | string | Max duration between token refresh attempt and token expiry. (default "1h0m0s") |
| `--union.auth.tokenUrl` | string | OPTIONAL: Your IdP's token endpoint. It'll be discovered from flyte admin's OAuth Metadata endpoint if not provided. |
| `--union.auth.type` | string | Type of OAuth2 flow used for communicating with admin. (default "Pkce") |
| `--union.cache.maxItemsCount` | int | Maximum number of items to keep in the cache before evicting. (default 1000) |
| `--union.connection.host` | string | Host to connect to (default "dns:///utt-mgdp-stg-us-east-2.cloud-staging.union.ai") |
| `--union.connection.insecure` | | Whether to connect over insecure channel |
| `--union.connection.insecureSkipVerify` | | InsecureSkipVerify controls whether a client verifies the server's certificate chain and host name.Caution: shouldn't be use for production usecases' |
| `--union.connection.keepAliveConfig.permitWithoutStream` | | If true, client sends keepalive pings even with no active RPCs. |
| `--union.connection.keepAliveConfig.time` | string | After a duration of this time if the client doesn't see any activity it pings the server to see if the transport is still alive. (default "20s") |
| `--union.connection.keepAliveConfig.timeout` | string | After having pinged for keepalive check, the client waits for a duration of Timeout and if no activity is seen even after that the connection is closed. (default "2m0s") |
| `--union.connection.maxBackoffDelay` | string | Max delay for grpc backoff (default "8s") |
| `--union.connection.maxRecvMsgSize` | int | Maximum size of a message in bytes of a gRPC message (default 10485760) |
| `--union.connection.maxRetries` | int | Max number of gRPC retries (default 4) |
| `--union.connection.minConnectTimeout` | string | Minimum timeout for establishing a connection (default "20s") |
| `--union.connection.perRetryTimeout` | string | gRPC per retry timeout (default "15s") |
| `--union.connection.serviceConfig` | string | Defines gRPC experimental JSON Service Config (default "{"loadBalancingConfig": [{"round_robin":{}}]}") |
| `--union.connection.trustedIdentityClaims.enabled` | | Enables passing of trusted claims while making inter service calls |
| `--union.connection.trustedIdentityClaims.externalIdentityClaim` | string | External identity claim of the service which is authorized to make internal service call. These are verified against userclouds actions |
| `--union.connection.trustedIdentityClaims.externalIdentityTypeClaim` | string | External identity type claim of app or user to use for the current service identity. It should be an 'app' for inter service communication |
| `--union.internalConnectionConfig.-` | stringToString | (default []) |
| `--union.internalConnectionConfig.enabled` | | Enables internal service to service communication instead of going through ingress. |
| `--union.internalConnectionConfig.urlPattern` | string | UrlPattern of the internal service endpoints. (default "{{ service }}-helmchart.{{ service }}.svc.cluster.local:80") |
| `--webhook.awsSecretManager.sidecarImage` | string | Specifies the sidecar docker image to use (default "docker.io/amazon/aws-secrets-manager-secret-sidecar:v0.1.4") |
| `--webhook.certDir` | string | Certificate directory to use to write generated certs. Defaults to /etc/webhook/certs/ (default "/etc/webhook/certs") |
| `--webhook.embeddedSecretManagerConfig.awsConfig.region` | string | AWS region |
| `--webhook.embeddedSecretManagerConfig.fileMountInitContainer.image` | string | Specifies init container image to use for mounting secrets as files. (default "busybox:1.28") |
| `--webhook.embeddedSecretManagerConfig.gcpConfig.project` | string | GCP project to be used for secret manager |
| `--webhook.embeddedSecretManagerConfig.type` | string | (default "AWS") |
| `--webhook.gcpSecretManager.sidecarImage` | string | Specifies the sidecar docker image to use (default "gcr.io/google.com/cloudsdktool/cloud-sdk:alpine") |
| `--webhook.listenPort` | int | The port to use to listen to webhook calls. Defaults to 9443 (default 9443) |
| `--webhook.localCert` | | write certs locally. Defaults to false |
| `--webhook.metrics-prefix` | string | An optional prefix for all published metrics. (default "flyte:") |
| `--webhook.secretName` | string | Secret name to write generated certs to. (default "flyte-pod-webhook") |
| `--webhook.serviceName` | string | The name of the webhook service. (default "flyte-pod-webhook") |
| `--webhook.servicePort` | int32 | The port on the service that hosting webhook. (default 443) |
| `--webhook.vaultSecretManager.role` | string | Specifies the vault role to use (default "flyte") |
=== PAGE: https://www.union.ai/docs/v1/serverless/api-reference/uctl-cli/uctl-delete/uctl-delete-policy ===
# uctl delete policy
Delete a policy
## Synopsis
Delete a policy
```shell
$ uctl delete policy [flags]
```
## Options
| Option | Type | Description |
|--------|------|-------------|
| `-h`, `--help` | help for policy |
| `--name` | string | Name of the policy to remove |
### Options inherited from parent commands
| Option | Type | Description |
|--------|------|-------------|
| `--admin.audience` | string | Audience to use when initiating OAuth2 authorization requests. |
| `--admin.authType` | string | Type of OAuth2 flow used for communicating with admin.ClientSecret, Pkce, ExternalCommand are valid values (default "ClientSecret") |
| `--admin.authorizationHeader` | string | Custom metadata header to pass JWT |
| `--admin.authorizationServerUrl` | string | This is the URL to your IdP's authorization server. It'll default to Endpoint |
| `--admin.caCertFilePath` | string | Use specified certificate file to verify the admin server peer. |
| `--admin.clientId` | string | Client ID (default "flytepropeller") |
| `--admin.clientSecretEnvVar` | string | Environment variable containing the client secret |
| `--admin.clientSecretLocation` | string | File containing the client secret (default "/etc/secrets/client_secret") |
| `--admin.command` | strings | Command for external authentication token generation |
| `--admin.defaultOrg` | string | OPTIONAL: Default org to use to support non-org based cli's.'. |
| `--admin.defaultServiceConfig` | string | |
| `--admin.deviceFlowConfig.pollInterval` | string | amount of time the device flow would poll the token endpoint if auth server doesn't return a polling interval. Okta and google IDP do return an interval' (default "5s") |
| `--admin.deviceFlowConfig.refreshTime` | string | grace period from the token expiry after which it would refresh the token. (default "5m0s") |
| `--admin.deviceFlowConfig.timeout` | string | amount of time the device flow should complete or else it will be cancelled. (default "10m0s") |
| `--admin.endpoint` | string | For admin types, specify where the uri of the service is located. |
| `--admin.httpProxyURL` | string | OPTIONAL: HTTP Proxy to be used for OAuth requests. |
| `--admin.insecure` | | Use insecure connection. |
| `--admin.insecureSkipVerify` | | InsecureSkipVerify controls whether a client verifies the server's certificate chain and host name.Caution: shouldn't be use for production usecases' |
| `--admin.maxBackoffDelay` | string | Max delay for grpc backoff (default "8s") |
| `--admin.maxMessageSizeBytes` | int | The max size in bytes for incoming gRPC messages |
| `--admin.maxRetries` | int | Max number of gRPC retries (default 4) |
| `--admin.perRetryTimeout` | string | gRPC per retry timeout (default "15s") |
| `--admin.pkceConfig.refreshTime` | string | grace period from the token expiry after which it would refresh the token. (default "5m0s") |
| `--admin.pkceConfig.timeout` | string | Amount of time the browser session would be active for authentication from client app. (default "2m0s") |
| `--admin.proxyCommand` | strings | Command for external proxy-authorization token generation |
| `--admin.scopes` | strings | List of scopes to request |
| `--admin.tokenRefreshWindow` | string | Max duration between token refresh attempt and token expiry. (default "0s") |
| `--admin.tokenUrl` | string | OPTIONAL: Your IdP's token endpoint. It'll be discovered from flyte admin's OAuth Metadata endpoint if not provided. |
| `--admin.useAudienceFromAdmin` | | Use Audience configured from admins public endpoint config. |
| `--admin.useAuth` | | Deprecated: Auth will be enabled/disabled based on admin's dynamically discovered information. |
| `--auth.appAuth.externalAuthServer.allowedAudience` | strings | Optional: A list of allowed audiences. If not provided, the audience is expected to be the public Uri of the service. |
| `--auth.appAuth.externalAuthServer.baseUrl` | string | This should be the base url of the authorization server that you are trying to hit. With Okta for instance, it will look something like https://company.okta.com/oauth2/abcdef123456789/ |
| `--auth.appAuth.externalAuthServer.httpProxyURL` | string | OPTIONAL: HTTP Proxy to be used for OAuth requests. |
| `--auth.appAuth.externalAuthServer.metadataUrl` | string | Optional: If the server doesn't support /.well-known/oauth-authorization-server, you can set a custom metadata url here.' |
| `--auth.appAuth.externalAuthServer.retryAttempts` | int | Optional: The number of attempted retries on a transient failure to get the OAuth metadata (default 5) |
| `--auth.appAuth.externalAuthServer.retryDelay` | string | Optional, Duration to wait between retries (default "1s") |
| `--auth.appAuth.selfAuthServer.accessTokenLifespan` | string | Defines the lifespan of issued access tokens. (default "30m0s") |
| `--auth.appAuth.selfAuthServer.authorizationCodeLifespan` | string | Defines the lifespan of issued access tokens. (default "5m0s") |
| `--auth.appAuth.selfAuthServer.claimSymmetricEncryptionKeySecretName` | string | OPTIONAL: Secret name to use to encrypt claims in authcode token. (default "claim_symmetric_key") |
| `--auth.appAuth.selfAuthServer.issuer` | string | Defines the issuer to use when issuing and validating tokens. The default value is https://{requestUri.HostAndPort}/ |
| `--auth.appAuth.selfAuthServer.oldTokenSigningRSAKeySecretName` | string | OPTIONAL: Secret name to use to retrieve Old RSA Signing Key. This can be useful during key rotation to continue to accept older tokens. (default "token_rsa_key_old.pem") |
| `--auth.appAuth.selfAuthServer.refreshTokenLifespan` | string | Defines the lifespan of issued access tokens. (default "1h0m0s") |
| `--auth.appAuth.selfAuthServer.tokenSigningRSAKeySecretName` | string | OPTIONAL: Secret name to use to retrieve RSA Signing Key. (default "token_rsa_key.pem") |
| `--auth.appAuth.thirdPartyConfig.flyteClient.audience` | string | Audience to use when initiating OAuth2 authorization requests. |
| `--auth.appAuth.thirdPartyConfig.flyteClient.clientId` | string | public identifier for the app which handles authorization for a Flyte deployment (default "uctl") |
| `--auth.appAuth.thirdPartyConfig.flyteClient.redirectUri` | string | This is the callback uri registered with the app which handles authorization for a Flyte deployment (default "http://localhost:53593/callback") |
| `--auth.appAuth.thirdPartyConfig.flyteClient.scopes` | strings | Recommended scopes for the client to request. (default [all,offline]) |
| `--auth.disableForGrpc` | | Disables auth enforcement on Grpc Endpoints. |
| `--auth.disableForHttp` | | Disables auth enforcement on HTTP Endpoints. |
| `--auth.grpcAuthorizationHeader` | string | (default "flyte-authorization") |
| `--auth.httpAuthorizationHeader` | string | (default "flyte-authorization") |
| `--auth.httpProxyURL` | string | OPTIONAL: HTTP Proxy to be used for OAuth requests. |
| `--auth.tokenEndpointProxyPath` | string | The path used to proxy calls to the TokenURL |
| `--auth.userAuth.cookieBlockKeySecretName` | string | OPTIONAL: Secret name to use for cookie block key. (default "cookie_block_key") |
| `--auth.userAuth.cookieHashKeySecretName` | string | OPTIONAL: Secret name to use for cookie hash key. (default "cookie_hash_key") |
| `--auth.userAuth.cookieSetting.domain` | string | OPTIONAL: Allows you to set the domain attribute on the auth cookies. |
| `--auth.userAuth.cookieSetting.sameSitePolicy` | string | OPTIONAL: Allows you to declare if your cookie should be restricted to a first-party or same-site context.Wrapper around http.SameSite. (default "DefaultMode") |
| `--auth.userAuth.httpProxyURL` | string | OPTIONAL: HTTP Proxy to be used for OAuth requests. |
| `--auth.userAuth.idpQueryParameter` | string | idp query parameter used for selecting a particular IDP for doing user authentication. Eg: for Okta passing idp={IDP-ID} forces the authentication to happen with IDP-ID |
| `--auth.userAuth.openId.baseUrl` | string | |
| `--auth.userAuth.openId.clientId` | string | |
| `--auth.userAuth.openId.clientSecretFile` | string | |
| `--auth.userAuth.openId.clientSecretName` | string | (default "oidc_client_secret") |
| `--auth.userAuth.openId.scopes` | strings | (default [openid,profile]) |
| `--auth.userAuth.redirectUrl` | string | (default "/console") |
| `--authorizer.internalCommunicationConfig.enabled` | | Enables authorization decisions for internal communication. (default true) |
| `--authorizer.internalCommunicationConfig.ingressIdentity` | string | IngressIdentity used in the cluster. Needed to exclude the communication coming from ingress. (default "ingress-nginx.ingress-nginx.serviceaccount.identity.linkerd.cluster.local") |
| `--authorizer.internalCommunicationConfig.tenantUrlPatternIdentity` | string | UrlPatternIdentity of the internal tenant service endpoint identities. (default "{{ service }}.{{ org }}.serviceaccount.identity.linkerd.cluster.local") |
| `--authorizer.internalCommunicationConfig.urlPatternIdentity` | string | UrlPatternIdentity of the internal service endpoint identities. (default "{{ service }}-helmchart.{{ service }}.serviceaccount.identity.linkerd.cluster.local") |
| `--authorizer.mode` | string | (default "Active") |
| `--authorizer.organizationConfig.PolicyConfig.adminPolicyDescription` | string | description for the boilerplate admin policy (default "Contributor permissions and full admin permissions to manage users and view usage dashboards") |
| `--authorizer.organizationConfig.PolicyConfig.contributorPolicyDescription` | string | description for the boilerplate contributor policy (default "Viewer permissions and permissions to create workflows, tasks, launch plans, and executions") |
| `--authorizer.organizationConfig.PolicyConfig.defaultUserPolicyRoleType` | string | name of the role type to determine which default policy new users added to the organization should be assigned (default "Viewer") |
| `--authorizer.organizationConfig.PolicyConfig.serverlessContributorPolicyDescription` | string | description for the boilerplate serverless contributor policy (default "Viewer permissions and permissions to create workflows, tasks, launch plans, and executions") |
| `--authorizer.organizationConfig.PolicyConfig.serverlessViewerPolicyDescription` | string | description for the boilerplate serverless viewer policy (default "Permissions to view Flyte entities") |
| `--authorizer.organizationConfig.PolicyConfig.viewerPolicyDescription` | string | description for the boilerplate viewer policy (default "Permissions to view Flyte entities") |
| `--authorizer.organizationConfig.defaultPolicyCacheDuration` | string | Cache entry duration for the store of the default policy per organization (default "10m0s") |
| `--authorizer.syncRuleRefreshInterval` | string | (default "1m0s") |
| `--authorizer.type` | string | (default "UserClouds") |
| `--authorizer.userCloudsClient.cache.redis.ttl.edgeTypes` | string | Specifies how long edge types remain in the cache.. (default "30m0s") |
| `--authorizer.userCloudsClient.cache.redis.ttl.edges` | string | Specifies how long edges remain in the cache. (default "30m0s") |
| `--authorizer.userCloudsClient.cache.redis.ttl.objectTypes` | string | Specifies how long object types remain in the cache. (default "30m0s") |
| `--authorizer.userCloudsClient.cache.redis.ttl.objects` | string | Specifies how long objects remain in the cache. (default "30m0s") |
| `--authorizer.userCloudsClient.cache.type` | string | Cache type to use. (default "none") |
| `--authorizer.userCloudsClient.clientID` | string | UserClouds client id |
| `--authorizer.userCloudsClient.clientSecretName` | string | UserCloud client secret name to read from the secret manager. (default "userclouds-client-secret") |
| `--authorizer.userCloudsClient.enableLogging` | | Enable userclouds client's internal logging. Calls to post logs take 250-350 ms and will impact p99 latency, enable with caution. |
| `--authorizer.userCloudsClient.tenantID` | string | UserClouds tenant id. Should be a UUID. |
| `--authorizer.userCloudsClient.tenantUrl` | string | Something like https://{yourtenant}.tenant.userclouds.com |
| `--config` | string | config file (default is /Users/andrew/.union/config.yaml) |
| `--connection.environment` | string | |
| `--connection.region` | string | |
| `--connection.rootTenantURLPattern` | string | Pattern for tenant url. (default "dns:///{{ organization }}.cloud-staging.union.ai") |
| `--console.endpoint` | string | Endpoint of console, if different than flyte admin |
| `--database.connMaxLifeTime` | string | sets the maximum amount of time a connection may be reused (default "1h0m0s") |
| `--database.enableForeignKeyConstraintWhenMigrating` | | Whether to enable gorm foreign keys when migrating the db |
| `--database.maxIdleConnections` | int | maxIdleConnections sets the maximum number of connections in the idle connection pool. (default 10) |
| `--database.maxOpenConnections` | int | maxOpenConnections sets the maximum number of open connections to the database. (default 100) |
| `--database.postgres.dbname` | string | The database name (default "postgres") |
| `--database.postgres.debug` | | |
| `--database.postgres.host` | string | The host name of the database server (default "localhost") |
| `--database.postgres.options` | string | See http://gorm.io/docs/connecting_to_the_database.html for available options passed, in addition to the above. (default "sslmode=disable") |
| `--database.postgres.password` | string | The database password. (default "postgres") |
| `--database.postgres.passwordPath` | string | Points to the file containing the database password. |
| `--database.postgres.port` | int | The port name of the database server (default 30001) |
| `--database.postgres.readReplicaHost` | string | The host name of the read replica database server (default "localhost") |
| `--database.postgres.username` | string | The database user who is connecting to the server. (default "postgres") |
| `--database.sqlite.file` | string | The path to the file (existing or new) where the DB should be created / stored. If existing, then this will be re-used, else a new will be created |
| `--db.connectionPool.maxConnectionLifetime` | string | (default "0s") |
| `--db.connectionPool.maxIdleConnections` | int | |
| `--db.connectionPool.maxOpenConnections` | int | |
| `--db.dbname` | string | (default "postgres") |
| `--db.debug` | | |
| `--db.host` | string | (default "postgres") |
| `--db.log_level` | int | (default 4) |
| `--db.options` | string | (default "sslmode=disable") |
| `--db.password` | string | |
| `--db.passwordPath` | string | |
| `--db.port` | int | (default 5432) |
| `--db.username` | string | (default "postgres") |
| `-d`, `--domain` | string | Specifies the Flyte project's domain. |
| `--files.archive` | | Pass in archive file either an http link or local path. |
| `--files.assumableIamRole` | string | Custom assumable iam auth role to register launch plans with. |
| `--files.continueOnError` | | Continue on error when registering files. |
| `--files.destinationDirectory` | string | Location of source code in container. |
| `--files.dryRun` | | Execute command without making any modifications. |
| `--files.enableSchedule` | | Enable the schedule if the files contain schedulable launchplan. |
| `--files.force` | | Force use of version number on entities registered with flyte. |
| `--files.k8ServiceAccount` | string | Deprecated. Please use `--K8sServiceAccount`|
| `--files.k8sServiceAccount` | string | Custom kubernetes service account auth role to register launch plans with. |
| `--files.outputLocationPrefix` | string | Custom output location prefix for offloaded types (files/schemas). |
| `--files.sourceUploadPath` | string | Deprecated: Update flyte admin to avoid having to configure storage access from uctl. |
| `--files.version` | string | Version of the entity to be registered with flyte which are un-versioned after serialization. |
| `--logger.formatter.type` | string | Sets logging format type. (default "json") |
| `--logger.level` | int | Sets the minimum logging level. (default 3) |
| `--logger.mute` | | Mutes all logs regardless of severity. Intended for benchmarks/tests only. |
| `--logger.show-source` | | Includes source code location in logs. |
| `--org` | string | Organization to work on. If not set, default to user's org. |
| `--otel.file.filename` | string | Filename to store exported telemetry traces (default "/tmp/trace.txt") |
| `--otel.jaeger.endpoint` | string | Endpoint for the jaeger telemetry trace ingestor (default "http://localhost:14268/api/traces") |
| `--otel.otlpgrpc.endpoint` | string | Endpoint for the OTLP telemetry trace collector (default "http://localhost:4317") |
| `--otel.otlphttp.endpoint` | string | Endpoint for the OTLP telemetry trace collector (default "http://localhost:4318/v1/traces") |
| `--otel.sampler.parentSampler` | string | Sets the parent sampler to use for the tracer (default "always") |
| `--otel.type` | string | Sets the type of exporter to configure [noop/file/jaeger/otlpgrpc/otlphttp]. (default "noop") |
| `-o`, `--output` | string | Specifies the output type - supported formats [TABLE JSON YAML DOT DOTURL]. NOTE: dot, doturl are only supported for Workflow (default "table") |
| `--plugins.catalogcache.reader.maxItems` | int | Maximum number of entries to keep in the index. (default 10000) |
| `--plugins.catalogcache.reader.maxRetries` | int | Maximum number of retries per item. (default 3) |
| `--plugins.catalogcache.reader.workers` | int | Number of concurrent workers to start processing the queue. (default 10) |
| `--plugins.catalogcache.writer.maxItems` | int | Maximum number of entries to keep in the index. (default 10000) |
| `--plugins.catalogcache.writer.maxRetries` | int | Maximum number of retries per item. (default 3) |
| `--plugins.catalogcache.writer.workers` | int | Number of concurrent workers to start processing the queue. (default 10) |
| `-p`, `--project` | string | Specifies the Flyte project. |
| `--rediscache.passwordSecretName` | string | Name of secret with Redis password. |
| `--rediscache.primaryEndpoint` | string | Primary endpoint for the redis cache that can be used for both reads and writes. |
| `--rediscache.replicaEndpoint` | string | Replica endpoint for the redis cache that can be used for reads. |
| `--secrets.env-prefix` | string | Prefix for environment variables (default "FLYTE_SECRET_") |
| `--secrets.secrets-prefix` | string | Prefix where to look for secrets file (default "/etc/secrets") |
| `--secrets.type` | string | Sets the type of storage to configure [local]. (default "local") |
| `--server.dataProxy.download.maxExpiresIn` | string | Maximum allowed expiration duration. (default "1h0m0s") |
| `--server.dataProxy.upload.defaultFileNameLength` | int | Default length for the generated file name if not provided in the request. (default 20) |
| `--server.dataProxy.upload.maxExpiresIn` | string | Maximum allowed expiration duration. (default "1h0m0s") |
| `--server.dataProxy.upload.maxSize` | string | Maximum allowed upload size. (default "6Mi") |
| `--server.dataProxy.upload.storagePrefix` | string | Storage prefix to use for all upload requests. |
| `--server.grpc.enableGrpcLatencyMetrics` | | Enable grpc latency metrics. Note Histograms metrics can be expensive on Prometheus servers. |
| `--server.grpc.maxMessageSizeBytes` | int | The max size in bytes for incoming gRPC messages |
| `--server.grpc.port` | int | On which grpc port to serve admin (default 8089) |
| `--server.grpc.serverReflection` | | Enable GRPC Server Reflection (default true) |
| `--server.grpcPort` | int | deprecated |
| `--server.grpcServerReflection` | | deprecated |
| `--server.httpPort` | int | On which http port to serve admin (default 8088) |
| `--server.kube-config` | string | Path to kubernetes client config file, default is empty, useful for incluster config. |
| `--server.kubeClientConfig.burst` | int | Max burst rate for throttle. 0 defaults to 10 (default 25) |
| `--server.kubeClientConfig.qps` | int32 | Max QPS to the master for requests to KubeAPI. 0 defaults to 5. (default 100) |
| `--server.kubeClientConfig.timeout` | string | Max duration allowed for every request to KubeAPI before giving up. 0 implies no timeout. (default "30s") |
| `--server.master` | string | The address of the Kubernetes API server. |
| `--server.readHeaderTimeoutSeconds` | int | The amount of time allowed to read request headers. (default 32) |
| `--server.security.allowCors` | | (default true) |
| `--server.security.allowedHeaders` | strings | (default [Content-Type,flyte-authorization]) |
| `--server.security.allowedOrigins` | strings | (default [*]) |
| `--server.security.auditAccess` | | |
| `--server.security.secure` | | |
| `--server.security.ssl.certificateFile` | string | |
| `--server.security.ssl.keyFile` | string | |
| `--server.security.useAuth` | | |
| `--server.thirdPartyConfig.flyteClient.audience` | string | Audience to use when initiating OAuth2 authorization requests. |
| `--server.thirdPartyConfig.flyteClient.clientId` | string | public identifier for the app which handles authorization for a Flyte deployment |
| `--server.thirdPartyConfig.flyteClient.redirectUri` | string | This is the callback uri registered with the app which handles authorization for a Flyte deployment |
| `--server.thirdPartyConfig.flyteClient.scopes` | strings | Recommended scopes for the client to request. |
| `--server.watchService.maxActiveClusterConnections` | int | (default 5) |
| `--server.watchService.maxPageSize` | int | (default 50000) |
| `--server.watchService.nonTerminalStatusUpdatesInterval` | string | (default "1m0s") |
| `--server.watchService.pollInterval` | string | (default "1s") |
| `--sharedservice.connectPort` | string | On which connect port to serve admin (default "8080") |
| `--sharedservice.grpc.grpcMaxResponseStatusBytes` | int32 | specifies the maximum (uncompressed) size of header list that the client is prepared to accept on grpc calls (default 32000) |
| `--sharedservice.grpc.maxConcurrentStreams` | int | Limit on the number of concurrent streams to each ServerTransport. (default 100) |
| `--sharedservice.grpc.maxMessageSizeBytes` | int | Limit on the size of message that can be received on the server. (default 10485760) |
| `--sharedservice.grpcServerReflection` | | Enable GRPC Server Reflection (default true) |
| `--sharedservice.httpPort` | string | On which http port to serve admin (default "8089") |
| `--sharedservice.kubeConfig` | string | Path to kubernetes client config file. |
| `--sharedservice.master` | string | The address of the Kubernetes API server. |
| `--sharedservice.metrics.enableClientGrpcHistograms` | | Enable client grpc histograms (default true) |
| `--sharedservice.metrics.enableGrpcHistograms` | | Enable grpc histograms (default true) |
| `--sharedservice.metrics.scope` | string | Scope to emit metrics under (default "service:") |
| `--sharedservice.port` | string | On which grpc port to serve admin (default "8080") |
| `--sharedservice.profiler.enabled` | | Enable Profiler on server |
| `--sharedservice.profilerPort` | string | Profile port to start listen for pprof and metric handlers on. (default "10254") |
| `--sharedservice.security.allowCors` | | |
| `--sharedservice.security.allowLocalhostAccess` | | Whether to permit localhost unauthenticated access to the server |
| `--sharedservice.security.allowedHeaders` | strings | |
| `--sharedservice.security.allowedOrigins` | strings | |
| `--sharedservice.security.auditAccess` | | |
| `--sharedservice.security.orgOverride` | string | Override org in identity context if localhost access enabled |
| `--sharedservice.security.secure` | | |
| `--sharedservice.security.ssl.certificateAuthorityFile` | string | |
| `--sharedservice.security.ssl.certificateFile` | string | |
| `--sharedservice.security.ssl.keyFile` | string | |
| `--sharedservice.security.useAuth` | | |
| `--sharedservice.sync.syncInterval` | string | Time interval to sync (default "5m0s") |
| `--storage.cache.max_size_mbs` | int | Maximum size of the cache where the Blob store data is cached in-memory. If not specified or set to 0, cache is not used |
| `--storage.cache.target_gc_percent` | int | Sets the garbage collection target percentage. |
| `--storage.connection.access-key` | string | Access key to use. Only required when authtype is set to accesskey. |
| `--storage.connection.auth-type` | string | Auth Type to use [iam, accesskey]. (default "iam") |
| `--storage.connection.disable-ssl` | | Disables SSL connection. Should only be used for development. |
| `--storage.connection.endpoint` | string | URL for storage client to connect to. |
| `--storage.connection.region` | string | Region to connect to. (default "us-east-1") |
| `--storage.connection.secret-key` | string | Secret to use when accesskey is set. |
| `--storage.container` | string | Initial container (in s3 a bucket) to create -if it doesn't exist-.' |
| `--storage.defaultHttpClient.timeout` | string | Sets time out on the http client. (default "0s") |
| `--storage.enable-multicontainer` | | If this is true, then the container argument is overlooked and redundant. This config will automatically open new connections to new containers/buckets as they are encountered |
| `--storage.limits.maxDownloadMBs` | int | Maximum allowed download size (in MBs) per call. (default 2) |
| `--storage.stow.config` | stringToString | Configuration for stow backend. Refer to github/flyteorg/stow (default []) |
| `--storage.stow.kind` | string | Kind of Stow backend to use. Refer to github/flyteorg/stow |
| `--storage.type` | string | Sets the type of storage to configure [s3/minio/local/mem/stow]. (default "s3") |
| `--union.auth.authorizationMetadataKey` | string | Authorization Header to use when passing Access Tokens to the server (default "flyte-authorization") |
| `--union.auth.clientId` | string | Client ID |
| `--union.auth.clientSecretEnvVar` | string | Environment variable containing the client secret |
| `--union.auth.clientSecretLocation` | string | File containing the client secret |
| `--union.auth.deviceFlow.pollInterval` | string | amount of time the device flow would poll the token endpoint if auth server doesn't return a polling interval. Okta and google IDP do return an interval' (default "5s") |
| `--union.auth.deviceFlow.refreshTime` | string | grace period from the token expiry after which it would refresh the token. (default "5m0s") |
| `--union.auth.deviceFlow.timeout` | string | amount of time the device flow should complete or else it will be cancelled. (default "10m0s") |
| `--union.auth.enable` | | Whether to enable an authenticated conenction when communicating with admin. (default true) |
| `--union.auth.externalAuth.command` | strings | Command for external authentication token generation |
| `--union.auth.pkce.refreshTime` | string | grace period from the token expiry after which it would refresh the token. (default "5m0s") |
| `--union.auth.pkce.timeout` | string | Amount of time the browser session would be active for authentication from client app. (default "15s") |
| `--union.auth.scopes` | strings | List of scopes to request |
| `--union.auth.tokenRefreshWindow` | string | Max duration between token refresh attempt and token expiry. (default "1h0m0s") |
| `--union.auth.tokenUrl` | string | OPTIONAL: Your IdP's token endpoint. It'll be discovered from flyte admin's OAuth Metadata endpoint if not provided. |
| `--union.auth.type` | string | Type of OAuth2 flow used for communicating with admin. (default "Pkce") |
| `--union.cache.maxItemsCount` | int | Maximum number of items to keep in the cache before evicting. (default 1000) |
| `--union.connection.host` | string | Host to connect to (default "dns:///utt-mgdp-stg-us-east-2.cloud-staging.union.ai") |
| `--union.connection.insecure` | | Whether to connect over insecure channel |
| `--union.connection.insecureSkipVerify` | | InsecureSkipVerify controls whether a client verifies the server's certificate chain and host name.Caution: shouldn't be use for production usecases' |
| `--union.connection.keepAliveConfig.permitWithoutStream` | | If true, client sends keepalive pings even with no active RPCs. |
| `--union.connection.keepAliveConfig.time` | string | After a duration of this time if the client doesn't see any activity it pings the server to see if the transport is still alive. (default "20s") |
| `--union.connection.keepAliveConfig.timeout` | string | After having pinged for keepalive check, the client waits for a duration of Timeout and if no activity is seen even after that the connection is closed. (default "2m0s") |
| `--union.connection.maxBackoffDelay` | string | Max delay for grpc backoff (default "8s") |
| `--union.connection.maxRecvMsgSize` | int | Maximum size of a message in bytes of a gRPC message (default 10485760) |
| `--union.connection.maxRetries` | int | Max number of gRPC retries (default 4) |
| `--union.connection.minConnectTimeout` | string | Minimum timeout for establishing a connection (default "20s") |
| `--union.connection.perRetryTimeout` | string | gRPC per retry timeout (default "15s") |
| `--union.connection.serviceConfig` | string | Defines gRPC experimental JSON Service Config (default "{"loadBalancingConfig": [{"round_robin":{}}]}") |
| `--union.connection.trustedIdentityClaims.enabled` | | Enables passing of trusted claims while making inter service calls |
| `--union.connection.trustedIdentityClaims.externalIdentityClaim` | string | External identity claim of the service which is authorized to make internal service call. These are verified against userclouds actions |
| `--union.connection.trustedIdentityClaims.externalIdentityTypeClaim` | string | External identity type claim of app or user to use for the current service identity. It should be an 'app' for inter service communication |
| `--union.internalConnectionConfig.-` | stringToString | (default []) |
| `--union.internalConnectionConfig.enabled` | | Enables internal service to service communication instead of going through ingress. |
| `--union.internalConnectionConfig.urlPattern` | string | UrlPattern of the internal service endpoints. (default "{{ service }}-helmchart.{{ service }}.svc.cluster.local:80") |
| `--webhook.awsSecretManager.sidecarImage` | string | Specifies the sidecar docker image to use (default "docker.io/amazon/aws-secrets-manager-secret-sidecar:v0.1.4") |
| `--webhook.certDir` | string | Certificate directory to use to write generated certs. Defaults to /etc/webhook/certs/ (default "/etc/webhook/certs") |
| `--webhook.embeddedSecretManagerConfig.awsConfig.region` | string | AWS region |
| `--webhook.embeddedSecretManagerConfig.fileMountInitContainer.image` | string | Specifies init container image to use for mounting secrets as files. (default "busybox:1.28") |
| `--webhook.embeddedSecretManagerConfig.gcpConfig.project` | string | GCP project to be used for secret manager |
| `--webhook.embeddedSecretManagerConfig.type` | string | (default "AWS") |
| `--webhook.gcpSecretManager.sidecarImage` | string | Specifies the sidecar docker image to use (default "gcr.io/google.com/cloudsdktool/cloud-sdk:alpine") |
| `--webhook.listenPort` | int | The port to use to listen to webhook calls. Defaults to 9443 (default 9443) |
| `--webhook.localCert` | | write certs locally. Defaults to false |
| `--webhook.metrics-prefix` | string | An optional prefix for all published metrics. (default "flyte:") |
| `--webhook.secretName` | string | Secret name to write generated certs to. (default "flyte-pod-webhook") |
| `--webhook.serviceName` | string | The name of the webhook service. (default "flyte-pod-webhook") |
| `--webhook.servicePort` | int32 | The port on the service that hosting webhook. (default 443) |
| `--webhook.vaultSecretManager.role` | string | Specifies the vault role to use (default "flyte") |
=== PAGE: https://www.union.ai/docs/v1/serverless/api-reference/uctl-cli/uctl-delete/uctl-delete-role ===
# uctl delete role
Delete a role
## Synopsis
Delete a role
```shell
$ uctl delete role [flags]
```
## Options
| Option | Type | Description |
|--------|------|-------------|
| `-h`, `--help` | help for role |
| `--name` | string | Name of the role to remove |
### Options inherited from parent commands
| Option | Type | Description |
|--------|------|-------------|
| `--admin.audience` | string | Audience to use when initiating OAuth2 authorization requests. |
| `--admin.authType` | string | Type of OAuth2 flow used for communicating with admin.ClientSecret, Pkce, ExternalCommand are valid values (default "ClientSecret") |
| `--admin.authorizationHeader` | string | Custom metadata header to pass JWT |
| `--admin.authorizationServerUrl` | string | This is the URL to your IdP's authorization server. It'll default to Endpoint |
| `--admin.caCertFilePath` | string | Use specified certificate file to verify the admin server peer. |
| `--admin.clientId` | string | Client ID (default "flytepropeller") |
| `--admin.clientSecretEnvVar` | string | Environment variable containing the client secret |
| `--admin.clientSecretLocation` | string | File containing the client secret (default "/etc/secrets/client_secret") |
| `--admin.command` | strings | Command for external authentication token generation |
| `--admin.defaultOrg` | string | OPTIONAL: Default org to use to support non-org based cli's.'. |
| `--admin.defaultServiceConfig` | string | |
| `--admin.deviceFlowConfig.pollInterval` | string | amount of time the device flow would poll the token endpoint if auth server doesn't return a polling interval. Okta and google IDP do return an interval' (default "5s") |
| `--admin.deviceFlowConfig.refreshTime` | string | grace period from the token expiry after which it would refresh the token. (default "5m0s") |
| `--admin.deviceFlowConfig.timeout` | string | amount of time the device flow should complete or else it will be cancelled. (default "10m0s") |
| `--admin.endpoint` | string | For admin types, specify where the uri of the service is located. |
| `--admin.httpProxyURL` | string | OPTIONAL: HTTP Proxy to be used for OAuth requests. |
| `--admin.insecure` | | Use insecure connection. |
| `--admin.insecureSkipVerify` | | InsecureSkipVerify controls whether a client verifies the server's certificate chain and host name.Caution: shouldn't be use for production usecases' |
| `--admin.maxBackoffDelay` | string | Max delay for grpc backoff (default "8s") |
| `--admin.maxMessageSizeBytes` | int | The max size in bytes for incoming gRPC messages |
| `--admin.maxRetries` | int | Max number of gRPC retries (default 4) |
| `--admin.perRetryTimeout` | string | gRPC per retry timeout (default "15s") |
| `--admin.pkceConfig.refreshTime` | string | grace period from the token expiry after which it would refresh the token. (default "5m0s") |
| `--admin.pkceConfig.timeout` | string | Amount of time the browser session would be active for authentication from client app. (default "2m0s") |
| `--admin.proxyCommand` | strings | Command for external proxy-authorization token generation |
| `--admin.scopes` | strings | List of scopes to request |
| `--admin.tokenRefreshWindow` | string | Max duration between token refresh attempt and token expiry. (default "0s") |
| `--admin.tokenUrl` | string | OPTIONAL: Your IdP's token endpoint. It'll be discovered from flyte admin's OAuth Metadata endpoint if not provided. |
| `--admin.useAudienceFromAdmin` | | Use Audience configured from admins public endpoint config. |
| `--admin.useAuth` | | Deprecated: Auth will be enabled/disabled based on admin's dynamically discovered information. |
| `--auth.appAuth.externalAuthServer.allowedAudience` | strings | Optional: A list of allowed audiences. If not provided, the audience is expected to be the public Uri of the service. |
| `--auth.appAuth.externalAuthServer.baseUrl` | string | This should be the base url of the authorization server that you are trying to hit. With Okta for instance, it will look something like https://company.okta.com/oauth2/abcdef123456789/ |
| `--auth.appAuth.externalAuthServer.httpProxyURL` | string | OPTIONAL: HTTP Proxy to be used for OAuth requests. |
| `--auth.appAuth.externalAuthServer.metadataUrl` | string | Optional: If the server doesn't support /.well-known/oauth-authorization-server, you can set a custom metadata url here.' |
| `--auth.appAuth.externalAuthServer.retryAttempts` | int | Optional: The number of attempted retries on a transient failure to get the OAuth metadata (default 5) |
| `--auth.appAuth.externalAuthServer.retryDelay` | string | Optional, Duration to wait between retries (default "1s") |
| `--auth.appAuth.selfAuthServer.accessTokenLifespan` | string | Defines the lifespan of issued access tokens. (default "30m0s") |
| `--auth.appAuth.selfAuthServer.authorizationCodeLifespan` | string | Defines the lifespan of issued access tokens. (default "5m0s") |
| `--auth.appAuth.selfAuthServer.claimSymmetricEncryptionKeySecretName` | string | OPTIONAL: Secret name to use to encrypt claims in authcode token. (default "claim_symmetric_key") |
| `--auth.appAuth.selfAuthServer.issuer` | string | Defines the issuer to use when issuing and validating tokens. The default value is https://{requestUri.HostAndPort}/ |
| `--auth.appAuth.selfAuthServer.oldTokenSigningRSAKeySecretName` | string | OPTIONAL: Secret name to use to retrieve Old RSA Signing Key. This can be useful during key rotation to continue to accept older tokens. (default "token_rsa_key_old.pem") |
| `--auth.appAuth.selfAuthServer.refreshTokenLifespan` | string | Defines the lifespan of issued access tokens. (default "1h0m0s") |
| `--auth.appAuth.selfAuthServer.tokenSigningRSAKeySecretName` | string | OPTIONAL: Secret name to use to retrieve RSA Signing Key. (default "token_rsa_key.pem") |
| `--auth.appAuth.thirdPartyConfig.flyteClient.audience` | string | Audience to use when initiating OAuth2 authorization requests. |
| `--auth.appAuth.thirdPartyConfig.flyteClient.clientId` | string | public identifier for the app which handles authorization for a Flyte deployment (default "uctl") |
| `--auth.appAuth.thirdPartyConfig.flyteClient.redirectUri` | string | This is the callback uri registered with the app which handles authorization for a Flyte deployment (default "http://localhost:53593/callback") |
| `--auth.appAuth.thirdPartyConfig.flyteClient.scopes` | strings | Recommended scopes for the client to request. (default [all,offline]) |
| `--auth.disableForGrpc` | | Disables auth enforcement on Grpc Endpoints. |
| `--auth.disableForHttp` | | Disables auth enforcement on HTTP Endpoints. |
| `--auth.grpcAuthorizationHeader` | string | (default "flyte-authorization") |
| `--auth.httpAuthorizationHeader` | string | (default "flyte-authorization") |
| `--auth.httpProxyURL` | string | OPTIONAL: HTTP Proxy to be used for OAuth requests. |
| `--auth.tokenEndpointProxyPath` | string | The path used to proxy calls to the TokenURL |
| `--auth.userAuth.cookieBlockKeySecretName` | string | OPTIONAL: Secret name to use for cookie block key. (default "cookie_block_key") |
| `--auth.userAuth.cookieHashKeySecretName` | string | OPTIONAL: Secret name to use for cookie hash key. (default "cookie_hash_key") |
| `--auth.userAuth.cookieSetting.domain` | string | OPTIONAL: Allows you to set the domain attribute on the auth cookies. |
| `--auth.userAuth.cookieSetting.sameSitePolicy` | string | OPTIONAL: Allows you to declare if your cookie should be restricted to a first-party or same-site context.Wrapper around http.SameSite. (default "DefaultMode") |
| `--auth.userAuth.httpProxyURL` | string | OPTIONAL: HTTP Proxy to be used for OAuth requests. |
| `--auth.userAuth.idpQueryParameter` | string | idp query parameter used for selecting a particular IDP for doing user authentication. Eg: for Okta passing idp={IDP-ID} forces the authentication to happen with IDP-ID |
| `--auth.userAuth.openId.baseUrl` | string | |
| `--auth.userAuth.openId.clientId` | string | |
| `--auth.userAuth.openId.clientSecretFile` | string | |
| `--auth.userAuth.openId.clientSecretName` | string | (default "oidc_client_secret") |
| `--auth.userAuth.openId.scopes` | strings | (default [openid,profile]) |
| `--auth.userAuth.redirectUrl` | string | (default "/console") |
| `--authorizer.internalCommunicationConfig.enabled` | | Enables authorization decisions for internal communication. (default true) |
| `--authorizer.internalCommunicationConfig.ingressIdentity` | string | IngressIdentity used in the cluster. Needed to exclude the communication coming from ingress. (default "ingress-nginx.ingress-nginx.serviceaccount.identity.linkerd.cluster.local") |
| `--authorizer.internalCommunicationConfig.tenantUrlPatternIdentity` | string | UrlPatternIdentity of the internal tenant service endpoint identities. (default "{{ service }}.{{ org }}.serviceaccount.identity.linkerd.cluster.local") |
| `--authorizer.internalCommunicationConfig.urlPatternIdentity` | string | UrlPatternIdentity of the internal service endpoint identities. (default "{{ service }}-helmchart.{{ service }}.serviceaccount.identity.linkerd.cluster.local") |
| `--authorizer.mode` | string | (default "Active") |
| `--authorizer.organizationConfig.PolicyConfig.adminPolicyDescription` | string | description for the boilerplate admin policy (default "Contributor permissions and full admin permissions to manage users and view usage dashboards") |
| `--authorizer.organizationConfig.PolicyConfig.contributorPolicyDescription` | string | description for the boilerplate contributor policy (default "Viewer permissions and permissions to create workflows, tasks, launch plans, and executions") |
| `--authorizer.organizationConfig.PolicyConfig.defaultUserPolicyRoleType` | string | name of the role type to determine which default policy new users added to the organization should be assigned (default "Viewer") |
| `--authorizer.organizationConfig.PolicyConfig.serverlessContributorPolicyDescription` | string | description for the boilerplate serverless contributor policy (default "Viewer permissions and permissions to create workflows, tasks, launch plans, and executions") |
| `--authorizer.organizationConfig.PolicyConfig.serverlessViewerPolicyDescription` | string | description for the boilerplate serverless viewer policy (default "Permissions to view Flyte entities") |
| `--authorizer.organizationConfig.PolicyConfig.viewerPolicyDescription` | string | description for the boilerplate viewer policy (default "Permissions to view Flyte entities") |
| `--authorizer.organizationConfig.defaultPolicyCacheDuration` | string | Cache entry duration for the store of the default policy per organization (default "10m0s") |
| `--authorizer.syncRuleRefreshInterval` | string | (default "1m0s") |
| `--authorizer.type` | string | (default "UserClouds") |
| `--authorizer.userCloudsClient.cache.redis.ttl.edgeTypes` | string | Specifies how long edge types remain in the cache.. (default "30m0s") |
| `--authorizer.userCloudsClient.cache.redis.ttl.edges` | string | Specifies how long edges remain in the cache. (default "30m0s") |
| `--authorizer.userCloudsClient.cache.redis.ttl.objectTypes` | string | Specifies how long object types remain in the cache. (default "30m0s") |
| `--authorizer.userCloudsClient.cache.redis.ttl.objects` | string | Specifies how long objects remain in the cache. (default "30m0s") |
| `--authorizer.userCloudsClient.cache.type` | string | Cache type to use. (default "none") |
| `--authorizer.userCloudsClient.clientID` | string | UserClouds client id |
| `--authorizer.userCloudsClient.clientSecretName` | string | UserCloud client secret name to read from the secret manager. (default "userclouds-client-secret") |
| `--authorizer.userCloudsClient.enableLogging` | | Enable userclouds client's internal logging. Calls to post logs take 250-350 ms and will impact p99 latency, enable with caution. |
| `--authorizer.userCloudsClient.tenantID` | string | UserClouds tenant id. Should be a UUID. |
| `--authorizer.userCloudsClient.tenantUrl` | string | Something like https://{yourtenant}.tenant.userclouds.com |
| `--config` | string | config file (default is /Users/andrew/.union/config.yaml) |
| `--connection.environment` | string | |
| `--connection.region` | string | |
| `--connection.rootTenantURLPattern` | string | Pattern for tenant url. (default "dns:///{{ organization }}.cloud-staging.union.ai") |
| `--console.endpoint` | string | Endpoint of console, if different than flyte admin |
| `--database.connMaxLifeTime` | string | sets the maximum amount of time a connection may be reused (default "1h0m0s") |
| `--database.enableForeignKeyConstraintWhenMigrating` | | Whether to enable gorm foreign keys when migrating the db |
| `--database.maxIdleConnections` | int | maxIdleConnections sets the maximum number of connections in the idle connection pool. (default 10) |
| `--database.maxOpenConnections` | int | maxOpenConnections sets the maximum number of open connections to the database. (default 100) |
| `--database.postgres.dbname` | string | The database name (default "postgres") |
| `--database.postgres.debug` | | |
| `--database.postgres.host` | string | The host name of the database server (default "localhost") |
| `--database.postgres.options` | string | See http://gorm.io/docs/connecting_to_the_database.html for available options passed, in addition to the above. (default "sslmode=disable") |
| `--database.postgres.password` | string | The database password. (default "postgres") |
| `--database.postgres.passwordPath` | string | Points to the file containing the database password. |
| `--database.postgres.port` | int | The port name of the database server (default 30001) |
| `--database.postgres.readReplicaHost` | string | The host name of the read replica database server (default "localhost") |
| `--database.postgres.username` | string | The database user who is connecting to the server. (default "postgres") |
| `--database.sqlite.file` | string | The path to the file (existing or new) where the DB should be created / stored. If existing, then this will be re-used, else a new will be created |
| `--db.connectionPool.maxConnectionLifetime` | string | (default "0s") |
| `--db.connectionPool.maxIdleConnections` | int | |
| `--db.connectionPool.maxOpenConnections` | int | |
| `--db.dbname` | string | (default "postgres") |
| `--db.debug` | | |
| `--db.host` | string | (default "postgres") |
| `--db.log_level` | int | (default 4) |
| `--db.options` | string | (default "sslmode=disable") |
| `--db.password` | string | |
| `--db.passwordPath` | string | |
| `--db.port` | int | (default 5432) |
| `--db.username` | string | (default "postgres") |
| `-d`, `--domain` | string | Specifies the Flyte project's domain. |
| `--files.archive` | | Pass in archive file either an http link or local path. |
| `--files.assumableIamRole` | string | Custom assumable iam auth role to register launch plans with. |
| `--files.continueOnError` | | Continue on error when registering files. |
| `--files.destinationDirectory` | string | Location of source code in container. |
| `--files.dryRun` | | Execute command without making any modifications. |
| `--files.enableSchedule` | | Enable the schedule if the files contain schedulable launchplan. |
| `--files.force` | | Force use of version number on entities registered with flyte. |
| `--files.k8ServiceAccount` | string | Deprecated. Please use `--K8sServiceAccount`|
| `--files.k8sServiceAccount` | string | Custom kubernetes service account auth role to register launch plans with. |
| `--files.outputLocationPrefix` | string | Custom output location prefix for offloaded types (files/schemas). |
| `--files.sourceUploadPath` | string | Deprecated: Update flyte admin to avoid having to configure storage access from uctl. |
| `--files.version` | string | Version of the entity to be registered with flyte which are un-versioned after serialization. |
| `--logger.formatter.type` | string | Sets logging format type. (default "json") |
| `--logger.level` | int | Sets the minimum logging level. (default 3) |
| `--logger.mute` | | Mutes all logs regardless of severity. Intended for benchmarks/tests only. |
| `--logger.show-source` | | Includes source code location in logs. |
| `--org` | string | Organization to work on. If not set, default to user's org. |
| `--otel.file.filename` | string | Filename to store exported telemetry traces (default "/tmp/trace.txt") |
| `--otel.jaeger.endpoint` | string | Endpoint for the jaeger telemetry trace ingestor (default "http://localhost:14268/api/traces") |
| `--otel.otlpgrpc.endpoint` | string | Endpoint for the OTLP telemetry trace collector (default "http://localhost:4317") |
| `--otel.otlphttp.endpoint` | string | Endpoint for the OTLP telemetry trace collector (default "http://localhost:4318/v1/traces") |
| `--otel.sampler.parentSampler` | string | Sets the parent sampler to use for the tracer (default "always") |
| `--otel.type` | string | Sets the type of exporter to configure [noop/file/jaeger/otlpgrpc/otlphttp]. (default "noop") |
| `-o`, `--output` | string | Specifies the output type - supported formats [TABLE JSON YAML DOT DOTURL]. NOTE: dot, doturl are only supported for Workflow (default "table") |
| `--plugins.catalogcache.reader.maxItems` | int | Maximum number of entries to keep in the index. (default 10000) |
| `--plugins.catalogcache.reader.maxRetries` | int | Maximum number of retries per item. (default 3) |
| `--plugins.catalogcache.reader.workers` | int | Number of concurrent workers to start processing the queue. (default 10) |
| `--plugins.catalogcache.writer.maxItems` | int | Maximum number of entries to keep in the index. (default 10000) |
| `--plugins.catalogcache.writer.maxRetries` | int | Maximum number of retries per item. (default 3) |
| `--plugins.catalogcache.writer.workers` | int | Number of concurrent workers to start processing the queue. (default 10) |
| `-p`, `--project` | string | Specifies the Flyte project. |
| `--rediscache.passwordSecretName` | string | Name of secret with Redis password. |
| `--rediscache.primaryEndpoint` | string | Primary endpoint for the redis cache that can be used for both reads and writes. |
| `--rediscache.replicaEndpoint` | string | Replica endpoint for the redis cache that can be used for reads. |
| `--secrets.env-prefix` | string | Prefix for environment variables (default "FLYTE_SECRET_") |
| `--secrets.secrets-prefix` | string | Prefix where to look for secrets file (default "/etc/secrets") |
| `--secrets.type` | string | Sets the type of storage to configure [local]. (default "local") |
| `--server.dataProxy.download.maxExpiresIn` | string | Maximum allowed expiration duration. (default "1h0m0s") |
| `--server.dataProxy.upload.defaultFileNameLength` | int | Default length for the generated file name if not provided in the request. (default 20) |
| `--server.dataProxy.upload.maxExpiresIn` | string | Maximum allowed expiration duration. (default "1h0m0s") |
| `--server.dataProxy.upload.maxSize` | string | Maximum allowed upload size. (default "6Mi") |
| `--server.dataProxy.upload.storagePrefix` | string | Storage prefix to use for all upload requests. |
| `--server.grpc.enableGrpcLatencyMetrics` | | Enable grpc latency metrics. Note Histograms metrics can be expensive on Prometheus servers. |
| `--server.grpc.maxMessageSizeBytes` | int | The max size in bytes for incoming gRPC messages |
| `--server.grpc.port` | int | On which grpc port to serve admin (default 8089) |
| `--server.grpc.serverReflection` | | Enable GRPC Server Reflection (default true) |
| `--server.grpcPort` | int | deprecated |
| `--server.grpcServerReflection` | | deprecated |
| `--server.httpPort` | int | On which http port to serve admin (default 8088) |
| `--server.kube-config` | string | Path to kubernetes client config file, default is empty, useful for incluster config. |
| `--server.kubeClientConfig.burst` | int | Max burst rate for throttle. 0 defaults to 10 (default 25) |
| `--server.kubeClientConfig.qps` | int32 | Max QPS to the master for requests to KubeAPI. 0 defaults to 5. (default 100) |
| `--server.kubeClientConfig.timeout` | string | Max duration allowed for every request to KubeAPI before giving up. 0 implies no timeout. (default "30s") |
| `--server.master` | string | The address of the Kubernetes API server. |
| `--server.readHeaderTimeoutSeconds` | int | The amount of time allowed to read request headers. (default 32) |
| `--server.security.allowCors` | | (default true) |
| `--server.security.allowedHeaders` | strings | (default [Content-Type,flyte-authorization]) |
| `--server.security.allowedOrigins` | strings | (default [*]) |
| `--server.security.auditAccess` | | |
| `--server.security.secure` | | |
| `--server.security.ssl.certificateFile` | string | |
| `--server.security.ssl.keyFile` | string | |
| `--server.security.useAuth` | | |
| `--server.thirdPartyConfig.flyteClient.audience` | string | Audience to use when initiating OAuth2 authorization requests. |
| `--server.thirdPartyConfig.flyteClient.clientId` | string | public identifier for the app which handles authorization for a Flyte deployment |
| `--server.thirdPartyConfig.flyteClient.redirectUri` | string | This is the callback uri registered with the app which handles authorization for a Flyte deployment |
| `--server.thirdPartyConfig.flyteClient.scopes` | strings | Recommended scopes for the client to request. |
| `--server.watchService.maxActiveClusterConnections` | int | (default 5) |
| `--server.watchService.maxPageSize` | int | (default 50000) |
| `--server.watchService.nonTerminalStatusUpdatesInterval` | string | (default "1m0s") |
| `--server.watchService.pollInterval` | string | (default "1s") |
| `--sharedservice.connectPort` | string | On which connect port to serve admin (default "8080") |
| `--sharedservice.grpc.grpcMaxResponseStatusBytes` | int32 | specifies the maximum (uncompressed) size of header list that the client is prepared to accept on grpc calls (default 32000) |
| `--sharedservice.grpc.maxConcurrentStreams` | int | Limit on the number of concurrent streams to each ServerTransport. (default 100) |
| `--sharedservice.grpc.maxMessageSizeBytes` | int | Limit on the size of message that can be received on the server. (default 10485760) |
| `--sharedservice.grpcServerReflection` | | Enable GRPC Server Reflection (default true) |
| `--sharedservice.httpPort` | string | On which http port to serve admin (default "8089") |
| `--sharedservice.kubeConfig` | string | Path to kubernetes client config file. |
| `--sharedservice.master` | string | The address of the Kubernetes API server. |
| `--sharedservice.metrics.enableClientGrpcHistograms` | | Enable client grpc histograms (default true) |
| `--sharedservice.metrics.enableGrpcHistograms` | | Enable grpc histograms (default true) |
| `--sharedservice.metrics.scope` | string | Scope to emit metrics under (default "service:") |
| `--sharedservice.port` | string | On which grpc port to serve admin (default "8080") |
| `--sharedservice.profiler.enabled` | | Enable Profiler on server |
| `--sharedservice.profilerPort` | string | Profile port to start listen for pprof and metric handlers on. (default "10254") |
| `--sharedservice.security.allowCors` | | |
| `--sharedservice.security.allowLocalhostAccess` | | Whether to permit localhost unauthenticated access to the server |
| `--sharedservice.security.allowedHeaders` | strings | |
| `--sharedservice.security.allowedOrigins` | strings | |
| `--sharedservice.security.auditAccess` | | |
| `--sharedservice.security.orgOverride` | string | Override org in identity context if localhost access enabled |
| `--sharedservice.security.secure` | | |
| `--sharedservice.security.ssl.certificateAuthorityFile` | string | |
| `--sharedservice.security.ssl.certificateFile` | string | |
| `--sharedservice.security.ssl.keyFile` | string | |
| `--sharedservice.security.useAuth` | | |
| `--sharedservice.sync.syncInterval` | string | Time interval to sync (default "5m0s") |
| `--storage.cache.max_size_mbs` | int | Maximum size of the cache where the Blob store data is cached in-memory. If not specified or set to 0, cache is not used |
| `--storage.cache.target_gc_percent` | int | Sets the garbage collection target percentage. |
| `--storage.connection.access-key` | string | Access key to use. Only required when authtype is set to accesskey. |
| `--storage.connection.auth-type` | string | Auth Type to use [iam, accesskey]. (default "iam") |
| `--storage.connection.disable-ssl` | | Disables SSL connection. Should only be used for development. |
| `--storage.connection.endpoint` | string | URL for storage client to connect to. |
| `--storage.connection.region` | string | Region to connect to. (default "us-east-1") |
| `--storage.connection.secret-key` | string | Secret to use when accesskey is set. |
| `--storage.container` | string | Initial container (in s3 a bucket) to create -if it doesn't exist-.' |
| `--storage.defaultHttpClient.timeout` | string | Sets time out on the http client. (default "0s") |
| `--storage.enable-multicontainer` | | If this is true, then the container argument is overlooked and redundant. This config will automatically open new connections to new containers/buckets as they are encountered |
| `--storage.limits.maxDownloadMBs` | int | Maximum allowed download size (in MBs) per call. (default 2) |
| `--storage.stow.config` | stringToString | Configuration for stow backend. Refer to github/flyteorg/stow (default []) |
| `--storage.stow.kind` | string | Kind of Stow backend to use. Refer to github/flyteorg/stow |
| `--storage.type` | string | Sets the type of storage to configure [s3/minio/local/mem/stow]. (default "s3") |
| `--union.auth.authorizationMetadataKey` | string | Authorization Header to use when passing Access Tokens to the server (default "flyte-authorization") |
| `--union.auth.clientId` | string | Client ID |
| `--union.auth.clientSecretEnvVar` | string | Environment variable containing the client secret |
| `--union.auth.clientSecretLocation` | string | File containing the client secret |
| `--union.auth.deviceFlow.pollInterval` | string | amount of time the device flow would poll the token endpoint if auth server doesn't return a polling interval. Okta and google IDP do return an interval' (default "5s") |
| `--union.auth.deviceFlow.refreshTime` | string | grace period from the token expiry after which it would refresh the token. (default "5m0s") |
| `--union.auth.deviceFlow.timeout` | string | amount of time the device flow should complete or else it will be cancelled. (default "10m0s") |
| `--union.auth.enable` | | Whether to enable an authenticated conenction when communicating with admin. (default true) |
| `--union.auth.externalAuth.command` | strings | Command for external authentication token generation |
| `--union.auth.pkce.refreshTime` | string | grace period from the token expiry after which it would refresh the token. (default "5m0s") |
| `--union.auth.pkce.timeout` | string | Amount of time the browser session would be active for authentication from client app. (default "15s") |
| `--union.auth.scopes` | strings | List of scopes to request |
| `--union.auth.tokenRefreshWindow` | string | Max duration between token refresh attempt and token expiry. (default "1h0m0s") |
| `--union.auth.tokenUrl` | string | OPTIONAL: Your IdP's token endpoint. It'll be discovered from flyte admin's OAuth Metadata endpoint if not provided. |
| `--union.auth.type` | string | Type of OAuth2 flow used for communicating with admin. (default "Pkce") |
| `--union.cache.maxItemsCount` | int | Maximum number of items to keep in the cache before evicting. (default 1000) |
| `--union.connection.host` | string | Host to connect to (default "dns:///utt-mgdp-stg-us-east-2.cloud-staging.union.ai") |
| `--union.connection.insecure` | | Whether to connect over insecure channel |
| `--union.connection.insecureSkipVerify` | | InsecureSkipVerify controls whether a client verifies the server's certificate chain and host name.Caution: shouldn't be use for production usecases' |
| `--union.connection.keepAliveConfig.permitWithoutStream` | | If true, client sends keepalive pings even with no active RPCs. |
| `--union.connection.keepAliveConfig.time` | string | After a duration of this time if the client doesn't see any activity it pings the server to see if the transport is still alive. (default "20s") |
| `--union.connection.keepAliveConfig.timeout` | string | After having pinged for keepalive check, the client waits for a duration of Timeout and if no activity is seen even after that the connection is closed. (default "2m0s") |
| `--union.connection.maxBackoffDelay` | string | Max delay for grpc backoff (default "8s") |
| `--union.connection.maxRecvMsgSize` | int | Maximum size of a message in bytes of a gRPC message (default 10485760) |
| `--union.connection.maxRetries` | int | Max number of gRPC retries (default 4) |
| `--union.connection.minConnectTimeout` | string | Minimum timeout for establishing a connection (default "20s") |
| `--union.connection.perRetryTimeout` | string | gRPC per retry timeout (default "15s") |
| `--union.connection.serviceConfig` | string | Defines gRPC experimental JSON Service Config (default "{"loadBalancingConfig": [{"round_robin":{}}]}") |
| `--union.connection.trustedIdentityClaims.enabled` | | Enables passing of trusted claims while making inter service calls |
| `--union.connection.trustedIdentityClaims.externalIdentityClaim` | string | External identity claim of the service which is authorized to make internal service call. These are verified against userclouds actions |
| `--union.connection.trustedIdentityClaims.externalIdentityTypeClaim` | string | External identity type claim of app or user to use for the current service identity. It should be an 'app' for inter service communication |
| `--union.internalConnectionConfig.-` | stringToString | (default []) |
| `--union.internalConnectionConfig.enabled` | | Enables internal service to service communication instead of going through ingress. |
| `--union.internalConnectionConfig.urlPattern` | string | UrlPattern of the internal service endpoints. (default "{{ service }}-helmchart.{{ service }}.svc.cluster.local:80") |
| `--webhook.awsSecretManager.sidecarImage` | string | Specifies the sidecar docker image to use (default "docker.io/amazon/aws-secrets-manager-secret-sidecar:v0.1.4") |
| `--webhook.certDir` | string | Certificate directory to use to write generated certs. Defaults to /etc/webhook/certs/ (default "/etc/webhook/certs") |
| `--webhook.embeddedSecretManagerConfig.awsConfig.region` | string | AWS region |
| `--webhook.embeddedSecretManagerConfig.fileMountInitContainer.image` | string | Specifies init container image to use for mounting secrets as files. (default "busybox:1.28") |
| `--webhook.embeddedSecretManagerConfig.gcpConfig.project` | string | GCP project to be used for secret manager |
| `--webhook.embeddedSecretManagerConfig.type` | string | (default "AWS") |
| `--webhook.gcpSecretManager.sidecarImage` | string | Specifies the sidecar docker image to use (default "gcr.io/google.com/cloudsdktool/cloud-sdk:alpine") |
| `--webhook.listenPort` | int | The port to use to listen to webhook calls. Defaults to 9443 (default 9443) |
| `--webhook.localCert` | | write certs locally. Defaults to false |
| `--webhook.metrics-prefix` | string | An optional prefix for all published metrics. (default "flyte:") |
| `--webhook.secretName` | string | Secret name to write generated certs to. (default "flyte-pod-webhook") |
| `--webhook.serviceName` | string | The name of the webhook service. (default "flyte-pod-webhook") |
| `--webhook.servicePort` | int32 | The port on the service that hosting webhook. (default 443) |
| `--webhook.vaultSecretManager.role` | string | Specifies the vault role to use (default "flyte") |
=== PAGE: https://www.union.ai/docs/v1/serverless/api-reference/uctl-cli/uctl-delete/uctl-delete-task-resource-attribute ===
# uctl delete task-resource-attribute
Deletes matchable resources of task attributes.
## Synopsis
Delete task resource attributes for the given project and domain, in
combination with the workflow name.
For project flytesnacks and development domain, run:
```shell
$ uctl delete task-resource-attribute -p flytesnacks -d development
```
To delete task resource attribute using the config file which was used
to create it, run:
```shell
$ uctl delete task-resource-attribute --attrFile tra.yaml
```
For example, here's the config file tra.yaml:
``` yaml
domain: development
project: flytesnacks
defaults:
cpu: "1"
memory: "150Mi"
limits:
cpu: "2"
memory: "450Mi"
```
The defaults/limits are optional in the file as they are unread during
the delete command, but can be retained since the same file can be used
for `get`, `update` and `delete` commands.
To delete task resource attribute for the workflow
`core.control_flow.merge_sort.merge_sort`, run the following command:
```shell
$ uctl delete task-resource-attribute -p flytesnacks -d development core.control_flow.merge_sort.merge_sort
```
Usage:
```shell
$ uctl delete task-resource-attribute [flags]
```
## Options
| Option | Type | Description |
|--------|------|-------------|
| `--attrFile` | string | attribute file name to be used for delete attribute for the resource type. |
| `--dryRun` | | execute command without making any modifications. |
| `-h`, `--help` | help for task-resource-attribute |
### Options inherited from parent commands
| Option | Type | Description |
|--------|------|-------------|
| `--admin.audience` | string | Audience to use when initiating OAuth2 authorization requests. |
| `--admin.authType` | string | Type of OAuth2 flow used for communicating with admin.ClientSecret, Pkce, ExternalCommand are valid values (default "ClientSecret") |
| `--admin.authorizationHeader` | string | Custom metadata header to pass JWT |
| `--admin.authorizationServerUrl` | string | This is the URL to your IdP's authorization server. It'll default to Endpoint |
| `--admin.caCertFilePath` | string | Use specified certificate file to verify the admin server peer. |
| `--admin.clientId` | string | Client ID (default "flytepropeller") |
| `--admin.clientSecretEnvVar` | string | Environment variable containing the client secret |
| `--admin.clientSecretLocation` | string | File containing the client secret (default "/etc/secrets/client_secret") |
| `--admin.command` | strings | Command for external authentication token generation |
| `--admin.defaultOrg` | string | OPTIONAL: Default org to use to support non-org based cli's.'. |
| `--admin.defaultServiceConfig` | string | |
| `--admin.deviceFlowConfig.pollInterval` | string | amount of time the device flow would poll the token endpoint if auth server doesn't return a polling interval. Okta and google IDP do return an interval' (default "5s") |
| `--admin.deviceFlowConfig.refreshTime` | string | grace period from the token expiry after which it would refresh the token. (default "5m0s") |
| `--admin.deviceFlowConfig.timeout` | string | amount of time the device flow should complete or else it will be cancelled. (default "10m0s") |
| `--admin.endpoint` | string | For admin types, specify where the uri of the service is located. |
| `--admin.httpProxyURL` | string | OPTIONAL: HTTP Proxy to be used for OAuth requests. |
| `--admin.insecure` | | Use insecure connection. |
| `--admin.insecureSkipVerify` | | InsecureSkipVerify controls whether a client verifies the server's certificate chain and host name.Caution: shouldn't be use for production usecases' |
| `--admin.maxBackoffDelay` | string | Max delay for grpc backoff (default "8s") |
| `--admin.maxMessageSizeBytes` | int | The max size in bytes for incoming gRPC messages |
| `--admin.maxRetries` | int | Max number of gRPC retries (default 4) |
| `--admin.perRetryTimeout` | string | gRPC per retry timeout (default "15s") |
| `--admin.pkceConfig.refreshTime` | string | grace period from the token expiry after which it would refresh the token. (default "5m0s") |
| `--admin.pkceConfig.timeout` | string | Amount of time the browser session would be active for authentication from client app. (default "2m0s") |
| `--admin.proxyCommand` | strings | Command for external proxy-authorization token generation |
| `--admin.scopes` | strings | List of scopes to request |
| `--admin.tokenRefreshWindow` | string | Max duration between token refresh attempt and token expiry. (default "0s") |
| `--admin.tokenUrl` | string | OPTIONAL: Your IdP's token endpoint. It'll be discovered from flyte admin's OAuth Metadata endpoint if not provided. |
| `--admin.useAudienceFromAdmin` | | Use Audience configured from admins public endpoint config. |
| `--admin.useAuth` | | Deprecated: Auth will be enabled/disabled based on admin's dynamically discovered information. |
| `--auth.appAuth.externalAuthServer.allowedAudience` | strings | Optional: A list of allowed audiences. If not provided, the audience is expected to be the public Uri of the service. |
| `--auth.appAuth.externalAuthServer.baseUrl` | string | This should be the base url of the authorization server that you are trying to hit. With Okta for instance, it will look something like https://company.okta.com/oauth2/abcdef123456789/ |
| `--auth.appAuth.externalAuthServer.httpProxyURL` | string | OPTIONAL: HTTP Proxy to be used for OAuth requests. |
| `--auth.appAuth.externalAuthServer.metadataUrl` | string | Optional: If the server doesn't support /.well-known/oauth-authorization-server, you can set a custom metadata url here.' |
| `--auth.appAuth.externalAuthServer.retryAttempts` | int | Optional: The number of attempted retries on a transient failure to get the OAuth metadata (default 5) |
| `--auth.appAuth.externalAuthServer.retryDelay` | string | Optional, Duration to wait between retries (default "1s") |
| `--auth.appAuth.selfAuthServer.accessTokenLifespan` | string | Defines the lifespan of issued access tokens. (default "30m0s") |
| `--auth.appAuth.selfAuthServer.authorizationCodeLifespan` | string | Defines the lifespan of issued access tokens. (default "5m0s") |
| `--auth.appAuth.selfAuthServer.claimSymmetricEncryptionKeySecretName` | string | OPTIONAL: Secret name to use to encrypt claims in authcode token. (default "claim_symmetric_key") |
| `--auth.appAuth.selfAuthServer.issuer` | string | Defines the issuer to use when issuing and validating tokens. The default value is https://{requestUri.HostAndPort}/ |
| `--auth.appAuth.selfAuthServer.oldTokenSigningRSAKeySecretName` | string | OPTIONAL: Secret name to use to retrieve Old RSA Signing Key. This can be useful during key rotation to continue to accept older tokens. (default "token_rsa_key_old.pem") |
| `--auth.appAuth.selfAuthServer.refreshTokenLifespan` | string | Defines the lifespan of issued access tokens. (default "1h0m0s") |
| `--auth.appAuth.selfAuthServer.tokenSigningRSAKeySecretName` | string | OPTIONAL: Secret name to use to retrieve RSA Signing Key. (default "token_rsa_key.pem") |
| `--auth.appAuth.thirdPartyConfig.flyteClient.audience` | string | Audience to use when initiating OAuth2 authorization requests. |
| `--auth.appAuth.thirdPartyConfig.flyteClient.clientId` | string | public identifier for the app which handles authorization for a Flyte deployment (default "uctl") |
| `--auth.appAuth.thirdPartyConfig.flyteClient.redirectUri` | string | This is the callback uri registered with the app which handles authorization for a Flyte deployment (default "http://localhost:53593/callback") |
| `--auth.appAuth.thirdPartyConfig.flyteClient.scopes` | strings | Recommended scopes for the client to request. (default [all,offline]) |
| `--auth.disableForGrpc` | | Disables auth enforcement on Grpc Endpoints. |
| `--auth.disableForHttp` | | Disables auth enforcement on HTTP Endpoints. |
| `--auth.grpcAuthorizationHeader` | string | (default "flyte-authorization") |
| `--auth.httpAuthorizationHeader` | string | (default "flyte-authorization") |
| `--auth.httpProxyURL` | string | OPTIONAL: HTTP Proxy to be used for OAuth requests. |
| `--auth.tokenEndpointProxyPath` | string | The path used to proxy calls to the TokenURL |
| `--auth.userAuth.cookieBlockKeySecretName` | string | OPTIONAL: Secret name to use for cookie block key. (default "cookie_block_key") |
| `--auth.userAuth.cookieHashKeySecretName` | string | OPTIONAL: Secret name to use for cookie hash key. (default "cookie_hash_key") |
| `--auth.userAuth.cookieSetting.domain` | string | OPTIONAL: Allows you to set the domain attribute on the auth cookies. |
| `--auth.userAuth.cookieSetting.sameSitePolicy` | string | OPTIONAL: Allows you to declare if your cookie should be restricted to a first-party or same-site context.Wrapper around http.SameSite. (default "DefaultMode") |
| `--auth.userAuth.httpProxyURL` | string | OPTIONAL: HTTP Proxy to be used for OAuth requests. |
| `--auth.userAuth.idpQueryParameter` | string | idp query parameter used for selecting a particular IDP for doing user authentication. Eg: for Okta passing idp={IDP-ID} forces the authentication to happen with IDP-ID |
| `--auth.userAuth.openId.baseUrl` | string | |
| `--auth.userAuth.openId.clientId` | string | |
| `--auth.userAuth.openId.clientSecretFile` | string | |
| `--auth.userAuth.openId.clientSecretName` | string | (default "oidc_client_secret") |
| `--auth.userAuth.openId.scopes` | strings | (default [openid,profile]) |
| `--auth.userAuth.redirectUrl` | string | (default "/console") |
| `--authorizer.internalCommunicationConfig.enabled` | | Enables authorization decisions for internal communication. (default true) |
| `--authorizer.internalCommunicationConfig.ingressIdentity` | string | IngressIdentity used in the cluster. Needed to exclude the communication coming from ingress. (default "ingress-nginx.ingress-nginx.serviceaccount.identity.linkerd.cluster.local") |
| `--authorizer.internalCommunicationConfig.tenantUrlPatternIdentity` | string | UrlPatternIdentity of the internal tenant service endpoint identities. (default "{{ service }}.{{ org }}.serviceaccount.identity.linkerd.cluster.local") |
| `--authorizer.internalCommunicationConfig.urlPatternIdentity` | string | UrlPatternIdentity of the internal service endpoint identities. (default "{{ service }}-helmchart.{{ service }}.serviceaccount.identity.linkerd.cluster.local") |
| `--authorizer.mode` | string | (default "Active") |
| `--authorizer.organizationConfig.PolicyConfig.adminPolicyDescription` | string | description for the boilerplate admin policy (default "Contributor permissions and full admin permissions to manage users and view usage dashboards") |
| `--authorizer.organizationConfig.PolicyConfig.contributorPolicyDescription` | string | description for the boilerplate contributor policy (default "Viewer permissions and permissions to create workflows, tasks, launch plans, and executions") |
| `--authorizer.organizationConfig.PolicyConfig.defaultUserPolicyRoleType` | string | name of the role type to determine which default policy new users added to the organization should be assigned (default "Viewer") |
| `--authorizer.organizationConfig.PolicyConfig.serverlessContributorPolicyDescription` | string | description for the boilerplate serverless contributor policy (default "Viewer permissions and permissions to create workflows, tasks, launch plans, and executions") |
| `--authorizer.organizationConfig.PolicyConfig.serverlessViewerPolicyDescription` | string | description for the boilerplate serverless viewer policy (default "Permissions to view Flyte entities") |
| `--authorizer.organizationConfig.PolicyConfig.viewerPolicyDescription` | string | description for the boilerplate viewer policy (default "Permissions to view Flyte entities") |
| `--authorizer.organizationConfig.defaultPolicyCacheDuration` | string | Cache entry duration for the store of the default policy per organization (default "10m0s") |
| `--authorizer.syncRuleRefreshInterval` | string | (default "1m0s") |
| `--authorizer.type` | string | (default "UserClouds") |
| `--authorizer.userCloudsClient.cache.redis.ttl.edgeTypes` | string | Specifies how long edge types remain in the cache.. (default "30m0s") |
| `--authorizer.userCloudsClient.cache.redis.ttl.edges` | string | Specifies how long edges remain in the cache. (default "30m0s") |
| `--authorizer.userCloudsClient.cache.redis.ttl.objectTypes` | string | Specifies how long object types remain in the cache. (default "30m0s") |
| `--authorizer.userCloudsClient.cache.redis.ttl.objects` | string | Specifies how long objects remain in the cache. (default "30m0s") |
| `--authorizer.userCloudsClient.cache.type` | string | Cache type to use. (default "none") |
| `--authorizer.userCloudsClient.clientID` | string | UserClouds client id |
| `--authorizer.userCloudsClient.clientSecretName` | string | UserCloud client secret name to read from the secret manager. (default "userclouds-client-secret") |
| `--authorizer.userCloudsClient.enableLogging` | | Enable userclouds client's internal logging. Calls to post logs take 250-350 ms and will impact p99 latency, enable with caution. |
| `--authorizer.userCloudsClient.tenantID` | string | UserClouds tenant id. Should be a UUID. |
| `--authorizer.userCloudsClient.tenantUrl` | string | Something like https://{yourtenant}.tenant.userclouds.com |
| `--config` | string | config file (default is /Users/andrew/.union/config.yaml) |
| `--connection.environment` | string | |
| `--connection.region` | string | |
| `--connection.rootTenantURLPattern` | string | Pattern for tenant url. (default "dns:///{{ organization }}.cloud-staging.union.ai") |
| `--console.endpoint` | string | Endpoint of console, if different than flyte admin |
| `--database.connMaxLifeTime` | string | sets the maximum amount of time a connection may be reused (default "1h0m0s") |
| `--database.enableForeignKeyConstraintWhenMigrating` | | Whether to enable gorm foreign keys when migrating the db |
| `--database.maxIdleConnections` | int | maxIdleConnections sets the maximum number of connections in the idle connection pool. (default 10) |
| `--database.maxOpenConnections` | int | maxOpenConnections sets the maximum number of open connections to the database. (default 100) |
| `--database.postgres.dbname` | string | The database name (default "postgres") |
| `--database.postgres.debug` | | |
| `--database.postgres.host` | string | The host name of the database server (default "localhost") |
| `--database.postgres.options` | string | See http://gorm.io/docs/connecting_to_the_database.html for available options passed, in addition to the above. (default "sslmode=disable") |
| `--database.postgres.password` | string | The database password. (default "postgres") |
| `--database.postgres.passwordPath` | string | Points to the file containing the database password. |
| `--database.postgres.port` | int | The port name of the database server (default 30001) |
| `--database.postgres.readReplicaHost` | string | The host name of the read replica database server (default "localhost") |
| `--database.postgres.username` | string | The database user who is connecting to the server. (default "postgres") |
| `--database.sqlite.file` | string | The path to the file (existing or new) where the DB should be created / stored. If existing, then this will be re-used, else a new will be created |
| `--db.connectionPool.maxConnectionLifetime` | string | (default "0s") |
| `--db.connectionPool.maxIdleConnections` | int | |
| `--db.connectionPool.maxOpenConnections` | int | |
| `--db.dbname` | string | (default "postgres") |
| `--db.debug` | | |
| `--db.host` | string | (default "postgres") |
| `--db.log_level` | int | (default 4) |
| `--db.options` | string | (default "sslmode=disable") |
| `--db.password` | string | |
| `--db.passwordPath` | string | |
| `--db.port` | int | (default 5432) |
| `--db.username` | string | (default "postgres") |
| `-d`, `--domain` | string | Specifies the Flyte project's domain. |
| `--files.archive` | | Pass in archive file either an http link or local path. |
| `--files.assumableIamRole` | string | Custom assumable iam auth role to register launch plans with. |
| `--files.continueOnError` | | Continue on error when registering files. |
| `--files.destinationDirectory` | string | Location of source code in container. |
| `--files.dryRun` | | Execute command without making any modifications. |
| `--files.enableSchedule` | | Enable the schedule if the files contain schedulable launchplan. |
| `--files.force` | | Force use of version number on entities registered with flyte. |
| `--files.k8ServiceAccount` | string | Deprecated. Please use `--K8sServiceAccount`|
| `--files.k8sServiceAccount` | string | Custom kubernetes service account auth role to register launch plans with. |
| `--files.outputLocationPrefix` | string | Custom output location prefix for offloaded types (files/schemas). |
| `--files.sourceUploadPath` | string | Deprecated: Update flyte admin to avoid having to configure storage access from uctl. |
| `--files.version` | string | Version of the entity to be registered with flyte which are un-versioned after serialization. |
| `--logger.formatter.type` | string | Sets logging format type. (default "json") |
| `--logger.level` | int | Sets the minimum logging level. (default 3) |
| `--logger.mute` | | Mutes all logs regardless of severity. Intended for benchmarks/tests only. |
| `--logger.show-source` | | Includes source code location in logs. |
| `--org` | string | Organization to work on. If not set, default to user's org. |
| `--otel.file.filename` | string | Filename to store exported telemetry traces (default "/tmp/trace.txt") |
| `--otel.jaeger.endpoint` | string | Endpoint for the jaeger telemetry trace ingestor (default "http://localhost:14268/api/traces") |
| `--otel.otlpgrpc.endpoint` | string | Endpoint for the OTLP telemetry trace collector (default "http://localhost:4317") |
| `--otel.otlphttp.endpoint` | string | Endpoint for the OTLP telemetry trace collector (default "http://localhost:4318/v1/traces") |
| `--otel.sampler.parentSampler` | string | Sets the parent sampler to use for the tracer (default "always") |
| `--otel.type` | string | Sets the type of exporter to configure [noop/file/jaeger/otlpgrpc/otlphttp]. (default "noop") |
| `-o`, `--output` | string | Specifies the output type - supported formats [TABLE JSON YAML DOT DOTURL]. NOTE: dot, doturl are only supported for Workflow (default "table") |
| `--plugins.catalogcache.reader.maxItems` | int | Maximum number of entries to keep in the index. (default 10000) |
| `--plugins.catalogcache.reader.maxRetries` | int | Maximum number of retries per item. (default 3) |
| `--plugins.catalogcache.reader.workers` | int | Number of concurrent workers to start processing the queue. (default 10) |
| `--plugins.catalogcache.writer.maxItems` | int | Maximum number of entries to keep in the index. (default 10000) |
| `--plugins.catalogcache.writer.maxRetries` | int | Maximum number of retries per item. (default 3) |
| `--plugins.catalogcache.writer.workers` | int | Number of concurrent workers to start processing the queue. (default 10) |
| `-p`, `--project` | string | Specifies the Flyte project. |
| `--rediscache.passwordSecretName` | string | Name of secret with Redis password. |
| `--rediscache.primaryEndpoint` | string | Primary endpoint for the redis cache that can be used for both reads and writes. |
| `--rediscache.replicaEndpoint` | string | Replica endpoint for the redis cache that can be used for reads. |
| `--secrets.env-prefix` | string | Prefix for environment variables (default "FLYTE_SECRET_") |
| `--secrets.secrets-prefix` | string | Prefix where to look for secrets file (default "/etc/secrets") |
| `--secrets.type` | string | Sets the type of storage to configure [local]. (default "local") |
| `--server.dataProxy.download.maxExpiresIn` | string | Maximum allowed expiration duration. (default "1h0m0s") |
| `--server.dataProxy.upload.defaultFileNameLength` | int | Default length for the generated file name if not provided in the request. (default 20) |
| `--server.dataProxy.upload.maxExpiresIn` | string | Maximum allowed expiration duration. (default "1h0m0s") |
| `--server.dataProxy.upload.maxSize` | string | Maximum allowed upload size. (default "6Mi") |
| `--server.dataProxy.upload.storagePrefix` | string | Storage prefix to use for all upload requests. |
| `--server.grpc.enableGrpcLatencyMetrics` | | Enable grpc latency metrics. Note Histograms metrics can be expensive on Prometheus servers. |
| `--server.grpc.maxMessageSizeBytes` | int | The max size in bytes for incoming gRPC messages |
| `--server.grpc.port` | int | On which grpc port to serve admin (default 8089) |
| `--server.grpc.serverReflection` | | Enable GRPC Server Reflection (default true) |
| `--server.grpcPort` | int | deprecated |
| `--server.grpcServerReflection` | | deprecated |
| `--server.httpPort` | int | On which http port to serve admin (default 8088) |
| `--server.kube-config` | string | Path to kubernetes client config file, default is empty, useful for incluster config. |
| `--server.kubeClientConfig.burst` | int | Max burst rate for throttle. 0 defaults to 10 (default 25) |
| `--server.kubeClientConfig.qps` | int32 | Max QPS to the master for requests to KubeAPI. 0 defaults to 5. (default 100) |
| `--server.kubeClientConfig.timeout` | string | Max duration allowed for every request to KubeAPI before giving up. 0 implies no timeout. (default "30s") |
| `--server.master` | string | The address of the Kubernetes API server. |
| `--server.readHeaderTimeoutSeconds` | int | The amount of time allowed to read request headers. (default 32) |
| `--server.security.allowCors` | | (default true) |
| `--server.security.allowedHeaders` | strings | (default [Content-Type,flyte-authorization]) |
| `--server.security.allowedOrigins` | strings | (default [*]) |
| `--server.security.auditAccess` | | |
| `--server.security.secure` | | |
| `--server.security.ssl.certificateFile` | string | |
| `--server.security.ssl.keyFile` | string | |
| `--server.security.useAuth` | | |
| `--server.thirdPartyConfig.flyteClient.audience` | string | Audience to use when initiating OAuth2 authorization requests. |
| `--server.thirdPartyConfig.flyteClient.clientId` | string | public identifier for the app which handles authorization for a Flyte deployment |
| `--server.thirdPartyConfig.flyteClient.redirectUri` | string | This is the callback uri registered with the app which handles authorization for a Flyte deployment |
| `--server.thirdPartyConfig.flyteClient.scopes` | strings | Recommended scopes for the client to request. |
| `--server.watchService.maxActiveClusterConnections` | int | (default 5) |
| `--server.watchService.maxPageSize` | int | (default 50000) |
| `--server.watchService.nonTerminalStatusUpdatesInterval` | string | (default "1m0s") |
| `--server.watchService.pollInterval` | string | (default "1s") |
| `--sharedservice.connectPort` | string | On which connect port to serve admin (default "8080") |
| `--sharedservice.grpc.grpcMaxResponseStatusBytes` | int32 | specifies the maximum (uncompressed) size of header list that the client is prepared to accept on grpc calls (default 32000) |
| `--sharedservice.grpc.maxConcurrentStreams` | int | Limit on the number of concurrent streams to each ServerTransport. (default 100) |
| `--sharedservice.grpc.maxMessageSizeBytes` | int | Limit on the size of message that can be received on the server. (default 10485760) |
| `--sharedservice.grpcServerReflection` | | Enable GRPC Server Reflection (default true) |
| `--sharedservice.httpPort` | string | On which http port to serve admin (default "8089") |
| `--sharedservice.kubeConfig` | string | Path to kubernetes client config file. |
| `--sharedservice.master` | string | The address of the Kubernetes API server. |
| `--sharedservice.metrics.enableClientGrpcHistograms` | | Enable client grpc histograms (default true) |
| `--sharedservice.metrics.enableGrpcHistograms` | | Enable grpc histograms (default true) |
| `--sharedservice.metrics.scope` | string | Scope to emit metrics under (default "service:") |
| `--sharedservice.port` | string | On which grpc port to serve admin (default "8080") |
| `--sharedservice.profiler.enabled` | | Enable Profiler on server |
| `--sharedservice.profilerPort` | string | Profile port to start listen for pprof and metric handlers on. (default "10254") |
| `--sharedservice.security.allowCors` | | |
| `--sharedservice.security.allowLocalhostAccess` | | Whether to permit localhost unauthenticated access to the server |
| `--sharedservice.security.allowedHeaders` | strings | |
| `--sharedservice.security.allowedOrigins` | strings | |
| `--sharedservice.security.auditAccess` | | |
| `--sharedservice.security.orgOverride` | string | Override org in identity context if localhost access enabled |
| `--sharedservice.security.secure` | | |
| `--sharedservice.security.ssl.certificateAuthorityFile` | string | |
| `--sharedservice.security.ssl.certificateFile` | string | |
| `--sharedservice.security.ssl.keyFile` | string | |
| `--sharedservice.security.useAuth` | | |
| `--sharedservice.sync.syncInterval` | string | Time interval to sync (default "5m0s") |
| `--storage.cache.max_size_mbs` | int | Maximum size of the cache where the Blob store data is cached in-memory. If not specified or set to 0, cache is not used |
| `--storage.cache.target_gc_percent` | int | Sets the garbage collection target percentage. |
| `--storage.connection.access-key` | string | Access key to use. Only required when authtype is set to accesskey. |
| `--storage.connection.auth-type` | string | Auth Type to use [iam, accesskey]. (default "iam") |
| `--storage.connection.disable-ssl` | | Disables SSL connection. Should only be used for development. |
| `--storage.connection.endpoint` | string | URL for storage client to connect to. |
| `--storage.connection.region` | string | Region to connect to. (default "us-east-1") |
| `--storage.connection.secret-key` | string | Secret to use when accesskey is set. |
| `--storage.container` | string | Initial container (in s3 a bucket) to create -if it doesn't exist-.' |
| `--storage.defaultHttpClient.timeout` | string | Sets time out on the http client. (default "0s") |
| `--storage.enable-multicontainer` | | If this is true, then the container argument is overlooked and redundant. This config will automatically open new connections to new containers/buckets as they are encountered |
| `--storage.limits.maxDownloadMBs` | int | Maximum allowed download size (in MBs) per call. (default 2) |
| `--storage.stow.config` | stringToString | Configuration for stow backend. Refer to github/flyteorg/stow (default []) |
| `--storage.stow.kind` | string | Kind of Stow backend to use. Refer to github/flyteorg/stow |
| `--storage.type` | string | Sets the type of storage to configure [s3/minio/local/mem/stow]. (default "s3") |
| `--union.auth.authorizationMetadataKey` | string | Authorization Header to use when passing Access Tokens to the server (default "flyte-authorization") |
| `--union.auth.clientId` | string | Client ID |
| `--union.auth.clientSecretEnvVar` | string | Environment variable containing the client secret |
| `--union.auth.clientSecretLocation` | string | File containing the client secret |
| `--union.auth.deviceFlow.pollInterval` | string | amount of time the device flow would poll the token endpoint if auth server doesn't return a polling interval. Okta and google IDP do return an interval' (default "5s") |
| `--union.auth.deviceFlow.refreshTime` | string | grace period from the token expiry after which it would refresh the token. (default "5m0s") |
| `--union.auth.deviceFlow.timeout` | string | amount of time the device flow should complete or else it will be cancelled. (default "10m0s") |
| `--union.auth.enable` | | Whether to enable an authenticated conenction when communicating with admin. (default true) |
| `--union.auth.externalAuth.command` | strings | Command for external authentication token generation |
| `--union.auth.pkce.refreshTime` | string | grace period from the token expiry after which it would refresh the token. (default "5m0s") |
| `--union.auth.pkce.timeout` | string | Amount of time the browser session would be active for authentication from client app. (default "15s") |
| `--union.auth.scopes` | strings | List of scopes to request |
| `--union.auth.tokenRefreshWindow` | string | Max duration between token refresh attempt and token expiry. (default "1h0m0s") |
| `--union.auth.tokenUrl` | string | OPTIONAL: Your IdP's token endpoint. It'll be discovered from flyte admin's OAuth Metadata endpoint if not provided. |
| `--union.auth.type` | string | Type of OAuth2 flow used for communicating with admin. (default "Pkce") |
| `--union.cache.maxItemsCount` | int | Maximum number of items to keep in the cache before evicting. (default 1000) |
| `--union.connection.host` | string | Host to connect to (default "dns:///utt-mgdp-stg-us-east-2.cloud-staging.union.ai") |
| `--union.connection.insecure` | | Whether to connect over insecure channel |
| `--union.connection.insecureSkipVerify` | | InsecureSkipVerify controls whether a client verifies the server's certificate chain and host name.Caution: shouldn't be use for production usecases' |
| `--union.connection.keepAliveConfig.permitWithoutStream` | | If true, client sends keepalive pings even with no active RPCs. |
| `--union.connection.keepAliveConfig.time` | string | After a duration of this time if the client doesn't see any activity it pings the server to see if the transport is still alive. (default "20s") |
| `--union.connection.keepAliveConfig.timeout` | string | After having pinged for keepalive check, the client waits for a duration of Timeout and if no activity is seen even after that the connection is closed. (default "2m0s") |
| `--union.connection.maxBackoffDelay` | string | Max delay for grpc backoff (default "8s") |
| `--union.connection.maxRecvMsgSize` | int | Maximum size of a message in bytes of a gRPC message (default 10485760) |
| `--union.connection.maxRetries` | int | Max number of gRPC retries (default 4) |
| `--union.connection.minConnectTimeout` | string | Minimum timeout for establishing a connection (default "20s") |
| `--union.connection.perRetryTimeout` | string | gRPC per retry timeout (default "15s") |
| `--union.connection.serviceConfig` | string | Defines gRPC experimental JSON Service Config (default "{"loadBalancingConfig": [{"round_robin":{}}]}") |
| `--union.connection.trustedIdentityClaims.enabled` | | Enables passing of trusted claims while making inter service calls |
| `--union.connection.trustedIdentityClaims.externalIdentityClaim` | string | External identity claim of the service which is authorized to make internal service call. These are verified against userclouds actions |
| `--union.connection.trustedIdentityClaims.externalIdentityTypeClaim` | string | External identity type claim of app or user to use for the current service identity. It should be an 'app' for inter service communication |
| `--union.internalConnectionConfig.-` | stringToString | (default []) |
| `--union.internalConnectionConfig.enabled` | | Enables internal service to service communication instead of going through ingress. |
| `--union.internalConnectionConfig.urlPattern` | string | UrlPattern of the internal service endpoints. (default "{{ service }}-helmchart.{{ service }}.svc.cluster.local:80") |
| `--webhook.awsSecretManager.sidecarImage` | string | Specifies the sidecar docker image to use (default "docker.io/amazon/aws-secrets-manager-secret-sidecar:v0.1.4") |
| `--webhook.certDir` | string | Certificate directory to use to write generated certs. Defaults to /etc/webhook/certs/ (default "/etc/webhook/certs") |
| `--webhook.embeddedSecretManagerConfig.awsConfig.region` | string | AWS region |
| `--webhook.embeddedSecretManagerConfig.fileMountInitContainer.image` | string | Specifies init container image to use for mounting secrets as files. (default "busybox:1.28") |
| `--webhook.embeddedSecretManagerConfig.gcpConfig.project` | string | GCP project to be used for secret manager |
| `--webhook.embeddedSecretManagerConfig.type` | string | (default "AWS") |
| `--webhook.gcpSecretManager.sidecarImage` | string | Specifies the sidecar docker image to use (default "gcr.io/google.com/cloudsdktool/cloud-sdk:alpine") |
| `--webhook.listenPort` | int | The port to use to listen to webhook calls. Defaults to 9443 (default 9443) |
| `--webhook.localCert` | | write certs locally. Defaults to false |
| `--webhook.metrics-prefix` | string | An optional prefix for all published metrics. (default "flyte:") |
| `--webhook.secretName` | string | Secret name to write generated certs to. (default "flyte-pod-webhook") |
| `--webhook.serviceName` | string | The name of the webhook service. (default "flyte-pod-webhook") |
| `--webhook.servicePort` | int32 | The port on the service that hosting webhook. (default 443) |
| `--webhook.vaultSecretManager.role` | string | Specifies the vault role to use (default "flyte") |
=== PAGE: https://www.union.ai/docs/v1/serverless/api-reference/uctl-cli/uctl-delete/uctl-delete-workflow-execution-config ===
# uctl delete workflow-execution-config
Deletes matchable resources of workflow execution config.
## Synopsis
Delete workflow execution config for the given project and domain
combination or additionally the workflow name.
For project flytesnacks and development domain, run:
```shell
$ uctl delete workflow-execution-config -p flytesnacks -d development
```
To delete workflow execution config using the config file which was used
to create it, run:
```shell
$ uctl delete workflow-execution-config --attrFile wec.yaml
```
For example, here's the config file wec.yaml:
``` yaml
domain: development
project: flytesnacks
max_parallelism: 5
security_context:
run_as:
k8s_service_account: demo
```
Max_parallelism is optional in the file as it is unread during the
delete command but can be retained since the same file can be used for
get, update and delete commands.
To delete workflow execution config for the workflow
`core.control_flow.merge_sort.merge_sort`, run:
```shell
$ uctl delete workflow-execution-config -p flytesnacks -d development core.control_flow.merge_sort.merge_sort
```
Usage:
```shell
$ uctl delete workflow-execution-config [flags]
```
## Options
| Option | Type | Description |
|--------|------|-------------|
| `--attrFile` | string | attribute file name to be used for delete attribute for the resource type. |
| `--dryRun` | | execute command without making any modifications. |
| `-h`, `--help` | help for workflow-execution-config |
### Options inherited from parent commands
| Option | Type | Description |
|--------|------|-------------|
| `--admin.audience` | string | Audience to use when initiating OAuth2 authorization requests. |
| `--admin.authType` | string | Type of OAuth2 flow used for communicating with admin.ClientSecret, Pkce, ExternalCommand are valid values (default "ClientSecret") |
| `--admin.authorizationHeader` | string | Custom metadata header to pass JWT |
| `--admin.authorizationServerUrl` | string | This is the URL to your IdP's authorization server. It'll default to Endpoint |
| `--admin.caCertFilePath` | string | Use specified certificate file to verify the admin server peer. |
| `--admin.clientId` | string | Client ID (default "flytepropeller") |
| `--admin.clientSecretEnvVar` | string | Environment variable containing the client secret |
| `--admin.clientSecretLocation` | string | File containing the client secret (default "/etc/secrets/client_secret") |
| `--admin.command` | strings | Command for external authentication token generation |
| `--admin.defaultOrg` | string | OPTIONAL: Default org to use to support non-org based cli's.'. |
| `--admin.defaultServiceConfig` | string | |
| `--admin.deviceFlowConfig.pollInterval` | string | amount of time the device flow would poll the token endpoint if auth server doesn't return a polling interval. Okta and google IDP do return an interval' (default "5s") |
| `--admin.deviceFlowConfig.refreshTime` | string | grace period from the token expiry after which it would refresh the token. (default "5m0s") |
| `--admin.deviceFlowConfig.timeout` | string | amount of time the device flow should complete or else it will be cancelled. (default "10m0s") |
| `--admin.endpoint` | string | For admin types, specify where the uri of the service is located. |
| `--admin.httpProxyURL` | string | OPTIONAL: HTTP Proxy to be used for OAuth requests. |
| `--admin.insecure` | | Use insecure connection. |
| `--admin.insecureSkipVerify` | | InsecureSkipVerify controls whether a client verifies the server's certificate chain and host name.Caution: shouldn't be use for production usecases' |
| `--admin.maxBackoffDelay` | string | Max delay for grpc backoff (default "8s") |
| `--admin.maxMessageSizeBytes` | int | The max size in bytes for incoming gRPC messages |
| `--admin.maxRetries` | int | Max number of gRPC retries (default 4) |
| `--admin.perRetryTimeout` | string | gRPC per retry timeout (default "15s") |
| `--admin.pkceConfig.refreshTime` | string | grace period from the token expiry after which it would refresh the token. (default "5m0s") |
| `--admin.pkceConfig.timeout` | string | Amount of time the browser session would be active for authentication from client app. (default "2m0s") |
| `--admin.proxyCommand` | strings | Command for external proxy-authorization token generation |
| `--admin.scopes` | strings | List of scopes to request |
| `--admin.tokenRefreshWindow` | string | Max duration between token refresh attempt and token expiry. (default "0s") |
| `--admin.tokenUrl` | string | OPTIONAL: Your IdP's token endpoint. It'll be discovered from flyte admin's OAuth Metadata endpoint if not provided. |
| `--admin.useAudienceFromAdmin` | | Use Audience configured from admins public endpoint config. |
| `--admin.useAuth` | | Deprecated: Auth will be enabled/disabled based on admin's dynamically discovered information. |
| `--auth.appAuth.externalAuthServer.allowedAudience` | strings | Optional: A list of allowed audiences. If not provided, the audience is expected to be the public Uri of the service. |
| `--auth.appAuth.externalAuthServer.baseUrl` | string | This should be the base url of the authorization server that you are trying to hit. With Okta for instance, it will look something like https://company.okta.com/oauth2/abcdef123456789/ |
| `--auth.appAuth.externalAuthServer.httpProxyURL` | string | OPTIONAL: HTTP Proxy to be used for OAuth requests. |
| `--auth.appAuth.externalAuthServer.metadataUrl` | string | Optional: If the server doesn't support /.well-known/oauth-authorization-server, you can set a custom metadata url here.' |
| `--auth.appAuth.externalAuthServer.retryAttempts` | int | Optional: The number of attempted retries on a transient failure to get the OAuth metadata (default 5) |
| `--auth.appAuth.externalAuthServer.retryDelay` | string | Optional, Duration to wait between retries (default "1s") |
| `--auth.appAuth.selfAuthServer.accessTokenLifespan` | string | Defines the lifespan of issued access tokens. (default "30m0s") |
| `--auth.appAuth.selfAuthServer.authorizationCodeLifespan` | string | Defines the lifespan of issued access tokens. (default "5m0s") |
| `--auth.appAuth.selfAuthServer.claimSymmetricEncryptionKeySecretName` | string | OPTIONAL: Secret name to use to encrypt claims in authcode token. (default "claim_symmetric_key") |
| `--auth.appAuth.selfAuthServer.issuer` | string | Defines the issuer to use when issuing and validating tokens. The default value is https://{requestUri.HostAndPort}/ |
| `--auth.appAuth.selfAuthServer.oldTokenSigningRSAKeySecretName` | string | OPTIONAL: Secret name to use to retrieve Old RSA Signing Key. This can be useful during key rotation to continue to accept older tokens. (default "token_rsa_key_old.pem") |
| `--auth.appAuth.selfAuthServer.refreshTokenLifespan` | string | Defines the lifespan of issued access tokens. (default "1h0m0s") |
| `--auth.appAuth.selfAuthServer.tokenSigningRSAKeySecretName` | string | OPTIONAL: Secret name to use to retrieve RSA Signing Key. (default "token_rsa_key.pem") |
| `--auth.appAuth.thirdPartyConfig.flyteClient.audience` | string | Audience to use when initiating OAuth2 authorization requests. |
| `--auth.appAuth.thirdPartyConfig.flyteClient.clientId` | string | public identifier for the app which handles authorization for a Flyte deployment (default "uctl") |
| `--auth.appAuth.thirdPartyConfig.flyteClient.redirectUri` | string | This is the callback uri registered with the app which handles authorization for a Flyte deployment (default "http://localhost:53593/callback") |
| `--auth.appAuth.thirdPartyConfig.flyteClient.scopes` | strings | Recommended scopes for the client to request. (default [all,offline]) |
| `--auth.disableForGrpc` | | Disables auth enforcement on Grpc Endpoints. |
| `--auth.disableForHttp` | | Disables auth enforcement on HTTP Endpoints. |
| `--auth.grpcAuthorizationHeader` | string | (default "flyte-authorization") |
| `--auth.httpAuthorizationHeader` | string | (default "flyte-authorization") |
| `--auth.httpProxyURL` | string | OPTIONAL: HTTP Proxy to be used for OAuth requests. |
| `--auth.tokenEndpointProxyPath` | string | The path used to proxy calls to the TokenURL |
| `--auth.userAuth.cookieBlockKeySecretName` | string | OPTIONAL: Secret name to use for cookie block key. (default "cookie_block_key") |
| `--auth.userAuth.cookieHashKeySecretName` | string | OPTIONAL: Secret name to use for cookie hash key. (default "cookie_hash_key") |
| `--auth.userAuth.cookieSetting.domain` | string | OPTIONAL: Allows you to set the domain attribute on the auth cookies. |
| `--auth.userAuth.cookieSetting.sameSitePolicy` | string | OPTIONAL: Allows you to declare if your cookie should be restricted to a first-party or same-site context.Wrapper around http.SameSite. (default "DefaultMode") |
| `--auth.userAuth.httpProxyURL` | string | OPTIONAL: HTTP Proxy to be used for OAuth requests. |
| `--auth.userAuth.idpQueryParameter` | string | idp query parameter used for selecting a particular IDP for doing user authentication. Eg: for Okta passing idp={IDP-ID} forces the authentication to happen with IDP-ID |
| `--auth.userAuth.openId.baseUrl` | string | |
| `--auth.userAuth.openId.clientId` | string | |
| `--auth.userAuth.openId.clientSecretFile` | string | |
| `--auth.userAuth.openId.clientSecretName` | string | (default "oidc_client_secret") |
| `--auth.userAuth.openId.scopes` | strings | (default [openid,profile]) |
| `--auth.userAuth.redirectUrl` | string | (default "/console") |
| `--authorizer.internalCommunicationConfig.enabled` | | Enables authorization decisions for internal communication. (default true) |
| `--authorizer.internalCommunicationConfig.ingressIdentity` | string | IngressIdentity used in the cluster. Needed to exclude the communication coming from ingress. (default "ingress-nginx.ingress-nginx.serviceaccount.identity.linkerd.cluster.local") |
| `--authorizer.internalCommunicationConfig.tenantUrlPatternIdentity` | string | UrlPatternIdentity of the internal tenant service endpoint identities. (default "{{ service }}.{{ org }}.serviceaccount.identity.linkerd.cluster.local") |
| `--authorizer.internalCommunicationConfig.urlPatternIdentity` | string | UrlPatternIdentity of the internal service endpoint identities. (default "{{ service }}-helmchart.{{ service }}.serviceaccount.identity.linkerd.cluster.local") |
| `--authorizer.mode` | string | (default "Active") |
| `--authorizer.organizationConfig.PolicyConfig.adminPolicyDescription` | string | description for the boilerplate admin policy (default "Contributor permissions and full admin permissions to manage users and view usage dashboards") |
| `--authorizer.organizationConfig.PolicyConfig.contributorPolicyDescription` | string | description for the boilerplate contributor policy (default "Viewer permissions and permissions to create workflows, tasks, launch plans, and executions") |
| `--authorizer.organizationConfig.PolicyConfig.defaultUserPolicyRoleType` | string | name of the role type to determine which default policy new users added to the organization should be assigned (default "Viewer") |
| `--authorizer.organizationConfig.PolicyConfig.serverlessContributorPolicyDescription` | string | description for the boilerplate serverless contributor policy (default "Viewer permissions and permissions to create workflows, tasks, launch plans, and executions") |
| `--authorizer.organizationConfig.PolicyConfig.serverlessViewerPolicyDescription` | string | description for the boilerplate serverless viewer policy (default "Permissions to view Flyte entities") |
| `--authorizer.organizationConfig.PolicyConfig.viewerPolicyDescription` | string | description for the boilerplate viewer policy (default "Permissions to view Flyte entities") |
| `--authorizer.organizationConfig.defaultPolicyCacheDuration` | string | Cache entry duration for the store of the default policy per organization (default "10m0s") |
| `--authorizer.syncRuleRefreshInterval` | string | (default "1m0s") |
| `--authorizer.type` | string | (default "UserClouds") |
| `--authorizer.userCloudsClient.cache.redis.ttl.edgeTypes` | string | Specifies how long edge types remain in the cache.. (default "30m0s") |
| `--authorizer.userCloudsClient.cache.redis.ttl.edges` | string | Specifies how long edges remain in the cache. (default "30m0s") |
| `--authorizer.userCloudsClient.cache.redis.ttl.objectTypes` | string | Specifies how long object types remain in the cache. (default "30m0s") |
| `--authorizer.userCloudsClient.cache.redis.ttl.objects` | string | Specifies how long objects remain in the cache. (default "30m0s") |
| `--authorizer.userCloudsClient.cache.type` | string | Cache type to use. (default "none") |
| `--authorizer.userCloudsClient.clientID` | string | UserClouds client id |
| `--authorizer.userCloudsClient.clientSecretName` | string | UserCloud client secret name to read from the secret manager. (default "userclouds-client-secret") |
| `--authorizer.userCloudsClient.enableLogging` | | Enable userclouds client's internal logging. Calls to post logs take 250-350 ms and will impact p99 latency, enable with caution. |
| `--authorizer.userCloudsClient.tenantID` | string | UserClouds tenant id. Should be a UUID. |
| `--authorizer.userCloudsClient.tenantUrl` | string | Something like https://{yourtenant}.tenant.userclouds.com |
| `--config` | string | config file (default is /Users/andrew/.union/config.yaml) |
| `--connection.environment` | string | |
| `--connection.region` | string | |
| `--connection.rootTenantURLPattern` | string | Pattern for tenant url. (default "dns:///{{ organization }}.cloud-staging.union.ai") |
| `--console.endpoint` | string | Endpoint of console, if different than flyte admin |
| `--database.connMaxLifeTime` | string | sets the maximum amount of time a connection may be reused (default "1h0m0s") |
| `--database.enableForeignKeyConstraintWhenMigrating` | | Whether to enable gorm foreign keys when migrating the db |
| `--database.maxIdleConnections` | int | maxIdleConnections sets the maximum number of connections in the idle connection pool. (default 10) |
| `--database.maxOpenConnections` | int | maxOpenConnections sets the maximum number of open connections to the database. (default 100) |
| `--database.postgres.dbname` | string | The database name (default "postgres") |
| `--database.postgres.debug` | | |
| `--database.postgres.host` | string | The host name of the database server (default "localhost") |
| `--database.postgres.options` | string | See http://gorm.io/docs/connecting_to_the_database.html for available options passed, in addition to the above. (default "sslmode=disable") |
| `--database.postgres.password` | string | The database password. (default "postgres") |
| `--database.postgres.passwordPath` | string | Points to the file containing the database password. |
| `--database.postgres.port` | int | The port name of the database server (default 30001) |
| `--database.postgres.readReplicaHost` | string | The host name of the read replica database server (default "localhost") |
| `--database.postgres.username` | string | The database user who is connecting to the server. (default "postgres") |
| `--database.sqlite.file` | string | The path to the file (existing or new) where the DB should be created / stored. If existing, then this will be re-used, else a new will be created |
| `--db.connectionPool.maxConnectionLifetime` | string | (default "0s") |
| `--db.connectionPool.maxIdleConnections` | int | |
| `--db.connectionPool.maxOpenConnections` | int | |
| `--db.dbname` | string | (default "postgres") |
| `--db.debug` | | |
| `--db.host` | string | (default "postgres") |
| `--db.log_level` | int | (default 4) |
| `--db.options` | string | (default "sslmode=disable") |
| `--db.password` | string | |
| `--db.passwordPath` | string | |
| `--db.port` | int | (default 5432) |
| `--db.username` | string | (default "postgres") |
| `-d`, `--domain` | string | Specifies the Flyte project's domain. |
| `--files.archive` | | Pass in archive file either an http link or local path. |
| `--files.assumableIamRole` | string | Custom assumable iam auth role to register launch plans with. |
| `--files.continueOnError` | | Continue on error when registering files. |
| `--files.destinationDirectory` | string | Location of source code in container. |
| `--files.dryRun` | | Execute command without making any modifications. |
| `--files.enableSchedule` | | Enable the schedule if the files contain schedulable launchplan. |
| `--files.force` | | Force use of version number on entities registered with flyte. |
| `--files.k8ServiceAccount` | string | Deprecated. Please use `--K8sServiceAccount`|
| `--files.k8sServiceAccount` | string | Custom kubernetes service account auth role to register launch plans with. |
| `--files.outputLocationPrefix` | string | Custom output location prefix for offloaded types (files/schemas). |
| `--files.sourceUploadPath` | string | Deprecated: Update flyte admin to avoid having to configure storage access from uctl. |
| `--files.version` | string | Version of the entity to be registered with flyte which are un-versioned after serialization. |
| `--logger.formatter.type` | string | Sets logging format type. (default "json") |
| `--logger.level` | int | Sets the minimum logging level. (default 3) |
| `--logger.mute` | | Mutes all logs regardless of severity. Intended for benchmarks/tests only. |
| `--logger.show-source` | | Includes source code location in logs. |
| `--org` | string | Organization to work on. If not set, default to user's org. |
| `--otel.file.filename` | string | Filename to store exported telemetry traces (default "/tmp/trace.txt") |
| `--otel.jaeger.endpoint` | string | Endpoint for the jaeger telemetry trace ingestor (default "http://localhost:14268/api/traces") |
| `--otel.otlpgrpc.endpoint` | string | Endpoint for the OTLP telemetry trace collector (default "http://localhost:4317") |
| `--otel.otlphttp.endpoint` | string | Endpoint for the OTLP telemetry trace collector (default "http://localhost:4318/v1/traces") |
| `--otel.sampler.parentSampler` | string | Sets the parent sampler to use for the tracer (default "always") |
| `--otel.type` | string | Sets the type of exporter to configure [noop/file/jaeger/otlpgrpc/otlphttp]. (default "noop") |
| `-o`, `--output` | string | Specifies the output type - supported formats [TABLE JSON YAML DOT DOTURL]. NOTE: dot, doturl are only supported for Workflow (default "table") |
| `--plugins.catalogcache.reader.maxItems` | int | Maximum number of entries to keep in the index. (default 10000) |
| `--plugins.catalogcache.reader.maxRetries` | int | Maximum number of retries per item. (default 3) |
| `--plugins.catalogcache.reader.workers` | int | Number of concurrent workers to start processing the queue. (default 10) |
| `--plugins.catalogcache.writer.maxItems` | int | Maximum number of entries to keep in the index. (default 10000) |
| `--plugins.catalogcache.writer.maxRetries` | int | Maximum number of retries per item. (default 3) |
| `--plugins.catalogcache.writer.workers` | int | Number of concurrent workers to start processing the queue. (default 10) |
| `-p`, `--project` | string | Specifies the Flyte project. |
| `--rediscache.passwordSecretName` | string | Name of secret with Redis password. |
| `--rediscache.primaryEndpoint` | string | Primary endpoint for the redis cache that can be used for both reads and writes. |
| `--rediscache.replicaEndpoint` | string | Replica endpoint for the redis cache that can be used for reads. |
| `--secrets.env-prefix` | string | Prefix for environment variables (default "FLYTE_SECRET_") |
| `--secrets.secrets-prefix` | string | Prefix where to look for secrets file (default "/etc/secrets") |
| `--secrets.type` | string | Sets the type of storage to configure [local]. (default "local") |
| `--server.dataProxy.download.maxExpiresIn` | string | Maximum allowed expiration duration. (default "1h0m0s") |
| `--server.dataProxy.upload.defaultFileNameLength` | int | Default length for the generated file name if not provided in the request. (default 20) |
| `--server.dataProxy.upload.maxExpiresIn` | string | Maximum allowed expiration duration. (default "1h0m0s") |
| `--server.dataProxy.upload.maxSize` | string | Maximum allowed upload size. (default "6Mi") |
| `--server.dataProxy.upload.storagePrefix` | string | Storage prefix to use for all upload requests. |
| `--server.grpc.enableGrpcLatencyMetrics` | | Enable grpc latency metrics. Note Histograms metrics can be expensive on Prometheus servers. |
| `--server.grpc.maxMessageSizeBytes` | int | The max size in bytes for incoming gRPC messages |
| `--server.grpc.port` | int | On which grpc port to serve admin (default 8089) |
| `--server.grpc.serverReflection` | | Enable GRPC Server Reflection (default true) |
| `--server.grpcPort` | int | deprecated |
| `--server.grpcServerReflection` | | deprecated |
| `--server.httpPort` | int | On which http port to serve admin (default 8088) |
| `--server.kube-config` | string | Path to kubernetes client config file, default is empty, useful for incluster config. |
| `--server.kubeClientConfig.burst` | int | Max burst rate for throttle. 0 defaults to 10 (default 25) |
| `--server.kubeClientConfig.qps` | int32 | Max QPS to the master for requests to KubeAPI. 0 defaults to 5. (default 100) |
| `--server.kubeClientConfig.timeout` | string | Max duration allowed for every request to KubeAPI before giving up. 0 implies no timeout. (default "30s") |
| `--server.master` | string | The address of the Kubernetes API server. |
| `--server.readHeaderTimeoutSeconds` | int | The amount of time allowed to read request headers. (default 32) |
| `--server.security.allowCors` | | (default true) |
| `--server.security.allowedHeaders` | strings | (default [Content-Type,flyte-authorization]) |
| `--server.security.allowedOrigins` | strings | (default [*]) |
| `--server.security.auditAccess` | | |
| `--server.security.secure` | | |
| `--server.security.ssl.certificateFile` | string | |
| `--server.security.ssl.keyFile` | string | |
| `--server.security.useAuth` | | |
| `--server.thirdPartyConfig.flyteClient.audience` | string | Audience to use when initiating OAuth2 authorization requests. |
| `--server.thirdPartyConfig.flyteClient.clientId` | string | public identifier for the app which handles authorization for a Flyte deployment |
| `--server.thirdPartyConfig.flyteClient.redirectUri` | string | This is the callback uri registered with the app which handles authorization for a Flyte deployment |
| `--server.thirdPartyConfig.flyteClient.scopes` | strings | Recommended scopes for the client to request. |
| `--server.watchService.maxActiveClusterConnections` | int | (default 5) |
| `--server.watchService.maxPageSize` | int | (default 50000) |
| `--server.watchService.nonTerminalStatusUpdatesInterval` | string | (default "1m0s") |
| `--server.watchService.pollInterval` | string | (default "1s") |
| `--sharedservice.connectPort` | string | On which connect port to serve admin (default "8080") |
| `--sharedservice.grpc.grpcMaxResponseStatusBytes` | int32 | specifies the maximum (uncompressed) size of header list that the client is prepared to accept on grpc calls (default 32000) |
| `--sharedservice.grpc.maxConcurrentStreams` | int | Limit on the number of concurrent streams to each ServerTransport. (default 100) |
| `--sharedservice.grpc.maxMessageSizeBytes` | int | Limit on the size of message that can be received on the server. (default 10485760) |
| `--sharedservice.grpcServerReflection` | | Enable GRPC Server Reflection (default true) |
| `--sharedservice.httpPort` | string | On which http port to serve admin (default "8089") |
| `--sharedservice.kubeConfig` | string | Path to kubernetes client config file. |
| `--sharedservice.master` | string | The address of the Kubernetes API server. |
| `--sharedservice.metrics.enableClientGrpcHistograms` | | Enable client grpc histograms (default true) |
| `--sharedservice.metrics.enableGrpcHistograms` | | Enable grpc histograms (default true) |
| `--sharedservice.metrics.scope` | string | Scope to emit metrics under (default "service:") |
| `--sharedservice.port` | string | On which grpc port to serve admin (default "8080") |
| `--sharedservice.profiler.enabled` | | Enable Profiler on server |
| `--sharedservice.profilerPort` | string | Profile port to start listen for pprof and metric handlers on. (default "10254") |
| `--sharedservice.security.allowCors` | | |
| `--sharedservice.security.allowLocalhostAccess` | | Whether to permit localhost unauthenticated access to the server |
| `--sharedservice.security.allowedHeaders` | strings | |
| `--sharedservice.security.allowedOrigins` | strings | |
| `--sharedservice.security.auditAccess` | | |
| `--sharedservice.security.orgOverride` | string | Override org in identity context if localhost access enabled |
| `--sharedservice.security.secure` | | |
| `--sharedservice.security.ssl.certificateAuthorityFile` | string | |
| `--sharedservice.security.ssl.certificateFile` | string | |
| `--sharedservice.security.ssl.keyFile` | string | |
| `--sharedservice.security.useAuth` | | |
| `--sharedservice.sync.syncInterval` | string | Time interval to sync (default "5m0s") |
| `--storage.cache.max_size_mbs` | int | Maximum size of the cache where the Blob store data is cached in-memory. If not specified or set to 0, cache is not used |
| `--storage.cache.target_gc_percent` | int | Sets the garbage collection target percentage. |
| `--storage.connection.access-key` | string | Access key to use. Only required when authtype is set to accesskey. |
| `--storage.connection.auth-type` | string | Auth Type to use [iam, accesskey]. (default "iam") |
| `--storage.connection.disable-ssl` | | Disables SSL connection. Should only be used for development. |
| `--storage.connection.endpoint` | string | URL for storage client to connect to. |
| `--storage.connection.region` | string | Region to connect to. (default "us-east-1") |
| `--storage.connection.secret-key` | string | Secret to use when accesskey is set. |
| `--storage.container` | string | Initial container (in s3 a bucket) to create -if it doesn't exist-.' |
| `--storage.defaultHttpClient.timeout` | string | Sets time out on the http client. (default "0s") |
| `--storage.enable-multicontainer` | | If this is true, then the container argument is overlooked and redundant. This config will automatically open new connections to new containers/buckets as they are encountered |
| `--storage.limits.maxDownloadMBs` | int | Maximum allowed download size (in MBs) per call. (default 2) |
| `--storage.stow.config` | stringToString | Configuration for stow backend. Refer to github/flyteorg/stow (default []) |
| `--storage.stow.kind` | string | Kind of Stow backend to use. Refer to github/flyteorg/stow |
| `--storage.type` | string | Sets the type of storage to configure [s3/minio/local/mem/stow]. (default "s3") |
| `--union.auth.authorizationMetadataKey` | string | Authorization Header to use when passing Access Tokens to the server (default "flyte-authorization") |
| `--union.auth.clientId` | string | Client ID |
| `--union.auth.clientSecretEnvVar` | string | Environment variable containing the client secret |
| `--union.auth.clientSecretLocation` | string | File containing the client secret |
| `--union.auth.deviceFlow.pollInterval` | string | amount of time the device flow would poll the token endpoint if auth server doesn't return a polling interval. Okta and google IDP do return an interval' (default "5s") |
| `--union.auth.deviceFlow.refreshTime` | string | grace period from the token expiry after which it would refresh the token. (default "5m0s") |
| `--union.auth.deviceFlow.timeout` | string | amount of time the device flow should complete or else it will be cancelled. (default "10m0s") |
| `--union.auth.enable` | | Whether to enable an authenticated conenction when communicating with admin. (default true) |
| `--union.auth.externalAuth.command` | strings | Command for external authentication token generation |
| `--union.auth.pkce.refreshTime` | string | grace period from the token expiry after which it would refresh the token. (default "5m0s") |
| `--union.auth.pkce.timeout` | string | Amount of time the browser session would be active for authentication from client app. (default "15s") |
| `--union.auth.scopes` | strings | List of scopes to request |
| `--union.auth.tokenRefreshWindow` | string | Max duration between token refresh attempt and token expiry. (default "1h0m0s") |
| `--union.auth.tokenUrl` | string | OPTIONAL: Your IdP's token endpoint. It'll be discovered from flyte admin's OAuth Metadata endpoint if not provided. |
| `--union.auth.type` | string | Type of OAuth2 flow used for communicating with admin. (default "Pkce") |
| `--union.cache.maxItemsCount` | int | Maximum number of items to keep in the cache before evicting. (default 1000) |
| `--union.connection.host` | string | Host to connect to (default "dns:///utt-mgdp-stg-us-east-2.cloud-staging.union.ai") |
| `--union.connection.insecure` | | Whether to connect over insecure channel |
| `--union.connection.insecureSkipVerify` | | InsecureSkipVerify controls whether a client verifies the server's certificate chain and host name.Caution: shouldn't be use for production usecases' |
| `--union.connection.keepAliveConfig.permitWithoutStream` | | If true, client sends keepalive pings even with no active RPCs. |
| `--union.connection.keepAliveConfig.time` | string | After a duration of this time if the client doesn't see any activity it pings the server to see if the transport is still alive. (default "20s") |
| `--union.connection.keepAliveConfig.timeout` | string | After having pinged for keepalive check, the client waits for a duration of Timeout and if no activity is seen even after that the connection is closed. (default "2m0s") |
| `--union.connection.maxBackoffDelay` | string | Max delay for grpc backoff (default "8s") |
| `--union.connection.maxRecvMsgSize` | int | Maximum size of a message in bytes of a gRPC message (default 10485760) |
| `--union.connection.maxRetries` | int | Max number of gRPC retries (default 4) |
| `--union.connection.minConnectTimeout` | string | Minimum timeout for establishing a connection (default "20s") |
| `--union.connection.perRetryTimeout` | string | gRPC per retry timeout (default "15s") |
| `--union.connection.serviceConfig` | string | Defines gRPC experimental JSON Service Config (default "{"loadBalancingConfig": [{"round_robin":{}}]}") |
| `--union.connection.trustedIdentityClaims.enabled` | | Enables passing of trusted claims while making inter service calls |
| `--union.connection.trustedIdentityClaims.externalIdentityClaim` | string | External identity claim of the service which is authorized to make internal service call. These are verified against userclouds actions |
| `--union.connection.trustedIdentityClaims.externalIdentityTypeClaim` | string | External identity type claim of app or user to use for the current service identity. It should be an 'app' for inter service communication |
| `--union.internalConnectionConfig.-` | stringToString | (default []) |
| `--union.internalConnectionConfig.enabled` | | Enables internal service to service communication instead of going through ingress. |
| `--union.internalConnectionConfig.urlPattern` | string | UrlPattern of the internal service endpoints. (default "{{ service }}-helmchart.{{ service }}.svc.cluster.local:80") |
| `--webhook.awsSecretManager.sidecarImage` | string | Specifies the sidecar docker image to use (default "docker.io/amazon/aws-secrets-manager-secret-sidecar:v0.1.4") |
| `--webhook.certDir` | string | Certificate directory to use to write generated certs. Defaults to /etc/webhook/certs/ (default "/etc/webhook/certs") |
| `--webhook.embeddedSecretManagerConfig.awsConfig.region` | string | AWS region |
| `--webhook.embeddedSecretManagerConfig.fileMountInitContainer.image` | string | Specifies init container image to use for mounting secrets as files. (default "busybox:1.28") |
| `--webhook.embeddedSecretManagerConfig.gcpConfig.project` | string | GCP project to be used for secret manager |
| `--webhook.embeddedSecretManagerConfig.type` | string | (default "AWS") |
| `--webhook.gcpSecretManager.sidecarImage` | string | Specifies the sidecar docker image to use (default "gcr.io/google.com/cloudsdktool/cloud-sdk:alpine") |
| `--webhook.listenPort` | int | The port to use to listen to webhook calls. Defaults to 9443 (default 9443) |
| `--webhook.localCert` | | write certs locally. Defaults to false |
| `--webhook.metrics-prefix` | string | An optional prefix for all published metrics. (default "flyte:") |
| `--webhook.secretName` | string | Secret name to write generated certs to. (default "flyte-pod-webhook") |
| `--webhook.serviceName` | string | The name of the webhook service. (default "flyte-pod-webhook") |
| `--webhook.servicePort` | int32 | The port on the service that hosting webhook. (default 443) |
| `--webhook.vaultSecretManager.role` | string | Specifies the vault role to use (default "flyte") |
=== PAGE: https://www.union.ai/docs/v1/serverless/api-reference/uctl-cli/uctl-demo ===
# uctl demo
Helps with demo interactions like start, teardown, status, and exec.
## Synopsis
Uctl Flyte Demo is a fully standalone minimal environment for running
Flyte. It provides a simplified way of running Flyte demo as a single
Docker container locally.
To create a demo cluster:
```shell
$ uctl demo start
```
To remove a demo cluster:
```shell
$ uctl demo teardown
```
To check the status of the demo container:
```shell
$ uctl demo status
```
To execute commands inside the demo container:
```shell
$ uctl demo exec -- pwd
```
## Options
| Option | Type | Description |
|--------|------|-------------|
| `-h`, `--help` | help for demo |
### Options inherited from parent commands
| Option | Type | Description |
|--------|------|-------------|
| `--admin.audience` | string | Audience to use when initiating OAuth2 authorization requests. |
| `--admin.authType` | string | Type of OAuth2 flow used for communicating with admin.ClientSecret, Pkce, ExternalCommand are valid values (default "ClientSecret") |
| `--admin.authorizationHeader` | string | Custom metadata header to pass JWT |
| `--admin.authorizationServerUrl` | string | This is the URL to your IdP's authorization server. It'll default to Endpoint |
| `--admin.caCertFilePath` | string | Use specified certificate file to verify the admin server peer. |
| `--admin.clientId` | string | Client ID (default "flytepropeller") |
| `--admin.clientSecretEnvVar` | string | Environment variable containing the client secret |
| `--admin.clientSecretLocation` | string | File containing the client secret (default "/etc/secrets/client_secret") |
| `--admin.command` | strings | Command for external authentication token generation |
| `--admin.defaultOrg` | string | OPTIONAL: Default org to use to support non-org based cli's.'. |
| `--admin.defaultServiceConfig` | string | |
| `--admin.deviceFlowConfig.pollInterval` | string | amount of time the device flow would poll the token endpoint if auth server doesn't return a polling interval. Okta and google IDP do return an interval' (default "5s") |
| `--admin.deviceFlowConfig.refreshTime` | string | grace period from the token expiry after which it would refresh the token. (default "5m0s") |
| `--admin.deviceFlowConfig.timeout` | string | amount of time the device flow should complete or else it will be cancelled. (default "10m0s") |
| `--admin.endpoint` | string | For admin types, specify where the uri of the service is located. |
| `--admin.httpProxyURL` | string | OPTIONAL: HTTP Proxy to be used for OAuth requests. |
| `--admin.insecure` | | Use insecure connection. |
| `--admin.insecureSkipVerify` | | InsecureSkipVerify controls whether a client verifies the server's certificate chain and host name.Caution: shouldn't be use for production usecases' |
| `--admin.maxBackoffDelay` | string | Max delay for grpc backoff (default "8s") |
| `--admin.maxMessageSizeBytes` | int | The max size in bytes for incoming gRPC messages |
| `--admin.maxRetries` | int | Max number of gRPC retries (default 4) |
| `--admin.perRetryTimeout` | string | gRPC per retry timeout (default "15s") |
| `--admin.pkceConfig.refreshTime` | string | grace period from the token expiry after which it would refresh the token. (default "5m0s") |
| `--admin.pkceConfig.timeout` | string | Amount of time the browser session would be active for authentication from client app. (default "2m0s") |
| `--admin.proxyCommand` | strings | Command for external proxy-authorization token generation |
| `--admin.scopes` | strings | List of scopes to request |
| `--admin.tokenRefreshWindow` | string | Max duration between token refresh attempt and token expiry. (default "0s") |
| `--admin.tokenUrl` | string | OPTIONAL: Your IdP's token endpoint. It'll be discovered from flyte admin's OAuth Metadata endpoint if not provided. |
| `--admin.useAudienceFromAdmin` | | Use Audience configured from admins public endpoint config. |
| `--admin.useAuth` | | Deprecated: Auth will be enabled/disabled based on admin's dynamically discovered information. |
| `--auth.appAuth.externalAuthServer.allowedAudience` | strings | Optional: A list of allowed audiences. If not provided, the audience is expected to be the public Uri of the service. |
| `--auth.appAuth.externalAuthServer.baseUrl` | string | This should be the base url of the authorization server that you are trying to hit. With Okta for instance, it will look something like https://company.okta.com/oauth2/abcdef123456789/ |
| `--auth.appAuth.externalAuthServer.httpProxyURL` | string | OPTIONAL: HTTP Proxy to be used for OAuth requests. |
| `--auth.appAuth.externalAuthServer.metadataUrl` | string | Optional: If the server doesn't support /.well-known/oauth-authorization-server, you can set a custom metadata url here.' |
| `--auth.appAuth.externalAuthServer.retryAttempts` | int | Optional: The number of attempted retries on a transient failure to get the OAuth metadata (default 5) |
| `--auth.appAuth.externalAuthServer.retryDelay` | string | Optional, Duration to wait between retries (default "1s") |
| `--auth.appAuth.selfAuthServer.accessTokenLifespan` | string | Defines the lifespan of issued access tokens. (default "30m0s") |
| `--auth.appAuth.selfAuthServer.authorizationCodeLifespan` | string | Defines the lifespan of issued access tokens. (default "5m0s") |
| `--auth.appAuth.selfAuthServer.claimSymmetricEncryptionKeySecretName` | string | OPTIONAL: Secret name to use to encrypt claims in authcode token. (default "claim_symmetric_key") |
| `--auth.appAuth.selfAuthServer.issuer` | string | Defines the issuer to use when issuing and validating tokens. The default value is https://{requestUri.HostAndPort}/ |
| `--auth.appAuth.selfAuthServer.oldTokenSigningRSAKeySecretName` | string | OPTIONAL: Secret name to use to retrieve Old RSA Signing Key. This can be useful during key rotation to continue to accept older tokens. (default "token_rsa_key_old.pem") |
| `--auth.appAuth.selfAuthServer.refreshTokenLifespan` | string | Defines the lifespan of issued access tokens. (default "1h0m0s") |
| `--auth.appAuth.selfAuthServer.tokenSigningRSAKeySecretName` | string | OPTIONAL: Secret name to use to retrieve RSA Signing Key. (default "token_rsa_key.pem") |
| `--auth.appAuth.thirdPartyConfig.flyteClient.audience` | string | Audience to use when initiating OAuth2 authorization requests. |
| `--auth.appAuth.thirdPartyConfig.flyteClient.clientId` | string | public identifier for the app which handles authorization for a Flyte deployment (default "uctl") |
| `--auth.appAuth.thirdPartyConfig.flyteClient.redirectUri` | string | This is the callback uri registered with the app which handles authorization for a Flyte deployment (default "http://localhost:53593/callback") |
| `--auth.appAuth.thirdPartyConfig.flyteClient.scopes` | strings | Recommended scopes for the client to request. (default [all,offline]) |
| `--auth.disableForGrpc` | | Disables auth enforcement on Grpc Endpoints. |
| `--auth.disableForHttp` | | Disables auth enforcement on HTTP Endpoints. |
| `--auth.grpcAuthorizationHeader` | string | (default "flyte-authorization") |
| `--auth.httpAuthorizationHeader` | string | (default "flyte-authorization") |
| `--auth.httpProxyURL` | string | OPTIONAL: HTTP Proxy to be used for OAuth requests. |
| `--auth.tokenEndpointProxyPath` | string | The path used to proxy calls to the TokenURL |
| `--auth.userAuth.cookieBlockKeySecretName` | string | OPTIONAL: Secret name to use for cookie block key. (default "cookie_block_key") |
| `--auth.userAuth.cookieHashKeySecretName` | string | OPTIONAL: Secret name to use for cookie hash key. (default "cookie_hash_key") |
| `--auth.userAuth.cookieSetting.domain` | string | OPTIONAL: Allows you to set the domain attribute on the auth cookies. |
| `--auth.userAuth.cookieSetting.sameSitePolicy` | string | OPTIONAL: Allows you to declare if your cookie should be restricted to a first-party or same-site context.Wrapper around http.SameSite. (default "DefaultMode") |
| `--auth.userAuth.httpProxyURL` | string | OPTIONAL: HTTP Proxy to be used for OAuth requests. |
| `--auth.userAuth.idpQueryParameter` | string | idp query parameter used for selecting a particular IDP for doing user authentication. Eg: for Okta passing idp={IDP-ID} forces the authentication to happen with IDP-ID |
| `--auth.userAuth.openId.baseUrl` | string | |
| `--auth.userAuth.openId.clientId` | string | |
| `--auth.userAuth.openId.clientSecretFile` | string | |
| `--auth.userAuth.openId.clientSecretName` | string | (default "oidc_client_secret") |
| `--auth.userAuth.openId.scopes` | strings | (default [openid,profile]) |
| `--auth.userAuth.redirectUrl` | string | (default "/console") |
| `--authorizer.internalCommunicationConfig.enabled` | | Enables authorization decisions for internal communication. (default true) |
| `--authorizer.internalCommunicationConfig.ingressIdentity` | string | IngressIdentity used in the cluster. Needed to exclude the communication coming from ingress. (default "ingress-nginx.ingress-nginx.serviceaccount.identity.linkerd.cluster.local") |
| `--authorizer.internalCommunicationConfig.tenantUrlPatternIdentity` | string | UrlPatternIdentity of the internal tenant service endpoint identities. (default "{{ service }}.{{ org }}.serviceaccount.identity.linkerd.cluster.local") |
| `--authorizer.internalCommunicationConfig.urlPatternIdentity` | string | UrlPatternIdentity of the internal service endpoint identities. (default "{{ service }}-helmchart.{{ service }}.serviceaccount.identity.linkerd.cluster.local") |
| `--authorizer.mode` | string | (default "Active") |
| `--authorizer.organizationConfig.PolicyConfig.adminPolicyDescription` | string | description for the boilerplate admin policy (default "Contributor permissions and full admin permissions to manage users and view usage dashboards") |
| `--authorizer.organizationConfig.PolicyConfig.contributorPolicyDescription` | string | description for the boilerplate contributor policy (default "Viewer permissions and permissions to create workflows, tasks, launch plans, and executions") |
| `--authorizer.organizationConfig.PolicyConfig.defaultUserPolicyRoleType` | string | name of the role type to determine which default policy new users added to the organization should be assigned (default "Viewer") |
| `--authorizer.organizationConfig.PolicyConfig.serverlessContributorPolicyDescription` | string | description for the boilerplate serverless contributor policy (default "Viewer permissions and permissions to create workflows, tasks, launch plans, and executions") |
| `--authorizer.organizationConfig.PolicyConfig.serverlessViewerPolicyDescription` | string | description for the boilerplate serverless viewer policy (default "Permissions to view Flyte entities") |
| `--authorizer.organizationConfig.PolicyConfig.viewerPolicyDescription` | string | description for the boilerplate viewer policy (default "Permissions to view Flyte entities") |
| `--authorizer.organizationConfig.defaultPolicyCacheDuration` | string | Cache entry duration for the store of the default policy per organization (default "10m0s") |
| `--authorizer.syncRuleRefreshInterval` | string | (default "1m0s") |
| `--authorizer.type` | string | (default "UserClouds") |
| `--authorizer.userCloudsClient.cache.redis.ttl.edgeTypes` | string | Specifies how long edge types remain in the cache.. (default "30m0s") |
| `--authorizer.userCloudsClient.cache.redis.ttl.edges` | string | Specifies how long edges remain in the cache. (default "30m0s") |
| `--authorizer.userCloudsClient.cache.redis.ttl.objectTypes` | string | Specifies how long object types remain in the cache. (default "30m0s") |
| `--authorizer.userCloudsClient.cache.redis.ttl.objects` | string | Specifies how long objects remain in the cache. (default "30m0s") |
| `--authorizer.userCloudsClient.cache.type` | string | Cache type to use. (default "none") |
| `--authorizer.userCloudsClient.clientID` | string | UserClouds client id |
| `--authorizer.userCloudsClient.clientSecretName` | string | UserCloud client secret name to read from the secret manager. (default "userclouds-client-secret") |
| `--authorizer.userCloudsClient.enableLogging` | | Enable userclouds client's internal logging. Calls to post logs take 250-350 ms and will impact p99 latency, enable with caution. |
| `--authorizer.userCloudsClient.tenantID` | string | UserClouds tenant id. Should be a UUID. |
| `--authorizer.userCloudsClient.tenantUrl` | string | Something like https://{yourtenant}.tenant.userclouds.com |
| `--config` | string | config file (default is /Users/andrew/.union/config.yaml) |
| `--connection.environment` | string | |
| `--connection.region` | string | |
| `--connection.rootTenantURLPattern` | string | Pattern for tenant url. (default "dns:///{{ organization }}.cloud-staging.union.ai") |
| `--console.endpoint` | string | Endpoint of console, if different than flyte admin |
| `--database.connMaxLifeTime` | string | sets the maximum amount of time a connection may be reused (default "1h0m0s") |
| `--database.enableForeignKeyConstraintWhenMigrating` | | Whether to enable gorm foreign keys when migrating the db |
| `--database.maxIdleConnections` | int | maxIdleConnections sets the maximum number of connections in the idle connection pool. (default 10) |
| `--database.maxOpenConnections` | int | maxOpenConnections sets the maximum number of open connections to the database. (default 100) |
| `--database.postgres.dbname` | string | The database name (default "postgres") |
| `--database.postgres.debug` | | |
| `--database.postgres.host` | string | The host name of the database server (default "localhost") |
| `--database.postgres.options` | string | See http://gorm.io/docs/connecting_to_the_database.html for available options passed, in addition to the above. (default "sslmode=disable") |
| `--database.postgres.password` | string | The database password. (default "postgres") |
| `--database.postgres.passwordPath` | string | Points to the file containing the database password. |
| `--database.postgres.port` | int | The port name of the database server (default 30001) |
| `--database.postgres.readReplicaHost` | string | The host name of the read replica database server (default "localhost") |
| `--database.postgres.username` | string | The database user who is connecting to the server. (default "postgres") |
| `--database.sqlite.file` | string | The path to the file (existing or new) where the DB should be created / stored. If existing, then this will be re-used, else a new will be created |
| `--db.connectionPool.maxConnectionLifetime` | string | (default "0s") |
| `--db.connectionPool.maxIdleConnections` | int | |
| `--db.connectionPool.maxOpenConnections` | int | |
| `--db.dbname` | string | (default "postgres") |
| `--db.debug` | | |
| `--db.host` | string | (default "postgres") |
| `--db.log_level` | int | (default 4) |
| `--db.options` | string | (default "sslmode=disable") |
| `--db.password` | string | |
| `--db.passwordPath` | string | |
| `--db.port` | int | (default 5432) |
| `--db.username` | string | (default "postgres") |
| `-d`, `--domain` | string | Specifies the Flyte project's domain. |
| `--files.archive` | | Pass in archive file either an http link or local path. |
| `--files.assumableIamRole` | string | Custom assumable iam auth role to register launch plans with. |
| `--files.continueOnError` | | Continue on error when registering files. |
| `--files.destinationDirectory` | string | Location of source code in container. |
| `--files.dryRun` | | Execute command without making any modifications. |
| `--files.enableSchedule` | | Enable the schedule if the files contain schedulable launchplan. |
| `--files.force` | | Force use of version number on entities registered with flyte. |
| `--files.k8ServiceAccount` | string | Deprecated. Please use `--K8sServiceAccount`|
| `--files.k8sServiceAccount` | string | Custom kubernetes service account auth role to register launch plans with. |
| `--files.outputLocationPrefix` | string | Custom output location prefix for offloaded types (files/schemas). |
| `--files.sourceUploadPath` | string | Deprecated: Update flyte admin to avoid having to configure storage access from uctl. |
| `--files.version` | string | Version of the entity to be registered with flyte which are un-versioned after serialization. |
| `--logger.formatter.type` | string | Sets logging format type. (default "json") |
| `--logger.level` | int | Sets the minimum logging level. (default 3) |
| `--logger.mute` | | Mutes all logs regardless of severity. Intended for benchmarks/tests only. |
| `--logger.show-source` | | Includes source code location in logs. |
| `--org` | string | Organization to work on. If not set, default to user's org. |
| `--otel.file.filename` | string | Filename to store exported telemetry traces (default "/tmp/trace.txt") |
| `--otel.jaeger.endpoint` | string | Endpoint for the jaeger telemetry trace ingestor (default "http://localhost:14268/api/traces") |
| `--otel.otlpgrpc.endpoint` | string | Endpoint for the OTLP telemetry trace collector (default "http://localhost:4317") |
| `--otel.otlphttp.endpoint` | string | Endpoint for the OTLP telemetry trace collector (default "http://localhost:4318/v1/traces") |
| `--otel.sampler.parentSampler` | string | Sets the parent sampler to use for the tracer (default "always") |
| `--otel.type` | string | Sets the type of exporter to configure [noop/file/jaeger/otlpgrpc/otlphttp]. (default "noop") |
| `-o`, `--output` | string | Specifies the output type - supported formats [TABLE JSON YAML DOT DOTURL]. NOTE: dot, doturl are only supported for Workflow (default "table") |
| `--plugins.catalogcache.reader.maxItems` | int | Maximum number of entries to keep in the index. (default 10000) |
| `--plugins.catalogcache.reader.maxRetries` | int | Maximum number of retries per item. (default 3) |
| `--plugins.catalogcache.reader.workers` | int | Number of concurrent workers to start processing the queue. (default 10) |
| `--plugins.catalogcache.writer.maxItems` | int | Maximum number of entries to keep in the index. (default 10000) |
| `--plugins.catalogcache.writer.maxRetries` | int | Maximum number of retries per item. (default 3) |
| `--plugins.catalogcache.writer.workers` | int | Number of concurrent workers to start processing the queue. (default 10) |
| `-p`, `--project` | string | Specifies the Flyte project. |
| `--rediscache.passwordSecretName` | string | Name of secret with Redis password. |
| `--rediscache.primaryEndpoint` | string | Primary endpoint for the redis cache that can be used for both reads and writes. |
| `--rediscache.replicaEndpoint` | string | Replica endpoint for the redis cache that can be used for reads. |
| `--secrets.env-prefix` | string | Prefix for environment variables (default "FLYTE_SECRET_") |
| `--secrets.secrets-prefix` | string | Prefix where to look for secrets file (default "/etc/secrets") |
| `--secrets.type` | string | Sets the type of storage to configure [local]. (default "local") |
| `--server.dataProxy.download.maxExpiresIn` | string | Maximum allowed expiration duration. (default "1h0m0s") |
| `--server.dataProxy.upload.defaultFileNameLength` | int | Default length for the generated file name if not provided in the request. (default 20) |
| `--server.dataProxy.upload.maxExpiresIn` | string | Maximum allowed expiration duration. (default "1h0m0s") |
| `--server.dataProxy.upload.maxSize` | string | Maximum allowed upload size. (default "6Mi") |
| `--server.dataProxy.upload.storagePrefix` | string | Storage prefix to use for all upload requests. |
| `--server.grpc.enableGrpcLatencyMetrics` | | Enable grpc latency metrics. Note Histograms metrics can be expensive on Prometheus servers. |
| `--server.grpc.maxMessageSizeBytes` | int | The max size in bytes for incoming gRPC messages |
| `--server.grpc.port` | int | On which grpc port to serve admin (default 8089) |
| `--server.grpc.serverReflection` | | Enable GRPC Server Reflection (default true) |
| `--server.grpcPort` | int | deprecated |
| `--server.grpcServerReflection` | | deprecated |
| `--server.httpPort` | int | On which http port to serve admin (default 8088) |
| `--server.kube-config` | string | Path to kubernetes client config file, default is empty, useful for incluster config. |
| `--server.kubeClientConfig.burst` | int | Max burst rate for throttle. 0 defaults to 10 (default 25) |
| `--server.kubeClientConfig.qps` | int32 | Max QPS to the master for requests to KubeAPI. 0 defaults to 5. (default 100) |
| `--server.kubeClientConfig.timeout` | string | Max duration allowed for every request to KubeAPI before giving up. 0 implies no timeout. (default "30s") |
| `--server.master` | string | The address of the Kubernetes API server. |
| `--server.readHeaderTimeoutSeconds` | int | The amount of time allowed to read request headers. (default 32) |
| `--server.security.allowCors` | | (default true) |
| `--server.security.allowedHeaders` | strings | (default [Content-Type,flyte-authorization]) |
| `--server.security.allowedOrigins` | strings | (default [*]) |
| `--server.security.auditAccess` | | |
| `--server.security.secure` | | |
| `--server.security.ssl.certificateFile` | string | |
| `--server.security.ssl.keyFile` | string | |
| `--server.security.useAuth` | | |
| `--server.thirdPartyConfig.flyteClient.audience` | string | Audience to use when initiating OAuth2 authorization requests. |
| `--server.thirdPartyConfig.flyteClient.clientId` | string | public identifier for the app which handles authorization for a Flyte deployment |
| `--server.thirdPartyConfig.flyteClient.redirectUri` | string | This is the callback uri registered with the app which handles authorization for a Flyte deployment |
| `--server.thirdPartyConfig.flyteClient.scopes` | strings | Recommended scopes for the client to request. |
| `--server.watchService.maxActiveClusterConnections` | int | (default 5) |
| `--server.watchService.maxPageSize` | int | (default 50000) |
| `--server.watchService.nonTerminalStatusUpdatesInterval` | string | (default "1m0s") |
| `--server.watchService.pollInterval` | string | (default "1s") |
| `--sharedservice.connectPort` | string | On which connect port to serve admin (default "8080") |
| `--sharedservice.grpc.grpcMaxResponseStatusBytes` | int32 | specifies the maximum (uncompressed) size of header list that the client is prepared to accept on grpc calls (default 32000) |
| `--sharedservice.grpc.maxConcurrentStreams` | int | Limit on the number of concurrent streams to each ServerTransport. (default 100) |
| `--sharedservice.grpc.maxMessageSizeBytes` | int | Limit on the size of message that can be received on the server. (default 10485760) |
| `--sharedservice.grpcServerReflection` | | Enable GRPC Server Reflection (default true) |
| `--sharedservice.httpPort` | string | On which http port to serve admin (default "8089") |
| `--sharedservice.kubeConfig` | string | Path to kubernetes client config file. |
| `--sharedservice.master` | string | The address of the Kubernetes API server. |
| `--sharedservice.metrics.enableClientGrpcHistograms` | | Enable client grpc histograms (default true) |
| `--sharedservice.metrics.enableGrpcHistograms` | | Enable grpc histograms (default true) |
| `--sharedservice.metrics.scope` | string | Scope to emit metrics under (default "service:") |
| `--sharedservice.port` | string | On which grpc port to serve admin (default "8080") |
| `--sharedservice.profiler.enabled` | | Enable Profiler on server |
| `--sharedservice.profilerPort` | string | Profile port to start listen for pprof and metric handlers on. (default "10254") |
| `--sharedservice.security.allowCors` | | |
| `--sharedservice.security.allowLocalhostAccess` | | Whether to permit localhost unauthenticated access to the server |
| `--sharedservice.security.allowedHeaders` | strings | |
| `--sharedservice.security.allowedOrigins` | strings | |
| `--sharedservice.security.auditAccess` | | |
| `--sharedservice.security.orgOverride` | string | Override org in identity context if localhost access enabled |
| `--sharedservice.security.secure` | | |
| `--sharedservice.security.ssl.certificateAuthorityFile` | string | |
| `--sharedservice.security.ssl.certificateFile` | string | |
| `--sharedservice.security.ssl.keyFile` | string | |
| `--sharedservice.security.useAuth` | | |
| `--sharedservice.sync.syncInterval` | string | Time interval to sync (default "5m0s") |
| `--storage.cache.max_size_mbs` | int | Maximum size of the cache where the Blob store data is cached in-memory. If not specified or set to 0, cache is not used |
| `--storage.cache.target_gc_percent` | int | Sets the garbage collection target percentage. |
| `--storage.connection.access-key` | string | Access key to use. Only required when authtype is set to accesskey. |
| `--storage.connection.auth-type` | string | Auth Type to use [iam, accesskey]. (default "iam") |
| `--storage.connection.disable-ssl` | | Disables SSL connection. Should only be used for development. |
| `--storage.connection.endpoint` | string | URL for storage client to connect to. |
| `--storage.connection.region` | string | Region to connect to. (default "us-east-1") |
| `--storage.connection.secret-key` | string | Secret to use when accesskey is set. |
| `--storage.container` | string | Initial container (in s3 a bucket) to create -if it doesn't exist-.' |
| `--storage.defaultHttpClient.timeout` | string | Sets time out on the http client. (default "0s") |
| `--storage.enable-multicontainer` | | If this is true, then the container argument is overlooked and redundant. This config will automatically open new connections to new containers/buckets as they are encountered |
| `--storage.limits.maxDownloadMBs` | int | Maximum allowed download size (in MBs) per call. (default 2) |
| `--storage.stow.config` | stringToString | Configuration for stow backend. Refer to github/flyteorg/stow (default []) |
| `--storage.stow.kind` | string | Kind of Stow backend to use. Refer to github/flyteorg/stow |
| `--storage.type` | string | Sets the type of storage to configure [s3/minio/local/mem/stow]. (default "s3") |
| `--union.auth.authorizationMetadataKey` | string | Authorization Header to use when passing Access Tokens to the server (default "flyte-authorization") |
| `--union.auth.clientId` | string | Client ID |
| `--union.auth.clientSecretEnvVar` | string | Environment variable containing the client secret |
| `--union.auth.clientSecretLocation` | string | File containing the client secret |
| `--union.auth.deviceFlow.pollInterval` | string | amount of time the device flow would poll the token endpoint if auth server doesn't return a polling interval. Okta and google IDP do return an interval' (default "5s") |
| `--union.auth.deviceFlow.refreshTime` | string | grace period from the token expiry after which it would refresh the token. (default "5m0s") |
| `--union.auth.deviceFlow.timeout` | string | amount of time the device flow should complete or else it will be cancelled. (default "10m0s") |
| `--union.auth.enable` | | Whether to enable an authenticated conenction when communicating with admin. (default true) |
| `--union.auth.externalAuth.command` | strings | Command for external authentication token generation |
| `--union.auth.pkce.refreshTime` | string | grace period from the token expiry after which it would refresh the token. (default "5m0s") |
| `--union.auth.pkce.timeout` | string | Amount of time the browser session would be active for authentication from client app. (default "15s") |
| `--union.auth.scopes` | strings | List of scopes to request |
| `--union.auth.tokenRefreshWindow` | string | Max duration between token refresh attempt and token expiry. (default "1h0m0s") |
| `--union.auth.tokenUrl` | string | OPTIONAL: Your IdP's token endpoint. It'll be discovered from flyte admin's OAuth Metadata endpoint if not provided. |
| `--union.auth.type` | string | Type of OAuth2 flow used for communicating with admin. (default "Pkce") |
| `--union.cache.maxItemsCount` | int | Maximum number of items to keep in the cache before evicting. (default 1000) |
| `--union.connection.host` | string | Host to connect to (default "dns:///utt-mgdp-stg-us-east-2.cloud-staging.union.ai") |
| `--union.connection.insecure` | | Whether to connect over insecure channel |
| `--union.connection.insecureSkipVerify` | | InsecureSkipVerify controls whether a client verifies the server's certificate chain and host name.Caution: shouldn't be use for production usecases' |
| `--union.connection.keepAliveConfig.permitWithoutStream` | | If true, client sends keepalive pings even with no active RPCs. |
| `--union.connection.keepAliveConfig.time` | string | After a duration of this time if the client doesn't see any activity it pings the server to see if the transport is still alive. (default "20s") |
| `--union.connection.keepAliveConfig.timeout` | string | After having pinged for keepalive check, the client waits for a duration of Timeout and if no activity is seen even after that the connection is closed. (default "2m0s") |
| `--union.connection.maxBackoffDelay` | string | Max delay for grpc backoff (default "8s") |
| `--union.connection.maxRecvMsgSize` | int | Maximum size of a message in bytes of a gRPC message (default 10485760) |
| `--union.connection.maxRetries` | int | Max number of gRPC retries (default 4) |
| `--union.connection.minConnectTimeout` | string | Minimum timeout for establishing a connection (default "20s") |
| `--union.connection.perRetryTimeout` | string | gRPC per retry timeout (default "15s") |
| `--union.connection.serviceConfig` | string | Defines gRPC experimental JSON Service Config (default "{"loadBalancingConfig": [{"round_robin":{}}]}") |
| `--union.connection.trustedIdentityClaims.enabled` | | Enables passing of trusted claims while making inter service calls |
| `--union.connection.trustedIdentityClaims.externalIdentityClaim` | string | External identity claim of the service which is authorized to make internal service call. These are verified against userclouds actions |
| `--union.connection.trustedIdentityClaims.externalIdentityTypeClaim` | string | External identity type claim of app or user to use for the current service identity. It should be an 'app' for inter service communication |
| `--union.internalConnectionConfig.-` | stringToString | (default []) |
| `--union.internalConnectionConfig.enabled` | | Enables internal service to service communication instead of going through ingress. |
| `--union.internalConnectionConfig.urlPattern` | string | UrlPattern of the internal service endpoints. (default "{{ service }}-helmchart.{{ service }}.svc.cluster.local:80") |
| `--webhook.awsSecretManager.sidecarImage` | string | Specifies the sidecar docker image to use (default "docker.io/amazon/aws-secrets-manager-secret-sidecar:v0.1.4") |
| `--webhook.certDir` | string | Certificate directory to use to write generated certs. Defaults to /etc/webhook/certs/ (default "/etc/webhook/certs") |
| `--webhook.embeddedSecretManagerConfig.awsConfig.region` | string | AWS region |
| `--webhook.embeddedSecretManagerConfig.fileMountInitContainer.image` | string | Specifies init container image to use for mounting secrets as files. (default "busybox:1.28") |
| `--webhook.embeddedSecretManagerConfig.gcpConfig.project` | string | GCP project to be used for secret manager |
| `--webhook.embeddedSecretManagerConfig.type` | string | (default "AWS") |
| `--webhook.gcpSecretManager.sidecarImage` | string | Specifies the sidecar docker image to use (default "gcr.io/google.com/cloudsdktool/cloud-sdk:alpine") |
| `--webhook.listenPort` | int | The port to use to listen to webhook calls. Defaults to 9443 (default 9443) |
| `--webhook.localCert` | | write certs locally. Defaults to false |
| `--webhook.metrics-prefix` | string | An optional prefix for all published metrics. (default "flyte:") |
| `--webhook.secretName` | string | Secret name to write generated certs to. (default "flyte-pod-webhook") |
| `--webhook.serviceName` | string | The name of the webhook service. (default "flyte-pod-webhook") |
| `--webhook.servicePort` | int32 | The port on the service that hosting webhook. (default 443) |
| `--webhook.vaultSecretManager.role` | string | Specifies the vault role to use (default "flyte") |
## Subpages
- **Uctl CLI > uctl demo > uctl demo exec**
- **Uctl CLI > uctl demo > uctl demo reload**
- **Uctl CLI > uctl demo > uctl demo start**
- **Uctl CLI > uctl demo > uctl demo status**
- **Uctl CLI > uctl demo > uctl demo teardown**
=== PAGE: https://www.union.ai/docs/v1/serverless/api-reference/uctl-cli/uctl-demo/uctl-demo-exec ===
# uctl demo exec
Executes non-interactive command inside the demo container
## Synopsis
Run non-interactive commands inside the demo container and immediately
return the output. By default, "uctl exec" is present in the /root
directory inside the demo container.
```shell
$ uctl demo exec -- ls -al
```
Usage:
```shell
$ uctl demo exec [flags]
```
## Options
| Option | Type | Description |
|--------|------|-------------|
| `-h`, `--help` | help for exec |
### Options inherited from parent commands
| Option | Type | Description |
|--------|------|-------------|
| `--admin.audience` | string | Audience to use when initiating OAuth2 authorization requests. |
| `--admin.authType` | string | Type of OAuth2 flow used for communicating with admin.ClientSecret, Pkce, ExternalCommand are valid values (default "ClientSecret") |
| `--admin.authorizationHeader` | string | Custom metadata header to pass JWT |
| `--admin.authorizationServerUrl` | string | This is the URL to your IdP's authorization server. It'll default to Endpoint |
| `--admin.caCertFilePath` | string | Use specified certificate file to verify the admin server peer. |
| `--admin.clientId` | string | Client ID (default "flytepropeller") |
| `--admin.clientSecretEnvVar` | string | Environment variable containing the client secret |
| `--admin.clientSecretLocation` | string | File containing the client secret (default "/etc/secrets/client_secret") |
| `--admin.command` | strings | Command for external authentication token generation |
| `--admin.defaultOrg` | string | OPTIONAL: Default org to use to support non-org based cli's.'. |
| `--admin.defaultServiceConfig` | string | |
| `--admin.deviceFlowConfig.pollInterval` | string | amount of time the device flow would poll the token endpoint if auth server doesn't return a polling interval. Okta and google IDP do return an interval' (default "5s") |
| `--admin.deviceFlowConfig.refreshTime` | string | grace period from the token expiry after which it would refresh the token. (default "5m0s") |
| `--admin.deviceFlowConfig.timeout` | string | amount of time the device flow should complete or else it will be cancelled. (default "10m0s") |
| `--admin.endpoint` | string | For admin types, specify where the uri of the service is located. |
| `--admin.httpProxyURL` | string | OPTIONAL: HTTP Proxy to be used for OAuth requests. |
| `--admin.insecure` | | Use insecure connection. |
| `--admin.insecureSkipVerify` | | InsecureSkipVerify controls whether a client verifies the server's certificate chain and host name.Caution: shouldn't be use for production usecases' |
| `--admin.maxBackoffDelay` | string | Max delay for grpc backoff (default "8s") |
| `--admin.maxMessageSizeBytes` | int | The max size in bytes for incoming gRPC messages |
| `--admin.maxRetries` | int | Max number of gRPC retries (default 4) |
| `--admin.perRetryTimeout` | string | gRPC per retry timeout (default "15s") |
| `--admin.pkceConfig.refreshTime` | string | grace period from the token expiry after which it would refresh the token. (default "5m0s") |
| `--admin.pkceConfig.timeout` | string | Amount of time the browser session would be active for authentication from client app. (default "2m0s") |
| `--admin.proxyCommand` | strings | Command for external proxy-authorization token generation |
| `--admin.scopes` | strings | List of scopes to request |
| `--admin.tokenRefreshWindow` | string | Max duration between token refresh attempt and token expiry. (default "0s") |
| `--admin.tokenUrl` | string | OPTIONAL: Your IdP's token endpoint. It'll be discovered from flyte admin's OAuth Metadata endpoint if not provided. |
| `--admin.useAudienceFromAdmin` | | Use Audience configured from admins public endpoint config. |
| `--admin.useAuth` | | Deprecated: Auth will be enabled/disabled based on admin's dynamically discovered information. |
| `--auth.appAuth.externalAuthServer.allowedAudience` | strings | Optional: A list of allowed audiences. If not provided, the audience is expected to be the public Uri of the service. |
| `--auth.appAuth.externalAuthServer.baseUrl` | string | This should be the base url of the authorization server that you are trying to hit. With Okta for instance, it will look something like https://company.okta.com/oauth2/abcdef123456789/ |
| `--auth.appAuth.externalAuthServer.httpProxyURL` | string | OPTIONAL: HTTP Proxy to be used for OAuth requests. |
| `--auth.appAuth.externalAuthServer.metadataUrl` | string | Optional: If the server doesn't support /.well-known/oauth-authorization-server, you can set a custom metadata url here.' |
| `--auth.appAuth.externalAuthServer.retryAttempts` | int | Optional: The number of attempted retries on a transient failure to get the OAuth metadata (default 5) |
| `--auth.appAuth.externalAuthServer.retryDelay` | string | Optional, Duration to wait between retries (default "1s") |
| `--auth.appAuth.selfAuthServer.accessTokenLifespan` | string | Defines the lifespan of issued access tokens. (default "30m0s") |
| `--auth.appAuth.selfAuthServer.authorizationCodeLifespan` | string | Defines the lifespan of issued access tokens. (default "5m0s") |
| `--auth.appAuth.selfAuthServer.claimSymmetricEncryptionKeySecretName` | string | OPTIONAL: Secret name to use to encrypt claims in authcode token. (default "claim_symmetric_key") |
| `--auth.appAuth.selfAuthServer.issuer` | string | Defines the issuer to use when issuing and validating tokens. The default value is https://{requestUri.HostAndPort}/ |
| `--auth.appAuth.selfAuthServer.oldTokenSigningRSAKeySecretName` | string | OPTIONAL: Secret name to use to retrieve Old RSA Signing Key. This can be useful during key rotation to continue to accept older tokens. (default "token_rsa_key_old.pem") |
| `--auth.appAuth.selfAuthServer.refreshTokenLifespan` | string | Defines the lifespan of issued access tokens. (default "1h0m0s") |
| `--auth.appAuth.selfAuthServer.tokenSigningRSAKeySecretName` | string | OPTIONAL: Secret name to use to retrieve RSA Signing Key. (default "token_rsa_key.pem") |
| `--auth.appAuth.thirdPartyConfig.flyteClient.audience` | string | Audience to use when initiating OAuth2 authorization requests. |
| `--auth.appAuth.thirdPartyConfig.flyteClient.clientId` | string | public identifier for the app which handles authorization for a Flyte deployment (default "uctl") |
| `--auth.appAuth.thirdPartyConfig.flyteClient.redirectUri` | string | This is the callback uri registered with the app which handles authorization for a Flyte deployment (default "http://localhost:53593/callback") |
| `--auth.appAuth.thirdPartyConfig.flyteClient.scopes` | strings | Recommended scopes for the client to request. (default [all,offline]) |
| `--auth.disableForGrpc` | | Disables auth enforcement on Grpc Endpoints. |
| `--auth.disableForHttp` | | Disables auth enforcement on HTTP Endpoints. |
| `--auth.grpcAuthorizationHeader` | string | (default "flyte-authorization") |
| `--auth.httpAuthorizationHeader` | string | (default "flyte-authorization") |
| `--auth.httpProxyURL` | string | OPTIONAL: HTTP Proxy to be used for OAuth requests. |
| `--auth.tokenEndpointProxyPath` | string | The path used to proxy calls to the TokenURL |
| `--auth.userAuth.cookieBlockKeySecretName` | string | OPTIONAL: Secret name to use for cookie block key. (default "cookie_block_key") |
| `--auth.userAuth.cookieHashKeySecretName` | string | OPTIONAL: Secret name to use for cookie hash key. (default "cookie_hash_key") |
| `--auth.userAuth.cookieSetting.domain` | string | OPTIONAL: Allows you to set the domain attribute on the auth cookies. |
| `--auth.userAuth.cookieSetting.sameSitePolicy` | string | OPTIONAL: Allows you to declare if your cookie should be restricted to a first-party or same-site context.Wrapper around http.SameSite. (default "DefaultMode") |
| `--auth.userAuth.httpProxyURL` | string | OPTIONAL: HTTP Proxy to be used for OAuth requests. |
| `--auth.userAuth.idpQueryParameter` | string | idp query parameter used for selecting a particular IDP for doing user authentication. Eg: for Okta passing idp={IDP-ID} forces the authentication to happen with IDP-ID |
| `--auth.userAuth.openId.baseUrl` | string | |
| `--auth.userAuth.openId.clientId` | string | |
| `--auth.userAuth.openId.clientSecretFile` | string | |
| `--auth.userAuth.openId.clientSecretName` | string | (default "oidc_client_secret") |
| `--auth.userAuth.openId.scopes` | strings | (default [openid,profile]) |
| `--auth.userAuth.redirectUrl` | string | (default "/console") |
| `--authorizer.internalCommunicationConfig.enabled` | | Enables authorization decisions for internal communication. (default true) |
| `--authorizer.internalCommunicationConfig.ingressIdentity` | string | IngressIdentity used in the cluster. Needed to exclude the communication coming from ingress. (default "ingress-nginx.ingress-nginx.serviceaccount.identity.linkerd.cluster.local") |
| `--authorizer.internalCommunicationConfig.tenantUrlPatternIdentity` | string | UrlPatternIdentity of the internal tenant service endpoint identities. (default "{{ service }}.{{ org }}.serviceaccount.identity.linkerd.cluster.local") |
| `--authorizer.internalCommunicationConfig.urlPatternIdentity` | string | UrlPatternIdentity of the internal service endpoint identities. (default "{{ service }}-helmchart.{{ service }}.serviceaccount.identity.linkerd.cluster.local") |
| `--authorizer.mode` | string | (default "Active") |
| `--authorizer.organizationConfig.PolicyConfig.adminPolicyDescription` | string | description for the boilerplate admin policy (default "Contributor permissions and full admin permissions to manage users and view usage dashboards") |
| `--authorizer.organizationConfig.PolicyConfig.contributorPolicyDescription` | string | description for the boilerplate contributor policy (default "Viewer permissions and permissions to create workflows, tasks, launch plans, and executions") |
| `--authorizer.organizationConfig.PolicyConfig.defaultUserPolicyRoleType` | string | name of the role type to determine which default policy new users added to the organization should be assigned (default "Viewer") |
| `--authorizer.organizationConfig.PolicyConfig.serverlessContributorPolicyDescription` | string | description for the boilerplate serverless contributor policy (default "Viewer permissions and permissions to create workflows, tasks, launch plans, and executions") |
| `--authorizer.organizationConfig.PolicyConfig.serverlessViewerPolicyDescription` | string | description for the boilerplate serverless viewer policy (default "Permissions to view Flyte entities") |
| `--authorizer.organizationConfig.PolicyConfig.viewerPolicyDescription` | string | description for the boilerplate viewer policy (default "Permissions to view Flyte entities") |
| `--authorizer.organizationConfig.defaultPolicyCacheDuration` | string | Cache entry duration for the store of the default policy per organization (default "10m0s") |
| `--authorizer.syncRuleRefreshInterval` | string | (default "1m0s") |
| `--authorizer.type` | string | (default "UserClouds") |
| `--authorizer.userCloudsClient.cache.redis.ttl.edgeTypes` | string | Specifies how long edge types remain in the cache.. (default "30m0s") |
| `--authorizer.userCloudsClient.cache.redis.ttl.edges` | string | Specifies how long edges remain in the cache. (default "30m0s") |
| `--authorizer.userCloudsClient.cache.redis.ttl.objectTypes` | string | Specifies how long object types remain in the cache. (default "30m0s") |
| `--authorizer.userCloudsClient.cache.redis.ttl.objects` | string | Specifies how long objects remain in the cache. (default "30m0s") |
| `--authorizer.userCloudsClient.cache.type` | string | Cache type to use. (default "none") |
| `--authorizer.userCloudsClient.clientID` | string | UserClouds client id |
| `--authorizer.userCloudsClient.clientSecretName` | string | UserCloud client secret name to read from the secret manager. (default "userclouds-client-secret") |
| `--authorizer.userCloudsClient.enableLogging` | | Enable userclouds client's internal logging. Calls to post logs take 250-350 ms and will impact p99 latency, enable with caution. |
| `--authorizer.userCloudsClient.tenantID` | string | UserClouds tenant id. Should be a UUID. |
| `--authorizer.userCloudsClient.tenantUrl` | string | Something like https://{yourtenant}.tenant.userclouds.com |
| `--config` | string | config file (default is /Users/andrew/.union/config.yaml) |
| `--connection.environment` | string | |
| `--connection.region` | string | |
| `--connection.rootTenantURLPattern` | string | Pattern for tenant url. (default "dns:///{{ organization }}.cloud-staging.union.ai") |
| `--console.endpoint` | string | Endpoint of console, if different than flyte admin |
| `--database.connMaxLifeTime` | string | sets the maximum amount of time a connection may be reused (default "1h0m0s") |
| `--database.enableForeignKeyConstraintWhenMigrating` | | Whether to enable gorm foreign keys when migrating the db |
| `--database.maxIdleConnections` | int | maxIdleConnections sets the maximum number of connections in the idle connection pool. (default 10) |
| `--database.maxOpenConnections` | int | maxOpenConnections sets the maximum number of open connections to the database. (default 100) |
| `--database.postgres.dbname` | string | The database name (default "postgres") |
| `--database.postgres.debug` | | |
| `--database.postgres.host` | string | The host name of the database server (default "localhost") |
| `--database.postgres.options` | string | See http://gorm.io/docs/connecting_to_the_database.html for available options passed, in addition to the above. (default "sslmode=disable") |
| `--database.postgres.password` | string | The database password. (default "postgres") |
| `--database.postgres.passwordPath` | string | Points to the file containing the database password. |
| `--database.postgres.port` | int | The port name of the database server (default 30001) |
| `--database.postgres.readReplicaHost` | string | The host name of the read replica database server (default "localhost") |
| `--database.postgres.username` | string | The database user who is connecting to the server. (default "postgres") |
| `--database.sqlite.file` | string | The path to the file (existing or new) where the DB should be created / stored. If existing, then this will be re-used, else a new will be created |
| `--db.connectionPool.maxConnectionLifetime` | string | (default "0s") |
| `--db.connectionPool.maxIdleConnections` | int | |
| `--db.connectionPool.maxOpenConnections` | int | |
| `--db.dbname` | string | (default "postgres") |
| `--db.debug` | | |
| `--db.host` | string | (default "postgres") |
| `--db.log_level` | int | (default 4) |
| `--db.options` | string | (default "sslmode=disable") |
| `--db.password` | string | |
| `--db.passwordPath` | string | |
| `--db.port` | int | (default 5432) |
| `--db.username` | string | (default "postgres") |
| `-d`, `--domain` | string | Specifies the Flyte project's domain. |
| `--files.archive` | | Pass in archive file either an http link or local path. |
| `--files.assumableIamRole` | string | Custom assumable iam auth role to register launch plans with. |
| `--files.continueOnError` | | Continue on error when registering files. |
| `--files.destinationDirectory` | string | Location of source code in container. |
| `--files.dryRun` | | Execute command without making any modifications. |
| `--files.enableSchedule` | | Enable the schedule if the files contain schedulable launchplan. |
| `--files.force` | | Force use of version number on entities registered with flyte. |
| `--files.k8ServiceAccount` | string | Deprecated. Please use `--K8sServiceAccount`|
| `--files.k8sServiceAccount` | string | Custom kubernetes service account auth role to register launch plans with. |
| `--files.outputLocationPrefix` | string | Custom output location prefix for offloaded types (files/schemas). |
| `--files.sourceUploadPath` | string | Deprecated: Update flyte admin to avoid having to configure storage access from uctl. |
| `--files.version` | string | Version of the entity to be registered with flyte which are un-versioned after serialization. |
| `--logger.formatter.type` | string | Sets logging format type. (default "json") |
| `--logger.level` | int | Sets the minimum logging level. (default 3) |
| `--logger.mute` | | Mutes all logs regardless of severity. Intended for benchmarks/tests only. |
| `--logger.show-source` | | Includes source code location in logs. |
| `--org` | string | Organization to work on. If not set, default to user's org. |
| `--otel.file.filename` | string | Filename to store exported telemetry traces (default "/tmp/trace.txt") |
| `--otel.jaeger.endpoint` | string | Endpoint for the jaeger telemetry trace ingestor (default "http://localhost:14268/api/traces") |
| `--otel.otlpgrpc.endpoint` | string | Endpoint for the OTLP telemetry trace collector (default "http://localhost:4317") |
| `--otel.otlphttp.endpoint` | string | Endpoint for the OTLP telemetry trace collector (default "http://localhost:4318/v1/traces") |
| `--otel.sampler.parentSampler` | string | Sets the parent sampler to use for the tracer (default "always") |
| `--otel.type` | string | Sets the type of exporter to configure [noop/file/jaeger/otlpgrpc/otlphttp]. (default "noop") |
| `-o`, `--output` | string | Specifies the output type - supported formats [TABLE JSON YAML DOT DOTURL]. NOTE: dot, doturl are only supported for Workflow (default "table") |
| `--plugins.catalogcache.reader.maxItems` | int | Maximum number of entries to keep in the index. (default 10000) |
| `--plugins.catalogcache.reader.maxRetries` | int | Maximum number of retries per item. (default 3) |
| `--plugins.catalogcache.reader.workers` | int | Number of concurrent workers to start processing the queue. (default 10) |
| `--plugins.catalogcache.writer.maxItems` | int | Maximum number of entries to keep in the index. (default 10000) |
| `--plugins.catalogcache.writer.maxRetries` | int | Maximum number of retries per item. (default 3) |
| `--plugins.catalogcache.writer.workers` | int | Number of concurrent workers to start processing the queue. (default 10) |
| `-p`, `--project` | string | Specifies the Flyte project. |
| `--rediscache.passwordSecretName` | string | Name of secret with Redis password. |
| `--rediscache.primaryEndpoint` | string | Primary endpoint for the redis cache that can be used for both reads and writes. |
| `--rediscache.replicaEndpoint` | string | Replica endpoint for the redis cache that can be used for reads. |
| `--secrets.env-prefix` | string | Prefix for environment variables (default "FLYTE_SECRET_") |
| `--secrets.secrets-prefix` | string | Prefix where to look for secrets file (default "/etc/secrets") |
| `--secrets.type` | string | Sets the type of storage to configure [local]. (default "local") |
| `--server.dataProxy.download.maxExpiresIn` | string | Maximum allowed expiration duration. (default "1h0m0s") |
| `--server.dataProxy.upload.defaultFileNameLength` | int | Default length for the generated file name if not provided in the request. (default 20) |
| `--server.dataProxy.upload.maxExpiresIn` | string | Maximum allowed expiration duration. (default "1h0m0s") |
| `--server.dataProxy.upload.maxSize` | string | Maximum allowed upload size. (default "6Mi") |
| `--server.dataProxy.upload.storagePrefix` | string | Storage prefix to use for all upload requests. |
| `--server.grpc.enableGrpcLatencyMetrics` | | Enable grpc latency metrics. Note Histograms metrics can be expensive on Prometheus servers. |
| `--server.grpc.maxMessageSizeBytes` | int | The max size in bytes for incoming gRPC messages |
| `--server.grpc.port` | int | On which grpc port to serve admin (default 8089) |
| `--server.grpc.serverReflection` | | Enable GRPC Server Reflection (default true) |
| `--server.grpcPort` | int | deprecated |
| `--server.grpcServerReflection` | | deprecated |
| `--server.httpPort` | int | On which http port to serve admin (default 8088) |
| `--server.kube-config` | string | Path to kubernetes client config file, default is empty, useful for incluster config. |
| `--server.kubeClientConfig.burst` | int | Max burst rate for throttle. 0 defaults to 10 (default 25) |
| `--server.kubeClientConfig.qps` | int32 | Max QPS to the master for requests to KubeAPI. 0 defaults to 5. (default 100) |
| `--server.kubeClientConfig.timeout` | string | Max duration allowed for every request to KubeAPI before giving up. 0 implies no timeout. (default "30s") |
| `--server.master` | string | The address of the Kubernetes API server. |
| `--server.readHeaderTimeoutSeconds` | int | The amount of time allowed to read request headers. (default 32) |
| `--server.security.allowCors` | | (default true) |
| `--server.security.allowedHeaders` | strings | (default [Content-Type,flyte-authorization]) |
| `--server.security.allowedOrigins` | strings | (default [*]) |
| `--server.security.auditAccess` | | |
| `--server.security.secure` | | |
| `--server.security.ssl.certificateFile` | string | |
| `--server.security.ssl.keyFile` | string | |
| `--server.security.useAuth` | | |
| `--server.thirdPartyConfig.flyteClient.audience` | string | Audience to use when initiating OAuth2 authorization requests. |
| `--server.thirdPartyConfig.flyteClient.clientId` | string | public identifier for the app which handles authorization for a Flyte deployment |
| `--server.thirdPartyConfig.flyteClient.redirectUri` | string | This is the callback uri registered with the app which handles authorization for a Flyte deployment |
| `--server.thirdPartyConfig.flyteClient.scopes` | strings | Recommended scopes for the client to request. |
| `--server.watchService.maxActiveClusterConnections` | int | (default 5) |
| `--server.watchService.maxPageSize` | int | (default 50000) |
| `--server.watchService.nonTerminalStatusUpdatesInterval` | string | (default "1m0s") |
| `--server.watchService.pollInterval` | string | (default "1s") |
| `--sharedservice.connectPort` | string | On which connect port to serve admin (default "8080") |
| `--sharedservice.grpc.grpcMaxResponseStatusBytes` | int32 | specifies the maximum (uncompressed) size of header list that the client is prepared to accept on grpc calls (default 32000) |
| `--sharedservice.grpc.maxConcurrentStreams` | int | Limit on the number of concurrent streams to each ServerTransport. (default 100) |
| `--sharedservice.grpc.maxMessageSizeBytes` | int | Limit on the size of message that can be received on the server. (default 10485760) |
| `--sharedservice.grpcServerReflection` | | Enable GRPC Server Reflection (default true) |
| `--sharedservice.httpPort` | string | On which http port to serve admin (default "8089") |
| `--sharedservice.kubeConfig` | string | Path to kubernetes client config file. |
| `--sharedservice.master` | string | The address of the Kubernetes API server. |
| `--sharedservice.metrics.enableClientGrpcHistograms` | | Enable client grpc histograms (default true) |
| `--sharedservice.metrics.enableGrpcHistograms` | | Enable grpc histograms (default true) |
| `--sharedservice.metrics.scope` | string | Scope to emit metrics under (default "service:") |
| `--sharedservice.port` | string | On which grpc port to serve admin (default "8080") |
| `--sharedservice.profiler.enabled` | | Enable Profiler on server |
| `--sharedservice.profilerPort` | string | Profile port to start listen for pprof and metric handlers on. (default "10254") |
| `--sharedservice.security.allowCors` | | |
| `--sharedservice.security.allowLocalhostAccess` | | Whether to permit localhost unauthenticated access to the server |
| `--sharedservice.security.allowedHeaders` | strings | |
| `--sharedservice.security.allowedOrigins` | strings | |
| `--sharedservice.security.auditAccess` | | |
| `--sharedservice.security.orgOverride` | string | Override org in identity context if localhost access enabled |
| `--sharedservice.security.secure` | | |
| `--sharedservice.security.ssl.certificateAuthorityFile` | string | |
| `--sharedservice.security.ssl.certificateFile` | string | |
| `--sharedservice.security.ssl.keyFile` | string | |
| `--sharedservice.security.useAuth` | | |
| `--sharedservice.sync.syncInterval` | string | Time interval to sync (default "5m0s") |
| `--storage.cache.max_size_mbs` | int | Maximum size of the cache where the Blob store data is cached in-memory. If not specified or set to 0, cache is not used |
| `--storage.cache.target_gc_percent` | int | Sets the garbage collection target percentage. |
| `--storage.connection.access-key` | string | Access key to use. Only required when authtype is set to accesskey. |
| `--storage.connection.auth-type` | string | Auth Type to use [iam, accesskey]. (default "iam") |
| `--storage.connection.disable-ssl` | | Disables SSL connection. Should only be used for development. |
| `--storage.connection.endpoint` | string | URL for storage client to connect to. |
| `--storage.connection.region` | string | Region to connect to. (default "us-east-1") |
| `--storage.connection.secret-key` | string | Secret to use when accesskey is set. |
| `--storage.container` | string | Initial container (in s3 a bucket) to create -if it doesn't exist-.' |
| `--storage.defaultHttpClient.timeout` | string | Sets time out on the http client. (default "0s") |
| `--storage.enable-multicontainer` | | If this is true, then the container argument is overlooked and redundant. This config will automatically open new connections to new containers/buckets as they are encountered |
| `--storage.limits.maxDownloadMBs` | int | Maximum allowed download size (in MBs) per call. (default 2) |
| `--storage.stow.config` | stringToString | Configuration for stow backend. Refer to github/flyteorg/stow (default []) |
| `--storage.stow.kind` | string | Kind of Stow backend to use. Refer to github/flyteorg/stow |
| `--storage.type` | string | Sets the type of storage to configure [s3/minio/local/mem/stow]. (default "s3") |
| `--union.auth.authorizationMetadataKey` | string | Authorization Header to use when passing Access Tokens to the server (default "flyte-authorization") |
| `--union.auth.clientId` | string | Client ID |
| `--union.auth.clientSecretEnvVar` | string | Environment variable containing the client secret |
| `--union.auth.clientSecretLocation` | string | File containing the client secret |
| `--union.auth.deviceFlow.pollInterval` | string | amount of time the device flow would poll the token endpoint if auth server doesn't return a polling interval. Okta and google IDP do return an interval' (default "5s") |
| `--union.auth.deviceFlow.refreshTime` | string | grace period from the token expiry after which it would refresh the token. (default "5m0s") |
| `--union.auth.deviceFlow.timeout` | string | amount of time the device flow should complete or else it will be cancelled. (default "10m0s") |
| `--union.auth.enable` | | Whether to enable an authenticated conenction when communicating with admin. (default true) |
| `--union.auth.externalAuth.command` | strings | Command for external authentication token generation |
| `--union.auth.pkce.refreshTime` | string | grace period from the token expiry after which it would refresh the token. (default "5m0s") |
| `--union.auth.pkce.timeout` | string | Amount of time the browser session would be active for authentication from client app. (default "15s") |
| `--union.auth.scopes` | strings | List of scopes to request |
| `--union.auth.tokenRefreshWindow` | string | Max duration between token refresh attempt and token expiry. (default "1h0m0s") |
| `--union.auth.tokenUrl` | string | OPTIONAL: Your IdP's token endpoint. It'll be discovered from flyte admin's OAuth Metadata endpoint if not provided. |
| `--union.auth.type` | string | Type of OAuth2 flow used for communicating with admin. (default "Pkce") |
| `--union.cache.maxItemsCount` | int | Maximum number of items to keep in the cache before evicting. (default 1000) |
| `--union.connection.host` | string | Host to connect to (default "dns:///utt-mgdp-stg-us-east-2.cloud-staging.union.ai") |
| `--union.connection.insecure` | | Whether to connect over insecure channel |
| `--union.connection.insecureSkipVerify` | | InsecureSkipVerify controls whether a client verifies the server's certificate chain and host name.Caution: shouldn't be use for production usecases' |
| `--union.connection.keepAliveConfig.permitWithoutStream` | | If true, client sends keepalive pings even with no active RPCs. |
| `--union.connection.keepAliveConfig.time` | string | After a duration of this time if the client doesn't see any activity it pings the server to see if the transport is still alive. (default "20s") |
| `--union.connection.keepAliveConfig.timeout` | string | After having pinged for keepalive check, the client waits for a duration of Timeout and if no activity is seen even after that the connection is closed. (default "2m0s") |
| `--union.connection.maxBackoffDelay` | string | Max delay for grpc backoff (default "8s") |
| `--union.connection.maxRecvMsgSize` | int | Maximum size of a message in bytes of a gRPC message (default 10485760) |
| `--union.connection.maxRetries` | int | Max number of gRPC retries (default 4) |
| `--union.connection.minConnectTimeout` | string | Minimum timeout for establishing a connection (default "20s") |
| `--union.connection.perRetryTimeout` | string | gRPC per retry timeout (default "15s") |
| `--union.connection.serviceConfig` | string | Defines gRPC experimental JSON Service Config (default "{"loadBalancingConfig": [{"round_robin":{}}]}") |
| `--union.connection.trustedIdentityClaims.enabled` | | Enables passing of trusted claims while making inter service calls |
| `--union.connection.trustedIdentityClaims.externalIdentityClaim` | string | External identity claim of the service which is authorized to make internal service call. These are verified against userclouds actions |
| `--union.connection.trustedIdentityClaims.externalIdentityTypeClaim` | string | External identity type claim of app or user to use for the current service identity. It should be an 'app' for inter service communication |
| `--union.internalConnectionConfig.-` | stringToString | (default []) |
| `--union.internalConnectionConfig.enabled` | | Enables internal service to service communication instead of going through ingress. |
| `--union.internalConnectionConfig.urlPattern` | string | UrlPattern of the internal service endpoints. (default "{{ service }}-helmchart.{{ service }}.svc.cluster.local:80") |
| `--webhook.awsSecretManager.sidecarImage` | string | Specifies the sidecar docker image to use (default "docker.io/amazon/aws-secrets-manager-secret-sidecar:v0.1.4") |
| `--webhook.certDir` | string | Certificate directory to use to write generated certs. Defaults to /etc/webhook/certs/ (default "/etc/webhook/certs") |
| `--webhook.embeddedSecretManagerConfig.awsConfig.region` | string | AWS region |
| `--webhook.embeddedSecretManagerConfig.fileMountInitContainer.image` | string | Specifies init container image to use for mounting secrets as files. (default "busybox:1.28") |
| `--webhook.embeddedSecretManagerConfig.gcpConfig.project` | string | GCP project to be used for secret manager |
| `--webhook.embeddedSecretManagerConfig.type` | string | (default "AWS") |
| `--webhook.gcpSecretManager.sidecarImage` | string | Specifies the sidecar docker image to use (default "gcr.io/google.com/cloudsdktool/cloud-sdk:alpine") |
| `--webhook.listenPort` | int | The port to use to listen to webhook calls. Defaults to 9443 (default 9443) |
| `--webhook.localCert` | | write certs locally. Defaults to false |
| `--webhook.metrics-prefix` | string | An optional prefix for all published metrics. (default "flyte:") |
| `--webhook.secretName` | string | Secret name to write generated certs to. (default "flyte-pod-webhook") |
| `--webhook.serviceName` | string | The name of the webhook service. (default "flyte-pod-webhook") |
| `--webhook.servicePort` | int32 | The port on the service that hosting webhook. (default 443) |
| `--webhook.vaultSecretManager.role` | string | Specifies the vault role to use (default "flyte") |
=== PAGE: https://www.union.ai/docs/v1/serverless/api-reference/uctl-cli/uctl-demo/uctl-demo-reload ===
# uctl demo reload
Power cycle the Flyte executable pod, effectively picking up an updated
config.
## Synopsis
If you've changed the `~/.flyte/state/flyte.yaml` file, run this command
to restart the Flyte binary pod, effectively picking up the new
settings:
Usage:
```shell
$ uctl demo reload
```
```shell
$ uctl demo reload [flags]
```
## Options
| Option | Type | Description |
|--------|------|-------------|
| `--dev` | | Optional. Only start minio and postgres in the sandbox. |
| Option | Type | Description |
|--------|------|-------------|
| `--disable-agent` | | Optional. Disable the agent service. |
| Option | Type | Description |
|--------|------|-------------|
| `--dryRun` | | Optional. Only print the docker commands to bring up flyte sandbox/demo container.This will still call github api's to get the latest flyte release to use' |
| Option | Type | Description |
|--------|------|-------------|
| `--env` | strings | Optional. Provide Env variable in key=value format which can be passed to sandbox container. |
| `--force` | | Optional. Forcefully delete existing sandbox cluster if it exists. |
| `-h`, `--help` | help for reload |
| `--image` | string | Optional. Provide a fully qualified path to a Flyte compliant docker image. |
| `--imagePullOptions.platform` | string | Forces a specific platform's image to be pulled.' |
| `--imagePullOptions.registryAuth` | string | The base64 encoded credentials for the registry. |
| `--imagePullPolicy` | ImagePullPolicy | Optional. Defines the image pull behavior [Always/IfNotPresent/Never] (default Always) |
| `--pre` | | Optional. Pre release Version of flyte will be used for sandbox. |
| `--source` | string | deprecated, path of your source code, please build images with local daemon |
| `--version` | string | Version of flyte. Only supports flyte releases greater than v0.10.0 |
### Options inherited from parent commands
| Option | Type | Description |
|--------|------|-------------|
| `--admin.audience` | string | Audience to use when initiating OAuth2 authorization requests. |
| `--admin.authType` | string | Type of OAuth2 flow used for communicating with admin.ClientSecret, Pkce, ExternalCommand are valid values (default "ClientSecret") |
| `--admin.authorizationHeader` | string | Custom metadata header to pass JWT |
| `--admin.authorizationServerUrl` | string | This is the URL to your IdP's authorization server. It'll default to Endpoint |
| `--admin.caCertFilePath` | string | Use specified certificate file to verify the admin server peer. |
| `--admin.clientId` | string | Client ID (default "flytepropeller") |
| `--admin.clientSecretEnvVar` | string | Environment variable containing the client secret |
| `--admin.clientSecretLocation` | string | File containing the client secret (default "/etc/secrets/client_secret") |
| `--admin.command` | strings | Command for external authentication token generation |
| `--admin.defaultOrg` | string | OPTIONAL: Default org to use to support non-org based cli's.'. |
| `--admin.defaultServiceConfig` | string | |
| `--admin.deviceFlowConfig.pollInterval` | string | amount of time the device flow would poll the token endpoint if auth server doesn't return a polling interval. Okta and google IDP do return an interval' (default "5s") |
| `--admin.deviceFlowConfig.refreshTime` | string | grace period from the token expiry after which it would refresh the token. (default "5m0s") |
| `--admin.deviceFlowConfig.timeout` | string | amount of time the device flow should complete or else it will be cancelled. (default "10m0s") |
| `--admin.endpoint` | string | For admin types, specify where the uri of the service is located. |
| `--admin.httpProxyURL` | string | OPTIONAL: HTTP Proxy to be used for OAuth requests. |
| `--admin.insecure` | | Use insecure connection. |
| `--admin.insecureSkipVerify` | | InsecureSkipVerify controls whether a client verifies the server's certificate chain and host name.Caution: shouldn't be use for production usecases' |
| `--admin.maxBackoffDelay` | string | Max delay for grpc backoff (default "8s") |
| `--admin.maxMessageSizeBytes` | int | The max size in bytes for incoming gRPC messages |
| `--admin.maxRetries` | int | Max number of gRPC retries (default 4) |
| `--admin.perRetryTimeout` | string | gRPC per retry timeout (default "15s") |
| `--admin.pkceConfig.refreshTime` | string | grace period from the token expiry after which it would refresh the token. (default "5m0s") |
| `--admin.pkceConfig.timeout` | string | Amount of time the browser session would be active for authentication from client app. (default "2m0s") |
| `--admin.proxyCommand` | strings | Command for external proxy-authorization token generation |
| `--admin.scopes` | strings | List of scopes to request |
| `--admin.tokenRefreshWindow` | string | Max duration between token refresh attempt and token expiry. (default "0s") |
| `--admin.tokenUrl` | string | OPTIONAL: Your IdP's token endpoint. It'll be discovered from flyte admin's OAuth Metadata endpoint if not provided. |
| `--admin.useAudienceFromAdmin` | | Use Audience configured from admins public endpoint config. |
| `--admin.useAuth` | | Deprecated: Auth will be enabled/disabled based on admin's dynamically discovered information. |
| `--auth.appAuth.externalAuthServer.allowedAudience` | strings | Optional: A list of allowed audiences. If not provided, the audience is expected to be the public Uri of the service. |
| `--auth.appAuth.externalAuthServer.baseUrl` | string | This should be the base url of the authorization server that you are trying to hit. With Okta for instance, it will look something like https://company.okta.com/oauth2/abcdef123456789/ |
| `--auth.appAuth.externalAuthServer.httpProxyURL` | string | OPTIONAL: HTTP Proxy to be used for OAuth requests. |
| `--auth.appAuth.externalAuthServer.metadataUrl` | string | Optional: If the server doesn't support /.well-known/oauth-authorization-server, you can set a custom metadata url here.' |
| `--auth.appAuth.externalAuthServer.retryAttempts` | int | Optional: The number of attempted retries on a transient failure to get the OAuth metadata (default 5) |
| `--auth.appAuth.externalAuthServer.retryDelay` | string | Optional, Duration to wait between retries (default "1s") |
| `--auth.appAuth.selfAuthServer.accessTokenLifespan` | string | Defines the lifespan of issued access tokens. (default "30m0s") |
| `--auth.appAuth.selfAuthServer.authorizationCodeLifespan` | string | Defines the lifespan of issued access tokens. (default "5m0s") |
| `--auth.appAuth.selfAuthServer.claimSymmetricEncryptionKeySecretName` | string | OPTIONAL: Secret name to use to encrypt claims in authcode token. (default "claim_symmetric_key") |
| `--auth.appAuth.selfAuthServer.issuer` | string | Defines the issuer to use when issuing and validating tokens. The default value is https://{requestUri.HostAndPort}/ |
| `--auth.appAuth.selfAuthServer.oldTokenSigningRSAKeySecretName` | string | OPTIONAL: Secret name to use to retrieve Old RSA Signing Key. This can be useful during key rotation to continue to accept older tokens. (default "token_rsa_key_old.pem") |
| `--auth.appAuth.selfAuthServer.refreshTokenLifespan` | string | Defines the lifespan of issued access tokens. (default "1h0m0s") |
| `--auth.appAuth.selfAuthServer.tokenSigningRSAKeySecretName` | string | OPTIONAL: Secret name to use to retrieve RSA Signing Key. (default "token_rsa_key.pem") |
| `--auth.appAuth.thirdPartyConfig.flyteClient.audience` | string | Audience to use when initiating OAuth2 authorization requests. |
| `--auth.appAuth.thirdPartyConfig.flyteClient.clientId` | string | public identifier for the app which handles authorization for a Flyte deployment (default "uctl") |
| `--auth.appAuth.thirdPartyConfig.flyteClient.redirectUri` | string | This is the callback uri registered with the app which handles authorization for a Flyte deployment (default "http://localhost:53593/callback") |
| `--auth.appAuth.thirdPartyConfig.flyteClient.scopes` | strings | Recommended scopes for the client to request. (default [all,offline]) |
| `--auth.disableForGrpc` | | Disables auth enforcement on Grpc Endpoints. |
| `--auth.disableForHttp` | | Disables auth enforcement on HTTP Endpoints. |
| `--auth.grpcAuthorizationHeader` | string | (default "flyte-authorization") |
| `--auth.httpAuthorizationHeader` | string | (default "flyte-authorization") |
| `--auth.httpProxyURL` | string | OPTIONAL: HTTP Proxy to be used for OAuth requests. |
| `--auth.tokenEndpointProxyPath` | string | The path used to proxy calls to the TokenURL |
| `--auth.userAuth.cookieBlockKeySecretName` | string | OPTIONAL: Secret name to use for cookie block key. (default "cookie_block_key") |
| `--auth.userAuth.cookieHashKeySecretName` | string | OPTIONAL: Secret name to use for cookie hash key. (default "cookie_hash_key") |
| `--auth.userAuth.cookieSetting.domain` | string | OPTIONAL: Allows you to set the domain attribute on the auth cookies. |
| `--auth.userAuth.cookieSetting.sameSitePolicy` | string | OPTIONAL: Allows you to declare if your cookie should be restricted to a first-party or same-site context.Wrapper around http.SameSite. (default "DefaultMode") |
| `--auth.userAuth.httpProxyURL` | string | OPTIONAL: HTTP Proxy to be used for OAuth requests. |
| `--auth.userAuth.idpQueryParameter` | string | idp query parameter used for selecting a particular IDP for doing user authentication. Eg: for Okta passing idp={IDP-ID} forces the authentication to happen with IDP-ID |
| `--auth.userAuth.openId.baseUrl` | string | |
| `--auth.userAuth.openId.clientId` | string | |
| `--auth.userAuth.openId.clientSecretFile` | string | |
| `--auth.userAuth.openId.clientSecretName` | string | (default "oidc_client_secret") |
| `--auth.userAuth.openId.scopes` | strings | (default [openid,profile]) |
| `--auth.userAuth.redirectUrl` | string | (default "/console") |
| `--authorizer.internalCommunicationConfig.enabled` | | Enables authorization decisions for internal communication. (default true) |
| `--authorizer.internalCommunicationConfig.ingressIdentity` | string | IngressIdentity used in the cluster. Needed to exclude the communication coming from ingress. (default "ingress-nginx.ingress-nginx.serviceaccount.identity.linkerd.cluster.local") |
| `--authorizer.internalCommunicationConfig.tenantUrlPatternIdentity` | string | UrlPatternIdentity of the internal tenant service endpoint identities. (default "{{ service }}.{{ org }}.serviceaccount.identity.linkerd.cluster.local") |
| `--authorizer.internalCommunicationConfig.urlPatternIdentity` | string | UrlPatternIdentity of the internal service endpoint identities. (default "{{ service }}-helmchart.{{ service }}.serviceaccount.identity.linkerd.cluster.local") |
| `--authorizer.mode` | string | (default "Active") |
| `--authorizer.organizationConfig.PolicyConfig.adminPolicyDescription` | string | description for the boilerplate admin policy (default "Contributor permissions and full admin permissions to manage users and view usage dashboards") |
| `--authorizer.organizationConfig.PolicyConfig.contributorPolicyDescription` | string | description for the boilerplate contributor policy (default "Viewer permissions and permissions to create workflows, tasks, launch plans, and executions") |
| `--authorizer.organizationConfig.PolicyConfig.defaultUserPolicyRoleType` | string | name of the role type to determine which default policy new users added to the organization should be assigned (default "Viewer") |
| `--authorizer.organizationConfig.PolicyConfig.serverlessContributorPolicyDescription` | string | description for the boilerplate serverless contributor policy (default "Viewer permissions and permissions to create workflows, tasks, launch plans, and executions") |
| `--authorizer.organizationConfig.PolicyConfig.serverlessViewerPolicyDescription` | string | description for the boilerplate serverless viewer policy (default "Permissions to view Flyte entities") |
| `--authorizer.organizationConfig.PolicyConfig.viewerPolicyDescription` | string | description for the boilerplate viewer policy (default "Permissions to view Flyte entities") |
| `--authorizer.organizationConfig.defaultPolicyCacheDuration` | string | Cache entry duration for the store of the default policy per organization (default "10m0s") |
| `--authorizer.syncRuleRefreshInterval` | string | (default "1m0s") |
| `--authorizer.type` | string | (default "UserClouds") |
| `--authorizer.userCloudsClient.cache.redis.ttl.edgeTypes` | string | Specifies how long edge types remain in the cache.. (default "30m0s") |
| `--authorizer.userCloudsClient.cache.redis.ttl.edges` | string | Specifies how long edges remain in the cache. (default "30m0s") |
| `--authorizer.userCloudsClient.cache.redis.ttl.objectTypes` | string | Specifies how long object types remain in the cache. (default "30m0s") |
| `--authorizer.userCloudsClient.cache.redis.ttl.objects` | string | Specifies how long objects remain in the cache. (default "30m0s") |
| `--authorizer.userCloudsClient.cache.type` | string | Cache type to use. (default "none") |
| `--authorizer.userCloudsClient.clientID` | string | UserClouds client id |
| `--authorizer.userCloudsClient.clientSecretName` | string | UserCloud client secret name to read from the secret manager. (default "userclouds-client-secret") |
| `--authorizer.userCloudsClient.enableLogging` | | Enable userclouds client's internal logging. Calls to post logs take 250-350 ms and will impact p99 latency, enable with caution. |
| `--authorizer.userCloudsClient.tenantID` | string | UserClouds tenant id. Should be a UUID. |
| `--authorizer.userCloudsClient.tenantUrl` | string | Something like https://{yourtenant}.tenant.userclouds.com |
| `--config` | string | config file (default is /Users/andrew/.union/config.yaml) |
| `--connection.environment` | string | |
| `--connection.region` | string | |
| `--connection.rootTenantURLPattern` | string | Pattern for tenant url. (default "dns:///{{ organization }}.cloud-staging.union.ai") |
| `--console.endpoint` | string | Endpoint of console, if different than flyte admin |
| `--database.connMaxLifeTime` | string | sets the maximum amount of time a connection may be reused (default "1h0m0s") |
| `--database.enableForeignKeyConstraintWhenMigrating` | | Whether to enable gorm foreign keys when migrating the db |
| `--database.maxIdleConnections` | int | maxIdleConnections sets the maximum number of connections in the idle connection pool. (default 10) |
| `--database.maxOpenConnections` | int | maxOpenConnections sets the maximum number of open connections to the database. (default 100) |
| `--database.postgres.dbname` | string | The database name (default "postgres") |
| `--database.postgres.debug` | | |
| `--database.postgres.host` | string | The host name of the database server (default "localhost") |
| `--database.postgres.options` | string | See http://gorm.io/docs/connecting_to_the_database.html for available options passed, in addition to the above. (default "sslmode=disable") |
| `--database.postgres.password` | string | The database password. (default "postgres") |
| `--database.postgres.passwordPath` | string | Points to the file containing the database password. |
| `--database.postgres.port` | int | The port name of the database server (default 30001) |
| `--database.postgres.readReplicaHost` | string | The host name of the read replica database server (default "localhost") |
| `--database.postgres.username` | string | The database user who is connecting to the server. (default "postgres") |
| `--database.sqlite.file` | string | The path to the file (existing or new) where the DB should be created / stored. If existing, then this will be re-used, else a new will be created |
| `--db.connectionPool.maxConnectionLifetime` | string | (default "0s") |
| `--db.connectionPool.maxIdleConnections` | int | |
| `--db.connectionPool.maxOpenConnections` | int | |
| `--db.dbname` | string | (default "postgres") |
| `--db.debug` | | |
| `--db.host` | string | (default "postgres") |
| `--db.log_level` | int | (default 4) |
| `--db.options` | string | (default "sslmode=disable") |
| `--db.password` | string | |
| `--db.passwordPath` | string | |
| `--db.port` | int | (default 5432) |
| `--db.username` | string | (default "postgres") |
| `-d`, `--domain` | string | Specifies the Flyte project's domain. |
| `--files.archive` | | Pass in archive file either an http link or local path. |
| `--files.assumableIamRole` | string | Custom assumable iam auth role to register launch plans with. |
| `--files.continueOnError` | | Continue on error when registering files. |
| `--files.destinationDirectory` | string | Location of source code in container. |
| `--files.dryRun` | | Execute command without making any modifications. |
| `--files.enableSchedule` | | Enable the schedule if the files contain schedulable launchplan. |
| `--files.force` | | Force use of version number on entities registered with flyte. |
| `--files.k8ServiceAccount` | string | Deprecated. Please use `--K8sServiceAccount`|
| `--files.k8sServiceAccount` | string | Custom kubernetes service account auth role to register launch plans with. |
| `--files.outputLocationPrefix` | string | Custom output location prefix for offloaded types (files/schemas). |
| `--files.sourceUploadPath` | string | Deprecated: Update flyte admin to avoid having to configure storage access from uctl. |
| `--files.version` | string | Version of the entity to be registered with flyte which are un-versioned after serialization. |
| `--logger.formatter.type` | string | Sets logging format type. (default "json") |
| `--logger.level` | int | Sets the minimum logging level. (default 3) |
| `--logger.mute` | | Mutes all logs regardless of severity. Intended for benchmarks/tests only. |
| `--logger.show-source` | | Includes source code location in logs. |
| `--org` | string | Organization to work on. If not set, default to user's org. |
| `--otel.file.filename` | string | Filename to store exported telemetry traces (default "/tmp/trace.txt") |
| `--otel.jaeger.endpoint` | string | Endpoint for the jaeger telemetry trace ingestor (default "http://localhost:14268/api/traces") |
| `--otel.otlpgrpc.endpoint` | string | Endpoint for the OTLP telemetry trace collector (default "http://localhost:4317") |
| `--otel.otlphttp.endpoint` | string | Endpoint for the OTLP telemetry trace collector (default "http://localhost:4318/v1/traces") |
| `--otel.sampler.parentSampler` | string | Sets the parent sampler to use for the tracer (default "always") |
| `--otel.type` | string | Sets the type of exporter to configure [noop/file/jaeger/otlpgrpc/otlphttp]. (default "noop") |
| `-o`, `--output` | string | Specifies the output type - supported formats [TABLE JSON YAML DOT DOTURL]. NOTE: dot, doturl are only supported for Workflow (default "table") |
| `--plugins.catalogcache.reader.maxItems` | int | Maximum number of entries to keep in the index. (default 10000) |
| `--plugins.catalogcache.reader.maxRetries` | int | Maximum number of retries per item. (default 3) |
| `--plugins.catalogcache.reader.workers` | int | Number of concurrent workers to start processing the queue. (default 10) |
| `--plugins.catalogcache.writer.maxItems` | int | Maximum number of entries to keep in the index. (default 10000) |
| `--plugins.catalogcache.writer.maxRetries` | int | Maximum number of retries per item. (default 3) |
| `--plugins.catalogcache.writer.workers` | int | Number of concurrent workers to start processing the queue. (default 10) |
| `-p`, `--project` | string | Specifies the Flyte project. |
| `--rediscache.passwordSecretName` | string | Name of secret with Redis password. |
| `--rediscache.primaryEndpoint` | string | Primary endpoint for the redis cache that can be used for both reads and writes. |
| `--rediscache.replicaEndpoint` | string | Replica endpoint for the redis cache that can be used for reads. |
| `--secrets.env-prefix` | string | Prefix for environment variables (default "FLYTE_SECRET_") |
| `--secrets.secrets-prefix` | string | Prefix where to look for secrets file (default "/etc/secrets") |
| `--secrets.type` | string | Sets the type of storage to configure [local]. (default "local") |
| `--server.dataProxy.download.maxExpiresIn` | string | Maximum allowed expiration duration. (default "1h0m0s") |
| `--server.dataProxy.upload.defaultFileNameLength` | int | Default length for the generated file name if not provided in the request. (default 20) |
| `--server.dataProxy.upload.maxExpiresIn` | string | Maximum allowed expiration duration. (default "1h0m0s") |
| `--server.dataProxy.upload.maxSize` | string | Maximum allowed upload size. (default "6Mi") |
| `--server.dataProxy.upload.storagePrefix` | string | Storage prefix to use for all upload requests. |
| `--server.grpc.enableGrpcLatencyMetrics` | | Enable grpc latency metrics. Note Histograms metrics can be expensive on Prometheus servers. |
| `--server.grpc.maxMessageSizeBytes` | int | The max size in bytes for incoming gRPC messages |
| `--server.grpc.port` | int | On which grpc port to serve admin (default 8089) |
| `--server.grpc.serverReflection` | | Enable GRPC Server Reflection (default true) |
| `--server.grpcPort` | int | deprecated |
| `--server.grpcServerReflection` | | deprecated |
| `--server.httpPort` | int | On which http port to serve admin (default 8088) |
| `--server.kube-config` | string | Path to kubernetes client config file, default is empty, useful for incluster config. |
| `--server.kubeClientConfig.burst` | int | Max burst rate for throttle. 0 defaults to 10 (default 25) |
| `--server.kubeClientConfig.qps` | int32 | Max QPS to the master for requests to KubeAPI. 0 defaults to 5. (default 100) |
| `--server.kubeClientConfig.timeout` | string | Max duration allowed for every request to KubeAPI before giving up. 0 implies no timeout. (default "30s") |
| `--server.master` | string | The address of the Kubernetes API server. |
| `--server.readHeaderTimeoutSeconds` | int | The amount of time allowed to read request headers. (default 32) |
| `--server.security.allowCors` | | (default true) |
| `--server.security.allowedHeaders` | strings | (default [Content-Type,flyte-authorization]) |
| `--server.security.allowedOrigins` | strings | (default [*]) |
| `--server.security.auditAccess` | | |
| `--server.security.secure` | | |
| `--server.security.ssl.certificateFile` | string | |
| `--server.security.ssl.keyFile` | string | |
| `--server.security.useAuth` | | |
| `--server.thirdPartyConfig.flyteClient.audience` | string | Audience to use when initiating OAuth2 authorization requests. |
| `--server.thirdPartyConfig.flyteClient.clientId` | string | public identifier for the app which handles authorization for a Flyte deployment |
| `--server.thirdPartyConfig.flyteClient.redirectUri` | string | This is the callback uri registered with the app which handles authorization for a Flyte deployment |
| `--server.thirdPartyConfig.flyteClient.scopes` | strings | Recommended scopes for the client to request. |
| `--server.watchService.maxActiveClusterConnections` | int | (default 5) |
| `--server.watchService.maxPageSize` | int | (default 50000) |
| `--server.watchService.nonTerminalStatusUpdatesInterval` | string | (default "1m0s") |
| `--server.watchService.pollInterval` | string | (default "1s") |
| `--sharedservice.connectPort` | string | On which connect port to serve admin (default "8080") |
| `--sharedservice.grpc.grpcMaxResponseStatusBytes` | int32 | specifies the maximum (uncompressed) size of header list that the client is prepared to accept on grpc calls (default 32000) |
| `--sharedservice.grpc.maxConcurrentStreams` | int | Limit on the number of concurrent streams to each ServerTransport. (default 100) |
| `--sharedservice.grpc.maxMessageSizeBytes` | int | Limit on the size of message that can be received on the server. (default 10485760) |
| `--sharedservice.grpcServerReflection` | | Enable GRPC Server Reflection (default true) |
| `--sharedservice.httpPort` | string | On which http port to serve admin (default "8089") |
| `--sharedservice.kubeConfig` | string | Path to kubernetes client config file. |
| `--sharedservice.master` | string | The address of the Kubernetes API server. |
| `--sharedservice.metrics.enableClientGrpcHistograms` | | Enable client grpc histograms (default true) |
| `--sharedservice.metrics.enableGrpcHistograms` | | Enable grpc histograms (default true) |
| `--sharedservice.metrics.scope` | string | Scope to emit metrics under (default "service:") |
| `--sharedservice.port` | string | On which grpc port to serve admin (default "8080") |
| `--sharedservice.profiler.enabled` | | Enable Profiler on server |
| `--sharedservice.profilerPort` | string | Profile port to start listen for pprof and metric handlers on. (default "10254") |
| `--sharedservice.security.allowCors` | | |
| `--sharedservice.security.allowLocalhostAccess` | | Whether to permit localhost unauthenticated access to the server |
| `--sharedservice.security.allowedHeaders` | strings | |
| `--sharedservice.security.allowedOrigins` | strings | |
| `--sharedservice.security.auditAccess` | | |
| `--sharedservice.security.orgOverride` | string | Override org in identity context if localhost access enabled |
| `--sharedservice.security.secure` | | |
| `--sharedservice.security.ssl.certificateAuthorityFile` | string | |
| `--sharedservice.security.ssl.certificateFile` | string | |
| `--sharedservice.security.ssl.keyFile` | string | |
| `--sharedservice.security.useAuth` | | |
| `--sharedservice.sync.syncInterval` | string | Time interval to sync (default "5m0s") |
| `--storage.cache.max_size_mbs` | int | Maximum size of the cache where the Blob store data is cached in-memory. If not specified or set to 0, cache is not used |
| `--storage.cache.target_gc_percent` | int | Sets the garbage collection target percentage. |
| `--storage.connection.access-key` | string | Access key to use. Only required when authtype is set to accesskey. |
| `--storage.connection.auth-type` | string | Auth Type to use [iam, accesskey]. (default "iam") |
| `--storage.connection.disable-ssl` | | Disables SSL connection. Should only be used for development. |
| `--storage.connection.endpoint` | string | URL for storage client to connect to. |
| `--storage.connection.region` | string | Region to connect to. (default "us-east-1") |
| `--storage.connection.secret-key` | string | Secret to use when accesskey is set. |
| `--storage.container` | string | Initial container (in s3 a bucket) to create -if it doesn't exist-.' |
| `--storage.defaultHttpClient.timeout` | string | Sets time out on the http client. (default "0s") |
| `--storage.enable-multicontainer` | | If this is true, then the container argument is overlooked and redundant. This config will automatically open new connections to new containers/buckets as they are encountered |
| `--storage.limits.maxDownloadMBs` | int | Maximum allowed download size (in MBs) per call. (default 2) |
| `--storage.stow.config` | stringToString | Configuration for stow backend. Refer to github/flyteorg/stow (default []) |
| `--storage.stow.kind` | string | Kind of Stow backend to use. Refer to github/flyteorg/stow |
| `--storage.type` | string | Sets the type of storage to configure [s3/minio/local/mem/stow]. (default "s3") |
| `--union.auth.authorizationMetadataKey` | string | Authorization Header to use when passing Access Tokens to the server (default "flyte-authorization") |
| `--union.auth.clientId` | string | Client ID |
| `--union.auth.clientSecretEnvVar` | string | Environment variable containing the client secret |
| `--union.auth.clientSecretLocation` | string | File containing the client secret |
| `--union.auth.deviceFlow.pollInterval` | string | amount of time the device flow would poll the token endpoint if auth server doesn't return a polling interval. Okta and google IDP do return an interval' (default "5s") |
| `--union.auth.deviceFlow.refreshTime` | string | grace period from the token expiry after which it would refresh the token. (default "5m0s") |
| `--union.auth.deviceFlow.timeout` | string | amount of time the device flow should complete or else it will be cancelled. (default "10m0s") |
| `--union.auth.enable` | | Whether to enable an authenticated conenction when communicating with admin. (default true) |
| `--union.auth.externalAuth.command` | strings | Command for external authentication token generation |
| `--union.auth.pkce.refreshTime` | string | grace period from the token expiry after which it would refresh the token. (default "5m0s") |
| `--union.auth.pkce.timeout` | string | Amount of time the browser session would be active for authentication from client app. (default "15s") |
| `--union.auth.scopes` | strings | List of scopes to request |
| `--union.auth.tokenRefreshWindow` | string | Max duration between token refresh attempt and token expiry. (default "1h0m0s") |
| `--union.auth.tokenUrl` | string | OPTIONAL: Your IdP's token endpoint. It'll be discovered from flyte admin's OAuth Metadata endpoint if not provided. |
| `--union.auth.type` | string | Type of OAuth2 flow used for communicating with admin. (default "Pkce") |
| `--union.cache.maxItemsCount` | int | Maximum number of items to keep in the cache before evicting. (default 1000) |
| `--union.connection.host` | string | Host to connect to (default "dns:///utt-mgdp-stg-us-east-2.cloud-staging.union.ai") |
| `--union.connection.insecure` | | Whether to connect over insecure channel |
| `--union.connection.insecureSkipVerify` | | InsecureSkipVerify controls whether a client verifies the server's certificate chain and host name.Caution: shouldn't be use for production usecases' |
| `--union.connection.keepAliveConfig.permitWithoutStream` | | If true, client sends keepalive pings even with no active RPCs. |
| `--union.connection.keepAliveConfig.time` | string | After a duration of this time if the client doesn't see any activity it pings the server to see if the transport is still alive. (default "20s") |
| `--union.connection.keepAliveConfig.timeout` | string | After having pinged for keepalive check, the client waits for a duration of Timeout and if no activity is seen even after that the connection is closed. (default "2m0s") |
| `--union.connection.maxBackoffDelay` | string | Max delay for grpc backoff (default "8s") |
| `--union.connection.maxRecvMsgSize` | int | Maximum size of a message in bytes of a gRPC message (default 10485760) |
| `--union.connection.maxRetries` | int | Max number of gRPC retries (default 4) |
| `--union.connection.minConnectTimeout` | string | Minimum timeout for establishing a connection (default "20s") |
| `--union.connection.perRetryTimeout` | string | gRPC per retry timeout (default "15s") |
| `--union.connection.serviceConfig` | string | Defines gRPC experimental JSON Service Config (default "{"loadBalancingConfig": [{"round_robin":{}}]}") |
| `--union.connection.trustedIdentityClaims.enabled` | | Enables passing of trusted claims while making inter service calls |
| `--union.connection.trustedIdentityClaims.externalIdentityClaim` | string | External identity claim of the service which is authorized to make internal service call. These are verified against userclouds actions |
| `--union.connection.trustedIdentityClaims.externalIdentityTypeClaim` | string | External identity type claim of app or user to use for the current service identity. It should be an 'app' for inter service communication |
| `--union.internalConnectionConfig.-` | stringToString | (default []) |
| `--union.internalConnectionConfig.enabled` | | Enables internal service to service communication instead of going through ingress. |
| `--union.internalConnectionConfig.urlPattern` | string | UrlPattern of the internal service endpoints. (default "{{ service }}-helmchart.{{ service }}.svc.cluster.local:80") |
| `--webhook.awsSecretManager.sidecarImage` | string | Specifies the sidecar docker image to use (default "docker.io/amazon/aws-secrets-manager-secret-sidecar:v0.1.4") |
| `--webhook.certDir` | string | Certificate directory to use to write generated certs. Defaults to /etc/webhook/certs/ (default "/etc/webhook/certs") |
| `--webhook.embeddedSecretManagerConfig.awsConfig.region` | string | AWS region |
| `--webhook.embeddedSecretManagerConfig.fileMountInitContainer.image` | string | Specifies init container image to use for mounting secrets as files. (default "busybox:1.28") |
| `--webhook.embeddedSecretManagerConfig.gcpConfig.project` | string | GCP project to be used for secret manager |
| `--webhook.embeddedSecretManagerConfig.type` | string | (default "AWS") |
| `--webhook.gcpSecretManager.sidecarImage` | string | Specifies the sidecar docker image to use (default "gcr.io/google.com/cloudsdktool/cloud-sdk:alpine") |
| `--webhook.listenPort` | int | The port to use to listen to webhook calls. Defaults to 9443 (default 9443) |
| `--webhook.localCert` | | write certs locally. Defaults to false |
| `--webhook.metrics-prefix` | string | An optional prefix for all published metrics. (default "flyte:") |
| `--webhook.secretName` | string | Secret name to write generated certs to. (default "flyte-pod-webhook") |
| `--webhook.serviceName` | string | The name of the webhook service. (default "flyte-pod-webhook") |
| `--webhook.servicePort` | int32 | The port on the service that hosting webhook. (default 443) |
| `--webhook.vaultSecretManager.role` | string | Specifies the vault role to use (default "flyte") |
=== PAGE: https://www.union.ai/docs/v1/serverless/api-reference/uctl-cli/uctl-demo/uctl-demo-start ===
# uctl demo start
Starts the Flyte demo cluster.
## Synopsis
Flyte demo is a fully standalone minimal environment for running Flyte.
It provides a simplified way of running Flyte demo as a single Docker
container locally.
Starts the demo cluster without any source code:
```shell
$ uctl demo start
```
Runs a dev cluster, which only has minio and postgres pod:
```shell
$ uctl demo start --dev
```
Mounts your source code repository inside the demo cluster:
```shell
$ uctl demo start --source=$HOME/flyteorg/flytesnacks
```
Specify a Flyte demo compliant image with the registry. This is useful
in case you want to use an image from your registry:
```shell
$ uctl demo start --image docker.io/my-override:latest
```
Note: If image flag is passed then Flytectl will ignore version and pre
flags.
Specify a Flyte demo image pull policy. Possible pull policy values are
Always, IfNotPresent, or Never:
```shell
$ uctl demo start --image docker.io/my-override:latest --imagePullPolicy Always
```
Runs a specific version of Flyte. Flytectl demo only supports Flyte
version available in the Github release,
{https://github.com/flyteorg/flyte/tags}:
```shell
$ uctl demo start --version=v0.14.0
```
> [!NOTE]
> Flytectl demo is only supported for Flyte versions >= v1.0.0
Runs the latest pre release of Flyte:
```shell
$ uctl demo start --pre
```
Start demo cluster passing environment variables. This can be used to
pass docker specific env variables or flyte specific env variables. eg:
for passing timeout value in secs for the demo container use the
following:
```shell
$ uctl demo start --env FLYTE_TIMEOUT=700
```
The DURATION can be a positive integer or a floating-point number,
followed by an optional unit suffix:: s - seconds (default) m - minutes
h - hours d - days When no unit is used, it defaults to seconds. If the
duration is set to zero, the associated timeout is disabled.
For passing multiple environment variables:
```shell
$ uctl demo start --env USER=foo --env PASSWORD=bar
```
For just printing the docker commands for bringing up the demo container:
```shell
$ uctl demo start --dryRun
```
Usage:
```shell
$ uctl demo start [flags]
```
## Options
| Option | Type | Description |
|--------|------|-------------|
| `--dev` | | Optional. Only start minio and postgres in the sandbox. |
| Option | Type | Description |
|--------|------|-------------|
| `--disable-agent` | | Optional. Disable the agent service. |
| Option | Type | Description |
|--------|------|-------------|
| `--dryRun` | | Optional. Only print the docker commands to bring up flyte sandbox/demo container.This will still call github api's to get the latest flyte release to use' |
| Option | Type | Description |
|--------|------|-------------|
| `--env` | strings | Optional. Provide Env variable in key=value format which can be passed to sandbox container. |
| `--force` | | Optional. Forcefully delete existing sandbox cluster if it exists. |
| `-h`, `--help` | help for start |
| `--image` | string | Optional. Provide a fully qualified path to a Flyte compliant docker image. |
| `--imagePullOptions.platform` | string | Forces a specific platform's image to be pulled.' |
| `--imagePullOptions.registryAuth` | string | The base64 encoded credentials for the registry. |
| `--imagePullPolicy` | ImagePullPolicy | Optional. Defines the image pull behavior [Always/IfNotPresent/Never] (default Always) |
| `--pre` | | Optional. Pre release Version of flyte will be used for sandbox. |
| `--source` | string | deprecated, path of your source code, please build images with local daemon |
| `--version` | string | Version of flyte. Only supports flyte releases greater than v0.10.0 |
### Options inherited from parent commands
| Option | Type | Description |
|--------|------|-------------|
| `--admin.audience` | string | Audience to use when initiating OAuth2 authorization requests. |
| `--admin.authType` | string | Type of OAuth2 flow used for communicating with admin.ClientSecret, Pkce, ExternalCommand are valid values (default "ClientSecret") |
| `--admin.authorizationHeader` | string | Custom metadata header to pass JWT |
| `--admin.authorizationServerUrl` | string | This is the URL to your IdP's authorization server. It'll default to Endpoint |
| `--admin.caCertFilePath` | string | Use specified certificate file to verify the admin server peer. |
| `--admin.clientId` | string | Client ID (default "flytepropeller") |
| `--admin.clientSecretEnvVar` | string | Environment variable containing the client secret |
| `--admin.clientSecretLocation` | string | File containing the client secret (default "/etc/secrets/client_secret") |
| `--admin.command` | strings | Command for external authentication token generation |
| `--admin.defaultOrg` | string | OPTIONAL: Default org to use to support non-org based cli's.'. |
| `--admin.defaultServiceConfig` | string | |
| `--admin.deviceFlowConfig.pollInterval` | string | amount of time the device flow would poll the token endpoint if auth server doesn't return a polling interval. Okta and google IDP do return an interval' (default "5s") |
| `--admin.deviceFlowConfig.refreshTime` | string | grace period from the token expiry after which it would refresh the token. (default "5m0s") |
| `--admin.deviceFlowConfig.timeout` | string | amount of time the device flow should complete or else it will be cancelled. (default "10m0s") |
| `--admin.endpoint` | string | For admin types, specify where the uri of the service is located. |
| `--admin.httpProxyURL` | string | OPTIONAL: HTTP Proxy to be used for OAuth requests. |
| `--admin.insecure` | | Use insecure connection. |
| `--admin.insecureSkipVerify` | | InsecureSkipVerify controls whether a client verifies the server's certificate chain and host name.Caution: shouldn't be use for production usecases' |
| `--admin.maxBackoffDelay` | string | Max delay for grpc backoff (default "8s") |
| `--admin.maxMessageSizeBytes` | int | The max size in bytes for incoming gRPC messages |
| `--admin.maxRetries` | int | Max number of gRPC retries (default 4) |
| `--admin.perRetryTimeout` | string | gRPC per retry timeout (default "15s") |
| `--admin.pkceConfig.refreshTime` | string | grace period from the token expiry after which it would refresh the token. (default "5m0s") |
| `--admin.pkceConfig.timeout` | string | Amount of time the browser session would be active for authentication from client app. (default "2m0s") |
| `--admin.proxyCommand` | strings | Command for external proxy-authorization token generation |
| `--admin.scopes` | strings | List of scopes to request |
| `--admin.tokenRefreshWindow` | string | Max duration between token refresh attempt and token expiry. (default "0s") |
| `--admin.tokenUrl` | string | OPTIONAL: Your IdP's token endpoint. It'll be discovered from flyte admin's OAuth Metadata endpoint if not provided. |
| `--admin.useAudienceFromAdmin` | | Use Audience configured from admins public endpoint config. |
| `--admin.useAuth` | | Deprecated: Auth will be enabled/disabled based on admin's dynamically discovered information. |
| `--auth.appAuth.externalAuthServer.allowedAudience` | strings | Optional: A list of allowed audiences. If not provided, the audience is expected to be the public Uri of the service. |
| `--auth.appAuth.externalAuthServer.baseUrl` | string | This should be the base url of the authorization server that you are trying to hit. With Okta for instance, it will look something like https://company.okta.com/oauth2/abcdef123456789/ |
| `--auth.appAuth.externalAuthServer.httpProxyURL` | string | OPTIONAL: HTTP Proxy to be used for OAuth requests. |
| `--auth.appAuth.externalAuthServer.metadataUrl` | string | Optional: If the server doesn't support /.well-known/oauth-authorization-server, you can set a custom metadata url here.' |
| `--auth.appAuth.externalAuthServer.retryAttempts` | int | Optional: The number of attempted retries on a transient failure to get the OAuth metadata (default 5) |
| `--auth.appAuth.externalAuthServer.retryDelay` | string | Optional, Duration to wait between retries (default "1s") |
| `--auth.appAuth.selfAuthServer.accessTokenLifespan` | string | Defines the lifespan of issued access tokens. (default "30m0s") |
| `--auth.appAuth.selfAuthServer.authorizationCodeLifespan` | string | Defines the lifespan of issued access tokens. (default "5m0s") |
| `--auth.appAuth.selfAuthServer.claimSymmetricEncryptionKeySecretName` | string | OPTIONAL: Secret name to use to encrypt claims in authcode token. (default "claim_symmetric_key") |
| `--auth.appAuth.selfAuthServer.issuer` | string | Defines the issuer to use when issuing and validating tokens. The default value is https://{requestUri.HostAndPort}/ |
| `--auth.appAuth.selfAuthServer.oldTokenSigningRSAKeySecretName` | string | OPTIONAL: Secret name to use to retrieve Old RSA Signing Key. This can be useful during key rotation to continue to accept older tokens. (default "token_rsa_key_old.pem") |
| `--auth.appAuth.selfAuthServer.refreshTokenLifespan` | string | Defines the lifespan of issued access tokens. (default "1h0m0s") |
| `--auth.appAuth.selfAuthServer.tokenSigningRSAKeySecretName` | string | OPTIONAL: Secret name to use to retrieve RSA Signing Key. (default "token_rsa_key.pem") |
| `--auth.appAuth.thirdPartyConfig.flyteClient.audience` | string | Audience to use when initiating OAuth2 authorization requests. |
| `--auth.appAuth.thirdPartyConfig.flyteClient.clientId` | string | public identifier for the app which handles authorization for a Flyte deployment (default "uctl") |
| `--auth.appAuth.thirdPartyConfig.flyteClient.redirectUri` | string | This is the callback uri registered with the app which handles authorization for a Flyte deployment (default "http://localhost:53593/callback") |
| `--auth.appAuth.thirdPartyConfig.flyteClient.scopes` | strings | Recommended scopes for the client to request. (default [all,offline]) |
| `--auth.disableForGrpc` | | Disables auth enforcement on Grpc Endpoints. |
| `--auth.disableForHttp` | | Disables auth enforcement on HTTP Endpoints. |
| `--auth.grpcAuthorizationHeader` | string | (default "flyte-authorization") |
| `--auth.httpAuthorizationHeader` | string | (default "flyte-authorization") |
| `--auth.httpProxyURL` | string | OPTIONAL: HTTP Proxy to be used for OAuth requests. |
| `--auth.tokenEndpointProxyPath` | string | The path used to proxy calls to the TokenURL |
| `--auth.userAuth.cookieBlockKeySecretName` | string | OPTIONAL: Secret name to use for cookie block key. (default "cookie_block_key") |
| `--auth.userAuth.cookieHashKeySecretName` | string | OPTIONAL: Secret name to use for cookie hash key. (default "cookie_hash_key") |
| `--auth.userAuth.cookieSetting.domain` | string | OPTIONAL: Allows you to set the domain attribute on the auth cookies. |
| `--auth.userAuth.cookieSetting.sameSitePolicy` | string | OPTIONAL: Allows you to declare if your cookie should be restricted to a first-party or same-site context.Wrapper around http.SameSite. (default "DefaultMode") |
| `--auth.userAuth.httpProxyURL` | string | OPTIONAL: HTTP Proxy to be used for OAuth requests. |
| `--auth.userAuth.idpQueryParameter` | string | idp query parameter used for selecting a particular IDP for doing user authentication. Eg: for Okta passing idp={IDP-ID} forces the authentication to happen with IDP-ID |
| `--auth.userAuth.openId.baseUrl` | string | |
| `--auth.userAuth.openId.clientId` | string | |
| `--auth.userAuth.openId.clientSecretFile` | string | |
| `--auth.userAuth.openId.clientSecretName` | string | (default "oidc_client_secret") |
| `--auth.userAuth.openId.scopes` | strings | (default [openid,profile]) |
| `--auth.userAuth.redirectUrl` | string | (default "/console") |
| `--authorizer.internalCommunicationConfig.enabled` | | Enables authorization decisions for internal communication. (default true) |
| `--authorizer.internalCommunicationConfig.ingressIdentity` | string | IngressIdentity used in the cluster. Needed to exclude the communication coming from ingress. (default "ingress-nginx.ingress-nginx.serviceaccount.identity.linkerd.cluster.local") |
| `--authorizer.internalCommunicationConfig.tenantUrlPatternIdentity` | string | UrlPatternIdentity of the internal tenant service endpoint identities. (default "{{ service }}.{{ org }}.serviceaccount.identity.linkerd.cluster.local") |
| `--authorizer.internalCommunicationConfig.urlPatternIdentity` | string | UrlPatternIdentity of the internal service endpoint identities. (default "{{ service }}-helmchart.{{ service }}.serviceaccount.identity.linkerd.cluster.local") |
| `--authorizer.mode` | string | (default "Active") |
| `--authorizer.organizationConfig.PolicyConfig.adminPolicyDescription` | string | description for the boilerplate admin policy (default "Contributor permissions and full admin permissions to manage users and view usage dashboards") |
| `--authorizer.organizationConfig.PolicyConfig.contributorPolicyDescription` | string | description for the boilerplate contributor policy (default "Viewer permissions and permissions to create workflows, tasks, launch plans, and executions") |
| `--authorizer.organizationConfig.PolicyConfig.defaultUserPolicyRoleType` | string | name of the role type to determine which default policy new users added to the organization should be assigned (default "Viewer") |
| `--authorizer.organizationConfig.PolicyConfig.serverlessContributorPolicyDescription` | string | description for the boilerplate serverless contributor policy (default "Viewer permissions and permissions to create workflows, tasks, launch plans, and executions") |
| `--authorizer.organizationConfig.PolicyConfig.serverlessViewerPolicyDescription` | string | description for the boilerplate serverless viewer policy (default "Permissions to view Flyte entities") |
| `--authorizer.organizationConfig.PolicyConfig.viewerPolicyDescription` | string | description for the boilerplate viewer policy (default "Permissions to view Flyte entities") |
| `--authorizer.organizationConfig.defaultPolicyCacheDuration` | string | Cache entry duration for the store of the default policy per organization (default "10m0s") |
| `--authorizer.syncRuleRefreshInterval` | string | (default "1m0s") |
| `--authorizer.type` | string | (default "UserClouds") |
| `--authorizer.userCloudsClient.cache.redis.ttl.edgeTypes` | string | Specifies how long edge types remain in the cache.. (default "30m0s") |
| `--authorizer.userCloudsClient.cache.redis.ttl.edges` | string | Specifies how long edges remain in the cache. (default "30m0s") |
| `--authorizer.userCloudsClient.cache.redis.ttl.objectTypes` | string | Specifies how long object types remain in the cache. (default "30m0s") |
| `--authorizer.userCloudsClient.cache.redis.ttl.objects` | string | Specifies how long objects remain in the cache. (default "30m0s") |
| `--authorizer.userCloudsClient.cache.type` | string | Cache type to use. (default "none") |
| `--authorizer.userCloudsClient.clientID` | string | UserClouds client id |
| `--authorizer.userCloudsClient.clientSecretName` | string | UserCloud client secret name to read from the secret manager. (default "userclouds-client-secret") |
| `--authorizer.userCloudsClient.enableLogging` | | Enable userclouds client's internal logging. Calls to post logs take 250-350 ms and will impact p99 latency, enable with caution. |
| `--authorizer.userCloudsClient.tenantID` | string | UserClouds tenant id. Should be a UUID. |
| `--authorizer.userCloudsClient.tenantUrl` | string | Something like https://{yourtenant}.tenant.userclouds.com |
| `--config` | string | config file (default is /Users/andrew/.union/config.yaml) |
| `--connection.environment` | string | |
| `--connection.region` | string | |
| `--connection.rootTenantURLPattern` | string | Pattern for tenant url. (default "dns:///{{ organization }}.cloud-staging.union.ai") |
| `--console.endpoint` | string | Endpoint of console, if different than flyte admin |
| `--database.connMaxLifeTime` | string | sets the maximum amount of time a connection may be reused (default "1h0m0s") |
| `--database.enableForeignKeyConstraintWhenMigrating` | | Whether to enable gorm foreign keys when migrating the db |
| `--database.maxIdleConnections` | int | maxIdleConnections sets the maximum number of connections in the idle connection pool. (default 10) |
| `--database.maxOpenConnections` | int | maxOpenConnections sets the maximum number of open connections to the database. (default 100) |
| `--database.postgres.dbname` | string | The database name (default "postgres") |
| `--database.postgres.debug` | | |
| `--database.postgres.host` | string | The host name of the database server (default "localhost") |
| `--database.postgres.options` | string | See http://gorm.io/docs/connecting_to_the_database.html for available options passed, in addition to the above. (default "sslmode=disable") |
| `--database.postgres.password` | string | The database password. (default "postgres") |
| `--database.postgres.passwordPath` | string | Points to the file containing the database password. |
| `--database.postgres.port` | int | The port name of the database server (default 30001) |
| `--database.postgres.readReplicaHost` | string | The host name of the read replica database server (default "localhost") |
| `--database.postgres.username` | string | The database user who is connecting to the server. (default "postgres") |
| `--database.sqlite.file` | string | The path to the file (existing or new) where the DB should be created / stored. If existing, then this will be re-used, else a new will be created |
| `--db.connectionPool.maxConnectionLifetime` | string | (default "0s") |
| `--db.connectionPool.maxIdleConnections` | int | |
| `--db.connectionPool.maxOpenConnections` | int | |
| `--db.dbname` | string | (default "postgres") |
| `--db.debug` | | |
| `--db.host` | string | (default "postgres") |
| `--db.log_level` | int | (default 4) |
| `--db.options` | string | (default "sslmode=disable") |
| `--db.password` | string | |
| `--db.passwordPath` | string | |
| `--db.port` | int | (default 5432) |
| `--db.username` | string | (default "postgres") |
| `-d`, `--domain` | string | Specifies the Flyte project's domain. |
| `--files.archive` | | Pass in archive file either an http link or local path. |
| `--files.assumableIamRole` | string | Custom assumable iam auth role to register launch plans with. |
| `--files.continueOnError` | | Continue on error when registering files. |
| `--files.destinationDirectory` | string | Location of source code in container. |
| `--files.dryRun` | | Execute command without making any modifications. |
| `--files.enableSchedule` | | Enable the schedule if the files contain schedulable launchplan. |
| `--files.force` | | Force use of version number on entities registered with flyte. |
| `--files.k8ServiceAccount` | string | Deprecated. Please use `--K8sServiceAccount`|
| `--files.k8sServiceAccount` | string | Custom kubernetes service account auth role to register launch plans with. |
| `--files.outputLocationPrefix` | string | Custom output location prefix for offloaded types (files/schemas). |
| `--files.sourceUploadPath` | string | Deprecated: Update flyte admin to avoid having to configure storage access from uctl. |
| `--files.version` | string | Version of the entity to be registered with flyte which are un-versioned after serialization. |
| `--logger.formatter.type` | string | Sets logging format type. (default "json") |
| `--logger.level` | int | Sets the minimum logging level. (default 3) |
| `--logger.mute` | | Mutes all logs regardless of severity. Intended for benchmarks/tests only. |
| `--logger.show-source` | | Includes source code location in logs. |
| `--org` | string | Organization to work on. If not set, default to user's org. |
| `--otel.file.filename` | string | Filename to store exported telemetry traces (default "/tmp/trace.txt") |
| `--otel.jaeger.endpoint` | string | Endpoint for the jaeger telemetry trace ingestor (default "http://localhost:14268/api/traces") |
| `--otel.otlpgrpc.endpoint` | string | Endpoint for the OTLP telemetry trace collector (default "http://localhost:4317") |
| `--otel.otlphttp.endpoint` | string | Endpoint for the OTLP telemetry trace collector (default "http://localhost:4318/v1/traces") |
| `--otel.sampler.parentSampler` | string | Sets the parent sampler to use for the tracer (default "always") |
| `--otel.type` | string | Sets the type of exporter to configure [noop/file/jaeger/otlpgrpc/otlphttp]. (default "noop") |
| `-o`, `--output` | string | Specifies the output type - supported formats [TABLE JSON YAML DOT DOTURL]. NOTE: dot, doturl are only supported for Workflow (default "table") |
| `--plugins.catalogcache.reader.maxItems` | int | Maximum number of entries to keep in the index. (default 10000) |
| `--plugins.catalogcache.reader.maxRetries` | int | Maximum number of retries per item. (default 3) |
| `--plugins.catalogcache.reader.workers` | int | Number of concurrent workers to start processing the queue. (default 10) |
| `--plugins.catalogcache.writer.maxItems` | int | Maximum number of entries to keep in the index. (default 10000) |
| `--plugins.catalogcache.writer.maxRetries` | int | Maximum number of retries per item. (default 3) |
| `--plugins.catalogcache.writer.workers` | int | Number of concurrent workers to start processing the queue. (default 10) |
| `-p`, `--project` | string | Specifies the Flyte project. |
| `--rediscache.passwordSecretName` | string | Name of secret with Redis password. |
| `--rediscache.primaryEndpoint` | string | Primary endpoint for the redis cache that can be used for both reads and writes. |
| `--rediscache.replicaEndpoint` | string | Replica endpoint for the redis cache that can be used for reads. |
| `--secrets.env-prefix` | string | Prefix for environment variables (default "FLYTE_SECRET_") |
| `--secrets.secrets-prefix` | string | Prefix where to look for secrets file (default "/etc/secrets") |
| `--secrets.type` | string | Sets the type of storage to configure [local]. (default "local") |
| `--server.dataProxy.download.maxExpiresIn` | string | Maximum allowed expiration duration. (default "1h0m0s") |
| `--server.dataProxy.upload.defaultFileNameLength` | int | Default length for the generated file name if not provided in the request. (default 20) |
| `--server.dataProxy.upload.maxExpiresIn` | string | Maximum allowed expiration duration. (default "1h0m0s") |
| `--server.dataProxy.upload.maxSize` | string | Maximum allowed upload size. (default "6Mi") |
| `--server.dataProxy.upload.storagePrefix` | string | Storage prefix to use for all upload requests. |
| `--server.grpc.enableGrpcLatencyMetrics` | | Enable grpc latency metrics. Note Histograms metrics can be expensive on Prometheus servers. |
| `--server.grpc.maxMessageSizeBytes` | int | The max size in bytes for incoming gRPC messages |
| `--server.grpc.port` | int | On which grpc port to serve admin (default 8089) |
| `--server.grpc.serverReflection` | | Enable GRPC Server Reflection (default true) |
| `--server.grpcPort` | int | deprecated |
| `--server.grpcServerReflection` | | deprecated |
| `--server.httpPort` | int | On which http port to serve admin (default 8088) |
| `--server.kube-config` | string | Path to kubernetes client config file, default is empty, useful for incluster config. |
| `--server.kubeClientConfig.burst` | int | Max burst rate for throttle. 0 defaults to 10 (default 25) |
| `--server.kubeClientConfig.qps` | int32 | Max QPS to the master for requests to KubeAPI. 0 defaults to 5. (default 100) |
| `--server.kubeClientConfig.timeout` | string | Max duration allowed for every request to KubeAPI before giving up. 0 implies no timeout. (default "30s") |
| `--server.master` | string | The address of the Kubernetes API server. |
| `--server.readHeaderTimeoutSeconds` | int | The amount of time allowed to read request headers. (default 32) |
| `--server.security.allowCors` | | (default true) |
| `--server.security.allowedHeaders` | strings | (default [Content-Type,flyte-authorization]) |
| `--server.security.allowedOrigins` | strings | (default [*]) |
| `--server.security.auditAccess` | | |
| `--server.security.secure` | | |
| `--server.security.ssl.certificateFile` | string | |
| `--server.security.ssl.keyFile` | string | |
| `--server.security.useAuth` | | |
| `--server.thirdPartyConfig.flyteClient.audience` | string | Audience to use when initiating OAuth2 authorization requests. |
| `--server.thirdPartyConfig.flyteClient.clientId` | string | public identifier for the app which handles authorization for a Flyte deployment |
| `--server.thirdPartyConfig.flyteClient.redirectUri` | string | This is the callback uri registered with the app which handles authorization for a Flyte deployment |
| `--server.thirdPartyConfig.flyteClient.scopes` | strings | Recommended scopes for the client to request. |
| `--server.watchService.maxActiveClusterConnections` | int | (default 5) |
| `--server.watchService.maxPageSize` | int | (default 50000) |
| `--server.watchService.nonTerminalStatusUpdatesInterval` | string | (default "1m0s") |
| `--server.watchService.pollInterval` | string | (default "1s") |
| `--sharedservice.connectPort` | string | On which connect port to serve admin (default "8080") |
| `--sharedservice.grpc.grpcMaxResponseStatusBytes` | int32 | specifies the maximum (uncompressed) size of header list that the client is prepared to accept on grpc calls (default 32000) |
| `--sharedservice.grpc.maxConcurrentStreams` | int | Limit on the number of concurrent streams to each ServerTransport. (default 100) |
| `--sharedservice.grpc.maxMessageSizeBytes` | int | Limit on the size of message that can be received on the server. (default 10485760) |
| `--sharedservice.grpcServerReflection` | | Enable GRPC Server Reflection (default true) |
| `--sharedservice.httpPort` | string | On which http port to serve admin (default "8089") |
| `--sharedservice.kubeConfig` | string | Path to kubernetes client config file. |
| `--sharedservice.master` | string | The address of the Kubernetes API server. |
| `--sharedservice.metrics.enableClientGrpcHistograms` | | Enable client grpc histograms (default true) |
| `--sharedservice.metrics.enableGrpcHistograms` | | Enable grpc histograms (default true) |
| `--sharedservice.metrics.scope` | string | Scope to emit metrics under (default "service:") |
| `--sharedservice.port` | string | On which grpc port to serve admin (default "8080") |
| `--sharedservice.profiler.enabled` | | Enable Profiler on server |
| `--sharedservice.profilerPort` | string | Profile port to start listen for pprof and metric handlers on. (default "10254") |
| `--sharedservice.security.allowCors` | | |
| `--sharedservice.security.allowLocalhostAccess` | | Whether to permit localhost unauthenticated access to the server |
| `--sharedservice.security.allowedHeaders` | strings | |
| `--sharedservice.security.allowedOrigins` | strings | |
| `--sharedservice.security.auditAccess` | | |
| `--sharedservice.security.orgOverride` | string | Override org in identity context if localhost access enabled |
| `--sharedservice.security.secure` | | |
| `--sharedservice.security.ssl.certificateAuthorityFile` | string | |
| `--sharedservice.security.ssl.certificateFile` | string | |
| `--sharedservice.security.ssl.keyFile` | string | |
| `--sharedservice.security.useAuth` | | |
| `--sharedservice.sync.syncInterval` | string | Time interval to sync (default "5m0s") |
| `--storage.cache.max_size_mbs` | int | Maximum size of the cache where the Blob store data is cached in-memory. If not specified or set to 0, cache is not used |
| `--storage.cache.target_gc_percent` | int | Sets the garbage collection target percentage. |
| `--storage.connection.access-key` | string | Access key to use. Only required when authtype is set to accesskey. |
| `--storage.connection.auth-type` | string | Auth Type to use [iam, accesskey]. (default "iam") |
| `--storage.connection.disable-ssl` | | Disables SSL connection. Should only be used for development. |
| `--storage.connection.endpoint` | string | URL for storage client to connect to. |
| `--storage.connection.region` | string | Region to connect to. (default "us-east-1") |
| `--storage.connection.secret-key` | string | Secret to use when accesskey is set. |
| `--storage.container` | string | Initial container (in s3 a bucket) to create -if it doesn't exist-.' |
| `--storage.defaultHttpClient.timeout` | string | Sets time out on the http client. (default "0s") |
| `--storage.enable-multicontainer` | | If this is true, then the container argument is overlooked and redundant. This config will automatically open new connections to new containers/buckets as they are encountered |
| `--storage.limits.maxDownloadMBs` | int | Maximum allowed download size (in MBs) per call. (default 2) |
| `--storage.stow.config` | stringToString | Configuration for stow backend. Refer to github/flyteorg/stow (default []) |
| `--storage.stow.kind` | string | Kind of Stow backend to use. Refer to github/flyteorg/stow |
| `--storage.type` | string | Sets the type of storage to configure [s3/minio/local/mem/stow]. (default "s3") |
| `--union.auth.authorizationMetadataKey` | string | Authorization Header to use when passing Access Tokens to the server (default "flyte-authorization") |
| `--union.auth.clientId` | string | Client ID |
| `--union.auth.clientSecretEnvVar` | string | Environment variable containing the client secret |
| `--union.auth.clientSecretLocation` | string | File containing the client secret |
| `--union.auth.deviceFlow.pollInterval` | string | amount of time the device flow would poll the token endpoint if auth server doesn't return a polling interval. Okta and google IDP do return an interval' (default "5s") |
| `--union.auth.deviceFlow.refreshTime` | string | grace period from the token expiry after which it would refresh the token. (default "5m0s") |
| `--union.auth.deviceFlow.timeout` | string | amount of time the device flow should complete or else it will be cancelled. (default "10m0s") |
| `--union.auth.enable` | | Whether to enable an authenticated conenction when communicating with admin. (default true) |
| `--union.auth.externalAuth.command` | strings | Command for external authentication token generation |
| `--union.auth.pkce.refreshTime` | string | grace period from the token expiry after which it would refresh the token. (default "5m0s") |
| `--union.auth.pkce.timeout` | string | Amount of time the browser session would be active for authentication from client app. (default "15s") |
| `--union.auth.scopes` | strings | List of scopes to request |
| `--union.auth.tokenRefreshWindow` | string | Max duration between token refresh attempt and token expiry. (default "1h0m0s") |
| `--union.auth.tokenUrl` | string | OPTIONAL: Your IdP's token endpoint. It'll be discovered from flyte admin's OAuth Metadata endpoint if not provided. |
| `--union.auth.type` | string | Type of OAuth2 flow used for communicating with admin. (default "Pkce") |
| `--union.cache.maxItemsCount` | int | Maximum number of items to keep in the cache before evicting. (default 1000) |
| `--union.connection.host` | string | Host to connect to (default "dns:///utt-mgdp-stg-us-east-2.cloud-staging.union.ai") |
| `--union.connection.insecure` | | Whether to connect over insecure channel |
| `--union.connection.insecureSkipVerify` | | InsecureSkipVerify controls whether a client verifies the server's certificate chain and host name.Caution: shouldn't be use for production usecases' |
| `--union.connection.keepAliveConfig.permitWithoutStream` | | If true, client sends keepalive pings even with no active RPCs. |
| `--union.connection.keepAliveConfig.time` | string | After a duration of this time if the client doesn't see any activity it pings the server to see if the transport is still alive. (default "20s") |
| `--union.connection.keepAliveConfig.timeout` | string | After having pinged for keepalive check, the client waits for a duration of Timeout and if no activity is seen even after that the connection is closed. (default "2m0s") |
| `--union.connection.maxBackoffDelay` | string | Max delay for grpc backoff (default "8s") |
| `--union.connection.maxRecvMsgSize` | int | Maximum size of a message in bytes of a gRPC message (default 10485760) |
| `--union.connection.maxRetries` | int | Max number of gRPC retries (default 4) |
| `--union.connection.minConnectTimeout` | string | Minimum timeout for establishing a connection (default "20s") |
| `--union.connection.perRetryTimeout` | string | gRPC per retry timeout (default "15s") |
| `--union.connection.serviceConfig` | string | Defines gRPC experimental JSON Service Config (default "{"loadBalancingConfig": [{"round_robin":{}}]}") |
| `--union.connection.trustedIdentityClaims.enabled` | | Enables passing of trusted claims while making inter service calls |
| `--union.connection.trustedIdentityClaims.externalIdentityClaim` | string | External identity claim of the service which is authorized to make internal service call. These are verified against userclouds actions |
| `--union.connection.trustedIdentityClaims.externalIdentityTypeClaim` | string | External identity type claim of app or user to use for the current service identity. It should be an 'app' for inter service communication |
| `--union.internalConnectionConfig.-` | stringToString | (default []) |
| `--union.internalConnectionConfig.enabled` | | Enables internal service to service communication instead of going through ingress. |
| `--union.internalConnectionConfig.urlPattern` | string | UrlPattern of the internal service endpoints. (default "{{ service }}-helmchart.{{ service }}.svc.cluster.local:80") |
| `--webhook.awsSecretManager.sidecarImage` | string | Specifies the sidecar docker image to use (default "docker.io/amazon/aws-secrets-manager-secret-sidecar:v0.1.4") |
| `--webhook.certDir` | string | Certificate directory to use to write generated certs. Defaults to /etc/webhook/certs/ (default "/etc/webhook/certs") |
| `--webhook.embeddedSecretManagerConfig.awsConfig.region` | string | AWS region |
| `--webhook.embeddedSecretManagerConfig.fileMountInitContainer.image` | string | Specifies init container image to use for mounting secrets as files. (default "busybox:1.28") |
| `--webhook.embeddedSecretManagerConfig.gcpConfig.project` | string | GCP project to be used for secret manager |
| `--webhook.embeddedSecretManagerConfig.type` | string | (default "AWS") |
| `--webhook.gcpSecretManager.sidecarImage` | string | Specifies the sidecar docker image to use (default "gcr.io/google.com/cloudsdktool/cloud-sdk:alpine") |
| `--webhook.listenPort` | int | The port to use to listen to webhook calls. Defaults to 9443 (default 9443) |
| `--webhook.localCert` | | write certs locally. Defaults to false |
| `--webhook.metrics-prefix` | string | An optional prefix for all published metrics. (default "flyte:") |
| `--webhook.secretName` | string | Secret name to write generated certs to. (default "flyte-pod-webhook") |
| `--webhook.serviceName` | string | The name of the webhook service. (default "flyte-pod-webhook") |
| `--webhook.servicePort` | int32 | The port on the service that hosting webhook. (default 443) |
| `--webhook.vaultSecretManager.role` | string | Specifies the vault role to use (default "flyte") |
=== PAGE: https://www.union.ai/docs/v1/serverless/api-reference/uctl-cli/uctl-demo/uctl-demo-status ===
# uctl demo status
Gets the status of the demo environment.
## Synopsis
Retrieves the status of the demo environment. Currently, Flyte demo runs
as a local Docker container.
Usage:
```shell
$ uctl demo status
```
## Options
| Option | Type | Description |
|--------|------|-------------|
| `-h`, `--help` | help for status |
### Options inherited from parent commands
| Option | Type | Description |
|--------|------|-------------|
| `--admin.audience` | string | Audience to use when initiating OAuth2 authorization requests. |
| `--admin.authType` | string | Type of OAuth2 flow used for communicating with admin.ClientSecret, Pkce, ExternalCommand are valid values (default "ClientSecret") |
| `--admin.authorizationHeader` | string | Custom metadata header to pass JWT |
| `--admin.authorizationServerUrl` | string | This is the URL to your IdP's authorization server. It'll default to Endpoint |
| `--admin.caCertFilePath` | string | Use specified certificate file to verify the admin server peer. |
| `--admin.clientId` | string | Client ID (default "flytepropeller") |
| `--admin.clientSecretEnvVar` | string | Environment variable containing the client secret |
| `--admin.clientSecretLocation` | string | File containing the client secret (default "/etc/secrets/client_secret") |
| `--admin.command` | strings | Command for external authentication token generation |
| `--admin.defaultOrg` | string | OPTIONAL: Default org to use to support non-org based cli's.'. |
| `--admin.defaultServiceConfig` | string | |
| `--admin.deviceFlowConfig.pollInterval` | string | amount of time the device flow would poll the token endpoint if auth server doesn't return a polling interval. Okta and google IDP do return an interval' (default "5s") |
| `--admin.deviceFlowConfig.refreshTime` | string | grace period from the token expiry after which it would refresh the token. (default "5m0s") |
| `--admin.deviceFlowConfig.timeout` | string | amount of time the device flow should complete or else it will be cancelled. (default "10m0s") |
| `--admin.endpoint` | string | For admin types, specify where the uri of the service is located. |
| `--admin.httpProxyURL` | string | OPTIONAL: HTTP Proxy to be used for OAuth requests. |
| `--admin.insecure` | | Use insecure connection. |
| `--admin.insecureSkipVerify` | | InsecureSkipVerify controls whether a client verifies the server's certificate chain and host name.Caution: shouldn't be use for production usecases' |
| `--admin.maxBackoffDelay` | string | Max delay for grpc backoff (default "8s") |
| `--admin.maxMessageSizeBytes` | int | The max size in bytes for incoming gRPC messages |
| `--admin.maxRetries` | int | Max number of gRPC retries (default 4) |
| `--admin.perRetryTimeout` | string | gRPC per retry timeout (default "15s") |
| `--admin.pkceConfig.refreshTime` | string | grace period from the token expiry after which it would refresh the token. (default "5m0s") |
| `--admin.pkceConfig.timeout` | string | Amount of time the browser session would be active for authentication from client app. (default "2m0s") |
| `--admin.proxyCommand` | strings | Command for external proxy-authorization token generation |
| `--admin.scopes` | strings | List of scopes to request |
| `--admin.tokenRefreshWindow` | string | Max duration between token refresh attempt and token expiry. (default "0s") |
| `--admin.tokenUrl` | string | OPTIONAL: Your IdP's token endpoint. It'll be discovered from flyte admin's OAuth Metadata endpoint if not provided. |
| `--admin.useAudienceFromAdmin` | | Use Audience configured from admins public endpoint config. |
| `--admin.useAuth` | | Deprecated: Auth will be enabled/disabled based on admin's dynamically discovered information. |
| `--auth.appAuth.externalAuthServer.allowedAudience` | strings | Optional: A list of allowed audiences. If not provided, the audience is expected to be the public Uri of the service. |
| `--auth.appAuth.externalAuthServer.baseUrl` | string | This should be the base url of the authorization server that you are trying to hit. With Okta for instance, it will look something like https://company.okta.com/oauth2/abcdef123456789/ |
| `--auth.appAuth.externalAuthServer.httpProxyURL` | string | OPTIONAL: HTTP Proxy to be used for OAuth requests. |
| `--auth.appAuth.externalAuthServer.metadataUrl` | string | Optional: If the server doesn't support /.well-known/oauth-authorization-server, you can set a custom metadata url here.' |
| `--auth.appAuth.externalAuthServer.retryAttempts` | int | Optional: The number of attempted retries on a transient failure to get the OAuth metadata (default 5) |
| `--auth.appAuth.externalAuthServer.retryDelay` | string | Optional, Duration to wait between retries (default "1s") |
| `--auth.appAuth.selfAuthServer.accessTokenLifespan` | string | Defines the lifespan of issued access tokens. (default "30m0s") |
| `--auth.appAuth.selfAuthServer.authorizationCodeLifespan` | string | Defines the lifespan of issued access tokens. (default "5m0s") |
| `--auth.appAuth.selfAuthServer.claimSymmetricEncryptionKeySecretName` | string | OPTIONAL: Secret name to use to encrypt claims in authcode token. (default "claim_symmetric_key") |
| `--auth.appAuth.selfAuthServer.issuer` | string | Defines the issuer to use when issuing and validating tokens. The default value is https://{requestUri.HostAndPort}/ |
| `--auth.appAuth.selfAuthServer.oldTokenSigningRSAKeySecretName` | string | OPTIONAL: Secret name to use to retrieve Old RSA Signing Key. This can be useful during key rotation to continue to accept older tokens. (default "token_rsa_key_old.pem") |
| `--auth.appAuth.selfAuthServer.refreshTokenLifespan` | string | Defines the lifespan of issued access tokens. (default "1h0m0s") |
| `--auth.appAuth.selfAuthServer.tokenSigningRSAKeySecretName` | string | OPTIONAL: Secret name to use to retrieve RSA Signing Key. (default "token_rsa_key.pem") |
| `--auth.appAuth.thirdPartyConfig.flyteClient.audience` | string | Audience to use when initiating OAuth2 authorization requests. |
| `--auth.appAuth.thirdPartyConfig.flyteClient.clientId` | string | public identifier for the app which handles authorization for a Flyte deployment (default "uctl") |
| `--auth.appAuth.thirdPartyConfig.flyteClient.redirectUri` | string | This is the callback uri registered with the app which handles authorization for a Flyte deployment (default "http://localhost:53593/callback") |
| `--auth.appAuth.thirdPartyConfig.flyteClient.scopes` | strings | Recommended scopes for the client to request. (default [all,offline]) |
| `--auth.disableForGrpc` | | Disables auth enforcement on Grpc Endpoints. |
| `--auth.disableForHttp` | | Disables auth enforcement on HTTP Endpoints. |
| `--auth.grpcAuthorizationHeader` | string | (default "flyte-authorization") |
| `--auth.httpAuthorizationHeader` | string | (default "flyte-authorization") |
| `--auth.httpProxyURL` | string | OPTIONAL: HTTP Proxy to be used for OAuth requests. |
| `--auth.tokenEndpointProxyPath` | string | The path used to proxy calls to the TokenURL |
| `--auth.userAuth.cookieBlockKeySecretName` | string | OPTIONAL: Secret name to use for cookie block key. (default "cookie_block_key") |
| `--auth.userAuth.cookieHashKeySecretName` | string | OPTIONAL: Secret name to use for cookie hash key. (default "cookie_hash_key") |
| `--auth.userAuth.cookieSetting.domain` | string | OPTIONAL: Allows you to set the domain attribute on the auth cookies. |
| `--auth.userAuth.cookieSetting.sameSitePolicy` | string | OPTIONAL: Allows you to declare if your cookie should be restricted to a first-party or same-site context.Wrapper around http.SameSite. (default "DefaultMode") |
| `--auth.userAuth.httpProxyURL` | string | OPTIONAL: HTTP Proxy to be used for OAuth requests. |
| `--auth.userAuth.idpQueryParameter` | string | idp query parameter used for selecting a particular IDP for doing user authentication. Eg: for Okta passing idp={IDP-ID} forces the authentication to happen with IDP-ID |
| `--auth.userAuth.openId.baseUrl` | string | |
| `--auth.userAuth.openId.clientId` | string | |
| `--auth.userAuth.openId.clientSecretFile` | string | |
| `--auth.userAuth.openId.clientSecretName` | string | (default "oidc_client_secret") |
| `--auth.userAuth.openId.scopes` | strings | (default [openid,profile]) |
| `--auth.userAuth.redirectUrl` | string | (default "/console") |
| `--authorizer.internalCommunicationConfig.enabled` | | Enables authorization decisions for internal communication. (default true) |
| `--authorizer.internalCommunicationConfig.ingressIdentity` | string | IngressIdentity used in the cluster. Needed to exclude the communication coming from ingress. (default "ingress-nginx.ingress-nginx.serviceaccount.identity.linkerd.cluster.local") |
| `--authorizer.internalCommunicationConfig.tenantUrlPatternIdentity` | string | UrlPatternIdentity of the internal tenant service endpoint identities. (default "{{ service }}.{{ org }}.serviceaccount.identity.linkerd.cluster.local") |
| `--authorizer.internalCommunicationConfig.urlPatternIdentity` | string | UrlPatternIdentity of the internal service endpoint identities. (default "{{ service }}-helmchart.{{ service }}.serviceaccount.identity.linkerd.cluster.local") |
| `--authorizer.mode` | string | (default "Active") |
| `--authorizer.organizationConfig.PolicyConfig.adminPolicyDescription` | string | description for the boilerplate admin policy (default "Contributor permissions and full admin permissions to manage users and view usage dashboards") |
| `--authorizer.organizationConfig.PolicyConfig.contributorPolicyDescription` | string | description for the boilerplate contributor policy (default "Viewer permissions and permissions to create workflows, tasks, launch plans, and executions") |
| `--authorizer.organizationConfig.PolicyConfig.defaultUserPolicyRoleType` | string | name of the role type to determine which default policy new users added to the organization should be assigned (default "Viewer") |
| `--authorizer.organizationConfig.PolicyConfig.serverlessContributorPolicyDescription` | string | description for the boilerplate serverless contributor policy (default "Viewer permissions and permissions to create workflows, tasks, launch plans, and executions") |
| `--authorizer.organizationConfig.PolicyConfig.serverlessViewerPolicyDescription` | string | description for the boilerplate serverless viewer policy (default "Permissions to view Flyte entities") |
| `--authorizer.organizationConfig.PolicyConfig.viewerPolicyDescription` | string | description for the boilerplate viewer policy (default "Permissions to view Flyte entities") |
| `--authorizer.organizationConfig.defaultPolicyCacheDuration` | string | Cache entry duration for the store of the default policy per organization (default "10m0s") |
| `--authorizer.syncRuleRefreshInterval` | string | (default "1m0s") |
| `--authorizer.type` | string | (default "UserClouds") |
| `--authorizer.userCloudsClient.cache.redis.ttl.edgeTypes` | string | Specifies how long edge types remain in the cache.. (default "30m0s") |
| `--authorizer.userCloudsClient.cache.redis.ttl.edges` | string | Specifies how long edges remain in the cache. (default "30m0s") |
| `--authorizer.userCloudsClient.cache.redis.ttl.objectTypes` | string | Specifies how long object types remain in the cache. (default "30m0s") |
| `--authorizer.userCloudsClient.cache.redis.ttl.objects` | string | Specifies how long objects remain in the cache. (default "30m0s") |
| `--authorizer.userCloudsClient.cache.type` | string | Cache type to use. (default "none") |
| `--authorizer.userCloudsClient.clientID` | string | UserClouds client id |
| `--authorizer.userCloudsClient.clientSecretName` | string | UserCloud client secret name to read from the secret manager. (default "userclouds-client-secret") |
| `--authorizer.userCloudsClient.enableLogging` | | Enable userclouds client's internal logging. Calls to post logs take 250-350 ms and will impact p99 latency, enable with caution. |
| `--authorizer.userCloudsClient.tenantID` | string | UserClouds tenant id. Should be a UUID. |
| `--authorizer.userCloudsClient.tenantUrl` | string | Something like https://{yourtenant}.tenant.userclouds.com |
| `--config` | string | config file (default is /Users/andrew/.union/config.yaml) |
| `--connection.environment` | string | |
| `--connection.region` | string | |
| `--connection.rootTenantURLPattern` | string | Pattern for tenant url. (default "dns:///{{ organization }}.cloud-staging.union.ai") |
| `--console.endpoint` | string | Endpoint of console, if different than flyte admin |
| `--database.connMaxLifeTime` | string | sets the maximum amount of time a connection may be reused (default "1h0m0s") |
| `--database.enableForeignKeyConstraintWhenMigrating` | | Whether to enable gorm foreign keys when migrating the db |
| `--database.maxIdleConnections` | int | maxIdleConnections sets the maximum number of connections in the idle connection pool. (default 10) |
| `--database.maxOpenConnections` | int | maxOpenConnections sets the maximum number of open connections to the database. (default 100) |
| `--database.postgres.dbname` | string | The database name (default "postgres") |
| `--database.postgres.debug` | | |
| `--database.postgres.host` | string | The host name of the database server (default "localhost") |
| `--database.postgres.options` | string | See http://gorm.io/docs/connecting_to_the_database.html for available options passed, in addition to the above. (default "sslmode=disable") |
| `--database.postgres.password` | string | The database password. (default "postgres") |
| `--database.postgres.passwordPath` | string | Points to the file containing the database password. |
| `--database.postgres.port` | int | The port name of the database server (default 30001) |
| `--database.postgres.readReplicaHost` | string | The host name of the read replica database server (default "localhost") |
| `--database.postgres.username` | string | The database user who is connecting to the server. (default "postgres") |
| `--database.sqlite.file` | string | The path to the file (existing or new) where the DB should be created / stored. If existing, then this will be re-used, else a new will be created |
| `--db.connectionPool.maxConnectionLifetime` | string | (default "0s") |
| `--db.connectionPool.maxIdleConnections` | int | |
| `--db.connectionPool.maxOpenConnections` | int | |
| `--db.dbname` | string | (default "postgres") |
| `--db.debug` | | |
| `--db.host` | string | (default "postgres") |
| `--db.log_level` | int | (default 4) |
| `--db.options` | string | (default "sslmode=disable") |
| `--db.password` | string | |
| `--db.passwordPath` | string | |
| `--db.port` | int | (default 5432) |
| `--db.username` | string | (default "postgres") |
| `-d`, `--domain` | string | Specifies the Flyte project's domain. |
| `--files.archive` | | Pass in archive file either an http link or local path. |
| `--files.assumableIamRole` | string | Custom assumable iam auth role to register launch plans with. |
| `--files.continueOnError` | | Continue on error when registering files. |
| `--files.destinationDirectory` | string | Location of source code in container. |
| `--files.dryRun` | | Execute command without making any modifications. |
| `--files.enableSchedule` | | Enable the schedule if the files contain schedulable launchplan. |
| `--files.force` | | Force use of version number on entities registered with flyte. |
| `--files.k8ServiceAccount` | string | Deprecated. Please use `--K8sServiceAccount`|
| `--files.k8sServiceAccount` | string | Custom kubernetes service account auth role to register launch plans with. |
| `--files.outputLocationPrefix` | string | Custom output location prefix for offloaded types (files/schemas). |
| `--files.sourceUploadPath` | string | Deprecated: Update flyte admin to avoid having to configure storage access from uctl. |
| `--files.version` | string | Version of the entity to be registered with flyte which are un-versioned after serialization. |
| `--logger.formatter.type` | string | Sets logging format type. (default "json") |
| `--logger.level` | int | Sets the minimum logging level. (default 3) |
| `--logger.mute` | | Mutes all logs regardless of severity. Intended for benchmarks/tests only. |
| `--logger.show-source` | | Includes source code location in logs. |
| `--org` | string | Organization to work on. If not set, default to user's org. |
| `--otel.file.filename` | string | Filename to store exported telemetry traces (default "/tmp/trace.txt") |
| `--otel.jaeger.endpoint` | string | Endpoint for the jaeger telemetry trace ingestor (default "http://localhost:14268/api/traces") |
| `--otel.otlpgrpc.endpoint` | string | Endpoint for the OTLP telemetry trace collector (default "http://localhost:4317") |
| `--otel.otlphttp.endpoint` | string | Endpoint for the OTLP telemetry trace collector (default "http://localhost:4318/v1/traces") |
| `--otel.sampler.parentSampler` | string | Sets the parent sampler to use for the tracer (default "always") |
| `--otel.type` | string | Sets the type of exporter to configure [noop/file/jaeger/otlpgrpc/otlphttp]. (default "noop") |
| `-o`, `--output` | string | Specifies the output type - supported formats [TABLE JSON YAML DOT DOTURL]. NOTE: dot, doturl are only supported for Workflow (default "table") |
| `--plugins.catalogcache.reader.maxItems` | int | Maximum number of entries to keep in the index. (default 10000) |
| `--plugins.catalogcache.reader.maxRetries` | int | Maximum number of retries per item. (default 3) |
| `--plugins.catalogcache.reader.workers` | int | Number of concurrent workers to start processing the queue. (default 10) |
| `--plugins.catalogcache.writer.maxItems` | int | Maximum number of entries to keep in the index. (default 10000) |
| `--plugins.catalogcache.writer.maxRetries` | int | Maximum number of retries per item. (default 3) |
| `--plugins.catalogcache.writer.workers` | int | Number of concurrent workers to start processing the queue. (default 10) |
| `-p`, `--project` | string | Specifies the Flyte project. |
| `--rediscache.passwordSecretName` | string | Name of secret with Redis password. |
| `--rediscache.primaryEndpoint` | string | Primary endpoint for the redis cache that can be used for both reads and writes. |
| `--rediscache.replicaEndpoint` | string | Replica endpoint for the redis cache that can be used for reads. |
| `--secrets.env-prefix` | string | Prefix for environment variables (default "FLYTE_SECRET_") |
| `--secrets.secrets-prefix` | string | Prefix where to look for secrets file (default "/etc/secrets") |
| `--secrets.type` | string | Sets the type of storage to configure [local]. (default "local") |
| `--server.dataProxy.download.maxExpiresIn` | string | Maximum allowed expiration duration. (default "1h0m0s") |
| `--server.dataProxy.upload.defaultFileNameLength` | int | Default length for the generated file name if not provided in the request. (default 20) |
| `--server.dataProxy.upload.maxExpiresIn` | string | Maximum allowed expiration duration. (default "1h0m0s") |
| `--server.dataProxy.upload.maxSize` | string | Maximum allowed upload size. (default "6Mi") |
| `--server.dataProxy.upload.storagePrefix` | string | Storage prefix to use for all upload requests. |
| `--server.grpc.enableGrpcLatencyMetrics` | | Enable grpc latency metrics. Note Histograms metrics can be expensive on Prometheus servers. |
| `--server.grpc.maxMessageSizeBytes` | int | The max size in bytes for incoming gRPC messages |
| `--server.grpc.port` | int | On which grpc port to serve admin (default 8089) |
| `--server.grpc.serverReflection` | | Enable GRPC Server Reflection (default true) |
| `--server.grpcPort` | int | deprecated |
| `--server.grpcServerReflection` | | deprecated |
| `--server.httpPort` | int | On which http port to serve admin (default 8088) |
| `--server.kube-config` | string | Path to kubernetes client config file, default is empty, useful for incluster config. |
| `--server.kubeClientConfig.burst` | int | Max burst rate for throttle. 0 defaults to 10 (default 25) |
| `--server.kubeClientConfig.qps` | int32 | Max QPS to the master for requests to KubeAPI. 0 defaults to 5. (default 100) |
| `--server.kubeClientConfig.timeout` | string | Max duration allowed for every request to KubeAPI before giving up. 0 implies no timeout. (default "30s") |
| `--server.master` | string | The address of the Kubernetes API server. |
| `--server.readHeaderTimeoutSeconds` | int | The amount of time allowed to read request headers. (default 32) |
| `--server.security.allowCors` | | (default true) |
| `--server.security.allowedHeaders` | strings | (default [Content-Type,flyte-authorization]) |
| `--server.security.allowedOrigins` | strings | (default [*]) |
| `--server.security.auditAccess` | | |
| `--server.security.secure` | | |
| `--server.security.ssl.certificateFile` | string | |
| `--server.security.ssl.keyFile` | string | |
| `--server.security.useAuth` | | |
| `--server.thirdPartyConfig.flyteClient.audience` | string | Audience to use when initiating OAuth2 authorization requests. |
| `--server.thirdPartyConfig.flyteClient.clientId` | string | public identifier for the app which handles authorization for a Flyte deployment |
| `--server.thirdPartyConfig.flyteClient.redirectUri` | string | This is the callback uri registered with the app which handles authorization for a Flyte deployment |
| `--server.thirdPartyConfig.flyteClient.scopes` | strings | Recommended scopes for the client to request. |
| `--server.watchService.maxActiveClusterConnections` | int | (default 5) |
| `--server.watchService.maxPageSize` | int | (default 50000) |
| `--server.watchService.nonTerminalStatusUpdatesInterval` | string | (default "1m0s") |
| `--server.watchService.pollInterval` | string | (default "1s") |
| `--sharedservice.connectPort` | string | On which connect port to serve admin (default "8080") |
| `--sharedservice.grpc.grpcMaxResponseStatusBytes` | int32 | specifies the maximum (uncompressed) size of header list that the client is prepared to accept on grpc calls (default 32000) |
| `--sharedservice.grpc.maxConcurrentStreams` | int | Limit on the number of concurrent streams to each ServerTransport. (default 100) |
| `--sharedservice.grpc.maxMessageSizeBytes` | int | Limit on the size of message that can be received on the server. (default 10485760) |
| `--sharedservice.grpcServerReflection` | | Enable GRPC Server Reflection (default true) |
| `--sharedservice.httpPort` | string | On which http port to serve admin (default "8089") |
| `--sharedservice.kubeConfig` | string | Path to kubernetes client config file. |
| `--sharedservice.master` | string | The address of the Kubernetes API server. |
| `--sharedservice.metrics.enableClientGrpcHistograms` | | Enable client grpc histograms (default true) |
| `--sharedservice.metrics.enableGrpcHistograms` | | Enable grpc histograms (default true) |
| `--sharedservice.metrics.scope` | string | Scope to emit metrics under (default "service:") |
| `--sharedservice.port` | string | On which grpc port to serve admin (default "8080") |
| `--sharedservice.profiler.enabled` | | Enable Profiler on server |
| `--sharedservice.profilerPort` | string | Profile port to start listen for pprof and metric handlers on. (default "10254") |
| `--sharedservice.security.allowCors` | | |
| `--sharedservice.security.allowLocalhostAccess` | | Whether to permit localhost unauthenticated access to the server |
| `--sharedservice.security.allowedHeaders` | strings | |
| `--sharedservice.security.allowedOrigins` | strings | |
| `--sharedservice.security.auditAccess` | | |
| `--sharedservice.security.orgOverride` | string | Override org in identity context if localhost access enabled |
| `--sharedservice.security.secure` | | |
| `--sharedservice.security.ssl.certificateAuthorityFile` | string | |
| `--sharedservice.security.ssl.certificateFile` | string | |
| `--sharedservice.security.ssl.keyFile` | string | |
| `--sharedservice.security.useAuth` | | |
| `--sharedservice.sync.syncInterval` | string | Time interval to sync (default "5m0s") |
| `--storage.cache.max_size_mbs` | int | Maximum size of the cache where the Blob store data is cached in-memory. If not specified or set to 0, cache is not used |
| `--storage.cache.target_gc_percent` | int | Sets the garbage collection target percentage. |
| `--storage.connection.access-key` | string | Access key to use. Only required when authtype is set to accesskey. |
| `--storage.connection.auth-type` | string | Auth Type to use [iam, accesskey]. (default "iam") |
| `--storage.connection.disable-ssl` | | Disables SSL connection. Should only be used for development. |
| `--storage.connection.endpoint` | string | URL for storage client to connect to. |
| `--storage.connection.region` | string | Region to connect to. (default "us-east-1") |
| `--storage.connection.secret-key` | string | Secret to use when accesskey is set. |
| `--storage.container` | string | Initial container (in s3 a bucket) to create -if it doesn't exist-.' |
| `--storage.defaultHttpClient.timeout` | string | Sets time out on the http client. (default "0s") |
| `--storage.enable-multicontainer` | | If this is true, then the container argument is overlooked and redundant. This config will automatically open new connections to new containers/buckets as they are encountered |
| `--storage.limits.maxDownloadMBs` | int | Maximum allowed download size (in MBs) per call. (default 2) |
| `--storage.stow.config` | stringToString | Configuration for stow backend. Refer to github/flyteorg/stow (default []) |
| `--storage.stow.kind` | string | Kind of Stow backend to use. Refer to github/flyteorg/stow |
| `--storage.type` | string | Sets the type of storage to configure [s3/minio/local/mem/stow]. (default "s3") |
| `--union.auth.authorizationMetadataKey` | string | Authorization Header to use when passing Access Tokens to the server (default "flyte-authorization") |
| `--union.auth.clientId` | string | Client ID |
| `--union.auth.clientSecretEnvVar` | string | Environment variable containing the client secret |
| `--union.auth.clientSecretLocation` | string | File containing the client secret |
| `--union.auth.deviceFlow.pollInterval` | string | amount of time the device flow would poll the token endpoint if auth server doesn't return a polling interval. Okta and google IDP do return an interval' (default "5s") |
| `--union.auth.deviceFlow.refreshTime` | string | grace period from the token expiry after which it would refresh the token. (default "5m0s") |
| `--union.auth.deviceFlow.timeout` | string | amount of time the device flow should complete or else it will be cancelled. (default "10m0s") |
| `--union.auth.enable` | | Whether to enable an authenticated conenction when communicating with admin. (default true) |
| `--union.auth.externalAuth.command` | strings | Command for external authentication token generation |
| `--union.auth.pkce.refreshTime` | string | grace period from the token expiry after which it would refresh the token. (default "5m0s") |
| `--union.auth.pkce.timeout` | string | Amount of time the browser session would be active for authentication from client app. (default "15s") |
| `--union.auth.scopes` | strings | List of scopes to request |
| `--union.auth.tokenRefreshWindow` | string | Max duration between token refresh attempt and token expiry. (default "1h0m0s") |
| `--union.auth.tokenUrl` | string | OPTIONAL: Your IdP's token endpoint. It'll be discovered from flyte admin's OAuth Metadata endpoint if not provided. |
| `--union.auth.type` | string | Type of OAuth2 flow used for communicating with admin. (default "Pkce") |
| `--union.cache.maxItemsCount` | int | Maximum number of items to keep in the cache before evicting. (default 1000) |
| `--union.connection.host` | string | Host to connect to (default "dns:///utt-mgdp-stg-us-east-2.cloud-staging.union.ai") |
| `--union.connection.insecure` | | Whether to connect over insecure channel |
| `--union.connection.insecureSkipVerify` | | InsecureSkipVerify controls whether a client verifies the server's certificate chain and host name.Caution: shouldn't be use for production usecases' |
| `--union.connection.keepAliveConfig.permitWithoutStream` | | If true, client sends keepalive pings even with no active RPCs. |
| `--union.connection.keepAliveConfig.time` | string | After a duration of this time if the client doesn't see any activity it pings the server to see if the transport is still alive. (default "20s") |
| `--union.connection.keepAliveConfig.timeout` | string | After having pinged for keepalive check, the client waits for a duration of Timeout and if no activity is seen even after that the connection is closed. (default "2m0s") |
| `--union.connection.maxBackoffDelay` | string | Max delay for grpc backoff (default "8s") |
| `--union.connection.maxRecvMsgSize` | int | Maximum size of a message in bytes of a gRPC message (default 10485760) |
| `--union.connection.maxRetries` | int | Max number of gRPC retries (default 4) |
| `--union.connection.minConnectTimeout` | string | Minimum timeout for establishing a connection (default "20s") |
| `--union.connection.perRetryTimeout` | string | gRPC per retry timeout (default "15s") |
| `--union.connection.serviceConfig` | string | Defines gRPC experimental JSON Service Config (default "{"loadBalancingConfig": [{"round_robin":{}}]}") |
| `--union.connection.trustedIdentityClaims.enabled` | | Enables passing of trusted claims while making inter service calls |
| `--union.connection.trustedIdentityClaims.externalIdentityClaim` | string | External identity claim of the service which is authorized to make internal service call. These are verified against userclouds actions |
| `--union.connection.trustedIdentityClaims.externalIdentityTypeClaim` | string | External identity type claim of app or user to use for the current service identity. It should be an 'app' for inter service communication |
| `--union.internalConnectionConfig.-` | stringToString | (default []) |
| `--union.internalConnectionConfig.enabled` | | Enables internal service to service communication instead of going through ingress. |
| `--union.internalConnectionConfig.urlPattern` | string | UrlPattern of the internal service endpoints. (default "{{ service }}-helmchart.{{ service }}.svc.cluster.local:80") |
| `--webhook.awsSecretManager.sidecarImage` | string | Specifies the sidecar docker image to use (default "docker.io/amazon/aws-secrets-manager-secret-sidecar:v0.1.4") |
| `--webhook.certDir` | string | Certificate directory to use to write generated certs. Defaults to /etc/webhook/certs/ (default "/etc/webhook/certs") |
| `--webhook.embeddedSecretManagerConfig.awsConfig.region` | string | AWS region |
| `--webhook.embeddedSecretManagerConfig.fileMountInitContainer.image` | string | Specifies init container image to use for mounting secrets as files. (default "busybox:1.28") |
| `--webhook.embeddedSecretManagerConfig.gcpConfig.project` | string | GCP project to be used for secret manager |
| `--webhook.embeddedSecretManagerConfig.type` | string | (default "AWS") |
| `--webhook.gcpSecretManager.sidecarImage` | string | Specifies the sidecar docker image to use (default "gcr.io/google.com/cloudsdktool/cloud-sdk:alpine") |
| `--webhook.listenPort` | int | The port to use to listen to webhook calls. Defaults to 9443 (default 9443) |
| `--webhook.localCert` | | write certs locally. Defaults to false |
| `--webhook.metrics-prefix` | string | An optional prefix for all published metrics. (default "flyte:") |
| `--webhook.secretName` | string | Secret name to write generated certs to. (default "flyte-pod-webhook") |
| `--webhook.serviceName` | string | The name of the webhook service. (default "flyte-pod-webhook") |
| `--webhook.servicePort` | int32 | The port on the service that hosting webhook. (default 443) |
| `--webhook.vaultSecretManager.role` | string | Specifies the vault role to use (default "flyte") |
=== PAGE: https://www.union.ai/docs/v1/serverless/api-reference/uctl-cli/uctl-demo/uctl-demo-teardown ===
# uctl demo teardown
Cleans up the demo environment
## Synopsis
Removes the demo cluster and all the Flyte config created by `demo
start`:
```shell
$ uctl demo teardown
```
Usage:
```shell
$ uctl demo teardown [flags]
```
## Options
| Option | Type | Description |
|--------|------|-------------|
| `-h`, `--help` | help for teardown |
| `-v`, `--volume` | Optional. | Clean up Docker volume. This will result in a permanent loss of all data within the database and object store. Use with caution! |
### Options inherited from parent commands
| Option | Type | Description |
|--------|------|-------------|
| `--admin.audience` | string | Audience to use when initiating OAuth2 authorization requests. |
| `--admin.authType` | string | Type of OAuth2 flow used for communicating with admin.ClientSecret, Pkce, ExternalCommand are valid values (default "ClientSecret") |
| `--admin.authorizationHeader` | string | Custom metadata header to pass JWT |
| `--admin.authorizationServerUrl` | string | This is the URL to your IdP's authorization server. It'll default to Endpoint |
| `--admin.caCertFilePath` | string | Use specified certificate file to verify the admin server peer. |
| `--admin.clientId` | string | Client ID (default "flytepropeller") |
| `--admin.clientSecretEnvVar` | string | Environment variable containing the client secret |
| `--admin.clientSecretLocation` | string | File containing the client secret (default "/etc/secrets/client_secret") |
| `--admin.command` | strings | Command for external authentication token generation |
| `--admin.defaultOrg` | string | OPTIONAL: Default org to use to support non-org based cli's.'. |
| `--admin.defaultServiceConfig` | string | |
| `--admin.deviceFlowConfig.pollInterval` | string | amount of time the device flow would poll the token endpoint if auth server doesn't return a polling interval. Okta and google IDP do return an interval' (default "5s") |
| `--admin.deviceFlowConfig.refreshTime` | string | grace period from the token expiry after which it would refresh the token. (default "5m0s") |
| `--admin.deviceFlowConfig.timeout` | string | amount of time the device flow should complete or else it will be cancelled. (default "10m0s") |
| `--admin.endpoint` | string | For admin types, specify where the uri of the service is located. |
| `--admin.httpProxyURL` | string | OPTIONAL: HTTP Proxy to be used for OAuth requests. |
| `--admin.insecure` | | Use insecure connection. |
| `--admin.insecureSkipVerify` | | InsecureSkipVerify controls whether a client verifies the server's certificate chain and host name.Caution: shouldn't be use for production usecases' |
| `--admin.maxBackoffDelay` | string | Max delay for grpc backoff (default "8s") |
| `--admin.maxMessageSizeBytes` | int | The max size in bytes for incoming gRPC messages |
| `--admin.maxRetries` | int | Max number of gRPC retries (default 4) |
| `--admin.perRetryTimeout` | string | gRPC per retry timeout (default "15s") |
| `--admin.pkceConfig.refreshTime` | string | grace period from the token expiry after which it would refresh the token. (default "5m0s") |
| `--admin.pkceConfig.timeout` | string | Amount of time the browser session would be active for authentication from client app. (default "2m0s") |
| `--admin.proxyCommand` | strings | Command for external proxy-authorization token generation |
| `--admin.scopes` | strings | List of scopes to request |
| `--admin.tokenRefreshWindow` | string | Max duration between token refresh attempt and token expiry. (default "0s") |
| `--admin.tokenUrl` | string | OPTIONAL: Your IdP's token endpoint. It'll be discovered from flyte admin's OAuth Metadata endpoint if not provided. |
| `--admin.useAudienceFromAdmin` | | Use Audience configured from admins public endpoint config. |
| `--admin.useAuth` | | Deprecated: Auth will be enabled/disabled based on admin's dynamically discovered information. |
| `--auth.appAuth.externalAuthServer.allowedAudience` | strings | Optional: A list of allowed audiences. If not provided, the audience is expected to be the public Uri of the service. |
| `--auth.appAuth.externalAuthServer.baseUrl` | string | This should be the base url of the authorization server that you are trying to hit. With Okta for instance, it will look something like https://company.okta.com/oauth2/abcdef123456789/ |
| `--auth.appAuth.externalAuthServer.httpProxyURL` | string | OPTIONAL: HTTP Proxy to be used for OAuth requests. |
| `--auth.appAuth.externalAuthServer.metadataUrl` | string | Optional: If the server doesn't support /.well-known/oauth-authorization-server, you can set a custom metadata url here.' |
| `--auth.appAuth.externalAuthServer.retryAttempts` | int | Optional: The number of attempted retries on a transient failure to get the OAuth metadata (default 5) |
| `--auth.appAuth.externalAuthServer.retryDelay` | string | Optional, Duration to wait between retries (default "1s") |
| `--auth.appAuth.selfAuthServer.accessTokenLifespan` | string | Defines the lifespan of issued access tokens. (default "30m0s") |
| `--auth.appAuth.selfAuthServer.authorizationCodeLifespan` | string | Defines the lifespan of issued access tokens. (default "5m0s") |
| `--auth.appAuth.selfAuthServer.claimSymmetricEncryptionKeySecretName` | string | OPTIONAL: Secret name to use to encrypt claims in authcode token. (default "claim_symmetric_key") |
| `--auth.appAuth.selfAuthServer.issuer` | string | Defines the issuer to use when issuing and validating tokens. The default value is https://{requestUri.HostAndPort}/ |
| `--auth.appAuth.selfAuthServer.oldTokenSigningRSAKeySecretName` | string | OPTIONAL: Secret name to use to retrieve Old RSA Signing Key. This can be useful during key rotation to continue to accept older tokens. (default "token_rsa_key_old.pem") |
| `--auth.appAuth.selfAuthServer.refreshTokenLifespan` | string | Defines the lifespan of issued access tokens. (default "1h0m0s") |
| `--auth.appAuth.selfAuthServer.tokenSigningRSAKeySecretName` | string | OPTIONAL: Secret name to use to retrieve RSA Signing Key. (default "token_rsa_key.pem") |
| `--auth.appAuth.thirdPartyConfig.flyteClient.audience` | string | Audience to use when initiating OAuth2 authorization requests. |
| `--auth.appAuth.thirdPartyConfig.flyteClient.clientId` | string | public identifier for the app which handles authorization for a Flyte deployment (default "uctl") |
| `--auth.appAuth.thirdPartyConfig.flyteClient.redirectUri` | string | This is the callback uri registered with the app which handles authorization for a Flyte deployment (default "http://localhost:53593/callback") |
| `--auth.appAuth.thirdPartyConfig.flyteClient.scopes` | strings | Recommended scopes for the client to request. (default [all,offline]) |
| `--auth.disableForGrpc` | | Disables auth enforcement on Grpc Endpoints. |
| `--auth.disableForHttp` | | Disables auth enforcement on HTTP Endpoints. |
| `--auth.grpcAuthorizationHeader` | string | (default "flyte-authorization") |
| `--auth.httpAuthorizationHeader` | string | (default "flyte-authorization") |
| `--auth.httpProxyURL` | string | OPTIONAL: HTTP Proxy to be used for OAuth requests. |
| `--auth.tokenEndpointProxyPath` | string | The path used to proxy calls to the TokenURL |
| `--auth.userAuth.cookieBlockKeySecretName` | string | OPTIONAL: Secret name to use for cookie block key. (default "cookie_block_key") |
| `--auth.userAuth.cookieHashKeySecretName` | string | OPTIONAL: Secret name to use for cookie hash key. (default "cookie_hash_key") |
| `--auth.userAuth.cookieSetting.domain` | string | OPTIONAL: Allows you to set the domain attribute on the auth cookies. |
| `--auth.userAuth.cookieSetting.sameSitePolicy` | string | OPTIONAL: Allows you to declare if your cookie should be restricted to a first-party or same-site context.Wrapper around http.SameSite. (default "DefaultMode") |
| `--auth.userAuth.httpProxyURL` | string | OPTIONAL: HTTP Proxy to be used for OAuth requests. |
| `--auth.userAuth.idpQueryParameter` | string | idp query parameter used for selecting a particular IDP for doing user authentication. Eg: for Okta passing idp={IDP-ID} forces the authentication to happen with IDP-ID |
| `--auth.userAuth.openId.baseUrl` | string | |
| `--auth.userAuth.openId.clientId` | string | |
| `--auth.userAuth.openId.clientSecretFile` | string | |
| `--auth.userAuth.openId.clientSecretName` | string | (default "oidc_client_secret") |
| `--auth.userAuth.openId.scopes` | strings | (default [openid,profile]) |
| `--auth.userAuth.redirectUrl` | string | (default "/console") |
| `--authorizer.internalCommunicationConfig.enabled` | | Enables authorization decisions for internal communication. (default true) |
| `--authorizer.internalCommunicationConfig.ingressIdentity` | string | IngressIdentity used in the cluster. Needed to exclude the communication coming from ingress. (default "ingress-nginx.ingress-nginx.serviceaccount.identity.linkerd.cluster.local") |
| `--authorizer.internalCommunicationConfig.tenantUrlPatternIdentity` | string | UrlPatternIdentity of the internal tenant service endpoint identities. (default "{{ service }}.{{ org }}.serviceaccount.identity.linkerd.cluster.local") |
| `--authorizer.internalCommunicationConfig.urlPatternIdentity` | string | UrlPatternIdentity of the internal service endpoint identities. (default "{{ service }}-helmchart.{{ service }}.serviceaccount.identity.linkerd.cluster.local") |
| `--authorizer.mode` | string | (default "Active") |
| `--authorizer.organizationConfig.PolicyConfig.adminPolicyDescription` | string | description for the boilerplate admin policy (default "Contributor permissions and full admin permissions to manage users and view usage dashboards") |
| `--authorizer.organizationConfig.PolicyConfig.contributorPolicyDescription` | string | description for the boilerplate contributor policy (default "Viewer permissions and permissions to create workflows, tasks, launch plans, and executions") |
| `--authorizer.organizationConfig.PolicyConfig.defaultUserPolicyRoleType` | string | name of the role type to determine which default policy new users added to the organization should be assigned (default "Viewer") |
| `--authorizer.organizationConfig.PolicyConfig.serverlessContributorPolicyDescription` | string | description for the boilerplate serverless contributor policy (default "Viewer permissions and permissions to create workflows, tasks, launch plans, and executions") |
| `--authorizer.organizationConfig.PolicyConfig.serverlessViewerPolicyDescription` | string | description for the boilerplate serverless viewer policy (default "Permissions to view Flyte entities") |
| `--authorizer.organizationConfig.PolicyConfig.viewerPolicyDescription` | string | description for the boilerplate viewer policy (default "Permissions to view Flyte entities") |
| `--authorizer.organizationConfig.defaultPolicyCacheDuration` | string | Cache entry duration for the store of the default policy per organization (default "10m0s") |
| `--authorizer.syncRuleRefreshInterval` | string | (default "1m0s") |
| `--authorizer.type` | string | (default "UserClouds") |
| `--authorizer.userCloudsClient.cache.redis.ttl.edgeTypes` | string | Specifies how long edge types remain in the cache.. (default "30m0s") |
| `--authorizer.userCloudsClient.cache.redis.ttl.edges` | string | Specifies how long edges remain in the cache. (default "30m0s") |
| `--authorizer.userCloudsClient.cache.redis.ttl.objectTypes` | string | Specifies how long object types remain in the cache. (default "30m0s") |
| `--authorizer.userCloudsClient.cache.redis.ttl.objects` | string | Specifies how long objects remain in the cache. (default "30m0s") |
| `--authorizer.userCloudsClient.cache.type` | string | Cache type to use. (default "none") |
| `--authorizer.userCloudsClient.clientID` | string | UserClouds client id |
| `--authorizer.userCloudsClient.clientSecretName` | string | UserCloud client secret name to read from the secret manager. (default "userclouds-client-secret") |
| `--authorizer.userCloudsClient.enableLogging` | | Enable userclouds client's internal logging. Calls to post logs take 250-350 ms and will impact p99 latency, enable with caution. |
| `--authorizer.userCloudsClient.tenantID` | string | UserClouds tenant id. Should be a UUID. |
| `--authorizer.userCloudsClient.tenantUrl` | string | Something like https://{yourtenant}.tenant.userclouds.com |
| `--config` | string | config file (default is /Users/andrew/.union/config.yaml) |
| `--connection.environment` | string | |
| `--connection.region` | string | |
| `--connection.rootTenantURLPattern` | string | Pattern for tenant url. (default "dns:///{{ organization }}.cloud-staging.union.ai") |
| `--console.endpoint` | string | Endpoint of console, if different than flyte admin |
| `--database.connMaxLifeTime` | string | sets the maximum amount of time a connection may be reused (default "1h0m0s") |
| `--database.enableForeignKeyConstraintWhenMigrating` | | Whether to enable gorm foreign keys when migrating the db |
| `--database.maxIdleConnections` | int | maxIdleConnections sets the maximum number of connections in the idle connection pool. (default 10) |
| `--database.maxOpenConnections` | int | maxOpenConnections sets the maximum number of open connections to the database. (default 100) |
| `--database.postgres.dbname` | string | The database name (default "postgres") |
| `--database.postgres.debug` | | |
| `--database.postgres.host` | string | The host name of the database server (default "localhost") |
| `--database.postgres.options` | string | See http://gorm.io/docs/connecting_to_the_database.html for available options passed, in addition to the above. (default "sslmode=disable") |
| `--database.postgres.password` | string | The database password. (default "postgres") |
| `--database.postgres.passwordPath` | string | Points to the file containing the database password. |
| `--database.postgres.port` | int | The port name of the database server (default 30001) |
| `--database.postgres.readReplicaHost` | string | The host name of the read replica database server (default "localhost") |
| `--database.postgres.username` | string | The database user who is connecting to the server. (default "postgres") |
| `--database.sqlite.file` | string | The path to the file (existing or new) where the DB should be created / stored. If existing, then this will be re-used, else a new will be created |
| `--db.connectionPool.maxConnectionLifetime` | string | (default "0s") |
| `--db.connectionPool.maxIdleConnections` | int | |
| `--db.connectionPool.maxOpenConnections` | int | |
| `--db.dbname` | string | (default "postgres") |
| `--db.debug` | | |
| `--db.host` | string | (default "postgres") |
| `--db.log_level` | int | (default 4) |
| `--db.options` | string | (default "sslmode=disable") |
| `--db.password` | string | |
| `--db.passwordPath` | string | |
| `--db.port` | int | (default 5432) |
| `--db.username` | string | (default "postgres") |
| `-d`, `--domain` | string | Specifies the Flyte project's domain. |
| `--files.archive` | | Pass in archive file either an http link or local path. |
| `--files.assumableIamRole` | string | Custom assumable iam auth role to register launch plans with. |
| `--files.continueOnError` | | Continue on error when registering files. |
| `--files.destinationDirectory` | string | Location of source code in container. |
| `--files.dryRun` | | Execute command without making any modifications. |
| `--files.enableSchedule` | | Enable the schedule if the files contain schedulable launchplan. |
| `--files.force` | | Force use of version number on entities registered with flyte. |
| `--files.k8ServiceAccount` | string | Deprecated. Please use `--K8sServiceAccount`|
| `--files.k8sServiceAccount` | string | Custom kubernetes service account auth role to register launch plans with. |
| `--files.outputLocationPrefix` | string | Custom output location prefix for offloaded types (files/schemas). |
| `--files.sourceUploadPath` | string | Deprecated: Update flyte admin to avoid having to configure storage access from uctl. |
| `--files.version` | string | Version of the entity to be registered with flyte which are un-versioned after serialization. |
| `--logger.formatter.type` | string | Sets logging format type. (default "json") |
| `--logger.level` | int | Sets the minimum logging level. (default 3) |
| `--logger.mute` | | Mutes all logs regardless of severity. Intended for benchmarks/tests only. |
| `--logger.show-source` | | Includes source code location in logs. |
| `--org` | string | Organization to work on. If not set, default to user's org. |
| `--otel.file.filename` | string | Filename to store exported telemetry traces (default "/tmp/trace.txt") |
| `--otel.jaeger.endpoint` | string | Endpoint for the jaeger telemetry trace ingestor (default "http://localhost:14268/api/traces") |
| `--otel.otlpgrpc.endpoint` | string | Endpoint for the OTLP telemetry trace collector (default "http://localhost:4317") |
| `--otel.otlphttp.endpoint` | string | Endpoint for the OTLP telemetry trace collector (default "http://localhost:4318/v1/traces") |
| `--otel.sampler.parentSampler` | string | Sets the parent sampler to use for the tracer (default "always") |
| `--otel.type` | string | Sets the type of exporter to configure [noop/file/jaeger/otlpgrpc/otlphttp]. (default "noop") |
| `-o`, `--output` | string | Specifies the output type - supported formats [TABLE JSON YAML DOT DOTURL]. NOTE: dot, doturl are only supported for Workflow (default "table") |
| `--plugins.catalogcache.reader.maxItems` | int | Maximum number of entries to keep in the index. (default 10000) |
| `--plugins.catalogcache.reader.maxRetries` | int | Maximum number of retries per item. (default 3) |
| `--plugins.catalogcache.reader.workers` | int | Number of concurrent workers to start processing the queue. (default 10) |
| `--plugins.catalogcache.writer.maxItems` | int | Maximum number of entries to keep in the index. (default 10000) |
| `--plugins.catalogcache.writer.maxRetries` | int | Maximum number of retries per item. (default 3) |
| `--plugins.catalogcache.writer.workers` | int | Number of concurrent workers to start processing the queue. (default 10) |
| `-p`, `--project` | string | Specifies the Flyte project. |
| `--rediscache.passwordSecretName` | string | Name of secret with Redis password. |
| `--rediscache.primaryEndpoint` | string | Primary endpoint for the redis cache that can be used for both reads and writes. |
| `--rediscache.replicaEndpoint` | string | Replica endpoint for the redis cache that can be used for reads. |
| `--secrets.env-prefix` | string | Prefix for environment variables (default "FLYTE_SECRET_") |
| `--secrets.secrets-prefix` | string | Prefix where to look for secrets file (default "/etc/secrets") |
| `--secrets.type` | string | Sets the type of storage to configure [local]. (default "local") |
| `--server.dataProxy.download.maxExpiresIn` | string | Maximum allowed expiration duration. (default "1h0m0s") |
| `--server.dataProxy.upload.defaultFileNameLength` | int | Default length for the generated file name if not provided in the request. (default 20) |
| `--server.dataProxy.upload.maxExpiresIn` | string | Maximum allowed expiration duration. (default "1h0m0s") |
| `--server.dataProxy.upload.maxSize` | string | Maximum allowed upload size. (default "6Mi") |
| `--server.dataProxy.upload.storagePrefix` | string | Storage prefix to use for all upload requests. |
| `--server.grpc.enableGrpcLatencyMetrics` | | Enable grpc latency metrics. Note Histograms metrics can be expensive on Prometheus servers. |
| `--server.grpc.maxMessageSizeBytes` | int | The max size in bytes for incoming gRPC messages |
| `--server.grpc.port` | int | On which grpc port to serve admin (default 8089) |
| `--server.grpc.serverReflection` | | Enable GRPC Server Reflection (default true) |
| `--server.grpcPort` | int | deprecated |
| `--server.grpcServerReflection` | | deprecated |
| `--server.httpPort` | int | On which http port to serve admin (default 8088) |
| `--server.kube-config` | string | Path to kubernetes client config file, default is empty, useful for incluster config. |
| `--server.kubeClientConfig.burst` | int | Max burst rate for throttle. 0 defaults to 10 (default 25) |
| `--server.kubeClientConfig.qps` | int32 | Max QPS to the master for requests to KubeAPI. 0 defaults to 5. (default 100) |
| `--server.kubeClientConfig.timeout` | string | Max duration allowed for every request to KubeAPI before giving up. 0 implies no timeout. (default "30s") |
| `--server.master` | string | The address of the Kubernetes API server. |
| `--server.readHeaderTimeoutSeconds` | int | The amount of time allowed to read request headers. (default 32) |
| `--server.security.allowCors` | | (default true) |
| `--server.security.allowedHeaders` | strings | (default [Content-Type,flyte-authorization]) |
| `--server.security.allowedOrigins` | strings | (default [*]) |
| `--server.security.auditAccess` | | |
| `--server.security.secure` | | |
| `--server.security.ssl.certificateFile` | string | |
| `--server.security.ssl.keyFile` | string | |
| `--server.security.useAuth` | | |
| `--server.thirdPartyConfig.flyteClient.audience` | string | Audience to use when initiating OAuth2 authorization requests. |
| `--server.thirdPartyConfig.flyteClient.clientId` | string | public identifier for the app which handles authorization for a Flyte deployment |
| `--server.thirdPartyConfig.flyteClient.redirectUri` | string | This is the callback uri registered with the app which handles authorization for a Flyte deployment |
| `--server.thirdPartyConfig.flyteClient.scopes` | strings | Recommended scopes for the client to request. |
| `--server.watchService.maxActiveClusterConnections` | int | (default 5) |
| `--server.watchService.maxPageSize` | int | (default 50000) |
| `--server.watchService.nonTerminalStatusUpdatesInterval` | string | (default "1m0s") |
| `--server.watchService.pollInterval` | string | (default "1s") |
| `--sharedservice.connectPort` | string | On which connect port to serve admin (default "8080") |
| `--sharedservice.grpc.grpcMaxResponseStatusBytes` | int32 | specifies the maximum (uncompressed) size of header list that the client is prepared to accept on grpc calls (default 32000) |
| `--sharedservice.grpc.maxConcurrentStreams` | int | Limit on the number of concurrent streams to each ServerTransport. (default 100) |
| `--sharedservice.grpc.maxMessageSizeBytes` | int | Limit on the size of message that can be received on the server. (default 10485760) |
| `--sharedservice.grpcServerReflection` | | Enable GRPC Server Reflection (default true) |
| `--sharedservice.httpPort` | string | On which http port to serve admin (default "8089") |
| `--sharedservice.kubeConfig` | string | Path to kubernetes client config file. |
| `--sharedservice.master` | string | The address of the Kubernetes API server. |
| `--sharedservice.metrics.enableClientGrpcHistograms` | | Enable client grpc histograms (default true) |
| `--sharedservice.metrics.enableGrpcHistograms` | | Enable grpc histograms (default true) |
| `--sharedservice.metrics.scope` | string | Scope to emit metrics under (default "service:") |
| `--sharedservice.port` | string | On which grpc port to serve admin (default "8080") |
| `--sharedservice.profiler.enabled` | | Enable Profiler on server |
| `--sharedservice.profilerPort` | string | Profile port to start listen for pprof and metric handlers on. (default "10254") |
| `--sharedservice.security.allowCors` | | |
| `--sharedservice.security.allowLocalhostAccess` | | Whether to permit localhost unauthenticated access to the server |
| `--sharedservice.security.allowedHeaders` | strings | |
| `--sharedservice.security.allowedOrigins` | strings | |
| `--sharedservice.security.auditAccess` | | |
| `--sharedservice.security.orgOverride` | string | Override org in identity context if localhost access enabled |
| `--sharedservice.security.secure` | | |
| `--sharedservice.security.ssl.certificateAuthorityFile` | string | |
| `--sharedservice.security.ssl.certificateFile` | string | |
| `--sharedservice.security.ssl.keyFile` | string | |
| `--sharedservice.security.useAuth` | | |
| `--sharedservice.sync.syncInterval` | string | Time interval to sync (default "5m0s") |
| `--storage.cache.max_size_mbs` | int | Maximum size of the cache where the Blob store data is cached in-memory. If not specified or set to 0, cache is not used |
| `--storage.cache.target_gc_percent` | int | Sets the garbage collection target percentage. |
| `--storage.connection.access-key` | string | Access key to use. Only required when authtype is set to accesskey. |
| `--storage.connection.auth-type` | string | Auth Type to use [iam, accesskey]. (default "iam") |
| `--storage.connection.disable-ssl` | | Disables SSL connection. Should only be used for development. |
| `--storage.connection.endpoint` | string | URL for storage client to connect to. |
| `--storage.connection.region` | string | Region to connect to. (default "us-east-1") |
| `--storage.connection.secret-key` | string | Secret to use when accesskey is set. |
| `--storage.container` | string | Initial container (in s3 a bucket) to create -if it doesn't exist-.' |
| `--storage.defaultHttpClient.timeout` | string | Sets time out on the http client. (default "0s") |
| `--storage.enable-multicontainer` | | If this is true, then the container argument is overlooked and redundant. This config will automatically open new connections to new containers/buckets as they are encountered |
| `--storage.limits.maxDownloadMBs` | int | Maximum allowed download size (in MBs) per call. (default 2) |
| `--storage.stow.config` | stringToString | Configuration for stow backend. Refer to github/flyteorg/stow (default []) |
| `--storage.stow.kind` | string | Kind of Stow backend to use. Refer to github/flyteorg/stow |
| `--storage.type` | string | Sets the type of storage to configure [s3/minio/local/mem/stow]. (default "s3") |
| `--union.auth.authorizationMetadataKey` | string | Authorization Header to use when passing Access Tokens to the server (default "flyte-authorization") |
| `--union.auth.clientId` | string | Client ID |
| `--union.auth.clientSecretEnvVar` | string | Environment variable containing the client secret |
| `--union.auth.clientSecretLocation` | string | File containing the client secret |
| `--union.auth.deviceFlow.pollInterval` | string | amount of time the device flow would poll the token endpoint if auth server doesn't return a polling interval. Okta and google IDP do return an interval' (default "5s") |
| `--union.auth.deviceFlow.refreshTime` | string | grace period from the token expiry after which it would refresh the token. (default "5m0s") |
| `--union.auth.deviceFlow.timeout` | string | amount of time the device flow should complete or else it will be cancelled. (default "10m0s") |
| `--union.auth.enable` | | Whether to enable an authenticated conenction when communicating with admin. (default true) |
| `--union.auth.externalAuth.command` | strings | Command for external authentication token generation |
| `--union.auth.pkce.refreshTime` | string | grace period from the token expiry after which it would refresh the token. (default "5m0s") |
| `--union.auth.pkce.timeout` | string | Amount of time the browser session would be active for authentication from client app. (default "15s") |
| `--union.auth.scopes` | strings | List of scopes to request |
| `--union.auth.tokenRefreshWindow` | string | Max duration between token refresh attempt and token expiry. (default "1h0m0s") |
| `--union.auth.tokenUrl` | string | OPTIONAL: Your IdP's token endpoint. It'll be discovered from flyte admin's OAuth Metadata endpoint if not provided. |
| `--union.auth.type` | string | Type of OAuth2 flow used for communicating with admin. (default "Pkce") |
| `--union.cache.maxItemsCount` | int | Maximum number of items to keep in the cache before evicting. (default 1000) |
| `--union.connection.host` | string | Host to connect to (default "dns:///utt-mgdp-stg-us-east-2.cloud-staging.union.ai") |
| `--union.connection.insecure` | | Whether to connect over insecure channel |
| `--union.connection.insecureSkipVerify` | | InsecureSkipVerify controls whether a client verifies the server's certificate chain and host name.Caution: shouldn't be use for production usecases' |
| `--union.connection.keepAliveConfig.permitWithoutStream` | | If true, client sends keepalive pings even with no active RPCs. |
| `--union.connection.keepAliveConfig.time` | string | After a duration of this time if the client doesn't see any activity it pings the server to see if the transport is still alive. (default "20s") |
| `--union.connection.keepAliveConfig.timeout` | string | After having pinged for keepalive check, the client waits for a duration of Timeout and if no activity is seen even after that the connection is closed. (default "2m0s") |
| `--union.connection.maxBackoffDelay` | string | Max delay for grpc backoff (default "8s") |
| `--union.connection.maxRecvMsgSize` | int | Maximum size of a message in bytes of a gRPC message (default 10485760) |
| `--union.connection.maxRetries` | int | Max number of gRPC retries (default 4) |
| `--union.connection.minConnectTimeout` | string | Minimum timeout for establishing a connection (default "20s") |
| `--union.connection.perRetryTimeout` | string | gRPC per retry timeout (default "15s") |
| `--union.connection.serviceConfig` | string | Defines gRPC experimental JSON Service Config (default "{"loadBalancingConfig": [{"round_robin":{}}]}") |
| `--union.connection.trustedIdentityClaims.enabled` | | Enables passing of trusted claims while making inter service calls |
| `--union.connection.trustedIdentityClaims.externalIdentityClaim` | string | External identity claim of the service which is authorized to make internal service call. These are verified against userclouds actions |
| `--union.connection.trustedIdentityClaims.externalIdentityTypeClaim` | string | External identity type claim of app or user to use for the current service identity. It should be an 'app' for inter service communication |
| `--union.internalConnectionConfig.-` | stringToString | (default []) |
| `--union.internalConnectionConfig.enabled` | | Enables internal service to service communication instead of going through ingress. |
| `--union.internalConnectionConfig.urlPattern` | string | UrlPattern of the internal service endpoints. (default "{{ service }}-helmchart.{{ service }}.svc.cluster.local:80") |
| `--webhook.awsSecretManager.sidecarImage` | string | Specifies the sidecar docker image to use (default "docker.io/amazon/aws-secrets-manager-secret-sidecar:v0.1.4") |
| `--webhook.certDir` | string | Certificate directory to use to write generated certs. Defaults to /etc/webhook/certs/ (default "/etc/webhook/certs") |
| `--webhook.embeddedSecretManagerConfig.awsConfig.region` | string | AWS region |
| `--webhook.embeddedSecretManagerConfig.fileMountInitContainer.image` | string | Specifies init container image to use for mounting secrets as files. (default "busybox:1.28") |
| `--webhook.embeddedSecretManagerConfig.gcpConfig.project` | string | GCP project to be used for secret manager |
| `--webhook.embeddedSecretManagerConfig.type` | string | (default "AWS") |
| `--webhook.gcpSecretManager.sidecarImage` | string | Specifies the sidecar docker image to use (default "gcr.io/google.com/cloudsdktool/cloud-sdk:alpine") |
| `--webhook.listenPort` | int | The port to use to listen to webhook calls. Defaults to 9443 (default 9443) |
| `--webhook.localCert` | | write certs locally. Defaults to false |
| `--webhook.metrics-prefix` | string | An optional prefix for all published metrics. (default "flyte:") |
| `--webhook.secretName` | string | Secret name to write generated certs to. (default "flyte-pod-webhook") |
| `--webhook.serviceName` | string | The name of the webhook service. (default "flyte-pod-webhook") |
| `--webhook.servicePort` | int32 | The port on the service that hosting webhook. (default 443) |
| `--webhook.vaultSecretManager.role` | string | Specifies the vault role to use (default "flyte") |
=== PAGE: https://www.union.ai/docs/v1/serverless/api-reference/uctl-cli/uctl-get ===
# uctl get
Used for fetching various union/flyte resources including
tasks/workflows/launchplans/executions/project.
## Synopsis
To fetch a project, use the following command:
```shell
$ uctl get project
```
## Options
| Option | Type | Description |
|--------|------|-------------|
| `-h`, `--help` | help for get |
### Options inherited from parent commands
| Option | Type | Description |
|--------|------|-------------|
| `--admin.audience` | string | Audience to use when initiating OAuth2 authorization requests. |
| `--admin.authType` | string | Type of OAuth2 flow used for communicating with admin.ClientSecret, Pkce, ExternalCommand are valid values (default "ClientSecret") |
| `--admin.authorizationHeader` | string | Custom metadata header to pass JWT |
| `--admin.authorizationServerUrl` | string | This is the URL to your IdP's authorization server. It'll default to Endpoint |
| `--admin.caCertFilePath` | string | Use specified certificate file to verify the admin server peer. |
| `--admin.clientId` | string | Client ID (default "flytepropeller") |
| `--admin.clientSecretEnvVar` | string | Environment variable containing the client secret |
| `--admin.clientSecretLocation` | string | File containing the client secret (default "/etc/secrets/client_secret") |
| `--admin.command` | strings | Command for external authentication token generation |
| `--admin.defaultOrg` | string | OPTIONAL: Default org to use to support non-org based cli's.'. |
| `--admin.defaultServiceConfig` | string | |
| `--admin.deviceFlowConfig.pollInterval` | string | amount of time the device flow would poll the token endpoint if auth server doesn't return a polling interval. Okta and google IDP do return an interval' (default "5s") |
| `--admin.deviceFlowConfig.refreshTime` | string | grace period from the token expiry after which it would refresh the token. (default "5m0s") |
| `--admin.deviceFlowConfig.timeout` | string | amount of time the device flow should complete or else it will be cancelled. (default "10m0s") |
| `--admin.endpoint` | string | For admin types, specify where the uri of the service is located. |
| `--admin.httpProxyURL` | string | OPTIONAL: HTTP Proxy to be used for OAuth requests. |
| `--admin.insecure` | | Use insecure connection. |
| `--admin.insecureSkipVerify` | | InsecureSkipVerify controls whether a client verifies the server's certificate chain and host name.Caution: shouldn't be use for production usecases' |
| `--admin.maxBackoffDelay` | string | Max delay for grpc backoff (default "8s") |
| `--admin.maxMessageSizeBytes` | int | The max size in bytes for incoming gRPC messages |
| `--admin.maxRetries` | int | Max number of gRPC retries (default 4) |
| `--admin.perRetryTimeout` | string | gRPC per retry timeout (default "15s") |
| `--admin.pkceConfig.refreshTime` | string | grace period from the token expiry after which it would refresh the token. (default "5m0s") |
| `--admin.pkceConfig.timeout` | string | Amount of time the browser session would be active for authentication from client app. (default "2m0s") |
| `--admin.proxyCommand` | strings | Command for external proxy-authorization token generation |
| `--admin.scopes` | strings | List of scopes to request |
| `--admin.tokenRefreshWindow` | string | Max duration between token refresh attempt and token expiry. (default "0s") |
| `--admin.tokenUrl` | string | OPTIONAL: Your IdP's token endpoint. It'll be discovered from flyte admin's OAuth Metadata endpoint if not provided. |
| `--admin.useAudienceFromAdmin` | | Use Audience configured from admins public endpoint config. |
| `--admin.useAuth` | | Deprecated: Auth will be enabled/disabled based on admin's dynamically discovered information. |
| `--auth.appAuth.externalAuthServer.allowedAudience` | strings | Optional: A list of allowed audiences. If not provided, the audience is expected to be the public Uri of the service. |
| `--auth.appAuth.externalAuthServer.baseUrl` | string | This should be the base url of the authorization server that you are trying to hit. With Okta for instance, it will look something like https://company.okta.com/oauth2/abcdef123456789/ |
| `--auth.appAuth.externalAuthServer.httpProxyURL` | string | OPTIONAL: HTTP Proxy to be used for OAuth requests. |
| `--auth.appAuth.externalAuthServer.metadataUrl` | string | Optional: If the server doesn't support /.well-known/oauth-authorization-server, you can set a custom metadata url here.' |
| `--auth.appAuth.externalAuthServer.retryAttempts` | int | Optional: The number of attempted retries on a transient failure to get the OAuth metadata (default 5) |
| `--auth.appAuth.externalAuthServer.retryDelay` | string | Optional, Duration to wait between retries (default "1s") |
| `--auth.appAuth.selfAuthServer.accessTokenLifespan` | string | Defines the lifespan of issued access tokens. (default "30m0s") |
| `--auth.appAuth.selfAuthServer.authorizationCodeLifespan` | string | Defines the lifespan of issued access tokens. (default "5m0s") |
| `--auth.appAuth.selfAuthServer.claimSymmetricEncryptionKeySecretName` | string | OPTIONAL: Secret name to use to encrypt claims in authcode token. (default "claim_symmetric_key") |
| `--auth.appAuth.selfAuthServer.issuer` | string | Defines the issuer to use when issuing and validating tokens. The default value is https://{requestUri.HostAndPort}/ |
| `--auth.appAuth.selfAuthServer.oldTokenSigningRSAKeySecretName` | string | OPTIONAL: Secret name to use to retrieve Old RSA Signing Key. This can be useful during key rotation to continue to accept older tokens. (default "token_rsa_key_old.pem") |
| `--auth.appAuth.selfAuthServer.refreshTokenLifespan` | string | Defines the lifespan of issued access tokens. (default "1h0m0s") |
| `--auth.appAuth.selfAuthServer.tokenSigningRSAKeySecretName` | string | OPTIONAL: Secret name to use to retrieve RSA Signing Key. (default "token_rsa_key.pem") |
| `--auth.appAuth.thirdPartyConfig.flyteClient.audience` | string | Audience to use when initiating OAuth2 authorization requests. |
| `--auth.appAuth.thirdPartyConfig.flyteClient.clientId` | string | public identifier for the app which handles authorization for a Flyte deployment (default "uctl") |
| `--auth.appAuth.thirdPartyConfig.flyteClient.redirectUri` | string | This is the callback uri registered with the app which handles authorization for a Flyte deployment (default "http://localhost:53593/callback") |
| `--auth.appAuth.thirdPartyConfig.flyteClient.scopes` | strings | Recommended scopes for the client to request. (default [all,offline]) |
| `--auth.disableForGrpc` | | Disables auth enforcement on Grpc Endpoints. |
| `--auth.disableForHttp` | | Disables auth enforcement on HTTP Endpoints. |
| `--auth.grpcAuthorizationHeader` | string | (default "flyte-authorization") |
| `--auth.httpAuthorizationHeader` | string | (default "flyte-authorization") |
| `--auth.httpProxyURL` | string | OPTIONAL: HTTP Proxy to be used for OAuth requests. |
| `--auth.tokenEndpointProxyPath` | string | The path used to proxy calls to the TokenURL |
| `--auth.userAuth.cookieBlockKeySecretName` | string | OPTIONAL: Secret name to use for cookie block key. (default "cookie_block_key") |
| `--auth.userAuth.cookieHashKeySecretName` | string | OPTIONAL: Secret name to use for cookie hash key. (default "cookie_hash_key") |
| `--auth.userAuth.cookieSetting.domain` | string | OPTIONAL: Allows you to set the domain attribute on the auth cookies. |
| `--auth.userAuth.cookieSetting.sameSitePolicy` | string | OPTIONAL: Allows you to declare if your cookie should be restricted to a first-party or same-site context.Wrapper around http.SameSite. (default "DefaultMode") |
| `--auth.userAuth.httpProxyURL` | string | OPTIONAL: HTTP Proxy to be used for OAuth requests. |
| `--auth.userAuth.idpQueryParameter` | string | idp query parameter used for selecting a particular IDP for doing user authentication. Eg: for Okta passing idp={IDP-ID} forces the authentication to happen with IDP-ID |
| `--auth.userAuth.openId.baseUrl` | string | |
| `--auth.userAuth.openId.clientId` | string | |
| `--auth.userAuth.openId.clientSecretFile` | string | |
| `--auth.userAuth.openId.clientSecretName` | string | (default "oidc_client_secret") |
| `--auth.userAuth.openId.scopes` | strings | (default [openid,profile]) |
| `--auth.userAuth.redirectUrl` | string | (default "/console") |
| `--authorizer.internalCommunicationConfig.enabled` | | Enables authorization decisions for internal communication. (default true) |
| `--authorizer.internalCommunicationConfig.ingressIdentity` | string | IngressIdentity used in the cluster. Needed to exclude the communication coming from ingress. (default "ingress-nginx.ingress-nginx.serviceaccount.identity.linkerd.cluster.local") |
| `--authorizer.internalCommunicationConfig.tenantUrlPatternIdentity` | string | UrlPatternIdentity of the internal tenant service endpoint identities. (default "{{ service }}.{{ org }}.serviceaccount.identity.linkerd.cluster.local") |
| `--authorizer.internalCommunicationConfig.urlPatternIdentity` | string | UrlPatternIdentity of the internal service endpoint identities. (default "{{ service }}-helmchart.{{ service }}.serviceaccount.identity.linkerd.cluster.local") |
| `--authorizer.mode` | string | (default "Active") |
| `--authorizer.organizationConfig.PolicyConfig.adminPolicyDescription` | string | description for the boilerplate admin policy (default "Contributor permissions and full admin permissions to manage users and view usage dashboards") |
| `--authorizer.organizationConfig.PolicyConfig.contributorPolicyDescription` | string | description for the boilerplate contributor policy (default "Viewer permissions and permissions to create workflows, tasks, launch plans, and executions") |
| `--authorizer.organizationConfig.PolicyConfig.defaultUserPolicyRoleType` | string | name of the role type to determine which default policy new users added to the organization should be assigned (default "Viewer") |
| `--authorizer.organizationConfig.PolicyConfig.serverlessContributorPolicyDescription` | string | description for the boilerplate serverless contributor policy (default "Viewer permissions and permissions to create workflows, tasks, launch plans, and executions") |
| `--authorizer.organizationConfig.PolicyConfig.serverlessViewerPolicyDescription` | string | description for the boilerplate serverless viewer policy (default "Permissions to view Flyte entities") |
| `--authorizer.organizationConfig.PolicyConfig.viewerPolicyDescription` | string | description for the boilerplate viewer policy (default "Permissions to view Flyte entities") |
| `--authorizer.organizationConfig.defaultPolicyCacheDuration` | string | Cache entry duration for the store of the default policy per organization (default "10m0s") |
| `--authorizer.syncRuleRefreshInterval` | string | (default "1m0s") |
| `--authorizer.type` | string | (default "UserClouds") |
| `--authorizer.userCloudsClient.cache.redis.ttl.edgeTypes` | string | Specifies how long edge types remain in the cache.. (default "30m0s") |
| `--authorizer.userCloudsClient.cache.redis.ttl.edges` | string | Specifies how long edges remain in the cache. (default "30m0s") |
| `--authorizer.userCloudsClient.cache.redis.ttl.objectTypes` | string | Specifies how long object types remain in the cache. (default "30m0s") |
| `--authorizer.userCloudsClient.cache.redis.ttl.objects` | string | Specifies how long objects remain in the cache. (default "30m0s") |
| `--authorizer.userCloudsClient.cache.type` | string | Cache type to use. (default "none") |
| `--authorizer.userCloudsClient.clientID` | string | UserClouds client id |
| `--authorizer.userCloudsClient.clientSecretName` | string | UserCloud client secret name to read from the secret manager. (default "userclouds-client-secret") |
| `--authorizer.userCloudsClient.enableLogging` | | Enable userclouds client's internal logging. Calls to post logs take 250-350 ms and will impact p99 latency, enable with caution. |
| `--authorizer.userCloudsClient.tenantID` | string | UserClouds tenant id. Should be a UUID. |
| `--authorizer.userCloudsClient.tenantUrl` | string | Something like https://{yourtenant}.tenant.userclouds.com |
| `--config` | string | config file (default is /Users/andrew/.union/config.yaml) |
| `--connection.environment` | string | |
| `--connection.region` | string | |
| `--connection.rootTenantURLPattern` | string | Pattern for tenant url. (default "dns:///{{ organization }}.cloud-staging.union.ai") |
| `--console.endpoint` | string | Endpoint of console, if different than flyte admin |
| `--database.connMaxLifeTime` | string | sets the maximum amount of time a connection may be reused (default "1h0m0s") |
| `--database.enableForeignKeyConstraintWhenMigrating` | | Whether to enable gorm foreign keys when migrating the db |
| `--database.maxIdleConnections` | int | maxIdleConnections sets the maximum number of connections in the idle connection pool. (default 10) |
| `--database.maxOpenConnections` | int | maxOpenConnections sets the maximum number of open connections to the database. (default 100) |
| `--database.postgres.dbname` | string | The database name (default "postgres") |
| `--database.postgres.debug` | | |
| `--database.postgres.host` | string | The host name of the database server (default "localhost") |
| `--database.postgres.options` | string | See http://gorm.io/docs/connecting_to_the_database.html for available options passed, in addition to the above. (default "sslmode=disable") |
| `--database.postgres.password` | string | The database password. (default "postgres") |
| `--database.postgres.passwordPath` | string | Points to the file containing the database password. |
| `--database.postgres.port` | int | The port name of the database server (default 30001) |
| `--database.postgres.readReplicaHost` | string | The host name of the read replica database server (default "localhost") |
| `--database.postgres.username` | string | The database user who is connecting to the server. (default "postgres") |
| `--database.sqlite.file` | string | The path to the file (existing or new) where the DB should be created / stored. If existing, then this will be re-used, else a new will be created |
| `--db.connectionPool.maxConnectionLifetime` | string | (default "0s") |
| `--db.connectionPool.maxIdleConnections` | int | |
| `--db.connectionPool.maxOpenConnections` | int | |
| `--db.dbname` | string | (default "postgres") |
| `--db.debug` | | |
| `--db.host` | string | (default "postgres") |
| `--db.log_level` | int | (default 4) |
| `--db.options` | string | (default "sslmode=disable") |
| `--db.password` | string | |
| `--db.passwordPath` | string | |
| `--db.port` | int | (default 5432) |
| `--db.username` | string | (default "postgres") |
| `-d`, `--domain` | string | Specifies the Flyte project's domain. |
| `--files.archive` | | Pass in archive file either an http link or local path. |
| `--files.assumableIamRole` | string | Custom assumable iam auth role to register launch plans with. |
| `--files.continueOnError` | | Continue on error when registering files. |
| `--files.destinationDirectory` | string | Location of source code in container. |
| `--files.dryRun` | | Execute command without making any modifications. |
| `--files.enableSchedule` | | Enable the schedule if the files contain schedulable launchplan. |
| `--files.force` | | Force use of version number on entities registered with flyte. |
| `--files.k8ServiceAccount` | string | Deprecated. Please use `--K8sServiceAccount`|
| `--files.k8sServiceAccount` | string | Custom kubernetes service account auth role to register launch plans with. |
| `--files.outputLocationPrefix` | string | Custom output location prefix for offloaded types (files/schemas). |
| `--files.sourceUploadPath` | string | Deprecated: Update flyte admin to avoid having to configure storage access from uctl. |
| `--files.version` | string | Version of the entity to be registered with flyte which are un-versioned after serialization. |
| `--logger.formatter.type` | string | Sets logging format type. (default "json") |
| `--logger.level` | int | Sets the minimum logging level. (default 3) |
| `--logger.mute` | | Mutes all logs regardless of severity. Intended for benchmarks/tests only. |
| `--logger.show-source` | | Includes source code location in logs. |
| `--org` | string | Organization to work on. If not set, default to user's org. |
| `--otel.file.filename` | string | Filename to store exported telemetry traces (default "/tmp/trace.txt") |
| `--otel.jaeger.endpoint` | string | Endpoint for the jaeger telemetry trace ingestor (default "http://localhost:14268/api/traces") |
| `--otel.otlpgrpc.endpoint` | string | Endpoint for the OTLP telemetry trace collector (default "http://localhost:4317") |
| `--otel.otlphttp.endpoint` | string | Endpoint for the OTLP telemetry trace collector (default "http://localhost:4318/v1/traces") |
| `--otel.sampler.parentSampler` | string | Sets the parent sampler to use for the tracer (default "always") |
| `--otel.type` | string | Sets the type of exporter to configure [noop/file/jaeger/otlpgrpc/otlphttp]. (default "noop") |
| `-o`, `--output` | string | Specifies the output type - supported formats [TABLE JSON YAML DOT DOTURL]. NOTE: dot, doturl are only supported for Workflow (default "table") |
| `--plugins.catalogcache.reader.maxItems` | int | Maximum number of entries to keep in the index. (default 10000) |
| `--plugins.catalogcache.reader.maxRetries` | int | Maximum number of retries per item. (default 3) |
| `--plugins.catalogcache.reader.workers` | int | Number of concurrent workers to start processing the queue. (default 10) |
| `--plugins.catalogcache.writer.maxItems` | int | Maximum number of entries to keep in the index. (default 10000) |
| `--plugins.catalogcache.writer.maxRetries` | int | Maximum number of retries per item. (default 3) |
| `--plugins.catalogcache.writer.workers` | int | Number of concurrent workers to start processing the queue. (default 10) |
| `-p`, `--project` | string | Specifies the Flyte project. |
| `--rediscache.passwordSecretName` | string | Name of secret with Redis password. |
| `--rediscache.primaryEndpoint` | string | Primary endpoint for the redis cache that can be used for both reads and writes. |
| `--rediscache.replicaEndpoint` | string | Replica endpoint for the redis cache that can be used for reads. |
| `--secrets.env-prefix` | string | Prefix for environment variables (default "FLYTE_SECRET_") |
| `--secrets.secrets-prefix` | string | Prefix where to look for secrets file (default "/etc/secrets") |
| `--secrets.type` | string | Sets the type of storage to configure [local]. (default "local") |
| `--server.dataProxy.download.maxExpiresIn` | string | Maximum allowed expiration duration. (default "1h0m0s") |
| `--server.dataProxy.upload.defaultFileNameLength` | int | Default length for the generated file name if not provided in the request. (default 20) |
| `--server.dataProxy.upload.maxExpiresIn` | string | Maximum allowed expiration duration. (default "1h0m0s") |
| `--server.dataProxy.upload.maxSize` | string | Maximum allowed upload size. (default "6Mi") |
| `--server.dataProxy.upload.storagePrefix` | string | Storage prefix to use for all upload requests. |
| `--server.grpc.enableGrpcLatencyMetrics` | | Enable grpc latency metrics. Note Histograms metrics can be expensive on Prometheus servers. |
| `--server.grpc.maxMessageSizeBytes` | int | The max size in bytes for incoming gRPC messages |
| `--server.grpc.port` | int | On which grpc port to serve admin (default 8089) |
| `--server.grpc.serverReflection` | | Enable GRPC Server Reflection (default true) |
| `--server.grpcPort` | int | deprecated |
| `--server.grpcServerReflection` | | deprecated |
| `--server.httpPort` | int | On which http port to serve admin (default 8088) |
| `--server.kube-config` | string | Path to kubernetes client config file, default is empty, useful for incluster config. |
| `--server.kubeClientConfig.burst` | int | Max burst rate for throttle. 0 defaults to 10 (default 25) |
| `--server.kubeClientConfig.qps` | int32 | Max QPS to the master for requests to KubeAPI. 0 defaults to 5. (default 100) |
| `--server.kubeClientConfig.timeout` | string | Max duration allowed for every request to KubeAPI before giving up. 0 implies no timeout. (default "30s") |
| `--server.master` | string | The address of the Kubernetes API server. |
| `--server.readHeaderTimeoutSeconds` | int | The amount of time allowed to read request headers. (default 32) |
| `--server.security.allowCors` | | (default true) |
| `--server.security.allowedHeaders` | strings | (default [Content-Type,flyte-authorization]) |
| `--server.security.allowedOrigins` | strings | (default [*]) |
| `--server.security.auditAccess` | | |
| `--server.security.secure` | | |
| `--server.security.ssl.certificateFile` | string | |
| `--server.security.ssl.keyFile` | string | |
| `--server.security.useAuth` | | |
| `--server.thirdPartyConfig.flyteClient.audience` | string | Audience to use when initiating OAuth2 authorization requests. |
| `--server.thirdPartyConfig.flyteClient.clientId` | string | public identifier for the app which handles authorization for a Flyte deployment |
| `--server.thirdPartyConfig.flyteClient.redirectUri` | string | This is the callback uri registered with the app which handles authorization for a Flyte deployment |
| `--server.thirdPartyConfig.flyteClient.scopes` | strings | Recommended scopes for the client to request. |
| `--server.watchService.maxActiveClusterConnections` | int | (default 5) |
| `--server.watchService.maxPageSize` | int | (default 50000) |
| `--server.watchService.nonTerminalStatusUpdatesInterval` | string | (default "1m0s") |
| `--server.watchService.pollInterval` | string | (default "1s") |
| `--sharedservice.connectPort` | string | On which connect port to serve admin (default "8080") |
| `--sharedservice.grpc.grpcMaxResponseStatusBytes` | int32 | specifies the maximum (uncompressed) size of header list that the client is prepared to accept on grpc calls (default 32000) |
| `--sharedservice.grpc.maxConcurrentStreams` | int | Limit on the number of concurrent streams to each ServerTransport. (default 100) |
| `--sharedservice.grpc.maxMessageSizeBytes` | int | Limit on the size of message that can be received on the server. (default 10485760) |
| `--sharedservice.grpcServerReflection` | | Enable GRPC Server Reflection (default true) |
| `--sharedservice.httpPort` | string | On which http port to serve admin (default "8089") |
| `--sharedservice.kubeConfig` | string | Path to kubernetes client config file. |
| `--sharedservice.master` | string | The address of the Kubernetes API server. |
| `--sharedservice.metrics.enableClientGrpcHistograms` | | Enable client grpc histograms (default true) |
| `--sharedservice.metrics.enableGrpcHistograms` | | Enable grpc histograms (default true) |
| `--sharedservice.metrics.scope` | string | Scope to emit metrics under (default "service:") |
| `--sharedservice.port` | string | On which grpc port to serve admin (default "8080") |
| `--sharedservice.profiler.enabled` | | Enable Profiler on server |
| `--sharedservice.profilerPort` | string | Profile port to start listen for pprof and metric handlers on. (default "10254") |
| `--sharedservice.security.allowCors` | | |
| `--sharedservice.security.allowLocalhostAccess` | | Whether to permit localhost unauthenticated access to the server |
| `--sharedservice.security.allowedHeaders` | strings | |
| `--sharedservice.security.allowedOrigins` | strings | |
| `--sharedservice.security.auditAccess` | | |
| `--sharedservice.security.orgOverride` | string | Override org in identity context if localhost access enabled |
| `--sharedservice.security.secure` | | |
| `--sharedservice.security.ssl.certificateAuthorityFile` | string | |
| `--sharedservice.security.ssl.certificateFile` | string | |
| `--sharedservice.security.ssl.keyFile` | string | |
| `--sharedservice.security.useAuth` | | |
| `--sharedservice.sync.syncInterval` | string | Time interval to sync (default "5m0s") |
| `--storage.cache.max_size_mbs` | int | Maximum size of the cache where the Blob store data is cached in-memory. If not specified or set to 0, cache is not used |
| `--storage.cache.target_gc_percent` | int | Sets the garbage collection target percentage. |
| `--storage.connection.access-key` | string | Access key to use. Only required when authtype is set to accesskey. |
| `--storage.connection.auth-type` | string | Auth Type to use [iam, accesskey]. (default "iam") |
| `--storage.connection.disable-ssl` | | Disables SSL connection. Should only be used for development. |
| `--storage.connection.endpoint` | string | URL for storage client to connect to. |
| `--storage.connection.region` | string | Region to connect to. (default "us-east-1") |
| `--storage.connection.secret-key` | string | Secret to use when accesskey is set. |
| `--storage.container` | string | Initial container (in s3 a bucket) to create -if it doesn't exist-.' |
| `--storage.defaultHttpClient.timeout` | string | Sets time out on the http client. (default "0s") |
| `--storage.enable-multicontainer` | | If this is true, then the container argument is overlooked and redundant. This config will automatically open new connections to new containers/buckets as they are encountered |
| `--storage.limits.maxDownloadMBs` | int | Maximum allowed download size (in MBs) per call. (default 2) |
| `--storage.stow.config` | stringToString | Configuration for stow backend. Refer to github/flyteorg/stow (default []) |
| `--storage.stow.kind` | string | Kind of Stow backend to use. Refer to github/flyteorg/stow |
| `--storage.type` | string | Sets the type of storage to configure [s3/minio/local/mem/stow]. (default "s3") |
| `--union.auth.authorizationMetadataKey` | string | Authorization Header to use when passing Access Tokens to the server (default "flyte-authorization") |
| `--union.auth.clientId` | string | Client ID |
| `--union.auth.clientSecretEnvVar` | string | Environment variable containing the client secret |
| `--union.auth.clientSecretLocation` | string | File containing the client secret |
| `--union.auth.deviceFlow.pollInterval` | string | amount of time the device flow would poll the token endpoint if auth server doesn't return a polling interval. Okta and google IDP do return an interval' (default "5s") |
| `--union.auth.deviceFlow.refreshTime` | string | grace period from the token expiry after which it would refresh the token. (default "5m0s") |
| `--union.auth.deviceFlow.timeout` | string | amount of time the device flow should complete or else it will be cancelled. (default "10m0s") |
| `--union.auth.enable` | | Whether to enable an authenticated conenction when communicating with admin. (default true) |
| `--union.auth.externalAuth.command` | strings | Command for external authentication token generation |
| `--union.auth.pkce.refreshTime` | string | grace period from the token expiry after which it would refresh the token. (default "5m0s") |
| `--union.auth.pkce.timeout` | string | Amount of time the browser session would be active for authentication from client app. (default "15s") |
| `--union.auth.scopes` | strings | List of scopes to request |
| `--union.auth.tokenRefreshWindow` | string | Max duration between token refresh attempt and token expiry. (default "1h0m0s") |
| `--union.auth.tokenUrl` | string | OPTIONAL: Your IdP's token endpoint. It'll be discovered from flyte admin's OAuth Metadata endpoint if not provided. |
| `--union.auth.type` | string | Type of OAuth2 flow used for communicating with admin. (default "Pkce") |
| `--union.cache.maxItemsCount` | int | Maximum number of items to keep in the cache before evicting. (default 1000) |
| `--union.connection.host` | string | Host to connect to (default "dns:///utt-mgdp-stg-us-east-2.cloud-staging.union.ai") |
| `--union.connection.insecure` | | Whether to connect over insecure channel |
| `--union.connection.insecureSkipVerify` | | InsecureSkipVerify controls whether a client verifies the server's certificate chain and host name.Caution: shouldn't be use for production usecases' |
| `--union.connection.keepAliveConfig.permitWithoutStream` | | If true, client sends keepalive pings even with no active RPCs. |
| `--union.connection.keepAliveConfig.time` | string | After a duration of this time if the client doesn't see any activity it pings the server to see if the transport is still alive. (default "20s") |
| `--union.connection.keepAliveConfig.timeout` | string | After having pinged for keepalive check, the client waits for a duration of Timeout and if no activity is seen even after that the connection is closed. (default "2m0s") |
| `--union.connection.maxBackoffDelay` | string | Max delay for grpc backoff (default "8s") |
| `--union.connection.maxRecvMsgSize` | int | Maximum size of a message in bytes of a gRPC message (default 10485760) |
| `--union.connection.maxRetries` | int | Max number of gRPC retries (default 4) |
| `--union.connection.minConnectTimeout` | string | Minimum timeout for establishing a connection (default "20s") |
| `--union.connection.perRetryTimeout` | string | gRPC per retry timeout (default "15s") |
| `--union.connection.serviceConfig` | string | Defines gRPC experimental JSON Service Config (default "{"loadBalancingConfig": [{"round_robin":{}}]}") |
| `--union.connection.trustedIdentityClaims.enabled` | | Enables passing of trusted claims while making inter service calls |
| `--union.connection.trustedIdentityClaims.externalIdentityClaim` | string | External identity claim of the service which is authorized to make internal service call. These are verified against userclouds actions |
| `--union.connection.trustedIdentityClaims.externalIdentityTypeClaim` | string | External identity type claim of app or user to use for the current service identity. It should be an 'app' for inter service communication |
| `--union.internalConnectionConfig.-` | stringToString | (default []) |
| `--union.internalConnectionConfig.enabled` | | Enables internal service to service communication instead of going through ingress. |
| `--union.internalConnectionConfig.urlPattern` | string | UrlPattern of the internal service endpoints. (default "{{ service }}-helmchart.{{ service }}.svc.cluster.local:80") |
| `--webhook.awsSecretManager.sidecarImage` | string | Specifies the sidecar docker image to use (default "docker.io/amazon/aws-secrets-manager-secret-sidecar:v0.1.4") |
| `--webhook.certDir` | string | Certificate directory to use to write generated certs. Defaults to /etc/webhook/certs/ (default "/etc/webhook/certs") |
| `--webhook.embeddedSecretManagerConfig.awsConfig.region` | string | AWS region |
| `--webhook.embeddedSecretManagerConfig.fileMountInitContainer.image` | string | Specifies init container image to use for mounting secrets as files. (default "busybox:1.28") |
| `--webhook.embeddedSecretManagerConfig.gcpConfig.project` | string | GCP project to be used for secret manager |
| `--webhook.embeddedSecretManagerConfig.type` | string | (default "AWS") |
| `--webhook.gcpSecretManager.sidecarImage` | string | Specifies the sidecar docker image to use (default "gcr.io/google.com/cloudsdktool/cloud-sdk:alpine") |
| `--webhook.listenPort` | int | The port to use to listen to webhook calls. Defaults to 9443 (default 9443) |
| `--webhook.localCert` | | write certs locally. Defaults to false |
| `--webhook.metrics-prefix` | string | An optional prefix for all published metrics. (default "flyte:") |
| `--webhook.secretName` | string | Secret name to write generated certs to. (default "flyte-pod-webhook") |
| `--webhook.serviceName` | string | The name of the webhook service. (default "flyte-pod-webhook") |
| `--webhook.servicePort` | int32 | The port on the service that hosting webhook. (default 443) |
| `--webhook.vaultSecretManager.role` | string | Specifies the vault role to use (default "flyte") |
## Subpages
- **Uctl CLI > uctl get > uctl get app**
- **Uctl CLI > uctl get > uctl get cluster**
- **Uctl CLI > uctl get > uctl get cluster-pool-attributes**
- **Uctl CLI > uctl get > uctl get cluster-resource-attribute**
- **Uctl CLI > uctl get > uctl get clusterconfig**
- **Uctl CLI > uctl get > uctl get clusterconfigs**
- **Uctl CLI > uctl get > uctl get clusterpool**
- **Uctl CLI > uctl get > uctl get clusterpoolconfig**
- **Uctl CLI > uctl get > uctl get clusterswithconfig**
- **Uctl CLI > uctl get > uctl get echo**
- **Uctl CLI > uctl get > uctl get execution**
- **Uctl CLI > uctl get > uctl get execution-cluster-label**
- **Uctl CLI > uctl get > uctl get execution-queue-attribute**
- **Uctl CLI > uctl get > uctl get executionoperation**
- **Uctl CLI > uctl get > uctl get identityassignment**
- **Uctl CLI > uctl get > uctl get launchplan**
- **Uctl CLI > uctl get > uctl get plugin-override**
- **Uctl CLI > uctl get > uctl get policy**
- **Uctl CLI > uctl get > uctl get project**
- **Uctl CLI > uctl get > uctl get role**
- **Uctl CLI > uctl get > uctl get task**
- **Uctl CLI > uctl get > uctl get task-resource-attribute**
- **Uctl CLI > uctl get > uctl get workflow**
- **Uctl CLI > uctl get > uctl get workflow-execution-config**
=== PAGE: https://www.union.ai/docs/v1/serverless/api-reference/uctl-cli/uctl-get/uctl-get-app ===
# uctl get app
Retrieves apps registered in the tenant
## Synopsis
Retrieves apps registered in the tenant
```shell
$ uctl get app [flags]
```
## Options
| Option | Type | Description |
|--------|------|-------------|
| `--appSpecFile` | string | generates an app spec file with conformance to the api format with current values.This can only be used while fetching single app |
| `--filter.asc` | | Specifies the sorting order. By default sorts result in descending order |
| `--filter.fieldSelector` | string | Allows for filtering resources based on a specific value for a field name using operations =, !=, >, {, }=, <=, in, contains.Multiple selectors can be added separated by commas |
| `--filter.limit` | int32 | Specifies the number of results to return (default 100) |
| `--filter.sortBy` | string | Specifies which field to sort results (default "created_at") |
| `--filter.token` | string | Specifies the server provided token to use for fetching next page in case of multi page result |
| `-h`, `--help` | help for app |
### Options inherited from parent commands
| Option | Type | Description |
|--------|------|-------------|
| `--admin.audience` | string | Audience to use when initiating OAuth2 authorization requests. |
| `--admin.authType` | string | Type of OAuth2 flow used for communicating with admin.ClientSecret, Pkce, ExternalCommand are valid values (default "ClientSecret") |
| `--admin.authorizationHeader` | string | Custom metadata header to pass JWT |
| `--admin.authorizationServerUrl` | string | This is the URL to your IdP's authorization server. It'll default to Endpoint |
| `--admin.caCertFilePath` | string | Use specified certificate file to verify the admin server peer. |
| `--admin.clientId` | string | Client ID (default "flytepropeller") |
| `--admin.clientSecretEnvVar` | string | Environment variable containing the client secret |
| `--admin.clientSecretLocation` | string | File containing the client secret (default "/etc/secrets/client_secret") |
| `--admin.command` | strings | Command for external authentication token generation |
| `--admin.defaultOrg` | string | OPTIONAL: Default org to use to support non-org based cli's.'. |
| `--admin.defaultServiceConfig` | string | |
| `--admin.deviceFlowConfig.pollInterval` | string | amount of time the device flow would poll the token endpoint if auth server doesn't return a polling interval. Okta and google IDP do return an interval' (default "5s") |
| `--admin.deviceFlowConfig.refreshTime` | string | grace period from the token expiry after which it would refresh the token. (default "5m0s") |
| `--admin.deviceFlowConfig.timeout` | string | amount of time the device flow should complete or else it will be cancelled. (default "10m0s") |
| `--admin.endpoint` | string | For admin types, specify where the uri of the service is located. |
| `--admin.httpProxyURL` | string | OPTIONAL: HTTP Proxy to be used for OAuth requests. |
| `--admin.insecure` | | Use insecure connection. |
| `--admin.insecureSkipVerify` | | InsecureSkipVerify controls whether a client verifies the server's certificate chain and host name.Caution: shouldn't be use for production usecases' |
| `--admin.maxBackoffDelay` | string | Max delay for grpc backoff (default "8s") |
| `--admin.maxMessageSizeBytes` | int | The max size in bytes for incoming gRPC messages |
| `--admin.maxRetries` | int | Max number of gRPC retries (default 4) |
| `--admin.perRetryTimeout` | string | gRPC per retry timeout (default "15s") |
| `--admin.pkceConfig.refreshTime` | string | grace period from the token expiry after which it would refresh the token. (default "5m0s") |
| `--admin.pkceConfig.timeout` | string | Amount of time the browser session would be active for authentication from client app. (default "2m0s") |
| `--admin.proxyCommand` | strings | Command for external proxy-authorization token generation |
| `--admin.scopes` | strings | List of scopes to request |
| `--admin.tokenRefreshWindow` | string | Max duration between token refresh attempt and token expiry. (default "0s") |
| `--admin.tokenUrl` | string | OPTIONAL: Your IdP's token endpoint. It'll be discovered from flyte admin's OAuth Metadata endpoint if not provided. |
| `--admin.useAudienceFromAdmin` | | Use Audience configured from admins public endpoint config. |
| `--admin.useAuth` | | Deprecated: Auth will be enabled/disabled based on admin's dynamically discovered information. |
| `--auth.appAuth.externalAuthServer.allowedAudience` | strings | Optional: A list of allowed audiences. If not provided, the audience is expected to be the public Uri of the service. |
| `--auth.appAuth.externalAuthServer.baseUrl` | string | This should be the base url of the authorization server that you are trying to hit. With Okta for instance, it will look something like https://company.okta.com/oauth2/abcdef123456789/ |
| `--auth.appAuth.externalAuthServer.httpProxyURL` | string | OPTIONAL: HTTP Proxy to be used for OAuth requests. |
| `--auth.appAuth.externalAuthServer.metadataUrl` | string | Optional: If the server doesn't support /.well-known/oauth-authorization-server, you can set a custom metadata url here.' |
| `--auth.appAuth.externalAuthServer.retryAttempts` | int | Optional: The number of attempted retries on a transient failure to get the OAuth metadata (default 5) |
| `--auth.appAuth.externalAuthServer.retryDelay` | string | Optional, Duration to wait between retries (default "1s") |
| `--auth.appAuth.selfAuthServer.accessTokenLifespan` | string | Defines the lifespan of issued access tokens. (default "30m0s") |
| `--auth.appAuth.selfAuthServer.authorizationCodeLifespan` | string | Defines the lifespan of issued access tokens. (default "5m0s") |
| `--auth.appAuth.selfAuthServer.claimSymmetricEncryptionKeySecretName` | string | OPTIONAL: Secret name to use to encrypt claims in authcode token. (default "claim_symmetric_key") |
| `--auth.appAuth.selfAuthServer.issuer` | string | Defines the issuer to use when issuing and validating tokens. The default value is https://{requestUri.HostAndPort}/ |
| `--auth.appAuth.selfAuthServer.oldTokenSigningRSAKeySecretName` | string | OPTIONAL: Secret name to use to retrieve Old RSA Signing Key. This can be useful during key rotation to continue to accept older tokens. (default "token_rsa_key_old.pem") |
| `--auth.appAuth.selfAuthServer.refreshTokenLifespan` | string | Defines the lifespan of issued access tokens. (default "1h0m0s") |
| `--auth.appAuth.selfAuthServer.tokenSigningRSAKeySecretName` | string | OPTIONAL: Secret name to use to retrieve RSA Signing Key. (default "token_rsa_key.pem") |
| `--auth.appAuth.thirdPartyConfig.flyteClient.audience` | string | Audience to use when initiating OAuth2 authorization requests. |
| `--auth.appAuth.thirdPartyConfig.flyteClient.clientId` | string | public identifier for the app which handles authorization for a Flyte deployment (default "uctl") |
| `--auth.appAuth.thirdPartyConfig.flyteClient.redirectUri` | string | This is the callback uri registered with the app which handles authorization for a Flyte deployment (default "http://localhost:53593/callback") |
| `--auth.appAuth.thirdPartyConfig.flyteClient.scopes` | strings | Recommended scopes for the client to request. (default [all,offline]) |
| `--auth.disableForGrpc` | | Disables auth enforcement on Grpc Endpoints. |
| `--auth.disableForHttp` | | Disables auth enforcement on HTTP Endpoints. |
| `--auth.grpcAuthorizationHeader` | string | (default "flyte-authorization") |
| `--auth.httpAuthorizationHeader` | string | (default "flyte-authorization") |
| `--auth.httpProxyURL` | string | OPTIONAL: HTTP Proxy to be used for OAuth requests. |
| `--auth.tokenEndpointProxyPath` | string | The path used to proxy calls to the TokenURL |
| `--auth.userAuth.cookieBlockKeySecretName` | string | OPTIONAL: Secret name to use for cookie block key. (default "cookie_block_key") |
| `--auth.userAuth.cookieHashKeySecretName` | string | OPTIONAL: Secret name to use for cookie hash key. (default "cookie_hash_key") |
| `--auth.userAuth.cookieSetting.domain` | string | OPTIONAL: Allows you to set the domain attribute on the auth cookies. |
| `--auth.userAuth.cookieSetting.sameSitePolicy` | string | OPTIONAL: Allows you to declare if your cookie should be restricted to a first-party or same-site context.Wrapper around http.SameSite. (default "DefaultMode") |
| `--auth.userAuth.httpProxyURL` | string | OPTIONAL: HTTP Proxy to be used for OAuth requests. |
| `--auth.userAuth.idpQueryParameter` | string | idp query parameter used for selecting a particular IDP for doing user authentication. Eg: for Okta passing idp={IDP-ID} forces the authentication to happen with IDP-ID |
| `--auth.userAuth.openId.baseUrl` | string | |
| `--auth.userAuth.openId.clientId` | string | |
| `--auth.userAuth.openId.clientSecretFile` | string | |
| `--auth.userAuth.openId.clientSecretName` | string | (default "oidc_client_secret") |
| `--auth.userAuth.openId.scopes` | strings | (default [openid,profile]) |
| `--auth.userAuth.redirectUrl` | string | (default "/console") |
| `--authorizer.internalCommunicationConfig.enabled` | | Enables authorization decisions for internal communication. (default true) |
| `--authorizer.internalCommunicationConfig.ingressIdentity` | string | IngressIdentity used in the cluster. Needed to exclude the communication coming from ingress. (default "ingress-nginx.ingress-nginx.serviceaccount.identity.linkerd.cluster.local") |
| `--authorizer.internalCommunicationConfig.tenantUrlPatternIdentity` | string | UrlPatternIdentity of the internal tenant service endpoint identities. (default "{{ service }}.{{ org }}.serviceaccount.identity.linkerd.cluster.local") |
| `--authorizer.internalCommunicationConfig.urlPatternIdentity` | string | UrlPatternIdentity of the internal service endpoint identities. (default "{{ service }}-helmchart.{{ service }}.serviceaccount.identity.linkerd.cluster.local") |
| `--authorizer.mode` | string | (default "Active") |
| `--authorizer.organizationConfig.PolicyConfig.adminPolicyDescription` | string | description for the boilerplate admin policy (default "Contributor permissions and full admin permissions to manage users and view usage dashboards") |
| `--authorizer.organizationConfig.PolicyConfig.contributorPolicyDescription` | string | description for the boilerplate contributor policy (default "Viewer permissions and permissions to create workflows, tasks, launch plans, and executions") |
| `--authorizer.organizationConfig.PolicyConfig.defaultUserPolicyRoleType` | string | name of the role type to determine which default policy new users added to the organization should be assigned (default "Viewer") |
| `--authorizer.organizationConfig.PolicyConfig.serverlessContributorPolicyDescription` | string | description for the boilerplate serverless contributor policy (default "Viewer permissions and permissions to create workflows, tasks, launch plans, and executions") |
| `--authorizer.organizationConfig.PolicyConfig.serverlessViewerPolicyDescription` | string | description for the boilerplate serverless viewer policy (default "Permissions to view Flyte entities") |
| `--authorizer.organizationConfig.PolicyConfig.viewerPolicyDescription` | string | description for the boilerplate viewer policy (default "Permissions to view Flyte entities") |
| `--authorizer.organizationConfig.defaultPolicyCacheDuration` | string | Cache entry duration for the store of the default policy per organization (default "10m0s") |
| `--authorizer.syncRuleRefreshInterval` | string | (default "1m0s") |
| `--authorizer.type` | string | (default "UserClouds") |
| `--authorizer.userCloudsClient.cache.redis.ttl.edgeTypes` | string | Specifies how long edge types remain in the cache.. (default "30m0s") |
| `--authorizer.userCloudsClient.cache.redis.ttl.edges` | string | Specifies how long edges remain in the cache. (default "30m0s") |
| `--authorizer.userCloudsClient.cache.redis.ttl.objectTypes` | string | Specifies how long object types remain in the cache. (default "30m0s") |
| `--authorizer.userCloudsClient.cache.redis.ttl.objects` | string | Specifies how long objects remain in the cache. (default "30m0s") |
| `--authorizer.userCloudsClient.cache.type` | string | Cache type to use. (default "none") |
| `--authorizer.userCloudsClient.clientID` | string | UserClouds client id |
| `--authorizer.userCloudsClient.clientSecretName` | string | UserCloud client secret name to read from the secret manager. (default "userclouds-client-secret") |
| `--authorizer.userCloudsClient.enableLogging` | | Enable userclouds client's internal logging. Calls to post logs take 250-350 ms and will impact p99 latency, enable with caution. |
| `--authorizer.userCloudsClient.tenantID` | string | UserClouds tenant id. Should be a UUID. |
| `--authorizer.userCloudsClient.tenantUrl` | string | Something like https://{yourtenant}.tenant.userclouds.com |
| `--config` | string | config file (default is /Users/andrew/.union/config.yaml) |
| `--connection.environment` | string | |
| `--connection.region` | string | |
| `--connection.rootTenantURLPattern` | string | Pattern for tenant url. (default "dns:///{{ organization }}.cloud-staging.union.ai") |
| `--console.endpoint` | string | Endpoint of console, if different than flyte admin |
| `--database.connMaxLifeTime` | string | sets the maximum amount of time a connection may be reused (default "1h0m0s") |
| `--database.enableForeignKeyConstraintWhenMigrating` | | Whether to enable gorm foreign keys when migrating the db |
| `--database.maxIdleConnections` | int | maxIdleConnections sets the maximum number of connections in the idle connection pool. (default 10) |
| `--database.maxOpenConnections` | int | maxOpenConnections sets the maximum number of open connections to the database. (default 100) |
| `--database.postgres.dbname` | string | The database name (default "postgres") |
| `--database.postgres.debug` | | |
| `--database.postgres.host` | string | The host name of the database server (default "localhost") |
| `--database.postgres.options` | string | See http://gorm.io/docs/connecting_to_the_database.html for available options passed, in addition to the above. (default "sslmode=disable") |
| `--database.postgres.password` | string | The database password. (default "postgres") |
| `--database.postgres.passwordPath` | string | Points to the file containing the database password. |
| `--database.postgres.port` | int | The port name of the database server (default 30001) |
| `--database.postgres.readReplicaHost` | string | The host name of the read replica database server (default "localhost") |
| `--database.postgres.username` | string | The database user who is connecting to the server. (default "postgres") |
| `--database.sqlite.file` | string | The path to the file (existing or new) where the DB should be created / stored. If existing, then this will be re-used, else a new will be created |
| `--db.connectionPool.maxConnectionLifetime` | string | (default "0s") |
| `--db.connectionPool.maxIdleConnections` | int | |
| `--db.connectionPool.maxOpenConnections` | int | |
| `--db.dbname` | string | (default "postgres") |
| `--db.debug` | | |
| `--db.host` | string | (default "postgres") |
| `--db.log_level` | int | (default 4) |
| `--db.options` | string | (default "sslmode=disable") |
| `--db.password` | string | |
| `--db.passwordPath` | string | |
| `--db.port` | int | (default 5432) |
| `--db.username` | string | (default "postgres") |
| `-d`, `--domain` | string | Specifies the Flyte project's domain. |
| `--files.archive` | | Pass in archive file either an http link or local path. |
| `--files.assumableIamRole` | string | Custom assumable iam auth role to register launch plans with. |
| `--files.continueOnError` | | Continue on error when registering files. |
| `--files.destinationDirectory` | string | Location of source code in container. |
| `--files.dryRun` | | Execute command without making any modifications. |
| `--files.enableSchedule` | | Enable the schedule if the files contain schedulable launchplan. |
| `--files.force` | | Force use of version number on entities registered with flyte. |
| `--files.k8ServiceAccount` | string | Deprecated. Please use `--K8sServiceAccount`|
| `--files.k8sServiceAccount` | string | Custom kubernetes service account auth role to register launch plans with. |
| `--files.outputLocationPrefix` | string | Custom output location prefix for offloaded types (files/schemas). |
| `--files.sourceUploadPath` | string | Deprecated: Update flyte admin to avoid having to configure storage access from uctl. |
| `--files.version` | string | Version of the entity to be registered with flyte which are un-versioned after serialization. |
| `--logger.formatter.type` | string | Sets logging format type. (default "json") |
| `--logger.level` | int | Sets the minimum logging level. (default 3) |
| `--logger.mute` | | Mutes all logs regardless of severity. Intended for benchmarks/tests only. |
| `--logger.show-source` | | Includes source code location in logs. |
| `--org` | string | Organization to work on. If not set, default to user's org. |
| `--otel.file.filename` | string | Filename to store exported telemetry traces (default "/tmp/trace.txt") |
| `--otel.jaeger.endpoint` | string | Endpoint for the jaeger telemetry trace ingestor (default "http://localhost:14268/api/traces") |
| `--otel.otlpgrpc.endpoint` | string | Endpoint for the OTLP telemetry trace collector (default "http://localhost:4317") |
| `--otel.otlphttp.endpoint` | string | Endpoint for the OTLP telemetry trace collector (default "http://localhost:4318/v1/traces") |
| `--otel.sampler.parentSampler` | string | Sets the parent sampler to use for the tracer (default "always") |
| `--otel.type` | string | Sets the type of exporter to configure [noop/file/jaeger/otlpgrpc/otlphttp]. (default "noop") |
| `-o`, `--output` | string | Specifies the output type - supported formats [TABLE JSON YAML DOT DOTURL]. NOTE: dot, doturl are only supported for Workflow (default "table") |
| `--plugins.catalogcache.reader.maxItems` | int | Maximum number of entries to keep in the index. (default 10000) |
| `--plugins.catalogcache.reader.maxRetries` | int | Maximum number of retries per item. (default 3) |
| `--plugins.catalogcache.reader.workers` | int | Number of concurrent workers to start processing the queue. (default 10) |
| `--plugins.catalogcache.writer.maxItems` | int | Maximum number of entries to keep in the index. (default 10000) |
| `--plugins.catalogcache.writer.maxRetries` | int | Maximum number of retries per item. (default 3) |
| `--plugins.catalogcache.writer.workers` | int | Number of concurrent workers to start processing the queue. (default 10) |
| `-p`, `--project` | string | Specifies the Flyte project. |
| `--rediscache.passwordSecretName` | string | Name of secret with Redis password. |
| `--rediscache.primaryEndpoint` | string | Primary endpoint for the redis cache that can be used for both reads and writes. |
| `--rediscache.replicaEndpoint` | string | Replica endpoint for the redis cache that can be used for reads. |
| `--secrets.env-prefix` | string | Prefix for environment variables (default "FLYTE_SECRET_") |
| `--secrets.secrets-prefix` | string | Prefix where to look for secrets file (default "/etc/secrets") |
| `--secrets.type` | string | Sets the type of storage to configure [local]. (default "local") |
| `--server.dataProxy.download.maxExpiresIn` | string | Maximum allowed expiration duration. (default "1h0m0s") |
| `--server.dataProxy.upload.defaultFileNameLength` | int | Default length for the generated file name if not provided in the request. (default 20) |
| `--server.dataProxy.upload.maxExpiresIn` | string | Maximum allowed expiration duration. (default "1h0m0s") |
| `--server.dataProxy.upload.maxSize` | string | Maximum allowed upload size. (default "6Mi") |
| `--server.dataProxy.upload.storagePrefix` | string | Storage prefix to use for all upload requests. |
| `--server.grpc.enableGrpcLatencyMetrics` | | Enable grpc latency metrics. Note Histograms metrics can be expensive on Prometheus servers. |
| `--server.grpc.maxMessageSizeBytes` | int | The max size in bytes for incoming gRPC messages |
| `--server.grpc.port` | int | On which grpc port to serve admin (default 8089) |
| `--server.grpc.serverReflection` | | Enable GRPC Server Reflection (default true) |
| `--server.grpcPort` | int | deprecated |
| `--server.grpcServerReflection` | | deprecated |
| `--server.httpPort` | int | On which http port to serve admin (default 8088) |
| `--server.kube-config` | string | Path to kubernetes client config file, default is empty, useful for incluster config. |
| `--server.kubeClientConfig.burst` | int | Max burst rate for throttle. 0 defaults to 10 (default 25) |
| `--server.kubeClientConfig.qps` | int32 | Max QPS to the master for requests to KubeAPI. 0 defaults to 5. (default 100) |
| `--server.kubeClientConfig.timeout` | string | Max duration allowed for every request to KubeAPI before giving up. 0 implies no timeout. (default "30s") |
| `--server.master` | string | The address of the Kubernetes API server. |
| `--server.readHeaderTimeoutSeconds` | int | The amount of time allowed to read request headers. (default 32) |
| `--server.security.allowCors` | | (default true) |
| `--server.security.allowedHeaders` | strings | (default [Content-Type,flyte-authorization]) |
| `--server.security.allowedOrigins` | strings | (default [*]) |
| `--server.security.auditAccess` | | |
| `--server.security.secure` | | |
| `--server.security.ssl.certificateFile` | string | |
| `--server.security.ssl.keyFile` | string | |
| `--server.security.useAuth` | | |
| `--server.thirdPartyConfig.flyteClient.audience` | string | Audience to use when initiating OAuth2 authorization requests. |
| `--server.thirdPartyConfig.flyteClient.clientId` | string | public identifier for the app which handles authorization for a Flyte deployment |
| `--server.thirdPartyConfig.flyteClient.redirectUri` | string | This is the callback uri registered with the app which handles authorization for a Flyte deployment |
| `--server.thirdPartyConfig.flyteClient.scopes` | strings | Recommended scopes for the client to request. |
| `--server.watchService.maxActiveClusterConnections` | int | (default 5) |
| `--server.watchService.maxPageSize` | int | (default 50000) |
| `--server.watchService.nonTerminalStatusUpdatesInterval` | string | (default "1m0s") |
| `--server.watchService.pollInterval` | string | (default "1s") |
| `--sharedservice.connectPort` | string | On which connect port to serve admin (default "8080") |
| `--sharedservice.grpc.grpcMaxResponseStatusBytes` | int32 | specifies the maximum (uncompressed) size of header list that the client is prepared to accept on grpc calls (default 32000) |
| `--sharedservice.grpc.maxConcurrentStreams` | int | Limit on the number of concurrent streams to each ServerTransport. (default 100) |
| `--sharedservice.grpc.maxMessageSizeBytes` | int | Limit on the size of message that can be received on the server. (default 10485760) |
| `--sharedservice.grpcServerReflection` | | Enable GRPC Server Reflection (default true) |
| `--sharedservice.httpPort` | string | On which http port to serve admin (default "8089") |
| `--sharedservice.kubeConfig` | string | Path to kubernetes client config file. |
| `--sharedservice.master` | string | The address of the Kubernetes API server. |
| `--sharedservice.metrics.enableClientGrpcHistograms` | | Enable client grpc histograms (default true) |
| `--sharedservice.metrics.enableGrpcHistograms` | | Enable grpc histograms (default true) |
| `--sharedservice.metrics.scope` | string | Scope to emit metrics under (default "service:") |
| `--sharedservice.port` | string | On which grpc port to serve admin (default "8080") |
| `--sharedservice.profiler.enabled` | | Enable Profiler on server |
| `--sharedservice.profilerPort` | string | Profile port to start listen for pprof and metric handlers on. (default "10254") |
| `--sharedservice.security.allowCors` | | |
| `--sharedservice.security.allowLocalhostAccess` | | Whether to permit localhost unauthenticated access to the server |
| `--sharedservice.security.allowedHeaders` | strings | |
| `--sharedservice.security.allowedOrigins` | strings | |
| `--sharedservice.security.auditAccess` | | |
| `--sharedservice.security.orgOverride` | string | Override org in identity context if localhost access enabled |
| `--sharedservice.security.secure` | | |
| `--sharedservice.security.ssl.certificateAuthorityFile` | string | |
| `--sharedservice.security.ssl.certificateFile` | string | |
| `--sharedservice.security.ssl.keyFile` | string | |
| `--sharedservice.security.useAuth` | | |
| `--sharedservice.sync.syncInterval` | string | Time interval to sync (default "5m0s") |
| `--storage.cache.max_size_mbs` | int | Maximum size of the cache where the Blob store data is cached in-memory. If not specified or set to 0, cache is not used |
| `--storage.cache.target_gc_percent` | int | Sets the garbage collection target percentage. |
| `--storage.connection.access-key` | string | Access key to use. Only required when authtype is set to accesskey. |
| `--storage.connection.auth-type` | string | Auth Type to use [iam, accesskey]. (default "iam") |
| `--storage.connection.disable-ssl` | | Disables SSL connection. Should only be used for development. |
| `--storage.connection.endpoint` | string | URL for storage client to connect to. |
| `--storage.connection.region` | string | Region to connect to. (default "us-east-1") |
| `--storage.connection.secret-key` | string | Secret to use when accesskey is set. |
| `--storage.container` | string | Initial container (in s3 a bucket) to create -if it doesn't exist-.' |
| `--storage.defaultHttpClient.timeout` | string | Sets time out on the http client. (default "0s") |
| `--storage.enable-multicontainer` | | If this is true, then the container argument is overlooked and redundant. This config will automatically open new connections to new containers/buckets as they are encountered |
| `--storage.limits.maxDownloadMBs` | int | Maximum allowed download size (in MBs) per call. (default 2) |
| `--storage.stow.config` | stringToString | Configuration for stow backend. Refer to github/flyteorg/stow (default []) |
| `--storage.stow.kind` | string | Kind of Stow backend to use. Refer to github/flyteorg/stow |
| `--storage.type` | string | Sets the type of storage to configure [s3/minio/local/mem/stow]. (default "s3") |
| `--union.auth.authorizationMetadataKey` | string | Authorization Header to use when passing Access Tokens to the server (default "flyte-authorization") |
| `--union.auth.clientId` | string | Client ID |
| `--union.auth.clientSecretEnvVar` | string | Environment variable containing the client secret |
| `--union.auth.clientSecretLocation` | string | File containing the client secret |
| `--union.auth.deviceFlow.pollInterval` | string | amount of time the device flow would poll the token endpoint if auth server doesn't return a polling interval. Okta and google IDP do return an interval' (default "5s") |
| `--union.auth.deviceFlow.refreshTime` | string | grace period from the token expiry after which it would refresh the token. (default "5m0s") |
| `--union.auth.deviceFlow.timeout` | string | amount of time the device flow should complete or else it will be cancelled. (default "10m0s") |
| `--union.auth.enable` | | Whether to enable an authenticated conenction when communicating with admin. (default true) |
| `--union.auth.externalAuth.command` | strings | Command for external authentication token generation |
| `--union.auth.pkce.refreshTime` | string | grace period from the token expiry after which it would refresh the token. (default "5m0s") |
| `--union.auth.pkce.timeout` | string | Amount of time the browser session would be active for authentication from client app. (default "15s") |
| `--union.auth.scopes` | strings | List of scopes to request |
| `--union.auth.tokenRefreshWindow` | string | Max duration between token refresh attempt and token expiry. (default "1h0m0s") |
| `--union.auth.tokenUrl` | string | OPTIONAL: Your IdP's token endpoint. It'll be discovered from flyte admin's OAuth Metadata endpoint if not provided. |
| `--union.auth.type` | string | Type of OAuth2 flow used for communicating with admin. (default "Pkce") |
| `--union.cache.maxItemsCount` | int | Maximum number of items to keep in the cache before evicting. (default 1000) |
| `--union.connection.host` | string | Host to connect to (default "dns:///utt-mgdp-stg-us-east-2.cloud-staging.union.ai") |
| `--union.connection.insecure` | | Whether to connect over insecure channel |
| `--union.connection.insecureSkipVerify` | | InsecureSkipVerify controls whether a client verifies the server's certificate chain and host name.Caution: shouldn't be use for production usecases' |
| `--union.connection.keepAliveConfig.permitWithoutStream` | | If true, client sends keepalive pings even with no active RPCs. |
| `--union.connection.keepAliveConfig.time` | string | After a duration of this time if the client doesn't see any activity it pings the server to see if the transport is still alive. (default "20s") |
| `--union.connection.keepAliveConfig.timeout` | string | After having pinged for keepalive check, the client waits for a duration of Timeout and if no activity is seen even after that the connection is closed. (default "2m0s") |
| `--union.connection.maxBackoffDelay` | string | Max delay for grpc backoff (default "8s") |
| `--union.connection.maxRecvMsgSize` | int | Maximum size of a message in bytes of a gRPC message (default 10485760) |
| `--union.connection.maxRetries` | int | Max number of gRPC retries (default 4) |
| `--union.connection.minConnectTimeout` | string | Minimum timeout for establishing a connection (default "20s") |
| `--union.connection.perRetryTimeout` | string | gRPC per retry timeout (default "15s") |
| `--union.connection.serviceConfig` | string | Defines gRPC experimental JSON Service Config (default "{"loadBalancingConfig": [{"round_robin":{}}]}") |
| `--union.connection.trustedIdentityClaims.enabled` | | Enables passing of trusted claims while making inter service calls |
| `--union.connection.trustedIdentityClaims.externalIdentityClaim` | string | External identity claim of the service which is authorized to make internal service call. These are verified against userclouds actions |
| `--union.connection.trustedIdentityClaims.externalIdentityTypeClaim` | string | External identity type claim of app or user to use for the current service identity. It should be an 'app' for inter service communication |
| `--union.internalConnectionConfig.-` | stringToString | (default []) |
| `--union.internalConnectionConfig.enabled` | | Enables internal service to service communication instead of going through ingress. |
| `--union.internalConnectionConfig.urlPattern` | string | UrlPattern of the internal service endpoints. (default "{{ service }}-helmchart.{{ service }}.svc.cluster.local:80") |
| `--webhook.awsSecretManager.sidecarImage` | string | Specifies the sidecar docker image to use (default "docker.io/amazon/aws-secrets-manager-secret-sidecar:v0.1.4") |
| `--webhook.certDir` | string | Certificate directory to use to write generated certs. Defaults to /etc/webhook/certs/ (default "/etc/webhook/certs") |
| `--webhook.embeddedSecretManagerConfig.awsConfig.region` | string | AWS region |
| `--webhook.embeddedSecretManagerConfig.fileMountInitContainer.image` | string | Specifies init container image to use for mounting secrets as files. (default "busybox:1.28") |
| `--webhook.embeddedSecretManagerConfig.gcpConfig.project` | string | GCP project to be used for secret manager |
| `--webhook.embeddedSecretManagerConfig.type` | string | (default "AWS") |
| `--webhook.gcpSecretManager.sidecarImage` | string | Specifies the sidecar docker image to use (default "gcr.io/google.com/cloudsdktool/cloud-sdk:alpine") |
| `--webhook.listenPort` | int | The port to use to listen to webhook calls. Defaults to 9443 (default 9443) |
| `--webhook.localCert` | | write certs locally. Defaults to false |
| `--webhook.metrics-prefix` | string | An optional prefix for all published metrics. (default "flyte:") |
| `--webhook.secretName` | string | Secret name to write generated certs to. (default "flyte-pod-webhook") |
| `--webhook.serviceName` | string | The name of the webhook service. (default "flyte-pod-webhook") |
| `--webhook.servicePort` | int32 | The port on the service that hosting webhook. (default 443) |
| `--webhook.vaultSecretManager.role` | string | Specifies the vault role to use (default "flyte") |
=== PAGE: https://www.union.ai/docs/v1/serverless/api-reference/uctl-cli/uctl-get/uctl-get-cluster ===
# uctl get cluster
Retrieves clusters
## Synopsis
Retrieves clusters
```shell
$ uctl get cluster [flags]
```
## Options
| Option | Type | Description |
|--------|------|-------------|
| `--dryRun` | | execute command without making any modifications. |
| Option | Type | Description |
|--------|------|-------------|
| `--filter.asc` | | Specifies the sorting order. By default sorts result in descending order |
| Option | Type | Description |
|--------|------|-------------|
| `--filter.fieldSelector` | string | Allows for filtering resources based on a specific value for a field name using operations =, !=, >, {, }=, <=, in, contains.Multiple selectors can be added separated by commas |
| `--filter.limit` | int32 | Specifies the number of results to return (default 100) |
| `--filter.sortBy` | string | Specifies which field to sort results (default "created_at") |
| `--filter.token` | string | Specifies the server provided token to use for fetching next page in case of multi page result |
| `-h`, `--help` | help for cluster |
### Options inherited from parent commands
| Option | Type | Description |
|--------|------|-------------|
| `--admin.audience` | string | Audience to use when initiating OAuth2 authorization requests. |
| `--admin.authType` | string | Type of OAuth2 flow used for communicating with admin.ClientSecret, Pkce, ExternalCommand are valid values (default "ClientSecret") |
| `--admin.authorizationHeader` | string | Custom metadata header to pass JWT |
| `--admin.authorizationServerUrl` | string | This is the URL to your IdP's authorization server. It'll default to Endpoint |
| `--admin.caCertFilePath` | string | Use specified certificate file to verify the admin server peer. |
| `--admin.clientId` | string | Client ID (default "flytepropeller") |
| `--admin.clientSecretEnvVar` | string | Environment variable containing the client secret |
| `--admin.clientSecretLocation` | string | File containing the client secret (default "/etc/secrets/client_secret") |
| `--admin.command` | strings | Command for external authentication token generation |
| `--admin.defaultOrg` | string | OPTIONAL: Default org to use to support non-org based cli's.'. |
| `--admin.defaultServiceConfig` | string | |
| `--admin.deviceFlowConfig.pollInterval` | string | amount of time the device flow would poll the token endpoint if auth server doesn't return a polling interval. Okta and google IDP do return an interval' (default "5s") |
| `--admin.deviceFlowConfig.refreshTime` | string | grace period from the token expiry after which it would refresh the token. (default "5m0s") |
| `--admin.deviceFlowConfig.timeout` | string | amount of time the device flow should complete or else it will be cancelled. (default "10m0s") |
| `--admin.endpoint` | string | For admin types, specify where the uri of the service is located. |
| `--admin.httpProxyURL` | string | OPTIONAL: HTTP Proxy to be used for OAuth requests. |
| `--admin.insecure` | | Use insecure connection. |
| `--admin.insecureSkipVerify` | | InsecureSkipVerify controls whether a client verifies the server's certificate chain and host name.Caution: shouldn't be use for production usecases' |
| `--admin.maxBackoffDelay` | string | Max delay for grpc backoff (default "8s") |
| `--admin.maxMessageSizeBytes` | int | The max size in bytes for incoming gRPC messages |
| `--admin.maxRetries` | int | Max number of gRPC retries (default 4) |
| `--admin.perRetryTimeout` | string | gRPC per retry timeout (default "15s") |
| `--admin.pkceConfig.refreshTime` | string | grace period from the token expiry after which it would refresh the token. (default "5m0s") |
| `--admin.pkceConfig.timeout` | string | Amount of time the browser session would be active for authentication from client app. (default "2m0s") |
| `--admin.proxyCommand` | strings | Command for external proxy-authorization token generation |
| `--admin.scopes` | strings | List of scopes to request |
| `--admin.tokenRefreshWindow` | string | Max duration between token refresh attempt and token expiry. (default "0s") |
| `--admin.tokenUrl` | string | OPTIONAL: Your IdP's token endpoint. It'll be discovered from flyte admin's OAuth Metadata endpoint if not provided. |
| `--admin.useAudienceFromAdmin` | | Use Audience configured from admins public endpoint config. |
| `--admin.useAuth` | | Deprecated: Auth will be enabled/disabled based on admin's dynamically discovered information. |
| `--auth.appAuth.externalAuthServer.allowedAudience` | strings | Optional: A list of allowed audiences. If not provided, the audience is expected to be the public Uri of the service. |
| `--auth.appAuth.externalAuthServer.baseUrl` | string | This should be the base url of the authorization server that you are trying to hit. With Okta for instance, it will look something like https://company.okta.com/oauth2/abcdef123456789/ |
| `--auth.appAuth.externalAuthServer.httpProxyURL` | string | OPTIONAL: HTTP Proxy to be used for OAuth requests. |
| `--auth.appAuth.externalAuthServer.metadataUrl` | string | Optional: If the server doesn't support /.well-known/oauth-authorization-server, you can set a custom metadata url here.' |
| `--auth.appAuth.externalAuthServer.retryAttempts` | int | Optional: The number of attempted retries on a transient failure to get the OAuth metadata (default 5) |
| `--auth.appAuth.externalAuthServer.retryDelay` | string | Optional, Duration to wait between retries (default "1s") |
| `--auth.appAuth.selfAuthServer.accessTokenLifespan` | string | Defines the lifespan of issued access tokens. (default "30m0s") |
| `--auth.appAuth.selfAuthServer.authorizationCodeLifespan` | string | Defines the lifespan of issued access tokens. (default "5m0s") |
| `--auth.appAuth.selfAuthServer.claimSymmetricEncryptionKeySecretName` | string | OPTIONAL: Secret name to use to encrypt claims in authcode token. (default "claim_symmetric_key") |
| `--auth.appAuth.selfAuthServer.issuer` | string | Defines the issuer to use when issuing and validating tokens. The default value is https://{requestUri.HostAndPort}/ |
| `--auth.appAuth.selfAuthServer.oldTokenSigningRSAKeySecretName` | string | OPTIONAL: Secret name to use to retrieve Old RSA Signing Key. This can be useful during key rotation to continue to accept older tokens. (default "token_rsa_key_old.pem") |
| `--auth.appAuth.selfAuthServer.refreshTokenLifespan` | string | Defines the lifespan of issued access tokens. (default "1h0m0s") |
| `--auth.appAuth.selfAuthServer.tokenSigningRSAKeySecretName` | string | OPTIONAL: Secret name to use to retrieve RSA Signing Key. (default "token_rsa_key.pem") |
| `--auth.appAuth.thirdPartyConfig.flyteClient.audience` | string | Audience to use when initiating OAuth2 authorization requests. |
| `--auth.appAuth.thirdPartyConfig.flyteClient.clientId` | string | public identifier for the app which handles authorization for a Flyte deployment (default "uctl") |
| `--auth.appAuth.thirdPartyConfig.flyteClient.redirectUri` | string | This is the callback uri registered with the app which handles authorization for a Flyte deployment (default "http://localhost:53593/callback") |
| `--auth.appAuth.thirdPartyConfig.flyteClient.scopes` | strings | Recommended scopes for the client to request. (default [all,offline]) |
| `--auth.disableForGrpc` | | Disables auth enforcement on Grpc Endpoints. |
| `--auth.disableForHttp` | | Disables auth enforcement on HTTP Endpoints. |
| `--auth.grpcAuthorizationHeader` | string | (default "flyte-authorization") |
| `--auth.httpAuthorizationHeader` | string | (default "flyte-authorization") |
| `--auth.httpProxyURL` | string | OPTIONAL: HTTP Proxy to be used for OAuth requests. |
| `--auth.tokenEndpointProxyPath` | string | The path used to proxy calls to the TokenURL |
| `--auth.userAuth.cookieBlockKeySecretName` | string | OPTIONAL: Secret name to use for cookie block key. (default "cookie_block_key") |
| `--auth.userAuth.cookieHashKeySecretName` | string | OPTIONAL: Secret name to use for cookie hash key. (default "cookie_hash_key") |
| `--auth.userAuth.cookieSetting.domain` | string | OPTIONAL: Allows you to set the domain attribute on the auth cookies. |
| `--auth.userAuth.cookieSetting.sameSitePolicy` | string | OPTIONAL: Allows you to declare if your cookie should be restricted to a first-party or same-site context.Wrapper around http.SameSite. (default "DefaultMode") |
| `--auth.userAuth.httpProxyURL` | string | OPTIONAL: HTTP Proxy to be used for OAuth requests. |
| `--auth.userAuth.idpQueryParameter` | string | idp query parameter used for selecting a particular IDP for doing user authentication. Eg: for Okta passing idp={IDP-ID} forces the authentication to happen with IDP-ID |
| `--auth.userAuth.openId.baseUrl` | string | |
| `--auth.userAuth.openId.clientId` | string | |
| `--auth.userAuth.openId.clientSecretFile` | string | |
| `--auth.userAuth.openId.clientSecretName` | string | (default "oidc_client_secret") |
| `--auth.userAuth.openId.scopes` | strings | (default [openid,profile]) |
| `--auth.userAuth.redirectUrl` | string | (default "/console") |
| `--authorizer.internalCommunicationConfig.enabled` | | Enables authorization decisions for internal communication. (default true) |
| `--authorizer.internalCommunicationConfig.ingressIdentity` | string | IngressIdentity used in the cluster. Needed to exclude the communication coming from ingress. (default "ingress-nginx.ingress-nginx.serviceaccount.identity.linkerd.cluster.local") |
| `--authorizer.internalCommunicationConfig.tenantUrlPatternIdentity` | string | UrlPatternIdentity of the internal tenant service endpoint identities. (default "{{ service }}.{{ org }}.serviceaccount.identity.linkerd.cluster.local") |
| `--authorizer.internalCommunicationConfig.urlPatternIdentity` | string | UrlPatternIdentity of the internal service endpoint identities. (default "{{ service }}-helmchart.{{ service }}.serviceaccount.identity.linkerd.cluster.local") |
| `--authorizer.mode` | string | (default "Active") |
| `--authorizer.organizationConfig.PolicyConfig.adminPolicyDescription` | string | description for the boilerplate admin policy (default "Contributor permissions and full admin permissions to manage users and view usage dashboards") |
| `--authorizer.organizationConfig.PolicyConfig.contributorPolicyDescription` | string | description for the boilerplate contributor policy (default "Viewer permissions and permissions to create workflows, tasks, launch plans, and executions") |
| `--authorizer.organizationConfig.PolicyConfig.defaultUserPolicyRoleType` | string | name of the role type to determine which default policy new users added to the organization should be assigned (default "Viewer") |
| `--authorizer.organizationConfig.PolicyConfig.serverlessContributorPolicyDescription` | string | description for the boilerplate serverless contributor policy (default "Viewer permissions and permissions to create workflows, tasks, launch plans, and executions") |
| `--authorizer.organizationConfig.PolicyConfig.serverlessViewerPolicyDescription` | string | description for the boilerplate serverless viewer policy (default "Permissions to view Flyte entities") |
| `--authorizer.organizationConfig.PolicyConfig.viewerPolicyDescription` | string | description for the boilerplate viewer policy (default "Permissions to view Flyte entities") |
| `--authorizer.organizationConfig.defaultPolicyCacheDuration` | string | Cache entry duration for the store of the default policy per organization (default "10m0s") |
| `--authorizer.syncRuleRefreshInterval` | string | (default "1m0s") |
| `--authorizer.type` | string | (default "UserClouds") |
| `--authorizer.userCloudsClient.cache.redis.ttl.edgeTypes` | string | Specifies how long edge types remain in the cache.. (default "30m0s") |
| `--authorizer.userCloudsClient.cache.redis.ttl.edges` | string | Specifies how long edges remain in the cache. (default "30m0s") |
| `--authorizer.userCloudsClient.cache.redis.ttl.objectTypes` | string | Specifies how long object types remain in the cache. (default "30m0s") |
| `--authorizer.userCloudsClient.cache.redis.ttl.objects` | string | Specifies how long objects remain in the cache. (default "30m0s") |
| `--authorizer.userCloudsClient.cache.type` | string | Cache type to use. (default "none") |
| `--authorizer.userCloudsClient.clientID` | string | UserClouds client id |
| `--authorizer.userCloudsClient.clientSecretName` | string | UserCloud client secret name to read from the secret manager. (default "userclouds-client-secret") |
| `--authorizer.userCloudsClient.enableLogging` | | Enable userclouds client's internal logging. Calls to post logs take 250-350 ms and will impact p99 latency, enable with caution. |
| `--authorizer.userCloudsClient.tenantID` | string | UserClouds tenant id. Should be a UUID. |
| `--authorizer.userCloudsClient.tenantUrl` | string | Something like https://{yourtenant}.tenant.userclouds.com |
| `--config` | string | config file (default is /Users/andrew/.union/config.yaml) |
| `--connection.environment` | string | |
| `--connection.region` | string | |
| `--connection.rootTenantURLPattern` | string | Pattern for tenant url. (default "dns:///{{ organization }}.cloud-staging.union.ai") |
| `--console.endpoint` | string | Endpoint of console, if different than flyte admin |
| `--database.connMaxLifeTime` | string | sets the maximum amount of time a connection may be reused (default "1h0m0s") |
| `--database.enableForeignKeyConstraintWhenMigrating` | | Whether to enable gorm foreign keys when migrating the db |
| `--database.maxIdleConnections` | int | maxIdleConnections sets the maximum number of connections in the idle connection pool. (default 10) |
| `--database.maxOpenConnections` | int | maxOpenConnections sets the maximum number of open connections to the database. (default 100) |
| `--database.postgres.dbname` | string | The database name (default "postgres") |
| `--database.postgres.debug` | | |
| `--database.postgres.host` | string | The host name of the database server (default "localhost") |
| `--database.postgres.options` | string | See http://gorm.io/docs/connecting_to_the_database.html for available options passed, in addition to the above. (default "sslmode=disable") |
| `--database.postgres.password` | string | The database password. (default "postgres") |
| `--database.postgres.passwordPath` | string | Points to the file containing the database password. |
| `--database.postgres.port` | int | The port name of the database server (default 30001) |
| `--database.postgres.readReplicaHost` | string | The host name of the read replica database server (default "localhost") |
| `--database.postgres.username` | string | The database user who is connecting to the server. (default "postgres") |
| `--database.sqlite.file` | string | The path to the file (existing or new) where the DB should be created / stored. If existing, then this will be re-used, else a new will be created |
| `--db.connectionPool.maxConnectionLifetime` | string | (default "0s") |
| `--db.connectionPool.maxIdleConnections` | int | |
| `--db.connectionPool.maxOpenConnections` | int | |
| `--db.dbname` | string | (default "postgres") |
| `--db.debug` | | |
| `--db.host` | string | (default "postgres") |
| `--db.log_level` | int | (default 4) |
| `--db.options` | string | (default "sslmode=disable") |
| `--db.password` | string | |
| `--db.passwordPath` | string | |
| `--db.port` | int | (default 5432) |
| `--db.username` | string | (default "postgres") |
| `-d`, `--domain` | string | Specifies the Flyte project's domain. |
| `--files.archive` | | Pass in archive file either an http link or local path. |
| `--files.assumableIamRole` | string | Custom assumable iam auth role to register launch plans with. |
| `--files.continueOnError` | | Continue on error when registering files. |
| `--files.destinationDirectory` | string | Location of source code in container. |
| `--files.dryRun` | | Execute command without making any modifications. |
| `--files.enableSchedule` | | Enable the schedule if the files contain schedulable launchplan. |
| `--files.force` | | Force use of version number on entities registered with flyte. |
| `--files.k8ServiceAccount` | string | Deprecated. Please use `--K8sServiceAccount`|
| `--files.k8sServiceAccount` | string | Custom kubernetes service account auth role to register launch plans with. |
| `--files.outputLocationPrefix` | string | Custom output location prefix for offloaded types (files/schemas). |
| `--files.sourceUploadPath` | string | Deprecated: Update flyte admin to avoid having to configure storage access from uctl. |
| `--files.version` | string | Version of the entity to be registered with flyte which are un-versioned after serialization. |
| `--logger.formatter.type` | string | Sets logging format type. (default "json") |
| `--logger.level` | int | Sets the minimum logging level. (default 3) |
| `--logger.mute` | | Mutes all logs regardless of severity. Intended for benchmarks/tests only. |
| `--logger.show-source` | | Includes source code location in logs. |
| `--org` | string | Organization to work on. If not set, default to user's org. |
| `--otel.file.filename` | string | Filename to store exported telemetry traces (default "/tmp/trace.txt") |
| `--otel.jaeger.endpoint` | string | Endpoint for the jaeger telemetry trace ingestor (default "http://localhost:14268/api/traces") |
| `--otel.otlpgrpc.endpoint` | string | Endpoint for the OTLP telemetry trace collector (default "http://localhost:4317") |
| `--otel.otlphttp.endpoint` | string | Endpoint for the OTLP telemetry trace collector (default "http://localhost:4318/v1/traces") |
| `--otel.sampler.parentSampler` | string | Sets the parent sampler to use for the tracer (default "always") |
| `--otel.type` | string | Sets the type of exporter to configure [noop/file/jaeger/otlpgrpc/otlphttp]. (default "noop") |
| `-o`, `--output` | string | Specifies the output type - supported formats [TABLE JSON YAML DOT DOTURL]. NOTE: dot, doturl are only supported for Workflow (default "table") |
| `--plugins.catalogcache.reader.maxItems` | int | Maximum number of entries to keep in the index. (default 10000) |
| `--plugins.catalogcache.reader.maxRetries` | int | Maximum number of retries per item. (default 3) |
| `--plugins.catalogcache.reader.workers` | int | Number of concurrent workers to start processing the queue. (default 10) |
| `--plugins.catalogcache.writer.maxItems` | int | Maximum number of entries to keep in the index. (default 10000) |
| `--plugins.catalogcache.writer.maxRetries` | int | Maximum number of retries per item. (default 3) |
| `--plugins.catalogcache.writer.workers` | int | Number of concurrent workers to start processing the queue. (default 10) |
| `-p`, `--project` | string | Specifies the Flyte project. |
| `--rediscache.passwordSecretName` | string | Name of secret with Redis password. |
| `--rediscache.primaryEndpoint` | string | Primary endpoint for the redis cache that can be used for both reads and writes. |
| `--rediscache.replicaEndpoint` | string | Replica endpoint for the redis cache that can be used for reads. |
| `--secrets.env-prefix` | string | Prefix for environment variables (default "FLYTE_SECRET_") |
| `--secrets.secrets-prefix` | string | Prefix where to look for secrets file (default "/etc/secrets") |
| `--secrets.type` | string | Sets the type of storage to configure [local]. (default "local") |
| `--server.dataProxy.download.maxExpiresIn` | string | Maximum allowed expiration duration. (default "1h0m0s") |
| `--server.dataProxy.upload.defaultFileNameLength` | int | Default length for the generated file name if not provided in the request. (default 20) |
| `--server.dataProxy.upload.maxExpiresIn` | string | Maximum allowed expiration duration. (default "1h0m0s") |
| `--server.dataProxy.upload.maxSize` | string | Maximum allowed upload size. (default "6Mi") |
| `--server.dataProxy.upload.storagePrefix` | string | Storage prefix to use for all upload requests. |
| `--server.grpc.enableGrpcLatencyMetrics` | | Enable grpc latency metrics. Note Histograms metrics can be expensive on Prometheus servers. |
| `--server.grpc.maxMessageSizeBytes` | int | The max size in bytes for incoming gRPC messages |
| `--server.grpc.port` | int | On which grpc port to serve admin (default 8089) |
| `--server.grpc.serverReflection` | | Enable GRPC Server Reflection (default true) |
| `--server.grpcPort` | int | deprecated |
| `--server.grpcServerReflection` | | deprecated |
| `--server.httpPort` | int | On which http port to serve admin (default 8088) |
| `--server.kube-config` | string | Path to kubernetes client config file, default is empty, useful for incluster config. |
| `--server.kubeClientConfig.burst` | int | Max burst rate for throttle. 0 defaults to 10 (default 25) |
| `--server.kubeClientConfig.qps` | int32 | Max QPS to the master for requests to KubeAPI. 0 defaults to 5. (default 100) |
| `--server.kubeClientConfig.timeout` | string | Max duration allowed for every request to KubeAPI before giving up. 0 implies no timeout. (default "30s") |
| `--server.master` | string | The address of the Kubernetes API server. |
| `--server.readHeaderTimeoutSeconds` | int | The amount of time allowed to read request headers. (default 32) |
| `--server.security.allowCors` | | (default true) |
| `--server.security.allowedHeaders` | strings | (default [Content-Type,flyte-authorization]) |
| `--server.security.allowedOrigins` | strings | (default [*]) |
| `--server.security.auditAccess` | | |
| `--server.security.secure` | | |
| `--server.security.ssl.certificateFile` | string | |
| `--server.security.ssl.keyFile` | string | |
| `--server.security.useAuth` | | |
| `--server.thirdPartyConfig.flyteClient.audience` | string | Audience to use when initiating OAuth2 authorization requests. |
| `--server.thirdPartyConfig.flyteClient.clientId` | string | public identifier for the app which handles authorization for a Flyte deployment |
| `--server.thirdPartyConfig.flyteClient.redirectUri` | string | This is the callback uri registered with the app which handles authorization for a Flyte deployment |
| `--server.thirdPartyConfig.flyteClient.scopes` | strings | Recommended scopes for the client to request. |
| `--server.watchService.maxActiveClusterConnections` | int | (default 5) |
| `--server.watchService.maxPageSize` | int | (default 50000) |
| `--server.watchService.nonTerminalStatusUpdatesInterval` | string | (default "1m0s") |
| `--server.watchService.pollInterval` | string | (default "1s") |
| `--sharedservice.connectPort` | string | On which connect port to serve admin (default "8080") |
| `--sharedservice.grpc.grpcMaxResponseStatusBytes` | int32 | specifies the maximum (uncompressed) size of header list that the client is prepared to accept on grpc calls (default 32000) |
| `--sharedservice.grpc.maxConcurrentStreams` | int | Limit on the number of concurrent streams to each ServerTransport. (default 100) |
| `--sharedservice.grpc.maxMessageSizeBytes` | int | Limit on the size of message that can be received on the server. (default 10485760) |
| `--sharedservice.grpcServerReflection` | | Enable GRPC Server Reflection (default true) |
| `--sharedservice.httpPort` | string | On which http port to serve admin (default "8089") |
| `--sharedservice.kubeConfig` | string | Path to kubernetes client config file. |
| `--sharedservice.master` | string | The address of the Kubernetes API server. |
| `--sharedservice.metrics.enableClientGrpcHistograms` | | Enable client grpc histograms (default true) |
| `--sharedservice.metrics.enableGrpcHistograms` | | Enable grpc histograms (default true) |
| `--sharedservice.metrics.scope` | string | Scope to emit metrics under (default "service:") |
| `--sharedservice.port` | string | On which grpc port to serve admin (default "8080") |
| `--sharedservice.profiler.enabled` | | Enable Profiler on server |
| `--sharedservice.profilerPort` | string | Profile port to start listen for pprof and metric handlers on. (default "10254") |
| `--sharedservice.security.allowCors` | | |
| `--sharedservice.security.allowLocalhostAccess` | | Whether to permit localhost unauthenticated access to the server |
| `--sharedservice.security.allowedHeaders` | strings | |
| `--sharedservice.security.allowedOrigins` | strings | |
| `--sharedservice.security.auditAccess` | | |
| `--sharedservice.security.orgOverride` | string | Override org in identity context if localhost access enabled |
| `--sharedservice.security.secure` | | |
| `--sharedservice.security.ssl.certificateAuthorityFile` | string | |
| `--sharedservice.security.ssl.certificateFile` | string | |
| `--sharedservice.security.ssl.keyFile` | string | |
| `--sharedservice.security.useAuth` | | |
| `--sharedservice.sync.syncInterval` | string | Time interval to sync (default "5m0s") |
| `--storage.cache.max_size_mbs` | int | Maximum size of the cache where the Blob store data is cached in-memory. If not specified or set to 0, cache is not used |
| `--storage.cache.target_gc_percent` | int | Sets the garbage collection target percentage. |
| `--storage.connection.access-key` | string | Access key to use. Only required when authtype is set to accesskey. |
| `--storage.connection.auth-type` | string | Auth Type to use [iam, accesskey]. (default "iam") |
| `--storage.connection.disable-ssl` | | Disables SSL connection. Should only be used for development. |
| `--storage.connection.endpoint` | string | URL for storage client to connect to. |
| `--storage.connection.region` | string | Region to connect to. (default "us-east-1") |
| `--storage.connection.secret-key` | string | Secret to use when accesskey is set. |
| `--storage.container` | string | Initial container (in s3 a bucket) to create -if it doesn't exist-.' |
| `--storage.defaultHttpClient.timeout` | string | Sets time out on the http client. (default "0s") |
| `--storage.enable-multicontainer` | | If this is true, then the container argument is overlooked and redundant. This config will automatically open new connections to new containers/buckets as they are encountered |
| `--storage.limits.maxDownloadMBs` | int | Maximum allowed download size (in MBs) per call. (default 2) |
| `--storage.stow.config` | stringToString | Configuration for stow backend. Refer to github/flyteorg/stow (default []) |
| `--storage.stow.kind` | string | Kind of Stow backend to use. Refer to github/flyteorg/stow |
| `--storage.type` | string | Sets the type of storage to configure [s3/minio/local/mem/stow]. (default "s3") |
| `--union.auth.authorizationMetadataKey` | string | Authorization Header to use when passing Access Tokens to the server (default "flyte-authorization") |
| `--union.auth.clientId` | string | Client ID |
| `--union.auth.clientSecretEnvVar` | string | Environment variable containing the client secret |
| `--union.auth.clientSecretLocation` | string | File containing the client secret |
| `--union.auth.deviceFlow.pollInterval` | string | amount of time the device flow would poll the token endpoint if auth server doesn't return a polling interval. Okta and google IDP do return an interval' (default "5s") |
| `--union.auth.deviceFlow.refreshTime` | string | grace period from the token expiry after which it would refresh the token. (default "5m0s") |
| `--union.auth.deviceFlow.timeout` | string | amount of time the device flow should complete or else it will be cancelled. (default "10m0s") |
| `--union.auth.enable` | | Whether to enable an authenticated conenction when communicating with admin. (default true) |
| `--union.auth.externalAuth.command` | strings | Command for external authentication token generation |
| `--union.auth.pkce.refreshTime` | string | grace period from the token expiry after which it would refresh the token. (default "5m0s") |
| `--union.auth.pkce.timeout` | string | Amount of time the browser session would be active for authentication from client app. (default "15s") |
| `--union.auth.scopes` | strings | List of scopes to request |
| `--union.auth.tokenRefreshWindow` | string | Max duration between token refresh attempt and token expiry. (default "1h0m0s") |
| `--union.auth.tokenUrl` | string | OPTIONAL: Your IdP's token endpoint. It'll be discovered from flyte admin's OAuth Metadata endpoint if not provided. |
| `--union.auth.type` | string | Type of OAuth2 flow used for communicating with admin. (default "Pkce") |
| `--union.cache.maxItemsCount` | int | Maximum number of items to keep in the cache before evicting. (default 1000) |
| `--union.connection.host` | string | Host to connect to (default "dns:///utt-mgdp-stg-us-east-2.cloud-staging.union.ai") |
| `--union.connection.insecure` | | Whether to connect over insecure channel |
| `--union.connection.insecureSkipVerify` | | InsecureSkipVerify controls whether a client verifies the server's certificate chain and host name.Caution: shouldn't be use for production usecases' |
| `--union.connection.keepAliveConfig.permitWithoutStream` | | If true, client sends keepalive pings even with no active RPCs. |
| `--union.connection.keepAliveConfig.time` | string | After a duration of this time if the client doesn't see any activity it pings the server to see if the transport is still alive. (default "20s") |
| `--union.connection.keepAliveConfig.timeout` | string | After having pinged for keepalive check, the client waits for a duration of Timeout and if no activity is seen even after that the connection is closed. (default "2m0s") |
| `--union.connection.maxBackoffDelay` | string | Max delay for grpc backoff (default "8s") |
| `--union.connection.maxRecvMsgSize` | int | Maximum size of a message in bytes of a gRPC message (default 10485760) |
| `--union.connection.maxRetries` | int | Max number of gRPC retries (default 4) |
| `--union.connection.minConnectTimeout` | string | Minimum timeout for establishing a connection (default "20s") |
| `--union.connection.perRetryTimeout` | string | gRPC per retry timeout (default "15s") |
| `--union.connection.serviceConfig` | string | Defines gRPC experimental JSON Service Config (default "{"loadBalancingConfig": [{"round_robin":{}}]}") |
| `--union.connection.trustedIdentityClaims.enabled` | | Enables passing of trusted claims while making inter service calls |
| `--union.connection.trustedIdentityClaims.externalIdentityClaim` | string | External identity claim of the service which is authorized to make internal service call. These are verified against userclouds actions |
| `--union.connection.trustedIdentityClaims.externalIdentityTypeClaim` | string | External identity type claim of app or user to use for the current service identity. It should be an 'app' for inter service communication |
| `--union.internalConnectionConfig.-` | stringToString | (default []) |
| `--union.internalConnectionConfig.enabled` | | Enables internal service to service communication instead of going through ingress. |
| `--union.internalConnectionConfig.urlPattern` | string | UrlPattern of the internal service endpoints. (default "{{ service }}-helmchart.{{ service }}.svc.cluster.local:80") |
| `--webhook.awsSecretManager.sidecarImage` | string | Specifies the sidecar docker image to use (default "docker.io/amazon/aws-secrets-manager-secret-sidecar:v0.1.4") |
| `--webhook.certDir` | string | Certificate directory to use to write generated certs. Defaults to /etc/webhook/certs/ (default "/etc/webhook/certs") |
| `--webhook.embeddedSecretManagerConfig.awsConfig.region` | string | AWS region |
| `--webhook.embeddedSecretManagerConfig.fileMountInitContainer.image` | string | Specifies init container image to use for mounting secrets as files. (default "busybox:1.28") |
| `--webhook.embeddedSecretManagerConfig.gcpConfig.project` | string | GCP project to be used for secret manager |
| `--webhook.embeddedSecretManagerConfig.type` | string | (default "AWS") |
| `--webhook.gcpSecretManager.sidecarImage` | string | Specifies the sidecar docker image to use (default "gcr.io/google.com/cloudsdktool/cloud-sdk:alpine") |
| `--webhook.listenPort` | int | The port to use to listen to webhook calls. Defaults to 9443 (default 9443) |
| `--webhook.localCert` | | write certs locally. Defaults to false |
| `--webhook.metrics-prefix` | string | An optional prefix for all published metrics. (default "flyte:") |
| `--webhook.secretName` | string | Secret name to write generated certs to. (default "flyte-pod-webhook") |
| `--webhook.serviceName` | string | The name of the webhook service. (default "flyte-pod-webhook") |
| `--webhook.servicePort` | int32 | The port on the service that hosting webhook. (default 443) |
| `--webhook.vaultSecretManager.role` | string | Specifies the vault role to use (default "flyte") |
=== PAGE: https://www.union.ai/docs/v1/serverless/api-reference/uctl-cli/uctl-get/uctl-get-cluster-pool-attributes ===
# uctl get cluster-pool-attributes
Retrieves project and domain specific attributes
## Synopsis
To fetch cluster pool attributes for all domains:
```shell
$ uctl get cluster-pool-attributes
```
To fetch domain cluster pool attributes:
```shell
$ uctl get cluster-pool-attributes -d staging
```
To fetch cluster pool project and domain attributes:
```shell
$ uctl get cluster-pool-attributes -p flytesnacks -d staging
```
To fetch cluster pool workflow attributes:
```shell
$ uctl get cluster-pool-attributes -p flytesnacks -d staging --workflow my_wf
```
## Options
| Option | Type | Description |
|--------|------|-------------|
| `-h`, `--help` | help for cluster-pool-attributes |
| `--workflow` | string | optional, workflow name for the matchable attributes to fetch |
### Options inherited from parent commands
| Option | Type | Description |
|--------|------|-------------|
| `--admin.audience` | string | Audience to use when initiating OAuth2 authorization requests. |
| `--admin.authType` | string | Type of OAuth2 flow used for communicating with admin.ClientSecret, Pkce, ExternalCommand are valid values (default "ClientSecret") |
| `--admin.authorizationHeader` | string | Custom metadata header to pass JWT |
| `--admin.authorizationServerUrl` | string | This is the URL to your IdP's authorization server. It'll default to Endpoint |
| `--admin.caCertFilePath` | string | Use specified certificate file to verify the admin server peer. |
| `--admin.clientId` | string | Client ID (default "flytepropeller") |
| `--admin.clientSecretEnvVar` | string | Environment variable containing the client secret |
| `--admin.clientSecretLocation` | string | File containing the client secret (default "/etc/secrets/client_secret") |
| `--admin.command` | strings | Command for external authentication token generation |
| `--admin.defaultOrg` | string | OPTIONAL: Default org to use to support non-org based cli's.'. |
| `--admin.defaultServiceConfig` | string | |
| `--admin.deviceFlowConfig.pollInterval` | string | amount of time the device flow would poll the token endpoint if auth server doesn't return a polling interval. Okta and google IDP do return an interval' (default "5s") |
| `--admin.deviceFlowConfig.refreshTime` | string | grace period from the token expiry after which it would refresh the token. (default "5m0s") |
| `--admin.deviceFlowConfig.timeout` | string | amount of time the device flow should complete or else it will be cancelled. (default "10m0s") |
| `--admin.endpoint` | string | For admin types, specify where the uri of the service is located. |
| `--admin.httpProxyURL` | string | OPTIONAL: HTTP Proxy to be used for OAuth requests. |
| `--admin.insecure` | | Use insecure connection. |
| `--admin.insecureSkipVerify` | | InsecureSkipVerify controls whether a client verifies the server's certificate chain and host name.Caution: shouldn't be use for production usecases' |
| `--admin.maxBackoffDelay` | string | Max delay for grpc backoff (default "8s") |
| `--admin.maxMessageSizeBytes` | int | The max size in bytes for incoming gRPC messages |
| `--admin.maxRetries` | int | Max number of gRPC retries (default 4) |
| `--admin.perRetryTimeout` | string | gRPC per retry timeout (default "15s") |
| `--admin.pkceConfig.refreshTime` | string | grace period from the token expiry after which it would refresh the token. (default "5m0s") |
| `--admin.pkceConfig.timeout` | string | Amount of time the browser session would be active for authentication from client app. (default "2m0s") |
| `--admin.proxyCommand` | strings | Command for external proxy-authorization token generation |
| `--admin.scopes` | strings | List of scopes to request |
| `--admin.tokenRefreshWindow` | string | Max duration between token refresh attempt and token expiry. (default "0s") |
| `--admin.tokenUrl` | string | OPTIONAL: Your IdP's token endpoint. It'll be discovered from flyte admin's OAuth Metadata endpoint if not provided. |
| `--admin.useAudienceFromAdmin` | | Use Audience configured from admins public endpoint config. |
| `--admin.useAuth` | | Deprecated: Auth will be enabled/disabled based on admin's dynamically discovered information. |
| `--auth.appAuth.externalAuthServer.allowedAudience` | strings | Optional: A list of allowed audiences. If not provided, the audience is expected to be the public Uri of the service. |
| `--auth.appAuth.externalAuthServer.baseUrl` | string | This should be the base url of the authorization server that you are trying to hit. With Okta for instance, it will look something like https://company.okta.com/oauth2/abcdef123456789/ |
| `--auth.appAuth.externalAuthServer.httpProxyURL` | string | OPTIONAL: HTTP Proxy to be used for OAuth requests. |
| `--auth.appAuth.externalAuthServer.metadataUrl` | string | Optional: If the server doesn't support /.well-known/oauth-authorization-server, you can set a custom metadata url here.' |
| `--auth.appAuth.externalAuthServer.retryAttempts` | int | Optional: The number of attempted retries on a transient failure to get the OAuth metadata (default 5) |
| `--auth.appAuth.externalAuthServer.retryDelay` | string | Optional, Duration to wait between retries (default "1s") |
| `--auth.appAuth.selfAuthServer.accessTokenLifespan` | string | Defines the lifespan of issued access tokens. (default "30m0s") |
| `--auth.appAuth.selfAuthServer.authorizationCodeLifespan` | string | Defines the lifespan of issued access tokens. (default "5m0s") |
| `--auth.appAuth.selfAuthServer.claimSymmetricEncryptionKeySecretName` | string | OPTIONAL: Secret name to use to encrypt claims in authcode token. (default "claim_symmetric_key") |
| `--auth.appAuth.selfAuthServer.issuer` | string | Defines the issuer to use when issuing and validating tokens. The default value is https://{requestUri.HostAndPort}/ |
| `--auth.appAuth.selfAuthServer.oldTokenSigningRSAKeySecretName` | string | OPTIONAL: Secret name to use to retrieve Old RSA Signing Key. This can be useful during key rotation to continue to accept older tokens. (default "token_rsa_key_old.pem") |
| `--auth.appAuth.selfAuthServer.refreshTokenLifespan` | string | Defines the lifespan of issued access tokens. (default "1h0m0s") |
| `--auth.appAuth.selfAuthServer.tokenSigningRSAKeySecretName` | string | OPTIONAL: Secret name to use to retrieve RSA Signing Key. (default "token_rsa_key.pem") |
| `--auth.appAuth.thirdPartyConfig.flyteClient.audience` | string | Audience to use when initiating OAuth2 authorization requests. |
| `--auth.appAuth.thirdPartyConfig.flyteClient.clientId` | string | public identifier for the app which handles authorization for a Flyte deployment (default "uctl") |
| `--auth.appAuth.thirdPartyConfig.flyteClient.redirectUri` | string | This is the callback uri registered with the app which handles authorization for a Flyte deployment (default "http://localhost:53593/callback") |
| `--auth.appAuth.thirdPartyConfig.flyteClient.scopes` | strings | Recommended scopes for the client to request. (default [all,offline]) |
| `--auth.disableForGrpc` | | Disables auth enforcement on Grpc Endpoints. |
| `--auth.disableForHttp` | | Disables auth enforcement on HTTP Endpoints. |
| `--auth.grpcAuthorizationHeader` | string | (default "flyte-authorization") |
| `--auth.httpAuthorizationHeader` | string | (default "flyte-authorization") |
| `--auth.httpProxyURL` | string | OPTIONAL: HTTP Proxy to be used for OAuth requests. |
| `--auth.tokenEndpointProxyPath` | string | The path used to proxy calls to the TokenURL |
| `--auth.userAuth.cookieBlockKeySecretName` | string | OPTIONAL: Secret name to use for cookie block key. (default "cookie_block_key") |
| `--auth.userAuth.cookieHashKeySecretName` | string | OPTIONAL: Secret name to use for cookie hash key. (default "cookie_hash_key") |
| `--auth.userAuth.cookieSetting.domain` | string | OPTIONAL: Allows you to set the domain attribute on the auth cookies. |
| `--auth.userAuth.cookieSetting.sameSitePolicy` | string | OPTIONAL: Allows you to declare if your cookie should be restricted to a first-party or same-site context.Wrapper around http.SameSite. (default "DefaultMode") |
| `--auth.userAuth.httpProxyURL` | string | OPTIONAL: HTTP Proxy to be used for OAuth requests. |
| `--auth.userAuth.idpQueryParameter` | string | idp query parameter used for selecting a particular IDP for doing user authentication. Eg: for Okta passing idp={IDP-ID} forces the authentication to happen with IDP-ID |
| `--auth.userAuth.openId.baseUrl` | string | |
| `--auth.userAuth.openId.clientId` | string | |
| `--auth.userAuth.openId.clientSecretFile` | string | |
| `--auth.userAuth.openId.clientSecretName` | string | (default "oidc_client_secret") |
| `--auth.userAuth.openId.scopes` | strings | (default [openid,profile]) |
| `--auth.userAuth.redirectUrl` | string | (default "/console") |
| `--authorizer.internalCommunicationConfig.enabled` | | Enables authorization decisions for internal communication. (default true) |
| `--authorizer.internalCommunicationConfig.ingressIdentity` | string | IngressIdentity used in the cluster. Needed to exclude the communication coming from ingress. (default "ingress-nginx.ingress-nginx.serviceaccount.identity.linkerd.cluster.local") |
| `--authorizer.internalCommunicationConfig.tenantUrlPatternIdentity` | string | UrlPatternIdentity of the internal tenant service endpoint identities. (default "{{ service }}.{{ org }}.serviceaccount.identity.linkerd.cluster.local") |
| `--authorizer.internalCommunicationConfig.urlPatternIdentity` | string | UrlPatternIdentity of the internal service endpoint identities. (default "{{ service }}-helmchart.{{ service }}.serviceaccount.identity.linkerd.cluster.local") |
| `--authorizer.mode` | string | (default "Active") |
| `--authorizer.organizationConfig.PolicyConfig.adminPolicyDescription` | string | description for the boilerplate admin policy (default "Contributor permissions and full admin permissions to manage users and view usage dashboards") |
| `--authorizer.organizationConfig.PolicyConfig.contributorPolicyDescription` | string | description for the boilerplate contributor policy (default "Viewer permissions and permissions to create workflows, tasks, launch plans, and executions") |
| `--authorizer.organizationConfig.PolicyConfig.defaultUserPolicyRoleType` | string | name of the role type to determine which default policy new users added to the organization should be assigned (default "Viewer") |
| `--authorizer.organizationConfig.PolicyConfig.serverlessContributorPolicyDescription` | string | description for the boilerplate serverless contributor policy (default "Viewer permissions and permissions to create workflows, tasks, launch plans, and executions") |
| `--authorizer.organizationConfig.PolicyConfig.serverlessViewerPolicyDescription` | string | description for the boilerplate serverless viewer policy (default "Permissions to view Flyte entities") |
| `--authorizer.organizationConfig.PolicyConfig.viewerPolicyDescription` | string | description for the boilerplate viewer policy (default "Permissions to view Flyte entities") |
| `--authorizer.organizationConfig.defaultPolicyCacheDuration` | string | Cache entry duration for the store of the default policy per organization (default "10m0s") |
| `--authorizer.syncRuleRefreshInterval` | string | (default "1m0s") |
| `--authorizer.type` | string | (default "UserClouds") |
| `--authorizer.userCloudsClient.cache.redis.ttl.edgeTypes` | string | Specifies how long edge types remain in the cache.. (default "30m0s") |
| `--authorizer.userCloudsClient.cache.redis.ttl.edges` | string | Specifies how long edges remain in the cache. (default "30m0s") |
| `--authorizer.userCloudsClient.cache.redis.ttl.objectTypes` | string | Specifies how long object types remain in the cache. (default "30m0s") |
| `--authorizer.userCloudsClient.cache.redis.ttl.objects` | string | Specifies how long objects remain in the cache. (default "30m0s") |
| `--authorizer.userCloudsClient.cache.type` | string | Cache type to use. (default "none") |
| `--authorizer.userCloudsClient.clientID` | string | UserClouds client id |
| `--authorizer.userCloudsClient.clientSecretName` | string | UserCloud client secret name to read from the secret manager. (default "userclouds-client-secret") |
| `--authorizer.userCloudsClient.enableLogging` | | Enable userclouds client's internal logging. Calls to post logs take 250-350 ms and will impact p99 latency, enable with caution. |
| `--authorizer.userCloudsClient.tenantID` | string | UserClouds tenant id. Should be a UUID. |
| `--authorizer.userCloudsClient.tenantUrl` | string | Something like https://{yourtenant}.tenant.userclouds.com |
| `--config` | string | config file (default is /Users/andrew/.union/config.yaml) |
| `--connection.environment` | string | |
| `--connection.region` | string | |
| `--connection.rootTenantURLPattern` | string | Pattern for tenant url. (default "dns:///{{ organization }}.cloud-staging.union.ai") |
| `--console.endpoint` | string | Endpoint of console, if different than flyte admin |
| `--database.connMaxLifeTime` | string | sets the maximum amount of time a connection may be reused (default "1h0m0s") |
| `--database.enableForeignKeyConstraintWhenMigrating` | | Whether to enable gorm foreign keys when migrating the db |
| `--database.maxIdleConnections` | int | maxIdleConnections sets the maximum number of connections in the idle connection pool. (default 10) |
| `--database.maxOpenConnections` | int | maxOpenConnections sets the maximum number of open connections to the database. (default 100) |
| `--database.postgres.dbname` | string | The database name (default "postgres") |
| `--database.postgres.debug` | | |
| `--database.postgres.host` | string | The host name of the database server (default "localhost") |
| `--database.postgres.options` | string | See http://gorm.io/docs/connecting_to_the_database.html for available options passed, in addition to the above. (default "sslmode=disable") |
| `--database.postgres.password` | string | The database password. (default "postgres") |
| `--database.postgres.passwordPath` | string | Points to the file containing the database password. |
| `--database.postgres.port` | int | The port name of the database server (default 30001) |
| `--database.postgres.readReplicaHost` | string | The host name of the read replica database server (default "localhost") |
| `--database.postgres.username` | string | The database user who is connecting to the server. (default "postgres") |
| `--database.sqlite.file` | string | The path to the file (existing or new) where the DB should be created / stored. If existing, then this will be re-used, else a new will be created |
| `--db.connectionPool.maxConnectionLifetime` | string | (default "0s") |
| `--db.connectionPool.maxIdleConnections` | int | |
| `--db.connectionPool.maxOpenConnections` | int | |
| `--db.dbname` | string | (default "postgres") |
| `--db.debug` | | |
| `--db.host` | string | (default "postgres") |
| `--db.log_level` | int | (default 4) |
| `--db.options` | string | (default "sslmode=disable") |
| `--db.password` | string | |
| `--db.passwordPath` | string | |
| `--db.port` | int | (default 5432) |
| `--db.username` | string | (default "postgres") |
| `-d`, `--domain` | string | Specifies the Flyte project's domain. |
| `--files.archive` | | Pass in archive file either an http link or local path. |
| `--files.assumableIamRole` | string | Custom assumable iam auth role to register launch plans with. |
| `--files.continueOnError` | | Continue on error when registering files. |
| `--files.destinationDirectory` | string | Location of source code in container. |
| `--files.dryRun` | | Execute command without making any modifications. |
| `--files.enableSchedule` | | Enable the schedule if the files contain schedulable launchplan. |
| `--files.force` | | Force use of version number on entities registered with flyte. |
| `--files.k8ServiceAccount` | string | Deprecated. Please use `--K8sServiceAccount`|
| `--files.k8sServiceAccount` | string | Custom kubernetes service account auth role to register launch plans with. |
| `--files.outputLocationPrefix` | string | Custom output location prefix for offloaded types (files/schemas). |
| `--files.sourceUploadPath` | string | Deprecated: Update flyte admin to avoid having to configure storage access from uctl. |
| `--files.version` | string | Version of the entity to be registered with flyte which are un-versioned after serialization. |
| `--logger.formatter.type` | string | Sets logging format type. (default "json") |
| `--logger.level` | int | Sets the minimum logging level. (default 3) |
| `--logger.mute` | | Mutes all logs regardless of severity. Intended for benchmarks/tests only. |
| `--logger.show-source` | | Includes source code location in logs. |
| `--org` | string | Organization to work on. If not set, default to user's org. |
| `--otel.file.filename` | string | Filename to store exported telemetry traces (default "/tmp/trace.txt") |
| `--otel.jaeger.endpoint` | string | Endpoint for the jaeger telemetry trace ingestor (default "http://localhost:14268/api/traces") |
| `--otel.otlpgrpc.endpoint` | string | Endpoint for the OTLP telemetry trace collector (default "http://localhost:4317") |
| `--otel.otlphttp.endpoint` | string | Endpoint for the OTLP telemetry trace collector (default "http://localhost:4318/v1/traces") |
| `--otel.sampler.parentSampler` | string | Sets the parent sampler to use for the tracer (default "always") |
| `--otel.type` | string | Sets the type of exporter to configure [noop/file/jaeger/otlpgrpc/otlphttp]. (default "noop") |
| `-o`, `--output` | string | Specifies the output type - supported formats [TABLE JSON YAML DOT DOTURL]. NOTE: dot, doturl are only supported for Workflow (default "table") |
| `--plugins.catalogcache.reader.maxItems` | int | Maximum number of entries to keep in the index. (default 10000) |
| `--plugins.catalogcache.reader.maxRetries` | int | Maximum number of retries per item. (default 3) |
| `--plugins.catalogcache.reader.workers` | int | Number of concurrent workers to start processing the queue. (default 10) |
| `--plugins.catalogcache.writer.maxItems` | int | Maximum number of entries to keep in the index. (default 10000) |
| `--plugins.catalogcache.writer.maxRetries` | int | Maximum number of retries per item. (default 3) |
| `--plugins.catalogcache.writer.workers` | int | Number of concurrent workers to start processing the queue. (default 10) |
| `-p`, `--project` | string | Specifies the Flyte project. |
| `--rediscache.passwordSecretName` | string | Name of secret with Redis password. |
| `--rediscache.primaryEndpoint` | string | Primary endpoint for the redis cache that can be used for both reads and writes. |
| `--rediscache.replicaEndpoint` | string | Replica endpoint for the redis cache that can be used for reads. |
| `--secrets.env-prefix` | string | Prefix for environment variables (default "FLYTE_SECRET_") |
| `--secrets.secrets-prefix` | string | Prefix where to look for secrets file (default "/etc/secrets") |
| `--secrets.type` | string | Sets the type of storage to configure [local]. (default "local") |
| `--server.dataProxy.download.maxExpiresIn` | string | Maximum allowed expiration duration. (default "1h0m0s") |
| `--server.dataProxy.upload.defaultFileNameLength` | int | Default length for the generated file name if not provided in the request. (default 20) |
| `--server.dataProxy.upload.maxExpiresIn` | string | Maximum allowed expiration duration. (default "1h0m0s") |
| `--server.dataProxy.upload.maxSize` | string | Maximum allowed upload size. (default "6Mi") |
| `--server.dataProxy.upload.storagePrefix` | string | Storage prefix to use for all upload requests. |
| `--server.grpc.enableGrpcLatencyMetrics` | | Enable grpc latency metrics. Note Histograms metrics can be expensive on Prometheus servers. |
| `--server.grpc.maxMessageSizeBytes` | int | The max size in bytes for incoming gRPC messages |
| `--server.grpc.port` | int | On which grpc port to serve admin (default 8089) |
| `--server.grpc.serverReflection` | | Enable GRPC Server Reflection (default true) |
| `--server.grpcPort` | int | deprecated |
| `--server.grpcServerReflection` | | deprecated |
| `--server.httpPort` | int | On which http port to serve admin (default 8088) |
| `--server.kube-config` | string | Path to kubernetes client config file, default is empty, useful for incluster config. |
| `--server.kubeClientConfig.burst` | int | Max burst rate for throttle. 0 defaults to 10 (default 25) |
| `--server.kubeClientConfig.qps` | int32 | Max QPS to the master for requests to KubeAPI. 0 defaults to 5. (default 100) |
| `--server.kubeClientConfig.timeout` | string | Max duration allowed for every request to KubeAPI before giving up. 0 implies no timeout. (default "30s") |
| `--server.master` | string | The address of the Kubernetes API server. |
| `--server.readHeaderTimeoutSeconds` | int | The amount of time allowed to read request headers. (default 32) |
| `--server.security.allowCors` | | (default true) |
| `--server.security.allowedHeaders` | strings | (default [Content-Type,flyte-authorization]) |
| `--server.security.allowedOrigins` | strings | (default [*]) |
| `--server.security.auditAccess` | | |
| `--server.security.secure` | | |
| `--server.security.ssl.certificateFile` | string | |
| `--server.security.ssl.keyFile` | string | |
| `--server.security.useAuth` | | |
| `--server.thirdPartyConfig.flyteClient.audience` | string | Audience to use when initiating OAuth2 authorization requests. |
| `--server.thirdPartyConfig.flyteClient.clientId` | string | public identifier for the app which handles authorization for a Flyte deployment |
| `--server.thirdPartyConfig.flyteClient.redirectUri` | string | This is the callback uri registered with the app which handles authorization for a Flyte deployment |
| `--server.thirdPartyConfig.flyteClient.scopes` | strings | Recommended scopes for the client to request. |
| `--server.watchService.maxActiveClusterConnections` | int | (default 5) |
| `--server.watchService.maxPageSize` | int | (default 50000) |
| `--server.watchService.nonTerminalStatusUpdatesInterval` | string | (default "1m0s") |
| `--server.watchService.pollInterval` | string | (default "1s") |
| `--sharedservice.connectPort` | string | On which connect port to serve admin (default "8080") |
| `--sharedservice.grpc.grpcMaxResponseStatusBytes` | int32 | specifies the maximum (uncompressed) size of header list that the client is prepared to accept on grpc calls (default 32000) |
| `--sharedservice.grpc.maxConcurrentStreams` | int | Limit on the number of concurrent streams to each ServerTransport. (default 100) |
| `--sharedservice.grpc.maxMessageSizeBytes` | int | Limit on the size of message that can be received on the server. (default 10485760) |
| `--sharedservice.grpcServerReflection` | | Enable GRPC Server Reflection (default true) |
| `--sharedservice.httpPort` | string | On which http port to serve admin (default "8089") |
| `--sharedservice.kubeConfig` | string | Path to kubernetes client config file. |
| `--sharedservice.master` | string | The address of the Kubernetes API server. |
| `--sharedservice.metrics.enableClientGrpcHistograms` | | Enable client grpc histograms (default true) |
| `--sharedservice.metrics.enableGrpcHistograms` | | Enable grpc histograms (default true) |
| `--sharedservice.metrics.scope` | string | Scope to emit metrics under (default "service:") |
| `--sharedservice.port` | string | On which grpc port to serve admin (default "8080") |
| `--sharedservice.profiler.enabled` | | Enable Profiler on server |
| `--sharedservice.profilerPort` | string | Profile port to start listen for pprof and metric handlers on. (default "10254") |
| `--sharedservice.security.allowCors` | | |
| `--sharedservice.security.allowLocalhostAccess` | | Whether to permit localhost unauthenticated access to the server |
| `--sharedservice.security.allowedHeaders` | strings | |
| `--sharedservice.security.allowedOrigins` | strings | |
| `--sharedservice.security.auditAccess` | | |
| `--sharedservice.security.orgOverride` | string | Override org in identity context if localhost access enabled |
| `--sharedservice.security.secure` | | |
| `--sharedservice.security.ssl.certificateAuthorityFile` | string | |
| `--sharedservice.security.ssl.certificateFile` | string | |
| `--sharedservice.security.ssl.keyFile` | string | |
| `--sharedservice.security.useAuth` | | |
| `--sharedservice.sync.syncInterval` | string | Time interval to sync (default "5m0s") |
| `--storage.cache.max_size_mbs` | int | Maximum size of the cache where the Blob store data is cached in-memory. If not specified or set to 0, cache is not used |
| `--storage.cache.target_gc_percent` | int | Sets the garbage collection target percentage. |
| `--storage.connection.access-key` | string | Access key to use. Only required when authtype is set to accesskey. |
| `--storage.connection.auth-type` | string | Auth Type to use [iam, accesskey]. (default "iam") |
| `--storage.connection.disable-ssl` | | Disables SSL connection. Should only be used for development. |
| `--storage.connection.endpoint` | string | URL for storage client to connect to. |
| `--storage.connection.region` | string | Region to connect to. (default "us-east-1") |
| `--storage.connection.secret-key` | string | Secret to use when accesskey is set. |
| `--storage.container` | string | Initial container (in s3 a bucket) to create -if it doesn't exist-.' |
| `--storage.defaultHttpClient.timeout` | string | Sets time out on the http client. (default "0s") |
| `--storage.enable-multicontainer` | | If this is true, then the container argument is overlooked and redundant. This config will automatically open new connections to new containers/buckets as they are encountered |
| `--storage.limits.maxDownloadMBs` | int | Maximum allowed download size (in MBs) per call. (default 2) |
| `--storage.stow.config` | stringToString | Configuration for stow backend. Refer to github/flyteorg/stow (default []) |
| `--storage.stow.kind` | string | Kind of Stow backend to use. Refer to github/flyteorg/stow |
| `--storage.type` | string | Sets the type of storage to configure [s3/minio/local/mem/stow]. (default "s3") |
| `--union.auth.authorizationMetadataKey` | string | Authorization Header to use when passing Access Tokens to the server (default "flyte-authorization") |
| `--union.auth.clientId` | string | Client ID |
| `--union.auth.clientSecretEnvVar` | string | Environment variable containing the client secret |
| `--union.auth.clientSecretLocation` | string | File containing the client secret |
| `--union.auth.deviceFlow.pollInterval` | string | amount of time the device flow would poll the token endpoint if auth server doesn't return a polling interval. Okta and google IDP do return an interval' (default "5s") |
| `--union.auth.deviceFlow.refreshTime` | string | grace period from the token expiry after which it would refresh the token. (default "5m0s") |
| `--union.auth.deviceFlow.timeout` | string | amount of time the device flow should complete or else it will be cancelled. (default "10m0s") |
| `--union.auth.enable` | | Whether to enable an authenticated conenction when communicating with admin. (default true) |
| `--union.auth.externalAuth.command` | strings | Command for external authentication token generation |
| `--union.auth.pkce.refreshTime` | string | grace period from the token expiry after which it would refresh the token. (default "5m0s") |
| `--union.auth.pkce.timeout` | string | Amount of time the browser session would be active for authentication from client app. (default "15s") |
| `--union.auth.scopes` | strings | List of scopes to request |
| `--union.auth.tokenRefreshWindow` | string | Max duration between token refresh attempt and token expiry. (default "1h0m0s") |
| `--union.auth.tokenUrl` | string | OPTIONAL: Your IdP's token endpoint. It'll be discovered from flyte admin's OAuth Metadata endpoint if not provided. |
| `--union.auth.type` | string | Type of OAuth2 flow used for communicating with admin. (default "Pkce") |
| `--union.cache.maxItemsCount` | int | Maximum number of items to keep in the cache before evicting. (default 1000) |
| `--union.connection.host` | string | Host to connect to (default "dns:///utt-mgdp-stg-us-east-2.cloud-staging.union.ai") |
| `--union.connection.insecure` | | Whether to connect over insecure channel |
| `--union.connection.insecureSkipVerify` | | InsecureSkipVerify controls whether a client verifies the server's certificate chain and host name.Caution: shouldn't be use for production usecases' |
| `--union.connection.keepAliveConfig.permitWithoutStream` | | If true, client sends keepalive pings even with no active RPCs. |
| `--union.connection.keepAliveConfig.time` | string | After a duration of this time if the client doesn't see any activity it pings the server to see if the transport is still alive. (default "20s") |
| `--union.connection.keepAliveConfig.timeout` | string | After having pinged for keepalive check, the client waits for a duration of Timeout and if no activity is seen even after that the connection is closed. (default "2m0s") |
| `--union.connection.maxBackoffDelay` | string | Max delay for grpc backoff (default "8s") |
| `--union.connection.maxRecvMsgSize` | int | Maximum size of a message in bytes of a gRPC message (default 10485760) |
| `--union.connection.maxRetries` | int | Max number of gRPC retries (default 4) |
| `--union.connection.minConnectTimeout` | string | Minimum timeout for establishing a connection (default "20s") |
| `--union.connection.perRetryTimeout` | string | gRPC per retry timeout (default "15s") |
| `--union.connection.serviceConfig` | string | Defines gRPC experimental JSON Service Config (default "{"loadBalancingConfig": [{"round_robin":{}}]}") |
| `--union.connection.trustedIdentityClaims.enabled` | | Enables passing of trusted claims while making inter service calls |
| `--union.connection.trustedIdentityClaims.externalIdentityClaim` | string | External identity claim of the service which is authorized to make internal service call. These are verified against userclouds actions |
| `--union.connection.trustedIdentityClaims.externalIdentityTypeClaim` | string | External identity type claim of app or user to use for the current service identity. It should be an 'app' for inter service communication |
| `--union.internalConnectionConfig.-` | stringToString | (default []) |
| `--union.internalConnectionConfig.enabled` | | Enables internal service to service communication instead of going through ingress. |
| `--union.internalConnectionConfig.urlPattern` | string | UrlPattern of the internal service endpoints. (default "{{ service }}-helmchart.{{ service }}.svc.cluster.local:80") |
| `--webhook.awsSecretManager.sidecarImage` | string | Specifies the sidecar docker image to use (default "docker.io/amazon/aws-secrets-manager-secret-sidecar:v0.1.4") |
| `--webhook.certDir` | string | Certificate directory to use to write generated certs. Defaults to /etc/webhook/certs/ (default "/etc/webhook/certs") |
| `--webhook.embeddedSecretManagerConfig.awsConfig.region` | string | AWS region |
| `--webhook.embeddedSecretManagerConfig.fileMountInitContainer.image` | string | Specifies init container image to use for mounting secrets as files. (default "busybox:1.28") |
| `--webhook.embeddedSecretManagerConfig.gcpConfig.project` | string | GCP project to be used for secret manager |
| `--webhook.embeddedSecretManagerConfig.type` | string | (default "AWS") |
| `--webhook.gcpSecretManager.sidecarImage` | string | Specifies the sidecar docker image to use (default "gcr.io/google.com/cloudsdktool/cloud-sdk:alpine") |
| `--webhook.listenPort` | int | The port to use to listen to webhook calls. Defaults to 9443 (default 9443) |
| `--webhook.localCert` | | write certs locally. Defaults to false |
| `--webhook.metrics-prefix` | string | An optional prefix for all published metrics. (default "flyte:") |
| `--webhook.secretName` | string | Secret name to write generated certs to. (default "flyte-pod-webhook") |
| `--webhook.serviceName` | string | The name of the webhook service. (default "flyte-pod-webhook") |
| `--webhook.servicePort` | int32 | The port on the service that hosting webhook. (default 443) |
| `--webhook.vaultSecretManager.role` | string | Specifies the vault role to use (default "flyte") |
=== PAGE: https://www.union.ai/docs/v1/serverless/api-reference/uctl-cli/uctl-get/uctl-get-cluster-resource-attribute ===
# uctl get cluster-resource-attribute
Gets matchable resources of cluster resource attributes.
## Synopsis
Retrieve cluster resource attributes for the given project and domain.
For project flytesnacks and development domain:
```shell
$ uctl get cluster-resource-attribute -p flytesnacks -d development
```
Example: output from the command:
``` json
{"project":"flytesnacks","domain":"development","attributes":{"buzz":"lightyear","foo":"bar"}}
```
Retrieve cluster resource attributes for the given project, domain, and
workflow. For project flytesnacks, development domain, and workflow
`core.control_flow.merge_sort.merge_sort`:
```shell
$ uctl get cluster-resource-attribute -p flytesnacks -d development core.control_flow.merge_sort.merge_sort
```
Example: output from the command:
``` json
{"project":"flytesnacks","domain":"development","workflow":"core.control_flow.merge_sort.merge_sort","attributes":{"buzz":"lightyear","foo":"bar"}}
```
Write the cluster resource attributes to a file. If there are no cluster
resource attributes, the command throws an error. The config file is
written to cra.yaml file. Example: content of cra.yaml:
```shell
$ uctl get task-resource-attribute --attrFile cra.yaml
```
``` yaml
domain: development
project: flytesnacks
attributes:
foo: "bar"
buzz: "lightyear"
```
Usage:
```shell
$ uctl get cluster-resource-attribute [flags]
```
## Options
| Option | Type | Description |
|--------|------|-------------|
| `--attrFile` | string | attribute file name to be used for generating attribute for the resource type. |
| `-h`, `--help` | help for cluster-resource-attribute |
### Options inherited from parent commands
| Option | Type | Description |
|--------|------|-------------|
| `--admin.audience` | string | Audience to use when initiating OAuth2 authorization requests. |
| `--admin.authType` | string | Type of OAuth2 flow used for communicating with admin.ClientSecret, Pkce, ExternalCommand are valid values (default "ClientSecret") |
| `--admin.authorizationHeader` | string | Custom metadata header to pass JWT |
| `--admin.authorizationServerUrl` | string | This is the URL to your IdP's authorization server. It'll default to Endpoint |
| `--admin.caCertFilePath` | string | Use specified certificate file to verify the admin server peer. |
| `--admin.clientId` | string | Client ID (default "flytepropeller") |
| `--admin.clientSecretEnvVar` | string | Environment variable containing the client secret |
| `--admin.clientSecretLocation` | string | File containing the client secret (default "/etc/secrets/client_secret") |
| `--admin.command` | strings | Command for external authentication token generation |
| `--admin.defaultOrg` | string | OPTIONAL: Default org to use to support non-org based cli's.'. |
| `--admin.defaultServiceConfig` | string | |
| `--admin.deviceFlowConfig.pollInterval` | string | amount of time the device flow would poll the token endpoint if auth server doesn't return a polling interval. Okta and google IDP do return an interval' (default "5s") |
| `--admin.deviceFlowConfig.refreshTime` | string | grace period from the token expiry after which it would refresh the token. (default "5m0s") |
| `--admin.deviceFlowConfig.timeout` | string | amount of time the device flow should complete or else it will be cancelled. (default "10m0s") |
| `--admin.endpoint` | string | For admin types, specify where the uri of the service is located. |
| `--admin.httpProxyURL` | string | OPTIONAL: HTTP Proxy to be used for OAuth requests. |
| `--admin.insecure` | | Use insecure connection. |
| `--admin.insecureSkipVerify` | | InsecureSkipVerify controls whether a client verifies the server's certificate chain and host name.Caution: shouldn't be use for production usecases' |
| `--admin.maxBackoffDelay` | string | Max delay for grpc backoff (default "8s") |
| `--admin.maxMessageSizeBytes` | int | The max size in bytes for incoming gRPC messages |
| `--admin.maxRetries` | int | Max number of gRPC retries (default 4) |
| `--admin.perRetryTimeout` | string | gRPC per retry timeout (default "15s") |
| `--admin.pkceConfig.refreshTime` | string | grace period from the token expiry after which it would refresh the token. (default "5m0s") |
| `--admin.pkceConfig.timeout` | string | Amount of time the browser session would be active for authentication from client app. (default "2m0s") |
| `--admin.proxyCommand` | strings | Command for external proxy-authorization token generation |
| `--admin.scopes` | strings | List of scopes to request |
| `--admin.tokenRefreshWindow` | string | Max duration between token refresh attempt and token expiry. (default "0s") |
| `--admin.tokenUrl` | string | OPTIONAL: Your IdP's token endpoint. It'll be discovered from flyte admin's OAuth Metadata endpoint if not provided. |
| `--admin.useAudienceFromAdmin` | | Use Audience configured from admins public endpoint config. |
| `--admin.useAuth` | | Deprecated: Auth will be enabled/disabled based on admin's dynamically discovered information. |
| `--auth.appAuth.externalAuthServer.allowedAudience` | strings | Optional: A list of allowed audiences. If not provided, the audience is expected to be the public Uri of the service. |
| `--auth.appAuth.externalAuthServer.baseUrl` | string | This should be the base url of the authorization server that you are trying to hit. With Okta for instance, it will look something like https://company.okta.com/oauth2/abcdef123456789/ |
| `--auth.appAuth.externalAuthServer.httpProxyURL` | string | OPTIONAL: HTTP Proxy to be used for OAuth requests. |
| `--auth.appAuth.externalAuthServer.metadataUrl` | string | Optional: If the server doesn't support /.well-known/oauth-authorization-server, you can set a custom metadata url here.' |
| `--auth.appAuth.externalAuthServer.retryAttempts` | int | Optional: The number of attempted retries on a transient failure to get the OAuth metadata (default 5) |
| `--auth.appAuth.externalAuthServer.retryDelay` | string | Optional, Duration to wait between retries (default "1s") |
| `--auth.appAuth.selfAuthServer.accessTokenLifespan` | string | Defines the lifespan of issued access tokens. (default "30m0s") |
| `--auth.appAuth.selfAuthServer.authorizationCodeLifespan` | string | Defines the lifespan of issued access tokens. (default "5m0s") |
| `--auth.appAuth.selfAuthServer.claimSymmetricEncryptionKeySecretName` | string | OPTIONAL: Secret name to use to encrypt claims in authcode token. (default "claim_symmetric_key") |
| `--auth.appAuth.selfAuthServer.issuer` | string | Defines the issuer to use when issuing and validating tokens. The default value is https://{requestUri.HostAndPort}/ |
| `--auth.appAuth.selfAuthServer.oldTokenSigningRSAKeySecretName` | string | OPTIONAL: Secret name to use to retrieve Old RSA Signing Key. This can be useful during key rotation to continue to accept older tokens. (default "token_rsa_key_old.pem") |
| `--auth.appAuth.selfAuthServer.refreshTokenLifespan` | string | Defines the lifespan of issued access tokens. (default "1h0m0s") |
| `--auth.appAuth.selfAuthServer.tokenSigningRSAKeySecretName` | string | OPTIONAL: Secret name to use to retrieve RSA Signing Key. (default "token_rsa_key.pem") |
| `--auth.appAuth.thirdPartyConfig.flyteClient.audience` | string | Audience to use when initiating OAuth2 authorization requests. |
| `--auth.appAuth.thirdPartyConfig.flyteClient.clientId` | string | public identifier for the app which handles authorization for a Flyte deployment (default "uctl") |
| `--auth.appAuth.thirdPartyConfig.flyteClient.redirectUri` | string | This is the callback uri registered with the app which handles authorization for a Flyte deployment (default "http://localhost:53593/callback") |
| `--auth.appAuth.thirdPartyConfig.flyteClient.scopes` | strings | Recommended scopes for the client to request. (default [all,offline]) |
| `--auth.disableForGrpc` | | Disables auth enforcement on Grpc Endpoints. |
| `--auth.disableForHttp` | | Disables auth enforcement on HTTP Endpoints. |
| `--auth.grpcAuthorizationHeader` | string | (default "flyte-authorization") |
| `--auth.httpAuthorizationHeader` | string | (default "flyte-authorization") |
| `--auth.httpProxyURL` | string | OPTIONAL: HTTP Proxy to be used for OAuth requests. |
| `--auth.tokenEndpointProxyPath` | string | The path used to proxy calls to the TokenURL |
| `--auth.userAuth.cookieBlockKeySecretName` | string | OPTIONAL: Secret name to use for cookie block key. (default "cookie_block_key") |
| `--auth.userAuth.cookieHashKeySecretName` | string | OPTIONAL: Secret name to use for cookie hash key. (default "cookie_hash_key") |
| `--auth.userAuth.cookieSetting.domain` | string | OPTIONAL: Allows you to set the domain attribute on the auth cookies. |
| `--auth.userAuth.cookieSetting.sameSitePolicy` | string | OPTIONAL: Allows you to declare if your cookie should be restricted to a first-party or same-site context.Wrapper around http.SameSite. (default "DefaultMode") |
| `--auth.userAuth.httpProxyURL` | string | OPTIONAL: HTTP Proxy to be used for OAuth requests. |
| `--auth.userAuth.idpQueryParameter` | string | idp query parameter used for selecting a particular IDP for doing user authentication. Eg: for Okta passing idp={IDP-ID} forces the authentication to happen with IDP-ID |
| `--auth.userAuth.openId.baseUrl` | string | |
| `--auth.userAuth.openId.clientId` | string | |
| `--auth.userAuth.openId.clientSecretFile` | string | |
| `--auth.userAuth.openId.clientSecretName` | string | (default "oidc_client_secret") |
| `--auth.userAuth.openId.scopes` | strings | (default [openid,profile]) |
| `--auth.userAuth.redirectUrl` | string | (default "/console") |
| `--authorizer.internalCommunicationConfig.enabled` | | Enables authorization decisions for internal communication. (default true) |
| `--authorizer.internalCommunicationConfig.ingressIdentity` | string | IngressIdentity used in the cluster. Needed to exclude the communication coming from ingress. (default "ingress-nginx.ingress-nginx.serviceaccount.identity.linkerd.cluster.local") |
| `--authorizer.internalCommunicationConfig.tenantUrlPatternIdentity` | string | UrlPatternIdentity of the internal tenant service endpoint identities. (default "{{ service }}.{{ org }}.serviceaccount.identity.linkerd.cluster.local") |
| `--authorizer.internalCommunicationConfig.urlPatternIdentity` | string | UrlPatternIdentity of the internal service endpoint identities. (default "{{ service }}-helmchart.{{ service }}.serviceaccount.identity.linkerd.cluster.local") |
| `--authorizer.mode` | string | (default "Active") |
| `--authorizer.organizationConfig.PolicyConfig.adminPolicyDescription` | string | description for the boilerplate admin policy (default "Contributor permissions and full admin permissions to manage users and view usage dashboards") |
| `--authorizer.organizationConfig.PolicyConfig.contributorPolicyDescription` | string | description for the boilerplate contributor policy (default "Viewer permissions and permissions to create workflows, tasks, launch plans, and executions") |
| `--authorizer.organizationConfig.PolicyConfig.defaultUserPolicyRoleType` | string | name of the role type to determine which default policy new users added to the organization should be assigned (default "Viewer") |
| `--authorizer.organizationConfig.PolicyConfig.serverlessContributorPolicyDescription` | string | description for the boilerplate serverless contributor policy (default "Viewer permissions and permissions to create workflows, tasks, launch plans, and executions") |
| `--authorizer.organizationConfig.PolicyConfig.serverlessViewerPolicyDescription` | string | description for the boilerplate serverless viewer policy (default "Permissions to view Flyte entities") |
| `--authorizer.organizationConfig.PolicyConfig.viewerPolicyDescription` | string | description for the boilerplate viewer policy (default "Permissions to view Flyte entities") |
| `--authorizer.organizationConfig.defaultPolicyCacheDuration` | string | Cache entry duration for the store of the default policy per organization (default "10m0s") |
| `--authorizer.syncRuleRefreshInterval` | string | (default "1m0s") |
| `--authorizer.type` | string | (default "UserClouds") |
| `--authorizer.userCloudsClient.cache.redis.ttl.edgeTypes` | string | Specifies how long edge types remain in the cache.. (default "30m0s") |
| `--authorizer.userCloudsClient.cache.redis.ttl.edges` | string | Specifies how long edges remain in the cache. (default "30m0s") |
| `--authorizer.userCloudsClient.cache.redis.ttl.objectTypes` | string | Specifies how long object types remain in the cache. (default "30m0s") |
| `--authorizer.userCloudsClient.cache.redis.ttl.objects` | string | Specifies how long objects remain in the cache. (default "30m0s") |
| `--authorizer.userCloudsClient.cache.type` | string | Cache type to use. (default "none") |
| `--authorizer.userCloudsClient.clientID` | string | UserClouds client id |
| `--authorizer.userCloudsClient.clientSecretName` | string | UserCloud client secret name to read from the secret manager. (default "userclouds-client-secret") |
| `--authorizer.userCloudsClient.enableLogging` | | Enable userclouds client's internal logging. Calls to post logs take 250-350 ms and will impact p99 latency, enable with caution. |
| `--authorizer.userCloudsClient.tenantID` | string | UserClouds tenant id. Should be a UUID. |
| `--authorizer.userCloudsClient.tenantUrl` | string | Something like https://{yourtenant}.tenant.userclouds.com |
| `--config` | string | config file (default is /Users/andrew/.union/config.yaml) |
| `--connection.environment` | string | |
| `--connection.region` | string | |
| `--connection.rootTenantURLPattern` | string | Pattern for tenant url. (default "dns:///{{ organization }}.cloud-staging.union.ai") |
| `--console.endpoint` | string | Endpoint of console, if different than flyte admin |
| `--database.connMaxLifeTime` | string | sets the maximum amount of time a connection may be reused (default "1h0m0s") |
| `--database.enableForeignKeyConstraintWhenMigrating` | | Whether to enable gorm foreign keys when migrating the db |
| `--database.maxIdleConnections` | int | maxIdleConnections sets the maximum number of connections in the idle connection pool. (default 10) |
| `--database.maxOpenConnections` | int | maxOpenConnections sets the maximum number of open connections to the database. (default 100) |
| `--database.postgres.dbname` | string | The database name (default "postgres") |
| `--database.postgres.debug` | | |
| `--database.postgres.host` | string | The host name of the database server (default "localhost") |
| `--database.postgres.options` | string | See http://gorm.io/docs/connecting_to_the_database.html for available options passed, in addition to the above. (default "sslmode=disable") |
| `--database.postgres.password` | string | The database password. (default "postgres") |
| `--database.postgres.passwordPath` | string | Points to the file containing the database password. |
| `--database.postgres.port` | int | The port name of the database server (default 30001) |
| `--database.postgres.readReplicaHost` | string | The host name of the read replica database server (default "localhost") |
| `--database.postgres.username` | string | The database user who is connecting to the server. (default "postgres") |
| `--database.sqlite.file` | string | The path to the file (existing or new) where the DB should be created / stored. If existing, then this will be re-used, else a new will be created |
| `--db.connectionPool.maxConnectionLifetime` | string | (default "0s") |
| `--db.connectionPool.maxIdleConnections` | int | |
| `--db.connectionPool.maxOpenConnections` | int | |
| `--db.dbname` | string | (default "postgres") |
| `--db.debug` | | |
| `--db.host` | string | (default "postgres") |
| `--db.log_level` | int | (default 4) |
| `--db.options` | string | (default "sslmode=disable") |
| `--db.password` | string | |
| `--db.passwordPath` | string | |
| `--db.port` | int | (default 5432) |
| `--db.username` | string | (default "postgres") |
| `-d`, `--domain` | string | Specifies the Flyte project's domain. |
| `--files.archive` | | Pass in archive file either an http link or local path. |
| `--files.assumableIamRole` | string | Custom assumable iam auth role to register launch plans with. |
| `--files.continueOnError` | | Continue on error when registering files. |
| `--files.destinationDirectory` | string | Location of source code in container. |
| `--files.dryRun` | | Execute command without making any modifications. |
| `--files.enableSchedule` | | Enable the schedule if the files contain schedulable launchplan. |
| `--files.force` | | Force use of version number on entities registered with flyte. |
| `--files.k8ServiceAccount` | string | Deprecated. Please use `--K8sServiceAccount`|
| `--files.k8sServiceAccount` | string | Custom kubernetes service account auth role to register launch plans with. |
| `--files.outputLocationPrefix` | string | Custom output location prefix for offloaded types (files/schemas). |
| `--files.sourceUploadPath` | string | Deprecated: Update flyte admin to avoid having to configure storage access from uctl. |
| `--files.version` | string | Version of the entity to be registered with flyte which are un-versioned after serialization. |
| `--logger.formatter.type` | string | Sets logging format type. (default "json") |
| `--logger.level` | int | Sets the minimum logging level. (default 3) |
| `--logger.mute` | | Mutes all logs regardless of severity. Intended for benchmarks/tests only. |
| `--logger.show-source` | | Includes source code location in logs. |
| `--org` | string | Organization to work on. If not set, default to user's org. |
| `--otel.file.filename` | string | Filename to store exported telemetry traces (default "/tmp/trace.txt") |
| `--otel.jaeger.endpoint` | string | Endpoint for the jaeger telemetry trace ingestor (default "http://localhost:14268/api/traces") |
| `--otel.otlpgrpc.endpoint` | string | Endpoint for the OTLP telemetry trace collector (default "http://localhost:4317") |
| `--otel.otlphttp.endpoint` | string | Endpoint for the OTLP telemetry trace collector (default "http://localhost:4318/v1/traces") |
| `--otel.sampler.parentSampler` | string | Sets the parent sampler to use for the tracer (default "always") |
| `--otel.type` | string | Sets the type of exporter to configure [noop/file/jaeger/otlpgrpc/otlphttp]. (default "noop") |
| `-o`, `--output` | string | Specifies the output type - supported formats [TABLE JSON YAML DOT DOTURL]. NOTE: dot, doturl are only supported for Workflow (default "table") |
| `--plugins.catalogcache.reader.maxItems` | int | Maximum number of entries to keep in the index. (default 10000) |
| `--plugins.catalogcache.reader.maxRetries` | int | Maximum number of retries per item. (default 3) |
| `--plugins.catalogcache.reader.workers` | int | Number of concurrent workers to start processing the queue. (default 10) |
| `--plugins.catalogcache.writer.maxItems` | int | Maximum number of entries to keep in the index. (default 10000) |
| `--plugins.catalogcache.writer.maxRetries` | int | Maximum number of retries per item. (default 3) |
| `--plugins.catalogcache.writer.workers` | int | Number of concurrent workers to start processing the queue. (default 10) |
| `-p`, `--project` | string | Specifies the Flyte project. |
| `--rediscache.passwordSecretName` | string | Name of secret with Redis password. |
| `--rediscache.primaryEndpoint` | string | Primary endpoint for the redis cache that can be used for both reads and writes. |
| `--rediscache.replicaEndpoint` | string | Replica endpoint for the redis cache that can be used for reads. |
| `--secrets.env-prefix` | string | Prefix for environment variables (default "FLYTE_SECRET_") |
| `--secrets.secrets-prefix` | string | Prefix where to look for secrets file (default "/etc/secrets") |
| `--secrets.type` | string | Sets the type of storage to configure [local]. (default "local") |
| `--server.dataProxy.download.maxExpiresIn` | string | Maximum allowed expiration duration. (default "1h0m0s") |
| `--server.dataProxy.upload.defaultFileNameLength` | int | Default length for the generated file name if not provided in the request. (default 20) |
| `--server.dataProxy.upload.maxExpiresIn` | string | Maximum allowed expiration duration. (default "1h0m0s") |
| `--server.dataProxy.upload.maxSize` | string | Maximum allowed upload size. (default "6Mi") |
| `--server.dataProxy.upload.storagePrefix` | string | Storage prefix to use for all upload requests. |
| `--server.grpc.enableGrpcLatencyMetrics` | | Enable grpc latency metrics. Note Histograms metrics can be expensive on Prometheus servers. |
| `--server.grpc.maxMessageSizeBytes` | int | The max size in bytes for incoming gRPC messages |
| `--server.grpc.port` | int | On which grpc port to serve admin (default 8089) |
| `--server.grpc.serverReflection` | | Enable GRPC Server Reflection (default true) |
| `--server.grpcPort` | int | deprecated |
| `--server.grpcServerReflection` | | deprecated |
| `--server.httpPort` | int | On which http port to serve admin (default 8088) |
| `--server.kube-config` | string | Path to kubernetes client config file, default is empty, useful for incluster config. |
| `--server.kubeClientConfig.burst` | int | Max burst rate for throttle. 0 defaults to 10 (default 25) |
| `--server.kubeClientConfig.qps` | int32 | Max QPS to the master for requests to KubeAPI. 0 defaults to 5. (default 100) |
| `--server.kubeClientConfig.timeout` | string | Max duration allowed for every request to KubeAPI before giving up. 0 implies no timeout. (default "30s") |
| `--server.master` | string | The address of the Kubernetes API server. |
| `--server.readHeaderTimeoutSeconds` | int | The amount of time allowed to read request headers. (default 32) |
| `--server.security.allowCors` | | (default true) |
| `--server.security.allowedHeaders` | strings | (default [Content-Type,flyte-authorization]) |
| `--server.security.allowedOrigins` | strings | (default [*]) |
| `--server.security.auditAccess` | | |
| `--server.security.secure` | | |
| `--server.security.ssl.certificateFile` | string | |
| `--server.security.ssl.keyFile` | string | |
| `--server.security.useAuth` | | |
| `--server.thirdPartyConfig.flyteClient.audience` | string | Audience to use when initiating OAuth2 authorization requests. |
| `--server.thirdPartyConfig.flyteClient.clientId` | string | public identifier for the app which handles authorization for a Flyte deployment |
| `--server.thirdPartyConfig.flyteClient.redirectUri` | string | This is the callback uri registered with the app which handles authorization for a Flyte deployment |
| `--server.thirdPartyConfig.flyteClient.scopes` | strings | Recommended scopes for the client to request. |
| `--server.watchService.maxActiveClusterConnections` | int | (default 5) |
| `--server.watchService.maxPageSize` | int | (default 50000) |
| `--server.watchService.nonTerminalStatusUpdatesInterval` | string | (default "1m0s") |
| `--server.watchService.pollInterval` | string | (default "1s") |
| `--sharedservice.connectPort` | string | On which connect port to serve admin (default "8080") |
| `--sharedservice.grpc.grpcMaxResponseStatusBytes` | int32 | specifies the maximum (uncompressed) size of header list that the client is prepared to accept on grpc calls (default 32000) |
| `--sharedservice.grpc.maxConcurrentStreams` | int | Limit on the number of concurrent streams to each ServerTransport. (default 100) |
| `--sharedservice.grpc.maxMessageSizeBytes` | int | Limit on the size of message that can be received on the server. (default 10485760) |
| `--sharedservice.grpcServerReflection` | | Enable GRPC Server Reflection (default true) |
| `--sharedservice.httpPort` | string | On which http port to serve admin (default "8089") |
| `--sharedservice.kubeConfig` | string | Path to kubernetes client config file. |
| `--sharedservice.master` | string | The address of the Kubernetes API server. |
| `--sharedservice.metrics.enableClientGrpcHistograms` | | Enable client grpc histograms (default true) |
| `--sharedservice.metrics.enableGrpcHistograms` | | Enable grpc histograms (default true) |
| `--sharedservice.metrics.scope` | string | Scope to emit metrics under (default "service:") |
| `--sharedservice.port` | string | On which grpc port to serve admin (default "8080") |
| `--sharedservice.profiler.enabled` | | Enable Profiler on server |
| `--sharedservice.profilerPort` | string | Profile port to start listen for pprof and metric handlers on. (default "10254") |
| `--sharedservice.security.allowCors` | | |
| `--sharedservice.security.allowLocalhostAccess` | | Whether to permit localhost unauthenticated access to the server |
| `--sharedservice.security.allowedHeaders` | strings | |
| `--sharedservice.security.allowedOrigins` | strings | |
| `--sharedservice.security.auditAccess` | | |
| `--sharedservice.security.orgOverride` | string | Override org in identity context if localhost access enabled |
| `--sharedservice.security.secure` | | |
| `--sharedservice.security.ssl.certificateAuthorityFile` | string | |
| `--sharedservice.security.ssl.certificateFile` | string | |
| `--sharedservice.security.ssl.keyFile` | string | |
| `--sharedservice.security.useAuth` | | |
| `--sharedservice.sync.syncInterval` | string | Time interval to sync (default "5m0s") |
| `--storage.cache.max_size_mbs` | int | Maximum size of the cache where the Blob store data is cached in-memory. If not specified or set to 0, cache is not used |
| `--storage.cache.target_gc_percent` | int | Sets the garbage collection target percentage. |
| `--storage.connection.access-key` | string | Access key to use. Only required when authtype is set to accesskey. |
| `--storage.connection.auth-type` | string | Auth Type to use [iam, accesskey]. (default "iam") |
| `--storage.connection.disable-ssl` | | Disables SSL connection. Should only be used for development. |
| `--storage.connection.endpoint` | string | URL for storage client to connect to. |
| `--storage.connection.region` | string | Region to connect to. (default "us-east-1") |
| `--storage.connection.secret-key` | string | Secret to use when accesskey is set. |
| `--storage.container` | string | Initial container (in s3 a bucket) to create -if it doesn't exist-.' |
| `--storage.defaultHttpClient.timeout` | string | Sets time out on the http client. (default "0s") |
| `--storage.enable-multicontainer` | | If this is true, then the container argument is overlooked and redundant. This config will automatically open new connections to new containers/buckets as they are encountered |
| `--storage.limits.maxDownloadMBs` | int | Maximum allowed download size (in MBs) per call. (default 2) |
| `--storage.stow.config` | stringToString | Configuration for stow backend. Refer to github/flyteorg/stow (default []) |
| `--storage.stow.kind` | string | Kind of Stow backend to use. Refer to github/flyteorg/stow |
| `--storage.type` | string | Sets the type of storage to configure [s3/minio/local/mem/stow]. (default "s3") |
| `--union.auth.authorizationMetadataKey` | string | Authorization Header to use when passing Access Tokens to the server (default "flyte-authorization") |
| `--union.auth.clientId` | string | Client ID |
| `--union.auth.clientSecretEnvVar` | string | Environment variable containing the client secret |
| `--union.auth.clientSecretLocation` | string | File containing the client secret |
| `--union.auth.deviceFlow.pollInterval` | string | amount of time the device flow would poll the token endpoint if auth server doesn't return a polling interval. Okta and google IDP do return an interval' (default "5s") |
| `--union.auth.deviceFlow.refreshTime` | string | grace period from the token expiry after which it would refresh the token. (default "5m0s") |
| `--union.auth.deviceFlow.timeout` | string | amount of time the device flow should complete or else it will be cancelled. (default "10m0s") |
| `--union.auth.enable` | | Whether to enable an authenticated conenction when communicating with admin. (default true) |
| `--union.auth.externalAuth.command` | strings | Command for external authentication token generation |
| `--union.auth.pkce.refreshTime` | string | grace period from the token expiry after which it would refresh the token. (default "5m0s") |
| `--union.auth.pkce.timeout` | string | Amount of time the browser session would be active for authentication from client app. (default "15s") |
| `--union.auth.scopes` | strings | List of scopes to request |
| `--union.auth.tokenRefreshWindow` | string | Max duration between token refresh attempt and token expiry. (default "1h0m0s") |
| `--union.auth.tokenUrl` | string | OPTIONAL: Your IdP's token endpoint. It'll be discovered from flyte admin's OAuth Metadata endpoint if not provided. |
| `--union.auth.type` | string | Type of OAuth2 flow used for communicating with admin. (default "Pkce") |
| `--union.cache.maxItemsCount` | int | Maximum number of items to keep in the cache before evicting. (default 1000) |
| `--union.connection.host` | string | Host to connect to (default "dns:///utt-mgdp-stg-us-east-2.cloud-staging.union.ai") |
| `--union.connection.insecure` | | Whether to connect over insecure channel |
| `--union.connection.insecureSkipVerify` | | InsecureSkipVerify controls whether a client verifies the server's certificate chain and host name.Caution: shouldn't be use for production usecases' |
| `--union.connection.keepAliveConfig.permitWithoutStream` | | If true, client sends keepalive pings even with no active RPCs. |
| `--union.connection.keepAliveConfig.time` | string | After a duration of this time if the client doesn't see any activity it pings the server to see if the transport is still alive. (default "20s") |
| `--union.connection.keepAliveConfig.timeout` | string | After having pinged for keepalive check, the client waits for a duration of Timeout and if no activity is seen even after that the connection is closed. (default "2m0s") |
| `--union.connection.maxBackoffDelay` | string | Max delay for grpc backoff (default "8s") |
| `--union.connection.maxRecvMsgSize` | int | Maximum size of a message in bytes of a gRPC message (default 10485760) |
| `--union.connection.maxRetries` | int | Max number of gRPC retries (default 4) |
| `--union.connection.minConnectTimeout` | string | Minimum timeout for establishing a connection (default "20s") |
| `--union.connection.perRetryTimeout` | string | gRPC per retry timeout (default "15s") |
| `--union.connection.serviceConfig` | string | Defines gRPC experimental JSON Service Config (default "{"loadBalancingConfig": [{"round_robin":{}}]}") |
| `--union.connection.trustedIdentityClaims.enabled` | | Enables passing of trusted claims while making inter service calls |
| `--union.connection.trustedIdentityClaims.externalIdentityClaim` | string | External identity claim of the service which is authorized to make internal service call. These are verified against userclouds actions |
| `--union.connection.trustedIdentityClaims.externalIdentityTypeClaim` | string | External identity type claim of app or user to use for the current service identity. It should be an 'app' for inter service communication |
| `--union.internalConnectionConfig.-` | stringToString | (default []) |
| `--union.internalConnectionConfig.enabled` | | Enables internal service to service communication instead of going through ingress. |
| `--union.internalConnectionConfig.urlPattern` | string | UrlPattern of the internal service endpoints. (default "{{ service }}-helmchart.{{ service }}.svc.cluster.local:80") |
| `--webhook.awsSecretManager.sidecarImage` | string | Specifies the sidecar docker image to use (default "docker.io/amazon/aws-secrets-manager-secret-sidecar:v0.1.4") |
| `--webhook.certDir` | string | Certificate directory to use to write generated certs. Defaults to /etc/webhook/certs/ (default "/etc/webhook/certs") |
| `--webhook.embeddedSecretManagerConfig.awsConfig.region` | string | AWS region |
| `--webhook.embeddedSecretManagerConfig.fileMountInitContainer.image` | string | Specifies init container image to use for mounting secrets as files. (default "busybox:1.28") |
| `--webhook.embeddedSecretManagerConfig.gcpConfig.project` | string | GCP project to be used for secret manager |
| `--webhook.embeddedSecretManagerConfig.type` | string | (default "AWS") |
| `--webhook.gcpSecretManager.sidecarImage` | string | Specifies the sidecar docker image to use (default "gcr.io/google.com/cloudsdktool/cloud-sdk:alpine") |
| `--webhook.listenPort` | int | The port to use to listen to webhook calls. Defaults to 9443 (default 9443) |
| `--webhook.localCert` | | write certs locally. Defaults to false |
| `--webhook.metrics-prefix` | string | An optional prefix for all published metrics. (default "flyte:") |
| `--webhook.secretName` | string | Secret name to write generated certs to. (default "flyte-pod-webhook") |
| `--webhook.serviceName` | string | The name of the webhook service. (default "flyte-pod-webhook") |
| `--webhook.servicePort` | int32 | The port on the service that hosting webhook. (default 443) |
| `--webhook.vaultSecretManager.role` | string | Specifies the vault role to use (default "flyte") |
=== PAGE: https://www.union.ai/docs/v1/serverless/api-reference/uctl-cli/uctl-get/uctl-get-clusterconfig ===
# uctl get clusterconfig
Retrieves cluster config
## Synopsis
To fetch default cluster config template:
```shell
$ uctl get clusterconfig --configID default
```
To fetch cluster config template:
```shell
$ uctl get clusterconfig --clusterName mycluster123
```
To fetch cluster config template and save to file:
```shell
$ uctl get clusterconfig --clusterName mycluster123 --outputFile spec.yaml
```
To fetch compiled cluster config:
```shell
$ uctl get clusterconfig --clusterName mycluster123 --compiled
```
## Options
| Option | Type | Description |
|--------|------|-------------|
| `--clusterName` | string | Fetch config of cluster with given name |
| `--compiled` | | fetch compiled config for given cluster |
| `--configID` | string | Fetch cluster config with given id |
| `-h`, `--help` | help for clusterconfig |
| `--outputFile` | string | optional output file |
### Options inherited from parent commands
| Option | Type | Description |
|--------|------|-------------|
| `--admin.audience` | string | Audience to use when initiating OAuth2 authorization requests. |
| `--admin.authType` | string | Type of OAuth2 flow used for communicating with admin.ClientSecret, Pkce, ExternalCommand are valid values (default "ClientSecret") |
| `--admin.authorizationHeader` | string | Custom metadata header to pass JWT |
| `--admin.authorizationServerUrl` | string | This is the URL to your IdP's authorization server. It'll default to Endpoint |
| `--admin.caCertFilePath` | string | Use specified certificate file to verify the admin server peer. |
| `--admin.clientId` | string | Client ID (default "flytepropeller") |
| `--admin.clientSecretEnvVar` | string | Environment variable containing the client secret |
| `--admin.clientSecretLocation` | string | File containing the client secret (default "/etc/secrets/client_secret") |
| `--admin.command` | strings | Command for external authentication token generation |
| `--admin.defaultOrg` | string | OPTIONAL: Default org to use to support non-org based cli's.'. |
| `--admin.defaultServiceConfig` | string | |
| `--admin.deviceFlowConfig.pollInterval` | string | amount of time the device flow would poll the token endpoint if auth server doesn't return a polling interval. Okta and google IDP do return an interval' (default "5s") |
| `--admin.deviceFlowConfig.refreshTime` | string | grace period from the token expiry after which it would refresh the token. (default "5m0s") |
| `--admin.deviceFlowConfig.timeout` | string | amount of time the device flow should complete or else it will be cancelled. (default "10m0s") |
| `--admin.endpoint` | string | For admin types, specify where the uri of the service is located. |
| `--admin.httpProxyURL` | string | OPTIONAL: HTTP Proxy to be used for OAuth requests. |
| `--admin.insecure` | | Use insecure connection. |
| `--admin.insecureSkipVerify` | | InsecureSkipVerify controls whether a client verifies the server's certificate chain and host name.Caution: shouldn't be use for production usecases' |
| `--admin.maxBackoffDelay` | string | Max delay for grpc backoff (default "8s") |
| `--admin.maxMessageSizeBytes` | int | The max size in bytes for incoming gRPC messages |
| `--admin.maxRetries` | int | Max number of gRPC retries (default 4) |
| `--admin.perRetryTimeout` | string | gRPC per retry timeout (default "15s") |
| `--admin.pkceConfig.refreshTime` | string | grace period from the token expiry after which it would refresh the token. (default "5m0s") |
| `--admin.pkceConfig.timeout` | string | Amount of time the browser session would be active for authentication from client app. (default "2m0s") |
| `--admin.proxyCommand` | strings | Command for external proxy-authorization token generation |
| `--admin.scopes` | strings | List of scopes to request |
| `--admin.tokenRefreshWindow` | string | Max duration between token refresh attempt and token expiry. (default "0s") |
| `--admin.tokenUrl` | string | OPTIONAL: Your IdP's token endpoint. It'll be discovered from flyte admin's OAuth Metadata endpoint if not provided. |
| `--admin.useAudienceFromAdmin` | | Use Audience configured from admins public endpoint config. |
| `--admin.useAuth` | | Deprecated: Auth will be enabled/disabled based on admin's dynamically discovered information. |
| `--auth.appAuth.externalAuthServer.allowedAudience` | strings | Optional: A list of allowed audiences. If not provided, the audience is expected to be the public Uri of the service. |
| `--auth.appAuth.externalAuthServer.baseUrl` | string | This should be the base url of the authorization server that you are trying to hit. With Okta for instance, it will look something like https://company.okta.com/oauth2/abcdef123456789/ |
| `--auth.appAuth.externalAuthServer.httpProxyURL` | string | OPTIONAL: HTTP Proxy to be used for OAuth requests. |
| `--auth.appAuth.externalAuthServer.metadataUrl` | string | Optional: If the server doesn't support /.well-known/oauth-authorization-server, you can set a custom metadata url here.' |
| `--auth.appAuth.externalAuthServer.retryAttempts` | int | Optional: The number of attempted retries on a transient failure to get the OAuth metadata (default 5) |
| `--auth.appAuth.externalAuthServer.retryDelay` | string | Optional, Duration to wait between retries (default "1s") |
| `--auth.appAuth.selfAuthServer.accessTokenLifespan` | string | Defines the lifespan of issued access tokens. (default "30m0s") |
| `--auth.appAuth.selfAuthServer.authorizationCodeLifespan` | string | Defines the lifespan of issued access tokens. (default "5m0s") |
| `--auth.appAuth.selfAuthServer.claimSymmetricEncryptionKeySecretName` | string | OPTIONAL: Secret name to use to encrypt claims in authcode token. (default "claim_symmetric_key") |
| `--auth.appAuth.selfAuthServer.issuer` | string | Defines the issuer to use when issuing and validating tokens. The default value is https://{requestUri.HostAndPort}/ |
| `--auth.appAuth.selfAuthServer.oldTokenSigningRSAKeySecretName` | string | OPTIONAL: Secret name to use to retrieve Old RSA Signing Key. This can be useful during key rotation to continue to accept older tokens. (default "token_rsa_key_old.pem") |
| `--auth.appAuth.selfAuthServer.refreshTokenLifespan` | string | Defines the lifespan of issued access tokens. (default "1h0m0s") |
| `--auth.appAuth.selfAuthServer.tokenSigningRSAKeySecretName` | string | OPTIONAL: Secret name to use to retrieve RSA Signing Key. (default "token_rsa_key.pem") |
| `--auth.appAuth.thirdPartyConfig.flyteClient.audience` | string | Audience to use when initiating OAuth2 authorization requests. |
| `--auth.appAuth.thirdPartyConfig.flyteClient.clientId` | string | public identifier for the app which handles authorization for a Flyte deployment (default "uctl") |
| `--auth.appAuth.thirdPartyConfig.flyteClient.redirectUri` | string | This is the callback uri registered with the app which handles authorization for a Flyte deployment (default "http://localhost:53593/callback") |
| `--auth.appAuth.thirdPartyConfig.flyteClient.scopes` | strings | Recommended scopes for the client to request. (default [all,offline]) |
| `--auth.disableForGrpc` | | Disables auth enforcement on Grpc Endpoints. |
| `--auth.disableForHttp` | | Disables auth enforcement on HTTP Endpoints. |
| `--auth.grpcAuthorizationHeader` | string | (default "flyte-authorization") |
| `--auth.httpAuthorizationHeader` | string | (default "flyte-authorization") |
| `--auth.httpProxyURL` | string | OPTIONAL: HTTP Proxy to be used for OAuth requests. |
| `--auth.tokenEndpointProxyPath` | string | The path used to proxy calls to the TokenURL |
| `--auth.userAuth.cookieBlockKeySecretName` | string | OPTIONAL: Secret name to use for cookie block key. (default "cookie_block_key") |
| `--auth.userAuth.cookieHashKeySecretName` | string | OPTIONAL: Secret name to use for cookie hash key. (default "cookie_hash_key") |
| `--auth.userAuth.cookieSetting.domain` | string | OPTIONAL: Allows you to set the domain attribute on the auth cookies. |
| `--auth.userAuth.cookieSetting.sameSitePolicy` | string | OPTIONAL: Allows you to declare if your cookie should be restricted to a first-party or same-site context.Wrapper around http.SameSite. (default "DefaultMode") |
| `--auth.userAuth.httpProxyURL` | string | OPTIONAL: HTTP Proxy to be used for OAuth requests. |
| `--auth.userAuth.idpQueryParameter` | string | idp query parameter used for selecting a particular IDP for doing user authentication. Eg: for Okta passing idp={IDP-ID} forces the authentication to happen with IDP-ID |
| `--auth.userAuth.openId.baseUrl` | string | |
| `--auth.userAuth.openId.clientId` | string | |
| `--auth.userAuth.openId.clientSecretFile` | string | |
| `--auth.userAuth.openId.clientSecretName` | string | (default "oidc_client_secret") |
| `--auth.userAuth.openId.scopes` | strings | (default [openid,profile]) |
| `--auth.userAuth.redirectUrl` | string | (default "/console") |
| `--authorizer.internalCommunicationConfig.enabled` | | Enables authorization decisions for internal communication. (default true) |
| `--authorizer.internalCommunicationConfig.ingressIdentity` | string | IngressIdentity used in the cluster. Needed to exclude the communication coming from ingress. (default "ingress-nginx.ingress-nginx.serviceaccount.identity.linkerd.cluster.local") |
| `--authorizer.internalCommunicationConfig.tenantUrlPatternIdentity` | string | UrlPatternIdentity of the internal tenant service endpoint identities. (default "{{ service }}.{{ org }}.serviceaccount.identity.linkerd.cluster.local") |
| `--authorizer.internalCommunicationConfig.urlPatternIdentity` | string | UrlPatternIdentity of the internal service endpoint identities. (default "{{ service }}-helmchart.{{ service }}.serviceaccount.identity.linkerd.cluster.local") |
| `--authorizer.mode` | string | (default "Active") |
| `--authorizer.organizationConfig.PolicyConfig.adminPolicyDescription` | string | description for the boilerplate admin policy (default "Contributor permissions and full admin permissions to manage users and view usage dashboards") |
| `--authorizer.organizationConfig.PolicyConfig.contributorPolicyDescription` | string | description for the boilerplate contributor policy (default "Viewer permissions and permissions to create workflows, tasks, launch plans, and executions") |
| `--authorizer.organizationConfig.PolicyConfig.defaultUserPolicyRoleType` | string | name of the role type to determine which default policy new users added to the organization should be assigned (default "Viewer") |
| `--authorizer.organizationConfig.PolicyConfig.serverlessContributorPolicyDescription` | string | description for the boilerplate serverless contributor policy (default "Viewer permissions and permissions to create workflows, tasks, launch plans, and executions") |
| `--authorizer.organizationConfig.PolicyConfig.serverlessViewerPolicyDescription` | string | description for the boilerplate serverless viewer policy (default "Permissions to view Flyte entities") |
| `--authorizer.organizationConfig.PolicyConfig.viewerPolicyDescription` | string | description for the boilerplate viewer policy (default "Permissions to view Flyte entities") |
| `--authorizer.organizationConfig.defaultPolicyCacheDuration` | string | Cache entry duration for the store of the default policy per organization (default "10m0s") |
| `--authorizer.syncRuleRefreshInterval` | string | (default "1m0s") |
| `--authorizer.type` | string | (default "UserClouds") |
| `--authorizer.userCloudsClient.cache.redis.ttl.edgeTypes` | string | Specifies how long edge types remain in the cache.. (default "30m0s") |
| `--authorizer.userCloudsClient.cache.redis.ttl.edges` | string | Specifies how long edges remain in the cache. (default "30m0s") |
| `--authorizer.userCloudsClient.cache.redis.ttl.objectTypes` | string | Specifies how long object types remain in the cache. (default "30m0s") |
| `--authorizer.userCloudsClient.cache.redis.ttl.objects` | string | Specifies how long objects remain in the cache. (default "30m0s") |
| `--authorizer.userCloudsClient.cache.type` | string | Cache type to use. (default "none") |
| `--authorizer.userCloudsClient.clientID` | string | UserClouds client id |
| `--authorizer.userCloudsClient.clientSecretName` | string | UserCloud client secret name to read from the secret manager. (default "userclouds-client-secret") |
| `--authorizer.userCloudsClient.enableLogging` | | Enable userclouds client's internal logging. Calls to post logs take 250-350 ms and will impact p99 latency, enable with caution. |
| `--authorizer.userCloudsClient.tenantID` | string | UserClouds tenant id. Should be a UUID. |
| `--authorizer.userCloudsClient.tenantUrl` | string | Something like https://{yourtenant}.tenant.userclouds.com |
| `--config` | string | config file (default is /Users/andrew/.union/config.yaml) |
| `--connection.environment` | string | |
| `--connection.region` | string | |
| `--connection.rootTenantURLPattern` | string | Pattern for tenant url. (default "dns:///{{ organization }}.cloud-staging.union.ai") |
| `--console.endpoint` | string | Endpoint of console, if different than flyte admin |
| `--database.connMaxLifeTime` | string | sets the maximum amount of time a connection may be reused (default "1h0m0s") |
| `--database.enableForeignKeyConstraintWhenMigrating` | | Whether to enable gorm foreign keys when migrating the db |
| `--database.maxIdleConnections` | int | maxIdleConnections sets the maximum number of connections in the idle connection pool. (default 10) |
| `--database.maxOpenConnections` | int | maxOpenConnections sets the maximum number of open connections to the database. (default 100) |
| `--database.postgres.dbname` | string | The database name (default "postgres") |
| `--database.postgres.debug` | | |
| `--database.postgres.host` | string | The host name of the database server (default "localhost") |
| `--database.postgres.options` | string | See http://gorm.io/docs/connecting_to_the_database.html for available options passed, in addition to the above. (default "sslmode=disable") |
| `--database.postgres.password` | string | The database password. (default "postgres") |
| `--database.postgres.passwordPath` | string | Points to the file containing the database password. |
| `--database.postgres.port` | int | The port name of the database server (default 30001) |
| `--database.postgres.readReplicaHost` | string | The host name of the read replica database server (default "localhost") |
| `--database.postgres.username` | string | The database user who is connecting to the server. (default "postgres") |
| `--database.sqlite.file` | string | The path to the file (existing or new) where the DB should be created / stored. If existing, then this will be re-used, else a new will be created |
| `--db.connectionPool.maxConnectionLifetime` | string | (default "0s") |
| `--db.connectionPool.maxIdleConnections` | int | |
| `--db.connectionPool.maxOpenConnections` | int | |
| `--db.dbname` | string | (default "postgres") |
| `--db.debug` | | |
| `--db.host` | string | (default "postgres") |
| `--db.log_level` | int | (default 4) |
| `--db.options` | string | (default "sslmode=disable") |
| `--db.password` | string | |
| `--db.passwordPath` | string | |
| `--db.port` | int | (default 5432) |
| `--db.username` | string | (default "postgres") |
| `-d`, `--domain` | string | Specifies the Flyte project's domain. |
| `--files.archive` | | Pass in archive file either an http link or local path. |
| `--files.assumableIamRole` | string | Custom assumable iam auth role to register launch plans with. |
| `--files.continueOnError` | | Continue on error when registering files. |
| `--files.destinationDirectory` | string | Location of source code in container. |
| `--files.dryRun` | | Execute command without making any modifications. |
| `--files.enableSchedule` | | Enable the schedule if the files contain schedulable launchplan. |
| `--files.force` | | Force use of version number on entities registered with flyte. |
| `--files.k8ServiceAccount` | string | Deprecated. Please use `--K8sServiceAccount`|
| `--files.k8sServiceAccount` | string | Custom kubernetes service account auth role to register launch plans with. |
| `--files.outputLocationPrefix` | string | Custom output location prefix for offloaded types (files/schemas). |
| `--files.sourceUploadPath` | string | Deprecated: Update flyte admin to avoid having to configure storage access from uctl. |
| `--files.version` | string | Version of the entity to be registered with flyte which are un-versioned after serialization. |
| `--logger.formatter.type` | string | Sets logging format type. (default "json") |
| `--logger.level` | int | Sets the minimum logging level. (default 3) |
| `--logger.mute` | | Mutes all logs regardless of severity. Intended for benchmarks/tests only. |
| `--logger.show-source` | | Includes source code location in logs. |
| `--org` | string | Organization to work on. If not set, default to user's org. |
| `--otel.file.filename` | string | Filename to store exported telemetry traces (default "/tmp/trace.txt") |
| `--otel.jaeger.endpoint` | string | Endpoint for the jaeger telemetry trace ingestor (default "http://localhost:14268/api/traces") |
| `--otel.otlpgrpc.endpoint` | string | Endpoint for the OTLP telemetry trace collector (default "http://localhost:4317") |
| `--otel.otlphttp.endpoint` | string | Endpoint for the OTLP telemetry trace collector (default "http://localhost:4318/v1/traces") |
| `--otel.sampler.parentSampler` | string | Sets the parent sampler to use for the tracer (default "always") |
| `--otel.type` | string | Sets the type of exporter to configure [noop/file/jaeger/otlpgrpc/otlphttp]. (default "noop") |
| `-o`, `--output` | string | Specifies the output type - supported formats [TABLE JSON YAML DOT DOTURL]. NOTE: dot, doturl are only supported for Workflow (default "table") |
| `--plugins.catalogcache.reader.maxItems` | int | Maximum number of entries to keep in the index. (default 10000) |
| `--plugins.catalogcache.reader.maxRetries` | int | Maximum number of retries per item. (default 3) |
| `--plugins.catalogcache.reader.workers` | int | Number of concurrent workers to start processing the queue. (default 10) |
| `--plugins.catalogcache.writer.maxItems` | int | Maximum number of entries to keep in the index. (default 10000) |
| `--plugins.catalogcache.writer.maxRetries` | int | Maximum number of retries per item. (default 3) |
| `--plugins.catalogcache.writer.workers` | int | Number of concurrent workers to start processing the queue. (default 10) |
| `-p`, `--project` | string | Specifies the Flyte project. |
| `--rediscache.passwordSecretName` | string | Name of secret with Redis password. |
| `--rediscache.primaryEndpoint` | string | Primary endpoint for the redis cache that can be used for both reads and writes. |
| `--rediscache.replicaEndpoint` | string | Replica endpoint for the redis cache that can be used for reads. |
| `--secrets.env-prefix` | string | Prefix for environment variables (default "FLYTE_SECRET_") |
| `--secrets.secrets-prefix` | string | Prefix where to look for secrets file (default "/etc/secrets") |
| `--secrets.type` | string | Sets the type of storage to configure [local]. (default "local") |
| `--server.dataProxy.download.maxExpiresIn` | string | Maximum allowed expiration duration. (default "1h0m0s") |
| `--server.dataProxy.upload.defaultFileNameLength` | int | Default length for the generated file name if not provided in the request. (default 20) |
| `--server.dataProxy.upload.maxExpiresIn` | string | Maximum allowed expiration duration. (default "1h0m0s") |
| `--server.dataProxy.upload.maxSize` | string | Maximum allowed upload size. (default "6Mi") |
| `--server.dataProxy.upload.storagePrefix` | string | Storage prefix to use for all upload requests. |
| `--server.grpc.enableGrpcLatencyMetrics` | | Enable grpc latency metrics. Note Histograms metrics can be expensive on Prometheus servers. |
| `--server.grpc.maxMessageSizeBytes` | int | The max size in bytes for incoming gRPC messages |
| `--server.grpc.port` | int | On which grpc port to serve admin (default 8089) |
| `--server.grpc.serverReflection` | | Enable GRPC Server Reflection (default true) |
| `--server.grpcPort` | int | deprecated |
| `--server.grpcServerReflection` | | deprecated |
| `--server.httpPort` | int | On which http port to serve admin (default 8088) |
| `--server.kube-config` | string | Path to kubernetes client config file, default is empty, useful for incluster config. |
| `--server.kubeClientConfig.burst` | int | Max burst rate for throttle. 0 defaults to 10 (default 25) |
| `--server.kubeClientConfig.qps` | int32 | Max QPS to the master for requests to KubeAPI. 0 defaults to 5. (default 100) |
| `--server.kubeClientConfig.timeout` | string | Max duration allowed for every request to KubeAPI before giving up. 0 implies no timeout. (default "30s") |
| `--server.master` | string | The address of the Kubernetes API server. |
| `--server.readHeaderTimeoutSeconds` | int | The amount of time allowed to read request headers. (default 32) |
| `--server.security.allowCors` | | (default true) |
| `--server.security.allowedHeaders` | strings | (default [Content-Type,flyte-authorization]) |
| `--server.security.allowedOrigins` | strings | (default [*]) |
| `--server.security.auditAccess` | | |
| `--server.security.secure` | | |
| `--server.security.ssl.certificateFile` | string | |
| `--server.security.ssl.keyFile` | string | |
| `--server.security.useAuth` | | |
| `--server.thirdPartyConfig.flyteClient.audience` | string | Audience to use when initiating OAuth2 authorization requests. |
| `--server.thirdPartyConfig.flyteClient.clientId` | string | public identifier for the app which handles authorization for a Flyte deployment |
| `--server.thirdPartyConfig.flyteClient.redirectUri` | string | This is the callback uri registered with the app which handles authorization for a Flyte deployment |
| `--server.thirdPartyConfig.flyteClient.scopes` | strings | Recommended scopes for the client to request. |
| `--server.watchService.maxActiveClusterConnections` | int | (default 5) |
| `--server.watchService.maxPageSize` | int | (default 50000) |
| `--server.watchService.nonTerminalStatusUpdatesInterval` | string | (default "1m0s") |
| `--server.watchService.pollInterval` | string | (default "1s") |
| `--sharedservice.connectPort` | string | On which connect port to serve admin (default "8080") |
| `--sharedservice.grpc.grpcMaxResponseStatusBytes` | int32 | specifies the maximum (uncompressed) size of header list that the client is prepared to accept on grpc calls (default 32000) |
| `--sharedservice.grpc.maxConcurrentStreams` | int | Limit on the number of concurrent streams to each ServerTransport. (default 100) |
| `--sharedservice.grpc.maxMessageSizeBytes` | int | Limit on the size of message that can be received on the server. (default 10485760) |
| `--sharedservice.grpcServerReflection` | | Enable GRPC Server Reflection (default true) |
| `--sharedservice.httpPort` | string | On which http port to serve admin (default "8089") |
| `--sharedservice.kubeConfig` | string | Path to kubernetes client config file. |
| `--sharedservice.master` | string | The address of the Kubernetes API server. |
| `--sharedservice.metrics.enableClientGrpcHistograms` | | Enable client grpc histograms (default true) |
| `--sharedservice.metrics.enableGrpcHistograms` | | Enable grpc histograms (default true) |
| `--sharedservice.metrics.scope` | string | Scope to emit metrics under (default "service:") |
| `--sharedservice.port` | string | On which grpc port to serve admin (default "8080") |
| `--sharedservice.profiler.enabled` | | Enable Profiler on server |
| `--sharedservice.profilerPort` | string | Profile port to start listen for pprof and metric handlers on. (default "10254") |
| `--sharedservice.security.allowCors` | | |
| `--sharedservice.security.allowLocalhostAccess` | | Whether to permit localhost unauthenticated access to the server |
| `--sharedservice.security.allowedHeaders` | strings | |
| `--sharedservice.security.allowedOrigins` | strings | |
| `--sharedservice.security.auditAccess` | | |
| `--sharedservice.security.orgOverride` | string | Override org in identity context if localhost access enabled |
| `--sharedservice.security.secure` | | |
| `--sharedservice.security.ssl.certificateAuthorityFile` | string | |
| `--sharedservice.security.ssl.certificateFile` | string | |
| `--sharedservice.security.ssl.keyFile` | string | |
| `--sharedservice.security.useAuth` | | |
| `--sharedservice.sync.syncInterval` | string | Time interval to sync (default "5m0s") |
| `--storage.cache.max_size_mbs` | int | Maximum size of the cache where the Blob store data is cached in-memory. If not specified or set to 0, cache is not used |
| `--storage.cache.target_gc_percent` | int | Sets the garbage collection target percentage. |
| `--storage.connection.access-key` | string | Access key to use. Only required when authtype is set to accesskey. |
| `--storage.connection.auth-type` | string | Auth Type to use [iam, accesskey]. (default "iam") |
| `--storage.connection.disable-ssl` | | Disables SSL connection. Should only be used for development. |
| `--storage.connection.endpoint` | string | URL for storage client to connect to. |
| `--storage.connection.region` | string | Region to connect to. (default "us-east-1") |
| `--storage.connection.secret-key` | string | Secret to use when accesskey is set. |
| `--storage.container` | string | Initial container (in s3 a bucket) to create -if it doesn't exist-.' |
| `--storage.defaultHttpClient.timeout` | string | Sets time out on the http client. (default "0s") |
| `--storage.enable-multicontainer` | | If this is true, then the container argument is overlooked and redundant. This config will automatically open new connections to new containers/buckets as they are encountered |
| `--storage.limits.maxDownloadMBs` | int | Maximum allowed download size (in MBs) per call. (default 2) |
| `--storage.stow.config` | stringToString | Configuration for stow backend. Refer to github/flyteorg/stow (default []) |
| `--storage.stow.kind` | string | Kind of Stow backend to use. Refer to github/flyteorg/stow |
| `--storage.type` | string | Sets the type of storage to configure [s3/minio/local/mem/stow]. (default "s3") |
| `--union.auth.authorizationMetadataKey` | string | Authorization Header to use when passing Access Tokens to the server (default "flyte-authorization") |
| `--union.auth.clientId` | string | Client ID |
| `--union.auth.clientSecretEnvVar` | string | Environment variable containing the client secret |
| `--union.auth.clientSecretLocation` | string | File containing the client secret |
| `--union.auth.deviceFlow.pollInterval` | string | amount of time the device flow would poll the token endpoint if auth server doesn't return a polling interval. Okta and google IDP do return an interval' (default "5s") |
| `--union.auth.deviceFlow.refreshTime` | string | grace period from the token expiry after which it would refresh the token. (default "5m0s") |
| `--union.auth.deviceFlow.timeout` | string | amount of time the device flow should complete or else it will be cancelled. (default "10m0s") |
| `--union.auth.enable` | | Whether to enable an authenticated conenction when communicating with admin. (default true) |
| `--union.auth.externalAuth.command` | strings | Command for external authentication token generation |
| `--union.auth.pkce.refreshTime` | string | grace period from the token expiry after which it would refresh the token. (default "5m0s") |
| `--union.auth.pkce.timeout` | string | Amount of time the browser session would be active for authentication from client app. (default "15s") |
| `--union.auth.scopes` | strings | List of scopes to request |
| `--union.auth.tokenRefreshWindow` | string | Max duration between token refresh attempt and token expiry. (default "1h0m0s") |
| `--union.auth.tokenUrl` | string | OPTIONAL: Your IdP's token endpoint. It'll be discovered from flyte admin's OAuth Metadata endpoint if not provided. |
| `--union.auth.type` | string | Type of OAuth2 flow used for communicating with admin. (default "Pkce") |
| `--union.cache.maxItemsCount` | int | Maximum number of items to keep in the cache before evicting. (default 1000) |
| `--union.connection.host` | string | Host to connect to (default "dns:///utt-mgdp-stg-us-east-2.cloud-staging.union.ai") |
| `--union.connection.insecure` | | Whether to connect over insecure channel |
| `--union.connection.insecureSkipVerify` | | InsecureSkipVerify controls whether a client verifies the server's certificate chain and host name.Caution: shouldn't be use for production usecases' |
| `--union.connection.keepAliveConfig.permitWithoutStream` | | If true, client sends keepalive pings even with no active RPCs. |
| `--union.connection.keepAliveConfig.time` | string | After a duration of this time if the client doesn't see any activity it pings the server to see if the transport is still alive. (default "20s") |
| `--union.connection.keepAliveConfig.timeout` | string | After having pinged for keepalive check, the client waits for a duration of Timeout and if no activity is seen even after that the connection is closed. (default "2m0s") |
| `--union.connection.maxBackoffDelay` | string | Max delay for grpc backoff (default "8s") |
| `--union.connection.maxRecvMsgSize` | int | Maximum size of a message in bytes of a gRPC message (default 10485760) |
| `--union.connection.maxRetries` | int | Max number of gRPC retries (default 4) |
| `--union.connection.minConnectTimeout` | string | Minimum timeout for establishing a connection (default "20s") |
| `--union.connection.perRetryTimeout` | string | gRPC per retry timeout (default "15s") |
| `--union.connection.serviceConfig` | string | Defines gRPC experimental JSON Service Config (default "{"loadBalancingConfig": [{"round_robin":{}}]}") |
| `--union.connection.trustedIdentityClaims.enabled` | | Enables passing of trusted claims while making inter service calls |
| `--union.connection.trustedIdentityClaims.externalIdentityClaim` | string | External identity claim of the service which is authorized to make internal service call. These are verified against userclouds actions |
| `--union.connection.trustedIdentityClaims.externalIdentityTypeClaim` | string | External identity type claim of app or user to use for the current service identity. It should be an 'app' for inter service communication |
| `--union.internalConnectionConfig.-` | stringToString | (default []) |
| `--union.internalConnectionConfig.enabled` | | Enables internal service to service communication instead of going through ingress. |
| `--union.internalConnectionConfig.urlPattern` | string | UrlPattern of the internal service endpoints. (default "{{ service }}-helmchart.{{ service }}.svc.cluster.local:80") |
| `--webhook.awsSecretManager.sidecarImage` | string | Specifies the sidecar docker image to use (default "docker.io/amazon/aws-secrets-manager-secret-sidecar:v0.1.4") |
| `--webhook.certDir` | string | Certificate directory to use to write generated certs. Defaults to /etc/webhook/certs/ (default "/etc/webhook/certs") |
| `--webhook.embeddedSecretManagerConfig.awsConfig.region` | string | AWS region |
| `--webhook.embeddedSecretManagerConfig.fileMountInitContainer.image` | string | Specifies init container image to use for mounting secrets as files. (default "busybox:1.28") |
| `--webhook.embeddedSecretManagerConfig.gcpConfig.project` | string | GCP project to be used for secret manager |
| `--webhook.embeddedSecretManagerConfig.type` | string | (default "AWS") |
| `--webhook.gcpSecretManager.sidecarImage` | string | Specifies the sidecar docker image to use (default "gcr.io/google.com/cloudsdktool/cloud-sdk:alpine") |
| `--webhook.listenPort` | int | The port to use to listen to webhook calls. Defaults to 9443 (default 9443) |
| `--webhook.localCert` | | write certs locally. Defaults to false |
| `--webhook.metrics-prefix` | string | An optional prefix for all published metrics. (default "flyte:") |
| `--webhook.secretName` | string | Secret name to write generated certs to. (default "flyte-pod-webhook") |
| `--webhook.serviceName` | string | The name of the webhook service. (default "flyte-pod-webhook") |
| `--webhook.servicePort` | int32 | The port on the service that hosting webhook. (default 443) |
| `--webhook.vaultSecretManager.role` | string | Specifies the vault role to use (default "flyte") |
=== PAGE: https://www.union.ai/docs/v1/serverless/api-reference/uctl-cli/uctl-get/uctl-get-clusterconfigs ===
# uctl get clusterconfigs
Retrieves list of cluster configs
## Synopsis
To fetch list of cluster configs of organization configured in `.uctl`
config:
```shell
$ uctl get clusterconfigs
```
## Options
| Option | Type | Description |
|--------|------|-------------|
| `-h`, `--help` | help for clusterconfigs |
### Options inherited from parent commands
| Option | Type | Description |
|--------|------|-------------|
| `--admin.audience` | string | Audience to use when initiating OAuth2 authorization requests. |
| `--admin.authType` | string | Type of OAuth2 flow used for communicating with admin.ClientSecret, Pkce, ExternalCommand are valid values (default "ClientSecret") |
| `--admin.authorizationHeader` | string | Custom metadata header to pass JWT |
| `--admin.authorizationServerUrl` | string | This is the URL to your IdP's authorization server. It'll default to Endpoint |
| `--admin.caCertFilePath` | string | Use specified certificate file to verify the admin server peer. |
| `--admin.clientId` | string | Client ID (default "flytepropeller") |
| `--admin.clientSecretEnvVar` | string | Environment variable containing the client secret |
| `--admin.clientSecretLocation` | string | File containing the client secret (default "/etc/secrets/client_secret") |
| `--admin.command` | strings | Command for external authentication token generation |
| `--admin.defaultOrg` | string | OPTIONAL: Default org to use to support non-org based cli's.'. |
| `--admin.defaultServiceConfig` | string | |
| `--admin.deviceFlowConfig.pollInterval` | string | amount of time the device flow would poll the token endpoint if auth server doesn't return a polling interval. Okta and google IDP do return an interval' (default "5s") |
| `--admin.deviceFlowConfig.refreshTime` | string | grace period from the token expiry after which it would refresh the token. (default "5m0s") |
| `--admin.deviceFlowConfig.timeout` | string | amount of time the device flow should complete or else it will be cancelled. (default "10m0s") |
| `--admin.endpoint` | string | For admin types, specify where the uri of the service is located. |
| `--admin.httpProxyURL` | string | OPTIONAL: HTTP Proxy to be used for OAuth requests. |
| `--admin.insecure` | | Use insecure connection. |
| `--admin.insecureSkipVerify` | | InsecureSkipVerify controls whether a client verifies the server's certificate chain and host name.Caution: shouldn't be use for production usecases' |
| `--admin.maxBackoffDelay` | string | Max delay for grpc backoff (default "8s") |
| `--admin.maxMessageSizeBytes` | int | The max size in bytes for incoming gRPC messages |
| `--admin.maxRetries` | int | Max number of gRPC retries (default 4) |
| `--admin.perRetryTimeout` | string | gRPC per retry timeout (default "15s") |
| `--admin.pkceConfig.refreshTime` | string | grace period from the token expiry after which it would refresh the token. (default "5m0s") |
| `--admin.pkceConfig.timeout` | string | Amount of time the browser session would be active for authentication from client app. (default "2m0s") |
| `--admin.proxyCommand` | strings | Command for external proxy-authorization token generation |
| `--admin.scopes` | strings | List of scopes to request |
| `--admin.tokenRefreshWindow` | string | Max duration between token refresh attempt and token expiry. (default "0s") |
| `--admin.tokenUrl` | string | OPTIONAL: Your IdP's token endpoint. It'll be discovered from flyte admin's OAuth Metadata endpoint if not provided. |
| `--admin.useAudienceFromAdmin` | | Use Audience configured from admins public endpoint config. |
| `--admin.useAuth` | | Deprecated: Auth will be enabled/disabled based on admin's dynamically discovered information. |
| `--auth.appAuth.externalAuthServer.allowedAudience` | strings | Optional: A list of allowed audiences. If not provided, the audience is expected to be the public Uri of the service. |
| `--auth.appAuth.externalAuthServer.baseUrl` | string | This should be the base url of the authorization server that you are trying to hit. With Okta for instance, it will look something like https://company.okta.com/oauth2/abcdef123456789/ |
| `--auth.appAuth.externalAuthServer.httpProxyURL` | string | OPTIONAL: HTTP Proxy to be used for OAuth requests. |
| `--auth.appAuth.externalAuthServer.metadataUrl` | string | Optional: If the server doesn't support /.well-known/oauth-authorization-server, you can set a custom metadata url here.' |
| `--auth.appAuth.externalAuthServer.retryAttempts` | int | Optional: The number of attempted retries on a transient failure to get the OAuth metadata (default 5) |
| `--auth.appAuth.externalAuthServer.retryDelay` | string | Optional, Duration to wait between retries (default "1s") |
| `--auth.appAuth.selfAuthServer.accessTokenLifespan` | string | Defines the lifespan of issued access tokens. (default "30m0s") |
| `--auth.appAuth.selfAuthServer.authorizationCodeLifespan` | string | Defines the lifespan of issued access tokens. (default "5m0s") |
| `--auth.appAuth.selfAuthServer.claimSymmetricEncryptionKeySecretName` | string | OPTIONAL: Secret name to use to encrypt claims in authcode token. (default "claim_symmetric_key") |
| `--auth.appAuth.selfAuthServer.issuer` | string | Defines the issuer to use when issuing and validating tokens. The default value is https://{requestUri.HostAndPort}/ |
| `--auth.appAuth.selfAuthServer.oldTokenSigningRSAKeySecretName` | string | OPTIONAL: Secret name to use to retrieve Old RSA Signing Key. This can be useful during key rotation to continue to accept older tokens. (default "token_rsa_key_old.pem") |
| `--auth.appAuth.selfAuthServer.refreshTokenLifespan` | string | Defines the lifespan of issued access tokens. (default "1h0m0s") |
| `--auth.appAuth.selfAuthServer.tokenSigningRSAKeySecretName` | string | OPTIONAL: Secret name to use to retrieve RSA Signing Key. (default "token_rsa_key.pem") |
| `--auth.appAuth.thirdPartyConfig.flyteClient.audience` | string | Audience to use when initiating OAuth2 authorization requests. |
| `--auth.appAuth.thirdPartyConfig.flyteClient.clientId` | string | public identifier for the app which handles authorization for a Flyte deployment (default "uctl") |
| `--auth.appAuth.thirdPartyConfig.flyteClient.redirectUri` | string | This is the callback uri registered with the app which handles authorization for a Flyte deployment (default "http://localhost:53593/callback") |
| `--auth.appAuth.thirdPartyConfig.flyteClient.scopes` | strings | Recommended scopes for the client to request. (default [all,offline]) |
| `--auth.disableForGrpc` | | Disables auth enforcement on Grpc Endpoints. |
| `--auth.disableForHttp` | | Disables auth enforcement on HTTP Endpoints. |
| `--auth.grpcAuthorizationHeader` | string | (default "flyte-authorization") |
| `--auth.httpAuthorizationHeader` | string | (default "flyte-authorization") |
| `--auth.httpProxyURL` | string | OPTIONAL: HTTP Proxy to be used for OAuth requests. |
| `--auth.tokenEndpointProxyPath` | string | The path used to proxy calls to the TokenURL |
| `--auth.userAuth.cookieBlockKeySecretName` | string | OPTIONAL: Secret name to use for cookie block key. (default "cookie_block_key") |
| `--auth.userAuth.cookieHashKeySecretName` | string | OPTIONAL: Secret name to use for cookie hash key. (default "cookie_hash_key") |
| `--auth.userAuth.cookieSetting.domain` | string | OPTIONAL: Allows you to set the domain attribute on the auth cookies. |
| `--auth.userAuth.cookieSetting.sameSitePolicy` | string | OPTIONAL: Allows you to declare if your cookie should be restricted to a first-party or same-site context.Wrapper around http.SameSite. (default "DefaultMode") |
| `--auth.userAuth.httpProxyURL` | string | OPTIONAL: HTTP Proxy to be used for OAuth requests. |
| `--auth.userAuth.idpQueryParameter` | string | idp query parameter used for selecting a particular IDP for doing user authentication. Eg: for Okta passing idp={IDP-ID} forces the authentication to happen with IDP-ID |
| `--auth.userAuth.openId.baseUrl` | string | |
| `--auth.userAuth.openId.clientId` | string | |
| `--auth.userAuth.openId.clientSecretFile` | string | |
| `--auth.userAuth.openId.clientSecretName` | string | (default "oidc_client_secret") |
| `--auth.userAuth.openId.scopes` | strings | (default [openid,profile]) |
| `--auth.userAuth.redirectUrl` | string | (default "/console") |
| `--authorizer.internalCommunicationConfig.enabled` | | Enables authorization decisions for internal communication. (default true) |
| `--authorizer.internalCommunicationConfig.ingressIdentity` | string | IngressIdentity used in the cluster. Needed to exclude the communication coming from ingress. (default "ingress-nginx.ingress-nginx.serviceaccount.identity.linkerd.cluster.local") |
| `--authorizer.internalCommunicationConfig.tenantUrlPatternIdentity` | string | UrlPatternIdentity of the internal tenant service endpoint identities. (default "{{ service }}.{{ org }}.serviceaccount.identity.linkerd.cluster.local") |
| `--authorizer.internalCommunicationConfig.urlPatternIdentity` | string | UrlPatternIdentity of the internal service endpoint identities. (default "{{ service }}-helmchart.{{ service }}.serviceaccount.identity.linkerd.cluster.local") |
| `--authorizer.mode` | string | (default "Active") |
| `--authorizer.organizationConfig.PolicyConfig.adminPolicyDescription` | string | description for the boilerplate admin policy (default "Contributor permissions and full admin permissions to manage users and view usage dashboards") |
| `--authorizer.organizationConfig.PolicyConfig.contributorPolicyDescription` | string | description for the boilerplate contributor policy (default "Viewer permissions and permissions to create workflows, tasks, launch plans, and executions") |
| `--authorizer.organizationConfig.PolicyConfig.defaultUserPolicyRoleType` | string | name of the role type to determine which default policy new users added to the organization should be assigned (default "Viewer") |
| `--authorizer.organizationConfig.PolicyConfig.serverlessContributorPolicyDescription` | string | description for the boilerplate serverless contributor policy (default "Viewer permissions and permissions to create workflows, tasks, launch plans, and executions") |
| `--authorizer.organizationConfig.PolicyConfig.serverlessViewerPolicyDescription` | string | description for the boilerplate serverless viewer policy (default "Permissions to view Flyte entities") |
| `--authorizer.organizationConfig.PolicyConfig.viewerPolicyDescription` | string | description for the boilerplate viewer policy (default "Permissions to view Flyte entities") |
| `--authorizer.organizationConfig.defaultPolicyCacheDuration` | string | Cache entry duration for the store of the default policy per organization (default "10m0s") |
| `--authorizer.syncRuleRefreshInterval` | string | (default "1m0s") |
| `--authorizer.type` | string | (default "UserClouds") |
| `--authorizer.userCloudsClient.cache.redis.ttl.edgeTypes` | string | Specifies how long edge types remain in the cache.. (default "30m0s") |
| `--authorizer.userCloudsClient.cache.redis.ttl.edges` | string | Specifies how long edges remain in the cache. (default "30m0s") |
| `--authorizer.userCloudsClient.cache.redis.ttl.objectTypes` | string | Specifies how long object types remain in the cache. (default "30m0s") |
| `--authorizer.userCloudsClient.cache.redis.ttl.objects` | string | Specifies how long objects remain in the cache. (default "30m0s") |
| `--authorizer.userCloudsClient.cache.type` | string | Cache type to use. (default "none") |
| `--authorizer.userCloudsClient.clientID` | string | UserClouds client id |
| `--authorizer.userCloudsClient.clientSecretName` | string | UserCloud client secret name to read from the secret manager. (default "userclouds-client-secret") |
| `--authorizer.userCloudsClient.enableLogging` | | Enable userclouds client's internal logging. Calls to post logs take 250-350 ms and will impact p99 latency, enable with caution. |
| `--authorizer.userCloudsClient.tenantID` | string | UserClouds tenant id. Should be a UUID. |
| `--authorizer.userCloudsClient.tenantUrl` | string | Something like https://{yourtenant}.tenant.userclouds.com |
| `--config` | string | config file (default is /Users/andrew/.union/config.yaml) |
| `--connection.environment` | string | |
| `--connection.region` | string | |
| `--connection.rootTenantURLPattern` | string | Pattern for tenant url. (default "dns:///{{ organization }}.cloud-staging.union.ai") |
| `--console.endpoint` | string | Endpoint of console, if different than flyte admin |
| `--database.connMaxLifeTime` | string | sets the maximum amount of time a connection may be reused (default "1h0m0s") |
| `--database.enableForeignKeyConstraintWhenMigrating` | | Whether to enable gorm foreign keys when migrating the db |
| `--database.maxIdleConnections` | int | maxIdleConnections sets the maximum number of connections in the idle connection pool. (default 10) |
| `--database.maxOpenConnections` | int | maxOpenConnections sets the maximum number of open connections to the database. (default 100) |
| `--database.postgres.dbname` | string | The database name (default "postgres") |
| `--database.postgres.debug` | | |
| `--database.postgres.host` | string | The host name of the database server (default "localhost") |
| `--database.postgres.options` | string | See http://gorm.io/docs/connecting_to_the_database.html for available options passed, in addition to the above. (default "sslmode=disable") |
| `--database.postgres.password` | string | The database password. (default "postgres") |
| `--database.postgres.passwordPath` | string | Points to the file containing the database password. |
| `--database.postgres.port` | int | The port name of the database server (default 30001) |
| `--database.postgres.readReplicaHost` | string | The host name of the read replica database server (default "localhost") |
| `--database.postgres.username` | string | The database user who is connecting to the server. (default "postgres") |
| `--database.sqlite.file` | string | The path to the file (existing or new) where the DB should be created / stored. If existing, then this will be re-used, else a new will be created |
| `--db.connectionPool.maxConnectionLifetime` | string | (default "0s") |
| `--db.connectionPool.maxIdleConnections` | int | |
| `--db.connectionPool.maxOpenConnections` | int | |
| `--db.dbname` | string | (default "postgres") |
| `--db.debug` | | |
| `--db.host` | string | (default "postgres") |
| `--db.log_level` | int | (default 4) |
| `--db.options` | string | (default "sslmode=disable") |
| `--db.password` | string | |
| `--db.passwordPath` | string | |
| `--db.port` | int | (default 5432) |
| `--db.username` | string | (default "postgres") |
| `-d`, `--domain` | string | Specifies the Flyte project's domain. |
| `--files.archive` | | Pass in archive file either an http link or local path. |
| `--files.assumableIamRole` | string | Custom assumable iam auth role to register launch plans with. |
| `--files.continueOnError` | | Continue on error when registering files. |
| `--files.destinationDirectory` | string | Location of source code in container. |
| `--files.dryRun` | | Execute command without making any modifications. |
| `--files.enableSchedule` | | Enable the schedule if the files contain schedulable launchplan. |
| `--files.force` | | Force use of version number on entities registered with flyte. |
| `--files.k8ServiceAccount` | string | Deprecated. Please use `--K8sServiceAccount`|
| `--files.k8sServiceAccount` | string | Custom kubernetes service account auth role to register launch plans with. |
| `--files.outputLocationPrefix` | string | Custom output location prefix for offloaded types (files/schemas). |
| `--files.sourceUploadPath` | string | Deprecated: Update flyte admin to avoid having to configure storage access from uctl. |
| `--files.version` | string | Version of the entity to be registered with flyte which are un-versioned after serialization. |
| `--logger.formatter.type` | string | Sets logging format type. (default "json") |
| `--logger.level` | int | Sets the minimum logging level. (default 3) |
| `--logger.mute` | | Mutes all logs regardless of severity. Intended for benchmarks/tests only. |
| `--logger.show-source` | | Includes source code location in logs. |
| `--org` | string | Organization to work on. If not set, default to user's org. |
| `--otel.file.filename` | string | Filename to store exported telemetry traces (default "/tmp/trace.txt") |
| `--otel.jaeger.endpoint` | string | Endpoint for the jaeger telemetry trace ingestor (default "http://localhost:14268/api/traces") |
| `--otel.otlpgrpc.endpoint` | string | Endpoint for the OTLP telemetry trace collector (default "http://localhost:4317") |
| `--otel.otlphttp.endpoint` | string | Endpoint for the OTLP telemetry trace collector (default "http://localhost:4318/v1/traces") |
| `--otel.sampler.parentSampler` | string | Sets the parent sampler to use for the tracer (default "always") |
| `--otel.type` | string | Sets the type of exporter to configure [noop/file/jaeger/otlpgrpc/otlphttp]. (default "noop") |
| `-o`, `--output` | string | Specifies the output type - supported formats [TABLE JSON YAML DOT DOTURL]. NOTE: dot, doturl are only supported for Workflow (default "table") |
| `--plugins.catalogcache.reader.maxItems` | int | Maximum number of entries to keep in the index. (default 10000) |
| `--plugins.catalogcache.reader.maxRetries` | int | Maximum number of retries per item. (default 3) |
| `--plugins.catalogcache.reader.workers` | int | Number of concurrent workers to start processing the queue. (default 10) |
| `--plugins.catalogcache.writer.maxItems` | int | Maximum number of entries to keep in the index. (default 10000) |
| `--plugins.catalogcache.writer.maxRetries` | int | Maximum number of retries per item. (default 3) |
| `--plugins.catalogcache.writer.workers` | int | Number of concurrent workers to start processing the queue. (default 10) |
| `-p`, `--project` | string | Specifies the Flyte project. |
| `--rediscache.passwordSecretName` | string | Name of secret with Redis password. |
| `--rediscache.primaryEndpoint` | string | Primary endpoint for the redis cache that can be used for both reads and writes. |
| `--rediscache.replicaEndpoint` | string | Replica endpoint for the redis cache that can be used for reads. |
| `--secrets.env-prefix` | string | Prefix for environment variables (default "FLYTE_SECRET_") |
| `--secrets.secrets-prefix` | string | Prefix where to look for secrets file (default "/etc/secrets") |
| `--secrets.type` | string | Sets the type of storage to configure [local]. (default "local") |
| `--server.dataProxy.download.maxExpiresIn` | string | Maximum allowed expiration duration. (default "1h0m0s") |
| `--server.dataProxy.upload.defaultFileNameLength` | int | Default length for the generated file name if not provided in the request. (default 20) |
| `--server.dataProxy.upload.maxExpiresIn` | string | Maximum allowed expiration duration. (default "1h0m0s") |
| `--server.dataProxy.upload.maxSize` | string | Maximum allowed upload size. (default "6Mi") |
| `--server.dataProxy.upload.storagePrefix` | string | Storage prefix to use for all upload requests. |
| `--server.grpc.enableGrpcLatencyMetrics` | | Enable grpc latency metrics. Note Histograms metrics can be expensive on Prometheus servers. |
| `--server.grpc.maxMessageSizeBytes` | int | The max size in bytes for incoming gRPC messages |
| `--server.grpc.port` | int | On which grpc port to serve admin (default 8089) |
| `--server.grpc.serverReflection` | | Enable GRPC Server Reflection (default true) |
| `--server.grpcPort` | int | deprecated |
| `--server.grpcServerReflection` | | deprecated |
| `--server.httpPort` | int | On which http port to serve admin (default 8088) |
| `--server.kube-config` | string | Path to kubernetes client config file, default is empty, useful for incluster config. |
| `--server.kubeClientConfig.burst` | int | Max burst rate for throttle. 0 defaults to 10 (default 25) |
| `--server.kubeClientConfig.qps` | int32 | Max QPS to the master for requests to KubeAPI. 0 defaults to 5. (default 100) |
| `--server.kubeClientConfig.timeout` | string | Max duration allowed for every request to KubeAPI before giving up. 0 implies no timeout. (default "30s") |
| `--server.master` | string | The address of the Kubernetes API server. |
| `--server.readHeaderTimeoutSeconds` | int | The amount of time allowed to read request headers. (default 32) |
| `--server.security.allowCors` | | (default true) |
| `--server.security.allowedHeaders` | strings | (default [Content-Type,flyte-authorization]) |
| `--server.security.allowedOrigins` | strings | (default [*]) |
| `--server.security.auditAccess` | | |
| `--server.security.secure` | | |
| `--server.security.ssl.certificateFile` | string | |
| `--server.security.ssl.keyFile` | string | |
| `--server.security.useAuth` | | |
| `--server.thirdPartyConfig.flyteClient.audience` | string | Audience to use when initiating OAuth2 authorization requests. |
| `--server.thirdPartyConfig.flyteClient.clientId` | string | public identifier for the app which handles authorization for a Flyte deployment |
| `--server.thirdPartyConfig.flyteClient.redirectUri` | string | This is the callback uri registered with the app which handles authorization for a Flyte deployment |
| `--server.thirdPartyConfig.flyteClient.scopes` | strings | Recommended scopes for the client to request. |
| `--server.watchService.maxActiveClusterConnections` | int | (default 5) |
| `--server.watchService.maxPageSize` | int | (default 50000) |
| `--server.watchService.nonTerminalStatusUpdatesInterval` | string | (default "1m0s") |
| `--server.watchService.pollInterval` | string | (default "1s") |
| `--sharedservice.connectPort` | string | On which connect port to serve admin (default "8080") |
| `--sharedservice.grpc.grpcMaxResponseStatusBytes` | int32 | specifies the maximum (uncompressed) size of header list that the client is prepared to accept on grpc calls (default 32000) |
| `--sharedservice.grpc.maxConcurrentStreams` | int | Limit on the number of concurrent streams to each ServerTransport. (default 100) |
| `--sharedservice.grpc.maxMessageSizeBytes` | int | Limit on the size of message that can be received on the server. (default 10485760) |
| `--sharedservice.grpcServerReflection` | | Enable GRPC Server Reflection (default true) |
| `--sharedservice.httpPort` | string | On which http port to serve admin (default "8089") |
| `--sharedservice.kubeConfig` | string | Path to kubernetes client config file. |
| `--sharedservice.master` | string | The address of the Kubernetes API server. |
| `--sharedservice.metrics.enableClientGrpcHistograms` | | Enable client grpc histograms (default true) |
| `--sharedservice.metrics.enableGrpcHistograms` | | Enable grpc histograms (default true) |
| `--sharedservice.metrics.scope` | string | Scope to emit metrics under (default "service:") |
| `--sharedservice.port` | string | On which grpc port to serve admin (default "8080") |
| `--sharedservice.profiler.enabled` | | Enable Profiler on server |
| `--sharedservice.profilerPort` | string | Profile port to start listen for pprof and metric handlers on. (default "10254") |
| `--sharedservice.security.allowCors` | | |
| `--sharedservice.security.allowLocalhostAccess` | | Whether to permit localhost unauthenticated access to the server |
| `--sharedservice.security.allowedHeaders` | strings | |
| `--sharedservice.security.allowedOrigins` | strings | |
| `--sharedservice.security.auditAccess` | | |
| `--sharedservice.security.orgOverride` | string | Override org in identity context if localhost access enabled |
| `--sharedservice.security.secure` | | |
| `--sharedservice.security.ssl.certificateAuthorityFile` | string | |
| `--sharedservice.security.ssl.certificateFile` | string | |
| `--sharedservice.security.ssl.keyFile` | string | |
| `--sharedservice.security.useAuth` | | |
| `--sharedservice.sync.syncInterval` | string | Time interval to sync (default "5m0s") |
| `--storage.cache.max_size_mbs` | int | Maximum size of the cache where the Blob store data is cached in-memory. If not specified or set to 0, cache is not used |
| `--storage.cache.target_gc_percent` | int | Sets the garbage collection target percentage. |
| `--storage.connection.access-key` | string | Access key to use. Only required when authtype is set to accesskey. |
| `--storage.connection.auth-type` | string | Auth Type to use [iam, accesskey]. (default "iam") |
| `--storage.connection.disable-ssl` | | Disables SSL connection. Should only be used for development. |
| `--storage.connection.endpoint` | string | URL for storage client to connect to. |
| `--storage.connection.region` | string | Region to connect to. (default "us-east-1") |
| `--storage.connection.secret-key` | string | Secret to use when accesskey is set. |
| `--storage.container` | string | Initial container (in s3 a bucket) to create -if it doesn't exist-.' |
| `--storage.defaultHttpClient.timeout` | string | Sets time out on the http client. (default "0s") |
| `--storage.enable-multicontainer` | | If this is true, then the container argument is overlooked and redundant. This config will automatically open new connections to new containers/buckets as they are encountered |
| `--storage.limits.maxDownloadMBs` | int | Maximum allowed download size (in MBs) per call. (default 2) |
| `--storage.stow.config` | stringToString | Configuration for stow backend. Refer to github/flyteorg/stow (default []) |
| `--storage.stow.kind` | string | Kind of Stow backend to use. Refer to github/flyteorg/stow |
| `--storage.type` | string | Sets the type of storage to configure [s3/minio/local/mem/stow]. (default "s3") |
| `--union.auth.authorizationMetadataKey` | string | Authorization Header to use when passing Access Tokens to the server (default "flyte-authorization") |
| `--union.auth.clientId` | string | Client ID |
| `--union.auth.clientSecretEnvVar` | string | Environment variable containing the client secret |
| `--union.auth.clientSecretLocation` | string | File containing the client secret |
| `--union.auth.deviceFlow.pollInterval` | string | amount of time the device flow would poll the token endpoint if auth server doesn't return a polling interval. Okta and google IDP do return an interval' (default "5s") |
| `--union.auth.deviceFlow.refreshTime` | string | grace period from the token expiry after which it would refresh the token. (default "5m0s") |
| `--union.auth.deviceFlow.timeout` | string | amount of time the device flow should complete or else it will be cancelled. (default "10m0s") |
| `--union.auth.enable` | | Whether to enable an authenticated conenction when communicating with admin. (default true) |
| `--union.auth.externalAuth.command` | strings | Command for external authentication token generation |
| `--union.auth.pkce.refreshTime` | string | grace period from the token expiry after which it would refresh the token. (default "5m0s") |
| `--union.auth.pkce.timeout` | string | Amount of time the browser session would be active for authentication from client app. (default "15s") |
| `--union.auth.scopes` | strings | List of scopes to request |
| `--union.auth.tokenRefreshWindow` | string | Max duration between token refresh attempt and token expiry. (default "1h0m0s") |
| `--union.auth.tokenUrl` | string | OPTIONAL: Your IdP's token endpoint. It'll be discovered from flyte admin's OAuth Metadata endpoint if not provided. |
| `--union.auth.type` | string | Type of OAuth2 flow used for communicating with admin. (default "Pkce") |
| `--union.cache.maxItemsCount` | int | Maximum number of items to keep in the cache before evicting. (default 1000) |
| `--union.connection.host` | string | Host to connect to (default "dns:///utt-mgdp-stg-us-east-2.cloud-staging.union.ai") |
| `--union.connection.insecure` | | Whether to connect over insecure channel |
| `--union.connection.insecureSkipVerify` | | InsecureSkipVerify controls whether a client verifies the server's certificate chain and host name.Caution: shouldn't be use for production usecases' |
| `--union.connection.keepAliveConfig.permitWithoutStream` | | If true, client sends keepalive pings even with no active RPCs. |
| `--union.connection.keepAliveConfig.time` | string | After a duration of this time if the client doesn't see any activity it pings the server to see if the transport is still alive. (default "20s") |
| `--union.connection.keepAliveConfig.timeout` | string | After having pinged for keepalive check, the client waits for a duration of Timeout and if no activity is seen even after that the connection is closed. (default "2m0s") |
| `--union.connection.maxBackoffDelay` | string | Max delay for grpc backoff (default "8s") |
| `--union.connection.maxRecvMsgSize` | int | Maximum size of a message in bytes of a gRPC message (default 10485760) |
| `--union.connection.maxRetries` | int | Max number of gRPC retries (default 4) |
| `--union.connection.minConnectTimeout` | string | Minimum timeout for establishing a connection (default "20s") |
| `--union.connection.perRetryTimeout` | string | gRPC per retry timeout (default "15s") |
| `--union.connection.serviceConfig` | string | Defines gRPC experimental JSON Service Config (default "{"loadBalancingConfig": [{"round_robin":{}}]}") |
| `--union.connection.trustedIdentityClaims.enabled` | | Enables passing of trusted claims while making inter service calls |
| `--union.connection.trustedIdentityClaims.externalIdentityClaim` | string | External identity claim of the service which is authorized to make internal service call. These are verified against userclouds actions |
| `--union.connection.trustedIdentityClaims.externalIdentityTypeClaim` | string | External identity type claim of app or user to use for the current service identity. It should be an 'app' for inter service communication |
| `--union.internalConnectionConfig.-` | stringToString | (default []) |
| `--union.internalConnectionConfig.enabled` | | Enables internal service to service communication instead of going through ingress. |
| `--union.internalConnectionConfig.urlPattern` | string | UrlPattern of the internal service endpoints. (default "{{ service }}-helmchart.{{ service }}.svc.cluster.local:80") |
| `--webhook.awsSecretManager.sidecarImage` | string | Specifies the sidecar docker image to use (default "docker.io/amazon/aws-secrets-manager-secret-sidecar:v0.1.4") |
| `--webhook.certDir` | string | Certificate directory to use to write generated certs. Defaults to /etc/webhook/certs/ (default "/etc/webhook/certs") |
| `--webhook.embeddedSecretManagerConfig.awsConfig.region` | string | AWS region |
| `--webhook.embeddedSecretManagerConfig.fileMountInitContainer.image` | string | Specifies init container image to use for mounting secrets as files. (default "busybox:1.28") |
| `--webhook.embeddedSecretManagerConfig.gcpConfig.project` | string | GCP project to be used for secret manager |
| `--webhook.embeddedSecretManagerConfig.type` | string | (default "AWS") |
| `--webhook.gcpSecretManager.sidecarImage` | string | Specifies the sidecar docker image to use (default "gcr.io/google.com/cloudsdktool/cloud-sdk:alpine") |
| `--webhook.listenPort` | int | The port to use to listen to webhook calls. Defaults to 9443 (default 9443) |
| `--webhook.localCert` | | write certs locally. Defaults to false |
| `--webhook.metrics-prefix` | string | An optional prefix for all published metrics. (default "flyte:") |
| `--webhook.secretName` | string | Secret name to write generated certs to. (default "flyte-pod-webhook") |
| `--webhook.serviceName` | string | The name of the webhook service. (default "flyte-pod-webhook") |
| `--webhook.servicePort` | int32 | The port on the service that hosting webhook. (default 443) |
| `--webhook.vaultSecretManager.role` | string | Specifies the vault role to use (default "flyte") |
=== PAGE: https://www.union.ai/docs/v1/serverless/api-reference/uctl-cli/uctl-get/uctl-get-clusterpool ===
# uctl get clusterpool
Retrieves cluster pools
## Synopsis
To fetch all available cluster pools:
```shell
$ uctl get clusterpools
```
To fetch one cluster pool:
```shell
$ uctl get clusterpool {pool_name}
```
## Options
| Option | Type | Description |
|--------|------|-------------|
| `--clusterPoolSpecFile` | string | generates an clusterPool spec file with conformance to the api format with current values.This can only be used while fetching single cluster pool |
| `--filter.asc` | | Specifies the sorting order. By default sorts result in descending order |
| `--filter.fieldSelector` | string | Allows for filtering resources based on a specific value for a field name using operations =, !=, >, {, }=, <=, in, contains.Multiple selectors can be added separated by commas |
| `--filter.limit` | int32 | Specifies the number of results to return (default 100) |
| `--filter.sortBy` | string | Specifies which field to sort results (default "created_at") |
| `--filter.token` | string | Specifies the server provided token to use for fetching next page in case of multi page result |
| `-h`, `--help` | help for clusterpool |
### Options inherited from parent commands
| Option | Type | Description |
|--------|------|-------------|
| `--admin.audience` | string | Audience to use when initiating OAuth2 authorization requests. |
| `--admin.authType` | string | Type of OAuth2 flow used for communicating with admin.ClientSecret, Pkce, ExternalCommand are valid values (default "ClientSecret") |
| `--admin.authorizationHeader` | string | Custom metadata header to pass JWT |
| `--admin.authorizationServerUrl` | string | This is the URL to your IdP's authorization server. It'll default to Endpoint |
| `--admin.caCertFilePath` | string | Use specified certificate file to verify the admin server peer. |
| `--admin.clientId` | string | Client ID (default "flytepropeller") |
| `--admin.clientSecretEnvVar` | string | Environment variable containing the client secret |
| `--admin.clientSecretLocation` | string | File containing the client secret (default "/etc/secrets/client_secret") |
| `--admin.command` | strings | Command for external authentication token generation |
| `--admin.defaultOrg` | string | OPTIONAL: Default org to use to support non-org based cli's.'. |
| `--admin.defaultServiceConfig` | string | |
| `--admin.deviceFlowConfig.pollInterval` | string | amount of time the device flow would poll the token endpoint if auth server doesn't return a polling interval. Okta and google IDP do return an interval' (default "5s") |
| `--admin.deviceFlowConfig.refreshTime` | string | grace period from the token expiry after which it would refresh the token. (default "5m0s") |
| `--admin.deviceFlowConfig.timeout` | string | amount of time the device flow should complete or else it will be cancelled. (default "10m0s") |
| `--admin.endpoint` | string | For admin types, specify where the uri of the service is located. |
| `--admin.httpProxyURL` | string | OPTIONAL: HTTP Proxy to be used for OAuth requests. |
| `--admin.insecure` | | Use insecure connection. |
| `--admin.insecureSkipVerify` | | InsecureSkipVerify controls whether a client verifies the server's certificate chain and host name.Caution: shouldn't be use for production usecases' |
| `--admin.maxBackoffDelay` | string | Max delay for grpc backoff (default "8s") |
| `--admin.maxMessageSizeBytes` | int | The max size in bytes for incoming gRPC messages |
| `--admin.maxRetries` | int | Max number of gRPC retries (default 4) |
| `--admin.perRetryTimeout` | string | gRPC per retry timeout (default "15s") |
| `--admin.pkceConfig.refreshTime` | string | grace period from the token expiry after which it would refresh the token. (default "5m0s") |
| `--admin.pkceConfig.timeout` | string | Amount of time the browser session would be active for authentication from client app. (default "2m0s") |
| `--admin.proxyCommand` | strings | Command for external proxy-authorization token generation |
| `--admin.scopes` | strings | List of scopes to request |
| `--admin.tokenRefreshWindow` | string | Max duration between token refresh attempt and token expiry. (default "0s") |
| `--admin.tokenUrl` | string | OPTIONAL: Your IdP's token endpoint. It'll be discovered from flyte admin's OAuth Metadata endpoint if not provided. |
| `--admin.useAudienceFromAdmin` | | Use Audience configured from admins public endpoint config. |
| `--admin.useAuth` | | Deprecated: Auth will be enabled/disabled based on admin's dynamically discovered information. |
| `--auth.appAuth.externalAuthServer.allowedAudience` | strings | Optional: A list of allowed audiences. If not provided, the audience is expected to be the public Uri of the service. |
| `--auth.appAuth.externalAuthServer.baseUrl` | string | This should be the base url of the authorization server that you are trying to hit. With Okta for instance, it will look something like https://company.okta.com/oauth2/abcdef123456789/ |
| `--auth.appAuth.externalAuthServer.httpProxyURL` | string | OPTIONAL: HTTP Proxy to be used for OAuth requests. |
| `--auth.appAuth.externalAuthServer.metadataUrl` | string | Optional: If the server doesn't support /.well-known/oauth-authorization-server, you can set a custom metadata url here.' |
| `--auth.appAuth.externalAuthServer.retryAttempts` | int | Optional: The number of attempted retries on a transient failure to get the OAuth metadata (default 5) |
| `--auth.appAuth.externalAuthServer.retryDelay` | string | Optional, Duration to wait between retries (default "1s") |
| `--auth.appAuth.selfAuthServer.accessTokenLifespan` | string | Defines the lifespan of issued access tokens. (default "30m0s") |
| `--auth.appAuth.selfAuthServer.authorizationCodeLifespan` | string | Defines the lifespan of issued access tokens. (default "5m0s") |
| `--auth.appAuth.selfAuthServer.claimSymmetricEncryptionKeySecretName` | string | OPTIONAL: Secret name to use to encrypt claims in authcode token. (default "claim_symmetric_key") |
| `--auth.appAuth.selfAuthServer.issuer` | string | Defines the issuer to use when issuing and validating tokens. The default value is https://{requestUri.HostAndPort}/ |
| `--auth.appAuth.selfAuthServer.oldTokenSigningRSAKeySecretName` | string | OPTIONAL: Secret name to use to retrieve Old RSA Signing Key. This can be useful during key rotation to continue to accept older tokens. (default "token_rsa_key_old.pem") |
| `--auth.appAuth.selfAuthServer.refreshTokenLifespan` | string | Defines the lifespan of issued access tokens. (default "1h0m0s") |
| `--auth.appAuth.selfAuthServer.tokenSigningRSAKeySecretName` | string | OPTIONAL: Secret name to use to retrieve RSA Signing Key. (default "token_rsa_key.pem") |
| `--auth.appAuth.thirdPartyConfig.flyteClient.audience` | string | Audience to use when initiating OAuth2 authorization requests. |
| `--auth.appAuth.thirdPartyConfig.flyteClient.clientId` | string | public identifier for the app which handles authorization for a Flyte deployment (default "uctl") |
| `--auth.appAuth.thirdPartyConfig.flyteClient.redirectUri` | string | This is the callback uri registered with the app which handles authorization for a Flyte deployment (default "http://localhost:53593/callback") |
| `--auth.appAuth.thirdPartyConfig.flyteClient.scopes` | strings | Recommended scopes for the client to request. (default [all,offline]) |
| `--auth.disableForGrpc` | | Disables auth enforcement on Grpc Endpoints. |
| `--auth.disableForHttp` | | Disables auth enforcement on HTTP Endpoints. |
| `--auth.grpcAuthorizationHeader` | string | (default "flyte-authorization") |
| `--auth.httpAuthorizationHeader` | string | (default "flyte-authorization") |
| `--auth.httpProxyURL` | string | OPTIONAL: HTTP Proxy to be used for OAuth requests. |
| `--auth.tokenEndpointProxyPath` | string | The path used to proxy calls to the TokenURL |
| `--auth.userAuth.cookieBlockKeySecretName` | string | OPTIONAL: Secret name to use for cookie block key. (default "cookie_block_key") |
| `--auth.userAuth.cookieHashKeySecretName` | string | OPTIONAL: Secret name to use for cookie hash key. (default "cookie_hash_key") |
| `--auth.userAuth.cookieSetting.domain` | string | OPTIONAL: Allows you to set the domain attribute on the auth cookies. |
| `--auth.userAuth.cookieSetting.sameSitePolicy` | string | OPTIONAL: Allows you to declare if your cookie should be restricted to a first-party or same-site context.Wrapper around http.SameSite. (default "DefaultMode") |
| `--auth.userAuth.httpProxyURL` | string | OPTIONAL: HTTP Proxy to be used for OAuth requests. |
| `--auth.userAuth.idpQueryParameter` | string | idp query parameter used for selecting a particular IDP for doing user authentication. Eg: for Okta passing idp={IDP-ID} forces the authentication to happen with IDP-ID |
| `--auth.userAuth.openId.baseUrl` | string | |
| `--auth.userAuth.openId.clientId` | string | |
| `--auth.userAuth.openId.clientSecretFile` | string | |
| `--auth.userAuth.openId.clientSecretName` | string | (default "oidc_client_secret") |
| `--auth.userAuth.openId.scopes` | strings | (default [openid,profile]) |
| `--auth.userAuth.redirectUrl` | string | (default "/console") |
| `--authorizer.internalCommunicationConfig.enabled` | | Enables authorization decisions for internal communication. (default true) |
| `--authorizer.internalCommunicationConfig.ingressIdentity` | string | IngressIdentity used in the cluster. Needed to exclude the communication coming from ingress. (default "ingress-nginx.ingress-nginx.serviceaccount.identity.linkerd.cluster.local") |
| `--authorizer.internalCommunicationConfig.tenantUrlPatternIdentity` | string | UrlPatternIdentity of the internal tenant service endpoint identities. (default "{{ service }}.{{ org }}.serviceaccount.identity.linkerd.cluster.local") |
| `--authorizer.internalCommunicationConfig.urlPatternIdentity` | string | UrlPatternIdentity of the internal service endpoint identities. (default "{{ service }}-helmchart.{{ service }}.serviceaccount.identity.linkerd.cluster.local") |
| `--authorizer.mode` | string | (default "Active") |
| `--authorizer.organizationConfig.PolicyConfig.adminPolicyDescription` | string | description for the boilerplate admin policy (default "Contributor permissions and full admin permissions to manage users and view usage dashboards") |
| `--authorizer.organizationConfig.PolicyConfig.contributorPolicyDescription` | string | description for the boilerplate contributor policy (default "Viewer permissions and permissions to create workflows, tasks, launch plans, and executions") |
| `--authorizer.organizationConfig.PolicyConfig.defaultUserPolicyRoleType` | string | name of the role type to determine which default policy new users added to the organization should be assigned (default "Viewer") |
| `--authorizer.organizationConfig.PolicyConfig.serverlessContributorPolicyDescription` | string | description for the boilerplate serverless contributor policy (default "Viewer permissions and permissions to create workflows, tasks, launch plans, and executions") |
| `--authorizer.organizationConfig.PolicyConfig.serverlessViewerPolicyDescription` | string | description for the boilerplate serverless viewer policy (default "Permissions to view Flyte entities") |
| `--authorizer.organizationConfig.PolicyConfig.viewerPolicyDescription` | string | description for the boilerplate viewer policy (default "Permissions to view Flyte entities") |
| `--authorizer.organizationConfig.defaultPolicyCacheDuration` | string | Cache entry duration for the store of the default policy per organization (default "10m0s") |
| `--authorizer.syncRuleRefreshInterval` | string | (default "1m0s") |
| `--authorizer.type` | string | (default "UserClouds") |
| `--authorizer.userCloudsClient.cache.redis.ttl.edgeTypes` | string | Specifies how long edge types remain in the cache.. (default "30m0s") |
| `--authorizer.userCloudsClient.cache.redis.ttl.edges` | string | Specifies how long edges remain in the cache. (default "30m0s") |
| `--authorizer.userCloudsClient.cache.redis.ttl.objectTypes` | string | Specifies how long object types remain in the cache. (default "30m0s") |
| `--authorizer.userCloudsClient.cache.redis.ttl.objects` | string | Specifies how long objects remain in the cache. (default "30m0s") |
| `--authorizer.userCloudsClient.cache.type` | string | Cache type to use. (default "none") |
| `--authorizer.userCloudsClient.clientID` | string | UserClouds client id |
| `--authorizer.userCloudsClient.clientSecretName` | string | UserCloud client secret name to read from the secret manager. (default "userclouds-client-secret") |
| `--authorizer.userCloudsClient.enableLogging` | | Enable userclouds client's internal logging. Calls to post logs take 250-350 ms and will impact p99 latency, enable with caution. |
| `--authorizer.userCloudsClient.tenantID` | string | UserClouds tenant id. Should be a UUID. |
| `--authorizer.userCloudsClient.tenantUrl` | string | Something like https://{yourtenant}.tenant.userclouds.com |
| `--config` | string | config file (default is /Users/andrew/.union/config.yaml) |
| `--connection.environment` | string | |
| `--connection.region` | string | |
| `--connection.rootTenantURLPattern` | string | Pattern for tenant url. (default "dns:///{{ organization }}.cloud-staging.union.ai") |
| `--console.endpoint` | string | Endpoint of console, if different than flyte admin |
| `--database.connMaxLifeTime` | string | sets the maximum amount of time a connection may be reused (default "1h0m0s") |
| `--database.enableForeignKeyConstraintWhenMigrating` | | Whether to enable gorm foreign keys when migrating the db |
| `--database.maxIdleConnections` | int | maxIdleConnections sets the maximum number of connections in the idle connection pool. (default 10) |
| `--database.maxOpenConnections` | int | maxOpenConnections sets the maximum number of open connections to the database. (default 100) |
| `--database.postgres.dbname` | string | The database name (default "postgres") |
| `--database.postgres.debug` | | |
| `--database.postgres.host` | string | The host name of the database server (default "localhost") |
| `--database.postgres.options` | string | See http://gorm.io/docs/connecting_to_the_database.html for available options passed, in addition to the above. (default "sslmode=disable") |
| `--database.postgres.password` | string | The database password. (default "postgres") |
| `--database.postgres.passwordPath` | string | Points to the file containing the database password. |
| `--database.postgres.port` | int | The port name of the database server (default 30001) |
| `--database.postgres.readReplicaHost` | string | The host name of the read replica database server (default "localhost") |
| `--database.postgres.username` | string | The database user who is connecting to the server. (default "postgres") |
| `--database.sqlite.file` | string | The path to the file (existing or new) where the DB should be created / stored. If existing, then this will be re-used, else a new will be created |
| `--db.connectionPool.maxConnectionLifetime` | string | (default "0s") |
| `--db.connectionPool.maxIdleConnections` | int | |
| `--db.connectionPool.maxOpenConnections` | int | |
| `--db.dbname` | string | (default "postgres") |
| `--db.debug` | | |
| `--db.host` | string | (default "postgres") |
| `--db.log_level` | int | (default 4) |
| `--db.options` | string | (default "sslmode=disable") |
| `--db.password` | string | |
| `--db.passwordPath` | string | |
| `--db.port` | int | (default 5432) |
| `--db.username` | string | (default "postgres") |
| `-d`, `--domain` | string | Specifies the Flyte project's domain. |
| `--files.archive` | | Pass in archive file either an http link or local path. |
| `--files.assumableIamRole` | string | Custom assumable iam auth role to register launch plans with. |
| `--files.continueOnError` | | Continue on error when registering files. |
| `--files.destinationDirectory` | string | Location of source code in container. |
| `--files.dryRun` | | Execute command without making any modifications. |
| `--files.enableSchedule` | | Enable the schedule if the files contain schedulable launchplan. |
| `--files.force` | | Force use of version number on entities registered with flyte. |
| `--files.k8ServiceAccount` | string | Deprecated. Please use `--K8sServiceAccount`|
| `--files.k8sServiceAccount` | string | Custom kubernetes service account auth role to register launch plans with. |
| `--files.outputLocationPrefix` | string | Custom output location prefix for offloaded types (files/schemas). |
| `--files.sourceUploadPath` | string | Deprecated: Update flyte admin to avoid having to configure storage access from uctl. |
| `--files.version` | string | Version of the entity to be registered with flyte which are un-versioned after serialization. |
| `--logger.formatter.type` | string | Sets logging format type. (default "json") |
| `--logger.level` | int | Sets the minimum logging level. (default 3) |
| `--logger.mute` | | Mutes all logs regardless of severity. Intended for benchmarks/tests only. |
| `--logger.show-source` | | Includes source code location in logs. |
| `--org` | string | Organization to work on. If not set, default to user's org. |
| `--otel.file.filename` | string | Filename to store exported telemetry traces (default "/tmp/trace.txt") |
| `--otel.jaeger.endpoint` | string | Endpoint for the jaeger telemetry trace ingestor (default "http://localhost:14268/api/traces") |
| `--otel.otlpgrpc.endpoint` | string | Endpoint for the OTLP telemetry trace collector (default "http://localhost:4317") |
| `--otel.otlphttp.endpoint` | string | Endpoint for the OTLP telemetry trace collector (default "http://localhost:4318/v1/traces") |
| `--otel.sampler.parentSampler` | string | Sets the parent sampler to use for the tracer (default "always") |
| `--otel.type` | string | Sets the type of exporter to configure [noop/file/jaeger/otlpgrpc/otlphttp]. (default "noop") |
| `-o`, `--output` | string | Specifies the output type - supported formats [TABLE JSON YAML DOT DOTURL]. NOTE: dot, doturl are only supported for Workflow (default "table") |
| `--plugins.catalogcache.reader.maxItems` | int | Maximum number of entries to keep in the index. (default 10000) |
| `--plugins.catalogcache.reader.maxRetries` | int | Maximum number of retries per item. (default 3) |
| `--plugins.catalogcache.reader.workers` | int | Number of concurrent workers to start processing the queue. (default 10) |
| `--plugins.catalogcache.writer.maxItems` | int | Maximum number of entries to keep in the index. (default 10000) |
| `--plugins.catalogcache.writer.maxRetries` | int | Maximum number of retries per item. (default 3) |
| `--plugins.catalogcache.writer.workers` | int | Number of concurrent workers to start processing the queue. (default 10) |
| `-p`, `--project` | string | Specifies the Flyte project. |
| `--rediscache.passwordSecretName` | string | Name of secret with Redis password. |
| `--rediscache.primaryEndpoint` | string | Primary endpoint for the redis cache that can be used for both reads and writes. |
| `--rediscache.replicaEndpoint` | string | Replica endpoint for the redis cache that can be used for reads. |
| `--secrets.env-prefix` | string | Prefix for environment variables (default "FLYTE_SECRET_") |
| `--secrets.secrets-prefix` | string | Prefix where to look for secrets file (default "/etc/secrets") |
| `--secrets.type` | string | Sets the type of storage to configure [local]. (default "local") |
| `--server.dataProxy.download.maxExpiresIn` | string | Maximum allowed expiration duration. (default "1h0m0s") |
| `--server.dataProxy.upload.defaultFileNameLength` | int | Default length for the generated file name if not provided in the request. (default 20) |
| `--server.dataProxy.upload.maxExpiresIn` | string | Maximum allowed expiration duration. (default "1h0m0s") |
| `--server.dataProxy.upload.maxSize` | string | Maximum allowed upload size. (default "6Mi") |
| `--server.dataProxy.upload.storagePrefix` | string | Storage prefix to use for all upload requests. |
| `--server.grpc.enableGrpcLatencyMetrics` | | Enable grpc latency metrics. Note Histograms metrics can be expensive on Prometheus servers. |
| `--server.grpc.maxMessageSizeBytes` | int | The max size in bytes for incoming gRPC messages |
| `--server.grpc.port` | int | On which grpc port to serve admin (default 8089) |
| `--server.grpc.serverReflection` | | Enable GRPC Server Reflection (default true) |
| `--server.grpcPort` | int | deprecated |
| `--server.grpcServerReflection` | | deprecated |
| `--server.httpPort` | int | On which http port to serve admin (default 8088) |
| `--server.kube-config` | string | Path to kubernetes client config file, default is empty, useful for incluster config. |
| `--server.kubeClientConfig.burst` | int | Max burst rate for throttle. 0 defaults to 10 (default 25) |
| `--server.kubeClientConfig.qps` | int32 | Max QPS to the master for requests to KubeAPI. 0 defaults to 5. (default 100) |
| `--server.kubeClientConfig.timeout` | string | Max duration allowed for every request to KubeAPI before giving up. 0 implies no timeout. (default "30s") |
| `--server.master` | string | The address of the Kubernetes API server. |
| `--server.readHeaderTimeoutSeconds` | int | The amount of time allowed to read request headers. (default 32) |
| `--server.security.allowCors` | | (default true) |
| `--server.security.allowedHeaders` | strings | (default [Content-Type,flyte-authorization]) |
| `--server.security.allowedOrigins` | strings | (default [*]) |
| `--server.security.auditAccess` | | |
| `--server.security.secure` | | |
| `--server.security.ssl.certificateFile` | string | |
| `--server.security.ssl.keyFile` | string | |
| `--server.security.useAuth` | | |
| `--server.thirdPartyConfig.flyteClient.audience` | string | Audience to use when initiating OAuth2 authorization requests. |
| `--server.thirdPartyConfig.flyteClient.clientId` | string | public identifier for the app which handles authorization for a Flyte deployment |
| `--server.thirdPartyConfig.flyteClient.redirectUri` | string | This is the callback uri registered with the app which handles authorization for a Flyte deployment |
| `--server.thirdPartyConfig.flyteClient.scopes` | strings | Recommended scopes for the client to request. |
| `--server.watchService.maxActiveClusterConnections` | int | (default 5) |
| `--server.watchService.maxPageSize` | int | (default 50000) |
| `--server.watchService.nonTerminalStatusUpdatesInterval` | string | (default "1m0s") |
| `--server.watchService.pollInterval` | string | (default "1s") |
| `--sharedservice.connectPort` | string | On which connect port to serve admin (default "8080") |
| `--sharedservice.grpc.grpcMaxResponseStatusBytes` | int32 | specifies the maximum (uncompressed) size of header list that the client is prepared to accept on grpc calls (default 32000) |
| `--sharedservice.grpc.maxConcurrentStreams` | int | Limit on the number of concurrent streams to each ServerTransport. (default 100) |
| `--sharedservice.grpc.maxMessageSizeBytes` | int | Limit on the size of message that can be received on the server. (default 10485760) |
| `--sharedservice.grpcServerReflection` | | Enable GRPC Server Reflection (default true) |
| `--sharedservice.httpPort` | string | On which http port to serve admin (default "8089") |
| `--sharedservice.kubeConfig` | string | Path to kubernetes client config file. |
| `--sharedservice.master` | string | The address of the Kubernetes API server. |
| `--sharedservice.metrics.enableClientGrpcHistograms` | | Enable client grpc histograms (default true) |
| `--sharedservice.metrics.enableGrpcHistograms` | | Enable grpc histograms (default true) |
| `--sharedservice.metrics.scope` | string | Scope to emit metrics under (default "service:") |
| `--sharedservice.port` | string | On which grpc port to serve admin (default "8080") |
| `--sharedservice.profiler.enabled` | | Enable Profiler on server |
| `--sharedservice.profilerPort` | string | Profile port to start listen for pprof and metric handlers on. (default "10254") |
| `--sharedservice.security.allowCors` | | |
| `--sharedservice.security.allowLocalhostAccess` | | Whether to permit localhost unauthenticated access to the server |
| `--sharedservice.security.allowedHeaders` | strings | |
| `--sharedservice.security.allowedOrigins` | strings | |
| `--sharedservice.security.auditAccess` | | |
| `--sharedservice.security.orgOverride` | string | Override org in identity context if localhost access enabled |
| `--sharedservice.security.secure` | | |
| `--sharedservice.security.ssl.certificateAuthorityFile` | string | |
| `--sharedservice.security.ssl.certificateFile` | string | |
| `--sharedservice.security.ssl.keyFile` | string | |
| `--sharedservice.security.useAuth` | | |
| `--sharedservice.sync.syncInterval` | string | Time interval to sync (default "5m0s") |
| `--storage.cache.max_size_mbs` | int | Maximum size of the cache where the Blob store data is cached in-memory. If not specified or set to 0, cache is not used |
| `--storage.cache.target_gc_percent` | int | Sets the garbage collection target percentage. |
| `--storage.connection.access-key` | string | Access key to use. Only required when authtype is set to accesskey. |
| `--storage.connection.auth-type` | string | Auth Type to use [iam, accesskey]. (default "iam") |
| `--storage.connection.disable-ssl` | | Disables SSL connection. Should only be used for development. |
| `--storage.connection.endpoint` | string | URL for storage client to connect to. |
| `--storage.connection.region` | string | Region to connect to. (default "us-east-1") |
| `--storage.connection.secret-key` | string | Secret to use when accesskey is set. |
| `--storage.container` | string | Initial container (in s3 a bucket) to create -if it doesn't exist-.' |
| `--storage.defaultHttpClient.timeout` | string | Sets time out on the http client. (default "0s") |
| `--storage.enable-multicontainer` | | If this is true, then the container argument is overlooked and redundant. This config will automatically open new connections to new containers/buckets as they are encountered |
| `--storage.limits.maxDownloadMBs` | int | Maximum allowed download size (in MBs) per call. (default 2) |
| `--storage.stow.config` | stringToString | Configuration for stow backend. Refer to github/flyteorg/stow (default []) |
| `--storage.stow.kind` | string | Kind of Stow backend to use. Refer to github/flyteorg/stow |
| `--storage.type` | string | Sets the type of storage to configure [s3/minio/local/mem/stow]. (default "s3") |
| `--union.auth.authorizationMetadataKey` | string | Authorization Header to use when passing Access Tokens to the server (default "flyte-authorization") |
| `--union.auth.clientId` | string | Client ID |
| `--union.auth.clientSecretEnvVar` | string | Environment variable containing the client secret |
| `--union.auth.clientSecretLocation` | string | File containing the client secret |
| `--union.auth.deviceFlow.pollInterval` | string | amount of time the device flow would poll the token endpoint if auth server doesn't return a polling interval. Okta and google IDP do return an interval' (default "5s") |
| `--union.auth.deviceFlow.refreshTime` | string | grace period from the token expiry after which it would refresh the token. (default "5m0s") |
| `--union.auth.deviceFlow.timeout` | string | amount of time the device flow should complete or else it will be cancelled. (default "10m0s") |
| `--union.auth.enable` | | Whether to enable an authenticated conenction when communicating with admin. (default true) |
| `--union.auth.externalAuth.command` | strings | Command for external authentication token generation |
| `--union.auth.pkce.refreshTime` | string | grace period from the token expiry after which it would refresh the token. (default "5m0s") |
| `--union.auth.pkce.timeout` | string | Amount of time the browser session would be active for authentication from client app. (default "15s") |
| `--union.auth.scopes` | strings | List of scopes to request |
| `--union.auth.tokenRefreshWindow` | string | Max duration between token refresh attempt and token expiry. (default "1h0m0s") |
| `--union.auth.tokenUrl` | string | OPTIONAL: Your IdP's token endpoint. It'll be discovered from flyte admin's OAuth Metadata endpoint if not provided. |
| `--union.auth.type` | string | Type of OAuth2 flow used for communicating with admin. (default "Pkce") |
| `--union.cache.maxItemsCount` | int | Maximum number of items to keep in the cache before evicting. (default 1000) |
| `--union.connection.host` | string | Host to connect to (default "dns:///utt-mgdp-stg-us-east-2.cloud-staging.union.ai") |
| `--union.connection.insecure` | | Whether to connect over insecure channel |
| `--union.connection.insecureSkipVerify` | | InsecureSkipVerify controls whether a client verifies the server's certificate chain and host name.Caution: shouldn't be use for production usecases' |
| `--union.connection.keepAliveConfig.permitWithoutStream` | | If true, client sends keepalive pings even with no active RPCs. |
| `--union.connection.keepAliveConfig.time` | string | After a duration of this time if the client doesn't see any activity it pings the server to see if the transport is still alive. (default "20s") |
| `--union.connection.keepAliveConfig.timeout` | string | After having pinged for keepalive check, the client waits for a duration of Timeout and if no activity is seen even after that the connection is closed. (default "2m0s") |
| `--union.connection.maxBackoffDelay` | string | Max delay for grpc backoff (default "8s") |
| `--union.connection.maxRecvMsgSize` | int | Maximum size of a message in bytes of a gRPC message (default 10485760) |
| `--union.connection.maxRetries` | int | Max number of gRPC retries (default 4) |
| `--union.connection.minConnectTimeout` | string | Minimum timeout for establishing a connection (default "20s") |
| `--union.connection.perRetryTimeout` | string | gRPC per retry timeout (default "15s") |
| `--union.connection.serviceConfig` | string | Defines gRPC experimental JSON Service Config (default "{"loadBalancingConfig": [{"round_robin":{}}]}") |
| `--union.connection.trustedIdentityClaims.enabled` | | Enables passing of trusted claims while making inter service calls |
| `--union.connection.trustedIdentityClaims.externalIdentityClaim` | string | External identity claim of the service which is authorized to make internal service call. These are verified against userclouds actions |
| `--union.connection.trustedIdentityClaims.externalIdentityTypeClaim` | string | External identity type claim of app or user to use for the current service identity. It should be an 'app' for inter service communication |
| `--union.internalConnectionConfig.-` | stringToString | (default []) |
| `--union.internalConnectionConfig.enabled` | | Enables internal service to service communication instead of going through ingress. |
| `--union.internalConnectionConfig.urlPattern` | string | UrlPattern of the internal service endpoints. (default "{{ service }}-helmchart.{{ service }}.svc.cluster.local:80") |
| `--webhook.awsSecretManager.sidecarImage` | string | Specifies the sidecar docker image to use (default "docker.io/amazon/aws-secrets-manager-secret-sidecar:v0.1.4") |
| `--webhook.certDir` | string | Certificate directory to use to write generated certs. Defaults to /etc/webhook/certs/ (default "/etc/webhook/certs") |
| `--webhook.embeddedSecretManagerConfig.awsConfig.region` | string | AWS region |
| `--webhook.embeddedSecretManagerConfig.fileMountInitContainer.image` | string | Specifies init container image to use for mounting secrets as files. (default "busybox:1.28") |
| `--webhook.embeddedSecretManagerConfig.gcpConfig.project` | string | GCP project to be used for secret manager |
| `--webhook.embeddedSecretManagerConfig.type` | string | (default "AWS") |
| `--webhook.gcpSecretManager.sidecarImage` | string | Specifies the sidecar docker image to use (default "gcr.io/google.com/cloudsdktool/cloud-sdk:alpine") |
| `--webhook.listenPort` | int | The port to use to listen to webhook calls. Defaults to 9443 (default 9443) |
| `--webhook.localCert` | | write certs locally. Defaults to false |
| `--webhook.metrics-prefix` | string | An optional prefix for all published metrics. (default "flyte:") |
| `--webhook.secretName` | string | Secret name to write generated certs to. (default "flyte-pod-webhook") |
| `--webhook.serviceName` | string | The name of the webhook service. (default "flyte-pod-webhook") |
| `--webhook.servicePort` | int32 | The port on the service that hosting webhook. (default 443) |
| `--webhook.vaultSecretManager.role` | string | Specifies the vault role to use (default "flyte") |
=== PAGE: https://www.union.ai/docs/v1/serverless/api-reference/uctl-cli/uctl-get/uctl-get-clusterpoolconfig ===
# uctl get clusterpoolconfig
Retrieves cluster pools config
## Synopsis
Retrieves cluster pools config
```shell
$ uctl get clusterpoolconfig [flags]
```
## Options
| Option | Type | Description |
|--------|------|-------------|
| `--clusterPoolSpecFile` | string | generates an clusterPool spec file with conformance to the api format with current values.This can only be used while fetching single cluster pool |
| `--filter.asc` | | Specifies the sorting order. By default sorts result in descending order |
| `--filter.fieldSelector` | string | Allows for filtering resources based on a specific value for a field name using operations =, !=, >, {, }=, <=, in, contains.Multiple selectors can be added separated by commas |
| `--filter.limit` | int32 | Specifies the number of results to return (default 100) |
| `--filter.sortBy` | string | Specifies which field to sort results (default "created_at") |
| `--filter.token` | string | Specifies the server provided token to use for fetching next page in case of multi page result |
| `-h`, `--help` | help for clusterpoolconfig |
### Options inherited from parent commands
| Option | Type | Description |
|--------|------|-------------|
| `--admin.audience` | string | Audience to use when initiating OAuth2 authorization requests. |
| `--admin.authType` | string | Type of OAuth2 flow used for communicating with admin.ClientSecret, Pkce, ExternalCommand are valid values (default "ClientSecret") |
| `--admin.authorizationHeader` | string | Custom metadata header to pass JWT |
| `--admin.authorizationServerUrl` | string | This is the URL to your IdP's authorization server. It'll default to Endpoint |
| `--admin.caCertFilePath` | string | Use specified certificate file to verify the admin server peer. |
| `--admin.clientId` | string | Client ID (default "flytepropeller") |
| `--admin.clientSecretEnvVar` | string | Environment variable containing the client secret |
| `--admin.clientSecretLocation` | string | File containing the client secret (default "/etc/secrets/client_secret") |
| `--admin.command` | strings | Command for external authentication token generation |
| `--admin.defaultOrg` | string | OPTIONAL: Default org to use to support non-org based cli's.'. |
| `--admin.defaultServiceConfig` | string | |
| `--admin.deviceFlowConfig.pollInterval` | string | amount of time the device flow would poll the token endpoint if auth server doesn't return a polling interval. Okta and google IDP do return an interval' (default "5s") |
| `--admin.deviceFlowConfig.refreshTime` | string | grace period from the token expiry after which it would refresh the token. (default "5m0s") |
| `--admin.deviceFlowConfig.timeout` | string | amount of time the device flow should complete or else it will be cancelled. (default "10m0s") |
| `--admin.endpoint` | string | For admin types, specify where the uri of the service is located. |
| `--admin.httpProxyURL` | string | OPTIONAL: HTTP Proxy to be used for OAuth requests. |
| `--admin.insecure` | | Use insecure connection. |
| `--admin.insecureSkipVerify` | | InsecureSkipVerify controls whether a client verifies the server's certificate chain and host name.Caution: shouldn't be use for production usecases' |
| `--admin.maxBackoffDelay` | string | Max delay for grpc backoff (default "8s") |
| `--admin.maxMessageSizeBytes` | int | The max size in bytes for incoming gRPC messages |
| `--admin.maxRetries` | int | Max number of gRPC retries (default 4) |
| `--admin.perRetryTimeout` | string | gRPC per retry timeout (default "15s") |
| `--admin.pkceConfig.refreshTime` | string | grace period from the token expiry after which it would refresh the token. (default "5m0s") |
| `--admin.pkceConfig.timeout` | string | Amount of time the browser session would be active for authentication from client app. (default "2m0s") |
| `--admin.proxyCommand` | strings | Command for external proxy-authorization token generation |
| `--admin.scopes` | strings | List of scopes to request |
| `--admin.tokenRefreshWindow` | string | Max duration between token refresh attempt and token expiry. (default "0s") |
| `--admin.tokenUrl` | string | OPTIONAL: Your IdP's token endpoint. It'll be discovered from flyte admin's OAuth Metadata endpoint if not provided. |
| `--admin.useAudienceFromAdmin` | | Use Audience configured from admins public endpoint config. |
| `--admin.useAuth` | | Deprecated: Auth will be enabled/disabled based on admin's dynamically discovered information. |
| `--auth.appAuth.externalAuthServer.allowedAudience` | strings | Optional: A list of allowed audiences. If not provided, the audience is expected to be the public Uri of the service. |
| `--auth.appAuth.externalAuthServer.baseUrl` | string | This should be the base url of the authorization server that you are trying to hit. With Okta for instance, it will look something like https://company.okta.com/oauth2/abcdef123456789/ |
| `--auth.appAuth.externalAuthServer.httpProxyURL` | string | OPTIONAL: HTTP Proxy to be used for OAuth requests. |
| `--auth.appAuth.externalAuthServer.metadataUrl` | string | Optional: If the server doesn't support /.well-known/oauth-authorization-server, you can set a custom metadata url here.' |
| `--auth.appAuth.externalAuthServer.retryAttempts` | int | Optional: The number of attempted retries on a transient failure to get the OAuth metadata (default 5) |
| `--auth.appAuth.externalAuthServer.retryDelay` | string | Optional, Duration to wait between retries (default "1s") |
| `--auth.appAuth.selfAuthServer.accessTokenLifespan` | string | Defines the lifespan of issued access tokens. (default "30m0s") |
| `--auth.appAuth.selfAuthServer.authorizationCodeLifespan` | string | Defines the lifespan of issued access tokens. (default "5m0s") |
| `--auth.appAuth.selfAuthServer.claimSymmetricEncryptionKeySecretName` | string | OPTIONAL: Secret name to use to encrypt claims in authcode token. (default "claim_symmetric_key") |
| `--auth.appAuth.selfAuthServer.issuer` | string | Defines the issuer to use when issuing and validating tokens. The default value is https://{requestUri.HostAndPort}/ |
| `--auth.appAuth.selfAuthServer.oldTokenSigningRSAKeySecretName` | string | OPTIONAL: Secret name to use to retrieve Old RSA Signing Key. This can be useful during key rotation to continue to accept older tokens. (default "token_rsa_key_old.pem") |
| `--auth.appAuth.selfAuthServer.refreshTokenLifespan` | string | Defines the lifespan of issued access tokens. (default "1h0m0s") |
| `--auth.appAuth.selfAuthServer.tokenSigningRSAKeySecretName` | string | OPTIONAL: Secret name to use to retrieve RSA Signing Key. (default "token_rsa_key.pem") |
| `--auth.appAuth.thirdPartyConfig.flyteClient.audience` | string | Audience to use when initiating OAuth2 authorization requests. |
| `--auth.appAuth.thirdPartyConfig.flyteClient.clientId` | string | public identifier for the app which handles authorization for a Flyte deployment (default "uctl") |
| `--auth.appAuth.thirdPartyConfig.flyteClient.redirectUri` | string | This is the callback uri registered with the app which handles authorization for a Flyte deployment (default "http://localhost:53593/callback") |
| `--auth.appAuth.thirdPartyConfig.flyteClient.scopes` | strings | Recommended scopes for the client to request. (default [all,offline]) |
| `--auth.disableForGrpc` | | Disables auth enforcement on Grpc Endpoints. |
| `--auth.disableForHttp` | | Disables auth enforcement on HTTP Endpoints. |
| `--auth.grpcAuthorizationHeader` | string | (default "flyte-authorization") |
| `--auth.httpAuthorizationHeader` | string | (default "flyte-authorization") |
| `--auth.httpProxyURL` | string | OPTIONAL: HTTP Proxy to be used for OAuth requests. |
| `--auth.tokenEndpointProxyPath` | string | The path used to proxy calls to the TokenURL |
| `--auth.userAuth.cookieBlockKeySecretName` | string | OPTIONAL: Secret name to use for cookie block key. (default "cookie_block_key") |
| `--auth.userAuth.cookieHashKeySecretName` | string | OPTIONAL: Secret name to use for cookie hash key. (default "cookie_hash_key") |
| `--auth.userAuth.cookieSetting.domain` | string | OPTIONAL: Allows you to set the domain attribute on the auth cookies. |
| `--auth.userAuth.cookieSetting.sameSitePolicy` | string | OPTIONAL: Allows you to declare if your cookie should be restricted to a first-party or same-site context.Wrapper around http.SameSite. (default "DefaultMode") |
| `--auth.userAuth.httpProxyURL` | string | OPTIONAL: HTTP Proxy to be used for OAuth requests. |
| `--auth.userAuth.idpQueryParameter` | string | idp query parameter used for selecting a particular IDP for doing user authentication. Eg: for Okta passing idp={IDP-ID} forces the authentication to happen with IDP-ID |
| `--auth.userAuth.openId.baseUrl` | string | |
| `--auth.userAuth.openId.clientId` | string | |
| `--auth.userAuth.openId.clientSecretFile` | string | |
| `--auth.userAuth.openId.clientSecretName` | string | (default "oidc_client_secret") |
| `--auth.userAuth.openId.scopes` | strings | (default [openid,profile]) |
| `--auth.userAuth.redirectUrl` | string | (default "/console") |
| `--authorizer.internalCommunicationConfig.enabled` | | Enables authorization decisions for internal communication. (default true) |
| `--authorizer.internalCommunicationConfig.ingressIdentity` | string | IngressIdentity used in the cluster. Needed to exclude the communication coming from ingress. (default "ingress-nginx.ingress-nginx.serviceaccount.identity.linkerd.cluster.local") |
| `--authorizer.internalCommunicationConfig.tenantUrlPatternIdentity` | string | UrlPatternIdentity of the internal tenant service endpoint identities. (default "{{ service }}.{{ org }}.serviceaccount.identity.linkerd.cluster.local") |
| `--authorizer.internalCommunicationConfig.urlPatternIdentity` | string | UrlPatternIdentity of the internal service endpoint identities. (default "{{ service }}-helmchart.{{ service }}.serviceaccount.identity.linkerd.cluster.local") |
| `--authorizer.mode` | string | (default "Active") |
| `--authorizer.organizationConfig.PolicyConfig.adminPolicyDescription` | string | description for the boilerplate admin policy (default "Contributor permissions and full admin permissions to manage users and view usage dashboards") |
| `--authorizer.organizationConfig.PolicyConfig.contributorPolicyDescription` | string | description for the boilerplate contributor policy (default "Viewer permissions and permissions to create workflows, tasks, launch plans, and executions") |
| `--authorizer.organizationConfig.PolicyConfig.defaultUserPolicyRoleType` | string | name of the role type to determine which default policy new users added to the organization should be assigned (default "Viewer") |
| `--authorizer.organizationConfig.PolicyConfig.serverlessContributorPolicyDescription` | string | description for the boilerplate serverless contributor policy (default "Viewer permissions and permissions to create workflows, tasks, launch plans, and executions") |
| `--authorizer.organizationConfig.PolicyConfig.serverlessViewerPolicyDescription` | string | description for the boilerplate serverless viewer policy (default "Permissions to view Flyte entities") |
| `--authorizer.organizationConfig.PolicyConfig.viewerPolicyDescription` | string | description for the boilerplate viewer policy (default "Permissions to view Flyte entities") |
| `--authorizer.organizationConfig.defaultPolicyCacheDuration` | string | Cache entry duration for the store of the default policy per organization (default "10m0s") |
| `--authorizer.syncRuleRefreshInterval` | string | (default "1m0s") |
| `--authorizer.type` | string | (default "UserClouds") |
| `--authorizer.userCloudsClient.cache.redis.ttl.edgeTypes` | string | Specifies how long edge types remain in the cache.. (default "30m0s") |
| `--authorizer.userCloudsClient.cache.redis.ttl.edges` | string | Specifies how long edges remain in the cache. (default "30m0s") |
| `--authorizer.userCloudsClient.cache.redis.ttl.objectTypes` | string | Specifies how long object types remain in the cache. (default "30m0s") |
| `--authorizer.userCloudsClient.cache.redis.ttl.objects` | string | Specifies how long objects remain in the cache. (default "30m0s") |
| `--authorizer.userCloudsClient.cache.type` | string | Cache type to use. (default "none") |
| `--authorizer.userCloudsClient.clientID` | string | UserClouds client id |
| `--authorizer.userCloudsClient.clientSecretName` | string | UserCloud client secret name to read from the secret manager. (default "userclouds-client-secret") |
| `--authorizer.userCloudsClient.enableLogging` | | Enable userclouds client's internal logging. Calls to post logs take 250-350 ms and will impact p99 latency, enable with caution. |
| `--authorizer.userCloudsClient.tenantID` | string | UserClouds tenant id. Should be a UUID. |
| `--authorizer.userCloudsClient.tenantUrl` | string | Something like https://{yourtenant}.tenant.userclouds.com |
| `--config` | string | config file (default is /Users/andrew/.union/config.yaml) |
| `--connection.environment` | string | |
| `--connection.region` | string | |
| `--connection.rootTenantURLPattern` | string | Pattern for tenant url. (default "dns:///{{ organization }}.cloud-staging.union.ai") |
| `--console.endpoint` | string | Endpoint of console, if different than flyte admin |
| `--database.connMaxLifeTime` | string | sets the maximum amount of time a connection may be reused (default "1h0m0s") |
| `--database.enableForeignKeyConstraintWhenMigrating` | | Whether to enable gorm foreign keys when migrating the db |
| `--database.maxIdleConnections` | int | maxIdleConnections sets the maximum number of connections in the idle connection pool. (default 10) |
| `--database.maxOpenConnections` | int | maxOpenConnections sets the maximum number of open connections to the database. (default 100) |
| `--database.postgres.dbname` | string | The database name (default "postgres") |
| `--database.postgres.debug` | | |
| `--database.postgres.host` | string | The host name of the database server (default "localhost") |
| `--database.postgres.options` | string | See http://gorm.io/docs/connecting_to_the_database.html for available options passed, in addition to the above. (default "sslmode=disable") |
| `--database.postgres.password` | string | The database password. (default "postgres") |
| `--database.postgres.passwordPath` | string | Points to the file containing the database password. |
| `--database.postgres.port` | int | The port name of the database server (default 30001) |
| `--database.postgres.readReplicaHost` | string | The host name of the read replica database server (default "localhost") |
| `--database.postgres.username` | string | The database user who is connecting to the server. (default "postgres") |
| `--database.sqlite.file` | string | The path to the file (existing or new) where the DB should be created / stored. If existing, then this will be re-used, else a new will be created |
| `--db.connectionPool.maxConnectionLifetime` | string | (default "0s") |
| `--db.connectionPool.maxIdleConnections` | int | |
| `--db.connectionPool.maxOpenConnections` | int | |
| `--db.dbname` | string | (default "postgres") |
| `--db.debug` | | |
| `--db.host` | string | (default "postgres") |
| `--db.log_level` | int | (default 4) |
| `--db.options` | string | (default "sslmode=disable") |
| `--db.password` | string | |
| `--db.passwordPath` | string | |
| `--db.port` | int | (default 5432) |
| `--db.username` | string | (default "postgres") |
| `-d`, `--domain` | string | Specifies the Flyte project's domain. |
| `--files.archive` | | Pass in archive file either an http link or local path. |
| `--files.assumableIamRole` | string | Custom assumable iam auth role to register launch plans with. |
| `--files.continueOnError` | | Continue on error when registering files. |
| `--files.destinationDirectory` | string | Location of source code in container. |
| `--files.dryRun` | | Execute command without making any modifications. |
| `--files.enableSchedule` | | Enable the schedule if the files contain schedulable launchplan. |
| `--files.force` | | Force use of version number on entities registered with flyte. |
| `--files.k8ServiceAccount` | string | Deprecated. Please use `--K8sServiceAccount`|
| `--files.k8sServiceAccount` | string | Custom kubernetes service account auth role to register launch plans with. |
| `--files.outputLocationPrefix` | string | Custom output location prefix for offloaded types (files/schemas). |
| `--files.sourceUploadPath` | string | Deprecated: Update flyte admin to avoid having to configure storage access from uctl. |
| `--files.version` | string | Version of the entity to be registered with flyte which are un-versioned after serialization. |
| `--logger.formatter.type` | string | Sets logging format type. (default "json") |
| `--logger.level` | int | Sets the minimum logging level. (default 3) |
| `--logger.mute` | | Mutes all logs regardless of severity. Intended for benchmarks/tests only. |
| `--logger.show-source` | | Includes source code location in logs. |
| `--org` | string | Organization to work on. If not set, default to user's org. |
| `--otel.file.filename` | string | Filename to store exported telemetry traces (default "/tmp/trace.txt") |
| `--otel.jaeger.endpoint` | string | Endpoint for the jaeger telemetry trace ingestor (default "http://localhost:14268/api/traces") |
| `--otel.otlpgrpc.endpoint` | string | Endpoint for the OTLP telemetry trace collector (default "http://localhost:4317") |
| `--otel.otlphttp.endpoint` | string | Endpoint for the OTLP telemetry trace collector (default "http://localhost:4318/v1/traces") |
| `--otel.sampler.parentSampler` | string | Sets the parent sampler to use for the tracer (default "always") |
| `--otel.type` | string | Sets the type of exporter to configure [noop/file/jaeger/otlpgrpc/otlphttp]. (default "noop") |
| `-o`, `--output` | string | Specifies the output type - supported formats [TABLE JSON YAML DOT DOTURL]. NOTE: dot, doturl are only supported for Workflow (default "table") |
| `--plugins.catalogcache.reader.maxItems` | int | Maximum number of entries to keep in the index. (default 10000) |
| `--plugins.catalogcache.reader.maxRetries` | int | Maximum number of retries per item. (default 3) |
| `--plugins.catalogcache.reader.workers` | int | Number of concurrent workers to start processing the queue. (default 10) |
| `--plugins.catalogcache.writer.maxItems` | int | Maximum number of entries to keep in the index. (default 10000) |
| `--plugins.catalogcache.writer.maxRetries` | int | Maximum number of retries per item. (default 3) |
| `--plugins.catalogcache.writer.workers` | int | Number of concurrent workers to start processing the queue. (default 10) |
| `-p`, `--project` | string | Specifies the Flyte project. |
| `--rediscache.passwordSecretName` | string | Name of secret with Redis password. |
| `--rediscache.primaryEndpoint` | string | Primary endpoint for the redis cache that can be used for both reads and writes. |
| `--rediscache.replicaEndpoint` | string | Replica endpoint for the redis cache that can be used for reads. |
| `--secrets.env-prefix` | string | Prefix for environment variables (default "FLYTE_SECRET_") |
| `--secrets.secrets-prefix` | string | Prefix where to look for secrets file (default "/etc/secrets") |
| `--secrets.type` | string | Sets the type of storage to configure [local]. (default "local") |
| `--server.dataProxy.download.maxExpiresIn` | string | Maximum allowed expiration duration. (default "1h0m0s") |
| `--server.dataProxy.upload.defaultFileNameLength` | int | Default length for the generated file name if not provided in the request. (default 20) |
| `--server.dataProxy.upload.maxExpiresIn` | string | Maximum allowed expiration duration. (default "1h0m0s") |
| `--server.dataProxy.upload.maxSize` | string | Maximum allowed upload size. (default "6Mi") |
| `--server.dataProxy.upload.storagePrefix` | string | Storage prefix to use for all upload requests. |
| `--server.grpc.enableGrpcLatencyMetrics` | | Enable grpc latency metrics. Note Histograms metrics can be expensive on Prometheus servers. |
| `--server.grpc.maxMessageSizeBytes` | int | The max size in bytes for incoming gRPC messages |
| `--server.grpc.port` | int | On which grpc port to serve admin (default 8089) |
| `--server.grpc.serverReflection` | | Enable GRPC Server Reflection (default true) |
| `--server.grpcPort` | int | deprecated |
| `--server.grpcServerReflection` | | deprecated |
| `--server.httpPort` | int | On which http port to serve admin (default 8088) |
| `--server.kube-config` | string | Path to kubernetes client config file, default is empty, useful for incluster config. |
| `--server.kubeClientConfig.burst` | int | Max burst rate for throttle. 0 defaults to 10 (default 25) |
| `--server.kubeClientConfig.qps` | int32 | Max QPS to the master for requests to KubeAPI. 0 defaults to 5. (default 100) |
| `--server.kubeClientConfig.timeout` | string | Max duration allowed for every request to KubeAPI before giving up. 0 implies no timeout. (default "30s") |
| `--server.master` | string | The address of the Kubernetes API server. |
| `--server.readHeaderTimeoutSeconds` | int | The amount of time allowed to read request headers. (default 32) |
| `--server.security.allowCors` | | (default true) |
| `--server.security.allowedHeaders` | strings | (default [Content-Type,flyte-authorization]) |
| `--server.security.allowedOrigins` | strings | (default [*]) |
| `--server.security.auditAccess` | | |
| `--server.security.secure` | | |
| `--server.security.ssl.certificateFile` | string | |
| `--server.security.ssl.keyFile` | string | |
| `--server.security.useAuth` | | |
| `--server.thirdPartyConfig.flyteClient.audience` | string | Audience to use when initiating OAuth2 authorization requests. |
| `--server.thirdPartyConfig.flyteClient.clientId` | string | public identifier for the app which handles authorization for a Flyte deployment |
| `--server.thirdPartyConfig.flyteClient.redirectUri` | string | This is the callback uri registered with the app which handles authorization for a Flyte deployment |
| `--server.thirdPartyConfig.flyteClient.scopes` | strings | Recommended scopes for the client to request. |
| `--server.watchService.maxActiveClusterConnections` | int | (default 5) |
| `--server.watchService.maxPageSize` | int | (default 50000) |
| `--server.watchService.nonTerminalStatusUpdatesInterval` | string | (default "1m0s") |
| `--server.watchService.pollInterval` | string | (default "1s") |
| `--sharedservice.connectPort` | string | On which connect port to serve admin (default "8080") |
| `--sharedservice.grpc.grpcMaxResponseStatusBytes` | int32 | specifies the maximum (uncompressed) size of header list that the client is prepared to accept on grpc calls (default 32000) |
| `--sharedservice.grpc.maxConcurrentStreams` | int | Limit on the number of concurrent streams to each ServerTransport. (default 100) |
| `--sharedservice.grpc.maxMessageSizeBytes` | int | Limit on the size of message that can be received on the server. (default 10485760) |
| `--sharedservice.grpcServerReflection` | | Enable GRPC Server Reflection (default true) |
| `--sharedservice.httpPort` | string | On which http port to serve admin (default "8089") |
| `--sharedservice.kubeConfig` | string | Path to kubernetes client config file. |
| `--sharedservice.master` | string | The address of the Kubernetes API server. |
| `--sharedservice.metrics.enableClientGrpcHistograms` | | Enable client grpc histograms (default true) |
| `--sharedservice.metrics.enableGrpcHistograms` | | Enable grpc histograms (default true) |
| `--sharedservice.metrics.scope` | string | Scope to emit metrics under (default "service:") |
| `--sharedservice.port` | string | On which grpc port to serve admin (default "8080") |
| `--sharedservice.profiler.enabled` | | Enable Profiler on server |
| `--sharedservice.profilerPort` | string | Profile port to start listen for pprof and metric handlers on. (default "10254") |
| `--sharedservice.security.allowCors` | | |
| `--sharedservice.security.allowLocalhostAccess` | | Whether to permit localhost unauthenticated access to the server |
| `--sharedservice.security.allowedHeaders` | strings | |
| `--sharedservice.security.allowedOrigins` | strings | |
| `--sharedservice.security.auditAccess` | | |
| `--sharedservice.security.orgOverride` | string | Override org in identity context if localhost access enabled |
| `--sharedservice.security.secure` | | |
| `--sharedservice.security.ssl.certificateAuthorityFile` | string | |
| `--sharedservice.security.ssl.certificateFile` | string | |
| `--sharedservice.security.ssl.keyFile` | string | |
| `--sharedservice.security.useAuth` | | |
| `--sharedservice.sync.syncInterval` | string | Time interval to sync (default "5m0s") |
| `--storage.cache.max_size_mbs` | int | Maximum size of the cache where the Blob store data is cached in-memory. If not specified or set to 0, cache is not used |
| `--storage.cache.target_gc_percent` | int | Sets the garbage collection target percentage. |
| `--storage.connection.access-key` | string | Access key to use. Only required when authtype is set to accesskey. |
| `--storage.connection.auth-type` | string | Auth Type to use [iam, accesskey]. (default "iam") |
| `--storage.connection.disable-ssl` | | Disables SSL connection. Should only be used for development. |
| `--storage.connection.endpoint` | string | URL for storage client to connect to. |
| `--storage.connection.region` | string | Region to connect to. (default "us-east-1") |
| `--storage.connection.secret-key` | string | Secret to use when accesskey is set. |
| `--storage.container` | string | Initial container (in s3 a bucket) to create -if it doesn't exist-.' |
| `--storage.defaultHttpClient.timeout` | string | Sets time out on the http client. (default "0s") |
| `--storage.enable-multicontainer` | | If this is true, then the container argument is overlooked and redundant. This config will automatically open new connections to new containers/buckets as they are encountered |
| `--storage.limits.maxDownloadMBs` | int | Maximum allowed download size (in MBs) per call. (default 2) |
| `--storage.stow.config` | stringToString | Configuration for stow backend. Refer to github/flyteorg/stow (default []) |
| `--storage.stow.kind` | string | Kind of Stow backend to use. Refer to github/flyteorg/stow |
| `--storage.type` | string | Sets the type of storage to configure [s3/minio/local/mem/stow]. (default "s3") |
| `--union.auth.authorizationMetadataKey` | string | Authorization Header to use when passing Access Tokens to the server (default "flyte-authorization") |
| `--union.auth.clientId` | string | Client ID |
| `--union.auth.clientSecretEnvVar` | string | Environment variable containing the client secret |
| `--union.auth.clientSecretLocation` | string | File containing the client secret |
| `--union.auth.deviceFlow.pollInterval` | string | amount of time the device flow would poll the token endpoint if auth server doesn't return a polling interval. Okta and google IDP do return an interval' (default "5s") |
| `--union.auth.deviceFlow.refreshTime` | string | grace period from the token expiry after which it would refresh the token. (default "5m0s") |
| `--union.auth.deviceFlow.timeout` | string | amount of time the device flow should complete or else it will be cancelled. (default "10m0s") |
| `--union.auth.enable` | | Whether to enable an authenticated conenction when communicating with admin. (default true) |
| `--union.auth.externalAuth.command` | strings | Command for external authentication token generation |
| `--union.auth.pkce.refreshTime` | string | grace period from the token expiry after which it would refresh the token. (default "5m0s") |
| `--union.auth.pkce.timeout` | string | Amount of time the browser session would be active for authentication from client app. (default "15s") |
| `--union.auth.scopes` | strings | List of scopes to request |
| `--union.auth.tokenRefreshWindow` | string | Max duration between token refresh attempt and token expiry. (default "1h0m0s") |
| `--union.auth.tokenUrl` | string | OPTIONAL: Your IdP's token endpoint. It'll be discovered from flyte admin's OAuth Metadata endpoint if not provided. |
| `--union.auth.type` | string | Type of OAuth2 flow used for communicating with admin. (default "Pkce") |
| `--union.cache.maxItemsCount` | int | Maximum number of items to keep in the cache before evicting. (default 1000) |
| `--union.connection.host` | string | Host to connect to (default "dns:///utt-mgdp-stg-us-east-2.cloud-staging.union.ai") |
| `--union.connection.insecure` | | Whether to connect over insecure channel |
| `--union.connection.insecureSkipVerify` | | InsecureSkipVerify controls whether a client verifies the server's certificate chain and host name.Caution: shouldn't be use for production usecases' |
| `--union.connection.keepAliveConfig.permitWithoutStream` | | If true, client sends keepalive pings even with no active RPCs. |
| `--union.connection.keepAliveConfig.time` | string | After a duration of this time if the client doesn't see any activity it pings the server to see if the transport is still alive. (default "20s") |
| `--union.connection.keepAliveConfig.timeout` | string | After having pinged for keepalive check, the client waits for a duration of Timeout and if no activity is seen even after that the connection is closed. (default "2m0s") |
| `--union.connection.maxBackoffDelay` | string | Max delay for grpc backoff (default "8s") |
| `--union.connection.maxRecvMsgSize` | int | Maximum size of a message in bytes of a gRPC message (default 10485760) |
| `--union.connection.maxRetries` | int | Max number of gRPC retries (default 4) |
| `--union.connection.minConnectTimeout` | string | Minimum timeout for establishing a connection (default "20s") |
| `--union.connection.perRetryTimeout` | string | gRPC per retry timeout (default "15s") |
| `--union.connection.serviceConfig` | string | Defines gRPC experimental JSON Service Config (default "{"loadBalancingConfig": [{"round_robin":{}}]}") |
| `--union.connection.trustedIdentityClaims.enabled` | | Enables passing of trusted claims while making inter service calls |
| `--union.connection.trustedIdentityClaims.externalIdentityClaim` | string | External identity claim of the service which is authorized to make internal service call. These are verified against userclouds actions |
| `--union.connection.trustedIdentityClaims.externalIdentityTypeClaim` | string | External identity type claim of app or user to use for the current service identity. It should be an 'app' for inter service communication |
| `--union.internalConnectionConfig.-` | stringToString | (default []) |
| `--union.internalConnectionConfig.enabled` | | Enables internal service to service communication instead of going through ingress. |
| `--union.internalConnectionConfig.urlPattern` | string | UrlPattern of the internal service endpoints. (default "{{ service }}-helmchart.{{ service }}.svc.cluster.local:80") |
| `--webhook.awsSecretManager.sidecarImage` | string | Specifies the sidecar docker image to use (default "docker.io/amazon/aws-secrets-manager-secret-sidecar:v0.1.4") |
| `--webhook.certDir` | string | Certificate directory to use to write generated certs. Defaults to /etc/webhook/certs/ (default "/etc/webhook/certs") |
| `--webhook.embeddedSecretManagerConfig.awsConfig.region` | string | AWS region |
| `--webhook.embeddedSecretManagerConfig.fileMountInitContainer.image` | string | Specifies init container image to use for mounting secrets as files. (default "busybox:1.28") |
| `--webhook.embeddedSecretManagerConfig.gcpConfig.project` | string | GCP project to be used for secret manager |
| `--webhook.embeddedSecretManagerConfig.type` | string | (default "AWS") |
| `--webhook.gcpSecretManager.sidecarImage` | string | Specifies the sidecar docker image to use (default "gcr.io/google.com/cloudsdktool/cloud-sdk:alpine") |
| `--webhook.listenPort` | int | The port to use to listen to webhook calls. Defaults to 9443 (default 9443) |
| `--webhook.localCert` | | write certs locally. Defaults to false |
| `--webhook.metrics-prefix` | string | An optional prefix for all published metrics. (default "flyte:") |
| `--webhook.secretName` | string | Secret name to write generated certs to. (default "flyte-pod-webhook") |
| `--webhook.serviceName` | string | The name of the webhook service. (default "flyte-pod-webhook") |
| `--webhook.servicePort` | int32 | The port on the service that hosting webhook. (default 443) |
| `--webhook.vaultSecretManager.role` | string | Specifies the vault role to use (default "flyte") |
=== PAGE: https://www.union.ai/docs/v1/serverless/api-reference/uctl-cli/uctl-get/uctl-get-clusterswithconfig ===
# uctl get clusterswithconfig
Retrieves list of cluster names with assigned config id
## Synopsis
To fetch list of clusters with assigned config:
```shell
$ uctl get clusterswithconfig {configID}
```
## Options
| Option | Type | Description |
|--------|------|-------------|
| `-h`, `--help` | help for clusterswithconfig |
### Options inherited from parent commands
| Option | Type | Description |
|--------|------|-------------|
| `--admin.audience` | string | Audience to use when initiating OAuth2 authorization requests. |
| `--admin.authType` | string | Type of OAuth2 flow used for communicating with admin.ClientSecret, Pkce, ExternalCommand are valid values (default "ClientSecret") |
| `--admin.authorizationHeader` | string | Custom metadata header to pass JWT |
| `--admin.authorizationServerUrl` | string | This is the URL to your IdP's authorization server. It'll default to Endpoint |
| `--admin.caCertFilePath` | string | Use specified certificate file to verify the admin server peer. |
| `--admin.clientId` | string | Client ID (default "flytepropeller") |
| `--admin.clientSecretEnvVar` | string | Environment variable containing the client secret |
| `--admin.clientSecretLocation` | string | File containing the client secret (default "/etc/secrets/client_secret") |
| `--admin.command` | strings | Command for external authentication token generation |
| `--admin.defaultOrg` | string | OPTIONAL: Default org to use to support non-org based cli's.'. |
| `--admin.defaultServiceConfig` | string | |
| `--admin.deviceFlowConfig.pollInterval` | string | amount of time the device flow would poll the token endpoint if auth server doesn't return a polling interval. Okta and google IDP do return an interval' (default "5s") |
| `--admin.deviceFlowConfig.refreshTime` | string | grace period from the token expiry after which it would refresh the token. (default "5m0s") |
| `--admin.deviceFlowConfig.timeout` | string | amount of time the device flow should complete or else it will be cancelled. (default "10m0s") |
| `--admin.endpoint` | string | For admin types, specify where the uri of the service is located. |
| `--admin.httpProxyURL` | string | OPTIONAL: HTTP Proxy to be used for OAuth requests. |
| `--admin.insecure` | | Use insecure connection. |
| `--admin.insecureSkipVerify` | | InsecureSkipVerify controls whether a client verifies the server's certificate chain and host name.Caution: shouldn't be use for production usecases' |
| `--admin.maxBackoffDelay` | string | Max delay for grpc backoff (default "8s") |
| `--admin.maxMessageSizeBytes` | int | The max size in bytes for incoming gRPC messages |
| `--admin.maxRetries` | int | Max number of gRPC retries (default 4) |
| `--admin.perRetryTimeout` | string | gRPC per retry timeout (default "15s") |
| `--admin.pkceConfig.refreshTime` | string | grace period from the token expiry after which it would refresh the token. (default "5m0s") |
| `--admin.pkceConfig.timeout` | string | Amount of time the browser session would be active for authentication from client app. (default "2m0s") |
| `--admin.proxyCommand` | strings | Command for external proxy-authorization token generation |
| `--admin.scopes` | strings | List of scopes to request |
| `--admin.tokenRefreshWindow` | string | Max duration between token refresh attempt and token expiry. (default "0s") |
| `--admin.tokenUrl` | string | OPTIONAL: Your IdP's token endpoint. It'll be discovered from flyte admin's OAuth Metadata endpoint if not provided. |
| `--admin.useAudienceFromAdmin` | | Use Audience configured from admins public endpoint config. |
| `--admin.useAuth` | | Deprecated: Auth will be enabled/disabled based on admin's dynamically discovered information. |
| `--auth.appAuth.externalAuthServer.allowedAudience` | strings | Optional: A list of allowed audiences. If not provided, the audience is expected to be the public Uri of the service. |
| `--auth.appAuth.externalAuthServer.baseUrl` | string | This should be the base url of the authorization server that you are trying to hit. With Okta for instance, it will look something like https://company.okta.com/oauth2/abcdef123456789/ |
| `--auth.appAuth.externalAuthServer.httpProxyURL` | string | OPTIONAL: HTTP Proxy to be used for OAuth requests. |
| `--auth.appAuth.externalAuthServer.metadataUrl` | string | Optional: If the server doesn't support /.well-known/oauth-authorization-server, you can set a custom metadata url here.' |
| `--auth.appAuth.externalAuthServer.retryAttempts` | int | Optional: The number of attempted retries on a transient failure to get the OAuth metadata (default 5) |
| `--auth.appAuth.externalAuthServer.retryDelay` | string | Optional, Duration to wait between retries (default "1s") |
| `--auth.appAuth.selfAuthServer.accessTokenLifespan` | string | Defines the lifespan of issued access tokens. (default "30m0s") |
| `--auth.appAuth.selfAuthServer.authorizationCodeLifespan` | string | Defines the lifespan of issued access tokens. (default "5m0s") |
| `--auth.appAuth.selfAuthServer.claimSymmetricEncryptionKeySecretName` | string | OPTIONAL: Secret name to use to encrypt claims in authcode token. (default "claim_symmetric_key") |
| `--auth.appAuth.selfAuthServer.issuer` | string | Defines the issuer to use when issuing and validating tokens. The default value is https://{requestUri.HostAndPort}/ |
| `--auth.appAuth.selfAuthServer.oldTokenSigningRSAKeySecretName` | string | OPTIONAL: Secret name to use to retrieve Old RSA Signing Key. This can be useful during key rotation to continue to accept older tokens. (default "token_rsa_key_old.pem") |
| `--auth.appAuth.selfAuthServer.refreshTokenLifespan` | string | Defines the lifespan of issued access tokens. (default "1h0m0s") |
| `--auth.appAuth.selfAuthServer.tokenSigningRSAKeySecretName` | string | OPTIONAL: Secret name to use to retrieve RSA Signing Key. (default "token_rsa_key.pem") |
| `--auth.appAuth.thirdPartyConfig.flyteClient.audience` | string | Audience to use when initiating OAuth2 authorization requests. |
| `--auth.appAuth.thirdPartyConfig.flyteClient.clientId` | string | public identifier for the app which handles authorization for a Flyte deployment (default "uctl") |
| `--auth.appAuth.thirdPartyConfig.flyteClient.redirectUri` | string | This is the callback uri registered with the app which handles authorization for a Flyte deployment (default "http://localhost:53593/callback") |
| `--auth.appAuth.thirdPartyConfig.flyteClient.scopes` | strings | Recommended scopes for the client to request. (default [all,offline]) |
| `--auth.disableForGrpc` | | Disables auth enforcement on Grpc Endpoints. |
| `--auth.disableForHttp` | | Disables auth enforcement on HTTP Endpoints. |
| `--auth.grpcAuthorizationHeader` | string | (default "flyte-authorization") |
| `--auth.httpAuthorizationHeader` | string | (default "flyte-authorization") |
| `--auth.httpProxyURL` | string | OPTIONAL: HTTP Proxy to be used for OAuth requests. |
| `--auth.tokenEndpointProxyPath` | string | The path used to proxy calls to the TokenURL |
| `--auth.userAuth.cookieBlockKeySecretName` | string | OPTIONAL: Secret name to use for cookie block key. (default "cookie_block_key") |
| `--auth.userAuth.cookieHashKeySecretName` | string | OPTIONAL: Secret name to use for cookie hash key. (default "cookie_hash_key") |
| `--auth.userAuth.cookieSetting.domain` | string | OPTIONAL: Allows you to set the domain attribute on the auth cookies. |
| `--auth.userAuth.cookieSetting.sameSitePolicy` | string | OPTIONAL: Allows you to declare if your cookie should be restricted to a first-party or same-site context.Wrapper around http.SameSite. (default "DefaultMode") |
| `--auth.userAuth.httpProxyURL` | string | OPTIONAL: HTTP Proxy to be used for OAuth requests. |
| `--auth.userAuth.idpQueryParameter` | string | idp query parameter used for selecting a particular IDP for doing user authentication. Eg: for Okta passing idp={IDP-ID} forces the authentication to happen with IDP-ID |
| `--auth.userAuth.openId.baseUrl` | string | |
| `--auth.userAuth.openId.clientId` | string | |
| `--auth.userAuth.openId.clientSecretFile` | string | |
| `--auth.userAuth.openId.clientSecretName` | string | (default "oidc_client_secret") |
| `--auth.userAuth.openId.scopes` | strings | (default [openid,profile]) |
| `--auth.userAuth.redirectUrl` | string | (default "/console") |
| `--authorizer.internalCommunicationConfig.enabled` | | Enables authorization decisions for internal communication. (default true) |
| `--authorizer.internalCommunicationConfig.ingressIdentity` | string | IngressIdentity used in the cluster. Needed to exclude the communication coming from ingress. (default "ingress-nginx.ingress-nginx.serviceaccount.identity.linkerd.cluster.local") |
| `--authorizer.internalCommunicationConfig.tenantUrlPatternIdentity` | string | UrlPatternIdentity of the internal tenant service endpoint identities. (default "{{ service }}.{{ org }}.serviceaccount.identity.linkerd.cluster.local") |
| `--authorizer.internalCommunicationConfig.urlPatternIdentity` | string | UrlPatternIdentity of the internal service endpoint identities. (default "{{ service }}-helmchart.{{ service }}.serviceaccount.identity.linkerd.cluster.local") |
| `--authorizer.mode` | string | (default "Active") |
| `--authorizer.organizationConfig.PolicyConfig.adminPolicyDescription` | string | description for the boilerplate admin policy (default "Contributor permissions and full admin permissions to manage users and view usage dashboards") |
| `--authorizer.organizationConfig.PolicyConfig.contributorPolicyDescription` | string | description for the boilerplate contributor policy (default "Viewer permissions and permissions to create workflows, tasks, launch plans, and executions") |
| `--authorizer.organizationConfig.PolicyConfig.defaultUserPolicyRoleType` | string | name of the role type to determine which default policy new users added to the organization should be assigned (default "Viewer") |
| `--authorizer.organizationConfig.PolicyConfig.serverlessContributorPolicyDescription` | string | description for the boilerplate serverless contributor policy (default "Viewer permissions and permissions to create workflows, tasks, launch plans, and executions") |
| `--authorizer.organizationConfig.PolicyConfig.serverlessViewerPolicyDescription` | string | description for the boilerplate serverless viewer policy (default "Permissions to view Flyte entities") |
| `--authorizer.organizationConfig.PolicyConfig.viewerPolicyDescription` | string | description for the boilerplate viewer policy (default "Permissions to view Flyte entities") |
| `--authorizer.organizationConfig.defaultPolicyCacheDuration` | string | Cache entry duration for the store of the default policy per organization (default "10m0s") |
| `--authorizer.syncRuleRefreshInterval` | string | (default "1m0s") |
| `--authorizer.type` | string | (default "UserClouds") |
| `--authorizer.userCloudsClient.cache.redis.ttl.edgeTypes` | string | Specifies how long edge types remain in the cache.. (default "30m0s") |
| `--authorizer.userCloudsClient.cache.redis.ttl.edges` | string | Specifies how long edges remain in the cache. (default "30m0s") |
| `--authorizer.userCloudsClient.cache.redis.ttl.objectTypes` | string | Specifies how long object types remain in the cache. (default "30m0s") |
| `--authorizer.userCloudsClient.cache.redis.ttl.objects` | string | Specifies how long objects remain in the cache. (default "30m0s") |
| `--authorizer.userCloudsClient.cache.type` | string | Cache type to use. (default "none") |
| `--authorizer.userCloudsClient.clientID` | string | UserClouds client id |
| `--authorizer.userCloudsClient.clientSecretName` | string | UserCloud client secret name to read from the secret manager. (default "userclouds-client-secret") |
| `--authorizer.userCloudsClient.enableLogging` | | Enable userclouds client's internal logging. Calls to post logs take 250-350 ms and will impact p99 latency, enable with caution. |
| `--authorizer.userCloudsClient.tenantID` | string | UserClouds tenant id. Should be a UUID. |
| `--authorizer.userCloudsClient.tenantUrl` | string | Something like https://{yourtenant}.tenant.userclouds.com |
| `--config` | string | config file (default is /Users/andrew/.union/config.yaml) |
| `--connection.environment` | string | |
| `--connection.region` | string | |
| `--connection.rootTenantURLPattern` | string | Pattern for tenant url. (default "dns:///{{ organization }}.cloud-staging.union.ai") |
| `--console.endpoint` | string | Endpoint of console, if different than flyte admin |
| `--database.connMaxLifeTime` | string | sets the maximum amount of time a connection may be reused (default "1h0m0s") |
| `--database.enableForeignKeyConstraintWhenMigrating` | | Whether to enable gorm foreign keys when migrating the db |
| `--database.maxIdleConnections` | int | maxIdleConnections sets the maximum number of connections in the idle connection pool. (default 10) |
| `--database.maxOpenConnections` | int | maxOpenConnections sets the maximum number of open connections to the database. (default 100) |
| `--database.postgres.dbname` | string | The database name (default "postgres") |
| `--database.postgres.debug` | | |
| `--database.postgres.host` | string | The host name of the database server (default "localhost") |
| `--database.postgres.options` | string | See http://gorm.io/docs/connecting_to_the_database.html for available options passed, in addition to the above. (default "sslmode=disable") |
| `--database.postgres.password` | string | The database password. (default "postgres") |
| `--database.postgres.passwordPath` | string | Points to the file containing the database password. |
| `--database.postgres.port` | int | The port name of the database server (default 30001) |
| `--database.postgres.readReplicaHost` | string | The host name of the read replica database server (default "localhost") |
| `--database.postgres.username` | string | The database user who is connecting to the server. (default "postgres") |
| `--database.sqlite.file` | string | The path to the file (existing or new) where the DB should be created / stored. If existing, then this will be re-used, else a new will be created |
| `--db.connectionPool.maxConnectionLifetime` | string | (default "0s") |
| `--db.connectionPool.maxIdleConnections` | int | |
| `--db.connectionPool.maxOpenConnections` | int | |
| `--db.dbname` | string | (default "postgres") |
| `--db.debug` | | |
| `--db.host` | string | (default "postgres") |
| `--db.log_level` | int | (default 4) |
| `--db.options` | string | (default "sslmode=disable") |
| `--db.password` | string | |
| `--db.passwordPath` | string | |
| `--db.port` | int | (default 5432) |
| `--db.username` | string | (default "postgres") |
| `-d`, `--domain` | string | Specifies the Flyte project's domain. |
| `--files.archive` | | Pass in archive file either an http link or local path. |
| `--files.assumableIamRole` | string | Custom assumable iam auth role to register launch plans with. |
| `--files.continueOnError` | | Continue on error when registering files. |
| `--files.destinationDirectory` | string | Location of source code in container. |
| `--files.dryRun` | | Execute command without making any modifications. |
| `--files.enableSchedule` | | Enable the schedule if the files contain schedulable launchplan. |
| `--files.force` | | Force use of version number on entities registered with flyte. |
| `--files.k8ServiceAccount` | string | Deprecated. Please use `--K8sServiceAccount`|
| `--files.k8sServiceAccount` | string | Custom kubernetes service account auth role to register launch plans with. |
| `--files.outputLocationPrefix` | string | Custom output location prefix for offloaded types (files/schemas). |
| `--files.sourceUploadPath` | string | Deprecated: Update flyte admin to avoid having to configure storage access from uctl. |
| `--files.version` | string | Version of the entity to be registered with flyte which are un-versioned after serialization. |
| `--logger.formatter.type` | string | Sets logging format type. (default "json") |
| `--logger.level` | int | Sets the minimum logging level. (default 3) |
| `--logger.mute` | | Mutes all logs regardless of severity. Intended for benchmarks/tests only. |
| `--logger.show-source` | | Includes source code location in logs. |
| `--org` | string | Organization to work on. If not set, default to user's org. |
| `--otel.file.filename` | string | Filename to store exported telemetry traces (default "/tmp/trace.txt") |
| `--otel.jaeger.endpoint` | string | Endpoint for the jaeger telemetry trace ingestor (default "http://localhost:14268/api/traces") |
| `--otel.otlpgrpc.endpoint` | string | Endpoint for the OTLP telemetry trace collector (default "http://localhost:4317") |
| `--otel.otlphttp.endpoint` | string | Endpoint for the OTLP telemetry trace collector (default "http://localhost:4318/v1/traces") |
| `--otel.sampler.parentSampler` | string | Sets the parent sampler to use for the tracer (default "always") |
| `--otel.type` | string | Sets the type of exporter to configure [noop/file/jaeger/otlpgrpc/otlphttp]. (default "noop") |
| `-o`, `--output` | string | Specifies the output type - supported formats [TABLE JSON YAML DOT DOTURL]. NOTE: dot, doturl are only supported for Workflow (default "table") |
| `--plugins.catalogcache.reader.maxItems` | int | Maximum number of entries to keep in the index. (default 10000) |
| `--plugins.catalogcache.reader.maxRetries` | int | Maximum number of retries per item. (default 3) |
| `--plugins.catalogcache.reader.workers` | int | Number of concurrent workers to start processing the queue. (default 10) |
| `--plugins.catalogcache.writer.maxItems` | int | Maximum number of entries to keep in the index. (default 10000) |
| `--plugins.catalogcache.writer.maxRetries` | int | Maximum number of retries per item. (default 3) |
| `--plugins.catalogcache.writer.workers` | int | Number of concurrent workers to start processing the queue. (default 10) |
| `-p`, `--project` | string | Specifies the Flyte project. |
| `--rediscache.passwordSecretName` | string | Name of secret with Redis password. |
| `--rediscache.primaryEndpoint` | string | Primary endpoint for the redis cache that can be used for both reads and writes. |
| `--rediscache.replicaEndpoint` | string | Replica endpoint for the redis cache that can be used for reads. |
| `--secrets.env-prefix` | string | Prefix for environment variables (default "FLYTE_SECRET_") |
| `--secrets.secrets-prefix` | string | Prefix where to look for secrets file (default "/etc/secrets") |
| `--secrets.type` | string | Sets the type of storage to configure [local]. (default "local") |
| `--server.dataProxy.download.maxExpiresIn` | string | Maximum allowed expiration duration. (default "1h0m0s") |
| `--server.dataProxy.upload.defaultFileNameLength` | int | Default length for the generated file name if not provided in the request. (default 20) |
| `--server.dataProxy.upload.maxExpiresIn` | string | Maximum allowed expiration duration. (default "1h0m0s") |
| `--server.dataProxy.upload.maxSize` | string | Maximum allowed upload size. (default "6Mi") |
| `--server.dataProxy.upload.storagePrefix` | string | Storage prefix to use for all upload requests. |
| `--server.grpc.enableGrpcLatencyMetrics` | | Enable grpc latency metrics. Note Histograms metrics can be expensive on Prometheus servers. |
| `--server.grpc.maxMessageSizeBytes` | int | The max size in bytes for incoming gRPC messages |
| `--server.grpc.port` | int | On which grpc port to serve admin (default 8089) |
| `--server.grpc.serverReflection` | | Enable GRPC Server Reflection (default true) |
| `--server.grpcPort` | int | deprecated |
| `--server.grpcServerReflection` | | deprecated |
| `--server.httpPort` | int | On which http port to serve admin (default 8088) |
| `--server.kube-config` | string | Path to kubernetes client config file, default is empty, useful for incluster config. |
| `--server.kubeClientConfig.burst` | int | Max burst rate for throttle. 0 defaults to 10 (default 25) |
| `--server.kubeClientConfig.qps` | int32 | Max QPS to the master for requests to KubeAPI. 0 defaults to 5. (default 100) |
| `--server.kubeClientConfig.timeout` | string | Max duration allowed for every request to KubeAPI before giving up. 0 implies no timeout. (default "30s") |
| `--server.master` | string | The address of the Kubernetes API server. |
| `--server.readHeaderTimeoutSeconds` | int | The amount of time allowed to read request headers. (default 32) |
| `--server.security.allowCors` | | (default true) |
| `--server.security.allowedHeaders` | strings | (default [Content-Type,flyte-authorization]) |
| `--server.security.allowedOrigins` | strings | (default [*]) |
| `--server.security.auditAccess` | | |
| `--server.security.secure` | | |
| `--server.security.ssl.certificateFile` | string | |
| `--server.security.ssl.keyFile` | string | |
| `--server.security.useAuth` | | |
| `--server.thirdPartyConfig.flyteClient.audience` | string | Audience to use when initiating OAuth2 authorization requests. |
| `--server.thirdPartyConfig.flyteClient.clientId` | string | public identifier for the app which handles authorization for a Flyte deployment |
| `--server.thirdPartyConfig.flyteClient.redirectUri` | string | This is the callback uri registered with the app which handles authorization for a Flyte deployment |
| `--server.thirdPartyConfig.flyteClient.scopes` | strings | Recommended scopes for the client to request. |
| `--server.watchService.maxActiveClusterConnections` | int | (default 5) |
| `--server.watchService.maxPageSize` | int | (default 50000) |
| `--server.watchService.nonTerminalStatusUpdatesInterval` | string | (default "1m0s") |
| `--server.watchService.pollInterval` | string | (default "1s") |
| `--sharedservice.connectPort` | string | On which connect port to serve admin (default "8080") |
| `--sharedservice.grpc.grpcMaxResponseStatusBytes` | int32 | specifies the maximum (uncompressed) size of header list that the client is prepared to accept on grpc calls (default 32000) |
| `--sharedservice.grpc.maxConcurrentStreams` | int | Limit on the number of concurrent streams to each ServerTransport. (default 100) |
| `--sharedservice.grpc.maxMessageSizeBytes` | int | Limit on the size of message that can be received on the server. (default 10485760) |
| `--sharedservice.grpcServerReflection` | | Enable GRPC Server Reflection (default true) |
| `--sharedservice.httpPort` | string | On which http port to serve admin (default "8089") |
| `--sharedservice.kubeConfig` | string | Path to kubernetes client config file. |
| `--sharedservice.master` | string | The address of the Kubernetes API server. |
| `--sharedservice.metrics.enableClientGrpcHistograms` | | Enable client grpc histograms (default true) |
| `--sharedservice.metrics.enableGrpcHistograms` | | Enable grpc histograms (default true) |
| `--sharedservice.metrics.scope` | string | Scope to emit metrics under (default "service:") |
| `--sharedservice.port` | string | On which grpc port to serve admin (default "8080") |
| `--sharedservice.profiler.enabled` | | Enable Profiler on server |
| `--sharedservice.profilerPort` | string | Profile port to start listen for pprof and metric handlers on. (default "10254") |
| `--sharedservice.security.allowCors` | | |
| `--sharedservice.security.allowLocalhostAccess` | | Whether to permit localhost unauthenticated access to the server |
| `--sharedservice.security.allowedHeaders` | strings | |
| `--sharedservice.security.allowedOrigins` | strings | |
| `--sharedservice.security.auditAccess` | | |
| `--sharedservice.security.orgOverride` | string | Override org in identity context if localhost access enabled |
| `--sharedservice.security.secure` | | |
| `--sharedservice.security.ssl.certificateAuthorityFile` | string | |
| `--sharedservice.security.ssl.certificateFile` | string | |
| `--sharedservice.security.ssl.keyFile` | string | |
| `--sharedservice.security.useAuth` | | |
| `--sharedservice.sync.syncInterval` | string | Time interval to sync (default "5m0s") |
| `--storage.cache.max_size_mbs` | int | Maximum size of the cache where the Blob store data is cached in-memory. If not specified or set to 0, cache is not used |
| `--storage.cache.target_gc_percent` | int | Sets the garbage collection target percentage. |
| `--storage.connection.access-key` | string | Access key to use. Only required when authtype is set to accesskey. |
| `--storage.connection.auth-type` | string | Auth Type to use [iam, accesskey]. (default "iam") |
| `--storage.connection.disable-ssl` | | Disables SSL connection. Should only be used for development. |
| `--storage.connection.endpoint` | string | URL for storage client to connect to. |
| `--storage.connection.region` | string | Region to connect to. (default "us-east-1") |
| `--storage.connection.secret-key` | string | Secret to use when accesskey is set. |
| `--storage.container` | string | Initial container (in s3 a bucket) to create -if it doesn't exist-.' |
| `--storage.defaultHttpClient.timeout` | string | Sets time out on the http client. (default "0s") |
| `--storage.enable-multicontainer` | | If this is true, then the container argument is overlooked and redundant. This config will automatically open new connections to new containers/buckets as they are encountered |
| `--storage.limits.maxDownloadMBs` | int | Maximum allowed download size (in MBs) per call. (default 2) |
| `--storage.stow.config` | stringToString | Configuration for stow backend. Refer to github/flyteorg/stow (default []) |
| `--storage.stow.kind` | string | Kind of Stow backend to use. Refer to github/flyteorg/stow |
| `--storage.type` | string | Sets the type of storage to configure [s3/minio/local/mem/stow]. (default "s3") |
| `--union.auth.authorizationMetadataKey` | string | Authorization Header to use when passing Access Tokens to the server (default "flyte-authorization") |
| `--union.auth.clientId` | string | Client ID |
| `--union.auth.clientSecretEnvVar` | string | Environment variable containing the client secret |
| `--union.auth.clientSecretLocation` | string | File containing the client secret |
| `--union.auth.deviceFlow.pollInterval` | string | amount of time the device flow would poll the token endpoint if auth server doesn't return a polling interval. Okta and google IDP do return an interval' (default "5s") |
| `--union.auth.deviceFlow.refreshTime` | string | grace period from the token expiry after which it would refresh the token. (default "5m0s") |
| `--union.auth.deviceFlow.timeout` | string | amount of time the device flow should complete or else it will be cancelled. (default "10m0s") |
| `--union.auth.enable` | | Whether to enable an authenticated conenction when communicating with admin. (default true) |
| `--union.auth.externalAuth.command` | strings | Command for external authentication token generation |
| `--union.auth.pkce.refreshTime` | string | grace period from the token expiry after which it would refresh the token. (default "5m0s") |
| `--union.auth.pkce.timeout` | string | Amount of time the browser session would be active for authentication from client app. (default "15s") |
| `--union.auth.scopes` | strings | List of scopes to request |
| `--union.auth.tokenRefreshWindow` | string | Max duration between token refresh attempt and token expiry. (default "1h0m0s") |
| `--union.auth.tokenUrl` | string | OPTIONAL: Your IdP's token endpoint. It'll be discovered from flyte admin's OAuth Metadata endpoint if not provided. |
| `--union.auth.type` | string | Type of OAuth2 flow used for communicating with admin. (default "Pkce") |
| `--union.cache.maxItemsCount` | int | Maximum number of items to keep in the cache before evicting. (default 1000) |
| `--union.connection.host` | string | Host to connect to (default "dns:///utt-mgdp-stg-us-east-2.cloud-staging.union.ai") |
| `--union.connection.insecure` | | Whether to connect over insecure channel |
| `--union.connection.insecureSkipVerify` | | InsecureSkipVerify controls whether a client verifies the server's certificate chain and host name.Caution: shouldn't be use for production usecases' |
| `--union.connection.keepAliveConfig.permitWithoutStream` | | If true, client sends keepalive pings even with no active RPCs. |
| `--union.connection.keepAliveConfig.time` | string | After a duration of this time if the client doesn't see any activity it pings the server to see if the transport is still alive. (default "20s") |
| `--union.connection.keepAliveConfig.timeout` | string | After having pinged for keepalive check, the client waits for a duration of Timeout and if no activity is seen even after that the connection is closed. (default "2m0s") |
| `--union.connection.maxBackoffDelay` | string | Max delay for grpc backoff (default "8s") |
| `--union.connection.maxRecvMsgSize` | int | Maximum size of a message in bytes of a gRPC message (default 10485760) |
| `--union.connection.maxRetries` | int | Max number of gRPC retries (default 4) |
| `--union.connection.minConnectTimeout` | string | Minimum timeout for establishing a connection (default "20s") |
| `--union.connection.perRetryTimeout` | string | gRPC per retry timeout (default "15s") |
| `--union.connection.serviceConfig` | string | Defines gRPC experimental JSON Service Config (default "{"loadBalancingConfig": [{"round_robin":{}}]}") |
| `--union.connection.trustedIdentityClaims.enabled` | | Enables passing of trusted claims while making inter service calls |
| `--union.connection.trustedIdentityClaims.externalIdentityClaim` | string | External identity claim of the service which is authorized to make internal service call. These are verified against userclouds actions |
| `--union.connection.trustedIdentityClaims.externalIdentityTypeClaim` | string | External identity type claim of app or user to use for the current service identity. It should be an 'app' for inter service communication |
| `--union.internalConnectionConfig.-` | stringToString | (default []) |
| `--union.internalConnectionConfig.enabled` | | Enables internal service to service communication instead of going through ingress. |
| `--union.internalConnectionConfig.urlPattern` | string | UrlPattern of the internal service endpoints. (default "{{ service }}-helmchart.{{ service }}.svc.cluster.local:80") |
| `--webhook.awsSecretManager.sidecarImage` | string | Specifies the sidecar docker image to use (default "docker.io/amazon/aws-secrets-manager-secret-sidecar:v0.1.4") |
| `--webhook.certDir` | string | Certificate directory to use to write generated certs. Defaults to /etc/webhook/certs/ (default "/etc/webhook/certs") |
| `--webhook.embeddedSecretManagerConfig.awsConfig.region` | string | AWS region |
| `--webhook.embeddedSecretManagerConfig.fileMountInitContainer.image` | string | Specifies init container image to use for mounting secrets as files. (default "busybox:1.28") |
| `--webhook.embeddedSecretManagerConfig.gcpConfig.project` | string | GCP project to be used for secret manager |
| `--webhook.embeddedSecretManagerConfig.type` | string | (default "AWS") |
| `--webhook.gcpSecretManager.sidecarImage` | string | Specifies the sidecar docker image to use (default "gcr.io/google.com/cloudsdktool/cloud-sdk:alpine") |
| `--webhook.listenPort` | int | The port to use to listen to webhook calls. Defaults to 9443 (default 9443) |
| `--webhook.localCert` | | write certs locally. Defaults to false |
| `--webhook.metrics-prefix` | string | An optional prefix for all published metrics. (default "flyte:") |
| `--webhook.secretName` | string | Secret name to write generated certs to. (default "flyte-pod-webhook") |
| `--webhook.serviceName` | string | The name of the webhook service. (default "flyte-pod-webhook") |
| `--webhook.servicePort` | int32 | The port on the service that hosting webhook. (default 443) |
| `--webhook.vaultSecretManager.role` | string | Specifies the vault role to use (default "flyte") |
=== PAGE: https://www.union.ai/docs/v1/serverless/api-reference/uctl-cli/uctl-get/uctl-get-echo ===
# uctl get echo
## Synopsis
```shell
$ uctl get echo [flags]
```
## Options
| Option | Type | Description |
|--------|------|-------------|
| `-h`, `--help` | help for echo |
### Options inherited from parent commands
| Option | Type | Description |
|--------|------|-------------|
| `--admin.audience` | string | Audience to use when initiating OAuth2 authorization requests. |
| `--admin.authType` | string | Type of OAuth2 flow used for communicating with admin.ClientSecret, Pkce, ExternalCommand are valid values (default "ClientSecret") |
| `--admin.authorizationHeader` | string | Custom metadata header to pass JWT |
| `--admin.authorizationServerUrl` | string | This is the URL to your IdP's authorization server. It'll default to Endpoint |
| `--admin.caCertFilePath` | string | Use specified certificate file to verify the admin server peer. |
| `--admin.clientId` | string | Client ID (default "flytepropeller") |
| `--admin.clientSecretEnvVar` | string | Environment variable containing the client secret |
| `--admin.clientSecretLocation` | string | File containing the client secret (default "/etc/secrets/client_secret") |
| `--admin.command` | strings | Command for external authentication token generation |
| `--admin.defaultOrg` | string | OPTIONAL: Default org to use to support non-org based cli's.'. |
| `--admin.defaultServiceConfig` | string | |
| `--admin.deviceFlowConfig.pollInterval` | string | amount of time the device flow would poll the token endpoint if auth server doesn't return a polling interval. Okta and google IDP do return an interval' (default "5s") |
| `--admin.deviceFlowConfig.refreshTime` | string | grace period from the token expiry after which it would refresh the token. (default "5m0s") |
| `--admin.deviceFlowConfig.timeout` | string | amount of time the device flow should complete or else it will be cancelled. (default "10m0s") |
| `--admin.endpoint` | string | For admin types, specify where the uri of the service is located. |
| `--admin.httpProxyURL` | string | OPTIONAL: HTTP Proxy to be used for OAuth requests. |
| `--admin.insecure` | | Use insecure connection. |
| `--admin.insecureSkipVerify` | | InsecureSkipVerify controls whether a client verifies the server's certificate chain and host name.Caution: shouldn't be use for production usecases' |
| `--admin.maxBackoffDelay` | string | Max delay for grpc backoff (default "8s") |
| `--admin.maxMessageSizeBytes` | int | The max size in bytes for incoming gRPC messages |
| `--admin.maxRetries` | int | Max number of gRPC retries (default 4) |
| `--admin.perRetryTimeout` | string | gRPC per retry timeout (default "15s") |
| `--admin.pkceConfig.refreshTime` | string | grace period from the token expiry after which it would refresh the token. (default "5m0s") |
| `--admin.pkceConfig.timeout` | string | Amount of time the browser session would be active for authentication from client app. (default "2m0s") |
| `--admin.proxyCommand` | strings | Command for external proxy-authorization token generation |
| `--admin.scopes` | strings | List of scopes to request |
| `--admin.tokenRefreshWindow` | string | Max duration between token refresh attempt and token expiry. (default "0s") |
| `--admin.tokenUrl` | string | OPTIONAL: Your IdP's token endpoint. It'll be discovered from flyte admin's OAuth Metadata endpoint if not provided. |
| `--admin.useAudienceFromAdmin` | | Use Audience configured from admins public endpoint config. |
| `--admin.useAuth` | | Deprecated: Auth will be enabled/disabled based on admin's dynamically discovered information. |
| `--auth.appAuth.externalAuthServer.allowedAudience` | strings | Optional: A list of allowed audiences. If not provided, the audience is expected to be the public Uri of the service. |
| `--auth.appAuth.externalAuthServer.baseUrl` | string | This should be the base url of the authorization server that you are trying to hit. With Okta for instance, it will look something like https://company.okta.com/oauth2/abcdef123456789/ |
| `--auth.appAuth.externalAuthServer.httpProxyURL` | string | OPTIONAL: HTTP Proxy to be used for OAuth requests. |
| `--auth.appAuth.externalAuthServer.metadataUrl` | string | Optional: If the server doesn't support /.well-known/oauth-authorization-server, you can set a custom metadata url here.' |
| `--auth.appAuth.externalAuthServer.retryAttempts` | int | Optional: The number of attempted retries on a transient failure to get the OAuth metadata (default 5) |
| `--auth.appAuth.externalAuthServer.retryDelay` | string | Optional, Duration to wait between retries (default "1s") |
| `--auth.appAuth.selfAuthServer.accessTokenLifespan` | string | Defines the lifespan of issued access tokens. (default "30m0s") |
| `--auth.appAuth.selfAuthServer.authorizationCodeLifespan` | string | Defines the lifespan of issued access tokens. (default "5m0s") |
| `--auth.appAuth.selfAuthServer.claimSymmetricEncryptionKeySecretName` | string | OPTIONAL: Secret name to use to encrypt claims in authcode token. (default "claim_symmetric_key") |
| `--auth.appAuth.selfAuthServer.issuer` | string | Defines the issuer to use when issuing and validating tokens. The default value is https://{requestUri.HostAndPort}/ |
| `--auth.appAuth.selfAuthServer.oldTokenSigningRSAKeySecretName` | string | OPTIONAL: Secret name to use to retrieve Old RSA Signing Key. This can be useful during key rotation to continue to accept older tokens. (default "token_rsa_key_old.pem") |
| `--auth.appAuth.selfAuthServer.refreshTokenLifespan` | string | Defines the lifespan of issued access tokens. (default "1h0m0s") |
| `--auth.appAuth.selfAuthServer.tokenSigningRSAKeySecretName` | string | OPTIONAL: Secret name to use to retrieve RSA Signing Key. (default "token_rsa_key.pem") |
| `--auth.appAuth.thirdPartyConfig.flyteClient.audience` | string | Audience to use when initiating OAuth2 authorization requests. |
| `--auth.appAuth.thirdPartyConfig.flyteClient.clientId` | string | public identifier for the app which handles authorization for a Flyte deployment (default "uctl") |
| `--auth.appAuth.thirdPartyConfig.flyteClient.redirectUri` | string | This is the callback uri registered with the app which handles authorization for a Flyte deployment (default "http://localhost:53593/callback") |
| `--auth.appAuth.thirdPartyConfig.flyteClient.scopes` | strings | Recommended scopes for the client to request. (default [all,offline]) |
| `--auth.disableForGrpc` | | Disables auth enforcement on Grpc Endpoints. |
| `--auth.disableForHttp` | | Disables auth enforcement on HTTP Endpoints. |
| `--auth.grpcAuthorizationHeader` | string | (default "flyte-authorization") |
| `--auth.httpAuthorizationHeader` | string | (default "flyte-authorization") |
| `--auth.httpProxyURL` | string | OPTIONAL: HTTP Proxy to be used for OAuth requests. |
| `--auth.tokenEndpointProxyPath` | string | The path used to proxy calls to the TokenURL |
| `--auth.userAuth.cookieBlockKeySecretName` | string | OPTIONAL: Secret name to use for cookie block key. (default "cookie_block_key") |
| `--auth.userAuth.cookieHashKeySecretName` | string | OPTIONAL: Secret name to use for cookie hash key. (default "cookie_hash_key") |
| `--auth.userAuth.cookieSetting.domain` | string | OPTIONAL: Allows you to set the domain attribute on the auth cookies. |
| `--auth.userAuth.cookieSetting.sameSitePolicy` | string | OPTIONAL: Allows you to declare if your cookie should be restricted to a first-party or same-site context.Wrapper around http.SameSite. (default "DefaultMode") |
| `--auth.userAuth.httpProxyURL` | string | OPTIONAL: HTTP Proxy to be used for OAuth requests. |
| `--auth.userAuth.idpQueryParameter` | string | idp query parameter used for selecting a particular IDP for doing user authentication. Eg: for Okta passing idp={IDP-ID} forces the authentication to happen with IDP-ID |
| `--auth.userAuth.openId.baseUrl` | string | |
| `--auth.userAuth.openId.clientId` | string | |
| `--auth.userAuth.openId.clientSecretFile` | string | |
| `--auth.userAuth.openId.clientSecretName` | string | (default "oidc_client_secret") |
| `--auth.userAuth.openId.scopes` | strings | (default [openid,profile]) |
| `--auth.userAuth.redirectUrl` | string | (default "/console") |
| `--authorizer.internalCommunicationConfig.enabled` | | Enables authorization decisions for internal communication. (default true) |
| `--authorizer.internalCommunicationConfig.ingressIdentity` | string | IngressIdentity used in the cluster. Needed to exclude the communication coming from ingress. (default "ingress-nginx.ingress-nginx.serviceaccount.identity.linkerd.cluster.local") |
| `--authorizer.internalCommunicationConfig.tenantUrlPatternIdentity` | string | UrlPatternIdentity of the internal tenant service endpoint identities. (default "{{ service }}.{{ org }}.serviceaccount.identity.linkerd.cluster.local") |
| `--authorizer.internalCommunicationConfig.urlPatternIdentity` | string | UrlPatternIdentity of the internal service endpoint identities. (default "{{ service }}-helmchart.{{ service }}.serviceaccount.identity.linkerd.cluster.local") |
| `--authorizer.mode` | string | (default "Active") |
| `--authorizer.organizationConfig.PolicyConfig.adminPolicyDescription` | string | description for the boilerplate admin policy (default "Contributor permissions and full admin permissions to manage users and view usage dashboards") |
| `--authorizer.organizationConfig.PolicyConfig.contributorPolicyDescription` | string | description for the boilerplate contributor policy (default "Viewer permissions and permissions to create workflows, tasks, launch plans, and executions") |
| `--authorizer.organizationConfig.PolicyConfig.defaultUserPolicyRoleType` | string | name of the role type to determine which default policy new users added to the organization should be assigned (default "Viewer") |
| `--authorizer.organizationConfig.PolicyConfig.serverlessContributorPolicyDescription` | string | description for the boilerplate serverless contributor policy (default "Viewer permissions and permissions to create workflows, tasks, launch plans, and executions") |
| `--authorizer.organizationConfig.PolicyConfig.serverlessViewerPolicyDescription` | string | description for the boilerplate serverless viewer policy (default "Permissions to view Flyte entities") |
| `--authorizer.organizationConfig.PolicyConfig.viewerPolicyDescription` | string | description for the boilerplate viewer policy (default "Permissions to view Flyte entities") |
| `--authorizer.organizationConfig.defaultPolicyCacheDuration` | string | Cache entry duration for the store of the default policy per organization (default "10m0s") |
| `--authorizer.syncRuleRefreshInterval` | string | (default "1m0s") |
| `--authorizer.type` | string | (default "UserClouds") |
| `--authorizer.userCloudsClient.cache.redis.ttl.edgeTypes` | string | Specifies how long edge types remain in the cache.. (default "30m0s") |
| `--authorizer.userCloudsClient.cache.redis.ttl.edges` | string | Specifies how long edges remain in the cache. (default "30m0s") |
| `--authorizer.userCloudsClient.cache.redis.ttl.objectTypes` | string | Specifies how long object types remain in the cache. (default "30m0s") |
| `--authorizer.userCloudsClient.cache.redis.ttl.objects` | string | Specifies how long objects remain in the cache. (default "30m0s") |
| `--authorizer.userCloudsClient.cache.type` | string | Cache type to use. (default "none") |
| `--authorizer.userCloudsClient.clientID` | string | UserClouds client id |
| `--authorizer.userCloudsClient.clientSecretName` | string | UserCloud client secret name to read from the secret manager. (default "userclouds-client-secret") |
| `--authorizer.userCloudsClient.enableLogging` | | Enable userclouds client's internal logging. Calls to post logs take 250-350 ms and will impact p99 latency, enable with caution. |
| `--authorizer.userCloudsClient.tenantID` | string | UserClouds tenant id. Should be a UUID. |
| `--authorizer.userCloudsClient.tenantUrl` | string | Something like https://{yourtenant}.tenant.userclouds.com |
| `--config` | string | config file (default is /Users/andrew/.union/config.yaml) |
| `--connection.environment` | string | |
| `--connection.region` | string | |
| `--connection.rootTenantURLPattern` | string | Pattern for tenant url. (default "dns:///{{ organization }}.cloud-staging.union.ai") |
| `--console.endpoint` | string | Endpoint of console, if different than flyte admin |
| `--database.connMaxLifeTime` | string | sets the maximum amount of time a connection may be reused (default "1h0m0s") |
| `--database.enableForeignKeyConstraintWhenMigrating` | | Whether to enable gorm foreign keys when migrating the db |
| `--database.maxIdleConnections` | int | maxIdleConnections sets the maximum number of connections in the idle connection pool. (default 10) |
| `--database.maxOpenConnections` | int | maxOpenConnections sets the maximum number of open connections to the database. (default 100) |
| `--database.postgres.dbname` | string | The database name (default "postgres") |
| `--database.postgres.debug` | | |
| `--database.postgres.host` | string | The host name of the database server (default "localhost") |
| `--database.postgres.options` | string | See http://gorm.io/docs/connecting_to_the_database.html for available options passed, in addition to the above. (default "sslmode=disable") |
| `--database.postgres.password` | string | The database password. (default "postgres") |
| `--database.postgres.passwordPath` | string | Points to the file containing the database password. |
| `--database.postgres.port` | int | The port name of the database server (default 30001) |
| `--database.postgres.readReplicaHost` | string | The host name of the read replica database server (default "localhost") |
| `--database.postgres.username` | string | The database user who is connecting to the server. (default "postgres") |
| `--database.sqlite.file` | string | The path to the file (existing or new) where the DB should be created / stored. If existing, then this will be re-used, else a new will be created |
| `--db.connectionPool.maxConnectionLifetime` | string | (default "0s") |
| `--db.connectionPool.maxIdleConnections` | int | |
| `--db.connectionPool.maxOpenConnections` | int | |
| `--db.dbname` | string | (default "postgres") |
| `--db.debug` | | |
| `--db.host` | string | (default "postgres") |
| `--db.log_level` | int | (default 4) |
| `--db.options` | string | (default "sslmode=disable") |
| `--db.password` | string | |
| `--db.passwordPath` | string | |
| `--db.port` | int | (default 5432) |
| `--db.username` | string | (default "postgres") |
| `-d`, `--domain` | string | Specifies the Flyte project's domain. |
| `--files.archive` | | Pass in archive file either an http link or local path. |
| `--files.assumableIamRole` | string | Custom assumable iam auth role to register launch plans with. |
| `--files.continueOnError` | | Continue on error when registering files. |
| `--files.destinationDirectory` | string | Location of source code in container. |
| `--files.dryRun` | | Execute command without making any modifications. |
| `--files.enableSchedule` | | Enable the schedule if the files contain schedulable launchplan. |
| `--files.force` | | Force use of version number on entities registered with flyte. |
| `--files.k8ServiceAccount` | string | Deprecated. Please use `--K8sServiceAccount`|
| `--files.k8sServiceAccount` | string | Custom kubernetes service account auth role to register launch plans with. |
| `--files.outputLocationPrefix` | string | Custom output location prefix for offloaded types (files/schemas). |
| `--files.sourceUploadPath` | string | Deprecated: Update flyte admin to avoid having to configure storage access from uctl. |
| `--files.version` | string | Version of the entity to be registered with flyte which are un-versioned after serialization. |
| `--logger.formatter.type` | string | Sets logging format type. (default "json") |
| `--logger.level` | int | Sets the minimum logging level. (default 3) |
| `--logger.mute` | | Mutes all logs regardless of severity. Intended for benchmarks/tests only. |
| `--logger.show-source` | | Includes source code location in logs. |
| `--org` | string | Organization to work on. If not set, default to user's org. |
| `--otel.file.filename` | string | Filename to store exported telemetry traces (default "/tmp/trace.txt") |
| `--otel.jaeger.endpoint` | string | Endpoint for the jaeger telemetry trace ingestor (default "http://localhost:14268/api/traces") |
| `--otel.otlpgrpc.endpoint` | string | Endpoint for the OTLP telemetry trace collector (default "http://localhost:4317") |
| `--otel.otlphttp.endpoint` | string | Endpoint for the OTLP telemetry trace collector (default "http://localhost:4318/v1/traces") |
| `--otel.sampler.parentSampler` | string | Sets the parent sampler to use for the tracer (default "always") |
| `--otel.type` | string | Sets the type of exporter to configure [noop/file/jaeger/otlpgrpc/otlphttp]. (default "noop") |
| `-o`, `--output` | string | Specifies the output type - supported formats [TABLE JSON YAML DOT DOTURL]. NOTE: dot, doturl are only supported for Workflow (default "table") |
| `--plugins.catalogcache.reader.maxItems` | int | Maximum number of entries to keep in the index. (default 10000) |
| `--plugins.catalogcache.reader.maxRetries` | int | Maximum number of retries per item. (default 3) |
| `--plugins.catalogcache.reader.workers` | int | Number of concurrent workers to start processing the queue. (default 10) |
| `--plugins.catalogcache.writer.maxItems` | int | Maximum number of entries to keep in the index. (default 10000) |
| `--plugins.catalogcache.writer.maxRetries` | int | Maximum number of retries per item. (default 3) |
| `--plugins.catalogcache.writer.workers` | int | Number of concurrent workers to start processing the queue. (default 10) |
| `-p`, `--project` | string | Specifies the Flyte project. |
| `--rediscache.passwordSecretName` | string | Name of secret with Redis password. |
| `--rediscache.primaryEndpoint` | string | Primary endpoint for the redis cache that can be used for both reads and writes. |
| `--rediscache.replicaEndpoint` | string | Replica endpoint for the redis cache that can be used for reads. |
| `--secrets.env-prefix` | string | Prefix for environment variables (default "FLYTE_SECRET_") |
| `--secrets.secrets-prefix` | string | Prefix where to look for secrets file (default "/etc/secrets") |
| `--secrets.type` | string | Sets the type of storage to configure [local]. (default "local") |
| `--server.dataProxy.download.maxExpiresIn` | string | Maximum allowed expiration duration. (default "1h0m0s") |
| `--server.dataProxy.upload.defaultFileNameLength` | int | Default length for the generated file name if not provided in the request. (default 20) |
| `--server.dataProxy.upload.maxExpiresIn` | string | Maximum allowed expiration duration. (default "1h0m0s") |
| `--server.dataProxy.upload.maxSize` | string | Maximum allowed upload size. (default "6Mi") |
| `--server.dataProxy.upload.storagePrefix` | string | Storage prefix to use for all upload requests. |
| `--server.grpc.enableGrpcLatencyMetrics` | | Enable grpc latency metrics. Note Histograms metrics can be expensive on Prometheus servers. |
| `--server.grpc.maxMessageSizeBytes` | int | The max size in bytes for incoming gRPC messages |
| `--server.grpc.port` | int | On which grpc port to serve admin (default 8089) |
| `--server.grpc.serverReflection` | | Enable GRPC Server Reflection (default true) |
| `--server.grpcPort` | int | deprecated |
| `--server.grpcServerReflection` | | deprecated |
| `--server.httpPort` | int | On which http port to serve admin (default 8088) |
| `--server.kube-config` | string | Path to kubernetes client config file, default is empty, useful for incluster config. |
| `--server.kubeClientConfig.burst` | int | Max burst rate for throttle. 0 defaults to 10 (default 25) |
| `--server.kubeClientConfig.qps` | int32 | Max QPS to the master for requests to KubeAPI. 0 defaults to 5. (default 100) |
| `--server.kubeClientConfig.timeout` | string | Max duration allowed for every request to KubeAPI before giving up. 0 implies no timeout. (default "30s") |
| `--server.master` | string | The address of the Kubernetes API server. |
| `--server.readHeaderTimeoutSeconds` | int | The amount of time allowed to read request headers. (default 32) |
| `--server.security.allowCors` | | (default true) |
| `--server.security.allowedHeaders` | strings | (default [Content-Type,flyte-authorization]) |
| `--server.security.allowedOrigins` | strings | (default [*]) |
| `--server.security.auditAccess` | | |
| `--server.security.secure` | | |
| `--server.security.ssl.certificateFile` | string | |
| `--server.security.ssl.keyFile` | string | |
| `--server.security.useAuth` | | |
| `--server.thirdPartyConfig.flyteClient.audience` | string | Audience to use when initiating OAuth2 authorization requests. |
| `--server.thirdPartyConfig.flyteClient.clientId` | string | public identifier for the app which handles authorization for a Flyte deployment |
| `--server.thirdPartyConfig.flyteClient.redirectUri` | string | This is the callback uri registered with the app which handles authorization for a Flyte deployment |
| `--server.thirdPartyConfig.flyteClient.scopes` | strings | Recommended scopes for the client to request. |
| `--server.watchService.maxActiveClusterConnections` | int | (default 5) |
| `--server.watchService.maxPageSize` | int | (default 50000) |
| `--server.watchService.nonTerminalStatusUpdatesInterval` | string | (default "1m0s") |
| `--server.watchService.pollInterval` | string | (default "1s") |
| `--sharedservice.connectPort` | string | On which connect port to serve admin (default "8080") |
| `--sharedservice.grpc.grpcMaxResponseStatusBytes` | int32 | specifies the maximum (uncompressed) size of header list that the client is prepared to accept on grpc calls (default 32000) |
| `--sharedservice.grpc.maxConcurrentStreams` | int | Limit on the number of concurrent streams to each ServerTransport. (default 100) |
| `--sharedservice.grpc.maxMessageSizeBytes` | int | Limit on the size of message that can be received on the server. (default 10485760) |
| `--sharedservice.grpcServerReflection` | | Enable GRPC Server Reflection (default true) |
| `--sharedservice.httpPort` | string | On which http port to serve admin (default "8089") |
| `--sharedservice.kubeConfig` | string | Path to kubernetes client config file. |
| `--sharedservice.master` | string | The address of the Kubernetes API server. |
| `--sharedservice.metrics.enableClientGrpcHistograms` | | Enable client grpc histograms (default true) |
| `--sharedservice.metrics.enableGrpcHistograms` | | Enable grpc histograms (default true) |
| `--sharedservice.metrics.scope` | string | Scope to emit metrics under (default "service:") |
| `--sharedservice.port` | string | On which grpc port to serve admin (default "8080") |
| `--sharedservice.profiler.enabled` | | Enable Profiler on server |
| `--sharedservice.profilerPort` | string | Profile port to start listen for pprof and metric handlers on. (default "10254") |
| `--sharedservice.security.allowCors` | | |
| `--sharedservice.security.allowLocalhostAccess` | | Whether to permit localhost unauthenticated access to the server |
| `--sharedservice.security.allowedHeaders` | strings | |
| `--sharedservice.security.allowedOrigins` | strings | |
| `--sharedservice.security.auditAccess` | | |
| `--sharedservice.security.orgOverride` | string | Override org in identity context if localhost access enabled |
| `--sharedservice.security.secure` | | |
| `--sharedservice.security.ssl.certificateAuthorityFile` | string | |
| `--sharedservice.security.ssl.certificateFile` | string | |
| `--sharedservice.security.ssl.keyFile` | string | |
| `--sharedservice.security.useAuth` | | |
| `--sharedservice.sync.syncInterval` | string | Time interval to sync (default "5m0s") |
| `--storage.cache.max_size_mbs` | int | Maximum size of the cache where the Blob store data is cached in-memory. If not specified or set to 0, cache is not used |
| `--storage.cache.target_gc_percent` | int | Sets the garbage collection target percentage. |
| `--storage.connection.access-key` | string | Access key to use. Only required when authtype is set to accesskey. |
| `--storage.connection.auth-type` | string | Auth Type to use [iam, accesskey]. (default "iam") |
| `--storage.connection.disable-ssl` | | Disables SSL connection. Should only be used for development. |
| `--storage.connection.endpoint` | string | URL for storage client to connect to. |
| `--storage.connection.region` | string | Region to connect to. (default "us-east-1") |
| `--storage.connection.secret-key` | string | Secret to use when accesskey is set. |
| `--storage.container` | string | Initial container (in s3 a bucket) to create -if it doesn't exist-.' |
| `--storage.defaultHttpClient.timeout` | string | Sets time out on the http client. (default "0s") |
| `--storage.enable-multicontainer` | | If this is true, then the container argument is overlooked and redundant. This config will automatically open new connections to new containers/buckets as they are encountered |
| `--storage.limits.maxDownloadMBs` | int | Maximum allowed download size (in MBs) per call. (default 2) |
| `--storage.stow.config` | stringToString | Configuration for stow backend. Refer to github/flyteorg/stow (default []) |
| `--storage.stow.kind` | string | Kind of Stow backend to use. Refer to github/flyteorg/stow |
| `--storage.type` | string | Sets the type of storage to configure [s3/minio/local/mem/stow]. (default "s3") |
| `--union.auth.authorizationMetadataKey` | string | Authorization Header to use when passing Access Tokens to the server (default "flyte-authorization") |
| `--union.auth.clientId` | string | Client ID |
| `--union.auth.clientSecretEnvVar` | string | Environment variable containing the client secret |
| `--union.auth.clientSecretLocation` | string | File containing the client secret |
| `--union.auth.deviceFlow.pollInterval` | string | amount of time the device flow would poll the token endpoint if auth server doesn't return a polling interval. Okta and google IDP do return an interval' (default "5s") |
| `--union.auth.deviceFlow.refreshTime` | string | grace period from the token expiry after which it would refresh the token. (default "5m0s") |
| `--union.auth.deviceFlow.timeout` | string | amount of time the device flow should complete or else it will be cancelled. (default "10m0s") |
| `--union.auth.enable` | | Whether to enable an authenticated conenction when communicating with admin. (default true) |
| `--union.auth.externalAuth.command` | strings | Command for external authentication token generation |
| `--union.auth.pkce.refreshTime` | string | grace period from the token expiry after which it would refresh the token. (default "5m0s") |
| `--union.auth.pkce.timeout` | string | Amount of time the browser session would be active for authentication from client app. (default "15s") |
| `--union.auth.scopes` | strings | List of scopes to request |
| `--union.auth.tokenRefreshWindow` | string | Max duration between token refresh attempt and token expiry. (default "1h0m0s") |
| `--union.auth.tokenUrl` | string | OPTIONAL: Your IdP's token endpoint. It'll be discovered from flyte admin's OAuth Metadata endpoint if not provided. |
| `--union.auth.type` | string | Type of OAuth2 flow used for communicating with admin. (default "Pkce") |
| `--union.cache.maxItemsCount` | int | Maximum number of items to keep in the cache before evicting. (default 1000) |
| `--union.connection.host` | string | Host to connect to (default "dns:///utt-mgdp-stg-us-east-2.cloud-staging.union.ai") |
| `--union.connection.insecure` | | Whether to connect over insecure channel |
| `--union.connection.insecureSkipVerify` | | InsecureSkipVerify controls whether a client verifies the server's certificate chain and host name.Caution: shouldn't be use for production usecases' |
| `--union.connection.keepAliveConfig.permitWithoutStream` | | If true, client sends keepalive pings even with no active RPCs. |
| `--union.connection.keepAliveConfig.time` | string | After a duration of this time if the client doesn't see any activity it pings the server to see if the transport is still alive. (default "20s") |
| `--union.connection.keepAliveConfig.timeout` | string | After having pinged for keepalive check, the client waits for a duration of Timeout and if no activity is seen even after that the connection is closed. (default "2m0s") |
| `--union.connection.maxBackoffDelay` | string | Max delay for grpc backoff (default "8s") |
| `--union.connection.maxRecvMsgSize` | int | Maximum size of a message in bytes of a gRPC message (default 10485760) |
| `--union.connection.maxRetries` | int | Max number of gRPC retries (default 4) |
| `--union.connection.minConnectTimeout` | string | Minimum timeout for establishing a connection (default "20s") |
| `--union.connection.perRetryTimeout` | string | gRPC per retry timeout (default "15s") |
| `--union.connection.serviceConfig` | string | Defines gRPC experimental JSON Service Config (default "{"loadBalancingConfig": [{"round_robin":{}}]}") |
| `--union.connection.trustedIdentityClaims.enabled` | | Enables passing of trusted claims while making inter service calls |
| `--union.connection.trustedIdentityClaims.externalIdentityClaim` | string | External identity claim of the service which is authorized to make internal service call. These are verified against userclouds actions |
| `--union.connection.trustedIdentityClaims.externalIdentityTypeClaim` | string | External identity type claim of app or user to use for the current service identity. It should be an 'app' for inter service communication |
| `--union.internalConnectionConfig.-` | stringToString | (default []) |
| `--union.internalConnectionConfig.enabled` | | Enables internal service to service communication instead of going through ingress. |
| `--union.internalConnectionConfig.urlPattern` | string | UrlPattern of the internal service endpoints. (default "{{ service }}-helmchart.{{ service }}.svc.cluster.local:80") |
| `--webhook.awsSecretManager.sidecarImage` | string | Specifies the sidecar docker image to use (default "docker.io/amazon/aws-secrets-manager-secret-sidecar:v0.1.4") |
| `--webhook.certDir` | string | Certificate directory to use to write generated certs. Defaults to /etc/webhook/certs/ (default "/etc/webhook/certs") |
| `--webhook.embeddedSecretManagerConfig.awsConfig.region` | string | AWS region |
| `--webhook.embeddedSecretManagerConfig.fileMountInitContainer.image` | string | Specifies init container image to use for mounting secrets as files. (default "busybox:1.28") |
| `--webhook.embeddedSecretManagerConfig.gcpConfig.project` | string | GCP project to be used for secret manager |
| `--webhook.embeddedSecretManagerConfig.type` | string | (default "AWS") |
| `--webhook.gcpSecretManager.sidecarImage` | string | Specifies the sidecar docker image to use (default "gcr.io/google.com/cloudsdktool/cloud-sdk:alpine") |
| `--webhook.listenPort` | int | The port to use to listen to webhook calls. Defaults to 9443 (default 9443) |
| `--webhook.localCert` | | write certs locally. Defaults to false |
| `--webhook.metrics-prefix` | string | An optional prefix for all published metrics. (default "flyte:") |
| `--webhook.secretName` | string | Secret name to write generated certs to. (default "flyte-pod-webhook") |
| `--webhook.serviceName` | string | The name of the webhook service. (default "flyte-pod-webhook") |
| `--webhook.servicePort` | int32 | The port on the service that hosting webhook. (default 443) |
| `--webhook.vaultSecretManager.role` | string | Specifies the vault role to use (default "flyte") |
=== PAGE: https://www.union.ai/docs/v1/serverless/api-reference/uctl-cli/uctl-get/uctl-get-execution ===
# uctl get execution
Gets execution resources.
## Synopsis
Retrieve all executions within the project and domain:
```shell
$ uctl get execution -p flytesnacks -d development
```
> [!NOTE]
> The terms execution/executions are interchangeable in these commands.
Retrieve executions by name within the project and domain:
```shell
$ uctl get execution -p flytesnacks -d development oeh94k9r2r
```
Retrieve all the executions with filters:
```shell
$ uctl get execution -p flytesnacks -d development --filter.fieldSelector="execution.phase in (FAILED;SUCCEEDED),execution.duration<200"
```
Retrieve executions as per the specified limit and sorting parameters:
```shell
$ uctl get execution -p flytesnacks -d development --filter.sortBy=created_at --filter.limit=1 --filter.asc
```
Retrieve executions present in other pages by specifying the limit and
page number.
```shell
$ uctl get -p flytesnacks -d development execution --filter.limit=10 --filter.page=2
```
Retrieve executions within the project and domain in YAML format.
```shell
$ uctl get execution -p flytesnacks -d development -o yaml
```
Retrieve executions within the project and domain in JSON format.
```shell
$ uctl get execution -p flytesnacks -d development -o json
```
Get more details of the execution using the --details flag, which shows
node and task executions. The default view is a tree view, and the TABLE
view format is not supported on this view.
```shell
$ uctl get execution -p flytesnacks -d development oeh94k9r2r --details
```
Fetch execution details in YAML format. In this view, only node details
are available. For task, pass the --nodeID flag:
```shell
$ uctl get execution -p flytesnacks -d development oeh94k9r2r --details -o yaml
```
Fetch task executions on a specific node using the --nodeID flag. Use
the nodeID attribute given by the node details view.
```shell
$ uctl get execution -p flytesnacks -d development oeh94k9r2r --nodeID n0
```
Task execution view is available in YAML/JSON format too. The following
example showcases YAML, where the output contains input and output data
of each node.
```shell
$ uctl get execution -p flytesnacks -d development oeh94k9r2r --nodeID n0 -o yaml
```
Usage:
```shell
$ uctl get execution [flags]
```
## Options
| Option | Type | Description |
|--------|------|-------------|
| `--details` | | gets node execution details. Only applicable for single execution name i.e get execution name `--details` |
| Option | Type | Description |
|--------|------|-------------|
| `--filter.asc` | | Specifies the sorting order. By default uctl sort result in descending order |
| Option | Type | Description |
|--------|------|-------------|
| `--filter.fieldSelector` | string | Specifies the Field selector |
| `--filter.limit` | int32 | Specifies the limit (default 100) |
| `--filter.page` | int32 | Specifies the page number, in case there are multiple pages of results (default 1) |
| `--filter.sortBy` | string | Specifies which field to sort results (default "created_at") |
| `-h`, `--help` | help for execution |
| `--nodeID` | string | get task executions for given node name. |
### Options inherited from parent commands
| Option | Type | Description |
|--------|------|-------------|
| `--admin.audience` | string | Audience to use when initiating OAuth2 authorization requests. |
| `--admin.authType` | string | Type of OAuth2 flow used for communicating with admin.ClientSecret, Pkce, ExternalCommand are valid values (default "ClientSecret") |
| `--admin.authorizationHeader` | string | Custom metadata header to pass JWT |
| `--admin.authorizationServerUrl` | string | This is the URL to your IdP's authorization server. It'll default to Endpoint |
| `--admin.caCertFilePath` | string | Use specified certificate file to verify the admin server peer. |
| `--admin.clientId` | string | Client ID (default "flytepropeller") |
| `--admin.clientSecretEnvVar` | string | Environment variable containing the client secret |
| `--admin.clientSecretLocation` | string | File containing the client secret (default "/etc/secrets/client_secret") |
| `--admin.command` | strings | Command for external authentication token generation |
| `--admin.defaultOrg` | string | OPTIONAL: Default org to use to support non-org based cli's.'. |
| `--admin.defaultServiceConfig` | string | |
| `--admin.deviceFlowConfig.pollInterval` | string | amount of time the device flow would poll the token endpoint if auth server doesn't return a polling interval. Okta and google IDP do return an interval' (default "5s") |
| `--admin.deviceFlowConfig.refreshTime` | string | grace period from the token expiry after which it would refresh the token. (default "5m0s") |
| `--admin.deviceFlowConfig.timeout` | string | amount of time the device flow should complete or else it will be cancelled. (default "10m0s") |
| `--admin.endpoint` | string | For admin types, specify where the uri of the service is located. |
| `--admin.httpProxyURL` | string | OPTIONAL: HTTP Proxy to be used for OAuth requests. |
| `--admin.insecure` | | Use insecure connection. |
| `--admin.insecureSkipVerify` | | InsecureSkipVerify controls whether a client verifies the server's certificate chain and host name.Caution: shouldn't be use for production usecases' |
| `--admin.maxBackoffDelay` | string | Max delay for grpc backoff (default "8s") |
| `--admin.maxMessageSizeBytes` | int | The max size in bytes for incoming gRPC messages |
| `--admin.maxRetries` | int | Max number of gRPC retries (default 4) |
| `--admin.perRetryTimeout` | string | gRPC per retry timeout (default "15s") |
| `--admin.pkceConfig.refreshTime` | string | grace period from the token expiry after which it would refresh the token. (default "5m0s") |
| `--admin.pkceConfig.timeout` | string | Amount of time the browser session would be active for authentication from client app. (default "2m0s") |
| `--admin.proxyCommand` | strings | Command for external proxy-authorization token generation |
| `--admin.scopes` | strings | List of scopes to request |
| `--admin.tokenRefreshWindow` | string | Max duration between token refresh attempt and token expiry. (default "0s") |
| `--admin.tokenUrl` | string | OPTIONAL: Your IdP's token endpoint. It'll be discovered from flyte admin's OAuth Metadata endpoint if not provided. |
| `--admin.useAudienceFromAdmin` | | Use Audience configured from admins public endpoint config. |
| `--admin.useAuth` | | Deprecated: Auth will be enabled/disabled based on admin's dynamically discovered information. |
| `--auth.appAuth.externalAuthServer.allowedAudience` | strings | Optional: A list of allowed audiences. If not provided, the audience is expected to be the public Uri of the service. |
| `--auth.appAuth.externalAuthServer.baseUrl` | string | This should be the base url of the authorization server that you are trying to hit. With Okta for instance, it will look something like https://company.okta.com/oauth2/abcdef123456789/ |
| `--auth.appAuth.externalAuthServer.httpProxyURL` | string | OPTIONAL: HTTP Proxy to be used for OAuth requests. |
| `--auth.appAuth.externalAuthServer.metadataUrl` | string | Optional: If the server doesn't support /.well-known/oauth-authorization-server, you can set a custom metadata url here.' |
| `--auth.appAuth.externalAuthServer.retryAttempts` | int | Optional: The number of attempted retries on a transient failure to get the OAuth metadata (default 5) |
| `--auth.appAuth.externalAuthServer.retryDelay` | string | Optional, Duration to wait between retries (default "1s") |
| `--auth.appAuth.selfAuthServer.accessTokenLifespan` | string | Defines the lifespan of issued access tokens. (default "30m0s") |
| `--auth.appAuth.selfAuthServer.authorizationCodeLifespan` | string | Defines the lifespan of issued access tokens. (default "5m0s") |
| `--auth.appAuth.selfAuthServer.claimSymmetricEncryptionKeySecretName` | string | OPTIONAL: Secret name to use to encrypt claims in authcode token. (default "claim_symmetric_key") |
| `--auth.appAuth.selfAuthServer.issuer` | string | Defines the issuer to use when issuing and validating tokens. The default value is https://{requestUri.HostAndPort}/ |
| `--auth.appAuth.selfAuthServer.oldTokenSigningRSAKeySecretName` | string | OPTIONAL: Secret name to use to retrieve Old RSA Signing Key. This can be useful during key rotation to continue to accept older tokens. (default "token_rsa_key_old.pem") |
| `--auth.appAuth.selfAuthServer.refreshTokenLifespan` | string | Defines the lifespan of issued access tokens. (default "1h0m0s") |
| `--auth.appAuth.selfAuthServer.tokenSigningRSAKeySecretName` | string | OPTIONAL: Secret name to use to retrieve RSA Signing Key. (default "token_rsa_key.pem") |
| `--auth.appAuth.thirdPartyConfig.flyteClient.audience` | string | Audience to use when initiating OAuth2 authorization requests. |
| `--auth.appAuth.thirdPartyConfig.flyteClient.clientId` | string | public identifier for the app which handles authorization for a Flyte deployment (default "uctl") |
| `--auth.appAuth.thirdPartyConfig.flyteClient.redirectUri` | string | This is the callback uri registered with the app which handles authorization for a Flyte deployment (default "http://localhost:53593/callback") |
| `--auth.appAuth.thirdPartyConfig.flyteClient.scopes` | strings | Recommended scopes for the client to request. (default [all,offline]) |
| `--auth.disableForGrpc` | | Disables auth enforcement on Grpc Endpoints. |
| `--auth.disableForHttp` | | Disables auth enforcement on HTTP Endpoints. |
| `--auth.grpcAuthorizationHeader` | string | (default "flyte-authorization") |
| `--auth.httpAuthorizationHeader` | string | (default "flyte-authorization") |
| `--auth.httpProxyURL` | string | OPTIONAL: HTTP Proxy to be used for OAuth requests. |
| `--auth.tokenEndpointProxyPath` | string | The path used to proxy calls to the TokenURL |
| `--auth.userAuth.cookieBlockKeySecretName` | string | OPTIONAL: Secret name to use for cookie block key. (default "cookie_block_key") |
| `--auth.userAuth.cookieHashKeySecretName` | string | OPTIONAL: Secret name to use for cookie hash key. (default "cookie_hash_key") |
| `--auth.userAuth.cookieSetting.domain` | string | OPTIONAL: Allows you to set the domain attribute on the auth cookies. |
| `--auth.userAuth.cookieSetting.sameSitePolicy` | string | OPTIONAL: Allows you to declare if your cookie should be restricted to a first-party or same-site context.Wrapper around http.SameSite. (default "DefaultMode") |
| `--auth.userAuth.httpProxyURL` | string | OPTIONAL: HTTP Proxy to be used for OAuth requests. |
| `--auth.userAuth.idpQueryParameter` | string | idp query parameter used for selecting a particular IDP for doing user authentication. Eg: for Okta passing idp={IDP-ID} forces the authentication to happen with IDP-ID |
| `--auth.userAuth.openId.baseUrl` | string | |
| `--auth.userAuth.openId.clientId` | string | |
| `--auth.userAuth.openId.clientSecretFile` | string | |
| `--auth.userAuth.openId.clientSecretName` | string | (default "oidc_client_secret") |
| `--auth.userAuth.openId.scopes` | strings | (default [openid,profile]) |
| `--auth.userAuth.redirectUrl` | string | (default "/console") |
| `--authorizer.internalCommunicationConfig.enabled` | | Enables authorization decisions for internal communication. (default true) |
| `--authorizer.internalCommunicationConfig.ingressIdentity` | string | IngressIdentity used in the cluster. Needed to exclude the communication coming from ingress. (default "ingress-nginx.ingress-nginx.serviceaccount.identity.linkerd.cluster.local") |
| `--authorizer.internalCommunicationConfig.tenantUrlPatternIdentity` | string | UrlPatternIdentity of the internal tenant service endpoint identities. (default "{{ service }}.{{ org }}.serviceaccount.identity.linkerd.cluster.local") |
| `--authorizer.internalCommunicationConfig.urlPatternIdentity` | string | UrlPatternIdentity of the internal service endpoint identities. (default "{{ service }}-helmchart.{{ service }}.serviceaccount.identity.linkerd.cluster.local") |
| `--authorizer.mode` | string | (default "Active") |
| `--authorizer.organizationConfig.PolicyConfig.adminPolicyDescription` | string | description for the boilerplate admin policy (default "Contributor permissions and full admin permissions to manage users and view usage dashboards") |
| `--authorizer.organizationConfig.PolicyConfig.contributorPolicyDescription` | string | description for the boilerplate contributor policy (default "Viewer permissions and permissions to create workflows, tasks, launch plans, and executions") |
| `--authorizer.organizationConfig.PolicyConfig.defaultUserPolicyRoleType` | string | name of the role type to determine which default policy new users added to the organization should be assigned (default "Viewer") |
| `--authorizer.organizationConfig.PolicyConfig.serverlessContributorPolicyDescription` | string | description for the boilerplate serverless contributor policy (default "Viewer permissions and permissions to create workflows, tasks, launch plans, and executions") |
| `--authorizer.organizationConfig.PolicyConfig.serverlessViewerPolicyDescription` | string | description for the boilerplate serverless viewer policy (default "Permissions to view Flyte entities") |
| `--authorizer.organizationConfig.PolicyConfig.viewerPolicyDescription` | string | description for the boilerplate viewer policy (default "Permissions to view Flyte entities") |
| `--authorizer.organizationConfig.defaultPolicyCacheDuration` | string | Cache entry duration for the store of the default policy per organization (default "10m0s") |
| `--authorizer.syncRuleRefreshInterval` | string | (default "1m0s") |
| `--authorizer.type` | string | (default "UserClouds") |
| `--authorizer.userCloudsClient.cache.redis.ttl.edgeTypes` | string | Specifies how long edge types remain in the cache.. (default "30m0s") |
| `--authorizer.userCloudsClient.cache.redis.ttl.edges` | string | Specifies how long edges remain in the cache. (default "30m0s") |
| `--authorizer.userCloudsClient.cache.redis.ttl.objectTypes` | string | Specifies how long object types remain in the cache. (default "30m0s") |
| `--authorizer.userCloudsClient.cache.redis.ttl.objects` | string | Specifies how long objects remain in the cache. (default "30m0s") |
| `--authorizer.userCloudsClient.cache.type` | string | Cache type to use. (default "none") |
| `--authorizer.userCloudsClient.clientID` | string | UserClouds client id |
| `--authorizer.userCloudsClient.clientSecretName` | string | UserCloud client secret name to read from the secret manager. (default "userclouds-client-secret") |
| `--authorizer.userCloudsClient.enableLogging` | | Enable userclouds client's internal logging. Calls to post logs take 250-350 ms and will impact p99 latency, enable with caution. |
| `--authorizer.userCloudsClient.tenantID` | string | UserClouds tenant id. Should be a UUID. |
| `--authorizer.userCloudsClient.tenantUrl` | string | Something like https://{yourtenant}.tenant.userclouds.com |
| `--config` | string | config file (default is /Users/andrew/.union/config.yaml) |
| `--connection.environment` | string | |
| `--connection.region` | string | |
| `--connection.rootTenantURLPattern` | string | Pattern for tenant url. (default "dns:///{{ organization }}.cloud-staging.union.ai") |
| `--console.endpoint` | string | Endpoint of console, if different than flyte admin |
| `--database.connMaxLifeTime` | string | sets the maximum amount of time a connection may be reused (default "1h0m0s") |
| `--database.enableForeignKeyConstraintWhenMigrating` | | Whether to enable gorm foreign keys when migrating the db |
| `--database.maxIdleConnections` | int | maxIdleConnections sets the maximum number of connections in the idle connection pool. (default 10) |
| `--database.maxOpenConnections` | int | maxOpenConnections sets the maximum number of open connections to the database. (default 100) |
| `--database.postgres.dbname` | string | The database name (default "postgres") |
| `--database.postgres.debug` | | |
| `--database.postgres.host` | string | The host name of the database server (default "localhost") |
| `--database.postgres.options` | string | See http://gorm.io/docs/connecting_to_the_database.html for available options passed, in addition to the above. (default "sslmode=disable") |
| `--database.postgres.password` | string | The database password. (default "postgres") |
| `--database.postgres.passwordPath` | string | Points to the file containing the database password. |
| `--database.postgres.port` | int | The port name of the database server (default 30001) |
| `--database.postgres.readReplicaHost` | string | The host name of the read replica database server (default "localhost") |
| `--database.postgres.username` | string | The database user who is connecting to the server. (default "postgres") |
| `--database.sqlite.file` | string | The path to the file (existing or new) where the DB should be created / stored. If existing, then this will be re-used, else a new will be created |
| `--db.connectionPool.maxConnectionLifetime` | string | (default "0s") |
| `--db.connectionPool.maxIdleConnections` | int | |
| `--db.connectionPool.maxOpenConnections` | int | |
| `--db.dbname` | string | (default "postgres") |
| `--db.debug` | | |
| `--db.host` | string | (default "postgres") |
| `--db.log_level` | int | (default 4) |
| `--db.options` | string | (default "sslmode=disable") |
| `--db.password` | string | |
| `--db.passwordPath` | string | |
| `--db.port` | int | (default 5432) |
| `--db.username` | string | (default "postgres") |
| `-d`, `--domain` | string | Specifies the Flyte project's domain. |
| `--files.archive` | | Pass in archive file either an http link or local path. |
| `--files.assumableIamRole` | string | Custom assumable iam auth role to register launch plans with. |
| `--files.continueOnError` | | Continue on error when registering files. |
| `--files.destinationDirectory` | string | Location of source code in container. |
| `--files.dryRun` | | Execute command without making any modifications. |
| `--files.enableSchedule` | | Enable the schedule if the files contain schedulable launchplan. |
| `--files.force` | | Force use of version number on entities registered with flyte. |
| `--files.k8ServiceAccount` | string | Deprecated. Please use `--K8sServiceAccount`|
| `--files.k8sServiceAccount` | string | Custom kubernetes service account auth role to register launch plans with. |
| `--files.outputLocationPrefix` | string | Custom output location prefix for offloaded types (files/schemas). |
| `--files.sourceUploadPath` | string | Deprecated: Update flyte admin to avoid having to configure storage access from uctl. |
| `--files.version` | string | Version of the entity to be registered with flyte which are un-versioned after serialization. |
| `--logger.formatter.type` | string | Sets logging format type. (default "json") |
| `--logger.level` | int | Sets the minimum logging level. (default 3) |
| `--logger.mute` | | Mutes all logs regardless of severity. Intended for benchmarks/tests only. |
| `--logger.show-source` | | Includes source code location in logs. |
| `--org` | string | Organization to work on. If not set, default to user's org. |
| `--otel.file.filename` | string | Filename to store exported telemetry traces (default "/tmp/trace.txt") |
| `--otel.jaeger.endpoint` | string | Endpoint for the jaeger telemetry trace ingestor (default "http://localhost:14268/api/traces") |
| `--otel.otlpgrpc.endpoint` | string | Endpoint for the OTLP telemetry trace collector (default "http://localhost:4317") |
| `--otel.otlphttp.endpoint` | string | Endpoint for the OTLP telemetry trace collector (default "http://localhost:4318/v1/traces") |
| `--otel.sampler.parentSampler` | string | Sets the parent sampler to use for the tracer (default "always") |
| `--otel.type` | string | Sets the type of exporter to configure [noop/file/jaeger/otlpgrpc/otlphttp]. (default "noop") |
| `-o`, `--output` | string | Specifies the output type - supported formats [TABLE JSON YAML DOT DOTURL]. NOTE: dot, doturl are only supported for Workflow (default "table") |
| `--plugins.catalogcache.reader.maxItems` | int | Maximum number of entries to keep in the index. (default 10000) |
| `--plugins.catalogcache.reader.maxRetries` | int | Maximum number of retries per item. (default 3) |
| `--plugins.catalogcache.reader.workers` | int | Number of concurrent workers to start processing the queue. (default 10) |
| `--plugins.catalogcache.writer.maxItems` | int | Maximum number of entries to keep in the index. (default 10000) |
| `--plugins.catalogcache.writer.maxRetries` | int | Maximum number of retries per item. (default 3) |
| `--plugins.catalogcache.writer.workers` | int | Number of concurrent workers to start processing the queue. (default 10) |
| `-p`, `--project` | string | Specifies the Flyte project. |
| `--rediscache.passwordSecretName` | string | Name of secret with Redis password. |
| `--rediscache.primaryEndpoint` | string | Primary endpoint for the redis cache that can be used for both reads and writes. |
| `--rediscache.replicaEndpoint` | string | Replica endpoint for the redis cache that can be used for reads. |
| `--secrets.env-prefix` | string | Prefix for environment variables (default "FLYTE_SECRET_") |
| `--secrets.secrets-prefix` | string | Prefix where to look for secrets file (default "/etc/secrets") |
| `--secrets.type` | string | Sets the type of storage to configure [local]. (default "local") |
| `--server.dataProxy.download.maxExpiresIn` | string | Maximum allowed expiration duration. (default "1h0m0s") |
| `--server.dataProxy.upload.defaultFileNameLength` | int | Default length for the generated file name if not provided in the request. (default 20) |
| `--server.dataProxy.upload.maxExpiresIn` | string | Maximum allowed expiration duration. (default "1h0m0s") |
| `--server.dataProxy.upload.maxSize` | string | Maximum allowed upload size. (default "6Mi") |
| `--server.dataProxy.upload.storagePrefix` | string | Storage prefix to use for all upload requests. |
| `--server.grpc.enableGrpcLatencyMetrics` | | Enable grpc latency metrics. Note Histograms metrics can be expensive on Prometheus servers. |
| `--server.grpc.maxMessageSizeBytes` | int | The max size in bytes for incoming gRPC messages |
| `--server.grpc.port` | int | On which grpc port to serve admin (default 8089) |
| `--server.grpc.serverReflection` | | Enable GRPC Server Reflection (default true) |
| `--server.grpcPort` | int | deprecated |
| `--server.grpcServerReflection` | | deprecated |
| `--server.httpPort` | int | On which http port to serve admin (default 8088) |
| `--server.kube-config` | string | Path to kubernetes client config file, default is empty, useful for incluster config. |
| `--server.kubeClientConfig.burst` | int | Max burst rate for throttle. 0 defaults to 10 (default 25) |
| `--server.kubeClientConfig.qps` | int32 | Max QPS to the master for requests to KubeAPI. 0 defaults to 5. (default 100) |
| `--server.kubeClientConfig.timeout` | string | Max duration allowed for every request to KubeAPI before giving up. 0 implies no timeout. (default "30s") |
| `--server.master` | string | The address of the Kubernetes API server. |
| `--server.readHeaderTimeoutSeconds` | int | The amount of time allowed to read request headers. (default 32) |
| `--server.security.allowCors` | | (default true) |
| `--server.security.allowedHeaders` | strings | (default [Content-Type,flyte-authorization]) |
| `--server.security.allowedOrigins` | strings | (default [*]) |
| `--server.security.auditAccess` | | |
| `--server.security.secure` | | |
| `--server.security.ssl.certificateFile` | string | |
| `--server.security.ssl.keyFile` | string | |
| `--server.security.useAuth` | | |
| `--server.thirdPartyConfig.flyteClient.audience` | string | Audience to use when initiating OAuth2 authorization requests. |
| `--server.thirdPartyConfig.flyteClient.clientId` | string | public identifier for the app which handles authorization for a Flyte deployment |
| `--server.thirdPartyConfig.flyteClient.redirectUri` | string | This is the callback uri registered with the app which handles authorization for a Flyte deployment |
| `--server.thirdPartyConfig.flyteClient.scopes` | strings | Recommended scopes for the client to request. |
| `--server.watchService.maxActiveClusterConnections` | int | (default 5) |
| `--server.watchService.maxPageSize` | int | (default 50000) |
| `--server.watchService.nonTerminalStatusUpdatesInterval` | string | (default "1m0s") |
| `--server.watchService.pollInterval` | string | (default "1s") |
| `--sharedservice.connectPort` | string | On which connect port to serve admin (default "8080") |
| `--sharedservice.grpc.grpcMaxResponseStatusBytes` | int32 | specifies the maximum (uncompressed) size of header list that the client is prepared to accept on grpc calls (default 32000) |
| `--sharedservice.grpc.maxConcurrentStreams` | int | Limit on the number of concurrent streams to each ServerTransport. (default 100) |
| `--sharedservice.grpc.maxMessageSizeBytes` | int | Limit on the size of message that can be received on the server. (default 10485760) |
| `--sharedservice.grpcServerReflection` | | Enable GRPC Server Reflection (default true) |
| `--sharedservice.httpPort` | string | On which http port to serve admin (default "8089") |
| `--sharedservice.kubeConfig` | string | Path to kubernetes client config file. |
| `--sharedservice.master` | string | The address of the Kubernetes API server. |
| `--sharedservice.metrics.enableClientGrpcHistograms` | | Enable client grpc histograms (default true) |
| `--sharedservice.metrics.enableGrpcHistograms` | | Enable grpc histograms (default true) |
| `--sharedservice.metrics.scope` | string | Scope to emit metrics under (default "service:") |
| `--sharedservice.port` | string | On which grpc port to serve admin (default "8080") |
| `--sharedservice.profiler.enabled` | | Enable Profiler on server |
| `--sharedservice.profilerPort` | string | Profile port to start listen for pprof and metric handlers on. (default "10254") |
| `--sharedservice.security.allowCors` | | |
| `--sharedservice.security.allowLocalhostAccess` | | Whether to permit localhost unauthenticated access to the server |
| `--sharedservice.security.allowedHeaders` | strings | |
| `--sharedservice.security.allowedOrigins` | strings | |
| `--sharedservice.security.auditAccess` | | |
| `--sharedservice.security.orgOverride` | string | Override org in identity context if localhost access enabled |
| `--sharedservice.security.secure` | | |
| `--sharedservice.security.ssl.certificateAuthorityFile` | string | |
| `--sharedservice.security.ssl.certificateFile` | string | |
| `--sharedservice.security.ssl.keyFile` | string | |
| `--sharedservice.security.useAuth` | | |
| `--sharedservice.sync.syncInterval` | string | Time interval to sync (default "5m0s") |
| `--storage.cache.max_size_mbs` | int | Maximum size of the cache where the Blob store data is cached in-memory. If not specified or set to 0, cache is not used |
| `--storage.cache.target_gc_percent` | int | Sets the garbage collection target percentage. |
| `--storage.connection.access-key` | string | Access key to use. Only required when authtype is set to accesskey. |
| `--storage.connection.auth-type` | string | Auth Type to use [iam, accesskey]. (default "iam") |
| `--storage.connection.disable-ssl` | | Disables SSL connection. Should only be used for development. |
| `--storage.connection.endpoint` | string | URL for storage client to connect to. |
| `--storage.connection.region` | string | Region to connect to. (default "us-east-1") |
| `--storage.connection.secret-key` | string | Secret to use when accesskey is set. |
| `--storage.container` | string | Initial container (in s3 a bucket) to create -if it doesn't exist-.' |
| `--storage.defaultHttpClient.timeout` | string | Sets time out on the http client. (default "0s") |
| `--storage.enable-multicontainer` | | If this is true, then the container argument is overlooked and redundant. This config will automatically open new connections to new containers/buckets as they are encountered |
| `--storage.limits.maxDownloadMBs` | int | Maximum allowed download size (in MBs) per call. (default 2) |
| `--storage.stow.config` | stringToString | Configuration for stow backend. Refer to github/flyteorg/stow (default []) |
| `--storage.stow.kind` | string | Kind of Stow backend to use. Refer to github/flyteorg/stow |
| `--storage.type` | string | Sets the type of storage to configure [s3/minio/local/mem/stow]. (default "s3") |
| `--union.auth.authorizationMetadataKey` | string | Authorization Header to use when passing Access Tokens to the server (default "flyte-authorization") |
| `--union.auth.clientId` | string | Client ID |
| `--union.auth.clientSecretEnvVar` | string | Environment variable containing the client secret |
| `--union.auth.clientSecretLocation` | string | File containing the client secret |
| `--union.auth.deviceFlow.pollInterval` | string | amount of time the device flow would poll the token endpoint if auth server doesn't return a polling interval. Okta and google IDP do return an interval' (default "5s") |
| `--union.auth.deviceFlow.refreshTime` | string | grace period from the token expiry after which it would refresh the token. (default "5m0s") |
| `--union.auth.deviceFlow.timeout` | string | amount of time the device flow should complete or else it will be cancelled. (default "10m0s") |
| `--union.auth.enable` | | Whether to enable an authenticated conenction when communicating with admin. (default true) |
| `--union.auth.externalAuth.command` | strings | Command for external authentication token generation |
| `--union.auth.pkce.refreshTime` | string | grace period from the token expiry after which it would refresh the token. (default "5m0s") |
| `--union.auth.pkce.timeout` | string | Amount of time the browser session would be active for authentication from client app. (default "15s") |
| `--union.auth.scopes` | strings | List of scopes to request |
| `--union.auth.tokenRefreshWindow` | string | Max duration between token refresh attempt and token expiry. (default "1h0m0s") |
| `--union.auth.tokenUrl` | string | OPTIONAL: Your IdP's token endpoint. It'll be discovered from flyte admin's OAuth Metadata endpoint if not provided. |
| `--union.auth.type` | string | Type of OAuth2 flow used for communicating with admin. (default "Pkce") |
| `--union.cache.maxItemsCount` | int | Maximum number of items to keep in the cache before evicting. (default 1000) |
| `--union.connection.host` | string | Host to connect to (default "dns:///utt-mgdp-stg-us-east-2.cloud-staging.union.ai") |
| `--union.connection.insecure` | | Whether to connect over insecure channel |
| `--union.connection.insecureSkipVerify` | | InsecureSkipVerify controls whether a client verifies the server's certificate chain and host name.Caution: shouldn't be use for production usecases' |
| `--union.connection.keepAliveConfig.permitWithoutStream` | | If true, client sends keepalive pings even with no active RPCs. |
| `--union.connection.keepAliveConfig.time` | string | After a duration of this time if the client doesn't see any activity it pings the server to see if the transport is still alive. (default "20s") |
| `--union.connection.keepAliveConfig.timeout` | string | After having pinged for keepalive check, the client waits for a duration of Timeout and if no activity is seen even after that the connection is closed. (default "2m0s") |
| `--union.connection.maxBackoffDelay` | string | Max delay for grpc backoff (default "8s") |
| `--union.connection.maxRecvMsgSize` | int | Maximum size of a message in bytes of a gRPC message (default 10485760) |
| `--union.connection.maxRetries` | int | Max number of gRPC retries (default 4) |
| `--union.connection.minConnectTimeout` | string | Minimum timeout for establishing a connection (default "20s") |
| `--union.connection.perRetryTimeout` | string | gRPC per retry timeout (default "15s") |
| `--union.connection.serviceConfig` | string | Defines gRPC experimental JSON Service Config (default "{"loadBalancingConfig": [{"round_robin":{}}]}") |
| `--union.connection.trustedIdentityClaims.enabled` | | Enables passing of trusted claims while making inter service calls |
| `--union.connection.trustedIdentityClaims.externalIdentityClaim` | string | External identity claim of the service which is authorized to make internal service call. These are verified against userclouds actions |
| `--union.connection.trustedIdentityClaims.externalIdentityTypeClaim` | string | External identity type claim of app or user to use for the current service identity. It should be an 'app' for inter service communication |
| `--union.internalConnectionConfig.-` | stringToString | (default []) |
| `--union.internalConnectionConfig.enabled` | | Enables internal service to service communication instead of going through ingress. |
| `--union.internalConnectionConfig.urlPattern` | string | UrlPattern of the internal service endpoints. (default "{{ service }}-helmchart.{{ service }}.svc.cluster.local:80") |
| `--webhook.awsSecretManager.sidecarImage` | string | Specifies the sidecar docker image to use (default "docker.io/amazon/aws-secrets-manager-secret-sidecar:v0.1.4") |
| `--webhook.certDir` | string | Certificate directory to use to write generated certs. Defaults to /etc/webhook/certs/ (default "/etc/webhook/certs") |
| `--webhook.embeddedSecretManagerConfig.awsConfig.region` | string | AWS region |
| `--webhook.embeddedSecretManagerConfig.fileMountInitContainer.image` | string | Specifies init container image to use for mounting secrets as files. (default "busybox:1.28") |
| `--webhook.embeddedSecretManagerConfig.gcpConfig.project` | string | GCP project to be used for secret manager |
| `--webhook.embeddedSecretManagerConfig.type` | string | (default "AWS") |
| `--webhook.gcpSecretManager.sidecarImage` | string | Specifies the sidecar docker image to use (default "gcr.io/google.com/cloudsdktool/cloud-sdk:alpine") |
| `--webhook.listenPort` | int | The port to use to listen to webhook calls. Defaults to 9443 (default 9443) |
| `--webhook.localCert` | | write certs locally. Defaults to false |
| `--webhook.metrics-prefix` | string | An optional prefix for all published metrics. (default "flyte:") |
| `--webhook.secretName` | string | Secret name to write generated certs to. (default "flyte-pod-webhook") |
| `--webhook.serviceName` | string | The name of the webhook service. (default "flyte-pod-webhook") |
| `--webhook.servicePort` | int32 | The port on the service that hosting webhook. (default 443) |
| `--webhook.vaultSecretManager.role` | string | Specifies the vault role to use (default "flyte") |
=== PAGE: https://www.union.ai/docs/v1/serverless/api-reference/uctl-cli/uctl-get/uctl-get-execution-cluster-label ===
# uctl get execution-cluster-label
Gets matchable resources of execution cluster label.
## Synopsis
Retrieve the execution cluster label for a given project and domain, in
combination with the workflow name.
For project flytesnacks and development domain, run:
```shell
$ uctl get execution-cluster-label -p flytesnacks -d development
```
The output would look like:
``` json
{"project":"flytesnacks","domain":"development","value":"foo"}
```
Retrieve the execution cluster label for the given project, domain, and
workflow. For project flytesnacks, development domain, and workflow
`core.control_flow.merge_sort.merge_sort`:
```shell
$ uctl get execution-cluster-label -p flytesnacks -d development core.control_flow.merge_sort.merge_sort
```
Example: output from the command:
``` json
{"project":"flytesnacks","domain":"development","workflow":"core.control_flow.merge_sort.merge_sort","value":"foo"}
```
Write the execution cluster label to a file. If there is no execution
cluster label, the command throws an error. The config file is written
to ecl.yaml file. Example: content of ecl.yaml:
```shell
$ uctl get execution-cluster-label --attrFile ecl.yaml
```
``` yaml
domain: development
project: flytesnacks
value: foo
```
Usage:
```shell
$ uctl get execution-cluster-label [flags]
```
## Options
| Option | Type | Description |
|--------|------|-------------|
| `--attrFile` | string | attribute file name to be used for generating attribute for the resource type. |
| `-h`, `--help` | help for execution-cluster-label |
### Options inherited from parent commands
| Option | Type | Description |
|--------|------|-------------|
| `--admin.audience` | string | Audience to use when initiating OAuth2 authorization requests. |
| `--admin.authType` | string | Type of OAuth2 flow used for communicating with admin.ClientSecret, Pkce, ExternalCommand are valid values (default "ClientSecret") |
| `--admin.authorizationHeader` | string | Custom metadata header to pass JWT |
| `--admin.authorizationServerUrl` | string | This is the URL to your IdP's authorization server. It'll default to Endpoint |
| `--admin.caCertFilePath` | string | Use specified certificate file to verify the admin server peer. |
| `--admin.clientId` | string | Client ID (default "flytepropeller") |
| `--admin.clientSecretEnvVar` | string | Environment variable containing the client secret |
| `--admin.clientSecretLocation` | string | File containing the client secret (default "/etc/secrets/client_secret") |
| `--admin.command` | strings | Command for external authentication token generation |
| `--admin.defaultOrg` | string | OPTIONAL: Default org to use to support non-org based cli's.'. |
| `--admin.defaultServiceConfig` | string | |
| `--admin.deviceFlowConfig.pollInterval` | string | amount of time the device flow would poll the token endpoint if auth server doesn't return a polling interval. Okta and google IDP do return an interval' (default "5s") |
| `--admin.deviceFlowConfig.refreshTime` | string | grace period from the token expiry after which it would refresh the token. (default "5m0s") |
| `--admin.deviceFlowConfig.timeout` | string | amount of time the device flow should complete or else it will be cancelled. (default "10m0s") |
| `--admin.endpoint` | string | For admin types, specify where the uri of the service is located. |
| `--admin.httpProxyURL` | string | OPTIONAL: HTTP Proxy to be used for OAuth requests. |
| `--admin.insecure` | | Use insecure connection. |
| `--admin.insecureSkipVerify` | | InsecureSkipVerify controls whether a client verifies the server's certificate chain and host name.Caution: shouldn't be use for production usecases' |
| `--admin.maxBackoffDelay` | string | Max delay for grpc backoff (default "8s") |
| `--admin.maxMessageSizeBytes` | int | The max size in bytes for incoming gRPC messages |
| `--admin.maxRetries` | int | Max number of gRPC retries (default 4) |
| `--admin.perRetryTimeout` | string | gRPC per retry timeout (default "15s") |
| `--admin.pkceConfig.refreshTime` | string | grace period from the token expiry after which it would refresh the token. (default "5m0s") |
| `--admin.pkceConfig.timeout` | string | Amount of time the browser session would be active for authentication from client app. (default "2m0s") |
| `--admin.proxyCommand` | strings | Command for external proxy-authorization token generation |
| `--admin.scopes` | strings | List of scopes to request |
| `--admin.tokenRefreshWindow` | string | Max duration between token refresh attempt and token expiry. (default "0s") |
| `--admin.tokenUrl` | string | OPTIONAL: Your IdP's token endpoint. It'll be discovered from flyte admin's OAuth Metadata endpoint if not provided. |
| `--admin.useAudienceFromAdmin` | | Use Audience configured from admins public endpoint config. |
| `--admin.useAuth` | | Deprecated: Auth will be enabled/disabled based on admin's dynamically discovered information. |
| `--auth.appAuth.externalAuthServer.allowedAudience` | strings | Optional: A list of allowed audiences. If not provided, the audience is expected to be the public Uri of the service. |
| `--auth.appAuth.externalAuthServer.baseUrl` | string | This should be the base url of the authorization server that you are trying to hit. With Okta for instance, it will look something like https://company.okta.com/oauth2/abcdef123456789/ |
| `--auth.appAuth.externalAuthServer.httpProxyURL` | string | OPTIONAL: HTTP Proxy to be used for OAuth requests. |
| `--auth.appAuth.externalAuthServer.metadataUrl` | string | Optional: If the server doesn't support /.well-known/oauth-authorization-server, you can set a custom metadata url here.' |
| `--auth.appAuth.externalAuthServer.retryAttempts` | int | Optional: The number of attempted retries on a transient failure to get the OAuth metadata (default 5) |
| `--auth.appAuth.externalAuthServer.retryDelay` | string | Optional, Duration to wait between retries (default "1s") |
| `--auth.appAuth.selfAuthServer.accessTokenLifespan` | string | Defines the lifespan of issued access tokens. (default "30m0s") |
| `--auth.appAuth.selfAuthServer.authorizationCodeLifespan` | string | Defines the lifespan of issued access tokens. (default "5m0s") |
| `--auth.appAuth.selfAuthServer.claimSymmetricEncryptionKeySecretName` | string | OPTIONAL: Secret name to use to encrypt claims in authcode token. (default "claim_symmetric_key") |
| `--auth.appAuth.selfAuthServer.issuer` | string | Defines the issuer to use when issuing and validating tokens. The default value is https://{requestUri.HostAndPort}/ |
| `--auth.appAuth.selfAuthServer.oldTokenSigningRSAKeySecretName` | string | OPTIONAL: Secret name to use to retrieve Old RSA Signing Key. This can be useful during key rotation to continue to accept older tokens. (default "token_rsa_key_old.pem") |
| `--auth.appAuth.selfAuthServer.refreshTokenLifespan` | string | Defines the lifespan of issued access tokens. (default "1h0m0s") |
| `--auth.appAuth.selfAuthServer.tokenSigningRSAKeySecretName` | string | OPTIONAL: Secret name to use to retrieve RSA Signing Key. (default "token_rsa_key.pem") |
| `--auth.appAuth.thirdPartyConfig.flyteClient.audience` | string | Audience to use when initiating OAuth2 authorization requests. |
| `--auth.appAuth.thirdPartyConfig.flyteClient.clientId` | string | public identifier for the app which handles authorization for a Flyte deployment (default "uctl") |
| `--auth.appAuth.thirdPartyConfig.flyteClient.redirectUri` | string | This is the callback uri registered with the app which handles authorization for a Flyte deployment (default "http://localhost:53593/callback") |
| `--auth.appAuth.thirdPartyConfig.flyteClient.scopes` | strings | Recommended scopes for the client to request. (default [all,offline]) |
| `--auth.disableForGrpc` | | Disables auth enforcement on Grpc Endpoints. |
| `--auth.disableForHttp` | | Disables auth enforcement on HTTP Endpoints. |
| `--auth.grpcAuthorizationHeader` | string | (default "flyte-authorization") |
| `--auth.httpAuthorizationHeader` | string | (default "flyte-authorization") |
| `--auth.httpProxyURL` | string | OPTIONAL: HTTP Proxy to be used for OAuth requests. |
| `--auth.tokenEndpointProxyPath` | string | The path used to proxy calls to the TokenURL |
| `--auth.userAuth.cookieBlockKeySecretName` | string | OPTIONAL: Secret name to use for cookie block key. (default "cookie_block_key") |
| `--auth.userAuth.cookieHashKeySecretName` | string | OPTIONAL: Secret name to use for cookie hash key. (default "cookie_hash_key") |
| `--auth.userAuth.cookieSetting.domain` | string | OPTIONAL: Allows you to set the domain attribute on the auth cookies. |
| `--auth.userAuth.cookieSetting.sameSitePolicy` | string | OPTIONAL: Allows you to declare if your cookie should be restricted to a first-party or same-site context.Wrapper around http.SameSite. (default "DefaultMode") |
| `--auth.userAuth.httpProxyURL` | string | OPTIONAL: HTTP Proxy to be used for OAuth requests. |
| `--auth.userAuth.idpQueryParameter` | string | idp query parameter used for selecting a particular IDP for doing user authentication. Eg: for Okta passing idp={IDP-ID} forces the authentication to happen with IDP-ID |
| `--auth.userAuth.openId.baseUrl` | string | |
| `--auth.userAuth.openId.clientId` | string | |
| `--auth.userAuth.openId.clientSecretFile` | string | |
| `--auth.userAuth.openId.clientSecretName` | string | (default "oidc_client_secret") |
| `--auth.userAuth.openId.scopes` | strings | (default [openid,profile]) |
| `--auth.userAuth.redirectUrl` | string | (default "/console") |
| `--authorizer.internalCommunicationConfig.enabled` | | Enables authorization decisions for internal communication. (default true) |
| `--authorizer.internalCommunicationConfig.ingressIdentity` | string | IngressIdentity used in the cluster. Needed to exclude the communication coming from ingress. (default "ingress-nginx.ingress-nginx.serviceaccount.identity.linkerd.cluster.local") |
| `--authorizer.internalCommunicationConfig.tenantUrlPatternIdentity` | string | UrlPatternIdentity of the internal tenant service endpoint identities. (default "{{ service }}.{{ org }}.serviceaccount.identity.linkerd.cluster.local") |
| `--authorizer.internalCommunicationConfig.urlPatternIdentity` | string | UrlPatternIdentity of the internal service endpoint identities. (default "{{ service }}-helmchart.{{ service }}.serviceaccount.identity.linkerd.cluster.local") |
| `--authorizer.mode` | string | (default "Active") |
| `--authorizer.organizationConfig.PolicyConfig.adminPolicyDescription` | string | description for the boilerplate admin policy (default "Contributor permissions and full admin permissions to manage users and view usage dashboards") |
| `--authorizer.organizationConfig.PolicyConfig.contributorPolicyDescription` | string | description for the boilerplate contributor policy (default "Viewer permissions and permissions to create workflows, tasks, launch plans, and executions") |
| `--authorizer.organizationConfig.PolicyConfig.defaultUserPolicyRoleType` | string | name of the role type to determine which default policy new users added to the organization should be assigned (default "Viewer") |
| `--authorizer.organizationConfig.PolicyConfig.serverlessContributorPolicyDescription` | string | description for the boilerplate serverless contributor policy (default "Viewer permissions and permissions to create workflows, tasks, launch plans, and executions") |
| `--authorizer.organizationConfig.PolicyConfig.serverlessViewerPolicyDescription` | string | description for the boilerplate serverless viewer policy (default "Permissions to view Flyte entities") |
| `--authorizer.organizationConfig.PolicyConfig.viewerPolicyDescription` | string | description for the boilerplate viewer policy (default "Permissions to view Flyte entities") |
| `--authorizer.organizationConfig.defaultPolicyCacheDuration` | string | Cache entry duration for the store of the default policy per organization (default "10m0s") |
| `--authorizer.syncRuleRefreshInterval` | string | (default "1m0s") |
| `--authorizer.type` | string | (default "UserClouds") |
| `--authorizer.userCloudsClient.cache.redis.ttl.edgeTypes` | string | Specifies how long edge types remain in the cache.. (default "30m0s") |
| `--authorizer.userCloudsClient.cache.redis.ttl.edges` | string | Specifies how long edges remain in the cache. (default "30m0s") |
| `--authorizer.userCloudsClient.cache.redis.ttl.objectTypes` | string | Specifies how long object types remain in the cache. (default "30m0s") |
| `--authorizer.userCloudsClient.cache.redis.ttl.objects` | string | Specifies how long objects remain in the cache. (default "30m0s") |
| `--authorizer.userCloudsClient.cache.type` | string | Cache type to use. (default "none") |
| `--authorizer.userCloudsClient.clientID` | string | UserClouds client id |
| `--authorizer.userCloudsClient.clientSecretName` | string | UserCloud client secret name to read from the secret manager. (default "userclouds-client-secret") |
| `--authorizer.userCloudsClient.enableLogging` | | Enable userclouds client's internal logging. Calls to post logs take 250-350 ms and will impact p99 latency, enable with caution. |
| `--authorizer.userCloudsClient.tenantID` | string | UserClouds tenant id. Should be a UUID. |
| `--authorizer.userCloudsClient.tenantUrl` | string | Something like https://{yourtenant}.tenant.userclouds.com |
| `--config` | string | config file (default is /Users/andrew/.union/config.yaml) |
| `--connection.environment` | string | |
| `--connection.region` | string | |
| `--connection.rootTenantURLPattern` | string | Pattern for tenant url. (default "dns:///{{ organization }}.cloud-staging.union.ai") |
| `--console.endpoint` | string | Endpoint of console, if different than flyte admin |
| `--database.connMaxLifeTime` | string | sets the maximum amount of time a connection may be reused (default "1h0m0s") |
| `--database.enableForeignKeyConstraintWhenMigrating` | | Whether to enable gorm foreign keys when migrating the db |
| `--database.maxIdleConnections` | int | maxIdleConnections sets the maximum number of connections in the idle connection pool. (default 10) |
| `--database.maxOpenConnections` | int | maxOpenConnections sets the maximum number of open connections to the database. (default 100) |
| `--database.postgres.dbname` | string | The database name (default "postgres") |
| `--database.postgres.debug` | | |
| `--database.postgres.host` | string | The host name of the database server (default "localhost") |
| `--database.postgres.options` | string | See http://gorm.io/docs/connecting_to_the_database.html for available options passed, in addition to the above. (default "sslmode=disable") |
| `--database.postgres.password` | string | The database password. (default "postgres") |
| `--database.postgres.passwordPath` | string | Points to the file containing the database password. |
| `--database.postgres.port` | int | The port name of the database server (default 30001) |
| `--database.postgres.readReplicaHost` | string | The host name of the read replica database server (default "localhost") |
| `--database.postgres.username` | string | The database user who is connecting to the server. (default "postgres") |
| `--database.sqlite.file` | string | The path to the file (existing or new) where the DB should be created / stored. If existing, then this will be re-used, else a new will be created |
| `--db.connectionPool.maxConnectionLifetime` | string | (default "0s") |
| `--db.connectionPool.maxIdleConnections` | int | |
| `--db.connectionPool.maxOpenConnections` | int | |
| `--db.dbname` | string | (default "postgres") |
| `--db.debug` | | |
| `--db.host` | string | (default "postgres") |
| `--db.log_level` | int | (default 4) |
| `--db.options` | string | (default "sslmode=disable") |
| `--db.password` | string | |
| `--db.passwordPath` | string | |
| `--db.port` | int | (default 5432) |
| `--db.username` | string | (default "postgres") |
| `-d`, `--domain` | string | Specifies the Flyte project's domain. |
| `--files.archive` | | Pass in archive file either an http link or local path. |
| `--files.assumableIamRole` | string | Custom assumable iam auth role to register launch plans with. |
| `--files.continueOnError` | | Continue on error when registering files. |
| `--files.destinationDirectory` | string | Location of source code in container. |
| `--files.dryRun` | | Execute command without making any modifications. |
| `--files.enableSchedule` | | Enable the schedule if the files contain schedulable launchplan. |
| `--files.force` | | Force use of version number on entities registered with flyte. |
| `--files.k8ServiceAccount` | string | Deprecated. Please use `--K8sServiceAccount`|
| `--files.k8sServiceAccount` | string | Custom kubernetes service account auth role to register launch plans with. |
| `--files.outputLocationPrefix` | string | Custom output location prefix for offloaded types (files/schemas). |
| `--files.sourceUploadPath` | string | Deprecated: Update flyte admin to avoid having to configure storage access from uctl. |
| `--files.version` | string | Version of the entity to be registered with flyte which are un-versioned after serialization. |
| `--logger.formatter.type` | string | Sets logging format type. (default "json") |
| `--logger.level` | int | Sets the minimum logging level. (default 3) |
| `--logger.mute` | | Mutes all logs regardless of severity. Intended for benchmarks/tests only. |
| `--logger.show-source` | | Includes source code location in logs. |
| `--org` | string | Organization to work on. If not set, default to user's org. |
| `--otel.file.filename` | string | Filename to store exported telemetry traces (default "/tmp/trace.txt") |
| `--otel.jaeger.endpoint` | string | Endpoint for the jaeger telemetry trace ingestor (default "http://localhost:14268/api/traces") |
| `--otel.otlpgrpc.endpoint` | string | Endpoint for the OTLP telemetry trace collector (default "http://localhost:4317") |
| `--otel.otlphttp.endpoint` | string | Endpoint for the OTLP telemetry trace collector (default "http://localhost:4318/v1/traces") |
| `--otel.sampler.parentSampler` | string | Sets the parent sampler to use for the tracer (default "always") |
| `--otel.type` | string | Sets the type of exporter to configure [noop/file/jaeger/otlpgrpc/otlphttp]. (default "noop") |
| `-o`, `--output` | string | Specifies the output type - supported formats [TABLE JSON YAML DOT DOTURL]. NOTE: dot, doturl are only supported for Workflow (default "table") |
| `--plugins.catalogcache.reader.maxItems` | int | Maximum number of entries to keep in the index. (default 10000) |
| `--plugins.catalogcache.reader.maxRetries` | int | Maximum number of retries per item. (default 3) |
| `--plugins.catalogcache.reader.workers` | int | Number of concurrent workers to start processing the queue. (default 10) |
| `--plugins.catalogcache.writer.maxItems` | int | Maximum number of entries to keep in the index. (default 10000) |
| `--plugins.catalogcache.writer.maxRetries` | int | Maximum number of retries per item. (default 3) |
| `--plugins.catalogcache.writer.workers` | int | Number of concurrent workers to start processing the queue. (default 10) |
| `-p`, `--project` | string | Specifies the Flyte project. |
| `--rediscache.passwordSecretName` | string | Name of secret with Redis password. |
| `--rediscache.primaryEndpoint` | string | Primary endpoint for the redis cache that can be used for both reads and writes. |
| `--rediscache.replicaEndpoint` | string | Replica endpoint for the redis cache that can be used for reads. |
| `--secrets.env-prefix` | string | Prefix for environment variables (default "FLYTE_SECRET_") |
| `--secrets.secrets-prefix` | string | Prefix where to look for secrets file (default "/etc/secrets") |
| `--secrets.type` | string | Sets the type of storage to configure [local]. (default "local") |
| `--server.dataProxy.download.maxExpiresIn` | string | Maximum allowed expiration duration. (default "1h0m0s") |
| `--server.dataProxy.upload.defaultFileNameLength` | int | Default length for the generated file name if not provided in the request. (default 20) |
| `--server.dataProxy.upload.maxExpiresIn` | string | Maximum allowed expiration duration. (default "1h0m0s") |
| `--server.dataProxy.upload.maxSize` | string | Maximum allowed upload size. (default "6Mi") |
| `--server.dataProxy.upload.storagePrefix` | string | Storage prefix to use for all upload requests. |
| `--server.grpc.enableGrpcLatencyMetrics` | | Enable grpc latency metrics. Note Histograms metrics can be expensive on Prometheus servers. |
| `--server.grpc.maxMessageSizeBytes` | int | The max size in bytes for incoming gRPC messages |
| `--server.grpc.port` | int | On which grpc port to serve admin (default 8089) |
| `--server.grpc.serverReflection` | | Enable GRPC Server Reflection (default true) |
| `--server.grpcPort` | int | deprecated |
| `--server.grpcServerReflection` | | deprecated |
| `--server.httpPort` | int | On which http port to serve admin (default 8088) |
| `--server.kube-config` | string | Path to kubernetes client config file, default is empty, useful for incluster config. |
| `--server.kubeClientConfig.burst` | int | Max burst rate for throttle. 0 defaults to 10 (default 25) |
| `--server.kubeClientConfig.qps` | int32 | Max QPS to the master for requests to KubeAPI. 0 defaults to 5. (default 100) |
| `--server.kubeClientConfig.timeout` | string | Max duration allowed for every request to KubeAPI before giving up. 0 implies no timeout. (default "30s") |
| `--server.master` | string | The address of the Kubernetes API server. |
| `--server.readHeaderTimeoutSeconds` | int | The amount of time allowed to read request headers. (default 32) |
| `--server.security.allowCors` | | (default true) |
| `--server.security.allowedHeaders` | strings | (default [Content-Type,flyte-authorization]) |
| `--server.security.allowedOrigins` | strings | (default [*]) |
| `--server.security.auditAccess` | | |
| `--server.security.secure` | | |
| `--server.security.ssl.certificateFile` | string | |
| `--server.security.ssl.keyFile` | string | |
| `--server.security.useAuth` | | |
| `--server.thirdPartyConfig.flyteClient.audience` | string | Audience to use when initiating OAuth2 authorization requests. |
| `--server.thirdPartyConfig.flyteClient.clientId` | string | public identifier for the app which handles authorization for a Flyte deployment |
| `--server.thirdPartyConfig.flyteClient.redirectUri` | string | This is the callback uri registered with the app which handles authorization for a Flyte deployment |
| `--server.thirdPartyConfig.flyteClient.scopes` | strings | Recommended scopes for the client to request. |
| `--server.watchService.maxActiveClusterConnections` | int | (default 5) |
| `--server.watchService.maxPageSize` | int | (default 50000) |
| `--server.watchService.nonTerminalStatusUpdatesInterval` | string | (default "1m0s") |
| `--server.watchService.pollInterval` | string | (default "1s") |
| `--sharedservice.connectPort` | string | On which connect port to serve admin (default "8080") |
| `--sharedservice.grpc.grpcMaxResponseStatusBytes` | int32 | specifies the maximum (uncompressed) size of header list that the client is prepared to accept on grpc calls (default 32000) |
| `--sharedservice.grpc.maxConcurrentStreams` | int | Limit on the number of concurrent streams to each ServerTransport. (default 100) |
| `--sharedservice.grpc.maxMessageSizeBytes` | int | Limit on the size of message that can be received on the server. (default 10485760) |
| `--sharedservice.grpcServerReflection` | | Enable GRPC Server Reflection (default true) |
| `--sharedservice.httpPort` | string | On which http port to serve admin (default "8089") |
| `--sharedservice.kubeConfig` | string | Path to kubernetes client config file. |
| `--sharedservice.master` | string | The address of the Kubernetes API server. |
| `--sharedservice.metrics.enableClientGrpcHistograms` | | Enable client grpc histograms (default true) |
| `--sharedservice.metrics.enableGrpcHistograms` | | Enable grpc histograms (default true) |
| `--sharedservice.metrics.scope` | string | Scope to emit metrics under (default "service:") |
| `--sharedservice.port` | string | On which grpc port to serve admin (default "8080") |
| `--sharedservice.profiler.enabled` | | Enable Profiler on server |
| `--sharedservice.profilerPort` | string | Profile port to start listen for pprof and metric handlers on. (default "10254") |
| `--sharedservice.security.allowCors` | | |
| `--sharedservice.security.allowLocalhostAccess` | | Whether to permit localhost unauthenticated access to the server |
| `--sharedservice.security.allowedHeaders` | strings | |
| `--sharedservice.security.allowedOrigins` | strings | |
| `--sharedservice.security.auditAccess` | | |
| `--sharedservice.security.orgOverride` | string | Override org in identity context if localhost access enabled |
| `--sharedservice.security.secure` | | |
| `--sharedservice.security.ssl.certificateAuthorityFile` | string | |
| `--sharedservice.security.ssl.certificateFile` | string | |
| `--sharedservice.security.ssl.keyFile` | string | |
| `--sharedservice.security.useAuth` | | |
| `--sharedservice.sync.syncInterval` | string | Time interval to sync (default "5m0s") |
| `--storage.cache.max_size_mbs` | int | Maximum size of the cache where the Blob store data is cached in-memory. If not specified or set to 0, cache is not used |
| `--storage.cache.target_gc_percent` | int | Sets the garbage collection target percentage. |
| `--storage.connection.access-key` | string | Access key to use. Only required when authtype is set to accesskey. |
| `--storage.connection.auth-type` | string | Auth Type to use [iam, accesskey]. (default "iam") |
| `--storage.connection.disable-ssl` | | Disables SSL connection. Should only be used for development. |
| `--storage.connection.endpoint` | string | URL for storage client to connect to. |
| `--storage.connection.region` | string | Region to connect to. (default "us-east-1") |
| `--storage.connection.secret-key` | string | Secret to use when accesskey is set. |
| `--storage.container` | string | Initial container (in s3 a bucket) to create -if it doesn't exist-.' |
| `--storage.defaultHttpClient.timeout` | string | Sets time out on the http client. (default "0s") |
| `--storage.enable-multicontainer` | | If this is true, then the container argument is overlooked and redundant. This config will automatically open new connections to new containers/buckets as they are encountered |
| `--storage.limits.maxDownloadMBs` | int | Maximum allowed download size (in MBs) per call. (default 2) |
| `--storage.stow.config` | stringToString | Configuration for stow backend. Refer to github/flyteorg/stow (default []) |
| `--storage.stow.kind` | string | Kind of Stow backend to use. Refer to github/flyteorg/stow |
| `--storage.type` | string | Sets the type of storage to configure [s3/minio/local/mem/stow]. (default "s3") |
| `--union.auth.authorizationMetadataKey` | string | Authorization Header to use when passing Access Tokens to the server (default "flyte-authorization") |
| `--union.auth.clientId` | string | Client ID |
| `--union.auth.clientSecretEnvVar` | string | Environment variable containing the client secret |
| `--union.auth.clientSecretLocation` | string | File containing the client secret |
| `--union.auth.deviceFlow.pollInterval` | string | amount of time the device flow would poll the token endpoint if auth server doesn't return a polling interval. Okta and google IDP do return an interval' (default "5s") |
| `--union.auth.deviceFlow.refreshTime` | string | grace period from the token expiry after which it would refresh the token. (default "5m0s") |
| `--union.auth.deviceFlow.timeout` | string | amount of time the device flow should complete or else it will be cancelled. (default "10m0s") |
| `--union.auth.enable` | | Whether to enable an authenticated conenction when communicating with admin. (default true) |
| `--union.auth.externalAuth.command` | strings | Command for external authentication token generation |
| `--union.auth.pkce.refreshTime` | string | grace period from the token expiry after which it would refresh the token. (default "5m0s") |
| `--union.auth.pkce.timeout` | string | Amount of time the browser session would be active for authentication from client app. (default "15s") |
| `--union.auth.scopes` | strings | List of scopes to request |
| `--union.auth.tokenRefreshWindow` | string | Max duration between token refresh attempt and token expiry. (default "1h0m0s") |
| `--union.auth.tokenUrl` | string | OPTIONAL: Your IdP's token endpoint. It'll be discovered from flyte admin's OAuth Metadata endpoint if not provided. |
| `--union.auth.type` | string | Type of OAuth2 flow used for communicating with admin. (default "Pkce") |
| `--union.cache.maxItemsCount` | int | Maximum number of items to keep in the cache before evicting. (default 1000) |
| `--union.connection.host` | string | Host to connect to (default "dns:///utt-mgdp-stg-us-east-2.cloud-staging.union.ai") |
| `--union.connection.insecure` | | Whether to connect over insecure channel |
| `--union.connection.insecureSkipVerify` | | InsecureSkipVerify controls whether a client verifies the server's certificate chain and host name.Caution: shouldn't be use for production usecases' |
| `--union.connection.keepAliveConfig.permitWithoutStream` | | If true, client sends keepalive pings even with no active RPCs. |
| `--union.connection.keepAliveConfig.time` | string | After a duration of this time if the client doesn't see any activity it pings the server to see if the transport is still alive. (default "20s") |
| `--union.connection.keepAliveConfig.timeout` | string | After having pinged for keepalive check, the client waits for a duration of Timeout and if no activity is seen even after that the connection is closed. (default "2m0s") |
| `--union.connection.maxBackoffDelay` | string | Max delay for grpc backoff (default "8s") |
| `--union.connection.maxRecvMsgSize` | int | Maximum size of a message in bytes of a gRPC message (default 10485760) |
| `--union.connection.maxRetries` | int | Max number of gRPC retries (default 4) |
| `--union.connection.minConnectTimeout` | string | Minimum timeout for establishing a connection (default "20s") |
| `--union.connection.perRetryTimeout` | string | gRPC per retry timeout (default "15s") |
| `--union.connection.serviceConfig` | string | Defines gRPC experimental JSON Service Config (default "{"loadBalancingConfig": [{"round_robin":{}}]}") |
| `--union.connection.trustedIdentityClaims.enabled` | | Enables passing of trusted claims while making inter service calls |
| `--union.connection.trustedIdentityClaims.externalIdentityClaim` | string | External identity claim of the service which is authorized to make internal service call. These are verified against userclouds actions |
| `--union.connection.trustedIdentityClaims.externalIdentityTypeClaim` | string | External identity type claim of app or user to use for the current service identity. It should be an 'app' for inter service communication |
| `--union.internalConnectionConfig.-` | stringToString | (default []) |
| `--union.internalConnectionConfig.enabled` | | Enables internal service to service communication instead of going through ingress. |
| `--union.internalConnectionConfig.urlPattern` | string | UrlPattern of the internal service endpoints. (default "{{ service }}-helmchart.{{ service }}.svc.cluster.local:80") |
| `--webhook.awsSecretManager.sidecarImage` | string | Specifies the sidecar docker image to use (default "docker.io/amazon/aws-secrets-manager-secret-sidecar:v0.1.4") |
| `--webhook.certDir` | string | Certificate directory to use to write generated certs. Defaults to /etc/webhook/certs/ (default "/etc/webhook/certs") |
| `--webhook.embeddedSecretManagerConfig.awsConfig.region` | string | AWS region |
| `--webhook.embeddedSecretManagerConfig.fileMountInitContainer.image` | string | Specifies init container image to use for mounting secrets as files. (default "busybox:1.28") |
| `--webhook.embeddedSecretManagerConfig.gcpConfig.project` | string | GCP project to be used for secret manager |
| `--webhook.embeddedSecretManagerConfig.type` | string | (default "AWS") |
| `--webhook.gcpSecretManager.sidecarImage` | string | Specifies the sidecar docker image to use (default "gcr.io/google.com/cloudsdktool/cloud-sdk:alpine") |
| `--webhook.listenPort` | int | The port to use to listen to webhook calls. Defaults to 9443 (default 9443) |
| `--webhook.localCert` | | write certs locally. Defaults to false |
| `--webhook.metrics-prefix` | string | An optional prefix for all published metrics. (default "flyte:") |
| `--webhook.secretName` | string | Secret name to write generated certs to. (default "flyte-pod-webhook") |
| `--webhook.serviceName` | string | The name of the webhook service. (default "flyte-pod-webhook") |
| `--webhook.servicePort` | int32 | The port on the service that hosting webhook. (default 443) |
| `--webhook.vaultSecretManager.role` | string | Specifies the vault role to use (default "flyte") |
=== PAGE: https://www.union.ai/docs/v1/serverless/api-reference/uctl-cli/uctl-get/uctl-get-execution-queue-attribute ===
# uctl get execution-queue-attribute
Gets matchable resources of execution queue attributes.
## Synopsis
Retrieve the execution queue attribute for the given project and domain.
For project flytesnacks and development domain:
```shell
$ uctl get execution-queue-attribute -p flytesnacks -d development
```
Example: output from the command:
``` json
{"project":"flytesnacks","domain":"development","tags":["foo", "bar"]}
```
Retrieve the execution queue attribute for the given project, domain,
and workflow. For project flytesnacks, development domain, and workflow
`core.control_flow.merge_sort.merge_sort`:
```shell
$ uctl get execution-queue-attribute -p flytesnacks -d development core.control_flow.merge_sort.merge_sort
```
Example: output from the command:
``` json
{"project":"flytesnacks","domain":"development","workflow":"core.control_flow.merge_sort.merge_sort","tags":["foo", "bar"]}
```
Write the execution queue attribute to a file. If there are no execution
queue attributes, the command throws an error. The config file is
written to era.yaml file. Example: content of era.yaml:
```shell
$ uctl get execution-queue-attribute --attrFile era.yaml
```
``` yaml
domain: development
project: flytesnacks
tags:
- foo
- bar
- buzz
- lightyear
```
Usage:
```shell
$ uctl get execution-queue-attribute [flags]
```
## Options
| Option | Type | Description |
|--------|------|-------------|
| `--attrFile` | string | attribute file name to be used for generating attribute for the resource type. |
| `-h`, `--help` | help for execution-queue-attribute |
### Options inherited from parent commands
| Option | Type | Description |
|--------|------|-------------|
| `--admin.audience` | string | Audience to use when initiating OAuth2 authorization requests. |
| `--admin.authType` | string | Type of OAuth2 flow used for communicating with admin.ClientSecret, Pkce, ExternalCommand are valid values (default "ClientSecret") |
| `--admin.authorizationHeader` | string | Custom metadata header to pass JWT |
| `--admin.authorizationServerUrl` | string | This is the URL to your IdP's authorization server. It'll default to Endpoint |
| `--admin.caCertFilePath` | string | Use specified certificate file to verify the admin server peer. |
| `--admin.clientId` | string | Client ID (default "flytepropeller") |
| `--admin.clientSecretEnvVar` | string | Environment variable containing the client secret |
| `--admin.clientSecretLocation` | string | File containing the client secret (default "/etc/secrets/client_secret") |
| `--admin.command` | strings | Command for external authentication token generation |
| `--admin.defaultOrg` | string | OPTIONAL: Default org to use to support non-org based cli's.'. |
| `--admin.defaultServiceConfig` | string | |
| `--admin.deviceFlowConfig.pollInterval` | string | amount of time the device flow would poll the token endpoint if auth server doesn't return a polling interval. Okta and google IDP do return an interval' (default "5s") |
| `--admin.deviceFlowConfig.refreshTime` | string | grace period from the token expiry after which it would refresh the token. (default "5m0s") |
| `--admin.deviceFlowConfig.timeout` | string | amount of time the device flow should complete or else it will be cancelled. (default "10m0s") |
| `--admin.endpoint` | string | For admin types, specify where the uri of the service is located. |
| `--admin.httpProxyURL` | string | OPTIONAL: HTTP Proxy to be used for OAuth requests. |
| `--admin.insecure` | | Use insecure connection. |
| `--admin.insecureSkipVerify` | | InsecureSkipVerify controls whether a client verifies the server's certificate chain and host name.Caution: shouldn't be use for production usecases' |
| `--admin.maxBackoffDelay` | string | Max delay for grpc backoff (default "8s") |
| `--admin.maxMessageSizeBytes` | int | The max size in bytes for incoming gRPC messages |
| `--admin.maxRetries` | int | Max number of gRPC retries (default 4) |
| `--admin.perRetryTimeout` | string | gRPC per retry timeout (default "15s") |
| `--admin.pkceConfig.refreshTime` | string | grace period from the token expiry after which it would refresh the token. (default "5m0s") |
| `--admin.pkceConfig.timeout` | string | Amount of time the browser session would be active for authentication from client app. (default "2m0s") |
| `--admin.proxyCommand` | strings | Command for external proxy-authorization token generation |
| `--admin.scopes` | strings | List of scopes to request |
| `--admin.tokenRefreshWindow` | string | Max duration between token refresh attempt and token expiry. (default "0s") |
| `--admin.tokenUrl` | string | OPTIONAL: Your IdP's token endpoint. It'll be discovered from flyte admin's OAuth Metadata endpoint if not provided. |
| `--admin.useAudienceFromAdmin` | | Use Audience configured from admins public endpoint config. |
| `--admin.useAuth` | | Deprecated: Auth will be enabled/disabled based on admin's dynamically discovered information. |
| `--auth.appAuth.externalAuthServer.allowedAudience` | strings | Optional: A list of allowed audiences. If not provided, the audience is expected to be the public Uri of the service. |
| `--auth.appAuth.externalAuthServer.baseUrl` | string | This should be the base url of the authorization server that you are trying to hit. With Okta for instance, it will look something like https://company.okta.com/oauth2/abcdef123456789/ |
| `--auth.appAuth.externalAuthServer.httpProxyURL` | string | OPTIONAL: HTTP Proxy to be used for OAuth requests. |
| `--auth.appAuth.externalAuthServer.metadataUrl` | string | Optional: If the server doesn't support /.well-known/oauth-authorization-server, you can set a custom metadata url here.' |
| `--auth.appAuth.externalAuthServer.retryAttempts` | int | Optional: The number of attempted retries on a transient failure to get the OAuth metadata (default 5) |
| `--auth.appAuth.externalAuthServer.retryDelay` | string | Optional, Duration to wait between retries (default "1s") |
| `--auth.appAuth.selfAuthServer.accessTokenLifespan` | string | Defines the lifespan of issued access tokens. (default "30m0s") |
| `--auth.appAuth.selfAuthServer.authorizationCodeLifespan` | string | Defines the lifespan of issued access tokens. (default "5m0s") |
| `--auth.appAuth.selfAuthServer.claimSymmetricEncryptionKeySecretName` | string | OPTIONAL: Secret name to use to encrypt claims in authcode token. (default "claim_symmetric_key") |
| `--auth.appAuth.selfAuthServer.issuer` | string | Defines the issuer to use when issuing and validating tokens. The default value is https://{requestUri.HostAndPort}/ |
| `--auth.appAuth.selfAuthServer.oldTokenSigningRSAKeySecretName` | string | OPTIONAL: Secret name to use to retrieve Old RSA Signing Key. This can be useful during key rotation to continue to accept older tokens. (default "token_rsa_key_old.pem") |
| `--auth.appAuth.selfAuthServer.refreshTokenLifespan` | string | Defines the lifespan of issued access tokens. (default "1h0m0s") |
| `--auth.appAuth.selfAuthServer.tokenSigningRSAKeySecretName` | string | OPTIONAL: Secret name to use to retrieve RSA Signing Key. (default "token_rsa_key.pem") |
| `--auth.appAuth.thirdPartyConfig.flyteClient.audience` | string | Audience to use when initiating OAuth2 authorization requests. |
| `--auth.appAuth.thirdPartyConfig.flyteClient.clientId` | string | public identifier for the app which handles authorization for a Flyte deployment (default "uctl") |
| `--auth.appAuth.thirdPartyConfig.flyteClient.redirectUri` | string | This is the callback uri registered with the app which handles authorization for a Flyte deployment (default "http://localhost:53593/callback") |
| `--auth.appAuth.thirdPartyConfig.flyteClient.scopes` | strings | Recommended scopes for the client to request. (default [all,offline]) |
| `--auth.disableForGrpc` | | Disables auth enforcement on Grpc Endpoints. |
| `--auth.disableForHttp` | | Disables auth enforcement on HTTP Endpoints. |
| `--auth.grpcAuthorizationHeader` | string | (default "flyte-authorization") |
| `--auth.httpAuthorizationHeader` | string | (default "flyte-authorization") |
| `--auth.httpProxyURL` | string | OPTIONAL: HTTP Proxy to be used for OAuth requests. |
| `--auth.tokenEndpointProxyPath` | string | The path used to proxy calls to the TokenURL |
| `--auth.userAuth.cookieBlockKeySecretName` | string | OPTIONAL: Secret name to use for cookie block key. (default "cookie_block_key") |
| `--auth.userAuth.cookieHashKeySecretName` | string | OPTIONAL: Secret name to use for cookie hash key. (default "cookie_hash_key") |
| `--auth.userAuth.cookieSetting.domain` | string | OPTIONAL: Allows you to set the domain attribute on the auth cookies. |
| `--auth.userAuth.cookieSetting.sameSitePolicy` | string | OPTIONAL: Allows you to declare if your cookie should be restricted to a first-party or same-site context.Wrapper around http.SameSite. (default "DefaultMode") |
| `--auth.userAuth.httpProxyURL` | string | OPTIONAL: HTTP Proxy to be used for OAuth requests. |
| `--auth.userAuth.idpQueryParameter` | string | idp query parameter used for selecting a particular IDP for doing user authentication. Eg: for Okta passing idp={IDP-ID} forces the authentication to happen with IDP-ID |
| `--auth.userAuth.openId.baseUrl` | string | |
| `--auth.userAuth.openId.clientId` | string | |
| `--auth.userAuth.openId.clientSecretFile` | string | |
| `--auth.userAuth.openId.clientSecretName` | string | (default "oidc_client_secret") |
| `--auth.userAuth.openId.scopes` | strings | (default [openid,profile]) |
| `--auth.userAuth.redirectUrl` | string | (default "/console") |
| `--authorizer.internalCommunicationConfig.enabled` | | Enables authorization decisions for internal communication. (default true) |
| `--authorizer.internalCommunicationConfig.ingressIdentity` | string | IngressIdentity used in the cluster. Needed to exclude the communication coming from ingress. (default "ingress-nginx.ingress-nginx.serviceaccount.identity.linkerd.cluster.local") |
| `--authorizer.internalCommunicationConfig.tenantUrlPatternIdentity` | string | UrlPatternIdentity of the internal tenant service endpoint identities. (default "{{ service }}.{{ org }}.serviceaccount.identity.linkerd.cluster.local") |
| `--authorizer.internalCommunicationConfig.urlPatternIdentity` | string | UrlPatternIdentity of the internal service endpoint identities. (default "{{ service }}-helmchart.{{ service }}.serviceaccount.identity.linkerd.cluster.local") |
| `--authorizer.mode` | string | (default "Active") |
| `--authorizer.organizationConfig.PolicyConfig.adminPolicyDescription` | string | description for the boilerplate admin policy (default "Contributor permissions and full admin permissions to manage users and view usage dashboards") |
| `--authorizer.organizationConfig.PolicyConfig.contributorPolicyDescription` | string | description for the boilerplate contributor policy (default "Viewer permissions and permissions to create workflows, tasks, launch plans, and executions") |
| `--authorizer.organizationConfig.PolicyConfig.defaultUserPolicyRoleType` | string | name of the role type to determine which default policy new users added to the organization should be assigned (default "Viewer") |
| `--authorizer.organizationConfig.PolicyConfig.serverlessContributorPolicyDescription` | string | description for the boilerplate serverless contributor policy (default "Viewer permissions and permissions to create workflows, tasks, launch plans, and executions") |
| `--authorizer.organizationConfig.PolicyConfig.serverlessViewerPolicyDescription` | string | description for the boilerplate serverless viewer policy (default "Permissions to view Flyte entities") |
| `--authorizer.organizationConfig.PolicyConfig.viewerPolicyDescription` | string | description for the boilerplate viewer policy (default "Permissions to view Flyte entities") |
| `--authorizer.organizationConfig.defaultPolicyCacheDuration` | string | Cache entry duration for the store of the default policy per organization (default "10m0s") |
| `--authorizer.syncRuleRefreshInterval` | string | (default "1m0s") |
| `--authorizer.type` | string | (default "UserClouds") |
| `--authorizer.userCloudsClient.cache.redis.ttl.edgeTypes` | string | Specifies how long edge types remain in the cache.. (default "30m0s") |
| `--authorizer.userCloudsClient.cache.redis.ttl.edges` | string | Specifies how long edges remain in the cache. (default "30m0s") |
| `--authorizer.userCloudsClient.cache.redis.ttl.objectTypes` | string | Specifies how long object types remain in the cache. (default "30m0s") |
| `--authorizer.userCloudsClient.cache.redis.ttl.objects` | string | Specifies how long objects remain in the cache. (default "30m0s") |
| `--authorizer.userCloudsClient.cache.type` | string | Cache type to use. (default "none") |
| `--authorizer.userCloudsClient.clientID` | string | UserClouds client id |
| `--authorizer.userCloudsClient.clientSecretName` | string | UserCloud client secret name to read from the secret manager. (default "userclouds-client-secret") |
| `--authorizer.userCloudsClient.enableLogging` | | Enable userclouds client's internal logging. Calls to post logs take 250-350 ms and will impact p99 latency, enable with caution. |
| `--authorizer.userCloudsClient.tenantID` | string | UserClouds tenant id. Should be a UUID. |
| `--authorizer.userCloudsClient.tenantUrl` | string | Something like https://{yourtenant}.tenant.userclouds.com |
| `--config` | string | config file (default is /Users/andrew/.union/config.yaml) |
| `--connection.environment` | string | |
| `--connection.region` | string | |
| `--connection.rootTenantURLPattern` | string | Pattern for tenant url. (default "dns:///{{ organization }}.cloud-staging.union.ai") |
| `--console.endpoint` | string | Endpoint of console, if different than flyte admin |
| `--database.connMaxLifeTime` | string | sets the maximum amount of time a connection may be reused (default "1h0m0s") |
| `--database.enableForeignKeyConstraintWhenMigrating` | | Whether to enable gorm foreign keys when migrating the db |
| `--database.maxIdleConnections` | int | maxIdleConnections sets the maximum number of connections in the idle connection pool. (default 10) |
| `--database.maxOpenConnections` | int | maxOpenConnections sets the maximum number of open connections to the database. (default 100) |
| `--database.postgres.dbname` | string | The database name (default "postgres") |
| `--database.postgres.debug` | | |
| `--database.postgres.host` | string | The host name of the database server (default "localhost") |
| `--database.postgres.options` | string | See http://gorm.io/docs/connecting_to_the_database.html for available options passed, in addition to the above. (default "sslmode=disable") |
| `--database.postgres.password` | string | The database password. (default "postgres") |
| `--database.postgres.passwordPath` | string | Points to the file containing the database password. |
| `--database.postgres.port` | int | The port name of the database server (default 30001) |
| `--database.postgres.readReplicaHost` | string | The host name of the read replica database server (default "localhost") |
| `--database.postgres.username` | string | The database user who is connecting to the server. (default "postgres") |
| `--database.sqlite.file` | string | The path to the file (existing or new) where the DB should be created / stored. If existing, then this will be re-used, else a new will be created |
| `--db.connectionPool.maxConnectionLifetime` | string | (default "0s") |
| `--db.connectionPool.maxIdleConnections` | int | |
| `--db.connectionPool.maxOpenConnections` | int | |
| `--db.dbname` | string | (default "postgres") |
| `--db.debug` | | |
| `--db.host` | string | (default "postgres") |
| `--db.log_level` | int | (default 4) |
| `--db.options` | string | (default "sslmode=disable") |
| `--db.password` | string | |
| `--db.passwordPath` | string | |
| `--db.port` | int | (default 5432) |
| `--db.username` | string | (default "postgres") |
| `-d`, `--domain` | string | Specifies the Flyte project's domain. |
| `--files.archive` | | Pass in archive file either an http link or local path. |
| `--files.assumableIamRole` | string | Custom assumable iam auth role to register launch plans with. |
| `--files.continueOnError` | | Continue on error when registering files. |
| `--files.destinationDirectory` | string | Location of source code in container. |
| `--files.dryRun` | | Execute command without making any modifications. |
| `--files.enableSchedule` | | Enable the schedule if the files contain schedulable launchplan. |
| `--files.force` | | Force use of version number on entities registered with flyte. |
| `--files.k8ServiceAccount` | string | Deprecated. Please use `--K8sServiceAccount`|
| `--files.k8sServiceAccount` | string | Custom kubernetes service account auth role to register launch plans with. |
| `--files.outputLocationPrefix` | string | Custom output location prefix for offloaded types (files/schemas). |
| `--files.sourceUploadPath` | string | Deprecated: Update flyte admin to avoid having to configure storage access from uctl. |
| `--files.version` | string | Version of the entity to be registered with flyte which are un-versioned after serialization. |
| `--logger.formatter.type` | string | Sets logging format type. (default "json") |
| `--logger.level` | int | Sets the minimum logging level. (default 3) |
| `--logger.mute` | | Mutes all logs regardless of severity. Intended for benchmarks/tests only. |
| `--logger.show-source` | | Includes source code location in logs. |
| `--org` | string | Organization to work on. If not set, default to user's org. |
| `--otel.file.filename` | string | Filename to store exported telemetry traces (default "/tmp/trace.txt") |
| `--otel.jaeger.endpoint` | string | Endpoint for the jaeger telemetry trace ingestor (default "http://localhost:14268/api/traces") |
| `--otel.otlpgrpc.endpoint` | string | Endpoint for the OTLP telemetry trace collector (default "http://localhost:4317") |
| `--otel.otlphttp.endpoint` | string | Endpoint for the OTLP telemetry trace collector (default "http://localhost:4318/v1/traces") |
| `--otel.sampler.parentSampler` | string | Sets the parent sampler to use for the tracer (default "always") |
| `--otel.type` | string | Sets the type of exporter to configure [noop/file/jaeger/otlpgrpc/otlphttp]. (default "noop") |
| `-o`, `--output` | string | Specifies the output type - supported formats [TABLE JSON YAML DOT DOTURL]. NOTE: dot, doturl are only supported for Workflow (default "table") |
| `--plugins.catalogcache.reader.maxItems` | int | Maximum number of entries to keep in the index. (default 10000) |
| `--plugins.catalogcache.reader.maxRetries` | int | Maximum number of retries per item. (default 3) |
| `--plugins.catalogcache.reader.workers` | int | Number of concurrent workers to start processing the queue. (default 10) |
| `--plugins.catalogcache.writer.maxItems` | int | Maximum number of entries to keep in the index. (default 10000) |
| `--plugins.catalogcache.writer.maxRetries` | int | Maximum number of retries per item. (default 3) |
| `--plugins.catalogcache.writer.workers` | int | Number of concurrent workers to start processing the queue. (default 10) |
| `-p`, `--project` | string | Specifies the Flyte project. |
| `--rediscache.passwordSecretName` | string | Name of secret with Redis password. |
| `--rediscache.primaryEndpoint` | string | Primary endpoint for the redis cache that can be used for both reads and writes. |
| `--rediscache.replicaEndpoint` | string | Replica endpoint for the redis cache that can be used for reads. |
| `--secrets.env-prefix` | string | Prefix for environment variables (default "FLYTE_SECRET_") |
| `--secrets.secrets-prefix` | string | Prefix where to look for secrets file (default "/etc/secrets") |
| `--secrets.type` | string | Sets the type of storage to configure [local]. (default "local") |
| `--server.dataProxy.download.maxExpiresIn` | string | Maximum allowed expiration duration. (default "1h0m0s") |
| `--server.dataProxy.upload.defaultFileNameLength` | int | Default length for the generated file name if not provided in the request. (default 20) |
| `--server.dataProxy.upload.maxExpiresIn` | string | Maximum allowed expiration duration. (default "1h0m0s") |
| `--server.dataProxy.upload.maxSize` | string | Maximum allowed upload size. (default "6Mi") |
| `--server.dataProxy.upload.storagePrefix` | string | Storage prefix to use for all upload requests. |
| `--server.grpc.enableGrpcLatencyMetrics` | | Enable grpc latency metrics. Note Histograms metrics can be expensive on Prometheus servers. |
| `--server.grpc.maxMessageSizeBytes` | int | The max size in bytes for incoming gRPC messages |
| `--server.grpc.port` | int | On which grpc port to serve admin (default 8089) |
| `--server.grpc.serverReflection` | | Enable GRPC Server Reflection (default true) |
| `--server.grpcPort` | int | deprecated |
| `--server.grpcServerReflection` | | deprecated |
| `--server.httpPort` | int | On which http port to serve admin (default 8088) |
| `--server.kube-config` | string | Path to kubernetes client config file, default is empty, useful for incluster config. |
| `--server.kubeClientConfig.burst` | int | Max burst rate for throttle. 0 defaults to 10 (default 25) |
| `--server.kubeClientConfig.qps` | int32 | Max QPS to the master for requests to KubeAPI. 0 defaults to 5. (default 100) |
| `--server.kubeClientConfig.timeout` | string | Max duration allowed for every request to KubeAPI before giving up. 0 implies no timeout. (default "30s") |
| `--server.master` | string | The address of the Kubernetes API server. |
| `--server.readHeaderTimeoutSeconds` | int | The amount of time allowed to read request headers. (default 32) |
| `--server.security.allowCors` | | (default true) |
| `--server.security.allowedHeaders` | strings | (default [Content-Type,flyte-authorization]) |
| `--server.security.allowedOrigins` | strings | (default [*]) |
| `--server.security.auditAccess` | | |
| `--server.security.secure` | | |
| `--server.security.ssl.certificateFile` | string | |
| `--server.security.ssl.keyFile` | string | |
| `--server.security.useAuth` | | |
| `--server.thirdPartyConfig.flyteClient.audience` | string | Audience to use when initiating OAuth2 authorization requests. |
| `--server.thirdPartyConfig.flyteClient.clientId` | string | public identifier for the app which handles authorization for a Flyte deployment |
| `--server.thirdPartyConfig.flyteClient.redirectUri` | string | This is the callback uri registered with the app which handles authorization for a Flyte deployment |
| `--server.thirdPartyConfig.flyteClient.scopes` | strings | Recommended scopes for the client to request. |
| `--server.watchService.maxActiveClusterConnections` | int | (default 5) |
| `--server.watchService.maxPageSize` | int | (default 50000) |
| `--server.watchService.nonTerminalStatusUpdatesInterval` | string | (default "1m0s") |
| `--server.watchService.pollInterval` | string | (default "1s") |
| `--sharedservice.connectPort` | string | On which connect port to serve admin (default "8080") |
| `--sharedservice.grpc.grpcMaxResponseStatusBytes` | int32 | specifies the maximum (uncompressed) size of header list that the client is prepared to accept on grpc calls (default 32000) |
| `--sharedservice.grpc.maxConcurrentStreams` | int | Limit on the number of concurrent streams to each ServerTransport. (default 100) |
| `--sharedservice.grpc.maxMessageSizeBytes` | int | Limit on the size of message that can be received on the server. (default 10485760) |
| `--sharedservice.grpcServerReflection` | | Enable GRPC Server Reflection (default true) |
| `--sharedservice.httpPort` | string | On which http port to serve admin (default "8089") |
| `--sharedservice.kubeConfig` | string | Path to kubernetes client config file. |
| `--sharedservice.master` | string | The address of the Kubernetes API server. |
| `--sharedservice.metrics.enableClientGrpcHistograms` | | Enable client grpc histograms (default true) |
| `--sharedservice.metrics.enableGrpcHistograms` | | Enable grpc histograms (default true) |
| `--sharedservice.metrics.scope` | string | Scope to emit metrics under (default "service:") |
| `--sharedservice.port` | string | On which grpc port to serve admin (default "8080") |
| `--sharedservice.profiler.enabled` | | Enable Profiler on server |
| `--sharedservice.profilerPort` | string | Profile port to start listen for pprof and metric handlers on. (default "10254") |
| `--sharedservice.security.allowCors` | | |
| `--sharedservice.security.allowLocalhostAccess` | | Whether to permit localhost unauthenticated access to the server |
| `--sharedservice.security.allowedHeaders` | strings | |
| `--sharedservice.security.allowedOrigins` | strings | |
| `--sharedservice.security.auditAccess` | | |
| `--sharedservice.security.orgOverride` | string | Override org in identity context if localhost access enabled |
| `--sharedservice.security.secure` | | |
| `--sharedservice.security.ssl.certificateAuthorityFile` | string | |
| `--sharedservice.security.ssl.certificateFile` | string | |
| `--sharedservice.security.ssl.keyFile` | string | |
| `--sharedservice.security.useAuth` | | |
| `--sharedservice.sync.syncInterval` | string | Time interval to sync (default "5m0s") |
| `--storage.cache.max_size_mbs` | int | Maximum size of the cache where the Blob store data is cached in-memory. If not specified or set to 0, cache is not used |
| `--storage.cache.target_gc_percent` | int | Sets the garbage collection target percentage. |
| `--storage.connection.access-key` | string | Access key to use. Only required when authtype is set to accesskey. |
| `--storage.connection.auth-type` | string | Auth Type to use [iam, accesskey]. (default "iam") |
| `--storage.connection.disable-ssl` | | Disables SSL connection. Should only be used for development. |
| `--storage.connection.endpoint` | string | URL for storage client to connect to. |
| `--storage.connection.region` | string | Region to connect to. (default "us-east-1") |
| `--storage.connection.secret-key` | string | Secret to use when accesskey is set. |
| `--storage.container` | string | Initial container (in s3 a bucket) to create -if it doesn't exist-.' |
| `--storage.defaultHttpClient.timeout` | string | Sets time out on the http client. (default "0s") |
| `--storage.enable-multicontainer` | | If this is true, then the container argument is overlooked and redundant. This config will automatically open new connections to new containers/buckets as they are encountered |
| `--storage.limits.maxDownloadMBs` | int | Maximum allowed download size (in MBs) per call. (default 2) |
| `--storage.stow.config` | stringToString | Configuration for stow backend. Refer to github/flyteorg/stow (default []) |
| `--storage.stow.kind` | string | Kind of Stow backend to use. Refer to github/flyteorg/stow |
| `--storage.type` | string | Sets the type of storage to configure [s3/minio/local/mem/stow]. (default "s3") |
| `--union.auth.authorizationMetadataKey` | string | Authorization Header to use when passing Access Tokens to the server (default "flyte-authorization") |
| `--union.auth.clientId` | string | Client ID |
| `--union.auth.clientSecretEnvVar` | string | Environment variable containing the client secret |
| `--union.auth.clientSecretLocation` | string | File containing the client secret |
| `--union.auth.deviceFlow.pollInterval` | string | amount of time the device flow would poll the token endpoint if auth server doesn't return a polling interval. Okta and google IDP do return an interval' (default "5s") |
| `--union.auth.deviceFlow.refreshTime` | string | grace period from the token expiry after which it would refresh the token. (default "5m0s") |
| `--union.auth.deviceFlow.timeout` | string | amount of time the device flow should complete or else it will be cancelled. (default "10m0s") |
| `--union.auth.enable` | | Whether to enable an authenticated conenction when communicating with admin. (default true) |
| `--union.auth.externalAuth.command` | strings | Command for external authentication token generation |
| `--union.auth.pkce.refreshTime` | string | grace period from the token expiry after which it would refresh the token. (default "5m0s") |
| `--union.auth.pkce.timeout` | string | Amount of time the browser session would be active for authentication from client app. (default "15s") |
| `--union.auth.scopes` | strings | List of scopes to request |
| `--union.auth.tokenRefreshWindow` | string | Max duration between token refresh attempt and token expiry. (default "1h0m0s") |
| `--union.auth.tokenUrl` | string | OPTIONAL: Your IdP's token endpoint. It'll be discovered from flyte admin's OAuth Metadata endpoint if not provided. |
| `--union.auth.type` | string | Type of OAuth2 flow used for communicating with admin. (default "Pkce") |
| `--union.cache.maxItemsCount` | int | Maximum number of items to keep in the cache before evicting. (default 1000) |
| `--union.connection.host` | string | Host to connect to (default "dns:///utt-mgdp-stg-us-east-2.cloud-staging.union.ai") |
| `--union.connection.insecure` | | Whether to connect over insecure channel |
| `--union.connection.insecureSkipVerify` | | InsecureSkipVerify controls whether a client verifies the server's certificate chain and host name.Caution: shouldn't be use for production usecases' |
| `--union.connection.keepAliveConfig.permitWithoutStream` | | If true, client sends keepalive pings even with no active RPCs. |
| `--union.connection.keepAliveConfig.time` | string | After a duration of this time if the client doesn't see any activity it pings the server to see if the transport is still alive. (default "20s") |
| `--union.connection.keepAliveConfig.timeout` | string | After having pinged for keepalive check, the client waits for a duration of Timeout and if no activity is seen even after that the connection is closed. (default "2m0s") |
| `--union.connection.maxBackoffDelay` | string | Max delay for grpc backoff (default "8s") |
| `--union.connection.maxRecvMsgSize` | int | Maximum size of a message in bytes of a gRPC message (default 10485760) |
| `--union.connection.maxRetries` | int | Max number of gRPC retries (default 4) |
| `--union.connection.minConnectTimeout` | string | Minimum timeout for establishing a connection (default "20s") |
| `--union.connection.perRetryTimeout` | string | gRPC per retry timeout (default "15s") |
| `--union.connection.serviceConfig` | string | Defines gRPC experimental JSON Service Config (default "{"loadBalancingConfig": [{"round_robin":{}}]}") |
| `--union.connection.trustedIdentityClaims.enabled` | | Enables passing of trusted claims while making inter service calls |
| `--union.connection.trustedIdentityClaims.externalIdentityClaim` | string | External identity claim of the service which is authorized to make internal service call. These are verified against userclouds actions |
| `--union.connection.trustedIdentityClaims.externalIdentityTypeClaim` | string | External identity type claim of app or user to use for the current service identity. It should be an 'app' for inter service communication |
| `--union.internalConnectionConfig.-` | stringToString | (default []) |
| `--union.internalConnectionConfig.enabled` | | Enables internal service to service communication instead of going through ingress. |
| `--union.internalConnectionConfig.urlPattern` | string | UrlPattern of the internal service endpoints. (default "{{ service }}-helmchart.{{ service }}.svc.cluster.local:80") |
| `--webhook.awsSecretManager.sidecarImage` | string | Specifies the sidecar docker image to use (default "docker.io/amazon/aws-secrets-manager-secret-sidecar:v0.1.4") |
| `--webhook.certDir` | string | Certificate directory to use to write generated certs. Defaults to /etc/webhook/certs/ (default "/etc/webhook/certs") |
| `--webhook.embeddedSecretManagerConfig.awsConfig.region` | string | AWS region |
| `--webhook.embeddedSecretManagerConfig.fileMountInitContainer.image` | string | Specifies init container image to use for mounting secrets as files. (default "busybox:1.28") |
| `--webhook.embeddedSecretManagerConfig.gcpConfig.project` | string | GCP project to be used for secret manager |
| `--webhook.embeddedSecretManagerConfig.type` | string | (default "AWS") |
| `--webhook.gcpSecretManager.sidecarImage` | string | Specifies the sidecar docker image to use (default "gcr.io/google.com/cloudsdktool/cloud-sdk:alpine") |
| `--webhook.listenPort` | int | The port to use to listen to webhook calls. Defaults to 9443 (default 9443) |
| `--webhook.localCert` | | write certs locally. Defaults to false |
| `--webhook.metrics-prefix` | string | An optional prefix for all published metrics. (default "flyte:") |
| `--webhook.secretName` | string | Secret name to write generated certs to. (default "flyte-pod-webhook") |
| `--webhook.serviceName` | string | The name of the webhook service. (default "flyte-pod-webhook") |
| `--webhook.servicePort` | int32 | The port on the service that hosting webhook. (default 443) |
| `--webhook.vaultSecretManager.role` | string | Specifies the vault role to use (default "flyte") |
=== PAGE: https://www.union.ai/docs/v1/serverless/api-reference/uctl-cli/uctl-get/uctl-get-executionoperation ===
# uctl get executionoperation
Peak at executions without acknowledging
## Synopsis
Retrieves executions from executions service without acknowledging the
executions. They will eventually show up again on the queue.
```shell
$ uctl get executionoperation [flags]
```
## Options
| Option | Type | Description |
|--------|------|-------------|
| `-h`, `--help` | help for executionoperation |
### Options inherited from parent commands
| Option | Type | Description |
|--------|------|-------------|
| `--admin.audience` | string | Audience to use when initiating OAuth2 authorization requests. |
| `--admin.authType` | string | Type of OAuth2 flow used for communicating with admin.ClientSecret, Pkce, ExternalCommand are valid values (default "ClientSecret") |
| `--admin.authorizationHeader` | string | Custom metadata header to pass JWT |
| `--admin.authorizationServerUrl` | string | This is the URL to your IdP's authorization server. It'll default to Endpoint |
| `--admin.caCertFilePath` | string | Use specified certificate file to verify the admin server peer. |
| `--admin.clientId` | string | Client ID (default "flytepropeller") |
| `--admin.clientSecretEnvVar` | string | Environment variable containing the client secret |
| `--admin.clientSecretLocation` | string | File containing the client secret (default "/etc/secrets/client_secret") |
| `--admin.command` | strings | Command for external authentication token generation |
| `--admin.defaultOrg` | string | OPTIONAL: Default org to use to support non-org based cli's.'. |
| `--admin.defaultServiceConfig` | string | |
| `--admin.deviceFlowConfig.pollInterval` | string | amount of time the device flow would poll the token endpoint if auth server doesn't return a polling interval. Okta and google IDP do return an interval' (default "5s") |
| `--admin.deviceFlowConfig.refreshTime` | string | grace period from the token expiry after which it would refresh the token. (default "5m0s") |
| `--admin.deviceFlowConfig.timeout` | string | amount of time the device flow should complete or else it will be cancelled. (default "10m0s") |
| `--admin.endpoint` | string | For admin types, specify where the uri of the service is located. |
| `--admin.httpProxyURL` | string | OPTIONAL: HTTP Proxy to be used for OAuth requests. |
| `--admin.insecure` | | Use insecure connection. |
| `--admin.insecureSkipVerify` | | InsecureSkipVerify controls whether a client verifies the server's certificate chain and host name.Caution: shouldn't be use for production usecases' |
| `--admin.maxBackoffDelay` | string | Max delay for grpc backoff (default "8s") |
| `--admin.maxMessageSizeBytes` | int | The max size in bytes for incoming gRPC messages |
| `--admin.maxRetries` | int | Max number of gRPC retries (default 4) |
| `--admin.perRetryTimeout` | string | gRPC per retry timeout (default "15s") |
| `--admin.pkceConfig.refreshTime` | string | grace period from the token expiry after which it would refresh the token. (default "5m0s") |
| `--admin.pkceConfig.timeout` | string | Amount of time the browser session would be active for authentication from client app. (default "2m0s") |
| `--admin.proxyCommand` | strings | Command for external proxy-authorization token generation |
| `--admin.scopes` | strings | List of scopes to request |
| `--admin.tokenRefreshWindow` | string | Max duration between token refresh attempt and token expiry. (default "0s") |
| `--admin.tokenUrl` | string | OPTIONAL: Your IdP's token endpoint. It'll be discovered from flyte admin's OAuth Metadata endpoint if not provided. |
| `--admin.useAudienceFromAdmin` | | Use Audience configured from admins public endpoint config. |
| `--admin.useAuth` | | Deprecated: Auth will be enabled/disabled based on admin's dynamically discovered information. |
| `--auth.appAuth.externalAuthServer.allowedAudience` | strings | Optional: A list of allowed audiences. If not provided, the audience is expected to be the public Uri of the service. |
| `--auth.appAuth.externalAuthServer.baseUrl` | string | This should be the base url of the authorization server that you are trying to hit. With Okta for instance, it will look something like https://company.okta.com/oauth2/abcdef123456789/ |
| `--auth.appAuth.externalAuthServer.httpProxyURL` | string | OPTIONAL: HTTP Proxy to be used for OAuth requests. |
| `--auth.appAuth.externalAuthServer.metadataUrl` | string | Optional: If the server doesn't support /.well-known/oauth-authorization-server, you can set a custom metadata url here.' |
| `--auth.appAuth.externalAuthServer.retryAttempts` | int | Optional: The number of attempted retries on a transient failure to get the OAuth metadata (default 5) |
| `--auth.appAuth.externalAuthServer.retryDelay` | string | Optional, Duration to wait between retries (default "1s") |
| `--auth.appAuth.selfAuthServer.accessTokenLifespan` | string | Defines the lifespan of issued access tokens. (default "30m0s") |
| `--auth.appAuth.selfAuthServer.authorizationCodeLifespan` | string | Defines the lifespan of issued access tokens. (default "5m0s") |
| `--auth.appAuth.selfAuthServer.claimSymmetricEncryptionKeySecretName` | string | OPTIONAL: Secret name to use to encrypt claims in authcode token. (default "claim_symmetric_key") |
| `--auth.appAuth.selfAuthServer.issuer` | string | Defines the issuer to use when issuing and validating tokens. The default value is https://{requestUri.HostAndPort}/ |
| `--auth.appAuth.selfAuthServer.oldTokenSigningRSAKeySecretName` | string | OPTIONAL: Secret name to use to retrieve Old RSA Signing Key. This can be useful during key rotation to continue to accept older tokens. (default "token_rsa_key_old.pem") |
| `--auth.appAuth.selfAuthServer.refreshTokenLifespan` | string | Defines the lifespan of issued access tokens. (default "1h0m0s") |
| `--auth.appAuth.selfAuthServer.tokenSigningRSAKeySecretName` | string | OPTIONAL: Secret name to use to retrieve RSA Signing Key. (default "token_rsa_key.pem") |
| `--auth.appAuth.thirdPartyConfig.flyteClient.audience` | string | Audience to use when initiating OAuth2 authorization requests. |
| `--auth.appAuth.thirdPartyConfig.flyteClient.clientId` | string | public identifier for the app which handles authorization for a Flyte deployment (default "uctl") |
| `--auth.appAuth.thirdPartyConfig.flyteClient.redirectUri` | string | This is the callback uri registered with the app which handles authorization for a Flyte deployment (default "http://localhost:53593/callback") |
| `--auth.appAuth.thirdPartyConfig.flyteClient.scopes` | strings | Recommended scopes for the client to request. (default [all,offline]) |
| `--auth.disableForGrpc` | | Disables auth enforcement on Grpc Endpoints. |
| `--auth.disableForHttp` | | Disables auth enforcement on HTTP Endpoints. |
| `--auth.grpcAuthorizationHeader` | string | (default "flyte-authorization") |
| `--auth.httpAuthorizationHeader` | string | (default "flyte-authorization") |
| `--auth.httpProxyURL` | string | OPTIONAL: HTTP Proxy to be used for OAuth requests. |
| `--auth.tokenEndpointProxyPath` | string | The path used to proxy calls to the TokenURL |
| `--auth.userAuth.cookieBlockKeySecretName` | string | OPTIONAL: Secret name to use for cookie block key. (default "cookie_block_key") |
| `--auth.userAuth.cookieHashKeySecretName` | string | OPTIONAL: Secret name to use for cookie hash key. (default "cookie_hash_key") |
| `--auth.userAuth.cookieSetting.domain` | string | OPTIONAL: Allows you to set the domain attribute on the auth cookies. |
| `--auth.userAuth.cookieSetting.sameSitePolicy` | string | OPTIONAL: Allows you to declare if your cookie should be restricted to a first-party or same-site context.Wrapper around http.SameSite. (default "DefaultMode") |
| `--auth.userAuth.httpProxyURL` | string | OPTIONAL: HTTP Proxy to be used for OAuth requests. |
| `--auth.userAuth.idpQueryParameter` | string | idp query parameter used for selecting a particular IDP for doing user authentication. Eg: for Okta passing idp={IDP-ID} forces the authentication to happen with IDP-ID |
| `--auth.userAuth.openId.baseUrl` | string | |
| `--auth.userAuth.openId.clientId` | string | |
| `--auth.userAuth.openId.clientSecretFile` | string | |
| `--auth.userAuth.openId.clientSecretName` | string | (default "oidc_client_secret") |
| `--auth.userAuth.openId.scopes` | strings | (default [openid,profile]) |
| `--auth.userAuth.redirectUrl` | string | (default "/console") |
| `--authorizer.internalCommunicationConfig.enabled` | | Enables authorization decisions for internal communication. (default true) |
| `--authorizer.internalCommunicationConfig.ingressIdentity` | string | IngressIdentity used in the cluster. Needed to exclude the communication coming from ingress. (default "ingress-nginx.ingress-nginx.serviceaccount.identity.linkerd.cluster.local") |
| `--authorizer.internalCommunicationConfig.tenantUrlPatternIdentity` | string | UrlPatternIdentity of the internal tenant service endpoint identities. (default "{{ service }}.{{ org }}.serviceaccount.identity.linkerd.cluster.local") |
| `--authorizer.internalCommunicationConfig.urlPatternIdentity` | string | UrlPatternIdentity of the internal service endpoint identities. (default "{{ service }}-helmchart.{{ service }}.serviceaccount.identity.linkerd.cluster.local") |
| `--authorizer.mode` | string | (default "Active") |
| `--authorizer.organizationConfig.PolicyConfig.adminPolicyDescription` | string | description for the boilerplate admin policy (default "Contributor permissions and full admin permissions to manage users and view usage dashboards") |
| `--authorizer.organizationConfig.PolicyConfig.contributorPolicyDescription` | string | description for the boilerplate contributor policy (default "Viewer permissions and permissions to create workflows, tasks, launch plans, and executions") |
| `--authorizer.organizationConfig.PolicyConfig.defaultUserPolicyRoleType` | string | name of the role type to determine which default policy new users added to the organization should be assigned (default "Viewer") |
| `--authorizer.organizationConfig.PolicyConfig.serverlessContributorPolicyDescription` | string | description for the boilerplate serverless contributor policy (default "Viewer permissions and permissions to create workflows, tasks, launch plans, and executions") |
| `--authorizer.organizationConfig.PolicyConfig.serverlessViewerPolicyDescription` | string | description for the boilerplate serverless viewer policy (default "Permissions to view Flyte entities") |
| `--authorizer.organizationConfig.PolicyConfig.viewerPolicyDescription` | string | description for the boilerplate viewer policy (default "Permissions to view Flyte entities") |
| `--authorizer.organizationConfig.defaultPolicyCacheDuration` | string | Cache entry duration for the store of the default policy per organization (default "10m0s") |
| `--authorizer.syncRuleRefreshInterval` | string | (default "1m0s") |
| `--authorizer.type` | string | (default "UserClouds") |
| `--authorizer.userCloudsClient.cache.redis.ttl.edgeTypes` | string | Specifies how long edge types remain in the cache.. (default "30m0s") |
| `--authorizer.userCloudsClient.cache.redis.ttl.edges` | string | Specifies how long edges remain in the cache. (default "30m0s") |
| `--authorizer.userCloudsClient.cache.redis.ttl.objectTypes` | string | Specifies how long object types remain in the cache. (default "30m0s") |
| `--authorizer.userCloudsClient.cache.redis.ttl.objects` | string | Specifies how long objects remain in the cache. (default "30m0s") |
| `--authorizer.userCloudsClient.cache.type` | string | Cache type to use. (default "none") |
| `--authorizer.userCloudsClient.clientID` | string | UserClouds client id |
| `--authorizer.userCloudsClient.clientSecretName` | string | UserCloud client secret name to read from the secret manager. (default "userclouds-client-secret") |
| `--authorizer.userCloudsClient.enableLogging` | | Enable userclouds client's internal logging. Calls to post logs take 250-350 ms and will impact p99 latency, enable with caution. |
| `--authorizer.userCloudsClient.tenantID` | string | UserClouds tenant id. Should be a UUID. |
| `--authorizer.userCloudsClient.tenantUrl` | string | Something like https://{yourtenant}.tenant.userclouds.com |
| `--config` | string | config file (default is /Users/andrew/.union/config.yaml) |
| `--connection.environment` | string | |
| `--connection.region` | string | |
| `--connection.rootTenantURLPattern` | string | Pattern for tenant url. (default "dns:///{{ organization }}.cloud-staging.union.ai") |
| `--console.endpoint` | string | Endpoint of console, if different than flyte admin |
| `--database.connMaxLifeTime` | string | sets the maximum amount of time a connection may be reused (default "1h0m0s") |
| `--database.enableForeignKeyConstraintWhenMigrating` | | Whether to enable gorm foreign keys when migrating the db |
| `--database.maxIdleConnections` | int | maxIdleConnections sets the maximum number of connections in the idle connection pool. (default 10) |
| `--database.maxOpenConnections` | int | maxOpenConnections sets the maximum number of open connections to the database. (default 100) |
| `--database.postgres.dbname` | string | The database name (default "postgres") |
| `--database.postgres.debug` | | |
| `--database.postgres.host` | string | The host name of the database server (default "localhost") |
| `--database.postgres.options` | string | See http://gorm.io/docs/connecting_to_the_database.html for available options passed, in addition to the above. (default "sslmode=disable") |
| `--database.postgres.password` | string | The database password. (default "postgres") |
| `--database.postgres.passwordPath` | string | Points to the file containing the database password. |
| `--database.postgres.port` | int | The port name of the database server (default 30001) |
| `--database.postgres.readReplicaHost` | string | The host name of the read replica database server (default "localhost") |
| `--database.postgres.username` | string | The database user who is connecting to the server. (default "postgres") |
| `--database.sqlite.file` | string | The path to the file (existing or new) where the DB should be created / stored. If existing, then this will be re-used, else a new will be created |
| `--db.connectionPool.maxConnectionLifetime` | string | (default "0s") |
| `--db.connectionPool.maxIdleConnections` | int | |
| `--db.connectionPool.maxOpenConnections` | int | |
| `--db.dbname` | string | (default "postgres") |
| `--db.debug` | | |
| `--db.host` | string | (default "postgres") |
| `--db.log_level` | int | (default 4) |
| `--db.options` | string | (default "sslmode=disable") |
| `--db.password` | string | |
| `--db.passwordPath` | string | |
| `--db.port` | int | (default 5432) |
| `--db.username` | string | (default "postgres") |
| `-d`, `--domain` | string | Specifies the Flyte project's domain. |
| `--files.archive` | | Pass in archive file either an http link or local path. |
| `--files.assumableIamRole` | string | Custom assumable iam auth role to register launch plans with. |
| `--files.continueOnError` | | Continue on error when registering files. |
| `--files.destinationDirectory` | string | Location of source code in container. |
| `--files.dryRun` | | Execute command without making any modifications. |
| `--files.enableSchedule` | | Enable the schedule if the files contain schedulable launchplan. |
| `--files.force` | | Force use of version number on entities registered with flyte. |
| `--files.k8ServiceAccount` | string | Deprecated. Please use `--K8sServiceAccount`|
| `--files.k8sServiceAccount` | string | Custom kubernetes service account auth role to register launch plans with. |
| `--files.outputLocationPrefix` | string | Custom output location prefix for offloaded types (files/schemas). |
| `--files.sourceUploadPath` | string | Deprecated: Update flyte admin to avoid having to configure storage access from uctl. |
| `--files.version` | string | Version of the entity to be registered with flyte which are un-versioned after serialization. |
| `--logger.formatter.type` | string | Sets logging format type. (default "json") |
| `--logger.level` | int | Sets the minimum logging level. (default 3) |
| `--logger.mute` | | Mutes all logs regardless of severity. Intended for benchmarks/tests only. |
| `--logger.show-source` | | Includes source code location in logs. |
| `--org` | string | Organization to work on. If not set, default to user's org. |
| `--otel.file.filename` | string | Filename to store exported telemetry traces (default "/tmp/trace.txt") |
| `--otel.jaeger.endpoint` | string | Endpoint for the jaeger telemetry trace ingestor (default "http://localhost:14268/api/traces") |
| `--otel.otlpgrpc.endpoint` | string | Endpoint for the OTLP telemetry trace collector (default "http://localhost:4317") |
| `--otel.otlphttp.endpoint` | string | Endpoint for the OTLP telemetry trace collector (default "http://localhost:4318/v1/traces") |
| `--otel.sampler.parentSampler` | string | Sets the parent sampler to use for the tracer (default "always") |
| `--otel.type` | string | Sets the type of exporter to configure [noop/file/jaeger/otlpgrpc/otlphttp]. (default "noop") |
| `-o`, `--output` | string | Specifies the output type - supported formats [TABLE JSON YAML DOT DOTURL]. NOTE: dot, doturl are only supported for Workflow (default "table") |
| `--plugins.catalogcache.reader.maxItems` | int | Maximum number of entries to keep in the index. (default 10000) |
| `--plugins.catalogcache.reader.maxRetries` | int | Maximum number of retries per item. (default 3) |
| `--plugins.catalogcache.reader.workers` | int | Number of concurrent workers to start processing the queue. (default 10) |
| `--plugins.catalogcache.writer.maxItems` | int | Maximum number of entries to keep in the index. (default 10000) |
| `--plugins.catalogcache.writer.maxRetries` | int | Maximum number of retries per item. (default 3) |
| `--plugins.catalogcache.writer.workers` | int | Number of concurrent workers to start processing the queue. (default 10) |
| `-p`, `--project` | string | Specifies the Flyte project. |
| `--rediscache.passwordSecretName` | string | Name of secret with Redis password. |
| `--rediscache.primaryEndpoint` | string | Primary endpoint for the redis cache that can be used for both reads and writes. |
| `--rediscache.replicaEndpoint` | string | Replica endpoint for the redis cache that can be used for reads. |
| `--secrets.env-prefix` | string | Prefix for environment variables (default "FLYTE_SECRET_") |
| `--secrets.secrets-prefix` | string | Prefix where to look for secrets file (default "/etc/secrets") |
| `--secrets.type` | string | Sets the type of storage to configure [local]. (default "local") |
| `--server.dataProxy.download.maxExpiresIn` | string | Maximum allowed expiration duration. (default "1h0m0s") |
| `--server.dataProxy.upload.defaultFileNameLength` | int | Default length for the generated file name if not provided in the request. (default 20) |
| `--server.dataProxy.upload.maxExpiresIn` | string | Maximum allowed expiration duration. (default "1h0m0s") |
| `--server.dataProxy.upload.maxSize` | string | Maximum allowed upload size. (default "6Mi") |
| `--server.dataProxy.upload.storagePrefix` | string | Storage prefix to use for all upload requests. |
| `--server.grpc.enableGrpcLatencyMetrics` | | Enable grpc latency metrics. Note Histograms metrics can be expensive on Prometheus servers. |
| `--server.grpc.maxMessageSizeBytes` | int | The max size in bytes for incoming gRPC messages |
| `--server.grpc.port` | int | On which grpc port to serve admin (default 8089) |
| `--server.grpc.serverReflection` | | Enable GRPC Server Reflection (default true) |
| `--server.grpcPort` | int | deprecated |
| `--server.grpcServerReflection` | | deprecated |
| `--server.httpPort` | int | On which http port to serve admin (default 8088) |
| `--server.kube-config` | string | Path to kubernetes client config file, default is empty, useful for incluster config. |
| `--server.kubeClientConfig.burst` | int | Max burst rate for throttle. 0 defaults to 10 (default 25) |
| `--server.kubeClientConfig.qps` | int32 | Max QPS to the master for requests to KubeAPI. 0 defaults to 5. (default 100) |
| `--server.kubeClientConfig.timeout` | string | Max duration allowed for every request to KubeAPI before giving up. 0 implies no timeout. (default "30s") |
| `--server.master` | string | The address of the Kubernetes API server. |
| `--server.readHeaderTimeoutSeconds` | int | The amount of time allowed to read request headers. (default 32) |
| `--server.security.allowCors` | | (default true) |
| `--server.security.allowedHeaders` | strings | (default [Content-Type,flyte-authorization]) |
| `--server.security.allowedOrigins` | strings | (default [*]) |
| `--server.security.auditAccess` | | |
| `--server.security.secure` | | |
| `--server.security.ssl.certificateFile` | string | |
| `--server.security.ssl.keyFile` | string | |
| `--server.security.useAuth` | | |
| `--server.thirdPartyConfig.flyteClient.audience` | string | Audience to use when initiating OAuth2 authorization requests. |
| `--server.thirdPartyConfig.flyteClient.clientId` | string | public identifier for the app which handles authorization for a Flyte deployment |
| `--server.thirdPartyConfig.flyteClient.redirectUri` | string | This is the callback uri registered with the app which handles authorization for a Flyte deployment |
| `--server.thirdPartyConfig.flyteClient.scopes` | strings | Recommended scopes for the client to request. |
| `--server.watchService.maxActiveClusterConnections` | int | (default 5) |
| `--server.watchService.maxPageSize` | int | (default 50000) |
| `--server.watchService.nonTerminalStatusUpdatesInterval` | string | (default "1m0s") |
| `--server.watchService.pollInterval` | string | (default "1s") |
| `--sharedservice.connectPort` | string | On which connect port to serve admin (default "8080") |
| `--sharedservice.grpc.grpcMaxResponseStatusBytes` | int32 | specifies the maximum (uncompressed) size of header list that the client is prepared to accept on grpc calls (default 32000) |
| `--sharedservice.grpc.maxConcurrentStreams` | int | Limit on the number of concurrent streams to each ServerTransport. (default 100) |
| `--sharedservice.grpc.maxMessageSizeBytes` | int | Limit on the size of message that can be received on the server. (default 10485760) |
| `--sharedservice.grpcServerReflection` | | Enable GRPC Server Reflection (default true) |
| `--sharedservice.httpPort` | string | On which http port to serve admin (default "8089") |
| `--sharedservice.kubeConfig` | string | Path to kubernetes client config file. |
| `--sharedservice.master` | string | The address of the Kubernetes API server. |
| `--sharedservice.metrics.enableClientGrpcHistograms` | | Enable client grpc histograms (default true) |
| `--sharedservice.metrics.enableGrpcHistograms` | | Enable grpc histograms (default true) |
| `--sharedservice.metrics.scope` | string | Scope to emit metrics under (default "service:") |
| `--sharedservice.port` | string | On which grpc port to serve admin (default "8080") |
| `--sharedservice.profiler.enabled` | | Enable Profiler on server |
| `--sharedservice.profilerPort` | string | Profile port to start listen for pprof and metric handlers on. (default "10254") |
| `--sharedservice.security.allowCors` | | |
| `--sharedservice.security.allowLocalhostAccess` | | Whether to permit localhost unauthenticated access to the server |
| `--sharedservice.security.allowedHeaders` | strings | |
| `--sharedservice.security.allowedOrigins` | strings | |
| `--sharedservice.security.auditAccess` | | |
| `--sharedservice.security.orgOverride` | string | Override org in identity context if localhost access enabled |
| `--sharedservice.security.secure` | | |
| `--sharedservice.security.ssl.certificateAuthorityFile` | string | |
| `--sharedservice.security.ssl.certificateFile` | string | |
| `--sharedservice.security.ssl.keyFile` | string | |
| `--sharedservice.security.useAuth` | | |
| `--sharedservice.sync.syncInterval` | string | Time interval to sync (default "5m0s") |
| `--storage.cache.max_size_mbs` | int | Maximum size of the cache where the Blob store data is cached in-memory. If not specified or set to 0, cache is not used |
| `--storage.cache.target_gc_percent` | int | Sets the garbage collection target percentage. |
| `--storage.connection.access-key` | string | Access key to use. Only required when authtype is set to accesskey. |
| `--storage.connection.auth-type` | string | Auth Type to use [iam, accesskey]. (default "iam") |
| `--storage.connection.disable-ssl` | | Disables SSL connection. Should only be used for development. |
| `--storage.connection.endpoint` | string | URL for storage client to connect to. |
| `--storage.connection.region` | string | Region to connect to. (default "us-east-1") |
| `--storage.connection.secret-key` | string | Secret to use when accesskey is set. |
| `--storage.container` | string | Initial container (in s3 a bucket) to create -if it doesn't exist-.' |
| `--storage.defaultHttpClient.timeout` | string | Sets time out on the http client. (default "0s") |
| `--storage.enable-multicontainer` | | If this is true, then the container argument is overlooked and redundant. This config will automatically open new connections to new containers/buckets as they are encountered |
| `--storage.limits.maxDownloadMBs` | int | Maximum allowed download size (in MBs) per call. (default 2) |
| `--storage.stow.config` | stringToString | Configuration for stow backend. Refer to github/flyteorg/stow (default []) |
| `--storage.stow.kind` | string | Kind of Stow backend to use. Refer to github/flyteorg/stow |
| `--storage.type` | string | Sets the type of storage to configure [s3/minio/local/mem/stow]. (default "s3") |
| `--union.auth.authorizationMetadataKey` | string | Authorization Header to use when passing Access Tokens to the server (default "flyte-authorization") |
| `--union.auth.clientId` | string | Client ID |
| `--union.auth.clientSecretEnvVar` | string | Environment variable containing the client secret |
| `--union.auth.clientSecretLocation` | string | File containing the client secret |
| `--union.auth.deviceFlow.pollInterval` | string | amount of time the device flow would poll the token endpoint if auth server doesn't return a polling interval. Okta and google IDP do return an interval' (default "5s") |
| `--union.auth.deviceFlow.refreshTime` | string | grace period from the token expiry after which it would refresh the token. (default "5m0s") |
| `--union.auth.deviceFlow.timeout` | string | amount of time the device flow should complete or else it will be cancelled. (default "10m0s") |
| `--union.auth.enable` | | Whether to enable an authenticated conenction when communicating with admin. (default true) |
| `--union.auth.externalAuth.command` | strings | Command for external authentication token generation |
| `--union.auth.pkce.refreshTime` | string | grace period from the token expiry after which it would refresh the token. (default "5m0s") |
| `--union.auth.pkce.timeout` | string | Amount of time the browser session would be active for authentication from client app. (default "15s") |
| `--union.auth.scopes` | strings | List of scopes to request |
| `--union.auth.tokenRefreshWindow` | string | Max duration between token refresh attempt and token expiry. (default "1h0m0s") |
| `--union.auth.tokenUrl` | string | OPTIONAL: Your IdP's token endpoint. It'll be discovered from flyte admin's OAuth Metadata endpoint if not provided. |
| `--union.auth.type` | string | Type of OAuth2 flow used for communicating with admin. (default "Pkce") |
| `--union.cache.maxItemsCount` | int | Maximum number of items to keep in the cache before evicting. (default 1000) |
| `--union.connection.host` | string | Host to connect to (default "dns:///utt-mgdp-stg-us-east-2.cloud-staging.union.ai") |
| `--union.connection.insecure` | | Whether to connect over insecure channel |
| `--union.connection.insecureSkipVerify` | | InsecureSkipVerify controls whether a client verifies the server's certificate chain and host name.Caution: shouldn't be use for production usecases' |
| `--union.connection.keepAliveConfig.permitWithoutStream` | | If true, client sends keepalive pings even with no active RPCs. |
| `--union.connection.keepAliveConfig.time` | string | After a duration of this time if the client doesn't see any activity it pings the server to see if the transport is still alive. (default "20s") |
| `--union.connection.keepAliveConfig.timeout` | string | After having pinged for keepalive check, the client waits for a duration of Timeout and if no activity is seen even after that the connection is closed. (default "2m0s") |
| `--union.connection.maxBackoffDelay` | string | Max delay for grpc backoff (default "8s") |
| `--union.connection.maxRecvMsgSize` | int | Maximum size of a message in bytes of a gRPC message (default 10485760) |
| `--union.connection.maxRetries` | int | Max number of gRPC retries (default 4) |
| `--union.connection.minConnectTimeout` | string | Minimum timeout for establishing a connection (default "20s") |
| `--union.connection.perRetryTimeout` | string | gRPC per retry timeout (default "15s") |
| `--union.connection.serviceConfig` | string | Defines gRPC experimental JSON Service Config (default "{"loadBalancingConfig": [{"round_robin":{}}]}") |
| `--union.connection.trustedIdentityClaims.enabled` | | Enables passing of trusted claims while making inter service calls |
| `--union.connection.trustedIdentityClaims.externalIdentityClaim` | string | External identity claim of the service which is authorized to make internal service call. These are verified against userclouds actions |
| `--union.connection.trustedIdentityClaims.externalIdentityTypeClaim` | string | External identity type claim of app or user to use for the current service identity. It should be an 'app' for inter service communication |
| `--union.internalConnectionConfig.-` | stringToString | (default []) |
| `--union.internalConnectionConfig.enabled` | | Enables internal service to service communication instead of going through ingress. |
| `--union.internalConnectionConfig.urlPattern` | string | UrlPattern of the internal service endpoints. (default "{{ service }}-helmchart.{{ service }}.svc.cluster.local:80") |
| `--webhook.awsSecretManager.sidecarImage` | string | Specifies the sidecar docker image to use (default "docker.io/amazon/aws-secrets-manager-secret-sidecar:v0.1.4") |
| `--webhook.certDir` | string | Certificate directory to use to write generated certs. Defaults to /etc/webhook/certs/ (default "/etc/webhook/certs") |
| `--webhook.embeddedSecretManagerConfig.awsConfig.region` | string | AWS region |
| `--webhook.embeddedSecretManagerConfig.fileMountInitContainer.image` | string | Specifies init container image to use for mounting secrets as files. (default "busybox:1.28") |
| `--webhook.embeddedSecretManagerConfig.gcpConfig.project` | string | GCP project to be used for secret manager |
| `--webhook.embeddedSecretManagerConfig.type` | string | (default "AWS") |
| `--webhook.gcpSecretManager.sidecarImage` | string | Specifies the sidecar docker image to use (default "gcr.io/google.com/cloudsdktool/cloud-sdk:alpine") |
| `--webhook.listenPort` | int | The port to use to listen to webhook calls. Defaults to 9443 (default 9443) |
| `--webhook.localCert` | | write certs locally. Defaults to false |
| `--webhook.metrics-prefix` | string | An optional prefix for all published metrics. (default "flyte:") |
| `--webhook.secretName` | string | Secret name to write generated certs to. (default "flyte-pod-webhook") |
| `--webhook.serviceName` | string | The name of the webhook service. (default "flyte-pod-webhook") |
| `--webhook.servicePort` | int32 | The port on the service that hosting webhook. (default 443) |
| `--webhook.vaultSecretManager.role` | string | Specifies the vault role to use (default "flyte") |
=== PAGE: https://www.union.ai/docs/v1/serverless/api-reference/uctl-cli/uctl-get/uctl-get-identityassignment ===
# uctl get identityassignment
## Synopsis
Fetch the policies assigned to a user, by email:
```shell
$ uctl get identityassignments --user bob@contoso.com
```
Fetch the specific policies assigned to an application, by id:
```shell
$ uctl get identityassignments --application "contoso-operator"
```
Hint: you can fetch an application's ID by listing apps:
```shell
$ uctl get apps
```
## Options
| Option | Type | Description |
|--------|------|-------------|
| `--application` | string | Application id to fetch identity assignments for |
| `-h`, `--help` | help for identityassignment |
| `--user` | string | Human user email to fetch identity assignments for |
### Options inherited from parent commands
| Option | Type | Description |
|--------|------|-------------|
| `--admin.audience` | string | Audience to use when initiating OAuth2 authorization requests. |
| `--admin.authType` | string | Type of OAuth2 flow used for communicating with admin.ClientSecret, Pkce, ExternalCommand are valid values (default "ClientSecret") |
| `--admin.authorizationHeader` | string | Custom metadata header to pass JWT |
| `--admin.authorizationServerUrl` | string | This is the URL to your IdP's authorization server. It'll default to Endpoint |
| `--admin.caCertFilePath` | string | Use specified certificate file to verify the admin server peer. |
| `--admin.clientId` | string | Client ID (default "flytepropeller") |
| `--admin.clientSecretEnvVar` | string | Environment variable containing the client secret |
| `--admin.clientSecretLocation` | string | File containing the client secret (default "/etc/secrets/client_secret") |
| `--admin.command` | strings | Command for external authentication token generation |
| `--admin.defaultOrg` | string | OPTIONAL: Default org to use to support non-org based cli's.'. |
| `--admin.defaultServiceConfig` | string | |
| `--admin.deviceFlowConfig.pollInterval` | string | amount of time the device flow would poll the token endpoint if auth server doesn't return a polling interval. Okta and google IDP do return an interval' (default "5s") |
| `--admin.deviceFlowConfig.refreshTime` | string | grace period from the token expiry after which it would refresh the token. (default "5m0s") |
| `--admin.deviceFlowConfig.timeout` | string | amount of time the device flow should complete or else it will be cancelled. (default "10m0s") |
| `--admin.endpoint` | string | For admin types, specify where the uri of the service is located. |
| `--admin.httpProxyURL` | string | OPTIONAL: HTTP Proxy to be used for OAuth requests. |
| `--admin.insecure` | | Use insecure connection. |
| `--admin.insecureSkipVerify` | | InsecureSkipVerify controls whether a client verifies the server's certificate chain and host name.Caution: shouldn't be use for production usecases' |
| `--admin.maxBackoffDelay` | string | Max delay for grpc backoff (default "8s") |
| `--admin.maxMessageSizeBytes` | int | The max size in bytes for incoming gRPC messages |
| `--admin.maxRetries` | int | Max number of gRPC retries (default 4) |
| `--admin.perRetryTimeout` | string | gRPC per retry timeout (default "15s") |
| `--admin.pkceConfig.refreshTime` | string | grace period from the token expiry after which it would refresh the token. (default "5m0s") |
| `--admin.pkceConfig.timeout` | string | Amount of time the browser session would be active for authentication from client app. (default "2m0s") |
| `--admin.proxyCommand` | strings | Command for external proxy-authorization token generation |
| `--admin.scopes` | strings | List of scopes to request |
| `--admin.tokenRefreshWindow` | string | Max duration between token refresh attempt and token expiry. (default "0s") |
| `--admin.tokenUrl` | string | OPTIONAL: Your IdP's token endpoint. It'll be discovered from flyte admin's OAuth Metadata endpoint if not provided. |
| `--admin.useAudienceFromAdmin` | | Use Audience configured from admins public endpoint config. |
| `--admin.useAuth` | | Deprecated: Auth will be enabled/disabled based on admin's dynamically discovered information. |
| `--auth.appAuth.externalAuthServer.allowedAudience` | strings | Optional: A list of allowed audiences. If not provided, the audience is expected to be the public Uri of the service. |
| `--auth.appAuth.externalAuthServer.baseUrl` | string | This should be the base url of the authorization server that you are trying to hit. With Okta for instance, it will look something like https://company.okta.com/oauth2/abcdef123456789/ |
| `--auth.appAuth.externalAuthServer.httpProxyURL` | string | OPTIONAL: HTTP Proxy to be used for OAuth requests. |
| `--auth.appAuth.externalAuthServer.metadataUrl` | string | Optional: If the server doesn't support /.well-known/oauth-authorization-server, you can set a custom metadata url here.' |
| `--auth.appAuth.externalAuthServer.retryAttempts` | int | Optional: The number of attempted retries on a transient failure to get the OAuth metadata (default 5) |
| `--auth.appAuth.externalAuthServer.retryDelay` | string | Optional, Duration to wait between retries (default "1s") |
| `--auth.appAuth.selfAuthServer.accessTokenLifespan` | string | Defines the lifespan of issued access tokens. (default "30m0s") |
| `--auth.appAuth.selfAuthServer.authorizationCodeLifespan` | string | Defines the lifespan of issued access tokens. (default "5m0s") |
| `--auth.appAuth.selfAuthServer.claimSymmetricEncryptionKeySecretName` | string | OPTIONAL: Secret name to use to encrypt claims in authcode token. (default "claim_symmetric_key") |
| `--auth.appAuth.selfAuthServer.issuer` | string | Defines the issuer to use when issuing and validating tokens. The default value is https://{requestUri.HostAndPort}/ |
| `--auth.appAuth.selfAuthServer.oldTokenSigningRSAKeySecretName` | string | OPTIONAL: Secret name to use to retrieve Old RSA Signing Key. This can be useful during key rotation to continue to accept older tokens. (default "token_rsa_key_old.pem") |
| `--auth.appAuth.selfAuthServer.refreshTokenLifespan` | string | Defines the lifespan of issued access tokens. (default "1h0m0s") |
| `--auth.appAuth.selfAuthServer.tokenSigningRSAKeySecretName` | string | OPTIONAL: Secret name to use to retrieve RSA Signing Key. (default "token_rsa_key.pem") |
| `--auth.appAuth.thirdPartyConfig.flyteClient.audience` | string | Audience to use when initiating OAuth2 authorization requests. |
| `--auth.appAuth.thirdPartyConfig.flyteClient.clientId` | string | public identifier for the app which handles authorization for a Flyte deployment (default "uctl") |
| `--auth.appAuth.thirdPartyConfig.flyteClient.redirectUri` | string | This is the callback uri registered with the app which handles authorization for a Flyte deployment (default "http://localhost:53593/callback") |
| `--auth.appAuth.thirdPartyConfig.flyteClient.scopes` | strings | Recommended scopes for the client to request. (default [all,offline]) |
| `--auth.disableForGrpc` | | Disables auth enforcement on Grpc Endpoints. |
| `--auth.disableForHttp` | | Disables auth enforcement on HTTP Endpoints. |
| `--auth.grpcAuthorizationHeader` | string | (default "flyte-authorization") |
| `--auth.httpAuthorizationHeader` | string | (default "flyte-authorization") |
| `--auth.httpProxyURL` | string | OPTIONAL: HTTP Proxy to be used for OAuth requests. |
| `--auth.tokenEndpointProxyPath` | string | The path used to proxy calls to the TokenURL |
| `--auth.userAuth.cookieBlockKeySecretName` | string | OPTIONAL: Secret name to use for cookie block key. (default "cookie_block_key") |
| `--auth.userAuth.cookieHashKeySecretName` | string | OPTIONAL: Secret name to use for cookie hash key. (default "cookie_hash_key") |
| `--auth.userAuth.cookieSetting.domain` | string | OPTIONAL: Allows you to set the domain attribute on the auth cookies. |
| `--auth.userAuth.cookieSetting.sameSitePolicy` | string | OPTIONAL: Allows you to declare if your cookie should be restricted to a first-party or same-site context.Wrapper around http.SameSite. (default "DefaultMode") |
| `--auth.userAuth.httpProxyURL` | string | OPTIONAL: HTTP Proxy to be used for OAuth requests. |
| `--auth.userAuth.idpQueryParameter` | string | idp query parameter used for selecting a particular IDP for doing user authentication. Eg: for Okta passing idp={IDP-ID} forces the authentication to happen with IDP-ID |
| `--auth.userAuth.openId.baseUrl` | string | |
| `--auth.userAuth.openId.clientId` | string | |
| `--auth.userAuth.openId.clientSecretFile` | string | |
| `--auth.userAuth.openId.clientSecretName` | string | (default "oidc_client_secret") |
| `--auth.userAuth.openId.scopes` | strings | (default [openid,profile]) |
| `--auth.userAuth.redirectUrl` | string | (default "/console") |
| `--authorizer.internalCommunicationConfig.enabled` | | Enables authorization decisions for internal communication. (default true) |
| `--authorizer.internalCommunicationConfig.ingressIdentity` | string | IngressIdentity used in the cluster. Needed to exclude the communication coming from ingress. (default "ingress-nginx.ingress-nginx.serviceaccount.identity.linkerd.cluster.local") |
| `--authorizer.internalCommunicationConfig.tenantUrlPatternIdentity` | string | UrlPatternIdentity of the internal tenant service endpoint identities. (default "{{ service }}.{{ org }}.serviceaccount.identity.linkerd.cluster.local") |
| `--authorizer.internalCommunicationConfig.urlPatternIdentity` | string | UrlPatternIdentity of the internal service endpoint identities. (default "{{ service }}-helmchart.{{ service }}.serviceaccount.identity.linkerd.cluster.local") |
| `--authorizer.mode` | string | (default "Active") |
| `--authorizer.organizationConfig.PolicyConfig.adminPolicyDescription` | string | description for the boilerplate admin policy (default "Contributor permissions and full admin permissions to manage users and view usage dashboards") |
| `--authorizer.organizationConfig.PolicyConfig.contributorPolicyDescription` | string | description for the boilerplate contributor policy (default "Viewer permissions and permissions to create workflows, tasks, launch plans, and executions") |
| `--authorizer.organizationConfig.PolicyConfig.defaultUserPolicyRoleType` | string | name of the role type to determine which default policy new users added to the organization should be assigned (default "Viewer") |
| `--authorizer.organizationConfig.PolicyConfig.serverlessContributorPolicyDescription` | string | description for the boilerplate serverless contributor policy (default "Viewer permissions and permissions to create workflows, tasks, launch plans, and executions") |
| `--authorizer.organizationConfig.PolicyConfig.serverlessViewerPolicyDescription` | string | description for the boilerplate serverless viewer policy (default "Permissions to view Flyte entities") |
| `--authorizer.organizationConfig.PolicyConfig.viewerPolicyDescription` | string | description for the boilerplate viewer policy (default "Permissions to view Flyte entities") |
| `--authorizer.organizationConfig.defaultPolicyCacheDuration` | string | Cache entry duration for the store of the default policy per organization (default "10m0s") |
| `--authorizer.syncRuleRefreshInterval` | string | (default "1m0s") |
| `--authorizer.type` | string | (default "UserClouds") |
| `--authorizer.userCloudsClient.cache.redis.ttl.edgeTypes` | string | Specifies how long edge types remain in the cache.. (default "30m0s") |
| `--authorizer.userCloudsClient.cache.redis.ttl.edges` | string | Specifies how long edges remain in the cache. (default "30m0s") |
| `--authorizer.userCloudsClient.cache.redis.ttl.objectTypes` | string | Specifies how long object types remain in the cache. (default "30m0s") |
| `--authorizer.userCloudsClient.cache.redis.ttl.objects` | string | Specifies how long objects remain in the cache. (default "30m0s") |
| `--authorizer.userCloudsClient.cache.type` | string | Cache type to use. (default "none") |
| `--authorizer.userCloudsClient.clientID` | string | UserClouds client id |
| `--authorizer.userCloudsClient.clientSecretName` | string | UserCloud client secret name to read from the secret manager. (default "userclouds-client-secret") |
| `--authorizer.userCloudsClient.enableLogging` | | Enable userclouds client's internal logging. Calls to post logs take 250-350 ms and will impact p99 latency, enable with caution. |
| `--authorizer.userCloudsClient.tenantID` | string | UserClouds tenant id. Should be a UUID. |
| `--authorizer.userCloudsClient.tenantUrl` | string | Something like https://{yourtenant}.tenant.userclouds.com |
| `--config` | string | config file (default is /Users/andrew/.union/config.yaml) |
| `--connection.environment` | string | |
| `--connection.region` | string | |
| `--connection.rootTenantURLPattern` | string | Pattern for tenant url. (default "dns:///{{ organization }}.cloud-staging.union.ai") |
| `--console.endpoint` | string | Endpoint of console, if different than flyte admin |
| `--database.connMaxLifeTime` | string | sets the maximum amount of time a connection may be reused (default "1h0m0s") |
| `--database.enableForeignKeyConstraintWhenMigrating` | | Whether to enable gorm foreign keys when migrating the db |
| `--database.maxIdleConnections` | int | maxIdleConnections sets the maximum number of connections in the idle connection pool. (default 10) |
| `--database.maxOpenConnections` | int | maxOpenConnections sets the maximum number of open connections to the database. (default 100) |
| `--database.postgres.dbname` | string | The database name (default "postgres") |
| `--database.postgres.debug` | | |
| `--database.postgres.host` | string | The host name of the database server (default "localhost") |
| `--database.postgres.options` | string | See http://gorm.io/docs/connecting_to_the_database.html for available options passed, in addition to the above. (default "sslmode=disable") |
| `--database.postgres.password` | string | The database password. (default "postgres") |
| `--database.postgres.passwordPath` | string | Points to the file containing the database password. |
| `--database.postgres.port` | int | The port name of the database server (default 30001) |
| `--database.postgres.readReplicaHost` | string | The host name of the read replica database server (default "localhost") |
| `--database.postgres.username` | string | The database user who is connecting to the server. (default "postgres") |
| `--database.sqlite.file` | string | The path to the file (existing or new) where the DB should be created / stored. If existing, then this will be re-used, else a new will be created |
| `--db.connectionPool.maxConnectionLifetime` | string | (default "0s") |
| `--db.connectionPool.maxIdleConnections` | int | |
| `--db.connectionPool.maxOpenConnections` | int | |
| `--db.dbname` | string | (default "postgres") |
| `--db.debug` | | |
| `--db.host` | string | (default "postgres") |
| `--db.log_level` | int | (default 4) |
| `--db.options` | string | (default "sslmode=disable") |
| `--db.password` | string | |
| `--db.passwordPath` | string | |
| `--db.port` | int | (default 5432) |
| `--db.username` | string | (default "postgres") |
| `-d`, `--domain` | string | Specifies the Flyte project's domain. |
| `--files.archive` | | Pass in archive file either an http link or local path. |
| `--files.assumableIamRole` | string | Custom assumable iam auth role to register launch plans with. |
| `--files.continueOnError` | | Continue on error when registering files. |
| `--files.destinationDirectory` | string | Location of source code in container. |
| `--files.dryRun` | | Execute command without making any modifications. |
| `--files.enableSchedule` | | Enable the schedule if the files contain schedulable launchplan. |
| `--files.force` | | Force use of version number on entities registered with flyte. |
| `--files.k8ServiceAccount` | string | Deprecated. Please use `--K8sServiceAccount`|
| `--files.k8sServiceAccount` | string | Custom kubernetes service account auth role to register launch plans with. |
| `--files.outputLocationPrefix` | string | Custom output location prefix for offloaded types (files/schemas). |
| `--files.sourceUploadPath` | string | Deprecated: Update flyte admin to avoid having to configure storage access from uctl. |
| `--files.version` | string | Version of the entity to be registered with flyte which are un-versioned after serialization. |
| `--logger.formatter.type` | string | Sets logging format type. (default "json") |
| `--logger.level` | int | Sets the minimum logging level. (default 3) |
| `--logger.mute` | | Mutes all logs regardless of severity. Intended for benchmarks/tests only. |
| `--logger.show-source` | | Includes source code location in logs. |
| `--org` | string | Organization to work on. If not set, default to user's org. |
| `--otel.file.filename` | string | Filename to store exported telemetry traces (default "/tmp/trace.txt") |
| `--otel.jaeger.endpoint` | string | Endpoint for the jaeger telemetry trace ingestor (default "http://localhost:14268/api/traces") |
| `--otel.otlpgrpc.endpoint` | string | Endpoint for the OTLP telemetry trace collector (default "http://localhost:4317") |
| `--otel.otlphttp.endpoint` | string | Endpoint for the OTLP telemetry trace collector (default "http://localhost:4318/v1/traces") |
| `--otel.sampler.parentSampler` | string | Sets the parent sampler to use for the tracer (default "always") |
| `--otel.type` | string | Sets the type of exporter to configure [noop/file/jaeger/otlpgrpc/otlphttp]. (default "noop") |
| `-o`, `--output` | string | Specifies the output type - supported formats [TABLE JSON YAML DOT DOTURL]. NOTE: dot, doturl are only supported for Workflow (default "table") |
| `--plugins.catalogcache.reader.maxItems` | int | Maximum number of entries to keep in the index. (default 10000) |
| `--plugins.catalogcache.reader.maxRetries` | int | Maximum number of retries per item. (default 3) |
| `--plugins.catalogcache.reader.workers` | int | Number of concurrent workers to start processing the queue. (default 10) |
| `--plugins.catalogcache.writer.maxItems` | int | Maximum number of entries to keep in the index. (default 10000) |
| `--plugins.catalogcache.writer.maxRetries` | int | Maximum number of retries per item. (default 3) |
| `--plugins.catalogcache.writer.workers` | int | Number of concurrent workers to start processing the queue. (default 10) |
| `-p`, `--project` | string | Specifies the Flyte project. |
| `--rediscache.passwordSecretName` | string | Name of secret with Redis password. |
| `--rediscache.primaryEndpoint` | string | Primary endpoint for the redis cache that can be used for both reads and writes. |
| `--rediscache.replicaEndpoint` | string | Replica endpoint for the redis cache that can be used for reads. |
| `--secrets.env-prefix` | string | Prefix for environment variables (default "FLYTE_SECRET_") |
| `--secrets.secrets-prefix` | string | Prefix where to look for secrets file (default "/etc/secrets") |
| `--secrets.type` | string | Sets the type of storage to configure [local]. (default "local") |
| `--server.dataProxy.download.maxExpiresIn` | string | Maximum allowed expiration duration. (default "1h0m0s") |
| `--server.dataProxy.upload.defaultFileNameLength` | int | Default length for the generated file name if not provided in the request. (default 20) |
| `--server.dataProxy.upload.maxExpiresIn` | string | Maximum allowed expiration duration. (default "1h0m0s") |
| `--server.dataProxy.upload.maxSize` | string | Maximum allowed upload size. (default "6Mi") |
| `--server.dataProxy.upload.storagePrefix` | string | Storage prefix to use for all upload requests. |
| `--server.grpc.enableGrpcLatencyMetrics` | | Enable grpc latency metrics. Note Histograms metrics can be expensive on Prometheus servers. |
| `--server.grpc.maxMessageSizeBytes` | int | The max size in bytes for incoming gRPC messages |
| `--server.grpc.port` | int | On which grpc port to serve admin (default 8089) |
| `--server.grpc.serverReflection` | | Enable GRPC Server Reflection (default true) |
| `--server.grpcPort` | int | deprecated |
| `--server.grpcServerReflection` | | deprecated |
| `--server.httpPort` | int | On which http port to serve admin (default 8088) |
| `--server.kube-config` | string | Path to kubernetes client config file, default is empty, useful for incluster config. |
| `--server.kubeClientConfig.burst` | int | Max burst rate for throttle. 0 defaults to 10 (default 25) |
| `--server.kubeClientConfig.qps` | int32 | Max QPS to the master for requests to KubeAPI. 0 defaults to 5. (default 100) |
| `--server.kubeClientConfig.timeout` | string | Max duration allowed for every request to KubeAPI before giving up. 0 implies no timeout. (default "30s") |
| `--server.master` | string | The address of the Kubernetes API server. |
| `--server.readHeaderTimeoutSeconds` | int | The amount of time allowed to read request headers. (default 32) |
| `--server.security.allowCors` | | (default true) |
| `--server.security.allowedHeaders` | strings | (default [Content-Type,flyte-authorization]) |
| `--server.security.allowedOrigins` | strings | (default [*]) |
| `--server.security.auditAccess` | | |
| `--server.security.secure` | | |
| `--server.security.ssl.certificateFile` | string | |
| `--server.security.ssl.keyFile` | string | |
| `--server.security.useAuth` | | |
| `--server.thirdPartyConfig.flyteClient.audience` | string | Audience to use when initiating OAuth2 authorization requests. |
| `--server.thirdPartyConfig.flyteClient.clientId` | string | public identifier for the app which handles authorization for a Flyte deployment |
| `--server.thirdPartyConfig.flyteClient.redirectUri` | string | This is the callback uri registered with the app which handles authorization for a Flyte deployment |
| `--server.thirdPartyConfig.flyteClient.scopes` | strings | Recommended scopes for the client to request. |
| `--server.watchService.maxActiveClusterConnections` | int | (default 5) |
| `--server.watchService.maxPageSize` | int | (default 50000) |
| `--server.watchService.nonTerminalStatusUpdatesInterval` | string | (default "1m0s") |
| `--server.watchService.pollInterval` | string | (default "1s") |
| `--sharedservice.connectPort` | string | On which connect port to serve admin (default "8080") |
| `--sharedservice.grpc.grpcMaxResponseStatusBytes` | int32 | specifies the maximum (uncompressed) size of header list that the client is prepared to accept on grpc calls (default 32000) |
| `--sharedservice.grpc.maxConcurrentStreams` | int | Limit on the number of concurrent streams to each ServerTransport. (default 100) |
| `--sharedservice.grpc.maxMessageSizeBytes` | int | Limit on the size of message that can be received on the server. (default 10485760) |
| `--sharedservice.grpcServerReflection` | | Enable GRPC Server Reflection (default true) |
| `--sharedservice.httpPort` | string | On which http port to serve admin (default "8089") |
| `--sharedservice.kubeConfig` | string | Path to kubernetes client config file. |
| `--sharedservice.master` | string | The address of the Kubernetes API server. |
| `--sharedservice.metrics.enableClientGrpcHistograms` | | Enable client grpc histograms (default true) |
| `--sharedservice.metrics.enableGrpcHistograms` | | Enable grpc histograms (default true) |
| `--sharedservice.metrics.scope` | string | Scope to emit metrics under (default "service:") |
| `--sharedservice.port` | string | On which grpc port to serve admin (default "8080") |
| `--sharedservice.profiler.enabled` | | Enable Profiler on server |
| `--sharedservice.profilerPort` | string | Profile port to start listen for pprof and metric handlers on. (default "10254") |
| `--sharedservice.security.allowCors` | | |
| `--sharedservice.security.allowLocalhostAccess` | | Whether to permit localhost unauthenticated access to the server |
| `--sharedservice.security.allowedHeaders` | strings | |
| `--sharedservice.security.allowedOrigins` | strings | |
| `--sharedservice.security.auditAccess` | | |
| `--sharedservice.security.orgOverride` | string | Override org in identity context if localhost access enabled |
| `--sharedservice.security.secure` | | |
| `--sharedservice.security.ssl.certificateAuthorityFile` | string | |
| `--sharedservice.security.ssl.certificateFile` | string | |
| `--sharedservice.security.ssl.keyFile` | string | |
| `--sharedservice.security.useAuth` | | |
| `--sharedservice.sync.syncInterval` | string | Time interval to sync (default "5m0s") |
| `--storage.cache.max_size_mbs` | int | Maximum size of the cache where the Blob store data is cached in-memory. If not specified or set to 0, cache is not used |
| `--storage.cache.target_gc_percent` | int | Sets the garbage collection target percentage. |
| `--storage.connection.access-key` | string | Access key to use. Only required when authtype is set to accesskey. |
| `--storage.connection.auth-type` | string | Auth Type to use [iam, accesskey]. (default "iam") |
| `--storage.connection.disable-ssl` | | Disables SSL connection. Should only be used for development. |
| `--storage.connection.endpoint` | string | URL for storage client to connect to. |
| `--storage.connection.region` | string | Region to connect to. (default "us-east-1") |
| `--storage.connection.secret-key` | string | Secret to use when accesskey is set. |
| `--storage.container` | string | Initial container (in s3 a bucket) to create -if it doesn't exist-.' |
| `--storage.defaultHttpClient.timeout` | string | Sets time out on the http client. (default "0s") |
| `--storage.enable-multicontainer` | | If this is true, then the container argument is overlooked and redundant. This config will automatically open new connections to new containers/buckets as they are encountered |
| `--storage.limits.maxDownloadMBs` | int | Maximum allowed download size (in MBs) per call. (default 2) |
| `--storage.stow.config` | stringToString | Configuration for stow backend. Refer to github/flyteorg/stow (default []) |
| `--storage.stow.kind` | string | Kind of Stow backend to use. Refer to github/flyteorg/stow |
| `--storage.type` | string | Sets the type of storage to configure [s3/minio/local/mem/stow]. (default "s3") |
| `--union.auth.authorizationMetadataKey` | string | Authorization Header to use when passing Access Tokens to the server (default "flyte-authorization") |
| `--union.auth.clientId` | string | Client ID |
| `--union.auth.clientSecretEnvVar` | string | Environment variable containing the client secret |
| `--union.auth.clientSecretLocation` | string | File containing the client secret |
| `--union.auth.deviceFlow.pollInterval` | string | amount of time the device flow would poll the token endpoint if auth server doesn't return a polling interval. Okta and google IDP do return an interval' (default "5s") |
| `--union.auth.deviceFlow.refreshTime` | string | grace period from the token expiry after which it would refresh the token. (default "5m0s") |
| `--union.auth.deviceFlow.timeout` | string | amount of time the device flow should complete or else it will be cancelled. (default "10m0s") |
| `--union.auth.enable` | | Whether to enable an authenticated conenction when communicating with admin. (default true) |
| `--union.auth.externalAuth.command` | strings | Command for external authentication token generation |
| `--union.auth.pkce.refreshTime` | string | grace period from the token expiry after which it would refresh the token. (default "5m0s") |
| `--union.auth.pkce.timeout` | string | Amount of time the browser session would be active for authentication from client app. (default "15s") |
| `--union.auth.scopes` | strings | List of scopes to request |
| `--union.auth.tokenRefreshWindow` | string | Max duration between token refresh attempt and token expiry. (default "1h0m0s") |
| `--union.auth.tokenUrl` | string | OPTIONAL: Your IdP's token endpoint. It'll be discovered from flyte admin's OAuth Metadata endpoint if not provided. |
| `--union.auth.type` | string | Type of OAuth2 flow used for communicating with admin. (default "Pkce") |
| `--union.cache.maxItemsCount` | int | Maximum number of items to keep in the cache before evicting. (default 1000) |
| `--union.connection.host` | string | Host to connect to (default "dns:///utt-mgdp-stg-us-east-2.cloud-staging.union.ai") |
| `--union.connection.insecure` | | Whether to connect over insecure channel |
| `--union.connection.insecureSkipVerify` | | InsecureSkipVerify controls whether a client verifies the server's certificate chain and host name.Caution: shouldn't be use for production usecases' |
| `--union.connection.keepAliveConfig.permitWithoutStream` | | If true, client sends keepalive pings even with no active RPCs. |
| `--union.connection.keepAliveConfig.time` | string | After a duration of this time if the client doesn't see any activity it pings the server to see if the transport is still alive. (default "20s") |
| `--union.connection.keepAliveConfig.timeout` | string | After having pinged for keepalive check, the client waits for a duration of Timeout and if no activity is seen even after that the connection is closed. (default "2m0s") |
| `--union.connection.maxBackoffDelay` | string | Max delay for grpc backoff (default "8s") |
| `--union.connection.maxRecvMsgSize` | int | Maximum size of a message in bytes of a gRPC message (default 10485760) |
| `--union.connection.maxRetries` | int | Max number of gRPC retries (default 4) |
| `--union.connection.minConnectTimeout` | string | Minimum timeout for establishing a connection (default "20s") |
| `--union.connection.perRetryTimeout` | string | gRPC per retry timeout (default "15s") |
| `--union.connection.serviceConfig` | string | Defines gRPC experimental JSON Service Config (default "{"loadBalancingConfig": [{"round_robin":{}}]}") |
| `--union.connection.trustedIdentityClaims.enabled` | | Enables passing of trusted claims while making inter service calls |
| `--union.connection.trustedIdentityClaims.externalIdentityClaim` | string | External identity claim of the service which is authorized to make internal service call. These are verified against userclouds actions |
| `--union.connection.trustedIdentityClaims.externalIdentityTypeClaim` | string | External identity type claim of app or user to use for the current service identity. It should be an 'app' for inter service communication |
| `--union.internalConnectionConfig.-` | stringToString | (default []) |
| `--union.internalConnectionConfig.enabled` | | Enables internal service to service communication instead of going through ingress. |
| `--union.internalConnectionConfig.urlPattern` | string | UrlPattern of the internal service endpoints. (default "{{ service }}-helmchart.{{ service }}.svc.cluster.local:80") |
| `--webhook.awsSecretManager.sidecarImage` | string | Specifies the sidecar docker image to use (default "docker.io/amazon/aws-secrets-manager-secret-sidecar:v0.1.4") |
| `--webhook.certDir` | string | Certificate directory to use to write generated certs. Defaults to /etc/webhook/certs/ (default "/etc/webhook/certs") |
| `--webhook.embeddedSecretManagerConfig.awsConfig.region` | string | AWS region |
| `--webhook.embeddedSecretManagerConfig.fileMountInitContainer.image` | string | Specifies init container image to use for mounting secrets as files. (default "busybox:1.28") |
| `--webhook.embeddedSecretManagerConfig.gcpConfig.project` | string | GCP project to be used for secret manager |
| `--webhook.embeddedSecretManagerConfig.type` | string | (default "AWS") |
| `--webhook.gcpSecretManager.sidecarImage` | string | Specifies the sidecar docker image to use (default "gcr.io/google.com/cloudsdktool/cloud-sdk:alpine") |
| `--webhook.listenPort` | int | The port to use to listen to webhook calls. Defaults to 9443 (default 9443) |
| `--webhook.localCert` | | write certs locally. Defaults to false |
| `--webhook.metrics-prefix` | string | An optional prefix for all published metrics. (default "flyte:") |
| `--webhook.secretName` | string | Secret name to write generated certs to. (default "flyte-pod-webhook") |
| `--webhook.serviceName` | string | The name of the webhook service. (default "flyte-pod-webhook") |
| `--webhook.servicePort` | int32 | The port on the service that hosting webhook. (default 443) |
| `--webhook.vaultSecretManager.role` | string | Specifies the vault role to use (default "flyte") |
=== PAGE: https://www.union.ai/docs/v1/serverless/api-reference/uctl-cli/uctl-get/uctl-get-launchplan ===
# uctl get launchplan
Gets the launch plan resources.
## Synopsis
Retrieve all launch plans within the project and domain:
```shell
$ uctl get launchplan -p flytesnacks -d development
```
> [!NOTE]
> The terms launchplan/launchplans are interchangeable in these commands.
Retrieve a launch plan by name within the project and domain:
```shell
$ uctl get launchplan -p flytesnacks -d development core.basic.lp.go_greet
```
Retrieve the latest version of the task by name within the project and
domain:
```shell
$ uctl get launchplan -p flytesnacks -d development core.basic.lp.go_greet --latest
```
Retrieve a particular version of the launch plan by name within the
project and domain:
```shell
$ uctl get launchplan -p flytesnacks -d development core.basic.lp.go_greet --version v2
```
Retrieve all launch plans for a given workflow name:
```shell
$ uctl get launchplan -p flytesnacks -d development --workflow core.flyte_basics.lp.go_greet
```
Retrieve all the launch plans with filters:
```shell
$ uctl get launchplan -p flytesnacks -d development --filter.fieldSelector="name=core.basic.lp.go_greet"
```
Retrieve all active launch plans:
```shell
$ uctl get launchplan -p flytesnacks -d development -o yaml --filter.fieldSelector "state=1"
```
Retrieve all archived launch plans:
```shell
$ uctl get launchplan -p flytesnacks -d development -o yaml --filter.fieldSelector "state=0"
```
Retrieve launch plans entity search across all versions with filters:
```shell
$ uctl get launchplan -p flytesnacks -d development k8s_spark.dataframe_passing.my_smart_schema --filter.fieldSelector="version=v1"
```
Retrieve all the launch plans with limit and sorting:
```shell
$ uctl get launchplan -p flytesnacks -d development --filter.sortBy=created_at --filter.limit=1 --filter.asc
```
Retrieve launch plans present in other pages by specifying the limit and
page number:
```shell
$ uctl get -p flytesnacks -d development launchplan --filter.limit=10 --filter.page=2
```
Retrieve all launch plans within the project and domain in YAML format:
```shell
$ uctl get launchplan -p flytesnacks -d development -o yaml
```
Retrieve all launch plans the within the project and domain in JSON
format:
```shell
$ uctl get launchplan -p flytesnacks -d development -o json
```
Retrieve a launch plan within the project and domain as per a version
and generates the execution spec file; the file can be used to launch
the execution using the `create execution` command:
```shell
$ uctl get launchplan -d development -p flytesnacks core.control_flow.merge_sort.merge_sort --execFile execution_spec.yaml
```
The generated file would look similar to this:
``` yaml
iamRoleARN: ""
inputs:
numbers:
- 0
numbers_count: 0
run_local_at_count: 10
kubeServiceAcct: ""
targetDomain: ""
targetProject: ""
version: v3
workflow: core.control_flow.merge_sort.merge_sort
```
Usage:
```shell
$ uctl get launchplan [flags]
```
## Options
| Option | Type | Description |
|--------|------|-------------|
| `--execFile` | string | execution file name to be used for generating execution spec of a single launchplan. |
| `--filter.asc` | | Specifies the sorting order. By default uctl sort result in descending order |
| `--filter.fieldSelector` | string | Specifies the Field selector |
| `--filter.limit` | int32 | Specifies the limit (default 100) |
| `--filter.page` | int32 | Specifies the page number, in case there are multiple pages of results (default 1) |
| `--filter.sortBy` | string | Specifies which field to sort results (default "created_at") |
| `-h`, `--help` | help for launchplan |
| `--latest` | | flag to indicate to fetch the latest version, version flag will be ignored in this case |
| `--version` | string | version of the launchplan to be fetched. |
| `--workflow` | string | name of the workflow for which the launchplans need to be fetched. |
### Options inherited from parent commands
| Option | Type | Description |
|--------|------|-------------|
| `--admin.audience` | string | Audience to use when initiating OAuth2 authorization requests. |
| `--admin.authType` | string | Type of OAuth2 flow used for communicating with admin.ClientSecret, Pkce, ExternalCommand are valid values (default "ClientSecret") |
| `--admin.authorizationHeader` | string | Custom metadata header to pass JWT |
| `--admin.authorizationServerUrl` | string | This is the URL to your IdP's authorization server. It'll default to Endpoint |
| `--admin.caCertFilePath` | string | Use specified certificate file to verify the admin server peer. |
| `--admin.clientId` | string | Client ID (default "flytepropeller") |
| `--admin.clientSecretEnvVar` | string | Environment variable containing the client secret |
| `--admin.clientSecretLocation` | string | File containing the client secret (default "/etc/secrets/client_secret") |
| `--admin.command` | strings | Command for external authentication token generation |
| `--admin.defaultOrg` | string | OPTIONAL: Default org to use to support non-org based cli's.'. |
| `--admin.defaultServiceConfig` | string | |
| `--admin.deviceFlowConfig.pollInterval` | string | amount of time the device flow would poll the token endpoint if auth server doesn't return a polling interval. Okta and google IDP do return an interval' (default "5s") |
| `--admin.deviceFlowConfig.refreshTime` | string | grace period from the token expiry after which it would refresh the token. (default "5m0s") |
| `--admin.deviceFlowConfig.timeout` | string | amount of time the device flow should complete or else it will be cancelled. (default "10m0s") |
| `--admin.endpoint` | string | For admin types, specify where the uri of the service is located. |
| `--admin.httpProxyURL` | string | OPTIONAL: HTTP Proxy to be used for OAuth requests. |
| `--admin.insecure` | | Use insecure connection. |
| `--admin.insecureSkipVerify` | | InsecureSkipVerify controls whether a client verifies the server's certificate chain and host name.Caution: shouldn't be use for production usecases' |
| `--admin.maxBackoffDelay` | string | Max delay for grpc backoff (default "8s") |
| `--admin.maxMessageSizeBytes` | int | The max size in bytes for incoming gRPC messages |
| `--admin.maxRetries` | int | Max number of gRPC retries (default 4) |
| `--admin.perRetryTimeout` | string | gRPC per retry timeout (default "15s") |
| `--admin.pkceConfig.refreshTime` | string | grace period from the token expiry after which it would refresh the token. (default "5m0s") |
| `--admin.pkceConfig.timeout` | string | Amount of time the browser session would be active for authentication from client app. (default "2m0s") |
| `--admin.proxyCommand` | strings | Command for external proxy-authorization token generation |
| `--admin.scopes` | strings | List of scopes to request |
| `--admin.tokenRefreshWindow` | string | Max duration between token refresh attempt and token expiry. (default "0s") |
| `--admin.tokenUrl` | string | OPTIONAL: Your IdP's token endpoint. It'll be discovered from flyte admin's OAuth Metadata endpoint if not provided. |
| `--admin.useAudienceFromAdmin` | | Use Audience configured from admins public endpoint config. |
| `--admin.useAuth` | | Deprecated: Auth will be enabled/disabled based on admin's dynamically discovered information. |
| `--auth.appAuth.externalAuthServer.allowedAudience` | strings | Optional: A list of allowed audiences. If not provided, the audience is expected to be the public Uri of the service. |
| `--auth.appAuth.externalAuthServer.baseUrl` | string | This should be the base url of the authorization server that you are trying to hit. With Okta for instance, it will look something like https://company.okta.com/oauth2/abcdef123456789/ |
| `--auth.appAuth.externalAuthServer.httpProxyURL` | string | OPTIONAL: HTTP Proxy to be used for OAuth requests. |
| `--auth.appAuth.externalAuthServer.metadataUrl` | string | Optional: If the server doesn't support /.well-known/oauth-authorization-server, you can set a custom metadata url here.' |
| `--auth.appAuth.externalAuthServer.retryAttempts` | int | Optional: The number of attempted retries on a transient failure to get the OAuth metadata (default 5) |
| `--auth.appAuth.externalAuthServer.retryDelay` | string | Optional, Duration to wait between retries (default "1s") |
| `--auth.appAuth.selfAuthServer.accessTokenLifespan` | string | Defines the lifespan of issued access tokens. (default "30m0s") |
| `--auth.appAuth.selfAuthServer.authorizationCodeLifespan` | string | Defines the lifespan of issued access tokens. (default "5m0s") |
| `--auth.appAuth.selfAuthServer.claimSymmetricEncryptionKeySecretName` | string | OPTIONAL: Secret name to use to encrypt claims in authcode token. (default "claim_symmetric_key") |
| `--auth.appAuth.selfAuthServer.issuer` | string | Defines the issuer to use when issuing and validating tokens. The default value is https://{requestUri.HostAndPort}/ |
| `--auth.appAuth.selfAuthServer.oldTokenSigningRSAKeySecretName` | string | OPTIONAL: Secret name to use to retrieve Old RSA Signing Key. This can be useful during key rotation to continue to accept older tokens. (default "token_rsa_key_old.pem") |
| `--auth.appAuth.selfAuthServer.refreshTokenLifespan` | string | Defines the lifespan of issued access tokens. (default "1h0m0s") |
| `--auth.appAuth.selfAuthServer.tokenSigningRSAKeySecretName` | string | OPTIONAL: Secret name to use to retrieve RSA Signing Key. (default "token_rsa_key.pem") |
| `--auth.appAuth.thirdPartyConfig.flyteClient.audience` | string | Audience to use when initiating OAuth2 authorization requests. |
| `--auth.appAuth.thirdPartyConfig.flyteClient.clientId` | string | public identifier for the app which handles authorization for a Flyte deployment (default "uctl") |
| `--auth.appAuth.thirdPartyConfig.flyteClient.redirectUri` | string | This is the callback uri registered with the app which handles authorization for a Flyte deployment (default "http://localhost:53593/callback") |
| `--auth.appAuth.thirdPartyConfig.flyteClient.scopes` | strings | Recommended scopes for the client to request. (default [all,offline]) |
| `--auth.disableForGrpc` | | Disables auth enforcement on Grpc Endpoints. |
| `--auth.disableForHttp` | | Disables auth enforcement on HTTP Endpoints. |
| `--auth.grpcAuthorizationHeader` | string | (default "flyte-authorization") |
| `--auth.httpAuthorizationHeader` | string | (default "flyte-authorization") |
| `--auth.httpProxyURL` | string | OPTIONAL: HTTP Proxy to be used for OAuth requests. |
| `--auth.tokenEndpointProxyPath` | string | The path used to proxy calls to the TokenURL |
| `--auth.userAuth.cookieBlockKeySecretName` | string | OPTIONAL: Secret name to use for cookie block key. (default "cookie_block_key") |
| `--auth.userAuth.cookieHashKeySecretName` | string | OPTIONAL: Secret name to use for cookie hash key. (default "cookie_hash_key") |
| `--auth.userAuth.cookieSetting.domain` | string | OPTIONAL: Allows you to set the domain attribute on the auth cookies. |
| `--auth.userAuth.cookieSetting.sameSitePolicy` | string | OPTIONAL: Allows you to declare if your cookie should be restricted to a first-party or same-site context.Wrapper around http.SameSite. (default "DefaultMode") |
| `--auth.userAuth.httpProxyURL` | string | OPTIONAL: HTTP Proxy to be used for OAuth requests. |
| `--auth.userAuth.idpQueryParameter` | string | idp query parameter used for selecting a particular IDP for doing user authentication. Eg: for Okta passing idp={IDP-ID} forces the authentication to happen with IDP-ID |
| `--auth.userAuth.openId.baseUrl` | string | |
| `--auth.userAuth.openId.clientId` | string | |
| `--auth.userAuth.openId.clientSecretFile` | string | |
| `--auth.userAuth.openId.clientSecretName` | string | (default "oidc_client_secret") |
| `--auth.userAuth.openId.scopes` | strings | (default [openid,profile]) |
| `--auth.userAuth.redirectUrl` | string | (default "/console") |
| `--authorizer.internalCommunicationConfig.enabled` | | Enables authorization decisions for internal communication. (default true) |
| `--authorizer.internalCommunicationConfig.ingressIdentity` | string | IngressIdentity used in the cluster. Needed to exclude the communication coming from ingress. (default "ingress-nginx.ingress-nginx.serviceaccount.identity.linkerd.cluster.local") |
| `--authorizer.internalCommunicationConfig.tenantUrlPatternIdentity` | string | UrlPatternIdentity of the internal tenant service endpoint identities. (default "{{ service }}.{{ org }}.serviceaccount.identity.linkerd.cluster.local") |
| `--authorizer.internalCommunicationConfig.urlPatternIdentity` | string | UrlPatternIdentity of the internal service endpoint identities. (default "{{ service }}-helmchart.{{ service }}.serviceaccount.identity.linkerd.cluster.local") |
| `--authorizer.mode` | string | (default "Active") |
| `--authorizer.organizationConfig.PolicyConfig.adminPolicyDescription` | string | description for the boilerplate admin policy (default "Contributor permissions and full admin permissions to manage users and view usage dashboards") |
| `--authorizer.organizationConfig.PolicyConfig.contributorPolicyDescription` | string | description for the boilerplate contributor policy (default "Viewer permissions and permissions to create workflows, tasks, launch plans, and executions") |
| `--authorizer.organizationConfig.PolicyConfig.defaultUserPolicyRoleType` | string | name of the role type to determine which default policy new users added to the organization should be assigned (default "Viewer") |
| `--authorizer.organizationConfig.PolicyConfig.serverlessContributorPolicyDescription` | string | description for the boilerplate serverless contributor policy (default "Viewer permissions and permissions to create workflows, tasks, launch plans, and executions") |
| `--authorizer.organizationConfig.PolicyConfig.serverlessViewerPolicyDescription` | string | description for the boilerplate serverless viewer policy (default "Permissions to view Flyte entities") |
| `--authorizer.organizationConfig.PolicyConfig.viewerPolicyDescription` | string | description for the boilerplate viewer policy (default "Permissions to view Flyte entities") |
| `--authorizer.organizationConfig.defaultPolicyCacheDuration` | string | Cache entry duration for the store of the default policy per organization (default "10m0s") |
| `--authorizer.syncRuleRefreshInterval` | string | (default "1m0s") |
| `--authorizer.type` | string | (default "UserClouds") |
| `--authorizer.userCloudsClient.cache.redis.ttl.edgeTypes` | string | Specifies how long edge types remain in the cache.. (default "30m0s") |
| `--authorizer.userCloudsClient.cache.redis.ttl.edges` | string | Specifies how long edges remain in the cache. (default "30m0s") |
| `--authorizer.userCloudsClient.cache.redis.ttl.objectTypes` | string | Specifies how long object types remain in the cache. (default "30m0s") |
| `--authorizer.userCloudsClient.cache.redis.ttl.objects` | string | Specifies how long objects remain in the cache. (default "30m0s") |
| `--authorizer.userCloudsClient.cache.type` | string | Cache type to use. (default "none") |
| `--authorizer.userCloudsClient.clientID` | string | UserClouds client id |
| `--authorizer.userCloudsClient.clientSecretName` | string | UserCloud client secret name to read from the secret manager. (default "userclouds-client-secret") |
| `--authorizer.userCloudsClient.enableLogging` | | Enable userclouds client's internal logging. Calls to post logs take 250-350 ms and will impact p99 latency, enable with caution. |
| `--authorizer.userCloudsClient.tenantID` | string | UserClouds tenant id. Should be a UUID. |
| `--authorizer.userCloudsClient.tenantUrl` | string | Something like https://{yourtenant}.tenant.userclouds.com |
| `--config` | string | config file (default is /Users/andrew/.union/config.yaml) |
| `--connection.environment` | string | |
| `--connection.region` | string | |
| `--connection.rootTenantURLPattern` | string | Pattern for tenant url. (default "dns:///{{ organization }}.cloud-staging.union.ai") |
| `--console.endpoint` | string | Endpoint of console, if different than flyte admin |
| `--database.connMaxLifeTime` | string | sets the maximum amount of time a connection may be reused (default "1h0m0s") |
| `--database.enableForeignKeyConstraintWhenMigrating` | | Whether to enable gorm foreign keys when migrating the db |
| `--database.maxIdleConnections` | int | maxIdleConnections sets the maximum number of connections in the idle connection pool. (default 10) |
| `--database.maxOpenConnections` | int | maxOpenConnections sets the maximum number of open connections to the database. (default 100) |
| `--database.postgres.dbname` | string | The database name (default "postgres") |
| `--database.postgres.debug` | | |
| `--database.postgres.host` | string | The host name of the database server (default "localhost") |
| `--database.postgres.options` | string | See http://gorm.io/docs/connecting_to_the_database.html for available options passed, in addition to the above. (default "sslmode=disable") |
| `--database.postgres.password` | string | The database password. (default "postgres") |
| `--database.postgres.passwordPath` | string | Points to the file containing the database password. |
| `--database.postgres.port` | int | The port name of the database server (default 30001) |
| `--database.postgres.readReplicaHost` | string | The host name of the read replica database server (default "localhost") |
| `--database.postgres.username` | string | The database user who is connecting to the server. (default "postgres") |
| `--database.sqlite.file` | string | The path to the file (existing or new) where the DB should be created / stored. If existing, then this will be re-used, else a new will be created |
| `--db.connectionPool.maxConnectionLifetime` | string | (default "0s") |
| `--db.connectionPool.maxIdleConnections` | int | |
| `--db.connectionPool.maxOpenConnections` | int | |
| `--db.dbname` | string | (default "postgres") |
| `--db.debug` | | |
| `--db.host` | string | (default "postgres") |
| `--db.log_level` | int | (default 4) |
| `--db.options` | string | (default "sslmode=disable") |
| `--db.password` | string | |
| `--db.passwordPath` | string | |
| `--db.port` | int | (default 5432) |
| `--db.username` | string | (default "postgres") |
| `-d`, `--domain` | string | Specifies the Flyte project's domain. |
| `--files.archive` | | Pass in archive file either an http link or local path. |
| `--files.assumableIamRole` | string | Custom assumable iam auth role to register launch plans with. |
| `--files.continueOnError` | | Continue on error when registering files. |
| `--files.destinationDirectory` | string | Location of source code in container. |
| `--files.dryRun` | | Execute command without making any modifications. |
| `--files.enableSchedule` | | Enable the schedule if the files contain schedulable launchplan. |
| `--files.force` | | Force use of version number on entities registered with flyte. |
| `--files.k8ServiceAccount` | string | Deprecated. Please use `--K8sServiceAccount`|
| `--files.k8sServiceAccount` | string | Custom kubernetes service account auth role to register launch plans with. |
| `--files.outputLocationPrefix` | string | Custom output location prefix for offloaded types (files/schemas). |
| `--files.sourceUploadPath` | string | Deprecated: Update flyte admin to avoid having to configure storage access from uctl. |
| `--files.version` | string | Version of the entity to be registered with flyte which are un-versioned after serialization. |
| `--logger.formatter.type` | string | Sets logging format type. (default "json") |
| `--logger.level` | int | Sets the minimum logging level. (default 3) |
| `--logger.mute` | | Mutes all logs regardless of severity. Intended for benchmarks/tests only. |
| `--logger.show-source` | | Includes source code location in logs. |
| `--org` | string | Organization to work on. If not set, default to user's org. |
| `--otel.file.filename` | string | Filename to store exported telemetry traces (default "/tmp/trace.txt") |
| `--otel.jaeger.endpoint` | string | Endpoint for the jaeger telemetry trace ingestor (default "http://localhost:14268/api/traces") |
| `--otel.otlpgrpc.endpoint` | string | Endpoint for the OTLP telemetry trace collector (default "http://localhost:4317") |
| `--otel.otlphttp.endpoint` | string | Endpoint for the OTLP telemetry trace collector (default "http://localhost:4318/v1/traces") |
| `--otel.sampler.parentSampler` | string | Sets the parent sampler to use for the tracer (default "always") |
| `--otel.type` | string | Sets the type of exporter to configure [noop/file/jaeger/otlpgrpc/otlphttp]. (default "noop") |
| `-o`, `--output` | string | Specifies the output type - supported formats [TABLE JSON YAML DOT DOTURL]. NOTE: dot, doturl are only supported for Workflow (default "table") |
| `--plugins.catalogcache.reader.maxItems` | int | Maximum number of entries to keep in the index. (default 10000) |
| `--plugins.catalogcache.reader.maxRetries` | int | Maximum number of retries per item. (default 3) |
| `--plugins.catalogcache.reader.workers` | int | Number of concurrent workers to start processing the queue. (default 10) |
| `--plugins.catalogcache.writer.maxItems` | int | Maximum number of entries to keep in the index. (default 10000) |
| `--plugins.catalogcache.writer.maxRetries` | int | Maximum number of retries per item. (default 3) |
| `--plugins.catalogcache.writer.workers` | int | Number of concurrent workers to start processing the queue. (default 10) |
| `-p`, `--project` | string | Specifies the Flyte project. |
| `--rediscache.passwordSecretName` | string | Name of secret with Redis password. |
| `--rediscache.primaryEndpoint` | string | Primary endpoint for the redis cache that can be used for both reads and writes. |
| `--rediscache.replicaEndpoint` | string | Replica endpoint for the redis cache that can be used for reads. |
| `--secrets.env-prefix` | string | Prefix for environment variables (default "FLYTE_SECRET_") |
| `--secrets.secrets-prefix` | string | Prefix where to look for secrets file (default "/etc/secrets") |
| `--secrets.type` | string | Sets the type of storage to configure [local]. (default "local") |
| `--server.dataProxy.download.maxExpiresIn` | string | Maximum allowed expiration duration. (default "1h0m0s") |
| `--server.dataProxy.upload.defaultFileNameLength` | int | Default length for the generated file name if not provided in the request. (default 20) |
| `--server.dataProxy.upload.maxExpiresIn` | string | Maximum allowed expiration duration. (default "1h0m0s") |
| `--server.dataProxy.upload.maxSize` | string | Maximum allowed upload size. (default "6Mi") |
| `--server.dataProxy.upload.storagePrefix` | string | Storage prefix to use for all upload requests. |
| `--server.grpc.enableGrpcLatencyMetrics` | | Enable grpc latency metrics. Note Histograms metrics can be expensive on Prometheus servers. |
| `--server.grpc.maxMessageSizeBytes` | int | The max size in bytes for incoming gRPC messages |
| `--server.grpc.port` | int | On which grpc port to serve admin (default 8089) |
| `--server.grpc.serverReflection` | | Enable GRPC Server Reflection (default true) |
| `--server.grpcPort` | int | deprecated |
| `--server.grpcServerReflection` | | deprecated |
| `--server.httpPort` | int | On which http port to serve admin (default 8088) |
| `--server.kube-config` | string | Path to kubernetes client config file, default is empty, useful for incluster config. |
| `--server.kubeClientConfig.burst` | int | Max burst rate for throttle. 0 defaults to 10 (default 25) |
| `--server.kubeClientConfig.qps` | int32 | Max QPS to the master for requests to KubeAPI. 0 defaults to 5. (default 100) |
| `--server.kubeClientConfig.timeout` | string | Max duration allowed for every request to KubeAPI before giving up. 0 implies no timeout. (default "30s") |
| `--server.master` | string | The address of the Kubernetes API server. |
| `--server.readHeaderTimeoutSeconds` | int | The amount of time allowed to read request headers. (default 32) |
| `--server.security.allowCors` | | (default true) |
| `--server.security.allowedHeaders` | strings | (default [Content-Type,flyte-authorization]) |
| `--server.security.allowedOrigins` | strings | (default [*]) |
| `--server.security.auditAccess` | | |
| `--server.security.secure` | | |
| `--server.security.ssl.certificateFile` | string | |
| `--server.security.ssl.keyFile` | string | |
| `--server.security.useAuth` | | |
| `--server.thirdPartyConfig.flyteClient.audience` | string | Audience to use when initiating OAuth2 authorization requests. |
| `--server.thirdPartyConfig.flyteClient.clientId` | string | public identifier for the app which handles authorization for a Flyte deployment |
| `--server.thirdPartyConfig.flyteClient.redirectUri` | string | This is the callback uri registered with the app which handles authorization for a Flyte deployment |
| `--server.thirdPartyConfig.flyteClient.scopes` | strings | Recommended scopes for the client to request. |
| `--server.watchService.maxActiveClusterConnections` | int | (default 5) |
| `--server.watchService.maxPageSize` | int | (default 50000) |
| `--server.watchService.nonTerminalStatusUpdatesInterval` | string | (default "1m0s") |
| `--server.watchService.pollInterval` | string | (default "1s") |
| `--sharedservice.connectPort` | string | On which connect port to serve admin (default "8080") |
| `--sharedservice.grpc.grpcMaxResponseStatusBytes` | int32 | specifies the maximum (uncompressed) size of header list that the client is prepared to accept on grpc calls (default 32000) |
| `--sharedservice.grpc.maxConcurrentStreams` | int | Limit on the number of concurrent streams to each ServerTransport. (default 100) |
| `--sharedservice.grpc.maxMessageSizeBytes` | int | Limit on the size of message that can be received on the server. (default 10485760) |
| `--sharedservice.grpcServerReflection` | | Enable GRPC Server Reflection (default true) |
| `--sharedservice.httpPort` | string | On which http port to serve admin (default "8089") |
| `--sharedservice.kubeConfig` | string | Path to kubernetes client config file. |
| `--sharedservice.master` | string | The address of the Kubernetes API server. |
| `--sharedservice.metrics.enableClientGrpcHistograms` | | Enable client grpc histograms (default true) |
| `--sharedservice.metrics.enableGrpcHistograms` | | Enable grpc histograms (default true) |
| `--sharedservice.metrics.scope` | string | Scope to emit metrics under (default "service:") |
| `--sharedservice.port` | string | On which grpc port to serve admin (default "8080") |
| `--sharedservice.profiler.enabled` | | Enable Profiler on server |
| `--sharedservice.profilerPort` | string | Profile port to start listen for pprof and metric handlers on. (default "10254") |
| `--sharedservice.security.allowCors` | | |
| `--sharedservice.security.allowLocalhostAccess` | | Whether to permit localhost unauthenticated access to the server |
| `--sharedservice.security.allowedHeaders` | strings | |
| `--sharedservice.security.allowedOrigins` | strings | |
| `--sharedservice.security.auditAccess` | | |
| `--sharedservice.security.orgOverride` | string | Override org in identity context if localhost access enabled |
| `--sharedservice.security.secure` | | |
| `--sharedservice.security.ssl.certificateAuthorityFile` | string | |
| `--sharedservice.security.ssl.certificateFile` | string | |
| `--sharedservice.security.ssl.keyFile` | string | |
| `--sharedservice.security.useAuth` | | |
| `--sharedservice.sync.syncInterval` | string | Time interval to sync (default "5m0s") |
| `--storage.cache.max_size_mbs` | int | Maximum size of the cache where the Blob store data is cached in-memory. If not specified or set to 0, cache is not used |
| `--storage.cache.target_gc_percent` | int | Sets the garbage collection target percentage. |
| `--storage.connection.access-key` | string | Access key to use. Only required when authtype is set to accesskey. |
| `--storage.connection.auth-type` | string | Auth Type to use [iam, accesskey]. (default "iam") |
| `--storage.connection.disable-ssl` | | Disables SSL connection. Should only be used for development. |
| `--storage.connection.endpoint` | string | URL for storage client to connect to. |
| `--storage.connection.region` | string | Region to connect to. (default "us-east-1") |
| `--storage.connection.secret-key` | string | Secret to use when accesskey is set. |
| `--storage.container` | string | Initial container (in s3 a bucket) to create -if it doesn't exist-.' |
| `--storage.defaultHttpClient.timeout` | string | Sets time out on the http client. (default "0s") |
| `--storage.enable-multicontainer` | | If this is true, then the container argument is overlooked and redundant. This config will automatically open new connections to new containers/buckets as they are encountered |
| `--storage.limits.maxDownloadMBs` | int | Maximum allowed download size (in MBs) per call. (default 2) |
| `--storage.stow.config` | stringToString | Configuration for stow backend. Refer to github/flyteorg/stow (default []) |
| `--storage.stow.kind` | string | Kind of Stow backend to use. Refer to github/flyteorg/stow |
| `--storage.type` | string | Sets the type of storage to configure [s3/minio/local/mem/stow]. (default "s3") |
| `--union.auth.authorizationMetadataKey` | string | Authorization Header to use when passing Access Tokens to the server (default "flyte-authorization") |
| `--union.auth.clientId` | string | Client ID |
| `--union.auth.clientSecretEnvVar` | string | Environment variable containing the client secret |
| `--union.auth.clientSecretLocation` | string | File containing the client secret |
| `--union.auth.deviceFlow.pollInterval` | string | amount of time the device flow would poll the token endpoint if auth server doesn't return a polling interval. Okta and google IDP do return an interval' (default "5s") |
| `--union.auth.deviceFlow.refreshTime` | string | grace period from the token expiry after which it would refresh the token. (default "5m0s") |
| `--union.auth.deviceFlow.timeout` | string | amount of time the device flow should complete or else it will be cancelled. (default "10m0s") |
| `--union.auth.enable` | | Whether to enable an authenticated conenction when communicating with admin. (default true) |
| `--union.auth.externalAuth.command` | strings | Command for external authentication token generation |
| `--union.auth.pkce.refreshTime` | string | grace period from the token expiry after which it would refresh the token. (default "5m0s") |
| `--union.auth.pkce.timeout` | string | Amount of time the browser session would be active for authentication from client app. (default "15s") |
| `--union.auth.scopes` | strings | List of scopes to request |
| `--union.auth.tokenRefreshWindow` | string | Max duration between token refresh attempt and token expiry. (default "1h0m0s") |
| `--union.auth.tokenUrl` | string | OPTIONAL: Your IdP's token endpoint. It'll be discovered from flyte admin's OAuth Metadata endpoint if not provided. |
| `--union.auth.type` | string | Type of OAuth2 flow used for communicating with admin. (default "Pkce") |
| `--union.cache.maxItemsCount` | int | Maximum number of items to keep in the cache before evicting. (default 1000) |
| `--union.connection.host` | string | Host to connect to (default "dns:///utt-mgdp-stg-us-east-2.cloud-staging.union.ai") |
| `--union.connection.insecure` | | Whether to connect over insecure channel |
| `--union.connection.insecureSkipVerify` | | InsecureSkipVerify controls whether a client verifies the server's certificate chain and host name.Caution: shouldn't be use for production usecases' |
| `--union.connection.keepAliveConfig.permitWithoutStream` | | If true, client sends keepalive pings even with no active RPCs. |
| `--union.connection.keepAliveConfig.time` | string | After a duration of this time if the client doesn't see any activity it pings the server to see if the transport is still alive. (default "20s") |
| `--union.connection.keepAliveConfig.timeout` | string | After having pinged for keepalive check, the client waits for a duration of Timeout and if no activity is seen even after that the connection is closed. (default "2m0s") |
| `--union.connection.maxBackoffDelay` | string | Max delay for grpc backoff (default "8s") |
| `--union.connection.maxRecvMsgSize` | int | Maximum size of a message in bytes of a gRPC message (default 10485760) |
| `--union.connection.maxRetries` | int | Max number of gRPC retries (default 4) |
| `--union.connection.minConnectTimeout` | string | Minimum timeout for establishing a connection (default "20s") |
| `--union.connection.perRetryTimeout` | string | gRPC per retry timeout (default "15s") |
| `--union.connection.serviceConfig` | string | Defines gRPC experimental JSON Service Config (default "{"loadBalancingConfig": [{"round_robin":{}}]}") |
| `--union.connection.trustedIdentityClaims.enabled` | | Enables passing of trusted claims while making inter service calls |
| `--union.connection.trustedIdentityClaims.externalIdentityClaim` | string | External identity claim of the service which is authorized to make internal service call. These are verified against userclouds actions |
| `--union.connection.trustedIdentityClaims.externalIdentityTypeClaim` | string | External identity type claim of app or user to use for the current service identity. It should be an 'app' for inter service communication |
| `--union.internalConnectionConfig.-` | stringToString | (default []) |
| `--union.internalConnectionConfig.enabled` | | Enables internal service to service communication instead of going through ingress. |
| `--union.internalConnectionConfig.urlPattern` | string | UrlPattern of the internal service endpoints. (default "{{ service }}-helmchart.{{ service }}.svc.cluster.local:80") |
| `--webhook.awsSecretManager.sidecarImage` | string | Specifies the sidecar docker image to use (default "docker.io/amazon/aws-secrets-manager-secret-sidecar:v0.1.4") |
| `--webhook.certDir` | string | Certificate directory to use to write generated certs. Defaults to /etc/webhook/certs/ (default "/etc/webhook/certs") |
| `--webhook.embeddedSecretManagerConfig.awsConfig.region` | string | AWS region |
| `--webhook.embeddedSecretManagerConfig.fileMountInitContainer.image` | string | Specifies init container image to use for mounting secrets as files. (default "busybox:1.28") |
| `--webhook.embeddedSecretManagerConfig.gcpConfig.project` | string | GCP project to be used for secret manager |
| `--webhook.embeddedSecretManagerConfig.type` | string | (default "AWS") |
| `--webhook.gcpSecretManager.sidecarImage` | string | Specifies the sidecar docker image to use (default "gcr.io/google.com/cloudsdktool/cloud-sdk:alpine") |
| `--webhook.listenPort` | int | The port to use to listen to webhook calls. Defaults to 9443 (default 9443) |
| `--webhook.localCert` | | write certs locally. Defaults to false |
| `--webhook.metrics-prefix` | string | An optional prefix for all published metrics. (default "flyte:") |
| `--webhook.secretName` | string | Secret name to write generated certs to. (default "flyte-pod-webhook") |
| `--webhook.serviceName` | string | The name of the webhook service. (default "flyte-pod-webhook") |
| `--webhook.servicePort` | int32 | The port on the service that hosting webhook. (default 443) |
| `--webhook.vaultSecretManager.role` | string | Specifies the vault role to use (default "flyte") |
=== PAGE: https://www.union.ai/docs/v1/serverless/api-reference/uctl-cli/uctl-get/uctl-get-plugin-override ===
# uctl get plugin-override
Gets matchable resources of plugin override.
## Synopsis
Retrieve the plugin override for the given project and domain. For
project flytesnacks and development domain:
```shell
$ uctl get plugin-override -p flytesnacks -d development
```
Example: output from the command
``` json
{
"project": "flytesnacks",
"domain": "development",
"overrides": [{
"task_type": "python_task",
"plugin_id": ["pluginoverride1", "pluginoverride2"],
"missing_plugin_behavior": 0
}]
}
```
Retrieve the plugin override for the given project, domain, and
workflow. For project flytesnacks, development domain and workflow
`core.control_flow.merge_sort.merge_sort`:
```shell
$ uctl get plugin-override -p flytesnacks -d development core.control_flow.merge_sort.merge_sort
```
Example: output from the command:
``` json
{
"project": "flytesnacks",
"domain": "development",
"workflow": "core.control_flow.merge_sort.merge_sort"
"overrides": [{
"task_type": "python_task",
"plugin_id": ["pluginoverride1", "pluginoverride2"],
"missing_plugin_behavior": 0
}]
}
```
Write plugin overrides to a file. If there are no plugin overrides, the
command throws an error. The config file is written to po.yaml file.
Example: content of po.yaml:
```shell
$ uctl get plugin-override --attrFile po.yaml
```
``` yaml
domain: development
project: flytesnacks
overrides:
- task_type: python_task # Task type for which to apply plugin implementation overrides
plugin_id: # Plugin id(s) to be used in place of the default for the task type.
- plugin_override1
- plugin_override2
missing_plugin_behavior: 1 # Behavior when no specified plugin_id has an associated handler. 0: FAIL , 1: DEFAULT
```
Usage:
```shell
$ uctl get plugin-override [flags]
```
## Options
| Option | Type | Description |
|--------|------|-------------|
| `--attrFile` | string | attribute file name to be used for generating attribute for the resource type. |
| `-h`, `--help` | help for plugin-override |
### Options inherited from parent commands
| Option | Type | Description |
|--------|------|-------------|
| `--admin.audience` | string | Audience to use when initiating OAuth2 authorization requests. |
| `--admin.authType` | string | Type of OAuth2 flow used for communicating with admin.ClientSecret, Pkce, ExternalCommand are valid values (default "ClientSecret") |
| `--admin.authorizationHeader` | string | Custom metadata header to pass JWT |
| `--admin.authorizationServerUrl` | string | This is the URL to your IdP's authorization server. It'll default to Endpoint |
| `--admin.caCertFilePath` | string | Use specified certificate file to verify the admin server peer. |
| `--admin.clientId` | string | Client ID (default "flytepropeller") |
| `--admin.clientSecretEnvVar` | string | Environment variable containing the client secret |
| `--admin.clientSecretLocation` | string | File containing the client secret (default "/etc/secrets/client_secret") |
| `--admin.command` | strings | Command for external authentication token generation |
| `--admin.defaultOrg` | string | OPTIONAL: Default org to use to support non-org based cli's.'. |
| `--admin.defaultServiceConfig` | string | |
| `--admin.deviceFlowConfig.pollInterval` | string | amount of time the device flow would poll the token endpoint if auth server doesn't return a polling interval. Okta and google IDP do return an interval' (default "5s") |
| `--admin.deviceFlowConfig.refreshTime` | string | grace period from the token expiry after which it would refresh the token. (default "5m0s") |
| `--admin.deviceFlowConfig.timeout` | string | amount of time the device flow should complete or else it will be cancelled. (default "10m0s") |
| `--admin.endpoint` | string | For admin types, specify where the uri of the service is located. |
| `--admin.httpProxyURL` | string | OPTIONAL: HTTP Proxy to be used for OAuth requests. |
| `--admin.insecure` | | Use insecure connection. |
| `--admin.insecureSkipVerify` | | InsecureSkipVerify controls whether a client verifies the server's certificate chain and host name.Caution: shouldn't be use for production usecases' |
| `--admin.maxBackoffDelay` | string | Max delay for grpc backoff (default "8s") |
| `--admin.maxMessageSizeBytes` | int | The max size in bytes for incoming gRPC messages |
| `--admin.maxRetries` | int | Max number of gRPC retries (default 4) |
| `--admin.perRetryTimeout` | string | gRPC per retry timeout (default "15s") |
| `--admin.pkceConfig.refreshTime` | string | grace period from the token expiry after which it would refresh the token. (default "5m0s") |
| `--admin.pkceConfig.timeout` | string | Amount of time the browser session would be active for authentication from client app. (default "2m0s") |
| `--admin.proxyCommand` | strings | Command for external proxy-authorization token generation |
| `--admin.scopes` | strings | List of scopes to request |
| `--admin.tokenRefreshWindow` | string | Max duration between token refresh attempt and token expiry. (default "0s") |
| `--admin.tokenUrl` | string | OPTIONAL: Your IdP's token endpoint. It'll be discovered from flyte admin's OAuth Metadata endpoint if not provided. |
| `--admin.useAudienceFromAdmin` | | Use Audience configured from admins public endpoint config. |
| `--admin.useAuth` | | Deprecated: Auth will be enabled/disabled based on admin's dynamically discovered information. |
| `--auth.appAuth.externalAuthServer.allowedAudience` | strings | Optional: A list of allowed audiences. If not provided, the audience is expected to be the public Uri of the service. |
| `--auth.appAuth.externalAuthServer.baseUrl` | string | This should be the base url of the authorization server that you are trying to hit. With Okta for instance, it will look something like https://company.okta.com/oauth2/abcdef123456789/ |
| `--auth.appAuth.externalAuthServer.httpProxyURL` | string | OPTIONAL: HTTP Proxy to be used for OAuth requests. |
| `--auth.appAuth.externalAuthServer.metadataUrl` | string | Optional: If the server doesn't support /.well-known/oauth-authorization-server, you can set a custom metadata url here.' |
| `--auth.appAuth.externalAuthServer.retryAttempts` | int | Optional: The number of attempted retries on a transient failure to get the OAuth metadata (default 5) |
| `--auth.appAuth.externalAuthServer.retryDelay` | string | Optional, Duration to wait between retries (default "1s") |
| `--auth.appAuth.selfAuthServer.accessTokenLifespan` | string | Defines the lifespan of issued access tokens. (default "30m0s") |
| `--auth.appAuth.selfAuthServer.authorizationCodeLifespan` | string | Defines the lifespan of issued access tokens. (default "5m0s") |
| `--auth.appAuth.selfAuthServer.claimSymmetricEncryptionKeySecretName` | string | OPTIONAL: Secret name to use to encrypt claims in authcode token. (default "claim_symmetric_key") |
| `--auth.appAuth.selfAuthServer.issuer` | string | Defines the issuer to use when issuing and validating tokens. The default value is https://{requestUri.HostAndPort}/ |
| `--auth.appAuth.selfAuthServer.oldTokenSigningRSAKeySecretName` | string | OPTIONAL: Secret name to use to retrieve Old RSA Signing Key. This can be useful during key rotation to continue to accept older tokens. (default "token_rsa_key_old.pem") |
| `--auth.appAuth.selfAuthServer.refreshTokenLifespan` | string | Defines the lifespan of issued access tokens. (default "1h0m0s") |
| `--auth.appAuth.selfAuthServer.tokenSigningRSAKeySecretName` | string | OPTIONAL: Secret name to use to retrieve RSA Signing Key. (default "token_rsa_key.pem") |
| `--auth.appAuth.thirdPartyConfig.flyteClient.audience` | string | Audience to use when initiating OAuth2 authorization requests. |
| `--auth.appAuth.thirdPartyConfig.flyteClient.clientId` | string | public identifier for the app which handles authorization for a Flyte deployment (default "uctl") |
| `--auth.appAuth.thirdPartyConfig.flyteClient.redirectUri` | string | This is the callback uri registered with the app which handles authorization for a Flyte deployment (default "http://localhost:53593/callback") |
| `--auth.appAuth.thirdPartyConfig.flyteClient.scopes` | strings | Recommended scopes for the client to request. (default [all,offline]) |
| `--auth.disableForGrpc` | | Disables auth enforcement on Grpc Endpoints. |
| `--auth.disableForHttp` | | Disables auth enforcement on HTTP Endpoints. |
| `--auth.grpcAuthorizationHeader` | string | (default "flyte-authorization") |
| `--auth.httpAuthorizationHeader` | string | (default "flyte-authorization") |
| `--auth.httpProxyURL` | string | OPTIONAL: HTTP Proxy to be used for OAuth requests. |
| `--auth.tokenEndpointProxyPath` | string | The path used to proxy calls to the TokenURL |
| `--auth.userAuth.cookieBlockKeySecretName` | string | OPTIONAL: Secret name to use for cookie block key. (default "cookie_block_key") |
| `--auth.userAuth.cookieHashKeySecretName` | string | OPTIONAL: Secret name to use for cookie hash key. (default "cookie_hash_key") |
| `--auth.userAuth.cookieSetting.domain` | string | OPTIONAL: Allows you to set the domain attribute on the auth cookies. |
| `--auth.userAuth.cookieSetting.sameSitePolicy` | string | OPTIONAL: Allows you to declare if your cookie should be restricted to a first-party or same-site context.Wrapper around http.SameSite. (default "DefaultMode") |
| `--auth.userAuth.httpProxyURL` | string | OPTIONAL: HTTP Proxy to be used for OAuth requests. |
| `--auth.userAuth.idpQueryParameter` | string | idp query parameter used for selecting a particular IDP for doing user authentication. Eg: for Okta passing idp={IDP-ID} forces the authentication to happen with IDP-ID |
| `--auth.userAuth.openId.baseUrl` | string | |
| `--auth.userAuth.openId.clientId` | string | |
| `--auth.userAuth.openId.clientSecretFile` | string | |
| `--auth.userAuth.openId.clientSecretName` | string | (default "oidc_client_secret") |
| `--auth.userAuth.openId.scopes` | strings | (default [openid,profile]) |
| `--auth.userAuth.redirectUrl` | string | (default "/console") |
| `--authorizer.internalCommunicationConfig.enabled` | | Enables authorization decisions for internal communication. (default true) |
| `--authorizer.internalCommunicationConfig.ingressIdentity` | string | IngressIdentity used in the cluster. Needed to exclude the communication coming from ingress. (default "ingress-nginx.ingress-nginx.serviceaccount.identity.linkerd.cluster.local") |
| `--authorizer.internalCommunicationConfig.tenantUrlPatternIdentity` | string | UrlPatternIdentity of the internal tenant service endpoint identities. (default "{{ service }}.{{ org }}.serviceaccount.identity.linkerd.cluster.local") |
| `--authorizer.internalCommunicationConfig.urlPatternIdentity` | string | UrlPatternIdentity of the internal service endpoint identities. (default "{{ service }}-helmchart.{{ service }}.serviceaccount.identity.linkerd.cluster.local") |
| `--authorizer.mode` | string | (default "Active") |
| `--authorizer.organizationConfig.PolicyConfig.adminPolicyDescription` | string | description for the boilerplate admin policy (default "Contributor permissions and full admin permissions to manage users and view usage dashboards") |
| `--authorizer.organizationConfig.PolicyConfig.contributorPolicyDescription` | string | description for the boilerplate contributor policy (default "Viewer permissions and permissions to create workflows, tasks, launch plans, and executions") |
| `--authorizer.organizationConfig.PolicyConfig.defaultUserPolicyRoleType` | string | name of the role type to determine which default policy new users added to the organization should be assigned (default "Viewer") |
| `--authorizer.organizationConfig.PolicyConfig.serverlessContributorPolicyDescription` | string | description for the boilerplate serverless contributor policy (default "Viewer permissions and permissions to create workflows, tasks, launch plans, and executions") |
| `--authorizer.organizationConfig.PolicyConfig.serverlessViewerPolicyDescription` | string | description for the boilerplate serverless viewer policy (default "Permissions to view Flyte entities") |
| `--authorizer.organizationConfig.PolicyConfig.viewerPolicyDescription` | string | description for the boilerplate viewer policy (default "Permissions to view Flyte entities") |
| `--authorizer.organizationConfig.defaultPolicyCacheDuration` | string | Cache entry duration for the store of the default policy per organization (default "10m0s") |
| `--authorizer.syncRuleRefreshInterval` | string | (default "1m0s") |
| `--authorizer.type` | string | (default "UserClouds") |
| `--authorizer.userCloudsClient.cache.redis.ttl.edgeTypes` | string | Specifies how long edge types remain in the cache.. (default "30m0s") |
| `--authorizer.userCloudsClient.cache.redis.ttl.edges` | string | Specifies how long edges remain in the cache. (default "30m0s") |
| `--authorizer.userCloudsClient.cache.redis.ttl.objectTypes` | string | Specifies how long object types remain in the cache. (default "30m0s") |
| `--authorizer.userCloudsClient.cache.redis.ttl.objects` | string | Specifies how long objects remain in the cache. (default "30m0s") |
| `--authorizer.userCloudsClient.cache.type` | string | Cache type to use. (default "none") |
| `--authorizer.userCloudsClient.clientID` | string | UserClouds client id |
| `--authorizer.userCloudsClient.clientSecretName` | string | UserCloud client secret name to read from the secret manager. (default "userclouds-client-secret") |
| `--authorizer.userCloudsClient.enableLogging` | | Enable userclouds client's internal logging. Calls to post logs take 250-350 ms and will impact p99 latency, enable with caution. |
| `--authorizer.userCloudsClient.tenantID` | string | UserClouds tenant id. Should be a UUID. |
| `--authorizer.userCloudsClient.tenantUrl` | string | Something like https://{yourtenant}.tenant.userclouds.com |
| `--config` | string | config file (default is /Users/andrew/.union/config.yaml) |
| `--connection.environment` | string | |
| `--connection.region` | string | |
| `--connection.rootTenantURLPattern` | string | Pattern for tenant url. (default "dns:///{{ organization }}.cloud-staging.union.ai") |
| `--console.endpoint` | string | Endpoint of console, if different than flyte admin |
| `--database.connMaxLifeTime` | string | sets the maximum amount of time a connection may be reused (default "1h0m0s") |
| `--database.enableForeignKeyConstraintWhenMigrating` | | Whether to enable gorm foreign keys when migrating the db |
| `--database.maxIdleConnections` | int | maxIdleConnections sets the maximum number of connections in the idle connection pool. (default 10) |
| `--database.maxOpenConnections` | int | maxOpenConnections sets the maximum number of open connections to the database. (default 100) |
| `--database.postgres.dbname` | string | The database name (default "postgres") |
| `--database.postgres.debug` | | |
| `--database.postgres.host` | string | The host name of the database server (default "localhost") |
| `--database.postgres.options` | string | See http://gorm.io/docs/connecting_to_the_database.html for available options passed, in addition to the above. (default "sslmode=disable") |
| `--database.postgres.password` | string | The database password. (default "postgres") |
| `--database.postgres.passwordPath` | string | Points to the file containing the database password. |
| `--database.postgres.port` | int | The port name of the database server (default 30001) |
| `--database.postgres.readReplicaHost` | string | The host name of the read replica database server (default "localhost") |
| `--database.postgres.username` | string | The database user who is connecting to the server. (default "postgres") |
| `--database.sqlite.file` | string | The path to the file (existing or new) where the DB should be created / stored. If existing, then this will be re-used, else a new will be created |
| `--db.connectionPool.maxConnectionLifetime` | string | (default "0s") |
| `--db.connectionPool.maxIdleConnections` | int | |
| `--db.connectionPool.maxOpenConnections` | int | |
| `--db.dbname` | string | (default "postgres") |
| `--db.debug` | | |
| `--db.host` | string | (default "postgres") |
| `--db.log_level` | int | (default 4) |
| `--db.options` | string | (default "sslmode=disable") |
| `--db.password` | string | |
| `--db.passwordPath` | string | |
| `--db.port` | int | (default 5432) |
| `--db.username` | string | (default "postgres") |
| `-d`, `--domain` | string | Specifies the Flyte project's domain. |
| `--files.archive` | | Pass in archive file either an http link or local path. |
| `--files.assumableIamRole` | string | Custom assumable iam auth role to register launch plans with. |
| `--files.continueOnError` | | Continue on error when registering files. |
| `--files.destinationDirectory` | string | Location of source code in container. |
| `--files.dryRun` | | Execute command without making any modifications. |
| `--files.enableSchedule` | | Enable the schedule if the files contain schedulable launchplan. |
| `--files.force` | | Force use of version number on entities registered with flyte. |
| `--files.k8ServiceAccount` | string | Deprecated. Please use `--K8sServiceAccount`|
| `--files.k8sServiceAccount` | string | Custom kubernetes service account auth role to register launch plans with. |
| `--files.outputLocationPrefix` | string | Custom output location prefix for offloaded types (files/schemas). |
| `--files.sourceUploadPath` | string | Deprecated: Update flyte admin to avoid having to configure storage access from uctl. |
| `--files.version` | string | Version of the entity to be registered with flyte which are un-versioned after serialization. |
| `--logger.formatter.type` | string | Sets logging format type. (default "json") |
| `--logger.level` | int | Sets the minimum logging level. (default 3) |
| `--logger.mute` | | Mutes all logs regardless of severity. Intended for benchmarks/tests only. |
| `--logger.show-source` | | Includes source code location in logs. |
| `--org` | string | Organization to work on. If not set, default to user's org. |
| `--otel.file.filename` | string | Filename to store exported telemetry traces (default "/tmp/trace.txt") |
| `--otel.jaeger.endpoint` | string | Endpoint for the jaeger telemetry trace ingestor (default "http://localhost:14268/api/traces") |
| `--otel.otlpgrpc.endpoint` | string | Endpoint for the OTLP telemetry trace collector (default "http://localhost:4317") |
| `--otel.otlphttp.endpoint` | string | Endpoint for the OTLP telemetry trace collector (default "http://localhost:4318/v1/traces") |
| `--otel.sampler.parentSampler` | string | Sets the parent sampler to use for the tracer (default "always") |
| `--otel.type` | string | Sets the type of exporter to configure [noop/file/jaeger/otlpgrpc/otlphttp]. (default "noop") |
| `-o`, `--output` | string | Specifies the output type - supported formats [TABLE JSON YAML DOT DOTURL]. NOTE: dot, doturl are only supported for Workflow (default "table") |
| `--plugins.catalogcache.reader.maxItems` | int | Maximum number of entries to keep in the index. (default 10000) |
| `--plugins.catalogcache.reader.maxRetries` | int | Maximum number of retries per item. (default 3) |
| `--plugins.catalogcache.reader.workers` | int | Number of concurrent workers to start processing the queue. (default 10) |
| `--plugins.catalogcache.writer.maxItems` | int | Maximum number of entries to keep in the index. (default 10000) |
| `--plugins.catalogcache.writer.maxRetries` | int | Maximum number of retries per item. (default 3) |
| `--plugins.catalogcache.writer.workers` | int | Number of concurrent workers to start processing the queue. (default 10) |
| `-p`, `--project` | string | Specifies the Flyte project. |
| `--rediscache.passwordSecretName` | string | Name of secret with Redis password. |
| `--rediscache.primaryEndpoint` | string | Primary endpoint for the redis cache that can be used for both reads and writes. |
| `--rediscache.replicaEndpoint` | string | Replica endpoint for the redis cache that can be used for reads. |
| `--secrets.env-prefix` | string | Prefix for environment variables (default "FLYTE_SECRET_") |
| `--secrets.secrets-prefix` | string | Prefix where to look for secrets file (default "/etc/secrets") |
| `--secrets.type` | string | Sets the type of storage to configure [local]. (default "local") |
| `--server.dataProxy.download.maxExpiresIn` | string | Maximum allowed expiration duration. (default "1h0m0s") |
| `--server.dataProxy.upload.defaultFileNameLength` | int | Default length for the generated file name if not provided in the request. (default 20) |
| `--server.dataProxy.upload.maxExpiresIn` | string | Maximum allowed expiration duration. (default "1h0m0s") |
| `--server.dataProxy.upload.maxSize` | string | Maximum allowed upload size. (default "6Mi") |
| `--server.dataProxy.upload.storagePrefix` | string | Storage prefix to use for all upload requests. |
| `--server.grpc.enableGrpcLatencyMetrics` | | Enable grpc latency metrics. Note Histograms metrics can be expensive on Prometheus servers. |
| `--server.grpc.maxMessageSizeBytes` | int | The max size in bytes for incoming gRPC messages |
| `--server.grpc.port` | int | On which grpc port to serve admin (default 8089) |
| `--server.grpc.serverReflection` | | Enable GRPC Server Reflection (default true) |
| `--server.grpcPort` | int | deprecated |
| `--server.grpcServerReflection` | | deprecated |
| `--server.httpPort` | int | On which http port to serve admin (default 8088) |
| `--server.kube-config` | string | Path to kubernetes client config file, default is empty, useful for incluster config. |
| `--server.kubeClientConfig.burst` | int | Max burst rate for throttle. 0 defaults to 10 (default 25) |
| `--server.kubeClientConfig.qps` | int32 | Max QPS to the master for requests to KubeAPI. 0 defaults to 5. (default 100) |
| `--server.kubeClientConfig.timeout` | string | Max duration allowed for every request to KubeAPI before giving up. 0 implies no timeout. (default "30s") |
| `--server.master` | string | The address of the Kubernetes API server. |
| `--server.readHeaderTimeoutSeconds` | int | The amount of time allowed to read request headers. (default 32) |
| `--server.security.allowCors` | | (default true) |
| `--server.security.allowedHeaders` | strings | (default [Content-Type,flyte-authorization]) |
| `--server.security.allowedOrigins` | strings | (default [*]) |
| `--server.security.auditAccess` | | |
| `--server.security.secure` | | |
| `--server.security.ssl.certificateFile` | string | |
| `--server.security.ssl.keyFile` | string | |
| `--server.security.useAuth` | | |
| `--server.thirdPartyConfig.flyteClient.audience` | string | Audience to use when initiating OAuth2 authorization requests. |
| `--server.thirdPartyConfig.flyteClient.clientId` | string | public identifier for the app which handles authorization for a Flyte deployment |
| `--server.thirdPartyConfig.flyteClient.redirectUri` | string | This is the callback uri registered with the app which handles authorization for a Flyte deployment |
| `--server.thirdPartyConfig.flyteClient.scopes` | strings | Recommended scopes for the client to request. |
| `--server.watchService.maxActiveClusterConnections` | int | (default 5) |
| `--server.watchService.maxPageSize` | int | (default 50000) |
| `--server.watchService.nonTerminalStatusUpdatesInterval` | string | (default "1m0s") |
| `--server.watchService.pollInterval` | string | (default "1s") |
| `--sharedservice.connectPort` | string | On which connect port to serve admin (default "8080") |
| `--sharedservice.grpc.grpcMaxResponseStatusBytes` | int32 | specifies the maximum (uncompressed) size of header list that the client is prepared to accept on grpc calls (default 32000) |
| `--sharedservice.grpc.maxConcurrentStreams` | int | Limit on the number of concurrent streams to each ServerTransport. (default 100) |
| `--sharedservice.grpc.maxMessageSizeBytes` | int | Limit on the size of message that can be received on the server. (default 10485760) |
| `--sharedservice.grpcServerReflection` | | Enable GRPC Server Reflection (default true) |
| `--sharedservice.httpPort` | string | On which http port to serve admin (default "8089") |
| `--sharedservice.kubeConfig` | string | Path to kubernetes client config file. |
| `--sharedservice.master` | string | The address of the Kubernetes API server. |
| `--sharedservice.metrics.enableClientGrpcHistograms` | | Enable client grpc histograms (default true) |
| `--sharedservice.metrics.enableGrpcHistograms` | | Enable grpc histograms (default true) |
| `--sharedservice.metrics.scope` | string | Scope to emit metrics under (default "service:") |
| `--sharedservice.port` | string | On which grpc port to serve admin (default "8080") |
| `--sharedservice.profiler.enabled` | | Enable Profiler on server |
| `--sharedservice.profilerPort` | string | Profile port to start listen for pprof and metric handlers on. (default "10254") |
| `--sharedservice.security.allowCors` | | |
| `--sharedservice.security.allowLocalhostAccess` | | Whether to permit localhost unauthenticated access to the server |
| `--sharedservice.security.allowedHeaders` | strings | |
| `--sharedservice.security.allowedOrigins` | strings | |
| `--sharedservice.security.auditAccess` | | |
| `--sharedservice.security.orgOverride` | string | Override org in identity context if localhost access enabled |
| `--sharedservice.security.secure` | | |
| `--sharedservice.security.ssl.certificateAuthorityFile` | string | |
| `--sharedservice.security.ssl.certificateFile` | string | |
| `--sharedservice.security.ssl.keyFile` | string | |
| `--sharedservice.security.useAuth` | | |
| `--sharedservice.sync.syncInterval` | string | Time interval to sync (default "5m0s") |
| `--storage.cache.max_size_mbs` | int | Maximum size of the cache where the Blob store data is cached in-memory. If not specified or set to 0, cache is not used |
| `--storage.cache.target_gc_percent` | int | Sets the garbage collection target percentage. |
| `--storage.connection.access-key` | string | Access key to use. Only required when authtype is set to accesskey. |
| `--storage.connection.auth-type` | string | Auth Type to use [iam, accesskey]. (default "iam") |
| `--storage.connection.disable-ssl` | | Disables SSL connection. Should only be used for development. |
| `--storage.connection.endpoint` | string | URL for storage client to connect to. |
| `--storage.connection.region` | string | Region to connect to. (default "us-east-1") |
| `--storage.connection.secret-key` | string | Secret to use when accesskey is set. |
| `--storage.container` | string | Initial container (in s3 a bucket) to create -if it doesn't exist-.' |
| `--storage.defaultHttpClient.timeout` | string | Sets time out on the http client. (default "0s") |
| `--storage.enable-multicontainer` | | If this is true, then the container argument is overlooked and redundant. This config will automatically open new connections to new containers/buckets as they are encountered |
| `--storage.limits.maxDownloadMBs` | int | Maximum allowed download size (in MBs) per call. (default 2) |
| `--storage.stow.config` | stringToString | Configuration for stow backend. Refer to github/flyteorg/stow (default []) |
| `--storage.stow.kind` | string | Kind of Stow backend to use. Refer to github/flyteorg/stow |
| `--storage.type` | string | Sets the type of storage to configure [s3/minio/local/mem/stow]. (default "s3") |
| `--union.auth.authorizationMetadataKey` | string | Authorization Header to use when passing Access Tokens to the server (default "flyte-authorization") |
| `--union.auth.clientId` | string | Client ID |
| `--union.auth.clientSecretEnvVar` | string | Environment variable containing the client secret |
| `--union.auth.clientSecretLocation` | string | File containing the client secret |
| `--union.auth.deviceFlow.pollInterval` | string | amount of time the device flow would poll the token endpoint if auth server doesn't return a polling interval. Okta and google IDP do return an interval' (default "5s") |
| `--union.auth.deviceFlow.refreshTime` | string | grace period from the token expiry after which it would refresh the token. (default "5m0s") |
| `--union.auth.deviceFlow.timeout` | string | amount of time the device flow should complete or else it will be cancelled. (default "10m0s") |
| `--union.auth.enable` | | Whether to enable an authenticated conenction when communicating with admin. (default true) |
| `--union.auth.externalAuth.command` | strings | Command for external authentication token generation |
| `--union.auth.pkce.refreshTime` | string | grace period from the token expiry after which it would refresh the token. (default "5m0s") |
| `--union.auth.pkce.timeout` | string | Amount of time the browser session would be active for authentication from client app. (default "15s") |
| `--union.auth.scopes` | strings | List of scopes to request |
| `--union.auth.tokenRefreshWindow` | string | Max duration between token refresh attempt and token expiry. (default "1h0m0s") |
| `--union.auth.tokenUrl` | string | OPTIONAL: Your IdP's token endpoint. It'll be discovered from flyte admin's OAuth Metadata endpoint if not provided. |
| `--union.auth.type` | string | Type of OAuth2 flow used for communicating with admin. (default "Pkce") |
| `--union.cache.maxItemsCount` | int | Maximum number of items to keep in the cache before evicting. (default 1000) |
| `--union.connection.host` | string | Host to connect to (default "dns:///utt-mgdp-stg-us-east-2.cloud-staging.union.ai") |
| `--union.connection.insecure` | | Whether to connect over insecure channel |
| `--union.connection.insecureSkipVerify` | | InsecureSkipVerify controls whether a client verifies the server's certificate chain and host name.Caution: shouldn't be use for production usecases' |
| `--union.connection.keepAliveConfig.permitWithoutStream` | | If true, client sends keepalive pings even with no active RPCs. |
| `--union.connection.keepAliveConfig.time` | string | After a duration of this time if the client doesn't see any activity it pings the server to see if the transport is still alive. (default "20s") |
| `--union.connection.keepAliveConfig.timeout` | string | After having pinged for keepalive check, the client waits for a duration of Timeout and if no activity is seen even after that the connection is closed. (default "2m0s") |
| `--union.connection.maxBackoffDelay` | string | Max delay for grpc backoff (default "8s") |
| `--union.connection.maxRecvMsgSize` | int | Maximum size of a message in bytes of a gRPC message (default 10485760) |
| `--union.connection.maxRetries` | int | Max number of gRPC retries (default 4) |
| `--union.connection.minConnectTimeout` | string | Minimum timeout for establishing a connection (default "20s") |
| `--union.connection.perRetryTimeout` | string | gRPC per retry timeout (default "15s") |
| `--union.connection.serviceConfig` | string | Defines gRPC experimental JSON Service Config (default "{"loadBalancingConfig": [{"round_robin":{}}]}") |
| `--union.connection.trustedIdentityClaims.enabled` | | Enables passing of trusted claims while making inter service calls |
| `--union.connection.trustedIdentityClaims.externalIdentityClaim` | string | External identity claim of the service which is authorized to make internal service call. These are verified against userclouds actions |
| `--union.connection.trustedIdentityClaims.externalIdentityTypeClaim` | string | External identity type claim of app or user to use for the current service identity. It should be an 'app' for inter service communication |
| `--union.internalConnectionConfig.-` | stringToString | (default []) |
| `--union.internalConnectionConfig.enabled` | | Enables internal service to service communication instead of going through ingress. |
| `--union.internalConnectionConfig.urlPattern` | string | UrlPattern of the internal service endpoints. (default "{{ service }}-helmchart.{{ service }}.svc.cluster.local:80") |
| `--webhook.awsSecretManager.sidecarImage` | string | Specifies the sidecar docker image to use (default "docker.io/amazon/aws-secrets-manager-secret-sidecar:v0.1.4") |
| `--webhook.certDir` | string | Certificate directory to use to write generated certs. Defaults to /etc/webhook/certs/ (default "/etc/webhook/certs") |
| `--webhook.embeddedSecretManagerConfig.awsConfig.region` | string | AWS region |
| `--webhook.embeddedSecretManagerConfig.fileMountInitContainer.image` | string | Specifies init container image to use for mounting secrets as files. (default "busybox:1.28") |
| `--webhook.embeddedSecretManagerConfig.gcpConfig.project` | string | GCP project to be used for secret manager |
| `--webhook.embeddedSecretManagerConfig.type` | string | (default "AWS") |
| `--webhook.gcpSecretManager.sidecarImage` | string | Specifies the sidecar docker image to use (default "gcr.io/google.com/cloudsdktool/cloud-sdk:alpine") |
| `--webhook.listenPort` | int | The port to use to listen to webhook calls. Defaults to 9443 (default 9443) |
| `--webhook.localCert` | | write certs locally. Defaults to false |
| `--webhook.metrics-prefix` | string | An optional prefix for all published metrics. (default "flyte:") |
| `--webhook.secretName` | string | Secret name to write generated certs to. (default "flyte-pod-webhook") |
| `--webhook.serviceName` | string | The name of the webhook service. (default "flyte-pod-webhook") |
| `--webhook.servicePort` | int32 | The port on the service that hosting webhook. (default 443) |
| `--webhook.vaultSecretManager.role` | string | Specifies the vault role to use (default "flyte") |
=== PAGE: https://www.union.ai/docs/v1/serverless/api-reference/uctl-cli/uctl-get/uctl-get-policy ===
# uctl get policy
Returns all policies or a single policy for your entire organization
## Synopsis
Fetch the entire set of policies defined in your organization:
```shell
$ uctl get policies
```
Fetch an individual policy:
```shell
$ uctl get policy --name MyPolicy
```
## Options
| Option | Type | Description |
|--------|------|-------------|
| `-h`, `--help` | help for policy |
| `--name` | string | Optional, specific name of the policy to fetch |
| `--outputFile` | string | writes API response to this file. |
### Options inherited from parent commands
| Option | Type | Description |
|--------|------|-------------|
| `--admin.audience` | string | Audience to use when initiating OAuth2 authorization requests. |
| `--admin.authType` | string | Type of OAuth2 flow used for communicating with admin.ClientSecret, Pkce, ExternalCommand are valid values (default "ClientSecret") |
| `--admin.authorizationHeader` | string | Custom metadata header to pass JWT |
| `--admin.authorizationServerUrl` | string | This is the URL to your IdP's authorization server. It'll default to Endpoint |
| `--admin.caCertFilePath` | string | Use specified certificate file to verify the admin server peer. |
| `--admin.clientId` | string | Client ID (default "flytepropeller") |
| `--admin.clientSecretEnvVar` | string | Environment variable containing the client secret |
| `--admin.clientSecretLocation` | string | File containing the client secret (default "/etc/secrets/client_secret") |
| `--admin.command` | strings | Command for external authentication token generation |
| `--admin.defaultOrg` | string | OPTIONAL: Default org to use to support non-org based cli's.'. |
| `--admin.defaultServiceConfig` | string | |
| `--admin.deviceFlowConfig.pollInterval` | string | amount of time the device flow would poll the token endpoint if auth server doesn't return a polling interval. Okta and google IDP do return an interval' (default "5s") |
| `--admin.deviceFlowConfig.refreshTime` | string | grace period from the token expiry after which it would refresh the token. (default "5m0s") |
| `--admin.deviceFlowConfig.timeout` | string | amount of time the device flow should complete or else it will be cancelled. (default "10m0s") |
| `--admin.endpoint` | string | For admin types, specify where the uri of the service is located. |
| `--admin.httpProxyURL` | string | OPTIONAL: HTTP Proxy to be used for OAuth requests. |
| `--admin.insecure` | | Use insecure connection. |
| `--admin.insecureSkipVerify` | | InsecureSkipVerify controls whether a client verifies the server's certificate chain and host name.Caution: shouldn't be use for production usecases' |
| `--admin.maxBackoffDelay` | string | Max delay for grpc backoff (default "8s") |
| `--admin.maxMessageSizeBytes` | int | The max size in bytes for incoming gRPC messages |
| `--admin.maxRetries` | int | Max number of gRPC retries (default 4) |
| `--admin.perRetryTimeout` | string | gRPC per retry timeout (default "15s") |
| `--admin.pkceConfig.refreshTime` | string | grace period from the token expiry after which it would refresh the token. (default "5m0s") |
| `--admin.pkceConfig.timeout` | string | Amount of time the browser session would be active for authentication from client app. (default "2m0s") |
| `--admin.proxyCommand` | strings | Command for external proxy-authorization token generation |
| `--admin.scopes` | strings | List of scopes to request |
| `--admin.tokenRefreshWindow` | string | Max duration between token refresh attempt and token expiry. (default "0s") |
| `--admin.tokenUrl` | string | OPTIONAL: Your IdP's token endpoint. It'll be discovered from flyte admin's OAuth Metadata endpoint if not provided. |
| `--admin.useAudienceFromAdmin` | | Use Audience configured from admins public endpoint config. |
| `--admin.useAuth` | | Deprecated: Auth will be enabled/disabled based on admin's dynamically discovered information. |
| `--auth.appAuth.externalAuthServer.allowedAudience` | strings | Optional: A list of allowed audiences. If not provided, the audience is expected to be the public Uri of the service. |
| `--auth.appAuth.externalAuthServer.baseUrl` | string | This should be the base url of the authorization server that you are trying to hit. With Okta for instance, it will look something like https://company.okta.com/oauth2/abcdef123456789/ |
| `--auth.appAuth.externalAuthServer.httpProxyURL` | string | OPTIONAL: HTTP Proxy to be used for OAuth requests. |
| `--auth.appAuth.externalAuthServer.metadataUrl` | string | Optional: If the server doesn't support /.well-known/oauth-authorization-server, you can set a custom metadata url here.' |
| `--auth.appAuth.externalAuthServer.retryAttempts` | int | Optional: The number of attempted retries on a transient failure to get the OAuth metadata (default 5) |
| `--auth.appAuth.externalAuthServer.retryDelay` | string | Optional, Duration to wait between retries (default "1s") |
| `--auth.appAuth.selfAuthServer.accessTokenLifespan` | string | Defines the lifespan of issued access tokens. (default "30m0s") |
| `--auth.appAuth.selfAuthServer.authorizationCodeLifespan` | string | Defines the lifespan of issued access tokens. (default "5m0s") |
| `--auth.appAuth.selfAuthServer.claimSymmetricEncryptionKeySecretName` | string | OPTIONAL: Secret name to use to encrypt claims in authcode token. (default "claim_symmetric_key") |
| `--auth.appAuth.selfAuthServer.issuer` | string | Defines the issuer to use when issuing and validating tokens. The default value is https://{requestUri.HostAndPort}/ |
| `--auth.appAuth.selfAuthServer.oldTokenSigningRSAKeySecretName` | string | OPTIONAL: Secret name to use to retrieve Old RSA Signing Key. This can be useful during key rotation to continue to accept older tokens. (default "token_rsa_key_old.pem") |
| `--auth.appAuth.selfAuthServer.refreshTokenLifespan` | string | Defines the lifespan of issued access tokens. (default "1h0m0s") |
| `--auth.appAuth.selfAuthServer.tokenSigningRSAKeySecretName` | string | OPTIONAL: Secret name to use to retrieve RSA Signing Key. (default "token_rsa_key.pem") |
| `--auth.appAuth.thirdPartyConfig.flyteClient.audience` | string | Audience to use when initiating OAuth2 authorization requests. |
| `--auth.appAuth.thirdPartyConfig.flyteClient.clientId` | string | public identifier for the app which handles authorization for a Flyte deployment (default "uctl") |
| `--auth.appAuth.thirdPartyConfig.flyteClient.redirectUri` | string | This is the callback uri registered with the app which handles authorization for a Flyte deployment (default "http://localhost:53593/callback") |
| `--auth.appAuth.thirdPartyConfig.flyteClient.scopes` | strings | Recommended scopes for the client to request. (default [all,offline]) |
| `--auth.disableForGrpc` | | Disables auth enforcement on Grpc Endpoints. |
| `--auth.disableForHttp` | | Disables auth enforcement on HTTP Endpoints. |
| `--auth.grpcAuthorizationHeader` | string | (default "flyte-authorization") |
| `--auth.httpAuthorizationHeader` | string | (default "flyte-authorization") |
| `--auth.httpProxyURL` | string | OPTIONAL: HTTP Proxy to be used for OAuth requests. |
| `--auth.tokenEndpointProxyPath` | string | The path used to proxy calls to the TokenURL |
| `--auth.userAuth.cookieBlockKeySecretName` | string | OPTIONAL: Secret name to use for cookie block key. (default "cookie_block_key") |
| `--auth.userAuth.cookieHashKeySecretName` | string | OPTIONAL: Secret name to use for cookie hash key. (default "cookie_hash_key") |
| `--auth.userAuth.cookieSetting.domain` | string | OPTIONAL: Allows you to set the domain attribute on the auth cookies. |
| `--auth.userAuth.cookieSetting.sameSitePolicy` | string | OPTIONAL: Allows you to declare if your cookie should be restricted to a first-party or same-site context.Wrapper around http.SameSite. (default "DefaultMode") |
| `--auth.userAuth.httpProxyURL` | string | OPTIONAL: HTTP Proxy to be used for OAuth requests. |
| `--auth.userAuth.idpQueryParameter` | string | idp query parameter used for selecting a particular IDP for doing user authentication. Eg: for Okta passing idp={IDP-ID} forces the authentication to happen with IDP-ID |
| `--auth.userAuth.openId.baseUrl` | string | |
| `--auth.userAuth.openId.clientId` | string | |
| `--auth.userAuth.openId.clientSecretFile` | string | |
| `--auth.userAuth.openId.clientSecretName` | string | (default "oidc_client_secret") |
| `--auth.userAuth.openId.scopes` | strings | (default [openid,profile]) |
| `--auth.userAuth.redirectUrl` | string | (default "/console") |
| `--authorizer.internalCommunicationConfig.enabled` | | Enables authorization decisions for internal communication. (default true) |
| `--authorizer.internalCommunicationConfig.ingressIdentity` | string | IngressIdentity used in the cluster. Needed to exclude the communication coming from ingress. (default "ingress-nginx.ingress-nginx.serviceaccount.identity.linkerd.cluster.local") |
| `--authorizer.internalCommunicationConfig.tenantUrlPatternIdentity` | string | UrlPatternIdentity of the internal tenant service endpoint identities. (default "{{ service }}.{{ org }}.serviceaccount.identity.linkerd.cluster.local") |
| `--authorizer.internalCommunicationConfig.urlPatternIdentity` | string | UrlPatternIdentity of the internal service endpoint identities. (default "{{ service }}-helmchart.{{ service }}.serviceaccount.identity.linkerd.cluster.local") |
| `--authorizer.mode` | string | (default "Active") |
| `--authorizer.organizationConfig.PolicyConfig.adminPolicyDescription` | string | description for the boilerplate admin policy (default "Contributor permissions and full admin permissions to manage users and view usage dashboards") |
| `--authorizer.organizationConfig.PolicyConfig.contributorPolicyDescription` | string | description for the boilerplate contributor policy (default "Viewer permissions and permissions to create workflows, tasks, launch plans, and executions") |
| `--authorizer.organizationConfig.PolicyConfig.defaultUserPolicyRoleType` | string | name of the role type to determine which default policy new users added to the organization should be assigned (default "Viewer") |
| `--authorizer.organizationConfig.PolicyConfig.serverlessContributorPolicyDescription` | string | description for the boilerplate serverless contributor policy (default "Viewer permissions and permissions to create workflows, tasks, launch plans, and executions") |
| `--authorizer.organizationConfig.PolicyConfig.serverlessViewerPolicyDescription` | string | description for the boilerplate serverless viewer policy (default "Permissions to view Flyte entities") |
| `--authorizer.organizationConfig.PolicyConfig.viewerPolicyDescription` | string | description for the boilerplate viewer policy (default "Permissions to view Flyte entities") |
| `--authorizer.organizationConfig.defaultPolicyCacheDuration` | string | Cache entry duration for the store of the default policy per organization (default "10m0s") |
| `--authorizer.syncRuleRefreshInterval` | string | (default "1m0s") |
| `--authorizer.type` | string | (default "UserClouds") |
| `--authorizer.userCloudsClient.cache.redis.ttl.edgeTypes` | string | Specifies how long edge types remain in the cache.. (default "30m0s") |
| `--authorizer.userCloudsClient.cache.redis.ttl.edges` | string | Specifies how long edges remain in the cache. (default "30m0s") |
| `--authorizer.userCloudsClient.cache.redis.ttl.objectTypes` | string | Specifies how long object types remain in the cache. (default "30m0s") |
| `--authorizer.userCloudsClient.cache.redis.ttl.objects` | string | Specifies how long objects remain in the cache. (default "30m0s") |
| `--authorizer.userCloudsClient.cache.type` | string | Cache type to use. (default "none") |
| `--authorizer.userCloudsClient.clientID` | string | UserClouds client id |
| `--authorizer.userCloudsClient.clientSecretName` | string | UserCloud client secret name to read from the secret manager. (default "userclouds-client-secret") |
| `--authorizer.userCloudsClient.enableLogging` | | Enable userclouds client's internal logging. Calls to post logs take 250-350 ms and will impact p99 latency, enable with caution. |
| `--authorizer.userCloudsClient.tenantID` | string | UserClouds tenant id. Should be a UUID. |
| `--authorizer.userCloudsClient.tenantUrl` | string | Something like https://{yourtenant}.tenant.userclouds.com |
| `--config` | string | config file (default is /Users/andrew/.union/config.yaml) |
| `--connection.environment` | string | |
| `--connection.region` | string | |
| `--connection.rootTenantURLPattern` | string | Pattern for tenant url. (default "dns:///{{ organization }}.cloud-staging.union.ai") |
| `--console.endpoint` | string | Endpoint of console, if different than flyte admin |
| `--database.connMaxLifeTime` | string | sets the maximum amount of time a connection may be reused (default "1h0m0s") |
| `--database.enableForeignKeyConstraintWhenMigrating` | | Whether to enable gorm foreign keys when migrating the db |
| `--database.maxIdleConnections` | int | maxIdleConnections sets the maximum number of connections in the idle connection pool. (default 10) |
| `--database.maxOpenConnections` | int | maxOpenConnections sets the maximum number of open connections to the database. (default 100) |
| `--database.postgres.dbname` | string | The database name (default "postgres") |
| `--database.postgres.debug` | | |
| `--database.postgres.host` | string | The host name of the database server (default "localhost") |
| `--database.postgres.options` | string | See http://gorm.io/docs/connecting_to_the_database.html for available options passed, in addition to the above. (default "sslmode=disable") |
| `--database.postgres.password` | string | The database password. (default "postgres") |
| `--database.postgres.passwordPath` | string | Points to the file containing the database password. |
| `--database.postgres.port` | int | The port name of the database server (default 30001) |
| `--database.postgres.readReplicaHost` | string | The host name of the read replica database server (default "localhost") |
| `--database.postgres.username` | string | The database user who is connecting to the server. (default "postgres") |
| `--database.sqlite.file` | string | The path to the file (existing or new) where the DB should be created / stored. If existing, then this will be re-used, else a new will be created |
| `--db.connectionPool.maxConnectionLifetime` | string | (default "0s") |
| `--db.connectionPool.maxIdleConnections` | int | |
| `--db.connectionPool.maxOpenConnections` | int | |
| `--db.dbname` | string | (default "postgres") |
| `--db.debug` | | |
| `--db.host` | string | (default "postgres") |
| `--db.log_level` | int | (default 4) |
| `--db.options` | string | (default "sslmode=disable") |
| `--db.password` | string | |
| `--db.passwordPath` | string | |
| `--db.port` | int | (default 5432) |
| `--db.username` | string | (default "postgres") |
| `-d`, `--domain` | string | Specifies the Flyte project's domain. |
| `--files.archive` | | Pass in archive file either an http link or local path. |
| `--files.assumableIamRole` | string | Custom assumable iam auth role to register launch plans with. |
| `--files.continueOnError` | | Continue on error when registering files. |
| `--files.destinationDirectory` | string | Location of source code in container. |
| `--files.dryRun` | | Execute command without making any modifications. |
| `--files.enableSchedule` | | Enable the schedule if the files contain schedulable launchplan. |
| `--files.force` | | Force use of version number on entities registered with flyte. |
| `--files.k8ServiceAccount` | string | Deprecated. Please use `--K8sServiceAccount`|
| `--files.k8sServiceAccount` | string | Custom kubernetes service account auth role to register launch plans with. |
| `--files.outputLocationPrefix` | string | Custom output location prefix for offloaded types (files/schemas). |
| `--files.sourceUploadPath` | string | Deprecated: Update flyte admin to avoid having to configure storage access from uctl. |
| `--files.version` | string | Version of the entity to be registered with flyte which are un-versioned after serialization. |
| `--logger.formatter.type` | string | Sets logging format type. (default "json") |
| `--logger.level` | int | Sets the minimum logging level. (default 3) |
| `--logger.mute` | | Mutes all logs regardless of severity. Intended for benchmarks/tests only. |
| `--logger.show-source` | | Includes source code location in logs. |
| `--org` | string | Organization to work on. If not set, default to user's org. |
| `--otel.file.filename` | string | Filename to store exported telemetry traces (default "/tmp/trace.txt") |
| `--otel.jaeger.endpoint` | string | Endpoint for the jaeger telemetry trace ingestor (default "http://localhost:14268/api/traces") |
| `--otel.otlpgrpc.endpoint` | string | Endpoint for the OTLP telemetry trace collector (default "http://localhost:4317") |
| `--otel.otlphttp.endpoint` | string | Endpoint for the OTLP telemetry trace collector (default "http://localhost:4318/v1/traces") |
| `--otel.sampler.parentSampler` | string | Sets the parent sampler to use for the tracer (default "always") |
| `--otel.type` | string | Sets the type of exporter to configure [noop/file/jaeger/otlpgrpc/otlphttp]. (default "noop") |
| `-o`, `--output` | string | Specifies the output type - supported formats [TABLE JSON YAML DOT DOTURL]. NOTE: dot, doturl are only supported for Workflow (default "table") |
| `--plugins.catalogcache.reader.maxItems` | int | Maximum number of entries to keep in the index. (default 10000) |
| `--plugins.catalogcache.reader.maxRetries` | int | Maximum number of retries per item. (default 3) |
| `--plugins.catalogcache.reader.workers` | int | Number of concurrent workers to start processing the queue. (default 10) |
| `--plugins.catalogcache.writer.maxItems` | int | Maximum number of entries to keep in the index. (default 10000) |
| `--plugins.catalogcache.writer.maxRetries` | int | Maximum number of retries per item. (default 3) |
| `--plugins.catalogcache.writer.workers` | int | Number of concurrent workers to start processing the queue. (default 10) |
| `-p`, `--project` | string | Specifies the Flyte project. |
| `--rediscache.passwordSecretName` | string | Name of secret with Redis password. |
| `--rediscache.primaryEndpoint` | string | Primary endpoint for the redis cache that can be used for both reads and writes. |
| `--rediscache.replicaEndpoint` | string | Replica endpoint for the redis cache that can be used for reads. |
| `--secrets.env-prefix` | string | Prefix for environment variables (default "FLYTE_SECRET_") |
| `--secrets.secrets-prefix` | string | Prefix where to look for secrets file (default "/etc/secrets") |
| `--secrets.type` | string | Sets the type of storage to configure [local]. (default "local") |
| `--server.dataProxy.download.maxExpiresIn` | string | Maximum allowed expiration duration. (default "1h0m0s") |
| `--server.dataProxy.upload.defaultFileNameLength` | int | Default length for the generated file name if not provided in the request. (default 20) |
| `--server.dataProxy.upload.maxExpiresIn` | string | Maximum allowed expiration duration. (default "1h0m0s") |
| `--server.dataProxy.upload.maxSize` | string | Maximum allowed upload size. (default "6Mi") |
| `--server.dataProxy.upload.storagePrefix` | string | Storage prefix to use for all upload requests. |
| `--server.grpc.enableGrpcLatencyMetrics` | | Enable grpc latency metrics. Note Histograms metrics can be expensive on Prometheus servers. |
| `--server.grpc.maxMessageSizeBytes` | int | The max size in bytes for incoming gRPC messages |
| `--server.grpc.port` | int | On which grpc port to serve admin (default 8089) |
| `--server.grpc.serverReflection` | | Enable GRPC Server Reflection (default true) |
| `--server.grpcPort` | int | deprecated |
| `--server.grpcServerReflection` | | deprecated |
| `--server.httpPort` | int | On which http port to serve admin (default 8088) |
| `--server.kube-config` | string | Path to kubernetes client config file, default is empty, useful for incluster config. |
| `--server.kubeClientConfig.burst` | int | Max burst rate for throttle. 0 defaults to 10 (default 25) |
| `--server.kubeClientConfig.qps` | int32 | Max QPS to the master for requests to KubeAPI. 0 defaults to 5. (default 100) |
| `--server.kubeClientConfig.timeout` | string | Max duration allowed for every request to KubeAPI before giving up. 0 implies no timeout. (default "30s") |
| `--server.master` | string | The address of the Kubernetes API server. |
| `--server.readHeaderTimeoutSeconds` | int | The amount of time allowed to read request headers. (default 32) |
| `--server.security.allowCors` | | (default true) |
| `--server.security.allowedHeaders` | strings | (default [Content-Type,flyte-authorization]) |
| `--server.security.allowedOrigins` | strings | (default [*]) |
| `--server.security.auditAccess` | | |
| `--server.security.secure` | | |
| `--server.security.ssl.certificateFile` | string | |
| `--server.security.ssl.keyFile` | string | |
| `--server.security.useAuth` | | |
| `--server.thirdPartyConfig.flyteClient.audience` | string | Audience to use when initiating OAuth2 authorization requests. |
| `--server.thirdPartyConfig.flyteClient.clientId` | string | public identifier for the app which handles authorization for a Flyte deployment |
| `--server.thirdPartyConfig.flyteClient.redirectUri` | string | This is the callback uri registered with the app which handles authorization for a Flyte deployment |
| `--server.thirdPartyConfig.flyteClient.scopes` | strings | Recommended scopes for the client to request. |
| `--server.watchService.maxActiveClusterConnections` | int | (default 5) |
| `--server.watchService.maxPageSize` | int | (default 50000) |
| `--server.watchService.nonTerminalStatusUpdatesInterval` | string | (default "1m0s") |
| `--server.watchService.pollInterval` | string | (default "1s") |
| `--sharedservice.connectPort` | string | On which connect port to serve admin (default "8080") |
| `--sharedservice.grpc.grpcMaxResponseStatusBytes` | int32 | specifies the maximum (uncompressed) size of header list that the client is prepared to accept on grpc calls (default 32000) |
| `--sharedservice.grpc.maxConcurrentStreams` | int | Limit on the number of concurrent streams to each ServerTransport. (default 100) |
| `--sharedservice.grpc.maxMessageSizeBytes` | int | Limit on the size of message that can be received on the server. (default 10485760) |
| `--sharedservice.grpcServerReflection` | | Enable GRPC Server Reflection (default true) |
| `--sharedservice.httpPort` | string | On which http port to serve admin (default "8089") |
| `--sharedservice.kubeConfig` | string | Path to kubernetes client config file. |
| `--sharedservice.master` | string | The address of the Kubernetes API server. |
| `--sharedservice.metrics.enableClientGrpcHistograms` | | Enable client grpc histograms (default true) |
| `--sharedservice.metrics.enableGrpcHistograms` | | Enable grpc histograms (default true) |
| `--sharedservice.metrics.scope` | string | Scope to emit metrics under (default "service:") |
| `--sharedservice.port` | string | On which grpc port to serve admin (default "8080") |
| `--sharedservice.profiler.enabled` | | Enable Profiler on server |
| `--sharedservice.profilerPort` | string | Profile port to start listen for pprof and metric handlers on. (default "10254") |
| `--sharedservice.security.allowCors` | | |
| `--sharedservice.security.allowLocalhostAccess` | | Whether to permit localhost unauthenticated access to the server |
| `--sharedservice.security.allowedHeaders` | strings | |
| `--sharedservice.security.allowedOrigins` | strings | |
| `--sharedservice.security.auditAccess` | | |
| `--sharedservice.security.orgOverride` | string | Override org in identity context if localhost access enabled |
| `--sharedservice.security.secure` | | |
| `--sharedservice.security.ssl.certificateAuthorityFile` | string | |
| `--sharedservice.security.ssl.certificateFile` | string | |
| `--sharedservice.security.ssl.keyFile` | string | |
| `--sharedservice.security.useAuth` | | |
| `--sharedservice.sync.syncInterval` | string | Time interval to sync (default "5m0s") |
| `--storage.cache.max_size_mbs` | int | Maximum size of the cache where the Blob store data is cached in-memory. If not specified or set to 0, cache is not used |
| `--storage.cache.target_gc_percent` | int | Sets the garbage collection target percentage. |
| `--storage.connection.access-key` | string | Access key to use. Only required when authtype is set to accesskey. |
| `--storage.connection.auth-type` | string | Auth Type to use [iam, accesskey]. (default "iam") |
| `--storage.connection.disable-ssl` | | Disables SSL connection. Should only be used for development. |
| `--storage.connection.endpoint` | string | URL for storage client to connect to. |
| `--storage.connection.region` | string | Region to connect to. (default "us-east-1") |
| `--storage.connection.secret-key` | string | Secret to use when accesskey is set. |
| `--storage.container` | string | Initial container (in s3 a bucket) to create -if it doesn't exist-.' |
| `--storage.defaultHttpClient.timeout` | string | Sets time out on the http client. (default "0s") |
| `--storage.enable-multicontainer` | | If this is true, then the container argument is overlooked and redundant. This config will automatically open new connections to new containers/buckets as they are encountered |
| `--storage.limits.maxDownloadMBs` | int | Maximum allowed download size (in MBs) per call. (default 2) |
| `--storage.stow.config` | stringToString | Configuration for stow backend. Refer to github/flyteorg/stow (default []) |
| `--storage.stow.kind` | string | Kind of Stow backend to use. Refer to github/flyteorg/stow |
| `--storage.type` | string | Sets the type of storage to configure [s3/minio/local/mem/stow]. (default "s3") |
| `--union.auth.authorizationMetadataKey` | string | Authorization Header to use when passing Access Tokens to the server (default "flyte-authorization") |
| `--union.auth.clientId` | string | Client ID |
| `--union.auth.clientSecretEnvVar` | string | Environment variable containing the client secret |
| `--union.auth.clientSecretLocation` | string | File containing the client secret |
| `--union.auth.deviceFlow.pollInterval` | string | amount of time the device flow would poll the token endpoint if auth server doesn't return a polling interval. Okta and google IDP do return an interval' (default "5s") |
| `--union.auth.deviceFlow.refreshTime` | string | grace period from the token expiry after which it would refresh the token. (default "5m0s") |
| `--union.auth.deviceFlow.timeout` | string | amount of time the device flow should complete or else it will be cancelled. (default "10m0s") |
| `--union.auth.enable` | | Whether to enable an authenticated conenction when communicating with admin. (default true) |
| `--union.auth.externalAuth.command` | strings | Command for external authentication token generation |
| `--union.auth.pkce.refreshTime` | string | grace period from the token expiry after which it would refresh the token. (default "5m0s") |
| `--union.auth.pkce.timeout` | string | Amount of time the browser session would be active for authentication from client app. (default "15s") |
| `--union.auth.scopes` | strings | List of scopes to request |
| `--union.auth.tokenRefreshWindow` | string | Max duration between token refresh attempt and token expiry. (default "1h0m0s") |
| `--union.auth.tokenUrl` | string | OPTIONAL: Your IdP's token endpoint. It'll be discovered from flyte admin's OAuth Metadata endpoint if not provided. |
| `--union.auth.type` | string | Type of OAuth2 flow used for communicating with admin. (default "Pkce") |
| `--union.cache.maxItemsCount` | int | Maximum number of items to keep in the cache before evicting. (default 1000) |
| `--union.connection.host` | string | Host to connect to (default "dns:///utt-mgdp-stg-us-east-2.cloud-staging.union.ai") |
| `--union.connection.insecure` | | Whether to connect over insecure channel |
| `--union.connection.insecureSkipVerify` | | InsecureSkipVerify controls whether a client verifies the server's certificate chain and host name.Caution: shouldn't be use for production usecases' |
| `--union.connection.keepAliveConfig.permitWithoutStream` | | If true, client sends keepalive pings even with no active RPCs. |
| `--union.connection.keepAliveConfig.time` | string | After a duration of this time if the client doesn't see any activity it pings the server to see if the transport is still alive. (default "20s") |
| `--union.connection.keepAliveConfig.timeout` | string | After having pinged for keepalive check, the client waits for a duration of Timeout and if no activity is seen even after that the connection is closed. (default "2m0s") |
| `--union.connection.maxBackoffDelay` | string | Max delay for grpc backoff (default "8s") |
| `--union.connection.maxRecvMsgSize` | int | Maximum size of a message in bytes of a gRPC message (default 10485760) |
| `--union.connection.maxRetries` | int | Max number of gRPC retries (default 4) |
| `--union.connection.minConnectTimeout` | string | Minimum timeout for establishing a connection (default "20s") |
| `--union.connection.perRetryTimeout` | string | gRPC per retry timeout (default "15s") |
| `--union.connection.serviceConfig` | string | Defines gRPC experimental JSON Service Config (default "{"loadBalancingConfig": [{"round_robin":{}}]}") |
| `--union.connection.trustedIdentityClaims.enabled` | | Enables passing of trusted claims while making inter service calls |
| `--union.connection.trustedIdentityClaims.externalIdentityClaim` | string | External identity claim of the service which is authorized to make internal service call. These are verified against userclouds actions |
| `--union.connection.trustedIdentityClaims.externalIdentityTypeClaim` | string | External identity type claim of app or user to use for the current service identity. It should be an 'app' for inter service communication |
| `--union.internalConnectionConfig.-` | stringToString | (default []) |
| `--union.internalConnectionConfig.enabled` | | Enables internal service to service communication instead of going through ingress. |
| `--union.internalConnectionConfig.urlPattern` | string | UrlPattern of the internal service endpoints. (default "{{ service }}-helmchart.{{ service }}.svc.cluster.local:80") |
| `--webhook.awsSecretManager.sidecarImage` | string | Specifies the sidecar docker image to use (default "docker.io/amazon/aws-secrets-manager-secret-sidecar:v0.1.4") |
| `--webhook.certDir` | string | Certificate directory to use to write generated certs. Defaults to /etc/webhook/certs/ (default "/etc/webhook/certs") |
| `--webhook.embeddedSecretManagerConfig.awsConfig.region` | string | AWS region |
| `--webhook.embeddedSecretManagerConfig.fileMountInitContainer.image` | string | Specifies init container image to use for mounting secrets as files. (default "busybox:1.28") |
| `--webhook.embeddedSecretManagerConfig.gcpConfig.project` | string | GCP project to be used for secret manager |
| `--webhook.embeddedSecretManagerConfig.type` | string | (default "AWS") |
| `--webhook.gcpSecretManager.sidecarImage` | string | Specifies the sidecar docker image to use (default "gcr.io/google.com/cloudsdktool/cloud-sdk:alpine") |
| `--webhook.listenPort` | int | The port to use to listen to webhook calls. Defaults to 9443 (default 9443) |
| `--webhook.localCert` | | write certs locally. Defaults to false |
| `--webhook.metrics-prefix` | string | An optional prefix for all published metrics. (default "flyte:") |
| `--webhook.secretName` | string | Secret name to write generated certs to. (default "flyte-pod-webhook") |
| `--webhook.serviceName` | string | The name of the webhook service. (default "flyte-pod-webhook") |
| `--webhook.servicePort` | int32 | The port on the service that hosting webhook. (default 443) |
| `--webhook.vaultSecretManager.role` | string | Specifies the vault role to use (default "flyte") |
=== PAGE: https://www.union.ai/docs/v1/serverless/api-reference/uctl-cli/uctl-get/uctl-get-project ===
# uctl get project
Gets project resources
## Synopsis
Retrieve all the projects:
```shell
$ uctl get project
```
> [!NOTE]
> The terms project/projects are interchangeable in these commands.
Retrieve project by name:
```shell
$ uctl get project flytesnacks
```
Retrieve all the projects with filters:
```shell
$ uctl get project --filter.fieldSelector="project.name=flytesnacks"
```
Retrieve all the projects with limit and sorting:
```shell
$ uctl get project --filter.sortBy=created_at --filter.limit=1 --filter.asc
```
Retrieve projects present in other pages by specifying the limit and
page number:
```shell
$ uctl get project --filter.limit=10 --filter.page=2
```
Retrieve all the projects in yaml format:
```shell
$ uctl get project -o yaml
```
Retrieve all the projects in json format:
```shell
$ uctl get project -o json
```
Usage:
```shell
$ uctl get project [flags]
```
## Options
| Option | Type | Description |
|--------|------|-------------|
| `--filter.asc` | | Specifies the sorting order. By default uctl sort result in descending order |
| Option | Type | Description |
|--------|------|-------------|
| `--filter.fieldSelector` | string | Specifies the Field selector |
| `--filter.limit` | int32 | Specifies the limit (default 100) |
| `--filter.page` | int32 | Specifies the page number, in case there are multiple pages of results (default 1) |
| `--filter.sortBy` | string | Specifies which field to sort results (default "created_at") |
| `-h`, `--help` | help for project |
### Options inherited from parent commands
| Option | Type | Description |
|--------|------|-------------|
| `--admin.audience` | string | Audience to use when initiating OAuth2 authorization requests. |
| `--admin.authType` | string | Type of OAuth2 flow used for communicating with admin.ClientSecret, Pkce, ExternalCommand are valid values (default "ClientSecret") |
| `--admin.authorizationHeader` | string | Custom metadata header to pass JWT |
| `--admin.authorizationServerUrl` | string | This is the URL to your IdP's authorization server. It'll default to Endpoint |
| `--admin.caCertFilePath` | string | Use specified certificate file to verify the admin server peer. |
| `--admin.clientId` | string | Client ID (default "flytepropeller") |
| `--admin.clientSecretEnvVar` | string | Environment variable containing the client secret |
| `--admin.clientSecretLocation` | string | File containing the client secret (default "/etc/secrets/client_secret") |
| `--admin.command` | strings | Command for external authentication token generation |
| `--admin.defaultOrg` | string | OPTIONAL: Default org to use to support non-org based cli's.'. |
| `--admin.defaultServiceConfig` | string | |
| `--admin.deviceFlowConfig.pollInterval` | string | amount of time the device flow would poll the token endpoint if auth server doesn't return a polling interval. Okta and google IDP do return an interval' (default "5s") |
| `--admin.deviceFlowConfig.refreshTime` | string | grace period from the token expiry after which it would refresh the token. (default "5m0s") |
| `--admin.deviceFlowConfig.timeout` | string | amount of time the device flow should complete or else it will be cancelled. (default "10m0s") |
| `--admin.endpoint` | string | For admin types, specify where the uri of the service is located. |
| `--admin.httpProxyURL` | string | OPTIONAL: HTTP Proxy to be used for OAuth requests. |
| `--admin.insecure` | | Use insecure connection. |
| `--admin.insecureSkipVerify` | | InsecureSkipVerify controls whether a client verifies the server's certificate chain and host name.Caution: shouldn't be use for production usecases' |
| `--admin.maxBackoffDelay` | string | Max delay for grpc backoff (default "8s") |
| `--admin.maxMessageSizeBytes` | int | The max size in bytes for incoming gRPC messages |
| `--admin.maxRetries` | int | Max number of gRPC retries (default 4) |
| `--admin.perRetryTimeout` | string | gRPC per retry timeout (default "15s") |
| `--admin.pkceConfig.refreshTime` | string | grace period from the token expiry after which it would refresh the token. (default "5m0s") |
| `--admin.pkceConfig.timeout` | string | Amount of time the browser session would be active for authentication from client app. (default "2m0s") |
| `--admin.proxyCommand` | strings | Command for external proxy-authorization token generation |
| `--admin.scopes` | strings | List of scopes to request |
| `--admin.tokenRefreshWindow` | string | Max duration between token refresh attempt and token expiry. (default "0s") |
| `--admin.tokenUrl` | string | OPTIONAL: Your IdP's token endpoint. It'll be discovered from flyte admin's OAuth Metadata endpoint if not provided. |
| `--admin.useAudienceFromAdmin` | | Use Audience configured from admins public endpoint config. |
| `--admin.useAuth` | | Deprecated: Auth will be enabled/disabled based on admin's dynamically discovered information. |
| `--auth.appAuth.externalAuthServer.allowedAudience` | strings | Optional: A list of allowed audiences. If not provided, the audience is expected to be the public Uri of the service. |
| `--auth.appAuth.externalAuthServer.baseUrl` | string | This should be the base url of the authorization server that you are trying to hit. With Okta for instance, it will look something like https://company.okta.com/oauth2/abcdef123456789/ |
| `--auth.appAuth.externalAuthServer.httpProxyURL` | string | OPTIONAL: HTTP Proxy to be used for OAuth requests. |
| `--auth.appAuth.externalAuthServer.metadataUrl` | string | Optional: If the server doesn't support /.well-known/oauth-authorization-server, you can set a custom metadata url here.' |
| `--auth.appAuth.externalAuthServer.retryAttempts` | int | Optional: The number of attempted retries on a transient failure to get the OAuth metadata (default 5) |
| `--auth.appAuth.externalAuthServer.retryDelay` | string | Optional, Duration to wait between retries (default "1s") |
| `--auth.appAuth.selfAuthServer.accessTokenLifespan` | string | Defines the lifespan of issued access tokens. (default "30m0s") |
| `--auth.appAuth.selfAuthServer.authorizationCodeLifespan` | string | Defines the lifespan of issued access tokens. (default "5m0s") |
| `--auth.appAuth.selfAuthServer.claimSymmetricEncryptionKeySecretName` | string | OPTIONAL: Secret name to use to encrypt claims in authcode token. (default "claim_symmetric_key") |
| `--auth.appAuth.selfAuthServer.issuer` | string | Defines the issuer to use when issuing and validating tokens. The default value is https://{requestUri.HostAndPort}/ |
| `--auth.appAuth.selfAuthServer.oldTokenSigningRSAKeySecretName` | string | OPTIONAL: Secret name to use to retrieve Old RSA Signing Key. This can be useful during key rotation to continue to accept older tokens. (default "token_rsa_key_old.pem") |
| `--auth.appAuth.selfAuthServer.refreshTokenLifespan` | string | Defines the lifespan of issued access tokens. (default "1h0m0s") |
| `--auth.appAuth.selfAuthServer.tokenSigningRSAKeySecretName` | string | OPTIONAL: Secret name to use to retrieve RSA Signing Key. (default "token_rsa_key.pem") |
| `--auth.appAuth.thirdPartyConfig.flyteClient.audience` | string | Audience to use when initiating OAuth2 authorization requests. |
| `--auth.appAuth.thirdPartyConfig.flyteClient.clientId` | string | public identifier for the app which handles authorization for a Flyte deployment (default "uctl") |
| `--auth.appAuth.thirdPartyConfig.flyteClient.redirectUri` | string | This is the callback uri registered with the app which handles authorization for a Flyte deployment (default "http://localhost:53593/callback") |
| `--auth.appAuth.thirdPartyConfig.flyteClient.scopes` | strings | Recommended scopes for the client to request. (default [all,offline]) |
| `--auth.disableForGrpc` | | Disables auth enforcement on Grpc Endpoints. |
| `--auth.disableForHttp` | | Disables auth enforcement on HTTP Endpoints. |
| `--auth.grpcAuthorizationHeader` | string | (default "flyte-authorization") |
| `--auth.httpAuthorizationHeader` | string | (default "flyte-authorization") |
| `--auth.httpProxyURL` | string | OPTIONAL: HTTP Proxy to be used for OAuth requests. |
| `--auth.tokenEndpointProxyPath` | string | The path used to proxy calls to the TokenURL |
| `--auth.userAuth.cookieBlockKeySecretName` | string | OPTIONAL: Secret name to use for cookie block key. (default "cookie_block_key") |
| `--auth.userAuth.cookieHashKeySecretName` | string | OPTIONAL: Secret name to use for cookie hash key. (default "cookie_hash_key") |
| `--auth.userAuth.cookieSetting.domain` | string | OPTIONAL: Allows you to set the domain attribute on the auth cookies. |
| `--auth.userAuth.cookieSetting.sameSitePolicy` | string | OPTIONAL: Allows you to declare if your cookie should be restricted to a first-party or same-site context.Wrapper around http.SameSite. (default "DefaultMode") |
| `--auth.userAuth.httpProxyURL` | string | OPTIONAL: HTTP Proxy to be used for OAuth requests. |
| `--auth.userAuth.idpQueryParameter` | string | idp query parameter used for selecting a particular IDP for doing user authentication. Eg: for Okta passing idp={IDP-ID} forces the authentication to happen with IDP-ID |
| `--auth.userAuth.openId.baseUrl` | string | |
| `--auth.userAuth.openId.clientId` | string | |
| `--auth.userAuth.openId.clientSecretFile` | string | |
| `--auth.userAuth.openId.clientSecretName` | string | (default "oidc_client_secret") |
| `--auth.userAuth.openId.scopes` | strings | (default [openid,profile]) |
| `--auth.userAuth.redirectUrl` | string | (default "/console") |
| `--authorizer.internalCommunicationConfig.enabled` | | Enables authorization decisions for internal communication. (default true) |
| `--authorizer.internalCommunicationConfig.ingressIdentity` | string | IngressIdentity used in the cluster. Needed to exclude the communication coming from ingress. (default "ingress-nginx.ingress-nginx.serviceaccount.identity.linkerd.cluster.local") |
| `--authorizer.internalCommunicationConfig.tenantUrlPatternIdentity` | string | UrlPatternIdentity of the internal tenant service endpoint identities. (default "{{ service }}.{{ org }}.serviceaccount.identity.linkerd.cluster.local") |
| `--authorizer.internalCommunicationConfig.urlPatternIdentity` | string | UrlPatternIdentity of the internal service endpoint identities. (default "{{ service }}-helmchart.{{ service }}.serviceaccount.identity.linkerd.cluster.local") |
| `--authorizer.mode` | string | (default "Active") |
| `--authorizer.organizationConfig.PolicyConfig.adminPolicyDescription` | string | description for the boilerplate admin policy (default "Contributor permissions and full admin permissions to manage users and view usage dashboards") |
| `--authorizer.organizationConfig.PolicyConfig.contributorPolicyDescription` | string | description for the boilerplate contributor policy (default "Viewer permissions and permissions to create workflows, tasks, launch plans, and executions") |
| `--authorizer.organizationConfig.PolicyConfig.defaultUserPolicyRoleType` | string | name of the role type to determine which default policy new users added to the organization should be assigned (default "Viewer") |
| `--authorizer.organizationConfig.PolicyConfig.serverlessContributorPolicyDescription` | string | description for the boilerplate serverless contributor policy (default "Viewer permissions and permissions to create workflows, tasks, launch plans, and executions") |
| `--authorizer.organizationConfig.PolicyConfig.serverlessViewerPolicyDescription` | string | description for the boilerplate serverless viewer policy (default "Permissions to view Flyte entities") |
| `--authorizer.organizationConfig.PolicyConfig.viewerPolicyDescription` | string | description for the boilerplate viewer policy (default "Permissions to view Flyte entities") |
| `--authorizer.organizationConfig.defaultPolicyCacheDuration` | string | Cache entry duration for the store of the default policy per organization (default "10m0s") |
| `--authorizer.syncRuleRefreshInterval` | string | (default "1m0s") |
| `--authorizer.type` | string | (default "UserClouds") |
| `--authorizer.userCloudsClient.cache.redis.ttl.edgeTypes` | string | Specifies how long edge types remain in the cache.. (default "30m0s") |
| `--authorizer.userCloudsClient.cache.redis.ttl.edges` | string | Specifies how long edges remain in the cache. (default "30m0s") |
| `--authorizer.userCloudsClient.cache.redis.ttl.objectTypes` | string | Specifies how long object types remain in the cache. (default "30m0s") |
| `--authorizer.userCloudsClient.cache.redis.ttl.objects` | string | Specifies how long objects remain in the cache. (default "30m0s") |
| `--authorizer.userCloudsClient.cache.type` | string | Cache type to use. (default "none") |
| `--authorizer.userCloudsClient.clientID` | string | UserClouds client id |
| `--authorizer.userCloudsClient.clientSecretName` | string | UserCloud client secret name to read from the secret manager. (default "userclouds-client-secret") |
| `--authorizer.userCloudsClient.enableLogging` | | Enable userclouds client's internal logging. Calls to post logs take 250-350 ms and will impact p99 latency, enable with caution. |
| `--authorizer.userCloudsClient.tenantID` | string | UserClouds tenant id. Should be a UUID. |
| `--authorizer.userCloudsClient.tenantUrl` | string | Something like https://{yourtenant}.tenant.userclouds.com |
| `--config` | string | config file (default is /Users/andrew/.union/config.yaml) |
| `--connection.environment` | string | |
| `--connection.region` | string | |
| `--connection.rootTenantURLPattern` | string | Pattern for tenant url. (default "dns:///{{ organization }}.cloud-staging.union.ai") |
| `--console.endpoint` | string | Endpoint of console, if different than flyte admin |
| `--database.connMaxLifeTime` | string | sets the maximum amount of time a connection may be reused (default "1h0m0s") |
| `--database.enableForeignKeyConstraintWhenMigrating` | | Whether to enable gorm foreign keys when migrating the db |
| `--database.maxIdleConnections` | int | maxIdleConnections sets the maximum number of connections in the idle connection pool. (default 10) |
| `--database.maxOpenConnections` | int | maxOpenConnections sets the maximum number of open connections to the database. (default 100) |
| `--database.postgres.dbname` | string | The database name (default "postgres") |
| `--database.postgres.debug` | | |
| `--database.postgres.host` | string | The host name of the database server (default "localhost") |
| `--database.postgres.options` | string | See http://gorm.io/docs/connecting_to_the_database.html for available options passed, in addition to the above. (default "sslmode=disable") |
| `--database.postgres.password` | string | The database password. (default "postgres") |
| `--database.postgres.passwordPath` | string | Points to the file containing the database password. |
| `--database.postgres.port` | int | The port name of the database server (default 30001) |
| `--database.postgres.readReplicaHost` | string | The host name of the read replica database server (default "localhost") |
| `--database.postgres.username` | string | The database user who is connecting to the server. (default "postgres") |
| `--database.sqlite.file` | string | The path to the file (existing or new) where the DB should be created / stored. If existing, then this will be re-used, else a new will be created |
| `--db.connectionPool.maxConnectionLifetime` | string | (default "0s") |
| `--db.connectionPool.maxIdleConnections` | int | |
| `--db.connectionPool.maxOpenConnections` | int | |
| `--db.dbname` | string | (default "postgres") |
| `--db.debug` | | |
| `--db.host` | string | (default "postgres") |
| `--db.log_level` | int | (default 4) |
| `--db.options` | string | (default "sslmode=disable") |
| `--db.password` | string | |
| `--db.passwordPath` | string | |
| `--db.port` | int | (default 5432) |
| `--db.username` | string | (default "postgres") |
| `-d`, `--domain` | string | Specifies the Flyte project's domain. |
| `--files.archive` | | Pass in archive file either an http link or local path. |
| `--files.assumableIamRole` | string | Custom assumable iam auth role to register launch plans with. |
| `--files.continueOnError` | | Continue on error when registering files. |
| `--files.destinationDirectory` | string | Location of source code in container. |
| `--files.dryRun` | | Execute command without making any modifications. |
| `--files.enableSchedule` | | Enable the schedule if the files contain schedulable launchplan. |
| `--files.force` | | Force use of version number on entities registered with flyte. |
| `--files.k8ServiceAccount` | string | Deprecated. Please use `--K8sServiceAccount`|
| `--files.k8sServiceAccount` | string | Custom kubernetes service account auth role to register launch plans with. |
| `--files.outputLocationPrefix` | string | Custom output location prefix for offloaded types (files/schemas). |
| `--files.sourceUploadPath` | string | Deprecated: Update flyte admin to avoid having to configure storage access from uctl. |
| `--files.version` | string | Version of the entity to be registered with flyte which are un-versioned after serialization. |
| `--logger.formatter.type` | string | Sets logging format type. (default "json") |
| `--logger.level` | int | Sets the minimum logging level. (default 3) |
| `--logger.mute` | | Mutes all logs regardless of severity. Intended for benchmarks/tests only. |
| `--logger.show-source` | | Includes source code location in logs. |
| `--org` | string | Organization to work on. If not set, default to user's org. |
| `--otel.file.filename` | string | Filename to store exported telemetry traces (default "/tmp/trace.txt") |
| `--otel.jaeger.endpoint` | string | Endpoint for the jaeger telemetry trace ingestor (default "http://localhost:14268/api/traces") |
| `--otel.otlpgrpc.endpoint` | string | Endpoint for the OTLP telemetry trace collector (default "http://localhost:4317") |
| `--otel.otlphttp.endpoint` | string | Endpoint for the OTLP telemetry trace collector (default "http://localhost:4318/v1/traces") |
| `--otel.sampler.parentSampler` | string | Sets the parent sampler to use for the tracer (default "always") |
| `--otel.type` | string | Sets the type of exporter to configure [noop/file/jaeger/otlpgrpc/otlphttp]. (default "noop") |
| `-o`, `--output` | string | Specifies the output type - supported formats [TABLE JSON YAML DOT DOTURL]. NOTE: dot, doturl are only supported for Workflow (default "table") |
| `--plugins.catalogcache.reader.maxItems` | int | Maximum number of entries to keep in the index. (default 10000) |
| `--plugins.catalogcache.reader.maxRetries` | int | Maximum number of retries per item. (default 3) |
| `--plugins.catalogcache.reader.workers` | int | Number of concurrent workers to start processing the queue. (default 10) |
| `--plugins.catalogcache.writer.maxItems` | int | Maximum number of entries to keep in the index. (default 10000) |
| `--plugins.catalogcache.writer.maxRetries` | int | Maximum number of retries per item. (default 3) |
| `--plugins.catalogcache.writer.workers` | int | Number of concurrent workers to start processing the queue. (default 10) |
| `-p`, `--project` | string | Specifies the Flyte project. |
| `--rediscache.passwordSecretName` | string | Name of secret with Redis password. |
| `--rediscache.primaryEndpoint` | string | Primary endpoint for the redis cache that can be used for both reads and writes. |
| `--rediscache.replicaEndpoint` | string | Replica endpoint for the redis cache that can be used for reads. |
| `--secrets.env-prefix` | string | Prefix for environment variables (default "FLYTE_SECRET_") |
| `--secrets.secrets-prefix` | string | Prefix where to look for secrets file (default "/etc/secrets") |
| `--secrets.type` | string | Sets the type of storage to configure [local]. (default "local") |
| `--server.dataProxy.download.maxExpiresIn` | string | Maximum allowed expiration duration. (default "1h0m0s") |
| `--server.dataProxy.upload.defaultFileNameLength` | int | Default length for the generated file name if not provided in the request. (default 20) |
| `--server.dataProxy.upload.maxExpiresIn` | string | Maximum allowed expiration duration. (default "1h0m0s") |
| `--server.dataProxy.upload.maxSize` | string | Maximum allowed upload size. (default "6Mi") |
| `--server.dataProxy.upload.storagePrefix` | string | Storage prefix to use for all upload requests. |
| `--server.grpc.enableGrpcLatencyMetrics` | | Enable grpc latency metrics. Note Histograms metrics can be expensive on Prometheus servers. |
| `--server.grpc.maxMessageSizeBytes` | int | The max size in bytes for incoming gRPC messages |
| `--server.grpc.port` | int | On which grpc port to serve admin (default 8089) |
| `--server.grpc.serverReflection` | | Enable GRPC Server Reflection (default true) |
| `--server.grpcPort` | int | deprecated |
| `--server.grpcServerReflection` | | deprecated |
| `--server.httpPort` | int | On which http port to serve admin (default 8088) |
| `--server.kube-config` | string | Path to kubernetes client config file, default is empty, useful for incluster config. |
| `--server.kubeClientConfig.burst` | int | Max burst rate for throttle. 0 defaults to 10 (default 25) |
| `--server.kubeClientConfig.qps` | int32 | Max QPS to the master for requests to KubeAPI. 0 defaults to 5. (default 100) |
| `--server.kubeClientConfig.timeout` | string | Max duration allowed for every request to KubeAPI before giving up. 0 implies no timeout. (default "30s") |
| `--server.master` | string | The address of the Kubernetes API server. |
| `--server.readHeaderTimeoutSeconds` | int | The amount of time allowed to read request headers. (default 32) |
| `--server.security.allowCors` | | (default true) |
| `--server.security.allowedHeaders` | strings | (default [Content-Type,flyte-authorization]) |
| `--server.security.allowedOrigins` | strings | (default [*]) |
| `--server.security.auditAccess` | | |
| `--server.security.secure` | | |
| `--server.security.ssl.certificateFile` | string | |
| `--server.security.ssl.keyFile` | string | |
| `--server.security.useAuth` | | |
| `--server.thirdPartyConfig.flyteClient.audience` | string | Audience to use when initiating OAuth2 authorization requests. |
| `--server.thirdPartyConfig.flyteClient.clientId` | string | public identifier for the app which handles authorization for a Flyte deployment |
| `--server.thirdPartyConfig.flyteClient.redirectUri` | string | This is the callback uri registered with the app which handles authorization for a Flyte deployment |
| `--server.thirdPartyConfig.flyteClient.scopes` | strings | Recommended scopes for the client to request. |
| `--server.watchService.maxActiveClusterConnections` | int | (default 5) |
| `--server.watchService.maxPageSize` | int | (default 50000) |
| `--server.watchService.nonTerminalStatusUpdatesInterval` | string | (default "1m0s") |
| `--server.watchService.pollInterval` | string | (default "1s") |
| `--sharedservice.connectPort` | string | On which connect port to serve admin (default "8080") |
| `--sharedservice.grpc.grpcMaxResponseStatusBytes` | int32 | specifies the maximum (uncompressed) size of header list that the client is prepared to accept on grpc calls (default 32000) |
| `--sharedservice.grpc.maxConcurrentStreams` | int | Limit on the number of concurrent streams to each ServerTransport. (default 100) |
| `--sharedservice.grpc.maxMessageSizeBytes` | int | Limit on the size of message that can be received on the server. (default 10485760) |
| `--sharedservice.grpcServerReflection` | | Enable GRPC Server Reflection (default true) |
| `--sharedservice.httpPort` | string | On which http port to serve admin (default "8089") |
| `--sharedservice.kubeConfig` | string | Path to kubernetes client config file. |
| `--sharedservice.master` | string | The address of the Kubernetes API server. |
| `--sharedservice.metrics.enableClientGrpcHistograms` | | Enable client grpc histograms (default true) |
| `--sharedservice.metrics.enableGrpcHistograms` | | Enable grpc histograms (default true) |
| `--sharedservice.metrics.scope` | string | Scope to emit metrics under (default "service:") |
| `--sharedservice.port` | string | On which grpc port to serve admin (default "8080") |
| `--sharedservice.profiler.enabled` | | Enable Profiler on server |
| `--sharedservice.profilerPort` | string | Profile port to start listen for pprof and metric handlers on. (default "10254") |
| `--sharedservice.security.allowCors` | | |
| `--sharedservice.security.allowLocalhostAccess` | | Whether to permit localhost unauthenticated access to the server |
| `--sharedservice.security.allowedHeaders` | strings | |
| `--sharedservice.security.allowedOrigins` | strings | |
| `--sharedservice.security.auditAccess` | | |
| `--sharedservice.security.orgOverride` | string | Override org in identity context if localhost access enabled |
| `--sharedservice.security.secure` | | |
| `--sharedservice.security.ssl.certificateAuthorityFile` | string | |
| `--sharedservice.security.ssl.certificateFile` | string | |
| `--sharedservice.security.ssl.keyFile` | string | |
| `--sharedservice.security.useAuth` | | |
| `--sharedservice.sync.syncInterval` | string | Time interval to sync (default "5m0s") |
| `--storage.cache.max_size_mbs` | int | Maximum size of the cache where the Blob store data is cached in-memory. If not specified or set to 0, cache is not used |
| `--storage.cache.target_gc_percent` | int | Sets the garbage collection target percentage. |
| `--storage.connection.access-key` | string | Access key to use. Only required when authtype is set to accesskey. |
| `--storage.connection.auth-type` | string | Auth Type to use [iam, accesskey]. (default "iam") |
| `--storage.connection.disable-ssl` | | Disables SSL connection. Should only be used for development. |
| `--storage.connection.endpoint` | string | URL for storage client to connect to. |
| `--storage.connection.region` | string | Region to connect to. (default "us-east-1") |
| `--storage.connection.secret-key` | string | Secret to use when accesskey is set. |
| `--storage.container` | string | Initial container (in s3 a bucket) to create -if it doesn't exist-.' |
| `--storage.defaultHttpClient.timeout` | string | Sets time out on the http client. (default "0s") |
| `--storage.enable-multicontainer` | | If this is true, then the container argument is overlooked and redundant. This config will automatically open new connections to new containers/buckets as they are encountered |
| `--storage.limits.maxDownloadMBs` | int | Maximum allowed download size (in MBs) per call. (default 2) |
| `--storage.stow.config` | stringToString | Configuration for stow backend. Refer to github/flyteorg/stow (default []) |
| `--storage.stow.kind` | string | Kind of Stow backend to use. Refer to github/flyteorg/stow |
| `--storage.type` | string | Sets the type of storage to configure [s3/minio/local/mem/stow]. (default "s3") |
| `--union.auth.authorizationMetadataKey` | string | Authorization Header to use when passing Access Tokens to the server (default "flyte-authorization") |
| `--union.auth.clientId` | string | Client ID |
| `--union.auth.clientSecretEnvVar` | string | Environment variable containing the client secret |
| `--union.auth.clientSecretLocation` | string | File containing the client secret |
| `--union.auth.deviceFlow.pollInterval` | string | amount of time the device flow would poll the token endpoint if auth server doesn't return a polling interval. Okta and google IDP do return an interval' (default "5s") |
| `--union.auth.deviceFlow.refreshTime` | string | grace period from the token expiry after which it would refresh the token. (default "5m0s") |
| `--union.auth.deviceFlow.timeout` | string | amount of time the device flow should complete or else it will be cancelled. (default "10m0s") |
| `--union.auth.enable` | | Whether to enable an authenticated conenction when communicating with admin. (default true) |
| `--union.auth.externalAuth.command` | strings | Command for external authentication token generation |
| `--union.auth.pkce.refreshTime` | string | grace period from the token expiry after which it would refresh the token. (default "5m0s") |
| `--union.auth.pkce.timeout` | string | Amount of time the browser session would be active for authentication from client app. (default "15s") |
| `--union.auth.scopes` | strings | List of scopes to request |
| `--union.auth.tokenRefreshWindow` | string | Max duration between token refresh attempt and token expiry. (default "1h0m0s") |
| `--union.auth.tokenUrl` | string | OPTIONAL: Your IdP's token endpoint. It'll be discovered from flyte admin's OAuth Metadata endpoint if not provided. |
| `--union.auth.type` | string | Type of OAuth2 flow used for communicating with admin. (default "Pkce") |
| `--union.cache.maxItemsCount` | int | Maximum number of items to keep in the cache before evicting. (default 1000) |
| `--union.connection.host` | string | Host to connect to (default "dns:///utt-mgdp-stg-us-east-2.cloud-staging.union.ai") |
| `--union.connection.insecure` | | Whether to connect over insecure channel |
| `--union.connection.insecureSkipVerify` | | InsecureSkipVerify controls whether a client verifies the server's certificate chain and host name.Caution: shouldn't be use for production usecases' |
| `--union.connection.keepAliveConfig.permitWithoutStream` | | If true, client sends keepalive pings even with no active RPCs. |
| `--union.connection.keepAliveConfig.time` | string | After a duration of this time if the client doesn't see any activity it pings the server to see if the transport is still alive. (default "20s") |
| `--union.connection.keepAliveConfig.timeout` | string | After having pinged for keepalive check, the client waits for a duration of Timeout and if no activity is seen even after that the connection is closed. (default "2m0s") |
| `--union.connection.maxBackoffDelay` | string | Max delay for grpc backoff (default "8s") |
| `--union.connection.maxRecvMsgSize` | int | Maximum size of a message in bytes of a gRPC message (default 10485760) |
| `--union.connection.maxRetries` | int | Max number of gRPC retries (default 4) |
| `--union.connection.minConnectTimeout` | string | Minimum timeout for establishing a connection (default "20s") |
| `--union.connection.perRetryTimeout` | string | gRPC per retry timeout (default "15s") |
| `--union.connection.serviceConfig` | string | Defines gRPC experimental JSON Service Config (default "{"loadBalancingConfig": [{"round_robin":{}}]}") |
| `--union.connection.trustedIdentityClaims.enabled` | | Enables passing of trusted claims while making inter service calls |
| `--union.connection.trustedIdentityClaims.externalIdentityClaim` | string | External identity claim of the service which is authorized to make internal service call. These are verified against userclouds actions |
| `--union.connection.trustedIdentityClaims.externalIdentityTypeClaim` | string | External identity type claim of app or user to use for the current service identity. It should be an 'app' for inter service communication |
| `--union.internalConnectionConfig.-` | stringToString | (default []) |
| `--union.internalConnectionConfig.enabled` | | Enables internal service to service communication instead of going through ingress. |
| `--union.internalConnectionConfig.urlPattern` | string | UrlPattern of the internal service endpoints. (default "{{ service }}-helmchart.{{ service }}.svc.cluster.local:80") |
| `--webhook.awsSecretManager.sidecarImage` | string | Specifies the sidecar docker image to use (default "docker.io/amazon/aws-secrets-manager-secret-sidecar:v0.1.4") |
| `--webhook.certDir` | string | Certificate directory to use to write generated certs. Defaults to /etc/webhook/certs/ (default "/etc/webhook/certs") |
| `--webhook.embeddedSecretManagerConfig.awsConfig.region` | string | AWS region |
| `--webhook.embeddedSecretManagerConfig.fileMountInitContainer.image` | string | Specifies init container image to use for mounting secrets as files. (default "busybox:1.28") |
| `--webhook.embeddedSecretManagerConfig.gcpConfig.project` | string | GCP project to be used for secret manager |
| `--webhook.embeddedSecretManagerConfig.type` | string | (default "AWS") |
| `--webhook.gcpSecretManager.sidecarImage` | string | Specifies the sidecar docker image to use (default "gcr.io/google.com/cloudsdktool/cloud-sdk:alpine") |
| `--webhook.listenPort` | int | The port to use to listen to webhook calls. Defaults to 9443 (default 9443) |
| `--webhook.localCert` | | write certs locally. Defaults to false |
| `--webhook.metrics-prefix` | string | An optional prefix for all published metrics. (default "flyte:") |
| `--webhook.secretName` | string | Secret name to write generated certs to. (default "flyte-pod-webhook") |
| `--webhook.serviceName` | string | The name of the webhook service. (default "flyte-pod-webhook") |
| `--webhook.servicePort` | int32 | The port on the service that hosting webhook. (default 443) |
| `--webhook.vaultSecretManager.role` | string | Specifies the vault role to use (default "flyte") |
=== PAGE: https://www.union.ai/docs/v1/serverless/api-reference/uctl-cli/uctl-get/uctl-get-role ===
# uctl get role
Returns roles for your entire organization or assigned to a specific
identity (user or application)
## Synopsis
Fetch the entire set of roles defined in your organization:
```shell
$ uctl get roles
```
Fetch an individual role:
```shell
$ uctl get role MyExampleRole
```
## Options
| Option | Type | Description |
|--------|------|-------------|
| `-h`, `--help` | help for role |
| `--name` | string | Optional, specific name of the role to fetch |
| `--outputFile` | string | writes API response to this file. |
### Options inherited from parent commands
| Option | Type | Description |
|--------|------|-------------|
| `--admin.audience` | string | Audience to use when initiating OAuth2 authorization requests. |
| `--admin.authType` | string | Type of OAuth2 flow used for communicating with admin.ClientSecret, Pkce, ExternalCommand are valid values (default "ClientSecret") |
| `--admin.authorizationHeader` | string | Custom metadata header to pass JWT |
| `--admin.authorizationServerUrl` | string | This is the URL to your IdP's authorization server. It'll default to Endpoint |
| `--admin.caCertFilePath` | string | Use specified certificate file to verify the admin server peer. |
| `--admin.clientId` | string | Client ID (default "flytepropeller") |
| `--admin.clientSecretEnvVar` | string | Environment variable containing the client secret |
| `--admin.clientSecretLocation` | string | File containing the client secret (default "/etc/secrets/client_secret") |
| `--admin.command` | strings | Command for external authentication token generation |
| `--admin.defaultOrg` | string | OPTIONAL: Default org to use to support non-org based cli's.'. |
| `--admin.defaultServiceConfig` | string | |
| `--admin.deviceFlowConfig.pollInterval` | string | amount of time the device flow would poll the token endpoint if auth server doesn't return a polling interval. Okta and google IDP do return an interval' (default "5s") |
| `--admin.deviceFlowConfig.refreshTime` | string | grace period from the token expiry after which it would refresh the token. (default "5m0s") |
| `--admin.deviceFlowConfig.timeout` | string | amount of time the device flow should complete or else it will be cancelled. (default "10m0s") |
| `--admin.endpoint` | string | For admin types, specify where the uri of the service is located. |
| `--admin.httpProxyURL` | string | OPTIONAL: HTTP Proxy to be used for OAuth requests. |
| `--admin.insecure` | | Use insecure connection. |
| `--admin.insecureSkipVerify` | | InsecureSkipVerify controls whether a client verifies the server's certificate chain and host name.Caution: shouldn't be use for production usecases' |
| `--admin.maxBackoffDelay` | string | Max delay for grpc backoff (default "8s") |
| `--admin.maxMessageSizeBytes` | int | The max size in bytes for incoming gRPC messages |
| `--admin.maxRetries` | int | Max number of gRPC retries (default 4) |
| `--admin.perRetryTimeout` | string | gRPC per retry timeout (default "15s") |
| `--admin.pkceConfig.refreshTime` | string | grace period from the token expiry after which it would refresh the token. (default "5m0s") |
| `--admin.pkceConfig.timeout` | string | Amount of time the browser session would be active for authentication from client app. (default "2m0s") |
| `--admin.proxyCommand` | strings | Command for external proxy-authorization token generation |
| `--admin.scopes` | strings | List of scopes to request |
| `--admin.tokenRefreshWindow` | string | Max duration between token refresh attempt and token expiry. (default "0s") |
| `--admin.tokenUrl` | string | OPTIONAL: Your IdP's token endpoint. It'll be discovered from flyte admin's OAuth Metadata endpoint if not provided. |
| `--admin.useAudienceFromAdmin` | | Use Audience configured from admins public endpoint config. |
| `--admin.useAuth` | | Deprecated: Auth will be enabled/disabled based on admin's dynamically discovered information. |
| `--auth.appAuth.externalAuthServer.allowedAudience` | strings | Optional: A list of allowed audiences. If not provided, the audience is expected to be the public Uri of the service. |
| `--auth.appAuth.externalAuthServer.baseUrl` | string | This should be the base url of the authorization server that you are trying to hit. With Okta for instance, it will look something like https://company.okta.com/oauth2/abcdef123456789/ |
| `--auth.appAuth.externalAuthServer.httpProxyURL` | string | OPTIONAL: HTTP Proxy to be used for OAuth requests. |
| `--auth.appAuth.externalAuthServer.metadataUrl` | string | Optional: If the server doesn't support /.well-known/oauth-authorization-server, you can set a custom metadata url here.' |
| `--auth.appAuth.externalAuthServer.retryAttempts` | int | Optional: The number of attempted retries on a transient failure to get the OAuth metadata (default 5) |
| `--auth.appAuth.externalAuthServer.retryDelay` | string | Optional, Duration to wait between retries (default "1s") |
| `--auth.appAuth.selfAuthServer.accessTokenLifespan` | string | Defines the lifespan of issued access tokens. (default "30m0s") |
| `--auth.appAuth.selfAuthServer.authorizationCodeLifespan` | string | Defines the lifespan of issued access tokens. (default "5m0s") |
| `--auth.appAuth.selfAuthServer.claimSymmetricEncryptionKeySecretName` | string | OPTIONAL: Secret name to use to encrypt claims in authcode token. (default "claim_symmetric_key") |
| `--auth.appAuth.selfAuthServer.issuer` | string | Defines the issuer to use when issuing and validating tokens. The default value is https://{requestUri.HostAndPort}/ |
| `--auth.appAuth.selfAuthServer.oldTokenSigningRSAKeySecretName` | string | OPTIONAL: Secret name to use to retrieve Old RSA Signing Key. This can be useful during key rotation to continue to accept older tokens. (default "token_rsa_key_old.pem") |
| `--auth.appAuth.selfAuthServer.refreshTokenLifespan` | string | Defines the lifespan of issued access tokens. (default "1h0m0s") |
| `--auth.appAuth.selfAuthServer.tokenSigningRSAKeySecretName` | string | OPTIONAL: Secret name to use to retrieve RSA Signing Key. (default "token_rsa_key.pem") |
| `--auth.appAuth.thirdPartyConfig.flyteClient.audience` | string | Audience to use when initiating OAuth2 authorization requests. |
| `--auth.appAuth.thirdPartyConfig.flyteClient.clientId` | string | public identifier for the app which handles authorization for a Flyte deployment (default "uctl") |
| `--auth.appAuth.thirdPartyConfig.flyteClient.redirectUri` | string | This is the callback uri registered with the app which handles authorization for a Flyte deployment (default "http://localhost:53593/callback") |
| `--auth.appAuth.thirdPartyConfig.flyteClient.scopes` | strings | Recommended scopes for the client to request. (default [all,offline]) |
| `--auth.disableForGrpc` | | Disables auth enforcement on Grpc Endpoints. |
| `--auth.disableForHttp` | | Disables auth enforcement on HTTP Endpoints. |
| `--auth.grpcAuthorizationHeader` | string | (default "flyte-authorization") |
| `--auth.httpAuthorizationHeader` | string | (default "flyte-authorization") |
| `--auth.httpProxyURL` | string | OPTIONAL: HTTP Proxy to be used for OAuth requests. |
| `--auth.tokenEndpointProxyPath` | string | The path used to proxy calls to the TokenURL |
| `--auth.userAuth.cookieBlockKeySecretName` | string | OPTIONAL: Secret name to use for cookie block key. (default "cookie_block_key") |
| `--auth.userAuth.cookieHashKeySecretName` | string | OPTIONAL: Secret name to use for cookie hash key. (default "cookie_hash_key") |
| `--auth.userAuth.cookieSetting.domain` | string | OPTIONAL: Allows you to set the domain attribute on the auth cookies. |
| `--auth.userAuth.cookieSetting.sameSitePolicy` | string | OPTIONAL: Allows you to declare if your cookie should be restricted to a first-party or same-site context.Wrapper around http.SameSite. (default "DefaultMode") |
| `--auth.userAuth.httpProxyURL` | string | OPTIONAL: HTTP Proxy to be used for OAuth requests. |
| `--auth.userAuth.idpQueryParameter` | string | idp query parameter used for selecting a particular IDP for doing user authentication. Eg: for Okta passing idp={IDP-ID} forces the authentication to happen with IDP-ID |
| `--auth.userAuth.openId.baseUrl` | string | |
| `--auth.userAuth.openId.clientId` | string | |
| `--auth.userAuth.openId.clientSecretFile` | string | |
| `--auth.userAuth.openId.clientSecretName` | string | (default "oidc_client_secret") |
| `--auth.userAuth.openId.scopes` | strings | (default [openid,profile]) |
| `--auth.userAuth.redirectUrl` | string | (default "/console") |
| `--authorizer.internalCommunicationConfig.enabled` | | Enables authorization decisions for internal communication. (default true) |
| `--authorizer.internalCommunicationConfig.ingressIdentity` | string | IngressIdentity used in the cluster. Needed to exclude the communication coming from ingress. (default "ingress-nginx.ingress-nginx.serviceaccount.identity.linkerd.cluster.local") |
| `--authorizer.internalCommunicationConfig.tenantUrlPatternIdentity` | string | UrlPatternIdentity of the internal tenant service endpoint identities. (default "{{ service }}.{{ org }}.serviceaccount.identity.linkerd.cluster.local") |
| `--authorizer.internalCommunicationConfig.urlPatternIdentity` | string | UrlPatternIdentity of the internal service endpoint identities. (default "{{ service }}-helmchart.{{ service }}.serviceaccount.identity.linkerd.cluster.local") |
| `--authorizer.mode` | string | (default "Active") |
| `--authorizer.organizationConfig.PolicyConfig.adminPolicyDescription` | string | description for the boilerplate admin policy (default "Contributor permissions and full admin permissions to manage users and view usage dashboards") |
| `--authorizer.organizationConfig.PolicyConfig.contributorPolicyDescription` | string | description for the boilerplate contributor policy (default "Viewer permissions and permissions to create workflows, tasks, launch plans, and executions") |
| `--authorizer.organizationConfig.PolicyConfig.defaultUserPolicyRoleType` | string | name of the role type to determine which default policy new users added to the organization should be assigned (default "Viewer") |
| `--authorizer.organizationConfig.PolicyConfig.serverlessContributorPolicyDescription` | string | description for the boilerplate serverless contributor policy (default "Viewer permissions and permissions to create workflows, tasks, launch plans, and executions") |
| `--authorizer.organizationConfig.PolicyConfig.serverlessViewerPolicyDescription` | string | description for the boilerplate serverless viewer policy (default "Permissions to view Flyte entities") |
| `--authorizer.organizationConfig.PolicyConfig.viewerPolicyDescription` | string | description for the boilerplate viewer policy (default "Permissions to view Flyte entities") |
| `--authorizer.organizationConfig.defaultPolicyCacheDuration` | string | Cache entry duration for the store of the default policy per organization (default "10m0s") |
| `--authorizer.syncRuleRefreshInterval` | string | (default "1m0s") |
| `--authorizer.type` | string | (default "UserClouds") |
| `--authorizer.userCloudsClient.cache.redis.ttl.edgeTypes` | string | Specifies how long edge types remain in the cache.. (default "30m0s") |
| `--authorizer.userCloudsClient.cache.redis.ttl.edges` | string | Specifies how long edges remain in the cache. (default "30m0s") |
| `--authorizer.userCloudsClient.cache.redis.ttl.objectTypes` | string | Specifies how long object types remain in the cache. (default "30m0s") |
| `--authorizer.userCloudsClient.cache.redis.ttl.objects` | string | Specifies how long objects remain in the cache. (default "30m0s") |
| `--authorizer.userCloudsClient.cache.type` | string | Cache type to use. (default "none") |
| `--authorizer.userCloudsClient.clientID` | string | UserClouds client id |
| `--authorizer.userCloudsClient.clientSecretName` | string | UserCloud client secret name to read from the secret manager. (default "userclouds-client-secret") |
| `--authorizer.userCloudsClient.enableLogging` | | Enable userclouds client's internal logging. Calls to post logs take 250-350 ms and will impact p99 latency, enable with caution. |
| `--authorizer.userCloudsClient.tenantID` | string | UserClouds tenant id. Should be a UUID. |
| `--authorizer.userCloudsClient.tenantUrl` | string | Something like https://{yourtenant}.tenant.userclouds.com |
| `--config` | string | config file (default is /Users/andrew/.union/config.yaml) |
| `--connection.environment` | string | |
| `--connection.region` | string | |
| `--connection.rootTenantURLPattern` | string | Pattern for tenant url. (default "dns:///{{ organization }}.cloud-staging.union.ai") |
| `--console.endpoint` | string | Endpoint of console, if different than flyte admin |
| `--database.connMaxLifeTime` | string | sets the maximum amount of time a connection may be reused (default "1h0m0s") |
| `--database.enableForeignKeyConstraintWhenMigrating` | | Whether to enable gorm foreign keys when migrating the db |
| `--database.maxIdleConnections` | int | maxIdleConnections sets the maximum number of connections in the idle connection pool. (default 10) |
| `--database.maxOpenConnections` | int | maxOpenConnections sets the maximum number of open connections to the database. (default 100) |
| `--database.postgres.dbname` | string | The database name (default "postgres") |
| `--database.postgres.debug` | | |
| `--database.postgres.host` | string | The host name of the database server (default "localhost") |
| `--database.postgres.options` | string | See http://gorm.io/docs/connecting_to_the_database.html for available options passed, in addition to the above. (default "sslmode=disable") |
| `--database.postgres.password` | string | The database password. (default "postgres") |
| `--database.postgres.passwordPath` | string | Points to the file containing the database password. |
| `--database.postgres.port` | int | The port name of the database server (default 30001) |
| `--database.postgres.readReplicaHost` | string | The host name of the read replica database server (default "localhost") |
| `--database.postgres.username` | string | The database user who is connecting to the server. (default "postgres") |
| `--database.sqlite.file` | string | The path to the file (existing or new) where the DB should be created / stored. If existing, then this will be re-used, else a new will be created |
| `--db.connectionPool.maxConnectionLifetime` | string | (default "0s") |
| `--db.connectionPool.maxIdleConnections` | int | |
| `--db.connectionPool.maxOpenConnections` | int | |
| `--db.dbname` | string | (default "postgres") |
| `--db.debug` | | |
| `--db.host` | string | (default "postgres") |
| `--db.log_level` | int | (default 4) |
| `--db.options` | string | (default "sslmode=disable") |
| `--db.password` | string | |
| `--db.passwordPath` | string | |
| `--db.port` | int | (default 5432) |
| `--db.username` | string | (default "postgres") |
| `-d`, `--domain` | string | Specifies the Flyte project's domain. |
| `--files.archive` | | Pass in archive file either an http link or local path. |
| `--files.assumableIamRole` | string | Custom assumable iam auth role to register launch plans with. |
| `--files.continueOnError` | | Continue on error when registering files. |
| `--files.destinationDirectory` | string | Location of source code in container. |
| `--files.dryRun` | | Execute command without making any modifications. |
| `--files.enableSchedule` | | Enable the schedule if the files contain schedulable launchplan. |
| `--files.force` | | Force use of version number on entities registered with flyte. |
| `--files.k8ServiceAccount` | string | Deprecated. Please use `--K8sServiceAccount`|
| `--files.k8sServiceAccount` | string | Custom kubernetes service account auth role to register launch plans with. |
| `--files.outputLocationPrefix` | string | Custom output location prefix for offloaded types (files/schemas). |
| `--files.sourceUploadPath` | string | Deprecated: Update flyte admin to avoid having to configure storage access from uctl. |
| `--files.version` | string | Version of the entity to be registered with flyte which are un-versioned after serialization. |
| `--logger.formatter.type` | string | Sets logging format type. (default "json") |
| `--logger.level` | int | Sets the minimum logging level. (default 3) |
| `--logger.mute` | | Mutes all logs regardless of severity. Intended for benchmarks/tests only. |
| `--logger.show-source` | | Includes source code location in logs. |
| `--org` | string | Organization to work on. If not set, default to user's org. |
| `--otel.file.filename` | string | Filename to store exported telemetry traces (default "/tmp/trace.txt") |
| `--otel.jaeger.endpoint` | string | Endpoint for the jaeger telemetry trace ingestor (default "http://localhost:14268/api/traces") |
| `--otel.otlpgrpc.endpoint` | string | Endpoint for the OTLP telemetry trace collector (default "http://localhost:4317") |
| `--otel.otlphttp.endpoint` | string | Endpoint for the OTLP telemetry trace collector (default "http://localhost:4318/v1/traces") |
| `--otel.sampler.parentSampler` | string | Sets the parent sampler to use for the tracer (default "always") |
| `--otel.type` | string | Sets the type of exporter to configure [noop/file/jaeger/otlpgrpc/otlphttp]. (default "noop") |
| `-o`, `--output` | string | Specifies the output type - supported formats [TABLE JSON YAML DOT DOTURL]. NOTE: dot, doturl are only supported for Workflow (default "table") |
| `--plugins.catalogcache.reader.maxItems` | int | Maximum number of entries to keep in the index. (default 10000) |
| `--plugins.catalogcache.reader.maxRetries` | int | Maximum number of retries per item. (default 3) |
| `--plugins.catalogcache.reader.workers` | int | Number of concurrent workers to start processing the queue. (default 10) |
| `--plugins.catalogcache.writer.maxItems` | int | Maximum number of entries to keep in the index. (default 10000) |
| `--plugins.catalogcache.writer.maxRetries` | int | Maximum number of retries per item. (default 3) |
| `--plugins.catalogcache.writer.workers` | int | Number of concurrent workers to start processing the queue. (default 10) |
| `-p`, `--project` | string | Specifies the Flyte project. |
| `--rediscache.passwordSecretName` | string | Name of secret with Redis password. |
| `--rediscache.primaryEndpoint` | string | Primary endpoint for the redis cache that can be used for both reads and writes. |
| `--rediscache.replicaEndpoint` | string | Replica endpoint for the redis cache that can be used for reads. |
| `--secrets.env-prefix` | string | Prefix for environment variables (default "FLYTE_SECRET_") |
| `--secrets.secrets-prefix` | string | Prefix where to look for secrets file (default "/etc/secrets") |
| `--secrets.type` | string | Sets the type of storage to configure [local]. (default "local") |
| `--server.dataProxy.download.maxExpiresIn` | string | Maximum allowed expiration duration. (default "1h0m0s") |
| `--server.dataProxy.upload.defaultFileNameLength` | int | Default length for the generated file name if not provided in the request. (default 20) |
| `--server.dataProxy.upload.maxExpiresIn` | string | Maximum allowed expiration duration. (default "1h0m0s") |
| `--server.dataProxy.upload.maxSize` | string | Maximum allowed upload size. (default "6Mi") |
| `--server.dataProxy.upload.storagePrefix` | string | Storage prefix to use for all upload requests. |
| `--server.grpc.enableGrpcLatencyMetrics` | | Enable grpc latency metrics. Note Histograms metrics can be expensive on Prometheus servers. |
| `--server.grpc.maxMessageSizeBytes` | int | The max size in bytes for incoming gRPC messages |
| `--server.grpc.port` | int | On which grpc port to serve admin (default 8089) |
| `--server.grpc.serverReflection` | | Enable GRPC Server Reflection (default true) |
| `--server.grpcPort` | int | deprecated |
| `--server.grpcServerReflection` | | deprecated |
| `--server.httpPort` | int | On which http port to serve admin (default 8088) |
| `--server.kube-config` | string | Path to kubernetes client config file, default is empty, useful for incluster config. |
| `--server.kubeClientConfig.burst` | int | Max burst rate for throttle. 0 defaults to 10 (default 25) |
| `--server.kubeClientConfig.qps` | int32 | Max QPS to the master for requests to KubeAPI. 0 defaults to 5. (default 100) |
| `--server.kubeClientConfig.timeout` | string | Max duration allowed for every request to KubeAPI before giving up. 0 implies no timeout. (default "30s") |
| `--server.master` | string | The address of the Kubernetes API server. |
| `--server.readHeaderTimeoutSeconds` | int | The amount of time allowed to read request headers. (default 32) |
| `--server.security.allowCors` | | (default true) |
| `--server.security.allowedHeaders` | strings | (default [Content-Type,flyte-authorization]) |
| `--server.security.allowedOrigins` | strings | (default [*]) |
| `--server.security.auditAccess` | | |
| `--server.security.secure` | | |
| `--server.security.ssl.certificateFile` | string | |
| `--server.security.ssl.keyFile` | string | |
| `--server.security.useAuth` | | |
| `--server.thirdPartyConfig.flyteClient.audience` | string | Audience to use when initiating OAuth2 authorization requests. |
| `--server.thirdPartyConfig.flyteClient.clientId` | string | public identifier for the app which handles authorization for a Flyte deployment |
| `--server.thirdPartyConfig.flyteClient.redirectUri` | string | This is the callback uri registered with the app which handles authorization for a Flyte deployment |
| `--server.thirdPartyConfig.flyteClient.scopes` | strings | Recommended scopes for the client to request. |
| `--server.watchService.maxActiveClusterConnections` | int | (default 5) |
| `--server.watchService.maxPageSize` | int | (default 50000) |
| `--server.watchService.nonTerminalStatusUpdatesInterval` | string | (default "1m0s") |
| `--server.watchService.pollInterval` | string | (default "1s") |
| `--sharedservice.connectPort` | string | On which connect port to serve admin (default "8080") |
| `--sharedservice.grpc.grpcMaxResponseStatusBytes` | int32 | specifies the maximum (uncompressed) size of header list that the client is prepared to accept on grpc calls (default 32000) |
| `--sharedservice.grpc.maxConcurrentStreams` | int | Limit on the number of concurrent streams to each ServerTransport. (default 100) |
| `--sharedservice.grpc.maxMessageSizeBytes` | int | Limit on the size of message that can be received on the server. (default 10485760) |
| `--sharedservice.grpcServerReflection` | | Enable GRPC Server Reflection (default true) |
| `--sharedservice.httpPort` | string | On which http port to serve admin (default "8089") |
| `--sharedservice.kubeConfig` | string | Path to kubernetes client config file. |
| `--sharedservice.master` | string | The address of the Kubernetes API server. |
| `--sharedservice.metrics.enableClientGrpcHistograms` | | Enable client grpc histograms (default true) |
| `--sharedservice.metrics.enableGrpcHistograms` | | Enable grpc histograms (default true) |
| `--sharedservice.metrics.scope` | string | Scope to emit metrics under (default "service:") |
| `--sharedservice.port` | string | On which grpc port to serve admin (default "8080") |
| `--sharedservice.profiler.enabled` | | Enable Profiler on server |
| `--sharedservice.profilerPort` | string | Profile port to start listen for pprof and metric handlers on. (default "10254") |
| `--sharedservice.security.allowCors` | | |
| `--sharedservice.security.allowLocalhostAccess` | | Whether to permit localhost unauthenticated access to the server |
| `--sharedservice.security.allowedHeaders` | strings | |
| `--sharedservice.security.allowedOrigins` | strings | |
| `--sharedservice.security.auditAccess` | | |
| `--sharedservice.security.orgOverride` | string | Override org in identity context if localhost access enabled |
| `--sharedservice.security.secure` | | |
| `--sharedservice.security.ssl.certificateAuthorityFile` | string | |
| `--sharedservice.security.ssl.certificateFile` | string | |
| `--sharedservice.security.ssl.keyFile` | string | |
| `--sharedservice.security.useAuth` | | |
| `--sharedservice.sync.syncInterval` | string | Time interval to sync (default "5m0s") |
| `--storage.cache.max_size_mbs` | int | Maximum size of the cache where the Blob store data is cached in-memory. If not specified or set to 0, cache is not used |
| `--storage.cache.target_gc_percent` | int | Sets the garbage collection target percentage. |
| `--storage.connection.access-key` | string | Access key to use. Only required when authtype is set to accesskey. |
| `--storage.connection.auth-type` | string | Auth Type to use [iam, accesskey]. (default "iam") |
| `--storage.connection.disable-ssl` | | Disables SSL connection. Should only be used for development. |
| `--storage.connection.endpoint` | string | URL for storage client to connect to. |
| `--storage.connection.region` | string | Region to connect to. (default "us-east-1") |
| `--storage.connection.secret-key` | string | Secret to use when accesskey is set. |
| `--storage.container` | string | Initial container (in s3 a bucket) to create -if it doesn't exist-.' |
| `--storage.defaultHttpClient.timeout` | string | Sets time out on the http client. (default "0s") |
| `--storage.enable-multicontainer` | | If this is true, then the container argument is overlooked and redundant. This config will automatically open new connections to new containers/buckets as they are encountered |
| `--storage.limits.maxDownloadMBs` | int | Maximum allowed download size (in MBs) per call. (default 2) |
| `--storage.stow.config` | stringToString | Configuration for stow backend. Refer to github/flyteorg/stow (default []) |
| `--storage.stow.kind` | string | Kind of Stow backend to use. Refer to github/flyteorg/stow |
| `--storage.type` | string | Sets the type of storage to configure [s3/minio/local/mem/stow]. (default "s3") |
| `--union.auth.authorizationMetadataKey` | string | Authorization Header to use when passing Access Tokens to the server (default "flyte-authorization") |
| `--union.auth.clientId` | string | Client ID |
| `--union.auth.clientSecretEnvVar` | string | Environment variable containing the client secret |
| `--union.auth.clientSecretLocation` | string | File containing the client secret |
| `--union.auth.deviceFlow.pollInterval` | string | amount of time the device flow would poll the token endpoint if auth server doesn't return a polling interval. Okta and google IDP do return an interval' (default "5s") |
| `--union.auth.deviceFlow.refreshTime` | string | grace period from the token expiry after which it would refresh the token. (default "5m0s") |
| `--union.auth.deviceFlow.timeout` | string | amount of time the device flow should complete or else it will be cancelled. (default "10m0s") |
| `--union.auth.enable` | | Whether to enable an authenticated conenction when communicating with admin. (default true) |
| `--union.auth.externalAuth.command` | strings | Command for external authentication token generation |
| `--union.auth.pkce.refreshTime` | string | grace period from the token expiry after which it would refresh the token. (default "5m0s") |
| `--union.auth.pkce.timeout` | string | Amount of time the browser session would be active for authentication from client app. (default "15s") |
| `--union.auth.scopes` | strings | List of scopes to request |
| `--union.auth.tokenRefreshWindow` | string | Max duration between token refresh attempt and token expiry. (default "1h0m0s") |
| `--union.auth.tokenUrl` | string | OPTIONAL: Your IdP's token endpoint. It'll be discovered from flyte admin's OAuth Metadata endpoint if not provided. |
| `--union.auth.type` | string | Type of OAuth2 flow used for communicating with admin. (default "Pkce") |
| `--union.cache.maxItemsCount` | int | Maximum number of items to keep in the cache before evicting. (default 1000) |
| `--union.connection.host` | string | Host to connect to (default "dns:///utt-mgdp-stg-us-east-2.cloud-staging.union.ai") |
| `--union.connection.insecure` | | Whether to connect over insecure channel |
| `--union.connection.insecureSkipVerify` | | InsecureSkipVerify controls whether a client verifies the server's certificate chain and host name.Caution: shouldn't be use for production usecases' |
| `--union.connection.keepAliveConfig.permitWithoutStream` | | If true, client sends keepalive pings even with no active RPCs. |
| `--union.connection.keepAliveConfig.time` | string | After a duration of this time if the client doesn't see any activity it pings the server to see if the transport is still alive. (default "20s") |
| `--union.connection.keepAliveConfig.timeout` | string | After having pinged for keepalive check, the client waits for a duration of Timeout and if no activity is seen even after that the connection is closed. (default "2m0s") |
| `--union.connection.maxBackoffDelay` | string | Max delay for grpc backoff (default "8s") |
| `--union.connection.maxRecvMsgSize` | int | Maximum size of a message in bytes of a gRPC message (default 10485760) |
| `--union.connection.maxRetries` | int | Max number of gRPC retries (default 4) |
| `--union.connection.minConnectTimeout` | string | Minimum timeout for establishing a connection (default "20s") |
| `--union.connection.perRetryTimeout` | string | gRPC per retry timeout (default "15s") |
| `--union.connection.serviceConfig` | string | Defines gRPC experimental JSON Service Config (default "{"loadBalancingConfig": [{"round_robin":{}}]}") |
| `--union.connection.trustedIdentityClaims.enabled` | | Enables passing of trusted claims while making inter service calls |
| `--union.connection.trustedIdentityClaims.externalIdentityClaim` | string | External identity claim of the service which is authorized to make internal service call. These are verified against userclouds actions |
| `--union.connection.trustedIdentityClaims.externalIdentityTypeClaim` | string | External identity type claim of app or user to use for the current service identity. It should be an 'app' for inter service communication |
| `--union.internalConnectionConfig.-` | stringToString | (default []) |
| `--union.internalConnectionConfig.enabled` | | Enables internal service to service communication instead of going through ingress. |
| `--union.internalConnectionConfig.urlPattern` | string | UrlPattern of the internal service endpoints. (default "{{ service }}-helmchart.{{ service }}.svc.cluster.local:80") |
| `--webhook.awsSecretManager.sidecarImage` | string | Specifies the sidecar docker image to use (default "docker.io/amazon/aws-secrets-manager-secret-sidecar:v0.1.4") |
| `--webhook.certDir` | string | Certificate directory to use to write generated certs. Defaults to /etc/webhook/certs/ (default "/etc/webhook/certs") |
| `--webhook.embeddedSecretManagerConfig.awsConfig.region` | string | AWS region |
| `--webhook.embeddedSecretManagerConfig.fileMountInitContainer.image` | string | Specifies init container image to use for mounting secrets as files. (default "busybox:1.28") |
| `--webhook.embeddedSecretManagerConfig.gcpConfig.project` | string | GCP project to be used for secret manager |
| `--webhook.embeddedSecretManagerConfig.type` | string | (default "AWS") |
| `--webhook.gcpSecretManager.sidecarImage` | string | Specifies the sidecar docker image to use (default "gcr.io/google.com/cloudsdktool/cloud-sdk:alpine") |
| `--webhook.listenPort` | int | The port to use to listen to webhook calls. Defaults to 9443 (default 9443) |
| `--webhook.localCert` | | write certs locally. Defaults to false |
| `--webhook.metrics-prefix` | string | An optional prefix for all published metrics. (default "flyte:") |
| `--webhook.secretName` | string | Secret name to write generated certs to. (default "flyte-pod-webhook") |
| `--webhook.serviceName` | string | The name of the webhook service. (default "flyte-pod-webhook") |
| `--webhook.servicePort` | int32 | The port on the service that hosting webhook. (default 443) |
| `--webhook.vaultSecretManager.role` | string | Specifies the vault role to use (default "flyte") |
=== PAGE: https://www.union.ai/docs/v1/serverless/api-reference/uctl-cli/uctl-get/uctl-get-task ===
# uctl get task
Gets task resources
## Synopsis
Retrieve all the tasks within project and domain:
```shell
$ uctl get task -p flytesnacks -d development
```
> [!NOTE]
> The terms task/tasks are interchangeable in these commands.
Retrieve task by name within project and domain:
```shell
$ uctl task -p flytesnacks -d development core.basic.lp.greet
```
Retrieve latest version of task by name within project and domain:
```shell
$ uctl get task -p flytesnacks -d development core.basic.lp.greet --latest
```
Retrieve particular version of task by name within project and domain:
```shell
$ uctl get task -p flytesnacks -d development core.basic.lp.greet --version v2
```
Retrieve all the tasks with filters:
```shell
$ uctl get task -p flytesnacks -d development --filter.fieldSelector="task.name=k8s_spark.pyspark_pi.print_every_time,task.version=v1"
```
Retrieve a specific task with filters:
```shell
$ uctl get task -p flytesnacks -d development k8s_spark.pyspark_pi.print_every_time --filter.fieldSelector="task.version=v1,created_at>=2021-05-24T21:43:12.325335Z"
```
Retrieve all the tasks with limit and sorting:
```shell
$ uctl get -p flytesnacks -d development task --filter.sortBy=created_at --filter.limit=1 --filter.asc
```
Retrieve tasks present in other pages by specifying the limit and page
number:
```shell
$ uctl get -p flytesnacks -d development task --filter.limit=10 --filter.page=2
```
Retrieve all the tasks within project and domain in yaml format:
```shell
$ uctl get task -p flytesnacks -d development -o yaml
```
Retrieve all the tasks within project and domain in json format:
```shell
$ uctl get task -p flytesnacks -d development -o json
```
Retrieve tasks within project and domain for a version and generate the
execution spec file for it to be used for launching the execution using
create execution:
```shell
$ uctl get tasks -d development -p flytesnacks core.control_flow.merge_sort.merge --execFile execution_spec.yaml --version v2
```
The generated file would look similar to this:
``` yaml
iamRoleARN: ""
inputs:
sorted_list1:
- 0
sorted_list2:
- 0
kubeServiceAcct: ""
targetDomain: ""
targetProject: ""
task: core.control_flow.merge_sort.merge
version: v2
```
Check the create execution section on how to launch one using the
generated file.
Usage:
```shell
$ uctl get task [flags]
```
## Options
| Option | Type | Description |
|--------|------|-------------|
| `--execFile` | string | execution file name to be used for generating execution spec of a single task. |
| `--filter.asc` | | Specifies the sorting order. By default uctl sort result in descending order |
| `--filter.fieldSelector` | string | Specifies the Field selector |
| `--filter.limit` | int32 | Specifies the limit (default 100) |
| `--filter.page` | int32 | Specifies the page number, in case there are multiple pages of results (default 1) |
| `--filter.sortBy` | string | Specifies which field to sort results (default "created_at") |
| `-h`, `--help` | help for task |
| `--latest` | | flag to indicate to fetch the latest version, version flag will be ignored in this case |
| `--version` | string | version of the task to be fetched. |
### Options inherited from parent commands
| Option | Type | Description |
|--------|------|-------------|
| `--admin.audience` | string | Audience to use when initiating OAuth2 authorization requests. |
| `--admin.authType` | string | Type of OAuth2 flow used for communicating with admin.ClientSecret, Pkce, ExternalCommand are valid values (default "ClientSecret") |
| `--admin.authorizationHeader` | string | Custom metadata header to pass JWT |
| `--admin.authorizationServerUrl` | string | This is the URL to your IdP's authorization server. It'll default to Endpoint |
| `--admin.caCertFilePath` | string | Use specified certificate file to verify the admin server peer. |
| `--admin.clientId` | string | Client ID (default "flytepropeller") |
| `--admin.clientSecretEnvVar` | string | Environment variable containing the client secret |
| `--admin.clientSecretLocation` | string | File containing the client secret (default "/etc/secrets/client_secret") |
| `--admin.command` | strings | Command for external authentication token generation |
| `--admin.defaultOrg` | string | OPTIONAL: Default org to use to support non-org based cli's.'. |
| `--admin.defaultServiceConfig` | string | |
| `--admin.deviceFlowConfig.pollInterval` | string | amount of time the device flow would poll the token endpoint if auth server doesn't return a polling interval. Okta and google IDP do return an interval' (default "5s") |
| `--admin.deviceFlowConfig.refreshTime` | string | grace period from the token expiry after which it would refresh the token. (default "5m0s") |
| `--admin.deviceFlowConfig.timeout` | string | amount of time the device flow should complete or else it will be cancelled. (default "10m0s") |
| `--admin.endpoint` | string | For admin types, specify where the uri of the service is located. |
| `--admin.httpProxyURL` | string | OPTIONAL: HTTP Proxy to be used for OAuth requests. |
| `--admin.insecure` | | Use insecure connection. |
| `--admin.insecureSkipVerify` | | InsecureSkipVerify controls whether a client verifies the server's certificate chain and host name.Caution: shouldn't be use for production usecases' |
| `--admin.maxBackoffDelay` | string | Max delay for grpc backoff (default "8s") |
| `--admin.maxMessageSizeBytes` | int | The max size in bytes for incoming gRPC messages |
| `--admin.maxRetries` | int | Max number of gRPC retries (default 4) |
| `--admin.perRetryTimeout` | string | gRPC per retry timeout (default "15s") |
| `--admin.pkceConfig.refreshTime` | string | grace period from the token expiry after which it would refresh the token. (default "5m0s") |
| `--admin.pkceConfig.timeout` | string | Amount of time the browser session would be active for authentication from client app. (default "2m0s") |
| `--admin.proxyCommand` | strings | Command for external proxy-authorization token generation |
| `--admin.scopes` | strings | List of scopes to request |
| `--admin.tokenRefreshWindow` | string | Max duration between token refresh attempt and token expiry. (default "0s") |
| `--admin.tokenUrl` | string | OPTIONAL: Your IdP's token endpoint. It'll be discovered from flyte admin's OAuth Metadata endpoint if not provided. |
| `--admin.useAudienceFromAdmin` | | Use Audience configured from admins public endpoint config. |
| `--admin.useAuth` | | Deprecated: Auth will be enabled/disabled based on admin's dynamically discovered information. |
| `--auth.appAuth.externalAuthServer.allowedAudience` | strings | Optional: A list of allowed audiences. If not provided, the audience is expected to be the public Uri of the service. |
| `--auth.appAuth.externalAuthServer.baseUrl` | string | This should be the base url of the authorization server that you are trying to hit. With Okta for instance, it will look something like https://company.okta.com/oauth2/abcdef123456789/ |
| `--auth.appAuth.externalAuthServer.httpProxyURL` | string | OPTIONAL: HTTP Proxy to be used for OAuth requests. |
| `--auth.appAuth.externalAuthServer.metadataUrl` | string | Optional: If the server doesn't support /.well-known/oauth-authorization-server, you can set a custom metadata url here.' |
| `--auth.appAuth.externalAuthServer.retryAttempts` | int | Optional: The number of attempted retries on a transient failure to get the OAuth metadata (default 5) |
| `--auth.appAuth.externalAuthServer.retryDelay` | string | Optional, Duration to wait between retries (default "1s") |
| `--auth.appAuth.selfAuthServer.accessTokenLifespan` | string | Defines the lifespan of issued access tokens. (default "30m0s") |
| `--auth.appAuth.selfAuthServer.authorizationCodeLifespan` | string | Defines the lifespan of issued access tokens. (default "5m0s") |
| `--auth.appAuth.selfAuthServer.claimSymmetricEncryptionKeySecretName` | string | OPTIONAL: Secret name to use to encrypt claims in authcode token. (default "claim_symmetric_key") |
| `--auth.appAuth.selfAuthServer.issuer` | string | Defines the issuer to use when issuing and validating tokens. The default value is https://{requestUri.HostAndPort}/ |
| `--auth.appAuth.selfAuthServer.oldTokenSigningRSAKeySecretName` | string | OPTIONAL: Secret name to use to retrieve Old RSA Signing Key. This can be useful during key rotation to continue to accept older tokens. (default "token_rsa_key_old.pem") |
| `--auth.appAuth.selfAuthServer.refreshTokenLifespan` | string | Defines the lifespan of issued access tokens. (default "1h0m0s") |
| `--auth.appAuth.selfAuthServer.tokenSigningRSAKeySecretName` | string | OPTIONAL: Secret name to use to retrieve RSA Signing Key. (default "token_rsa_key.pem") |
| `--auth.appAuth.thirdPartyConfig.flyteClient.audience` | string | Audience to use when initiating OAuth2 authorization requests. |
| `--auth.appAuth.thirdPartyConfig.flyteClient.clientId` | string | public identifier for the app which handles authorization for a Flyte deployment (default "uctl") |
| `--auth.appAuth.thirdPartyConfig.flyteClient.redirectUri` | string | This is the callback uri registered with the app which handles authorization for a Flyte deployment (default "http://localhost:53593/callback") |
| `--auth.appAuth.thirdPartyConfig.flyteClient.scopes` | strings | Recommended scopes for the client to request. (default [all,offline]) |
| `--auth.disableForGrpc` | | Disables auth enforcement on Grpc Endpoints. |
| `--auth.disableForHttp` | | Disables auth enforcement on HTTP Endpoints. |
| `--auth.grpcAuthorizationHeader` | string | (default "flyte-authorization") |
| `--auth.httpAuthorizationHeader` | string | (default "flyte-authorization") |
| `--auth.httpProxyURL` | string | OPTIONAL: HTTP Proxy to be used for OAuth requests. |
| `--auth.tokenEndpointProxyPath` | string | The path used to proxy calls to the TokenURL |
| `--auth.userAuth.cookieBlockKeySecretName` | string | OPTIONAL: Secret name to use for cookie block key. (default "cookie_block_key") |
| `--auth.userAuth.cookieHashKeySecretName` | string | OPTIONAL: Secret name to use for cookie hash key. (default "cookie_hash_key") |
| `--auth.userAuth.cookieSetting.domain` | string | OPTIONAL: Allows you to set the domain attribute on the auth cookies. |
| `--auth.userAuth.cookieSetting.sameSitePolicy` | string | OPTIONAL: Allows you to declare if your cookie should be restricted to a first-party or same-site context.Wrapper around http.SameSite. (default "DefaultMode") |
| `--auth.userAuth.httpProxyURL` | string | OPTIONAL: HTTP Proxy to be used for OAuth requests. |
| `--auth.userAuth.idpQueryParameter` | string | idp query parameter used for selecting a particular IDP for doing user authentication. Eg: for Okta passing idp={IDP-ID} forces the authentication to happen with IDP-ID |
| `--auth.userAuth.openId.baseUrl` | string | |
| `--auth.userAuth.openId.clientId` | string | |
| `--auth.userAuth.openId.clientSecretFile` | string | |
| `--auth.userAuth.openId.clientSecretName` | string | (default "oidc_client_secret") |
| `--auth.userAuth.openId.scopes` | strings | (default [openid,profile]) |
| `--auth.userAuth.redirectUrl` | string | (default "/console") |
| `--authorizer.internalCommunicationConfig.enabled` | | Enables authorization decisions for internal communication. (default true) |
| `--authorizer.internalCommunicationConfig.ingressIdentity` | string | IngressIdentity used in the cluster. Needed to exclude the communication coming from ingress. (default "ingress-nginx.ingress-nginx.serviceaccount.identity.linkerd.cluster.local") |
| `--authorizer.internalCommunicationConfig.tenantUrlPatternIdentity` | string | UrlPatternIdentity of the internal tenant service endpoint identities. (default "{{ service }}.{{ org }}.serviceaccount.identity.linkerd.cluster.local") |
| `--authorizer.internalCommunicationConfig.urlPatternIdentity` | string | UrlPatternIdentity of the internal service endpoint identities. (default "{{ service }}-helmchart.{{ service }}.serviceaccount.identity.linkerd.cluster.local") |
| `--authorizer.mode` | string | (default "Active") |
| `--authorizer.organizationConfig.PolicyConfig.adminPolicyDescription` | string | description for the boilerplate admin policy (default "Contributor permissions and full admin permissions to manage users and view usage dashboards") |
| `--authorizer.organizationConfig.PolicyConfig.contributorPolicyDescription` | string | description for the boilerplate contributor policy (default "Viewer permissions and permissions to create workflows, tasks, launch plans, and executions") |
| `--authorizer.organizationConfig.PolicyConfig.defaultUserPolicyRoleType` | string | name of the role type to determine which default policy new users added to the organization should be assigned (default "Viewer") |
| `--authorizer.organizationConfig.PolicyConfig.serverlessContributorPolicyDescription` | string | description for the boilerplate serverless contributor policy (default "Viewer permissions and permissions to create workflows, tasks, launch plans, and executions") |
| `--authorizer.organizationConfig.PolicyConfig.serverlessViewerPolicyDescription` | string | description for the boilerplate serverless viewer policy (default "Permissions to view Flyte entities") |
| `--authorizer.organizationConfig.PolicyConfig.viewerPolicyDescription` | string | description for the boilerplate viewer policy (default "Permissions to view Flyte entities") |
| `--authorizer.organizationConfig.defaultPolicyCacheDuration` | string | Cache entry duration for the store of the default policy per organization (default "10m0s") |
| `--authorizer.syncRuleRefreshInterval` | string | (default "1m0s") |
| `--authorizer.type` | string | (default "UserClouds") |
| `--authorizer.userCloudsClient.cache.redis.ttl.edgeTypes` | string | Specifies how long edge types remain in the cache.. (default "30m0s") |
| `--authorizer.userCloudsClient.cache.redis.ttl.edges` | string | Specifies how long edges remain in the cache. (default "30m0s") |
| `--authorizer.userCloudsClient.cache.redis.ttl.objectTypes` | string | Specifies how long object types remain in the cache. (default "30m0s") |
| `--authorizer.userCloudsClient.cache.redis.ttl.objects` | string | Specifies how long objects remain in the cache. (default "30m0s") |
| `--authorizer.userCloudsClient.cache.type` | string | Cache type to use. (default "none") |
| `--authorizer.userCloudsClient.clientID` | string | UserClouds client id |
| `--authorizer.userCloudsClient.clientSecretName` | string | UserCloud client secret name to read from the secret manager. (default "userclouds-client-secret") |
| `--authorizer.userCloudsClient.enableLogging` | | Enable userclouds client's internal logging. Calls to post logs take 250-350 ms and will impact p99 latency, enable with caution. |
| `--authorizer.userCloudsClient.tenantID` | string | UserClouds tenant id. Should be a UUID. |
| `--authorizer.userCloudsClient.tenantUrl` | string | Something like https://{yourtenant}.tenant.userclouds.com |
| `--config` | string | config file (default is /Users/andrew/.union/config.yaml) |
| `--connection.environment` | string | |
| `--connection.region` | string | |
| `--connection.rootTenantURLPattern` | string | Pattern for tenant url. (default "dns:///{{ organization }}.cloud-staging.union.ai") |
| `--console.endpoint` | string | Endpoint of console, if different than flyte admin |
| `--database.connMaxLifeTime` | string | sets the maximum amount of time a connection may be reused (default "1h0m0s") |
| `--database.enableForeignKeyConstraintWhenMigrating` | | Whether to enable gorm foreign keys when migrating the db |
| `--database.maxIdleConnections` | int | maxIdleConnections sets the maximum number of connections in the idle connection pool. (default 10) |
| `--database.maxOpenConnections` | int | maxOpenConnections sets the maximum number of open connections to the database. (default 100) |
| `--database.postgres.dbname` | string | The database name (default "postgres") |
| `--database.postgres.debug` | | |
| `--database.postgres.host` | string | The host name of the database server (default "localhost") |
| `--database.postgres.options` | string | See http://gorm.io/docs/connecting_to_the_database.html for available options passed, in addition to the above. (default "sslmode=disable") |
| `--database.postgres.password` | string | The database password. (default "postgres") |
| `--database.postgres.passwordPath` | string | Points to the file containing the database password. |
| `--database.postgres.port` | int | The port name of the database server (default 30001) |
| `--database.postgres.readReplicaHost` | string | The host name of the read replica database server (default "localhost") |
| `--database.postgres.username` | string | The database user who is connecting to the server. (default "postgres") |
| `--database.sqlite.file` | string | The path to the file (existing or new) where the DB should be created / stored. If existing, then this will be re-used, else a new will be created |
| `--db.connectionPool.maxConnectionLifetime` | string | (default "0s") |
| `--db.connectionPool.maxIdleConnections` | int | |
| `--db.connectionPool.maxOpenConnections` | int | |
| `--db.dbname` | string | (default "postgres") |
| `--db.debug` | | |
| `--db.host` | string | (default "postgres") |
| `--db.log_level` | int | (default 4) |
| `--db.options` | string | (default "sslmode=disable") |
| `--db.password` | string | |
| `--db.passwordPath` | string | |
| `--db.port` | int | (default 5432) |
| `--db.username` | string | (default "postgres") |
| `-d`, `--domain` | string | Specifies the Flyte project's domain. |
| `--files.archive` | | Pass in archive file either an http link or local path. |
| `--files.assumableIamRole` | string | Custom assumable iam auth role to register launch plans with. |
| `--files.continueOnError` | | Continue on error when registering files. |
| `--files.destinationDirectory` | string | Location of source code in container. |
| `--files.dryRun` | | Execute command without making any modifications. |
| `--files.enableSchedule` | | Enable the schedule if the files contain schedulable launchplan. |
| `--files.force` | | Force use of version number on entities registered with flyte. |
| `--files.k8ServiceAccount` | string | Deprecated. Please use `--K8sServiceAccount`|
| `--files.k8sServiceAccount` | string | Custom kubernetes service account auth role to register launch plans with. |
| `--files.outputLocationPrefix` | string | Custom output location prefix for offloaded types (files/schemas). |
| `--files.sourceUploadPath` | string | Deprecated: Update flyte admin to avoid having to configure storage access from uctl. |
| `--files.version` | string | Version of the entity to be registered with flyte which are un-versioned after serialization. |
| `--logger.formatter.type` | string | Sets logging format type. (default "json") |
| `--logger.level` | int | Sets the minimum logging level. (default 3) |
| `--logger.mute` | | Mutes all logs regardless of severity. Intended for benchmarks/tests only. |
| `--logger.show-source` | | Includes source code location in logs. |
| `--org` | string | Organization to work on. If not set, default to user's org. |
| `--otel.file.filename` | string | Filename to store exported telemetry traces (default "/tmp/trace.txt") |
| `--otel.jaeger.endpoint` | string | Endpoint for the jaeger telemetry trace ingestor (default "http://localhost:14268/api/traces") |
| `--otel.otlpgrpc.endpoint` | string | Endpoint for the OTLP telemetry trace collector (default "http://localhost:4317") |
| `--otel.otlphttp.endpoint` | string | Endpoint for the OTLP telemetry trace collector (default "http://localhost:4318/v1/traces") |
| `--otel.sampler.parentSampler` | string | Sets the parent sampler to use for the tracer (default "always") |
| `--otel.type` | string | Sets the type of exporter to configure [noop/file/jaeger/otlpgrpc/otlphttp]. (default "noop") |
| `-o`, `--output` | string | Specifies the output type - supported formats [TABLE JSON YAML DOT DOTURL]. NOTE: dot, doturl are only supported for Workflow (default "table") |
| `--plugins.catalogcache.reader.maxItems` | int | Maximum number of entries to keep in the index. (default 10000) |
| `--plugins.catalogcache.reader.maxRetries` | int | Maximum number of retries per item. (default 3) |
| `--plugins.catalogcache.reader.workers` | int | Number of concurrent workers to start processing the queue. (default 10) |
| `--plugins.catalogcache.writer.maxItems` | int | Maximum number of entries to keep in the index. (default 10000) |
| `--plugins.catalogcache.writer.maxRetries` | int | Maximum number of retries per item. (default 3) |
| `--plugins.catalogcache.writer.workers` | int | Number of concurrent workers to start processing the queue. (default 10) |
| `-p`, `--project` | string | Specifies the Flyte project. |
| `--rediscache.passwordSecretName` | string | Name of secret with Redis password. |
| `--rediscache.primaryEndpoint` | string | Primary endpoint for the redis cache that can be used for both reads and writes. |
| `--rediscache.replicaEndpoint` | string | Replica endpoint for the redis cache that can be used for reads. |
| `--secrets.env-prefix` | string | Prefix for environment variables (default "FLYTE_SECRET_") |
| `--secrets.secrets-prefix` | string | Prefix where to look for secrets file (default "/etc/secrets") |
| `--secrets.type` | string | Sets the type of storage to configure [local]. (default "local") |
| `--server.dataProxy.download.maxExpiresIn` | string | Maximum allowed expiration duration. (default "1h0m0s") |
| `--server.dataProxy.upload.defaultFileNameLength` | int | Default length for the generated file name if not provided in the request. (default 20) |
| `--server.dataProxy.upload.maxExpiresIn` | string | Maximum allowed expiration duration. (default "1h0m0s") |
| `--server.dataProxy.upload.maxSize` | string | Maximum allowed upload size. (default "6Mi") |
| `--server.dataProxy.upload.storagePrefix` | string | Storage prefix to use for all upload requests. |
| `--server.grpc.enableGrpcLatencyMetrics` | | Enable grpc latency metrics. Note Histograms metrics can be expensive on Prometheus servers. |
| `--server.grpc.maxMessageSizeBytes` | int | The max size in bytes for incoming gRPC messages |
| `--server.grpc.port` | int | On which grpc port to serve admin (default 8089) |
| `--server.grpc.serverReflection` | | Enable GRPC Server Reflection (default true) |
| `--server.grpcPort` | int | deprecated |
| `--server.grpcServerReflection` | | deprecated |
| `--server.httpPort` | int | On which http port to serve admin (default 8088) |
| `--server.kube-config` | string | Path to kubernetes client config file, default is empty, useful for incluster config. |
| `--server.kubeClientConfig.burst` | int | Max burst rate for throttle. 0 defaults to 10 (default 25) |
| `--server.kubeClientConfig.qps` | int32 | Max QPS to the master for requests to KubeAPI. 0 defaults to 5. (default 100) |
| `--server.kubeClientConfig.timeout` | string | Max duration allowed for every request to KubeAPI before giving up. 0 implies no timeout. (default "30s") |
| `--server.master` | string | The address of the Kubernetes API server. |
| `--server.readHeaderTimeoutSeconds` | int | The amount of time allowed to read request headers. (default 32) |
| `--server.security.allowCors` | | (default true) |
| `--server.security.allowedHeaders` | strings | (default [Content-Type,flyte-authorization]) |
| `--server.security.allowedOrigins` | strings | (default [*]) |
| `--server.security.auditAccess` | | |
| `--server.security.secure` | | |
| `--server.security.ssl.certificateFile` | string | |
| `--server.security.ssl.keyFile` | string | |
| `--server.security.useAuth` | | |
| `--server.thirdPartyConfig.flyteClient.audience` | string | Audience to use when initiating OAuth2 authorization requests. |
| `--server.thirdPartyConfig.flyteClient.clientId` | string | public identifier for the app which handles authorization for a Flyte deployment |
| `--server.thirdPartyConfig.flyteClient.redirectUri` | string | This is the callback uri registered with the app which handles authorization for a Flyte deployment |
| `--server.thirdPartyConfig.flyteClient.scopes` | strings | Recommended scopes for the client to request. |
| `--server.watchService.maxActiveClusterConnections` | int | (default 5) |
| `--server.watchService.maxPageSize` | int | (default 50000) |
| `--server.watchService.nonTerminalStatusUpdatesInterval` | string | (default "1m0s") |
| `--server.watchService.pollInterval` | string | (default "1s") |
| `--sharedservice.connectPort` | string | On which connect port to serve admin (default "8080") |
| `--sharedservice.grpc.grpcMaxResponseStatusBytes` | int32 | specifies the maximum (uncompressed) size of header list that the client is prepared to accept on grpc calls (default 32000) |
| `--sharedservice.grpc.maxConcurrentStreams` | int | Limit on the number of concurrent streams to each ServerTransport. (default 100) |
| `--sharedservice.grpc.maxMessageSizeBytes` | int | Limit on the size of message that can be received on the server. (default 10485760) |
| `--sharedservice.grpcServerReflection` | | Enable GRPC Server Reflection (default true) |
| `--sharedservice.httpPort` | string | On which http port to serve admin (default "8089") |
| `--sharedservice.kubeConfig` | string | Path to kubernetes client config file. |
| `--sharedservice.master` | string | The address of the Kubernetes API server. |
| `--sharedservice.metrics.enableClientGrpcHistograms` | | Enable client grpc histograms (default true) |
| `--sharedservice.metrics.enableGrpcHistograms` | | Enable grpc histograms (default true) |
| `--sharedservice.metrics.scope` | string | Scope to emit metrics under (default "service:") |
| `--sharedservice.port` | string | On which grpc port to serve admin (default "8080") |
| `--sharedservice.profiler.enabled` | | Enable Profiler on server |
| `--sharedservice.profilerPort` | string | Profile port to start listen for pprof and metric handlers on. (default "10254") |
| `--sharedservice.security.allowCors` | | |
| `--sharedservice.security.allowLocalhostAccess` | | Whether to permit localhost unauthenticated access to the server |
| `--sharedservice.security.allowedHeaders` | strings | |
| `--sharedservice.security.allowedOrigins` | strings | |
| `--sharedservice.security.auditAccess` | | |
| `--sharedservice.security.orgOverride` | string | Override org in identity context if localhost access enabled |
| `--sharedservice.security.secure` | | |
| `--sharedservice.security.ssl.certificateAuthorityFile` | string | |
| `--sharedservice.security.ssl.certificateFile` | string | |
| `--sharedservice.security.ssl.keyFile` | string | |
| `--sharedservice.security.useAuth` | | |
| `--sharedservice.sync.syncInterval` | string | Time interval to sync (default "5m0s") |
| `--storage.cache.max_size_mbs` | int | Maximum size of the cache where the Blob store data is cached in-memory. If not specified or set to 0, cache is not used |
| `--storage.cache.target_gc_percent` | int | Sets the garbage collection target percentage. |
| `--storage.connection.access-key` | string | Access key to use. Only required when authtype is set to accesskey. |
| `--storage.connection.auth-type` | string | Auth Type to use [iam, accesskey]. (default "iam") |
| `--storage.connection.disable-ssl` | | Disables SSL connection. Should only be used for development. |
| `--storage.connection.endpoint` | string | URL for storage client to connect to. |
| `--storage.connection.region` | string | Region to connect to. (default "us-east-1") |
| `--storage.connection.secret-key` | string | Secret to use when accesskey is set. |
| `--storage.container` | string | Initial container (in s3 a bucket) to create -if it doesn't exist-.' |
| `--storage.defaultHttpClient.timeout` | string | Sets time out on the http client. (default "0s") |
| `--storage.enable-multicontainer` | | If this is true, then the container argument is overlooked and redundant. This config will automatically open new connections to new containers/buckets as they are encountered |
| `--storage.limits.maxDownloadMBs` | int | Maximum allowed download size (in MBs) per call. (default 2) |
| `--storage.stow.config` | stringToString | Configuration for stow backend. Refer to github/flyteorg/stow (default []) |
| `--storage.stow.kind` | string | Kind of Stow backend to use. Refer to github/flyteorg/stow |
| `--storage.type` | string | Sets the type of storage to configure [s3/minio/local/mem/stow]. (default "s3") |
| `--union.auth.authorizationMetadataKey` | string | Authorization Header to use when passing Access Tokens to the server (default "flyte-authorization") |
| `--union.auth.clientId` | string | Client ID |
| `--union.auth.clientSecretEnvVar` | string | Environment variable containing the client secret |
| `--union.auth.clientSecretLocation` | string | File containing the client secret |
| `--union.auth.deviceFlow.pollInterval` | string | amount of time the device flow would poll the token endpoint if auth server doesn't return a polling interval. Okta and google IDP do return an interval' (default "5s") |
| `--union.auth.deviceFlow.refreshTime` | string | grace period from the token expiry after which it would refresh the token. (default "5m0s") |
| `--union.auth.deviceFlow.timeout` | string | amount of time the device flow should complete or else it will be cancelled. (default "10m0s") |
| `--union.auth.enable` | | Whether to enable an authenticated conenction when communicating with admin. (default true) |
| `--union.auth.externalAuth.command` | strings | Command for external authentication token generation |
| `--union.auth.pkce.refreshTime` | string | grace period from the token expiry after which it would refresh the token. (default "5m0s") |
| `--union.auth.pkce.timeout` | string | Amount of time the browser session would be active for authentication from client app. (default "15s") |
| `--union.auth.scopes` | strings | List of scopes to request |
| `--union.auth.tokenRefreshWindow` | string | Max duration between token refresh attempt and token expiry. (default "1h0m0s") |
| `--union.auth.tokenUrl` | string | OPTIONAL: Your IdP's token endpoint. It'll be discovered from flyte admin's OAuth Metadata endpoint if not provided. |
| `--union.auth.type` | string | Type of OAuth2 flow used for communicating with admin. (default "Pkce") |
| `--union.cache.maxItemsCount` | int | Maximum number of items to keep in the cache before evicting. (default 1000) |
| `--union.connection.host` | string | Host to connect to (default "dns:///utt-mgdp-stg-us-east-2.cloud-staging.union.ai") |
| `--union.connection.insecure` | | Whether to connect over insecure channel |
| `--union.connection.insecureSkipVerify` | | InsecureSkipVerify controls whether a client verifies the server's certificate chain and host name.Caution: shouldn't be use for production usecases' |
| `--union.connection.keepAliveConfig.permitWithoutStream` | | If true, client sends keepalive pings even with no active RPCs. |
| `--union.connection.keepAliveConfig.time` | string | After a duration of this time if the client doesn't see any activity it pings the server to see if the transport is still alive. (default "20s") |
| `--union.connection.keepAliveConfig.timeout` | string | After having pinged for keepalive check, the client waits for a duration of Timeout and if no activity is seen even after that the connection is closed. (default "2m0s") |
| `--union.connection.maxBackoffDelay` | string | Max delay for grpc backoff (default "8s") |
| `--union.connection.maxRecvMsgSize` | int | Maximum size of a message in bytes of a gRPC message (default 10485760) |
| `--union.connection.maxRetries` | int | Max number of gRPC retries (default 4) |
| `--union.connection.minConnectTimeout` | string | Minimum timeout for establishing a connection (default "20s") |
| `--union.connection.perRetryTimeout` | string | gRPC per retry timeout (default "15s") |
| `--union.connection.serviceConfig` | string | Defines gRPC experimental JSON Service Config (default "{"loadBalancingConfig": [{"round_robin":{}}]}") |
| `--union.connection.trustedIdentityClaims.enabled` | | Enables passing of trusted claims while making inter service calls |
| `--union.connection.trustedIdentityClaims.externalIdentityClaim` | string | External identity claim of the service which is authorized to make internal service call. These are verified against userclouds actions |
| `--union.connection.trustedIdentityClaims.externalIdentityTypeClaim` | string | External identity type claim of app or user to use for the current service identity. It should be an 'app' for inter service communication |
| `--union.internalConnectionConfig.-` | stringToString | (default []) |
| `--union.internalConnectionConfig.enabled` | | Enables internal service to service communication instead of going through ingress. |
| `--union.internalConnectionConfig.urlPattern` | string | UrlPattern of the internal service endpoints. (default "{{ service }}-helmchart.{{ service }}.svc.cluster.local:80") |
| `--webhook.awsSecretManager.sidecarImage` | string | Specifies the sidecar docker image to use (default "docker.io/amazon/aws-secrets-manager-secret-sidecar:v0.1.4") |
| `--webhook.certDir` | string | Certificate directory to use to write generated certs. Defaults to /etc/webhook/certs/ (default "/etc/webhook/certs") |
| `--webhook.embeddedSecretManagerConfig.awsConfig.region` | string | AWS region |
| `--webhook.embeddedSecretManagerConfig.fileMountInitContainer.image` | string | Specifies init container image to use for mounting secrets as files. (default "busybox:1.28") |
| `--webhook.embeddedSecretManagerConfig.gcpConfig.project` | string | GCP project to be used for secret manager |
| `--webhook.embeddedSecretManagerConfig.type` | string | (default "AWS") |
| `--webhook.gcpSecretManager.sidecarImage` | string | Specifies the sidecar docker image to use (default "gcr.io/google.com/cloudsdktool/cloud-sdk:alpine") |
| `--webhook.listenPort` | int | The port to use to listen to webhook calls. Defaults to 9443 (default 9443) |
| `--webhook.localCert` | | write certs locally. Defaults to false |
| `--webhook.metrics-prefix` | string | An optional prefix for all published metrics. (default "flyte:") |
| `--webhook.secretName` | string | Secret name to write generated certs to. (default "flyte-pod-webhook") |
| `--webhook.serviceName` | string | The name of the webhook service. (default "flyte-pod-webhook") |
| `--webhook.servicePort` | int32 | The port on the service that hosting webhook. (default 443) |
| `--webhook.vaultSecretManager.role` | string | Specifies the vault role to use (default "flyte") |
=== PAGE: https://www.union.ai/docs/v1/serverless/api-reference/uctl-cli/uctl-get/uctl-get-task-resource-attribute ===
# uctl get task-resource-attribute
Gets matchable resources of task attributes.
## Synopsis
Retrieve task resource attributes for the given project and domain. For
project flytesnacks and development domain:
```shell
$ uctl get task-resource-attribute -p flytesnacks -d development
```
Example: output from the command:
``` json
{"project":"flytesnacks","domain":"development","workflow":"","defaults":{"cpu":"1","memory":"150Mi"},"limits":{"cpu":"2","memory":"450Mi"}}
```
Retrieve task resource attributes for the given project, domain, and
workflow. For project flytesnacks, development domain, and workflow
`core.control_flow.merge_sort.merge_sort`:
```shell
$ uctl get task-resource-attribute -p flytesnacks -d development core.control_flow.merge_sort.merge_sort
```
Example: output from the command:
``` json
{"project":"flytesnacks","domain":"development","workflow":"core.control_flow.merge_sort.merge_sort","defaults":{"cpu":"1","memory":"150Mi"},"limits":{"cpu":"2","memory":"450Mi"}}
```
Write the task resource attributes to a file. If there are no task
resource attributes, a file would be populated with the basic data. The
config file is written to tra.yaml file. Example: content of tra.yaml:
```shell
$ uctl get -p flytesnacks -d development task-resource-attribute --attrFile tra.yaml
```
``` yaml
domain: development
project: flytesnacks
defaults:
cpu: "1"
memory: "150Mi"
limits:
cpu: "2"
memory: "450Mi"
```
Usage:
```shell
$ uctl get task-resource-attribute [flags]
```
## Options
| Option | Type | Description |
|--------|------|-------------|
| `--attrFile` | string | attribute file name to be used for generating attribute for the resource type. |
| `-h`, `--help` | help for task-resource-attribute |
### Options inherited from parent commands
| Option | Type | Description |
|--------|------|-------------|
| `--admin.audience` | string | Audience to use when initiating OAuth2 authorization requests. |
| `--admin.authType` | string | Type of OAuth2 flow used for communicating with admin.ClientSecret, Pkce, ExternalCommand are valid values (default "ClientSecret") |
| `--admin.authorizationHeader` | string | Custom metadata header to pass JWT |
| `--admin.authorizationServerUrl` | string | This is the URL to your IdP's authorization server. It'll default to Endpoint |
| `--admin.caCertFilePath` | string | Use specified certificate file to verify the admin server peer. |
| `--admin.clientId` | string | Client ID (default "flytepropeller") |
| `--admin.clientSecretEnvVar` | string | Environment variable containing the client secret |
| `--admin.clientSecretLocation` | string | File containing the client secret (default "/etc/secrets/client_secret") |
| `--admin.command` | strings | Command for external authentication token generation |
| `--admin.defaultOrg` | string | OPTIONAL: Default org to use to support non-org based cli's.'. |
| `--admin.defaultServiceConfig` | string | |
| `--admin.deviceFlowConfig.pollInterval` | string | amount of time the device flow would poll the token endpoint if auth server doesn't return a polling interval. Okta and google IDP do return an interval' (default "5s") |
| `--admin.deviceFlowConfig.refreshTime` | string | grace period from the token expiry after which it would refresh the token. (default "5m0s") |
| `--admin.deviceFlowConfig.timeout` | string | amount of time the device flow should complete or else it will be cancelled. (default "10m0s") |
| `--admin.endpoint` | string | For admin types, specify where the uri of the service is located. |
| `--admin.httpProxyURL` | string | OPTIONAL: HTTP Proxy to be used for OAuth requests. |
| `--admin.insecure` | | Use insecure connection. |
| `--admin.insecureSkipVerify` | | InsecureSkipVerify controls whether a client verifies the server's certificate chain and host name.Caution: shouldn't be use for production usecases' |
| `--admin.maxBackoffDelay` | string | Max delay for grpc backoff (default "8s") |
| `--admin.maxMessageSizeBytes` | int | The max size in bytes for incoming gRPC messages |
| `--admin.maxRetries` | int | Max number of gRPC retries (default 4) |
| `--admin.perRetryTimeout` | string | gRPC per retry timeout (default "15s") |
| `--admin.pkceConfig.refreshTime` | string | grace period from the token expiry after which it would refresh the token. (default "5m0s") |
| `--admin.pkceConfig.timeout` | string | Amount of time the browser session would be active for authentication from client app. (default "2m0s") |
| `--admin.proxyCommand` | strings | Command for external proxy-authorization token generation |
| `--admin.scopes` | strings | List of scopes to request |
| `--admin.tokenRefreshWindow` | string | Max duration between token refresh attempt and token expiry. (default "0s") |
| `--admin.tokenUrl` | string | OPTIONAL: Your IdP's token endpoint. It'll be discovered from flyte admin's OAuth Metadata endpoint if not provided. |
| `--admin.useAudienceFromAdmin` | | Use Audience configured from admins public endpoint config. |
| `--admin.useAuth` | | Deprecated: Auth will be enabled/disabled based on admin's dynamically discovered information. |
| `--auth.appAuth.externalAuthServer.allowedAudience` | strings | Optional: A list of allowed audiences. If not provided, the audience is expected to be the public Uri of the service. |
| `--auth.appAuth.externalAuthServer.baseUrl` | string | This should be the base url of the authorization server that you are trying to hit. With Okta for instance, it will look something like https://company.okta.com/oauth2/abcdef123456789/ |
| `--auth.appAuth.externalAuthServer.httpProxyURL` | string | OPTIONAL: HTTP Proxy to be used for OAuth requests. |
| `--auth.appAuth.externalAuthServer.metadataUrl` | string | Optional: If the server doesn't support /.well-known/oauth-authorization-server, you can set a custom metadata url here.' |
| `--auth.appAuth.externalAuthServer.retryAttempts` | int | Optional: The number of attempted retries on a transient failure to get the OAuth metadata (default 5) |
| `--auth.appAuth.externalAuthServer.retryDelay` | string | Optional, Duration to wait between retries (default "1s") |
| `--auth.appAuth.selfAuthServer.accessTokenLifespan` | string | Defines the lifespan of issued access tokens. (default "30m0s") |
| `--auth.appAuth.selfAuthServer.authorizationCodeLifespan` | string | Defines the lifespan of issued access tokens. (default "5m0s") |
| `--auth.appAuth.selfAuthServer.claimSymmetricEncryptionKeySecretName` | string | OPTIONAL: Secret name to use to encrypt claims in authcode token. (default "claim_symmetric_key") |
| `--auth.appAuth.selfAuthServer.issuer` | string | Defines the issuer to use when issuing and validating tokens. The default value is https://{requestUri.HostAndPort}/ |
| `--auth.appAuth.selfAuthServer.oldTokenSigningRSAKeySecretName` | string | OPTIONAL: Secret name to use to retrieve Old RSA Signing Key. This can be useful during key rotation to continue to accept older tokens. (default "token_rsa_key_old.pem") |
| `--auth.appAuth.selfAuthServer.refreshTokenLifespan` | string | Defines the lifespan of issued access tokens. (default "1h0m0s") |
| `--auth.appAuth.selfAuthServer.tokenSigningRSAKeySecretName` | string | OPTIONAL: Secret name to use to retrieve RSA Signing Key. (default "token_rsa_key.pem") |
| `--auth.appAuth.thirdPartyConfig.flyteClient.audience` | string | Audience to use when initiating OAuth2 authorization requests. |
| `--auth.appAuth.thirdPartyConfig.flyteClient.clientId` | string | public identifier for the app which handles authorization for a Flyte deployment (default "uctl") |
| `--auth.appAuth.thirdPartyConfig.flyteClient.redirectUri` | string | This is the callback uri registered with the app which handles authorization for a Flyte deployment (default "http://localhost:53593/callback") |
| `--auth.appAuth.thirdPartyConfig.flyteClient.scopes` | strings | Recommended scopes for the client to request. (default [all,offline]) |
| `--auth.disableForGrpc` | | Disables auth enforcement on Grpc Endpoints. |
| `--auth.disableForHttp` | | Disables auth enforcement on HTTP Endpoints. |
| `--auth.grpcAuthorizationHeader` | string | (default "flyte-authorization") |
| `--auth.httpAuthorizationHeader` | string | (default "flyte-authorization") |
| `--auth.httpProxyURL` | string | OPTIONAL: HTTP Proxy to be used for OAuth requests. |
| `--auth.tokenEndpointProxyPath` | string | The path used to proxy calls to the TokenURL |
| `--auth.userAuth.cookieBlockKeySecretName` | string | OPTIONAL: Secret name to use for cookie block key. (default "cookie_block_key") |
| `--auth.userAuth.cookieHashKeySecretName` | string | OPTIONAL: Secret name to use for cookie hash key. (default "cookie_hash_key") |
| `--auth.userAuth.cookieSetting.domain` | string | OPTIONAL: Allows you to set the domain attribute on the auth cookies. |
| `--auth.userAuth.cookieSetting.sameSitePolicy` | string | OPTIONAL: Allows you to declare if your cookie should be restricted to a first-party or same-site context.Wrapper around http.SameSite. (default "DefaultMode") |
| `--auth.userAuth.httpProxyURL` | string | OPTIONAL: HTTP Proxy to be used for OAuth requests. |
| `--auth.userAuth.idpQueryParameter` | string | idp query parameter used for selecting a particular IDP for doing user authentication. Eg: for Okta passing idp={IDP-ID} forces the authentication to happen with IDP-ID |
| `--auth.userAuth.openId.baseUrl` | string | |
| `--auth.userAuth.openId.clientId` | string | |
| `--auth.userAuth.openId.clientSecretFile` | string | |
| `--auth.userAuth.openId.clientSecretName` | string | (default "oidc_client_secret") |
| `--auth.userAuth.openId.scopes` | strings | (default [openid,profile]) |
| `--auth.userAuth.redirectUrl` | string | (default "/console") |
| `--authorizer.internalCommunicationConfig.enabled` | | Enables authorization decisions for internal communication. (default true) |
| `--authorizer.internalCommunicationConfig.ingressIdentity` | string | IngressIdentity used in the cluster. Needed to exclude the communication coming from ingress. (default "ingress-nginx.ingress-nginx.serviceaccount.identity.linkerd.cluster.local") |
| `--authorizer.internalCommunicationConfig.tenantUrlPatternIdentity` | string | UrlPatternIdentity of the internal tenant service endpoint identities. (default "{{ service }}.{{ org }}.serviceaccount.identity.linkerd.cluster.local") |
| `--authorizer.internalCommunicationConfig.urlPatternIdentity` | string | UrlPatternIdentity of the internal service endpoint identities. (default "{{ service }}-helmchart.{{ service }}.serviceaccount.identity.linkerd.cluster.local") |
| `--authorizer.mode` | string | (default "Active") |
| `--authorizer.organizationConfig.PolicyConfig.adminPolicyDescription` | string | description for the boilerplate admin policy (default "Contributor permissions and full admin permissions to manage users and view usage dashboards") |
| `--authorizer.organizationConfig.PolicyConfig.contributorPolicyDescription` | string | description for the boilerplate contributor policy (default "Viewer permissions and permissions to create workflows, tasks, launch plans, and executions") |
| `--authorizer.organizationConfig.PolicyConfig.defaultUserPolicyRoleType` | string | name of the role type to determine which default policy new users added to the organization should be assigned (default "Viewer") |
| `--authorizer.organizationConfig.PolicyConfig.serverlessContributorPolicyDescription` | string | description for the boilerplate serverless contributor policy (default "Viewer permissions and permissions to create workflows, tasks, launch plans, and executions") |
| `--authorizer.organizationConfig.PolicyConfig.serverlessViewerPolicyDescription` | string | description for the boilerplate serverless viewer policy (default "Permissions to view Flyte entities") |
| `--authorizer.organizationConfig.PolicyConfig.viewerPolicyDescription` | string | description for the boilerplate viewer policy (default "Permissions to view Flyte entities") |
| `--authorizer.organizationConfig.defaultPolicyCacheDuration` | string | Cache entry duration for the store of the default policy per organization (default "10m0s") |
| `--authorizer.syncRuleRefreshInterval` | string | (default "1m0s") |
| `--authorizer.type` | string | (default "UserClouds") |
| `--authorizer.userCloudsClient.cache.redis.ttl.edgeTypes` | string | Specifies how long edge types remain in the cache.. (default "30m0s") |
| `--authorizer.userCloudsClient.cache.redis.ttl.edges` | string | Specifies how long edges remain in the cache. (default "30m0s") |
| `--authorizer.userCloudsClient.cache.redis.ttl.objectTypes` | string | Specifies how long object types remain in the cache. (default "30m0s") |
| `--authorizer.userCloudsClient.cache.redis.ttl.objects` | string | Specifies how long objects remain in the cache. (default "30m0s") |
| `--authorizer.userCloudsClient.cache.type` | string | Cache type to use. (default "none") |
| `--authorizer.userCloudsClient.clientID` | string | UserClouds client id |
| `--authorizer.userCloudsClient.clientSecretName` | string | UserCloud client secret name to read from the secret manager. (default "userclouds-client-secret") |
| `--authorizer.userCloudsClient.enableLogging` | | Enable userclouds client's internal logging. Calls to post logs take 250-350 ms and will impact p99 latency, enable with caution. |
| `--authorizer.userCloudsClient.tenantID` | string | UserClouds tenant id. Should be a UUID. |
| `--authorizer.userCloudsClient.tenantUrl` | string | Something like https://{yourtenant}.tenant.userclouds.com |
| `--config` | string | config file (default is /Users/andrew/.union/config.yaml) |
| `--connection.environment` | string | |
| `--connection.region` | string | |
| `--connection.rootTenantURLPattern` | string | Pattern for tenant url. (default "dns:///{{ organization }}.cloud-staging.union.ai") |
| `--console.endpoint` | string | Endpoint of console, if different than flyte admin |
| `--database.connMaxLifeTime` | string | sets the maximum amount of time a connection may be reused (default "1h0m0s") |
| `--database.enableForeignKeyConstraintWhenMigrating` | | Whether to enable gorm foreign keys when migrating the db |
| `--database.maxIdleConnections` | int | maxIdleConnections sets the maximum number of connections in the idle connection pool. (default 10) |
| `--database.maxOpenConnections` | int | maxOpenConnections sets the maximum number of open connections to the database. (default 100) |
| `--database.postgres.dbname` | string | The database name (default "postgres") |
| `--database.postgres.debug` | | |
| `--database.postgres.host` | string | The host name of the database server (default "localhost") |
| `--database.postgres.options` | string | See http://gorm.io/docs/connecting_to_the_database.html for available options passed, in addition to the above. (default "sslmode=disable") |
| `--database.postgres.password` | string | The database password. (default "postgres") |
| `--database.postgres.passwordPath` | string | Points to the file containing the database password. |
| `--database.postgres.port` | int | The port name of the database server (default 30001) |
| `--database.postgres.readReplicaHost` | string | The host name of the read replica database server (default "localhost") |
| `--database.postgres.username` | string | The database user who is connecting to the server. (default "postgres") |
| `--database.sqlite.file` | string | The path to the file (existing or new) where the DB should be created / stored. If existing, then this will be re-used, else a new will be created |
| `--db.connectionPool.maxConnectionLifetime` | string | (default "0s") |
| `--db.connectionPool.maxIdleConnections` | int | |
| `--db.connectionPool.maxOpenConnections` | int | |
| `--db.dbname` | string | (default "postgres") |
| `--db.debug` | | |
| `--db.host` | string | (default "postgres") |
| `--db.log_level` | int | (default 4) |
| `--db.options` | string | (default "sslmode=disable") |
| `--db.password` | string | |
| `--db.passwordPath` | string | |
| `--db.port` | int | (default 5432) |
| `--db.username` | string | (default "postgres") |
| `-d`, `--domain` | string | Specifies the Flyte project's domain. |
| `--files.archive` | | Pass in archive file either an http link or local path. |
| `--files.assumableIamRole` | string | Custom assumable iam auth role to register launch plans with. |
| `--files.continueOnError` | | Continue on error when registering files. |
| `--files.destinationDirectory` | string | Location of source code in container. |
| `--files.dryRun` | | Execute command without making any modifications. |
| `--files.enableSchedule` | | Enable the schedule if the files contain schedulable launchplan. |
| `--files.force` | | Force use of version number on entities registered with flyte. |
| `--files.k8ServiceAccount` | string | Deprecated. Please use `--K8sServiceAccount`|
| `--files.k8sServiceAccount` | string | Custom kubernetes service account auth role to register launch plans with. |
| `--files.outputLocationPrefix` | string | Custom output location prefix for offloaded types (files/schemas). |
| `--files.sourceUploadPath` | string | Deprecated: Update flyte admin to avoid having to configure storage access from uctl. |
| `--files.version` | string | Version of the entity to be registered with flyte which are un-versioned after serialization. |
| `--logger.formatter.type` | string | Sets logging format type. (default "json") |
| `--logger.level` | int | Sets the minimum logging level. (default 3) |
| `--logger.mute` | | Mutes all logs regardless of severity. Intended for benchmarks/tests only. |
| `--logger.show-source` | | Includes source code location in logs. |
| `--org` | string | Organization to work on. If not set, default to user's org. |
| `--otel.file.filename` | string | Filename to store exported telemetry traces (default "/tmp/trace.txt") |
| `--otel.jaeger.endpoint` | string | Endpoint for the jaeger telemetry trace ingestor (default "http://localhost:14268/api/traces") |
| `--otel.otlpgrpc.endpoint` | string | Endpoint for the OTLP telemetry trace collector (default "http://localhost:4317") |
| `--otel.otlphttp.endpoint` | string | Endpoint for the OTLP telemetry trace collector (default "http://localhost:4318/v1/traces") |
| `--otel.sampler.parentSampler` | string | Sets the parent sampler to use for the tracer (default "always") |
| `--otel.type` | string | Sets the type of exporter to configure [noop/file/jaeger/otlpgrpc/otlphttp]. (default "noop") |
| `-o`, `--output` | string | Specifies the output type - supported formats [TABLE JSON YAML DOT DOTURL]. NOTE: dot, doturl are only supported for Workflow (default "table") |
| `--plugins.catalogcache.reader.maxItems` | int | Maximum number of entries to keep in the index. (default 10000) |
| `--plugins.catalogcache.reader.maxRetries` | int | Maximum number of retries per item. (default 3) |
| `--plugins.catalogcache.reader.workers` | int | Number of concurrent workers to start processing the queue. (default 10) |
| `--plugins.catalogcache.writer.maxItems` | int | Maximum number of entries to keep in the index. (default 10000) |
| `--plugins.catalogcache.writer.maxRetries` | int | Maximum number of retries per item. (default 3) |
| `--plugins.catalogcache.writer.workers` | int | Number of concurrent workers to start processing the queue. (default 10) |
| `-p`, `--project` | string | Specifies the Flyte project. |
| `--rediscache.passwordSecretName` | string | Name of secret with Redis password. |
| `--rediscache.primaryEndpoint` | string | Primary endpoint for the redis cache that can be used for both reads and writes. |
| `--rediscache.replicaEndpoint` | string | Replica endpoint for the redis cache that can be used for reads. |
| `--secrets.env-prefix` | string | Prefix for environment variables (default "FLYTE_SECRET_") |
| `--secrets.secrets-prefix` | string | Prefix where to look for secrets file (default "/etc/secrets") |
| `--secrets.type` | string | Sets the type of storage to configure [local]. (default "local") |
| `--server.dataProxy.download.maxExpiresIn` | string | Maximum allowed expiration duration. (default "1h0m0s") |
| `--server.dataProxy.upload.defaultFileNameLength` | int | Default length for the generated file name if not provided in the request. (default 20) |
| `--server.dataProxy.upload.maxExpiresIn` | string | Maximum allowed expiration duration. (default "1h0m0s") |
| `--server.dataProxy.upload.maxSize` | string | Maximum allowed upload size. (default "6Mi") |
| `--server.dataProxy.upload.storagePrefix` | string | Storage prefix to use for all upload requests. |
| `--server.grpc.enableGrpcLatencyMetrics` | | Enable grpc latency metrics. Note Histograms metrics can be expensive on Prometheus servers. |
| `--server.grpc.maxMessageSizeBytes` | int | The max size in bytes for incoming gRPC messages |
| `--server.grpc.port` | int | On which grpc port to serve admin (default 8089) |
| `--server.grpc.serverReflection` | | Enable GRPC Server Reflection (default true) |
| `--server.grpcPort` | int | deprecated |
| `--server.grpcServerReflection` | | deprecated |
| `--server.httpPort` | int | On which http port to serve admin (default 8088) |
| `--server.kube-config` | string | Path to kubernetes client config file, default is empty, useful for incluster config. |
| `--server.kubeClientConfig.burst` | int | Max burst rate for throttle. 0 defaults to 10 (default 25) |
| `--server.kubeClientConfig.qps` | int32 | Max QPS to the master for requests to KubeAPI. 0 defaults to 5. (default 100) |
| `--server.kubeClientConfig.timeout` | string | Max duration allowed for every request to KubeAPI before giving up. 0 implies no timeout. (default "30s") |
| `--server.master` | string | The address of the Kubernetes API server. |
| `--server.readHeaderTimeoutSeconds` | int | The amount of time allowed to read request headers. (default 32) |
| `--server.security.allowCors` | | (default true) |
| `--server.security.allowedHeaders` | strings | (default [Content-Type,flyte-authorization]) |
| `--server.security.allowedOrigins` | strings | (default [*]) |
| `--server.security.auditAccess` | | |
| `--server.security.secure` | | |
| `--server.security.ssl.certificateFile` | string | |
| `--server.security.ssl.keyFile` | string | |
| `--server.security.useAuth` | | |
| `--server.thirdPartyConfig.flyteClient.audience` | string | Audience to use when initiating OAuth2 authorization requests. |
| `--server.thirdPartyConfig.flyteClient.clientId` | string | public identifier for the app which handles authorization for a Flyte deployment |
| `--server.thirdPartyConfig.flyteClient.redirectUri` | string | This is the callback uri registered with the app which handles authorization for a Flyte deployment |
| `--server.thirdPartyConfig.flyteClient.scopes` | strings | Recommended scopes for the client to request. |
| `--server.watchService.maxActiveClusterConnections` | int | (default 5) |
| `--server.watchService.maxPageSize` | int | (default 50000) |
| `--server.watchService.nonTerminalStatusUpdatesInterval` | string | (default "1m0s") |
| `--server.watchService.pollInterval` | string | (default "1s") |
| `--sharedservice.connectPort` | string | On which connect port to serve admin (default "8080") |
| `--sharedservice.grpc.grpcMaxResponseStatusBytes` | int32 | specifies the maximum (uncompressed) size of header list that the client is prepared to accept on grpc calls (default 32000) |
| `--sharedservice.grpc.maxConcurrentStreams` | int | Limit on the number of concurrent streams to each ServerTransport. (default 100) |
| `--sharedservice.grpc.maxMessageSizeBytes` | int | Limit on the size of message that can be received on the server. (default 10485760) |
| `--sharedservice.grpcServerReflection` | | Enable GRPC Server Reflection (default true) |
| `--sharedservice.httpPort` | string | On which http port to serve admin (default "8089") |
| `--sharedservice.kubeConfig` | string | Path to kubernetes client config file. |
| `--sharedservice.master` | string | The address of the Kubernetes API server. |
| `--sharedservice.metrics.enableClientGrpcHistograms` | | Enable client grpc histograms (default true) |
| `--sharedservice.metrics.enableGrpcHistograms` | | Enable grpc histograms (default true) |
| `--sharedservice.metrics.scope` | string | Scope to emit metrics under (default "service:") |
| `--sharedservice.port` | string | On which grpc port to serve admin (default "8080") |
| `--sharedservice.profiler.enabled` | | Enable Profiler on server |
| `--sharedservice.profilerPort` | string | Profile port to start listen for pprof and metric handlers on. (default "10254") |
| `--sharedservice.security.allowCors` | | |
| `--sharedservice.security.allowLocalhostAccess` | | Whether to permit localhost unauthenticated access to the server |
| `--sharedservice.security.allowedHeaders` | strings | |
| `--sharedservice.security.allowedOrigins` | strings | |
| `--sharedservice.security.auditAccess` | | |
| `--sharedservice.security.orgOverride` | string | Override org in identity context if localhost access enabled |
| `--sharedservice.security.secure` | | |
| `--sharedservice.security.ssl.certificateAuthorityFile` | string | |
| `--sharedservice.security.ssl.certificateFile` | string | |
| `--sharedservice.security.ssl.keyFile` | string | |
| `--sharedservice.security.useAuth` | | |
| `--sharedservice.sync.syncInterval` | string | Time interval to sync (default "5m0s") |
| `--storage.cache.max_size_mbs` | int | Maximum size of the cache where the Blob store data is cached in-memory. If not specified or set to 0, cache is not used |
| `--storage.cache.target_gc_percent` | int | Sets the garbage collection target percentage. |
| `--storage.connection.access-key` | string | Access key to use. Only required when authtype is set to accesskey. |
| `--storage.connection.auth-type` | string | Auth Type to use [iam, accesskey]. (default "iam") |
| `--storage.connection.disable-ssl` | | Disables SSL connection. Should only be used for development. |
| `--storage.connection.endpoint` | string | URL for storage client to connect to. |
| `--storage.connection.region` | string | Region to connect to. (default "us-east-1") |
| `--storage.connection.secret-key` | string | Secret to use when accesskey is set. |
| `--storage.container` | string | Initial container (in s3 a bucket) to create -if it doesn't exist-.' |
| `--storage.defaultHttpClient.timeout` | string | Sets time out on the http client. (default "0s") |
| `--storage.enable-multicontainer` | | If this is true, then the container argument is overlooked and redundant. This config will automatically open new connections to new containers/buckets as they are encountered |
| `--storage.limits.maxDownloadMBs` | int | Maximum allowed download size (in MBs) per call. (default 2) |
| `--storage.stow.config` | stringToString | Configuration for stow backend. Refer to github/flyteorg/stow (default []) |
| `--storage.stow.kind` | string | Kind of Stow backend to use. Refer to github/flyteorg/stow |
| `--storage.type` | string | Sets the type of storage to configure [s3/minio/local/mem/stow]. (default "s3") |
| `--union.auth.authorizationMetadataKey` | string | Authorization Header to use when passing Access Tokens to the server (default "flyte-authorization") |
| `--union.auth.clientId` | string | Client ID |
| `--union.auth.clientSecretEnvVar` | string | Environment variable containing the client secret |
| `--union.auth.clientSecretLocation` | string | File containing the client secret |
| `--union.auth.deviceFlow.pollInterval` | string | amount of time the device flow would poll the token endpoint if auth server doesn't return a polling interval. Okta and google IDP do return an interval' (default "5s") |
| `--union.auth.deviceFlow.refreshTime` | string | grace period from the token expiry after which it would refresh the token. (default "5m0s") |
| `--union.auth.deviceFlow.timeout` | string | amount of time the device flow should complete or else it will be cancelled. (default "10m0s") |
| `--union.auth.enable` | | Whether to enable an authenticated conenction when communicating with admin. (default true) |
| `--union.auth.externalAuth.command` | strings | Command for external authentication token generation |
| `--union.auth.pkce.refreshTime` | string | grace period from the token expiry after which it would refresh the token. (default "5m0s") |
| `--union.auth.pkce.timeout` | string | Amount of time the browser session would be active for authentication from client app. (default "15s") |
| `--union.auth.scopes` | strings | List of scopes to request |
| `--union.auth.tokenRefreshWindow` | string | Max duration between token refresh attempt and token expiry. (default "1h0m0s") |
| `--union.auth.tokenUrl` | string | OPTIONAL: Your IdP's token endpoint. It'll be discovered from flyte admin's OAuth Metadata endpoint if not provided. |
| `--union.auth.type` | string | Type of OAuth2 flow used for communicating with admin. (default "Pkce") |
| `--union.cache.maxItemsCount` | int | Maximum number of items to keep in the cache before evicting. (default 1000) |
| `--union.connection.host` | string | Host to connect to (default "dns:///utt-mgdp-stg-us-east-2.cloud-staging.union.ai") |
| `--union.connection.insecure` | | Whether to connect over insecure channel |
| `--union.connection.insecureSkipVerify` | | InsecureSkipVerify controls whether a client verifies the server's certificate chain and host name.Caution: shouldn't be use for production usecases' |
| `--union.connection.keepAliveConfig.permitWithoutStream` | | If true, client sends keepalive pings even with no active RPCs. |
| `--union.connection.keepAliveConfig.time` | string | After a duration of this time if the client doesn't see any activity it pings the server to see if the transport is still alive. (default "20s") |
| `--union.connection.keepAliveConfig.timeout` | string | After having pinged for keepalive check, the client waits for a duration of Timeout and if no activity is seen even after that the connection is closed. (default "2m0s") |
| `--union.connection.maxBackoffDelay` | string | Max delay for grpc backoff (default "8s") |
| `--union.connection.maxRecvMsgSize` | int | Maximum size of a message in bytes of a gRPC message (default 10485760) |
| `--union.connection.maxRetries` | int | Max number of gRPC retries (default 4) |
| `--union.connection.minConnectTimeout` | string | Minimum timeout for establishing a connection (default "20s") |
| `--union.connection.perRetryTimeout` | string | gRPC per retry timeout (default "15s") |
| `--union.connection.serviceConfig` | string | Defines gRPC experimental JSON Service Config (default "{"loadBalancingConfig": [{"round_robin":{}}]}") |
| `--union.connection.trustedIdentityClaims.enabled` | | Enables passing of trusted claims while making inter service calls |
| `--union.connection.trustedIdentityClaims.externalIdentityClaim` | string | External identity claim of the service which is authorized to make internal service call. These are verified against userclouds actions |
| `--union.connection.trustedIdentityClaims.externalIdentityTypeClaim` | string | External identity type claim of app or user to use for the current service identity. It should be an 'app' for inter service communication |
| `--union.internalConnectionConfig.-` | stringToString | (default []) |
| `--union.internalConnectionConfig.enabled` | | Enables internal service to service communication instead of going through ingress. |
| `--union.internalConnectionConfig.urlPattern` | string | UrlPattern of the internal service endpoints. (default "{{ service }}-helmchart.{{ service }}.svc.cluster.local:80") |
| `--webhook.awsSecretManager.sidecarImage` | string | Specifies the sidecar docker image to use (default "docker.io/amazon/aws-secrets-manager-secret-sidecar:v0.1.4") |
| `--webhook.certDir` | string | Certificate directory to use to write generated certs. Defaults to /etc/webhook/certs/ (default "/etc/webhook/certs") |
| `--webhook.embeddedSecretManagerConfig.awsConfig.region` | string | AWS region |
| `--webhook.embeddedSecretManagerConfig.fileMountInitContainer.image` | string | Specifies init container image to use for mounting secrets as files. (default "busybox:1.28") |
| `--webhook.embeddedSecretManagerConfig.gcpConfig.project` | string | GCP project to be used for secret manager |
| `--webhook.embeddedSecretManagerConfig.type` | string | (default "AWS") |
| `--webhook.gcpSecretManager.sidecarImage` | string | Specifies the sidecar docker image to use (default "gcr.io/google.com/cloudsdktool/cloud-sdk:alpine") |
| `--webhook.listenPort` | int | The port to use to listen to webhook calls. Defaults to 9443 (default 9443) |
| `--webhook.localCert` | | write certs locally. Defaults to false |
| `--webhook.metrics-prefix` | string | An optional prefix for all published metrics. (default "flyte:") |
| `--webhook.secretName` | string | Secret name to write generated certs to. (default "flyte-pod-webhook") |
| `--webhook.serviceName` | string | The name of the webhook service. (default "flyte-pod-webhook") |
| `--webhook.servicePort` | int32 | The port on the service that hosting webhook. (default 443) |
| `--webhook.vaultSecretManager.role` | string | Specifies the vault role to use (default "flyte") |
=== PAGE: https://www.union.ai/docs/v1/serverless/api-reference/uctl-cli/uctl-get/uctl-get-workflow ===
# uctl get workflow
Gets workflow resources
## Synopsis
Retrieve all the workflows within project and domain (workflow/workflows
can be used interchangeably in these commands):
```shell
$ uctl get workflow -p flytesnacks -d development
```
Retrieve all versions of a workflow by name within project and domain:
```shell
$ uctl get workflow -p flytesnacks -d development core.basic.lp.go_greet
```
Retrieve latest version of workflow by name within project and domain:
```shell
$ uctl get workflow -p flytesnacks -d development core.basic.lp.go_greet --latest
```
Retrieve particular version of workflow by name within project and
domain:
```shell
$ uctl get workflow -p flytesnacks -d development core.basic.lp.go_greet --version v2
```
Retrieve all the workflows with filters:
```shell
$ uctl get workflow -p flytesnacks -d development --filter.fieldSelector="workflow.name=k8s_spark.dataframe_passing.my_smart_schema"
```
Retrieve specific workflow with filters:
```shell
$ uctl get workflow -p flytesnacks -d development k8s_spark.dataframe_passing.my_smart_schema --filter.fieldSelector="workflow.version=v1"
```
Retrieve all the workflows with limit and sorting:
```shell
$ uctl get -p flytesnacks -d development workflow --filter.sortBy=created_at --filter.limit=1 --filter.asc
```
Retrieve workflows present in other pages by specifying the limit and
page number:
```shell
$ uctl get -p flytesnacks -d development workflow --filter.limit=10 --filter.page 2
```
Retrieve all the workflows within project and domain in yaml format:
```shell
$ uctl get workflow -p flytesnacks -d development -o yaml
```
Retrieve all the workflow within project and domain in json format:
```shell
$ uctl get workflow -p flytesnacks -d development -o json
```
Visualize the graph for a workflow within project and domain in dot
format:
```shell
$ uctl get workflow -p flytesnacks -d development core.flyte_basics.basic_workflow.my_wf --latest -o dot
```
Visualize the graph for a workflow within project and domain in a dot
content render:
```shell
$ uctl get workflow -p flytesnacks -d development core.flyte_basics.basic_workflow.my_wf --latest -o doturl
```
Usage:
```shell
$ uctl get workflow [flags]
```
## Options
| Option | Type | Description |
|--------|------|-------------|
| `--filter.asc` | | Specifies the sorting order. By default uctl sort result in descending order |
| Option | Type | Description |
|--------|------|-------------|
| `--filter.fieldSelector` | string | Specifies the Field selector |
| `--filter.limit` | int32 | Specifies the limit (default 100) |
| `--filter.page` | int32 | Specifies the page number, in case there are multiple pages of results (default 1) |
| `--filter.sortBy` | string | Specifies which field to sort results |
| `-h`, `--help` | help for workflow |
| `--latest` | | flag to indicate to fetch the latest version, version flag will be ignored in this case |
| `--version` | string | version of the workflow to be fetched. |
### Options inherited from parent commands
| Option | Type | Description |
|--------|------|-------------|
| `--admin.audience` | string | Audience to use when initiating OAuth2 authorization requests. |
| `--admin.authType` | string | Type of OAuth2 flow used for communicating with admin.ClientSecret, Pkce, ExternalCommand are valid values (default "ClientSecret") |
| `--admin.authorizationHeader` | string | Custom metadata header to pass JWT |
| `--admin.authorizationServerUrl` | string | This is the URL to your IdP's authorization server. It'll default to Endpoint |
| `--admin.caCertFilePath` | string | Use specified certificate file to verify the admin server peer. |
| `--admin.clientId` | string | Client ID (default "flytepropeller") |
| `--admin.clientSecretEnvVar` | string | Environment variable containing the client secret |
| `--admin.clientSecretLocation` | string | File containing the client secret (default "/etc/secrets/client_secret") |
| `--admin.command` | strings | Command for external authentication token generation |
| `--admin.defaultOrg` | string | OPTIONAL: Default org to use to support non-org based cli's.'. |
| `--admin.defaultServiceConfig` | string | |
| `--admin.deviceFlowConfig.pollInterval` | string | amount of time the device flow would poll the token endpoint if auth server doesn't return a polling interval. Okta and google IDP do return an interval' (default "5s") |
| `--admin.deviceFlowConfig.refreshTime` | string | grace period from the token expiry after which it would refresh the token. (default "5m0s") |
| `--admin.deviceFlowConfig.timeout` | string | amount of time the device flow should complete or else it will be cancelled. (default "10m0s") |
| `--admin.endpoint` | string | For admin types, specify where the uri of the service is located. |
| `--admin.httpProxyURL` | string | OPTIONAL: HTTP Proxy to be used for OAuth requests. |
| `--admin.insecure` | | Use insecure connection. |
| `--admin.insecureSkipVerify` | | InsecureSkipVerify controls whether a client verifies the server's certificate chain and host name.Caution: shouldn't be use for production usecases' |
| `--admin.maxBackoffDelay` | string | Max delay for grpc backoff (default "8s") |
| `--admin.maxMessageSizeBytes` | int | The max size in bytes for incoming gRPC messages |
| `--admin.maxRetries` | int | Max number of gRPC retries (default 4) |
| `--admin.perRetryTimeout` | string | gRPC per retry timeout (default "15s") |
| `--admin.pkceConfig.refreshTime` | string | grace period from the token expiry after which it would refresh the token. (default "5m0s") |
| `--admin.pkceConfig.timeout` | string | Amount of time the browser session would be active for authentication from client app. (default "2m0s") |
| `--admin.proxyCommand` | strings | Command for external proxy-authorization token generation |
| `--admin.scopes` | strings | List of scopes to request |
| `--admin.tokenRefreshWindow` | string | Max duration between token refresh attempt and token expiry. (default "0s") |
| `--admin.tokenUrl` | string | OPTIONAL: Your IdP's token endpoint. It'll be discovered from flyte admin's OAuth Metadata endpoint if not provided. |
| `--admin.useAudienceFromAdmin` | | Use Audience configured from admins public endpoint config. |
| `--admin.useAuth` | | Deprecated: Auth will be enabled/disabled based on admin's dynamically discovered information. |
| `--auth.appAuth.externalAuthServer.allowedAudience` | strings | Optional: A list of allowed audiences. If not provided, the audience is expected to be the public Uri of the service. |
| `--auth.appAuth.externalAuthServer.baseUrl` | string | This should be the base url of the authorization server that you are trying to hit. With Okta for instance, it will look something like https://company.okta.com/oauth2/abcdef123456789/ |
| `--auth.appAuth.externalAuthServer.httpProxyURL` | string | OPTIONAL: HTTP Proxy to be used for OAuth requests. |
| `--auth.appAuth.externalAuthServer.metadataUrl` | string | Optional: If the server doesn't support /.well-known/oauth-authorization-server, you can set a custom metadata url here.' |
| `--auth.appAuth.externalAuthServer.retryAttempts` | int | Optional: The number of attempted retries on a transient failure to get the OAuth metadata (default 5) |
| `--auth.appAuth.externalAuthServer.retryDelay` | string | Optional, Duration to wait between retries (default "1s") |
| `--auth.appAuth.selfAuthServer.accessTokenLifespan` | string | Defines the lifespan of issued access tokens. (default "30m0s") |
| `--auth.appAuth.selfAuthServer.authorizationCodeLifespan` | string | Defines the lifespan of issued access tokens. (default "5m0s") |
| `--auth.appAuth.selfAuthServer.claimSymmetricEncryptionKeySecretName` | string | OPTIONAL: Secret name to use to encrypt claims in authcode token. (default "claim_symmetric_key") |
| `--auth.appAuth.selfAuthServer.issuer` | string | Defines the issuer to use when issuing and validating tokens. The default value is https://{requestUri.HostAndPort}/ |
| `--auth.appAuth.selfAuthServer.oldTokenSigningRSAKeySecretName` | string | OPTIONAL: Secret name to use to retrieve Old RSA Signing Key. This can be useful during key rotation to continue to accept older tokens. (default "token_rsa_key_old.pem") |
| `--auth.appAuth.selfAuthServer.refreshTokenLifespan` | string | Defines the lifespan of issued access tokens. (default "1h0m0s") |
| `--auth.appAuth.selfAuthServer.tokenSigningRSAKeySecretName` | string | OPTIONAL: Secret name to use to retrieve RSA Signing Key. (default "token_rsa_key.pem") |
| `--auth.appAuth.thirdPartyConfig.flyteClient.audience` | string | Audience to use when initiating OAuth2 authorization requests. |
| `--auth.appAuth.thirdPartyConfig.flyteClient.clientId` | string | public identifier for the app which handles authorization for a Flyte deployment (default "uctl") |
| `--auth.appAuth.thirdPartyConfig.flyteClient.redirectUri` | string | This is the callback uri registered with the app which handles authorization for a Flyte deployment (default "http://localhost:53593/callback") |
| `--auth.appAuth.thirdPartyConfig.flyteClient.scopes` | strings | Recommended scopes for the client to request. (default [all,offline]) |
| `--auth.disableForGrpc` | | Disables auth enforcement on Grpc Endpoints. |
| `--auth.disableForHttp` | | Disables auth enforcement on HTTP Endpoints. |
| `--auth.grpcAuthorizationHeader` | string | (default "flyte-authorization") |
| `--auth.httpAuthorizationHeader` | string | (default "flyte-authorization") |
| `--auth.httpProxyURL` | string | OPTIONAL: HTTP Proxy to be used for OAuth requests. |
| `--auth.tokenEndpointProxyPath` | string | The path used to proxy calls to the TokenURL |
| `--auth.userAuth.cookieBlockKeySecretName` | string | OPTIONAL: Secret name to use for cookie block key. (default "cookie_block_key") |
| `--auth.userAuth.cookieHashKeySecretName` | string | OPTIONAL: Secret name to use for cookie hash key. (default "cookie_hash_key") |
| `--auth.userAuth.cookieSetting.domain` | string | OPTIONAL: Allows you to set the domain attribute on the auth cookies. |
| `--auth.userAuth.cookieSetting.sameSitePolicy` | string | OPTIONAL: Allows you to declare if your cookie should be restricted to a first-party or same-site context.Wrapper around http.SameSite. (default "DefaultMode") |
| `--auth.userAuth.httpProxyURL` | string | OPTIONAL: HTTP Proxy to be used for OAuth requests. |
| `--auth.userAuth.idpQueryParameter` | string | idp query parameter used for selecting a particular IDP for doing user authentication. Eg: for Okta passing idp={IDP-ID} forces the authentication to happen with IDP-ID |
| `--auth.userAuth.openId.baseUrl` | string | |
| `--auth.userAuth.openId.clientId` | string | |
| `--auth.userAuth.openId.clientSecretFile` | string | |
| `--auth.userAuth.openId.clientSecretName` | string | (default "oidc_client_secret") |
| `--auth.userAuth.openId.scopes` | strings | (default [openid,profile]) |
| `--auth.userAuth.redirectUrl` | string | (default "/console") |
| `--authorizer.internalCommunicationConfig.enabled` | | Enables authorization decisions for internal communication. (default true) |
| `--authorizer.internalCommunicationConfig.ingressIdentity` | string | IngressIdentity used in the cluster. Needed to exclude the communication coming from ingress. (default "ingress-nginx.ingress-nginx.serviceaccount.identity.linkerd.cluster.local") |
| `--authorizer.internalCommunicationConfig.tenantUrlPatternIdentity` | string | UrlPatternIdentity of the internal tenant service endpoint identities. (default "{{ service }}.{{ org }}.serviceaccount.identity.linkerd.cluster.local") |
| `--authorizer.internalCommunicationConfig.urlPatternIdentity` | string | UrlPatternIdentity of the internal service endpoint identities. (default "{{ service }}-helmchart.{{ service }}.serviceaccount.identity.linkerd.cluster.local") |
| `--authorizer.mode` | string | (default "Active") |
| `--authorizer.organizationConfig.PolicyConfig.adminPolicyDescription` | string | description for the boilerplate admin policy (default "Contributor permissions and full admin permissions to manage users and view usage dashboards") |
| `--authorizer.organizationConfig.PolicyConfig.contributorPolicyDescription` | string | description for the boilerplate contributor policy (default "Viewer permissions and permissions to create workflows, tasks, launch plans, and executions") |
| `--authorizer.organizationConfig.PolicyConfig.defaultUserPolicyRoleType` | string | name of the role type to determine which default policy new users added to the organization should be assigned (default "Viewer") |
| `--authorizer.organizationConfig.PolicyConfig.serverlessContributorPolicyDescription` | string | description for the boilerplate serverless contributor policy (default "Viewer permissions and permissions to create workflows, tasks, launch plans, and executions") |
| `--authorizer.organizationConfig.PolicyConfig.serverlessViewerPolicyDescription` | string | description for the boilerplate serverless viewer policy (default "Permissions to view Flyte entities") |
| `--authorizer.organizationConfig.PolicyConfig.viewerPolicyDescription` | string | description for the boilerplate viewer policy (default "Permissions to view Flyte entities") |
| `--authorizer.organizationConfig.defaultPolicyCacheDuration` | string | Cache entry duration for the store of the default policy per organization (default "10m0s") |
| `--authorizer.syncRuleRefreshInterval` | string | (default "1m0s") |
| `--authorizer.type` | string | (default "UserClouds") |
| `--authorizer.userCloudsClient.cache.redis.ttl.edgeTypes` | string | Specifies how long edge types remain in the cache.. (default "30m0s") |
| `--authorizer.userCloudsClient.cache.redis.ttl.edges` | string | Specifies how long edges remain in the cache. (default "30m0s") |
| `--authorizer.userCloudsClient.cache.redis.ttl.objectTypes` | string | Specifies how long object types remain in the cache. (default "30m0s") |
| `--authorizer.userCloudsClient.cache.redis.ttl.objects` | string | Specifies how long objects remain in the cache. (default "30m0s") |
| `--authorizer.userCloudsClient.cache.type` | string | Cache type to use. (default "none") |
| `--authorizer.userCloudsClient.clientID` | string | UserClouds client id |
| `--authorizer.userCloudsClient.clientSecretName` | string | UserCloud client secret name to read from the secret manager. (default "userclouds-client-secret") |
| `--authorizer.userCloudsClient.enableLogging` | | Enable userclouds client's internal logging. Calls to post logs take 250-350 ms and will impact p99 latency, enable with caution. |
| `--authorizer.userCloudsClient.tenantID` | string | UserClouds tenant id. Should be a UUID. |
| `--authorizer.userCloudsClient.tenantUrl` | string | Something like https://{yourtenant}.tenant.userclouds.com |
| `--config` | string | config file (default is /Users/andrew/.union/config.yaml) |
| `--connection.environment` | string | |
| `--connection.region` | string | |
| `--connection.rootTenantURLPattern` | string | Pattern for tenant url. (default "dns:///{{ organization }}.cloud-staging.union.ai") |
| `--console.endpoint` | string | Endpoint of console, if different than flyte admin |
| `--database.connMaxLifeTime` | string | sets the maximum amount of time a connection may be reused (default "1h0m0s") |
| `--database.enableForeignKeyConstraintWhenMigrating` | | Whether to enable gorm foreign keys when migrating the db |
| `--database.maxIdleConnections` | int | maxIdleConnections sets the maximum number of connections in the idle connection pool. (default 10) |
| `--database.maxOpenConnections` | int | maxOpenConnections sets the maximum number of open connections to the database. (default 100) |
| `--database.postgres.dbname` | string | The database name (default "postgres") |
| `--database.postgres.debug` | | |
| `--database.postgres.host` | string | The host name of the database server (default "localhost") |
| `--database.postgres.options` | string | See http://gorm.io/docs/connecting_to_the_database.html for available options passed, in addition to the above. (default "sslmode=disable") |
| `--database.postgres.password` | string | The database password. (default "postgres") |
| `--database.postgres.passwordPath` | string | Points to the file containing the database password. |
| `--database.postgres.port` | int | The port name of the database server (default 30001) |
| `--database.postgres.readReplicaHost` | string | The host name of the read replica database server (default "localhost") |
| `--database.postgres.username` | string | The database user who is connecting to the server. (default "postgres") |
| `--database.sqlite.file` | string | The path to the file (existing or new) where the DB should be created / stored. If existing, then this will be re-used, else a new will be created |
| `--db.connectionPool.maxConnectionLifetime` | string | (default "0s") |
| `--db.connectionPool.maxIdleConnections` | int | |
| `--db.connectionPool.maxOpenConnections` | int | |
| `--db.dbname` | string | (default "postgres") |
| `--db.debug` | | |
| `--db.host` | string | (default "postgres") |
| `--db.log_level` | int | (default 4) |
| `--db.options` | string | (default "sslmode=disable") |
| `--db.password` | string | |
| `--db.passwordPath` | string | |
| `--db.port` | int | (default 5432) |
| `--db.username` | string | (default "postgres") |
| `-d`, `--domain` | string | Specifies the Flyte project's domain. |
| `--files.archive` | | Pass in archive file either an http link or local path. |
| `--files.assumableIamRole` | string | Custom assumable iam auth role to register launch plans with. |
| `--files.continueOnError` | | Continue on error when registering files. |
| `--files.destinationDirectory` | string | Location of source code in container. |
| `--files.dryRun` | | Execute command without making any modifications. |
| `--files.enableSchedule` | | Enable the schedule if the files contain schedulable launchplan. |
| `--files.force` | | Force use of version number on entities registered with flyte. |
| `--files.k8ServiceAccount` | string | Deprecated. Please use `--K8sServiceAccount`|
| `--files.k8sServiceAccount` | string | Custom kubernetes service account auth role to register launch plans with. |
| `--files.outputLocationPrefix` | string | Custom output location prefix for offloaded types (files/schemas). |
| `--files.sourceUploadPath` | string | Deprecated: Update flyte admin to avoid having to configure storage access from uctl. |
| `--files.version` | string | Version of the entity to be registered with flyte which are un-versioned after serialization. |
| `--logger.formatter.type` | string | Sets logging format type. (default "json") |
| `--logger.level` | int | Sets the minimum logging level. (default 3) |
| `--logger.mute` | | Mutes all logs regardless of severity. Intended for benchmarks/tests only. |
| `--logger.show-source` | | Includes source code location in logs. |
| `--org` | string | Organization to work on. If not set, default to user's org. |
| `--otel.file.filename` | string | Filename to store exported telemetry traces (default "/tmp/trace.txt") |
| `--otel.jaeger.endpoint` | string | Endpoint for the jaeger telemetry trace ingestor (default "http://localhost:14268/api/traces") |
| `--otel.otlpgrpc.endpoint` | string | Endpoint for the OTLP telemetry trace collector (default "http://localhost:4317") |
| `--otel.otlphttp.endpoint` | string | Endpoint for the OTLP telemetry trace collector (default "http://localhost:4318/v1/traces") |
| `--otel.sampler.parentSampler` | string | Sets the parent sampler to use for the tracer (default "always") |
| `--otel.type` | string | Sets the type of exporter to configure [noop/file/jaeger/otlpgrpc/otlphttp]. (default "noop") |
| `-o`, `--output` | string | Specifies the output type - supported formats [TABLE JSON YAML DOT DOTURL]. NOTE: dot, doturl are only supported for Workflow (default "table") |
| `--plugins.catalogcache.reader.maxItems` | int | Maximum number of entries to keep in the index. (default 10000) |
| `--plugins.catalogcache.reader.maxRetries` | int | Maximum number of retries per item. (default 3) |
| `--plugins.catalogcache.reader.workers` | int | Number of concurrent workers to start processing the queue. (default 10) |
| `--plugins.catalogcache.writer.maxItems` | int | Maximum number of entries to keep in the index. (default 10000) |
| `--plugins.catalogcache.writer.maxRetries` | int | Maximum number of retries per item. (default 3) |
| `--plugins.catalogcache.writer.workers` | int | Number of concurrent workers to start processing the queue. (default 10) |
| `-p`, `--project` | string | Specifies the Flyte project. |
| `--rediscache.passwordSecretName` | string | Name of secret with Redis password. |
| `--rediscache.primaryEndpoint` | string | Primary endpoint for the redis cache that can be used for both reads and writes. |
| `--rediscache.replicaEndpoint` | string | Replica endpoint for the redis cache that can be used for reads. |
| `--secrets.env-prefix` | string | Prefix for environment variables (default "FLYTE_SECRET_") |
| `--secrets.secrets-prefix` | string | Prefix where to look for secrets file (default "/etc/secrets") |
| `--secrets.type` | string | Sets the type of storage to configure [local]. (default "local") |
| `--server.dataProxy.download.maxExpiresIn` | string | Maximum allowed expiration duration. (default "1h0m0s") |
| `--server.dataProxy.upload.defaultFileNameLength` | int | Default length for the generated file name if not provided in the request. (default 20) |
| `--server.dataProxy.upload.maxExpiresIn` | string | Maximum allowed expiration duration. (default "1h0m0s") |
| `--server.dataProxy.upload.maxSize` | string | Maximum allowed upload size. (default "6Mi") |
| `--server.dataProxy.upload.storagePrefix` | string | Storage prefix to use for all upload requests. |
| `--server.grpc.enableGrpcLatencyMetrics` | | Enable grpc latency metrics. Note Histograms metrics can be expensive on Prometheus servers. |
| `--server.grpc.maxMessageSizeBytes` | int | The max size in bytes for incoming gRPC messages |
| `--server.grpc.port` | int | On which grpc port to serve admin (default 8089) |
| `--server.grpc.serverReflection` | | Enable GRPC Server Reflection (default true) |
| `--server.grpcPort` | int | deprecated |
| `--server.grpcServerReflection` | | deprecated |
| `--server.httpPort` | int | On which http port to serve admin (default 8088) |
| `--server.kube-config` | string | Path to kubernetes client config file, default is empty, useful for incluster config. |
| `--server.kubeClientConfig.burst` | int | Max burst rate for throttle. 0 defaults to 10 (default 25) |
| `--server.kubeClientConfig.qps` | int32 | Max QPS to the master for requests to KubeAPI. 0 defaults to 5. (default 100) |
| `--server.kubeClientConfig.timeout` | string | Max duration allowed for every request to KubeAPI before giving up. 0 implies no timeout. (default "30s") |
| `--server.master` | string | The address of the Kubernetes API server. |
| `--server.readHeaderTimeoutSeconds` | int | The amount of time allowed to read request headers. (default 32) |
| `--server.security.allowCors` | | (default true) |
| `--server.security.allowedHeaders` | strings | (default [Content-Type,flyte-authorization]) |
| `--server.security.allowedOrigins` | strings | (default [*]) |
| `--server.security.auditAccess` | | |
| `--server.security.secure` | | |
| `--server.security.ssl.certificateFile` | string | |
| `--server.security.ssl.keyFile` | string | |
| `--server.security.useAuth` | | |
| `--server.thirdPartyConfig.flyteClient.audience` | string | Audience to use when initiating OAuth2 authorization requests. |
| `--server.thirdPartyConfig.flyteClient.clientId` | string | public identifier for the app which handles authorization for a Flyte deployment |
| `--server.thirdPartyConfig.flyteClient.redirectUri` | string | This is the callback uri registered with the app which handles authorization for a Flyte deployment |
| `--server.thirdPartyConfig.flyteClient.scopes` | strings | Recommended scopes for the client to request. |
| `--server.watchService.maxActiveClusterConnections` | int | (default 5) |
| `--server.watchService.maxPageSize` | int | (default 50000) |
| `--server.watchService.nonTerminalStatusUpdatesInterval` | string | (default "1m0s") |
| `--server.watchService.pollInterval` | string | (default "1s") |
| `--sharedservice.connectPort` | string | On which connect port to serve admin (default "8080") |
| `--sharedservice.grpc.grpcMaxResponseStatusBytes` | int32 | specifies the maximum (uncompressed) size of header list that the client is prepared to accept on grpc calls (default 32000) |
| `--sharedservice.grpc.maxConcurrentStreams` | int | Limit on the number of concurrent streams to each ServerTransport. (default 100) |
| `--sharedservice.grpc.maxMessageSizeBytes` | int | Limit on the size of message that can be received on the server. (default 10485760) |
| `--sharedservice.grpcServerReflection` | | Enable GRPC Server Reflection (default true) |
| `--sharedservice.httpPort` | string | On which http port to serve admin (default "8089") |
| `--sharedservice.kubeConfig` | string | Path to kubernetes client config file. |
| `--sharedservice.master` | string | The address of the Kubernetes API server. |
| `--sharedservice.metrics.enableClientGrpcHistograms` | | Enable client grpc histograms (default true) |
| `--sharedservice.metrics.enableGrpcHistograms` | | Enable grpc histograms (default true) |
| `--sharedservice.metrics.scope` | string | Scope to emit metrics under (default "service:") |
| `--sharedservice.port` | string | On which grpc port to serve admin (default "8080") |
| `--sharedservice.profiler.enabled` | | Enable Profiler on server |
| `--sharedservice.profilerPort` | string | Profile port to start listen for pprof and metric handlers on. (default "10254") |
| `--sharedservice.security.allowCors` | | |
| `--sharedservice.security.allowLocalhostAccess` | | Whether to permit localhost unauthenticated access to the server |
| `--sharedservice.security.allowedHeaders` | strings | |
| `--sharedservice.security.allowedOrigins` | strings | |
| `--sharedservice.security.auditAccess` | | |
| `--sharedservice.security.orgOverride` | string | Override org in identity context if localhost access enabled |
| `--sharedservice.security.secure` | | |
| `--sharedservice.security.ssl.certificateAuthorityFile` | string | |
| `--sharedservice.security.ssl.certificateFile` | string | |
| `--sharedservice.security.ssl.keyFile` | string | |
| `--sharedservice.security.useAuth` | | |
| `--sharedservice.sync.syncInterval` | string | Time interval to sync (default "5m0s") |
| `--storage.cache.max_size_mbs` | int | Maximum size of the cache where the Blob store data is cached in-memory. If not specified or set to 0, cache is not used |
| `--storage.cache.target_gc_percent` | int | Sets the garbage collection target percentage. |
| `--storage.connection.access-key` | string | Access key to use. Only required when authtype is set to accesskey. |
| `--storage.connection.auth-type` | string | Auth Type to use [iam, accesskey]. (default "iam") |
| `--storage.connection.disable-ssl` | | Disables SSL connection. Should only be used for development. |
| `--storage.connection.endpoint` | string | URL for storage client to connect to. |
| `--storage.connection.region` | string | Region to connect to. (default "us-east-1") |
| `--storage.connection.secret-key` | string | Secret to use when accesskey is set. |
| `--storage.container` | string | Initial container (in s3 a bucket) to create -if it doesn't exist-.' |
| `--storage.defaultHttpClient.timeout` | string | Sets time out on the http client. (default "0s") |
| `--storage.enable-multicontainer` | | If this is true, then the container argument is overlooked and redundant. This config will automatically open new connections to new containers/buckets as they are encountered |
| `--storage.limits.maxDownloadMBs` | int | Maximum allowed download size (in MBs) per call. (default 2) |
| `--storage.stow.config` | stringToString | Configuration for stow backend. Refer to github/flyteorg/stow (default []) |
| `--storage.stow.kind` | string | Kind of Stow backend to use. Refer to github/flyteorg/stow |
| `--storage.type` | string | Sets the type of storage to configure [s3/minio/local/mem/stow]. (default "s3") |
| `--union.auth.authorizationMetadataKey` | string | Authorization Header to use when passing Access Tokens to the server (default "flyte-authorization") |
| `--union.auth.clientId` | string | Client ID |
| `--union.auth.clientSecretEnvVar` | string | Environment variable containing the client secret |
| `--union.auth.clientSecretLocation` | string | File containing the client secret |
| `--union.auth.deviceFlow.pollInterval` | string | amount of time the device flow would poll the token endpoint if auth server doesn't return a polling interval. Okta and google IDP do return an interval' (default "5s") |
| `--union.auth.deviceFlow.refreshTime` | string | grace period from the token expiry after which it would refresh the token. (default "5m0s") |
| `--union.auth.deviceFlow.timeout` | string | amount of time the device flow should complete or else it will be cancelled. (default "10m0s") |
| `--union.auth.enable` | | Whether to enable an authenticated conenction when communicating with admin. (default true) |
| `--union.auth.externalAuth.command` | strings | Command for external authentication token generation |
| `--union.auth.pkce.refreshTime` | string | grace period from the token expiry after which it would refresh the token. (default "5m0s") |
| `--union.auth.pkce.timeout` | string | Amount of time the browser session would be active for authentication from client app. (default "15s") |
| `--union.auth.scopes` | strings | List of scopes to request |
| `--union.auth.tokenRefreshWindow` | string | Max duration between token refresh attempt and token expiry. (default "1h0m0s") |
| `--union.auth.tokenUrl` | string | OPTIONAL: Your IdP's token endpoint. It'll be discovered from flyte admin's OAuth Metadata endpoint if not provided. |
| `--union.auth.type` | string | Type of OAuth2 flow used for communicating with admin. (default "Pkce") |
| `--union.cache.maxItemsCount` | int | Maximum number of items to keep in the cache before evicting. (default 1000) |
| `--union.connection.host` | string | Host to connect to (default "dns:///utt-mgdp-stg-us-east-2.cloud-staging.union.ai") |
| `--union.connection.insecure` | | Whether to connect over insecure channel |
| `--union.connection.insecureSkipVerify` | | InsecureSkipVerify controls whether a client verifies the server's certificate chain and host name.Caution: shouldn't be use for production usecases' |
| `--union.connection.keepAliveConfig.permitWithoutStream` | | If true, client sends keepalive pings even with no active RPCs. |
| `--union.connection.keepAliveConfig.time` | string | After a duration of this time if the client doesn't see any activity it pings the server to see if the transport is still alive. (default "20s") |
| `--union.connection.keepAliveConfig.timeout` | string | After having pinged for keepalive check, the client waits for a duration of Timeout and if no activity is seen even after that the connection is closed. (default "2m0s") |
| `--union.connection.maxBackoffDelay` | string | Max delay for grpc backoff (default "8s") |
| `--union.connection.maxRecvMsgSize` | int | Maximum size of a message in bytes of a gRPC message (default 10485760) |
| `--union.connection.maxRetries` | int | Max number of gRPC retries (default 4) |
| `--union.connection.minConnectTimeout` | string | Minimum timeout for establishing a connection (default "20s") |
| `--union.connection.perRetryTimeout` | string | gRPC per retry timeout (default "15s") |
| `--union.connection.serviceConfig` | string | Defines gRPC experimental JSON Service Config (default "{"loadBalancingConfig": [{"round_robin":{}}]}") |
| `--union.connection.trustedIdentityClaims.enabled` | | Enables passing of trusted claims while making inter service calls |
| `--union.connection.trustedIdentityClaims.externalIdentityClaim` | string | External identity claim of the service which is authorized to make internal service call. These are verified against userclouds actions |
| `--union.connection.trustedIdentityClaims.externalIdentityTypeClaim` | string | External identity type claim of app or user to use for the current service identity. It should be an 'app' for inter service communication |
| `--union.internalConnectionConfig.-` | stringToString | (default []) |
| `--union.internalConnectionConfig.enabled` | | Enables internal service to service communication instead of going through ingress. |
| `--union.internalConnectionConfig.urlPattern` | string | UrlPattern of the internal service endpoints. (default "{{ service }}-helmchart.{{ service }}.svc.cluster.local:80") |
| `--webhook.awsSecretManager.sidecarImage` | string | Specifies the sidecar docker image to use (default "docker.io/amazon/aws-secrets-manager-secret-sidecar:v0.1.4") |
| `--webhook.certDir` | string | Certificate directory to use to write generated certs. Defaults to /etc/webhook/certs/ (default "/etc/webhook/certs") |
| `--webhook.embeddedSecretManagerConfig.awsConfig.region` | string | AWS region |
| `--webhook.embeddedSecretManagerConfig.fileMountInitContainer.image` | string | Specifies init container image to use for mounting secrets as files. (default "busybox:1.28") |
| `--webhook.embeddedSecretManagerConfig.gcpConfig.project` | string | GCP project to be used for secret manager |
| `--webhook.embeddedSecretManagerConfig.type` | string | (default "AWS") |
| `--webhook.gcpSecretManager.sidecarImage` | string | Specifies the sidecar docker image to use (default "gcr.io/google.com/cloudsdktool/cloud-sdk:alpine") |
| `--webhook.listenPort` | int | The port to use to listen to webhook calls. Defaults to 9443 (default 9443) |
| `--webhook.localCert` | | write certs locally. Defaults to false |
| `--webhook.metrics-prefix` | string | An optional prefix for all published metrics. (default "flyte:") |
| `--webhook.secretName` | string | Secret name to write generated certs to. (default "flyte-pod-webhook") |
| `--webhook.serviceName` | string | The name of the webhook service. (default "flyte-pod-webhook") |
| `--webhook.servicePort` | int32 | The port on the service that hosting webhook. (default 443) |
| `--webhook.vaultSecretManager.role` | string | Specifies the vault role to use (default "flyte") |
=== PAGE: https://www.union.ai/docs/v1/serverless/api-reference/uctl-cli/uctl-get/uctl-get-workflow-execution-config ===
# uctl get workflow-execution-config
Gets matchable resources of workflow execution config.
## Synopsis
Retrieve workflow execution config for the given project and domain, in
combination with the workflow name.
For project flytesnacks and development domain:
```shell
$ uctl get workflow-execution-config -p flytesnacks -d development
```
Example: output from the command:
``` json
{
"project": "flytesnacks",
"domain": "development",
"max_parallelism": 5
}
```
Retrieve workflow execution config for the project, domain, and
workflow. For project flytesnacks, development domain and workflow
`core.control_flow.merge_sort.merge_sort`:
```shell
$ uctl get workflow-execution-config -p flytesnacks -d development core.control_flow.merge_sort.merge_sort
```
Example: output from the command:
``` json
{
"project": "flytesnacks",
"domain": "development",
"workflow": "core.control_flow.merge_sort.merge_sort"
"max_parallelism": 5
}
```
Write the workflow execution config to a file. If there are no workflow
execution config, the command throws an error. The config file is
written to wec.yaml file. Example: content of wec.yaml:
```shell
$ uctl get workflow-execution-config -p flytesnacks -d development --attrFile wec.yaml
```
``` yaml
domain: development
project: flytesnacks
max_parallelism: 5
```
Generate a sample workflow execution config file to be used for creating
a new workflow execution config at project domain
::
: uctl get workflow-execution-config -p flytesnacks -d development
--attrFile wec.yaml --gen
``` yaml
annotations:
values:
cliAnnotationKey: cliAnnotationValue
domain: development
labels:
values:
cliLabelKey: cliLabelValue
max_parallelism: 10
project: flytesnacks
raw_output_data_config:
output_location_prefix: cliOutputLocationPrefix
security_context:
run_as:
k8s_service_account: default
```
Generate a sample workflow execution config file to be used for creating
a new workflow execution config at project domain workflow level
::
: uctl get workflow-execution-config -p flytesnacks -d development
--attrFile wec.yaml uctl get workflow-execution-config --gen
``` yaml
annotations:
values:
cliAnnotationKey: cliAnnotationValue
domain: development
labels:
values:
cliLabelKey: cliLabelValue
max_parallelism: 10
project: flytesnacks
workflow: k8s_spark.dataframe_passing.my_smart_structured_dataset
raw_output_data_config:
output_location_prefix: cliOutputLocationPrefix
security_context:
run_as:
k8s_service_account: default
```
Usage:
```shell
$ uctl get workflow-execution-config [flags]
```
## Options
| Option | Type | Description |
|--------|------|-------------|
| `--attrFile` | string | attribute file name to be used for generating attribute for the resource type. |
| `--gen` | | generates an empty workflow execution config file with conformance to the api format. |
| `-h`, `--help` | help for workflow-execution-config |
### Options inherited from parent commands
| Option | Type | Description |
|--------|------|-------------|
| `--admin.audience` | string | Audience to use when initiating OAuth2 authorization requests. |
| `--admin.authType` | string | Type of OAuth2 flow used for communicating with admin.ClientSecret, Pkce, ExternalCommand are valid values (default "ClientSecret") |
| `--admin.authorizationHeader` | string | Custom metadata header to pass JWT |
| `--admin.authorizationServerUrl` | string | This is the URL to your IdP's authorization server. It'll default to Endpoint |
| `--admin.caCertFilePath` | string | Use specified certificate file to verify the admin server peer. |
| `--admin.clientId` | string | Client ID (default "flytepropeller") |
| `--admin.clientSecretEnvVar` | string | Environment variable containing the client secret |
| `--admin.clientSecretLocation` | string | File containing the client secret (default "/etc/secrets/client_secret") |
| `--admin.command` | strings | Command for external authentication token generation |
| `--admin.defaultOrg` | string | OPTIONAL: Default org to use to support non-org based cli's.'. |
| `--admin.defaultServiceConfig` | string | |
| `--admin.deviceFlowConfig.pollInterval` | string | amount of time the device flow would poll the token endpoint if auth server doesn't return a polling interval. Okta and google IDP do return an interval' (default "5s") |
| `--admin.deviceFlowConfig.refreshTime` | string | grace period from the token expiry after which it would refresh the token. (default "5m0s") |
| `--admin.deviceFlowConfig.timeout` | string | amount of time the device flow should complete or else it will be cancelled. (default "10m0s") |
| `--admin.endpoint` | string | For admin types, specify where the uri of the service is located. |
| `--admin.httpProxyURL` | string | OPTIONAL: HTTP Proxy to be used for OAuth requests. |
| `--admin.insecure` | | Use insecure connection. |
| `--admin.insecureSkipVerify` | | InsecureSkipVerify controls whether a client verifies the server's certificate chain and host name.Caution: shouldn't be use for production usecases' |
| `--admin.maxBackoffDelay` | string | Max delay for grpc backoff (default "8s") |
| `--admin.maxMessageSizeBytes` | int | The max size in bytes for incoming gRPC messages |
| `--admin.maxRetries` | int | Max number of gRPC retries (default 4) |
| `--admin.perRetryTimeout` | string | gRPC per retry timeout (default "15s") |
| `--admin.pkceConfig.refreshTime` | string | grace period from the token expiry after which it would refresh the token. (default "5m0s") |
| `--admin.pkceConfig.timeout` | string | Amount of time the browser session would be active for authentication from client app. (default "2m0s") |
| `--admin.proxyCommand` | strings | Command for external proxy-authorization token generation |
| `--admin.scopes` | strings | List of scopes to request |
| `--admin.tokenRefreshWindow` | string | Max duration between token refresh attempt and token expiry. (default "0s") |
| `--admin.tokenUrl` | string | OPTIONAL: Your IdP's token endpoint. It'll be discovered from flyte admin's OAuth Metadata endpoint if not provided. |
| `--admin.useAudienceFromAdmin` | | Use Audience configured from admins public endpoint config. |
| `--admin.useAuth` | | Deprecated: Auth will be enabled/disabled based on admin's dynamically discovered information. |
| `--auth.appAuth.externalAuthServer.allowedAudience` | strings | Optional: A list of allowed audiences. If not provided, the audience is expected to be the public Uri of the service. |
| `--auth.appAuth.externalAuthServer.baseUrl` | string | This should be the base url of the authorization server that you are trying to hit. With Okta for instance, it will look something like https://company.okta.com/oauth2/abcdef123456789/ |
| `--auth.appAuth.externalAuthServer.httpProxyURL` | string | OPTIONAL: HTTP Proxy to be used for OAuth requests. |
| `--auth.appAuth.externalAuthServer.metadataUrl` | string | Optional: If the server doesn't support /.well-known/oauth-authorization-server, you can set a custom metadata url here.' |
| `--auth.appAuth.externalAuthServer.retryAttempts` | int | Optional: The number of attempted retries on a transient failure to get the OAuth metadata (default 5) |
| `--auth.appAuth.externalAuthServer.retryDelay` | string | Optional, Duration to wait between retries (default "1s") |
| `--auth.appAuth.selfAuthServer.accessTokenLifespan` | string | Defines the lifespan of issued access tokens. (default "30m0s") |
| `--auth.appAuth.selfAuthServer.authorizationCodeLifespan` | string | Defines the lifespan of issued access tokens. (default "5m0s") |
| `--auth.appAuth.selfAuthServer.claimSymmetricEncryptionKeySecretName` | string | OPTIONAL: Secret name to use to encrypt claims in authcode token. (default "claim_symmetric_key") |
| `--auth.appAuth.selfAuthServer.issuer` | string | Defines the issuer to use when issuing and validating tokens. The default value is https://{requestUri.HostAndPort}/ |
| `--auth.appAuth.selfAuthServer.oldTokenSigningRSAKeySecretName` | string | OPTIONAL: Secret name to use to retrieve Old RSA Signing Key. This can be useful during key rotation to continue to accept older tokens. (default "token_rsa_key_old.pem") |
| `--auth.appAuth.selfAuthServer.refreshTokenLifespan` | string | Defines the lifespan of issued access tokens. (default "1h0m0s") |
| `--auth.appAuth.selfAuthServer.tokenSigningRSAKeySecretName` | string | OPTIONAL: Secret name to use to retrieve RSA Signing Key. (default "token_rsa_key.pem") |
| `--auth.appAuth.thirdPartyConfig.flyteClient.audience` | string | Audience to use when initiating OAuth2 authorization requests. |
| `--auth.appAuth.thirdPartyConfig.flyteClient.clientId` | string | public identifier for the app which handles authorization for a Flyte deployment (default "uctl") |
| `--auth.appAuth.thirdPartyConfig.flyteClient.redirectUri` | string | This is the callback uri registered with the app which handles authorization for a Flyte deployment (default "http://localhost:53593/callback") |
| `--auth.appAuth.thirdPartyConfig.flyteClient.scopes` | strings | Recommended scopes for the client to request. (default [all,offline]) |
| `--auth.disableForGrpc` | | Disables auth enforcement on Grpc Endpoints. |
| `--auth.disableForHttp` | | Disables auth enforcement on HTTP Endpoints. |
| `--auth.grpcAuthorizationHeader` | string | (default "flyte-authorization") |
| `--auth.httpAuthorizationHeader` | string | (default "flyte-authorization") |
| `--auth.httpProxyURL` | string | OPTIONAL: HTTP Proxy to be used for OAuth requests. |
| `--auth.tokenEndpointProxyPath` | string | The path used to proxy calls to the TokenURL |
| `--auth.userAuth.cookieBlockKeySecretName` | string | OPTIONAL: Secret name to use for cookie block key. (default "cookie_block_key") |
| `--auth.userAuth.cookieHashKeySecretName` | string | OPTIONAL: Secret name to use for cookie hash key. (default "cookie_hash_key") |
| `--auth.userAuth.cookieSetting.domain` | string | OPTIONAL: Allows you to set the domain attribute on the auth cookies. |
| `--auth.userAuth.cookieSetting.sameSitePolicy` | string | OPTIONAL: Allows you to declare if your cookie should be restricted to a first-party or same-site context.Wrapper around http.SameSite. (default "DefaultMode") |
| `--auth.userAuth.httpProxyURL` | string | OPTIONAL: HTTP Proxy to be used for OAuth requests. |
| `--auth.userAuth.idpQueryParameter` | string | idp query parameter used for selecting a particular IDP for doing user authentication. Eg: for Okta passing idp={IDP-ID} forces the authentication to happen with IDP-ID |
| `--auth.userAuth.openId.baseUrl` | string | |
| `--auth.userAuth.openId.clientId` | string | |
| `--auth.userAuth.openId.clientSecretFile` | string | |
| `--auth.userAuth.openId.clientSecretName` | string | (default "oidc_client_secret") |
| `--auth.userAuth.openId.scopes` | strings | (default [openid,profile]) |
| `--auth.userAuth.redirectUrl` | string | (default "/console") |
| `--authorizer.internalCommunicationConfig.enabled` | | Enables authorization decisions for internal communication. (default true) |
| `--authorizer.internalCommunicationConfig.ingressIdentity` | string | IngressIdentity used in the cluster. Needed to exclude the communication coming from ingress. (default "ingress-nginx.ingress-nginx.serviceaccount.identity.linkerd.cluster.local") |
| `--authorizer.internalCommunicationConfig.tenantUrlPatternIdentity` | string | UrlPatternIdentity of the internal tenant service endpoint identities. (default "{{ service }}.{{ org }}.serviceaccount.identity.linkerd.cluster.local") |
| `--authorizer.internalCommunicationConfig.urlPatternIdentity` | string | UrlPatternIdentity of the internal service endpoint identities. (default "{{ service }}-helmchart.{{ service }}.serviceaccount.identity.linkerd.cluster.local") |
| `--authorizer.mode` | string | (default "Active") |
| `--authorizer.organizationConfig.PolicyConfig.adminPolicyDescription` | string | description for the boilerplate admin policy (default "Contributor permissions and full admin permissions to manage users and view usage dashboards") |
| `--authorizer.organizationConfig.PolicyConfig.contributorPolicyDescription` | string | description for the boilerplate contributor policy (default "Viewer permissions and permissions to create workflows, tasks, launch plans, and executions") |
| `--authorizer.organizationConfig.PolicyConfig.defaultUserPolicyRoleType` | string | name of the role type to determine which default policy new users added to the organization should be assigned (default "Viewer") |
| `--authorizer.organizationConfig.PolicyConfig.serverlessContributorPolicyDescription` | string | description for the boilerplate serverless contributor policy (default "Viewer permissions and permissions to create workflows, tasks, launch plans, and executions") |
| `--authorizer.organizationConfig.PolicyConfig.serverlessViewerPolicyDescription` | string | description for the boilerplate serverless viewer policy (default "Permissions to view Flyte entities") |
| `--authorizer.organizationConfig.PolicyConfig.viewerPolicyDescription` | string | description for the boilerplate viewer policy (default "Permissions to view Flyte entities") |
| `--authorizer.organizationConfig.defaultPolicyCacheDuration` | string | Cache entry duration for the store of the default policy per organization (default "10m0s") |
| `--authorizer.syncRuleRefreshInterval` | string | (default "1m0s") |
| `--authorizer.type` | string | (default "UserClouds") |
| `--authorizer.userCloudsClient.cache.redis.ttl.edgeTypes` | string | Specifies how long edge types remain in the cache.. (default "30m0s") |
| `--authorizer.userCloudsClient.cache.redis.ttl.edges` | string | Specifies how long edges remain in the cache. (default "30m0s") |
| `--authorizer.userCloudsClient.cache.redis.ttl.objectTypes` | string | Specifies how long object types remain in the cache. (default "30m0s") |
| `--authorizer.userCloudsClient.cache.redis.ttl.objects` | string | Specifies how long objects remain in the cache. (default "30m0s") |
| `--authorizer.userCloudsClient.cache.type` | string | Cache type to use. (default "none") |
| `--authorizer.userCloudsClient.clientID` | string | UserClouds client id |
| `--authorizer.userCloudsClient.clientSecretName` | string | UserCloud client secret name to read from the secret manager. (default "userclouds-client-secret") |
| `--authorizer.userCloudsClient.enableLogging` | | Enable userclouds client's internal logging. Calls to post logs take 250-350 ms and will impact p99 latency, enable with caution. |
| `--authorizer.userCloudsClient.tenantID` | string | UserClouds tenant id. Should be a UUID. |
| `--authorizer.userCloudsClient.tenantUrl` | string | Something like https://{yourtenant}.tenant.userclouds.com |
| `--config` | string | config file (default is /Users/andrew/.union/config.yaml) |
| `--connection.environment` | string | |
| `--connection.region` | string | |
| `--connection.rootTenantURLPattern` | string | Pattern for tenant url. (default "dns:///{{ organization }}.cloud-staging.union.ai") |
| `--console.endpoint` | string | Endpoint of console, if different than flyte admin |
| `--database.connMaxLifeTime` | string | sets the maximum amount of time a connection may be reused (default "1h0m0s") |
| `--database.enableForeignKeyConstraintWhenMigrating` | | Whether to enable gorm foreign keys when migrating the db |
| `--database.maxIdleConnections` | int | maxIdleConnections sets the maximum number of connections in the idle connection pool. (default 10) |
| `--database.maxOpenConnections` | int | maxOpenConnections sets the maximum number of open connections to the database. (default 100) |
| `--database.postgres.dbname` | string | The database name (default "postgres") |
| `--database.postgres.debug` | | |
| `--database.postgres.host` | string | The host name of the database server (default "localhost") |
| `--database.postgres.options` | string | See http://gorm.io/docs/connecting_to_the_database.html for available options passed, in addition to the above. (default "sslmode=disable") |
| `--database.postgres.password` | string | The database password. (default "postgres") |
| `--database.postgres.passwordPath` | string | Points to the file containing the database password. |
| `--database.postgres.port` | int | The port name of the database server (default 30001) |
| `--database.postgres.readReplicaHost` | string | The host name of the read replica database server (default "localhost") |
| `--database.postgres.username` | string | The database user who is connecting to the server. (default "postgres") |
| `--database.sqlite.file` | string | The path to the file (existing or new) where the DB should be created / stored. If existing, then this will be re-used, else a new will be created |
| `--db.connectionPool.maxConnectionLifetime` | string | (default "0s") |
| `--db.connectionPool.maxIdleConnections` | int | |
| `--db.connectionPool.maxOpenConnections` | int | |
| `--db.dbname` | string | (default "postgres") |
| `--db.debug` | | |
| `--db.host` | string | (default "postgres") |
| `--db.log_level` | int | (default 4) |
| `--db.options` | string | (default "sslmode=disable") |
| `--db.password` | string | |
| `--db.passwordPath` | string | |
| `--db.port` | int | (default 5432) |
| `--db.username` | string | (default "postgres") |
| `-d`, `--domain` | string | Specifies the Flyte project's domain. |
| `--files.archive` | | Pass in archive file either an http link or local path. |
| `--files.assumableIamRole` | string | Custom assumable iam auth role to register launch plans with. |
| `--files.continueOnError` | | Continue on error when registering files. |
| `--files.destinationDirectory` | string | Location of source code in container. |
| `--files.dryRun` | | Execute command without making any modifications. |
| `--files.enableSchedule` | | Enable the schedule if the files contain schedulable launchplan. |
| `--files.force` | | Force use of version number on entities registered with flyte. |
| `--files.k8ServiceAccount` | string | Deprecated. Please use `--K8sServiceAccount`|
| `--files.k8sServiceAccount` | string | Custom kubernetes service account auth role to register launch plans with. |
| `--files.outputLocationPrefix` | string | Custom output location prefix for offloaded types (files/schemas). |
| `--files.sourceUploadPath` | string | Deprecated: Update flyte admin to avoid having to configure storage access from uctl. |
| `--files.version` | string | Version of the entity to be registered with flyte which are un-versioned after serialization. |
| `--logger.formatter.type` | string | Sets logging format type. (default "json") |
| `--logger.level` | int | Sets the minimum logging level. (default 3) |
| `--logger.mute` | | Mutes all logs regardless of severity. Intended for benchmarks/tests only. |
| `--logger.show-source` | | Includes source code location in logs. |
| `--org` | string | Organization to work on. If not set, default to user's org. |
| `--otel.file.filename` | string | Filename to store exported telemetry traces (default "/tmp/trace.txt") |
| `--otel.jaeger.endpoint` | string | Endpoint for the jaeger telemetry trace ingestor (default "http://localhost:14268/api/traces") |
| `--otel.otlpgrpc.endpoint` | string | Endpoint for the OTLP telemetry trace collector (default "http://localhost:4317") |
| `--otel.otlphttp.endpoint` | string | Endpoint for the OTLP telemetry trace collector (default "http://localhost:4318/v1/traces") |
| `--otel.sampler.parentSampler` | string | Sets the parent sampler to use for the tracer (default "always") |
| `--otel.type` | string | Sets the type of exporter to configure [noop/file/jaeger/otlpgrpc/otlphttp]. (default "noop") |
| `-o`, `--output` | string | Specifies the output type - supported formats [TABLE JSON YAML DOT DOTURL]. NOTE: dot, doturl are only supported for Workflow (default "table") |
| `--plugins.catalogcache.reader.maxItems` | int | Maximum number of entries to keep in the index. (default 10000) |
| `--plugins.catalogcache.reader.maxRetries` | int | Maximum number of retries per item. (default 3) |
| `--plugins.catalogcache.reader.workers` | int | Number of concurrent workers to start processing the queue. (default 10) |
| `--plugins.catalogcache.writer.maxItems` | int | Maximum number of entries to keep in the index. (default 10000) |
| `--plugins.catalogcache.writer.maxRetries` | int | Maximum number of retries per item. (default 3) |
| `--plugins.catalogcache.writer.workers` | int | Number of concurrent workers to start processing the queue. (default 10) |
| `-p`, `--project` | string | Specifies the Flyte project. |
| `--rediscache.passwordSecretName` | string | Name of secret with Redis password. |
| `--rediscache.primaryEndpoint` | string | Primary endpoint for the redis cache that can be used for both reads and writes. |
| `--rediscache.replicaEndpoint` | string | Replica endpoint for the redis cache that can be used for reads. |
| `--secrets.env-prefix` | string | Prefix for environment variables (default "FLYTE_SECRET_") |
| `--secrets.secrets-prefix` | string | Prefix where to look for secrets file (default "/etc/secrets") |
| `--secrets.type` | string | Sets the type of storage to configure [local]. (default "local") |
| `--server.dataProxy.download.maxExpiresIn` | string | Maximum allowed expiration duration. (default "1h0m0s") |
| `--server.dataProxy.upload.defaultFileNameLength` | int | Default length for the generated file name if not provided in the request. (default 20) |
| `--server.dataProxy.upload.maxExpiresIn` | string | Maximum allowed expiration duration. (default "1h0m0s") |
| `--server.dataProxy.upload.maxSize` | string | Maximum allowed upload size. (default "6Mi") |
| `--server.dataProxy.upload.storagePrefix` | string | Storage prefix to use for all upload requests. |
| `--server.grpc.enableGrpcLatencyMetrics` | | Enable grpc latency metrics. Note Histograms metrics can be expensive on Prometheus servers. |
| `--server.grpc.maxMessageSizeBytes` | int | The max size in bytes for incoming gRPC messages |
| `--server.grpc.port` | int | On which grpc port to serve admin (default 8089) |
| `--server.grpc.serverReflection` | | Enable GRPC Server Reflection (default true) |
| `--server.grpcPort` | int | deprecated |
| `--server.grpcServerReflection` | | deprecated |
| `--server.httpPort` | int | On which http port to serve admin (default 8088) |
| `--server.kube-config` | string | Path to kubernetes client config file, default is empty, useful for incluster config. |
| `--server.kubeClientConfig.burst` | int | Max burst rate for throttle. 0 defaults to 10 (default 25) |
| `--server.kubeClientConfig.qps` | int32 | Max QPS to the master for requests to KubeAPI. 0 defaults to 5. (default 100) |
| `--server.kubeClientConfig.timeout` | string | Max duration allowed for every request to KubeAPI before giving up. 0 implies no timeout. (default "30s") |
| `--server.master` | string | The address of the Kubernetes API server. |
| `--server.readHeaderTimeoutSeconds` | int | The amount of time allowed to read request headers. (default 32) |
| `--server.security.allowCors` | | (default true) |
| `--server.security.allowedHeaders` | strings | (default [Content-Type,flyte-authorization]) |
| `--server.security.allowedOrigins` | strings | (default [*]) |
| `--server.security.auditAccess` | | |
| `--server.security.secure` | | |
| `--server.security.ssl.certificateFile` | string | |
| `--server.security.ssl.keyFile` | string | |
| `--server.security.useAuth` | | |
| `--server.thirdPartyConfig.flyteClient.audience` | string | Audience to use when initiating OAuth2 authorization requests. |
| `--server.thirdPartyConfig.flyteClient.clientId` | string | public identifier for the app which handles authorization for a Flyte deployment |
| `--server.thirdPartyConfig.flyteClient.redirectUri` | string | This is the callback uri registered with the app which handles authorization for a Flyte deployment |
| `--server.thirdPartyConfig.flyteClient.scopes` | strings | Recommended scopes for the client to request. |
| `--server.watchService.maxActiveClusterConnections` | int | (default 5) |
| `--server.watchService.maxPageSize` | int | (default 50000) |
| `--server.watchService.nonTerminalStatusUpdatesInterval` | string | (default "1m0s") |
| `--server.watchService.pollInterval` | string | (default "1s") |
| `--sharedservice.connectPort` | string | On which connect port to serve admin (default "8080") |
| `--sharedservice.grpc.grpcMaxResponseStatusBytes` | int32 | specifies the maximum (uncompressed) size of header list that the client is prepared to accept on grpc calls (default 32000) |
| `--sharedservice.grpc.maxConcurrentStreams` | int | Limit on the number of concurrent streams to each ServerTransport. (default 100) |
| `--sharedservice.grpc.maxMessageSizeBytes` | int | Limit on the size of message that can be received on the server. (default 10485760) |
| `--sharedservice.grpcServerReflection` | | Enable GRPC Server Reflection (default true) |
| `--sharedservice.httpPort` | string | On which http port to serve admin (default "8089") |
| `--sharedservice.kubeConfig` | string | Path to kubernetes client config file. |
| `--sharedservice.master` | string | The address of the Kubernetes API server. |
| `--sharedservice.metrics.enableClientGrpcHistograms` | | Enable client grpc histograms (default true) |
| `--sharedservice.metrics.enableGrpcHistograms` | | Enable grpc histograms (default true) |
| `--sharedservice.metrics.scope` | string | Scope to emit metrics under (default "service:") |
| `--sharedservice.port` | string | On which grpc port to serve admin (default "8080") |
| `--sharedservice.profiler.enabled` | | Enable Profiler on server |
| `--sharedservice.profilerPort` | string | Profile port to start listen for pprof and metric handlers on. (default "10254") |
| `--sharedservice.security.allowCors` | | |
| `--sharedservice.security.allowLocalhostAccess` | | Whether to permit localhost unauthenticated access to the server |
| `--sharedservice.security.allowedHeaders` | strings | |
| `--sharedservice.security.allowedOrigins` | strings | |
| `--sharedservice.security.auditAccess` | | |
| `--sharedservice.security.orgOverride` | string | Override org in identity context if localhost access enabled |
| `--sharedservice.security.secure` | | |
| `--sharedservice.security.ssl.certificateAuthorityFile` | string | |
| `--sharedservice.security.ssl.certificateFile` | string | |
| `--sharedservice.security.ssl.keyFile` | string | |
| `--sharedservice.security.useAuth` | | |
| `--sharedservice.sync.syncInterval` | string | Time interval to sync (default "5m0s") |
| `--storage.cache.max_size_mbs` | int | Maximum size of the cache where the Blob store data is cached in-memory. If not specified or set to 0, cache is not used |
| `--storage.cache.target_gc_percent` | int | Sets the garbage collection target percentage. |
| `--storage.connection.access-key` | string | Access key to use. Only required when authtype is set to accesskey. |
| `--storage.connection.auth-type` | string | Auth Type to use [iam, accesskey]. (default "iam") |
| `--storage.connection.disable-ssl` | | Disables SSL connection. Should only be used for development. |
| `--storage.connection.endpoint` | string | URL for storage client to connect to. |
| `--storage.connection.region` | string | Region to connect to. (default "us-east-1") |
| `--storage.connection.secret-key` | string | Secret to use when accesskey is set. |
| `--storage.container` | string | Initial container (in s3 a bucket) to create -if it doesn't exist-.' |
| `--storage.defaultHttpClient.timeout` | string | Sets time out on the http client. (default "0s") |
| `--storage.enable-multicontainer` | | If this is true, then the container argument is overlooked and redundant. This config will automatically open new connections to new containers/buckets as they are encountered |
| `--storage.limits.maxDownloadMBs` | int | Maximum allowed download size (in MBs) per call. (default 2) |
| `--storage.stow.config` | stringToString | Configuration for stow backend. Refer to github/flyteorg/stow (default []) |
| `--storage.stow.kind` | string | Kind of Stow backend to use. Refer to github/flyteorg/stow |
| `--storage.type` | string | Sets the type of storage to configure [s3/minio/local/mem/stow]. (default "s3") |
| `--union.auth.authorizationMetadataKey` | string | Authorization Header to use when passing Access Tokens to the server (default "flyte-authorization") |
| `--union.auth.clientId` | string | Client ID |
| `--union.auth.clientSecretEnvVar` | string | Environment variable containing the client secret |
| `--union.auth.clientSecretLocation` | string | File containing the client secret |
| `--union.auth.deviceFlow.pollInterval` | string | amount of time the device flow would poll the token endpoint if auth server doesn't return a polling interval. Okta and google IDP do return an interval' (default "5s") |
| `--union.auth.deviceFlow.refreshTime` | string | grace period from the token expiry after which it would refresh the token. (default "5m0s") |
| `--union.auth.deviceFlow.timeout` | string | amount of time the device flow should complete or else it will be cancelled. (default "10m0s") |
| `--union.auth.enable` | | Whether to enable an authenticated conenction when communicating with admin. (default true) |
| `--union.auth.externalAuth.command` | strings | Command for external authentication token generation |
| `--union.auth.pkce.refreshTime` | string | grace period from the token expiry after which it would refresh the token. (default "5m0s") |
| `--union.auth.pkce.timeout` | string | Amount of time the browser session would be active for authentication from client app. (default "15s") |
| `--union.auth.scopes` | strings | List of scopes to request |
| `--union.auth.tokenRefreshWindow` | string | Max duration between token refresh attempt and token expiry. (default "1h0m0s") |
| `--union.auth.tokenUrl` | string | OPTIONAL: Your IdP's token endpoint. It'll be discovered from flyte admin's OAuth Metadata endpoint if not provided. |
| `--union.auth.type` | string | Type of OAuth2 flow used for communicating with admin. (default "Pkce") |
| `--union.cache.maxItemsCount` | int | Maximum number of items to keep in the cache before evicting. (default 1000) |
| `--union.connection.host` | string | Host to connect to (default "dns:///utt-mgdp-stg-us-east-2.cloud-staging.union.ai") |
| `--union.connection.insecure` | | Whether to connect over insecure channel |
| `--union.connection.insecureSkipVerify` | | InsecureSkipVerify controls whether a client verifies the server's certificate chain and host name.Caution: shouldn't be use for production usecases' |
| `--union.connection.keepAliveConfig.permitWithoutStream` | | If true, client sends keepalive pings even with no active RPCs. |
| `--union.connection.keepAliveConfig.time` | string | After a duration of this time if the client doesn't see any activity it pings the server to see if the transport is still alive. (default "20s") |
| `--union.connection.keepAliveConfig.timeout` | string | After having pinged for keepalive check, the client waits for a duration of Timeout and if no activity is seen even after that the connection is closed. (default "2m0s") |
| `--union.connection.maxBackoffDelay` | string | Max delay for grpc backoff (default "8s") |
| `--union.connection.maxRecvMsgSize` | int | Maximum size of a message in bytes of a gRPC message (default 10485760) |
| `--union.connection.maxRetries` | int | Max number of gRPC retries (default 4) |
| `--union.connection.minConnectTimeout` | string | Minimum timeout for establishing a connection (default "20s") |
| `--union.connection.perRetryTimeout` | string | gRPC per retry timeout (default "15s") |
| `--union.connection.serviceConfig` | string | Defines gRPC experimental JSON Service Config (default "{"loadBalancingConfig": [{"round_robin":{}}]}") |
| `--union.connection.trustedIdentityClaims.enabled` | | Enables passing of trusted claims while making inter service calls |
| `--union.connection.trustedIdentityClaims.externalIdentityClaim` | string | External identity claim of the service which is authorized to make internal service call. These are verified against userclouds actions |
| `--union.connection.trustedIdentityClaims.externalIdentityTypeClaim` | string | External identity type claim of app or user to use for the current service identity. It should be an 'app' for inter service communication |
| `--union.internalConnectionConfig.-` | stringToString | (default []) |
| `--union.internalConnectionConfig.enabled` | | Enables internal service to service communication instead of going through ingress. |
| `--union.internalConnectionConfig.urlPattern` | string | UrlPattern of the internal service endpoints. (default "{{ service }}-helmchart.{{ service }}.svc.cluster.local:80") |
| `--webhook.awsSecretManager.sidecarImage` | string | Specifies the sidecar docker image to use (default "docker.io/amazon/aws-secrets-manager-secret-sidecar:v0.1.4") |
| `--webhook.certDir` | string | Certificate directory to use to write generated certs. Defaults to /etc/webhook/certs/ (default "/etc/webhook/certs") |
| `--webhook.embeddedSecretManagerConfig.awsConfig.region` | string | AWS region |
| `--webhook.embeddedSecretManagerConfig.fileMountInitContainer.image` | string | Specifies init container image to use for mounting secrets as files. (default "busybox:1.28") |
| `--webhook.embeddedSecretManagerConfig.gcpConfig.project` | string | GCP project to be used for secret manager |
| `--webhook.embeddedSecretManagerConfig.type` | string | (default "AWS") |
| `--webhook.gcpSecretManager.sidecarImage` | string | Specifies the sidecar docker image to use (default "gcr.io/google.com/cloudsdktool/cloud-sdk:alpine") |
| `--webhook.listenPort` | int | The port to use to listen to webhook calls. Defaults to 9443 (default 9443) |
| `--webhook.localCert` | | write certs locally. Defaults to false |
| `--webhook.metrics-prefix` | string | An optional prefix for all published metrics. (default "flyte:") |
| `--webhook.secretName` | string | Secret name to write generated certs to. (default "flyte-pod-webhook") |
| `--webhook.serviceName` | string | The name of the webhook service. (default "flyte-pod-webhook") |
| `--webhook.servicePort` | int32 | The port on the service that hosting webhook. (default 443) |
| `--webhook.vaultSecretManager.role` | string | Specifies the vault role to use (default "flyte") |
=== PAGE: https://www.union.ai/docs/v1/serverless/api-reference/uctl-cli/uctl-register ===
# uctl register
Registers tasks, workflows, and launch plans from a list of generated
serialized files.
## Synopsis
Take input files as serialized versions of the
tasks/workflows/launchplans and register them with FlyteAdmin.
Currently, these input files are protobuf files generated as output from
Flytekit serialize. Project and Domain are mandatory fields to be passed
for registration and an optional version which defaults to v1. If the
entities are already registered with Flyte for the same version, the
registration would fail.
## Options
| Option | Type | Description |
|--------|------|-------------|
| `-h`, `--help` | help for register |
### Options inherited from parent commands
| Option | Type | Description |
|--------|------|-------------|
| `--admin.audience` | string | Audience to use when initiating OAuth2 authorization requests. |
| `--admin.authType` | string | Type of OAuth2 flow used for communicating with admin.ClientSecret, Pkce, ExternalCommand are valid values (default "ClientSecret") |
| `--admin.authorizationHeader` | string | Custom metadata header to pass JWT |
| `--admin.authorizationServerUrl` | string | This is the URL to your IdP's authorization server. It'll default to Endpoint |
| `--admin.caCertFilePath` | string | Use specified certificate file to verify the admin server peer. |
| `--admin.clientId` | string | Client ID (default "flytepropeller") |
| `--admin.clientSecretEnvVar` | string | Environment variable containing the client secret |
| `--admin.clientSecretLocation` | string | File containing the client secret (default "/etc/secrets/client_secret") |
| `--admin.command` | strings | Command for external authentication token generation |
| `--admin.defaultOrg` | string | OPTIONAL: Default org to use to support non-org based cli's.'. |
| `--admin.defaultServiceConfig` | string | |
| `--admin.deviceFlowConfig.pollInterval` | string | amount of time the device flow would poll the token endpoint if auth server doesn't return a polling interval. Okta and google IDP do return an interval' (default "5s") |
| `--admin.deviceFlowConfig.refreshTime` | string | grace period from the token expiry after which it would refresh the token. (default "5m0s") |
| `--admin.deviceFlowConfig.timeout` | string | amount of time the device flow should complete or else it will be cancelled. (default "10m0s") |
| `--admin.endpoint` | string | For admin types, specify where the uri of the service is located. |
| `--admin.httpProxyURL` | string | OPTIONAL: HTTP Proxy to be used for OAuth requests. |
| `--admin.insecure` | | Use insecure connection. |
| `--admin.insecureSkipVerify` | | InsecureSkipVerify controls whether a client verifies the server's certificate chain and host name.Caution: shouldn't be use for production usecases' |
| `--admin.maxBackoffDelay` | string | Max delay for grpc backoff (default "8s") |
| `--admin.maxMessageSizeBytes` | int | The max size in bytes for incoming gRPC messages |
| `--admin.maxRetries` | int | Max number of gRPC retries (default 4) |
| `--admin.perRetryTimeout` | string | gRPC per retry timeout (default "15s") |
| `--admin.pkceConfig.refreshTime` | string | grace period from the token expiry after which it would refresh the token. (default "5m0s") |
| `--admin.pkceConfig.timeout` | string | Amount of time the browser session would be active for authentication from client app. (default "2m0s") |
| `--admin.proxyCommand` | strings | Command for external proxy-authorization token generation |
| `--admin.scopes` | strings | List of scopes to request |
| `--admin.tokenRefreshWindow` | string | Max duration between token refresh attempt and token expiry. (default "0s") |
| `--admin.tokenUrl` | string | OPTIONAL: Your IdP's token endpoint. It'll be discovered from flyte admin's OAuth Metadata endpoint if not provided. |
| `--admin.useAudienceFromAdmin` | | Use Audience configured from admins public endpoint config. |
| `--admin.useAuth` | | Deprecated: Auth will be enabled/disabled based on admin's dynamically discovered information. |
| `--auth.appAuth.externalAuthServer.allowedAudience` | strings | Optional: A list of allowed audiences. If not provided, the audience is expected to be the public Uri of the service. |
| `--auth.appAuth.externalAuthServer.baseUrl` | string | This should be the base url of the authorization server that you are trying to hit. With Okta for instance, it will look something like https://company.okta.com/oauth2/abcdef123456789/ |
| `--auth.appAuth.externalAuthServer.httpProxyURL` | string | OPTIONAL: HTTP Proxy to be used for OAuth requests. |
| `--auth.appAuth.externalAuthServer.metadataUrl` | string | Optional: If the server doesn't support /.well-known/oauth-authorization-server, you can set a custom metadata url here.' |
| `--auth.appAuth.externalAuthServer.retryAttempts` | int | Optional: The number of attempted retries on a transient failure to get the OAuth metadata (default 5) |
| `--auth.appAuth.externalAuthServer.retryDelay` | string | Optional, Duration to wait between retries (default "1s") |
| `--auth.appAuth.selfAuthServer.accessTokenLifespan` | string | Defines the lifespan of issued access tokens. (default "30m0s") |
| `--auth.appAuth.selfAuthServer.authorizationCodeLifespan` | string | Defines the lifespan of issued access tokens. (default "5m0s") |
| `--auth.appAuth.selfAuthServer.claimSymmetricEncryptionKeySecretName` | string | OPTIONAL: Secret name to use to encrypt claims in authcode token. (default "claim_symmetric_key") |
| `--auth.appAuth.selfAuthServer.issuer` | string | Defines the issuer to use when issuing and validating tokens. The default value is https://{requestUri.HostAndPort}/ |
| `--auth.appAuth.selfAuthServer.oldTokenSigningRSAKeySecretName` | string | OPTIONAL: Secret name to use to retrieve Old RSA Signing Key. This can be useful during key rotation to continue to accept older tokens. (default "token_rsa_key_old.pem") |
| `--auth.appAuth.selfAuthServer.refreshTokenLifespan` | string | Defines the lifespan of issued access tokens. (default "1h0m0s") |
| `--auth.appAuth.selfAuthServer.tokenSigningRSAKeySecretName` | string | OPTIONAL: Secret name to use to retrieve RSA Signing Key. (default "token_rsa_key.pem") |
| `--auth.appAuth.thirdPartyConfig.flyteClient.audience` | string | Audience to use when initiating OAuth2 authorization requests. |
| `--auth.appAuth.thirdPartyConfig.flyteClient.clientId` | string | public identifier for the app which handles authorization for a Flyte deployment (default "uctl") |
| `--auth.appAuth.thirdPartyConfig.flyteClient.redirectUri` | string | This is the callback uri registered with the app which handles authorization for a Flyte deployment (default "http://localhost:53593/callback") |
| `--auth.appAuth.thirdPartyConfig.flyteClient.scopes` | strings | Recommended scopes for the client to request. (default [all,offline]) |
| `--auth.disableForGrpc` | | Disables auth enforcement on Grpc Endpoints. |
| `--auth.disableForHttp` | | Disables auth enforcement on HTTP Endpoints. |
| `--auth.grpcAuthorizationHeader` | string | (default "flyte-authorization") |
| `--auth.httpAuthorizationHeader` | string | (default "flyte-authorization") |
| `--auth.httpProxyURL` | string | OPTIONAL: HTTP Proxy to be used for OAuth requests. |
| `--auth.tokenEndpointProxyPath` | string | The path used to proxy calls to the TokenURL |
| `--auth.userAuth.cookieBlockKeySecretName` | string | OPTIONAL: Secret name to use for cookie block key. (default "cookie_block_key") |
| `--auth.userAuth.cookieHashKeySecretName` | string | OPTIONAL: Secret name to use for cookie hash key. (default "cookie_hash_key") |
| `--auth.userAuth.cookieSetting.domain` | string | OPTIONAL: Allows you to set the domain attribute on the auth cookies. |
| `--auth.userAuth.cookieSetting.sameSitePolicy` | string | OPTIONAL: Allows you to declare if your cookie should be restricted to a first-party or same-site context.Wrapper around http.SameSite. (default "DefaultMode") |
| `--auth.userAuth.httpProxyURL` | string | OPTIONAL: HTTP Proxy to be used for OAuth requests. |
| `--auth.userAuth.idpQueryParameter` | string | idp query parameter used for selecting a particular IDP for doing user authentication. Eg: for Okta passing idp={IDP-ID} forces the authentication to happen with IDP-ID |
| `--auth.userAuth.openId.baseUrl` | string | |
| `--auth.userAuth.openId.clientId` | string | |
| `--auth.userAuth.openId.clientSecretFile` | string | |
| `--auth.userAuth.openId.clientSecretName` | string | (default "oidc_client_secret") |
| `--auth.userAuth.openId.scopes` | strings | (default [openid,profile]) |
| `--auth.userAuth.redirectUrl` | string | (default "/console") |
| `--authorizer.internalCommunicationConfig.enabled` | | Enables authorization decisions for internal communication. (default true) |
| `--authorizer.internalCommunicationConfig.ingressIdentity` | string | IngressIdentity used in the cluster. Needed to exclude the communication coming from ingress. (default "ingress-nginx.ingress-nginx.serviceaccount.identity.linkerd.cluster.local") |
| `--authorizer.internalCommunicationConfig.tenantUrlPatternIdentity` | string | UrlPatternIdentity of the internal tenant service endpoint identities. (default "{{ service }}.{{ org }}.serviceaccount.identity.linkerd.cluster.local") |
| `--authorizer.internalCommunicationConfig.urlPatternIdentity` | string | UrlPatternIdentity of the internal service endpoint identities. (default "{{ service }}-helmchart.{{ service }}.serviceaccount.identity.linkerd.cluster.local") |
| `--authorizer.mode` | string | (default "Active") |
| `--authorizer.organizationConfig.PolicyConfig.adminPolicyDescription` | string | description for the boilerplate admin policy (default "Contributor permissions and full admin permissions to manage users and view usage dashboards") |
| `--authorizer.organizationConfig.PolicyConfig.contributorPolicyDescription` | string | description for the boilerplate contributor policy (default "Viewer permissions and permissions to create workflows, tasks, launch plans, and executions") |
| `--authorizer.organizationConfig.PolicyConfig.defaultUserPolicyRoleType` | string | name of the role type to determine which default policy new users added to the organization should be assigned (default "Viewer") |
| `--authorizer.organizationConfig.PolicyConfig.serverlessContributorPolicyDescription` | string | description for the boilerplate serverless contributor policy (default "Viewer permissions and permissions to create workflows, tasks, launch plans, and executions") |
| `--authorizer.organizationConfig.PolicyConfig.serverlessViewerPolicyDescription` | string | description for the boilerplate serverless viewer policy (default "Permissions to view Flyte entities") |
| `--authorizer.organizationConfig.PolicyConfig.viewerPolicyDescription` | string | description for the boilerplate viewer policy (default "Permissions to view Flyte entities") |
| `--authorizer.organizationConfig.defaultPolicyCacheDuration` | string | Cache entry duration for the store of the default policy per organization (default "10m0s") |
| `--authorizer.syncRuleRefreshInterval` | string | (default "1m0s") |
| `--authorizer.type` | string | (default "UserClouds") |
| `--authorizer.userCloudsClient.cache.redis.ttl.edgeTypes` | string | Specifies how long edge types remain in the cache.. (default "30m0s") |
| `--authorizer.userCloudsClient.cache.redis.ttl.edges` | string | Specifies how long edges remain in the cache. (default "30m0s") |
| `--authorizer.userCloudsClient.cache.redis.ttl.objectTypes` | string | Specifies how long object types remain in the cache. (default "30m0s") |
| `--authorizer.userCloudsClient.cache.redis.ttl.objects` | string | Specifies how long objects remain in the cache. (default "30m0s") |
| `--authorizer.userCloudsClient.cache.type` | string | Cache type to use. (default "none") |
| `--authorizer.userCloudsClient.clientID` | string | UserClouds client id |
| `--authorizer.userCloudsClient.clientSecretName` | string | UserCloud client secret name to read from the secret manager. (default "userclouds-client-secret") |
| `--authorizer.userCloudsClient.enableLogging` | | Enable userclouds client's internal logging. Calls to post logs take 250-350 ms and will impact p99 latency, enable with caution. |
| `--authorizer.userCloudsClient.tenantID` | string | UserClouds tenant id. Should be a UUID. |
| `--authorizer.userCloudsClient.tenantUrl` | string | Something like https://{yourtenant}.tenant.userclouds.com |
| `--config` | string | config file (default is /Users/andrew/.union/config.yaml) |
| `--connection.environment` | string | |
| `--connection.region` | string | |
| `--connection.rootTenantURLPattern` | string | Pattern for tenant url. (default "dns:///{{ organization }}.cloud-staging.union.ai") |
| `--console.endpoint` | string | Endpoint of console, if different than flyte admin |
| `--database.connMaxLifeTime` | string | sets the maximum amount of time a connection may be reused (default "1h0m0s") |
| `--database.enableForeignKeyConstraintWhenMigrating` | | Whether to enable gorm foreign keys when migrating the db |
| `--database.maxIdleConnections` | int | maxIdleConnections sets the maximum number of connections in the idle connection pool. (default 10) |
| `--database.maxOpenConnections` | int | maxOpenConnections sets the maximum number of open connections to the database. (default 100) |
| `--database.postgres.dbname` | string | The database name (default "postgres") |
| `--database.postgres.debug` | | |
| `--database.postgres.host` | string | The host name of the database server (default "localhost") |
| `--database.postgres.options` | string | See http://gorm.io/docs/connecting_to_the_database.html for available options passed, in addition to the above. (default "sslmode=disable") |
| `--database.postgres.password` | string | The database password. (default "postgres") |
| `--database.postgres.passwordPath` | string | Points to the file containing the database password. |
| `--database.postgres.port` | int | The port name of the database server (default 30001) |
| `--database.postgres.readReplicaHost` | string | The host name of the read replica database server (default "localhost") |
| `--database.postgres.username` | string | The database user who is connecting to the server. (default "postgres") |
| `--database.sqlite.file` | string | The path to the file (existing or new) where the DB should be created / stored. If existing, then this will be re-used, else a new will be created |
| `--db.connectionPool.maxConnectionLifetime` | string | (default "0s") |
| `--db.connectionPool.maxIdleConnections` | int | |
| `--db.connectionPool.maxOpenConnections` | int | |
| `--db.dbname` | string | (default "postgres") |
| `--db.debug` | | |
| `--db.host` | string | (default "postgres") |
| `--db.log_level` | int | (default 4) |
| `--db.options` | string | (default "sslmode=disable") |
| `--db.password` | string | |
| `--db.passwordPath` | string | |
| `--db.port` | int | (default 5432) |
| `--db.username` | string | (default "postgres") |
| `-d`, `--domain` | string | Specifies the Flyte project's domain. |
| `--files.archive` | | Pass in archive file either an http link or local path. |
| `--files.assumableIamRole` | string | Custom assumable iam auth role to register launch plans with. |
| `--files.continueOnError` | | Continue on error when registering files. |
| `--files.destinationDirectory` | string | Location of source code in container. |
| `--files.dryRun` | | Execute command without making any modifications. |
| `--files.enableSchedule` | | Enable the schedule if the files contain schedulable launchplan. |
| `--files.force` | | Force use of version number on entities registered with flyte. |
| `--files.k8ServiceAccount` | string | Deprecated. Please use `--K8sServiceAccount`|
| `--files.k8sServiceAccount` | string | Custom kubernetes service account auth role to register launch plans with. |
| `--files.outputLocationPrefix` | string | Custom output location prefix for offloaded types (files/schemas). |
| `--files.sourceUploadPath` | string | Deprecated: Update flyte admin to avoid having to configure storage access from uctl. |
| `--files.version` | string | Version of the entity to be registered with flyte which are un-versioned after serialization. |
| `--logger.formatter.type` | string | Sets logging format type. (default "json") |
| `--logger.level` | int | Sets the minimum logging level. (default 3) |
| `--logger.mute` | | Mutes all logs regardless of severity. Intended for benchmarks/tests only. |
| `--logger.show-source` | | Includes source code location in logs. |
| `--org` | string | Organization to work on. If not set, default to user's org. |
| `--otel.file.filename` | string | Filename to store exported telemetry traces (default "/tmp/trace.txt") |
| `--otel.jaeger.endpoint` | string | Endpoint for the jaeger telemetry trace ingestor (default "http://localhost:14268/api/traces") |
| `--otel.otlpgrpc.endpoint` | string | Endpoint for the OTLP telemetry trace collector (default "http://localhost:4317") |
| `--otel.otlphttp.endpoint` | string | Endpoint for the OTLP telemetry trace collector (default "http://localhost:4318/v1/traces") |
| `--otel.sampler.parentSampler` | string | Sets the parent sampler to use for the tracer (default "always") |
| `--otel.type` | string | Sets the type of exporter to configure [noop/file/jaeger/otlpgrpc/otlphttp]. (default "noop") |
| `-o`, `--output` | string | Specifies the output type - supported formats [TABLE JSON YAML DOT DOTURL]. NOTE: dot, doturl are only supported for Workflow (default "table") |
| `--plugins.catalogcache.reader.maxItems` | int | Maximum number of entries to keep in the index. (default 10000) |
| `--plugins.catalogcache.reader.maxRetries` | int | Maximum number of retries per item. (default 3) |
| `--plugins.catalogcache.reader.workers` | int | Number of concurrent workers to start processing the queue. (default 10) |
| `--plugins.catalogcache.writer.maxItems` | int | Maximum number of entries to keep in the index. (default 10000) |
| `--plugins.catalogcache.writer.maxRetries` | int | Maximum number of retries per item. (default 3) |
| `--plugins.catalogcache.writer.workers` | int | Number of concurrent workers to start processing the queue. (default 10) |
| `-p`, `--project` | string | Specifies the Flyte project. |
| `--rediscache.passwordSecretName` | string | Name of secret with Redis password. |
| `--rediscache.primaryEndpoint` | string | Primary endpoint for the redis cache that can be used for both reads and writes. |
| `--rediscache.replicaEndpoint` | string | Replica endpoint for the redis cache that can be used for reads. |
| `--secrets.env-prefix` | string | Prefix for environment variables (default "FLYTE_SECRET_") |
| `--secrets.secrets-prefix` | string | Prefix where to look for secrets file (default "/etc/secrets") |
| `--secrets.type` | string | Sets the type of storage to configure [local]. (default "local") |
| `--server.dataProxy.download.maxExpiresIn` | string | Maximum allowed expiration duration. (default "1h0m0s") |
| `--server.dataProxy.upload.defaultFileNameLength` | int | Default length for the generated file name if not provided in the request. (default 20) |
| `--server.dataProxy.upload.maxExpiresIn` | string | Maximum allowed expiration duration. (default "1h0m0s") |
| `--server.dataProxy.upload.maxSize` | string | Maximum allowed upload size. (default "6Mi") |
| `--server.dataProxy.upload.storagePrefix` | string | Storage prefix to use for all upload requests. |
| `--server.grpc.enableGrpcLatencyMetrics` | | Enable grpc latency metrics. Note Histograms metrics can be expensive on Prometheus servers. |
| `--server.grpc.maxMessageSizeBytes` | int | The max size in bytes for incoming gRPC messages |
| `--server.grpc.port` | int | On which grpc port to serve admin (default 8089) |
| `--server.grpc.serverReflection` | | Enable GRPC Server Reflection (default true) |
| `--server.grpcPort` | int | deprecated |
| `--server.grpcServerReflection` | | deprecated |
| `--server.httpPort` | int | On which http port to serve admin (default 8088) |
| `--server.kube-config` | string | Path to kubernetes client config file, default is empty, useful for incluster config. |
| `--server.kubeClientConfig.burst` | int | Max burst rate for throttle. 0 defaults to 10 (default 25) |
| `--server.kubeClientConfig.qps` | int32 | Max QPS to the master for requests to KubeAPI. 0 defaults to 5. (default 100) |
| `--server.kubeClientConfig.timeout` | string | Max duration allowed for every request to KubeAPI before giving up. 0 implies no timeout. (default "30s") |
| `--server.master` | string | The address of the Kubernetes API server. |
| `--server.readHeaderTimeoutSeconds` | int | The amount of time allowed to read request headers. (default 32) |
| `--server.security.allowCors` | | (default true) |
| `--server.security.allowedHeaders` | strings | (default [Content-Type,flyte-authorization]) |
| `--server.security.allowedOrigins` | strings | (default [*]) |
| `--server.security.auditAccess` | | |
| `--server.security.secure` | | |
| `--server.security.ssl.certificateFile` | string | |
| `--server.security.ssl.keyFile` | string | |
| `--server.security.useAuth` | | |
| `--server.thirdPartyConfig.flyteClient.audience` | string | Audience to use when initiating OAuth2 authorization requests. |
| `--server.thirdPartyConfig.flyteClient.clientId` | string | public identifier for the app which handles authorization for a Flyte deployment |
| `--server.thirdPartyConfig.flyteClient.redirectUri` | string | This is the callback uri registered with the app which handles authorization for a Flyte deployment |
| `--server.thirdPartyConfig.flyteClient.scopes` | strings | Recommended scopes for the client to request. |
| `--server.watchService.maxActiveClusterConnections` | int | (default 5) |
| `--server.watchService.maxPageSize` | int | (default 50000) |
| `--server.watchService.nonTerminalStatusUpdatesInterval` | string | (default "1m0s") |
| `--server.watchService.pollInterval` | string | (default "1s") |
| `--sharedservice.connectPort` | string | On which connect port to serve admin (default "8080") |
| `--sharedservice.grpc.grpcMaxResponseStatusBytes` | int32 | specifies the maximum (uncompressed) size of header list that the client is prepared to accept on grpc calls (default 32000) |
| `--sharedservice.grpc.maxConcurrentStreams` | int | Limit on the number of concurrent streams to each ServerTransport. (default 100) |
| `--sharedservice.grpc.maxMessageSizeBytes` | int | Limit on the size of message that can be received on the server. (default 10485760) |
| `--sharedservice.grpcServerReflection` | | Enable GRPC Server Reflection (default true) |
| `--sharedservice.httpPort` | string | On which http port to serve admin (default "8089") |
| `--sharedservice.kubeConfig` | string | Path to kubernetes client config file. |
| `--sharedservice.master` | string | The address of the Kubernetes API server. |
| `--sharedservice.metrics.enableClientGrpcHistograms` | | Enable client grpc histograms (default true) |
| `--sharedservice.metrics.enableGrpcHistograms` | | Enable grpc histograms (default true) |
| `--sharedservice.metrics.scope` | string | Scope to emit metrics under (default "service:") |
| `--sharedservice.port` | string | On which grpc port to serve admin (default "8080") |
| `--sharedservice.profiler.enabled` | | Enable Profiler on server |
| `--sharedservice.profilerPort` | string | Profile port to start listen for pprof and metric handlers on. (default "10254") |
| `--sharedservice.security.allowCors` | | |
| `--sharedservice.security.allowLocalhostAccess` | | Whether to permit localhost unauthenticated access to the server |
| `--sharedservice.security.allowedHeaders` | strings | |
| `--sharedservice.security.allowedOrigins` | strings | |
| `--sharedservice.security.auditAccess` | | |
| `--sharedservice.security.orgOverride` | string | Override org in identity context if localhost access enabled |
| `--sharedservice.security.secure` | | |
| `--sharedservice.security.ssl.certificateAuthorityFile` | string | |
| `--sharedservice.security.ssl.certificateFile` | string | |
| `--sharedservice.security.ssl.keyFile` | string | |
| `--sharedservice.security.useAuth` | | |
| `--sharedservice.sync.syncInterval` | string | Time interval to sync (default "5m0s") |
| `--storage.cache.max_size_mbs` | int | Maximum size of the cache where the Blob store data is cached in-memory. If not specified or set to 0, cache is not used |
| `--storage.cache.target_gc_percent` | int | Sets the garbage collection target percentage. |
| `--storage.connection.access-key` | string | Access key to use. Only required when authtype is set to accesskey. |
| `--storage.connection.auth-type` | string | Auth Type to use [iam, accesskey]. (default "iam") |
| `--storage.connection.disable-ssl` | | Disables SSL connection. Should only be used for development. |
| `--storage.connection.endpoint` | string | URL for storage client to connect to. |
| `--storage.connection.region` | string | Region to connect to. (default "us-east-1") |
| `--storage.connection.secret-key` | string | Secret to use when accesskey is set. |
| `--storage.container` | string | Initial container (in s3 a bucket) to create -if it doesn't exist-.' |
| `--storage.defaultHttpClient.timeout` | string | Sets time out on the http client. (default "0s") |
| `--storage.enable-multicontainer` | | If this is true, then the container argument is overlooked and redundant. This config will automatically open new connections to new containers/buckets as they are encountered |
| `--storage.limits.maxDownloadMBs` | int | Maximum allowed download size (in MBs) per call. (default 2) |
| `--storage.stow.config` | stringToString | Configuration for stow backend. Refer to github/flyteorg/stow (default []) |
| `--storage.stow.kind` | string | Kind of Stow backend to use. Refer to github/flyteorg/stow |
| `--storage.type` | string | Sets the type of storage to configure [s3/minio/local/mem/stow]. (default "s3") |
| `--union.auth.authorizationMetadataKey` | string | Authorization Header to use when passing Access Tokens to the server (default "flyte-authorization") |
| `--union.auth.clientId` | string | Client ID |
| `--union.auth.clientSecretEnvVar` | string | Environment variable containing the client secret |
| `--union.auth.clientSecretLocation` | string | File containing the client secret |
| `--union.auth.deviceFlow.pollInterval` | string | amount of time the device flow would poll the token endpoint if auth server doesn't return a polling interval. Okta and google IDP do return an interval' (default "5s") |
| `--union.auth.deviceFlow.refreshTime` | string | grace period from the token expiry after which it would refresh the token. (default "5m0s") |
| `--union.auth.deviceFlow.timeout` | string | amount of time the device flow should complete or else it will be cancelled. (default "10m0s") |
| `--union.auth.enable` | | Whether to enable an authenticated conenction when communicating with admin. (default true) |
| `--union.auth.externalAuth.command` | strings | Command for external authentication token generation |
| `--union.auth.pkce.refreshTime` | string | grace period from the token expiry after which it would refresh the token. (default "5m0s") |
| `--union.auth.pkce.timeout` | string | Amount of time the browser session would be active for authentication from client app. (default "15s") |
| `--union.auth.scopes` | strings | List of scopes to request |
| `--union.auth.tokenRefreshWindow` | string | Max duration between token refresh attempt and token expiry. (default "1h0m0s") |
| `--union.auth.tokenUrl` | string | OPTIONAL: Your IdP's token endpoint. It'll be discovered from flyte admin's OAuth Metadata endpoint if not provided. |
| `--union.auth.type` | string | Type of OAuth2 flow used for communicating with admin. (default "Pkce") |
| `--union.cache.maxItemsCount` | int | Maximum number of items to keep in the cache before evicting. (default 1000) |
| `--union.connection.host` | string | Host to connect to (default "dns:///utt-mgdp-stg-us-east-2.cloud-staging.union.ai") |
| `--union.connection.insecure` | | Whether to connect over insecure channel |
| `--union.connection.insecureSkipVerify` | | InsecureSkipVerify controls whether a client verifies the server's certificate chain and host name.Caution: shouldn't be use for production usecases' |
| `--union.connection.keepAliveConfig.permitWithoutStream` | | If true, client sends keepalive pings even with no active RPCs. |
| `--union.connection.keepAliveConfig.time` | string | After a duration of this time if the client doesn't see any activity it pings the server to see if the transport is still alive. (default "20s") |
| `--union.connection.keepAliveConfig.timeout` | string | After having pinged for keepalive check, the client waits for a duration of Timeout and if no activity is seen even after that the connection is closed. (default "2m0s") |
| `--union.connection.maxBackoffDelay` | string | Max delay for grpc backoff (default "8s") |
| `--union.connection.maxRecvMsgSize` | int | Maximum size of a message in bytes of a gRPC message (default 10485760) |
| `--union.connection.maxRetries` | int | Max number of gRPC retries (default 4) |
| `--union.connection.minConnectTimeout` | string | Minimum timeout for establishing a connection (default "20s") |
| `--union.connection.perRetryTimeout` | string | gRPC per retry timeout (default "15s") |
| `--union.connection.serviceConfig` | string | Defines gRPC experimental JSON Service Config (default "{"loadBalancingConfig": [{"round_robin":{}}]}") |
| `--union.connection.trustedIdentityClaims.enabled` | | Enables passing of trusted claims while making inter service calls |
| `--union.connection.trustedIdentityClaims.externalIdentityClaim` | string | External identity claim of the service which is authorized to make internal service call. These are verified against userclouds actions |
| `--union.connection.trustedIdentityClaims.externalIdentityTypeClaim` | string | External identity type claim of app or user to use for the current service identity. It should be an 'app' for inter service communication |
| `--union.internalConnectionConfig.-` | stringToString | (default []) |
| `--union.internalConnectionConfig.enabled` | | Enables internal service to service communication instead of going through ingress. |
| `--union.internalConnectionConfig.urlPattern` | string | UrlPattern of the internal service endpoints. (default "{{ service }}-helmchart.{{ service }}.svc.cluster.local:80") |
| `--webhook.awsSecretManager.sidecarImage` | string | Specifies the sidecar docker image to use (default "docker.io/amazon/aws-secrets-manager-secret-sidecar:v0.1.4") |
| `--webhook.certDir` | string | Certificate directory to use to write generated certs. Defaults to /etc/webhook/certs/ (default "/etc/webhook/certs") |
| `--webhook.embeddedSecretManagerConfig.awsConfig.region` | string | AWS region |
| `--webhook.embeddedSecretManagerConfig.fileMountInitContainer.image` | string | Specifies init container image to use for mounting secrets as files. (default "busybox:1.28") |
| `--webhook.embeddedSecretManagerConfig.gcpConfig.project` | string | GCP project to be used for secret manager |
| `--webhook.embeddedSecretManagerConfig.type` | string | (default "AWS") |
| `--webhook.gcpSecretManager.sidecarImage` | string | Specifies the sidecar docker image to use (default "gcr.io/google.com/cloudsdktool/cloud-sdk:alpine") |
| `--webhook.listenPort` | int | The port to use to listen to webhook calls. Defaults to 9443 (default 9443) |
| `--webhook.localCert` | | write certs locally. Defaults to false |
| `--webhook.metrics-prefix` | string | An optional prefix for all published metrics. (default "flyte:") |
| `--webhook.secretName` | string | Secret name to write generated certs to. (default "flyte-pod-webhook") |
| `--webhook.serviceName` | string | The name of the webhook service. (default "flyte-pod-webhook") |
| `--webhook.servicePort` | int32 | The port on the service that hosting webhook. (default 443) |
| `--webhook.vaultSecretManager.role` | string | Specifies the vault role to use (default "flyte") |
## Subpages
- **Uctl CLI > uctl register > uctl register examples**
- **Uctl CLI > uctl register > uctl register files**
=== PAGE: https://www.union.ai/docs/v1/serverless/api-reference/uctl-cli/uctl-register/uctl-register-examples ===
# uctl register examples
Registers Flytesnacks example.
## Synopsis
Register all the latest Flytesnacks examples:
```shell
$ uctl register examples -d development -p flytesnacks
```
Register specific release of Flytesnacks examples:
```shell
$ uctl register examples -d development -p flytesnacks --version v0.2.176
```
> [!NOTE]
> The register command automatically override the version with release version.
Usage:
```shell
$ uctl register examples [flags]
```
## Options
| Option | Type | Description |
|--------|------|-------------|
| `--archive` | | Pass in archive file either an http link or local path. |
| Option | Type | Description |
|--------|------|-------------|
| `--assumableIamRole` | string | Custom assumable iam auth role to register launch plans with. |
| `--continueOnError` | | Continue on error when registering files. |
| `--destinationDirectory` | string | Location of source code in container. |
| `--dryRun` | | Execute command without making any modifications. |
| `--enableSchedule` | | Enable the schedule if the files contain schedulable launchplan. |
| `--force` | | Force use of version number on entities registered with flyte. |
| `-h`, `--help` | help for examples |
| `--k8ServiceAccount` | string | Deprecated. Please use `--K8sServiceAccount`|
| `--k8sServiceAccount` | string | Custom kubernetes service account auth role to register launch plans with. |
| `--outputLocationPrefix` | string | Custom output location prefix for offloaded types (files/schemas). |
| `--sourceUploadPath` | string | Deprecated: Update flyte admin to avoid having to configure storage access from uctl. |
| `--version` | string | Version of the entity to be registered with flyte which are un-versioned after serialization. |
### Options inherited from parent commands
| Option | Type | Description |
|--------|------|-------------|
| `--admin.audience` | string | Audience to use when initiating OAuth2 authorization requests. |
| `--admin.authType` | string | Type of OAuth2 flow used for communicating with admin.ClientSecret, Pkce, ExternalCommand are valid values (default "ClientSecret") |
| `--admin.authorizationHeader` | string | Custom metadata header to pass JWT |
| `--admin.authorizationServerUrl` | string | This is the URL to your IdP's authorization server. It'll default to Endpoint |
| `--admin.caCertFilePath` | string | Use specified certificate file to verify the admin server peer. |
| `--admin.clientId` | string | Client ID (default "flytepropeller") |
| `--admin.clientSecretEnvVar` | string | Environment variable containing the client secret |
| `--admin.clientSecretLocation` | string | File containing the client secret (default "/etc/secrets/client_secret") |
| `--admin.command` | strings | Command for external authentication token generation |
| `--admin.defaultOrg` | string | OPTIONAL: Default org to use to support non-org based cli's.'. |
| `--admin.defaultServiceConfig` | string | |
| `--admin.deviceFlowConfig.pollInterval` | string | amount of time the device flow would poll the token endpoint if auth server doesn't return a polling interval. Okta and google IDP do return an interval' (default "5s") |
| `--admin.deviceFlowConfig.refreshTime` | string | grace period from the token expiry after which it would refresh the token. (default "5m0s") |
| `--admin.deviceFlowConfig.timeout` | string | amount of time the device flow should complete or else it will be cancelled. (default "10m0s") |
| `--admin.endpoint` | string | For admin types, specify where the uri of the service is located. |
| `--admin.httpProxyURL` | string | OPTIONAL: HTTP Proxy to be used for OAuth requests. |
| `--admin.insecure` | | Use insecure connection. |
| `--admin.insecureSkipVerify` | | InsecureSkipVerify controls whether a client verifies the server's certificate chain and host name.Caution: shouldn't be use for production usecases' |
| `--admin.maxBackoffDelay` | string | Max delay for grpc backoff (default "8s") |
| `--admin.maxMessageSizeBytes` | int | The max size in bytes for incoming gRPC messages |
| `--admin.maxRetries` | int | Max number of gRPC retries (default 4) |
| `--admin.perRetryTimeout` | string | gRPC per retry timeout (default "15s") |
| `--admin.pkceConfig.refreshTime` | string | grace period from the token expiry after which it would refresh the token. (default "5m0s") |
| `--admin.pkceConfig.timeout` | string | Amount of time the browser session would be active for authentication from client app. (default "2m0s") |
| `--admin.proxyCommand` | strings | Command for external proxy-authorization token generation |
| `--admin.scopes` | strings | List of scopes to request |
| `--admin.tokenRefreshWindow` | string | Max duration between token refresh attempt and token expiry. (default "0s") |
| `--admin.tokenUrl` | string | OPTIONAL: Your IdP's token endpoint. It'll be discovered from flyte admin's OAuth Metadata endpoint if not provided. |
| `--admin.useAudienceFromAdmin` | | Use Audience configured from admins public endpoint config. |
| `--admin.useAuth` | | Deprecated: Auth will be enabled/disabled based on admin's dynamically discovered information. |
| `--auth.appAuth.externalAuthServer.allowedAudience` | strings | Optional: A list of allowed audiences. If not provided, the audience is expected to be the public Uri of the service. |
| `--auth.appAuth.externalAuthServer.baseUrl` | string | This should be the base url of the authorization server that you are trying to hit. With Okta for instance, it will look something like https://company.okta.com/oauth2/abcdef123456789/ |
| `--auth.appAuth.externalAuthServer.httpProxyURL` | string | OPTIONAL: HTTP Proxy to be used for OAuth requests. |
| `--auth.appAuth.externalAuthServer.metadataUrl` | string | Optional: If the server doesn't support /.well-known/oauth-authorization-server, you can set a custom metadata url here.' |
| `--auth.appAuth.externalAuthServer.retryAttempts` | int | Optional: The number of attempted retries on a transient failure to get the OAuth metadata (default 5) |
| `--auth.appAuth.externalAuthServer.retryDelay` | string | Optional, Duration to wait between retries (default "1s") |
| `--auth.appAuth.selfAuthServer.accessTokenLifespan` | string | Defines the lifespan of issued access tokens. (default "30m0s") |
| `--auth.appAuth.selfAuthServer.authorizationCodeLifespan` | string | Defines the lifespan of issued access tokens. (default "5m0s") |
| `--auth.appAuth.selfAuthServer.claimSymmetricEncryptionKeySecretName` | string | OPTIONAL: Secret name to use to encrypt claims in authcode token. (default "claim_symmetric_key") |
| `--auth.appAuth.selfAuthServer.issuer` | string | Defines the issuer to use when issuing and validating tokens. The default value is https://{requestUri.HostAndPort}/ |
| `--auth.appAuth.selfAuthServer.oldTokenSigningRSAKeySecretName` | string | OPTIONAL: Secret name to use to retrieve Old RSA Signing Key. This can be useful during key rotation to continue to accept older tokens. (default "token_rsa_key_old.pem") |
| `--auth.appAuth.selfAuthServer.refreshTokenLifespan` | string | Defines the lifespan of issued access tokens. (default "1h0m0s") |
| `--auth.appAuth.selfAuthServer.tokenSigningRSAKeySecretName` | string | OPTIONAL: Secret name to use to retrieve RSA Signing Key. (default "token_rsa_key.pem") |
| `--auth.appAuth.thirdPartyConfig.flyteClient.audience` | string | Audience to use when initiating OAuth2 authorization requests. |
| `--auth.appAuth.thirdPartyConfig.flyteClient.clientId` | string | public identifier for the app which handles authorization for a Flyte deployment (default "uctl") |
| `--auth.appAuth.thirdPartyConfig.flyteClient.redirectUri` | string | This is the callback uri registered with the app which handles authorization for a Flyte deployment (default "http://localhost:53593/callback") |
| `--auth.appAuth.thirdPartyConfig.flyteClient.scopes` | strings | Recommended scopes for the client to request. (default [all,offline]) |
| `--auth.disableForGrpc` | | Disables auth enforcement on Grpc Endpoints. |
| `--auth.disableForHttp` | | Disables auth enforcement on HTTP Endpoints. |
| `--auth.grpcAuthorizationHeader` | string | (default "flyte-authorization") |
| `--auth.httpAuthorizationHeader` | string | (default "flyte-authorization") |
| `--auth.httpProxyURL` | string | OPTIONAL: HTTP Proxy to be used for OAuth requests. |
| `--auth.tokenEndpointProxyPath` | string | The path used to proxy calls to the TokenURL |
| `--auth.userAuth.cookieBlockKeySecretName` | string | OPTIONAL: Secret name to use for cookie block key. (default "cookie_block_key") |
| `--auth.userAuth.cookieHashKeySecretName` | string | OPTIONAL: Secret name to use for cookie hash key. (default "cookie_hash_key") |
| `--auth.userAuth.cookieSetting.domain` | string | OPTIONAL: Allows you to set the domain attribute on the auth cookies. |
| `--auth.userAuth.cookieSetting.sameSitePolicy` | string | OPTIONAL: Allows you to declare if your cookie should be restricted to a first-party or same-site context.Wrapper around http.SameSite. (default "DefaultMode") |
| `--auth.userAuth.httpProxyURL` | string | OPTIONAL: HTTP Proxy to be used for OAuth requests. |
| `--auth.userAuth.idpQueryParameter` | string | idp query parameter used for selecting a particular IDP for doing user authentication. Eg: for Okta passing idp={IDP-ID} forces the authentication to happen with IDP-ID |
| `--auth.userAuth.openId.baseUrl` | string | |
| `--auth.userAuth.openId.clientId` | string | |
| `--auth.userAuth.openId.clientSecretFile` | string | |
| `--auth.userAuth.openId.clientSecretName` | string | (default "oidc_client_secret") |
| `--auth.userAuth.openId.scopes` | strings | (default [openid,profile]) |
| `--auth.userAuth.redirectUrl` | string | (default "/console") |
| `--authorizer.internalCommunicationConfig.enabled` | | Enables authorization decisions for internal communication. (default true) |
| `--authorizer.internalCommunicationConfig.ingressIdentity` | string | IngressIdentity used in the cluster. Needed to exclude the communication coming from ingress. (default "ingress-nginx.ingress-nginx.serviceaccount.identity.linkerd.cluster.local") |
| `--authorizer.internalCommunicationConfig.tenantUrlPatternIdentity` | string | UrlPatternIdentity of the internal tenant service endpoint identities. (default "{{ service }}.{{ org }}.serviceaccount.identity.linkerd.cluster.local") |
| `--authorizer.internalCommunicationConfig.urlPatternIdentity` | string | UrlPatternIdentity of the internal service endpoint identities. (default "{{ service }}-helmchart.{{ service }}.serviceaccount.identity.linkerd.cluster.local") |
| `--authorizer.mode` | string | (default "Active") |
| `--authorizer.organizationConfig.PolicyConfig.adminPolicyDescription` | string | description for the boilerplate admin policy (default "Contributor permissions and full admin permissions to manage users and view usage dashboards") |
| `--authorizer.organizationConfig.PolicyConfig.contributorPolicyDescription` | string | description for the boilerplate contributor policy (default "Viewer permissions and permissions to create workflows, tasks, launch plans, and executions") |
| `--authorizer.organizationConfig.PolicyConfig.defaultUserPolicyRoleType` | string | name of the role type to determine which default policy new users added to the organization should be assigned (default "Viewer") |
| `--authorizer.organizationConfig.PolicyConfig.serverlessContributorPolicyDescription` | string | description for the boilerplate serverless contributor policy (default "Viewer permissions and permissions to create workflows, tasks, launch plans, and executions") |
| `--authorizer.organizationConfig.PolicyConfig.serverlessViewerPolicyDescription` | string | description for the boilerplate serverless viewer policy (default "Permissions to view Flyte entities") |
| `--authorizer.organizationConfig.PolicyConfig.viewerPolicyDescription` | string | description for the boilerplate viewer policy (default "Permissions to view Flyte entities") |
| `--authorizer.organizationConfig.defaultPolicyCacheDuration` | string | Cache entry duration for the store of the default policy per organization (default "10m0s") |
| `--authorizer.syncRuleRefreshInterval` | string | (default "1m0s") |
| `--authorizer.type` | string | (default "UserClouds") |
| `--authorizer.userCloudsClient.cache.redis.ttl.edgeTypes` | string | Specifies how long edge types remain in the cache.. (default "30m0s") |
| `--authorizer.userCloudsClient.cache.redis.ttl.edges` | string | Specifies how long edges remain in the cache. (default "30m0s") |
| `--authorizer.userCloudsClient.cache.redis.ttl.objectTypes` | string | Specifies how long object types remain in the cache. (default "30m0s") |
| `--authorizer.userCloudsClient.cache.redis.ttl.objects` | string | Specifies how long objects remain in the cache. (default "30m0s") |
| `--authorizer.userCloudsClient.cache.type` | string | Cache type to use. (default "none") |
| `--authorizer.userCloudsClient.clientID` | string | UserClouds client id |
| `--authorizer.userCloudsClient.clientSecretName` | string | UserCloud client secret name to read from the secret manager. (default "userclouds-client-secret") |
| `--authorizer.userCloudsClient.enableLogging` | | Enable userclouds client's internal logging. Calls to post logs take 250-350 ms and will impact p99 latency, enable with caution. |
| `--authorizer.userCloudsClient.tenantID` | string | UserClouds tenant id. Should be a UUID. |
| `--authorizer.userCloudsClient.tenantUrl` | string | Something like https://{yourtenant}.tenant.userclouds.com |
| `--config` | string | config file (default is /Users/andrew/.union/config.yaml) |
| `--connection.environment` | string | |
| `--connection.region` | string | |
| `--connection.rootTenantURLPattern` | string | Pattern for tenant url. (default "dns:///{{ organization }}.cloud-staging.union.ai") |
| `--console.endpoint` | string | Endpoint of console, if different than flyte admin |
| `--database.connMaxLifeTime` | string | sets the maximum amount of time a connection may be reused (default "1h0m0s") |
| `--database.enableForeignKeyConstraintWhenMigrating` | | Whether to enable gorm foreign keys when migrating the db |
| `--database.maxIdleConnections` | int | maxIdleConnections sets the maximum number of connections in the idle connection pool. (default 10) |
| `--database.maxOpenConnections` | int | maxOpenConnections sets the maximum number of open connections to the database. (default 100) |
| `--database.postgres.dbname` | string | The database name (default "postgres") |
| `--database.postgres.debug` | | |
| `--database.postgres.host` | string | The host name of the database server (default "localhost") |
| `--database.postgres.options` | string | See http://gorm.io/docs/connecting_to_the_database.html for available options passed, in addition to the above. (default "sslmode=disable") |
| `--database.postgres.password` | string | The database password. (default "postgres") |
| `--database.postgres.passwordPath` | string | Points to the file containing the database password. |
| `--database.postgres.port` | int | The port name of the database server (default 30001) |
| `--database.postgres.readReplicaHost` | string | The host name of the read replica database server (default "localhost") |
| `--database.postgres.username` | string | The database user who is connecting to the server. (default "postgres") |
| `--database.sqlite.file` | string | The path to the file (existing or new) where the DB should be created / stored. If existing, then this will be re-used, else a new will be created |
| `--db.connectionPool.maxConnectionLifetime` | string | (default "0s") |
| `--db.connectionPool.maxIdleConnections` | int | |
| `--db.connectionPool.maxOpenConnections` | int | |
| `--db.dbname` | string | (default "postgres") |
| `--db.debug` | | |
| `--db.host` | string | (default "postgres") |
| `--db.log_level` | int | (default 4) |
| `--db.options` | string | (default "sslmode=disable") |
| `--db.password` | string | |
| `--db.passwordPath` | string | |
| `--db.port` | int | (default 5432) |
| `--db.username` | string | (default "postgres") |
| `-d`, `--domain` | string | Specifies the Flyte project's domain. |
| `--files.archive` | | Pass in archive file either an http link or local path. |
| `--files.assumableIamRole` | string | Custom assumable iam auth role to register launch plans with. |
| `--files.continueOnError` | | Continue on error when registering files. |
| `--files.destinationDirectory` | string | Location of source code in container. |
| `--files.dryRun` | | Execute command without making any modifications. |
| `--files.enableSchedule` | | Enable the schedule if the files contain schedulable launchplan. |
| `--files.force` | | Force use of version number on entities registered with flyte. |
| `--files.k8ServiceAccount` | string | Deprecated. Please use `--K8sServiceAccount`|
| `--files.k8sServiceAccount` | string | Custom kubernetes service account auth role to register launch plans with. |
| `--files.outputLocationPrefix` | string | Custom output location prefix for offloaded types (files/schemas). |
| `--files.sourceUploadPath` | string | Deprecated: Update flyte admin to avoid having to configure storage access from uctl. |
| `--files.version` | string | Version of the entity to be registered with flyte which are un-versioned after serialization. |
| `--logger.formatter.type` | string | Sets logging format type. (default "json") |
| `--logger.level` | int | Sets the minimum logging level. (default 3) |
| `--logger.mute` | | Mutes all logs regardless of severity. Intended for benchmarks/tests only. |
| `--logger.show-source` | | Includes source code location in logs. |
| `--org` | string | Organization to work on. If not set, default to user's org. |
| `--otel.file.filename` | string | Filename to store exported telemetry traces (default "/tmp/trace.txt") |
| `--otel.jaeger.endpoint` | string | Endpoint for the jaeger telemetry trace ingestor (default "http://localhost:14268/api/traces") |
| `--otel.otlpgrpc.endpoint` | string | Endpoint for the OTLP telemetry trace collector (default "http://localhost:4317") |
| `--otel.otlphttp.endpoint` | string | Endpoint for the OTLP telemetry trace collector (default "http://localhost:4318/v1/traces") |
| `--otel.sampler.parentSampler` | string | Sets the parent sampler to use for the tracer (default "always") |
| `--otel.type` | string | Sets the type of exporter to configure [noop/file/jaeger/otlpgrpc/otlphttp]. (default "noop") |
| `-o`, `--output` | string | Specifies the output type - supported formats [TABLE JSON YAML DOT DOTURL]. NOTE: dot, doturl are only supported for Workflow (default "table") |
| `--plugins.catalogcache.reader.maxItems` | int | Maximum number of entries to keep in the index. (default 10000) |
| `--plugins.catalogcache.reader.maxRetries` | int | Maximum number of retries per item. (default 3) |
| `--plugins.catalogcache.reader.workers` | int | Number of concurrent workers to start processing the queue. (default 10) |
| `--plugins.catalogcache.writer.maxItems` | int | Maximum number of entries to keep in the index. (default 10000) |
| `--plugins.catalogcache.writer.maxRetries` | int | Maximum number of retries per item. (default 3) |
| `--plugins.catalogcache.writer.workers` | int | Number of concurrent workers to start processing the queue. (default 10) |
| `-p`, `--project` | string | Specifies the Flyte project. |
| `--rediscache.passwordSecretName` | string | Name of secret with Redis password. |
| `--rediscache.primaryEndpoint` | string | Primary endpoint for the redis cache that can be used for both reads and writes. |
| `--rediscache.replicaEndpoint` | string | Replica endpoint for the redis cache that can be used for reads. |
| `--secrets.env-prefix` | string | Prefix for environment variables (default "FLYTE_SECRET_") |
| `--secrets.secrets-prefix` | string | Prefix where to look for secrets file (default "/etc/secrets") |
| `--secrets.type` | string | Sets the type of storage to configure [local]. (default "local") |
| `--server.dataProxy.download.maxExpiresIn` | string | Maximum allowed expiration duration. (default "1h0m0s") |
| `--server.dataProxy.upload.defaultFileNameLength` | int | Default length for the generated file name if not provided in the request. (default 20) |
| `--server.dataProxy.upload.maxExpiresIn` | string | Maximum allowed expiration duration. (default "1h0m0s") |
| `--server.dataProxy.upload.maxSize` | string | Maximum allowed upload size. (default "6Mi") |
| `--server.dataProxy.upload.storagePrefix` | string | Storage prefix to use for all upload requests. |
| `--server.grpc.enableGrpcLatencyMetrics` | | Enable grpc latency metrics. Note Histograms metrics can be expensive on Prometheus servers. |
| `--server.grpc.maxMessageSizeBytes` | int | The max size in bytes for incoming gRPC messages |
| `--server.grpc.port` | int | On which grpc port to serve admin (default 8089) |
| `--server.grpc.serverReflection` | | Enable GRPC Server Reflection (default true) |
| `--server.grpcPort` | int | deprecated |
| `--server.grpcServerReflection` | | deprecated |
| `--server.httpPort` | int | On which http port to serve admin (default 8088) |
| `--server.kube-config` | string | Path to kubernetes client config file, default is empty, useful for incluster config. |
| `--server.kubeClientConfig.burst` | int | Max burst rate for throttle. 0 defaults to 10 (default 25) |
| `--server.kubeClientConfig.qps` | int32 | Max QPS to the master for requests to KubeAPI. 0 defaults to 5. (default 100) |
| `--server.kubeClientConfig.timeout` | string | Max duration allowed for every request to KubeAPI before giving up. 0 implies no timeout. (default "30s") |
| `--server.master` | string | The address of the Kubernetes API server. |
| `--server.readHeaderTimeoutSeconds` | int | The amount of time allowed to read request headers. (default 32) |
| `--server.security.allowCors` | | (default true) |
| `--server.security.allowedHeaders` | strings | (default [Content-Type,flyte-authorization]) |
| `--server.security.allowedOrigins` | strings | (default [*]) |
| `--server.security.auditAccess` | | |
| `--server.security.secure` | | |
| `--server.security.ssl.certificateFile` | string | |
| `--server.security.ssl.keyFile` | string | |
| `--server.security.useAuth` | | |
| `--server.thirdPartyConfig.flyteClient.audience` | string | Audience to use when initiating OAuth2 authorization requests. |
| `--server.thirdPartyConfig.flyteClient.clientId` | string | public identifier for the app which handles authorization for a Flyte deployment |
| `--server.thirdPartyConfig.flyteClient.redirectUri` | string | This is the callback uri registered with the app which handles authorization for a Flyte deployment |
| `--server.thirdPartyConfig.flyteClient.scopes` | strings | Recommended scopes for the client to request. |
| `--server.watchService.maxActiveClusterConnections` | int | (default 5) |
| `--server.watchService.maxPageSize` | int | (default 50000) |
| `--server.watchService.nonTerminalStatusUpdatesInterval` | string | (default "1m0s") |
| `--server.watchService.pollInterval` | string | (default "1s") |
| `--sharedservice.connectPort` | string | On which connect port to serve admin (default "8080") |
| `--sharedservice.grpc.grpcMaxResponseStatusBytes` | int32 | specifies the maximum (uncompressed) size of header list that the client is prepared to accept on grpc calls (default 32000) |
| `--sharedservice.grpc.maxConcurrentStreams` | int | Limit on the number of concurrent streams to each ServerTransport. (default 100) |
| `--sharedservice.grpc.maxMessageSizeBytes` | int | Limit on the size of message that can be received on the server. (default 10485760) |
| `--sharedservice.grpcServerReflection` | | Enable GRPC Server Reflection (default true) |
| `--sharedservice.httpPort` | string | On which http port to serve admin (default "8089") |
| `--sharedservice.kubeConfig` | string | Path to kubernetes client config file. |
| `--sharedservice.master` | string | The address of the Kubernetes API server. |
| `--sharedservice.metrics.enableClientGrpcHistograms` | | Enable client grpc histograms (default true) |
| `--sharedservice.metrics.enableGrpcHistograms` | | Enable grpc histograms (default true) |
| `--sharedservice.metrics.scope` | string | Scope to emit metrics under (default "service:") |
| `--sharedservice.port` | string | On which grpc port to serve admin (default "8080") |
| `--sharedservice.profiler.enabled` | | Enable Profiler on server |
| `--sharedservice.profilerPort` | string | Profile port to start listen for pprof and metric handlers on. (default "10254") |
| `--sharedservice.security.allowCors` | | |
| `--sharedservice.security.allowLocalhostAccess` | | Whether to permit localhost unauthenticated access to the server |
| `--sharedservice.security.allowedHeaders` | strings | |
| `--sharedservice.security.allowedOrigins` | strings | |
| `--sharedservice.security.auditAccess` | | |
| `--sharedservice.security.orgOverride` | string | Override org in identity context if localhost access enabled |
| `--sharedservice.security.secure` | | |
| `--sharedservice.security.ssl.certificateAuthorityFile` | string | |
| `--sharedservice.security.ssl.certificateFile` | string | |
| `--sharedservice.security.ssl.keyFile` | string | |
| `--sharedservice.security.useAuth` | | |
| `--sharedservice.sync.syncInterval` | string | Time interval to sync (default "5m0s") |
| `--storage.cache.max_size_mbs` | int | Maximum size of the cache where the Blob store data is cached in-memory. If not specified or set to 0, cache is not used |
| `--storage.cache.target_gc_percent` | int | Sets the garbage collection target percentage. |
| `--storage.connection.access-key` | string | Access key to use. Only required when authtype is set to accesskey. |
| `--storage.connection.auth-type` | string | Auth Type to use [iam, accesskey]. (default "iam") |
| `--storage.connection.disable-ssl` | | Disables SSL connection. Should only be used for development. |
| `--storage.connection.endpoint` | string | URL for storage client to connect to. |
| `--storage.connection.region` | string | Region to connect to. (default "us-east-1") |
| `--storage.connection.secret-key` | string | Secret to use when accesskey is set. |
| `--storage.container` | string | Initial container (in s3 a bucket) to create -if it doesn't exist-.' |
| `--storage.defaultHttpClient.timeout` | string | Sets time out on the http client. (default "0s") |
| `--storage.enable-multicontainer` | | If this is true, then the container argument is overlooked and redundant. This config will automatically open new connections to new containers/buckets as they are encountered |
| `--storage.limits.maxDownloadMBs` | int | Maximum allowed download size (in MBs) per call. (default 2) |
| `--storage.stow.config` | stringToString | Configuration for stow backend. Refer to github/flyteorg/stow (default []) |
| `--storage.stow.kind` | string | Kind of Stow backend to use. Refer to github/flyteorg/stow |
| `--storage.type` | string | Sets the type of storage to configure [s3/minio/local/mem/stow]. (default "s3") |
| `--union.auth.authorizationMetadataKey` | string | Authorization Header to use when passing Access Tokens to the server (default "flyte-authorization") |
| `--union.auth.clientId` | string | Client ID |
| `--union.auth.clientSecretEnvVar` | string | Environment variable containing the client secret |
| `--union.auth.clientSecretLocation` | string | File containing the client secret |
| `--union.auth.deviceFlow.pollInterval` | string | amount of time the device flow would poll the token endpoint if auth server doesn't return a polling interval. Okta and google IDP do return an interval' (default "5s") |
| `--union.auth.deviceFlow.refreshTime` | string | grace period from the token expiry after which it would refresh the token. (default "5m0s") |
| `--union.auth.deviceFlow.timeout` | string | amount of time the device flow should complete or else it will be cancelled. (default "10m0s") |
| `--union.auth.enable` | | Whether to enable an authenticated conenction when communicating with admin. (default true) |
| `--union.auth.externalAuth.command` | strings | Command for external authentication token generation |
| `--union.auth.pkce.refreshTime` | string | grace period from the token expiry after which it would refresh the token. (default "5m0s") |
| `--union.auth.pkce.timeout` | string | Amount of time the browser session would be active for authentication from client app. (default "15s") |
| `--union.auth.scopes` | strings | List of scopes to request |
| `--union.auth.tokenRefreshWindow` | string | Max duration between token refresh attempt and token expiry. (default "1h0m0s") |
| `--union.auth.tokenUrl` | string | OPTIONAL: Your IdP's token endpoint. It'll be discovered from flyte admin's OAuth Metadata endpoint if not provided. |
| `--union.auth.type` | string | Type of OAuth2 flow used for communicating with admin. (default "Pkce") |
| `--union.cache.maxItemsCount` | int | Maximum number of items to keep in the cache before evicting. (default 1000) |
| `--union.connection.host` | string | Host to connect to (default "dns:///utt-mgdp-stg-us-east-2.cloud-staging.union.ai") |
| `--union.connection.insecure` | | Whether to connect over insecure channel |
| `--union.connection.insecureSkipVerify` | | InsecureSkipVerify controls whether a client verifies the server's certificate chain and host name.Caution: shouldn't be use for production usecases' |
| `--union.connection.keepAliveConfig.permitWithoutStream` | | If true, client sends keepalive pings even with no active RPCs. |
| `--union.connection.keepAliveConfig.time` | string | After a duration of this time if the client doesn't see any activity it pings the server to see if the transport is still alive. (default "20s") |
| `--union.connection.keepAliveConfig.timeout` | string | After having pinged for keepalive check, the client waits for a duration of Timeout and if no activity is seen even after that the connection is closed. (default "2m0s") |
| `--union.connection.maxBackoffDelay` | string | Max delay for grpc backoff (default "8s") |
| `--union.connection.maxRecvMsgSize` | int | Maximum size of a message in bytes of a gRPC message (default 10485760) |
| `--union.connection.maxRetries` | int | Max number of gRPC retries (default 4) |
| `--union.connection.minConnectTimeout` | string | Minimum timeout for establishing a connection (default "20s") |
| `--union.connection.perRetryTimeout` | string | gRPC per retry timeout (default "15s") |
| `--union.connection.serviceConfig` | string | Defines gRPC experimental JSON Service Config (default "{"loadBalancingConfig": [{"round_robin":{}}]}") |
| `--union.connection.trustedIdentityClaims.enabled` | | Enables passing of trusted claims while making inter service calls |
| `--union.connection.trustedIdentityClaims.externalIdentityClaim` | string | External identity claim of the service which is authorized to make internal service call. These are verified against userclouds actions |
| `--union.connection.trustedIdentityClaims.externalIdentityTypeClaim` | string | External identity type claim of app or user to use for the current service identity. It should be an 'app' for inter service communication |
| `--union.internalConnectionConfig.-` | stringToString | (default []) |
| `--union.internalConnectionConfig.enabled` | | Enables internal service to service communication instead of going through ingress. |
| `--union.internalConnectionConfig.urlPattern` | string | UrlPattern of the internal service endpoints. (default "{{ service }}-helmchart.{{ service }}.svc.cluster.local:80") |
| `--webhook.awsSecretManager.sidecarImage` | string | Specifies the sidecar docker image to use (default "docker.io/amazon/aws-secrets-manager-secret-sidecar:v0.1.4") |
| `--webhook.certDir` | string | Certificate directory to use to write generated certs. Defaults to /etc/webhook/certs/ (default "/etc/webhook/certs") |
| `--webhook.embeddedSecretManagerConfig.awsConfig.region` | string | AWS region |
| `--webhook.embeddedSecretManagerConfig.fileMountInitContainer.image` | string | Specifies init container image to use for mounting secrets as files. (default "busybox:1.28") |
| `--webhook.embeddedSecretManagerConfig.gcpConfig.project` | string | GCP project to be used for secret manager |
| `--webhook.embeddedSecretManagerConfig.type` | string | (default "AWS") |
| `--webhook.gcpSecretManager.sidecarImage` | string | Specifies the sidecar docker image to use (default "gcr.io/google.com/cloudsdktool/cloud-sdk:alpine") |
| `--webhook.listenPort` | int | The port to use to listen to webhook calls. Defaults to 9443 (default 9443) |
| `--webhook.localCert` | | write certs locally. Defaults to false |
| `--webhook.metrics-prefix` | string | An optional prefix for all published metrics. (default "flyte:") |
| `--webhook.secretName` | string | Secret name to write generated certs to. (default "flyte-pod-webhook") |
| `--webhook.serviceName` | string | The name of the webhook service. (default "flyte-pod-webhook") |
| `--webhook.servicePort` | int32 | The port on the service that hosting webhook. (default 443) |
| `--webhook.vaultSecretManager.role` | string | Specifies the vault role to use (default "flyte") |
=== PAGE: https://www.union.ai/docs/v1/serverless/api-reference/uctl-cli/uctl-register/uctl-register-files ===
# uctl register files
Registers file resources.
## Synopsis
Registers all the serialized protobuf files including tasks, workflows
and launch plans with default v1 version.
If previously registered entities with v1 version are present, the
command will fail immediately on the first such encounter:
```shell
$ uctl register file _pb_output/* -d development -p flytesnacks
```
As per Flytectl, registration and fast registration mean the same!
In fast registration, the input provided by the user is fast serialized
proto generated by pyflyte. When the user runs pyflyte with --fast
flag, then pyflyte creates serialized proto and the source code archive
file in the same directory. Flytectl finds the input file by searching
for an archive file whose name starts with "fast" and has .tar.gz
extension. If Flytectl finds any source code in users' input, it
considers the registration as fast registration.
SourceUploadPath is an optional flag. By default, Flytectl will create
SourceUploadPath from your storage config. If s3, Flytectl will upload
the code base to
s3://{{DEFINE_BUCKET_IN_STORAGE_CONFIG}}/fast/{{VERSION}}-fast{{MD5_CREATED_BY_PYFLYTE}.tar.gz}.
:
```shell
$ uctl register file _pb_output/* -d development -p flytesnacks --version v2
```
In case of fast registration, if the SourceUploadPath flag is defined,
Flytectl will not use the default directory to upload the source code.
Instead, it will override the destination path on the registration:
```shell
$ uctl register file _pb_output/* -d development -p flytesnacks --version v2 --SourceUploadPath="s3://dummy/fast"
```
To register a .tgz or .tar file, use the --archive flag. They can be
local or remote files served through http/https.
```shell
$ uctl register files http://localhost:8080/_pb_output.tar -d development -p flytesnacks --archive
```
Using local tgz file:
```shell
$ uctl register files _pb_output.tgz -d development -p flytesnacks --archive
```
If you wish to continue executing registration on other files by
ignoring the errors including the version conflicts, then send the
continueOnError flag:
```shell
$ uctl register file _pb_output/* -d development -p flytesnacks --continueOnError
```
Using short format of continueOnError flag:
```shell
$ uctl register file _pb_output/* -d development -p flytesnacks --continueOnError
```
Override the default version v1 using version string:
```shell
$ uctl register file _pb_output/* -d development -p flytesnacks --version v2
```
Changing the o/p format has no effect on the registration. The O/p is
currently available only in table format:
```shell
$ uctl register file _pb_output/* -d development -p flytesnacks --continueOnError -o yaml
```
Override IamRole during registration:
```shell
$ uctl register file _pb_output/* -d development -p flytesnacks --continueOnError --version v2 --assumableIamRole "arn:aws:iam::123456789:role/dummy"
```
Override Kubernetes service account during registration:
```shell
$ uctl register file _pb_output/* -d development -p flytesnacks --continueOnError --version v2 --k8sServiceAccount "kubernetes-service-account"
```
Override Output location prefix during registration:
```shell
$ uctl register file _pb_output/* -d development -p flytesnacks --continueOnError --version v2 --outputLocationPrefix "s3://dummy/prefix"
```
Override Destination dir of source code in container during
registration:
```shell
$ uctl register file _pb_output/* -d development -p flytesnacks --continueOnError --version v2 --destinationDirectory "/root"
```
Enable schedule for the launchplans part of the serialized protobuf
files:
```shell
$ uctl register file _pb_output/* -d development -p flytesnacks --version v2 --enableSchedule
```
Usage:
```shell
$ uctl register files [flags]
```
## Options
| Option | Type | Description |
|--------|------|-------------|
| `--archive` | | Pass in archive file either an http link or local path. |
| Option | Type | Description |
|--------|------|-------------|
| `--assumableIamRole` | string | Custom assumable iam auth role to register launch plans with. |
| `--continueOnError` | | Continue on error when registering files. |
| `--destinationDirectory` | string | Location of source code in container. |
| `--dryRun` | | Execute command without making any modifications. |
| `--enableSchedule` | | Enable the schedule if the files contain schedulable launchplan. |
| `--force` | | Force use of version number on entities registered with flyte. |
| `-h`, `--help` | help for files |
| `--k8ServiceAccount` | string | Deprecated. Please use `--K8sServiceAccount`|
| `--k8sServiceAccount` | string | Custom kubernetes service account auth role to register launch plans with. |
| `--outputLocationPrefix` | string | Custom output location prefix for offloaded types (files/schemas). |
| `--sourceUploadPath` | string | Deprecated: Update flyte admin to avoid having to configure storage access from uctl. |
| `--version` | string | Version of the entity to be registered with flyte which are un-versioned after serialization. |
### Options inherited from parent commands
| Option | Type | Description |
|--------|------|-------------|
| `--admin.audience` | string | Audience to use when initiating OAuth2 authorization requests. |
| `--admin.authType` | string | Type of OAuth2 flow used for communicating with admin.ClientSecret, Pkce, ExternalCommand are valid values (default "ClientSecret") |
| `--admin.authorizationHeader` | string | Custom metadata header to pass JWT |
| `--admin.authorizationServerUrl` | string | This is the URL to your IdP's authorization server. It'll default to Endpoint |
| `--admin.caCertFilePath` | string | Use specified certificate file to verify the admin server peer. |
| `--admin.clientId` | string | Client ID (default "flytepropeller") |
| `--admin.clientSecretEnvVar` | string | Environment variable containing the client secret |
| `--admin.clientSecretLocation` | string | File containing the client secret (default "/etc/secrets/client_secret") |
| `--admin.command` | strings | Command for external authentication token generation |
| `--admin.defaultOrg` | string | OPTIONAL: Default org to use to support non-org based cli's.'. |
| `--admin.defaultServiceConfig` | string | |
| `--admin.deviceFlowConfig.pollInterval` | string | amount of time the device flow would poll the token endpoint if auth server doesn't return a polling interval. Okta and google IDP do return an interval' (default "5s") |
| `--admin.deviceFlowConfig.refreshTime` | string | grace period from the token expiry after which it would refresh the token. (default "5m0s") |
| `--admin.deviceFlowConfig.timeout` | string | amount of time the device flow should complete or else it will be cancelled. (default "10m0s") |
| `--admin.endpoint` | string | For admin types, specify where the uri of the service is located. |
| `--admin.httpProxyURL` | string | OPTIONAL: HTTP Proxy to be used for OAuth requests. |
| `--admin.insecure` | | Use insecure connection. |
| `--admin.insecureSkipVerify` | | InsecureSkipVerify controls whether a client verifies the server's certificate chain and host name.Caution: shouldn't be use for production usecases' |
| `--admin.maxBackoffDelay` | string | Max delay for grpc backoff (default "8s") |
| `--admin.maxMessageSizeBytes` | int | The max size in bytes for incoming gRPC messages |
| `--admin.maxRetries` | int | Max number of gRPC retries (default 4) |
| `--admin.perRetryTimeout` | string | gRPC per retry timeout (default "15s") |
| `--admin.pkceConfig.refreshTime` | string | grace period from the token expiry after which it would refresh the token. (default "5m0s") |
| `--admin.pkceConfig.timeout` | string | Amount of time the browser session would be active for authentication from client app. (default "2m0s") |
| `--admin.proxyCommand` | strings | Command for external proxy-authorization token generation |
| `--admin.scopes` | strings | List of scopes to request |
| `--admin.tokenRefreshWindow` | string | Max duration between token refresh attempt and token expiry. (default "0s") |
| `--admin.tokenUrl` | string | OPTIONAL: Your IdP's token endpoint. It'll be discovered from flyte admin's OAuth Metadata endpoint if not provided. |
| `--admin.useAudienceFromAdmin` | | Use Audience configured from admins public endpoint config. |
| `--admin.useAuth` | | Deprecated: Auth will be enabled/disabled based on admin's dynamically discovered information. |
| `--auth.appAuth.externalAuthServer.allowedAudience` | strings | Optional: A list of allowed audiences. If not provided, the audience is expected to be the public Uri of the service. |
| `--auth.appAuth.externalAuthServer.baseUrl` | string | This should be the base url of the authorization server that you are trying to hit. With Okta for instance, it will look something like https://company.okta.com/oauth2/abcdef123456789/ |
| `--auth.appAuth.externalAuthServer.httpProxyURL` | string | OPTIONAL: HTTP Proxy to be used for OAuth requests. |
| `--auth.appAuth.externalAuthServer.metadataUrl` | string | Optional: If the server doesn't support /.well-known/oauth-authorization-server, you can set a custom metadata url here.' |
| `--auth.appAuth.externalAuthServer.retryAttempts` | int | Optional: The number of attempted retries on a transient failure to get the OAuth metadata (default 5) |
| `--auth.appAuth.externalAuthServer.retryDelay` | string | Optional, Duration to wait between retries (default "1s") |
| `--auth.appAuth.selfAuthServer.accessTokenLifespan` | string | Defines the lifespan of issued access tokens. (default "30m0s") |
| `--auth.appAuth.selfAuthServer.authorizationCodeLifespan` | string | Defines the lifespan of issued access tokens. (default "5m0s") |
| `--auth.appAuth.selfAuthServer.claimSymmetricEncryptionKeySecretName` | string | OPTIONAL: Secret name to use to encrypt claims in authcode token. (default "claim_symmetric_key") |
| `--auth.appAuth.selfAuthServer.issuer` | string | Defines the issuer to use when issuing and validating tokens. The default value is https://{requestUri.HostAndPort}/ |
| `--auth.appAuth.selfAuthServer.oldTokenSigningRSAKeySecretName` | string | OPTIONAL: Secret name to use to retrieve Old RSA Signing Key. This can be useful during key rotation to continue to accept older tokens. (default "token_rsa_key_old.pem") |
| `--auth.appAuth.selfAuthServer.refreshTokenLifespan` | string | Defines the lifespan of issued access tokens. (default "1h0m0s") |
| `--auth.appAuth.selfAuthServer.tokenSigningRSAKeySecretName` | string | OPTIONAL: Secret name to use to retrieve RSA Signing Key. (default "token_rsa_key.pem") |
| `--auth.appAuth.thirdPartyConfig.flyteClient.audience` | string | Audience to use when initiating OAuth2 authorization requests. |
| `--auth.appAuth.thirdPartyConfig.flyteClient.clientId` | string | public identifier for the app which handles authorization for a Flyte deployment (default "uctl") |
| `--auth.appAuth.thirdPartyConfig.flyteClient.redirectUri` | string | This is the callback uri registered with the app which handles authorization for a Flyte deployment (default "http://localhost:53593/callback") |
| `--auth.appAuth.thirdPartyConfig.flyteClient.scopes` | strings | Recommended scopes for the client to request. (default [all,offline]) |
| `--auth.disableForGrpc` | | Disables auth enforcement on Grpc Endpoints. |
| `--auth.disableForHttp` | | Disables auth enforcement on HTTP Endpoints. |
| `--auth.grpcAuthorizationHeader` | string | (default "flyte-authorization") |
| `--auth.httpAuthorizationHeader` | string | (default "flyte-authorization") |
| `--auth.httpProxyURL` | string | OPTIONAL: HTTP Proxy to be used for OAuth requests. |
| `--auth.tokenEndpointProxyPath` | string | The path used to proxy calls to the TokenURL |
| `--auth.userAuth.cookieBlockKeySecretName` | string | OPTIONAL: Secret name to use for cookie block key. (default "cookie_block_key") |
| `--auth.userAuth.cookieHashKeySecretName` | string | OPTIONAL: Secret name to use for cookie hash key. (default "cookie_hash_key") |
| `--auth.userAuth.cookieSetting.domain` | string | OPTIONAL: Allows you to set the domain attribute on the auth cookies. |
| `--auth.userAuth.cookieSetting.sameSitePolicy` | string | OPTIONAL: Allows you to declare if your cookie should be restricted to a first-party or same-site context.Wrapper around http.SameSite. (default "DefaultMode") |
| `--auth.userAuth.httpProxyURL` | string | OPTIONAL: HTTP Proxy to be used for OAuth requests. |
| `--auth.userAuth.idpQueryParameter` | string | idp query parameter used for selecting a particular IDP for doing user authentication. Eg: for Okta passing idp={IDP-ID} forces the authentication to happen with IDP-ID |
| `--auth.userAuth.openId.baseUrl` | string | |
| `--auth.userAuth.openId.clientId` | string | |
| `--auth.userAuth.openId.clientSecretFile` | string | |
| `--auth.userAuth.openId.clientSecretName` | string | (default "oidc_client_secret") |
| `--auth.userAuth.openId.scopes` | strings | (default [openid,profile]) |
| `--auth.userAuth.redirectUrl` | string | (default "/console") |
| `--authorizer.internalCommunicationConfig.enabled` | | Enables authorization decisions for internal communication. (default true) |
| `--authorizer.internalCommunicationConfig.ingressIdentity` | string | IngressIdentity used in the cluster. Needed to exclude the communication coming from ingress. (default "ingress-nginx.ingress-nginx.serviceaccount.identity.linkerd.cluster.local") |
| `--authorizer.internalCommunicationConfig.tenantUrlPatternIdentity` | string | UrlPatternIdentity of the internal tenant service endpoint identities. (default "{{ service }}.{{ org }}.serviceaccount.identity.linkerd.cluster.local") |
| `--authorizer.internalCommunicationConfig.urlPatternIdentity` | string | UrlPatternIdentity of the internal service endpoint identities. (default "{{ service }}-helmchart.{{ service }}.serviceaccount.identity.linkerd.cluster.local") |
| `--authorizer.mode` | string | (default "Active") |
| `--authorizer.organizationConfig.PolicyConfig.adminPolicyDescription` | string | description for the boilerplate admin policy (default "Contributor permissions and full admin permissions to manage users and view usage dashboards") |
| `--authorizer.organizationConfig.PolicyConfig.contributorPolicyDescription` | string | description for the boilerplate contributor policy (default "Viewer permissions and permissions to create workflows, tasks, launch plans, and executions") |
| `--authorizer.organizationConfig.PolicyConfig.defaultUserPolicyRoleType` | string | name of the role type to determine which default policy new users added to the organization should be assigned (default "Viewer") |
| `--authorizer.organizationConfig.PolicyConfig.serverlessContributorPolicyDescription` | string | description for the boilerplate serverless contributor policy (default "Viewer permissions and permissions to create workflows, tasks, launch plans, and executions") |
| `--authorizer.organizationConfig.PolicyConfig.serverlessViewerPolicyDescription` | string | description for the boilerplate serverless viewer policy (default "Permissions to view Flyte entities") |
| `--authorizer.organizationConfig.PolicyConfig.viewerPolicyDescription` | string | description for the boilerplate viewer policy (default "Permissions to view Flyte entities") |
| `--authorizer.organizationConfig.defaultPolicyCacheDuration` | string | Cache entry duration for the store of the default policy per organization (default "10m0s") |
| `--authorizer.syncRuleRefreshInterval` | string | (default "1m0s") |
| `--authorizer.type` | string | (default "UserClouds") |
| `--authorizer.userCloudsClient.cache.redis.ttl.edgeTypes` | string | Specifies how long edge types remain in the cache.. (default "30m0s") |
| `--authorizer.userCloudsClient.cache.redis.ttl.edges` | string | Specifies how long edges remain in the cache. (default "30m0s") |
| `--authorizer.userCloudsClient.cache.redis.ttl.objectTypes` | string | Specifies how long object types remain in the cache. (default "30m0s") |
| `--authorizer.userCloudsClient.cache.redis.ttl.objects` | string | Specifies how long objects remain in the cache. (default "30m0s") |
| `--authorizer.userCloudsClient.cache.type` | string | Cache type to use. (default "none") |
| `--authorizer.userCloudsClient.clientID` | string | UserClouds client id |
| `--authorizer.userCloudsClient.clientSecretName` | string | UserCloud client secret name to read from the secret manager. (default "userclouds-client-secret") |
| `--authorizer.userCloudsClient.enableLogging` | | Enable userclouds client's internal logging. Calls to post logs take 250-350 ms and will impact p99 latency, enable with caution. |
| `--authorizer.userCloudsClient.tenantID` | string | UserClouds tenant id. Should be a UUID. |
| `--authorizer.userCloudsClient.tenantUrl` | string | Something like https://{yourtenant}.tenant.userclouds.com |
| `--config` | string | config file (default is /Users/andrew/.union/config.yaml) |
| `--connection.environment` | string | |
| `--connection.region` | string | |
| `--connection.rootTenantURLPattern` | string | Pattern for tenant url. (default "dns:///{{ organization }}.cloud-staging.union.ai") |
| `--console.endpoint` | string | Endpoint of console, if different than flyte admin |
| `--database.connMaxLifeTime` | string | sets the maximum amount of time a connection may be reused (default "1h0m0s") |
| `--database.enableForeignKeyConstraintWhenMigrating` | | Whether to enable gorm foreign keys when migrating the db |
| `--database.maxIdleConnections` | int | maxIdleConnections sets the maximum number of connections in the idle connection pool. (default 10) |
| `--database.maxOpenConnections` | int | maxOpenConnections sets the maximum number of open connections to the database. (default 100) |
| `--database.postgres.dbname` | string | The database name (default "postgres") |
| `--database.postgres.debug` | | |
| `--database.postgres.host` | string | The host name of the database server (default "localhost") |
| `--database.postgres.options` | string | See http://gorm.io/docs/connecting_to_the_database.html for available options passed, in addition to the above. (default "sslmode=disable") |
| `--database.postgres.password` | string | The database password. (default "postgres") |
| `--database.postgres.passwordPath` | string | Points to the file containing the database password. |
| `--database.postgres.port` | int | The port name of the database server (default 30001) |
| `--database.postgres.readReplicaHost` | string | The host name of the read replica database server (default "localhost") |
| `--database.postgres.username` | string | The database user who is connecting to the server. (default "postgres") |
| `--database.sqlite.file` | string | The path to the file (existing or new) where the DB should be created / stored. If existing, then this will be re-used, else a new will be created |
| `--db.connectionPool.maxConnectionLifetime` | string | (default "0s") |
| `--db.connectionPool.maxIdleConnections` | int | |
| `--db.connectionPool.maxOpenConnections` | int | |
| `--db.dbname` | string | (default "postgres") |
| `--db.debug` | | |
| `--db.host` | string | (default "postgres") |
| `--db.log_level` | int | (default 4) |
| `--db.options` | string | (default "sslmode=disable") |
| `--db.password` | string | |
| `--db.passwordPath` | string | |
| `--db.port` | int | (default 5432) |
| `--db.username` | string | (default "postgres") |
| `-d`, `--domain` | string | Specifies the Flyte project's domain. |
| `--files.archive` | | Pass in archive file either an http link or local path. |
| `--files.assumableIamRole` | string | Custom assumable iam auth role to register launch plans with. |
| `--files.continueOnError` | | Continue on error when registering files. |
| `--files.destinationDirectory` | string | Location of source code in container. |
| `--files.dryRun` | | Execute command without making any modifications. |
| `--files.enableSchedule` | | Enable the schedule if the files contain schedulable launchplan. |
| `--files.force` | | Force use of version number on entities registered with flyte. |
| `--files.k8ServiceAccount` | string | Deprecated. Please use `--K8sServiceAccount`|
| `--files.k8sServiceAccount` | string | Custom kubernetes service account auth role to register launch plans with. |
| `--files.outputLocationPrefix` | string | Custom output location prefix for offloaded types (files/schemas). |
| `--files.sourceUploadPath` | string | Deprecated: Update flyte admin to avoid having to configure storage access from uctl. |
| `--files.version` | string | Version of the entity to be registered with flyte which are un-versioned after serialization. |
| `--logger.formatter.type` | string | Sets logging format type. (default "json") |
| `--logger.level` | int | Sets the minimum logging level. (default 3) |
| `--logger.mute` | | Mutes all logs regardless of severity. Intended for benchmarks/tests only. |
| `--logger.show-source` | | Includes source code location in logs. |
| `--org` | string | Organization to work on. If not set, default to user's org. |
| `--otel.file.filename` | string | Filename to store exported telemetry traces (default "/tmp/trace.txt") |
| `--otel.jaeger.endpoint` | string | Endpoint for the jaeger telemetry trace ingestor (default "http://localhost:14268/api/traces") |
| `--otel.otlpgrpc.endpoint` | string | Endpoint for the OTLP telemetry trace collector (default "http://localhost:4317") |
| `--otel.otlphttp.endpoint` | string | Endpoint for the OTLP telemetry trace collector (default "http://localhost:4318/v1/traces") |
| `--otel.sampler.parentSampler` | string | Sets the parent sampler to use for the tracer (default "always") |
| `--otel.type` | string | Sets the type of exporter to configure [noop/file/jaeger/otlpgrpc/otlphttp]. (default "noop") |
| `-o`, `--output` | string | Specifies the output type - supported formats [TABLE JSON YAML DOT DOTURL]. NOTE: dot, doturl are only supported for Workflow (default "table") |
| `--plugins.catalogcache.reader.maxItems` | int | Maximum number of entries to keep in the index. (default 10000) |
| `--plugins.catalogcache.reader.maxRetries` | int | Maximum number of retries per item. (default 3) |
| `--plugins.catalogcache.reader.workers` | int | Number of concurrent workers to start processing the queue. (default 10) |
| `--plugins.catalogcache.writer.maxItems` | int | Maximum number of entries to keep in the index. (default 10000) |
| `--plugins.catalogcache.writer.maxRetries` | int | Maximum number of retries per item. (default 3) |
| `--plugins.catalogcache.writer.workers` | int | Number of concurrent workers to start processing the queue. (default 10) |
| `-p`, `--project` | string | Specifies the Flyte project. |
| `--rediscache.passwordSecretName` | string | Name of secret with Redis password. |
| `--rediscache.primaryEndpoint` | string | Primary endpoint for the redis cache that can be used for both reads and writes. |
| `--rediscache.replicaEndpoint` | string | Replica endpoint for the redis cache that can be used for reads. |
| `--secrets.env-prefix` | string | Prefix for environment variables (default "FLYTE_SECRET_") |
| `--secrets.secrets-prefix` | string | Prefix where to look for secrets file (default "/etc/secrets") |
| `--secrets.type` | string | Sets the type of storage to configure [local]. (default "local") |
| `--server.dataProxy.download.maxExpiresIn` | string | Maximum allowed expiration duration. (default "1h0m0s") |
| `--server.dataProxy.upload.defaultFileNameLength` | int | Default length for the generated file name if not provided in the request. (default 20) |
| `--server.dataProxy.upload.maxExpiresIn` | string | Maximum allowed expiration duration. (default "1h0m0s") |
| `--server.dataProxy.upload.maxSize` | string | Maximum allowed upload size. (default "6Mi") |
| `--server.dataProxy.upload.storagePrefix` | string | Storage prefix to use for all upload requests. |
| `--server.grpc.enableGrpcLatencyMetrics` | | Enable grpc latency metrics. Note Histograms metrics can be expensive on Prometheus servers. |
| `--server.grpc.maxMessageSizeBytes` | int | The max size in bytes for incoming gRPC messages |
| `--server.grpc.port` | int | On which grpc port to serve admin (default 8089) |
| `--server.grpc.serverReflection` | | Enable GRPC Server Reflection (default true) |
| `--server.grpcPort` | int | deprecated |
| `--server.grpcServerReflection` | | deprecated |
| `--server.httpPort` | int | On which http port to serve admin (default 8088) |
| `--server.kube-config` | string | Path to kubernetes client config file, default is empty, useful for incluster config. |
| `--server.kubeClientConfig.burst` | int | Max burst rate for throttle. 0 defaults to 10 (default 25) |
| `--server.kubeClientConfig.qps` | int32 | Max QPS to the master for requests to KubeAPI. 0 defaults to 5. (default 100) |
| `--server.kubeClientConfig.timeout` | string | Max duration allowed for every request to KubeAPI before giving up. 0 implies no timeout. (default "30s") |
| `--server.master` | string | The address of the Kubernetes API server. |
| `--server.readHeaderTimeoutSeconds` | int | The amount of time allowed to read request headers. (default 32) |
| `--server.security.allowCors` | | (default true) |
| `--server.security.allowedHeaders` | strings | (default [Content-Type,flyte-authorization]) |
| `--server.security.allowedOrigins` | strings | (default [*]) |
| `--server.security.auditAccess` | | |
| `--server.security.secure` | | |
| `--server.security.ssl.certificateFile` | string | |
| `--server.security.ssl.keyFile` | string | |
| `--server.security.useAuth` | | |
| `--server.thirdPartyConfig.flyteClient.audience` | string | Audience to use when initiating OAuth2 authorization requests. |
| `--server.thirdPartyConfig.flyteClient.clientId` | string | public identifier for the app which handles authorization for a Flyte deployment |
| `--server.thirdPartyConfig.flyteClient.redirectUri` | string | This is the callback uri registered with the app which handles authorization for a Flyte deployment |
| `--server.thirdPartyConfig.flyteClient.scopes` | strings | Recommended scopes for the client to request. |
| `--server.watchService.maxActiveClusterConnections` | int | (default 5) |
| `--server.watchService.maxPageSize` | int | (default 50000) |
| `--server.watchService.nonTerminalStatusUpdatesInterval` | string | (default "1m0s") |
| `--server.watchService.pollInterval` | string | (default "1s") |
| `--sharedservice.connectPort` | string | On which connect port to serve admin (default "8080") |
| `--sharedservice.grpc.grpcMaxResponseStatusBytes` | int32 | specifies the maximum (uncompressed) size of header list that the client is prepared to accept on grpc calls (default 32000) |
| `--sharedservice.grpc.maxConcurrentStreams` | int | Limit on the number of concurrent streams to each ServerTransport. (default 100) |
| `--sharedservice.grpc.maxMessageSizeBytes` | int | Limit on the size of message that can be received on the server. (default 10485760) |
| `--sharedservice.grpcServerReflection` | | Enable GRPC Server Reflection (default true) |
| `--sharedservice.httpPort` | string | On which http port to serve admin (default "8089") |
| `--sharedservice.kubeConfig` | string | Path to kubernetes client config file. |
| `--sharedservice.master` | string | The address of the Kubernetes API server. |
| `--sharedservice.metrics.enableClientGrpcHistograms` | | Enable client grpc histograms (default true) |
| `--sharedservice.metrics.enableGrpcHistograms` | | Enable grpc histograms (default true) |
| `--sharedservice.metrics.scope` | string | Scope to emit metrics under (default "service:") |
| `--sharedservice.port` | string | On which grpc port to serve admin (default "8080") |
| `--sharedservice.profiler.enabled` | | Enable Profiler on server |
| `--sharedservice.profilerPort` | string | Profile port to start listen for pprof and metric handlers on. (default "10254") |
| `--sharedservice.security.allowCors` | | |
| `--sharedservice.security.allowLocalhostAccess` | | Whether to permit localhost unauthenticated access to the server |
| `--sharedservice.security.allowedHeaders` | strings | |
| `--sharedservice.security.allowedOrigins` | strings | |
| `--sharedservice.security.auditAccess` | | |
| `--sharedservice.security.orgOverride` | string | Override org in identity context if localhost access enabled |
| `--sharedservice.security.secure` | | |
| `--sharedservice.security.ssl.certificateAuthorityFile` | string | |
| `--sharedservice.security.ssl.certificateFile` | string | |
| `--sharedservice.security.ssl.keyFile` | string | |
| `--sharedservice.security.useAuth` | | |
| `--sharedservice.sync.syncInterval` | string | Time interval to sync (default "5m0s") |
| `--storage.cache.max_size_mbs` | int | Maximum size of the cache where the Blob store data is cached in-memory. If not specified or set to 0, cache is not used |
| `--storage.cache.target_gc_percent` | int | Sets the garbage collection target percentage. |
| `--storage.connection.access-key` | string | Access key to use. Only required when authtype is set to accesskey. |
| `--storage.connection.auth-type` | string | Auth Type to use [iam, accesskey]. (default "iam") |
| `--storage.connection.disable-ssl` | | Disables SSL connection. Should only be used for development. |
| `--storage.connection.endpoint` | string | URL for storage client to connect to. |
| `--storage.connection.region` | string | Region to connect to. (default "us-east-1") |
| `--storage.connection.secret-key` | string | Secret to use when accesskey is set. |
| `--storage.container` | string | Initial container (in s3 a bucket) to create -if it doesn't exist-.' |
| `--storage.defaultHttpClient.timeout` | string | Sets time out on the http client. (default "0s") |
| `--storage.enable-multicontainer` | | If this is true, then the container argument is overlooked and redundant. This config will automatically open new connections to new containers/buckets as they are encountered |
| `--storage.limits.maxDownloadMBs` | int | Maximum allowed download size (in MBs) per call. (default 2) |
| `--storage.stow.config` | stringToString | Configuration for stow backend. Refer to github/flyteorg/stow (default []) |
| `--storage.stow.kind` | string | Kind of Stow backend to use. Refer to github/flyteorg/stow |
| `--storage.type` | string | Sets the type of storage to configure [s3/minio/local/mem/stow]. (default "s3") |
| `--union.auth.authorizationMetadataKey` | string | Authorization Header to use when passing Access Tokens to the server (default "flyte-authorization") |
| `--union.auth.clientId` | string | Client ID |
| `--union.auth.clientSecretEnvVar` | string | Environment variable containing the client secret |
| `--union.auth.clientSecretLocation` | string | File containing the client secret |
| `--union.auth.deviceFlow.pollInterval` | string | amount of time the device flow would poll the token endpoint if auth server doesn't return a polling interval. Okta and google IDP do return an interval' (default "5s") |
| `--union.auth.deviceFlow.refreshTime` | string | grace period from the token expiry after which it would refresh the token. (default "5m0s") |
| `--union.auth.deviceFlow.timeout` | string | amount of time the device flow should complete or else it will be cancelled. (default "10m0s") |
| `--union.auth.enable` | | Whether to enable an authenticated conenction when communicating with admin. (default true) |
| `--union.auth.externalAuth.command` | strings | Command for external authentication token generation |
| `--union.auth.pkce.refreshTime` | string | grace period from the token expiry after which it would refresh the token. (default "5m0s") |
| `--union.auth.pkce.timeout` | string | Amount of time the browser session would be active for authentication from client app. (default "15s") |
| `--union.auth.scopes` | strings | List of scopes to request |
| `--union.auth.tokenRefreshWindow` | string | Max duration between token refresh attempt and token expiry. (default "1h0m0s") |
| `--union.auth.tokenUrl` | string | OPTIONAL: Your IdP's token endpoint. It'll be discovered from flyte admin's OAuth Metadata endpoint if not provided. |
| `--union.auth.type` | string | Type of OAuth2 flow used for communicating with admin. (default "Pkce") |
| `--union.cache.maxItemsCount` | int | Maximum number of items to keep in the cache before evicting. (default 1000) |
| `--union.connection.host` | string | Host to connect to (default "dns:///utt-mgdp-stg-us-east-2.cloud-staging.union.ai") |
| `--union.connection.insecure` | | Whether to connect over insecure channel |
| `--union.connection.insecureSkipVerify` | | InsecureSkipVerify controls whether a client verifies the server's certificate chain and host name.Caution: shouldn't be use for production usecases' |
| `--union.connection.keepAliveConfig.permitWithoutStream` | | If true, client sends keepalive pings even with no active RPCs. |
| `--union.connection.keepAliveConfig.time` | string | After a duration of this time if the client doesn't see any activity it pings the server to see if the transport is still alive. (default "20s") |
| `--union.connection.keepAliveConfig.timeout` | string | After having pinged for keepalive check, the client waits for a duration of Timeout and if no activity is seen even after that the connection is closed. (default "2m0s") |
| `--union.connection.maxBackoffDelay` | string | Max delay for grpc backoff (default "8s") |
| `--union.connection.maxRecvMsgSize` | int | Maximum size of a message in bytes of a gRPC message (default 10485760) |
| `--union.connection.maxRetries` | int | Max number of gRPC retries (default 4) |
| `--union.connection.minConnectTimeout` | string | Minimum timeout for establishing a connection (default "20s") |
| `--union.connection.perRetryTimeout` | string | gRPC per retry timeout (default "15s") |
| `--union.connection.serviceConfig` | string | Defines gRPC experimental JSON Service Config (default "{"loadBalancingConfig": [{"round_robin":{}}]}") |
| `--union.connection.trustedIdentityClaims.enabled` | | Enables passing of trusted claims while making inter service calls |
| `--union.connection.trustedIdentityClaims.externalIdentityClaim` | string | External identity claim of the service which is authorized to make internal service call. These are verified against userclouds actions |
| `--union.connection.trustedIdentityClaims.externalIdentityTypeClaim` | string | External identity type claim of app or user to use for the current service identity. It should be an 'app' for inter service communication |
| `--union.internalConnectionConfig.-` | stringToString | (default []) |
| `--union.internalConnectionConfig.enabled` | | Enables internal service to service communication instead of going through ingress. |
| `--union.internalConnectionConfig.urlPattern` | string | UrlPattern of the internal service endpoints. (default "{{ service }}-helmchart.{{ service }}.svc.cluster.local:80") |
| `--webhook.awsSecretManager.sidecarImage` | string | Specifies the sidecar docker image to use (default "docker.io/amazon/aws-secrets-manager-secret-sidecar:v0.1.4") |
| `--webhook.certDir` | string | Certificate directory to use to write generated certs. Defaults to /etc/webhook/certs/ (default "/etc/webhook/certs") |
| `--webhook.embeddedSecretManagerConfig.awsConfig.region` | string | AWS region |
| `--webhook.embeddedSecretManagerConfig.fileMountInitContainer.image` | string | Specifies init container image to use for mounting secrets as files. (default "busybox:1.28") |
| `--webhook.embeddedSecretManagerConfig.gcpConfig.project` | string | GCP project to be used for secret manager |
| `--webhook.embeddedSecretManagerConfig.type` | string | (default "AWS") |
| `--webhook.gcpSecretManager.sidecarImage` | string | Specifies the sidecar docker image to use (default "gcr.io/google.com/cloudsdktool/cloud-sdk:alpine") |
| `--webhook.listenPort` | int | The port to use to listen to webhook calls. Defaults to 9443 (default 9443) |
| `--webhook.localCert` | | write certs locally. Defaults to false |
| `--webhook.metrics-prefix` | string | An optional prefix for all published metrics. (default "flyte:") |
| `--webhook.secretName` | string | Secret name to write generated certs to. (default "flyte-pod-webhook") |
| `--webhook.serviceName` | string | The name of the webhook service. (default "flyte-pod-webhook") |
| `--webhook.servicePort` | int32 | The port on the service that hosting webhook. (default 443) |
| `--webhook.vaultSecretManager.role` | string | Specifies the vault role to use (default "flyte") |
=== PAGE: https://www.union.ai/docs/v1/serverless/api-reference/uctl-cli/uctl-update ===
# uctl update
Used for updating various union/flyte resources including apps, cluster
pools, cluster configs
## Synopsis
Provides subcommands to update Flyte resources, such as tasks,
workflows, launch plans, executions, and projects. Update Flyte
resource; e.g., to activate a project:
```shell
$ uctl update project -p flytesnacks --activate
```
## Options
| Option | Type | Description |
|--------|------|-------------|
| `-h`, `--help` | help for update |
### Options inherited from parent commands
| Option | Type | Description |
|--------|------|-------------|
| `--admin.audience` | string | Audience to use when initiating OAuth2 authorization requests. |
| `--admin.authType` | string | Type of OAuth2 flow used for communicating with admin.ClientSecret, Pkce, ExternalCommand are valid values (default "ClientSecret") |
| `--admin.authorizationHeader` | string | Custom metadata header to pass JWT |
| `--admin.authorizationServerUrl` | string | This is the URL to your IdP's authorization server. It'll default to Endpoint |
| `--admin.caCertFilePath` | string | Use specified certificate file to verify the admin server peer. |
| `--admin.clientId` | string | Client ID (default "flytepropeller") |
| `--admin.clientSecretEnvVar` | string | Environment variable containing the client secret |
| `--admin.clientSecretLocation` | string | File containing the client secret (default "/etc/secrets/client_secret") |
| `--admin.command` | strings | Command for external authentication token generation |
| `--admin.defaultOrg` | string | OPTIONAL: Default org to use to support non-org based cli's.'. |
| `--admin.defaultServiceConfig` | string | |
| `--admin.deviceFlowConfig.pollInterval` | string | amount of time the device flow would poll the token endpoint if auth server doesn't return a polling interval. Okta and google IDP do return an interval' (default "5s") |
| `--admin.deviceFlowConfig.refreshTime` | string | grace period from the token expiry after which it would refresh the token. (default "5m0s") |
| `--admin.deviceFlowConfig.timeout` | string | amount of time the device flow should complete or else it will be cancelled. (default "10m0s") |
| `--admin.endpoint` | string | For admin types, specify where the uri of the service is located. |
| `--admin.httpProxyURL` | string | OPTIONAL: HTTP Proxy to be used for OAuth requests. |
| `--admin.insecure` | | Use insecure connection. |
| `--admin.insecureSkipVerify` | | InsecureSkipVerify controls whether a client verifies the server's certificate chain and host name.Caution: shouldn't be use for production usecases' |
| `--admin.maxBackoffDelay` | string | Max delay for grpc backoff (default "8s") |
| `--admin.maxMessageSizeBytes` | int | The max size in bytes for incoming gRPC messages |
| `--admin.maxRetries` | int | Max number of gRPC retries (default 4) |
| `--admin.perRetryTimeout` | string | gRPC per retry timeout (default "15s") |
| `--admin.pkceConfig.refreshTime` | string | grace period from the token expiry after which it would refresh the token. (default "5m0s") |
| `--admin.pkceConfig.timeout` | string | Amount of time the browser session would be active for authentication from client app. (default "2m0s") |
| `--admin.proxyCommand` | strings | Command for external proxy-authorization token generation |
| `--admin.scopes` | strings | List of scopes to request |
| `--admin.tokenRefreshWindow` | string | Max duration between token refresh attempt and token expiry. (default "0s") |
| `--admin.tokenUrl` | string | OPTIONAL: Your IdP's token endpoint. It'll be discovered from flyte admin's OAuth Metadata endpoint if not provided. |
| `--admin.useAudienceFromAdmin` | | Use Audience configured from admins public endpoint config. |
| `--admin.useAuth` | | Deprecated: Auth will be enabled/disabled based on admin's dynamically discovered information. |
| `--auth.appAuth.externalAuthServer.allowedAudience` | strings | Optional: A list of allowed audiences. If not provided, the audience is expected to be the public Uri of the service. |
| `--auth.appAuth.externalAuthServer.baseUrl` | string | This should be the base url of the authorization server that you are trying to hit. With Okta for instance, it will look something like https://company.okta.com/oauth2/abcdef123456789/ |
| `--auth.appAuth.externalAuthServer.httpProxyURL` | string | OPTIONAL: HTTP Proxy to be used for OAuth requests. |
| `--auth.appAuth.externalAuthServer.metadataUrl` | string | Optional: If the server doesn't support /.well-known/oauth-authorization-server, you can set a custom metadata url here.' |
| `--auth.appAuth.externalAuthServer.retryAttempts` | int | Optional: The number of attempted retries on a transient failure to get the OAuth metadata (default 5) |
| `--auth.appAuth.externalAuthServer.retryDelay` | string | Optional, Duration to wait between retries (default "1s") |
| `--auth.appAuth.selfAuthServer.accessTokenLifespan` | string | Defines the lifespan of issued access tokens. (default "30m0s") |
| `--auth.appAuth.selfAuthServer.authorizationCodeLifespan` | string | Defines the lifespan of issued access tokens. (default "5m0s") |
| `--auth.appAuth.selfAuthServer.claimSymmetricEncryptionKeySecretName` | string | OPTIONAL: Secret name to use to encrypt claims in authcode token. (default "claim_symmetric_key") |
| `--auth.appAuth.selfAuthServer.issuer` | string | Defines the issuer to use when issuing and validating tokens. The default value is https://{requestUri.HostAndPort}/ |
| `--auth.appAuth.selfAuthServer.oldTokenSigningRSAKeySecretName` | string | OPTIONAL: Secret name to use to retrieve Old RSA Signing Key. This can be useful during key rotation to continue to accept older tokens. (default "token_rsa_key_old.pem") |
| `--auth.appAuth.selfAuthServer.refreshTokenLifespan` | string | Defines the lifespan of issued access tokens. (default "1h0m0s") |
| `--auth.appAuth.selfAuthServer.tokenSigningRSAKeySecretName` | string | OPTIONAL: Secret name to use to retrieve RSA Signing Key. (default "token_rsa_key.pem") |
| `--auth.appAuth.thirdPartyConfig.flyteClient.audience` | string | Audience to use when initiating OAuth2 authorization requests. |
| `--auth.appAuth.thirdPartyConfig.flyteClient.clientId` | string | public identifier for the app which handles authorization for a Flyte deployment (default "uctl") |
| `--auth.appAuth.thirdPartyConfig.flyteClient.redirectUri` | string | This is the callback uri registered with the app which handles authorization for a Flyte deployment (default "http://localhost:53593/callback") |
| `--auth.appAuth.thirdPartyConfig.flyteClient.scopes` | strings | Recommended scopes for the client to request. (default [all,offline]) |
| `--auth.disableForGrpc` | | Disables auth enforcement on Grpc Endpoints. |
| `--auth.disableForHttp` | | Disables auth enforcement on HTTP Endpoints. |
| `--auth.grpcAuthorizationHeader` | string | (default "flyte-authorization") |
| `--auth.httpAuthorizationHeader` | string | (default "flyte-authorization") |
| `--auth.httpProxyURL` | string | OPTIONAL: HTTP Proxy to be used for OAuth requests. |
| `--auth.tokenEndpointProxyPath` | string | The path used to proxy calls to the TokenURL |
| `--auth.userAuth.cookieBlockKeySecretName` | string | OPTIONAL: Secret name to use for cookie block key. (default "cookie_block_key") |
| `--auth.userAuth.cookieHashKeySecretName` | string | OPTIONAL: Secret name to use for cookie hash key. (default "cookie_hash_key") |
| `--auth.userAuth.cookieSetting.domain` | string | OPTIONAL: Allows you to set the domain attribute on the auth cookies. |
| `--auth.userAuth.cookieSetting.sameSitePolicy` | string | OPTIONAL: Allows you to declare if your cookie should be restricted to a first-party or same-site context.Wrapper around http.SameSite. (default "DefaultMode") |
| `--auth.userAuth.httpProxyURL` | string | OPTIONAL: HTTP Proxy to be used for OAuth requests. |
| `--auth.userAuth.idpQueryParameter` | string | idp query parameter used for selecting a particular IDP for doing user authentication. Eg: for Okta passing idp={IDP-ID} forces the authentication to happen with IDP-ID |
| `--auth.userAuth.openId.baseUrl` | string | |
| `--auth.userAuth.openId.clientId` | string | |
| `--auth.userAuth.openId.clientSecretFile` | string | |
| `--auth.userAuth.openId.clientSecretName` | string | (default "oidc_client_secret") |
| `--auth.userAuth.openId.scopes` | strings | (default [openid,profile]) |
| `--auth.userAuth.redirectUrl` | string | (default "/console") |
| `--authorizer.internalCommunicationConfig.enabled` | | Enables authorization decisions for internal communication. (default true) |
| `--authorizer.internalCommunicationConfig.ingressIdentity` | string | IngressIdentity used in the cluster. Needed to exclude the communication coming from ingress. (default "ingress-nginx.ingress-nginx.serviceaccount.identity.linkerd.cluster.local") |
| `--authorizer.internalCommunicationConfig.tenantUrlPatternIdentity` | string | UrlPatternIdentity of the internal tenant service endpoint identities. (default "{{ service }}.{{ org }}.serviceaccount.identity.linkerd.cluster.local") |
| `--authorizer.internalCommunicationConfig.urlPatternIdentity` | string | UrlPatternIdentity of the internal service endpoint identities. (default "{{ service }}-helmchart.{{ service }}.serviceaccount.identity.linkerd.cluster.local") |
| `--authorizer.mode` | string | (default "Active") |
| `--authorizer.organizationConfig.PolicyConfig.adminPolicyDescription` | string | description for the boilerplate admin policy (default "Contributor permissions and full admin permissions to manage users and view usage dashboards") |
| `--authorizer.organizationConfig.PolicyConfig.contributorPolicyDescription` | string | description for the boilerplate contributor policy (default "Viewer permissions and permissions to create workflows, tasks, launch plans, and executions") |
| `--authorizer.organizationConfig.PolicyConfig.defaultUserPolicyRoleType` | string | name of the role type to determine which default policy new users added to the organization should be assigned (default "Viewer") |
| `--authorizer.organizationConfig.PolicyConfig.serverlessContributorPolicyDescription` | string | description for the boilerplate serverless contributor policy (default "Viewer permissions and permissions to create workflows, tasks, launch plans, and executions") |
| `--authorizer.organizationConfig.PolicyConfig.serverlessViewerPolicyDescription` | string | description for the boilerplate serverless viewer policy (default "Permissions to view Flyte entities") |
| `--authorizer.organizationConfig.PolicyConfig.viewerPolicyDescription` | string | description for the boilerplate viewer policy (default "Permissions to view Flyte entities") |
| `--authorizer.organizationConfig.defaultPolicyCacheDuration` | string | Cache entry duration for the store of the default policy per organization (default "10m0s") |
| `--authorizer.syncRuleRefreshInterval` | string | (default "1m0s") |
| `--authorizer.type` | string | (default "UserClouds") |
| `--authorizer.userCloudsClient.cache.redis.ttl.edgeTypes` | string | Specifies how long edge types remain in the cache.. (default "30m0s") |
| `--authorizer.userCloudsClient.cache.redis.ttl.edges` | string | Specifies how long edges remain in the cache. (default "30m0s") |
| `--authorizer.userCloudsClient.cache.redis.ttl.objectTypes` | string | Specifies how long object types remain in the cache. (default "30m0s") |
| `--authorizer.userCloudsClient.cache.redis.ttl.objects` | string | Specifies how long objects remain in the cache. (default "30m0s") |
| `--authorizer.userCloudsClient.cache.type` | string | Cache type to use. (default "none") |
| `--authorizer.userCloudsClient.clientID` | string | UserClouds client id |
| `--authorizer.userCloudsClient.clientSecretName` | string | UserCloud client secret name to read from the secret manager. (default "userclouds-client-secret") |
| `--authorizer.userCloudsClient.enableLogging` | | Enable userclouds client's internal logging. Calls to post logs take 250-350 ms and will impact p99 latency, enable with caution. |
| `--authorizer.userCloudsClient.tenantID` | string | UserClouds tenant id. Should be a UUID. |
| `--authorizer.userCloudsClient.tenantUrl` | string | Something like https://{yourtenant}.tenant.userclouds.com |
| `--config` | string | config file (default is /Users/andrew/.union/config.yaml) |
| `--connection.environment` | string | |
| `--connection.region` | string | |
| `--connection.rootTenantURLPattern` | string | Pattern for tenant url. (default "dns:///{{ organization }}.cloud-staging.union.ai") |
| `--console.endpoint` | string | Endpoint of console, if different than flyte admin |
| `--database.connMaxLifeTime` | string | sets the maximum amount of time a connection may be reused (default "1h0m0s") |
| `--database.enableForeignKeyConstraintWhenMigrating` | | Whether to enable gorm foreign keys when migrating the db |
| `--database.maxIdleConnections` | int | maxIdleConnections sets the maximum number of connections in the idle connection pool. (default 10) |
| `--database.maxOpenConnections` | int | maxOpenConnections sets the maximum number of open connections to the database. (default 100) |
| `--database.postgres.dbname` | string | The database name (default "postgres") |
| `--database.postgres.debug` | | |
| `--database.postgres.host` | string | The host name of the database server (default "localhost") |
| `--database.postgres.options` | string | See http://gorm.io/docs/connecting_to_the_database.html for available options passed, in addition to the above. (default "sslmode=disable") |
| `--database.postgres.password` | string | The database password. (default "postgres") |
| `--database.postgres.passwordPath` | string | Points to the file containing the database password. |
| `--database.postgres.port` | int | The port name of the database server (default 30001) |
| `--database.postgres.readReplicaHost` | string | The host name of the read replica database server (default "localhost") |
| `--database.postgres.username` | string | The database user who is connecting to the server. (default "postgres") |
| `--database.sqlite.file` | string | The path to the file (existing or new) where the DB should be created / stored. If existing, then this will be re-used, else a new will be created |
| `--db.connectionPool.maxConnectionLifetime` | string | (default "0s") |
| `--db.connectionPool.maxIdleConnections` | int | |
| `--db.connectionPool.maxOpenConnections` | int | |
| `--db.dbname` | string | (default "postgres") |
| `--db.debug` | | |
| `--db.host` | string | (default "postgres") |
| `--db.log_level` | int | (default 4) |
| `--db.options` | string | (default "sslmode=disable") |
| `--db.password` | string | |
| `--db.passwordPath` | string | |
| `--db.port` | int | (default 5432) |
| `--db.username` | string | (default "postgres") |
| `-d`, `--domain` | string | Specifies the Flyte project's domain. |
| `--files.archive` | | Pass in archive file either an http link or local path. |
| `--files.assumableIamRole` | string | Custom assumable iam auth role to register launch plans with. |
| `--files.continueOnError` | | Continue on error when registering files. |
| `--files.destinationDirectory` | string | Location of source code in container. |
| `--files.dryRun` | | Execute command without making any modifications. |
| `--files.enableSchedule` | | Enable the schedule if the files contain schedulable launchplan. |
| `--files.force` | | Force use of version number on entities registered with flyte. |
| `--files.k8ServiceAccount` | string | Deprecated. Please use `--K8sServiceAccount`|
| `--files.k8sServiceAccount` | string | Custom kubernetes service account auth role to register launch plans with. |
| `--files.outputLocationPrefix` | string | Custom output location prefix for offloaded types (files/schemas). |
| `--files.sourceUploadPath` | string | Deprecated: Update flyte admin to avoid having to configure storage access from uctl. |
| `--files.version` | string | Version of the entity to be registered with flyte which are un-versioned after serialization. |
| `--logger.formatter.type` | string | Sets logging format type. (default "json") |
| `--logger.level` | int | Sets the minimum logging level. (default 3) |
| `--logger.mute` | | Mutes all logs regardless of severity. Intended for benchmarks/tests only. |
| `--logger.show-source` | | Includes source code location in logs. |
| `--org` | string | Organization to work on. If not set, default to user's org. |
| `--otel.file.filename` | string | Filename to store exported telemetry traces (default "/tmp/trace.txt") |
| `--otel.jaeger.endpoint` | string | Endpoint for the jaeger telemetry trace ingestor (default "http://localhost:14268/api/traces") |
| `--otel.otlpgrpc.endpoint` | string | Endpoint for the OTLP telemetry trace collector (default "http://localhost:4317") |
| `--otel.otlphttp.endpoint` | string | Endpoint for the OTLP telemetry trace collector (default "http://localhost:4318/v1/traces") |
| `--otel.sampler.parentSampler` | string | Sets the parent sampler to use for the tracer (default "always") |
| `--otel.type` | string | Sets the type of exporter to configure [noop/file/jaeger/otlpgrpc/otlphttp]. (default "noop") |
| `-o`, `--output` | string | Specifies the output type - supported formats [TABLE JSON YAML DOT DOTURL]. NOTE: dot, doturl are only supported for Workflow (default "table") |
| `--plugins.catalogcache.reader.maxItems` | int | Maximum number of entries to keep in the index. (default 10000) |
| `--plugins.catalogcache.reader.maxRetries` | int | Maximum number of retries per item. (default 3) |
| `--plugins.catalogcache.reader.workers` | int | Number of concurrent workers to start processing the queue. (default 10) |
| `--plugins.catalogcache.writer.maxItems` | int | Maximum number of entries to keep in the index. (default 10000) |
| `--plugins.catalogcache.writer.maxRetries` | int | Maximum number of retries per item. (default 3) |
| `--plugins.catalogcache.writer.workers` | int | Number of concurrent workers to start processing the queue. (default 10) |
| `-p`, `--project` | string | Specifies the Flyte project. |
| `--rediscache.passwordSecretName` | string | Name of secret with Redis password. |
| `--rediscache.primaryEndpoint` | string | Primary endpoint for the redis cache that can be used for both reads and writes. |
| `--rediscache.replicaEndpoint` | string | Replica endpoint for the redis cache that can be used for reads. |
| `--secrets.env-prefix` | string | Prefix for environment variables (default "FLYTE_SECRET_") |
| `--secrets.secrets-prefix` | string | Prefix where to look for secrets file (default "/etc/secrets") |
| `--secrets.type` | string | Sets the type of storage to configure [local]. (default "local") |
| `--server.dataProxy.download.maxExpiresIn` | string | Maximum allowed expiration duration. (default "1h0m0s") |
| `--server.dataProxy.upload.defaultFileNameLength` | int | Default length for the generated file name if not provided in the request. (default 20) |
| `--server.dataProxy.upload.maxExpiresIn` | string | Maximum allowed expiration duration. (default "1h0m0s") |
| `--server.dataProxy.upload.maxSize` | string | Maximum allowed upload size. (default "6Mi") |
| `--server.dataProxy.upload.storagePrefix` | string | Storage prefix to use for all upload requests. |
| `--server.grpc.enableGrpcLatencyMetrics` | | Enable grpc latency metrics. Note Histograms metrics can be expensive on Prometheus servers. |
| `--server.grpc.maxMessageSizeBytes` | int | The max size in bytes for incoming gRPC messages |
| `--server.grpc.port` | int | On which grpc port to serve admin (default 8089) |
| `--server.grpc.serverReflection` | | Enable GRPC Server Reflection (default true) |
| `--server.grpcPort` | int | deprecated |
| `--server.grpcServerReflection` | | deprecated |
| `--server.httpPort` | int | On which http port to serve admin (default 8088) |
| `--server.kube-config` | string | Path to kubernetes client config file, default is empty, useful for incluster config. |
| `--server.kubeClientConfig.burst` | int | Max burst rate for throttle. 0 defaults to 10 (default 25) |
| `--server.kubeClientConfig.qps` | int32 | Max QPS to the master for requests to KubeAPI. 0 defaults to 5. (default 100) |
| `--server.kubeClientConfig.timeout` | string | Max duration allowed for every request to KubeAPI before giving up. 0 implies no timeout. (default "30s") |
| `--server.master` | string | The address of the Kubernetes API server. |
| `--server.readHeaderTimeoutSeconds` | int | The amount of time allowed to read request headers. (default 32) |
| `--server.security.allowCors` | | (default true) |
| `--server.security.allowedHeaders` | strings | (default [Content-Type,flyte-authorization]) |
| `--server.security.allowedOrigins` | strings | (default [*]) |
| `--server.security.auditAccess` | | |
| `--server.security.secure` | | |
| `--server.security.ssl.certificateFile` | string | |
| `--server.security.ssl.keyFile` | string | |
| `--server.security.useAuth` | | |
| `--server.thirdPartyConfig.flyteClient.audience` | string | Audience to use when initiating OAuth2 authorization requests. |
| `--server.thirdPartyConfig.flyteClient.clientId` | string | public identifier for the app which handles authorization for a Flyte deployment |
| `--server.thirdPartyConfig.flyteClient.redirectUri` | string | This is the callback uri registered with the app which handles authorization for a Flyte deployment |
| `--server.thirdPartyConfig.flyteClient.scopes` | strings | Recommended scopes for the client to request. |
| `--server.watchService.maxActiveClusterConnections` | int | (default 5) |
| `--server.watchService.maxPageSize` | int | (default 50000) |
| `--server.watchService.nonTerminalStatusUpdatesInterval` | string | (default "1m0s") |
| `--server.watchService.pollInterval` | string | (default "1s") |
| `--sharedservice.connectPort` | string | On which connect port to serve admin (default "8080") |
| `--sharedservice.grpc.grpcMaxResponseStatusBytes` | int32 | specifies the maximum (uncompressed) size of header list that the client is prepared to accept on grpc calls (default 32000) |
| `--sharedservice.grpc.maxConcurrentStreams` | int | Limit on the number of concurrent streams to each ServerTransport. (default 100) |
| `--sharedservice.grpc.maxMessageSizeBytes` | int | Limit on the size of message that can be received on the server. (default 10485760) |
| `--sharedservice.grpcServerReflection` | | Enable GRPC Server Reflection (default true) |
| `--sharedservice.httpPort` | string | On which http port to serve admin (default "8089") |
| `--sharedservice.kubeConfig` | string | Path to kubernetes client config file. |
| `--sharedservice.master` | string | The address of the Kubernetes API server. |
| `--sharedservice.metrics.enableClientGrpcHistograms` | | Enable client grpc histograms (default true) |
| `--sharedservice.metrics.enableGrpcHistograms` | | Enable grpc histograms (default true) |
| `--sharedservice.metrics.scope` | string | Scope to emit metrics under (default "service:") |
| `--sharedservice.port` | string | On which grpc port to serve admin (default "8080") |
| `--sharedservice.profiler.enabled` | | Enable Profiler on server |
| `--sharedservice.profilerPort` | string | Profile port to start listen for pprof and metric handlers on. (default "10254") |
| `--sharedservice.security.allowCors` | | |
| `--sharedservice.security.allowLocalhostAccess` | | Whether to permit localhost unauthenticated access to the server |
| `--sharedservice.security.allowedHeaders` | strings | |
| `--sharedservice.security.allowedOrigins` | strings | |
| `--sharedservice.security.auditAccess` | | |
| `--sharedservice.security.orgOverride` | string | Override org in identity context if localhost access enabled |
| `--sharedservice.security.secure` | | |
| `--sharedservice.security.ssl.certificateAuthorityFile` | string | |
| `--sharedservice.security.ssl.certificateFile` | string | |
| `--sharedservice.security.ssl.keyFile` | string | |
| `--sharedservice.security.useAuth` | | |
| `--sharedservice.sync.syncInterval` | string | Time interval to sync (default "5m0s") |
| `--storage.cache.max_size_mbs` | int | Maximum size of the cache where the Blob store data is cached in-memory. If not specified or set to 0, cache is not used |
| `--storage.cache.target_gc_percent` | int | Sets the garbage collection target percentage. |
| `--storage.connection.access-key` | string | Access key to use. Only required when authtype is set to accesskey. |
| `--storage.connection.auth-type` | string | Auth Type to use [iam, accesskey]. (default "iam") |
| `--storage.connection.disable-ssl` | | Disables SSL connection. Should only be used for development. |
| `--storage.connection.endpoint` | string | URL for storage client to connect to. |
| `--storage.connection.region` | string | Region to connect to. (default "us-east-1") |
| `--storage.connection.secret-key` | string | Secret to use when accesskey is set. |
| `--storage.container` | string | Initial container (in s3 a bucket) to create -if it doesn't exist-.' |
| `--storage.defaultHttpClient.timeout` | string | Sets time out on the http client. (default "0s") |
| `--storage.enable-multicontainer` | | If this is true, then the container argument is overlooked and redundant. This config will automatically open new connections to new containers/buckets as they are encountered |
| `--storage.limits.maxDownloadMBs` | int | Maximum allowed download size (in MBs) per call. (default 2) |
| `--storage.stow.config` | stringToString | Configuration for stow backend. Refer to github/flyteorg/stow (default []) |
| `--storage.stow.kind` | string | Kind of Stow backend to use. Refer to github/flyteorg/stow |
| `--storage.type` | string | Sets the type of storage to configure [s3/minio/local/mem/stow]. (default "s3") |
| `--union.auth.authorizationMetadataKey` | string | Authorization Header to use when passing Access Tokens to the server (default "flyte-authorization") |
| `--union.auth.clientId` | string | Client ID |
| `--union.auth.clientSecretEnvVar` | string | Environment variable containing the client secret |
| `--union.auth.clientSecretLocation` | string | File containing the client secret |
| `--union.auth.deviceFlow.pollInterval` | string | amount of time the device flow would poll the token endpoint if auth server doesn't return a polling interval. Okta and google IDP do return an interval' (default "5s") |
| `--union.auth.deviceFlow.refreshTime` | string | grace period from the token expiry after which it would refresh the token. (default "5m0s") |
| `--union.auth.deviceFlow.timeout` | string | amount of time the device flow should complete or else it will be cancelled. (default "10m0s") |
| `--union.auth.enable` | | Whether to enable an authenticated conenction when communicating with admin. (default true) |
| `--union.auth.externalAuth.command` | strings | Command for external authentication token generation |
| `--union.auth.pkce.refreshTime` | string | grace period from the token expiry after which it would refresh the token. (default "5m0s") |
| `--union.auth.pkce.timeout` | string | Amount of time the browser session would be active for authentication from client app. (default "15s") |
| `--union.auth.scopes` | strings | List of scopes to request |
| `--union.auth.tokenRefreshWindow` | string | Max duration between token refresh attempt and token expiry. (default "1h0m0s") |
| `--union.auth.tokenUrl` | string | OPTIONAL: Your IdP's token endpoint. It'll be discovered from flyte admin's OAuth Metadata endpoint if not provided. |
| `--union.auth.type` | string | Type of OAuth2 flow used for communicating with admin. (default "Pkce") |
| `--union.cache.maxItemsCount` | int | Maximum number of items to keep in the cache before evicting. (default 1000) |
| `--union.connection.host` | string | Host to connect to (default "dns:///utt-mgdp-stg-us-east-2.cloud-staging.union.ai") |
| `--union.connection.insecure` | | Whether to connect over insecure channel |
| `--union.connection.insecureSkipVerify` | | InsecureSkipVerify controls whether a client verifies the server's certificate chain and host name.Caution: shouldn't be use for production usecases' |
| `--union.connection.keepAliveConfig.permitWithoutStream` | | If true, client sends keepalive pings even with no active RPCs. |
| `--union.connection.keepAliveConfig.time` | string | After a duration of this time if the client doesn't see any activity it pings the server to see if the transport is still alive. (default "20s") |
| `--union.connection.keepAliveConfig.timeout` | string | After having pinged for keepalive check, the client waits for a duration of Timeout and if no activity is seen even after that the connection is closed. (default "2m0s") |
| `--union.connection.maxBackoffDelay` | string | Max delay for grpc backoff (default "8s") |
| `--union.connection.maxRecvMsgSize` | int | Maximum size of a message in bytes of a gRPC message (default 10485760) |
| `--union.connection.maxRetries` | int | Max number of gRPC retries (default 4) |
| `--union.connection.minConnectTimeout` | string | Minimum timeout for establishing a connection (default "20s") |
| `--union.connection.perRetryTimeout` | string | gRPC per retry timeout (default "15s") |
| `--union.connection.serviceConfig` | string | Defines gRPC experimental JSON Service Config (default "{"loadBalancingConfig": [{"round_robin":{}}]}") |
| `--union.connection.trustedIdentityClaims.enabled` | | Enables passing of trusted claims while making inter service calls |
| `--union.connection.trustedIdentityClaims.externalIdentityClaim` | string | External identity claim of the service which is authorized to make internal service call. These are verified against userclouds actions |
| `--union.connection.trustedIdentityClaims.externalIdentityTypeClaim` | string | External identity type claim of app or user to use for the current service identity. It should be an 'app' for inter service communication |
| `--union.internalConnectionConfig.-` | stringToString | (default []) |
| `--union.internalConnectionConfig.enabled` | | Enables internal service to service communication instead of going through ingress. |
| `--union.internalConnectionConfig.urlPattern` | string | UrlPattern of the internal service endpoints. (default "{{ service }}-helmchart.{{ service }}.svc.cluster.local:80") |
| `--webhook.awsSecretManager.sidecarImage` | string | Specifies the sidecar docker image to use (default "docker.io/amazon/aws-secrets-manager-secret-sidecar:v0.1.4") |
| `--webhook.certDir` | string | Certificate directory to use to write generated certs. Defaults to /etc/webhook/certs/ (default "/etc/webhook/certs") |
| `--webhook.embeddedSecretManagerConfig.awsConfig.region` | string | AWS region |
| `--webhook.embeddedSecretManagerConfig.fileMountInitContainer.image` | string | Specifies init container image to use for mounting secrets as files. (default "busybox:1.28") |
| `--webhook.embeddedSecretManagerConfig.gcpConfig.project` | string | GCP project to be used for secret manager |
| `--webhook.embeddedSecretManagerConfig.type` | string | (default "AWS") |
| `--webhook.gcpSecretManager.sidecarImage` | string | Specifies the sidecar docker image to use (default "gcr.io/google.com/cloudsdktool/cloud-sdk:alpine") |
| `--webhook.listenPort` | int | The port to use to listen to webhook calls. Defaults to 9443 (default 9443) |
| `--webhook.localCert` | | write certs locally. Defaults to false |
| `--webhook.metrics-prefix` | string | An optional prefix for all published metrics. (default "flyte:") |
| `--webhook.secretName` | string | Secret name to write generated certs to. (default "flyte-pod-webhook") |
| `--webhook.serviceName` | string | The name of the webhook service. (default "flyte-pod-webhook") |
| `--webhook.servicePort` | int32 | The port on the service that hosting webhook. (default 443) |
| `--webhook.vaultSecretManager.role` | string | Specifies the vault role to use (default "flyte") |
## Subpages
- **Uctl CLI > uctl update > uctl update cluster-pool-attributes**
- **Uctl CLI > uctl update > uctl update cluster-resource-attribute**
- **Uctl CLI > uctl update > uctl update execution**
- **Uctl CLI > uctl update > uctl update execution-cluster-label**
- **Uctl CLI > uctl update > uctl update execution-queue-attribute**
- **Uctl CLI > uctl update > uctl update launchplan**
- **Uctl CLI > uctl update > uctl update launchplan-meta**
- **Uctl CLI > uctl update > uctl update plugin-override**
- **Uctl CLI > uctl update > uctl update project**
- **Uctl CLI > uctl update > uctl update task-meta**
- **Uctl CLI > uctl update > uctl update task-resource-attribute**
- **Uctl CLI > uctl update > uctl update workflow-execution-config**
- **Uctl CLI > uctl update > uctl update workflow-meta**
=== PAGE: https://www.union.ai/docs/v1/serverless/api-reference/uctl-cli/uctl-update/uctl-update-cluster-pool-attributes ===
# uctl update cluster-pool-attributes
Update matchable resources for cluster pool assignment
## Synopsis
Update cluster pool assignment attributes for given project and domain
combination or additionally with workflow name.
Updating to the cluster pool attribute is only available from a
generated file. See the get section to generate this file. It takes
input for cluster resource attributes from the config file cpa.yaml,
Example: content of cpa.yaml:
``` yaml
domain: development
project: flytesnacks
clusterPoolName: my_cluster_pool
```
Update cluster pool assignment for project and domain and workflow
combination. This will take precedence over any other cluster pool
assignent defined at project domain level.
``` yaml
domain: development
project: flytesnacks
workflow: my_wf
clusterPoolName: my_cluster_pool
```
:
uctl update cluster-pool-attribute --attrFile cpa.yaml
To generate a skeleton cpa.yaml:
:
uctl update cluster-pool-attribute --genSkeleton --attrFile cpa.yaml
```shell
$ uctl update cluster-pool-attributes [flags]
```
## Options
| Option | Type | Description |
|--------|------|-------------|
| `--attrFile` | string | cluster pool attribute file to be used for creating cluster pool matchable attribute. |
| `--force` | | do not ask for an acknowledgement during updates |
| `--genSkeleton` | | generates a skeleton cluster pool config attribute file with templatized values in full conformance with the api format. |
| `-h`, `--help` | help for cluster-pool-attributes |
### Options inherited from parent commands
| Option | Type | Description |
|--------|------|-------------|
| `--admin.audience` | string | Audience to use when initiating OAuth2 authorization requests. |
| `--admin.authType` | string | Type of OAuth2 flow used for communicating with admin.ClientSecret, Pkce, ExternalCommand are valid values (default "ClientSecret") |
| `--admin.authorizationHeader` | string | Custom metadata header to pass JWT |
| `--admin.authorizationServerUrl` | string | This is the URL to your IdP's authorization server. It'll default to Endpoint |
| `--admin.caCertFilePath` | string | Use specified certificate file to verify the admin server peer. |
| `--admin.clientId` | string | Client ID (default "flytepropeller") |
| `--admin.clientSecretEnvVar` | string | Environment variable containing the client secret |
| `--admin.clientSecretLocation` | string | File containing the client secret (default "/etc/secrets/client_secret") |
| `--admin.command` | strings | Command for external authentication token generation |
| `--admin.defaultOrg` | string | OPTIONAL: Default org to use to support non-org based cli's.'. |
| `--admin.defaultServiceConfig` | string | |
| `--admin.deviceFlowConfig.pollInterval` | string | amount of time the device flow would poll the token endpoint if auth server doesn't return a polling interval. Okta and google IDP do return an interval' (default "5s") |
| `--admin.deviceFlowConfig.refreshTime` | string | grace period from the token expiry after which it would refresh the token. (default "5m0s") |
| `--admin.deviceFlowConfig.timeout` | string | amount of time the device flow should complete or else it will be cancelled. (default "10m0s") |
| `--admin.endpoint` | string | For admin types, specify where the uri of the service is located. |
| `--admin.httpProxyURL` | string | OPTIONAL: HTTP Proxy to be used for OAuth requests. |
| `--admin.insecure` | | Use insecure connection. |
| `--admin.insecureSkipVerify` | | InsecureSkipVerify controls whether a client verifies the server's certificate chain and host name.Caution: shouldn't be use for production usecases' |
| `--admin.maxBackoffDelay` | string | Max delay for grpc backoff (default "8s") |
| `--admin.maxMessageSizeBytes` | int | The max size in bytes for incoming gRPC messages |
| `--admin.maxRetries` | int | Max number of gRPC retries (default 4) |
| `--admin.perRetryTimeout` | string | gRPC per retry timeout (default "15s") |
| `--admin.pkceConfig.refreshTime` | string | grace period from the token expiry after which it would refresh the token. (default "5m0s") |
| `--admin.pkceConfig.timeout` | string | Amount of time the browser session would be active for authentication from client app. (default "2m0s") |
| `--admin.proxyCommand` | strings | Command for external proxy-authorization token generation |
| `--admin.scopes` | strings | List of scopes to request |
| `--admin.tokenRefreshWindow` | string | Max duration between token refresh attempt and token expiry. (default "0s") |
| `--admin.tokenUrl` | string | OPTIONAL: Your IdP's token endpoint. It'll be discovered from flyte admin's OAuth Metadata endpoint if not provided. |
| `--admin.useAudienceFromAdmin` | | Use Audience configured from admins public endpoint config. |
| `--admin.useAuth` | | Deprecated: Auth will be enabled/disabled based on admin's dynamically discovered information. |
| `--auth.appAuth.externalAuthServer.allowedAudience` | strings | Optional: A list of allowed audiences. If not provided, the audience is expected to be the public Uri of the service. |
| `--auth.appAuth.externalAuthServer.baseUrl` | string | This should be the base url of the authorization server that you are trying to hit. With Okta for instance, it will look something like https://company.okta.com/oauth2/abcdef123456789/ |
| `--auth.appAuth.externalAuthServer.httpProxyURL` | string | OPTIONAL: HTTP Proxy to be used for OAuth requests. |
| `--auth.appAuth.externalAuthServer.metadataUrl` | string | Optional: If the server doesn't support /.well-known/oauth-authorization-server, you can set a custom metadata url here.' |
| `--auth.appAuth.externalAuthServer.retryAttempts` | int | Optional: The number of attempted retries on a transient failure to get the OAuth metadata (default 5) |
| `--auth.appAuth.externalAuthServer.retryDelay` | string | Optional, Duration to wait between retries (default "1s") |
| `--auth.appAuth.selfAuthServer.accessTokenLifespan` | string | Defines the lifespan of issued access tokens. (default "30m0s") |
| `--auth.appAuth.selfAuthServer.authorizationCodeLifespan` | string | Defines the lifespan of issued access tokens. (default "5m0s") |
| `--auth.appAuth.selfAuthServer.claimSymmetricEncryptionKeySecretName` | string | OPTIONAL: Secret name to use to encrypt claims in authcode token. (default "claim_symmetric_key") |
| `--auth.appAuth.selfAuthServer.issuer` | string | Defines the issuer to use when issuing and validating tokens. The default value is https://{requestUri.HostAndPort}/ |
| `--auth.appAuth.selfAuthServer.oldTokenSigningRSAKeySecretName` | string | OPTIONAL: Secret name to use to retrieve Old RSA Signing Key. This can be useful during key rotation to continue to accept older tokens. (default "token_rsa_key_old.pem") |
| `--auth.appAuth.selfAuthServer.refreshTokenLifespan` | string | Defines the lifespan of issued access tokens. (default "1h0m0s") |
| `--auth.appAuth.selfAuthServer.tokenSigningRSAKeySecretName` | string | OPTIONAL: Secret name to use to retrieve RSA Signing Key. (default "token_rsa_key.pem") |
| `--auth.appAuth.thirdPartyConfig.flyteClient.audience` | string | Audience to use when initiating OAuth2 authorization requests. |
| `--auth.appAuth.thirdPartyConfig.flyteClient.clientId` | string | public identifier for the app which handles authorization for a Flyte deployment (default "uctl") |
| `--auth.appAuth.thirdPartyConfig.flyteClient.redirectUri` | string | This is the callback uri registered with the app which handles authorization for a Flyte deployment (default "http://localhost:53593/callback") |
| `--auth.appAuth.thirdPartyConfig.flyteClient.scopes` | strings | Recommended scopes for the client to request. (default [all,offline]) |
| `--auth.disableForGrpc` | | Disables auth enforcement on Grpc Endpoints. |
| `--auth.disableForHttp` | | Disables auth enforcement on HTTP Endpoints. |
| `--auth.grpcAuthorizationHeader` | string | (default "flyte-authorization") |
| `--auth.httpAuthorizationHeader` | string | (default "flyte-authorization") |
| `--auth.httpProxyURL` | string | OPTIONAL: HTTP Proxy to be used for OAuth requests. |
| `--auth.tokenEndpointProxyPath` | string | The path used to proxy calls to the TokenURL |
| `--auth.userAuth.cookieBlockKeySecretName` | string | OPTIONAL: Secret name to use for cookie block key. (default "cookie_block_key") |
| `--auth.userAuth.cookieHashKeySecretName` | string | OPTIONAL: Secret name to use for cookie hash key. (default "cookie_hash_key") |
| `--auth.userAuth.cookieSetting.domain` | string | OPTIONAL: Allows you to set the domain attribute on the auth cookies. |
| `--auth.userAuth.cookieSetting.sameSitePolicy` | string | OPTIONAL: Allows you to declare if your cookie should be restricted to a first-party or same-site context.Wrapper around http.SameSite. (default "DefaultMode") |
| `--auth.userAuth.httpProxyURL` | string | OPTIONAL: HTTP Proxy to be used for OAuth requests. |
| `--auth.userAuth.idpQueryParameter` | string | idp query parameter used for selecting a particular IDP for doing user authentication. Eg: for Okta passing idp={IDP-ID} forces the authentication to happen with IDP-ID |
| `--auth.userAuth.openId.baseUrl` | string | |
| `--auth.userAuth.openId.clientId` | string | |
| `--auth.userAuth.openId.clientSecretFile` | string | |
| `--auth.userAuth.openId.clientSecretName` | string | (default "oidc_client_secret") |
| `--auth.userAuth.openId.scopes` | strings | (default [openid,profile]) |
| `--auth.userAuth.redirectUrl` | string | (default "/console") |
| `--authorizer.internalCommunicationConfig.enabled` | | Enables authorization decisions for internal communication. (default true) |
| `--authorizer.internalCommunicationConfig.ingressIdentity` | string | IngressIdentity used in the cluster. Needed to exclude the communication coming from ingress. (default "ingress-nginx.ingress-nginx.serviceaccount.identity.linkerd.cluster.local") |
| `--authorizer.internalCommunicationConfig.tenantUrlPatternIdentity` | string | UrlPatternIdentity of the internal tenant service endpoint identities. (default "{{ service }}.{{ org }}.serviceaccount.identity.linkerd.cluster.local") |
| `--authorizer.internalCommunicationConfig.urlPatternIdentity` | string | UrlPatternIdentity of the internal service endpoint identities. (default "{{ service }}-helmchart.{{ service }}.serviceaccount.identity.linkerd.cluster.local") |
| `--authorizer.mode` | string | (default "Active") |
| `--authorizer.organizationConfig.PolicyConfig.adminPolicyDescription` | string | description for the boilerplate admin policy (default "Contributor permissions and full admin permissions to manage users and view usage dashboards") |
| `--authorizer.organizationConfig.PolicyConfig.contributorPolicyDescription` | string | description for the boilerplate contributor policy (default "Viewer permissions and permissions to create workflows, tasks, launch plans, and executions") |
| `--authorizer.organizationConfig.PolicyConfig.defaultUserPolicyRoleType` | string | name of the role type to determine which default policy new users added to the organization should be assigned (default "Viewer") |
| `--authorizer.organizationConfig.PolicyConfig.serverlessContributorPolicyDescription` | string | description for the boilerplate serverless contributor policy (default "Viewer permissions and permissions to create workflows, tasks, launch plans, and executions") |
| `--authorizer.organizationConfig.PolicyConfig.serverlessViewerPolicyDescription` | string | description for the boilerplate serverless viewer policy (default "Permissions to view Flyte entities") |
| `--authorizer.organizationConfig.PolicyConfig.viewerPolicyDescription` | string | description for the boilerplate viewer policy (default "Permissions to view Flyte entities") |
| `--authorizer.organizationConfig.defaultPolicyCacheDuration` | string | Cache entry duration for the store of the default policy per organization (default "10m0s") |
| `--authorizer.syncRuleRefreshInterval` | string | (default "1m0s") |
| `--authorizer.type` | string | (default "UserClouds") |
| `--authorizer.userCloudsClient.cache.redis.ttl.edgeTypes` | string | Specifies how long edge types remain in the cache.. (default "30m0s") |
| `--authorizer.userCloudsClient.cache.redis.ttl.edges` | string | Specifies how long edges remain in the cache. (default "30m0s") |
| `--authorizer.userCloudsClient.cache.redis.ttl.objectTypes` | string | Specifies how long object types remain in the cache. (default "30m0s") |
| `--authorizer.userCloudsClient.cache.redis.ttl.objects` | string | Specifies how long objects remain in the cache. (default "30m0s") |
| `--authorizer.userCloudsClient.cache.type` | string | Cache type to use. (default "none") |
| `--authorizer.userCloudsClient.clientID` | string | UserClouds client id |
| `--authorizer.userCloudsClient.clientSecretName` | string | UserCloud client secret name to read from the secret manager. (default "userclouds-client-secret") |
| `--authorizer.userCloudsClient.enableLogging` | | Enable userclouds client's internal logging. Calls to post logs take 250-350 ms and will impact p99 latency, enable with caution. |
| `--authorizer.userCloudsClient.tenantID` | string | UserClouds tenant id. Should be a UUID. |
| `--authorizer.userCloudsClient.tenantUrl` | string | Something like https://{yourtenant}.tenant.userclouds.com |
| `--config` | string | config file (default is /Users/andrew/.union/config.yaml) |
| `--connection.environment` | string | |
| `--connection.region` | string | |
| `--connection.rootTenantURLPattern` | string | Pattern for tenant url. (default "dns:///{{ organization }}.cloud-staging.union.ai") |
| `--console.endpoint` | string | Endpoint of console, if different than flyte admin |
| `--database.connMaxLifeTime` | string | sets the maximum amount of time a connection may be reused (default "1h0m0s") |
| `--database.enableForeignKeyConstraintWhenMigrating` | | Whether to enable gorm foreign keys when migrating the db |
| `--database.maxIdleConnections` | int | maxIdleConnections sets the maximum number of connections in the idle connection pool. (default 10) |
| `--database.maxOpenConnections` | int | maxOpenConnections sets the maximum number of open connections to the database. (default 100) |
| `--database.postgres.dbname` | string | The database name (default "postgres") |
| `--database.postgres.debug` | | |
| `--database.postgres.host` | string | The host name of the database server (default "localhost") |
| `--database.postgres.options` | string | See http://gorm.io/docs/connecting_to_the_database.html for available options passed, in addition to the above. (default "sslmode=disable") |
| `--database.postgres.password` | string | The database password. (default "postgres") |
| `--database.postgres.passwordPath` | string | Points to the file containing the database password. |
| `--database.postgres.port` | int | The port name of the database server (default 30001) |
| `--database.postgres.readReplicaHost` | string | The host name of the read replica database server (default "localhost") |
| `--database.postgres.username` | string | The database user who is connecting to the server. (default "postgres") |
| `--database.sqlite.file` | string | The path to the file (existing or new) where the DB should be created / stored. If existing, then this will be re-used, else a new will be created |
| `--db.connectionPool.maxConnectionLifetime` | string | (default "0s") |
| `--db.connectionPool.maxIdleConnections` | int | |
| `--db.connectionPool.maxOpenConnections` | int | |
| `--db.dbname` | string | (default "postgres") |
| `--db.debug` | | |
| `--db.host` | string | (default "postgres") |
| `--db.log_level` | int | (default 4) |
| `--db.options` | string | (default "sslmode=disable") |
| `--db.password` | string | |
| `--db.passwordPath` | string | |
| `--db.port` | int | (default 5432) |
| `--db.username` | string | (default "postgres") |
| `-d`, `--domain` | string | Specifies the Flyte project's domain. |
| `--files.archive` | | Pass in archive file either an http link or local path. |
| `--files.assumableIamRole` | string | Custom assumable iam auth role to register launch plans with. |
| `--files.continueOnError` | | Continue on error when registering files. |
| `--files.destinationDirectory` | string | Location of source code in container. |
| `--files.dryRun` | | Execute command without making any modifications. |
| `--files.enableSchedule` | | Enable the schedule if the files contain schedulable launchplan. |
| `--files.force` | | Force use of version number on entities registered with flyte. |
| `--files.k8ServiceAccount` | string | Deprecated. Please use `--K8sServiceAccount`|
| `--files.k8sServiceAccount` | string | Custom kubernetes service account auth role to register launch plans with. |
| `--files.outputLocationPrefix` | string | Custom output location prefix for offloaded types (files/schemas). |
| `--files.sourceUploadPath` | string | Deprecated: Update flyte admin to avoid having to configure storage access from uctl. |
| `--files.version` | string | Version of the entity to be registered with flyte which are un-versioned after serialization. |
| `--logger.formatter.type` | string | Sets logging format type. (default "json") |
| `--logger.level` | int | Sets the minimum logging level. (default 3) |
| `--logger.mute` | | Mutes all logs regardless of severity. Intended for benchmarks/tests only. |
| `--logger.show-source` | | Includes source code location in logs. |
| `--org` | string | Organization to work on. If not set, default to user's org. |
| `--otel.file.filename` | string | Filename to store exported telemetry traces (default "/tmp/trace.txt") |
| `--otel.jaeger.endpoint` | string | Endpoint for the jaeger telemetry trace ingestor (default "http://localhost:14268/api/traces") |
| `--otel.otlpgrpc.endpoint` | string | Endpoint for the OTLP telemetry trace collector (default "http://localhost:4317") |
| `--otel.otlphttp.endpoint` | string | Endpoint for the OTLP telemetry trace collector (default "http://localhost:4318/v1/traces") |
| `--otel.sampler.parentSampler` | string | Sets the parent sampler to use for the tracer (default "always") |
| `--otel.type` | string | Sets the type of exporter to configure [noop/file/jaeger/otlpgrpc/otlphttp]. (default "noop") |
| `-o`, `--output` | string | Specifies the output type - supported formats [TABLE JSON YAML DOT DOTURL]. NOTE: dot, doturl are only supported for Workflow (default "table") |
| `--plugins.catalogcache.reader.maxItems` | int | Maximum number of entries to keep in the index. (default 10000) |
| `--plugins.catalogcache.reader.maxRetries` | int | Maximum number of retries per item. (default 3) |
| `--plugins.catalogcache.reader.workers` | int | Number of concurrent workers to start processing the queue. (default 10) |
| `--plugins.catalogcache.writer.maxItems` | int | Maximum number of entries to keep in the index. (default 10000) |
| `--plugins.catalogcache.writer.maxRetries` | int | Maximum number of retries per item. (default 3) |
| `--plugins.catalogcache.writer.workers` | int | Number of concurrent workers to start processing the queue. (default 10) |
| `-p`, `--project` | string | Specifies the Flyte project. |
| `--rediscache.passwordSecretName` | string | Name of secret with Redis password. |
| `--rediscache.primaryEndpoint` | string | Primary endpoint for the redis cache that can be used for both reads and writes. |
| `--rediscache.replicaEndpoint` | string | Replica endpoint for the redis cache that can be used for reads. |
| `--secrets.env-prefix` | string | Prefix for environment variables (default "FLYTE_SECRET_") |
| `--secrets.secrets-prefix` | string | Prefix where to look for secrets file (default "/etc/secrets") |
| `--secrets.type` | string | Sets the type of storage to configure [local]. (default "local") |
| `--server.dataProxy.download.maxExpiresIn` | string | Maximum allowed expiration duration. (default "1h0m0s") |
| `--server.dataProxy.upload.defaultFileNameLength` | int | Default length for the generated file name if not provided in the request. (default 20) |
| `--server.dataProxy.upload.maxExpiresIn` | string | Maximum allowed expiration duration. (default "1h0m0s") |
| `--server.dataProxy.upload.maxSize` | string | Maximum allowed upload size. (default "6Mi") |
| `--server.dataProxy.upload.storagePrefix` | string | Storage prefix to use for all upload requests. |
| `--server.grpc.enableGrpcLatencyMetrics` | | Enable grpc latency metrics. Note Histograms metrics can be expensive on Prometheus servers. |
| `--server.grpc.maxMessageSizeBytes` | int | The max size in bytes for incoming gRPC messages |
| `--server.grpc.port` | int | On which grpc port to serve admin (default 8089) |
| `--server.grpc.serverReflection` | | Enable GRPC Server Reflection (default true) |
| `--server.grpcPort` | int | deprecated |
| `--server.grpcServerReflection` | | deprecated |
| `--server.httpPort` | int | On which http port to serve admin (default 8088) |
| `--server.kube-config` | string | Path to kubernetes client config file, default is empty, useful for incluster config. |
| `--server.kubeClientConfig.burst` | int | Max burst rate for throttle. 0 defaults to 10 (default 25) |
| `--server.kubeClientConfig.qps` | int32 | Max QPS to the master for requests to KubeAPI. 0 defaults to 5. (default 100) |
| `--server.kubeClientConfig.timeout` | string | Max duration allowed for every request to KubeAPI before giving up. 0 implies no timeout. (default "30s") |
| `--server.master` | string | The address of the Kubernetes API server. |
| `--server.readHeaderTimeoutSeconds` | int | The amount of time allowed to read request headers. (default 32) |
| `--server.security.allowCors` | | (default true) |
| `--server.security.allowedHeaders` | strings | (default [Content-Type,flyte-authorization]) |
| `--server.security.allowedOrigins` | strings | (default [*]) |
| `--server.security.auditAccess` | | |
| `--server.security.secure` | | |
| `--server.security.ssl.certificateFile` | string | |
| `--server.security.ssl.keyFile` | string | |
| `--server.security.useAuth` | | |
| `--server.thirdPartyConfig.flyteClient.audience` | string | Audience to use when initiating OAuth2 authorization requests. |
| `--server.thirdPartyConfig.flyteClient.clientId` | string | public identifier for the app which handles authorization for a Flyte deployment |
| `--server.thirdPartyConfig.flyteClient.redirectUri` | string | This is the callback uri registered with the app which handles authorization for a Flyte deployment |
| `--server.thirdPartyConfig.flyteClient.scopes` | strings | Recommended scopes for the client to request. |
| `--server.watchService.maxActiveClusterConnections` | int | (default 5) |
| `--server.watchService.maxPageSize` | int | (default 50000) |
| `--server.watchService.nonTerminalStatusUpdatesInterval` | string | (default "1m0s") |
| `--server.watchService.pollInterval` | string | (default "1s") |
| `--sharedservice.connectPort` | string | On which connect port to serve admin (default "8080") |
| `--sharedservice.grpc.grpcMaxResponseStatusBytes` | int32 | specifies the maximum (uncompressed) size of header list that the client is prepared to accept on grpc calls (default 32000) |
| `--sharedservice.grpc.maxConcurrentStreams` | int | Limit on the number of concurrent streams to each ServerTransport. (default 100) |
| `--sharedservice.grpc.maxMessageSizeBytes` | int | Limit on the size of message that can be received on the server. (default 10485760) |
| `--sharedservice.grpcServerReflection` | | Enable GRPC Server Reflection (default true) |
| `--sharedservice.httpPort` | string | On which http port to serve admin (default "8089") |
| `--sharedservice.kubeConfig` | string | Path to kubernetes client config file. |
| `--sharedservice.master` | string | The address of the Kubernetes API server. |
| `--sharedservice.metrics.enableClientGrpcHistograms` | | Enable client grpc histograms (default true) |
| `--sharedservice.metrics.enableGrpcHistograms` | | Enable grpc histograms (default true) |
| `--sharedservice.metrics.scope` | string | Scope to emit metrics under (default "service:") |
| `--sharedservice.port` | string | On which grpc port to serve admin (default "8080") |
| `--sharedservice.profiler.enabled` | | Enable Profiler on server |
| `--sharedservice.profilerPort` | string | Profile port to start listen for pprof and metric handlers on. (default "10254") |
| `--sharedservice.security.allowCors` | | |
| `--sharedservice.security.allowLocalhostAccess` | | Whether to permit localhost unauthenticated access to the server |
| `--sharedservice.security.allowedHeaders` | strings | |
| `--sharedservice.security.allowedOrigins` | strings | |
| `--sharedservice.security.auditAccess` | | |
| `--sharedservice.security.orgOverride` | string | Override org in identity context if localhost access enabled |
| `--sharedservice.security.secure` | | |
| `--sharedservice.security.ssl.certificateAuthorityFile` | string | |
| `--sharedservice.security.ssl.certificateFile` | string | |
| `--sharedservice.security.ssl.keyFile` | string | |
| `--sharedservice.security.useAuth` | | |
| `--sharedservice.sync.syncInterval` | string | Time interval to sync (default "5m0s") |
| `--storage.cache.max_size_mbs` | int | Maximum size of the cache where the Blob store data is cached in-memory. If not specified or set to 0, cache is not used |
| `--storage.cache.target_gc_percent` | int | Sets the garbage collection target percentage. |
| `--storage.connection.access-key` | string | Access key to use. Only required when authtype is set to accesskey. |
| `--storage.connection.auth-type` | string | Auth Type to use [iam, accesskey]. (default "iam") |
| `--storage.connection.disable-ssl` | | Disables SSL connection. Should only be used for development. |
| `--storage.connection.endpoint` | string | URL for storage client to connect to. |
| `--storage.connection.region` | string | Region to connect to. (default "us-east-1") |
| `--storage.connection.secret-key` | string | Secret to use when accesskey is set. |
| `--storage.container` | string | Initial container (in s3 a bucket) to create -if it doesn't exist-.' |
| `--storage.defaultHttpClient.timeout` | string | Sets time out on the http client. (default "0s") |
| `--storage.enable-multicontainer` | | If this is true, then the container argument is overlooked and redundant. This config will automatically open new connections to new containers/buckets as they are encountered |
| `--storage.limits.maxDownloadMBs` | int | Maximum allowed download size (in MBs) per call. (default 2) |
| `--storage.stow.config` | stringToString | Configuration for stow backend. Refer to github/flyteorg/stow (default []) |
| `--storage.stow.kind` | string | Kind of Stow backend to use. Refer to github/flyteorg/stow |
| `--storage.type` | string | Sets the type of storage to configure [s3/minio/local/mem/stow]. (default "s3") |
| `--union.auth.authorizationMetadataKey` | string | Authorization Header to use when passing Access Tokens to the server (default "flyte-authorization") |
| `--union.auth.clientId` | string | Client ID |
| `--union.auth.clientSecretEnvVar` | string | Environment variable containing the client secret |
| `--union.auth.clientSecretLocation` | string | File containing the client secret |
| `--union.auth.deviceFlow.pollInterval` | string | amount of time the device flow would poll the token endpoint if auth server doesn't return a polling interval. Okta and google IDP do return an interval' (default "5s") |
| `--union.auth.deviceFlow.refreshTime` | string | grace period from the token expiry after which it would refresh the token. (default "5m0s") |
| `--union.auth.deviceFlow.timeout` | string | amount of time the device flow should complete or else it will be cancelled. (default "10m0s") |
| `--union.auth.enable` | | Whether to enable an authenticated conenction when communicating with admin. (default true) |
| `--union.auth.externalAuth.command` | strings | Command for external authentication token generation |
| `--union.auth.pkce.refreshTime` | string | grace period from the token expiry after which it would refresh the token. (default "5m0s") |
| `--union.auth.pkce.timeout` | string | Amount of time the browser session would be active for authentication from client app. (default "15s") |
| `--union.auth.scopes` | strings | List of scopes to request |
| `--union.auth.tokenRefreshWindow` | string | Max duration between token refresh attempt and token expiry. (default "1h0m0s") |
| `--union.auth.tokenUrl` | string | OPTIONAL: Your IdP's token endpoint. It'll be discovered from flyte admin's OAuth Metadata endpoint if not provided. |
| `--union.auth.type` | string | Type of OAuth2 flow used for communicating with admin. (default "Pkce") |
| `--union.cache.maxItemsCount` | int | Maximum number of items to keep in the cache before evicting. (default 1000) |
| `--union.connection.host` | string | Host to connect to (default "dns:///utt-mgdp-stg-us-east-2.cloud-staging.union.ai") |
| `--union.connection.insecure` | | Whether to connect over insecure channel |
| `--union.connection.insecureSkipVerify` | | InsecureSkipVerify controls whether a client verifies the server's certificate chain and host name.Caution: shouldn't be use for production usecases' |
| `--union.connection.keepAliveConfig.permitWithoutStream` | | If true, client sends keepalive pings even with no active RPCs. |
| `--union.connection.keepAliveConfig.time` | string | After a duration of this time if the client doesn't see any activity it pings the server to see if the transport is still alive. (default "20s") |
| `--union.connection.keepAliveConfig.timeout` | string | After having pinged for keepalive check, the client waits for a duration of Timeout and if no activity is seen even after that the connection is closed. (default "2m0s") |
| `--union.connection.maxBackoffDelay` | string | Max delay for grpc backoff (default "8s") |
| `--union.connection.maxRecvMsgSize` | int | Maximum size of a message in bytes of a gRPC message (default 10485760) |
| `--union.connection.maxRetries` | int | Max number of gRPC retries (default 4) |
| `--union.connection.minConnectTimeout` | string | Minimum timeout for establishing a connection (default "20s") |
| `--union.connection.perRetryTimeout` | string | gRPC per retry timeout (default "15s") |
| `--union.connection.serviceConfig` | string | Defines gRPC experimental JSON Service Config (default "{"loadBalancingConfig": [{"round_robin":{}}]}") |
| `--union.connection.trustedIdentityClaims.enabled` | | Enables passing of trusted claims while making inter service calls |
| `--union.connection.trustedIdentityClaims.externalIdentityClaim` | string | External identity claim of the service which is authorized to make internal service call. These are verified against userclouds actions |
| `--union.connection.trustedIdentityClaims.externalIdentityTypeClaim` | string | External identity type claim of app or user to use for the current service identity. It should be an 'app' for inter service communication |
| `--union.internalConnectionConfig.-` | stringToString | (default []) |
| `--union.internalConnectionConfig.enabled` | | Enables internal service to service communication instead of going through ingress. |
| `--union.internalConnectionConfig.urlPattern` | string | UrlPattern of the internal service endpoints. (default "{{ service }}-helmchart.{{ service }}.svc.cluster.local:80") |
| `--webhook.awsSecretManager.sidecarImage` | string | Specifies the sidecar docker image to use (default "docker.io/amazon/aws-secrets-manager-secret-sidecar:v0.1.4") |
| `--webhook.certDir` | string | Certificate directory to use to write generated certs. Defaults to /etc/webhook/certs/ (default "/etc/webhook/certs") |
| `--webhook.embeddedSecretManagerConfig.awsConfig.region` | string | AWS region |
| `--webhook.embeddedSecretManagerConfig.fileMountInitContainer.image` | string | Specifies init container image to use for mounting secrets as files. (default "busybox:1.28") |
| `--webhook.embeddedSecretManagerConfig.gcpConfig.project` | string | GCP project to be used for secret manager |
| `--webhook.embeddedSecretManagerConfig.type` | string | (default "AWS") |
| `--webhook.gcpSecretManager.sidecarImage` | string | Specifies the sidecar docker image to use (default "gcr.io/google.com/cloudsdktool/cloud-sdk:alpine") |
| `--webhook.listenPort` | int | The port to use to listen to webhook calls. Defaults to 9443 (default 9443) |
| `--webhook.localCert` | | write certs locally. Defaults to false |
| `--webhook.metrics-prefix` | string | An optional prefix for all published metrics. (default "flyte:") |
| `--webhook.secretName` | string | Secret name to write generated certs to. (default "flyte-pod-webhook") |
| `--webhook.serviceName` | string | The name of the webhook service. (default "flyte-pod-webhook") |
| `--webhook.servicePort` | int32 | The port on the service that hosting webhook. (default 443) |
| `--webhook.vaultSecretManager.role` | string | Specifies the vault role to use (default "flyte") |
=== PAGE: https://www.union.ai/docs/v1/serverless/api-reference/uctl-cli/uctl-update/uctl-update-cluster-resource-attribute ===
# uctl update cluster-resource-attribute
Update matchable resources of cluster attributes
## Synopsis
Update cluster resource attributes for given project and domain
combination or additionally with workflow name.
Updating to the cluster resource attribute is only available from a
generated file. See the get section to generate this file. It takes
input for cluster resource attributes from the config file cra.yaml,
Example: content of cra.yaml:
``` yaml
domain: development
project: flytesnacks
attributes:
foo: "bar"
buzz: "lightyear"
```
```shell
$ uctl update cluster-resource-attribute --attrFile cra.yaml
```
Update cluster resource attribute for project and domain and workflow
combination. This will take precedence over any other resource attribute
defined at project domain level. This will completely overwrite any
existing custom project, domain and workflow combination attributes. It
is preferable to do get and generate an attribute file if there is an
existing attribute that is already set and then update it to have new
values. Refer to get cluster-resource-attribute section on how to
generate this file. For workflow
`core.control_flow.merge_sort.merge_sort` in flytesnacks project,
development domain, it is:
``` yaml
domain: development
project: flytesnacks
workflow: core.control_flow.merge_sort.merge_sort
attributes:
foo: "bar"
buzz: "lightyear"
```
```shell
$ uctl update cluster-resource-attribute --attrFile cra.yaml
```
Usage:
```shell
$ uctl update cluster-resource-attribute [flags]
```
## Options
| Option | Type | Description |
|--------|------|-------------|
| `--attrFile` | string | attribute file name to be used for updating attribute for the resource type. |
| `--dryRun` | | execute command without making any modifications. |
| `--force` | | do not ask for an acknowledgement during updates. |
| `-h`, `--help` | help for cluster-resource-attribute |
### Options inherited from parent commands
| Option | Type | Description |
|--------|------|-------------|
| `--admin.audience` | string | Audience to use when initiating OAuth2 authorization requests. |
| `--admin.authType` | string | Type of OAuth2 flow used for communicating with admin.ClientSecret, Pkce, ExternalCommand are valid values (default "ClientSecret") |
| `--admin.authorizationHeader` | string | Custom metadata header to pass JWT |
| `--admin.authorizationServerUrl` | string | This is the URL to your IdP's authorization server. It'll default to Endpoint |
| `--admin.caCertFilePath` | string | Use specified certificate file to verify the admin server peer. |
| `--admin.clientId` | string | Client ID (default "flytepropeller") |
| `--admin.clientSecretEnvVar` | string | Environment variable containing the client secret |
| `--admin.clientSecretLocation` | string | File containing the client secret (default "/etc/secrets/client_secret") |
| `--admin.command` | strings | Command for external authentication token generation |
| `--admin.defaultOrg` | string | OPTIONAL: Default org to use to support non-org based cli's.'. |
| `--admin.defaultServiceConfig` | string | |
| `--admin.deviceFlowConfig.pollInterval` | string | amount of time the device flow would poll the token endpoint if auth server doesn't return a polling interval. Okta and google IDP do return an interval' (default "5s") |
| `--admin.deviceFlowConfig.refreshTime` | string | grace period from the token expiry after which it would refresh the token. (default "5m0s") |
| `--admin.deviceFlowConfig.timeout` | string | amount of time the device flow should complete or else it will be cancelled. (default "10m0s") |
| `--admin.endpoint` | string | For admin types, specify where the uri of the service is located. |
| `--admin.httpProxyURL` | string | OPTIONAL: HTTP Proxy to be used for OAuth requests. |
| `--admin.insecure` | | Use insecure connection. |
| `--admin.insecureSkipVerify` | | InsecureSkipVerify controls whether a client verifies the server's certificate chain and host name.Caution: shouldn't be use for production usecases' |
| `--admin.maxBackoffDelay` | string | Max delay for grpc backoff (default "8s") |
| `--admin.maxMessageSizeBytes` | int | The max size in bytes for incoming gRPC messages |
| `--admin.maxRetries` | int | Max number of gRPC retries (default 4) |
| `--admin.perRetryTimeout` | string | gRPC per retry timeout (default "15s") |
| `--admin.pkceConfig.refreshTime` | string | grace period from the token expiry after which it would refresh the token. (default "5m0s") |
| `--admin.pkceConfig.timeout` | string | Amount of time the browser session would be active for authentication from client app. (default "2m0s") |
| `--admin.proxyCommand` | strings | Command for external proxy-authorization token generation |
| `--admin.scopes` | strings | List of scopes to request |
| `--admin.tokenRefreshWindow` | string | Max duration between token refresh attempt and token expiry. (default "0s") |
| `--admin.tokenUrl` | string | OPTIONAL: Your IdP's token endpoint. It'll be discovered from flyte admin's OAuth Metadata endpoint if not provided. |
| `--admin.useAudienceFromAdmin` | | Use Audience configured from admins public endpoint config. |
| `--admin.useAuth` | | Deprecated: Auth will be enabled/disabled based on admin's dynamically discovered information. |
| `--auth.appAuth.externalAuthServer.allowedAudience` | strings | Optional: A list of allowed audiences. If not provided, the audience is expected to be the public Uri of the service. |
| `--auth.appAuth.externalAuthServer.baseUrl` | string | This should be the base url of the authorization server that you are trying to hit. With Okta for instance, it will look something like https://company.okta.com/oauth2/abcdef123456789/ |
| `--auth.appAuth.externalAuthServer.httpProxyURL` | string | OPTIONAL: HTTP Proxy to be used for OAuth requests. |
| `--auth.appAuth.externalAuthServer.metadataUrl` | string | Optional: If the server doesn't support /.well-known/oauth-authorization-server, you can set a custom metadata url here.' |
| `--auth.appAuth.externalAuthServer.retryAttempts` | int | Optional: The number of attempted retries on a transient failure to get the OAuth metadata (default 5) |
| `--auth.appAuth.externalAuthServer.retryDelay` | string | Optional, Duration to wait between retries (default "1s") |
| `--auth.appAuth.selfAuthServer.accessTokenLifespan` | string | Defines the lifespan of issued access tokens. (default "30m0s") |
| `--auth.appAuth.selfAuthServer.authorizationCodeLifespan` | string | Defines the lifespan of issued access tokens. (default "5m0s") |
| `--auth.appAuth.selfAuthServer.claimSymmetricEncryptionKeySecretName` | string | OPTIONAL: Secret name to use to encrypt claims in authcode token. (default "claim_symmetric_key") |
| `--auth.appAuth.selfAuthServer.issuer` | string | Defines the issuer to use when issuing and validating tokens. The default value is https://{requestUri.HostAndPort}/ |
| `--auth.appAuth.selfAuthServer.oldTokenSigningRSAKeySecretName` | string | OPTIONAL: Secret name to use to retrieve Old RSA Signing Key. This can be useful during key rotation to continue to accept older tokens. (default "token_rsa_key_old.pem") |
| `--auth.appAuth.selfAuthServer.refreshTokenLifespan` | string | Defines the lifespan of issued access tokens. (default "1h0m0s") |
| `--auth.appAuth.selfAuthServer.tokenSigningRSAKeySecretName` | string | OPTIONAL: Secret name to use to retrieve RSA Signing Key. (default "token_rsa_key.pem") |
| `--auth.appAuth.thirdPartyConfig.flyteClient.audience` | string | Audience to use when initiating OAuth2 authorization requests. |
| `--auth.appAuth.thirdPartyConfig.flyteClient.clientId` | string | public identifier for the app which handles authorization for a Flyte deployment (default "uctl") |
| `--auth.appAuth.thirdPartyConfig.flyteClient.redirectUri` | string | This is the callback uri registered with the app which handles authorization for a Flyte deployment (default "http://localhost:53593/callback") |
| `--auth.appAuth.thirdPartyConfig.flyteClient.scopes` | strings | Recommended scopes for the client to request. (default [all,offline]) |
| `--auth.disableForGrpc` | | Disables auth enforcement on Grpc Endpoints. |
| `--auth.disableForHttp` | | Disables auth enforcement on HTTP Endpoints. |
| `--auth.grpcAuthorizationHeader` | string | (default "flyte-authorization") |
| `--auth.httpAuthorizationHeader` | string | (default "flyte-authorization") |
| `--auth.httpProxyURL` | string | OPTIONAL: HTTP Proxy to be used for OAuth requests. |
| `--auth.tokenEndpointProxyPath` | string | The path used to proxy calls to the TokenURL |
| `--auth.userAuth.cookieBlockKeySecretName` | string | OPTIONAL: Secret name to use for cookie block key. (default "cookie_block_key") |
| `--auth.userAuth.cookieHashKeySecretName` | string | OPTIONAL: Secret name to use for cookie hash key. (default "cookie_hash_key") |
| `--auth.userAuth.cookieSetting.domain` | string | OPTIONAL: Allows you to set the domain attribute on the auth cookies. |
| `--auth.userAuth.cookieSetting.sameSitePolicy` | string | OPTIONAL: Allows you to declare if your cookie should be restricted to a first-party or same-site context.Wrapper around http.SameSite. (default "DefaultMode") |
| `--auth.userAuth.httpProxyURL` | string | OPTIONAL: HTTP Proxy to be used for OAuth requests. |
| `--auth.userAuth.idpQueryParameter` | string | idp query parameter used for selecting a particular IDP for doing user authentication. Eg: for Okta passing idp={IDP-ID} forces the authentication to happen with IDP-ID |
| `--auth.userAuth.openId.baseUrl` | string | |
| `--auth.userAuth.openId.clientId` | string | |
| `--auth.userAuth.openId.clientSecretFile` | string | |
| `--auth.userAuth.openId.clientSecretName` | string | (default "oidc_client_secret") |
| `--auth.userAuth.openId.scopes` | strings | (default [openid,profile]) |
| `--auth.userAuth.redirectUrl` | string | (default "/console") |
| `--authorizer.internalCommunicationConfig.enabled` | | Enables authorization decisions for internal communication. (default true) |
| `--authorizer.internalCommunicationConfig.ingressIdentity` | string | IngressIdentity used in the cluster. Needed to exclude the communication coming from ingress. (default "ingress-nginx.ingress-nginx.serviceaccount.identity.linkerd.cluster.local") |
| `--authorizer.internalCommunicationConfig.tenantUrlPatternIdentity` | string | UrlPatternIdentity of the internal tenant service endpoint identities. (default "{{ service }}.{{ org }}.serviceaccount.identity.linkerd.cluster.local") |
| `--authorizer.internalCommunicationConfig.urlPatternIdentity` | string | UrlPatternIdentity of the internal service endpoint identities. (default "{{ service }}-helmchart.{{ service }}.serviceaccount.identity.linkerd.cluster.local") |
| `--authorizer.mode` | string | (default "Active") |
| `--authorizer.organizationConfig.PolicyConfig.adminPolicyDescription` | string | description for the boilerplate admin policy (default "Contributor permissions and full admin permissions to manage users and view usage dashboards") |
| `--authorizer.organizationConfig.PolicyConfig.contributorPolicyDescription` | string | description for the boilerplate contributor policy (default "Viewer permissions and permissions to create workflows, tasks, launch plans, and executions") |
| `--authorizer.organizationConfig.PolicyConfig.defaultUserPolicyRoleType` | string | name of the role type to determine which default policy new users added to the organization should be assigned (default "Viewer") |
| `--authorizer.organizationConfig.PolicyConfig.serverlessContributorPolicyDescription` | string | description for the boilerplate serverless contributor policy (default "Viewer permissions and permissions to create workflows, tasks, launch plans, and executions") |
| `--authorizer.organizationConfig.PolicyConfig.serverlessViewerPolicyDescription` | string | description for the boilerplate serverless viewer policy (default "Permissions to view Flyte entities") |
| `--authorizer.organizationConfig.PolicyConfig.viewerPolicyDescription` | string | description for the boilerplate viewer policy (default "Permissions to view Flyte entities") |
| `--authorizer.organizationConfig.defaultPolicyCacheDuration` | string | Cache entry duration for the store of the default policy per organization (default "10m0s") |
| `--authorizer.syncRuleRefreshInterval` | string | (default "1m0s") |
| `--authorizer.type` | string | (default "UserClouds") |
| `--authorizer.userCloudsClient.cache.redis.ttl.edgeTypes` | string | Specifies how long edge types remain in the cache.. (default "30m0s") |
| `--authorizer.userCloudsClient.cache.redis.ttl.edges` | string | Specifies how long edges remain in the cache. (default "30m0s") |
| `--authorizer.userCloudsClient.cache.redis.ttl.objectTypes` | string | Specifies how long object types remain in the cache. (default "30m0s") |
| `--authorizer.userCloudsClient.cache.redis.ttl.objects` | string | Specifies how long objects remain in the cache. (default "30m0s") |
| `--authorizer.userCloudsClient.cache.type` | string | Cache type to use. (default "none") |
| `--authorizer.userCloudsClient.clientID` | string | UserClouds client id |
| `--authorizer.userCloudsClient.clientSecretName` | string | UserCloud client secret name to read from the secret manager. (default "userclouds-client-secret") |
| `--authorizer.userCloudsClient.enableLogging` | | Enable userclouds client's internal logging. Calls to post logs take 250-350 ms and will impact p99 latency, enable with caution. |
| `--authorizer.userCloudsClient.tenantID` | string | UserClouds tenant id. Should be a UUID. |
| `--authorizer.userCloudsClient.tenantUrl` | string | Something like https://{yourtenant}.tenant.userclouds.com |
| `--config` | string | config file (default is /Users/andrew/.union/config.yaml) |
| `--connection.environment` | string | |
| `--connection.region` | string | |
| `--connection.rootTenantURLPattern` | string | Pattern for tenant url. (default "dns:///{{ organization }}.cloud-staging.union.ai") |
| `--console.endpoint` | string | Endpoint of console, if different than flyte admin |
| `--database.connMaxLifeTime` | string | sets the maximum amount of time a connection may be reused (default "1h0m0s") |
| `--database.enableForeignKeyConstraintWhenMigrating` | | Whether to enable gorm foreign keys when migrating the db |
| `--database.maxIdleConnections` | int | maxIdleConnections sets the maximum number of connections in the idle connection pool. (default 10) |
| `--database.maxOpenConnections` | int | maxOpenConnections sets the maximum number of open connections to the database. (default 100) |
| `--database.postgres.dbname` | string | The database name (default "postgres") |
| `--database.postgres.debug` | | |
| `--database.postgres.host` | string | The host name of the database server (default "localhost") |
| `--database.postgres.options` | string | See http://gorm.io/docs/connecting_to_the_database.html for available options passed, in addition to the above. (default "sslmode=disable") |
| `--database.postgres.password` | string | The database password. (default "postgres") |
| `--database.postgres.passwordPath` | string | Points to the file containing the database password. |
| `--database.postgres.port` | int | The port name of the database server (default 30001) |
| `--database.postgres.readReplicaHost` | string | The host name of the read replica database server (default "localhost") |
| `--database.postgres.username` | string | The database user who is connecting to the server. (default "postgres") |
| `--database.sqlite.file` | string | The path to the file (existing or new) where the DB should be created / stored. If existing, then this will be re-used, else a new will be created |
| `--db.connectionPool.maxConnectionLifetime` | string | (default "0s") |
| `--db.connectionPool.maxIdleConnections` | int | |
| `--db.connectionPool.maxOpenConnections` | int | |
| `--db.dbname` | string | (default "postgres") |
| `--db.debug` | | |
| `--db.host` | string | (default "postgres") |
| `--db.log_level` | int | (default 4) |
| `--db.options` | string | (default "sslmode=disable") |
| `--db.password` | string | |
| `--db.passwordPath` | string | |
| `--db.port` | int | (default 5432) |
| `--db.username` | string | (default "postgres") |
| `-d`, `--domain` | string | Specifies the Flyte project's domain. |
| `--files.archive` | | Pass in archive file either an http link or local path. |
| `--files.assumableIamRole` | string | Custom assumable iam auth role to register launch plans with. |
| `--files.continueOnError` | | Continue on error when registering files. |
| `--files.destinationDirectory` | string | Location of source code in container. |
| `--files.dryRun` | | Execute command without making any modifications. |
| `--files.enableSchedule` | | Enable the schedule if the files contain schedulable launchplan. |
| `--files.force` | | Force use of version number on entities registered with flyte. |
| `--files.k8ServiceAccount` | string | Deprecated. Please use `--K8sServiceAccount`|
| `--files.k8sServiceAccount` | string | Custom kubernetes service account auth role to register launch plans with. |
| `--files.outputLocationPrefix` | string | Custom output location prefix for offloaded types (files/schemas). |
| `--files.sourceUploadPath` | string | Deprecated: Update flyte admin to avoid having to configure storage access from uctl. |
| `--files.version` | string | Version of the entity to be registered with flyte which are un-versioned after serialization. |
| `--logger.formatter.type` | string | Sets logging format type. (default "json") |
| `--logger.level` | int | Sets the minimum logging level. (default 3) |
| `--logger.mute` | | Mutes all logs regardless of severity. Intended for benchmarks/tests only. |
| `--logger.show-source` | | Includes source code location in logs. |
| `--org` | string | Organization to work on. If not set, default to user's org. |
| `--otel.file.filename` | string | Filename to store exported telemetry traces (default "/tmp/trace.txt") |
| `--otel.jaeger.endpoint` | string | Endpoint for the jaeger telemetry trace ingestor (default "http://localhost:14268/api/traces") |
| `--otel.otlpgrpc.endpoint` | string | Endpoint for the OTLP telemetry trace collector (default "http://localhost:4317") |
| `--otel.otlphttp.endpoint` | string | Endpoint for the OTLP telemetry trace collector (default "http://localhost:4318/v1/traces") |
| `--otel.sampler.parentSampler` | string | Sets the parent sampler to use for the tracer (default "always") |
| `--otel.type` | string | Sets the type of exporter to configure [noop/file/jaeger/otlpgrpc/otlphttp]. (default "noop") |
| `-o`, `--output` | string | Specifies the output type - supported formats [TABLE JSON YAML DOT DOTURL]. NOTE: dot, doturl are only supported for Workflow (default "table") |
| `--plugins.catalogcache.reader.maxItems` | int | Maximum number of entries to keep in the index. (default 10000) |
| `--plugins.catalogcache.reader.maxRetries` | int | Maximum number of retries per item. (default 3) |
| `--plugins.catalogcache.reader.workers` | int | Number of concurrent workers to start processing the queue. (default 10) |
| `--plugins.catalogcache.writer.maxItems` | int | Maximum number of entries to keep in the index. (default 10000) |
| `--plugins.catalogcache.writer.maxRetries` | int | Maximum number of retries per item. (default 3) |
| `--plugins.catalogcache.writer.workers` | int | Number of concurrent workers to start processing the queue. (default 10) |
| `-p`, `--project` | string | Specifies the Flyte project. |
| `--rediscache.passwordSecretName` | string | Name of secret with Redis password. |
| `--rediscache.primaryEndpoint` | string | Primary endpoint for the redis cache that can be used for both reads and writes. |
| `--rediscache.replicaEndpoint` | string | Replica endpoint for the redis cache that can be used for reads. |
| `--secrets.env-prefix` | string | Prefix for environment variables (default "FLYTE_SECRET_") |
| `--secrets.secrets-prefix` | string | Prefix where to look for secrets file (default "/etc/secrets") |
| `--secrets.type` | string | Sets the type of storage to configure [local]. (default "local") |
| `--server.dataProxy.download.maxExpiresIn` | string | Maximum allowed expiration duration. (default "1h0m0s") |
| `--server.dataProxy.upload.defaultFileNameLength` | int | Default length for the generated file name if not provided in the request. (default 20) |
| `--server.dataProxy.upload.maxExpiresIn` | string | Maximum allowed expiration duration. (default "1h0m0s") |
| `--server.dataProxy.upload.maxSize` | string | Maximum allowed upload size. (default "6Mi") |
| `--server.dataProxy.upload.storagePrefix` | string | Storage prefix to use for all upload requests. |
| `--server.grpc.enableGrpcLatencyMetrics` | | Enable grpc latency metrics. Note Histograms metrics can be expensive on Prometheus servers. |
| `--server.grpc.maxMessageSizeBytes` | int | The max size in bytes for incoming gRPC messages |
| `--server.grpc.port` | int | On which grpc port to serve admin (default 8089) |
| `--server.grpc.serverReflection` | | Enable GRPC Server Reflection (default true) |
| `--server.grpcPort` | int | deprecated |
| `--server.grpcServerReflection` | | deprecated |
| `--server.httpPort` | int | On which http port to serve admin (default 8088) |
| `--server.kube-config` | string | Path to kubernetes client config file, default is empty, useful for incluster config. |
| `--server.kubeClientConfig.burst` | int | Max burst rate for throttle. 0 defaults to 10 (default 25) |
| `--server.kubeClientConfig.qps` | int32 | Max QPS to the master for requests to KubeAPI. 0 defaults to 5. (default 100) |
| `--server.kubeClientConfig.timeout` | string | Max duration allowed for every request to KubeAPI before giving up. 0 implies no timeout. (default "30s") |
| `--server.master` | string | The address of the Kubernetes API server. |
| `--server.readHeaderTimeoutSeconds` | int | The amount of time allowed to read request headers. (default 32) |
| `--server.security.allowCors` | | (default true) |
| `--server.security.allowedHeaders` | strings | (default [Content-Type,flyte-authorization]) |
| `--server.security.allowedOrigins` | strings | (default [*]) |
| `--server.security.auditAccess` | | |
| `--server.security.secure` | | |
| `--server.security.ssl.certificateFile` | string | |
| `--server.security.ssl.keyFile` | string | |
| `--server.security.useAuth` | | |
| `--server.thirdPartyConfig.flyteClient.audience` | string | Audience to use when initiating OAuth2 authorization requests. |
| `--server.thirdPartyConfig.flyteClient.clientId` | string | public identifier for the app which handles authorization for a Flyte deployment |
| `--server.thirdPartyConfig.flyteClient.redirectUri` | string | This is the callback uri registered with the app which handles authorization for a Flyte deployment |
| `--server.thirdPartyConfig.flyteClient.scopes` | strings | Recommended scopes for the client to request. |
| `--server.watchService.maxActiveClusterConnections` | int | (default 5) |
| `--server.watchService.maxPageSize` | int | (default 50000) |
| `--server.watchService.nonTerminalStatusUpdatesInterval` | string | (default "1m0s") |
| `--server.watchService.pollInterval` | string | (default "1s") |
| `--sharedservice.connectPort` | string | On which connect port to serve admin (default "8080") |
| `--sharedservice.grpc.grpcMaxResponseStatusBytes` | int32 | specifies the maximum (uncompressed) size of header list that the client is prepared to accept on grpc calls (default 32000) |
| `--sharedservice.grpc.maxConcurrentStreams` | int | Limit on the number of concurrent streams to each ServerTransport. (default 100) |
| `--sharedservice.grpc.maxMessageSizeBytes` | int | Limit on the size of message that can be received on the server. (default 10485760) |
| `--sharedservice.grpcServerReflection` | | Enable GRPC Server Reflection (default true) |
| `--sharedservice.httpPort` | string | On which http port to serve admin (default "8089") |
| `--sharedservice.kubeConfig` | string | Path to kubernetes client config file. |
| `--sharedservice.master` | string | The address of the Kubernetes API server. |
| `--sharedservice.metrics.enableClientGrpcHistograms` | | Enable client grpc histograms (default true) |
| `--sharedservice.metrics.enableGrpcHistograms` | | Enable grpc histograms (default true) |
| `--sharedservice.metrics.scope` | string | Scope to emit metrics under (default "service:") |
| `--sharedservice.port` | string | On which grpc port to serve admin (default "8080") |
| `--sharedservice.profiler.enabled` | | Enable Profiler on server |
| `--sharedservice.profilerPort` | string | Profile port to start listen for pprof and metric handlers on. (default "10254") |
| `--sharedservice.security.allowCors` | | |
| `--sharedservice.security.allowLocalhostAccess` | | Whether to permit localhost unauthenticated access to the server |
| `--sharedservice.security.allowedHeaders` | strings | |
| `--sharedservice.security.allowedOrigins` | strings | |
| `--sharedservice.security.auditAccess` | | |
| `--sharedservice.security.orgOverride` | string | Override org in identity context if localhost access enabled |
| `--sharedservice.security.secure` | | |
| `--sharedservice.security.ssl.certificateAuthorityFile` | string | |
| `--sharedservice.security.ssl.certificateFile` | string | |
| `--sharedservice.security.ssl.keyFile` | string | |
| `--sharedservice.security.useAuth` | | |
| `--sharedservice.sync.syncInterval` | string | Time interval to sync (default "5m0s") |
| `--storage.cache.max_size_mbs` | int | Maximum size of the cache where the Blob store data is cached in-memory. If not specified or set to 0, cache is not used |
| `--storage.cache.target_gc_percent` | int | Sets the garbage collection target percentage. |
| `--storage.connection.access-key` | string | Access key to use. Only required when authtype is set to accesskey. |
| `--storage.connection.auth-type` | string | Auth Type to use [iam, accesskey]. (default "iam") |
| `--storage.connection.disable-ssl` | | Disables SSL connection. Should only be used for development. |
| `--storage.connection.endpoint` | string | URL for storage client to connect to. |
| `--storage.connection.region` | string | Region to connect to. (default "us-east-1") |
| `--storage.connection.secret-key` | string | Secret to use when accesskey is set. |
| `--storage.container` | string | Initial container (in s3 a bucket) to create -if it doesn't exist-.' |
| `--storage.defaultHttpClient.timeout` | string | Sets time out on the http client. (default "0s") |
| `--storage.enable-multicontainer` | | If this is true, then the container argument is overlooked and redundant. This config will automatically open new connections to new containers/buckets as they are encountered |
| `--storage.limits.maxDownloadMBs` | int | Maximum allowed download size (in MBs) per call. (default 2) |
| `--storage.stow.config` | stringToString | Configuration for stow backend. Refer to github/flyteorg/stow (default []) |
| `--storage.stow.kind` | string | Kind of Stow backend to use. Refer to github/flyteorg/stow |
| `--storage.type` | string | Sets the type of storage to configure [s3/minio/local/mem/stow]. (default "s3") |
| `--union.auth.authorizationMetadataKey` | string | Authorization Header to use when passing Access Tokens to the server (default "flyte-authorization") |
| `--union.auth.clientId` | string | Client ID |
| `--union.auth.clientSecretEnvVar` | string | Environment variable containing the client secret |
| `--union.auth.clientSecretLocation` | string | File containing the client secret |
| `--union.auth.deviceFlow.pollInterval` | string | amount of time the device flow would poll the token endpoint if auth server doesn't return a polling interval. Okta and google IDP do return an interval' (default "5s") |
| `--union.auth.deviceFlow.refreshTime` | string | grace period from the token expiry after which it would refresh the token. (default "5m0s") |
| `--union.auth.deviceFlow.timeout` | string | amount of time the device flow should complete or else it will be cancelled. (default "10m0s") |
| `--union.auth.enable` | | Whether to enable an authenticated conenction when communicating with admin. (default true) |
| `--union.auth.externalAuth.command` | strings | Command for external authentication token generation |
| `--union.auth.pkce.refreshTime` | string | grace period from the token expiry after which it would refresh the token. (default "5m0s") |
| `--union.auth.pkce.timeout` | string | Amount of time the browser session would be active for authentication from client app. (default "15s") |
| `--union.auth.scopes` | strings | List of scopes to request |
| `--union.auth.tokenRefreshWindow` | string | Max duration between token refresh attempt and token expiry. (default "1h0m0s") |
| `--union.auth.tokenUrl` | string | OPTIONAL: Your IdP's token endpoint. It'll be discovered from flyte admin's OAuth Metadata endpoint if not provided. |
| `--union.auth.type` | string | Type of OAuth2 flow used for communicating with admin. (default "Pkce") |
| `--union.cache.maxItemsCount` | int | Maximum number of items to keep in the cache before evicting. (default 1000) |
| `--union.connection.host` | string | Host to connect to (default "dns:///utt-mgdp-stg-us-east-2.cloud-staging.union.ai") |
| `--union.connection.insecure` | | Whether to connect over insecure channel |
| `--union.connection.insecureSkipVerify` | | InsecureSkipVerify controls whether a client verifies the server's certificate chain and host name.Caution: shouldn't be use for production usecases' |
| `--union.connection.keepAliveConfig.permitWithoutStream` | | If true, client sends keepalive pings even with no active RPCs. |
| `--union.connection.keepAliveConfig.time` | string | After a duration of this time if the client doesn't see any activity it pings the server to see if the transport is still alive. (default "20s") |
| `--union.connection.keepAliveConfig.timeout` | string | After having pinged for keepalive check, the client waits for a duration of Timeout and if no activity is seen even after that the connection is closed. (default "2m0s") |
| `--union.connection.maxBackoffDelay` | string | Max delay for grpc backoff (default "8s") |
| `--union.connection.maxRecvMsgSize` | int | Maximum size of a message in bytes of a gRPC message (default 10485760) |
| `--union.connection.maxRetries` | int | Max number of gRPC retries (default 4) |
| `--union.connection.minConnectTimeout` | string | Minimum timeout for establishing a connection (default "20s") |
| `--union.connection.perRetryTimeout` | string | gRPC per retry timeout (default "15s") |
| `--union.connection.serviceConfig` | string | Defines gRPC experimental JSON Service Config (default "{"loadBalancingConfig": [{"round_robin":{}}]}") |
| `--union.connection.trustedIdentityClaims.enabled` | | Enables passing of trusted claims while making inter service calls |
| `--union.connection.trustedIdentityClaims.externalIdentityClaim` | string | External identity claim of the service which is authorized to make internal service call. These are verified against userclouds actions |
| `--union.connection.trustedIdentityClaims.externalIdentityTypeClaim` | string | External identity type claim of app or user to use for the current service identity. It should be an 'app' for inter service communication |
| `--union.internalConnectionConfig.-` | stringToString | (default []) |
| `--union.internalConnectionConfig.enabled` | | Enables internal service to service communication instead of going through ingress. |
| `--union.internalConnectionConfig.urlPattern` | string | UrlPattern of the internal service endpoints. (default "{{ service }}-helmchart.{{ service }}.svc.cluster.local:80") |
| `--webhook.awsSecretManager.sidecarImage` | string | Specifies the sidecar docker image to use (default "docker.io/amazon/aws-secrets-manager-secret-sidecar:v0.1.4") |
| `--webhook.certDir` | string | Certificate directory to use to write generated certs. Defaults to /etc/webhook/certs/ (default "/etc/webhook/certs") |
| `--webhook.embeddedSecretManagerConfig.awsConfig.region` | string | AWS region |
| `--webhook.embeddedSecretManagerConfig.fileMountInitContainer.image` | string | Specifies init container image to use for mounting secrets as files. (default "busybox:1.28") |
| `--webhook.embeddedSecretManagerConfig.gcpConfig.project` | string | GCP project to be used for secret manager |
| `--webhook.embeddedSecretManagerConfig.type` | string | (default "AWS") |
| `--webhook.gcpSecretManager.sidecarImage` | string | Specifies the sidecar docker image to use (default "gcr.io/google.com/cloudsdktool/cloud-sdk:alpine") |
| `--webhook.listenPort` | int | The port to use to listen to webhook calls. Defaults to 9443 (default 9443) |
| `--webhook.localCert` | | write certs locally. Defaults to false |
| `--webhook.metrics-prefix` | string | An optional prefix for all published metrics. (default "flyte:") |
| `--webhook.secretName` | string | Secret name to write generated certs to. (default "flyte-pod-webhook") |
| `--webhook.serviceName` | string | The name of the webhook service. (default "flyte-pod-webhook") |
| `--webhook.servicePort` | int32 | The port on the service that hosting webhook. (default 443) |
| `--webhook.vaultSecretManager.role` | string | Specifies the vault role to use (default "flyte") |
=== PAGE: https://www.union.ai/docs/v1/serverless/api-reference/uctl-cli/uctl-update/uctl-update-execution ===
# uctl update execution
Updates the execution status
## Synopsis
Activate an execution; and it shows up in the CLI and UI:
```shell
$ uctl update execution -p flytesnacks -d development oeh94k9r2r --activate
```
Archive an execution; and it is hidden from the CLI and UI:
```shell
$ uctl update execution -p flytesnacks -d development oeh94k9r2r --archive
```
Usage:
```shell
$ uctl update execution [flags]
```
## Options
| Option | Type | Description |
|--------|------|-------------|
| `--activate` | | activate execution. |
| Option | Type | Description |
|--------|------|-------------|
| `--archive` | | archive execution. |
| Option | Type | Description |
|--------|------|-------------|
| `--dryRun` | | execute command without making any modifications. |
| Option | Type | Description |
|--------|------|-------------|
| `--force` | | do not ask for an acknowledgement during updates. |
| Option | Type | Description |
|--------|------|-------------|
| `-h`, `--help` | help for execution |
### Options inherited from parent commands
| Option | Type | Description |
|--------|------|-------------|
| `--admin.audience` | string | Audience to use when initiating OAuth2 authorization requests. |
| `--admin.authType` | string | Type of OAuth2 flow used for communicating with admin.ClientSecret, Pkce, ExternalCommand are valid values (default "ClientSecret") |
| `--admin.authorizationHeader` | string | Custom metadata header to pass JWT |
| `--admin.authorizationServerUrl` | string | This is the URL to your IdP's authorization server. It'll default to Endpoint |
| `--admin.caCertFilePath` | string | Use specified certificate file to verify the admin server peer. |
| `--admin.clientId` | string | Client ID (default "flytepropeller") |
| `--admin.clientSecretEnvVar` | string | Environment variable containing the client secret |
| `--admin.clientSecretLocation` | string | File containing the client secret (default "/etc/secrets/client_secret") |
| `--admin.command` | strings | Command for external authentication token generation |
| `--admin.defaultOrg` | string | OPTIONAL: Default org to use to support non-org based cli's.'. |
| `--admin.defaultServiceConfig` | string | |
| `--admin.deviceFlowConfig.pollInterval` | string | amount of time the device flow would poll the token endpoint if auth server doesn't return a polling interval. Okta and google IDP do return an interval' (default "5s") |
| `--admin.deviceFlowConfig.refreshTime` | string | grace period from the token expiry after which it would refresh the token. (default "5m0s") |
| `--admin.deviceFlowConfig.timeout` | string | amount of time the device flow should complete or else it will be cancelled. (default "10m0s") |
| `--admin.endpoint` | string | For admin types, specify where the uri of the service is located. |
| `--admin.httpProxyURL` | string | OPTIONAL: HTTP Proxy to be used for OAuth requests. |
| `--admin.insecure` | | Use insecure connection. |
| `--admin.insecureSkipVerify` | | InsecureSkipVerify controls whether a client verifies the server's certificate chain and host name.Caution: shouldn't be use for production usecases' |
| `--admin.maxBackoffDelay` | string | Max delay for grpc backoff (default "8s") |
| `--admin.maxMessageSizeBytes` | int | The max size in bytes for incoming gRPC messages |
| `--admin.maxRetries` | int | Max number of gRPC retries (default 4) |
| `--admin.perRetryTimeout` | string | gRPC per retry timeout (default "15s") |
| `--admin.pkceConfig.refreshTime` | string | grace period from the token expiry after which it would refresh the token. (default "5m0s") |
| `--admin.pkceConfig.timeout` | string | Amount of time the browser session would be active for authentication from client app. (default "2m0s") |
| `--admin.proxyCommand` | strings | Command for external proxy-authorization token generation |
| `--admin.scopes` | strings | List of scopes to request |
| `--admin.tokenRefreshWindow` | string | Max duration between token refresh attempt and token expiry. (default "0s") |
| `--admin.tokenUrl` | string | OPTIONAL: Your IdP's token endpoint. It'll be discovered from flyte admin's OAuth Metadata endpoint if not provided. |
| `--admin.useAudienceFromAdmin` | | Use Audience configured from admins public endpoint config. |
| `--admin.useAuth` | | Deprecated: Auth will be enabled/disabled based on admin's dynamically discovered information. |
| `--auth.appAuth.externalAuthServer.allowedAudience` | strings | Optional: A list of allowed audiences. If not provided, the audience is expected to be the public Uri of the service. |
| `--auth.appAuth.externalAuthServer.baseUrl` | string | This should be the base url of the authorization server that you are trying to hit. With Okta for instance, it will look something like https://company.okta.com/oauth2/abcdef123456789/ |
| `--auth.appAuth.externalAuthServer.httpProxyURL` | string | OPTIONAL: HTTP Proxy to be used for OAuth requests. |
| `--auth.appAuth.externalAuthServer.metadataUrl` | string | Optional: If the server doesn't support /.well-known/oauth-authorization-server, you can set a custom metadata url here.' |
| `--auth.appAuth.externalAuthServer.retryAttempts` | int | Optional: The number of attempted retries on a transient failure to get the OAuth metadata (default 5) |
| `--auth.appAuth.externalAuthServer.retryDelay` | string | Optional, Duration to wait between retries (default "1s") |
| `--auth.appAuth.selfAuthServer.accessTokenLifespan` | string | Defines the lifespan of issued access tokens. (default "30m0s") |
| `--auth.appAuth.selfAuthServer.authorizationCodeLifespan` | string | Defines the lifespan of issued access tokens. (default "5m0s") |
| `--auth.appAuth.selfAuthServer.claimSymmetricEncryptionKeySecretName` | string | OPTIONAL: Secret name to use to encrypt claims in authcode token. (default "claim_symmetric_key") |
| `--auth.appAuth.selfAuthServer.issuer` | string | Defines the issuer to use when issuing and validating tokens. The default value is https://{requestUri.HostAndPort}/ |
| `--auth.appAuth.selfAuthServer.oldTokenSigningRSAKeySecretName` | string | OPTIONAL: Secret name to use to retrieve Old RSA Signing Key. This can be useful during key rotation to continue to accept older tokens. (default "token_rsa_key_old.pem") |
| `--auth.appAuth.selfAuthServer.refreshTokenLifespan` | string | Defines the lifespan of issued access tokens. (default "1h0m0s") |
| `--auth.appAuth.selfAuthServer.tokenSigningRSAKeySecretName` | string | OPTIONAL: Secret name to use to retrieve RSA Signing Key. (default "token_rsa_key.pem") |
| `--auth.appAuth.thirdPartyConfig.flyteClient.audience` | string | Audience to use when initiating OAuth2 authorization requests. |
| `--auth.appAuth.thirdPartyConfig.flyteClient.clientId` | string | public identifier for the app which handles authorization for a Flyte deployment (default "uctl") |
| `--auth.appAuth.thirdPartyConfig.flyteClient.redirectUri` | string | This is the callback uri registered with the app which handles authorization for a Flyte deployment (default "http://localhost:53593/callback") |
| `--auth.appAuth.thirdPartyConfig.flyteClient.scopes` | strings | Recommended scopes for the client to request. (default [all,offline]) |
| `--auth.disableForGrpc` | | Disables auth enforcement on Grpc Endpoints. |
| `--auth.disableForHttp` | | Disables auth enforcement on HTTP Endpoints. |
| `--auth.grpcAuthorizationHeader` | string | (default "flyte-authorization") |
| `--auth.httpAuthorizationHeader` | string | (default "flyte-authorization") |
| `--auth.httpProxyURL` | string | OPTIONAL: HTTP Proxy to be used for OAuth requests. |
| `--auth.tokenEndpointProxyPath` | string | The path used to proxy calls to the TokenURL |
| `--auth.userAuth.cookieBlockKeySecretName` | string | OPTIONAL: Secret name to use for cookie block key. (default "cookie_block_key") |
| `--auth.userAuth.cookieHashKeySecretName` | string | OPTIONAL: Secret name to use for cookie hash key. (default "cookie_hash_key") |
| `--auth.userAuth.cookieSetting.domain` | string | OPTIONAL: Allows you to set the domain attribute on the auth cookies. |
| `--auth.userAuth.cookieSetting.sameSitePolicy` | string | OPTIONAL: Allows you to declare if your cookie should be restricted to a first-party or same-site context.Wrapper around http.SameSite. (default "DefaultMode") |
| `--auth.userAuth.httpProxyURL` | string | OPTIONAL: HTTP Proxy to be used for OAuth requests. |
| `--auth.userAuth.idpQueryParameter` | string | idp query parameter used for selecting a particular IDP for doing user authentication. Eg: for Okta passing idp={IDP-ID} forces the authentication to happen with IDP-ID |
| `--auth.userAuth.openId.baseUrl` | string | |
| `--auth.userAuth.openId.clientId` | string | |
| `--auth.userAuth.openId.clientSecretFile` | string | |
| `--auth.userAuth.openId.clientSecretName` | string | (default "oidc_client_secret") |
| `--auth.userAuth.openId.scopes` | strings | (default [openid,profile]) |
| `--auth.userAuth.redirectUrl` | string | (default "/console") |
| `--authorizer.internalCommunicationConfig.enabled` | | Enables authorization decisions for internal communication. (default true) |
| `--authorizer.internalCommunicationConfig.ingressIdentity` | string | IngressIdentity used in the cluster. Needed to exclude the communication coming from ingress. (default "ingress-nginx.ingress-nginx.serviceaccount.identity.linkerd.cluster.local") |
| `--authorizer.internalCommunicationConfig.tenantUrlPatternIdentity` | string | UrlPatternIdentity of the internal tenant service endpoint identities. (default "{{ service }}.{{ org }}.serviceaccount.identity.linkerd.cluster.local") |
| `--authorizer.internalCommunicationConfig.urlPatternIdentity` | string | UrlPatternIdentity of the internal service endpoint identities. (default "{{ service }}-helmchart.{{ service }}.serviceaccount.identity.linkerd.cluster.local") |
| `--authorizer.mode` | string | (default "Active") |
| `--authorizer.organizationConfig.PolicyConfig.adminPolicyDescription` | string | description for the boilerplate admin policy (default "Contributor permissions and full admin permissions to manage users and view usage dashboards") |
| `--authorizer.organizationConfig.PolicyConfig.contributorPolicyDescription` | string | description for the boilerplate contributor policy (default "Viewer permissions and permissions to create workflows, tasks, launch plans, and executions") |
| `--authorizer.organizationConfig.PolicyConfig.defaultUserPolicyRoleType` | string | name of the role type to determine which default policy new users added to the organization should be assigned (default "Viewer") |
| `--authorizer.organizationConfig.PolicyConfig.serverlessContributorPolicyDescription` | string | description for the boilerplate serverless contributor policy (default "Viewer permissions and permissions to create workflows, tasks, launch plans, and executions") |
| `--authorizer.organizationConfig.PolicyConfig.serverlessViewerPolicyDescription` | string | description for the boilerplate serverless viewer policy (default "Permissions to view Flyte entities") |
| `--authorizer.organizationConfig.PolicyConfig.viewerPolicyDescription` | string | description for the boilerplate viewer policy (default "Permissions to view Flyte entities") |
| `--authorizer.organizationConfig.defaultPolicyCacheDuration` | string | Cache entry duration for the store of the default policy per organization (default "10m0s") |
| `--authorizer.syncRuleRefreshInterval` | string | (default "1m0s") |
| `--authorizer.type` | string | (default "UserClouds") |
| `--authorizer.userCloudsClient.cache.redis.ttl.edgeTypes` | string | Specifies how long edge types remain in the cache.. (default "30m0s") |
| `--authorizer.userCloudsClient.cache.redis.ttl.edges` | string | Specifies how long edges remain in the cache. (default "30m0s") |
| `--authorizer.userCloudsClient.cache.redis.ttl.objectTypes` | string | Specifies how long object types remain in the cache. (default "30m0s") |
| `--authorizer.userCloudsClient.cache.redis.ttl.objects` | string | Specifies how long objects remain in the cache. (default "30m0s") |
| `--authorizer.userCloudsClient.cache.type` | string | Cache type to use. (default "none") |
| `--authorizer.userCloudsClient.clientID` | string | UserClouds client id |
| `--authorizer.userCloudsClient.clientSecretName` | string | UserCloud client secret name to read from the secret manager. (default "userclouds-client-secret") |
| `--authorizer.userCloudsClient.enableLogging` | | Enable userclouds client's internal logging. Calls to post logs take 250-350 ms and will impact p99 latency, enable with caution. |
| `--authorizer.userCloudsClient.tenantID` | string | UserClouds tenant id. Should be a UUID. |
| `--authorizer.userCloudsClient.tenantUrl` | string | Something like https://{yourtenant}.tenant.userclouds.com |
| `--config` | string | config file (default is /Users/andrew/.union/config.yaml) |
| `--connection.environment` | string | |
| `--connection.region` | string | |
| `--connection.rootTenantURLPattern` | string | Pattern for tenant url. (default "dns:///{{ organization }}.cloud-staging.union.ai") |
| `--console.endpoint` | string | Endpoint of console, if different than flyte admin |
| `--database.connMaxLifeTime` | string | sets the maximum amount of time a connection may be reused (default "1h0m0s") |
| `--database.enableForeignKeyConstraintWhenMigrating` | | Whether to enable gorm foreign keys when migrating the db |
| `--database.maxIdleConnections` | int | maxIdleConnections sets the maximum number of connections in the idle connection pool. (default 10) |
| `--database.maxOpenConnections` | int | maxOpenConnections sets the maximum number of open connections to the database. (default 100) |
| `--database.postgres.dbname` | string | The database name (default "postgres") |
| `--database.postgres.debug` | | |
| `--database.postgres.host` | string | The host name of the database server (default "localhost") |
| `--database.postgres.options` | string | See http://gorm.io/docs/connecting_to_the_database.html for available options passed, in addition to the above. (default "sslmode=disable") |
| `--database.postgres.password` | string | The database password. (default "postgres") |
| `--database.postgres.passwordPath` | string | Points to the file containing the database password. |
| `--database.postgres.port` | int | The port name of the database server (default 30001) |
| `--database.postgres.readReplicaHost` | string | The host name of the read replica database server (default "localhost") |
| `--database.postgres.username` | string | The database user who is connecting to the server. (default "postgres") |
| `--database.sqlite.file` | string | The path to the file (existing or new) where the DB should be created / stored. If existing, then this will be re-used, else a new will be created |
| `--db.connectionPool.maxConnectionLifetime` | string | (default "0s") |
| `--db.connectionPool.maxIdleConnections` | int | |
| `--db.connectionPool.maxOpenConnections` | int | |
| `--db.dbname` | string | (default "postgres") |
| `--db.debug` | | |
| `--db.host` | string | (default "postgres") |
| `--db.log_level` | int | (default 4) |
| `--db.options` | string | (default "sslmode=disable") |
| `--db.password` | string | |
| `--db.passwordPath` | string | |
| `--db.port` | int | (default 5432) |
| `--db.username` | string | (default "postgres") |
| `-d`, `--domain` | string | Specifies the Flyte project's domain. |
| `--files.archive` | | Pass in archive file either an http link or local path. |
| `--files.assumableIamRole` | string | Custom assumable iam auth role to register launch plans with. |
| `--files.continueOnError` | | Continue on error when registering files. |
| `--files.destinationDirectory` | string | Location of source code in container. |
| `--files.dryRun` | | Execute command without making any modifications. |
| `--files.enableSchedule` | | Enable the schedule if the files contain schedulable launchplan. |
| `--files.force` | | Force use of version number on entities registered with flyte. |
| `--files.k8ServiceAccount` | string | Deprecated. Please use `--K8sServiceAccount`|
| `--files.k8sServiceAccount` | string | Custom kubernetes service account auth role to register launch plans with. |
| `--files.outputLocationPrefix` | string | Custom output location prefix for offloaded types (files/schemas). |
| `--files.sourceUploadPath` | string | Deprecated: Update flyte admin to avoid having to configure storage access from uctl. |
| `--files.version` | string | Version of the entity to be registered with flyte which are un-versioned after serialization. |
| `--logger.formatter.type` | string | Sets logging format type. (default "json") |
| `--logger.level` | int | Sets the minimum logging level. (default 3) |
| `--logger.mute` | | Mutes all logs regardless of severity. Intended for benchmarks/tests only. |
| `--logger.show-source` | | Includes source code location in logs. |
| `--org` | string | Organization to work on. If not set, default to user's org. |
| `--otel.file.filename` | string | Filename to store exported telemetry traces (default "/tmp/trace.txt") |
| `--otel.jaeger.endpoint` | string | Endpoint for the jaeger telemetry trace ingestor (default "http://localhost:14268/api/traces") |
| `--otel.otlpgrpc.endpoint` | string | Endpoint for the OTLP telemetry trace collector (default "http://localhost:4317") |
| `--otel.otlphttp.endpoint` | string | Endpoint for the OTLP telemetry trace collector (default "http://localhost:4318/v1/traces") |
| `--otel.sampler.parentSampler` | string | Sets the parent sampler to use for the tracer (default "always") |
| `--otel.type` | string | Sets the type of exporter to configure [noop/file/jaeger/otlpgrpc/otlphttp]. (default "noop") |
| `-o`, `--output` | string | Specifies the output type - supported formats [TABLE JSON YAML DOT DOTURL]. NOTE: dot, doturl are only supported for Workflow (default "table") |
| `--plugins.catalogcache.reader.maxItems` | int | Maximum number of entries to keep in the index. (default 10000) |
| `--plugins.catalogcache.reader.maxRetries` | int | Maximum number of retries per item. (default 3) |
| `--plugins.catalogcache.reader.workers` | int | Number of concurrent workers to start processing the queue. (default 10) |
| `--plugins.catalogcache.writer.maxItems` | int | Maximum number of entries to keep in the index. (default 10000) |
| `--plugins.catalogcache.writer.maxRetries` | int | Maximum number of retries per item. (default 3) |
| `--plugins.catalogcache.writer.workers` | int | Number of concurrent workers to start processing the queue. (default 10) |
| `-p`, `--project` | string | Specifies the Flyte project. |
| `--rediscache.passwordSecretName` | string | Name of secret with Redis password. |
| `--rediscache.primaryEndpoint` | string | Primary endpoint for the redis cache that can be used for both reads and writes. |
| `--rediscache.replicaEndpoint` | string | Replica endpoint for the redis cache that can be used for reads. |
| `--secrets.env-prefix` | string | Prefix for environment variables (default "FLYTE_SECRET_") |
| `--secrets.secrets-prefix` | string | Prefix where to look for secrets file (default "/etc/secrets") |
| `--secrets.type` | string | Sets the type of storage to configure [local]. (default "local") |
| `--server.dataProxy.download.maxExpiresIn` | string | Maximum allowed expiration duration. (default "1h0m0s") |
| `--server.dataProxy.upload.defaultFileNameLength` | int | Default length for the generated file name if not provided in the request. (default 20) |
| `--server.dataProxy.upload.maxExpiresIn` | string | Maximum allowed expiration duration. (default "1h0m0s") |
| `--server.dataProxy.upload.maxSize` | string | Maximum allowed upload size. (default "6Mi") |
| `--server.dataProxy.upload.storagePrefix` | string | Storage prefix to use for all upload requests. |
| `--server.grpc.enableGrpcLatencyMetrics` | | Enable grpc latency metrics. Note Histograms metrics can be expensive on Prometheus servers. |
| `--server.grpc.maxMessageSizeBytes` | int | The max size in bytes for incoming gRPC messages |
| `--server.grpc.port` | int | On which grpc port to serve admin (default 8089) |
| `--server.grpc.serverReflection` | | Enable GRPC Server Reflection (default true) |
| `--server.grpcPort` | int | deprecated |
| `--server.grpcServerReflection` | | deprecated |
| `--server.httpPort` | int | On which http port to serve admin (default 8088) |
| `--server.kube-config` | string | Path to kubernetes client config file, default is empty, useful for incluster config. |
| `--server.kubeClientConfig.burst` | int | Max burst rate for throttle. 0 defaults to 10 (default 25) |
| `--server.kubeClientConfig.qps` | int32 | Max QPS to the master for requests to KubeAPI. 0 defaults to 5. (default 100) |
| `--server.kubeClientConfig.timeout` | string | Max duration allowed for every request to KubeAPI before giving up. 0 implies no timeout. (default "30s") |
| `--server.master` | string | The address of the Kubernetes API server. |
| `--server.readHeaderTimeoutSeconds` | int | The amount of time allowed to read request headers. (default 32) |
| `--server.security.allowCors` | | (default true) |
| `--server.security.allowedHeaders` | strings | (default [Content-Type,flyte-authorization]) |
| `--server.security.allowedOrigins` | strings | (default [*]) |
| `--server.security.auditAccess` | | |
| `--server.security.secure` | | |
| `--server.security.ssl.certificateFile` | string | |
| `--server.security.ssl.keyFile` | string | |
| `--server.security.useAuth` | | |
| `--server.thirdPartyConfig.flyteClient.audience` | string | Audience to use when initiating OAuth2 authorization requests. |
| `--server.thirdPartyConfig.flyteClient.clientId` | string | public identifier for the app which handles authorization for a Flyte deployment |
| `--server.thirdPartyConfig.flyteClient.redirectUri` | string | This is the callback uri registered with the app which handles authorization for a Flyte deployment |
| `--server.thirdPartyConfig.flyteClient.scopes` | strings | Recommended scopes for the client to request. |
| `--server.watchService.maxActiveClusterConnections` | int | (default 5) |
| `--server.watchService.maxPageSize` | int | (default 50000) |
| `--server.watchService.nonTerminalStatusUpdatesInterval` | string | (default "1m0s") |
| `--server.watchService.pollInterval` | string | (default "1s") |
| `--sharedservice.connectPort` | string | On which connect port to serve admin (default "8080") |
| `--sharedservice.grpc.grpcMaxResponseStatusBytes` | int32 | specifies the maximum (uncompressed) size of header list that the client is prepared to accept on grpc calls (default 32000) |
| `--sharedservice.grpc.maxConcurrentStreams` | int | Limit on the number of concurrent streams to each ServerTransport. (default 100) |
| `--sharedservice.grpc.maxMessageSizeBytes` | int | Limit on the size of message that can be received on the server. (default 10485760) |
| `--sharedservice.grpcServerReflection` | | Enable GRPC Server Reflection (default true) |
| `--sharedservice.httpPort` | string | On which http port to serve admin (default "8089") |
| `--sharedservice.kubeConfig` | string | Path to kubernetes client config file. |
| `--sharedservice.master` | string | The address of the Kubernetes API server. |
| `--sharedservice.metrics.enableClientGrpcHistograms` | | Enable client grpc histograms (default true) |
| `--sharedservice.metrics.enableGrpcHistograms` | | Enable grpc histograms (default true) |
| `--sharedservice.metrics.scope` | string | Scope to emit metrics under (default "service:") |
| `--sharedservice.port` | string | On which grpc port to serve admin (default "8080") |
| `--sharedservice.profiler.enabled` | | Enable Profiler on server |
| `--sharedservice.profilerPort` | string | Profile port to start listen for pprof and metric handlers on. (default "10254") |
| `--sharedservice.security.allowCors` | | |
| `--sharedservice.security.allowLocalhostAccess` | | Whether to permit localhost unauthenticated access to the server |
| `--sharedservice.security.allowedHeaders` | strings | |
| `--sharedservice.security.allowedOrigins` | strings | |
| `--sharedservice.security.auditAccess` | | |
| `--sharedservice.security.orgOverride` | string | Override org in identity context if localhost access enabled |
| `--sharedservice.security.secure` | | |
| `--sharedservice.security.ssl.certificateAuthorityFile` | string | |
| `--sharedservice.security.ssl.certificateFile` | string | |
| `--sharedservice.security.ssl.keyFile` | string | |
| `--sharedservice.security.useAuth` | | |
| `--sharedservice.sync.syncInterval` | string | Time interval to sync (default "5m0s") |
| `--storage.cache.max_size_mbs` | int | Maximum size of the cache where the Blob store data is cached in-memory. If not specified or set to 0, cache is not used |
| `--storage.cache.target_gc_percent` | int | Sets the garbage collection target percentage. |
| `--storage.connection.access-key` | string | Access key to use. Only required when authtype is set to accesskey. |
| `--storage.connection.auth-type` | string | Auth Type to use [iam, accesskey]. (default "iam") |
| `--storage.connection.disable-ssl` | | Disables SSL connection. Should only be used for development. |
| `--storage.connection.endpoint` | string | URL for storage client to connect to. |
| `--storage.connection.region` | string | Region to connect to. (default "us-east-1") |
| `--storage.connection.secret-key` | string | Secret to use when accesskey is set. |
| `--storage.container` | string | Initial container (in s3 a bucket) to create -if it doesn't exist-.' |
| `--storage.defaultHttpClient.timeout` | string | Sets time out on the http client. (default "0s") |
| `--storage.enable-multicontainer` | | If this is true, then the container argument is overlooked and redundant. This config will automatically open new connections to new containers/buckets as they are encountered |
| `--storage.limits.maxDownloadMBs` | int | Maximum allowed download size (in MBs) per call. (default 2) |
| `--storage.stow.config` | stringToString | Configuration for stow backend. Refer to github/flyteorg/stow (default []) |
| `--storage.stow.kind` | string | Kind of Stow backend to use. Refer to github/flyteorg/stow |
| `--storage.type` | string | Sets the type of storage to configure [s3/minio/local/mem/stow]. (default "s3") |
| `--union.auth.authorizationMetadataKey` | string | Authorization Header to use when passing Access Tokens to the server (default "flyte-authorization") |
| `--union.auth.clientId` | string | Client ID |
| `--union.auth.clientSecretEnvVar` | string | Environment variable containing the client secret |
| `--union.auth.clientSecretLocation` | string | File containing the client secret |
| `--union.auth.deviceFlow.pollInterval` | string | amount of time the device flow would poll the token endpoint if auth server doesn't return a polling interval. Okta and google IDP do return an interval' (default "5s") |
| `--union.auth.deviceFlow.refreshTime` | string | grace period from the token expiry after which it would refresh the token. (default "5m0s") |
| `--union.auth.deviceFlow.timeout` | string | amount of time the device flow should complete or else it will be cancelled. (default "10m0s") |
| `--union.auth.enable` | | Whether to enable an authenticated conenction when communicating with admin. (default true) |
| `--union.auth.externalAuth.command` | strings | Command for external authentication token generation |
| `--union.auth.pkce.refreshTime` | string | grace period from the token expiry after which it would refresh the token. (default "5m0s") |
| `--union.auth.pkce.timeout` | string | Amount of time the browser session would be active for authentication from client app. (default "15s") |
| `--union.auth.scopes` | strings | List of scopes to request |
| `--union.auth.tokenRefreshWindow` | string | Max duration between token refresh attempt and token expiry. (default "1h0m0s") |
| `--union.auth.tokenUrl` | string | OPTIONAL: Your IdP's token endpoint. It'll be discovered from flyte admin's OAuth Metadata endpoint if not provided. |
| `--union.auth.type` | string | Type of OAuth2 flow used for communicating with admin. (default "Pkce") |
| `--union.cache.maxItemsCount` | int | Maximum number of items to keep in the cache before evicting. (default 1000) |
| `--union.connection.host` | string | Host to connect to (default "dns:///utt-mgdp-stg-us-east-2.cloud-staging.union.ai") |
| `--union.connection.insecure` | | Whether to connect over insecure channel |
| `--union.connection.insecureSkipVerify` | | InsecureSkipVerify controls whether a client verifies the server's certificate chain and host name.Caution: shouldn't be use for production usecases' |
| `--union.connection.keepAliveConfig.permitWithoutStream` | | If true, client sends keepalive pings even with no active RPCs. |
| `--union.connection.keepAliveConfig.time` | string | After a duration of this time if the client doesn't see any activity it pings the server to see if the transport is still alive. (default "20s") |
| `--union.connection.keepAliveConfig.timeout` | string | After having pinged for keepalive check, the client waits for a duration of Timeout and if no activity is seen even after that the connection is closed. (default "2m0s") |
| `--union.connection.maxBackoffDelay` | string | Max delay for grpc backoff (default "8s") |
| `--union.connection.maxRecvMsgSize` | int | Maximum size of a message in bytes of a gRPC message (default 10485760) |
| `--union.connection.maxRetries` | int | Max number of gRPC retries (default 4) |
| `--union.connection.minConnectTimeout` | string | Minimum timeout for establishing a connection (default "20s") |
| `--union.connection.perRetryTimeout` | string | gRPC per retry timeout (default "15s") |
| `--union.connection.serviceConfig` | string | Defines gRPC experimental JSON Service Config (default "{"loadBalancingConfig": [{"round_robin":{}}]}") |
| `--union.connection.trustedIdentityClaims.enabled` | | Enables passing of trusted claims while making inter service calls |
| `--union.connection.trustedIdentityClaims.externalIdentityClaim` | string | External identity claim of the service which is authorized to make internal service call. These are verified against userclouds actions |
| `--union.connection.trustedIdentityClaims.externalIdentityTypeClaim` | string | External identity type claim of app or user to use for the current service identity. It should be an 'app' for inter service communication |
| `--union.internalConnectionConfig.-` | stringToString | (default []) |
| `--union.internalConnectionConfig.enabled` | | Enables internal service to service communication instead of going through ingress. |
| `--union.internalConnectionConfig.urlPattern` | string | UrlPattern of the internal service endpoints. (default "{{ service }}-helmchart.{{ service }}.svc.cluster.local:80") |
| `--webhook.awsSecretManager.sidecarImage` | string | Specifies the sidecar docker image to use (default "docker.io/amazon/aws-secrets-manager-secret-sidecar:v0.1.4") |
| `--webhook.certDir` | string | Certificate directory to use to write generated certs. Defaults to /etc/webhook/certs/ (default "/etc/webhook/certs") |
| `--webhook.embeddedSecretManagerConfig.awsConfig.region` | string | AWS region |
| `--webhook.embeddedSecretManagerConfig.fileMountInitContainer.image` | string | Specifies init container image to use for mounting secrets as files. (default "busybox:1.28") |
| `--webhook.embeddedSecretManagerConfig.gcpConfig.project` | string | GCP project to be used for secret manager |
| `--webhook.embeddedSecretManagerConfig.type` | string | (default "AWS") |
| `--webhook.gcpSecretManager.sidecarImage` | string | Specifies the sidecar docker image to use (default "gcr.io/google.com/cloudsdktool/cloud-sdk:alpine") |
| `--webhook.listenPort` | int | The port to use to listen to webhook calls. Defaults to 9443 (default 9443) |
| `--webhook.localCert` | | write certs locally. Defaults to false |
| `--webhook.metrics-prefix` | string | An optional prefix for all published metrics. (default "flyte:") |
| `--webhook.secretName` | string | Secret name to write generated certs to. (default "flyte-pod-webhook") |
| `--webhook.serviceName` | string | The name of the webhook service. (default "flyte-pod-webhook") |
| `--webhook.servicePort` | int32 | The port on the service that hosting webhook. (default 443) |
| `--webhook.vaultSecretManager.role` | string | Specifies the vault role to use (default "flyte") |
=== PAGE: https://www.union.ai/docs/v1/serverless/api-reference/uctl-cli/uctl-update/uctl-update-execution-cluster-label ===
# uctl update execution-cluster-label
Update matchable resources of execution cluster label
## Synopsis
Update execution cluster label for the given project and domain
combination or additionally with workflow name.
Updating to the execution cluster label is only available from a
generated file. See the get section to generate this file. It takes
input for execution cluster label from the config file ecl.yaml Example:
content of ecl.yaml:
``` yaml
domain: development
project: flytesnacks
value: foo
```
```shell
$ uctl update execution-cluster-label --attrFile ecl.yaml
```
Update execution cluster label for project, domain, and workflow
combination. This will take precedence over any other execution cluster
label defined at project domain level. For workflow
`core.control_flow.merge_sort.merge_sort` in flytesnacks project,
development domain, it is:
``` yaml
domain: development
project: flytesnacks
workflow: core.control_flow.merge_sort.merge_sort
value: foo
```
```shell
$ uctl update execution-cluster-label --attrFile ecl.yaml
```
Usage:
```shell
$ uctl update execution-cluster-label [flags]
```
## Options
| Option | Type | Description |
|--------|------|-------------|
| `--attrFile` | string | attribute file name to be used for updating attribute for the resource type. |
| `--dryRun` | | execute command without making any modifications. |
| `--force` | | do not ask for an acknowledgement during updates. |
| `-h`, `--help` | help for execution-cluster-label |
### Options inherited from parent commands
| Option | Type | Description |
|--------|------|-------------|
| `--admin.audience` | string | Audience to use when initiating OAuth2 authorization requests. |
| `--admin.authType` | string | Type of OAuth2 flow used for communicating with admin.ClientSecret, Pkce, ExternalCommand are valid values (default "ClientSecret") |
| `--admin.authorizationHeader` | string | Custom metadata header to pass JWT |
| `--admin.authorizationServerUrl` | string | This is the URL to your IdP's authorization server. It'll default to Endpoint |
| `--admin.caCertFilePath` | string | Use specified certificate file to verify the admin server peer. |
| `--admin.clientId` | string | Client ID (default "flytepropeller") |
| `--admin.clientSecretEnvVar` | string | Environment variable containing the client secret |
| `--admin.clientSecretLocation` | string | File containing the client secret (default "/etc/secrets/client_secret") |
| `--admin.command` | strings | Command for external authentication token generation |
| `--admin.defaultOrg` | string | OPTIONAL: Default org to use to support non-org based cli's.'. |
| `--admin.defaultServiceConfig` | string | |
| `--admin.deviceFlowConfig.pollInterval` | string | amount of time the device flow would poll the token endpoint if auth server doesn't return a polling interval. Okta and google IDP do return an interval' (default "5s") |
| `--admin.deviceFlowConfig.refreshTime` | string | grace period from the token expiry after which it would refresh the token. (default "5m0s") |
| `--admin.deviceFlowConfig.timeout` | string | amount of time the device flow should complete or else it will be cancelled. (default "10m0s") |
| `--admin.endpoint` | string | For admin types, specify where the uri of the service is located. |
| `--admin.httpProxyURL` | string | OPTIONAL: HTTP Proxy to be used for OAuth requests. |
| `--admin.insecure` | | Use insecure connection. |
| `--admin.insecureSkipVerify` | | InsecureSkipVerify controls whether a client verifies the server's certificate chain and host name.Caution: shouldn't be use for production usecases' |
| `--admin.maxBackoffDelay` | string | Max delay for grpc backoff (default "8s") |
| `--admin.maxMessageSizeBytes` | int | The max size in bytes for incoming gRPC messages |
| `--admin.maxRetries` | int | Max number of gRPC retries (default 4) |
| `--admin.perRetryTimeout` | string | gRPC per retry timeout (default "15s") |
| `--admin.pkceConfig.refreshTime` | string | grace period from the token expiry after which it would refresh the token. (default "5m0s") |
| `--admin.pkceConfig.timeout` | string | Amount of time the browser session would be active for authentication from client app. (default "2m0s") |
| `--admin.proxyCommand` | strings | Command for external proxy-authorization token generation |
| `--admin.scopes` | strings | List of scopes to request |
| `--admin.tokenRefreshWindow` | string | Max duration between token refresh attempt and token expiry. (default "0s") |
| `--admin.tokenUrl` | string | OPTIONAL: Your IdP's token endpoint. It'll be discovered from flyte admin's OAuth Metadata endpoint if not provided. |
| `--admin.useAudienceFromAdmin` | | Use Audience configured from admins public endpoint config. |
| `--admin.useAuth` | | Deprecated: Auth will be enabled/disabled based on admin's dynamically discovered information. |
| `--auth.appAuth.externalAuthServer.allowedAudience` | strings | Optional: A list of allowed audiences. If not provided, the audience is expected to be the public Uri of the service. |
| `--auth.appAuth.externalAuthServer.baseUrl` | string | This should be the base url of the authorization server that you are trying to hit. With Okta for instance, it will look something like https://company.okta.com/oauth2/abcdef123456789/ |
| `--auth.appAuth.externalAuthServer.httpProxyURL` | string | OPTIONAL: HTTP Proxy to be used for OAuth requests. |
| `--auth.appAuth.externalAuthServer.metadataUrl` | string | Optional: If the server doesn't support /.well-known/oauth-authorization-server, you can set a custom metadata url here.' |
| `--auth.appAuth.externalAuthServer.retryAttempts` | int | Optional: The number of attempted retries on a transient failure to get the OAuth metadata (default 5) |
| `--auth.appAuth.externalAuthServer.retryDelay` | string | Optional, Duration to wait between retries (default "1s") |
| `--auth.appAuth.selfAuthServer.accessTokenLifespan` | string | Defines the lifespan of issued access tokens. (default "30m0s") |
| `--auth.appAuth.selfAuthServer.authorizationCodeLifespan` | string | Defines the lifespan of issued access tokens. (default "5m0s") |
| `--auth.appAuth.selfAuthServer.claimSymmetricEncryptionKeySecretName` | string | OPTIONAL: Secret name to use to encrypt claims in authcode token. (default "claim_symmetric_key") |
| `--auth.appAuth.selfAuthServer.issuer` | string | Defines the issuer to use when issuing and validating tokens. The default value is https://{requestUri.HostAndPort}/ |
| `--auth.appAuth.selfAuthServer.oldTokenSigningRSAKeySecretName` | string | OPTIONAL: Secret name to use to retrieve Old RSA Signing Key. This can be useful during key rotation to continue to accept older tokens. (default "token_rsa_key_old.pem") |
| `--auth.appAuth.selfAuthServer.refreshTokenLifespan` | string | Defines the lifespan of issued access tokens. (default "1h0m0s") |
| `--auth.appAuth.selfAuthServer.tokenSigningRSAKeySecretName` | string | OPTIONAL: Secret name to use to retrieve RSA Signing Key. (default "token_rsa_key.pem") |
| `--auth.appAuth.thirdPartyConfig.flyteClient.audience` | string | Audience to use when initiating OAuth2 authorization requests. |
| `--auth.appAuth.thirdPartyConfig.flyteClient.clientId` | string | public identifier for the app which handles authorization for a Flyte deployment (default "uctl") |
| `--auth.appAuth.thirdPartyConfig.flyteClient.redirectUri` | string | This is the callback uri registered with the app which handles authorization for a Flyte deployment (default "http://localhost:53593/callback") |
| `--auth.appAuth.thirdPartyConfig.flyteClient.scopes` | strings | Recommended scopes for the client to request. (default [all,offline]) |
| `--auth.disableForGrpc` | | Disables auth enforcement on Grpc Endpoints. |
| `--auth.disableForHttp` | | Disables auth enforcement on HTTP Endpoints. |
| `--auth.grpcAuthorizationHeader` | string | (default "flyte-authorization") |
| `--auth.httpAuthorizationHeader` | string | (default "flyte-authorization") |
| `--auth.httpProxyURL` | string | OPTIONAL: HTTP Proxy to be used for OAuth requests. |
| `--auth.tokenEndpointProxyPath` | string | The path used to proxy calls to the TokenURL |
| `--auth.userAuth.cookieBlockKeySecretName` | string | OPTIONAL: Secret name to use for cookie block key. (default "cookie_block_key") |
| `--auth.userAuth.cookieHashKeySecretName` | string | OPTIONAL: Secret name to use for cookie hash key. (default "cookie_hash_key") |
| `--auth.userAuth.cookieSetting.domain` | string | OPTIONAL: Allows you to set the domain attribute on the auth cookies. |
| `--auth.userAuth.cookieSetting.sameSitePolicy` | string | OPTIONAL: Allows you to declare if your cookie should be restricted to a first-party or same-site context.Wrapper around http.SameSite. (default "DefaultMode") |
| `--auth.userAuth.httpProxyURL` | string | OPTIONAL: HTTP Proxy to be used for OAuth requests. |
| `--auth.userAuth.idpQueryParameter` | string | idp query parameter used for selecting a particular IDP for doing user authentication. Eg: for Okta passing idp={IDP-ID} forces the authentication to happen with IDP-ID |
| `--auth.userAuth.openId.baseUrl` | string | |
| `--auth.userAuth.openId.clientId` | string | |
| `--auth.userAuth.openId.clientSecretFile` | string | |
| `--auth.userAuth.openId.clientSecretName` | string | (default "oidc_client_secret") |
| `--auth.userAuth.openId.scopes` | strings | (default [openid,profile]) |
| `--auth.userAuth.redirectUrl` | string | (default "/console") |
| `--authorizer.internalCommunicationConfig.enabled` | | Enables authorization decisions for internal communication. (default true) |
| `--authorizer.internalCommunicationConfig.ingressIdentity` | string | IngressIdentity used in the cluster. Needed to exclude the communication coming from ingress. (default "ingress-nginx.ingress-nginx.serviceaccount.identity.linkerd.cluster.local") |
| `--authorizer.internalCommunicationConfig.tenantUrlPatternIdentity` | string | UrlPatternIdentity of the internal tenant service endpoint identities. (default "{{ service }}.{{ org }}.serviceaccount.identity.linkerd.cluster.local") |
| `--authorizer.internalCommunicationConfig.urlPatternIdentity` | string | UrlPatternIdentity of the internal service endpoint identities. (default "{{ service }}-helmchart.{{ service }}.serviceaccount.identity.linkerd.cluster.local") |
| `--authorizer.mode` | string | (default "Active") |
| `--authorizer.organizationConfig.PolicyConfig.adminPolicyDescription` | string | description for the boilerplate admin policy (default "Contributor permissions and full admin permissions to manage users and view usage dashboards") |
| `--authorizer.organizationConfig.PolicyConfig.contributorPolicyDescription` | string | description for the boilerplate contributor policy (default "Viewer permissions and permissions to create workflows, tasks, launch plans, and executions") |
| `--authorizer.organizationConfig.PolicyConfig.defaultUserPolicyRoleType` | string | name of the role type to determine which default policy new users added to the organization should be assigned (default "Viewer") |
| `--authorizer.organizationConfig.PolicyConfig.serverlessContributorPolicyDescription` | string | description for the boilerplate serverless contributor policy (default "Viewer permissions and permissions to create workflows, tasks, launch plans, and executions") |
| `--authorizer.organizationConfig.PolicyConfig.serverlessViewerPolicyDescription` | string | description for the boilerplate serverless viewer policy (default "Permissions to view Flyte entities") |
| `--authorizer.organizationConfig.PolicyConfig.viewerPolicyDescription` | string | description for the boilerplate viewer policy (default "Permissions to view Flyte entities") |
| `--authorizer.organizationConfig.defaultPolicyCacheDuration` | string | Cache entry duration for the store of the default policy per organization (default "10m0s") |
| `--authorizer.syncRuleRefreshInterval` | string | (default "1m0s") |
| `--authorizer.type` | string | (default "UserClouds") |
| `--authorizer.userCloudsClient.cache.redis.ttl.edgeTypes` | string | Specifies how long edge types remain in the cache.. (default "30m0s") |
| `--authorizer.userCloudsClient.cache.redis.ttl.edges` | string | Specifies how long edges remain in the cache. (default "30m0s") |
| `--authorizer.userCloudsClient.cache.redis.ttl.objectTypes` | string | Specifies how long object types remain in the cache. (default "30m0s") |
| `--authorizer.userCloudsClient.cache.redis.ttl.objects` | string | Specifies how long objects remain in the cache. (default "30m0s") |
| `--authorizer.userCloudsClient.cache.type` | string | Cache type to use. (default "none") |
| `--authorizer.userCloudsClient.clientID` | string | UserClouds client id |
| `--authorizer.userCloudsClient.clientSecretName` | string | UserCloud client secret name to read from the secret manager. (default "userclouds-client-secret") |
| `--authorizer.userCloudsClient.enableLogging` | | Enable userclouds client's internal logging. Calls to post logs take 250-350 ms and will impact p99 latency, enable with caution. |
| `--authorizer.userCloudsClient.tenantID` | string | UserClouds tenant id. Should be a UUID. |
| `--authorizer.userCloudsClient.tenantUrl` | string | Something like https://{yourtenant}.tenant.userclouds.com |
| `--config` | string | config file (default is /Users/andrew/.union/config.yaml) |
| `--connection.environment` | string | |
| `--connection.region` | string | |
| `--connection.rootTenantURLPattern` | string | Pattern for tenant url. (default "dns:///{{ organization }}.cloud-staging.union.ai") |
| `--console.endpoint` | string | Endpoint of console, if different than flyte admin |
| `--database.connMaxLifeTime` | string | sets the maximum amount of time a connection may be reused (default "1h0m0s") |
| `--database.enableForeignKeyConstraintWhenMigrating` | | Whether to enable gorm foreign keys when migrating the db |
| `--database.maxIdleConnections` | int | maxIdleConnections sets the maximum number of connections in the idle connection pool. (default 10) |
| `--database.maxOpenConnections` | int | maxOpenConnections sets the maximum number of open connections to the database. (default 100) |
| `--database.postgres.dbname` | string | The database name (default "postgres") |
| `--database.postgres.debug` | | |
| `--database.postgres.host` | string | The host name of the database server (default "localhost") |
| `--database.postgres.options` | string | See http://gorm.io/docs/connecting_to_the_database.html for available options passed, in addition to the above. (default "sslmode=disable") |
| `--database.postgres.password` | string | The database password. (default "postgres") |
| `--database.postgres.passwordPath` | string | Points to the file containing the database password. |
| `--database.postgres.port` | int | The port name of the database server (default 30001) |
| `--database.postgres.readReplicaHost` | string | The host name of the read replica database server (default "localhost") |
| `--database.postgres.username` | string | The database user who is connecting to the server. (default "postgres") |
| `--database.sqlite.file` | string | The path to the file (existing or new) where the DB should be created / stored. If existing, then this will be re-used, else a new will be created |
| `--db.connectionPool.maxConnectionLifetime` | string | (default "0s") |
| `--db.connectionPool.maxIdleConnections` | int | |
| `--db.connectionPool.maxOpenConnections` | int | |
| `--db.dbname` | string | (default "postgres") |
| `--db.debug` | | |
| `--db.host` | string | (default "postgres") |
| `--db.log_level` | int | (default 4) |
| `--db.options` | string | (default "sslmode=disable") |
| `--db.password` | string | |
| `--db.passwordPath` | string | |
| `--db.port` | int | (default 5432) |
| `--db.username` | string | (default "postgres") |
| `-d`, `--domain` | string | Specifies the Flyte project's domain. |
| `--files.archive` | | Pass in archive file either an http link or local path. |
| `--files.assumableIamRole` | string | Custom assumable iam auth role to register launch plans with. |
| `--files.continueOnError` | | Continue on error when registering files. |
| `--files.destinationDirectory` | string | Location of source code in container. |
| `--files.dryRun` | | Execute command without making any modifications. |
| `--files.enableSchedule` | | Enable the schedule if the files contain schedulable launchplan. |
| `--files.force` | | Force use of version number on entities registered with flyte. |
| `--files.k8ServiceAccount` | string | Deprecated. Please use `--K8sServiceAccount`|
| `--files.k8sServiceAccount` | string | Custom kubernetes service account auth role to register launch plans with. |
| `--files.outputLocationPrefix` | string | Custom output location prefix for offloaded types (files/schemas). |
| `--files.sourceUploadPath` | string | Deprecated: Update flyte admin to avoid having to configure storage access from uctl. |
| `--files.version` | string | Version of the entity to be registered with flyte which are un-versioned after serialization. |
| `--logger.formatter.type` | string | Sets logging format type. (default "json") |
| `--logger.level` | int | Sets the minimum logging level. (default 3) |
| `--logger.mute` | | Mutes all logs regardless of severity. Intended for benchmarks/tests only. |
| `--logger.show-source` | | Includes source code location in logs. |
| `--org` | string | Organization to work on. If not set, default to user's org. |
| `--otel.file.filename` | string | Filename to store exported telemetry traces (default "/tmp/trace.txt") |
| `--otel.jaeger.endpoint` | string | Endpoint for the jaeger telemetry trace ingestor (default "http://localhost:14268/api/traces") |
| `--otel.otlpgrpc.endpoint` | string | Endpoint for the OTLP telemetry trace collector (default "http://localhost:4317") |
| `--otel.otlphttp.endpoint` | string | Endpoint for the OTLP telemetry trace collector (default "http://localhost:4318/v1/traces") |
| `--otel.sampler.parentSampler` | string | Sets the parent sampler to use for the tracer (default "always") |
| `--otel.type` | string | Sets the type of exporter to configure [noop/file/jaeger/otlpgrpc/otlphttp]. (default "noop") |
| `-o`, `--output` | string | Specifies the output type - supported formats [TABLE JSON YAML DOT DOTURL]. NOTE: dot, doturl are only supported for Workflow (default "table") |
| `--plugins.catalogcache.reader.maxItems` | int | Maximum number of entries to keep in the index. (default 10000) |
| `--plugins.catalogcache.reader.maxRetries` | int | Maximum number of retries per item. (default 3) |
| `--plugins.catalogcache.reader.workers` | int | Number of concurrent workers to start processing the queue. (default 10) |
| `--plugins.catalogcache.writer.maxItems` | int | Maximum number of entries to keep in the index. (default 10000) |
| `--plugins.catalogcache.writer.maxRetries` | int | Maximum number of retries per item. (default 3) |
| `--plugins.catalogcache.writer.workers` | int | Number of concurrent workers to start processing the queue. (default 10) |
| `-p`, `--project` | string | Specifies the Flyte project. |
| `--rediscache.passwordSecretName` | string | Name of secret with Redis password. |
| `--rediscache.primaryEndpoint` | string | Primary endpoint for the redis cache that can be used for both reads and writes. |
| `--rediscache.replicaEndpoint` | string | Replica endpoint for the redis cache that can be used for reads. |
| `--secrets.env-prefix` | string | Prefix for environment variables (default "FLYTE_SECRET_") |
| `--secrets.secrets-prefix` | string | Prefix where to look for secrets file (default "/etc/secrets") |
| `--secrets.type` | string | Sets the type of storage to configure [local]. (default "local") |
| `--server.dataProxy.download.maxExpiresIn` | string | Maximum allowed expiration duration. (default "1h0m0s") |
| `--server.dataProxy.upload.defaultFileNameLength` | int | Default length for the generated file name if not provided in the request. (default 20) |
| `--server.dataProxy.upload.maxExpiresIn` | string | Maximum allowed expiration duration. (default "1h0m0s") |
| `--server.dataProxy.upload.maxSize` | string | Maximum allowed upload size. (default "6Mi") |
| `--server.dataProxy.upload.storagePrefix` | string | Storage prefix to use for all upload requests. |
| `--server.grpc.enableGrpcLatencyMetrics` | | Enable grpc latency metrics. Note Histograms metrics can be expensive on Prometheus servers. |
| `--server.grpc.maxMessageSizeBytes` | int | The max size in bytes for incoming gRPC messages |
| `--server.grpc.port` | int | On which grpc port to serve admin (default 8089) |
| `--server.grpc.serverReflection` | | Enable GRPC Server Reflection (default true) |
| `--server.grpcPort` | int | deprecated |
| `--server.grpcServerReflection` | | deprecated |
| `--server.httpPort` | int | On which http port to serve admin (default 8088) |
| `--server.kube-config` | string | Path to kubernetes client config file, default is empty, useful for incluster config. |
| `--server.kubeClientConfig.burst` | int | Max burst rate for throttle. 0 defaults to 10 (default 25) |
| `--server.kubeClientConfig.qps` | int32 | Max QPS to the master for requests to KubeAPI. 0 defaults to 5. (default 100) |
| `--server.kubeClientConfig.timeout` | string | Max duration allowed for every request to KubeAPI before giving up. 0 implies no timeout. (default "30s") |
| `--server.master` | string | The address of the Kubernetes API server. |
| `--server.readHeaderTimeoutSeconds` | int | The amount of time allowed to read request headers. (default 32) |
| `--server.security.allowCors` | | (default true) |
| `--server.security.allowedHeaders` | strings | (default [Content-Type,flyte-authorization]) |
| `--server.security.allowedOrigins` | strings | (default [*]) |
| `--server.security.auditAccess` | | |
| `--server.security.secure` | | |
| `--server.security.ssl.certificateFile` | string | |
| `--server.security.ssl.keyFile` | string | |
| `--server.security.useAuth` | | |
| `--server.thirdPartyConfig.flyteClient.audience` | string | Audience to use when initiating OAuth2 authorization requests. |
| `--server.thirdPartyConfig.flyteClient.clientId` | string | public identifier for the app which handles authorization for a Flyte deployment |
| `--server.thirdPartyConfig.flyteClient.redirectUri` | string | This is the callback uri registered with the app which handles authorization for a Flyte deployment |
| `--server.thirdPartyConfig.flyteClient.scopes` | strings | Recommended scopes for the client to request. |
| `--server.watchService.maxActiveClusterConnections` | int | (default 5) |
| `--server.watchService.maxPageSize` | int | (default 50000) |
| `--server.watchService.nonTerminalStatusUpdatesInterval` | string | (default "1m0s") |
| `--server.watchService.pollInterval` | string | (default "1s") |
| `--sharedservice.connectPort` | string | On which connect port to serve admin (default "8080") |
| `--sharedservice.grpc.grpcMaxResponseStatusBytes` | int32 | specifies the maximum (uncompressed) size of header list that the client is prepared to accept on grpc calls (default 32000) |
| `--sharedservice.grpc.maxConcurrentStreams` | int | Limit on the number of concurrent streams to each ServerTransport. (default 100) |
| `--sharedservice.grpc.maxMessageSizeBytes` | int | Limit on the size of message that can be received on the server. (default 10485760) |
| `--sharedservice.grpcServerReflection` | | Enable GRPC Server Reflection (default true) |
| `--sharedservice.httpPort` | string | On which http port to serve admin (default "8089") |
| `--sharedservice.kubeConfig` | string | Path to kubernetes client config file. |
| `--sharedservice.master` | string | The address of the Kubernetes API server. |
| `--sharedservice.metrics.enableClientGrpcHistograms` | | Enable client grpc histograms (default true) |
| `--sharedservice.metrics.enableGrpcHistograms` | | Enable grpc histograms (default true) |
| `--sharedservice.metrics.scope` | string | Scope to emit metrics under (default "service:") |
| `--sharedservice.port` | string | On which grpc port to serve admin (default "8080") |
| `--sharedservice.profiler.enabled` | | Enable Profiler on server |
| `--sharedservice.profilerPort` | string | Profile port to start listen for pprof and metric handlers on. (default "10254") |
| `--sharedservice.security.allowCors` | | |
| `--sharedservice.security.allowLocalhostAccess` | | Whether to permit localhost unauthenticated access to the server |
| `--sharedservice.security.allowedHeaders` | strings | |
| `--sharedservice.security.allowedOrigins` | strings | |
| `--sharedservice.security.auditAccess` | | |
| `--sharedservice.security.orgOverride` | string | Override org in identity context if localhost access enabled |
| `--sharedservice.security.secure` | | |
| `--sharedservice.security.ssl.certificateAuthorityFile` | string | |
| `--sharedservice.security.ssl.certificateFile` | string | |
| `--sharedservice.security.ssl.keyFile` | string | |
| `--sharedservice.security.useAuth` | | |
| `--sharedservice.sync.syncInterval` | string | Time interval to sync (default "5m0s") |
| `--storage.cache.max_size_mbs` | int | Maximum size of the cache where the Blob store data is cached in-memory. If not specified or set to 0, cache is not used |
| `--storage.cache.target_gc_percent` | int | Sets the garbage collection target percentage. |
| `--storage.connection.access-key` | string | Access key to use. Only required when authtype is set to accesskey. |
| `--storage.connection.auth-type` | string | Auth Type to use [iam, accesskey]. (default "iam") |
| `--storage.connection.disable-ssl` | | Disables SSL connection. Should only be used for development. |
| `--storage.connection.endpoint` | string | URL for storage client to connect to. |
| `--storage.connection.region` | string | Region to connect to. (default "us-east-1") |
| `--storage.connection.secret-key` | string | Secret to use when accesskey is set. |
| `--storage.container` | string | Initial container (in s3 a bucket) to create -if it doesn't exist-.' |
| `--storage.defaultHttpClient.timeout` | string | Sets time out on the http client. (default "0s") |
| `--storage.enable-multicontainer` | | If this is true, then the container argument is overlooked and redundant. This config will automatically open new connections to new containers/buckets as they are encountered |
| `--storage.limits.maxDownloadMBs` | int | Maximum allowed download size (in MBs) per call. (default 2) |
| `--storage.stow.config` | stringToString | Configuration for stow backend. Refer to github/flyteorg/stow (default []) |
| `--storage.stow.kind` | string | Kind of Stow backend to use. Refer to github/flyteorg/stow |
| `--storage.type` | string | Sets the type of storage to configure [s3/minio/local/mem/stow]. (default "s3") |
| `--union.auth.authorizationMetadataKey` | string | Authorization Header to use when passing Access Tokens to the server (default "flyte-authorization") |
| `--union.auth.clientId` | string | Client ID |
| `--union.auth.clientSecretEnvVar` | string | Environment variable containing the client secret |
| `--union.auth.clientSecretLocation` | string | File containing the client secret |
| `--union.auth.deviceFlow.pollInterval` | string | amount of time the device flow would poll the token endpoint if auth server doesn't return a polling interval. Okta and google IDP do return an interval' (default "5s") |
| `--union.auth.deviceFlow.refreshTime` | string | grace period from the token expiry after which it would refresh the token. (default "5m0s") |
| `--union.auth.deviceFlow.timeout` | string | amount of time the device flow should complete or else it will be cancelled. (default "10m0s") |
| `--union.auth.enable` | | Whether to enable an authenticated conenction when communicating with admin. (default true) |
| `--union.auth.externalAuth.command` | strings | Command for external authentication token generation |
| `--union.auth.pkce.refreshTime` | string | grace period from the token expiry after which it would refresh the token. (default "5m0s") |
| `--union.auth.pkce.timeout` | string | Amount of time the browser session would be active for authentication from client app. (default "15s") |
| `--union.auth.scopes` | strings | List of scopes to request |
| `--union.auth.tokenRefreshWindow` | string | Max duration between token refresh attempt and token expiry. (default "1h0m0s") |
| `--union.auth.tokenUrl` | string | OPTIONAL: Your IdP's token endpoint. It'll be discovered from flyte admin's OAuth Metadata endpoint if not provided. |
| `--union.auth.type` | string | Type of OAuth2 flow used for communicating with admin. (default "Pkce") |
| `--union.cache.maxItemsCount` | int | Maximum number of items to keep in the cache before evicting. (default 1000) |
| `--union.connection.host` | string | Host to connect to (default "dns:///utt-mgdp-stg-us-east-2.cloud-staging.union.ai") |
| `--union.connection.insecure` | | Whether to connect over insecure channel |
| `--union.connection.insecureSkipVerify` | | InsecureSkipVerify controls whether a client verifies the server's certificate chain and host name.Caution: shouldn't be use for production usecases' |
| `--union.connection.keepAliveConfig.permitWithoutStream` | | If true, client sends keepalive pings even with no active RPCs. |
| `--union.connection.keepAliveConfig.time` | string | After a duration of this time if the client doesn't see any activity it pings the server to see if the transport is still alive. (default "20s") |
| `--union.connection.keepAliveConfig.timeout` | string | After having pinged for keepalive check, the client waits for a duration of Timeout and if no activity is seen even after that the connection is closed. (default "2m0s") |
| `--union.connection.maxBackoffDelay` | string | Max delay for grpc backoff (default "8s") |
| `--union.connection.maxRecvMsgSize` | int | Maximum size of a message in bytes of a gRPC message (default 10485760) |
| `--union.connection.maxRetries` | int | Max number of gRPC retries (default 4) |
| `--union.connection.minConnectTimeout` | string | Minimum timeout for establishing a connection (default "20s") |
| `--union.connection.perRetryTimeout` | string | gRPC per retry timeout (default "15s") |
| `--union.connection.serviceConfig` | string | Defines gRPC experimental JSON Service Config (default "{"loadBalancingConfig": [{"round_robin":{}}]}") |
| `--union.connection.trustedIdentityClaims.enabled` | | Enables passing of trusted claims while making inter service calls |
| `--union.connection.trustedIdentityClaims.externalIdentityClaim` | string | External identity claim of the service which is authorized to make internal service call. These are verified against userclouds actions |
| `--union.connection.trustedIdentityClaims.externalIdentityTypeClaim` | string | External identity type claim of app or user to use for the current service identity. It should be an 'app' for inter service communication |
| `--union.internalConnectionConfig.-` | stringToString | (default []) |
| `--union.internalConnectionConfig.enabled` | | Enables internal service to service communication instead of going through ingress. |
| `--union.internalConnectionConfig.urlPattern` | string | UrlPattern of the internal service endpoints. (default "{{ service }}-helmchart.{{ service }}.svc.cluster.local:80") |
| `--webhook.awsSecretManager.sidecarImage` | string | Specifies the sidecar docker image to use (default "docker.io/amazon/aws-secrets-manager-secret-sidecar:v0.1.4") |
| `--webhook.certDir` | string | Certificate directory to use to write generated certs. Defaults to /etc/webhook/certs/ (default "/etc/webhook/certs") |
| `--webhook.embeddedSecretManagerConfig.awsConfig.region` | string | AWS region |
| `--webhook.embeddedSecretManagerConfig.fileMountInitContainer.image` | string | Specifies init container image to use for mounting secrets as files. (default "busybox:1.28") |
| `--webhook.embeddedSecretManagerConfig.gcpConfig.project` | string | GCP project to be used for secret manager |
| `--webhook.embeddedSecretManagerConfig.type` | string | (default "AWS") |
| `--webhook.gcpSecretManager.sidecarImage` | string | Specifies the sidecar docker image to use (default "gcr.io/google.com/cloudsdktool/cloud-sdk:alpine") |
| `--webhook.listenPort` | int | The port to use to listen to webhook calls. Defaults to 9443 (default 9443) |
| `--webhook.localCert` | | write certs locally. Defaults to false |
| `--webhook.metrics-prefix` | string | An optional prefix for all published metrics. (default "flyte:") |
| `--webhook.secretName` | string | Secret name to write generated certs to. (default "flyte-pod-webhook") |
| `--webhook.serviceName` | string | The name of the webhook service. (default "flyte-pod-webhook") |
| `--webhook.servicePort` | int32 | The port on the service that hosting webhook. (default 443) |
| `--webhook.vaultSecretManager.role` | string | Specifies the vault role to use (default "flyte") |
=== PAGE: https://www.union.ai/docs/v1/serverless/api-reference/uctl-cli/uctl-update/uctl-update-execution-queue-attribute ===
# uctl update execution-queue-attribute
Update matchable resources of execution queue attributes
## Synopsis
Update execution queue attributes for the given project and domain
combination or additionally with workflow name.
Updating the execution queue attribute is only available from a
generated file. See the get section for generating this file. This will
completely overwrite any existing custom project, domain, and workflow
combination attributes. It is preferable to do get and generate an
attribute file if there is an existing attribute that is already set and
then update it to have new values. Refer to get
execution-queue-attribute section on how to generate this file It takes
input for execution queue attributes from the config file era.yaml,
Example: content of era.yaml:
``` yaml
domain: development
project: flytesnacks
tags:
- foo
- bar
- buzz
- lightyear
```
```shell
$ uctl update execution-queue-attribute --attrFile era.yaml
```
Update execution queue attribute for project, domain, and workflow
combination. This will take precedence over any other execution queue
attribute defined at project domain level. For workflow
`core.control_flow.merge_sort.merge_sort` in flytesnacks project,
development domain, it is:
``` yaml
domain: development
project: flytesnacks
workflow: core.control_flow.merge_sort.merge_sort
tags:
- foo
- bar
- buzz
- lightyear
```
```shell
$ uctl update execution-queue-attribute --attrFile era.yaml
```
Usage:
```shell
$ uctl update execution-queue-attribute [flags]
```
## Options
| Option | Type | Description |
|--------|------|-------------|
| `--attrFile` | string | attribute file name to be used for updating attribute for the resource type. |
| `--dryRun` | | execute command without making any modifications. |
| `--force` | | do not ask for an acknowledgement during updates. |
| `-h`, `--help` | help for execution-queue-attribute |
### Options inherited from parent commands
| Option | Type | Description |
|--------|------|-------------|
| `--admin.audience` | string | Audience to use when initiating OAuth2 authorization requests. |
| `--admin.authType` | string | Type of OAuth2 flow used for communicating with admin.ClientSecret, Pkce, ExternalCommand are valid values (default "ClientSecret") |
| `--admin.authorizationHeader` | string | Custom metadata header to pass JWT |
| `--admin.authorizationServerUrl` | string | This is the URL to your IdP's authorization server. It'll default to Endpoint |
| `--admin.caCertFilePath` | string | Use specified certificate file to verify the admin server peer. |
| `--admin.clientId` | string | Client ID (default "flytepropeller") |
| `--admin.clientSecretEnvVar` | string | Environment variable containing the client secret |
| `--admin.clientSecretLocation` | string | File containing the client secret (default "/etc/secrets/client_secret") |
| `--admin.command` | strings | Command for external authentication token generation |
| `--admin.defaultOrg` | string | OPTIONAL: Default org to use to support non-org based cli's.'. |
| `--admin.defaultServiceConfig` | string | |
| `--admin.deviceFlowConfig.pollInterval` | string | amount of time the device flow would poll the token endpoint if auth server doesn't return a polling interval. Okta and google IDP do return an interval' (default "5s") |
| `--admin.deviceFlowConfig.refreshTime` | string | grace period from the token expiry after which it would refresh the token. (default "5m0s") |
| `--admin.deviceFlowConfig.timeout` | string | amount of time the device flow should complete or else it will be cancelled. (default "10m0s") |
| `--admin.endpoint` | string | For admin types, specify where the uri of the service is located. |
| `--admin.httpProxyURL` | string | OPTIONAL: HTTP Proxy to be used for OAuth requests. |
| `--admin.insecure` | | Use insecure connection. |
| `--admin.insecureSkipVerify` | | InsecureSkipVerify controls whether a client verifies the server's certificate chain and host name.Caution: shouldn't be use for production usecases' |
| `--admin.maxBackoffDelay` | string | Max delay for grpc backoff (default "8s") |
| `--admin.maxMessageSizeBytes` | int | The max size in bytes for incoming gRPC messages |
| `--admin.maxRetries` | int | Max number of gRPC retries (default 4) |
| `--admin.perRetryTimeout` | string | gRPC per retry timeout (default "15s") |
| `--admin.pkceConfig.refreshTime` | string | grace period from the token expiry after which it would refresh the token. (default "5m0s") |
| `--admin.pkceConfig.timeout` | string | Amount of time the browser session would be active for authentication from client app. (default "2m0s") |
| `--admin.proxyCommand` | strings | Command for external proxy-authorization token generation |
| `--admin.scopes` | strings | List of scopes to request |
| `--admin.tokenRefreshWindow` | string | Max duration between token refresh attempt and token expiry. (default "0s") |
| `--admin.tokenUrl` | string | OPTIONAL: Your IdP's token endpoint. It'll be discovered from flyte admin's OAuth Metadata endpoint if not provided. |
| `--admin.useAudienceFromAdmin` | | Use Audience configured from admins public endpoint config. |
| `--admin.useAuth` | | Deprecated: Auth will be enabled/disabled based on admin's dynamically discovered information. |
| `--auth.appAuth.externalAuthServer.allowedAudience` | strings | Optional: A list of allowed audiences. If not provided, the audience is expected to be the public Uri of the service. |
| `--auth.appAuth.externalAuthServer.baseUrl` | string | This should be the base url of the authorization server that you are trying to hit. With Okta for instance, it will look something like https://company.okta.com/oauth2/abcdef123456789/ |
| `--auth.appAuth.externalAuthServer.httpProxyURL` | string | OPTIONAL: HTTP Proxy to be used for OAuth requests. |
| `--auth.appAuth.externalAuthServer.metadataUrl` | string | Optional: If the server doesn't support /.well-known/oauth-authorization-server, you can set a custom metadata url here.' |
| `--auth.appAuth.externalAuthServer.retryAttempts` | int | Optional: The number of attempted retries on a transient failure to get the OAuth metadata (default 5) |
| `--auth.appAuth.externalAuthServer.retryDelay` | string | Optional, Duration to wait between retries (default "1s") |
| `--auth.appAuth.selfAuthServer.accessTokenLifespan` | string | Defines the lifespan of issued access tokens. (default "30m0s") |
| `--auth.appAuth.selfAuthServer.authorizationCodeLifespan` | string | Defines the lifespan of issued access tokens. (default "5m0s") |
| `--auth.appAuth.selfAuthServer.claimSymmetricEncryptionKeySecretName` | string | OPTIONAL: Secret name to use to encrypt claims in authcode token. (default "claim_symmetric_key") |
| `--auth.appAuth.selfAuthServer.issuer` | string | Defines the issuer to use when issuing and validating tokens. The default value is https://{requestUri.HostAndPort}/ |
| `--auth.appAuth.selfAuthServer.oldTokenSigningRSAKeySecretName` | string | OPTIONAL: Secret name to use to retrieve Old RSA Signing Key. This can be useful during key rotation to continue to accept older tokens. (default "token_rsa_key_old.pem") |
| `--auth.appAuth.selfAuthServer.refreshTokenLifespan` | string | Defines the lifespan of issued access tokens. (default "1h0m0s") |
| `--auth.appAuth.selfAuthServer.tokenSigningRSAKeySecretName` | string | OPTIONAL: Secret name to use to retrieve RSA Signing Key. (default "token_rsa_key.pem") |
| `--auth.appAuth.thirdPartyConfig.flyteClient.audience` | string | Audience to use when initiating OAuth2 authorization requests. |
| `--auth.appAuth.thirdPartyConfig.flyteClient.clientId` | string | public identifier for the app which handles authorization for a Flyte deployment (default "uctl") |
| `--auth.appAuth.thirdPartyConfig.flyteClient.redirectUri` | string | This is the callback uri registered with the app which handles authorization for a Flyte deployment (default "http://localhost:53593/callback") |
| `--auth.appAuth.thirdPartyConfig.flyteClient.scopes` | strings | Recommended scopes for the client to request. (default [all,offline]) |
| `--auth.disableForGrpc` | | Disables auth enforcement on Grpc Endpoints. |
| `--auth.disableForHttp` | | Disables auth enforcement on HTTP Endpoints. |
| `--auth.grpcAuthorizationHeader` | string | (default "flyte-authorization") |
| `--auth.httpAuthorizationHeader` | string | (default "flyte-authorization") |
| `--auth.httpProxyURL` | string | OPTIONAL: HTTP Proxy to be used for OAuth requests. |
| `--auth.tokenEndpointProxyPath` | string | The path used to proxy calls to the TokenURL |
| `--auth.userAuth.cookieBlockKeySecretName` | string | OPTIONAL: Secret name to use for cookie block key. (default "cookie_block_key") |
| `--auth.userAuth.cookieHashKeySecretName` | string | OPTIONAL: Secret name to use for cookie hash key. (default "cookie_hash_key") |
| `--auth.userAuth.cookieSetting.domain` | string | OPTIONAL: Allows you to set the domain attribute on the auth cookies. |
| `--auth.userAuth.cookieSetting.sameSitePolicy` | string | OPTIONAL: Allows you to declare if your cookie should be restricted to a first-party or same-site context.Wrapper around http.SameSite. (default "DefaultMode") |
| `--auth.userAuth.httpProxyURL` | string | OPTIONAL: HTTP Proxy to be used for OAuth requests. |
| `--auth.userAuth.idpQueryParameter` | string | idp query parameter used for selecting a particular IDP for doing user authentication. Eg: for Okta passing idp={IDP-ID} forces the authentication to happen with IDP-ID |
| `--auth.userAuth.openId.baseUrl` | string | |
| `--auth.userAuth.openId.clientId` | string | |
| `--auth.userAuth.openId.clientSecretFile` | string | |
| `--auth.userAuth.openId.clientSecretName` | string | (default "oidc_client_secret") |
| `--auth.userAuth.openId.scopes` | strings | (default [openid,profile]) |
| `--auth.userAuth.redirectUrl` | string | (default "/console") |
| `--authorizer.internalCommunicationConfig.enabled` | | Enables authorization decisions for internal communication. (default true) |
| `--authorizer.internalCommunicationConfig.ingressIdentity` | string | IngressIdentity used in the cluster. Needed to exclude the communication coming from ingress. (default "ingress-nginx.ingress-nginx.serviceaccount.identity.linkerd.cluster.local") |
| `--authorizer.internalCommunicationConfig.tenantUrlPatternIdentity` | string | UrlPatternIdentity of the internal tenant service endpoint identities. (default "{{ service }}.{{ org }}.serviceaccount.identity.linkerd.cluster.local") |
| `--authorizer.internalCommunicationConfig.urlPatternIdentity` | string | UrlPatternIdentity of the internal service endpoint identities. (default "{{ service }}-helmchart.{{ service }}.serviceaccount.identity.linkerd.cluster.local") |
| `--authorizer.mode` | string | (default "Active") |
| `--authorizer.organizationConfig.PolicyConfig.adminPolicyDescription` | string | description for the boilerplate admin policy (default "Contributor permissions and full admin permissions to manage users and view usage dashboards") |
| `--authorizer.organizationConfig.PolicyConfig.contributorPolicyDescription` | string | description for the boilerplate contributor policy (default "Viewer permissions and permissions to create workflows, tasks, launch plans, and executions") |
| `--authorizer.organizationConfig.PolicyConfig.defaultUserPolicyRoleType` | string | name of the role type to determine which default policy new users added to the organization should be assigned (default "Viewer") |
| `--authorizer.organizationConfig.PolicyConfig.serverlessContributorPolicyDescription` | string | description for the boilerplate serverless contributor policy (default "Viewer permissions and permissions to create workflows, tasks, launch plans, and executions") |
| `--authorizer.organizationConfig.PolicyConfig.serverlessViewerPolicyDescription` | string | description for the boilerplate serverless viewer policy (default "Permissions to view Flyte entities") |
| `--authorizer.organizationConfig.PolicyConfig.viewerPolicyDescription` | string | description for the boilerplate viewer policy (default "Permissions to view Flyte entities") |
| `--authorizer.organizationConfig.defaultPolicyCacheDuration` | string | Cache entry duration for the store of the default policy per organization (default "10m0s") |
| `--authorizer.syncRuleRefreshInterval` | string | (default "1m0s") |
| `--authorizer.type` | string | (default "UserClouds") |
| `--authorizer.userCloudsClient.cache.redis.ttl.edgeTypes` | string | Specifies how long edge types remain in the cache.. (default "30m0s") |
| `--authorizer.userCloudsClient.cache.redis.ttl.edges` | string | Specifies how long edges remain in the cache. (default "30m0s") |
| `--authorizer.userCloudsClient.cache.redis.ttl.objectTypes` | string | Specifies how long object types remain in the cache. (default "30m0s") |
| `--authorizer.userCloudsClient.cache.redis.ttl.objects` | string | Specifies how long objects remain in the cache. (default "30m0s") |
| `--authorizer.userCloudsClient.cache.type` | string | Cache type to use. (default "none") |
| `--authorizer.userCloudsClient.clientID` | string | UserClouds client id |
| `--authorizer.userCloudsClient.clientSecretName` | string | UserCloud client secret name to read from the secret manager. (default "userclouds-client-secret") |
| `--authorizer.userCloudsClient.enableLogging` | | Enable userclouds client's internal logging. Calls to post logs take 250-350 ms and will impact p99 latency, enable with caution. |
| `--authorizer.userCloudsClient.tenantID` | string | UserClouds tenant id. Should be a UUID. |
| `--authorizer.userCloudsClient.tenantUrl` | string | Something like https://{yourtenant}.tenant.userclouds.com |
| `--config` | string | config file (default is /Users/andrew/.union/config.yaml) |
| `--connection.environment` | string | |
| `--connection.region` | string | |
| `--connection.rootTenantURLPattern` | string | Pattern for tenant url. (default "dns:///{{ organization }}.cloud-staging.union.ai") |
| `--console.endpoint` | string | Endpoint of console, if different than flyte admin |
| `--database.connMaxLifeTime` | string | sets the maximum amount of time a connection may be reused (default "1h0m0s") |
| `--database.enableForeignKeyConstraintWhenMigrating` | | Whether to enable gorm foreign keys when migrating the db |
| `--database.maxIdleConnections` | int | maxIdleConnections sets the maximum number of connections in the idle connection pool. (default 10) |
| `--database.maxOpenConnections` | int | maxOpenConnections sets the maximum number of open connections to the database. (default 100) |
| `--database.postgres.dbname` | string | The database name (default "postgres") |
| `--database.postgres.debug` | | |
| `--database.postgres.host` | string | The host name of the database server (default "localhost") |
| `--database.postgres.options` | string | See http://gorm.io/docs/connecting_to_the_database.html for available options passed, in addition to the above. (default "sslmode=disable") |
| `--database.postgres.password` | string | The database password. (default "postgres") |
| `--database.postgres.passwordPath` | string | Points to the file containing the database password. |
| `--database.postgres.port` | int | The port name of the database server (default 30001) |
| `--database.postgres.readReplicaHost` | string | The host name of the read replica database server (default "localhost") |
| `--database.postgres.username` | string | The database user who is connecting to the server. (default "postgres") |
| `--database.sqlite.file` | string | The path to the file (existing or new) where the DB should be created / stored. If existing, then this will be re-used, else a new will be created |
| `--db.connectionPool.maxConnectionLifetime` | string | (default "0s") |
| `--db.connectionPool.maxIdleConnections` | int | |
| `--db.connectionPool.maxOpenConnections` | int | |
| `--db.dbname` | string | (default "postgres") |
| `--db.debug` | | |
| `--db.host` | string | (default "postgres") |
| `--db.log_level` | int | (default 4) |
| `--db.options` | string | (default "sslmode=disable") |
| `--db.password` | string | |
| `--db.passwordPath` | string | |
| `--db.port` | int | (default 5432) |
| `--db.username` | string | (default "postgres") |
| `-d`, `--domain` | string | Specifies the Flyte project's domain. |
| `--files.archive` | | Pass in archive file either an http link or local path. |
| `--files.assumableIamRole` | string | Custom assumable iam auth role to register launch plans with. |
| `--files.continueOnError` | | Continue on error when registering files. |
| `--files.destinationDirectory` | string | Location of source code in container. |
| `--files.dryRun` | | Execute command without making any modifications. |
| `--files.enableSchedule` | | Enable the schedule if the files contain schedulable launchplan. |
| `--files.force` | | Force use of version number on entities registered with flyte. |
| `--files.k8ServiceAccount` | string | Deprecated. Please use `--K8sServiceAccount`|
| `--files.k8sServiceAccount` | string | Custom kubernetes service account auth role to register launch plans with. |
| `--files.outputLocationPrefix` | string | Custom output location prefix for offloaded types (files/schemas). |
| `--files.sourceUploadPath` | string | Deprecated: Update flyte admin to avoid having to configure storage access from uctl. |
| `--files.version` | string | Version of the entity to be registered with flyte which are un-versioned after serialization. |
| `--logger.formatter.type` | string | Sets logging format type. (default "json") |
| `--logger.level` | int | Sets the minimum logging level. (default 3) |
| `--logger.mute` | | Mutes all logs regardless of severity. Intended for benchmarks/tests only. |
| `--logger.show-source` | | Includes source code location in logs. |
| `--org` | string | Organization to work on. If not set, default to user's org. |
| `--otel.file.filename` | string | Filename to store exported telemetry traces (default "/tmp/trace.txt") |
| `--otel.jaeger.endpoint` | string | Endpoint for the jaeger telemetry trace ingestor (default "http://localhost:14268/api/traces") |
| `--otel.otlpgrpc.endpoint` | string | Endpoint for the OTLP telemetry trace collector (default "http://localhost:4317") |
| `--otel.otlphttp.endpoint` | string | Endpoint for the OTLP telemetry trace collector (default "http://localhost:4318/v1/traces") |
| `--otel.sampler.parentSampler` | string | Sets the parent sampler to use for the tracer (default "always") |
| `--otel.type` | string | Sets the type of exporter to configure [noop/file/jaeger/otlpgrpc/otlphttp]. (default "noop") |
| `-o`, `--output` | string | Specifies the output type - supported formats [TABLE JSON YAML DOT DOTURL]. NOTE: dot, doturl are only supported for Workflow (default "table") |
| `--plugins.catalogcache.reader.maxItems` | int | Maximum number of entries to keep in the index. (default 10000) |
| `--plugins.catalogcache.reader.maxRetries` | int | Maximum number of retries per item. (default 3) |
| `--plugins.catalogcache.reader.workers` | int | Number of concurrent workers to start processing the queue. (default 10) |
| `--plugins.catalogcache.writer.maxItems` | int | Maximum number of entries to keep in the index. (default 10000) |
| `--plugins.catalogcache.writer.maxRetries` | int | Maximum number of retries per item. (default 3) |
| `--plugins.catalogcache.writer.workers` | int | Number of concurrent workers to start processing the queue. (default 10) |
| `-p`, `--project` | string | Specifies the Flyte project. |
| `--rediscache.passwordSecretName` | string | Name of secret with Redis password. |
| `--rediscache.primaryEndpoint` | string | Primary endpoint for the redis cache that can be used for both reads and writes. |
| `--rediscache.replicaEndpoint` | string | Replica endpoint for the redis cache that can be used for reads. |
| `--secrets.env-prefix` | string | Prefix for environment variables (default "FLYTE_SECRET_") |
| `--secrets.secrets-prefix` | string | Prefix where to look for secrets file (default "/etc/secrets") |
| `--secrets.type` | string | Sets the type of storage to configure [local]. (default "local") |
| `--server.dataProxy.download.maxExpiresIn` | string | Maximum allowed expiration duration. (default "1h0m0s") |
| `--server.dataProxy.upload.defaultFileNameLength` | int | Default length for the generated file name if not provided in the request. (default 20) |
| `--server.dataProxy.upload.maxExpiresIn` | string | Maximum allowed expiration duration. (default "1h0m0s") |
| `--server.dataProxy.upload.maxSize` | string | Maximum allowed upload size. (default "6Mi") |
| `--server.dataProxy.upload.storagePrefix` | string | Storage prefix to use for all upload requests. |
| `--server.grpc.enableGrpcLatencyMetrics` | | Enable grpc latency metrics. Note Histograms metrics can be expensive on Prometheus servers. |
| `--server.grpc.maxMessageSizeBytes` | int | The max size in bytes for incoming gRPC messages |
| `--server.grpc.port` | int | On which grpc port to serve admin (default 8089) |
| `--server.grpc.serverReflection` | | Enable GRPC Server Reflection (default true) |
| `--server.grpcPort` | int | deprecated |
| `--server.grpcServerReflection` | | deprecated |
| `--server.httpPort` | int | On which http port to serve admin (default 8088) |
| `--server.kube-config` | string | Path to kubernetes client config file, default is empty, useful for incluster config. |
| `--server.kubeClientConfig.burst` | int | Max burst rate for throttle. 0 defaults to 10 (default 25) |
| `--server.kubeClientConfig.qps` | int32 | Max QPS to the master for requests to KubeAPI. 0 defaults to 5. (default 100) |
| `--server.kubeClientConfig.timeout` | string | Max duration allowed for every request to KubeAPI before giving up. 0 implies no timeout. (default "30s") |
| `--server.master` | string | The address of the Kubernetes API server. |
| `--server.readHeaderTimeoutSeconds` | int | The amount of time allowed to read request headers. (default 32) |
| `--server.security.allowCors` | | (default true) |
| `--server.security.allowedHeaders` | strings | (default [Content-Type,flyte-authorization]) |
| `--server.security.allowedOrigins` | strings | (default [*]) |
| `--server.security.auditAccess` | | |
| `--server.security.secure` | | |
| `--server.security.ssl.certificateFile` | string | |
| `--server.security.ssl.keyFile` | string | |
| `--server.security.useAuth` | | |
| `--server.thirdPartyConfig.flyteClient.audience` | string | Audience to use when initiating OAuth2 authorization requests. |
| `--server.thirdPartyConfig.flyteClient.clientId` | string | public identifier for the app which handles authorization for a Flyte deployment |
| `--server.thirdPartyConfig.flyteClient.redirectUri` | string | This is the callback uri registered with the app which handles authorization for a Flyte deployment |
| `--server.thirdPartyConfig.flyteClient.scopes` | strings | Recommended scopes for the client to request. |
| `--server.watchService.maxActiveClusterConnections` | int | (default 5) |
| `--server.watchService.maxPageSize` | int | (default 50000) |
| `--server.watchService.nonTerminalStatusUpdatesInterval` | string | (default "1m0s") |
| `--server.watchService.pollInterval` | string | (default "1s") |
| `--sharedservice.connectPort` | string | On which connect port to serve admin (default "8080") |
| `--sharedservice.grpc.grpcMaxResponseStatusBytes` | int32 | specifies the maximum (uncompressed) size of header list that the client is prepared to accept on grpc calls (default 32000) |
| `--sharedservice.grpc.maxConcurrentStreams` | int | Limit on the number of concurrent streams to each ServerTransport. (default 100) |
| `--sharedservice.grpc.maxMessageSizeBytes` | int | Limit on the size of message that can be received on the server. (default 10485760) |
| `--sharedservice.grpcServerReflection` | | Enable GRPC Server Reflection (default true) |
| `--sharedservice.httpPort` | string | On which http port to serve admin (default "8089") |
| `--sharedservice.kubeConfig` | string | Path to kubernetes client config file. |
| `--sharedservice.master` | string | The address of the Kubernetes API server. |
| `--sharedservice.metrics.enableClientGrpcHistograms` | | Enable client grpc histograms (default true) |
| `--sharedservice.metrics.enableGrpcHistograms` | | Enable grpc histograms (default true) |
| `--sharedservice.metrics.scope` | string | Scope to emit metrics under (default "service:") |
| `--sharedservice.port` | string | On which grpc port to serve admin (default "8080") |
| `--sharedservice.profiler.enabled` | | Enable Profiler on server |
| `--sharedservice.profilerPort` | string | Profile port to start listen for pprof and metric handlers on. (default "10254") |
| `--sharedservice.security.allowCors` | | |
| `--sharedservice.security.allowLocalhostAccess` | | Whether to permit localhost unauthenticated access to the server |
| `--sharedservice.security.allowedHeaders` | strings | |
| `--sharedservice.security.allowedOrigins` | strings | |
| `--sharedservice.security.auditAccess` | | |
| `--sharedservice.security.orgOverride` | string | Override org in identity context if localhost access enabled |
| `--sharedservice.security.secure` | | |
| `--sharedservice.security.ssl.certificateAuthorityFile` | string | |
| `--sharedservice.security.ssl.certificateFile` | string | |
| `--sharedservice.security.ssl.keyFile` | string | |
| `--sharedservice.security.useAuth` | | |
| `--sharedservice.sync.syncInterval` | string | Time interval to sync (default "5m0s") |
| `--storage.cache.max_size_mbs` | int | Maximum size of the cache where the Blob store data is cached in-memory. If not specified or set to 0, cache is not used |
| `--storage.cache.target_gc_percent` | int | Sets the garbage collection target percentage. |
| `--storage.connection.access-key` | string | Access key to use. Only required when authtype is set to accesskey. |
| `--storage.connection.auth-type` | string | Auth Type to use [iam, accesskey]. (default "iam") |
| `--storage.connection.disable-ssl` | | Disables SSL connection. Should only be used for development. |
| `--storage.connection.endpoint` | string | URL for storage client to connect to. |
| `--storage.connection.region` | string | Region to connect to. (default "us-east-1") |
| `--storage.connection.secret-key` | string | Secret to use when accesskey is set. |
| `--storage.container` | string | Initial container (in s3 a bucket) to create -if it doesn't exist-.' |
| `--storage.defaultHttpClient.timeout` | string | Sets time out on the http client. (default "0s") |
| `--storage.enable-multicontainer` | | If this is true, then the container argument is overlooked and redundant. This config will automatically open new connections to new containers/buckets as they are encountered |
| `--storage.limits.maxDownloadMBs` | int | Maximum allowed download size (in MBs) per call. (default 2) |
| `--storage.stow.config` | stringToString | Configuration for stow backend. Refer to github/flyteorg/stow (default []) |
| `--storage.stow.kind` | string | Kind of Stow backend to use. Refer to github/flyteorg/stow |
| `--storage.type` | string | Sets the type of storage to configure [s3/minio/local/mem/stow]. (default "s3") |
| `--union.auth.authorizationMetadataKey` | string | Authorization Header to use when passing Access Tokens to the server (default "flyte-authorization") |
| `--union.auth.clientId` | string | Client ID |
| `--union.auth.clientSecretEnvVar` | string | Environment variable containing the client secret |
| `--union.auth.clientSecretLocation` | string | File containing the client secret |
| `--union.auth.deviceFlow.pollInterval` | string | amount of time the device flow would poll the token endpoint if auth server doesn't return a polling interval. Okta and google IDP do return an interval' (default "5s") |
| `--union.auth.deviceFlow.refreshTime` | string | grace period from the token expiry after which it would refresh the token. (default "5m0s") |
| `--union.auth.deviceFlow.timeout` | string | amount of time the device flow should complete or else it will be cancelled. (default "10m0s") |
| `--union.auth.enable` | | Whether to enable an authenticated conenction when communicating with admin. (default true) |
| `--union.auth.externalAuth.command` | strings | Command for external authentication token generation |
| `--union.auth.pkce.refreshTime` | string | grace period from the token expiry after which it would refresh the token. (default "5m0s") |
| `--union.auth.pkce.timeout` | string | Amount of time the browser session would be active for authentication from client app. (default "15s") |
| `--union.auth.scopes` | strings | List of scopes to request |
| `--union.auth.tokenRefreshWindow` | string | Max duration between token refresh attempt and token expiry. (default "1h0m0s") |
| `--union.auth.tokenUrl` | string | OPTIONAL: Your IdP's token endpoint. It'll be discovered from flyte admin's OAuth Metadata endpoint if not provided. |
| `--union.auth.type` | string | Type of OAuth2 flow used for communicating with admin. (default "Pkce") |
| `--union.cache.maxItemsCount` | int | Maximum number of items to keep in the cache before evicting. (default 1000) |
| `--union.connection.host` | string | Host to connect to (default "dns:///utt-mgdp-stg-us-east-2.cloud-staging.union.ai") |
| `--union.connection.insecure` | | Whether to connect over insecure channel |
| `--union.connection.insecureSkipVerify` | | InsecureSkipVerify controls whether a client verifies the server's certificate chain and host name.Caution: shouldn't be use for production usecases' |
| `--union.connection.keepAliveConfig.permitWithoutStream` | | If true, client sends keepalive pings even with no active RPCs. |
| `--union.connection.keepAliveConfig.time` | string | After a duration of this time if the client doesn't see any activity it pings the server to see if the transport is still alive. (default "20s") |
| `--union.connection.keepAliveConfig.timeout` | string | After having pinged for keepalive check, the client waits for a duration of Timeout and if no activity is seen even after that the connection is closed. (default "2m0s") |
| `--union.connection.maxBackoffDelay` | string | Max delay for grpc backoff (default "8s") |
| `--union.connection.maxRecvMsgSize` | int | Maximum size of a message in bytes of a gRPC message (default 10485760) |
| `--union.connection.maxRetries` | int | Max number of gRPC retries (default 4) |
| `--union.connection.minConnectTimeout` | string | Minimum timeout for establishing a connection (default "20s") |
| `--union.connection.perRetryTimeout` | string | gRPC per retry timeout (default "15s") |
| `--union.connection.serviceConfig` | string | Defines gRPC experimental JSON Service Config (default "{"loadBalancingConfig": [{"round_robin":{}}]}") |
| `--union.connection.trustedIdentityClaims.enabled` | | Enables passing of trusted claims while making inter service calls |
| `--union.connection.trustedIdentityClaims.externalIdentityClaim` | string | External identity claim of the service which is authorized to make internal service call. These are verified against userclouds actions |
| `--union.connection.trustedIdentityClaims.externalIdentityTypeClaim` | string | External identity type claim of app or user to use for the current service identity. It should be an 'app' for inter service communication |
| `--union.internalConnectionConfig.-` | stringToString | (default []) |
| `--union.internalConnectionConfig.enabled` | | Enables internal service to service communication instead of going through ingress. |
| `--union.internalConnectionConfig.urlPattern` | string | UrlPattern of the internal service endpoints. (default "{{ service }}-helmchart.{{ service }}.svc.cluster.local:80") |
| `--webhook.awsSecretManager.sidecarImage` | string | Specifies the sidecar docker image to use (default "docker.io/amazon/aws-secrets-manager-secret-sidecar:v0.1.4") |
| `--webhook.certDir` | string | Certificate directory to use to write generated certs. Defaults to /etc/webhook/certs/ (default "/etc/webhook/certs") |
| `--webhook.embeddedSecretManagerConfig.awsConfig.region` | string | AWS region |
| `--webhook.embeddedSecretManagerConfig.fileMountInitContainer.image` | string | Specifies init container image to use for mounting secrets as files. (default "busybox:1.28") |
| `--webhook.embeddedSecretManagerConfig.gcpConfig.project` | string | GCP project to be used for secret manager |
| `--webhook.embeddedSecretManagerConfig.type` | string | (default "AWS") |
| `--webhook.gcpSecretManager.sidecarImage` | string | Specifies the sidecar docker image to use (default "gcr.io/google.com/cloudsdktool/cloud-sdk:alpine") |
| `--webhook.listenPort` | int | The port to use to listen to webhook calls. Defaults to 9443 (default 9443) |
| `--webhook.localCert` | | write certs locally. Defaults to false |
| `--webhook.metrics-prefix` | string | An optional prefix for all published metrics. (default "flyte:") |
| `--webhook.secretName` | string | Secret name to write generated certs to. (default "flyte-pod-webhook") |
| `--webhook.serviceName` | string | The name of the webhook service. (default "flyte-pod-webhook") |
| `--webhook.servicePort` | int32 | The port on the service that hosting webhook. (default 443) |
| `--webhook.vaultSecretManager.role` | string | Specifies the vault role to use (default "flyte") |
=== PAGE: https://www.union.ai/docs/v1/serverless/api-reference/uctl-cli/uctl-update/uctl-update-launchplan ===
# uctl update launchplan
Updates launch plan status
## Synopsis
Activates a [launch
plan](https://docs.flyte.org/en/latest/user_guide/productionizing/schedules.html#activating-a-schedule)
which activates the scheduled job associated with it:
```shell
$ uctl update launchplan -p flytesnacks -d development core.control_flow.merge_sort.merge_sort --version v1 --activate
```
Deactivates a [launch
plan](https://docs.flyte.org/en/latest/user_guide/productionizing/schedules.html#deactivating-a-schedule)
which deschedules any scheduled job associated with it:
```shell
$ uctl update launchplan -p flytesnacks -d development core.control_flow.merge_sort.merge_sort --version v1 --deactivate
```
Usage:
```shell
$ uctl update launchplan [flags]
```
## Options
| Option | Type | Description |
|--------|------|-------------|
| `--activate` | | activate launchplan. |
| Option | Type | Description |
|--------|------|-------------|
| `--archive` | | (Deprecated) disable the launch plan schedule (if it has an active schedule associated with it). |
| Option | Type | Description |
|--------|------|-------------|
| `--deactivate` | | disable the launch plan schedule (if it has an active schedule associated with it). |
| Option | Type | Description |
|--------|------|-------------|
| `--dryRun` | | execute command without making any modifications. |
| Option | Type | Description |
|--------|------|-------------|
| `--force` | | do not ask for an acknowledgement during updates. |
| Option | Type | Description |
|--------|------|-------------|
| `-h`, `--help` | help for launchplan |
| `--version` | string | version of the launchplan to be fetched. |
### Options inherited from parent commands
| Option | Type | Description |
|--------|------|-------------|
| `--admin.audience` | string | Audience to use when initiating OAuth2 authorization requests. |
| `--admin.authType` | string | Type of OAuth2 flow used for communicating with admin.ClientSecret, Pkce, ExternalCommand are valid values (default "ClientSecret") |
| `--admin.authorizationHeader` | string | Custom metadata header to pass JWT |
| `--admin.authorizationServerUrl` | string | This is the URL to your IdP's authorization server. It'll default to Endpoint |
| `--admin.caCertFilePath` | string | Use specified certificate file to verify the admin server peer. |
| `--admin.clientId` | string | Client ID (default "flytepropeller") |
| `--admin.clientSecretEnvVar` | string | Environment variable containing the client secret |
| `--admin.clientSecretLocation` | string | File containing the client secret (default "/etc/secrets/client_secret") |
| `--admin.command` | strings | Command for external authentication token generation |
| `--admin.defaultOrg` | string | OPTIONAL: Default org to use to support non-org based cli's.'. |
| `--admin.defaultServiceConfig` | string | |
| `--admin.deviceFlowConfig.pollInterval` | string | amount of time the device flow would poll the token endpoint if auth server doesn't return a polling interval. Okta and google IDP do return an interval' (default "5s") |
| `--admin.deviceFlowConfig.refreshTime` | string | grace period from the token expiry after which it would refresh the token. (default "5m0s") |
| `--admin.deviceFlowConfig.timeout` | string | amount of time the device flow should complete or else it will be cancelled. (default "10m0s") |
| `--admin.endpoint` | string | For admin types, specify where the uri of the service is located. |
| `--admin.httpProxyURL` | string | OPTIONAL: HTTP Proxy to be used for OAuth requests. |
| `--admin.insecure` | | Use insecure connection. |
| `--admin.insecureSkipVerify` | | InsecureSkipVerify controls whether a client verifies the server's certificate chain and host name.Caution: shouldn't be use for production usecases' |
| `--admin.maxBackoffDelay` | string | Max delay for grpc backoff (default "8s") |
| `--admin.maxMessageSizeBytes` | int | The max size in bytes for incoming gRPC messages |
| `--admin.maxRetries` | int | Max number of gRPC retries (default 4) |
| `--admin.perRetryTimeout` | string | gRPC per retry timeout (default "15s") |
| `--admin.pkceConfig.refreshTime` | string | grace period from the token expiry after which it would refresh the token. (default "5m0s") |
| `--admin.pkceConfig.timeout` | string | Amount of time the browser session would be active for authentication from client app. (default "2m0s") |
| `--admin.proxyCommand` | strings | Command for external proxy-authorization token generation |
| `--admin.scopes` | strings | List of scopes to request |
| `--admin.tokenRefreshWindow` | string | Max duration between token refresh attempt and token expiry. (default "0s") |
| `--admin.tokenUrl` | string | OPTIONAL: Your IdP's token endpoint. It'll be discovered from flyte admin's OAuth Metadata endpoint if not provided. |
| `--admin.useAudienceFromAdmin` | | Use Audience configured from admins public endpoint config. |
| `--admin.useAuth` | | Deprecated: Auth will be enabled/disabled based on admin's dynamically discovered information. |
| `--auth.appAuth.externalAuthServer.allowedAudience` | strings | Optional: A list of allowed audiences. If not provided, the audience is expected to be the public Uri of the service. |
| `--auth.appAuth.externalAuthServer.baseUrl` | string | This should be the base url of the authorization server that you are trying to hit. With Okta for instance, it will look something like https://company.okta.com/oauth2/abcdef123456789/ |
| `--auth.appAuth.externalAuthServer.httpProxyURL` | string | OPTIONAL: HTTP Proxy to be used for OAuth requests. |
| `--auth.appAuth.externalAuthServer.metadataUrl` | string | Optional: If the server doesn't support /.well-known/oauth-authorization-server, you can set a custom metadata url here.' |
| `--auth.appAuth.externalAuthServer.retryAttempts` | int | Optional: The number of attempted retries on a transient failure to get the OAuth metadata (default 5) |
| `--auth.appAuth.externalAuthServer.retryDelay` | string | Optional, Duration to wait between retries (default "1s") |
| `--auth.appAuth.selfAuthServer.accessTokenLifespan` | string | Defines the lifespan of issued access tokens. (default "30m0s") |
| `--auth.appAuth.selfAuthServer.authorizationCodeLifespan` | string | Defines the lifespan of issued access tokens. (default "5m0s") |
| `--auth.appAuth.selfAuthServer.claimSymmetricEncryptionKeySecretName` | string | OPTIONAL: Secret name to use to encrypt claims in authcode token. (default "claim_symmetric_key") |
| `--auth.appAuth.selfAuthServer.issuer` | string | Defines the issuer to use when issuing and validating tokens. The default value is https://{requestUri.HostAndPort}/ |
| `--auth.appAuth.selfAuthServer.oldTokenSigningRSAKeySecretName` | string | OPTIONAL: Secret name to use to retrieve Old RSA Signing Key. This can be useful during key rotation to continue to accept older tokens. (default "token_rsa_key_old.pem") |
| `--auth.appAuth.selfAuthServer.refreshTokenLifespan` | string | Defines the lifespan of issued access tokens. (default "1h0m0s") |
| `--auth.appAuth.selfAuthServer.tokenSigningRSAKeySecretName` | string | OPTIONAL: Secret name to use to retrieve RSA Signing Key. (default "token_rsa_key.pem") |
| `--auth.appAuth.thirdPartyConfig.flyteClient.audience` | string | Audience to use when initiating OAuth2 authorization requests. |
| `--auth.appAuth.thirdPartyConfig.flyteClient.clientId` | string | public identifier for the app which handles authorization for a Flyte deployment (default "uctl") |
| `--auth.appAuth.thirdPartyConfig.flyteClient.redirectUri` | string | This is the callback uri registered with the app which handles authorization for a Flyte deployment (default "http://localhost:53593/callback") |
| `--auth.appAuth.thirdPartyConfig.flyteClient.scopes` | strings | Recommended scopes for the client to request. (default [all,offline]) |
| `--auth.disableForGrpc` | | Disables auth enforcement on Grpc Endpoints. |
| `--auth.disableForHttp` | | Disables auth enforcement on HTTP Endpoints. |
| `--auth.grpcAuthorizationHeader` | string | (default "flyte-authorization") |
| `--auth.httpAuthorizationHeader` | string | (default "flyte-authorization") |
| `--auth.httpProxyURL` | string | OPTIONAL: HTTP Proxy to be used for OAuth requests. |
| `--auth.tokenEndpointProxyPath` | string | The path used to proxy calls to the TokenURL |
| `--auth.userAuth.cookieBlockKeySecretName` | string | OPTIONAL: Secret name to use for cookie block key. (default "cookie_block_key") |
| `--auth.userAuth.cookieHashKeySecretName` | string | OPTIONAL: Secret name to use for cookie hash key. (default "cookie_hash_key") |
| `--auth.userAuth.cookieSetting.domain` | string | OPTIONAL: Allows you to set the domain attribute on the auth cookies. |
| `--auth.userAuth.cookieSetting.sameSitePolicy` | string | OPTIONAL: Allows you to declare if your cookie should be restricted to a first-party or same-site context.Wrapper around http.SameSite. (default "DefaultMode") |
| `--auth.userAuth.httpProxyURL` | string | OPTIONAL: HTTP Proxy to be used for OAuth requests. |
| `--auth.userAuth.idpQueryParameter` | string | idp query parameter used for selecting a particular IDP for doing user authentication. Eg: for Okta passing idp={IDP-ID} forces the authentication to happen with IDP-ID |
| `--auth.userAuth.openId.baseUrl` | string | |
| `--auth.userAuth.openId.clientId` | string | |
| `--auth.userAuth.openId.clientSecretFile` | string | |
| `--auth.userAuth.openId.clientSecretName` | string | (default "oidc_client_secret") |
| `--auth.userAuth.openId.scopes` | strings | (default [openid,profile]) |
| `--auth.userAuth.redirectUrl` | string | (default "/console") |
| `--authorizer.internalCommunicationConfig.enabled` | | Enables authorization decisions for internal communication. (default true) |
| `--authorizer.internalCommunicationConfig.ingressIdentity` | string | IngressIdentity used in the cluster. Needed to exclude the communication coming from ingress. (default "ingress-nginx.ingress-nginx.serviceaccount.identity.linkerd.cluster.local") |
| `--authorizer.internalCommunicationConfig.tenantUrlPatternIdentity` | string | UrlPatternIdentity of the internal tenant service endpoint identities. (default "{{ service }}.{{ org }}.serviceaccount.identity.linkerd.cluster.local") |
| `--authorizer.internalCommunicationConfig.urlPatternIdentity` | string | UrlPatternIdentity of the internal service endpoint identities. (default "{{ service }}-helmchart.{{ service }}.serviceaccount.identity.linkerd.cluster.local") |
| `--authorizer.mode` | string | (default "Active") |
| `--authorizer.organizationConfig.PolicyConfig.adminPolicyDescription` | string | description for the boilerplate admin policy (default "Contributor permissions and full admin permissions to manage users and view usage dashboards") |
| `--authorizer.organizationConfig.PolicyConfig.contributorPolicyDescription` | string | description for the boilerplate contributor policy (default "Viewer permissions and permissions to create workflows, tasks, launch plans, and executions") |
| `--authorizer.organizationConfig.PolicyConfig.defaultUserPolicyRoleType` | string | name of the role type to determine which default policy new users added to the organization should be assigned (default "Viewer") |
| `--authorizer.organizationConfig.PolicyConfig.serverlessContributorPolicyDescription` | string | description for the boilerplate serverless contributor policy (default "Viewer permissions and permissions to create workflows, tasks, launch plans, and executions") |
| `--authorizer.organizationConfig.PolicyConfig.serverlessViewerPolicyDescription` | string | description for the boilerplate serverless viewer policy (default "Permissions to view Flyte entities") |
| `--authorizer.organizationConfig.PolicyConfig.viewerPolicyDescription` | string | description for the boilerplate viewer policy (default "Permissions to view Flyte entities") |
| `--authorizer.organizationConfig.defaultPolicyCacheDuration` | string | Cache entry duration for the store of the default policy per organization (default "10m0s") |
| `--authorizer.syncRuleRefreshInterval` | string | (default "1m0s") |
| `--authorizer.type` | string | (default "UserClouds") |
| `--authorizer.userCloudsClient.cache.redis.ttl.edgeTypes` | string | Specifies how long edge types remain in the cache.. (default "30m0s") |
| `--authorizer.userCloudsClient.cache.redis.ttl.edges` | string | Specifies how long edges remain in the cache. (default "30m0s") |
| `--authorizer.userCloudsClient.cache.redis.ttl.objectTypes` | string | Specifies how long object types remain in the cache. (default "30m0s") |
| `--authorizer.userCloudsClient.cache.redis.ttl.objects` | string | Specifies how long objects remain in the cache. (default "30m0s") |
| `--authorizer.userCloudsClient.cache.type` | string | Cache type to use. (default "none") |
| `--authorizer.userCloudsClient.clientID` | string | UserClouds client id |
| `--authorizer.userCloudsClient.clientSecretName` | string | UserCloud client secret name to read from the secret manager. (default "userclouds-client-secret") |
| `--authorizer.userCloudsClient.enableLogging` | | Enable userclouds client's internal logging. Calls to post logs take 250-350 ms and will impact p99 latency, enable with caution. |
| `--authorizer.userCloudsClient.tenantID` | string | UserClouds tenant id. Should be a UUID. |
| `--authorizer.userCloudsClient.tenantUrl` | string | Something like https://{yourtenant}.tenant.userclouds.com |
| `--config` | string | config file (default is /Users/andrew/.union/config.yaml) |
| `--connection.environment` | string | |
| `--connection.region` | string | |
| `--connection.rootTenantURLPattern` | string | Pattern for tenant url. (default "dns:///{{ organization }}.cloud-staging.union.ai") |
| `--console.endpoint` | string | Endpoint of console, if different than flyte admin |
| `--database.connMaxLifeTime` | string | sets the maximum amount of time a connection may be reused (default "1h0m0s") |
| `--database.enableForeignKeyConstraintWhenMigrating` | | Whether to enable gorm foreign keys when migrating the db |
| `--database.maxIdleConnections` | int | maxIdleConnections sets the maximum number of connections in the idle connection pool. (default 10) |
| `--database.maxOpenConnections` | int | maxOpenConnections sets the maximum number of open connections to the database. (default 100) |
| `--database.postgres.dbname` | string | The database name (default "postgres") |
| `--database.postgres.debug` | | |
| `--database.postgres.host` | string | The host name of the database server (default "localhost") |
| `--database.postgres.options` | string | See http://gorm.io/docs/connecting_to_the_database.html for available options passed, in addition to the above. (default "sslmode=disable") |
| `--database.postgres.password` | string | The database password. (default "postgres") |
| `--database.postgres.passwordPath` | string | Points to the file containing the database password. |
| `--database.postgres.port` | int | The port name of the database server (default 30001) |
| `--database.postgres.readReplicaHost` | string | The host name of the read replica database server (default "localhost") |
| `--database.postgres.username` | string | The database user who is connecting to the server. (default "postgres") |
| `--database.sqlite.file` | string | The path to the file (existing or new) where the DB should be created / stored. If existing, then this will be re-used, else a new will be created |
| `--db.connectionPool.maxConnectionLifetime` | string | (default "0s") |
| `--db.connectionPool.maxIdleConnections` | int | |
| `--db.connectionPool.maxOpenConnections` | int | |
| `--db.dbname` | string | (default "postgres") |
| `--db.debug` | | |
| `--db.host` | string | (default "postgres") |
| `--db.log_level` | int | (default 4) |
| `--db.options` | string | (default "sslmode=disable") |
| `--db.password` | string | |
| `--db.passwordPath` | string | |
| `--db.port` | int | (default 5432) |
| `--db.username` | string | (default "postgres") |
| `-d`, `--domain` | string | Specifies the Flyte project's domain. |
| `--files.archive` | | Pass in archive file either an http link or local path. |
| `--files.assumableIamRole` | string | Custom assumable iam auth role to register launch plans with. |
| `--files.continueOnError` | | Continue on error when registering files. |
| `--files.destinationDirectory` | string | Location of source code in container. |
| `--files.dryRun` | | Execute command without making any modifications. |
| `--files.enableSchedule` | | Enable the schedule if the files contain schedulable launchplan. |
| `--files.force` | | Force use of version number on entities registered with flyte. |
| `--files.k8ServiceAccount` | string | Deprecated. Please use `--K8sServiceAccount`|
| `--files.k8sServiceAccount` | string | Custom kubernetes service account auth role to register launch plans with. |
| `--files.outputLocationPrefix` | string | Custom output location prefix for offloaded types (files/schemas). |
| `--files.sourceUploadPath` | string | Deprecated: Update flyte admin to avoid having to configure storage access from uctl. |
| `--files.version` | string | Version of the entity to be registered with flyte which are un-versioned after serialization. |
| `--logger.formatter.type` | string | Sets logging format type. (default "json") |
| `--logger.level` | int | Sets the minimum logging level. (default 3) |
| `--logger.mute` | | Mutes all logs regardless of severity. Intended for benchmarks/tests only. |
| `--logger.show-source` | | Includes source code location in logs. |
| `--org` | string | Organization to work on. If not set, default to user's org. |
| `--otel.file.filename` | string | Filename to store exported telemetry traces (default "/tmp/trace.txt") |
| `--otel.jaeger.endpoint` | string | Endpoint for the jaeger telemetry trace ingestor (default "http://localhost:14268/api/traces") |
| `--otel.otlpgrpc.endpoint` | string | Endpoint for the OTLP telemetry trace collector (default "http://localhost:4317") |
| `--otel.otlphttp.endpoint` | string | Endpoint for the OTLP telemetry trace collector (default "http://localhost:4318/v1/traces") |
| `--otel.sampler.parentSampler` | string | Sets the parent sampler to use for the tracer (default "always") |
| `--otel.type` | string | Sets the type of exporter to configure [noop/file/jaeger/otlpgrpc/otlphttp]. (default "noop") |
| `-o`, `--output` | string | Specifies the output type - supported formats [TABLE JSON YAML DOT DOTURL]. NOTE: dot, doturl are only supported for Workflow (default "table") |
| `--plugins.catalogcache.reader.maxItems` | int | Maximum number of entries to keep in the index. (default 10000) |
| `--plugins.catalogcache.reader.maxRetries` | int | Maximum number of retries per item. (default 3) |
| `--plugins.catalogcache.reader.workers` | int | Number of concurrent workers to start processing the queue. (default 10) |
| `--plugins.catalogcache.writer.maxItems` | int | Maximum number of entries to keep in the index. (default 10000) |
| `--plugins.catalogcache.writer.maxRetries` | int | Maximum number of retries per item. (default 3) |
| `--plugins.catalogcache.writer.workers` | int | Number of concurrent workers to start processing the queue. (default 10) |
| `-p`, `--project` | string | Specifies the Flyte project. |
| `--rediscache.passwordSecretName` | string | Name of secret with Redis password. |
| `--rediscache.primaryEndpoint` | string | Primary endpoint for the redis cache that can be used for both reads and writes. |
| `--rediscache.replicaEndpoint` | string | Replica endpoint for the redis cache that can be used for reads. |
| `--secrets.env-prefix` | string | Prefix for environment variables (default "FLYTE_SECRET_") |
| `--secrets.secrets-prefix` | string | Prefix where to look for secrets file (default "/etc/secrets") |
| `--secrets.type` | string | Sets the type of storage to configure [local]. (default "local") |
| `--server.dataProxy.download.maxExpiresIn` | string | Maximum allowed expiration duration. (default "1h0m0s") |
| `--server.dataProxy.upload.defaultFileNameLength` | int | Default length for the generated file name if not provided in the request. (default 20) |
| `--server.dataProxy.upload.maxExpiresIn` | string | Maximum allowed expiration duration. (default "1h0m0s") |
| `--server.dataProxy.upload.maxSize` | string | Maximum allowed upload size. (default "6Mi") |
| `--server.dataProxy.upload.storagePrefix` | string | Storage prefix to use for all upload requests. |
| `--server.grpc.enableGrpcLatencyMetrics` | | Enable grpc latency metrics. Note Histograms metrics can be expensive on Prometheus servers. |
| `--server.grpc.maxMessageSizeBytes` | int | The max size in bytes for incoming gRPC messages |
| `--server.grpc.port` | int | On which grpc port to serve admin (default 8089) |
| `--server.grpc.serverReflection` | | Enable GRPC Server Reflection (default true) |
| `--server.grpcPort` | int | deprecated |
| `--server.grpcServerReflection` | | deprecated |
| `--server.httpPort` | int | On which http port to serve admin (default 8088) |
| `--server.kube-config` | string | Path to kubernetes client config file, default is empty, useful for incluster config. |
| `--server.kubeClientConfig.burst` | int | Max burst rate for throttle. 0 defaults to 10 (default 25) |
| `--server.kubeClientConfig.qps` | int32 | Max QPS to the master for requests to KubeAPI. 0 defaults to 5. (default 100) |
| `--server.kubeClientConfig.timeout` | string | Max duration allowed for every request to KubeAPI before giving up. 0 implies no timeout. (default "30s") |
| `--server.master` | string | The address of the Kubernetes API server. |
| `--server.readHeaderTimeoutSeconds` | int | The amount of time allowed to read request headers. (default 32) |
| `--server.security.allowCors` | | (default true) |
| `--server.security.allowedHeaders` | strings | (default [Content-Type,flyte-authorization]) |
| `--server.security.allowedOrigins` | strings | (default [*]) |
| `--server.security.auditAccess` | | |
| `--server.security.secure` | | |
| `--server.security.ssl.certificateFile` | string | |
| `--server.security.ssl.keyFile` | string | |
| `--server.security.useAuth` | | |
| `--server.thirdPartyConfig.flyteClient.audience` | string | Audience to use when initiating OAuth2 authorization requests. |
| `--server.thirdPartyConfig.flyteClient.clientId` | string | public identifier for the app which handles authorization for a Flyte deployment |
| `--server.thirdPartyConfig.flyteClient.redirectUri` | string | This is the callback uri registered with the app which handles authorization for a Flyte deployment |
| `--server.thirdPartyConfig.flyteClient.scopes` | strings | Recommended scopes for the client to request. |
| `--server.watchService.maxActiveClusterConnections` | int | (default 5) |
| `--server.watchService.maxPageSize` | int | (default 50000) |
| `--server.watchService.nonTerminalStatusUpdatesInterval` | string | (default "1m0s") |
| `--server.watchService.pollInterval` | string | (default "1s") |
| `--sharedservice.connectPort` | string | On which connect port to serve admin (default "8080") |
| `--sharedservice.grpc.grpcMaxResponseStatusBytes` | int32 | specifies the maximum (uncompressed) size of header list that the client is prepared to accept on grpc calls (default 32000) |
| `--sharedservice.grpc.maxConcurrentStreams` | int | Limit on the number of concurrent streams to each ServerTransport. (default 100) |
| `--sharedservice.grpc.maxMessageSizeBytes` | int | Limit on the size of message that can be received on the server. (default 10485760) |
| `--sharedservice.grpcServerReflection` | | Enable GRPC Server Reflection (default true) |
| `--sharedservice.httpPort` | string | On which http port to serve admin (default "8089") |
| `--sharedservice.kubeConfig` | string | Path to kubernetes client config file. |
| `--sharedservice.master` | string | The address of the Kubernetes API server. |
| `--sharedservice.metrics.enableClientGrpcHistograms` | | Enable client grpc histograms (default true) |
| `--sharedservice.metrics.enableGrpcHistograms` | | Enable grpc histograms (default true) |
| `--sharedservice.metrics.scope` | string | Scope to emit metrics under (default "service:") |
| `--sharedservice.port` | string | On which grpc port to serve admin (default "8080") |
| `--sharedservice.profiler.enabled` | | Enable Profiler on server |
| `--sharedservice.profilerPort` | string | Profile port to start listen for pprof and metric handlers on. (default "10254") |
| `--sharedservice.security.allowCors` | | |
| `--sharedservice.security.allowLocalhostAccess` | | Whether to permit localhost unauthenticated access to the server |
| `--sharedservice.security.allowedHeaders` | strings | |
| `--sharedservice.security.allowedOrigins` | strings | |
| `--sharedservice.security.auditAccess` | | |
| `--sharedservice.security.orgOverride` | string | Override org in identity context if localhost access enabled |
| `--sharedservice.security.secure` | | |
| `--sharedservice.security.ssl.certificateAuthorityFile` | string | |
| `--sharedservice.security.ssl.certificateFile` | string | |
| `--sharedservice.security.ssl.keyFile` | string | |
| `--sharedservice.security.useAuth` | | |
| `--sharedservice.sync.syncInterval` | string | Time interval to sync (default "5m0s") |
| `--storage.cache.max_size_mbs` | int | Maximum size of the cache where the Blob store data is cached in-memory. If not specified or set to 0, cache is not used |
| `--storage.cache.target_gc_percent` | int | Sets the garbage collection target percentage. |
| `--storage.connection.access-key` | string | Access key to use. Only required when authtype is set to accesskey. |
| `--storage.connection.auth-type` | string | Auth Type to use [iam, accesskey]. (default "iam") |
| `--storage.connection.disable-ssl` | | Disables SSL connection. Should only be used for development. |
| `--storage.connection.endpoint` | string | URL for storage client to connect to. |
| `--storage.connection.region` | string | Region to connect to. (default "us-east-1") |
| `--storage.connection.secret-key` | string | Secret to use when accesskey is set. |
| `--storage.container` | string | Initial container (in s3 a bucket) to create -if it doesn't exist-.' |
| `--storage.defaultHttpClient.timeout` | string | Sets time out on the http client. (default "0s") |
| `--storage.enable-multicontainer` | | If this is true, then the container argument is overlooked and redundant. This config will automatically open new connections to new containers/buckets as they are encountered |
| `--storage.limits.maxDownloadMBs` | int | Maximum allowed download size (in MBs) per call. (default 2) |
| `--storage.stow.config` | stringToString | Configuration for stow backend. Refer to github/flyteorg/stow (default []) |
| `--storage.stow.kind` | string | Kind of Stow backend to use. Refer to github/flyteorg/stow |
| `--storage.type` | string | Sets the type of storage to configure [s3/minio/local/mem/stow]. (default "s3") |
| `--union.auth.authorizationMetadataKey` | string | Authorization Header to use when passing Access Tokens to the server (default "flyte-authorization") |
| `--union.auth.clientId` | string | Client ID |
| `--union.auth.clientSecretEnvVar` | string | Environment variable containing the client secret |
| `--union.auth.clientSecretLocation` | string | File containing the client secret |
| `--union.auth.deviceFlow.pollInterval` | string | amount of time the device flow would poll the token endpoint if auth server doesn't return a polling interval. Okta and google IDP do return an interval' (default "5s") |
| `--union.auth.deviceFlow.refreshTime` | string | grace period from the token expiry after which it would refresh the token. (default "5m0s") |
| `--union.auth.deviceFlow.timeout` | string | amount of time the device flow should complete or else it will be cancelled. (default "10m0s") |
| `--union.auth.enable` | | Whether to enable an authenticated conenction when communicating with admin. (default true) |
| `--union.auth.externalAuth.command` | strings | Command for external authentication token generation |
| `--union.auth.pkce.refreshTime` | string | grace period from the token expiry after which it would refresh the token. (default "5m0s") |
| `--union.auth.pkce.timeout` | string | Amount of time the browser session would be active for authentication from client app. (default "15s") |
| `--union.auth.scopes` | strings | List of scopes to request |
| `--union.auth.tokenRefreshWindow` | string | Max duration between token refresh attempt and token expiry. (default "1h0m0s") |
| `--union.auth.tokenUrl` | string | OPTIONAL: Your IdP's token endpoint. It'll be discovered from flyte admin's OAuth Metadata endpoint if not provided. |
| `--union.auth.type` | string | Type of OAuth2 flow used for communicating with admin. (default "Pkce") |
| `--union.cache.maxItemsCount` | int | Maximum number of items to keep in the cache before evicting. (default 1000) |
| `--union.connection.host` | string | Host to connect to (default "dns:///utt-mgdp-stg-us-east-2.cloud-staging.union.ai") |
| `--union.connection.insecure` | | Whether to connect over insecure channel |
| `--union.connection.insecureSkipVerify` | | InsecureSkipVerify controls whether a client verifies the server's certificate chain and host name.Caution: shouldn't be use for production usecases' |
| `--union.connection.keepAliveConfig.permitWithoutStream` | | If true, client sends keepalive pings even with no active RPCs. |
| `--union.connection.keepAliveConfig.time` | string | After a duration of this time if the client doesn't see any activity it pings the server to see if the transport is still alive. (default "20s") |
| `--union.connection.keepAliveConfig.timeout` | string | After having pinged for keepalive check, the client waits for a duration of Timeout and if no activity is seen even after that the connection is closed. (default "2m0s") |
| `--union.connection.maxBackoffDelay` | string | Max delay for grpc backoff (default "8s") |
| `--union.connection.maxRecvMsgSize` | int | Maximum size of a message in bytes of a gRPC message (default 10485760) |
| `--union.connection.maxRetries` | int | Max number of gRPC retries (default 4) |
| `--union.connection.minConnectTimeout` | string | Minimum timeout for establishing a connection (default "20s") |
| `--union.connection.perRetryTimeout` | string | gRPC per retry timeout (default "15s") |
| `--union.connection.serviceConfig` | string | Defines gRPC experimental JSON Service Config (default "{"loadBalancingConfig": [{"round_robin":{}}]}") |
| `--union.connection.trustedIdentityClaims.enabled` | | Enables passing of trusted claims while making inter service calls |
| `--union.connection.trustedIdentityClaims.externalIdentityClaim` | string | External identity claim of the service which is authorized to make internal service call. These are verified against userclouds actions |
| `--union.connection.trustedIdentityClaims.externalIdentityTypeClaim` | string | External identity type claim of app or user to use for the current service identity. It should be an 'app' for inter service communication |
| `--union.internalConnectionConfig.-` | stringToString | (default []) |
| `--union.internalConnectionConfig.enabled` | | Enables internal service to service communication instead of going through ingress. |
| `--union.internalConnectionConfig.urlPattern` | string | UrlPattern of the internal service endpoints. (default "{{ service }}-helmchart.{{ service }}.svc.cluster.local:80") |
| `--webhook.awsSecretManager.sidecarImage` | string | Specifies the sidecar docker image to use (default "docker.io/amazon/aws-secrets-manager-secret-sidecar:v0.1.4") |
| `--webhook.certDir` | string | Certificate directory to use to write generated certs. Defaults to /etc/webhook/certs/ (default "/etc/webhook/certs") |
| `--webhook.embeddedSecretManagerConfig.awsConfig.region` | string | AWS region |
| `--webhook.embeddedSecretManagerConfig.fileMountInitContainer.image` | string | Specifies init container image to use for mounting secrets as files. (default "busybox:1.28") |
| `--webhook.embeddedSecretManagerConfig.gcpConfig.project` | string | GCP project to be used for secret manager |
| `--webhook.embeddedSecretManagerConfig.type` | string | (default "AWS") |
| `--webhook.gcpSecretManager.sidecarImage` | string | Specifies the sidecar docker image to use (default "gcr.io/google.com/cloudsdktool/cloud-sdk:alpine") |
| `--webhook.listenPort` | int | The port to use to listen to webhook calls. Defaults to 9443 (default 9443) |
| `--webhook.localCert` | | write certs locally. Defaults to false |
| `--webhook.metrics-prefix` | string | An optional prefix for all published metrics. (default "flyte:") |
| `--webhook.secretName` | string | Secret name to write generated certs to. (default "flyte-pod-webhook") |
| `--webhook.serviceName` | string | The name of the webhook service. (default "flyte-pod-webhook") |
| `--webhook.servicePort` | int32 | The port on the service that hosting webhook. (default 443) |
| `--webhook.vaultSecretManager.role` | string | Specifies the vault role to use (default "flyte") |
=== PAGE: https://www.union.ai/docs/v1/serverless/api-reference/uctl-cli/uctl-update/uctl-update-launchplan-meta ===
# uctl update launchplan-meta
Updates the launch plan metadata
## Synopsis
Update the description on the launch plan:
```shell
$ uctl update launchplan-meta -p flytesnacks -d development core.advanced.merge_sort.merge_sort --description "Mergesort example"
```
Archiving launch plan named entity is not supported and would throw an
error:
```shell
$ uctl update launchplan-meta -p flytesnacks -d development core.advanced.merge_sort.merge_sort --archive
```
Activating launch plan named entity would be a noop:
```shell
$ uctl update launchplan-meta -p flytesnacks -d development core.advanced.merge_sort.merge_sort --activate
```
Usage:
```shell
$ uctl update launchplan-meta [flags]
```
## Options
| Option | Type | Description |
|--------|------|-------------|
| `--activate` | | activate the named entity. |
| Option | Type | Description |
|--------|------|-------------|
| `--archive` | | archive named entity. |
| Option | Type | Description |
|--------|------|-------------|
| `--description` | string | description of the named entity. |
| `--dryRun` | | execute command without making any modifications. |
| `--force` | | do not ask for an acknowledgement during updates. |
| `-h`, `--help` | help for launchplan-meta |
### Options inherited from parent commands
| Option | Type | Description |
|--------|------|-------------|
| `--admin.audience` | string | Audience to use when initiating OAuth2 authorization requests. |
| `--admin.authType` | string | Type of OAuth2 flow used for communicating with admin.ClientSecret, Pkce, ExternalCommand are valid values (default "ClientSecret") |
| `--admin.authorizationHeader` | string | Custom metadata header to pass JWT |
| `--admin.authorizationServerUrl` | string | This is the URL to your IdP's authorization server. It'll default to Endpoint |
| `--admin.caCertFilePath` | string | Use specified certificate file to verify the admin server peer. |
| `--admin.clientId` | string | Client ID (default "flytepropeller") |
| `--admin.clientSecretEnvVar` | string | Environment variable containing the client secret |
| `--admin.clientSecretLocation` | string | File containing the client secret (default "/etc/secrets/client_secret") |
| `--admin.command` | strings | Command for external authentication token generation |
| `--admin.defaultOrg` | string | OPTIONAL: Default org to use to support non-org based cli's.'. |
| `--admin.defaultServiceConfig` | string | |
| `--admin.deviceFlowConfig.pollInterval` | string | amount of time the device flow would poll the token endpoint if auth server doesn't return a polling interval. Okta and google IDP do return an interval' (default "5s") |
| `--admin.deviceFlowConfig.refreshTime` | string | grace period from the token expiry after which it would refresh the token. (default "5m0s") |
| `--admin.deviceFlowConfig.timeout` | string | amount of time the device flow should complete or else it will be cancelled. (default "10m0s") |
| `--admin.endpoint` | string | For admin types, specify where the uri of the service is located. |
| `--admin.httpProxyURL` | string | OPTIONAL: HTTP Proxy to be used for OAuth requests. |
| `--admin.insecure` | | Use insecure connection. |
| `--admin.insecureSkipVerify` | | InsecureSkipVerify controls whether a client verifies the server's certificate chain and host name.Caution: shouldn't be use for production usecases' |
| `--admin.maxBackoffDelay` | string | Max delay for grpc backoff (default "8s") |
| `--admin.maxMessageSizeBytes` | int | The max size in bytes for incoming gRPC messages |
| `--admin.maxRetries` | int | Max number of gRPC retries (default 4) |
| `--admin.perRetryTimeout` | string | gRPC per retry timeout (default "15s") |
| `--admin.pkceConfig.refreshTime` | string | grace period from the token expiry after which it would refresh the token. (default "5m0s") |
| `--admin.pkceConfig.timeout` | string | Amount of time the browser session would be active for authentication from client app. (default "2m0s") |
| `--admin.proxyCommand` | strings | Command for external proxy-authorization token generation |
| `--admin.scopes` | strings | List of scopes to request |
| `--admin.tokenRefreshWindow` | string | Max duration between token refresh attempt and token expiry. (default "0s") |
| `--admin.tokenUrl` | string | OPTIONAL: Your IdP's token endpoint. It'll be discovered from flyte admin's OAuth Metadata endpoint if not provided. |
| `--admin.useAudienceFromAdmin` | | Use Audience configured from admins public endpoint config. |
| `--admin.useAuth` | | Deprecated: Auth will be enabled/disabled based on admin's dynamically discovered information. |
| `--auth.appAuth.externalAuthServer.allowedAudience` | strings | Optional: A list of allowed audiences. If not provided, the audience is expected to be the public Uri of the service. |
| `--auth.appAuth.externalAuthServer.baseUrl` | string | This should be the base url of the authorization server that you are trying to hit. With Okta for instance, it will look something like https://company.okta.com/oauth2/abcdef123456789/ |
| `--auth.appAuth.externalAuthServer.httpProxyURL` | string | OPTIONAL: HTTP Proxy to be used for OAuth requests. |
| `--auth.appAuth.externalAuthServer.metadataUrl` | string | Optional: If the server doesn't support /.well-known/oauth-authorization-server, you can set a custom metadata url here.' |
| `--auth.appAuth.externalAuthServer.retryAttempts` | int | Optional: The number of attempted retries on a transient failure to get the OAuth metadata (default 5) |
| `--auth.appAuth.externalAuthServer.retryDelay` | string | Optional, Duration to wait between retries (default "1s") |
| `--auth.appAuth.selfAuthServer.accessTokenLifespan` | string | Defines the lifespan of issued access tokens. (default "30m0s") |
| `--auth.appAuth.selfAuthServer.authorizationCodeLifespan` | string | Defines the lifespan of issued access tokens. (default "5m0s") |
| `--auth.appAuth.selfAuthServer.claimSymmetricEncryptionKeySecretName` | string | OPTIONAL: Secret name to use to encrypt claims in authcode token. (default "claim_symmetric_key") |
| `--auth.appAuth.selfAuthServer.issuer` | string | Defines the issuer to use when issuing and validating tokens. The default value is https://{requestUri.HostAndPort}/ |
| `--auth.appAuth.selfAuthServer.oldTokenSigningRSAKeySecretName` | string | OPTIONAL: Secret name to use to retrieve Old RSA Signing Key. This can be useful during key rotation to continue to accept older tokens. (default "token_rsa_key_old.pem") |
| `--auth.appAuth.selfAuthServer.refreshTokenLifespan` | string | Defines the lifespan of issued access tokens. (default "1h0m0s") |
| `--auth.appAuth.selfAuthServer.tokenSigningRSAKeySecretName` | string | OPTIONAL: Secret name to use to retrieve RSA Signing Key. (default "token_rsa_key.pem") |
| `--auth.appAuth.thirdPartyConfig.flyteClient.audience` | string | Audience to use when initiating OAuth2 authorization requests. |
| `--auth.appAuth.thirdPartyConfig.flyteClient.clientId` | string | public identifier for the app which handles authorization for a Flyte deployment (default "uctl") |
| `--auth.appAuth.thirdPartyConfig.flyteClient.redirectUri` | string | This is the callback uri registered with the app which handles authorization for a Flyte deployment (default "http://localhost:53593/callback") |
| `--auth.appAuth.thirdPartyConfig.flyteClient.scopes` | strings | Recommended scopes for the client to request. (default [all,offline]) |
| `--auth.disableForGrpc` | | Disables auth enforcement on Grpc Endpoints. |
| `--auth.disableForHttp` | | Disables auth enforcement on HTTP Endpoints. |
| `--auth.grpcAuthorizationHeader` | string | (default "flyte-authorization") |
| `--auth.httpAuthorizationHeader` | string | (default "flyte-authorization") |
| `--auth.httpProxyURL` | string | OPTIONAL: HTTP Proxy to be used for OAuth requests. |
| `--auth.tokenEndpointProxyPath` | string | The path used to proxy calls to the TokenURL |
| `--auth.userAuth.cookieBlockKeySecretName` | string | OPTIONAL: Secret name to use for cookie block key. (default "cookie_block_key") |
| `--auth.userAuth.cookieHashKeySecretName` | string | OPTIONAL: Secret name to use for cookie hash key. (default "cookie_hash_key") |
| `--auth.userAuth.cookieSetting.domain` | string | OPTIONAL: Allows you to set the domain attribute on the auth cookies. |
| `--auth.userAuth.cookieSetting.sameSitePolicy` | string | OPTIONAL: Allows you to declare if your cookie should be restricted to a first-party or same-site context.Wrapper around http.SameSite. (default "DefaultMode") |
| `--auth.userAuth.httpProxyURL` | string | OPTIONAL: HTTP Proxy to be used for OAuth requests. |
| `--auth.userAuth.idpQueryParameter` | string | idp query parameter used for selecting a particular IDP for doing user authentication. Eg: for Okta passing idp={IDP-ID} forces the authentication to happen with IDP-ID |
| `--auth.userAuth.openId.baseUrl` | string | |
| `--auth.userAuth.openId.clientId` | string | |
| `--auth.userAuth.openId.clientSecretFile` | string | |
| `--auth.userAuth.openId.clientSecretName` | string | (default "oidc_client_secret") |
| `--auth.userAuth.openId.scopes` | strings | (default [openid,profile]) |
| `--auth.userAuth.redirectUrl` | string | (default "/console") |
| `--authorizer.internalCommunicationConfig.enabled` | | Enables authorization decisions for internal communication. (default true) |
| `--authorizer.internalCommunicationConfig.ingressIdentity` | string | IngressIdentity used in the cluster. Needed to exclude the communication coming from ingress. (default "ingress-nginx.ingress-nginx.serviceaccount.identity.linkerd.cluster.local") |
| `--authorizer.internalCommunicationConfig.tenantUrlPatternIdentity` | string | UrlPatternIdentity of the internal tenant service endpoint identities. (default "{{ service }}.{{ org }}.serviceaccount.identity.linkerd.cluster.local") |
| `--authorizer.internalCommunicationConfig.urlPatternIdentity` | string | UrlPatternIdentity of the internal service endpoint identities. (default "{{ service }}-helmchart.{{ service }}.serviceaccount.identity.linkerd.cluster.local") |
| `--authorizer.mode` | string | (default "Active") |
| `--authorizer.organizationConfig.PolicyConfig.adminPolicyDescription` | string | description for the boilerplate admin policy (default "Contributor permissions and full admin permissions to manage users and view usage dashboards") |
| `--authorizer.organizationConfig.PolicyConfig.contributorPolicyDescription` | string | description for the boilerplate contributor policy (default "Viewer permissions and permissions to create workflows, tasks, launch plans, and executions") |
| `--authorizer.organizationConfig.PolicyConfig.defaultUserPolicyRoleType` | string | name of the role type to determine which default policy new users added to the organization should be assigned (default "Viewer") |
| `--authorizer.organizationConfig.PolicyConfig.serverlessContributorPolicyDescription` | string | description for the boilerplate serverless contributor policy (default "Viewer permissions and permissions to create workflows, tasks, launch plans, and executions") |
| `--authorizer.organizationConfig.PolicyConfig.serverlessViewerPolicyDescription` | string | description for the boilerplate serverless viewer policy (default "Permissions to view Flyte entities") |
| `--authorizer.organizationConfig.PolicyConfig.viewerPolicyDescription` | string | description for the boilerplate viewer policy (default "Permissions to view Flyte entities") |
| `--authorizer.organizationConfig.defaultPolicyCacheDuration` | string | Cache entry duration for the store of the default policy per organization (default "10m0s") |
| `--authorizer.syncRuleRefreshInterval` | string | (default "1m0s") |
| `--authorizer.type` | string | (default "UserClouds") |
| `--authorizer.userCloudsClient.cache.redis.ttl.edgeTypes` | string | Specifies how long edge types remain in the cache.. (default "30m0s") |
| `--authorizer.userCloudsClient.cache.redis.ttl.edges` | string | Specifies how long edges remain in the cache. (default "30m0s") |
| `--authorizer.userCloudsClient.cache.redis.ttl.objectTypes` | string | Specifies how long object types remain in the cache. (default "30m0s") |
| `--authorizer.userCloudsClient.cache.redis.ttl.objects` | string | Specifies how long objects remain in the cache. (default "30m0s") |
| `--authorizer.userCloudsClient.cache.type` | string | Cache type to use. (default "none") |
| `--authorizer.userCloudsClient.clientID` | string | UserClouds client id |
| `--authorizer.userCloudsClient.clientSecretName` | string | UserCloud client secret name to read from the secret manager. (default "userclouds-client-secret") |
| `--authorizer.userCloudsClient.enableLogging` | | Enable userclouds client's internal logging. Calls to post logs take 250-350 ms and will impact p99 latency, enable with caution. |
| `--authorizer.userCloudsClient.tenantID` | string | UserClouds tenant id. Should be a UUID. |
| `--authorizer.userCloudsClient.tenantUrl` | string | Something like https://{yourtenant}.tenant.userclouds.com |
| `--config` | string | config file (default is /Users/andrew/.union/config.yaml) |
| `--connection.environment` | string | |
| `--connection.region` | string | |
| `--connection.rootTenantURLPattern` | string | Pattern for tenant url. (default "dns:///{{ organization }}.cloud-staging.union.ai") |
| `--console.endpoint` | string | Endpoint of console, if different than flyte admin |
| `--database.connMaxLifeTime` | string | sets the maximum amount of time a connection may be reused (default "1h0m0s") |
| `--database.enableForeignKeyConstraintWhenMigrating` | | Whether to enable gorm foreign keys when migrating the db |
| `--database.maxIdleConnections` | int | maxIdleConnections sets the maximum number of connections in the idle connection pool. (default 10) |
| `--database.maxOpenConnections` | int | maxOpenConnections sets the maximum number of open connections to the database. (default 100) |
| `--database.postgres.dbname` | string | The database name (default "postgres") |
| `--database.postgres.debug` | | |
| `--database.postgres.host` | string | The host name of the database server (default "localhost") |
| `--database.postgres.options` | string | See http://gorm.io/docs/connecting_to_the_database.html for available options passed, in addition to the above. (default "sslmode=disable") |
| `--database.postgres.password` | string | The database password. (default "postgres") |
| `--database.postgres.passwordPath` | string | Points to the file containing the database password. |
| `--database.postgres.port` | int | The port name of the database server (default 30001) |
| `--database.postgres.readReplicaHost` | string | The host name of the read replica database server (default "localhost") |
| `--database.postgres.username` | string | The database user who is connecting to the server. (default "postgres") |
| `--database.sqlite.file` | string | The path to the file (existing or new) where the DB should be created / stored. If existing, then this will be re-used, else a new will be created |
| `--db.connectionPool.maxConnectionLifetime` | string | (default "0s") |
| `--db.connectionPool.maxIdleConnections` | int | |
| `--db.connectionPool.maxOpenConnections` | int | |
| `--db.dbname` | string | (default "postgres") |
| `--db.debug` | | |
| `--db.host` | string | (default "postgres") |
| `--db.log_level` | int | (default 4) |
| `--db.options` | string | (default "sslmode=disable") |
| `--db.password` | string | |
| `--db.passwordPath` | string | |
| `--db.port` | int | (default 5432) |
| `--db.username` | string | (default "postgres") |
| `-d`, `--domain` | string | Specifies the Flyte project's domain. |
| `--files.archive` | | Pass in archive file either an http link or local path. |
| `--files.assumableIamRole` | string | Custom assumable iam auth role to register launch plans with. |
| `--files.continueOnError` | | Continue on error when registering files. |
| `--files.destinationDirectory` | string | Location of source code in container. |
| `--files.dryRun` | | Execute command without making any modifications. |
| `--files.enableSchedule` | | Enable the schedule if the files contain schedulable launchplan. |
| `--files.force` | | Force use of version number on entities registered with flyte. |
| `--files.k8ServiceAccount` | string | Deprecated. Please use `--K8sServiceAccount`|
| `--files.k8sServiceAccount` | string | Custom kubernetes service account auth role to register launch plans with. |
| `--files.outputLocationPrefix` | string | Custom output location prefix for offloaded types (files/schemas). |
| `--files.sourceUploadPath` | string | Deprecated: Update flyte admin to avoid having to configure storage access from uctl. |
| `--files.version` | string | Version of the entity to be registered with flyte which are un-versioned after serialization. |
| `--logger.formatter.type` | string | Sets logging format type. (default "json") |
| `--logger.level` | int | Sets the minimum logging level. (default 3) |
| `--logger.mute` | | Mutes all logs regardless of severity. Intended for benchmarks/tests only. |
| `--logger.show-source` | | Includes source code location in logs. |
| `--org` | string | Organization to work on. If not set, default to user's org. |
| `--otel.file.filename` | string | Filename to store exported telemetry traces (default "/tmp/trace.txt") |
| `--otel.jaeger.endpoint` | string | Endpoint for the jaeger telemetry trace ingestor (default "http://localhost:14268/api/traces") |
| `--otel.otlpgrpc.endpoint` | string | Endpoint for the OTLP telemetry trace collector (default "http://localhost:4317") |
| `--otel.otlphttp.endpoint` | string | Endpoint for the OTLP telemetry trace collector (default "http://localhost:4318/v1/traces") |
| `--otel.sampler.parentSampler` | string | Sets the parent sampler to use for the tracer (default "always") |
| `--otel.type` | string | Sets the type of exporter to configure [noop/file/jaeger/otlpgrpc/otlphttp]. (default "noop") |
| `-o`, `--output` | string | Specifies the output type - supported formats [TABLE JSON YAML DOT DOTURL]. NOTE: dot, doturl are only supported for Workflow (default "table") |
| `--plugins.catalogcache.reader.maxItems` | int | Maximum number of entries to keep in the index. (default 10000) |
| `--plugins.catalogcache.reader.maxRetries` | int | Maximum number of retries per item. (default 3) |
| `--plugins.catalogcache.reader.workers` | int | Number of concurrent workers to start processing the queue. (default 10) |
| `--plugins.catalogcache.writer.maxItems` | int | Maximum number of entries to keep in the index. (default 10000) |
| `--plugins.catalogcache.writer.maxRetries` | int | Maximum number of retries per item. (default 3) |
| `--plugins.catalogcache.writer.workers` | int | Number of concurrent workers to start processing the queue. (default 10) |
| `-p`, `--project` | string | Specifies the Flyte project. |
| `--rediscache.passwordSecretName` | string | Name of secret with Redis password. |
| `--rediscache.primaryEndpoint` | string | Primary endpoint for the redis cache that can be used for both reads and writes. |
| `--rediscache.replicaEndpoint` | string | Replica endpoint for the redis cache that can be used for reads. |
| `--secrets.env-prefix` | string | Prefix for environment variables (default "FLYTE_SECRET_") |
| `--secrets.secrets-prefix` | string | Prefix where to look for secrets file (default "/etc/secrets") |
| `--secrets.type` | string | Sets the type of storage to configure [local]. (default "local") |
| `--server.dataProxy.download.maxExpiresIn` | string | Maximum allowed expiration duration. (default "1h0m0s") |
| `--server.dataProxy.upload.defaultFileNameLength` | int | Default length for the generated file name if not provided in the request. (default 20) |
| `--server.dataProxy.upload.maxExpiresIn` | string | Maximum allowed expiration duration. (default "1h0m0s") |
| `--server.dataProxy.upload.maxSize` | string | Maximum allowed upload size. (default "6Mi") |
| `--server.dataProxy.upload.storagePrefix` | string | Storage prefix to use for all upload requests. |
| `--server.grpc.enableGrpcLatencyMetrics` | | Enable grpc latency metrics. Note Histograms metrics can be expensive on Prometheus servers. |
| `--server.grpc.maxMessageSizeBytes` | int | The max size in bytes for incoming gRPC messages |
| `--server.grpc.port` | int | On which grpc port to serve admin (default 8089) |
| `--server.grpc.serverReflection` | | Enable GRPC Server Reflection (default true) |
| `--server.grpcPort` | int | deprecated |
| `--server.grpcServerReflection` | | deprecated |
| `--server.httpPort` | int | On which http port to serve admin (default 8088) |
| `--server.kube-config` | string | Path to kubernetes client config file, default is empty, useful for incluster config. |
| `--server.kubeClientConfig.burst` | int | Max burst rate for throttle. 0 defaults to 10 (default 25) |
| `--server.kubeClientConfig.qps` | int32 | Max QPS to the master for requests to KubeAPI. 0 defaults to 5. (default 100) |
| `--server.kubeClientConfig.timeout` | string | Max duration allowed for every request to KubeAPI before giving up. 0 implies no timeout. (default "30s") |
| `--server.master` | string | The address of the Kubernetes API server. |
| `--server.readHeaderTimeoutSeconds` | int | The amount of time allowed to read request headers. (default 32) |
| `--server.security.allowCors` | | (default true) |
| `--server.security.allowedHeaders` | strings | (default [Content-Type,flyte-authorization]) |
| `--server.security.allowedOrigins` | strings | (default [*]) |
| `--server.security.auditAccess` | | |
| `--server.security.secure` | | |
| `--server.security.ssl.certificateFile` | string | |
| `--server.security.ssl.keyFile` | string | |
| `--server.security.useAuth` | | |
| `--server.thirdPartyConfig.flyteClient.audience` | string | Audience to use when initiating OAuth2 authorization requests. |
| `--server.thirdPartyConfig.flyteClient.clientId` | string | public identifier for the app which handles authorization for a Flyte deployment |
| `--server.thirdPartyConfig.flyteClient.redirectUri` | string | This is the callback uri registered with the app which handles authorization for a Flyte deployment |
| `--server.thirdPartyConfig.flyteClient.scopes` | strings | Recommended scopes for the client to request. |
| `--server.watchService.maxActiveClusterConnections` | int | (default 5) |
| `--server.watchService.maxPageSize` | int | (default 50000) |
| `--server.watchService.nonTerminalStatusUpdatesInterval` | string | (default "1m0s") |
| `--server.watchService.pollInterval` | string | (default "1s") |
| `--sharedservice.connectPort` | string | On which connect port to serve admin (default "8080") |
| `--sharedservice.grpc.grpcMaxResponseStatusBytes` | int32 | specifies the maximum (uncompressed) size of header list that the client is prepared to accept on grpc calls (default 32000) |
| `--sharedservice.grpc.maxConcurrentStreams` | int | Limit on the number of concurrent streams to each ServerTransport. (default 100) |
| `--sharedservice.grpc.maxMessageSizeBytes` | int | Limit on the size of message that can be received on the server. (default 10485760) |
| `--sharedservice.grpcServerReflection` | | Enable GRPC Server Reflection (default true) |
| `--sharedservice.httpPort` | string | On which http port to serve admin (default "8089") |
| `--sharedservice.kubeConfig` | string | Path to kubernetes client config file. |
| `--sharedservice.master` | string | The address of the Kubernetes API server. |
| `--sharedservice.metrics.enableClientGrpcHistograms` | | Enable client grpc histograms (default true) |
| `--sharedservice.metrics.enableGrpcHistograms` | | Enable grpc histograms (default true) |
| `--sharedservice.metrics.scope` | string | Scope to emit metrics under (default "service:") |
| `--sharedservice.port` | string | On which grpc port to serve admin (default "8080") |
| `--sharedservice.profiler.enabled` | | Enable Profiler on server |
| `--sharedservice.profilerPort` | string | Profile port to start listen for pprof and metric handlers on. (default "10254") |
| `--sharedservice.security.allowCors` | | |
| `--sharedservice.security.allowLocalhostAccess` | | Whether to permit localhost unauthenticated access to the server |
| `--sharedservice.security.allowedHeaders` | strings | |
| `--sharedservice.security.allowedOrigins` | strings | |
| `--sharedservice.security.auditAccess` | | |
| `--sharedservice.security.orgOverride` | string | Override org in identity context if localhost access enabled |
| `--sharedservice.security.secure` | | |
| `--sharedservice.security.ssl.certificateAuthorityFile` | string | |
| `--sharedservice.security.ssl.certificateFile` | string | |
| `--sharedservice.security.ssl.keyFile` | string | |
| `--sharedservice.security.useAuth` | | |
| `--sharedservice.sync.syncInterval` | string | Time interval to sync (default "5m0s") |
| `--storage.cache.max_size_mbs` | int | Maximum size of the cache where the Blob store data is cached in-memory. If not specified or set to 0, cache is not used |
| `--storage.cache.target_gc_percent` | int | Sets the garbage collection target percentage. |
| `--storage.connection.access-key` | string | Access key to use. Only required when authtype is set to accesskey. |
| `--storage.connection.auth-type` | string | Auth Type to use [iam, accesskey]. (default "iam") |
| `--storage.connection.disable-ssl` | | Disables SSL connection. Should only be used for development. |
| `--storage.connection.endpoint` | string | URL for storage client to connect to. |
| `--storage.connection.region` | string | Region to connect to. (default "us-east-1") |
| `--storage.connection.secret-key` | string | Secret to use when accesskey is set. |
| `--storage.container` | string | Initial container (in s3 a bucket) to create -if it doesn't exist-.' |
| `--storage.defaultHttpClient.timeout` | string | Sets time out on the http client. (default "0s") |
| `--storage.enable-multicontainer` | | If this is true, then the container argument is overlooked and redundant. This config will automatically open new connections to new containers/buckets as they are encountered |
| `--storage.limits.maxDownloadMBs` | int | Maximum allowed download size (in MBs) per call. (default 2) |
| `--storage.stow.config` | stringToString | Configuration for stow backend. Refer to github/flyteorg/stow (default []) |
| `--storage.stow.kind` | string | Kind of Stow backend to use. Refer to github/flyteorg/stow |
| `--storage.type` | string | Sets the type of storage to configure [s3/minio/local/mem/stow]. (default "s3") |
| `--union.auth.authorizationMetadataKey` | string | Authorization Header to use when passing Access Tokens to the server (default "flyte-authorization") |
| `--union.auth.clientId` | string | Client ID |
| `--union.auth.clientSecretEnvVar` | string | Environment variable containing the client secret |
| `--union.auth.clientSecretLocation` | string | File containing the client secret |
| `--union.auth.deviceFlow.pollInterval` | string | amount of time the device flow would poll the token endpoint if auth server doesn't return a polling interval. Okta and google IDP do return an interval' (default "5s") |
| `--union.auth.deviceFlow.refreshTime` | string | grace period from the token expiry after which it would refresh the token. (default "5m0s") |
| `--union.auth.deviceFlow.timeout` | string | amount of time the device flow should complete or else it will be cancelled. (default "10m0s") |
| `--union.auth.enable` | | Whether to enable an authenticated conenction when communicating with admin. (default true) |
| `--union.auth.externalAuth.command` | strings | Command for external authentication token generation |
| `--union.auth.pkce.refreshTime` | string | grace period from the token expiry after which it would refresh the token. (default "5m0s") |
| `--union.auth.pkce.timeout` | string | Amount of time the browser session would be active for authentication from client app. (default "15s") |
| `--union.auth.scopes` | strings | List of scopes to request |
| `--union.auth.tokenRefreshWindow` | string | Max duration between token refresh attempt and token expiry. (default "1h0m0s") |
| `--union.auth.tokenUrl` | string | OPTIONAL: Your IdP's token endpoint. It'll be discovered from flyte admin's OAuth Metadata endpoint if not provided. |
| `--union.auth.type` | string | Type of OAuth2 flow used for communicating with admin. (default "Pkce") |
| `--union.cache.maxItemsCount` | int | Maximum number of items to keep in the cache before evicting. (default 1000) |
| `--union.connection.host` | string | Host to connect to (default "dns:///utt-mgdp-stg-us-east-2.cloud-staging.union.ai") |
| `--union.connection.insecure` | | Whether to connect over insecure channel |
| `--union.connection.insecureSkipVerify` | | InsecureSkipVerify controls whether a client verifies the server's certificate chain and host name.Caution: shouldn't be use for production usecases' |
| `--union.connection.keepAliveConfig.permitWithoutStream` | | If true, client sends keepalive pings even with no active RPCs. |
| `--union.connection.keepAliveConfig.time` | string | After a duration of this time if the client doesn't see any activity it pings the server to see if the transport is still alive. (default "20s") |
| `--union.connection.keepAliveConfig.timeout` | string | After having pinged for keepalive check, the client waits for a duration of Timeout and if no activity is seen even after that the connection is closed. (default "2m0s") |
| `--union.connection.maxBackoffDelay` | string | Max delay for grpc backoff (default "8s") |
| `--union.connection.maxRecvMsgSize` | int | Maximum size of a message in bytes of a gRPC message (default 10485760) |
| `--union.connection.maxRetries` | int | Max number of gRPC retries (default 4) |
| `--union.connection.minConnectTimeout` | string | Minimum timeout for establishing a connection (default "20s") |
| `--union.connection.perRetryTimeout` | string | gRPC per retry timeout (default "15s") |
| `--union.connection.serviceConfig` | string | Defines gRPC experimental JSON Service Config (default "{"loadBalancingConfig": [{"round_robin":{}}]}") |
| `--union.connection.trustedIdentityClaims.enabled` | | Enables passing of trusted claims while making inter service calls |
| `--union.connection.trustedIdentityClaims.externalIdentityClaim` | string | External identity claim of the service which is authorized to make internal service call. These are verified against userclouds actions |
| `--union.connection.trustedIdentityClaims.externalIdentityTypeClaim` | string | External identity type claim of app or user to use for the current service identity. It should be an 'app' for inter service communication |
| `--union.internalConnectionConfig.-` | stringToString | (default []) |
| `--union.internalConnectionConfig.enabled` | | Enables internal service to service communication instead of going through ingress. |
| `--union.internalConnectionConfig.urlPattern` | string | UrlPattern of the internal service endpoints. (default "{{ service }}-helmchart.{{ service }}.svc.cluster.local:80") |
| `--webhook.awsSecretManager.sidecarImage` | string | Specifies the sidecar docker image to use (default "docker.io/amazon/aws-secrets-manager-secret-sidecar:v0.1.4") |
| `--webhook.certDir` | string | Certificate directory to use to write generated certs. Defaults to /etc/webhook/certs/ (default "/etc/webhook/certs") |
| `--webhook.embeddedSecretManagerConfig.awsConfig.region` | string | AWS region |
| `--webhook.embeddedSecretManagerConfig.fileMountInitContainer.image` | string | Specifies init container image to use for mounting secrets as files. (default "busybox:1.28") |
| `--webhook.embeddedSecretManagerConfig.gcpConfig.project` | string | GCP project to be used for secret manager |
| `--webhook.embeddedSecretManagerConfig.type` | string | (default "AWS") |
| `--webhook.gcpSecretManager.sidecarImage` | string | Specifies the sidecar docker image to use (default "gcr.io/google.com/cloudsdktool/cloud-sdk:alpine") |
| `--webhook.listenPort` | int | The port to use to listen to webhook calls. Defaults to 9443 (default 9443) |
| `--webhook.localCert` | | write certs locally. Defaults to false |
| `--webhook.metrics-prefix` | string | An optional prefix for all published metrics. (default "flyte:") |
| `--webhook.secretName` | string | Secret name to write generated certs to. (default "flyte-pod-webhook") |
| `--webhook.serviceName` | string | The name of the webhook service. (default "flyte-pod-webhook") |
| `--webhook.servicePort` | int32 | The port on the service that hosting webhook. (default 443) |
| `--webhook.vaultSecretManager.role` | string | Specifies the vault role to use (default "flyte") |
=== PAGE: https://www.union.ai/docs/v1/serverless/api-reference/uctl-cli/uctl-update/uctl-update-plugin-override ===
# uctl update plugin-override
Update matchable resources of plugin overrides
## Synopsis
Update plugin overrides for given project and domain combination or
additionally with workflow name.
Updating to the plugin override is only available from a generated file.
See the get section for generating this file. This will completely
overwrite any existing plugins overrides on custom project, domain, and
workflow combination. It is preferable to do get and generate a plugin
override file if there is an existing override already set and then
update it to have new values. Refer to get plugin-override section on
how to generate this file It takes input for plugin overrides from the
config file po.yaml, Example: content of po.yaml:
``` yaml
domain: development
project: flytesnacks
overrides:
- task_type: python_task # Task type for which to apply plugin implementation overrides
plugin_id: # Plugin id(s) to be used in place of the default for the task type.
- plugin_override1
- plugin_override2
missing_plugin_behavior: 1 # Behavior when no specified plugin_id has an associated handler. 0: FAIL , 1: DEFAULT
```
```shell
$ uctl update plugin-override --attrFile po.yaml
```
Update plugin override for project, domain, and workflow combination.
This will take precedence over any other plugin overrides defined at
project domain level. For workflow
`core.control_flow.merge_sort.merge_sort` in flytesnacks project,
development domain, it is:
``` yaml
domain: development
project: flytesnacks
workflow: core.control_flow.merge_sort.merge_sort
overrides:
- task_type: python_task # Task type for which to apply plugin implementation overrides
plugin_id: # Plugin id(s) to be used in place of the default for the task type.
- plugin_override1
- plugin_override2
missing_plugin_behavior: 1 # Behavior when no specified plugin_id has an associated handler. 0: FAIL , 1: DEFAULT
```
```shell
$ uctl update plugin-override --attrFile po.yaml
```
Usage:
```shell
$ uctl update plugin-override [flags]
```
## Options
| Option | Type | Description |
|--------|------|-------------|
| `--attrFile` | string | attribute file name to be used for updating attribute for the resource type. |
| `--dryRun` | | execute command without making any modifications. |
| `--force` | | do not ask for an acknowledgement during updates. |
| `-h`, `--help` | help for plugin-override |
### Options inherited from parent commands
| Option | Type | Description |
|--------|------|-------------|
| `--admin.audience` | string | Audience to use when initiating OAuth2 authorization requests. |
| `--admin.authType` | string | Type of OAuth2 flow used for communicating with admin.ClientSecret, Pkce, ExternalCommand are valid values (default "ClientSecret") |
| `--admin.authorizationHeader` | string | Custom metadata header to pass JWT |
| `--admin.authorizationServerUrl` | string | This is the URL to your IdP's authorization server. It'll default to Endpoint |
| `--admin.caCertFilePath` | string | Use specified certificate file to verify the admin server peer. |
| `--admin.clientId` | string | Client ID (default "flytepropeller") |
| `--admin.clientSecretEnvVar` | string | Environment variable containing the client secret |
| `--admin.clientSecretLocation` | string | File containing the client secret (default "/etc/secrets/client_secret") |
| `--admin.command` | strings | Command for external authentication token generation |
| `--admin.defaultOrg` | string | OPTIONAL: Default org to use to support non-org based cli's.'. |
| `--admin.defaultServiceConfig` | string | |
| `--admin.deviceFlowConfig.pollInterval` | string | amount of time the device flow would poll the token endpoint if auth server doesn't return a polling interval. Okta and google IDP do return an interval' (default "5s") |
| `--admin.deviceFlowConfig.refreshTime` | string | grace period from the token expiry after which it would refresh the token. (default "5m0s") |
| `--admin.deviceFlowConfig.timeout` | string | amount of time the device flow should complete or else it will be cancelled. (default "10m0s") |
| `--admin.endpoint` | string | For admin types, specify where the uri of the service is located. |
| `--admin.httpProxyURL` | string | OPTIONAL: HTTP Proxy to be used for OAuth requests. |
| `--admin.insecure` | | Use insecure connection. |
| `--admin.insecureSkipVerify` | | InsecureSkipVerify controls whether a client verifies the server's certificate chain and host name.Caution: shouldn't be use for production usecases' |
| `--admin.maxBackoffDelay` | string | Max delay for grpc backoff (default "8s") |
| `--admin.maxMessageSizeBytes` | int | The max size in bytes for incoming gRPC messages |
| `--admin.maxRetries` | int | Max number of gRPC retries (default 4) |
| `--admin.perRetryTimeout` | string | gRPC per retry timeout (default "15s") |
| `--admin.pkceConfig.refreshTime` | string | grace period from the token expiry after which it would refresh the token. (default "5m0s") |
| `--admin.pkceConfig.timeout` | string | Amount of time the browser session would be active for authentication from client app. (default "2m0s") |
| `--admin.proxyCommand` | strings | Command for external proxy-authorization token generation |
| `--admin.scopes` | strings | List of scopes to request |
| `--admin.tokenRefreshWindow` | string | Max duration between token refresh attempt and token expiry. (default "0s") |
| `--admin.tokenUrl` | string | OPTIONAL: Your IdP's token endpoint. It'll be discovered from flyte admin's OAuth Metadata endpoint if not provided. |
| `--admin.useAudienceFromAdmin` | | Use Audience configured from admins public endpoint config. |
| `--admin.useAuth` | | Deprecated: Auth will be enabled/disabled based on admin's dynamically discovered information. |
| `--auth.appAuth.externalAuthServer.allowedAudience` | strings | Optional: A list of allowed audiences. If not provided, the audience is expected to be the public Uri of the service. |
| `--auth.appAuth.externalAuthServer.baseUrl` | string | This should be the base url of the authorization server that you are trying to hit. With Okta for instance, it will look something like https://company.okta.com/oauth2/abcdef123456789/ |
| `--auth.appAuth.externalAuthServer.httpProxyURL` | string | OPTIONAL: HTTP Proxy to be used for OAuth requests. |
| `--auth.appAuth.externalAuthServer.metadataUrl` | string | Optional: If the server doesn't support /.well-known/oauth-authorization-server, you can set a custom metadata url here.' |
| `--auth.appAuth.externalAuthServer.retryAttempts` | int | Optional: The number of attempted retries on a transient failure to get the OAuth metadata (default 5) |
| `--auth.appAuth.externalAuthServer.retryDelay` | string | Optional, Duration to wait between retries (default "1s") |
| `--auth.appAuth.selfAuthServer.accessTokenLifespan` | string | Defines the lifespan of issued access tokens. (default "30m0s") |
| `--auth.appAuth.selfAuthServer.authorizationCodeLifespan` | string | Defines the lifespan of issued access tokens. (default "5m0s") |
| `--auth.appAuth.selfAuthServer.claimSymmetricEncryptionKeySecretName` | string | OPTIONAL: Secret name to use to encrypt claims in authcode token. (default "claim_symmetric_key") |
| `--auth.appAuth.selfAuthServer.issuer` | string | Defines the issuer to use when issuing and validating tokens. The default value is https://{requestUri.HostAndPort}/ |
| `--auth.appAuth.selfAuthServer.oldTokenSigningRSAKeySecretName` | string | OPTIONAL: Secret name to use to retrieve Old RSA Signing Key. This can be useful during key rotation to continue to accept older tokens. (default "token_rsa_key_old.pem") |
| `--auth.appAuth.selfAuthServer.refreshTokenLifespan` | string | Defines the lifespan of issued access tokens. (default "1h0m0s") |
| `--auth.appAuth.selfAuthServer.tokenSigningRSAKeySecretName` | string | OPTIONAL: Secret name to use to retrieve RSA Signing Key. (default "token_rsa_key.pem") |
| `--auth.appAuth.thirdPartyConfig.flyteClient.audience` | string | Audience to use when initiating OAuth2 authorization requests. |
| `--auth.appAuth.thirdPartyConfig.flyteClient.clientId` | string | public identifier for the app which handles authorization for a Flyte deployment (default "uctl") |
| `--auth.appAuth.thirdPartyConfig.flyteClient.redirectUri` | string | This is the callback uri registered with the app which handles authorization for a Flyte deployment (default "http://localhost:53593/callback") |
| `--auth.appAuth.thirdPartyConfig.flyteClient.scopes` | strings | Recommended scopes for the client to request. (default [all,offline]) |
| `--auth.disableForGrpc` | | Disables auth enforcement on Grpc Endpoints. |
| `--auth.disableForHttp` | | Disables auth enforcement on HTTP Endpoints. |
| `--auth.grpcAuthorizationHeader` | string | (default "flyte-authorization") |
| `--auth.httpAuthorizationHeader` | string | (default "flyte-authorization") |
| `--auth.httpProxyURL` | string | OPTIONAL: HTTP Proxy to be used for OAuth requests. |
| `--auth.tokenEndpointProxyPath` | string | The path used to proxy calls to the TokenURL |
| `--auth.userAuth.cookieBlockKeySecretName` | string | OPTIONAL: Secret name to use for cookie block key. (default "cookie_block_key") |
| `--auth.userAuth.cookieHashKeySecretName` | string | OPTIONAL: Secret name to use for cookie hash key. (default "cookie_hash_key") |
| `--auth.userAuth.cookieSetting.domain` | string | OPTIONAL: Allows you to set the domain attribute on the auth cookies. |
| `--auth.userAuth.cookieSetting.sameSitePolicy` | string | OPTIONAL: Allows you to declare if your cookie should be restricted to a first-party or same-site context.Wrapper around http.SameSite. (default "DefaultMode") |
| `--auth.userAuth.httpProxyURL` | string | OPTIONAL: HTTP Proxy to be used for OAuth requests. |
| `--auth.userAuth.idpQueryParameter` | string | idp query parameter used for selecting a particular IDP for doing user authentication. Eg: for Okta passing idp={IDP-ID} forces the authentication to happen with IDP-ID |
| `--auth.userAuth.openId.baseUrl` | string | |
| `--auth.userAuth.openId.clientId` | string | |
| `--auth.userAuth.openId.clientSecretFile` | string | |
| `--auth.userAuth.openId.clientSecretName` | string | (default "oidc_client_secret") |
| `--auth.userAuth.openId.scopes` | strings | (default [openid,profile]) |
| `--auth.userAuth.redirectUrl` | string | (default "/console") |
| `--authorizer.internalCommunicationConfig.enabled` | | Enables authorization decisions for internal communication. (default true) |
| `--authorizer.internalCommunicationConfig.ingressIdentity` | string | IngressIdentity used in the cluster. Needed to exclude the communication coming from ingress. (default "ingress-nginx.ingress-nginx.serviceaccount.identity.linkerd.cluster.local") |
| `--authorizer.internalCommunicationConfig.tenantUrlPatternIdentity` | string | UrlPatternIdentity of the internal tenant service endpoint identities. (default "{{ service }}.{{ org }}.serviceaccount.identity.linkerd.cluster.local") |
| `--authorizer.internalCommunicationConfig.urlPatternIdentity` | string | UrlPatternIdentity of the internal service endpoint identities. (default "{{ service }}-helmchart.{{ service }}.serviceaccount.identity.linkerd.cluster.local") |
| `--authorizer.mode` | string | (default "Active") |
| `--authorizer.organizationConfig.PolicyConfig.adminPolicyDescription` | string | description for the boilerplate admin policy (default "Contributor permissions and full admin permissions to manage users and view usage dashboards") |
| `--authorizer.organizationConfig.PolicyConfig.contributorPolicyDescription` | string | description for the boilerplate contributor policy (default "Viewer permissions and permissions to create workflows, tasks, launch plans, and executions") |
| `--authorizer.organizationConfig.PolicyConfig.defaultUserPolicyRoleType` | string | name of the role type to determine which default policy new users added to the organization should be assigned (default "Viewer") |
| `--authorizer.organizationConfig.PolicyConfig.serverlessContributorPolicyDescription` | string | description for the boilerplate serverless contributor policy (default "Viewer permissions and permissions to create workflows, tasks, launch plans, and executions") |
| `--authorizer.organizationConfig.PolicyConfig.serverlessViewerPolicyDescription` | string | description for the boilerplate serverless viewer policy (default "Permissions to view Flyte entities") |
| `--authorizer.organizationConfig.PolicyConfig.viewerPolicyDescription` | string | description for the boilerplate viewer policy (default "Permissions to view Flyte entities") |
| `--authorizer.organizationConfig.defaultPolicyCacheDuration` | string | Cache entry duration for the store of the default policy per organization (default "10m0s") |
| `--authorizer.syncRuleRefreshInterval` | string | (default "1m0s") |
| `--authorizer.type` | string | (default "UserClouds") |
| `--authorizer.userCloudsClient.cache.redis.ttl.edgeTypes` | string | Specifies how long edge types remain in the cache.. (default "30m0s") |
| `--authorizer.userCloudsClient.cache.redis.ttl.edges` | string | Specifies how long edges remain in the cache. (default "30m0s") |
| `--authorizer.userCloudsClient.cache.redis.ttl.objectTypes` | string | Specifies how long object types remain in the cache. (default "30m0s") |
| `--authorizer.userCloudsClient.cache.redis.ttl.objects` | string | Specifies how long objects remain in the cache. (default "30m0s") |
| `--authorizer.userCloudsClient.cache.type` | string | Cache type to use. (default "none") |
| `--authorizer.userCloudsClient.clientID` | string | UserClouds client id |
| `--authorizer.userCloudsClient.clientSecretName` | string | UserCloud client secret name to read from the secret manager. (default "userclouds-client-secret") |
| `--authorizer.userCloudsClient.enableLogging` | | Enable userclouds client's internal logging. Calls to post logs take 250-350 ms and will impact p99 latency, enable with caution. |
| `--authorizer.userCloudsClient.tenantID` | string | UserClouds tenant id. Should be a UUID. |
| `--authorizer.userCloudsClient.tenantUrl` | string | Something like https://{yourtenant}.tenant.userclouds.com |
| `--config` | string | config file (default is /Users/andrew/.union/config.yaml) |
| `--connection.environment` | string | |
| `--connection.region` | string | |
| `--connection.rootTenantURLPattern` | string | Pattern for tenant url. (default "dns:///{{ organization }}.cloud-staging.union.ai") |
| `--console.endpoint` | string | Endpoint of console, if different than flyte admin |
| `--database.connMaxLifeTime` | string | sets the maximum amount of time a connection may be reused (default "1h0m0s") |
| `--database.enableForeignKeyConstraintWhenMigrating` | | Whether to enable gorm foreign keys when migrating the db |
| `--database.maxIdleConnections` | int | maxIdleConnections sets the maximum number of connections in the idle connection pool. (default 10) |
| `--database.maxOpenConnections` | int | maxOpenConnections sets the maximum number of open connections to the database. (default 100) |
| `--database.postgres.dbname` | string | The database name (default "postgres") |
| `--database.postgres.debug` | | |
| `--database.postgres.host` | string | The host name of the database server (default "localhost") |
| `--database.postgres.options` | string | See http://gorm.io/docs/connecting_to_the_database.html for available options passed, in addition to the above. (default "sslmode=disable") |
| `--database.postgres.password` | string | The database password. (default "postgres") |
| `--database.postgres.passwordPath` | string | Points to the file containing the database password. |
| `--database.postgres.port` | int | The port name of the database server (default 30001) |
| `--database.postgres.readReplicaHost` | string | The host name of the read replica database server (default "localhost") |
| `--database.postgres.username` | string | The database user who is connecting to the server. (default "postgres") |
| `--database.sqlite.file` | string | The path to the file (existing or new) where the DB should be created / stored. If existing, then this will be re-used, else a new will be created |
| `--db.connectionPool.maxConnectionLifetime` | string | (default "0s") |
| `--db.connectionPool.maxIdleConnections` | int | |
| `--db.connectionPool.maxOpenConnections` | int | |
| `--db.dbname` | string | (default "postgres") |
| `--db.debug` | | |
| `--db.host` | string | (default "postgres") |
| `--db.log_level` | int | (default 4) |
| `--db.options` | string | (default "sslmode=disable") |
| `--db.password` | string | |
| `--db.passwordPath` | string | |
| `--db.port` | int | (default 5432) |
| `--db.username` | string | (default "postgres") |
| `-d`, `--domain` | string | Specifies the Flyte project's domain. |
| `--files.archive` | | Pass in archive file either an http link or local path. |
| `--files.assumableIamRole` | string | Custom assumable iam auth role to register launch plans with. |
| `--files.continueOnError` | | Continue on error when registering files. |
| `--files.destinationDirectory` | string | Location of source code in container. |
| `--files.dryRun` | | Execute command without making any modifications. |
| `--files.enableSchedule` | | Enable the schedule if the files contain schedulable launchplan. |
| `--files.force` | | Force use of version number on entities registered with flyte. |
| `--files.k8ServiceAccount` | string | Deprecated. Please use `--K8sServiceAccount`|
| `--files.k8sServiceAccount` | string | Custom kubernetes service account auth role to register launch plans with. |
| `--files.outputLocationPrefix` | string | Custom output location prefix for offloaded types (files/schemas). |
| `--files.sourceUploadPath` | string | Deprecated: Update flyte admin to avoid having to configure storage access from uctl. |
| `--files.version` | string | Version of the entity to be registered with flyte which are un-versioned after serialization. |
| `--logger.formatter.type` | string | Sets logging format type. (default "json") |
| `--logger.level` | int | Sets the minimum logging level. (default 3) |
| `--logger.mute` | | Mutes all logs regardless of severity. Intended for benchmarks/tests only. |
| `--logger.show-source` | | Includes source code location in logs. |
| `--org` | string | Organization to work on. If not set, default to user's org. |
| `--otel.file.filename` | string | Filename to store exported telemetry traces (default "/tmp/trace.txt") |
| `--otel.jaeger.endpoint` | string | Endpoint for the jaeger telemetry trace ingestor (default "http://localhost:14268/api/traces") |
| `--otel.otlpgrpc.endpoint` | string | Endpoint for the OTLP telemetry trace collector (default "http://localhost:4317") |
| `--otel.otlphttp.endpoint` | string | Endpoint for the OTLP telemetry trace collector (default "http://localhost:4318/v1/traces") |
| `--otel.sampler.parentSampler` | string | Sets the parent sampler to use for the tracer (default "always") |
| `--otel.type` | string | Sets the type of exporter to configure [noop/file/jaeger/otlpgrpc/otlphttp]. (default "noop") |
| `-o`, `--output` | string | Specifies the output type - supported formats [TABLE JSON YAML DOT DOTURL]. NOTE: dot, doturl are only supported for Workflow (default "table") |
| `--plugins.catalogcache.reader.maxItems` | int | Maximum number of entries to keep in the index. (default 10000) |
| `--plugins.catalogcache.reader.maxRetries` | int | Maximum number of retries per item. (default 3) |
| `--plugins.catalogcache.reader.workers` | int | Number of concurrent workers to start processing the queue. (default 10) |
| `--plugins.catalogcache.writer.maxItems` | int | Maximum number of entries to keep in the index. (default 10000) |
| `--plugins.catalogcache.writer.maxRetries` | int | Maximum number of retries per item. (default 3) |
| `--plugins.catalogcache.writer.workers` | int | Number of concurrent workers to start processing the queue. (default 10) |
| `-p`, `--project` | string | Specifies the Flyte project. |
| `--rediscache.passwordSecretName` | string | Name of secret with Redis password. |
| `--rediscache.primaryEndpoint` | string | Primary endpoint for the redis cache that can be used for both reads and writes. |
| `--rediscache.replicaEndpoint` | string | Replica endpoint for the redis cache that can be used for reads. |
| `--secrets.env-prefix` | string | Prefix for environment variables (default "FLYTE_SECRET_") |
| `--secrets.secrets-prefix` | string | Prefix where to look for secrets file (default "/etc/secrets") |
| `--secrets.type` | string | Sets the type of storage to configure [local]. (default "local") |
| `--server.dataProxy.download.maxExpiresIn` | string | Maximum allowed expiration duration. (default "1h0m0s") |
| `--server.dataProxy.upload.defaultFileNameLength` | int | Default length for the generated file name if not provided in the request. (default 20) |
| `--server.dataProxy.upload.maxExpiresIn` | string | Maximum allowed expiration duration. (default "1h0m0s") |
| `--server.dataProxy.upload.maxSize` | string | Maximum allowed upload size. (default "6Mi") |
| `--server.dataProxy.upload.storagePrefix` | string | Storage prefix to use for all upload requests. |
| `--server.grpc.enableGrpcLatencyMetrics` | | Enable grpc latency metrics. Note Histograms metrics can be expensive on Prometheus servers. |
| `--server.grpc.maxMessageSizeBytes` | int | The max size in bytes for incoming gRPC messages |
| `--server.grpc.port` | int | On which grpc port to serve admin (default 8089) |
| `--server.grpc.serverReflection` | | Enable GRPC Server Reflection (default true) |
| `--server.grpcPort` | int | deprecated |
| `--server.grpcServerReflection` | | deprecated |
| `--server.httpPort` | int | On which http port to serve admin (default 8088) |
| `--server.kube-config` | string | Path to kubernetes client config file, default is empty, useful for incluster config. |
| `--server.kubeClientConfig.burst` | int | Max burst rate for throttle. 0 defaults to 10 (default 25) |
| `--server.kubeClientConfig.qps` | int32 | Max QPS to the master for requests to KubeAPI. 0 defaults to 5. (default 100) |
| `--server.kubeClientConfig.timeout` | string | Max duration allowed for every request to KubeAPI before giving up. 0 implies no timeout. (default "30s") |
| `--server.master` | string | The address of the Kubernetes API server. |
| `--server.readHeaderTimeoutSeconds` | int | The amount of time allowed to read request headers. (default 32) |
| `--server.security.allowCors` | | (default true) |
| `--server.security.allowedHeaders` | strings | (default [Content-Type,flyte-authorization]) |
| `--server.security.allowedOrigins` | strings | (default [*]) |
| `--server.security.auditAccess` | | |
| `--server.security.secure` | | |
| `--server.security.ssl.certificateFile` | string | |
| `--server.security.ssl.keyFile` | string | |
| `--server.security.useAuth` | | |
| `--server.thirdPartyConfig.flyteClient.audience` | string | Audience to use when initiating OAuth2 authorization requests. |
| `--server.thirdPartyConfig.flyteClient.clientId` | string | public identifier for the app which handles authorization for a Flyte deployment |
| `--server.thirdPartyConfig.flyteClient.redirectUri` | string | This is the callback uri registered with the app which handles authorization for a Flyte deployment |
| `--server.thirdPartyConfig.flyteClient.scopes` | strings | Recommended scopes for the client to request. |
| `--server.watchService.maxActiveClusterConnections` | int | (default 5) |
| `--server.watchService.maxPageSize` | int | (default 50000) |
| `--server.watchService.nonTerminalStatusUpdatesInterval` | string | (default "1m0s") |
| `--server.watchService.pollInterval` | string | (default "1s") |
| `--sharedservice.connectPort` | string | On which connect port to serve admin (default "8080") |
| `--sharedservice.grpc.grpcMaxResponseStatusBytes` | int32 | specifies the maximum (uncompressed) size of header list that the client is prepared to accept on grpc calls (default 32000) |
| `--sharedservice.grpc.maxConcurrentStreams` | int | Limit on the number of concurrent streams to each ServerTransport. (default 100) |
| `--sharedservice.grpc.maxMessageSizeBytes` | int | Limit on the size of message that can be received on the server. (default 10485760) |
| `--sharedservice.grpcServerReflection` | | Enable GRPC Server Reflection (default true) |
| `--sharedservice.httpPort` | string | On which http port to serve admin (default "8089") |
| `--sharedservice.kubeConfig` | string | Path to kubernetes client config file. |
| `--sharedservice.master` | string | The address of the Kubernetes API server. |
| `--sharedservice.metrics.enableClientGrpcHistograms` | | Enable client grpc histograms (default true) |
| `--sharedservice.metrics.enableGrpcHistograms` | | Enable grpc histograms (default true) |
| `--sharedservice.metrics.scope` | string | Scope to emit metrics under (default "service:") |
| `--sharedservice.port` | string | On which grpc port to serve admin (default "8080") |
| `--sharedservice.profiler.enabled` | | Enable Profiler on server |
| `--sharedservice.profilerPort` | string | Profile port to start listen for pprof and metric handlers on. (default "10254") |
| `--sharedservice.security.allowCors` | | |
| `--sharedservice.security.allowLocalhostAccess` | | Whether to permit localhost unauthenticated access to the server |
| `--sharedservice.security.allowedHeaders` | strings | |
| `--sharedservice.security.allowedOrigins` | strings | |
| `--sharedservice.security.auditAccess` | | |
| `--sharedservice.security.orgOverride` | string | Override org in identity context if localhost access enabled |
| `--sharedservice.security.secure` | | |
| `--sharedservice.security.ssl.certificateAuthorityFile` | string | |
| `--sharedservice.security.ssl.certificateFile` | string | |
| `--sharedservice.security.ssl.keyFile` | string | |
| `--sharedservice.security.useAuth` | | |
| `--sharedservice.sync.syncInterval` | string | Time interval to sync (default "5m0s") |
| `--storage.cache.max_size_mbs` | int | Maximum size of the cache where the Blob store data is cached in-memory. If not specified or set to 0, cache is not used |
| `--storage.cache.target_gc_percent` | int | Sets the garbage collection target percentage. |
| `--storage.connection.access-key` | string | Access key to use. Only required when authtype is set to accesskey. |
| `--storage.connection.auth-type` | string | Auth Type to use [iam, accesskey]. (default "iam") |
| `--storage.connection.disable-ssl` | | Disables SSL connection. Should only be used for development. |
| `--storage.connection.endpoint` | string | URL for storage client to connect to. |
| `--storage.connection.region` | string | Region to connect to. (default "us-east-1") |
| `--storage.connection.secret-key` | string | Secret to use when accesskey is set. |
| `--storage.container` | string | Initial container (in s3 a bucket) to create -if it doesn't exist-.' |
| `--storage.defaultHttpClient.timeout` | string | Sets time out on the http client. (default "0s") |
| `--storage.enable-multicontainer` | | If this is true, then the container argument is overlooked and redundant. This config will automatically open new connections to new containers/buckets as they are encountered |
| `--storage.limits.maxDownloadMBs` | int | Maximum allowed download size (in MBs) per call. (default 2) |
| `--storage.stow.config` | stringToString | Configuration for stow backend. Refer to github/flyteorg/stow (default []) |
| `--storage.stow.kind` | string | Kind of Stow backend to use. Refer to github/flyteorg/stow |
| `--storage.type` | string | Sets the type of storage to configure [s3/minio/local/mem/stow]. (default "s3") |
| `--union.auth.authorizationMetadataKey` | string | Authorization Header to use when passing Access Tokens to the server (default "flyte-authorization") |
| `--union.auth.clientId` | string | Client ID |
| `--union.auth.clientSecretEnvVar` | string | Environment variable containing the client secret |
| `--union.auth.clientSecretLocation` | string | File containing the client secret |
| `--union.auth.deviceFlow.pollInterval` | string | amount of time the device flow would poll the token endpoint if auth server doesn't return a polling interval. Okta and google IDP do return an interval' (default "5s") |
| `--union.auth.deviceFlow.refreshTime` | string | grace period from the token expiry after which it would refresh the token. (default "5m0s") |
| `--union.auth.deviceFlow.timeout` | string | amount of time the device flow should complete or else it will be cancelled. (default "10m0s") |
| `--union.auth.enable` | | Whether to enable an authenticated conenction when communicating with admin. (default true) |
| `--union.auth.externalAuth.command` | strings | Command for external authentication token generation |
| `--union.auth.pkce.refreshTime` | string | grace period from the token expiry after which it would refresh the token. (default "5m0s") |
| `--union.auth.pkce.timeout` | string | Amount of time the browser session would be active for authentication from client app. (default "15s") |
| `--union.auth.scopes` | strings | List of scopes to request |
| `--union.auth.tokenRefreshWindow` | string | Max duration between token refresh attempt and token expiry. (default "1h0m0s") |
| `--union.auth.tokenUrl` | string | OPTIONAL: Your IdP's token endpoint. It'll be discovered from flyte admin's OAuth Metadata endpoint if not provided. |
| `--union.auth.type` | string | Type of OAuth2 flow used for communicating with admin. (default "Pkce") |
| `--union.cache.maxItemsCount` | int | Maximum number of items to keep in the cache before evicting. (default 1000) |
| `--union.connection.host` | string | Host to connect to (default "dns:///utt-mgdp-stg-us-east-2.cloud-staging.union.ai") |
| `--union.connection.insecure` | | Whether to connect over insecure channel |
| `--union.connection.insecureSkipVerify` | | InsecureSkipVerify controls whether a client verifies the server's certificate chain and host name.Caution: shouldn't be use for production usecases' |
| `--union.connection.keepAliveConfig.permitWithoutStream` | | If true, client sends keepalive pings even with no active RPCs. |
| `--union.connection.keepAliveConfig.time` | string | After a duration of this time if the client doesn't see any activity it pings the server to see if the transport is still alive. (default "20s") |
| `--union.connection.keepAliveConfig.timeout` | string | After having pinged for keepalive check, the client waits for a duration of Timeout and if no activity is seen even after that the connection is closed. (default "2m0s") |
| `--union.connection.maxBackoffDelay` | string | Max delay for grpc backoff (default "8s") |
| `--union.connection.maxRecvMsgSize` | int | Maximum size of a message in bytes of a gRPC message (default 10485760) |
| `--union.connection.maxRetries` | int | Max number of gRPC retries (default 4) |
| `--union.connection.minConnectTimeout` | string | Minimum timeout for establishing a connection (default "20s") |
| `--union.connection.perRetryTimeout` | string | gRPC per retry timeout (default "15s") |
| `--union.connection.serviceConfig` | string | Defines gRPC experimental JSON Service Config (default "{"loadBalancingConfig": [{"round_robin":{}}]}") |
| `--union.connection.trustedIdentityClaims.enabled` | | Enables passing of trusted claims while making inter service calls |
| `--union.connection.trustedIdentityClaims.externalIdentityClaim` | string | External identity claim of the service which is authorized to make internal service call. These are verified against userclouds actions |
| `--union.connection.trustedIdentityClaims.externalIdentityTypeClaim` | string | External identity type claim of app or user to use for the current service identity. It should be an 'app' for inter service communication |
| `--union.internalConnectionConfig.-` | stringToString | (default []) |
| `--union.internalConnectionConfig.enabled` | | Enables internal service to service communication instead of going through ingress. |
| `--union.internalConnectionConfig.urlPattern` | string | UrlPattern of the internal service endpoints. (default "{{ service }}-helmchart.{{ service }}.svc.cluster.local:80") |
| `--webhook.awsSecretManager.sidecarImage` | string | Specifies the sidecar docker image to use (default "docker.io/amazon/aws-secrets-manager-secret-sidecar:v0.1.4") |
| `--webhook.certDir` | string | Certificate directory to use to write generated certs. Defaults to /etc/webhook/certs/ (default "/etc/webhook/certs") |
| `--webhook.embeddedSecretManagerConfig.awsConfig.region` | string | AWS region |
| `--webhook.embeddedSecretManagerConfig.fileMountInitContainer.image` | string | Specifies init container image to use for mounting secrets as files. (default "busybox:1.28") |
| `--webhook.embeddedSecretManagerConfig.gcpConfig.project` | string | GCP project to be used for secret manager |
| `--webhook.embeddedSecretManagerConfig.type` | string | (default "AWS") |
| `--webhook.gcpSecretManager.sidecarImage` | string | Specifies the sidecar docker image to use (default "gcr.io/google.com/cloudsdktool/cloud-sdk:alpine") |
| `--webhook.listenPort` | int | The port to use to listen to webhook calls. Defaults to 9443 (default 9443) |
| `--webhook.localCert` | | write certs locally. Defaults to false |
| `--webhook.metrics-prefix` | string | An optional prefix for all published metrics. (default "flyte:") |
| `--webhook.secretName` | string | Secret name to write generated certs to. (default "flyte-pod-webhook") |
| `--webhook.serviceName` | string | The name of the webhook service. (default "flyte-pod-webhook") |
| `--webhook.servicePort` | int32 | The port on the service that hosting webhook. (default 443) |
| `--webhook.vaultSecretManager.role` | string | Specifies the vault role to use (default "flyte") |
=== PAGE: https://www.union.ai/docs/v1/serverless/api-reference/uctl-cli/uctl-update/uctl-update-project ===
# uctl update project
Update the characteristics of a project
## Synopsis
Allows you to update the characteristics of a project, including its
name, labels and description. Also allows you to archive or activate
(unarchive) a project.
To archive a project, specify its ID with the *p* flag and add the
*archive* flag:
```shell
$ uctl update project -p my-project-id --archive
```
To activate (unarchive) an archived project, specify its ID with the *p*
flag and add the *activate* flag:
```shell
$ uctl update project -p my-project-id --activate
```
To update the characteristics of a project using flags, specify the
project ID with the *p* flag and the flags corresponding to the
characteristics you want to update:
```shell
$ uctl update project -p my-project-id --description "A wonderful project" --labels app=my-app
```
To update the characteristics of a project using a *yaml* file, define
the file with the project ID desired updates:
``` yaml
id: "my-project-id"
name: "my-project-name"
labels:
values:
app: my-app
description: "A wonderful project"
```
(Note: The name parameter must not contain whitespace)
Then, pass it in using the *file* flag:
```shell
$ uctl update project --file project.yaml
```
To archive or activate (unarchive) a project using a *yaml* file:
- Add a state field, with a value of *0* for activated (unarchived) or
*1* for archived, at the top level of the `yaml` file.
- Add the *archive* flag to the command.
For example, to archive a project:
``` yaml
# update.yaml
id: "my-project-id"
state: 1
```
$ uctl update project --file update.yaml --archive
And to activate (unarchive) the same project:
``` yaml
# update.yaml
id: "my-project-id"
state: 0
```
$ uctl update project --file update.yaml --archive
Note that when using a *yaml* file, the *activate* flag is not used.
Instead, the *archive* flag is used for *both* archiving and activating
(unarchiving) with the difference being in the *state* field of the
*yaml* file. Furthermore, the *state* field only takes effect if the
*archive* flag is present in the command.
Usage:
```shell
$ uctl update project [flags]
```
## Options
| Option | Type | Description |
|--------|------|-------------|
| `--activate` | | Activates the project specified as argument. Only used in update |
| Option | Type | Description |
|--------|------|-------------|
| `--activateProject` | | (Deprecated) Activates the project specified as argument. Only used in update |
| Option | Type | Description |
|--------|------|-------------|
| `--archive` | | Archives the project specified as argument. Only used in update |
| Option | Type | Description |
|--------|------|-------------|
| `--archiveProject` | | (Deprecated) Archives the project specified as argument. Only used in update |
| Option | Type | Description |
|--------|------|-------------|
| `--description` | string | description for the project specified as argument. |
| `--dryRun` | | execute command without making any modifications. |
| `--file` | string | file for the project definition. |
| `--force` | | Skips asking for an acknowledgement during an update operation. Only used in update |
| `-h`, `--help` | help for project |
| `--id` | string | id for the project specified as argument. |
| `--labels` | stringToString | labels for the project specified as argument. (default []) |
| `--name` | string | name for the project specified as argument. |
### Options inherited from parent commands
| Option | Type | Description |
|--------|------|-------------|
| `--admin.audience` | string | Audience to use when initiating OAuth2 authorization requests. |
| `--admin.authType` | string | Type of OAuth2 flow used for communicating with admin.ClientSecret, Pkce, ExternalCommand are valid values (default "ClientSecret") |
| `--admin.authorizationHeader` | string | Custom metadata header to pass JWT |
| `--admin.authorizationServerUrl` | string | This is the URL to your IdP's authorization server. It'll default to Endpoint |
| `--admin.caCertFilePath` | string | Use specified certificate file to verify the admin server peer. |
| `--admin.clientId` | string | Client ID (default "flytepropeller") |
| `--admin.clientSecretEnvVar` | string | Environment variable containing the client secret |
| `--admin.clientSecretLocation` | string | File containing the client secret (default "/etc/secrets/client_secret") |
| `--admin.command` | strings | Command for external authentication token generation |
| `--admin.defaultOrg` | string | OPTIONAL: Default org to use to support non-org based cli's.'. |
| `--admin.defaultServiceConfig` | string | |
| `--admin.deviceFlowConfig.pollInterval` | string | amount of time the device flow would poll the token endpoint if auth server doesn't return a polling interval. Okta and google IDP do return an interval' (default "5s") |
| `--admin.deviceFlowConfig.refreshTime` | string | grace period from the token expiry after which it would refresh the token. (default "5m0s") |
| `--admin.deviceFlowConfig.timeout` | string | amount of time the device flow should complete or else it will be cancelled. (default "10m0s") |
| `--admin.endpoint` | string | For admin types, specify where the uri of the service is located. |
| `--admin.httpProxyURL` | string | OPTIONAL: HTTP Proxy to be used for OAuth requests. |
| `--admin.insecure` | | Use insecure connection. |
| `--admin.insecureSkipVerify` | | InsecureSkipVerify controls whether a client verifies the server's certificate chain and host name.Caution: shouldn't be use for production usecases' |
| `--admin.maxBackoffDelay` | string | Max delay for grpc backoff (default "8s") |
| `--admin.maxMessageSizeBytes` | int | The max size in bytes for incoming gRPC messages |
| `--admin.maxRetries` | int | Max number of gRPC retries (default 4) |
| `--admin.perRetryTimeout` | string | gRPC per retry timeout (default "15s") |
| `--admin.pkceConfig.refreshTime` | string | grace period from the token expiry after which it would refresh the token. (default "5m0s") |
| `--admin.pkceConfig.timeout` | string | Amount of time the browser session would be active for authentication from client app. (default "2m0s") |
| `--admin.proxyCommand` | strings | Command for external proxy-authorization token generation |
| `--admin.scopes` | strings | List of scopes to request |
| `--admin.tokenRefreshWindow` | string | Max duration between token refresh attempt and token expiry. (default "0s") |
| `--admin.tokenUrl` | string | OPTIONAL: Your IdP's token endpoint. It'll be discovered from flyte admin's OAuth Metadata endpoint if not provided. |
| `--admin.useAudienceFromAdmin` | | Use Audience configured from admins public endpoint config. |
| `--admin.useAuth` | | Deprecated: Auth will be enabled/disabled based on admin's dynamically discovered information. |
| `--auth.appAuth.externalAuthServer.allowedAudience` | strings | Optional: A list of allowed audiences. If not provided, the audience is expected to be the public Uri of the service. |
| `--auth.appAuth.externalAuthServer.baseUrl` | string | This should be the base url of the authorization server that you are trying to hit. With Okta for instance, it will look something like https://company.okta.com/oauth2/abcdef123456789/ |
| `--auth.appAuth.externalAuthServer.httpProxyURL` | string | OPTIONAL: HTTP Proxy to be used for OAuth requests. |
| `--auth.appAuth.externalAuthServer.metadataUrl` | string | Optional: If the server doesn't support /.well-known/oauth-authorization-server, you can set a custom metadata url here.' |
| `--auth.appAuth.externalAuthServer.retryAttempts` | int | Optional: The number of attempted retries on a transient failure to get the OAuth metadata (default 5) |
| `--auth.appAuth.externalAuthServer.retryDelay` | string | Optional, Duration to wait between retries (default "1s") |
| `--auth.appAuth.selfAuthServer.accessTokenLifespan` | string | Defines the lifespan of issued access tokens. (default "30m0s") |
| `--auth.appAuth.selfAuthServer.authorizationCodeLifespan` | string | Defines the lifespan of issued access tokens. (default "5m0s") |
| `--auth.appAuth.selfAuthServer.claimSymmetricEncryptionKeySecretName` | string | OPTIONAL: Secret name to use to encrypt claims in authcode token. (default "claim_symmetric_key") |
| `--auth.appAuth.selfAuthServer.issuer` | string | Defines the issuer to use when issuing and validating tokens. The default value is https://{requestUri.HostAndPort}/ |
| `--auth.appAuth.selfAuthServer.oldTokenSigningRSAKeySecretName` | string | OPTIONAL: Secret name to use to retrieve Old RSA Signing Key. This can be useful during key rotation to continue to accept older tokens. (default "token_rsa_key_old.pem") |
| `--auth.appAuth.selfAuthServer.refreshTokenLifespan` | string | Defines the lifespan of issued access tokens. (default "1h0m0s") |
| `--auth.appAuth.selfAuthServer.tokenSigningRSAKeySecretName` | string | OPTIONAL: Secret name to use to retrieve RSA Signing Key. (default "token_rsa_key.pem") |
| `--auth.appAuth.thirdPartyConfig.flyteClient.audience` | string | Audience to use when initiating OAuth2 authorization requests. |
| `--auth.appAuth.thirdPartyConfig.flyteClient.clientId` | string | public identifier for the app which handles authorization for a Flyte deployment (default "uctl") |
| `--auth.appAuth.thirdPartyConfig.flyteClient.redirectUri` | string | This is the callback uri registered with the app which handles authorization for a Flyte deployment (default "http://localhost:53593/callback") |
| `--auth.appAuth.thirdPartyConfig.flyteClient.scopes` | strings | Recommended scopes for the client to request. (default [all,offline]) |
| `--auth.disableForGrpc` | | Disables auth enforcement on Grpc Endpoints. |
| `--auth.disableForHttp` | | Disables auth enforcement on HTTP Endpoints. |
| `--auth.grpcAuthorizationHeader` | string | (default "flyte-authorization") |
| `--auth.httpAuthorizationHeader` | string | (default "flyte-authorization") |
| `--auth.httpProxyURL` | string | OPTIONAL: HTTP Proxy to be used for OAuth requests. |
| `--auth.tokenEndpointProxyPath` | string | The path used to proxy calls to the TokenURL |
| `--auth.userAuth.cookieBlockKeySecretName` | string | OPTIONAL: Secret name to use for cookie block key. (default "cookie_block_key") |
| `--auth.userAuth.cookieHashKeySecretName` | string | OPTIONAL: Secret name to use for cookie hash key. (default "cookie_hash_key") |
| `--auth.userAuth.cookieSetting.domain` | string | OPTIONAL: Allows you to set the domain attribute on the auth cookies. |
| `--auth.userAuth.cookieSetting.sameSitePolicy` | string | OPTIONAL: Allows you to declare if your cookie should be restricted to a first-party or same-site context.Wrapper around http.SameSite. (default "DefaultMode") |
| `--auth.userAuth.httpProxyURL` | string | OPTIONAL: HTTP Proxy to be used for OAuth requests. |
| `--auth.userAuth.idpQueryParameter` | string | idp query parameter used for selecting a particular IDP for doing user authentication. Eg: for Okta passing idp={IDP-ID} forces the authentication to happen with IDP-ID |
| `--auth.userAuth.openId.baseUrl` | string | |
| `--auth.userAuth.openId.clientId` | string | |
| `--auth.userAuth.openId.clientSecretFile` | string | |
| `--auth.userAuth.openId.clientSecretName` | string | (default "oidc_client_secret") |
| `--auth.userAuth.openId.scopes` | strings | (default [openid,profile]) |
| `--auth.userAuth.redirectUrl` | string | (default "/console") |
| `--authorizer.internalCommunicationConfig.enabled` | | Enables authorization decisions for internal communication. (default true) |
| `--authorizer.internalCommunicationConfig.ingressIdentity` | string | IngressIdentity used in the cluster. Needed to exclude the communication coming from ingress. (default "ingress-nginx.ingress-nginx.serviceaccount.identity.linkerd.cluster.local") |
| `--authorizer.internalCommunicationConfig.tenantUrlPatternIdentity` | string | UrlPatternIdentity of the internal tenant service endpoint identities. (default "{{ service }}.{{ org }}.serviceaccount.identity.linkerd.cluster.local") |
| `--authorizer.internalCommunicationConfig.urlPatternIdentity` | string | UrlPatternIdentity of the internal service endpoint identities. (default "{{ service }}-helmchart.{{ service }}.serviceaccount.identity.linkerd.cluster.local") |
| `--authorizer.mode` | string | (default "Active") |
| `--authorizer.organizationConfig.PolicyConfig.adminPolicyDescription` | string | description for the boilerplate admin policy (default "Contributor permissions and full admin permissions to manage users and view usage dashboards") |
| `--authorizer.organizationConfig.PolicyConfig.contributorPolicyDescription` | string | description for the boilerplate contributor policy (default "Viewer permissions and permissions to create workflows, tasks, launch plans, and executions") |
| `--authorizer.organizationConfig.PolicyConfig.defaultUserPolicyRoleType` | string | name of the role type to determine which default policy new users added to the organization should be assigned (default "Viewer") |
| `--authorizer.organizationConfig.PolicyConfig.serverlessContributorPolicyDescription` | string | description for the boilerplate serverless contributor policy (default "Viewer permissions and permissions to create workflows, tasks, launch plans, and executions") |
| `--authorizer.organizationConfig.PolicyConfig.serverlessViewerPolicyDescription` | string | description for the boilerplate serverless viewer policy (default "Permissions to view Flyte entities") |
| `--authorizer.organizationConfig.PolicyConfig.viewerPolicyDescription` | string | description for the boilerplate viewer policy (default "Permissions to view Flyte entities") |
| `--authorizer.organizationConfig.defaultPolicyCacheDuration` | string | Cache entry duration for the store of the default policy per organization (default "10m0s") |
| `--authorizer.syncRuleRefreshInterval` | string | (default "1m0s") |
| `--authorizer.type` | string | (default "UserClouds") |
| `--authorizer.userCloudsClient.cache.redis.ttl.edgeTypes` | string | Specifies how long edge types remain in the cache.. (default "30m0s") |
| `--authorizer.userCloudsClient.cache.redis.ttl.edges` | string | Specifies how long edges remain in the cache. (default "30m0s") |
| `--authorizer.userCloudsClient.cache.redis.ttl.objectTypes` | string | Specifies how long object types remain in the cache. (default "30m0s") |
| `--authorizer.userCloudsClient.cache.redis.ttl.objects` | string | Specifies how long objects remain in the cache. (default "30m0s") |
| `--authorizer.userCloudsClient.cache.type` | string | Cache type to use. (default "none") |
| `--authorizer.userCloudsClient.clientID` | string | UserClouds client id |
| `--authorizer.userCloudsClient.clientSecretName` | string | UserCloud client secret name to read from the secret manager. (default "userclouds-client-secret") |
| `--authorizer.userCloudsClient.enableLogging` | | Enable userclouds client's internal logging. Calls to post logs take 250-350 ms and will impact p99 latency, enable with caution. |
| `--authorizer.userCloudsClient.tenantID` | string | UserClouds tenant id. Should be a UUID. |
| `--authorizer.userCloudsClient.tenantUrl` | string | Something like https://{yourtenant}.tenant.userclouds.com |
| `--config` | string | config file (default is /Users/andrew/.union/config.yaml) |
| `--connection.environment` | string | |
| `--connection.region` | string | |
| `--connection.rootTenantURLPattern` | string | Pattern for tenant url. (default "dns:///{{ organization }}.cloud-staging.union.ai") |
| `--console.endpoint` | string | Endpoint of console, if different than flyte admin |
| `--database.connMaxLifeTime` | string | sets the maximum amount of time a connection may be reused (default "1h0m0s") |
| `--database.enableForeignKeyConstraintWhenMigrating` | | Whether to enable gorm foreign keys when migrating the db |
| `--database.maxIdleConnections` | int | maxIdleConnections sets the maximum number of connections in the idle connection pool. (default 10) |
| `--database.maxOpenConnections` | int | maxOpenConnections sets the maximum number of open connections to the database. (default 100) |
| `--database.postgres.dbname` | string | The database name (default "postgres") |
| `--database.postgres.debug` | | |
| `--database.postgres.host` | string | The host name of the database server (default "localhost") |
| `--database.postgres.options` | string | See http://gorm.io/docs/connecting_to_the_database.html for available options passed, in addition to the above. (default "sslmode=disable") |
| `--database.postgres.password` | string | The database password. (default "postgres") |
| `--database.postgres.passwordPath` | string | Points to the file containing the database password. |
| `--database.postgres.port` | int | The port name of the database server (default 30001) |
| `--database.postgres.readReplicaHost` | string | The host name of the read replica database server (default "localhost") |
| `--database.postgres.username` | string | The database user who is connecting to the server. (default "postgres") |
| `--database.sqlite.file` | string | The path to the file (existing or new) where the DB should be created / stored. If existing, then this will be re-used, else a new will be created |
| `--db.connectionPool.maxConnectionLifetime` | string | (default "0s") |
| `--db.connectionPool.maxIdleConnections` | int | |
| `--db.connectionPool.maxOpenConnections` | int | |
| `--db.dbname` | string | (default "postgres") |
| `--db.debug` | | |
| `--db.host` | string | (default "postgres") |
| `--db.log_level` | int | (default 4) |
| `--db.options` | string | (default "sslmode=disable") |
| `--db.password` | string | |
| `--db.passwordPath` | string | |
| `--db.port` | int | (default 5432) |
| `--db.username` | string | (default "postgres") |
| `-d`, `--domain` | string | Specifies the Flyte project's domain. |
| `--files.archive` | | Pass in archive file either an http link or local path. |
| `--files.assumableIamRole` | string | Custom assumable iam auth role to register launch plans with. |
| `--files.continueOnError` | | Continue on error when registering files. |
| `--files.destinationDirectory` | string | Location of source code in container. |
| `--files.dryRun` | | Execute command without making any modifications. |
| `--files.enableSchedule` | | Enable the schedule if the files contain schedulable launchplan. |
| `--files.force` | | Force use of version number on entities registered with flyte. |
| `--files.k8ServiceAccount` | string | Deprecated. Please use `--K8sServiceAccount`|
| `--files.k8sServiceAccount` | string | Custom kubernetes service account auth role to register launch plans with. |
| `--files.outputLocationPrefix` | string | Custom output location prefix for offloaded types (files/schemas). |
| `--files.sourceUploadPath` | string | Deprecated: Update flyte admin to avoid having to configure storage access from uctl. |
| `--files.version` | string | Version of the entity to be registered with flyte which are un-versioned after serialization. |
| `--logger.formatter.type` | string | Sets logging format type. (default "json") |
| `--logger.level` | int | Sets the minimum logging level. (default 3) |
| `--logger.mute` | | Mutes all logs regardless of severity. Intended for benchmarks/tests only. |
| `--logger.show-source` | | Includes source code location in logs. |
| `--org` | string | Organization to work on. If not set, default to user's org. |
| `--otel.file.filename` | string | Filename to store exported telemetry traces (default "/tmp/trace.txt") |
| `--otel.jaeger.endpoint` | string | Endpoint for the jaeger telemetry trace ingestor (default "http://localhost:14268/api/traces") |
| `--otel.otlpgrpc.endpoint` | string | Endpoint for the OTLP telemetry trace collector (default "http://localhost:4317") |
| `--otel.otlphttp.endpoint` | string | Endpoint for the OTLP telemetry trace collector (default "http://localhost:4318/v1/traces") |
| `--otel.sampler.parentSampler` | string | Sets the parent sampler to use for the tracer (default "always") |
| `--otel.type` | string | Sets the type of exporter to configure [noop/file/jaeger/otlpgrpc/otlphttp]. (default "noop") |
| `-o`, `--output` | string | Specifies the output type - supported formats [TABLE JSON YAML DOT DOTURL]. NOTE: dot, doturl are only supported for Workflow (default "table") |
| `--plugins.catalogcache.reader.maxItems` | int | Maximum number of entries to keep in the index. (default 10000) |
| `--plugins.catalogcache.reader.maxRetries` | int | Maximum number of retries per item. (default 3) |
| `--plugins.catalogcache.reader.workers` | int | Number of concurrent workers to start processing the queue. (default 10) |
| `--plugins.catalogcache.writer.maxItems` | int | Maximum number of entries to keep in the index. (default 10000) |
| `--plugins.catalogcache.writer.maxRetries` | int | Maximum number of retries per item. (default 3) |
| `--plugins.catalogcache.writer.workers` | int | Number of concurrent workers to start processing the queue. (default 10) |
| `-p`, `--project` | string | Specifies the Flyte project. |
| `--rediscache.passwordSecretName` | string | Name of secret with Redis password. |
| `--rediscache.primaryEndpoint` | string | Primary endpoint for the redis cache that can be used for both reads and writes. |
| `--rediscache.replicaEndpoint` | string | Replica endpoint for the redis cache that can be used for reads. |
| `--secrets.env-prefix` | string | Prefix for environment variables (default "FLYTE_SECRET_") |
| `--secrets.secrets-prefix` | string | Prefix where to look for secrets file (default "/etc/secrets") |
| `--secrets.type` | string | Sets the type of storage to configure [local]. (default "local") |
| `--server.dataProxy.download.maxExpiresIn` | string | Maximum allowed expiration duration. (default "1h0m0s") |
| `--server.dataProxy.upload.defaultFileNameLength` | int | Default length for the generated file name if not provided in the request. (default 20) |
| `--server.dataProxy.upload.maxExpiresIn` | string | Maximum allowed expiration duration. (default "1h0m0s") |
| `--server.dataProxy.upload.maxSize` | string | Maximum allowed upload size. (default "6Mi") |
| `--server.dataProxy.upload.storagePrefix` | string | Storage prefix to use for all upload requests. |
| `--server.grpc.enableGrpcLatencyMetrics` | | Enable grpc latency metrics. Note Histograms metrics can be expensive on Prometheus servers. |
| `--server.grpc.maxMessageSizeBytes` | int | The max size in bytes for incoming gRPC messages |
| `--server.grpc.port` | int | On which grpc port to serve admin (default 8089) |
| `--server.grpc.serverReflection` | | Enable GRPC Server Reflection (default true) |
| `--server.grpcPort` | int | deprecated |
| `--server.grpcServerReflection` | | deprecated |
| `--server.httpPort` | int | On which http port to serve admin (default 8088) |
| `--server.kube-config` | string | Path to kubernetes client config file, default is empty, useful for incluster config. |
| `--server.kubeClientConfig.burst` | int | Max burst rate for throttle. 0 defaults to 10 (default 25) |
| `--server.kubeClientConfig.qps` | int32 | Max QPS to the master for requests to KubeAPI. 0 defaults to 5. (default 100) |
| `--server.kubeClientConfig.timeout` | string | Max duration allowed for every request to KubeAPI before giving up. 0 implies no timeout. (default "30s") |
| `--server.master` | string | The address of the Kubernetes API server. |
| `--server.readHeaderTimeoutSeconds` | int | The amount of time allowed to read request headers. (default 32) |
| `--server.security.allowCors` | | (default true) |
| `--server.security.allowedHeaders` | strings | (default [Content-Type,flyte-authorization]) |
| `--server.security.allowedOrigins` | strings | (default [*]) |
| `--server.security.auditAccess` | | |
| `--server.security.secure` | | |
| `--server.security.ssl.certificateFile` | string | |
| `--server.security.ssl.keyFile` | string | |
| `--server.security.useAuth` | | |
| `--server.thirdPartyConfig.flyteClient.audience` | string | Audience to use when initiating OAuth2 authorization requests. |
| `--server.thirdPartyConfig.flyteClient.clientId` | string | public identifier for the app which handles authorization for a Flyte deployment |
| `--server.thirdPartyConfig.flyteClient.redirectUri` | string | This is the callback uri registered with the app which handles authorization for a Flyte deployment |
| `--server.thirdPartyConfig.flyteClient.scopes` | strings | Recommended scopes for the client to request. |
| `--server.watchService.maxActiveClusterConnections` | int | (default 5) |
| `--server.watchService.maxPageSize` | int | (default 50000) |
| `--server.watchService.nonTerminalStatusUpdatesInterval` | string | (default "1m0s") |
| `--server.watchService.pollInterval` | string | (default "1s") |
| `--sharedservice.connectPort` | string | On which connect port to serve admin (default "8080") |
| `--sharedservice.grpc.grpcMaxResponseStatusBytes` | int32 | specifies the maximum (uncompressed) size of header list that the client is prepared to accept on grpc calls (default 32000) |
| `--sharedservice.grpc.maxConcurrentStreams` | int | Limit on the number of concurrent streams to each ServerTransport. (default 100) |
| `--sharedservice.grpc.maxMessageSizeBytes` | int | Limit on the size of message that can be received on the server. (default 10485760) |
| `--sharedservice.grpcServerReflection` | | Enable GRPC Server Reflection (default true) |
| `--sharedservice.httpPort` | string | On which http port to serve admin (default "8089") |
| `--sharedservice.kubeConfig` | string | Path to kubernetes client config file. |
| `--sharedservice.master` | string | The address of the Kubernetes API server. |
| `--sharedservice.metrics.enableClientGrpcHistograms` | | Enable client grpc histograms (default true) |
| `--sharedservice.metrics.enableGrpcHistograms` | | Enable grpc histograms (default true) |
| `--sharedservice.metrics.scope` | string | Scope to emit metrics under (default "service:") |
| `--sharedservice.port` | string | On which grpc port to serve admin (default "8080") |
| `--sharedservice.profiler.enabled` | | Enable Profiler on server |
| `--sharedservice.profilerPort` | string | Profile port to start listen for pprof and metric handlers on. (default "10254") |
| `--sharedservice.security.allowCors` | | |
| `--sharedservice.security.allowLocalhostAccess` | | Whether to permit localhost unauthenticated access to the server |
| `--sharedservice.security.allowedHeaders` | strings | |
| `--sharedservice.security.allowedOrigins` | strings | |
| `--sharedservice.security.auditAccess` | | |
| `--sharedservice.security.orgOverride` | string | Override org in identity context if localhost access enabled |
| `--sharedservice.security.secure` | | |
| `--sharedservice.security.ssl.certificateAuthorityFile` | string | |
| `--sharedservice.security.ssl.certificateFile` | string | |
| `--sharedservice.security.ssl.keyFile` | string | |
| `--sharedservice.security.useAuth` | | |
| `--sharedservice.sync.syncInterval` | string | Time interval to sync (default "5m0s") |
| `--storage.cache.max_size_mbs` | int | Maximum size of the cache where the Blob store data is cached in-memory. If not specified or set to 0, cache is not used |
| `--storage.cache.target_gc_percent` | int | Sets the garbage collection target percentage. |
| `--storage.connection.access-key` | string | Access key to use. Only required when authtype is set to accesskey. |
| `--storage.connection.auth-type` | string | Auth Type to use [iam, accesskey]. (default "iam") |
| `--storage.connection.disable-ssl` | | Disables SSL connection. Should only be used for development. |
| `--storage.connection.endpoint` | string | URL for storage client to connect to. |
| `--storage.connection.region` | string | Region to connect to. (default "us-east-1") |
| `--storage.connection.secret-key` | string | Secret to use when accesskey is set. |
| `--storage.container` | string | Initial container (in s3 a bucket) to create -if it doesn't exist-.' |
| `--storage.defaultHttpClient.timeout` | string | Sets time out on the http client. (default "0s") |
| `--storage.enable-multicontainer` | | If this is true, then the container argument is overlooked and redundant. This config will automatically open new connections to new containers/buckets as they are encountered |
| `--storage.limits.maxDownloadMBs` | int | Maximum allowed download size (in MBs) per call. (default 2) |
| `--storage.stow.config` | stringToString | Configuration for stow backend. Refer to github/flyteorg/stow (default []) |
| `--storage.stow.kind` | string | Kind of Stow backend to use. Refer to github/flyteorg/stow |
| `--storage.type` | string | Sets the type of storage to configure [s3/minio/local/mem/stow]. (default "s3") |
| `--union.auth.authorizationMetadataKey` | string | Authorization Header to use when passing Access Tokens to the server (default "flyte-authorization") |
| `--union.auth.clientId` | string | Client ID |
| `--union.auth.clientSecretEnvVar` | string | Environment variable containing the client secret |
| `--union.auth.clientSecretLocation` | string | File containing the client secret |
| `--union.auth.deviceFlow.pollInterval` | string | amount of time the device flow would poll the token endpoint if auth server doesn't return a polling interval. Okta and google IDP do return an interval' (default "5s") |
| `--union.auth.deviceFlow.refreshTime` | string | grace period from the token expiry after which it would refresh the token. (default "5m0s") |
| `--union.auth.deviceFlow.timeout` | string | amount of time the device flow should complete or else it will be cancelled. (default "10m0s") |
| `--union.auth.enable` | | Whether to enable an authenticated conenction when communicating with admin. (default true) |
| `--union.auth.externalAuth.command` | strings | Command for external authentication token generation |
| `--union.auth.pkce.refreshTime` | string | grace period from the token expiry after which it would refresh the token. (default "5m0s") |
| `--union.auth.pkce.timeout` | string | Amount of time the browser session would be active for authentication from client app. (default "15s") |
| `--union.auth.scopes` | strings | List of scopes to request |
| `--union.auth.tokenRefreshWindow` | string | Max duration between token refresh attempt and token expiry. (default "1h0m0s") |
| `--union.auth.tokenUrl` | string | OPTIONAL: Your IdP's token endpoint. It'll be discovered from flyte admin's OAuth Metadata endpoint if not provided. |
| `--union.auth.type` | string | Type of OAuth2 flow used for communicating with admin. (default "Pkce") |
| `--union.cache.maxItemsCount` | int | Maximum number of items to keep in the cache before evicting. (default 1000) |
| `--union.connection.host` | string | Host to connect to (default "dns:///utt-mgdp-stg-us-east-2.cloud-staging.union.ai") |
| `--union.connection.insecure` | | Whether to connect over insecure channel |
| `--union.connection.insecureSkipVerify` | | InsecureSkipVerify controls whether a client verifies the server's certificate chain and host name.Caution: shouldn't be use for production usecases' |
| `--union.connection.keepAliveConfig.permitWithoutStream` | | If true, client sends keepalive pings even with no active RPCs. |
| `--union.connection.keepAliveConfig.time` | string | After a duration of this time if the client doesn't see any activity it pings the server to see if the transport is still alive. (default "20s") |
| `--union.connection.keepAliveConfig.timeout` | string | After having pinged for keepalive check, the client waits for a duration of Timeout and if no activity is seen even after that the connection is closed. (default "2m0s") |
| `--union.connection.maxBackoffDelay` | string | Max delay for grpc backoff (default "8s") |
| `--union.connection.maxRecvMsgSize` | int | Maximum size of a message in bytes of a gRPC message (default 10485760) |
| `--union.connection.maxRetries` | int | Max number of gRPC retries (default 4) |
| `--union.connection.minConnectTimeout` | string | Minimum timeout for establishing a connection (default "20s") |
| `--union.connection.perRetryTimeout` | string | gRPC per retry timeout (default "15s") |
| `--union.connection.serviceConfig` | string | Defines gRPC experimental JSON Service Config (default "{"loadBalancingConfig": [{"round_robin":{}}]}") |
| `--union.connection.trustedIdentityClaims.enabled` | | Enables passing of trusted claims while making inter service calls |
| `--union.connection.trustedIdentityClaims.externalIdentityClaim` | string | External identity claim of the service which is authorized to make internal service call. These are verified against userclouds actions |
| `--union.connection.trustedIdentityClaims.externalIdentityTypeClaim` | string | External identity type claim of app or user to use for the current service identity. It should be an 'app' for inter service communication |
| `--union.internalConnectionConfig.-` | stringToString | (default []) |
| `--union.internalConnectionConfig.enabled` | | Enables internal service to service communication instead of going through ingress. |
| `--union.internalConnectionConfig.urlPattern` | string | UrlPattern of the internal service endpoints. (default "{{ service }}-helmchart.{{ service }}.svc.cluster.local:80") |
| `--webhook.awsSecretManager.sidecarImage` | string | Specifies the sidecar docker image to use (default "docker.io/amazon/aws-secrets-manager-secret-sidecar:v0.1.4") |
| `--webhook.certDir` | string | Certificate directory to use to write generated certs. Defaults to /etc/webhook/certs/ (default "/etc/webhook/certs") |
| `--webhook.embeddedSecretManagerConfig.awsConfig.region` | string | AWS region |
| `--webhook.embeddedSecretManagerConfig.fileMountInitContainer.image` | string | Specifies init container image to use for mounting secrets as files. (default "busybox:1.28") |
| `--webhook.embeddedSecretManagerConfig.gcpConfig.project` | string | GCP project to be used for secret manager |
| `--webhook.embeddedSecretManagerConfig.type` | string | (default "AWS") |
| `--webhook.gcpSecretManager.sidecarImage` | string | Specifies the sidecar docker image to use (default "gcr.io/google.com/cloudsdktool/cloud-sdk:alpine") |
| `--webhook.listenPort` | int | The port to use to listen to webhook calls. Defaults to 9443 (default 9443) |
| `--webhook.localCert` | | write certs locally. Defaults to false |
| `--webhook.metrics-prefix` | string | An optional prefix for all published metrics. (default "flyte:") |
| `--webhook.secretName` | string | Secret name to write generated certs to. (default "flyte-pod-webhook") |
| `--webhook.serviceName` | string | The name of the webhook service. (default "flyte-pod-webhook") |
| `--webhook.servicePort` | int32 | The port on the service that hosting webhook. (default 443) |
| `--webhook.vaultSecretManager.role` | string | Specifies the vault role to use (default "flyte") |
=== PAGE: https://www.union.ai/docs/v1/serverless/api-reference/uctl-cli/uctl-update/uctl-update-task-meta ===
# uctl update task-meta
Update task metadata
## Synopsis
Update the description on the task:
```shell
$ uctl update task-meta -d development -p flytesnacks core.control_flow.merge_sort.merge --description "Merge sort example"
```
Archiving task named entity is not supported and would throw an error:
```shell
$ uctl update task-meta -d development -p flytesnacks core.control_flow.merge_sort.merge --archive
```
Activating task named entity would be a noop since archiving is not
possible:
```shell
$ uctl update task-meta -d development -p flytesnacks core.control_flow.merge_sort.merge --activate
```
Usage:
```shell
$ uctl update task-meta [flags]
```
## Options
| Option | Type | Description |
|--------|------|-------------|
| `--activate` | | activate the named entity. |
| Option | Type | Description |
|--------|------|-------------|
| `--archive` | | archive named entity. |
| Option | Type | Description |
|--------|------|-------------|
| `--description` | string | description of the named entity. |
| `--dryRun` | | execute command without making any modifications. |
| `--force` | | do not ask for an acknowledgement during updates. |
| `-h`, `--help` | help for task-meta |
### Options inherited from parent commands
| Option | Type | Description |
|--------|------|-------------|
| `--admin.audience` | string | Audience to use when initiating OAuth2 authorization requests. |
| `--admin.authType` | string | Type of OAuth2 flow used for communicating with admin.ClientSecret, Pkce, ExternalCommand are valid values (default "ClientSecret") |
| `--admin.authorizationHeader` | string | Custom metadata header to pass JWT |
| `--admin.authorizationServerUrl` | string | This is the URL to your IdP's authorization server. It'll default to Endpoint |
| `--admin.caCertFilePath` | string | Use specified certificate file to verify the admin server peer. |
| `--admin.clientId` | string | Client ID (default "flytepropeller") |
| `--admin.clientSecretEnvVar` | string | Environment variable containing the client secret |
| `--admin.clientSecretLocation` | string | File containing the client secret (default "/etc/secrets/client_secret") |
| `--admin.command` | strings | Command for external authentication token generation |
| `--admin.defaultOrg` | string | OPTIONAL: Default org to use to support non-org based cli's.'. |
| `--admin.defaultServiceConfig` | string | |
| `--admin.deviceFlowConfig.pollInterval` | string | amount of time the device flow would poll the token endpoint if auth server doesn't return a polling interval. Okta and google IDP do return an interval' (default "5s") |
| `--admin.deviceFlowConfig.refreshTime` | string | grace period from the token expiry after which it would refresh the token. (default "5m0s") |
| `--admin.deviceFlowConfig.timeout` | string | amount of time the device flow should complete or else it will be cancelled. (default "10m0s") |
| `--admin.endpoint` | string | For admin types, specify where the uri of the service is located. |
| `--admin.httpProxyURL` | string | OPTIONAL: HTTP Proxy to be used for OAuth requests. |
| `--admin.insecure` | | Use insecure connection. |
| `--admin.insecureSkipVerify` | | InsecureSkipVerify controls whether a client verifies the server's certificate chain and host name.Caution: shouldn't be use for production usecases' |
| `--admin.maxBackoffDelay` | string | Max delay for grpc backoff (default "8s") |
| `--admin.maxMessageSizeBytes` | int | The max size in bytes for incoming gRPC messages |
| `--admin.maxRetries` | int | Max number of gRPC retries (default 4) |
| `--admin.perRetryTimeout` | string | gRPC per retry timeout (default "15s") |
| `--admin.pkceConfig.refreshTime` | string | grace period from the token expiry after which it would refresh the token. (default "5m0s") |
| `--admin.pkceConfig.timeout` | string | Amount of time the browser session would be active for authentication from client app. (default "2m0s") |
| `--admin.proxyCommand` | strings | Command for external proxy-authorization token generation |
| `--admin.scopes` | strings | List of scopes to request |
| `--admin.tokenRefreshWindow` | string | Max duration between token refresh attempt and token expiry. (default "0s") |
| `--admin.tokenUrl` | string | OPTIONAL: Your IdP's token endpoint. It'll be discovered from flyte admin's OAuth Metadata endpoint if not provided. |
| `--admin.useAudienceFromAdmin` | | Use Audience configured from admins public endpoint config. |
| `--admin.useAuth` | | Deprecated: Auth will be enabled/disabled based on admin's dynamically discovered information. |
| `--auth.appAuth.externalAuthServer.allowedAudience` | strings | Optional: A list of allowed audiences. If not provided, the audience is expected to be the public Uri of the service. |
| `--auth.appAuth.externalAuthServer.baseUrl` | string | This should be the base url of the authorization server that you are trying to hit. With Okta for instance, it will look something like https://company.okta.com/oauth2/abcdef123456789/ |
| `--auth.appAuth.externalAuthServer.httpProxyURL` | string | OPTIONAL: HTTP Proxy to be used for OAuth requests. |
| `--auth.appAuth.externalAuthServer.metadataUrl` | string | Optional: If the server doesn't support /.well-known/oauth-authorization-server, you can set a custom metadata url here.' |
| `--auth.appAuth.externalAuthServer.retryAttempts` | int | Optional: The number of attempted retries on a transient failure to get the OAuth metadata (default 5) |
| `--auth.appAuth.externalAuthServer.retryDelay` | string | Optional, Duration to wait between retries (default "1s") |
| `--auth.appAuth.selfAuthServer.accessTokenLifespan` | string | Defines the lifespan of issued access tokens. (default "30m0s") |
| `--auth.appAuth.selfAuthServer.authorizationCodeLifespan` | string | Defines the lifespan of issued access tokens. (default "5m0s") |
| `--auth.appAuth.selfAuthServer.claimSymmetricEncryptionKeySecretName` | string | OPTIONAL: Secret name to use to encrypt claims in authcode token. (default "claim_symmetric_key") |
| `--auth.appAuth.selfAuthServer.issuer` | string | Defines the issuer to use when issuing and validating tokens. The default value is https://{requestUri.HostAndPort}/ |
| `--auth.appAuth.selfAuthServer.oldTokenSigningRSAKeySecretName` | string | OPTIONAL: Secret name to use to retrieve Old RSA Signing Key. This can be useful during key rotation to continue to accept older tokens. (default "token_rsa_key_old.pem") |
| `--auth.appAuth.selfAuthServer.refreshTokenLifespan` | string | Defines the lifespan of issued access tokens. (default "1h0m0s") |
| `--auth.appAuth.selfAuthServer.tokenSigningRSAKeySecretName` | string | OPTIONAL: Secret name to use to retrieve RSA Signing Key. (default "token_rsa_key.pem") |
| `--auth.appAuth.thirdPartyConfig.flyteClient.audience` | string | Audience to use when initiating OAuth2 authorization requests. |
| `--auth.appAuth.thirdPartyConfig.flyteClient.clientId` | string | public identifier for the app which handles authorization for a Flyte deployment (default "uctl") |
| `--auth.appAuth.thirdPartyConfig.flyteClient.redirectUri` | string | This is the callback uri registered with the app which handles authorization for a Flyte deployment (default "http://localhost:53593/callback") |
| `--auth.appAuth.thirdPartyConfig.flyteClient.scopes` | strings | Recommended scopes for the client to request. (default [all,offline]) |
| `--auth.disableForGrpc` | | Disables auth enforcement on Grpc Endpoints. |
| `--auth.disableForHttp` | | Disables auth enforcement on HTTP Endpoints. |
| `--auth.grpcAuthorizationHeader` | string | (default "flyte-authorization") |
| `--auth.httpAuthorizationHeader` | string | (default "flyte-authorization") |
| `--auth.httpProxyURL` | string | OPTIONAL: HTTP Proxy to be used for OAuth requests. |
| `--auth.tokenEndpointProxyPath` | string | The path used to proxy calls to the TokenURL |
| `--auth.userAuth.cookieBlockKeySecretName` | string | OPTIONAL: Secret name to use for cookie block key. (default "cookie_block_key") |
| `--auth.userAuth.cookieHashKeySecretName` | string | OPTIONAL: Secret name to use for cookie hash key. (default "cookie_hash_key") |
| `--auth.userAuth.cookieSetting.domain` | string | OPTIONAL: Allows you to set the domain attribute on the auth cookies. |
| `--auth.userAuth.cookieSetting.sameSitePolicy` | string | OPTIONAL: Allows you to declare if your cookie should be restricted to a first-party or same-site context.Wrapper around http.SameSite. (default "DefaultMode") |
| `--auth.userAuth.httpProxyURL` | string | OPTIONAL: HTTP Proxy to be used for OAuth requests. |
| `--auth.userAuth.idpQueryParameter` | string | idp query parameter used for selecting a particular IDP for doing user authentication. Eg: for Okta passing idp={IDP-ID} forces the authentication to happen with IDP-ID |
| `--auth.userAuth.openId.baseUrl` | string | |
| `--auth.userAuth.openId.clientId` | string | |
| `--auth.userAuth.openId.clientSecretFile` | string | |
| `--auth.userAuth.openId.clientSecretName` | string | (default "oidc_client_secret") |
| `--auth.userAuth.openId.scopes` | strings | (default [openid,profile]) |
| `--auth.userAuth.redirectUrl` | string | (default "/console") |
| `--authorizer.internalCommunicationConfig.enabled` | | Enables authorization decisions for internal communication. (default true) |
| `--authorizer.internalCommunicationConfig.ingressIdentity` | string | IngressIdentity used in the cluster. Needed to exclude the communication coming from ingress. (default "ingress-nginx.ingress-nginx.serviceaccount.identity.linkerd.cluster.local") |
| `--authorizer.internalCommunicationConfig.tenantUrlPatternIdentity` | string | UrlPatternIdentity of the internal tenant service endpoint identities. (default "{{ service }}.{{ org }}.serviceaccount.identity.linkerd.cluster.local") |
| `--authorizer.internalCommunicationConfig.urlPatternIdentity` | string | UrlPatternIdentity of the internal service endpoint identities. (default "{{ service }}-helmchart.{{ service }}.serviceaccount.identity.linkerd.cluster.local") |
| `--authorizer.mode` | string | (default "Active") |
| `--authorizer.organizationConfig.PolicyConfig.adminPolicyDescription` | string | description for the boilerplate admin policy (default "Contributor permissions and full admin permissions to manage users and view usage dashboards") |
| `--authorizer.organizationConfig.PolicyConfig.contributorPolicyDescription` | string | description for the boilerplate contributor policy (default "Viewer permissions and permissions to create workflows, tasks, launch plans, and executions") |
| `--authorizer.organizationConfig.PolicyConfig.defaultUserPolicyRoleType` | string | name of the role type to determine which default policy new users added to the organization should be assigned (default "Viewer") |
| `--authorizer.organizationConfig.PolicyConfig.serverlessContributorPolicyDescription` | string | description for the boilerplate serverless contributor policy (default "Viewer permissions and permissions to create workflows, tasks, launch plans, and executions") |
| `--authorizer.organizationConfig.PolicyConfig.serverlessViewerPolicyDescription` | string | description for the boilerplate serverless viewer policy (default "Permissions to view Flyte entities") |
| `--authorizer.organizationConfig.PolicyConfig.viewerPolicyDescription` | string | description for the boilerplate viewer policy (default "Permissions to view Flyte entities") |
| `--authorizer.organizationConfig.defaultPolicyCacheDuration` | string | Cache entry duration for the store of the default policy per organization (default "10m0s") |
| `--authorizer.syncRuleRefreshInterval` | string | (default "1m0s") |
| `--authorizer.type` | string | (default "UserClouds") |
| `--authorizer.userCloudsClient.cache.redis.ttl.edgeTypes` | string | Specifies how long edge types remain in the cache.. (default "30m0s") |
| `--authorizer.userCloudsClient.cache.redis.ttl.edges` | string | Specifies how long edges remain in the cache. (default "30m0s") |
| `--authorizer.userCloudsClient.cache.redis.ttl.objectTypes` | string | Specifies how long object types remain in the cache. (default "30m0s") |
| `--authorizer.userCloudsClient.cache.redis.ttl.objects` | string | Specifies how long objects remain in the cache. (default "30m0s") |
| `--authorizer.userCloudsClient.cache.type` | string | Cache type to use. (default "none") |
| `--authorizer.userCloudsClient.clientID` | string | UserClouds client id |
| `--authorizer.userCloudsClient.clientSecretName` | string | UserCloud client secret name to read from the secret manager. (default "userclouds-client-secret") |
| `--authorizer.userCloudsClient.enableLogging` | | Enable userclouds client's internal logging. Calls to post logs take 250-350 ms and will impact p99 latency, enable with caution. |
| `--authorizer.userCloudsClient.tenantID` | string | UserClouds tenant id. Should be a UUID. |
| `--authorizer.userCloudsClient.tenantUrl` | string | Something like https://{yourtenant}.tenant.userclouds.com |
| `--config` | string | config file (default is /Users/andrew/.union/config.yaml) |
| `--connection.environment` | string | |
| `--connection.region` | string | |
| `--connection.rootTenantURLPattern` | string | Pattern for tenant url. (default "dns:///{{ organization }}.cloud-staging.union.ai") |
| `--console.endpoint` | string | Endpoint of console, if different than flyte admin |
| `--database.connMaxLifeTime` | string | sets the maximum amount of time a connection may be reused (default "1h0m0s") |
| `--database.enableForeignKeyConstraintWhenMigrating` | | Whether to enable gorm foreign keys when migrating the db |
| `--database.maxIdleConnections` | int | maxIdleConnections sets the maximum number of connections in the idle connection pool. (default 10) |
| `--database.maxOpenConnections` | int | maxOpenConnections sets the maximum number of open connections to the database. (default 100) |
| `--database.postgres.dbname` | string | The database name (default "postgres") |
| `--database.postgres.debug` | | |
| `--database.postgres.host` | string | The host name of the database server (default "localhost") |
| `--database.postgres.options` | string | See http://gorm.io/docs/connecting_to_the_database.html for available options passed, in addition to the above. (default "sslmode=disable") |
| `--database.postgres.password` | string | The database password. (default "postgres") |
| `--database.postgres.passwordPath` | string | Points to the file containing the database password. |
| `--database.postgres.port` | int | The port name of the database server (default 30001) |
| `--database.postgres.readReplicaHost` | string | The host name of the read replica database server (default "localhost") |
| `--database.postgres.username` | string | The database user who is connecting to the server. (default "postgres") |
| `--database.sqlite.file` | string | The path to the file (existing or new) where the DB should be created / stored. If existing, then this will be re-used, else a new will be created |
| `--db.connectionPool.maxConnectionLifetime` | string | (default "0s") |
| `--db.connectionPool.maxIdleConnections` | int | |
| `--db.connectionPool.maxOpenConnections` | int | |
| `--db.dbname` | string | (default "postgres") |
| `--db.debug` | | |
| `--db.host` | string | (default "postgres") |
| `--db.log_level` | int | (default 4) |
| `--db.options` | string | (default "sslmode=disable") |
| `--db.password` | string | |
| `--db.passwordPath` | string | |
| `--db.port` | int | (default 5432) |
| `--db.username` | string | (default "postgres") |
| `-d`, `--domain` | string | Specifies the Flyte project's domain. |
| `--files.archive` | | Pass in archive file either an http link or local path. |
| `--files.assumableIamRole` | string | Custom assumable iam auth role to register launch plans with. |
| `--files.continueOnError` | | Continue on error when registering files. |
| `--files.destinationDirectory` | string | Location of source code in container. |
| `--files.dryRun` | | Execute command without making any modifications. |
| `--files.enableSchedule` | | Enable the schedule if the files contain schedulable launchplan. |
| `--files.force` | | Force use of version number on entities registered with flyte. |
| `--files.k8ServiceAccount` | string | Deprecated. Please use `--K8sServiceAccount`|
| `--files.k8sServiceAccount` | string | Custom kubernetes service account auth role to register launch plans with. |
| `--files.outputLocationPrefix` | string | Custom output location prefix for offloaded types (files/schemas). |
| `--files.sourceUploadPath` | string | Deprecated: Update flyte admin to avoid having to configure storage access from uctl. |
| `--files.version` | string | Version of the entity to be registered with flyte which are un-versioned after serialization. |
| `--logger.formatter.type` | string | Sets logging format type. (default "json") |
| `--logger.level` | int | Sets the minimum logging level. (default 3) |
| `--logger.mute` | | Mutes all logs regardless of severity. Intended for benchmarks/tests only. |
| `--logger.show-source` | | Includes source code location in logs. |
| `--org` | string | Organization to work on. If not set, default to user's org. |
| `--otel.file.filename` | string | Filename to store exported telemetry traces (default "/tmp/trace.txt") |
| `--otel.jaeger.endpoint` | string | Endpoint for the jaeger telemetry trace ingestor (default "http://localhost:14268/api/traces") |
| `--otel.otlpgrpc.endpoint` | string | Endpoint for the OTLP telemetry trace collector (default "http://localhost:4317") |
| `--otel.otlphttp.endpoint` | string | Endpoint for the OTLP telemetry trace collector (default "http://localhost:4318/v1/traces") |
| `--otel.sampler.parentSampler` | string | Sets the parent sampler to use for the tracer (default "always") |
| `--otel.type` | string | Sets the type of exporter to configure [noop/file/jaeger/otlpgrpc/otlphttp]. (default "noop") |
| `-o`, `--output` | string | Specifies the output type - supported formats [TABLE JSON YAML DOT DOTURL]. NOTE: dot, doturl are only supported for Workflow (default "table") |
| `--plugins.catalogcache.reader.maxItems` | int | Maximum number of entries to keep in the index. (default 10000) |
| `--plugins.catalogcache.reader.maxRetries` | int | Maximum number of retries per item. (default 3) |
| `--plugins.catalogcache.reader.workers` | int | Number of concurrent workers to start processing the queue. (default 10) |
| `--plugins.catalogcache.writer.maxItems` | int | Maximum number of entries to keep in the index. (default 10000) |
| `--plugins.catalogcache.writer.maxRetries` | int | Maximum number of retries per item. (default 3) |
| `--plugins.catalogcache.writer.workers` | int | Number of concurrent workers to start processing the queue. (default 10) |
| `-p`, `--project` | string | Specifies the Flyte project. |
| `--rediscache.passwordSecretName` | string | Name of secret with Redis password. |
| `--rediscache.primaryEndpoint` | string | Primary endpoint for the redis cache that can be used for both reads and writes. |
| `--rediscache.replicaEndpoint` | string | Replica endpoint for the redis cache that can be used for reads. |
| `--secrets.env-prefix` | string | Prefix for environment variables (default "FLYTE_SECRET_") |
| `--secrets.secrets-prefix` | string | Prefix where to look for secrets file (default "/etc/secrets") |
| `--secrets.type` | string | Sets the type of storage to configure [local]. (default "local") |
| `--server.dataProxy.download.maxExpiresIn` | string | Maximum allowed expiration duration. (default "1h0m0s") |
| `--server.dataProxy.upload.defaultFileNameLength` | int | Default length for the generated file name if not provided in the request. (default 20) |
| `--server.dataProxy.upload.maxExpiresIn` | string | Maximum allowed expiration duration. (default "1h0m0s") |
| `--server.dataProxy.upload.maxSize` | string | Maximum allowed upload size. (default "6Mi") |
| `--server.dataProxy.upload.storagePrefix` | string | Storage prefix to use for all upload requests. |
| `--server.grpc.enableGrpcLatencyMetrics` | | Enable grpc latency metrics. Note Histograms metrics can be expensive on Prometheus servers. |
| `--server.grpc.maxMessageSizeBytes` | int | The max size in bytes for incoming gRPC messages |
| `--server.grpc.port` | int | On which grpc port to serve admin (default 8089) |
| `--server.grpc.serverReflection` | | Enable GRPC Server Reflection (default true) |
| `--server.grpcPort` | int | deprecated |
| `--server.grpcServerReflection` | | deprecated |
| `--server.httpPort` | int | On which http port to serve admin (default 8088) |
| `--server.kube-config` | string | Path to kubernetes client config file, default is empty, useful for incluster config. |
| `--server.kubeClientConfig.burst` | int | Max burst rate for throttle. 0 defaults to 10 (default 25) |
| `--server.kubeClientConfig.qps` | int32 | Max QPS to the master for requests to KubeAPI. 0 defaults to 5. (default 100) |
| `--server.kubeClientConfig.timeout` | string | Max duration allowed for every request to KubeAPI before giving up. 0 implies no timeout. (default "30s") |
| `--server.master` | string | The address of the Kubernetes API server. |
| `--server.readHeaderTimeoutSeconds` | int | The amount of time allowed to read request headers. (default 32) |
| `--server.security.allowCors` | | (default true) |
| `--server.security.allowedHeaders` | strings | (default [Content-Type,flyte-authorization]) |
| `--server.security.allowedOrigins` | strings | (default [*]) |
| `--server.security.auditAccess` | | |
| `--server.security.secure` | | |
| `--server.security.ssl.certificateFile` | string | |
| `--server.security.ssl.keyFile` | string | |
| `--server.security.useAuth` | | |
| `--server.thirdPartyConfig.flyteClient.audience` | string | Audience to use when initiating OAuth2 authorization requests. |
| `--server.thirdPartyConfig.flyteClient.clientId` | string | public identifier for the app which handles authorization for a Flyte deployment |
| `--server.thirdPartyConfig.flyteClient.redirectUri` | string | This is the callback uri registered with the app which handles authorization for a Flyte deployment |
| `--server.thirdPartyConfig.flyteClient.scopes` | strings | Recommended scopes for the client to request. |
| `--server.watchService.maxActiveClusterConnections` | int | (default 5) |
| `--server.watchService.maxPageSize` | int | (default 50000) |
| `--server.watchService.nonTerminalStatusUpdatesInterval` | string | (default "1m0s") |
| `--server.watchService.pollInterval` | string | (default "1s") |
| `--sharedservice.connectPort` | string | On which connect port to serve admin (default "8080") |
| `--sharedservice.grpc.grpcMaxResponseStatusBytes` | int32 | specifies the maximum (uncompressed) size of header list that the client is prepared to accept on grpc calls (default 32000) |
| `--sharedservice.grpc.maxConcurrentStreams` | int | Limit on the number of concurrent streams to each ServerTransport. (default 100) |
| `--sharedservice.grpc.maxMessageSizeBytes` | int | Limit on the size of message that can be received on the server. (default 10485760) |
| `--sharedservice.grpcServerReflection` | | Enable GRPC Server Reflection (default true) |
| `--sharedservice.httpPort` | string | On which http port to serve admin (default "8089") |
| `--sharedservice.kubeConfig` | string | Path to kubernetes client config file. |
| `--sharedservice.master` | string | The address of the Kubernetes API server. |
| `--sharedservice.metrics.enableClientGrpcHistograms` | | Enable client grpc histograms (default true) |
| `--sharedservice.metrics.enableGrpcHistograms` | | Enable grpc histograms (default true) |
| `--sharedservice.metrics.scope` | string | Scope to emit metrics under (default "service:") |
| `--sharedservice.port` | string | On which grpc port to serve admin (default "8080") |
| `--sharedservice.profiler.enabled` | | Enable Profiler on server |
| `--sharedservice.profilerPort` | string | Profile port to start listen for pprof and metric handlers on. (default "10254") |
| `--sharedservice.security.allowCors` | | |
| `--sharedservice.security.allowLocalhostAccess` | | Whether to permit localhost unauthenticated access to the server |
| `--sharedservice.security.allowedHeaders` | strings | |
| `--sharedservice.security.allowedOrigins` | strings | |
| `--sharedservice.security.auditAccess` | | |
| `--sharedservice.security.orgOverride` | string | Override org in identity context if localhost access enabled |
| `--sharedservice.security.secure` | | |
| `--sharedservice.security.ssl.certificateAuthorityFile` | string | |
| `--sharedservice.security.ssl.certificateFile` | string | |
| `--sharedservice.security.ssl.keyFile` | string | |
| `--sharedservice.security.useAuth` | | |
| `--sharedservice.sync.syncInterval` | string | Time interval to sync (default "5m0s") |
| `--storage.cache.max_size_mbs` | int | Maximum size of the cache where the Blob store data is cached in-memory. If not specified or set to 0, cache is not used |
| `--storage.cache.target_gc_percent` | int | Sets the garbage collection target percentage. |
| `--storage.connection.access-key` | string | Access key to use. Only required when authtype is set to accesskey. |
| `--storage.connection.auth-type` | string | Auth Type to use [iam, accesskey]. (default "iam") |
| `--storage.connection.disable-ssl` | | Disables SSL connection. Should only be used for development. |
| `--storage.connection.endpoint` | string | URL for storage client to connect to. |
| `--storage.connection.region` | string | Region to connect to. (default "us-east-1") |
| `--storage.connection.secret-key` | string | Secret to use when accesskey is set. |
| `--storage.container` | string | Initial container (in s3 a bucket) to create -if it doesn't exist-.' |
| `--storage.defaultHttpClient.timeout` | string | Sets time out on the http client. (default "0s") |
| `--storage.enable-multicontainer` | | If this is true, then the container argument is overlooked and redundant. This config will automatically open new connections to new containers/buckets as they are encountered |
| `--storage.limits.maxDownloadMBs` | int | Maximum allowed download size (in MBs) per call. (default 2) |
| `--storage.stow.config` | stringToString | Configuration for stow backend. Refer to github/flyteorg/stow (default []) |
| `--storage.stow.kind` | string | Kind of Stow backend to use. Refer to github/flyteorg/stow |
| `--storage.type` | string | Sets the type of storage to configure [s3/minio/local/mem/stow]. (default "s3") |
| `--union.auth.authorizationMetadataKey` | string | Authorization Header to use when passing Access Tokens to the server (default "flyte-authorization") |
| `--union.auth.clientId` | string | Client ID |
| `--union.auth.clientSecretEnvVar` | string | Environment variable containing the client secret |
| `--union.auth.clientSecretLocation` | string | File containing the client secret |
| `--union.auth.deviceFlow.pollInterval` | string | amount of time the device flow would poll the token endpoint if auth server doesn't return a polling interval. Okta and google IDP do return an interval' (default "5s") |
| `--union.auth.deviceFlow.refreshTime` | string | grace period from the token expiry after which it would refresh the token. (default "5m0s") |
| `--union.auth.deviceFlow.timeout` | string | amount of time the device flow should complete or else it will be cancelled. (default "10m0s") |
| `--union.auth.enable` | | Whether to enable an authenticated conenction when communicating with admin. (default true) |
| `--union.auth.externalAuth.command` | strings | Command for external authentication token generation |
| `--union.auth.pkce.refreshTime` | string | grace period from the token expiry after which it would refresh the token. (default "5m0s") |
| `--union.auth.pkce.timeout` | string | Amount of time the browser session would be active for authentication from client app. (default "15s") |
| `--union.auth.scopes` | strings | List of scopes to request |
| `--union.auth.tokenRefreshWindow` | string | Max duration between token refresh attempt and token expiry. (default "1h0m0s") |
| `--union.auth.tokenUrl` | string | OPTIONAL: Your IdP's token endpoint. It'll be discovered from flyte admin's OAuth Metadata endpoint if not provided. |
| `--union.auth.type` | string | Type of OAuth2 flow used for communicating with admin. (default "Pkce") |
| `--union.cache.maxItemsCount` | int | Maximum number of items to keep in the cache before evicting. (default 1000) |
| `--union.connection.host` | string | Host to connect to (default "dns:///utt-mgdp-stg-us-east-2.cloud-staging.union.ai") |
| `--union.connection.insecure` | | Whether to connect over insecure channel |
| `--union.connection.insecureSkipVerify` | | InsecureSkipVerify controls whether a client verifies the server's certificate chain and host name.Caution: shouldn't be use for production usecases' |
| `--union.connection.keepAliveConfig.permitWithoutStream` | | If true, client sends keepalive pings even with no active RPCs. |
| `--union.connection.keepAliveConfig.time` | string | After a duration of this time if the client doesn't see any activity it pings the server to see if the transport is still alive. (default "20s") |
| `--union.connection.keepAliveConfig.timeout` | string | After having pinged for keepalive check, the client waits for a duration of Timeout and if no activity is seen even after that the connection is closed. (default "2m0s") |
| `--union.connection.maxBackoffDelay` | string | Max delay for grpc backoff (default "8s") |
| `--union.connection.maxRecvMsgSize` | int | Maximum size of a message in bytes of a gRPC message (default 10485760) |
| `--union.connection.maxRetries` | int | Max number of gRPC retries (default 4) |
| `--union.connection.minConnectTimeout` | string | Minimum timeout for establishing a connection (default "20s") |
| `--union.connection.perRetryTimeout` | string | gRPC per retry timeout (default "15s") |
| `--union.connection.serviceConfig` | string | Defines gRPC experimental JSON Service Config (default "{"loadBalancingConfig": [{"round_robin":{}}]}") |
| `--union.connection.trustedIdentityClaims.enabled` | | Enables passing of trusted claims while making inter service calls |
| `--union.connection.trustedIdentityClaims.externalIdentityClaim` | string | External identity claim of the service which is authorized to make internal service call. These are verified against userclouds actions |
| `--union.connection.trustedIdentityClaims.externalIdentityTypeClaim` | string | External identity type claim of app or user to use for the current service identity. It should be an 'app' for inter service communication |
| `--union.internalConnectionConfig.-` | stringToString | (default []) |
| `--union.internalConnectionConfig.enabled` | | Enables internal service to service communication instead of going through ingress. |
| `--union.internalConnectionConfig.urlPattern` | string | UrlPattern of the internal service endpoints. (default "{{ service }}-helmchart.{{ service }}.svc.cluster.local:80") |
| `--webhook.awsSecretManager.sidecarImage` | string | Specifies the sidecar docker image to use (default "docker.io/amazon/aws-secrets-manager-secret-sidecar:v0.1.4") |
| `--webhook.certDir` | string | Certificate directory to use to write generated certs. Defaults to /etc/webhook/certs/ (default "/etc/webhook/certs") |
| `--webhook.embeddedSecretManagerConfig.awsConfig.region` | string | AWS region |
| `--webhook.embeddedSecretManagerConfig.fileMountInitContainer.image` | string | Specifies init container image to use for mounting secrets as files. (default "busybox:1.28") |
| `--webhook.embeddedSecretManagerConfig.gcpConfig.project` | string | GCP project to be used for secret manager |
| `--webhook.embeddedSecretManagerConfig.type` | string | (default "AWS") |
| `--webhook.gcpSecretManager.sidecarImage` | string | Specifies the sidecar docker image to use (default "gcr.io/google.com/cloudsdktool/cloud-sdk:alpine") |
| `--webhook.listenPort` | int | The port to use to listen to webhook calls. Defaults to 9443 (default 9443) |
| `--webhook.localCert` | | write certs locally. Defaults to false |
| `--webhook.metrics-prefix` | string | An optional prefix for all published metrics. (default "flyte:") |
| `--webhook.secretName` | string | Secret name to write generated certs to. (default "flyte-pod-webhook") |
| `--webhook.serviceName` | string | The name of the webhook service. (default "flyte-pod-webhook") |
| `--webhook.servicePort` | int32 | The port on the service that hosting webhook. (default 443) |
| `--webhook.vaultSecretManager.role` | string | Specifies the vault role to use (default "flyte") |
=== PAGE: https://www.union.ai/docs/v1/serverless/api-reference/uctl-cli/uctl-update/uctl-update-task-resource-attribute ===
# uctl update task-resource-attribute
Update matchable resources of task attributes
## Synopsis
Updates the task resource attributes for the given project and domain
combination or additionally with workflow name.
Updating the task resource attribute is only available from a generated
file. See the get section for generating this file. This will completely
overwrite any existing custom project, domain, and workflow combination
attributes. It is preferable to do get and generate an attribute file if
there is an existing attribute already set and then update it to have
new values. Refer to get task-resource-attribute section on how to
generate this file. It takes input for task resource attributes from the
config file tra.yaml, Example: content of tra.yaml:
``` yaml
domain: development
project: flytesnacks
defaults:
cpu: "1"
memory: "150Mi"
limits:
cpu: "2"
memory: "450Mi"
```
```shell
$ uctl update task-resource-attribute --attrFile tra.yaml
```
Update task resource attribute for project, domain, and workflow
combination. This will take precedence over any other resource attribute
defined at project domain level. For workflow
`core.control_flow.merge_sort.merge_sort` in flytesnacks project,
development domain, it is:
``` yaml
domain: development
project: flytesnacks
workflow: core.control_flow.merge_sort.merge_sort
defaults:
cpu: "1"
memory: "150Mi"
limits:
cpu: "2"
memory: "450Mi"
```
```shell
$ uctl update task-resource-attribute --attrFile tra.yaml
```
Usage:
```shell
$ uctl update task-resource-attribute [flags]
```
## Options
| Option | Type | Description |
|--------|------|-------------|
| `--attrFile` | string | attribute file name to be used for updating attribute for the resource type. |
| `--dryRun` | | execute command without making any modifications. |
| `--force` | | do not ask for an acknowledgement during updates. |
| `-h`, `--help` | help for task-resource-attribute |
### Options inherited from parent commands
| Option | Type | Description |
|--------|------|-------------|
| `--admin.audience` | string | Audience to use when initiating OAuth2 authorization requests. |
| `--admin.authType` | string | Type of OAuth2 flow used for communicating with admin.ClientSecret, Pkce, ExternalCommand are valid values (default "ClientSecret") |
| `--admin.authorizationHeader` | string | Custom metadata header to pass JWT |
| `--admin.authorizationServerUrl` | string | This is the URL to your IdP's authorization server. It'll default to Endpoint |
| `--admin.caCertFilePath` | string | Use specified certificate file to verify the admin server peer. |
| `--admin.clientId` | string | Client ID (default "flytepropeller") |
| `--admin.clientSecretEnvVar` | string | Environment variable containing the client secret |
| `--admin.clientSecretLocation` | string | File containing the client secret (default "/etc/secrets/client_secret") |
| `--admin.command` | strings | Command for external authentication token generation |
| `--admin.defaultOrg` | string | OPTIONAL: Default org to use to support non-org based cli's.'. |
| `--admin.defaultServiceConfig` | string | |
| `--admin.deviceFlowConfig.pollInterval` | string | amount of time the device flow would poll the token endpoint if auth server doesn't return a polling interval. Okta and google IDP do return an interval' (default "5s") |
| `--admin.deviceFlowConfig.refreshTime` | string | grace period from the token expiry after which it would refresh the token. (default "5m0s") |
| `--admin.deviceFlowConfig.timeout` | string | amount of time the device flow should complete or else it will be cancelled. (default "10m0s") |
| `--admin.endpoint` | string | For admin types, specify where the uri of the service is located. |
| `--admin.httpProxyURL` | string | OPTIONAL: HTTP Proxy to be used for OAuth requests. |
| `--admin.insecure` | | Use insecure connection. |
| `--admin.insecureSkipVerify` | | InsecureSkipVerify controls whether a client verifies the server's certificate chain and host name.Caution: shouldn't be use for production usecases' |
| `--admin.maxBackoffDelay` | string | Max delay for grpc backoff (default "8s") |
| `--admin.maxMessageSizeBytes` | int | The max size in bytes for incoming gRPC messages |
| `--admin.maxRetries` | int | Max number of gRPC retries (default 4) |
| `--admin.perRetryTimeout` | string | gRPC per retry timeout (default "15s") |
| `--admin.pkceConfig.refreshTime` | string | grace period from the token expiry after which it would refresh the token. (default "5m0s") |
| `--admin.pkceConfig.timeout` | string | Amount of time the browser session would be active for authentication from client app. (default "2m0s") |
| `--admin.proxyCommand` | strings | Command for external proxy-authorization token generation |
| `--admin.scopes` | strings | List of scopes to request |
| `--admin.tokenRefreshWindow` | string | Max duration between token refresh attempt and token expiry. (default "0s") |
| `--admin.tokenUrl` | string | OPTIONAL: Your IdP's token endpoint. It'll be discovered from flyte admin's OAuth Metadata endpoint if not provided. |
| `--admin.useAudienceFromAdmin` | | Use Audience configured from admins public endpoint config. |
| `--admin.useAuth` | | Deprecated: Auth will be enabled/disabled based on admin's dynamically discovered information. |
| `--auth.appAuth.externalAuthServer.allowedAudience` | strings | Optional: A list of allowed audiences. If not provided, the audience is expected to be the public Uri of the service. |
| `--auth.appAuth.externalAuthServer.baseUrl` | string | This should be the base url of the authorization server that you are trying to hit. With Okta for instance, it will look something like https://company.okta.com/oauth2/abcdef123456789/ |
| `--auth.appAuth.externalAuthServer.httpProxyURL` | string | OPTIONAL: HTTP Proxy to be used for OAuth requests. |
| `--auth.appAuth.externalAuthServer.metadataUrl` | string | Optional: If the server doesn't support /.well-known/oauth-authorization-server, you can set a custom metadata url here.' |
| `--auth.appAuth.externalAuthServer.retryAttempts` | int | Optional: The number of attempted retries on a transient failure to get the OAuth metadata (default 5) |
| `--auth.appAuth.externalAuthServer.retryDelay` | string | Optional, Duration to wait between retries (default "1s") |
| `--auth.appAuth.selfAuthServer.accessTokenLifespan` | string | Defines the lifespan of issued access tokens. (default "30m0s") |
| `--auth.appAuth.selfAuthServer.authorizationCodeLifespan` | string | Defines the lifespan of issued access tokens. (default "5m0s") |
| `--auth.appAuth.selfAuthServer.claimSymmetricEncryptionKeySecretName` | string | OPTIONAL: Secret name to use to encrypt claims in authcode token. (default "claim_symmetric_key") |
| `--auth.appAuth.selfAuthServer.issuer` | string | Defines the issuer to use when issuing and validating tokens. The default value is https://{requestUri.HostAndPort}/ |
| `--auth.appAuth.selfAuthServer.oldTokenSigningRSAKeySecretName` | string | OPTIONAL: Secret name to use to retrieve Old RSA Signing Key. This can be useful during key rotation to continue to accept older tokens. (default "token_rsa_key_old.pem") |
| `--auth.appAuth.selfAuthServer.refreshTokenLifespan` | string | Defines the lifespan of issued access tokens. (default "1h0m0s") |
| `--auth.appAuth.selfAuthServer.tokenSigningRSAKeySecretName` | string | OPTIONAL: Secret name to use to retrieve RSA Signing Key. (default "token_rsa_key.pem") |
| `--auth.appAuth.thirdPartyConfig.flyteClient.audience` | string | Audience to use when initiating OAuth2 authorization requests. |
| `--auth.appAuth.thirdPartyConfig.flyteClient.clientId` | string | public identifier for the app which handles authorization for a Flyte deployment (default "uctl") |
| `--auth.appAuth.thirdPartyConfig.flyteClient.redirectUri` | string | This is the callback uri registered with the app which handles authorization for a Flyte deployment (default "http://localhost:53593/callback") |
| `--auth.appAuth.thirdPartyConfig.flyteClient.scopes` | strings | Recommended scopes for the client to request. (default [all,offline]) |
| `--auth.disableForGrpc` | | Disables auth enforcement on Grpc Endpoints. |
| `--auth.disableForHttp` | | Disables auth enforcement on HTTP Endpoints. |
| `--auth.grpcAuthorizationHeader` | string | (default "flyte-authorization") |
| `--auth.httpAuthorizationHeader` | string | (default "flyte-authorization") |
| `--auth.httpProxyURL` | string | OPTIONAL: HTTP Proxy to be used for OAuth requests. |
| `--auth.tokenEndpointProxyPath` | string | The path used to proxy calls to the TokenURL |
| `--auth.userAuth.cookieBlockKeySecretName` | string | OPTIONAL: Secret name to use for cookie block key. (default "cookie_block_key") |
| `--auth.userAuth.cookieHashKeySecretName` | string | OPTIONAL: Secret name to use for cookie hash key. (default "cookie_hash_key") |
| `--auth.userAuth.cookieSetting.domain` | string | OPTIONAL: Allows you to set the domain attribute on the auth cookies. |
| `--auth.userAuth.cookieSetting.sameSitePolicy` | string | OPTIONAL: Allows you to declare if your cookie should be restricted to a first-party or same-site context.Wrapper around http.SameSite. (default "DefaultMode") |
| `--auth.userAuth.httpProxyURL` | string | OPTIONAL: HTTP Proxy to be used for OAuth requests. |
| `--auth.userAuth.idpQueryParameter` | string | idp query parameter used for selecting a particular IDP for doing user authentication. Eg: for Okta passing idp={IDP-ID} forces the authentication to happen with IDP-ID |
| `--auth.userAuth.openId.baseUrl` | string | |
| `--auth.userAuth.openId.clientId` | string | |
| `--auth.userAuth.openId.clientSecretFile` | string | |
| `--auth.userAuth.openId.clientSecretName` | string | (default "oidc_client_secret") |
| `--auth.userAuth.openId.scopes` | strings | (default [openid,profile]) |
| `--auth.userAuth.redirectUrl` | string | (default "/console") |
| `--authorizer.internalCommunicationConfig.enabled` | | Enables authorization decisions for internal communication. (default true) |
| `--authorizer.internalCommunicationConfig.ingressIdentity` | string | IngressIdentity used in the cluster. Needed to exclude the communication coming from ingress. (default "ingress-nginx.ingress-nginx.serviceaccount.identity.linkerd.cluster.local") |
| `--authorizer.internalCommunicationConfig.tenantUrlPatternIdentity` | string | UrlPatternIdentity of the internal tenant service endpoint identities. (default "{{ service }}.{{ org }}.serviceaccount.identity.linkerd.cluster.local") |
| `--authorizer.internalCommunicationConfig.urlPatternIdentity` | string | UrlPatternIdentity of the internal service endpoint identities. (default "{{ service }}-helmchart.{{ service }}.serviceaccount.identity.linkerd.cluster.local") |
| `--authorizer.mode` | string | (default "Active") |
| `--authorizer.organizationConfig.PolicyConfig.adminPolicyDescription` | string | description for the boilerplate admin policy (default "Contributor permissions and full admin permissions to manage users and view usage dashboards") |
| `--authorizer.organizationConfig.PolicyConfig.contributorPolicyDescription` | string | description for the boilerplate contributor policy (default "Viewer permissions and permissions to create workflows, tasks, launch plans, and executions") |
| `--authorizer.organizationConfig.PolicyConfig.defaultUserPolicyRoleType` | string | name of the role type to determine which default policy new users added to the organization should be assigned (default "Viewer") |
| `--authorizer.organizationConfig.PolicyConfig.serverlessContributorPolicyDescription` | string | description for the boilerplate serverless contributor policy (default "Viewer permissions and permissions to create workflows, tasks, launch plans, and executions") |
| `--authorizer.organizationConfig.PolicyConfig.serverlessViewerPolicyDescription` | string | description for the boilerplate serverless viewer policy (default "Permissions to view Flyte entities") |
| `--authorizer.organizationConfig.PolicyConfig.viewerPolicyDescription` | string | description for the boilerplate viewer policy (default "Permissions to view Flyte entities") |
| `--authorizer.organizationConfig.defaultPolicyCacheDuration` | string | Cache entry duration for the store of the default policy per organization (default "10m0s") |
| `--authorizer.syncRuleRefreshInterval` | string | (default "1m0s") |
| `--authorizer.type` | string | (default "UserClouds") |
| `--authorizer.userCloudsClient.cache.redis.ttl.edgeTypes` | string | Specifies how long edge types remain in the cache.. (default "30m0s") |
| `--authorizer.userCloudsClient.cache.redis.ttl.edges` | string | Specifies how long edges remain in the cache. (default "30m0s") |
| `--authorizer.userCloudsClient.cache.redis.ttl.objectTypes` | string | Specifies how long object types remain in the cache. (default "30m0s") |
| `--authorizer.userCloudsClient.cache.redis.ttl.objects` | string | Specifies how long objects remain in the cache. (default "30m0s") |
| `--authorizer.userCloudsClient.cache.type` | string | Cache type to use. (default "none") |
| `--authorizer.userCloudsClient.clientID` | string | UserClouds client id |
| `--authorizer.userCloudsClient.clientSecretName` | string | UserCloud client secret name to read from the secret manager. (default "userclouds-client-secret") |
| `--authorizer.userCloudsClient.enableLogging` | | Enable userclouds client's internal logging. Calls to post logs take 250-350 ms and will impact p99 latency, enable with caution. |
| `--authorizer.userCloudsClient.tenantID` | string | UserClouds tenant id. Should be a UUID. |
| `--authorizer.userCloudsClient.tenantUrl` | string | Something like https://{yourtenant}.tenant.userclouds.com |
| `--config` | string | config file (default is /Users/andrew/.union/config.yaml) |
| `--connection.environment` | string | |
| `--connection.region` | string | |
| `--connection.rootTenantURLPattern` | string | Pattern for tenant url. (default "dns:///{{ organization }}.cloud-staging.union.ai") |
| `--console.endpoint` | string | Endpoint of console, if different than flyte admin |
| `--database.connMaxLifeTime` | string | sets the maximum amount of time a connection may be reused (default "1h0m0s") |
| `--database.enableForeignKeyConstraintWhenMigrating` | | Whether to enable gorm foreign keys when migrating the db |
| `--database.maxIdleConnections` | int | maxIdleConnections sets the maximum number of connections in the idle connection pool. (default 10) |
| `--database.maxOpenConnections` | int | maxOpenConnections sets the maximum number of open connections to the database. (default 100) |
| `--database.postgres.dbname` | string | The database name (default "postgres") |
| `--database.postgres.debug` | | |
| `--database.postgres.host` | string | The host name of the database server (default "localhost") |
| `--database.postgres.options` | string | See http://gorm.io/docs/connecting_to_the_database.html for available options passed, in addition to the above. (default "sslmode=disable") |
| `--database.postgres.password` | string | The database password. (default "postgres") |
| `--database.postgres.passwordPath` | string | Points to the file containing the database password. |
| `--database.postgres.port` | int | The port name of the database server (default 30001) |
| `--database.postgres.readReplicaHost` | string | The host name of the read replica database server (default "localhost") |
| `--database.postgres.username` | string | The database user who is connecting to the server. (default "postgres") |
| `--database.sqlite.file` | string | The path to the file (existing or new) where the DB should be created / stored. If existing, then this will be re-used, else a new will be created |
| `--db.connectionPool.maxConnectionLifetime` | string | (default "0s") |
| `--db.connectionPool.maxIdleConnections` | int | |
| `--db.connectionPool.maxOpenConnections` | int | |
| `--db.dbname` | string | (default "postgres") |
| `--db.debug` | | |
| `--db.host` | string | (default "postgres") |
| `--db.log_level` | int | (default 4) |
| `--db.options` | string | (default "sslmode=disable") |
| `--db.password` | string | |
| `--db.passwordPath` | string | |
| `--db.port` | int | (default 5432) |
| `--db.username` | string | (default "postgres") |
| `-d`, `--domain` | string | Specifies the Flyte project's domain. |
| `--files.archive` | | Pass in archive file either an http link or local path. |
| `--files.assumableIamRole` | string | Custom assumable iam auth role to register launch plans with. |
| `--files.continueOnError` | | Continue on error when registering files. |
| `--files.destinationDirectory` | string | Location of source code in container. |
| `--files.dryRun` | | Execute command without making any modifications. |
| `--files.enableSchedule` | | Enable the schedule if the files contain schedulable launchplan. |
| `--files.force` | | Force use of version number on entities registered with flyte. |
| `--files.k8ServiceAccount` | string | Deprecated. Please use `--K8sServiceAccount`|
| `--files.k8sServiceAccount` | string | Custom kubernetes service account auth role to register launch plans with. |
| `--files.outputLocationPrefix` | string | Custom output location prefix for offloaded types (files/schemas). |
| `--files.sourceUploadPath` | string | Deprecated: Update flyte admin to avoid having to configure storage access from uctl. |
| `--files.version` | string | Version of the entity to be registered with flyte which are un-versioned after serialization. |
| `--logger.formatter.type` | string | Sets logging format type. (default "json") |
| `--logger.level` | int | Sets the minimum logging level. (default 3) |
| `--logger.mute` | | Mutes all logs regardless of severity. Intended for benchmarks/tests only. |
| `--logger.show-source` | | Includes source code location in logs. |
| `--org` | string | Organization to work on. If not set, default to user's org. |
| `--otel.file.filename` | string | Filename to store exported telemetry traces (default "/tmp/trace.txt") |
| `--otel.jaeger.endpoint` | string | Endpoint for the jaeger telemetry trace ingestor (default "http://localhost:14268/api/traces") |
| `--otel.otlpgrpc.endpoint` | string | Endpoint for the OTLP telemetry trace collector (default "http://localhost:4317") |
| `--otel.otlphttp.endpoint` | string | Endpoint for the OTLP telemetry trace collector (default "http://localhost:4318/v1/traces") |
| `--otel.sampler.parentSampler` | string | Sets the parent sampler to use for the tracer (default "always") |
| `--otel.type` | string | Sets the type of exporter to configure [noop/file/jaeger/otlpgrpc/otlphttp]. (default "noop") |
| `-o`, `--output` | string | Specifies the output type - supported formats [TABLE JSON YAML DOT DOTURL]. NOTE: dot, doturl are only supported for Workflow (default "table") |
| `--plugins.catalogcache.reader.maxItems` | int | Maximum number of entries to keep in the index. (default 10000) |
| `--plugins.catalogcache.reader.maxRetries` | int | Maximum number of retries per item. (default 3) |
| `--plugins.catalogcache.reader.workers` | int | Number of concurrent workers to start processing the queue. (default 10) |
| `--plugins.catalogcache.writer.maxItems` | int | Maximum number of entries to keep in the index. (default 10000) |
| `--plugins.catalogcache.writer.maxRetries` | int | Maximum number of retries per item. (default 3) |
| `--plugins.catalogcache.writer.workers` | int | Number of concurrent workers to start processing the queue. (default 10) |
| `-p`, `--project` | string | Specifies the Flyte project. |
| `--rediscache.passwordSecretName` | string | Name of secret with Redis password. |
| `--rediscache.primaryEndpoint` | string | Primary endpoint for the redis cache that can be used for both reads and writes. |
| `--rediscache.replicaEndpoint` | string | Replica endpoint for the redis cache that can be used for reads. |
| `--secrets.env-prefix` | string | Prefix for environment variables (default "FLYTE_SECRET_") |
| `--secrets.secrets-prefix` | string | Prefix where to look for secrets file (default "/etc/secrets") |
| `--secrets.type` | string | Sets the type of storage to configure [local]. (default "local") |
| `--server.dataProxy.download.maxExpiresIn` | string | Maximum allowed expiration duration. (default "1h0m0s") |
| `--server.dataProxy.upload.defaultFileNameLength` | int | Default length for the generated file name if not provided in the request. (default 20) |
| `--server.dataProxy.upload.maxExpiresIn` | string | Maximum allowed expiration duration. (default "1h0m0s") |
| `--server.dataProxy.upload.maxSize` | string | Maximum allowed upload size. (default "6Mi") |
| `--server.dataProxy.upload.storagePrefix` | string | Storage prefix to use for all upload requests. |
| `--server.grpc.enableGrpcLatencyMetrics` | | Enable grpc latency metrics. Note Histograms metrics can be expensive on Prometheus servers. |
| `--server.grpc.maxMessageSizeBytes` | int | The max size in bytes for incoming gRPC messages |
| `--server.grpc.port` | int | On which grpc port to serve admin (default 8089) |
| `--server.grpc.serverReflection` | | Enable GRPC Server Reflection (default true) |
| `--server.grpcPort` | int | deprecated |
| `--server.grpcServerReflection` | | deprecated |
| `--server.httpPort` | int | On which http port to serve admin (default 8088) |
| `--server.kube-config` | string | Path to kubernetes client config file, default is empty, useful for incluster config. |
| `--server.kubeClientConfig.burst` | int | Max burst rate for throttle. 0 defaults to 10 (default 25) |
| `--server.kubeClientConfig.qps` | int32 | Max QPS to the master for requests to KubeAPI. 0 defaults to 5. (default 100) |
| `--server.kubeClientConfig.timeout` | string | Max duration allowed for every request to KubeAPI before giving up. 0 implies no timeout. (default "30s") |
| `--server.master` | string | The address of the Kubernetes API server. |
| `--server.readHeaderTimeoutSeconds` | int | The amount of time allowed to read request headers. (default 32) |
| `--server.security.allowCors` | | (default true) |
| `--server.security.allowedHeaders` | strings | (default [Content-Type,flyte-authorization]) |
| `--server.security.allowedOrigins` | strings | (default [*]) |
| `--server.security.auditAccess` | | |
| `--server.security.secure` | | |
| `--server.security.ssl.certificateFile` | string | |
| `--server.security.ssl.keyFile` | string | |
| `--server.security.useAuth` | | |
| `--server.thirdPartyConfig.flyteClient.audience` | string | Audience to use when initiating OAuth2 authorization requests. |
| `--server.thirdPartyConfig.flyteClient.clientId` | string | public identifier for the app which handles authorization for a Flyte deployment |
| `--server.thirdPartyConfig.flyteClient.redirectUri` | string | This is the callback uri registered with the app which handles authorization for a Flyte deployment |
| `--server.thirdPartyConfig.flyteClient.scopes` | strings | Recommended scopes for the client to request. |
| `--server.watchService.maxActiveClusterConnections` | int | (default 5) |
| `--server.watchService.maxPageSize` | int | (default 50000) |
| `--server.watchService.nonTerminalStatusUpdatesInterval` | string | (default "1m0s") |
| `--server.watchService.pollInterval` | string | (default "1s") |
| `--sharedservice.connectPort` | string | On which connect port to serve admin (default "8080") |
| `--sharedservice.grpc.grpcMaxResponseStatusBytes` | int32 | specifies the maximum (uncompressed) size of header list that the client is prepared to accept on grpc calls (default 32000) |
| `--sharedservice.grpc.maxConcurrentStreams` | int | Limit on the number of concurrent streams to each ServerTransport. (default 100) |
| `--sharedservice.grpc.maxMessageSizeBytes` | int | Limit on the size of message that can be received on the server. (default 10485760) |
| `--sharedservice.grpcServerReflection` | | Enable GRPC Server Reflection (default true) |
| `--sharedservice.httpPort` | string | On which http port to serve admin (default "8089") |
| `--sharedservice.kubeConfig` | string | Path to kubernetes client config file. |
| `--sharedservice.master` | string | The address of the Kubernetes API server. |
| `--sharedservice.metrics.enableClientGrpcHistograms` | | Enable client grpc histograms (default true) |
| `--sharedservice.metrics.enableGrpcHistograms` | | Enable grpc histograms (default true) |
| `--sharedservice.metrics.scope` | string | Scope to emit metrics under (default "service:") |
| `--sharedservice.port` | string | On which grpc port to serve admin (default "8080") |
| `--sharedservice.profiler.enabled` | | Enable Profiler on server |
| `--sharedservice.profilerPort` | string | Profile port to start listen for pprof and metric handlers on. (default "10254") |
| `--sharedservice.security.allowCors` | | |
| `--sharedservice.security.allowLocalhostAccess` | | Whether to permit localhost unauthenticated access to the server |
| `--sharedservice.security.allowedHeaders` | strings | |
| `--sharedservice.security.allowedOrigins` | strings | |
| `--sharedservice.security.auditAccess` | | |
| `--sharedservice.security.orgOverride` | string | Override org in identity context if localhost access enabled |
| `--sharedservice.security.secure` | | |
| `--sharedservice.security.ssl.certificateAuthorityFile` | string | |
| `--sharedservice.security.ssl.certificateFile` | string | |
| `--sharedservice.security.ssl.keyFile` | string | |
| `--sharedservice.security.useAuth` | | |
| `--sharedservice.sync.syncInterval` | string | Time interval to sync (default "5m0s") |
| `--storage.cache.max_size_mbs` | int | Maximum size of the cache where the Blob store data is cached in-memory. If not specified or set to 0, cache is not used |
| `--storage.cache.target_gc_percent` | int | Sets the garbage collection target percentage. |
| `--storage.connection.access-key` | string | Access key to use. Only required when authtype is set to accesskey. |
| `--storage.connection.auth-type` | string | Auth Type to use [iam, accesskey]. (default "iam") |
| `--storage.connection.disable-ssl` | | Disables SSL connection. Should only be used for development. |
| `--storage.connection.endpoint` | string | URL for storage client to connect to. |
| `--storage.connection.region` | string | Region to connect to. (default "us-east-1") |
| `--storage.connection.secret-key` | string | Secret to use when accesskey is set. |
| `--storage.container` | string | Initial container (in s3 a bucket) to create -if it doesn't exist-.' |
| `--storage.defaultHttpClient.timeout` | string | Sets time out on the http client. (default "0s") |
| `--storage.enable-multicontainer` | | If this is true, then the container argument is overlooked and redundant. This config will automatically open new connections to new containers/buckets as they are encountered |
| `--storage.limits.maxDownloadMBs` | int | Maximum allowed download size (in MBs) per call. (default 2) |
| `--storage.stow.config` | stringToString | Configuration for stow backend. Refer to github/flyteorg/stow (default []) |
| `--storage.stow.kind` | string | Kind of Stow backend to use. Refer to github/flyteorg/stow |
| `--storage.type` | string | Sets the type of storage to configure [s3/minio/local/mem/stow]. (default "s3") |
| `--union.auth.authorizationMetadataKey` | string | Authorization Header to use when passing Access Tokens to the server (default "flyte-authorization") |
| `--union.auth.clientId` | string | Client ID |
| `--union.auth.clientSecretEnvVar` | string | Environment variable containing the client secret |
| `--union.auth.clientSecretLocation` | string | File containing the client secret |
| `--union.auth.deviceFlow.pollInterval` | string | amount of time the device flow would poll the token endpoint if auth server doesn't return a polling interval. Okta and google IDP do return an interval' (default "5s") |
| `--union.auth.deviceFlow.refreshTime` | string | grace period from the token expiry after which it would refresh the token. (default "5m0s") |
| `--union.auth.deviceFlow.timeout` | string | amount of time the device flow should complete or else it will be cancelled. (default "10m0s") |
| `--union.auth.enable` | | Whether to enable an authenticated conenction when communicating with admin. (default true) |
| `--union.auth.externalAuth.command` | strings | Command for external authentication token generation |
| `--union.auth.pkce.refreshTime` | string | grace period from the token expiry after which it would refresh the token. (default "5m0s") |
| `--union.auth.pkce.timeout` | string | Amount of time the browser session would be active for authentication from client app. (default "15s") |
| `--union.auth.scopes` | strings | List of scopes to request |
| `--union.auth.tokenRefreshWindow` | string | Max duration between token refresh attempt and token expiry. (default "1h0m0s") |
| `--union.auth.tokenUrl` | string | OPTIONAL: Your IdP's token endpoint. It'll be discovered from flyte admin's OAuth Metadata endpoint if not provided. |
| `--union.auth.type` | string | Type of OAuth2 flow used for communicating with admin. (default "Pkce") |
| `--union.cache.maxItemsCount` | int | Maximum number of items to keep in the cache before evicting. (default 1000) |
| `--union.connection.host` | string | Host to connect to (default "dns:///utt-mgdp-stg-us-east-2.cloud-staging.union.ai") |
| `--union.connection.insecure` | | Whether to connect over insecure channel |
| `--union.connection.insecureSkipVerify` | | InsecureSkipVerify controls whether a client verifies the server's certificate chain and host name.Caution: shouldn't be use for production usecases' |
| `--union.connection.keepAliveConfig.permitWithoutStream` | | If true, client sends keepalive pings even with no active RPCs. |
| `--union.connection.keepAliveConfig.time` | string | After a duration of this time if the client doesn't see any activity it pings the server to see if the transport is still alive. (default "20s") |
| `--union.connection.keepAliveConfig.timeout` | string | After having pinged for keepalive check, the client waits for a duration of Timeout and if no activity is seen even after that the connection is closed. (default "2m0s") |
| `--union.connection.maxBackoffDelay` | string | Max delay for grpc backoff (default "8s") |
| `--union.connection.maxRecvMsgSize` | int | Maximum size of a message in bytes of a gRPC message (default 10485760) |
| `--union.connection.maxRetries` | int | Max number of gRPC retries (default 4) |
| `--union.connection.minConnectTimeout` | string | Minimum timeout for establishing a connection (default "20s") |
| `--union.connection.perRetryTimeout` | string | gRPC per retry timeout (default "15s") |
| `--union.connection.serviceConfig` | string | Defines gRPC experimental JSON Service Config (default "{"loadBalancingConfig": [{"round_robin":{}}]}") |
| `--union.connection.trustedIdentityClaims.enabled` | | Enables passing of trusted claims while making inter service calls |
| `--union.connection.trustedIdentityClaims.externalIdentityClaim` | string | External identity claim of the service which is authorized to make internal service call. These are verified against userclouds actions |
| `--union.connection.trustedIdentityClaims.externalIdentityTypeClaim` | string | External identity type claim of app or user to use for the current service identity. It should be an 'app' for inter service communication |
| `--union.internalConnectionConfig.-` | stringToString | (default []) |
| `--union.internalConnectionConfig.enabled` | | Enables internal service to service communication instead of going through ingress. |
| `--union.internalConnectionConfig.urlPattern` | string | UrlPattern of the internal service endpoints. (default "{{ service }}-helmchart.{{ service }}.svc.cluster.local:80") |
| `--webhook.awsSecretManager.sidecarImage` | string | Specifies the sidecar docker image to use (default "docker.io/amazon/aws-secrets-manager-secret-sidecar:v0.1.4") |
| `--webhook.certDir` | string | Certificate directory to use to write generated certs. Defaults to /etc/webhook/certs/ (default "/etc/webhook/certs") |
| `--webhook.embeddedSecretManagerConfig.awsConfig.region` | string | AWS region |
| `--webhook.embeddedSecretManagerConfig.fileMountInitContainer.image` | string | Specifies init container image to use for mounting secrets as files. (default "busybox:1.28") |
| `--webhook.embeddedSecretManagerConfig.gcpConfig.project` | string | GCP project to be used for secret manager |
| `--webhook.embeddedSecretManagerConfig.type` | string | (default "AWS") |
| `--webhook.gcpSecretManager.sidecarImage` | string | Specifies the sidecar docker image to use (default "gcr.io/google.com/cloudsdktool/cloud-sdk:alpine") |
| `--webhook.listenPort` | int | The port to use to listen to webhook calls. Defaults to 9443 (default 9443) |
| `--webhook.localCert` | | write certs locally. Defaults to false |
| `--webhook.metrics-prefix` | string | An optional prefix for all published metrics. (default "flyte:") |
| `--webhook.secretName` | string | Secret name to write generated certs to. (default "flyte-pod-webhook") |
| `--webhook.serviceName` | string | The name of the webhook service. (default "flyte-pod-webhook") |
| `--webhook.servicePort` | int32 | The port on the service that hosting webhook. (default 443) |
| `--webhook.vaultSecretManager.role` | string | Specifies the vault role to use (default "flyte") |
=== PAGE: https://www.union.ai/docs/v1/serverless/api-reference/uctl-cli/uctl-update/uctl-update-workflow-execution-config ===
# uctl update workflow-execution-config
Updates matchable resources of workflow execution config
## Synopsis
Updates the workflow execution config for the given project and domain
combination or additionally with workflow name.
Updating the workflow execution config is only available from a
generated file. See the get section for generating this file. This will
completely overwrite any existing custom project and domain and workflow
combination execution config. It is preferable to do get and generate a
config file if there is an existing execution config already set and
then update it to have new values. Refer to get
workflow-execution-config section on how to generate this file. It takes
input for workflow execution config from the config file wec.yaml,
Example: content of wec.yaml:
``` yaml
domain: development
project: flytesnacks
max_parallelism: 5
security_context:
run_as:
k8s_service_account: demo
```
```shell
$ uctl update workflow-execution-config --attrFile wec.yaml
```
Update workflow execution config for project, domain, and workflow
combination. This will take precedence over any other execution config
defined at project domain level. For workflow
`core.control_flow.merge_sort.merge_sort` in flytesnacks project,
development domain, it is:
``` yaml
domain: development
project: flytesnacks
workflow: core.control_flow.merge_sort.merge_sort
max_parallelism: 5
security_context:
run_as:
k8s_service_account: mergesortsa
```
```shell
$ uctl update workflow-execution-config --attrFile wec.yaml
```
Usage:
```shell
$ uctl update workflow-execution-config [flags]
```
## Options
| Option | Type | Description |
|--------|------|-------------|
| `--attrFile` | string | attribute file name to be used for updating attribute for the resource type. |
| `--dryRun` | | execute command without making any modifications. |
| `--force` | | do not ask for an acknowledgement during updates. |
| `-h`, `--help` | help for workflow-execution-config |
### Options inherited from parent commands
| Option | Type | Description |
|--------|------|-------------|
| `--admin.audience` | string | Audience to use when initiating OAuth2 authorization requests. |
| `--admin.authType` | string | Type of OAuth2 flow used for communicating with admin.ClientSecret, Pkce, ExternalCommand are valid values (default "ClientSecret") |
| `--admin.authorizationHeader` | string | Custom metadata header to pass JWT |
| `--admin.authorizationServerUrl` | string | This is the URL to your IdP's authorization server. It'll default to Endpoint |
| `--admin.caCertFilePath` | string | Use specified certificate file to verify the admin server peer. |
| `--admin.clientId` | string | Client ID (default "flytepropeller") |
| `--admin.clientSecretEnvVar` | string | Environment variable containing the client secret |
| `--admin.clientSecretLocation` | string | File containing the client secret (default "/etc/secrets/client_secret") |
| `--admin.command` | strings | Command for external authentication token generation |
| `--admin.defaultOrg` | string | OPTIONAL: Default org to use to support non-org based cli's.'. |
| `--admin.defaultServiceConfig` | string | |
| `--admin.deviceFlowConfig.pollInterval` | string | amount of time the device flow would poll the token endpoint if auth server doesn't return a polling interval. Okta and google IDP do return an interval' (default "5s") |
| `--admin.deviceFlowConfig.refreshTime` | string | grace period from the token expiry after which it would refresh the token. (default "5m0s") |
| `--admin.deviceFlowConfig.timeout` | string | amount of time the device flow should complete or else it will be cancelled. (default "10m0s") |
| `--admin.endpoint` | string | For admin types, specify where the uri of the service is located. |
| `--admin.httpProxyURL` | string | OPTIONAL: HTTP Proxy to be used for OAuth requests. |
| `--admin.insecure` | | Use insecure connection. |
| `--admin.insecureSkipVerify` | | InsecureSkipVerify controls whether a client verifies the server's certificate chain and host name.Caution: shouldn't be use for production usecases' |
| `--admin.maxBackoffDelay` | string | Max delay for grpc backoff (default "8s") |
| `--admin.maxMessageSizeBytes` | int | The max size in bytes for incoming gRPC messages |
| `--admin.maxRetries` | int | Max number of gRPC retries (default 4) |
| `--admin.perRetryTimeout` | string | gRPC per retry timeout (default "15s") |
| `--admin.pkceConfig.refreshTime` | string | grace period from the token expiry after which it would refresh the token. (default "5m0s") |
| `--admin.pkceConfig.timeout` | string | Amount of time the browser session would be active for authentication from client app. (default "2m0s") |
| `--admin.proxyCommand` | strings | Command for external proxy-authorization token generation |
| `--admin.scopes` | strings | List of scopes to request |
| `--admin.tokenRefreshWindow` | string | Max duration between token refresh attempt and token expiry. (default "0s") |
| `--admin.tokenUrl` | string | OPTIONAL: Your IdP's token endpoint. It'll be discovered from flyte admin's OAuth Metadata endpoint if not provided. |
| `--admin.useAudienceFromAdmin` | | Use Audience configured from admins public endpoint config. |
| `--admin.useAuth` | | Deprecated: Auth will be enabled/disabled based on admin's dynamically discovered information. |
| `--auth.appAuth.externalAuthServer.allowedAudience` | strings | Optional: A list of allowed audiences. If not provided, the audience is expected to be the public Uri of the service. |
| `--auth.appAuth.externalAuthServer.baseUrl` | string | This should be the base url of the authorization server that you are trying to hit. With Okta for instance, it will look something like https://company.okta.com/oauth2/abcdef123456789/ |
| `--auth.appAuth.externalAuthServer.httpProxyURL` | string | OPTIONAL: HTTP Proxy to be used for OAuth requests. |
| `--auth.appAuth.externalAuthServer.metadataUrl` | string | Optional: If the server doesn't support /.well-known/oauth-authorization-server, you can set a custom metadata url here.' |
| `--auth.appAuth.externalAuthServer.retryAttempts` | int | Optional: The number of attempted retries on a transient failure to get the OAuth metadata (default 5) |
| `--auth.appAuth.externalAuthServer.retryDelay` | string | Optional, Duration to wait between retries (default "1s") |
| `--auth.appAuth.selfAuthServer.accessTokenLifespan` | string | Defines the lifespan of issued access tokens. (default "30m0s") |
| `--auth.appAuth.selfAuthServer.authorizationCodeLifespan` | string | Defines the lifespan of issued access tokens. (default "5m0s") |
| `--auth.appAuth.selfAuthServer.claimSymmetricEncryptionKeySecretName` | string | OPTIONAL: Secret name to use to encrypt claims in authcode token. (default "claim_symmetric_key") |
| `--auth.appAuth.selfAuthServer.issuer` | string | Defines the issuer to use when issuing and validating tokens. The default value is https://{requestUri.HostAndPort}/ |
| `--auth.appAuth.selfAuthServer.oldTokenSigningRSAKeySecretName` | string | OPTIONAL: Secret name to use to retrieve Old RSA Signing Key. This can be useful during key rotation to continue to accept older tokens. (default "token_rsa_key_old.pem") |
| `--auth.appAuth.selfAuthServer.refreshTokenLifespan` | string | Defines the lifespan of issued access tokens. (default "1h0m0s") |
| `--auth.appAuth.selfAuthServer.tokenSigningRSAKeySecretName` | string | OPTIONAL: Secret name to use to retrieve RSA Signing Key. (default "token_rsa_key.pem") |
| `--auth.appAuth.thirdPartyConfig.flyteClient.audience` | string | Audience to use when initiating OAuth2 authorization requests. |
| `--auth.appAuth.thirdPartyConfig.flyteClient.clientId` | string | public identifier for the app which handles authorization for a Flyte deployment (default "uctl") |
| `--auth.appAuth.thirdPartyConfig.flyteClient.redirectUri` | string | This is the callback uri registered with the app which handles authorization for a Flyte deployment (default "http://localhost:53593/callback") |
| `--auth.appAuth.thirdPartyConfig.flyteClient.scopes` | strings | Recommended scopes for the client to request. (default [all,offline]) |
| `--auth.disableForGrpc` | | Disables auth enforcement on Grpc Endpoints. |
| `--auth.disableForHttp` | | Disables auth enforcement on HTTP Endpoints. |
| `--auth.grpcAuthorizationHeader` | string | (default "flyte-authorization") |
| `--auth.httpAuthorizationHeader` | string | (default "flyte-authorization") |
| `--auth.httpProxyURL` | string | OPTIONAL: HTTP Proxy to be used for OAuth requests. |
| `--auth.tokenEndpointProxyPath` | string | The path used to proxy calls to the TokenURL |
| `--auth.userAuth.cookieBlockKeySecretName` | string | OPTIONAL: Secret name to use for cookie block key. (default "cookie_block_key") |
| `--auth.userAuth.cookieHashKeySecretName` | string | OPTIONAL: Secret name to use for cookie hash key. (default "cookie_hash_key") |
| `--auth.userAuth.cookieSetting.domain` | string | OPTIONAL: Allows you to set the domain attribute on the auth cookies. |
| `--auth.userAuth.cookieSetting.sameSitePolicy` | string | OPTIONAL: Allows you to declare if your cookie should be restricted to a first-party or same-site context.Wrapper around http.SameSite. (default "DefaultMode") |
| `--auth.userAuth.httpProxyURL` | string | OPTIONAL: HTTP Proxy to be used for OAuth requests. |
| `--auth.userAuth.idpQueryParameter` | string | idp query parameter used for selecting a particular IDP for doing user authentication. Eg: for Okta passing idp={IDP-ID} forces the authentication to happen with IDP-ID |
| `--auth.userAuth.openId.baseUrl` | string | |
| `--auth.userAuth.openId.clientId` | string | |
| `--auth.userAuth.openId.clientSecretFile` | string | |
| `--auth.userAuth.openId.clientSecretName` | string | (default "oidc_client_secret") |
| `--auth.userAuth.openId.scopes` | strings | (default [openid,profile]) |
| `--auth.userAuth.redirectUrl` | string | (default "/console") |
| `--authorizer.internalCommunicationConfig.enabled` | | Enables authorization decisions for internal communication. (default true) |
| `--authorizer.internalCommunicationConfig.ingressIdentity` | string | IngressIdentity used in the cluster. Needed to exclude the communication coming from ingress. (default "ingress-nginx.ingress-nginx.serviceaccount.identity.linkerd.cluster.local") |
| `--authorizer.internalCommunicationConfig.tenantUrlPatternIdentity` | string | UrlPatternIdentity of the internal tenant service endpoint identities. (default "{{ service }}.{{ org }}.serviceaccount.identity.linkerd.cluster.local") |
| `--authorizer.internalCommunicationConfig.urlPatternIdentity` | string | UrlPatternIdentity of the internal service endpoint identities. (default "{{ service }}-helmchart.{{ service }}.serviceaccount.identity.linkerd.cluster.local") |
| `--authorizer.mode` | string | (default "Active") |
| `--authorizer.organizationConfig.PolicyConfig.adminPolicyDescription` | string | description for the boilerplate admin policy (default "Contributor permissions and full admin permissions to manage users and view usage dashboards") |
| `--authorizer.organizationConfig.PolicyConfig.contributorPolicyDescription` | string | description for the boilerplate contributor policy (default "Viewer permissions and permissions to create workflows, tasks, launch plans, and executions") |
| `--authorizer.organizationConfig.PolicyConfig.defaultUserPolicyRoleType` | string | name of the role type to determine which default policy new users added to the organization should be assigned (default "Viewer") |
| `--authorizer.organizationConfig.PolicyConfig.serverlessContributorPolicyDescription` | string | description for the boilerplate serverless contributor policy (default "Viewer permissions and permissions to create workflows, tasks, launch plans, and executions") |
| `--authorizer.organizationConfig.PolicyConfig.serverlessViewerPolicyDescription` | string | description for the boilerplate serverless viewer policy (default "Permissions to view Flyte entities") |
| `--authorizer.organizationConfig.PolicyConfig.viewerPolicyDescription` | string | description for the boilerplate viewer policy (default "Permissions to view Flyte entities") |
| `--authorizer.organizationConfig.defaultPolicyCacheDuration` | string | Cache entry duration for the store of the default policy per organization (default "10m0s") |
| `--authorizer.syncRuleRefreshInterval` | string | (default "1m0s") |
| `--authorizer.type` | string | (default "UserClouds") |
| `--authorizer.userCloudsClient.cache.redis.ttl.edgeTypes` | string | Specifies how long edge types remain in the cache.. (default "30m0s") |
| `--authorizer.userCloudsClient.cache.redis.ttl.edges` | string | Specifies how long edges remain in the cache. (default "30m0s") |
| `--authorizer.userCloudsClient.cache.redis.ttl.objectTypes` | string | Specifies how long object types remain in the cache. (default "30m0s") |
| `--authorizer.userCloudsClient.cache.redis.ttl.objects` | string | Specifies how long objects remain in the cache. (default "30m0s") |
| `--authorizer.userCloudsClient.cache.type` | string | Cache type to use. (default "none") |
| `--authorizer.userCloudsClient.clientID` | string | UserClouds client id |
| `--authorizer.userCloudsClient.clientSecretName` | string | UserCloud client secret name to read from the secret manager. (default "userclouds-client-secret") |
| `--authorizer.userCloudsClient.enableLogging` | | Enable userclouds client's internal logging. Calls to post logs take 250-350 ms and will impact p99 latency, enable with caution. |
| `--authorizer.userCloudsClient.tenantID` | string | UserClouds tenant id. Should be a UUID. |
| `--authorizer.userCloudsClient.tenantUrl` | string | Something like https://{yourtenant}.tenant.userclouds.com |
| `--config` | string | config file (default is /Users/andrew/.union/config.yaml) |
| `--connection.environment` | string | |
| `--connection.region` | string | |
| `--connection.rootTenantURLPattern` | string | Pattern for tenant url. (default "dns:///{{ organization }}.cloud-staging.union.ai") |
| `--console.endpoint` | string | Endpoint of console, if different than flyte admin |
| `--database.connMaxLifeTime` | string | sets the maximum amount of time a connection may be reused (default "1h0m0s") |
| `--database.enableForeignKeyConstraintWhenMigrating` | | Whether to enable gorm foreign keys when migrating the db |
| `--database.maxIdleConnections` | int | maxIdleConnections sets the maximum number of connections in the idle connection pool. (default 10) |
| `--database.maxOpenConnections` | int | maxOpenConnections sets the maximum number of open connections to the database. (default 100) |
| `--database.postgres.dbname` | string | The database name (default "postgres") |
| `--database.postgres.debug` | | |
| `--database.postgres.host` | string | The host name of the database server (default "localhost") |
| `--database.postgres.options` | string | See http://gorm.io/docs/connecting_to_the_database.html for available options passed, in addition to the above. (default "sslmode=disable") |
| `--database.postgres.password` | string | The database password. (default "postgres") |
| `--database.postgres.passwordPath` | string | Points to the file containing the database password. |
| `--database.postgres.port` | int | The port name of the database server (default 30001) |
| `--database.postgres.readReplicaHost` | string | The host name of the read replica database server (default "localhost") |
| `--database.postgres.username` | string | The database user who is connecting to the server. (default "postgres") |
| `--database.sqlite.file` | string | The path to the file (existing or new) where the DB should be created / stored. If existing, then this will be re-used, else a new will be created |
| `--db.connectionPool.maxConnectionLifetime` | string | (default "0s") |
| `--db.connectionPool.maxIdleConnections` | int | |
| `--db.connectionPool.maxOpenConnections` | int | |
| `--db.dbname` | string | (default "postgres") |
| `--db.debug` | | |
| `--db.host` | string | (default "postgres") |
| `--db.log_level` | int | (default 4) |
| `--db.options` | string | (default "sslmode=disable") |
| `--db.password` | string | |
| `--db.passwordPath` | string | |
| `--db.port` | int | (default 5432) |
| `--db.username` | string | (default "postgres") |
| `-d`, `--domain` | string | Specifies the Flyte project's domain. |
| `--files.archive` | | Pass in archive file either an http link or local path. |
| `--files.assumableIamRole` | string | Custom assumable iam auth role to register launch plans with. |
| `--files.continueOnError` | | Continue on error when registering files. |
| `--files.destinationDirectory` | string | Location of source code in container. |
| `--files.dryRun` | | Execute command without making any modifications. |
| `--files.enableSchedule` | | Enable the schedule if the files contain schedulable launchplan. |
| `--files.force` | | Force use of version number on entities registered with flyte. |
| `--files.k8ServiceAccount` | string | Deprecated. Please use `--K8sServiceAccount`|
| `--files.k8sServiceAccount` | string | Custom kubernetes service account auth role to register launch plans with. |
| `--files.outputLocationPrefix` | string | Custom output location prefix for offloaded types (files/schemas). |
| `--files.sourceUploadPath` | string | Deprecated: Update flyte admin to avoid having to configure storage access from uctl. |
| `--files.version` | string | Version of the entity to be registered with flyte which are un-versioned after serialization. |
| `--logger.formatter.type` | string | Sets logging format type. (default "json") |
| `--logger.level` | int | Sets the minimum logging level. (default 3) |
| `--logger.mute` | | Mutes all logs regardless of severity. Intended for benchmarks/tests only. |
| `--logger.show-source` | | Includes source code location in logs. |
| `--org` | string | Organization to work on. If not set, default to user's org. |
| `--otel.file.filename` | string | Filename to store exported telemetry traces (default "/tmp/trace.txt") |
| `--otel.jaeger.endpoint` | string | Endpoint for the jaeger telemetry trace ingestor (default "http://localhost:14268/api/traces") |
| `--otel.otlpgrpc.endpoint` | string | Endpoint for the OTLP telemetry trace collector (default "http://localhost:4317") |
| `--otel.otlphttp.endpoint` | string | Endpoint for the OTLP telemetry trace collector (default "http://localhost:4318/v1/traces") |
| `--otel.sampler.parentSampler` | string | Sets the parent sampler to use for the tracer (default "always") |
| `--otel.type` | string | Sets the type of exporter to configure [noop/file/jaeger/otlpgrpc/otlphttp]. (default "noop") |
| `-o`, `--output` | string | Specifies the output type - supported formats [TABLE JSON YAML DOT DOTURL]. NOTE: dot, doturl are only supported for Workflow (default "table") |
| `--plugins.catalogcache.reader.maxItems` | int | Maximum number of entries to keep in the index. (default 10000) |
| `--plugins.catalogcache.reader.maxRetries` | int | Maximum number of retries per item. (default 3) |
| `--plugins.catalogcache.reader.workers` | int | Number of concurrent workers to start processing the queue. (default 10) |
| `--plugins.catalogcache.writer.maxItems` | int | Maximum number of entries to keep in the index. (default 10000) |
| `--plugins.catalogcache.writer.maxRetries` | int | Maximum number of retries per item. (default 3) |
| `--plugins.catalogcache.writer.workers` | int | Number of concurrent workers to start processing the queue. (default 10) |
| `-p`, `--project` | string | Specifies the Flyte project. |
| `--rediscache.passwordSecretName` | string | Name of secret with Redis password. |
| `--rediscache.primaryEndpoint` | string | Primary endpoint for the redis cache that can be used for both reads and writes. |
| `--rediscache.replicaEndpoint` | string | Replica endpoint for the redis cache that can be used for reads. |
| `--secrets.env-prefix` | string | Prefix for environment variables (default "FLYTE_SECRET_") |
| `--secrets.secrets-prefix` | string | Prefix where to look for secrets file (default "/etc/secrets") |
| `--secrets.type` | string | Sets the type of storage to configure [local]. (default "local") |
| `--server.dataProxy.download.maxExpiresIn` | string | Maximum allowed expiration duration. (default "1h0m0s") |
| `--server.dataProxy.upload.defaultFileNameLength` | int | Default length for the generated file name if not provided in the request. (default 20) |
| `--server.dataProxy.upload.maxExpiresIn` | string | Maximum allowed expiration duration. (default "1h0m0s") |
| `--server.dataProxy.upload.maxSize` | string | Maximum allowed upload size. (default "6Mi") |
| `--server.dataProxy.upload.storagePrefix` | string | Storage prefix to use for all upload requests. |
| `--server.grpc.enableGrpcLatencyMetrics` | | Enable grpc latency metrics. Note Histograms metrics can be expensive on Prometheus servers. |
| `--server.grpc.maxMessageSizeBytes` | int | The max size in bytes for incoming gRPC messages |
| `--server.grpc.port` | int | On which grpc port to serve admin (default 8089) |
| `--server.grpc.serverReflection` | | Enable GRPC Server Reflection (default true) |
| `--server.grpcPort` | int | deprecated |
| `--server.grpcServerReflection` | | deprecated |
| `--server.httpPort` | int | On which http port to serve admin (default 8088) |
| `--server.kube-config` | string | Path to kubernetes client config file, default is empty, useful for incluster config. |
| `--server.kubeClientConfig.burst` | int | Max burst rate for throttle. 0 defaults to 10 (default 25) |
| `--server.kubeClientConfig.qps` | int32 | Max QPS to the master for requests to KubeAPI. 0 defaults to 5. (default 100) |
| `--server.kubeClientConfig.timeout` | string | Max duration allowed for every request to KubeAPI before giving up. 0 implies no timeout. (default "30s") |
| `--server.master` | string | The address of the Kubernetes API server. |
| `--server.readHeaderTimeoutSeconds` | int | The amount of time allowed to read request headers. (default 32) |
| `--server.security.allowCors` | | (default true) |
| `--server.security.allowedHeaders` | strings | (default [Content-Type,flyte-authorization]) |
| `--server.security.allowedOrigins` | strings | (default [*]) |
| `--server.security.auditAccess` | | |
| `--server.security.secure` | | |
| `--server.security.ssl.certificateFile` | string | |
| `--server.security.ssl.keyFile` | string | |
| `--server.security.useAuth` | | |
| `--server.thirdPartyConfig.flyteClient.audience` | string | Audience to use when initiating OAuth2 authorization requests. |
| `--server.thirdPartyConfig.flyteClient.clientId` | string | public identifier for the app which handles authorization for a Flyte deployment |
| `--server.thirdPartyConfig.flyteClient.redirectUri` | string | This is the callback uri registered with the app which handles authorization for a Flyte deployment |
| `--server.thirdPartyConfig.flyteClient.scopes` | strings | Recommended scopes for the client to request. |
| `--server.watchService.maxActiveClusterConnections` | int | (default 5) |
| `--server.watchService.maxPageSize` | int | (default 50000) |
| `--server.watchService.nonTerminalStatusUpdatesInterval` | string | (default "1m0s") |
| `--server.watchService.pollInterval` | string | (default "1s") |
| `--sharedservice.connectPort` | string | On which connect port to serve admin (default "8080") |
| `--sharedservice.grpc.grpcMaxResponseStatusBytes` | int32 | specifies the maximum (uncompressed) size of header list that the client is prepared to accept on grpc calls (default 32000) |
| `--sharedservice.grpc.maxConcurrentStreams` | int | Limit on the number of concurrent streams to each ServerTransport. (default 100) |
| `--sharedservice.grpc.maxMessageSizeBytes` | int | Limit on the size of message that can be received on the server. (default 10485760) |
| `--sharedservice.grpcServerReflection` | | Enable GRPC Server Reflection (default true) |
| `--sharedservice.httpPort` | string | On which http port to serve admin (default "8089") |
| `--sharedservice.kubeConfig` | string | Path to kubernetes client config file. |
| `--sharedservice.master` | string | The address of the Kubernetes API server. |
| `--sharedservice.metrics.enableClientGrpcHistograms` | | Enable client grpc histograms (default true) |
| `--sharedservice.metrics.enableGrpcHistograms` | | Enable grpc histograms (default true) |
| `--sharedservice.metrics.scope` | string | Scope to emit metrics under (default "service:") |
| `--sharedservice.port` | string | On which grpc port to serve admin (default "8080") |
| `--sharedservice.profiler.enabled` | | Enable Profiler on server |
| `--sharedservice.profilerPort` | string | Profile port to start listen for pprof and metric handlers on. (default "10254") |
| `--sharedservice.security.allowCors` | | |
| `--sharedservice.security.allowLocalhostAccess` | | Whether to permit localhost unauthenticated access to the server |
| `--sharedservice.security.allowedHeaders` | strings | |
| `--sharedservice.security.allowedOrigins` | strings | |
| `--sharedservice.security.auditAccess` | | |
| `--sharedservice.security.orgOverride` | string | Override org in identity context if localhost access enabled |
| `--sharedservice.security.secure` | | |
| `--sharedservice.security.ssl.certificateAuthorityFile` | string | |
| `--sharedservice.security.ssl.certificateFile` | string | |
| `--sharedservice.security.ssl.keyFile` | string | |
| `--sharedservice.security.useAuth` | | |
| `--sharedservice.sync.syncInterval` | string | Time interval to sync (default "5m0s") |
| `--storage.cache.max_size_mbs` | int | Maximum size of the cache where the Blob store data is cached in-memory. If not specified or set to 0, cache is not used |
| `--storage.cache.target_gc_percent` | int | Sets the garbage collection target percentage. |
| `--storage.connection.access-key` | string | Access key to use. Only required when authtype is set to accesskey. |
| `--storage.connection.auth-type` | string | Auth Type to use [iam, accesskey]. (default "iam") |
| `--storage.connection.disable-ssl` | | Disables SSL connection. Should only be used for development. |
| `--storage.connection.endpoint` | string | URL for storage client to connect to. |
| `--storage.connection.region` | string | Region to connect to. (default "us-east-1") |
| `--storage.connection.secret-key` | string | Secret to use when accesskey is set. |
| `--storage.container` | string | Initial container (in s3 a bucket) to create -if it doesn't exist-.' |
| `--storage.defaultHttpClient.timeout` | string | Sets time out on the http client. (default "0s") |
| `--storage.enable-multicontainer` | | If this is true, then the container argument is overlooked and redundant. This config will automatically open new connections to new containers/buckets as they are encountered |
| `--storage.limits.maxDownloadMBs` | int | Maximum allowed download size (in MBs) per call. (default 2) |
| `--storage.stow.config` | stringToString | Configuration for stow backend. Refer to github/flyteorg/stow (default []) |
| `--storage.stow.kind` | string | Kind of Stow backend to use. Refer to github/flyteorg/stow |
| `--storage.type` | string | Sets the type of storage to configure [s3/minio/local/mem/stow]. (default "s3") |
| `--union.auth.authorizationMetadataKey` | string | Authorization Header to use when passing Access Tokens to the server (default "flyte-authorization") |
| `--union.auth.clientId` | string | Client ID |
| `--union.auth.clientSecretEnvVar` | string | Environment variable containing the client secret |
| `--union.auth.clientSecretLocation` | string | File containing the client secret |
| `--union.auth.deviceFlow.pollInterval` | string | amount of time the device flow would poll the token endpoint if auth server doesn't return a polling interval. Okta and google IDP do return an interval' (default "5s") |
| `--union.auth.deviceFlow.refreshTime` | string | grace period from the token expiry after which it would refresh the token. (default "5m0s") |
| `--union.auth.deviceFlow.timeout` | string | amount of time the device flow should complete or else it will be cancelled. (default "10m0s") |
| `--union.auth.enable` | | Whether to enable an authenticated conenction when communicating with admin. (default true) |
| `--union.auth.externalAuth.command` | strings | Command for external authentication token generation |
| `--union.auth.pkce.refreshTime` | string | grace period from the token expiry after which it would refresh the token. (default "5m0s") |
| `--union.auth.pkce.timeout` | string | Amount of time the browser session would be active for authentication from client app. (default "15s") |
| `--union.auth.scopes` | strings | List of scopes to request |
| `--union.auth.tokenRefreshWindow` | string | Max duration between token refresh attempt and token expiry. (default "1h0m0s") |
| `--union.auth.tokenUrl` | string | OPTIONAL: Your IdP's token endpoint. It'll be discovered from flyte admin's OAuth Metadata endpoint if not provided. |
| `--union.auth.type` | string | Type of OAuth2 flow used for communicating with admin. (default "Pkce") |
| `--union.cache.maxItemsCount` | int | Maximum number of items to keep in the cache before evicting. (default 1000) |
| `--union.connection.host` | string | Host to connect to (default "dns:///utt-mgdp-stg-us-east-2.cloud-staging.union.ai") |
| `--union.connection.insecure` | | Whether to connect over insecure channel |
| `--union.connection.insecureSkipVerify` | | InsecureSkipVerify controls whether a client verifies the server's certificate chain and host name.Caution: shouldn't be use for production usecases' |
| `--union.connection.keepAliveConfig.permitWithoutStream` | | If true, client sends keepalive pings even with no active RPCs. |
| `--union.connection.keepAliveConfig.time` | string | After a duration of this time if the client doesn't see any activity it pings the server to see if the transport is still alive. (default "20s") |
| `--union.connection.keepAliveConfig.timeout` | string | After having pinged for keepalive check, the client waits for a duration of Timeout and if no activity is seen even after that the connection is closed. (default "2m0s") |
| `--union.connection.maxBackoffDelay` | string | Max delay for grpc backoff (default "8s") |
| `--union.connection.maxRecvMsgSize` | int | Maximum size of a message in bytes of a gRPC message (default 10485760) |
| `--union.connection.maxRetries` | int | Max number of gRPC retries (default 4) |
| `--union.connection.minConnectTimeout` | string | Minimum timeout for establishing a connection (default "20s") |
| `--union.connection.perRetryTimeout` | string | gRPC per retry timeout (default "15s") |
| `--union.connection.serviceConfig` | string | Defines gRPC experimental JSON Service Config (default "{"loadBalancingConfig": [{"round_robin":{}}]}") |
| `--union.connection.trustedIdentityClaims.enabled` | | Enables passing of trusted claims while making inter service calls |
| `--union.connection.trustedIdentityClaims.externalIdentityClaim` | string | External identity claim of the service which is authorized to make internal service call. These are verified against userclouds actions |
| `--union.connection.trustedIdentityClaims.externalIdentityTypeClaim` | string | External identity type claim of app or user to use for the current service identity. It should be an 'app' for inter service communication |
| `--union.internalConnectionConfig.-` | stringToString | (default []) |
| `--union.internalConnectionConfig.enabled` | | Enables internal service to service communication instead of going through ingress. |
| `--union.internalConnectionConfig.urlPattern` | string | UrlPattern of the internal service endpoints. (default "{{ service }}-helmchart.{{ service }}.svc.cluster.local:80") |
| `--webhook.awsSecretManager.sidecarImage` | string | Specifies the sidecar docker image to use (default "docker.io/amazon/aws-secrets-manager-secret-sidecar:v0.1.4") |
| `--webhook.certDir` | string | Certificate directory to use to write generated certs. Defaults to /etc/webhook/certs/ (default "/etc/webhook/certs") |
| `--webhook.embeddedSecretManagerConfig.awsConfig.region` | string | AWS region |
| `--webhook.embeddedSecretManagerConfig.fileMountInitContainer.image` | string | Specifies init container image to use for mounting secrets as files. (default "busybox:1.28") |
| `--webhook.embeddedSecretManagerConfig.gcpConfig.project` | string | GCP project to be used for secret manager |
| `--webhook.embeddedSecretManagerConfig.type` | string | (default "AWS") |
| `--webhook.gcpSecretManager.sidecarImage` | string | Specifies the sidecar docker image to use (default "gcr.io/google.com/cloudsdktool/cloud-sdk:alpine") |
| `--webhook.listenPort` | int | The port to use to listen to webhook calls. Defaults to 9443 (default 9443) |
| `--webhook.localCert` | | write certs locally. Defaults to false |
| `--webhook.metrics-prefix` | string | An optional prefix for all published metrics. (default "flyte:") |
| `--webhook.secretName` | string | Secret name to write generated certs to. (default "flyte-pod-webhook") |
| `--webhook.serviceName` | string | The name of the webhook service. (default "flyte-pod-webhook") |
| `--webhook.servicePort` | int32 | The port on the service that hosting webhook. (default 443) |
| `--webhook.vaultSecretManager.role` | string | Specifies the vault role to use (default "flyte") |
=== PAGE: https://www.union.ai/docs/v1/serverless/api-reference/uctl-cli/uctl-update/uctl-update-workflow-meta ===
# uctl update workflow-meta
Update workflow metadata
## Synopsis
Update the description on the workflow:
```shell
$ uctl update workflow-meta -p flytesnacks -d development core.control_flow.merge_sort.merge_sort --description "Mergesort workflow example"
```
Archiving workflow named entity would cause this to disappear from
flyteconsole UI:
```shell
$ uctl update workflow-meta -p flytesnacks -d development core.control_flow.merge_sort.merge_sort --archive
```
Activate workflow named entity:
```shell
$ uctl update workflow-meta -p flytesnacks -d development core.control_flow.merge_sort.merge_sort --activate
```
Usage:
```shell
$ uctl update workflow-meta [flags]
```
## Options
| Option | Type | Description |
|--------|------|-------------|
| `--activate` | | activate the named entity. |
| Option | Type | Description |
|--------|------|-------------|
| `--archive` | | archive named entity. |
| Option | Type | Description |
|--------|------|-------------|
| `--description` | string | description of the named entity. |
| `--dryRun` | | execute command without making any modifications. |
| `--force` | | do not ask for an acknowledgement during updates. |
| `-h`, `--help` | help for workflow-meta |
### Options inherited from parent commands
| Option | Type | Description |
|--------|------|-------------|
| `--admin.audience` | string | Audience to use when initiating OAuth2 authorization requests. |
| `--admin.authType` | string | Type of OAuth2 flow used for communicating with admin.ClientSecret, Pkce, ExternalCommand are valid values (default "ClientSecret") |
| `--admin.authorizationHeader` | string | Custom metadata header to pass JWT |
| `--admin.authorizationServerUrl` | string | This is the URL to your IdP's authorization server. It'll default to Endpoint |
| `--admin.caCertFilePath` | string | Use specified certificate file to verify the admin server peer. |
| `--admin.clientId` | string | Client ID (default "flytepropeller") |
| `--admin.clientSecretEnvVar` | string | Environment variable containing the client secret |
| `--admin.clientSecretLocation` | string | File containing the client secret (default "/etc/secrets/client_secret") |
| `--admin.command` | strings | Command for external authentication token generation |
| `--admin.defaultOrg` | string | OPTIONAL: Default org to use to support non-org based cli's.'. |
| `--admin.defaultServiceConfig` | string | |
| `--admin.deviceFlowConfig.pollInterval` | string | amount of time the device flow would poll the token endpoint if auth server doesn't return a polling interval. Okta and google IDP do return an interval' (default "5s") |
| `--admin.deviceFlowConfig.refreshTime` | string | grace period from the token expiry after which it would refresh the token. (default "5m0s") |
| `--admin.deviceFlowConfig.timeout` | string | amount of time the device flow should complete or else it will be cancelled. (default "10m0s") |
| `--admin.endpoint` | string | For admin types, specify where the uri of the service is located. |
| `--admin.httpProxyURL` | string | OPTIONAL: HTTP Proxy to be used for OAuth requests. |
| `--admin.insecure` | | Use insecure connection. |
| `--admin.insecureSkipVerify` | | InsecureSkipVerify controls whether a client verifies the server's certificate chain and host name.Caution: shouldn't be use for production usecases' |
| `--admin.maxBackoffDelay` | string | Max delay for grpc backoff (default "8s") |
| `--admin.maxMessageSizeBytes` | int | The max size in bytes for incoming gRPC messages |
| `--admin.maxRetries` | int | Max number of gRPC retries (default 4) |
| `--admin.perRetryTimeout` | string | gRPC per retry timeout (default "15s") |
| `--admin.pkceConfig.refreshTime` | string | grace period from the token expiry after which it would refresh the token. (default "5m0s") |
| `--admin.pkceConfig.timeout` | string | Amount of time the browser session would be active for authentication from client app. (default "2m0s") |
| `--admin.proxyCommand` | strings | Command for external proxy-authorization token generation |
| `--admin.scopes` | strings | List of scopes to request |
| `--admin.tokenRefreshWindow` | string | Max duration between token refresh attempt and token expiry. (default "0s") |
| `--admin.tokenUrl` | string | OPTIONAL: Your IdP's token endpoint. It'll be discovered from flyte admin's OAuth Metadata endpoint if not provided. |
| `--admin.useAudienceFromAdmin` | | Use Audience configured from admins public endpoint config. |
| `--admin.useAuth` | | Deprecated: Auth will be enabled/disabled based on admin's dynamically discovered information. |
| `--auth.appAuth.externalAuthServer.allowedAudience` | strings | Optional: A list of allowed audiences. If not provided, the audience is expected to be the public Uri of the service. |
| `--auth.appAuth.externalAuthServer.baseUrl` | string | This should be the base url of the authorization server that you are trying to hit. With Okta for instance, it will look something like https://company.okta.com/oauth2/abcdef123456789/ |
| `--auth.appAuth.externalAuthServer.httpProxyURL` | string | OPTIONAL: HTTP Proxy to be used for OAuth requests. |
| `--auth.appAuth.externalAuthServer.metadataUrl` | string | Optional: If the server doesn't support /.well-known/oauth-authorization-server, you can set a custom metadata url here.' |
| `--auth.appAuth.externalAuthServer.retryAttempts` | int | Optional: The number of attempted retries on a transient failure to get the OAuth metadata (default 5) |
| `--auth.appAuth.externalAuthServer.retryDelay` | string | Optional, Duration to wait between retries (default "1s") |
| `--auth.appAuth.selfAuthServer.accessTokenLifespan` | string | Defines the lifespan of issued access tokens. (default "30m0s") |
| `--auth.appAuth.selfAuthServer.authorizationCodeLifespan` | string | Defines the lifespan of issued access tokens. (default "5m0s") |
| `--auth.appAuth.selfAuthServer.claimSymmetricEncryptionKeySecretName` | string | OPTIONAL: Secret name to use to encrypt claims in authcode token. (default "claim_symmetric_key") |
| `--auth.appAuth.selfAuthServer.issuer` | string | Defines the issuer to use when issuing and validating tokens. The default value is https://{requestUri.HostAndPort}/ |
| `--auth.appAuth.selfAuthServer.oldTokenSigningRSAKeySecretName` | string | OPTIONAL: Secret name to use to retrieve Old RSA Signing Key. This can be useful during key rotation to continue to accept older tokens. (default "token_rsa_key_old.pem") |
| `--auth.appAuth.selfAuthServer.refreshTokenLifespan` | string | Defines the lifespan of issued access tokens. (default "1h0m0s") |
| `--auth.appAuth.selfAuthServer.tokenSigningRSAKeySecretName` | string | OPTIONAL: Secret name to use to retrieve RSA Signing Key. (default "token_rsa_key.pem") |
| `--auth.appAuth.thirdPartyConfig.flyteClient.audience` | string | Audience to use when initiating OAuth2 authorization requests. |
| `--auth.appAuth.thirdPartyConfig.flyteClient.clientId` | string | public identifier for the app which handles authorization for a Flyte deployment (default "uctl") |
| `--auth.appAuth.thirdPartyConfig.flyteClient.redirectUri` | string | This is the callback uri registered with the app which handles authorization for a Flyte deployment (default "http://localhost:53593/callback") |
| `--auth.appAuth.thirdPartyConfig.flyteClient.scopes` | strings | Recommended scopes for the client to request. (default [all,offline]) |
| `--auth.disableForGrpc` | | Disables auth enforcement on Grpc Endpoints. |
| `--auth.disableForHttp` | | Disables auth enforcement on HTTP Endpoints. |
| `--auth.grpcAuthorizationHeader` | string | (default "flyte-authorization") |
| `--auth.httpAuthorizationHeader` | string | (default "flyte-authorization") |
| `--auth.httpProxyURL` | string | OPTIONAL: HTTP Proxy to be used for OAuth requests. |
| `--auth.tokenEndpointProxyPath` | string | The path used to proxy calls to the TokenURL |
| `--auth.userAuth.cookieBlockKeySecretName` | string | OPTIONAL: Secret name to use for cookie block key. (default "cookie_block_key") |
| `--auth.userAuth.cookieHashKeySecretName` | string | OPTIONAL: Secret name to use for cookie hash key. (default "cookie_hash_key") |
| `--auth.userAuth.cookieSetting.domain` | string | OPTIONAL: Allows you to set the domain attribute on the auth cookies. |
| `--auth.userAuth.cookieSetting.sameSitePolicy` | string | OPTIONAL: Allows you to declare if your cookie should be restricted to a first-party or same-site context.Wrapper around http.SameSite. (default "DefaultMode") |
| `--auth.userAuth.httpProxyURL` | string | OPTIONAL: HTTP Proxy to be used for OAuth requests. |
| `--auth.userAuth.idpQueryParameter` | string | idp query parameter used for selecting a particular IDP for doing user authentication. Eg: for Okta passing idp={IDP-ID} forces the authentication to happen with IDP-ID |
| `--auth.userAuth.openId.baseUrl` | string | |
| `--auth.userAuth.openId.clientId` | string | |
| `--auth.userAuth.openId.clientSecretFile` | string | |
| `--auth.userAuth.openId.clientSecretName` | string | (default "oidc_client_secret") |
| `--auth.userAuth.openId.scopes` | strings | (default [openid,profile]) |
| `--auth.userAuth.redirectUrl` | string | (default "/console") |
| `--authorizer.internalCommunicationConfig.enabled` | | Enables authorization decisions for internal communication. (default true) |
| `--authorizer.internalCommunicationConfig.ingressIdentity` | string | IngressIdentity used in the cluster. Needed to exclude the communication coming from ingress. (default "ingress-nginx.ingress-nginx.serviceaccount.identity.linkerd.cluster.local") |
| `--authorizer.internalCommunicationConfig.tenantUrlPatternIdentity` | string | UrlPatternIdentity of the internal tenant service endpoint identities. (default "{{ service }}.{{ org }}.serviceaccount.identity.linkerd.cluster.local") |
| `--authorizer.internalCommunicationConfig.urlPatternIdentity` | string | UrlPatternIdentity of the internal service endpoint identities. (default "{{ service }}-helmchart.{{ service }}.serviceaccount.identity.linkerd.cluster.local") |
| `--authorizer.mode` | string | (default "Active") |
| `--authorizer.organizationConfig.PolicyConfig.adminPolicyDescription` | string | description for the boilerplate admin policy (default "Contributor permissions and full admin permissions to manage users and view usage dashboards") |
| `--authorizer.organizationConfig.PolicyConfig.contributorPolicyDescription` | string | description for the boilerplate contributor policy (default "Viewer permissions and permissions to create workflows, tasks, launch plans, and executions") |
| `--authorizer.organizationConfig.PolicyConfig.defaultUserPolicyRoleType` | string | name of the role type to determine which default policy new users added to the organization should be assigned (default "Viewer") |
| `--authorizer.organizationConfig.PolicyConfig.serverlessContributorPolicyDescription` | string | description for the boilerplate serverless contributor policy (default "Viewer permissions and permissions to create workflows, tasks, launch plans, and executions") |
| `--authorizer.organizationConfig.PolicyConfig.serverlessViewerPolicyDescription` | string | description for the boilerplate serverless viewer policy (default "Permissions to view Flyte entities") |
| `--authorizer.organizationConfig.PolicyConfig.viewerPolicyDescription` | string | description for the boilerplate viewer policy (default "Permissions to view Flyte entities") |
| `--authorizer.organizationConfig.defaultPolicyCacheDuration` | string | Cache entry duration for the store of the default policy per organization (default "10m0s") |
| `--authorizer.syncRuleRefreshInterval` | string | (default "1m0s") |
| `--authorizer.type` | string | (default "UserClouds") |
| `--authorizer.userCloudsClient.cache.redis.ttl.edgeTypes` | string | Specifies how long edge types remain in the cache.. (default "30m0s") |
| `--authorizer.userCloudsClient.cache.redis.ttl.edges` | string | Specifies how long edges remain in the cache. (default "30m0s") |
| `--authorizer.userCloudsClient.cache.redis.ttl.objectTypes` | string | Specifies how long object types remain in the cache. (default "30m0s") |
| `--authorizer.userCloudsClient.cache.redis.ttl.objects` | string | Specifies how long objects remain in the cache. (default "30m0s") |
| `--authorizer.userCloudsClient.cache.type` | string | Cache type to use. (default "none") |
| `--authorizer.userCloudsClient.clientID` | string | UserClouds client id |
| `--authorizer.userCloudsClient.clientSecretName` | string | UserCloud client secret name to read from the secret manager. (default "userclouds-client-secret") |
| `--authorizer.userCloudsClient.enableLogging` | | Enable userclouds client's internal logging. Calls to post logs take 250-350 ms and will impact p99 latency, enable with caution. |
| `--authorizer.userCloudsClient.tenantID` | string | UserClouds tenant id. Should be a UUID. |
| `--authorizer.userCloudsClient.tenantUrl` | string | Something like https://{yourtenant}.tenant.userclouds.com |
| `--config` | string | config file (default is /Users/andrew/.union/config.yaml) |
| `--connection.environment` | string | |
| `--connection.region` | string | |
| `--connection.rootTenantURLPattern` | string | Pattern for tenant url. (default "dns:///{{ organization }}.cloud-staging.union.ai") |
| `--console.endpoint` | string | Endpoint of console, if different than flyte admin |
| `--database.connMaxLifeTime` | string | sets the maximum amount of time a connection may be reused (default "1h0m0s") |
| `--database.enableForeignKeyConstraintWhenMigrating` | | Whether to enable gorm foreign keys when migrating the db |
| `--database.maxIdleConnections` | int | maxIdleConnections sets the maximum number of connections in the idle connection pool. (default 10) |
| `--database.maxOpenConnections` | int | maxOpenConnections sets the maximum number of open connections to the database. (default 100) |
| `--database.postgres.dbname` | string | The database name (default "postgres") |
| `--database.postgres.debug` | | |
| `--database.postgres.host` | string | The host name of the database server (default "localhost") |
| `--database.postgres.options` | string | See http://gorm.io/docs/connecting_to_the_database.html for available options passed, in addition to the above. (default "sslmode=disable") |
| `--database.postgres.password` | string | The database password. (default "postgres") |
| `--database.postgres.passwordPath` | string | Points to the file containing the database password. |
| `--database.postgres.port` | int | The port name of the database server (default 30001) |
| `--database.postgres.readReplicaHost` | string | The host name of the read replica database server (default "localhost") |
| `--database.postgres.username` | string | The database user who is connecting to the server. (default "postgres") |
| `--database.sqlite.file` | string | The path to the file (existing or new) where the DB should be created / stored. If existing, then this will be re-used, else a new will be created |
| `--db.connectionPool.maxConnectionLifetime` | string | (default "0s") |
| `--db.connectionPool.maxIdleConnections` | int | |
| `--db.connectionPool.maxOpenConnections` | int | |
| `--db.dbname` | string | (default "postgres") |
| `--db.debug` | | |
| `--db.host` | string | (default "postgres") |
| `--db.log_level` | int | (default 4) |
| `--db.options` | string | (default "sslmode=disable") |
| `--db.password` | string | |
| `--db.passwordPath` | string | |
| `--db.port` | int | (default 5432) |
| `--db.username` | string | (default "postgres") |
| `-d`, `--domain` | string | Specifies the Flyte project's domain. |
| `--files.archive` | | Pass in archive file either an http link or local path. |
| `--files.assumableIamRole` | string | Custom assumable iam auth role to register launch plans with. |
| `--files.continueOnError` | | Continue on error when registering files. |
| `--files.destinationDirectory` | string | Location of source code in container. |
| `--files.dryRun` | | Execute command without making any modifications. |
| `--files.enableSchedule` | | Enable the schedule if the files contain schedulable launchplan. |
| `--files.force` | | Force use of version number on entities registered with flyte. |
| `--files.k8ServiceAccount` | string | Deprecated. Please use `--K8sServiceAccount`|
| `--files.k8sServiceAccount` | string | Custom kubernetes service account auth role to register launch plans with. |
| `--files.outputLocationPrefix` | string | Custom output location prefix for offloaded types (files/schemas). |
| `--files.sourceUploadPath` | string | Deprecated: Update flyte admin to avoid having to configure storage access from uctl. |
| `--files.version` | string | Version of the entity to be registered with flyte which are un-versioned after serialization. |
| `--logger.formatter.type` | string | Sets logging format type. (default "json") |
| `--logger.level` | int | Sets the minimum logging level. (default 3) |
| `--logger.mute` | | Mutes all logs regardless of severity. Intended for benchmarks/tests only. |
| `--logger.show-source` | | Includes source code location in logs. |
| `--org` | string | Organization to work on. If not set, default to user's org. |
| `--otel.file.filename` | string | Filename to store exported telemetry traces (default "/tmp/trace.txt") |
| `--otel.jaeger.endpoint` | string | Endpoint for the jaeger telemetry trace ingestor (default "http://localhost:14268/api/traces") |
| `--otel.otlpgrpc.endpoint` | string | Endpoint for the OTLP telemetry trace collector (default "http://localhost:4317") |
| `--otel.otlphttp.endpoint` | string | Endpoint for the OTLP telemetry trace collector (default "http://localhost:4318/v1/traces") |
| `--otel.sampler.parentSampler` | string | Sets the parent sampler to use for the tracer (default "always") |
| `--otel.type` | string | Sets the type of exporter to configure [noop/file/jaeger/otlpgrpc/otlphttp]. (default "noop") |
| `-o`, `--output` | string | Specifies the output type - supported formats [TABLE JSON YAML DOT DOTURL]. NOTE: dot, doturl are only supported for Workflow (default "table") |
| `--plugins.catalogcache.reader.maxItems` | int | Maximum number of entries to keep in the index. (default 10000) |
| `--plugins.catalogcache.reader.maxRetries` | int | Maximum number of retries per item. (default 3) |
| `--plugins.catalogcache.reader.workers` | int | Number of concurrent workers to start processing the queue. (default 10) |
| `--plugins.catalogcache.writer.maxItems` | int | Maximum number of entries to keep in the index. (default 10000) |
| `--plugins.catalogcache.writer.maxRetries` | int | Maximum number of retries per item. (default 3) |
| `--plugins.catalogcache.writer.workers` | int | Number of concurrent workers to start processing the queue. (default 10) |
| `-p`, `--project` | string | Specifies the Flyte project. |
| `--rediscache.passwordSecretName` | string | Name of secret with Redis password. |
| `--rediscache.primaryEndpoint` | string | Primary endpoint for the redis cache that can be used for both reads and writes. |
| `--rediscache.replicaEndpoint` | string | Replica endpoint for the redis cache that can be used for reads. |
| `--secrets.env-prefix` | string | Prefix for environment variables (default "FLYTE_SECRET_") |
| `--secrets.secrets-prefix` | string | Prefix where to look for secrets file (default "/etc/secrets") |
| `--secrets.type` | string | Sets the type of storage to configure [local]. (default "local") |
| `--server.dataProxy.download.maxExpiresIn` | string | Maximum allowed expiration duration. (default "1h0m0s") |
| `--server.dataProxy.upload.defaultFileNameLength` | int | Default length for the generated file name if not provided in the request. (default 20) |
| `--server.dataProxy.upload.maxExpiresIn` | string | Maximum allowed expiration duration. (default "1h0m0s") |
| `--server.dataProxy.upload.maxSize` | string | Maximum allowed upload size. (default "6Mi") |
| `--server.dataProxy.upload.storagePrefix` | string | Storage prefix to use for all upload requests. |
| `--server.grpc.enableGrpcLatencyMetrics` | | Enable grpc latency metrics. Note Histograms metrics can be expensive on Prometheus servers. |
| `--server.grpc.maxMessageSizeBytes` | int | The max size in bytes for incoming gRPC messages |
| `--server.grpc.port` | int | On which grpc port to serve admin (default 8089) |
| `--server.grpc.serverReflection` | | Enable GRPC Server Reflection (default true) |
| `--server.grpcPort` | int | deprecated |
| `--server.grpcServerReflection` | | deprecated |
| `--server.httpPort` | int | On which http port to serve admin (default 8088) |
| `--server.kube-config` | string | Path to kubernetes client config file, default is empty, useful for incluster config. |
| `--server.kubeClientConfig.burst` | int | Max burst rate for throttle. 0 defaults to 10 (default 25) |
| `--server.kubeClientConfig.qps` | int32 | Max QPS to the master for requests to KubeAPI. 0 defaults to 5. (default 100) |
| `--server.kubeClientConfig.timeout` | string | Max duration allowed for every request to KubeAPI before giving up. 0 implies no timeout. (default "30s") |
| `--server.master` | string | The address of the Kubernetes API server. |
| `--server.readHeaderTimeoutSeconds` | int | The amount of time allowed to read request headers. (default 32) |
| `--server.security.allowCors` | | (default true) |
| `--server.security.allowedHeaders` | strings | (default [Content-Type,flyte-authorization]) |
| `--server.security.allowedOrigins` | strings | (default [*]) |
| `--server.security.auditAccess` | | |
| `--server.security.secure` | | |
| `--server.security.ssl.certificateFile` | string | |
| `--server.security.ssl.keyFile` | string | |
| `--server.security.useAuth` | | |
| `--server.thirdPartyConfig.flyteClient.audience` | string | Audience to use when initiating OAuth2 authorization requests. |
| `--server.thirdPartyConfig.flyteClient.clientId` | string | public identifier for the app which handles authorization for a Flyte deployment |
| `--server.thirdPartyConfig.flyteClient.redirectUri` | string | This is the callback uri registered with the app which handles authorization for a Flyte deployment |
| `--server.thirdPartyConfig.flyteClient.scopes` | strings | Recommended scopes for the client to request. |
| `--server.watchService.maxActiveClusterConnections` | int | (default 5) |
| `--server.watchService.maxPageSize` | int | (default 50000) |
| `--server.watchService.nonTerminalStatusUpdatesInterval` | string | (default "1m0s") |
| `--server.watchService.pollInterval` | string | (default "1s") |
| `--sharedservice.connectPort` | string | On which connect port to serve admin (default "8080") |
| `--sharedservice.grpc.grpcMaxResponseStatusBytes` | int32 | specifies the maximum (uncompressed) size of header list that the client is prepared to accept on grpc calls (default 32000) |
| `--sharedservice.grpc.maxConcurrentStreams` | int | Limit on the number of concurrent streams to each ServerTransport. (default 100) |
| `--sharedservice.grpc.maxMessageSizeBytes` | int | Limit on the size of message that can be received on the server. (default 10485760) |
| `--sharedservice.grpcServerReflection` | | Enable GRPC Server Reflection (default true) |
| `--sharedservice.httpPort` | string | On which http port to serve admin (default "8089") |
| `--sharedservice.kubeConfig` | string | Path to kubernetes client config file. |
| `--sharedservice.master` | string | The address of the Kubernetes API server. |
| `--sharedservice.metrics.enableClientGrpcHistograms` | | Enable client grpc histograms (default true) |
| `--sharedservice.metrics.enableGrpcHistograms` | | Enable grpc histograms (default true) |
| `--sharedservice.metrics.scope` | string | Scope to emit metrics under (default "service:") |
| `--sharedservice.port` | string | On which grpc port to serve admin (default "8080") |
| `--sharedservice.profiler.enabled` | | Enable Profiler on server |
| `--sharedservice.profilerPort` | string | Profile port to start listen for pprof and metric handlers on. (default "10254") |
| `--sharedservice.security.allowCors` | | |
| `--sharedservice.security.allowLocalhostAccess` | | Whether to permit localhost unauthenticated access to the server |
| `--sharedservice.security.allowedHeaders` | strings | |
| `--sharedservice.security.allowedOrigins` | strings | |
| `--sharedservice.security.auditAccess` | | |
| `--sharedservice.security.orgOverride` | string | Override org in identity context if localhost access enabled |
| `--sharedservice.security.secure` | | |
| `--sharedservice.security.ssl.certificateAuthorityFile` | string | |
| `--sharedservice.security.ssl.certificateFile` | string | |
| `--sharedservice.security.ssl.keyFile` | string | |
| `--sharedservice.security.useAuth` | | |
| `--sharedservice.sync.syncInterval` | string | Time interval to sync (default "5m0s") |
| `--storage.cache.max_size_mbs` | int | Maximum size of the cache where the Blob store data is cached in-memory. If not specified or set to 0, cache is not used |
| `--storage.cache.target_gc_percent` | int | Sets the garbage collection target percentage. |
| `--storage.connection.access-key` | string | Access key to use. Only required when authtype is set to accesskey. |
| `--storage.connection.auth-type` | string | Auth Type to use [iam, accesskey]. (default "iam") |
| `--storage.connection.disable-ssl` | | Disables SSL connection. Should only be used for development. |
| `--storage.connection.endpoint` | string | URL for storage client to connect to. |
| `--storage.connection.region` | string | Region to connect to. (default "us-east-1") |
| `--storage.connection.secret-key` | string | Secret to use when accesskey is set. |
| `--storage.container` | string | Initial container (in s3 a bucket) to create -if it doesn't exist-.' |
| `--storage.defaultHttpClient.timeout` | string | Sets time out on the http client. (default "0s") |
| `--storage.enable-multicontainer` | | If this is true, then the container argument is overlooked and redundant. This config will automatically open new connections to new containers/buckets as they are encountered |
| `--storage.limits.maxDownloadMBs` | int | Maximum allowed download size (in MBs) per call. (default 2) |
| `--storage.stow.config` | stringToString | Configuration for stow backend. Refer to github/flyteorg/stow (default []) |
| `--storage.stow.kind` | string | Kind of Stow backend to use. Refer to github/flyteorg/stow |
| `--storage.type` | string | Sets the type of storage to configure [s3/minio/local/mem/stow]. (default "s3") |
| `--union.auth.authorizationMetadataKey` | string | Authorization Header to use when passing Access Tokens to the server (default "flyte-authorization") |
| `--union.auth.clientId` | string | Client ID |
| `--union.auth.clientSecretEnvVar` | string | Environment variable containing the client secret |
| `--union.auth.clientSecretLocation` | string | File containing the client secret |
| `--union.auth.deviceFlow.pollInterval` | string | amount of time the device flow would poll the token endpoint if auth server doesn't return a polling interval. Okta and google IDP do return an interval' (default "5s") |
| `--union.auth.deviceFlow.refreshTime` | string | grace period from the token expiry after which it would refresh the token. (default "5m0s") |
| `--union.auth.deviceFlow.timeout` | string | amount of time the device flow should complete or else it will be cancelled. (default "10m0s") |
| `--union.auth.enable` | | Whether to enable an authenticated conenction when communicating with admin. (default true) |
| `--union.auth.externalAuth.command` | strings | Command for external authentication token generation |
| `--union.auth.pkce.refreshTime` | string | grace period from the token expiry after which it would refresh the token. (default "5m0s") |
| `--union.auth.pkce.timeout` | string | Amount of time the browser session would be active for authentication from client app. (default "15s") |
| `--union.auth.scopes` | strings | List of scopes to request |
| `--union.auth.tokenRefreshWindow` | string | Max duration between token refresh attempt and token expiry. (default "1h0m0s") |
| `--union.auth.tokenUrl` | string | OPTIONAL: Your IdP's token endpoint. It'll be discovered from flyte admin's OAuth Metadata endpoint if not provided. |
| `--union.auth.type` | string | Type of OAuth2 flow used for communicating with admin. (default "Pkce") |
| `--union.cache.maxItemsCount` | int | Maximum number of items to keep in the cache before evicting. (default 1000) |
| `--union.connection.host` | string | Host to connect to (default "dns:///utt-mgdp-stg-us-east-2.cloud-staging.union.ai") |
| `--union.connection.insecure` | | Whether to connect over insecure channel |
| `--union.connection.insecureSkipVerify` | | InsecureSkipVerify controls whether a client verifies the server's certificate chain and host name.Caution: shouldn't be use for production usecases' |
| `--union.connection.keepAliveConfig.permitWithoutStream` | | If true, client sends keepalive pings even with no active RPCs. |
| `--union.connection.keepAliveConfig.time` | string | After a duration of this time if the client doesn't see any activity it pings the server to see if the transport is still alive. (default "20s") |
| `--union.connection.keepAliveConfig.timeout` | string | After having pinged for keepalive check, the client waits for a duration of Timeout and if no activity is seen even after that the connection is closed. (default "2m0s") |
| `--union.connection.maxBackoffDelay` | string | Max delay for grpc backoff (default "8s") |
| `--union.connection.maxRecvMsgSize` | int | Maximum size of a message in bytes of a gRPC message (default 10485760) |
| `--union.connection.maxRetries` | int | Max number of gRPC retries (default 4) |
| `--union.connection.minConnectTimeout` | string | Minimum timeout for establishing a connection (default "20s") |
| `--union.connection.perRetryTimeout` | string | gRPC per retry timeout (default "15s") |
| `--union.connection.serviceConfig` | string | Defines gRPC experimental JSON Service Config (default "{"loadBalancingConfig": [{"round_robin":{}}]}") |
| `--union.connection.trustedIdentityClaims.enabled` | | Enables passing of trusted claims while making inter service calls |
| `--union.connection.trustedIdentityClaims.externalIdentityClaim` | string | External identity claim of the service which is authorized to make internal service call. These are verified against userclouds actions |
| `--union.connection.trustedIdentityClaims.externalIdentityTypeClaim` | string | External identity type claim of app or user to use for the current service identity. It should be an 'app' for inter service communication |
| `--union.internalConnectionConfig.-` | stringToString | (default []) |
| `--union.internalConnectionConfig.enabled` | | Enables internal service to service communication instead of going through ingress. |
| `--union.internalConnectionConfig.urlPattern` | string | UrlPattern of the internal service endpoints. (default "{{ service }}-helmchart.{{ service }}.svc.cluster.local:80") |
| `--webhook.awsSecretManager.sidecarImage` | string | Specifies the sidecar docker image to use (default "docker.io/amazon/aws-secrets-manager-secret-sidecar:v0.1.4") |
| `--webhook.certDir` | string | Certificate directory to use to write generated certs. Defaults to /etc/webhook/certs/ (default "/etc/webhook/certs") |
| `--webhook.embeddedSecretManagerConfig.awsConfig.region` | string | AWS region |
| `--webhook.embeddedSecretManagerConfig.fileMountInitContainer.image` | string | Specifies init container image to use for mounting secrets as files. (default "busybox:1.28") |
| `--webhook.embeddedSecretManagerConfig.gcpConfig.project` | string | GCP project to be used for secret manager |
| `--webhook.embeddedSecretManagerConfig.type` | string | (default "AWS") |
| `--webhook.gcpSecretManager.sidecarImage` | string | Specifies the sidecar docker image to use (default "gcr.io/google.com/cloudsdktool/cloud-sdk:alpine") |
| `--webhook.listenPort` | int | The port to use to listen to webhook calls. Defaults to 9443 (default 9443) |
| `--webhook.localCert` | | write certs locally. Defaults to false |
| `--webhook.metrics-prefix` | string | An optional prefix for all published metrics. (default "flyte:") |
| `--webhook.secretName` | string | Secret name to write generated certs to. (default "flyte-pod-webhook") |
| `--webhook.serviceName` | string | The name of the webhook service. (default "flyte-pod-webhook") |
| `--webhook.servicePort` | int32 | The port on the service that hosting webhook. (default 443) |
| `--webhook.vaultSecretManager.role` | string | Specifies the vault role to use (default "flyte") |
=== PAGE: https://www.union.ai/docs/v1/serverless/api-reference/flytekit-sdk ===
# Flytekit SDK
These are the Flytekit SDK API docs.
Flytekit is the core Python SDK for the Union and Flyte platforms.
## Developing on Flyte
For developing on the Flyte platform you need to add the `flytekit` package to your project:
```shell
$ uv add flytekit
```
This will install the Flytekit SDK and the `pyflyte` command-line tool.
When working with the FLytekit SDK you will be using the `pyflyte` CLI and the Flytekit SDK docs (not the Union SDK docs).
## Developing on Union
For developing on the Union platform you need to add the `union` package to your project:
```shell
$ uv add union
```
This will install the Union SDK, which is a superset of the Flytekit SDK.
It will also install the `union` command-line tool.
When working with the Union SDK you will be us=ing the `union` CLI and both the Flytekit SDK and the Union SDK docs.
## Subpages
- **Flytekit SDK > Classes**
- **Flytekit SDK > Packages**
=== PAGE: https://www.union.ai/docs/v1/serverless/api-reference/flytekit-sdk/classes ===
# Classes
| Class | Description |
|-|-|
| [`flytekit.clients.auth.auth_client.AuthorizationClient`](../packages/flytekit.clients.auth.auth_client#flytekitclientsauthauth_clientauthorizationclient) |Authorization client that stores the credentials in keyring and uses oauth2 standard flow to retrieve the. |
| [`flytekit.clients.auth.auth_client.AuthorizationCode`](../packages/flytekit.clients.auth.auth_client#flytekitclientsauthauth_clientauthorizationcode) | |
| [`flytekit.clients.auth.auth_client.EndpointMetadata`](../packages/flytekit.clients.auth.auth_client#flytekitclientsauthauth_clientendpointmetadata) |This class can be used to control the rendering of the page on login successful or failure. |
| [`flytekit.clients.auth.auth_client.OAuthCallbackHandler`](../packages/flytekit.clients.auth.auth_client#flytekitclientsauthauth_clientoauthcallbackhandler) |A simple wrapper around BaseHTTPServer. |
| [`flytekit.clients.auth.auth_client.OAuthHTTPServer`](../packages/flytekit.clients.auth.auth_client#flytekitclientsauthauth_clientoauthhttpserver) |A simple wrapper around the BaseHTTPServer. |
| [`flytekit.clients.auth.authenticator.Authenticator`](../packages/flytekit.clients.auth.authenticator#flytekitclientsauthauthenticatorauthenticator) |Base authenticator for all authentication flows. |
| [`flytekit.clients.auth.authenticator.ClientConfig`](../packages/flytekit.clients.auth.authenticator#flytekitclientsauthauthenticatorclientconfig) |Client Configuration that is needed by the authenticator. |
| [`flytekit.clients.auth.authenticator.ClientConfigStore`](../packages/flytekit.clients.auth.authenticator#flytekitclientsauthauthenticatorclientconfigstore) |Client Config store retrieve client config. |
| [`flytekit.clients.auth.authenticator.ClientCredentialsAuthenticator`](../packages/flytekit.clients.auth.authenticator#flytekitclientsauthauthenticatorclientcredentialsauthenticator) |This Authenticator uses ClientId and ClientSecret to authenticate. |
| [`flytekit.clients.auth.authenticator.CommandAuthenticator`](../packages/flytekit.clients.auth.authenticator#flytekitclientsauthauthenticatorcommandauthenticator) |This Authenticator retrieves access_token using the provided command. |
| [`flytekit.clients.auth.authenticator.DeviceCodeAuthenticator`](../packages/flytekit.clients.auth.authenticator#flytekitclientsauthauthenticatordevicecodeauthenticator) |This Authenticator implements the Device Code authorization flow useful for headless user authentication. |
| [`flytekit.clients.auth.authenticator.PKCEAuthenticator`](../packages/flytekit.clients.auth.authenticator#flytekitclientsauthauthenticatorpkceauthenticator) |This Authenticator encapsulates the entire PKCE flow and automatically opens a browser window for login. |
| [`flytekit.clients.auth.authenticator.StaticClientConfigStore`](../packages/flytekit.clients.auth.authenticator#flytekitclientsauthauthenticatorstaticclientconfigstore) |Client Config store retrieve client config. |
| [`flytekit.clients.auth.exceptions.AccessTokenNotFoundError`](../packages/flytekit.clients.auth.exceptions#flytekitclientsauthexceptionsaccesstokennotfounderror) |This error is raised with Access token is not found or if Refreshing the token fails. |
| [`flytekit.clients.auth.exceptions.AuthenticationError`](../packages/flytekit.clients.auth.exceptions#flytekitclientsauthexceptionsauthenticationerror) |This is raised for any AuthenticationError. |
| [`flytekit.clients.auth.exceptions.AuthenticationPending`](../packages/flytekit.clients.auth.exceptions#flytekitclientsauthexceptionsauthenticationpending) |This is raised if the token endpoint returns authentication pending. |
| [`flytekit.clients.auth.keyring.Credentials`](../packages/flytekit.clients.auth.keyring#flytekitclientsauthkeyringcredentials) |Stores the credentials together. |
| [`flytekit.clients.auth.keyring.KeyringStore`](../packages/flytekit.clients.auth.keyring#flytekitclientsauthkeyringkeyringstore) |Methods to access Keyring Store. |
| [`flytekit.clients.auth.token_client.DeviceCodeResponse`](../packages/flytekit.clients.auth.token_client#flytekitclientsauthtoken_clientdevicecoderesponse) |Response from device auth flow endpoint. |
| [`flytekit.clients.auth.token_client.GrantType`](../packages/flytekit.clients.auth.token_client#flytekitclientsauthtoken_clientgranttype) |str(object='') -> str. |
| [`flytekit.clients.auth_helper.AuthenticationHTTPAdapter`](../packages/flytekit.clients.auth_helper#flytekitclientsauth_helperauthenticationhttpadapter) |A custom HTTPAdapter that adds authentication headers to requests of a session. |
| [`flytekit.clients.auth_helper.RemoteClientConfigStore`](../packages/flytekit.clients.auth_helper#flytekitclientsauth_helperremoteclientconfigstore) |This class implements the ClientConfigStore that is served by the Flyte Server, that implements AuthMetadataService. |
| [`flytekit.clients.friendly.SynchronousFlyteClient`](../packages/flytekit.clients.friendly#flytekitclientsfriendlysynchronousflyteclient) |This is a low-level client that users can use to make direct gRPC service calls to the control plane. |
| [`flytekit.clients.grpc_utils.auth_interceptor.AuthUnaryInterceptor`](../packages/flytekit.clients.grpc_utils.auth_interceptor#flytekitclientsgrpc_utilsauth_interceptorauthunaryinterceptor) |This Interceptor can be used to automatically add Auth Metadata for every call - lazily in case authentication. |
| [`flytekit.clients.grpc_utils.default_metadata_interceptor.DefaultMetadataInterceptor`](../packages/flytekit.clients.grpc_utils.default_metadata_interceptor#flytekitclientsgrpc_utilsdefault_metadata_interceptordefaultmetadatainterceptor) |Affords intercepting unary-unary invocations. |
| [`flytekit.clients.grpc_utils.wrap_exception_interceptor.RetryExceptionWrapperInterceptor`](../packages/flytekit.clients.grpc_utils.wrap_exception_interceptor#flytekitclientsgrpc_utilswrap_exception_interceptorretryexceptionwrapperinterceptor) |Affords intercepting unary-unary invocations. |
| [`flytekit.clients.raw.RawSynchronousFlyteClient`](../packages/flytekit.clients.raw#flytekitclientsrawrawsynchronousflyteclient) |This is a thin synchronous wrapper around the auto-generated GRPC stubs for communicating with the admin service. |
| [`flytekit.clis.sdk_in_container.serialize.SerializationMode`](../packages/flytekit.clis.sdk_in_container.serialize#flytekitclissdk_in_containerserializeserializationmode) |Create a collection of name/value pairs. |
| [`flytekit.clis.sdk_in_container.utils.ErrorHandlingCommand`](../packages/flytekit.clis.sdk_in_container.utils#flytekitclissdk_in_containerutilserrorhandlingcommand) |Helper class that wraps the invoke method of a click command to catch exceptions and print them in a nice way. |
| [`flytekit.clis.sdk_in_container.utils.PyFlyteParams`](../packages/flytekit.clis.sdk_in_container.utils#flytekitclissdk_in_containerutilspyflyteparams) | |
| [`flytekit.configuration.AuthType`](../packages/flytekit.configuration#flytekitconfigurationauthtype) |Create a collection of name/value pairs. |
| [`flytekit.configuration.AzureBlobStorageConfig`](../packages/flytekit.configuration#flytekitconfigurationazureblobstorageconfig) |Any Azure Blob Storage specific configuration. |
| [`flytekit.configuration.Config`](../packages/flytekit.configuration#flytekitconfigurationconfig) |This the parent configuration object and holds all the underlying configuration object types. |
| [`flytekit.configuration.DataConfig`](../packages/flytekit.configuration#flytekitconfigurationdataconfig) |Any data storage specific configuration. |
| [`flytekit.configuration.EntrypointSettings`](../packages/flytekit.configuration#flytekitconfigurationentrypointsettings) |This object carries information about the path of the entrypoint command that will be invoked at runtime. |
| [`flytekit.configuration.FastSerializationSettings`](../packages/flytekit.configuration#flytekitconfigurationfastserializationsettings) |This object hold information about settings necessary to serialize an object so that it can be fast-registered. |
| [`flytekit.configuration.GCSConfig`](../packages/flytekit.configuration#flytekitconfigurationgcsconfig) |Any GCS specific configuration. |
| [`flytekit.configuration.GenericPersistenceConfig`](../packages/flytekit.configuration#flytekitconfigurationgenericpersistenceconfig) |Data storage configuration that applies across any provider. |
| [`flytekit.configuration.Image`](../packages/flytekit.configuration#flytekitconfigurationimage) |Image is a structured wrapper for task container images used in object serialization. |
| [`flytekit.configuration.ImageConfig`](../packages/flytekit.configuration#flytekitconfigurationimageconfig) |We recommend you to use ImageConfig. |
| [`flytekit.configuration.LocalConfig`](../packages/flytekit.configuration#flytekitconfigurationlocalconfig) |Any configuration specific to local runs. |
| [`flytekit.configuration.PlatformConfig`](../packages/flytekit.configuration#flytekitconfigurationplatformconfig) |This object contains the settings to talk to a Flyte backend (the DNS location of your Admin server basically). |
| [`flytekit.configuration.S3Config`](../packages/flytekit.configuration#flytekitconfigurations3config) |S3 specific configuration. |
| [`flytekit.configuration.SecretsConfig`](../packages/flytekit.configuration#flytekitconfigurationsecretsconfig) |Configuration for secrets. |
| [`flytekit.configuration.SerializationSettings`](../packages/flytekit.configuration#flytekitconfigurationserializationsettings) |These settings are provided while serializing a workflow and task, before registration. |
| [`flytekit.configuration.StatsConfig`](../packages/flytekit.configuration#flytekitconfigurationstatsconfig) |Configuration for sending statsd. |
| [`flytekit.configuration.TaskConfig`](../packages/flytekit.configuration#flytekitconfigurationtaskconfig) |Any Project/Domain/Org configuration. |
| [`flytekit.configuration.default_images.DefaultImages`](../packages/flytekit.configuration.default_images#flytekitconfigurationdefault_imagesdefaultimages) |We may want to load the default images from remote - maybe s3 location etc?. |
| [`flytekit.configuration.default_images.PythonVersion`](../packages/flytekit.configuration.default_images#flytekitconfigurationdefault_imagespythonversion) |Create a collection of name/value pairs. |
| [`flytekit.configuration.feature_flags.FeatureFlags`](../packages/flytekit.configuration.feature_flags#flytekitconfigurationfeature_flagsfeatureflags) | |
| [`flytekit.configuration.file.ConfigEntry`](../packages/flytekit.configuration.file#flytekitconfigurationfileconfigentry) |A top level Config entry holder, that holds multiple different representations of the config. |
| [`flytekit.configuration.file.ConfigFile`](../packages/flytekit.configuration.file#flytekitconfigurationfileconfigfile) | |
| [`flytekit.configuration.file.LegacyConfigEntry`](../packages/flytekit.configuration.file#flytekitconfigurationfilelegacyconfigentry) |Creates a record for the config entry. |
| [`flytekit.configuration.file.YamlConfigEntry`](../packages/flytekit.configuration.file#flytekitconfigurationfileyamlconfigentry) |Creates a record for the config entry. |
| [`flytekit.configuration.internal.AWS`](../packages/flytekit.configuration.internal#flytekitconfigurationinternalaws) | |
| [`flytekit.configuration.internal.AZURE`](../packages/flytekit.configuration.internal#flytekitconfigurationinternalazure) | |
| [`flytekit.configuration.internal.Credentials`](../packages/flytekit.configuration.internal#flytekitconfigurationinternalcredentials) | |
| [`flytekit.configuration.internal.GCP`](../packages/flytekit.configuration.internal#flytekitconfigurationinternalgcp) | |
| [`flytekit.configuration.internal.Images`](../packages/flytekit.configuration.internal#flytekitconfigurationinternalimages) | |
| [`flytekit.configuration.internal.Local`](../packages/flytekit.configuration.internal#flytekitconfigurationinternallocal) | |
| [`flytekit.configuration.internal.LocalSDK`](../packages/flytekit.configuration.internal#flytekitconfigurationinternallocalsdk) | |
| [`flytekit.configuration.internal.Persistence`](../packages/flytekit.configuration.internal#flytekitconfigurationinternalpersistence) | |
| [`flytekit.configuration.internal.Platform`](../packages/flytekit.configuration.internal#flytekitconfigurationinternalplatform) | |
| [`flytekit.configuration.internal.Secrets`](../packages/flytekit.configuration.internal#flytekitconfigurationinternalsecrets) | |
| [`flytekit.configuration.internal.StatsD`](../packages/flytekit.configuration.internal#flytekitconfigurationinternalstatsd) | |
| [`flytekit.configuration.plugin.FlytekitPlugin`](../packages/flytekit.configuration.plugin#flytekitconfigurationpluginflytekitplugin) | |
| [`flytekit.constants.CopyFileDetection`](../packages/flytekit.constants#flytekitconstantscopyfiledetection) |Create a collection of name/value pairs. |
| [`flytekit.core.annotation.FlyteAnnotation`](../packages/flytekit.core.annotation#flytekitcoreannotationflyteannotation) |A core object to add arbitrary annotations to flyte types. |
| [`flytekit.core.array_node.ArrayNode`](../packages/flytekit.core.array_node#flytekitcorearray_nodearraynode) | |
| [`flytekit.core.array_node_map_task.ArrayNodeMapTask`](../packages/flytekit.core.array_node_map_task#flytekitcorearray_node_map_taskarraynodemaptask) |Base Class for all Tasks with a Python native ``Interface``. |
| [`flytekit.core.array_node_map_task.ArrayNodeMapTaskResolver`](../packages/flytekit.core.array_node_map_task#flytekitcorearray_node_map_taskarraynodemaptaskresolver) |Special resolver that is used for ArrayNodeMapTasks. |
| [`flytekit.core.artifact.Artifact`](../packages/flytekit.core.artifact#flytekitcoreartifactartifact) |An Artifact is effectively just a metadata layer on top of data that exists in Flyte. |
| [`flytekit.core.artifact.ArtifactIDSpecification`](../packages/flytekit.core.artifact#flytekitcoreartifactartifactidspecification) |This is a special object that helps specify how Artifacts are to be created. |
| [`flytekit.core.artifact.ArtifactQuery`](../packages/flytekit.core.artifact#flytekitcoreartifactartifactquery) | |
| [`flytekit.core.artifact.DefaultArtifactSerializationHandler`](../packages/flytekit.core.artifact#flytekitcoreartifactdefaultartifactserializationhandler) |This protocol defines the interface for serializing artifact-related entities down to Flyte IDL. |
| [`flytekit.core.artifact.InputsBase`](../packages/flytekit.core.artifact#flytekitcoreartifactinputsbase) |A class to provide better partition semantics. |
| [`flytekit.core.artifact.Partition`](../packages/flytekit.core.artifact#flytekitcoreartifactpartition) | |
| [`flytekit.core.artifact.Partitions`](../packages/flytekit.core.artifact#flytekitcoreartifactpartitions) | |
| [`flytekit.core.artifact.Serializer`](../packages/flytekit.core.artifact#flytekitcoreartifactserializer) | |
| [`flytekit.core.artifact.TimePartition`](../packages/flytekit.core.artifact#flytekitcoreartifacttimepartition) | |
| [`flytekit.core.base_sql_task.SQLTask`](../packages/flytekit.core.base_sql_task#flytekitcorebase_sql_tasksqltask) |Base task types for all SQL tasks. |
| [`flytekit.core.base_task.IgnoreOutputs`](../packages/flytekit.core.base_task#flytekitcorebase_taskignoreoutputs) |This exception should be used to indicate that the outputs generated by this can be safely ignored. |
| [`flytekit.core.base_task.PythonTask`](../packages/flytekit.core.base_task#flytekitcorebase_taskpythontask) |Base Class for all Tasks with a Python native ``Interface``. |
| [`flytekit.core.base_task.Task`](../packages/flytekit.core.base_task#flytekitcorebase_tasktask) |The base of all Tasks in flytekit. |
| [`flytekit.core.base_task.TaskMetadata`](../packages/flytekit.core.base_task#flytekitcorebase_tasktaskmetadata) |Metadata for a Task. |
| [`flytekit.core.base_task.TaskResolverMixin`](../packages/flytekit.core.base_task#flytekitcorebase_tasktaskresolvermixin) |Flytekit tasks interact with the Flyte platform very, very broadly in two steps. |
| [`flytekit.core.cache.Cache`](../packages/flytekit.core.cache#flytekitcorecachecache) |Cache configuration for a task. |
| [`flytekit.core.cache.VersionParameters`](../packages/flytekit.core.cache#flytekitcorecacheversionparameters) |Parameters used for version hash generation. |
| [`flytekit.core.checkpointer.Checkpoint`](../packages/flytekit.core.checkpointer#flytekitcorecheckpointercheckpoint) |Base class for Checkpoint system. |
| [`flytekit.core.checkpointer.SyncCheckpoint`](../packages/flytekit.core.checkpointer#flytekitcorecheckpointersynccheckpoint) |This class is NOT THREAD-SAFE!. |
| [`flytekit.core.class_based_resolver.ClassStorageTaskResolver`](../packages/flytekit.core.class_based_resolver#flytekitcoreclass_based_resolverclassstoragetaskresolver) |Stores tasks inside a class variable. |
| [`flytekit.core.condition.BranchNode`](../packages/flytekit.core.condition#flytekitcoreconditionbranchnode) | |
| [`flytekit.core.condition.Case`](../packages/flytekit.core.condition#flytekitcoreconditioncase) | |
| [`flytekit.core.condition.Condition`](../packages/flytekit.core.condition#flytekitcoreconditioncondition) | |
| [`flytekit.core.condition.ConditionalSection`](../packages/flytekit.core.condition#flytekitcoreconditionconditionalsection) |ConditionalSection is used to denote a condition within a Workflow. |
| [`flytekit.core.condition.LocalExecutedConditionalSection`](../packages/flytekit.core.condition#flytekitcoreconditionlocalexecutedconditionalsection) |ConditionalSection is used to denote a condition within a Workflow. |
| [`flytekit.core.condition.SkippedConditionalSection`](../packages/flytekit.core.condition#flytekitcoreconditionskippedconditionalsection) |This ConditionalSection is used for nested conditionals, when the branch has been evaluated to false. |
| [`flytekit.core.container_task.ContainerTask`](../packages/flytekit.core.container_task#flytekitcorecontainer_taskcontainertask) |This is an intermediate class that represents Flyte Tasks that run a container at execution time. |
| [`flytekit.core.context_manager.BranchEvalMode`](../packages/flytekit.core.context_manager#flytekitcorecontext_managerbranchevalmode) |This is a 3-way class, with the None value meaning that we are not within a conditional context. |
| [`flytekit.core.context_manager.CompilationState`](../packages/flytekit.core.context_manager#flytekitcorecontext_managercompilationstate) |Compilation state is used during the compilation of a workflow or task. |
| [`flytekit.core.context_manager.ExecutionParameters`](../packages/flytekit.core.context_manager#flytekitcorecontext_managerexecutionparameters) |This is a run-time user-centric context object that is accessible to every @task method. |
| [`flytekit.core.context_manager.ExecutionState`](../packages/flytekit.core.context_manager#flytekitcorecontext_managerexecutionstate) |This is the context that is active when executing a task or a local workflow. |
| [`flytekit.core.context_manager.FlyteContext`](../packages/flytekit.core.context_manager#flytekitcorecontext_managerflytecontext) |This is an internal-facing context object, that most users will not have to deal with. |
| [`flytekit.core.context_manager.FlyteContextManager`](../packages/flytekit.core.context_manager#flytekitcorecontext_managerflytecontextmanager) |FlyteContextManager manages the execution context within Flytekit. |
| [`flytekit.core.context_manager.FlyteEntities`](../packages/flytekit.core.context_manager#flytekitcorecontext_managerflyteentities) |This is a global Object that tracks various tasks and workflows that are declared within a VM during the. |
| [`flytekit.core.context_manager.OutputMetadata`](../packages/flytekit.core.context_manager#flytekitcorecontext_manageroutputmetadata) | |
| [`flytekit.core.context_manager.OutputMetadataTracker`](../packages/flytekit.core.context_manager#flytekitcorecontext_manageroutputmetadatatracker) |This class is for the users to set arbitrary metadata on output literals. |
| [`flytekit.core.context_manager.SecretsManager`](../packages/flytekit.core.context_manager#flytekitcorecontext_managersecretsmanager) |This provides a secrets resolution logic at runtime. |
| [`flytekit.core.data_persistence.FileAccessProvider`](../packages/flytekit.core.data_persistence#flytekitcoredata_persistencefileaccessprovider) |This is the class that is available through the FlyteContext and can be used for persisting data to the remote. |
| [`flytekit.core.docstring.Docstring`](../packages/flytekit.core.docstring#flytekitcoredocstringdocstring) | |
| [`flytekit.core.environment.Environment`](../packages/flytekit.core.environment#flytekitcoreenvironmentenvironment) | |
| [`flytekit.core.gate.Gate`](../packages/flytekit.core.gate#flytekitcoregategate) |A node type that waits for user input before proceeding with a workflow. |
| [`flytekit.core.hash.HashMethod`](../packages/flytekit.core.hash#flytekitcorehashhashmethod) |Flyte-specific object used to wrap the hash function for a specific type. |
| [`flytekit.core.hash.HashOnReferenceMixin`](../packages/flytekit.core.hash#flytekitcorehashhashonreferencemixin) | |
| [`flytekit.core.interface.Interface`](../packages/flytekit.core.interface#flytekitcoreinterfaceinterface) |A Python native interface object, like inspect. |
| [`flytekit.core.launch_plan.LaunchPlan`](../packages/flytekit.core.launch_plan#flytekitcorelaunch_planlaunchplan) |Launch Plans are one of the core constructs of Flyte. |
| [`flytekit.core.launch_plan.ReferenceLaunchPlan`](../packages/flytekit.core.launch_plan#flytekitcorelaunch_planreferencelaunchplan) |A reference launch plan serves as a pointer to a Launch Plan that already exists on your Flyte installation. |
| [`flytekit.core.legacy_map_task.MapPythonTask`](../packages/flytekit.core.legacy_map_task#flytekitcorelegacy_map_taskmappythontask) |A MapPythonTask defines a {{< py_class_ref flytekit.PythonTask >}} which specifies how to run. |
| [`flytekit.core.legacy_map_task.MapTaskResolver`](../packages/flytekit.core.legacy_map_task#flytekitcorelegacy_map_taskmaptaskresolver) |Special resolver that is used for MapTasks. |
| [`flytekit.core.local_cache.LocalTaskCache`](../packages/flytekit.core.local_cache#flytekitcorelocal_cachelocaltaskcache) |This class implements a persistent store able to cache the result of local task executions. |
| [`flytekit.core.local_fsspec.FlyteLocalFileSystem`](../packages/flytekit.core.local_fsspec#flytekitcorelocal_fsspecflytelocalfilesystem) |This class doesn't do anything except override the separator so that it works on windows. |
| [`flytekit.core.mock_stats.MockStats`](../packages/flytekit.core.mock_stats#flytekitcoremock_statsmockstats) | |
| [`flytekit.core.node.Node`](../packages/flytekit.core.node#flytekitcorenodenode) |This class will hold all the things necessary to make an SdkNode but we won't make one until we know things like. |
| [`flytekit.core.notification.Email`](../packages/flytekit.core.notification#flytekitcorenotificationemail) |This notification should be used when sending regular emails to people. |
| [`flytekit.core.notification.Notification`](../packages/flytekit.core.notification#flytekitcorenotificationnotification) | |
| [`flytekit.core.notification.PagerDuty`](../packages/flytekit.core.notification#flytekitcorenotificationpagerduty) |This notification should be used when sending emails to the PagerDuty service. |
| [`flytekit.core.notification.Slack`](../packages/flytekit.core.notification#flytekitcorenotificationslack) |This notification should be used when sending emails to the Slack. |
| [`flytekit.core.options.Options`](../packages/flytekit.core.options#flytekitcoreoptionsoptions) |These are options that can be configured for a launchplan during registration or overridden during an execution. |
| [`flytekit.core.pod_template.PodTemplate`](../packages/flytekit.core.pod_template#flytekitcorepod_templatepodtemplate) |Custom PodTemplate specification for a Task. |
| [`flytekit.core.promise.ComparisonExpression`](../packages/flytekit.core.promise#flytekitcorepromisecomparisonexpression) |ComparisonExpression refers to an expression of the form (lhs operator rhs), where lhs and rhs are operands. |
| [`flytekit.core.promise.ComparisonOps`](../packages/flytekit.core.promise#flytekitcorepromisecomparisonops) |Create a collection of name/value pairs. |
| [`flytekit.core.promise.ConjunctionExpression`](../packages/flytekit.core.promise#flytekitcorepromiseconjunctionexpression) |A Conjunction Expression is an expression of the form either (A and B) or (A or B). |
| [`flytekit.core.promise.ConjunctionOps`](../packages/flytekit.core.promise#flytekitcorepromiseconjunctionops) |Create a collection of name/value pairs. |
| [`flytekit.core.promise.NodeOutput`](../packages/flytekit.core.promise#flytekitcorepromisenodeoutput) | |
| [`flytekit.core.promise.Promise`](../packages/flytekit.core.promise#flytekitcorepromisepromise) |This object is a wrapper and exists for three main reasons. |
| [`flytekit.core.promise.VoidPromise`](../packages/flytekit.core.promise#flytekitcorepromisevoidpromise) |This object is returned for tasks that do not return any outputs (declared interface is empty). |
| [`flytekit.core.python_auto_container.DefaultNotebookTaskResolver`](../packages/flytekit.core.python_auto_container#flytekitcorepython_auto_containerdefaultnotebooktaskresolver) |This resolved is used when the task is defined in a notebook. |
| [`flytekit.core.python_auto_container.DefaultTaskResolver`](../packages/flytekit.core.python_auto_container#flytekitcorepython_auto_containerdefaulttaskresolver) |Please see the notes in the TaskResolverMixin as it describes this default behavior. |
| [`flytekit.core.python_auto_container.PickledEntity`](../packages/flytekit.core.python_auto_container#flytekitcorepython_auto_containerpickledentity) |Represents the structure of the pickled object stored in the. |
| [`flytekit.core.python_auto_container.PickledEntityMetadata`](../packages/flytekit.core.python_auto_container#flytekitcorepython_auto_containerpickledentitymetadata) |Metadata for a pickled entity containing version information. |
| [`flytekit.core.python_auto_container.PythonAutoContainerTask`](../packages/flytekit.core.python_auto_container#flytekitcorepython_auto_containerpythonautocontainertask) |A Python AutoContainer task should be used as the base for all extensions that want the user's code to be in the. |
| [`flytekit.core.python_customized_container_task.PythonCustomizedContainerTask`](../packages/flytekit.core.python_customized_container_task#flytekitcorepython_customized_container_taskpythoncustomizedcontainertask) |Please take a look at the comments for {{< py_class_ref flytekit.extend.ExecutableTemplateShimTask >}} as well. |
| [`flytekit.core.python_customized_container_task.TaskTemplateResolver`](../packages/flytekit.core.python_customized_container_task#flytekitcorepython_customized_container_tasktasktemplateresolver) |This is a special resolver that resolves the task above at execution time, using only the ``TaskTemplate``,. |
| [`flytekit.core.python_function_task.AsyncPythonFunctionTask`](../packages/flytekit.core.python_function_task#flytekitcorepython_function_taskasyncpythonfunctiontask) |This is the base task for eager tasks, as well as normal async tasks. |
| [`flytekit.core.python_function_task.EagerAsyncPythonFunctionTask`](../packages/flytekit.core.python_function_task#flytekitcorepython_function_taskeagerasyncpythonfunctiontask) |This is the base eager task (aka eager workflow) type. |
| [`flytekit.core.python_function_task.EagerFailureHandlerTask`](../packages/flytekit.core.python_function_task#flytekitcorepython_function_taskeagerfailurehandlertask) |A Python AutoContainer task should be used as the base for all extensions that want the user's code to be in the. |
| [`flytekit.core.python_function_task.EagerFailureTaskResolver`](../packages/flytekit.core.python_function_task#flytekitcorepython_function_taskeagerfailuretaskresolver) |Flytekit tasks interact with the Flyte platform very, very broadly in two steps. |
| [`flytekit.core.python_function_task.PythonFunctionTask`](../packages/flytekit.core.python_function_task#flytekitcorepython_function_taskpythonfunctiontask) |A Python Function task should be used as the base for all extensions that have a python function. |
| [`flytekit.core.python_function_task.PythonInstanceTask`](../packages/flytekit.core.python_function_task#flytekitcorepython_function_taskpythoninstancetask) |This class should be used as the base class for all Tasks that do not have a user defined function body, but have. |
| [`flytekit.core.reference_entity.LaunchPlanReference`](../packages/flytekit.core.reference_entity#flytekitcorereference_entitylaunchplanreference) |A reference object containing metadata that points to a remote launch plan. |
| [`flytekit.core.reference_entity.Reference`](../packages/flytekit.core.reference_entity#flytekitcorereference_entityreference) | |
| [`flytekit.core.reference_entity.ReferenceEntity`](../packages/flytekit.core.reference_entity#flytekitcorereference_entityreferenceentity) | |
| [`flytekit.core.reference_entity.ReferenceSpec`](../packages/flytekit.core.reference_entity#flytekitcorereference_entityreferencespec) | |
| [`flytekit.core.reference_entity.ReferenceTemplate`](../packages/flytekit.core.reference_entity#flytekitcorereference_entityreferencetemplate) | |
| [`flytekit.core.reference_entity.TaskReference`](../packages/flytekit.core.reference_entity#flytekitcorereference_entitytaskreference) |A reference object containing metadata that points to a remote task. |
| [`flytekit.core.reference_entity.WorkflowReference`](../packages/flytekit.core.reference_entity#flytekitcorereference_entityworkflowreference) |A reference object containing metadata that points to a remote workflow. |
| [`flytekit.core.resources.ResourceSpec`](../packages/flytekit.core.resources#flytekitcoreresourcesresourcespec) | |
| [`flytekit.core.resources.Resources`](../packages/flytekit.core.resources#flytekitcoreresourcesresources) |This class is used to specify both resource requests and resource limits. |
| [`flytekit.core.schedule.CronSchedule`](../packages/flytekit.core.schedule#flytekitcoreschedulecronschedule) |Use this when you have a launch plan that you want to run on a cron expression. |
| [`flytekit.core.schedule.FixedRate`](../packages/flytekit.core.schedule#flytekitcoreschedulefixedrate) |Use this class to schedule a fixed-rate interval for a launch plan. |
| [`flytekit.core.schedule.OnSchedule`](../packages/flytekit.core.schedule#flytekitcorescheduleonschedule) |Base class for protocol classes. |
| [`flytekit.core.shim_task.ExecutableTemplateShimTask`](../packages/flytekit.core.shim_task#flytekitcoreshim_taskexecutabletemplateshimtask) |The canonical ``@task`` decorated Python function task is pretty simple to reason about. |
| [`flytekit.core.shim_task.ShimTaskExecutor`](../packages/flytekit.core.shim_task#flytekitcoreshim_taskshimtaskexecutor) |Please see the notes for the metaclass above first. |
| [`flytekit.core.task.Echo`](../packages/flytekit.core.task#flytekitcoretaskecho) |Base Class for all Tasks with a Python native ``Interface``. |
| [`flytekit.core.task.ReferenceTask`](../packages/flytekit.core.task#flytekitcoretaskreferencetask) |This is a reference task, the body of the function passed in through the constructor will never be used, only the. |
| [`flytekit.core.task.TaskPlugins`](../packages/flytekit.core.task#flytekitcoretasktaskplugins) |This is the TaskPlugins factory for task types that are derivative of PythonFunctionTask. |
| [`flytekit.core.tracked_abc.FlyteTrackedABC`](../packages/flytekit.core.tracked_abc#flytekitcoretracked_abcflytetrackedabc) |This class exists because if you try to inherit from abc. |
| [`flytekit.core.tracker.InstanceTrackingMeta`](../packages/flytekit.core.tracker#flytekitcoretrackerinstancetrackingmeta) |Please see the original class :flytekit. |
| [`flytekit.core.tracker.TrackedInstance`](../packages/flytekit.core.tracker#flytekitcoretrackertrackedinstance) |Please see the notes for the metaclass above first. |
| [`flytekit.core.type_engine.AsyncTypeTransformer`](../packages/flytekit.core.type_engine#flytekitcoretype_engineasynctypetransformer) |Base transformer type that should be implemented for every python native type that can be handled by flytekit. |
| [`flytekit.core.type_engine.BatchSize`](../packages/flytekit.core.type_engine#flytekitcoretype_enginebatchsize) |This is used to annotate a FlyteDirectory when we want to download/upload the contents of the directory in batches. |
| [`flytekit.core.type_engine.BinaryIOTransformer`](../packages/flytekit.core.type_engine#flytekitcoretype_enginebinaryiotransformer) |Handler for BinaryIO. |
| [`flytekit.core.type_engine.DataclassTransformer`](../packages/flytekit.core.type_engine#flytekitcoretype_enginedataclasstransformer) |The Dataclass Transformer provides a type transformer for dataclasses. |
| [`flytekit.core.type_engine.DictTransformer`](../packages/flytekit.core.type_engine#flytekitcoretype_enginedicttransformer) |Transformer that transforms an univariate dictionary Dict[str, T] to a Literal Map or. |
| [`flytekit.core.type_engine.EnumTransformer`](../packages/flytekit.core.type_engine#flytekitcoretype_engineenumtransformer) |Enables converting a python type enum. |
| [`flytekit.core.type_engine.ListTransformer`](../packages/flytekit.core.type_engine#flytekitcoretype_enginelisttransformer) |Transformer that handles a univariate typing. |
| [`flytekit.core.type_engine.LiteralTypeTransformer`](../packages/flytekit.core.type_engine#flytekitcoretype_engineliteraltypetransformer) |Base transformer type that should be implemented for every python native type that can be handled by flytekit. |
| [`flytekit.core.type_engine.LiteralsResolver`](../packages/flytekit.core.type_engine#flytekitcoretype_engineliteralsresolver) |LiteralsResolver is a helper class meant primarily for use with the FlyteRemote experience or any other situation. |
| [`flytekit.core.type_engine.ProtobufTransformer`](../packages/flytekit.core.type_engine#flytekitcoretype_engineprotobuftransformer) |Base transformer type that should be implemented for every python native type that can be handled by flytekit. |
| [`flytekit.core.type_engine.RestrictedTypeError`](../packages/flytekit.core.type_engine#flytekitcoretype_enginerestrictedtypeerror) |Common base class for all non-exit exceptions. |
| [`flytekit.core.type_engine.RestrictedTypeTransformer`](../packages/flytekit.core.type_engine#flytekitcoretype_enginerestrictedtypetransformer) |Types registered with the RestrictedTypeTransformer are not allowed to be converted to and from literals. |
| [`flytekit.core.type_engine.SimpleTransformer`](../packages/flytekit.core.type_engine#flytekitcoretype_enginesimpletransformer) |A Simple implementation of a type transformer that uses simple lambdas to transform and reduces boilerplate. |
| [`flytekit.core.type_engine.TextIOTransformer`](../packages/flytekit.core.type_engine#flytekitcoretype_enginetextiotransformer) |Handler for TextIO. |
| [`flytekit.core.type_engine.TypeEngine`](../packages/flytekit.core.type_engine#flytekitcoretype_enginetypeengine) |Core Extensible TypeEngine of Flytekit. |
| [`flytekit.core.type_engine.TypeTransformer`](../packages/flytekit.core.type_engine#flytekitcoretype_enginetypetransformer) |Base transformer type that should be implemented for every python native type that can be handled by flytekit. |
| [`flytekit.core.type_engine.TypeTransformerFailedError`](../packages/flytekit.core.type_engine#flytekitcoretype_enginetypetransformerfailederror) |Inappropriate argument type. |
| [`flytekit.core.type_engine.UnionTransformer`](../packages/flytekit.core.type_engine#flytekitcoretype_engineuniontransformer) |Transformer that handles a typing. |
| [`flytekit.core.utils.AutoDeletingTempDir`](../packages/flytekit.core.utils#flytekitcoreutilsautodeletingtempdir) |Creates a posix safe tempdir which is auto deleted once out of scope. |
| [`flytekit.core.utils.ClassDecorator`](../packages/flytekit.core.utils#flytekitcoreutilsclassdecorator) |Abstract class for class decorators. |
| [`flytekit.core.utils.Directory`](../packages/flytekit.core.utils#flytekitcoreutilsdirectory) | |
| [`flytekit.core.utils.timeit`](../packages/flytekit.core.utils#flytekitcoreutilstimeit) |A context manager and a decorator that measures the execution time of the wrapped code block or functions. |
| [`flytekit.core.worker_queue.Controller`](../packages/flytekit.core.worker_queue#flytekitcoreworker_queuecontroller) |This controller object is responsible for kicking off and monitoring executions against a Flyte Admin endpoint. |
| [`flytekit.core.worker_queue.ItemStatus`](../packages/flytekit.core.worker_queue#flytekitcoreworker_queueitemstatus) |Create a collection of name/value pairs. |
| [`flytekit.core.worker_queue.Update`](../packages/flytekit.core.worker_queue#flytekitcoreworker_queueupdate) | |
| [`flytekit.core.worker_queue.WorkItem`](../packages/flytekit.core.worker_queue#flytekitcoreworker_queueworkitem) |This is a class to keep track of what the user requested. |
| [`flytekit.core.workflow.ImperativeWorkflow`](../packages/flytekit.core.workflow#flytekitcoreworkflowimperativeworkflow) |An imperative workflow is a programmatic analogue to the typical ``@workflow`` function-based workflow and is. |
| [`flytekit.core.workflow.PythonFunctionWorkflow`](../packages/flytekit.core.workflow#flytekitcoreworkflowpythonfunctionworkflow) |Please read :std:ref:`flyte:divedeep-workflows` first for a high-level understanding of what workflows are in Flyte. |
| [`flytekit.core.workflow.ReferenceWorkflow`](../packages/flytekit.core.workflow#flytekitcoreworkflowreferenceworkflow) |A reference workflow is a pointer to a workflow that already exists on your Flyte installation. |
| [`flytekit.core.workflow.WorkflowBase`](../packages/flytekit.core.workflow#flytekitcoreworkflowworkflowbase) | |
| [`flytekit.core.workflow.WorkflowFailurePolicy`](../packages/flytekit.core.workflow#flytekitcoreworkflowworkflowfailurepolicy) |Defines the behavior for a workflow execution in the case of an observed node execution failure. |
| [`flytekit.core.workflow.WorkflowMetadata`](../packages/flytekit.core.workflow#flytekitcoreworkflowworkflowmetadata) | |
| [`flytekit.core.workflow.WorkflowMetadataDefaults`](../packages/flytekit.core.workflow#flytekitcoreworkflowworkflowmetadatadefaults) |This class is similarly named to the one above. |
| [`flytekit.deck.deck.Deck`](../packages/flytekit.deck.deck#flytekitdeckdeckdeck) |Deck enable users to get customizable and default visibility into their tasks. |
| [`flytekit.deck.deck.DeckField`](../packages/flytekit.deck.deck#flytekitdeckdeckdeckfield) |DeckField is used to specify the fields that will be rendered in the deck. |
| [`flytekit.deck.deck.TimeLineDeck`](../packages/flytekit.deck.deck#flytekitdeckdecktimelinedeck) |The TimeLineDeck class is designed to render the execution time of each part of a task. |
| [`flytekit.deck.renderer.ArrowRenderer`](../packages/flytekit.deck.renderer#flytekitdeckrendererarrowrenderer) |Render an Arrow dataframe as an HTML table. |
| [`flytekit.deck.renderer.MarkdownRenderer`](../packages/flytekit.deck.renderer#flytekitdeckrenderermarkdownrenderer) |Convert a markdown string to HTML and return HTML as a unicode string. |
| [`flytekit.deck.renderer.PythonDependencyRenderer`](../packages/flytekit.deck.renderer#flytekitdeckrendererpythondependencyrenderer) |PythonDependencyDeck is a deck that contains information about packages installed via pip. |
| [`flytekit.deck.renderer.SourceCodeRenderer`](../packages/flytekit.deck.renderer#flytekitdeckrenderersourcecoderenderer) |Convert Python source code to HTML, and return HTML as a unicode string. |
| [`flytekit.deck.renderer.TopFrameRenderer`](../packages/flytekit.deck.renderer#flytekitdeckrenderertopframerenderer) |Render a DataFrame as an HTML table. |
| [`flytekit.exceptions.base.FlyteException`](../packages/flytekit.exceptions.base#flytekitexceptionsbaseflyteexception) |Common base class for all non-exit exceptions. |
| [`flytekit.exceptions.base.FlyteRecoverableException`](../packages/flytekit.exceptions.base#flytekitexceptionsbaseflyterecoverableexception) |Common base class for all non-exit exceptions. |
| [`flytekit.exceptions.eager.EagerException`](../packages/flytekit.exceptions.eager#flytekitexceptionseagereagerexception) |Raised when a node in an eager workflow encounters an error. |
| [`flytekit.exceptions.scopes.FlyteScopedException`](../packages/flytekit.exceptions.scopes#flytekitexceptionsscopesflytescopedexception) |Common base class for all non-exit exceptions. |
| [`flytekit.exceptions.scopes.FlyteScopedSystemException`](../packages/flytekit.exceptions.scopes#flytekitexceptionsscopesflytescopedsystemexception) |Common base class for all non-exit exceptions. |
| [`flytekit.exceptions.scopes.FlyteScopedUserException`](../packages/flytekit.exceptions.scopes#flytekitexceptionsscopesflytescopeduserexception) |Common base class for all non-exit exceptions. |
| [`flytekit.exceptions.system.FlyteAgentNotFound`](../packages/flytekit.exceptions.system#flytekitexceptionssystemflyteagentnotfound) |Assertion failed. |
| [`flytekit.exceptions.system.FlyteConnectorNotFound`](../packages/flytekit.exceptions.system#flytekitexceptionssystemflyteconnectornotfound) |Assertion failed. |
| [`flytekit.exceptions.system.FlyteDownloadDataException`](../packages/flytekit.exceptions.system#flytekitexceptionssystemflytedownloaddataexception) |Common base class for all non-exit exceptions. |
| [`flytekit.exceptions.system.FlyteEntrypointNotLoadable`](../packages/flytekit.exceptions.system#flytekitexceptionssystemflyteentrypointnotloadable) |Common base class for all non-exit exceptions. |
| [`flytekit.exceptions.system.FlyteNonRecoverableSystemException`](../packages/flytekit.exceptions.system#flytekitexceptionssystemflytenonrecoverablesystemexception) |Common base class for all non-exit exceptions. |
| [`flytekit.exceptions.system.FlyteNotImplementedException`](../packages/flytekit.exceptions.system#flytekitexceptionssystemflytenotimplementedexception) |Method or function hasn't been implemented yet. |
| [`flytekit.exceptions.system.FlyteSystemAssertion`](../packages/flytekit.exceptions.system#flytekitexceptionssystemflytesystemassertion) |Assertion failed. |
| [`flytekit.exceptions.system.FlyteSystemException`](../packages/flytekit.exceptions.system#flytekitexceptionssystemflytesystemexception) |Common base class for all non-exit exceptions. |
| [`flytekit.exceptions.system.FlyteSystemUnavailableException`](../packages/flytekit.exceptions.system#flytekitexceptionssystemflytesystemunavailableexception) |Common base class for all non-exit exceptions. |
| [`flytekit.exceptions.system.FlyteUploadDataException`](../packages/flytekit.exceptions.system#flytekitexceptionssystemflyteuploaddataexception) |Common base class for all non-exit exceptions. |
| [`flytekit.exceptions.user.FlyteAssertion`](../packages/flytekit.exceptions.user#flytekitexceptionsuserflyteassertion) |Assertion failed. |
| [`flytekit.exceptions.user.FlyteAuthenticationException`](../packages/flytekit.exceptions.user#flytekitexceptionsuserflyteauthenticationexception) |Assertion failed. |
| [`flytekit.exceptions.user.FlyteCompilationException`](../packages/flytekit.exceptions.user#flytekitexceptionsuserflytecompilationexception) |Common base class for all non-exit exceptions. |
| [`flytekit.exceptions.user.FlyteDataNotFoundException`](../packages/flytekit.exceptions.user#flytekitexceptionsuserflytedatanotfoundexception) |Inappropriate argument value (of correct type). |
| [`flytekit.exceptions.user.FlyteDisapprovalException`](../packages/flytekit.exceptions.user#flytekitexceptionsuserflytedisapprovalexception) |Assertion failed. |
| [`flytekit.exceptions.user.FlyteEntityAlreadyExistsException`](../packages/flytekit.exceptions.user#flytekitexceptionsuserflyteentityalreadyexistsexception) |Assertion failed. |
| [`flytekit.exceptions.user.FlyteEntityNotExistException`](../packages/flytekit.exceptions.user#flytekitexceptionsuserflyteentitynotexistexception) |Assertion failed. |
| [`flytekit.exceptions.user.FlyteEntityNotFoundException`](../packages/flytekit.exceptions.user#flytekitexceptionsuserflyteentitynotfoundexception) |Inappropriate argument value (of correct type). |
| [`flytekit.exceptions.user.FlyteFailureNodeInputMismatchException`](../packages/flytekit.exceptions.user#flytekitexceptionsuserflytefailurenodeinputmismatchexception) |Assertion failed. |
| [`flytekit.exceptions.user.FlyteInvalidInputException`](../packages/flytekit.exceptions.user#flytekitexceptionsuserflyteinvalidinputexception) |Common base class for all non-exit exceptions. |
| [`flytekit.exceptions.user.FlyteMissingReturnValueException`](../packages/flytekit.exceptions.user#flytekitexceptionsuserflytemissingreturnvalueexception) |Common base class for all non-exit exceptions. |
| [`flytekit.exceptions.user.FlyteMissingTypeException`](../packages/flytekit.exceptions.user#flytekitexceptionsuserflytemissingtypeexception) |Common base class for all non-exit exceptions. |
| [`flytekit.exceptions.user.FlytePromiseAttributeResolveException`](../packages/flytekit.exceptions.user#flytekitexceptionsuserflytepromiseattributeresolveexception) |Assertion failed. |
| [`flytekit.exceptions.user.FlyteRecoverableException`](../packages/flytekit.exceptions.user#flytekitexceptionsuserflyterecoverableexception) |Common base class for all non-exit exceptions. |
| [`flytekit.exceptions.user.FlyteTimeout`](../packages/flytekit.exceptions.user#flytekitexceptionsuserflytetimeout) |Assertion failed. |
| [`flytekit.exceptions.user.FlyteTypeException`](../packages/flytekit.exceptions.user#flytekitexceptionsuserflytetypeexception) |Inappropriate argument type. |
| [`flytekit.exceptions.user.FlyteUserException`](../packages/flytekit.exceptions.user#flytekitexceptionsuserflyteuserexception) |Common base class for all non-exit exceptions. |
| [`flytekit.exceptions.user.FlyteUserRuntimeException`](../packages/flytekit.exceptions.user#flytekitexceptionsuserflyteuserruntimeexception) |Common base class for all non-exit exceptions. |
| [`flytekit.exceptions.user.FlyteValidationException`](../packages/flytekit.exceptions.user#flytekitexceptionsuserflytevalidationexception) |Assertion failed. |
| [`flytekit.exceptions.user.FlyteValueException`](../packages/flytekit.exceptions.user#flytekitexceptionsuserflytevalueexception) |Inappropriate argument value (of correct type). |
| [`flytekit.extend.backend.base_connector.AsyncConnectorBase`](../packages/flytekit.extend.backend.base_connector#flytekitextendbackendbase_connectorasyncconnectorbase) |This is the base class for all async connectors. |
| [`flytekit.extend.backend.base_connector.AsyncConnectorExecutorMixin`](../packages/flytekit.extend.backend.base_connector#flytekitextendbackendbase_connectorasyncconnectorexecutormixin) |This mixin class is used to run the async task locally, and it's only used for local execution. |
| [`flytekit.extend.backend.base_connector.ConnectorBase`](../packages/flytekit.extend.backend.base_connector#flytekitextendbackendbase_connectorconnectorbase) |Helper class that provides a standard way to create an ABC using. |
| [`flytekit.extend.backend.base_connector.ConnectorRegistry`](../packages/flytekit.extend.backend.base_connector#flytekitextendbackendbase_connectorconnectorregistry) |This is the registry for all connectors. |
| [`flytekit.extend.backend.base_connector.Resource`](../packages/flytekit.extend.backend.base_connector#flytekitextendbackendbase_connectorresource) |This is the output resource of the job. |
| [`flytekit.extend.backend.base_connector.ResourceMeta`](../packages/flytekit.extend.backend.base_connector#flytekitextendbackendbase_connectorresourcemeta) |This is the metadata for the job. |
| [`flytekit.extend.backend.base_connector.SyncConnectorBase`](../packages/flytekit.extend.backend.base_connector#flytekitextendbackendbase_connectorsyncconnectorbase) |This is the base class for all sync connectors. |
| [`flytekit.extend.backend.base_connector.SyncConnectorExecutorMixin`](../packages/flytekit.extend.backend.base_connector#flytekitextendbackendbase_connectorsyncconnectorexecutormixin) |This mixin class is used to run the sync task locally, and it's only used for local execution. |
| [`flytekit.extend.backend.base_connector.TaskCategory`](../packages/flytekit.extend.backend.base_connector#flytekitextendbackendbase_connectortaskcategory) | |
| [`flytekit.extend.backend.connector_service.AsyncConnectorService`](../packages/flytekit.extend.backend.connector_service#flytekitextendbackendconnector_serviceasyncconnectorservice) |AsyncAgentService defines an RPC Service that allows propeller to send the request to the agent server asynchronously. |
| [`flytekit.extend.backend.connector_service.ConnectorMetadataService`](../packages/flytekit.extend.backend.connector_service#flytekitextendbackendconnector_serviceconnectormetadataservice) |AgentMetadataService defines an RPC service that is also served over HTTP via grpc-gateway. |
| [`flytekit.extend.backend.connector_service.SyncConnectorService`](../packages/flytekit.extend.backend.connector_service#flytekitextendbackendconnector_servicesyncconnectorservice) |SyncAgentService defines an RPC Service that allows propeller to send the request to the agent server synchronously. |
| [`flytekit.extras.accelerators.BaseAccelerator`](../packages/flytekit.extras.accelerators#flytekitextrasacceleratorsbaseaccelerator) |Base class for all accelerator types. |
| [`flytekit.extras.accelerators.GPUAccelerator`](../packages/flytekit.extras.accelerators#flytekitextrasacceleratorsgpuaccelerator) |Class that represents a GPU accelerator. |
| [`flytekit.extras.accelerators.MultiInstanceGPUAccelerator`](../packages/flytekit.extras.accelerators#flytekitextrasacceleratorsmultiinstancegpuaccelerator) |Base class for all multi-instance GPU accelerator types. |
| [`flytekit.extras.cloud_pickle_resolver.ExperimentalNaiveCloudPickleResolver`](../packages/flytekit.extras.cloud_pickle_resolver#flytekitextrascloud_pickle_resolverexperimentalnaivecloudpickleresolver) |Please do not use this resolver, basically ever. |
| [`flytekit.extras.pydantic_transformer.transformer.PydanticTransformer`](../packages/flytekit.extras.pydantic_transformer.transformer#flytekitextraspydantic_transformertransformerpydantictransformer) |Base transformer type that should be implemented for every python native type that can be handled by flytekit. |
| [`flytekit.extras.pytorch.checkpoint.PyTorchCheckpoint`](../packages/flytekit.extras.pytorch.checkpoint#flytekitextraspytorchcheckpointpytorchcheckpoint) |This class is helpful to save a checkpoint. |
| [`flytekit.extras.pytorch.checkpoint.PyTorchCheckpointTransformer`](../packages/flytekit.extras.pytorch.checkpoint#flytekitextraspytorchcheckpointpytorchcheckpointtransformer) |TypeTransformer that supports serializing and deserializing checkpoint. |
| [`flytekit.extras.pytorch.native.PyTorchModuleTransformer`](../packages/flytekit.extras.pytorch.native#flytekitextraspytorchnativepytorchmoduletransformer) |Base transformer type that should be implemented for every python native type that can be handled by flytekit. |
| [`flytekit.extras.pytorch.native.PyTorchTensorTransformer`](../packages/flytekit.extras.pytorch.native#flytekitextraspytorchnativepytorchtensortransformer) |Base transformer type that should be implemented for every python native type that can be handled by flytekit. |
| [`flytekit.extras.pytorch.native.PyTorchTypeTransformer`](../packages/flytekit.extras.pytorch.native#flytekitextraspytorchnativepytorchtypetransformer) |Base transformer type that should be implemented for every python native type that can be handled by flytekit. |
| [`flytekit.extras.sklearn.native.SklearnEstimatorTransformer`](../packages/flytekit.extras.sklearn.native#flytekitextrassklearnnativesklearnestimatortransformer) |Base transformer type that should be implemented for every python native type that can be handled by flytekit. |
| [`flytekit.extras.sklearn.native.SklearnTypeTransformer`](../packages/flytekit.extras.sklearn.native#flytekitextrassklearnnativesklearntypetransformer) |Base transformer type that should be implemented for every python native type that can be handled by flytekit. |
| [`flytekit.extras.sqlite3.task.SQLite3Config`](../packages/flytekit.extras.sqlite3.task#flytekitextrassqlite3tasksqlite3config) |Use this configuration to configure if sqlite3 files that should be loaded by the task. |
| [`flytekit.extras.sqlite3.task.SQLite3Task`](../packages/flytekit.extras.sqlite3.task#flytekitextrassqlite3tasksqlite3task) |Run client side SQLite3 queries that optionally return a FlyteSchema object. |
| [`flytekit.extras.sqlite3.task.SQLite3TaskExecutor`](../packages/flytekit.extras.sqlite3.task#flytekitextrassqlite3tasksqlite3taskexecutor) |Please see the notes for the metaclass above first. |
| [`flytekit.extras.tasks.shell.AttrDict`](../packages/flytekit.extras.tasks.shell#flytekitextrastasksshellattrdict) |Convert a dictionary to an attribute style lookup. |
| [`flytekit.extras.tasks.shell.OutputLocation`](../packages/flytekit.extras.tasks.shell#flytekitextrastasksshelloutputlocation) | |
| [`flytekit.extras.tasks.shell.ProcessResult`](../packages/flytekit.extras.tasks.shell#flytekitextrastasksshellprocessresult) |Stores a process return code, standard output and standard error. |
| [`flytekit.extras.tasks.shell.RawShellTask`](../packages/flytekit.extras.tasks.shell#flytekitextrastasksshellrawshelltask) | |
| [`flytekit.extras.tasks.shell.ShellTask`](../packages/flytekit.extras.tasks.shell#flytekitextrastasksshellshelltask) | |
| [`flytekit.extras.tensorflow.model.TensorFlowModelTransformer`](../packages/flytekit.extras.tensorflow.model#flytekitextrastensorflowmodeltensorflowmodeltransformer) |Base transformer type that should be implemented for every python native type that can be handled by flytekit. |
| [`flytekit.extras.tensorflow.record.TFRecordDatasetConfig`](../packages/flytekit.extras.tensorflow.record#flytekitextrastensorflowrecordtfrecorddatasetconfig) |TFRecordDatasetConfig can be used while creating tf. |
| [`flytekit.extras.tensorflow.record.TensorFlowRecordFileTransformer`](../packages/flytekit.extras.tensorflow.record#flytekitextrastensorflowrecordtensorflowrecordfiletransformer) |TypeTransformer that supports serialising and deserialising to and from TFRecord file. |
| [`flytekit.extras.tensorflow.record.TensorFlowRecordsDirTransformer`](../packages/flytekit.extras.tensorflow.record#flytekitextrastensorflowrecordtensorflowrecordsdirtransformer) |TypeTransformer that supports serialising and deserialising to and from TFRecord directory. |
| [`flytekit.extras.webhook.WebhookConnector`](../packages/flytekit.extras.webhook#flytekitextraswebhookwebhookconnector) |WebhookConnector is responsible for handling webhook tasks. |
| [`flytekit.extras.webhook.WebhookTask`](../packages/flytekit.extras.webhook#flytekitextraswebhookwebhooktask) |The WebhookTask is used to invoke a webhook. |
| [`flytekit.extras.webhook.connector.WebhookConnector`](../packages/flytekit.extras.webhook.connector#flytekitextraswebhookconnectorwebhookconnector) |WebhookConnector is responsible for handling webhook tasks. |
| [`flytekit.extras.webhook.task.WebhookTask`](../packages/flytekit.extras.webhook.task#flytekitextraswebhooktaskwebhooktask) |The WebhookTask is used to invoke a webhook. |
| [`flytekit.image_spec.default_builder.DefaultImageBuilder`](../packages/flytekit.image_spec.default_builder#flytekitimage_specdefault_builderdefaultimagebuilder) |Image builder using Docker and buildkit. |
| [`flytekit.image_spec.image_spec.ImageBuildEngine`](../packages/flytekit.image_spec.image_spec#flytekitimage_specimage_specimagebuildengine) |ImageBuildEngine contains a list of builders that can be used to build an ImageSpec. |
| [`flytekit.image_spec.image_spec.ImageSpec`](../packages/flytekit.image_spec.image_spec#flytekitimage_specimage_specimagespec) |This class is used to specify the docker image that will be used to run the task. |
| [`flytekit.image_spec.image_spec.ImageSpecBuilder`](../packages/flytekit.image_spec.image_spec#flytekitimage_specimage_specimagespecbuilder) | |
| [`flytekit.image_spec.noop_builder.NoOpBuilder`](../packages/flytekit.image_spec.noop_builder#flytekitimage_specnoop_buildernoopbuilder) |Noop image builder. |
| [`flytekit.interaction.click_types.DateTimeType`](../packages/flytekit.interaction.click_types#flytekitinteractionclick_typesdatetimetype) |The DateTime type converts date strings into `datetime` objects. |
| [`flytekit.interaction.click_types.DirParamType`](../packages/flytekit.interaction.click_types#flytekitinteractionclick_typesdirparamtype) |Represents the type of a parameter. |
| [`flytekit.interaction.click_types.DurationParamType`](../packages/flytekit.interaction.click_types#flytekitinteractionclick_typesdurationparamtype) |Represents the type of a parameter. |
| [`flytekit.interaction.click_types.EnumParamType`](../packages/flytekit.interaction.click_types#flytekitinteractionclick_typesenumparamtype) |The choice type allows a value to be checked against a fixed set. |
| [`flytekit.interaction.click_types.FileParamType`](../packages/flytekit.interaction.click_types#flytekitinteractionclick_typesfileparamtype) |Represents the type of a parameter. |
| [`flytekit.interaction.click_types.FlyteLiteralConverter`](../packages/flytekit.interaction.click_types#flytekitinteractionclick_typesflyteliteralconverter) | |
| [`flytekit.interaction.click_types.JSONIteratorParamType`](../packages/flytekit.interaction.click_types#flytekitinteractionclick_typesjsoniteratorparamtype) |Represents the type of a parameter. |
| [`flytekit.interaction.click_types.JsonParamType`](../packages/flytekit.interaction.click_types#flytekitinteractionclick_typesjsonparamtype) |Represents the type of a parameter. |
| [`flytekit.interaction.click_types.PickleParamType`](../packages/flytekit.interaction.click_types#flytekitinteractionclick_typespickleparamtype) |Represents the type of a parameter. |
| [`flytekit.interaction.click_types.StructuredDatasetParamType`](../packages/flytekit.interaction.click_types#flytekitinteractionclick_typesstructureddatasetparamtype) |TODO handle column types. |
| [`flytekit.interaction.click_types.UnionParamType`](../packages/flytekit.interaction.click_types#flytekitinteractionclick_typesunionparamtype) |A composite type that allows for multiple types to be specified. |
| [`flytekit.interaction.rich_utils.RichCallback`](../packages/flytekit.interaction.rich_utils#flytekitinteractionrich_utilsrichcallback) |Base class and interface for callback mechanism. |
| [`flytekit.interactive.vscode_lib.config.VscodeConfig`](../packages/flytekit.interactive.vscode_lib.config#flytekitinteractivevscode_libconfigvscodeconfig) |VscodeConfig is the config contains default URLs of the VSCode server and extension remote paths. |
| [`flytekit.interactive.vscode_lib.decorator.vscode`](../packages/flytekit.interactive.vscode_lib.decorator#flytekitinteractivevscode_libdecoratorvscode) |Abstract class for class decorators. |
| [`flytekit.interfaces.cli_identifiers.Identifier`](../packages/flytekit.interfaces.cli_identifiers#flytekitinterfacescli_identifiersidentifier) | |
| [`flytekit.interfaces.cli_identifiers.TaskExecutionIdentifier`](../packages/flytekit.interfaces.cli_identifiers#flytekitinterfacescli_identifierstaskexecutionidentifier) | |
| [`flytekit.interfaces.cli_identifiers.WorkflowExecutionIdentifier`](../packages/flytekit.interfaces.cli_identifiers#flytekitinterfacescli_identifiersworkflowexecutionidentifier) | |
| [`flytekit.interfaces.stats.client.DummyStatsClient`](../packages/flytekit.interfaces.stats.client#flytekitinterfacesstatsclientdummystatsclient) |A dummy client for statsd. |
| [`flytekit.interfaces.stats.client.ScopeableStatsProxy`](../packages/flytekit.interfaces.stats.client#flytekitinterfacesstatsclientscopeablestatsproxy) |A Proxy object for an underlying statsd client. |
| [`flytekit.interfaces.stats.client.StatsClientProxy`](../packages/flytekit.interfaces.stats.client#flytekitinterfacesstatsclientstatsclientproxy) |A Proxy object for an underlying statsd client. |
| [`flytekit.interfaces.stats.taggable.TaggableStats`](../packages/flytekit.interfaces.stats.taggable#flytekitinterfacesstatstaggabletaggablestats) |A Proxy object for an underlying statsd client. |
| [`flytekit.models.admin.common.Sort`](../packages/flytekit.models.admin.common#flytekitmodelsadmincommonsort) | |
| [`flytekit.models.admin.task_execution.TaskExecution`](../packages/flytekit.models.admin.task_execution#flytekitmodelsadmintask_executiontaskexecution) | |
| [`flytekit.models.admin.task_execution.TaskExecutionClosure`](../packages/flytekit.models.admin.task_execution#flytekitmodelsadmintask_executiontaskexecutionclosure) | |
| [`flytekit.models.admin.workflow.Workflow`](../packages/flytekit.models.admin.workflow#flytekitmodelsadminworkflowworkflow) | |
| [`flytekit.models.admin.workflow.WorkflowClosure`](../packages/flytekit.models.admin.workflow#flytekitmodelsadminworkflowworkflowclosure) | |
| [`flytekit.models.admin.workflow.WorkflowSpec`](../packages/flytekit.models.admin.workflow#flytekitmodelsadminworkflowworkflowspec) | |
| [`flytekit.models.annotation.TypeAnnotation`](../packages/flytekit.models.annotation#flytekitmodelsannotationtypeannotation) |Python class representation of the flyteidl TypeAnnotation message. |
| [`flytekit.models.array_job.ArrayJob`](../packages/flytekit.models.array_job#flytekitmodelsarray_jobarrayjob) | |
| [`flytekit.models.common.Annotations`](../packages/flytekit.models.common#flytekitmodelscommonannotations) | |
| [`flytekit.models.common.AuthRole`](../packages/flytekit.models.common#flytekitmodelscommonauthrole) | |
| [`flytekit.models.common.EmailNotification`](../packages/flytekit.models.common#flytekitmodelscommonemailnotification) | |
| [`flytekit.models.common.Envs`](../packages/flytekit.models.common#flytekitmodelscommonenvs) | |
| [`flytekit.models.common.FlyteABCMeta`](../packages/flytekit.models.common#flytekitmodelscommonflyteabcmeta) |Metaclass for defining Abstract Base Classes (ABCs). |
| [`flytekit.models.common.FlyteCustomIdlEntity`](../packages/flytekit.models.common#flytekitmodelscommonflytecustomidlentity) | |
| [`flytekit.models.common.FlyteIdlEntity`](../packages/flytekit.models.common#flytekitmodelscommonflyteidlentity) | |
| [`flytekit.models.common.FlyteType`](../packages/flytekit.models.common#flytekitmodelscommonflytetype) |Metaclass for defining Abstract Base Classes (ABCs). |
| [`flytekit.models.common.Labels`](../packages/flytekit.models.common#flytekitmodelscommonlabels) | |
| [`flytekit.models.common.NamedEntityIdentifier`](../packages/flytekit.models.common#flytekitmodelscommonnamedentityidentifier) | |
| [`flytekit.models.common.Notification`](../packages/flytekit.models.common#flytekitmodelscommonnotification) | |
| [`flytekit.models.common.PagerDutyNotification`](../packages/flytekit.models.common#flytekitmodelscommonpagerdutynotification) | |
| [`flytekit.models.common.RawOutputDataConfig`](../packages/flytekit.models.common#flytekitmodelscommonrawoutputdataconfig) | |
| [`flytekit.models.common.SlackNotification`](../packages/flytekit.models.common#flytekitmodelscommonslacknotification) | |
| [`flytekit.models.common.UrlBlob`](../packages/flytekit.models.common#flytekitmodelscommonurlblob) | |
| [`flytekit.models.concurrency.ConcurrencyLimitBehavior`](../packages/flytekit.models.concurrency#flytekitmodelsconcurrencyconcurrencylimitbehavior) | |
| [`flytekit.models.concurrency.ConcurrencyPolicy`](../packages/flytekit.models.concurrency#flytekitmodelsconcurrencyconcurrencypolicy) |Defines the concurrency policy for a launch plan. |
| [`flytekit.models.core.catalog.CatalogArtifactTag`](../packages/flytekit.models.core.catalog#flytekitmodelscorecatalogcatalogartifacttag) | |
| [`flytekit.models.core.catalog.CatalogMetadata`](../packages/flytekit.models.core.catalog#flytekitmodelscorecatalogcatalogmetadata) | |
| [`flytekit.models.core.compiler.CompiledTask`](../packages/flytekit.models.core.compiler#flytekitmodelscorecompilercompiledtask) | |
| [`flytekit.models.core.compiler.CompiledWorkflow`](../packages/flytekit.models.core.compiler#flytekitmodelscorecompilercompiledworkflow) | |
| [`flytekit.models.core.compiler.CompiledWorkflowClosure`](../packages/flytekit.models.core.compiler#flytekitmodelscorecompilercompiledworkflowclosure) | |
| [`flytekit.models.core.compiler.ConnectionSet`](../packages/flytekit.models.core.compiler#flytekitmodelscorecompilerconnectionset) | |
| [`flytekit.models.core.condition.BooleanExpression`](../packages/flytekit.models.core.condition#flytekitmodelscoreconditionbooleanexpression) | |
| [`flytekit.models.core.condition.ComparisonExpression`](../packages/flytekit.models.core.condition#flytekitmodelscoreconditioncomparisonexpression) | |
| [`flytekit.models.core.condition.ConjunctionExpression`](../packages/flytekit.models.core.condition#flytekitmodelscoreconditionconjunctionexpression) | |
| [`flytekit.models.core.condition.Operand`](../packages/flytekit.models.core.condition#flytekitmodelscoreconditionoperand) | |
| [`flytekit.models.core.errors.ContainerError`](../packages/flytekit.models.core.errors#flytekitmodelscoreerrorscontainererror) | |
| [`flytekit.models.core.errors.ErrorDocument`](../packages/flytekit.models.core.errors#flytekitmodelscoreerrorserrordocument) | |
| [`flytekit.models.core.execution.ExecutionError`](../packages/flytekit.models.core.execution#flytekitmodelscoreexecutionexecutionerror) | |
| [`flytekit.models.core.execution.NodeExecutionPhase`](../packages/flytekit.models.core.execution#flytekitmodelscoreexecutionnodeexecutionphase) | |
| [`flytekit.models.core.execution.TaskExecutionPhase`](../packages/flytekit.models.core.execution#flytekitmodelscoreexecutiontaskexecutionphase) | |
| [`flytekit.models.core.execution.TaskLog`](../packages/flytekit.models.core.execution#flytekitmodelscoreexecutiontasklog) | |
| [`flytekit.models.core.execution.WorkflowExecutionPhase`](../packages/flytekit.models.core.execution#flytekitmodelscoreexecutionworkflowexecutionphase) |This class holds enum values used for setting notifications. |
| [`flytekit.models.core.identifier.Identifier`](../packages/flytekit.models.core.identifier#flytekitmodelscoreidentifieridentifier) | |
| [`flytekit.models.core.identifier.NodeExecutionIdentifier`](../packages/flytekit.models.core.identifier#flytekitmodelscoreidentifiernodeexecutionidentifier) | |
| [`flytekit.models.core.identifier.ResourceType`](../packages/flytekit.models.core.identifier#flytekitmodelscoreidentifierresourcetype) | |
| [`flytekit.models.core.identifier.SignalIdentifier`](../packages/flytekit.models.core.identifier#flytekitmodelscoreidentifiersignalidentifier) | |
| [`flytekit.models.core.identifier.TaskExecutionIdentifier`](../packages/flytekit.models.core.identifier#flytekitmodelscoreidentifiertaskexecutionidentifier) | |
| [`flytekit.models.core.identifier.WorkflowExecutionIdentifier`](../packages/flytekit.models.core.identifier#flytekitmodelscoreidentifierworkflowexecutionidentifier) | |
| [`flytekit.models.core.types.BlobType`](../packages/flytekit.models.core.types#flytekitmodelscoretypesblobtype) |This type represents offloaded data and is typically used for things like files. |
| [`flytekit.models.core.types.EnumType`](../packages/flytekit.models.core.types#flytekitmodelscoretypesenumtype) |Models _types_pb2. |
| [`flytekit.models.core.workflow.Alias`](../packages/flytekit.models.core.workflow#flytekitmodelscoreworkflowalias) | |
| [`flytekit.models.core.workflow.ApproveCondition`](../packages/flytekit.models.core.workflow#flytekitmodelscoreworkflowapprovecondition) | |
| [`flytekit.models.core.workflow.ArrayNode`](../packages/flytekit.models.core.workflow#flytekitmodelscoreworkflowarraynode) | |
| [`flytekit.models.core.workflow.BranchNode`](../packages/flytekit.models.core.workflow#flytekitmodelscoreworkflowbranchnode) | |
| [`flytekit.models.core.workflow.GateNode`](../packages/flytekit.models.core.workflow#flytekitmodelscoreworkflowgatenode) | |
| [`flytekit.models.core.workflow.IfBlock`](../packages/flytekit.models.core.workflow#flytekitmodelscoreworkflowifblock) | |
| [`flytekit.models.core.workflow.IfElseBlock`](../packages/flytekit.models.core.workflow#flytekitmodelscoreworkflowifelseblock) | |
| [`flytekit.models.core.workflow.Node`](../packages/flytekit.models.core.workflow#flytekitmodelscoreworkflownode) | |
| [`flytekit.models.core.workflow.NodeMetadata`](../packages/flytekit.models.core.workflow#flytekitmodelscoreworkflownodemetadata) | |
| [`flytekit.models.core.workflow.SignalCondition`](../packages/flytekit.models.core.workflow#flytekitmodelscoreworkflowsignalcondition) | |
| [`flytekit.models.core.workflow.SleepCondition`](../packages/flytekit.models.core.workflow#flytekitmodelscoreworkflowsleepcondition) | |
| [`flytekit.models.core.workflow.TaskNode`](../packages/flytekit.models.core.workflow#flytekitmodelscoreworkflowtasknode) | |
| [`flytekit.models.core.workflow.TaskNodeOverrides`](../packages/flytekit.models.core.workflow#flytekitmodelscoreworkflowtasknodeoverrides) | |
| [`flytekit.models.core.workflow.WorkflowMetadata`](../packages/flytekit.models.core.workflow#flytekitmodelscoreworkflowworkflowmetadata) | |
| [`flytekit.models.core.workflow.WorkflowMetadataDefaults`](../packages/flytekit.models.core.workflow#flytekitmodelscoreworkflowworkflowmetadatadefaults) | |
| [`flytekit.models.core.workflow.WorkflowNode`](../packages/flytekit.models.core.workflow#flytekitmodelscoreworkflowworkflownode) | |
| [`flytekit.models.core.workflow.WorkflowTemplate`](../packages/flytekit.models.core.workflow#flytekitmodelscoreworkflowworkflowtemplate) | |
| [`flytekit.models.documentation.Description`](../packages/flytekit.models.documentation#flytekitmodelsdocumentationdescription) |Full user description with formatting preserved. |
| [`flytekit.models.documentation.Documentation`](../packages/flytekit.models.documentation#flytekitmodelsdocumentationdocumentation) |DescriptionEntity contains detailed description for the task/workflow/launch plan. |
| [`flytekit.models.documentation.SourceCode`](../packages/flytekit.models.documentation#flytekitmodelsdocumentationsourcecode) |Link to source code used to define this task or workflow. |
| [`flytekit.models.domain.Domain`](../packages/flytekit.models.domain#flytekitmodelsdomaindomain) |Domains are fixed and unique at the global level, and provide an abstraction to isolate resources and feature configuration for different deployment environments. |
| [`flytekit.models.dynamic_job.DynamicJobSpec`](../packages/flytekit.models.dynamic_job#flytekitmodelsdynamic_jobdynamicjobspec) | |
| [`flytekit.models.event.TaskExecutionMetadata`](../packages/flytekit.models.event#flytekitmodelseventtaskexecutionmetadata) | |
| [`flytekit.models.execution.AbortMetadata`](../packages/flytekit.models.execution#flytekitmodelsexecutionabortmetadata) | |
| [`flytekit.models.execution.ClusterAssignment`](../packages/flytekit.models.execution#flytekitmodelsexecutionclusterassignment) | |
| [`flytekit.models.execution.Execution`](../packages/flytekit.models.execution#flytekitmodelsexecutionexecution) | |
| [`flytekit.models.execution.ExecutionClosure`](../packages/flytekit.models.execution#flytekitmodelsexecutionexecutionclosure) | |
| [`flytekit.models.execution.ExecutionMetadata`](../packages/flytekit.models.execution#flytekitmodelsexecutionexecutionmetadata) | |
| [`flytekit.models.execution.ExecutionSpec`](../packages/flytekit.models.execution#flytekitmodelsexecutionexecutionspec) | |
| [`flytekit.models.execution.LiteralMapBlob`](../packages/flytekit.models.execution#flytekitmodelsexecutionliteralmapblob) | |
| [`flytekit.models.execution.NodeExecutionGetDataResponse`](../packages/flytekit.models.execution#flytekitmodelsexecutionnodeexecutiongetdataresponse) |Currently, node, task, and workflow execution all have the same get data response. |
| [`flytekit.models.execution.NotificationList`](../packages/flytekit.models.execution#flytekitmodelsexecutionnotificationlist) | |
| [`flytekit.models.execution.SystemMetadata`](../packages/flytekit.models.execution#flytekitmodelsexecutionsystemmetadata) | |
| [`flytekit.models.execution.TaskExecutionGetDataResponse`](../packages/flytekit.models.execution#flytekitmodelsexecutiontaskexecutiongetdataresponse) |Currently, node, task, and workflow execution all have the same get data response. |
| [`flytekit.models.execution.WorkflowExecutionGetDataResponse`](../packages/flytekit.models.execution#flytekitmodelsexecutionworkflowexecutiongetdataresponse) |Currently, node, task, and workflow execution all have the same get data response. |
| [`flytekit.models.filters.Contains`](../packages/flytekit.models.filters#flytekitmodelsfilterscontains) | |
| [`flytekit.models.filters.Equal`](../packages/flytekit.models.filters#flytekitmodelsfiltersequal) | |
| [`flytekit.models.filters.Filter`](../packages/flytekit.models.filters#flytekitmodelsfiltersfilter) | |
| [`flytekit.models.filters.FilterList`](../packages/flytekit.models.filters#flytekitmodelsfiltersfilterlist) | |
| [`flytekit.models.filters.GreaterThan`](../packages/flytekit.models.filters#flytekitmodelsfiltersgreaterthan) | |
| [`flytekit.models.filters.GreaterThanOrEqual`](../packages/flytekit.models.filters#flytekitmodelsfiltersgreaterthanorequal) | |
| [`flytekit.models.filters.LessThan`](../packages/flytekit.models.filters#flytekitmodelsfilterslessthan) | |
| [`flytekit.models.filters.LessThanOrEqual`](../packages/flytekit.models.filters#flytekitmodelsfilterslessthanorequal) | |
| [`flytekit.models.filters.NotEqual`](../packages/flytekit.models.filters#flytekitmodelsfiltersnotequal) | |
| [`flytekit.models.filters.SetFilter`](../packages/flytekit.models.filters#flytekitmodelsfilterssetfilter) | |
| [`flytekit.models.filters.ValueIn`](../packages/flytekit.models.filters#flytekitmodelsfiltersvaluein) | |
| [`flytekit.models.filters.ValueNotIn`](../packages/flytekit.models.filters#flytekitmodelsfiltersvaluenotin) | |
| [`flytekit.models.interface.Parameter`](../packages/flytekit.models.interface#flytekitmodelsinterfaceparameter) | |
| [`flytekit.models.interface.ParameterMap`](../packages/flytekit.models.interface#flytekitmodelsinterfaceparametermap) | |
| [`flytekit.models.interface.TypedInterface`](../packages/flytekit.models.interface#flytekitmodelsinterfacetypedinterface) | |
| [`flytekit.models.interface.Variable`](../packages/flytekit.models.interface#flytekitmodelsinterfacevariable) | |
| [`flytekit.models.interface.VariableMap`](../packages/flytekit.models.interface#flytekitmodelsinterfacevariablemap) | |
| [`flytekit.models.launch_plan.Auth`](../packages/flytekit.models.launch_plan#flytekitmodelslaunch_planauth) | |
| [`flytekit.models.launch_plan.LaunchPlan`](../packages/flytekit.models.launch_plan#flytekitmodelslaunch_planlaunchplan) | |
| [`flytekit.models.launch_plan.LaunchPlanClosure`](../packages/flytekit.models.launch_plan#flytekitmodelslaunch_planlaunchplanclosure) | |
| [`flytekit.models.launch_plan.LaunchPlanMetadata`](../packages/flytekit.models.launch_plan#flytekitmodelslaunch_planlaunchplanmetadata) | |
| [`flytekit.models.launch_plan.LaunchPlanSpec`](../packages/flytekit.models.launch_plan#flytekitmodelslaunch_planlaunchplanspec) | |
| [`flytekit.models.launch_plan.LaunchPlanState`](../packages/flytekit.models.launch_plan#flytekitmodelslaunch_planlaunchplanstate) | |
| [`flytekit.models.literals.Binary`](../packages/flytekit.models.literals#flytekitmodelsliteralsbinary) | |
| [`flytekit.models.literals.Binding`](../packages/flytekit.models.literals#flytekitmodelsliteralsbinding) | |
| [`flytekit.models.literals.BindingData`](../packages/flytekit.models.literals#flytekitmodelsliteralsbindingdata) | |
| [`flytekit.models.literals.BindingDataCollection`](../packages/flytekit.models.literals#flytekitmodelsliteralsbindingdatacollection) | |
| [`flytekit.models.literals.BindingDataMap`](../packages/flytekit.models.literals#flytekitmodelsliteralsbindingdatamap) | |
| [`flytekit.models.literals.Blob`](../packages/flytekit.models.literals#flytekitmodelsliteralsblob) | |
| [`flytekit.models.literals.BlobMetadata`](../packages/flytekit.models.literals#flytekitmodelsliteralsblobmetadata) |This is metadata for the Blob literal. |
| [`flytekit.models.literals.Literal`](../packages/flytekit.models.literals#flytekitmodelsliteralsliteral) | |
| [`flytekit.models.literals.LiteralCollection`](../packages/flytekit.models.literals#flytekitmodelsliteralsliteralcollection) | |
| [`flytekit.models.literals.LiteralMap`](../packages/flytekit.models.literals#flytekitmodelsliteralsliteralmap) | |
| [`flytekit.models.literals.LiteralOffloadedMetadata`](../packages/flytekit.models.literals#flytekitmodelsliteralsliteraloffloadedmetadata) | |
| [`flytekit.models.literals.Primitive`](../packages/flytekit.models.literals#flytekitmodelsliteralsprimitive) | |
| [`flytekit.models.literals.RetryStrategy`](../packages/flytekit.models.literals#flytekitmodelsliteralsretrystrategy) | |
| [`flytekit.models.literals.Scalar`](../packages/flytekit.models.literals#flytekitmodelsliteralsscalar) | |
| [`flytekit.models.literals.Schema`](../packages/flytekit.models.literals#flytekitmodelsliteralsschema) | |
| [`flytekit.models.literals.StructuredDataset`](../packages/flytekit.models.literals#flytekitmodelsliteralsstructureddataset) | |
| [`flytekit.models.literals.StructuredDatasetMetadata`](../packages/flytekit.models.literals#flytekitmodelsliteralsstructureddatasetmetadata) | |
| [`flytekit.models.literals.Union`](../packages/flytekit.models.literals#flytekitmodelsliteralsunion) | |
| [`flytekit.models.literals.Void`](../packages/flytekit.models.literals#flytekitmodelsliteralsvoid) | |
| [`flytekit.models.matchable_resource.ClusterResourceAttributes`](../packages/flytekit.models.matchable_resource#flytekitmodelsmatchable_resourceclusterresourceattributes) | |
| [`flytekit.models.matchable_resource.ExecutionClusterLabel`](../packages/flytekit.models.matchable_resource#flytekitmodelsmatchable_resourceexecutionclusterlabel) | |
| [`flytekit.models.matchable_resource.ExecutionQueueAttributes`](../packages/flytekit.models.matchable_resource#flytekitmodelsmatchable_resourceexecutionqueueattributes) | |
| [`flytekit.models.matchable_resource.MatchableResource`](../packages/flytekit.models.matchable_resource#flytekitmodelsmatchable_resourcematchableresource) | |
| [`flytekit.models.matchable_resource.MatchingAttributes`](../packages/flytekit.models.matchable_resource#flytekitmodelsmatchable_resourcematchingattributes) | |
| [`flytekit.models.matchable_resource.PluginOverride`](../packages/flytekit.models.matchable_resource#flytekitmodelsmatchable_resourcepluginoverride) | |
| [`flytekit.models.matchable_resource.PluginOverrides`](../packages/flytekit.models.matchable_resource#flytekitmodelsmatchable_resourcepluginoverrides) | |
| [`flytekit.models.named_entity.NamedEntityIdentifier`](../packages/flytekit.models.named_entity#flytekitmodelsnamed_entitynamedentityidentifier) | |
| [`flytekit.models.named_entity.NamedEntityMetadata`](../packages/flytekit.models.named_entity#flytekitmodelsnamed_entitynamedentitymetadata) | |
| [`flytekit.models.named_entity.NamedEntityState`](../packages/flytekit.models.named_entity#flytekitmodelsnamed_entitynamedentitystate) | |
| [`flytekit.models.node_execution.DynamicWorkflowNodeMetadata`](../packages/flytekit.models.node_execution#flytekitmodelsnode_executiondynamicworkflownodemetadata) | |
| [`flytekit.models.node_execution.NodeExecution`](../packages/flytekit.models.node_execution#flytekitmodelsnode_executionnodeexecution) | |
| [`flytekit.models.node_execution.NodeExecutionClosure`](../packages/flytekit.models.node_execution#flytekitmodelsnode_executionnodeexecutionclosure) | |
| [`flytekit.models.node_execution.TaskNodeMetadata`](../packages/flytekit.models.node_execution#flytekitmodelsnode_executiontasknodemetadata) | |
| [`flytekit.models.node_execution.WorkflowNodeMetadata`](../packages/flytekit.models.node_execution#flytekitmodelsnode_executionworkflownodemetadata) | |
| [`flytekit.models.presto.PrestoQuery`](../packages/flytekit.models.presto#flytekitmodelsprestoprestoquery) | |
| [`flytekit.models.project.Project`](../packages/flytekit.models.project#flytekitmodelsprojectproject) | |
| [`flytekit.models.qubole.HiveQuery`](../packages/flytekit.models.qubole#flytekitmodelsqubolehivequery) | |
| [`flytekit.models.qubole.HiveQueryCollection`](../packages/flytekit.models.qubole#flytekitmodelsqubolehivequerycollection) | |
| [`flytekit.models.qubole.QuboleHiveJob`](../packages/flytekit.models.qubole#flytekitmodelsqubolequbolehivejob) | |
| [`flytekit.models.schedule.Schedule`](../packages/flytekit.models.schedule#flytekitmodelsscheduleschedule) | |
| [`flytekit.models.security.Identity`](../packages/flytekit.models.security#flytekitmodelssecurityidentity) | |
| [`flytekit.models.security.OAuth2Client`](../packages/flytekit.models.security#flytekitmodelssecurityoauth2client) | |
| [`flytekit.models.security.OAuth2TokenRequest`](../packages/flytekit.models.security#flytekitmodelssecurityoauth2tokenrequest) | |
| [`flytekit.models.security.Secret`](../packages/flytekit.models.security#flytekitmodelssecuritysecret) |See :std:ref:`cookbook:secrets` for usage examples. |
| [`flytekit.models.security.SecurityContext`](../packages/flytekit.models.security#flytekitmodelssecuritysecuritycontext) |This is a higher level wrapper object that for the most part users shouldn't have to worry about. |
| [`flytekit.models.task.CompiledTask`](../packages/flytekit.models.task#flytekitmodelstaskcompiledtask) | |
| [`flytekit.models.task.Container`](../packages/flytekit.models.task#flytekitmodelstaskcontainer) | |
| [`flytekit.models.task.DataLoadingConfig`](../packages/flytekit.models.task#flytekitmodelstaskdataloadingconfig) | |
| [`flytekit.models.task.IOStrategy`](../packages/flytekit.models.task#flytekitmodelstaskiostrategy) |Provides methods to manage data in and out of the Raw container using Download Modes. |
| [`flytekit.models.task.K8sObjectMetadata`](../packages/flytekit.models.task#flytekitmodelstaskk8sobjectmetadata) | |
| [`flytekit.models.task.K8sPod`](../packages/flytekit.models.task#flytekitmodelstaskk8spod) | |
| [`flytekit.models.task.Resources`](../packages/flytekit.models.task#flytekitmodelstaskresources) | |
| [`flytekit.models.task.RuntimeMetadata`](../packages/flytekit.models.task#flytekitmodelstaskruntimemetadata) | |
| [`flytekit.models.task.Sql`](../packages/flytekit.models.task#flytekitmodelstasksql) | |
| [`flytekit.models.task.Task`](../packages/flytekit.models.task#flytekitmodelstasktask) | |
| [`flytekit.models.task.TaskClosure`](../packages/flytekit.models.task#flytekitmodelstasktaskclosure) | |
| [`flytekit.models.task.TaskExecutionMetadata`](../packages/flytekit.models.task#flytekitmodelstasktaskexecutionmetadata) | |
| [`flytekit.models.task.TaskMetadata`](../packages/flytekit.models.task#flytekitmodelstasktaskmetadata) | |
| [`flytekit.models.task.TaskSpec`](../packages/flytekit.models.task#flytekitmodelstasktaskspec) | |
| [`flytekit.models.task.TaskTemplate`](../packages/flytekit.models.task#flytekitmodelstasktasktemplate) | |
| [`flytekit.models.types.Error`](../packages/flytekit.models.types#flytekitmodelstypeserror) | |
| [`flytekit.models.types.LiteralType`](../packages/flytekit.models.types#flytekitmodelstypesliteraltype) | |
| [`flytekit.models.types.OutputReference`](../packages/flytekit.models.types#flytekitmodelstypesoutputreference) | |
| [`flytekit.models.types.SchemaType`](../packages/flytekit.models.types#flytekitmodelstypesschematype) | |
| [`flytekit.models.types.SimpleType`](../packages/flytekit.models.types#flytekitmodelstypessimpletype) | |
| [`flytekit.models.types.StructuredDatasetType`](../packages/flytekit.models.types#flytekitmodelstypesstructureddatasettype) | |
| [`flytekit.models.types.TypeStructure`](../packages/flytekit.models.types#flytekitmodelstypestypestructure) |Models _types_pb2. |
| [`flytekit.models.types.UnionType`](../packages/flytekit.models.types#flytekitmodelstypesuniontype) |Models _types_pb2. |
| [`flytekit.models.workflow_closure.WorkflowClosure`](../packages/flytekit.models.workflow_closure#flytekitmodelsworkflow_closureworkflowclosure) | |
| [`flytekit.remote.entities.FlyteArrayNode`](../packages/flytekit.remote.entities#flytekitremoteentitiesflytearraynode) | |
| [`flytekit.remote.entities.FlyteBranchNode`](../packages/flytekit.remote.entities#flytekitremoteentitiesflytebranchnode) | |
| [`flytekit.remote.entities.FlyteGateNode`](../packages/flytekit.remote.entities#flytekitremoteentitiesflytegatenode) | |
| [`flytekit.remote.entities.FlyteLaunchPlan`](../packages/flytekit.remote.entities#flytekitremoteentitiesflytelaunchplan) |A class encapsulating a remote Flyte launch plan. |
| [`flytekit.remote.entities.FlyteNode`](../packages/flytekit.remote.entities#flytekitremoteentitiesflytenode) |A class encapsulating a remote Flyte node. |
| [`flytekit.remote.entities.FlyteTask`](../packages/flytekit.remote.entities#flytekitremoteentitiesflytetask) |A class encapsulating a remote Flyte task. |
| [`flytekit.remote.entities.FlyteTaskNode`](../packages/flytekit.remote.entities#flytekitremoteentitiesflytetasknode) |A class encapsulating a task that a Flyte node needs to execute. |
| [`flytekit.remote.entities.FlyteWorkflow`](../packages/flytekit.remote.entities#flytekitremoteentitiesflyteworkflow) |A class encapsulating a remote Flyte workflow. |
| [`flytekit.remote.entities.FlyteWorkflowNode`](../packages/flytekit.remote.entities#flytekitremoteentitiesflyteworkflownode) |A class encapsulating a workflow that a Flyte node needs to execute. |
| [`flytekit.remote.executions.FlyteNodeExecution`](../packages/flytekit.remote.executions#flytekitremoteexecutionsflytenodeexecution) |A class encapsulating a node execution being run on a Flyte remote backend. |
| [`flytekit.remote.executions.FlyteTaskExecution`](../packages/flytekit.remote.executions#flytekitremoteexecutionsflytetaskexecution) |A class encapsulating a task execution being run on a Flyte remote backend. |
| [`flytekit.remote.executions.FlyteWorkflowExecution`](../packages/flytekit.remote.executions#flytekitremoteexecutionsflyteworkflowexecution) |A class encapsulating a workflow execution being run on a Flyte remote backend. |
| [`flytekit.remote.executions.RemoteExecutionBase`](../packages/flytekit.remote.executions#flytekitremoteexecutionsremoteexecutionbase) | |
| [`flytekit.remote.interface.TypedInterface`](../packages/flytekit.remote.interface#flytekitremoteinterfacetypedinterface) | |
| [`flytekit.remote.lazy_entity.LazyEntity`](../packages/flytekit.remote.lazy_entity#flytekitremotelazy_entitylazyentity) |Fetches the entity when the entity is called or when the entity is retrieved. |
| [`flytekit.remote.metrics.FlyteExecutionSpan`](../packages/flytekit.remote.metrics#flytekitremotemetricsflyteexecutionspan) | |
| [`flytekit.remote.remote.FlyteRemote`](../packages/flytekit.remote.remote#flytekitremoteremoteflyteremote) |Main entrypoint for programmatically accessing a Flyte remote backend. |
| [`flytekit.remote.remote.RegistrationSkipped`](../packages/flytekit.remote.remote#flytekitremoteremoteregistrationskipped) |RegistrationSkipped error is raised when trying to register an entity that is not registrable. |
| [`flytekit.remote.remote.ResolvedIdentifiers`](../packages/flytekit.remote.remote#flytekitremoteremoteresolvedidentifiers) | |
| [`flytekit.remote.remote_callable.RemoteEntity`](../packages/flytekit.remote.remote_callable#flytekitremoteremote_callableremoteentity) |Helper class that provides a standard way to create an ABC using. |
| [`flytekit.remote.remote_fs.FlytePathResolver`](../packages/flytekit.remote.remote_fs#flytekitremoteremote_fsflytepathresolver) | |
| [`flytekit.sensor.base_sensor.BaseSensor`](../packages/flytekit.sensor.base_sensor#flytekitsensorbase_sensorbasesensor) |Base class for all sensors. |
| [`flytekit.sensor.base_sensor.SensorMetadata`](../packages/flytekit.sensor.base_sensor#flytekitsensorbase_sensorsensormetadata) | |
| [`flytekit.sensor.file_sensor.FileSensor`](../packages/flytekit.sensor.file_sensor#flytekitsensorfile_sensorfilesensor) |Base class for all sensors. |
| [`flytekit.sensor.sensor_engine.SensorEngine`](../packages/flytekit.sensor.sensor_engine#flytekitsensorsensor_enginesensorengine) |This is the base class for all async connectors. |
| [`flytekit.tools.fast_registration.FastPackageOptions`](../packages/flytekit.tools.fast_registration#flytekittoolsfast_registrationfastpackageoptions) |FastPackageOptions is used to set configuration options when packaging files. |
| [`flytekit.tools.ignore.DockerIgnore`](../packages/flytekit.tools.ignore#flytekittoolsignoredockerignore) |Uses docker-py's PatternMatcher to check whether a path is ignored. |
| [`flytekit.tools.ignore.FlyteIgnore`](../packages/flytekit.tools.ignore#flytekittoolsignoreflyteignore) |Uses a. |
| [`flytekit.tools.ignore.GitIgnore`](../packages/flytekit.tools.ignore#flytekittoolsignoregitignore) |Uses git cli (if available) to list all ignored files and compare with those. |
| [`flytekit.tools.ignore.Ignore`](../packages/flytekit.tools.ignore#flytekittoolsignoreignore) |Base for Ignores, implements core logic. |
| [`flytekit.tools.ignore.IgnoreGroup`](../packages/flytekit.tools.ignore#flytekittoolsignoreignoregroup) |Groups multiple Ignores and checks a path against them. |
| [`flytekit.tools.ignore.StandardIgnore`](../packages/flytekit.tools.ignore#flytekittoolsignorestandardignore) |Retains the standard ignore functionality that previously existed. |
| [`flytekit.tools.repo.NoSerializableEntitiesError`](../packages/flytekit.tools.repo#flytekittoolsreponoserializableentitieserror) |Common base class for all non-exit exceptions. |
| [`flytekit.types.directory.types.FlyteDirToMultipartBlobTransformer`](../packages/flytekit.types.directory.types#flytekittypesdirectorytypesflytedirtomultipartblobtransformer) |This transformer handles conversion between the Python native FlyteDirectory class defined above, and the Flyte. |
| [`flytekit.types.directory.types.FlyteDirectory`](../packages/flytekit.types.directory.types#flytekittypesdirectorytypesflytedirectory) | |
| [`flytekit.types.error.error.ErrorTransformer`](../packages/flytekit.types.error.error#flytekittypeserrorerrorerrortransformer) |Enables converting a python type FlyteError to LiteralType. |
| [`flytekit.types.error.error.FlyteError`](../packages/flytekit.types.error.error#flytekittypeserrorerrorflyteerror) |Special Task type that will be used in the failure node. |
| [`flytekit.types.file.FileExt`](../packages/flytekit.types.file#flytekittypesfilefileext) |Used for annotating file extension types of FlyteFile. |
| [`flytekit.types.file.file.FlyteFile`](../packages/flytekit.types.file.file#flytekittypesfilefileflytefile) | |
| [`flytekit.types.file.file.FlyteFilePathTransformer`](../packages/flytekit.types.file.file#flytekittypesfilefileflytefilepathtransformer) |Base transformer type that should be implemented for every python native type that can be handled by flytekit. |
| [`flytekit.types.file.image.PILImageTransformer`](../packages/flytekit.types.file.image#flytekittypesfileimagepilimagetransformer) |TypeTransformer that supports PIL. |
| [`flytekit.types.iterator.iterator.FlyteIterator`](../packages/flytekit.types.iterator.iterator#flytekittypesiteratoriteratorflyteiterator) | |
| [`flytekit.types.iterator.iterator.IteratorTransformer`](../packages/flytekit.types.iterator.iterator#flytekittypesiteratoriteratoriteratortransformer) |Base transformer type that should be implemented for every python native type that can be handled by flytekit. |
| [`flytekit.types.iterator.json_iterator.JSONIterator`](../packages/flytekit.types.iterator.json_iterator#flytekittypesiteratorjson_iteratorjsoniterator) |Abstract base class for generic types. |
| [`flytekit.types.iterator.json_iterator.JSONIteratorTransformer`](../packages/flytekit.types.iterator.json_iterator#flytekittypesiteratorjson_iteratorjsoniteratortransformer) |A JSON iterator that handles conversion between an iterator/generator and a JSONL file. |
| [`flytekit.types.numpy.ndarray.NumpyArrayTransformer`](../packages/flytekit.types.numpy.ndarray#flytekittypesnumpyndarraynumpyarraytransformer) |TypeTransformer that supports np. |
| [`flytekit.types.pickle.pickle.FlytePickle`](../packages/flytekit.types.pickle.pickle#flytekittypespicklepickleflytepickle) |This type is only used by flytekit internally. |
| [`flytekit.types.pickle.pickle.FlytePickleTransformer`](../packages/flytekit.types.pickle.pickle#flytekittypespicklepickleflytepickletransformer) |Base transformer type that should be implemented for every python native type that can be handled by flytekit. |
| [`flytekit.types.schema.types.FlyteSchema`](../packages/flytekit.types.schema.types#flytekittypesschematypesflyteschema) | |
| [`flytekit.types.schema.types.FlyteSchemaTransformer`](../packages/flytekit.types.schema.types#flytekittypesschematypesflyteschematransformer) |Base transformer type that should be implemented for every python native type that can be handled by flytekit. |
| [`flytekit.types.schema.types.LocalIOSchemaReader`](../packages/flytekit.types.schema.types#flytekittypesschematypeslocalioschemareader) |Base SchemaReader to handle any readers (that can manage their own IO or otherwise). |
| [`flytekit.types.schema.types.LocalIOSchemaWriter`](../packages/flytekit.types.schema.types#flytekittypesschematypeslocalioschemawriter) |Abstract base class for generic types. |
| [`flytekit.types.schema.types.SchemaEngine`](../packages/flytekit.types.schema.types#flytekittypesschematypesschemaengine) |This is the core Engine that handles all schema sub-systems. |
| [`flytekit.types.schema.types.SchemaFormat`](../packages/flytekit.types.schema.types#flytekittypesschematypesschemaformat) |Represents the schema storage format (at rest). |
| [`flytekit.types.schema.types.SchemaHandler`](../packages/flytekit.types.schema.types#flytekittypesschematypesschemahandler) | |
| [`flytekit.types.schema.types.SchemaOpenMode`](../packages/flytekit.types.schema.types#flytekittypesschematypesschemaopenmode) |Create a collection of name/value pairs. |
| [`flytekit.types.schema.types.SchemaReader`](../packages/flytekit.types.schema.types#flytekittypesschematypesschemareader) |Base SchemaReader to handle any readers (that can manage their own IO or otherwise). |
| [`flytekit.types.schema.types.SchemaWriter`](../packages/flytekit.types.schema.types#flytekittypesschematypesschemawriter) |Abstract base class for generic types. |
| [`flytekit.types.schema.types_pandas.PandasDataFrameTransformer`](../packages/flytekit.types.schema.types_pandas#flytekittypesschematypes_pandaspandasdataframetransformer) |Transforms a pd. |
| [`flytekit.types.schema.types_pandas.PandasSchemaReader`](../packages/flytekit.types.schema.types_pandas#flytekittypesschematypes_pandaspandasschemareader) |Base SchemaReader to handle any readers (that can manage their own IO or otherwise). |
| [`flytekit.types.schema.types_pandas.PandasSchemaWriter`](../packages/flytekit.types.schema.types_pandas#flytekittypesschematypes_pandaspandasschemawriter) |Abstract base class for generic types. |
| [`flytekit.types.schema.types_pandas.ParquetIO`](../packages/flytekit.types.schema.types_pandas#flytekittypesschematypes_pandasparquetio) | |
| [`flytekit.types.structured.basic_dfs.ArrowToParquetEncodingHandler`](../packages/flytekit.types.structured.basic_dfs#flytekittypesstructuredbasic_dfsarrowtoparquetencodinghandler) |Helper class that provides a standard way to create an ABC using. |
| [`flytekit.types.structured.basic_dfs.CSVToPandasDecodingHandler`](../packages/flytekit.types.structured.basic_dfs#flytekittypesstructuredbasic_dfscsvtopandasdecodinghandler) |Helper class that provides a standard way to create an ABC using. |
| [`flytekit.types.structured.basic_dfs.PandasToCSVEncodingHandler`](../packages/flytekit.types.structured.basic_dfs#flytekittypesstructuredbasic_dfspandastocsvencodinghandler) |Helper class that provides a standard way to create an ABC using. |
| [`flytekit.types.structured.basic_dfs.PandasToParquetEncodingHandler`](../packages/flytekit.types.structured.basic_dfs#flytekittypesstructuredbasic_dfspandastoparquetencodinghandler) |Helper class that provides a standard way to create an ABC using. |
| [`flytekit.types.structured.basic_dfs.ParquetToArrowDecodingHandler`](../packages/flytekit.types.structured.basic_dfs#flytekittypesstructuredbasic_dfsparquettoarrowdecodinghandler) |Helper class that provides a standard way to create an ABC using. |
| [`flytekit.types.structured.basic_dfs.ParquetToPandasDecodingHandler`](../packages/flytekit.types.structured.basic_dfs#flytekittypesstructuredbasic_dfsparquettopandasdecodinghandler) |Helper class that provides a standard way to create an ABC using. |
| [`flytekit.types.structured.bigquery.ArrowToBQEncodingHandlers`](../packages/flytekit.types.structured.bigquery#flytekittypesstructuredbigqueryarrowtobqencodinghandlers) |Helper class that provides a standard way to create an ABC using. |
| [`flytekit.types.structured.bigquery.BQToArrowDecodingHandler`](../packages/flytekit.types.structured.bigquery#flytekittypesstructuredbigquerybqtoarrowdecodinghandler) |Helper class that provides a standard way to create an ABC using. |
| [`flytekit.types.structured.bigquery.BQToPandasDecodingHandler`](../packages/flytekit.types.structured.bigquery#flytekittypesstructuredbigquerybqtopandasdecodinghandler) |Helper class that provides a standard way to create an ABC using. |
| [`flytekit.types.structured.bigquery.PandasToBQEncodingHandlers`](../packages/flytekit.types.structured.bigquery#flytekittypesstructuredbigquerypandastobqencodinghandlers) |Helper class that provides a standard way to create an ABC using. |
| [`flytekit.types.structured.snowflake.PandasToSnowflakeEncodingHandlers`](../packages/flytekit.types.structured.snowflake#flytekittypesstructuredsnowflakepandastosnowflakeencodinghandlers) |Helper class that provides a standard way to create an ABC using. |
| [`flytekit.types.structured.snowflake.SnowflakeToPandasDecodingHandler`](../packages/flytekit.types.structured.snowflake#flytekittypesstructuredsnowflakesnowflaketopandasdecodinghandler) |Helper class that provides a standard way to create an ABC using. |
| [`flytekit.types.structured.structured_dataset.DuplicateHandlerError`](../packages/flytekit.types.structured.structured_dataset#flytekittypesstructuredstructured_datasetduplicatehandlererror) |Inappropriate argument value (of correct type). |
| [`flytekit.types.structured.structured_dataset.StructuredDataset`](../packages/flytekit.types.structured.structured_dataset#flytekittypesstructuredstructured_datasetstructureddataset) |This is the user facing StructuredDataset class. |
| [`flytekit.types.structured.structured_dataset.StructuredDatasetDecoder`](../packages/flytekit.types.structured.structured_dataset#flytekittypesstructuredstructured_datasetstructureddatasetdecoder) |Helper class that provides a standard way to create an ABC using. |
| [`flytekit.types.structured.structured_dataset.StructuredDatasetEncoder`](../packages/flytekit.types.structured.structured_dataset#flytekittypesstructuredstructured_datasetstructureddatasetencoder) |Helper class that provides a standard way to create an ABC using. |
| [`flytekit.types.structured.structured_dataset.StructuredDatasetTransformerEngine`](../packages/flytekit.types.structured.structured_dataset#flytekittypesstructuredstructured_datasetstructureddatasettransformerengine) |Think of this transformer as a higher-level meta transformer that is used for all the dataframe types. |
| [`flytekit.utils.rate_limiter.RateLimiter`](../packages/flytekit.utils.rate_limiter#flytekitutilsrate_limiterratelimiter) |Rate limiter that allows up to a certain number of requests per minute. |
# Protocols
| Protocol | Description |
|-|-|
| [`flytekit.configuration.plugin.FlytekitPluginProtocol`](../packages/flytekit.configuration.plugin#flytekitconfigurationpluginflytekitpluginprotocol) |Base class for protocol classes. |
| [`flytekit.core.artifact.ArtifactSerializationHandler`](../packages/flytekit.core.artifact#flytekitcoreartifactartifactserializationhandler) |This protocol defines the interface for serializing artifact-related entities down to Flyte IDL. |
| [`flytekit.core.cache.CachePolicy`](../packages/flytekit.core.cache#flytekitcorecachecachepolicy) |Base class for protocol classes. |
| [`flytekit.core.context_manager.SerializableToString`](../packages/flytekit.core.context_manager#flytekitcorecontext_managerserializabletostring) |This protocol is used by the Artifact create_from function. |
| [`flytekit.core.promise.HasFlyteInterface`](../packages/flytekit.core.promise#flytekitcorepromisehasflyteinterface) |Base class for protocol classes. |
| [`flytekit.core.promise.LocallyExecutable`](../packages/flytekit.core.promise#flytekitcorepromiselocallyexecutable) |Base class for protocol classes. |
| [`flytekit.core.promise.SupportsNodeCreation`](../packages/flytekit.core.promise#flytekitcorepromisesupportsnodecreation) |Base class for protocol classes. |
| [`flytekit.core.schedule.LaunchPlanTriggerBase`](../packages/flytekit.core.schedule#flytekitcoreschedulelaunchplantriggerbase) |Base class for protocol classes. |
| [`flytekit.deck.renderer.Renderable`](../packages/flytekit.deck.renderer#flytekitdeckrendererrenderable) |Base class for protocol classes. |
| [`flytekit.extras.pytorch.checkpoint.IsDataclass`](../packages/flytekit.extras.pytorch.checkpoint#flytekitextraspytorchcheckpointisdataclass) |Base class for protocol classes. |
| [`flytekit.sensor.base_sensor.SensorConfig`](../packages/flytekit.sensor.base_sensor#flytekitsensorbase_sensorsensorconfig) |Base class for protocol classes. |
=== PAGE: https://www.union.ai/docs/v1/serverless/api-reference/flytekit-sdk/packages ===
# Packages
| Package | Description |
|-|-|
| **Flytekit SDK > Packages > flytekit** | This package contains all of the most common abstractions you'll need to write Flyte workflows and extend Flytekit. |
| [`flytekit.bin.entrypoint`](flytekit.bin.entrypoint) | |
| [`flytekit.clients.auth.auth_client`](flytekit.clients.auth.auth_client) | |
| [`flytekit.clients.auth.authenticator`](flytekit.clients.auth.authenticator) | |
| [`flytekit.clients.auth.default_html`](flytekit.clients.auth.default_html) | |
| [`flytekit.clients.auth.exceptions`](flytekit.clients.auth.exceptions) | |
| [`flytekit.clients.auth.keyring`](flytekit.clients.auth.keyring) | |
| [`flytekit.clients.auth.token_client`](flytekit.clients.auth.token_client) | |
| [`flytekit.clients.auth_helper`](flytekit.clients.auth_helper) | |
| [`flytekit.clients.friendly`](flytekit.clients.friendly) | |
| [`flytekit.clients.grpc_utils.auth_interceptor`](flytekit.clients.grpc_utils.auth_interceptor) | |
| [`flytekit.clients.grpc_utils.default_metadata_interceptor`](flytekit.clients.grpc_utils.default_metadata_interceptor) | |
| [`flytekit.clients.grpc_utils.wrap_exception_interceptor`](flytekit.clients.grpc_utils.wrap_exception_interceptor) | |
| [`flytekit.clients.helpers`](flytekit.clients.helpers) | |
| [`flytekit.clients.raw`](flytekit.clients.raw) | |
| [`flytekit.clis.helpers`](flytekit.clis.helpers) | |
| [`flytekit.clis.sdk_in_container.backfill`](flytekit.clis.sdk_in_container.backfill) | |
| [`flytekit.clis.sdk_in_container.constants`](flytekit.clis.sdk_in_container.constants) | |
| [`flytekit.clis.sdk_in_container.executions`](flytekit.clis.sdk_in_container.executions) | |
| [`flytekit.clis.sdk_in_container.helpers`](flytekit.clis.sdk_in_container.helpers) | |
| [`flytekit.clis.sdk_in_container.metrics`](flytekit.clis.sdk_in_container.metrics) | |
| [`flytekit.clis.sdk_in_container.package`](flytekit.clis.sdk_in_container.package) | |
| [`flytekit.clis.sdk_in_container.serialize`](flytekit.clis.sdk_in_container.serialize) | |
| [`flytekit.clis.sdk_in_container.serve`](flytekit.clis.sdk_in_container.serve) | |
| [`flytekit.clis.sdk_in_container.utils`](flytekit.clis.sdk_in_container.utils) | |
| [`flytekit.clis.version`](flytekit.clis.version) | |
| **Flytekit SDK > Packages > flytekit** | # Configuration. |
| **Flytekit SDK > Packages > flytekit.configuration** | |
| **Flytekit SDK > Packages > flytekit.configuration** | |
| **Flytekit SDK > Packages > flytekit.configuration** | |
| **Flytekit SDK > Packages > flytekit.configuration** | |
| **Flytekit SDK > Packages > flytekit.configuration** | Defines a plugin API allowing other libraries to modify the behavior of flytekit. |
| **Flytekit SDK > Packages > flytekit** | |
| [`flytekit.core.annotation`](flytekit.core.annotation) | |
| [`flytekit.core.array_node`](flytekit.core.array_node) | |
| [`flytekit.core.array_node_map_task`](flytekit.core.array_node_map_task) | |
| [`flytekit.core.artifact`](flytekit.core.artifact) | |
| [`flytekit.core.artifact_utils`](flytekit.core.artifact_utils) | |
| [`flytekit.core.base_sql_task`](flytekit.core.base_sql_task) | |
| [`flytekit.core.base_task`](flytekit.core.base_task) | # flytekit. |
| [`flytekit.core.cache`](flytekit.core.cache) | |
| [`flytekit.core.checkpointer`](flytekit.core.checkpointer) | |
| [`flytekit.core.class_based_resolver`](flytekit.core.class_based_resolver) | |
| [`flytekit.core.condition`](flytekit.core.condition) | |
| [`flytekit.core.constants`](flytekit.core.constants) | |
| [`flytekit.core.container_task`](flytekit.core.container_task) | |
| [`flytekit.core.context_manager`](flytekit.core.context_manager) | These classes provide functionality related context management. |
| [`flytekit.core.data_persistence`](flytekit.core.data_persistence) | The Data persistence module is used by core flytekit and most of the core TypeTransformers to manage data fetch & store,. |
| [`flytekit.core.docstring`](flytekit.core.docstring) | |
| [`flytekit.core.environment`](flytekit.core.environment) | |
| [`flytekit.core.gate`](flytekit.core.gate) | |
| [`flytekit.core.hash`](flytekit.core.hash) | |
| [`flytekit.core.interface`](flytekit.core.interface) | |
| [`flytekit.core.launch_plan`](flytekit.core.launch_plan) | |
| [`flytekit.core.legacy_map_task`](flytekit.core.legacy_map_task) | Flytekit map tasks specify how to run a single task across a list of inputs. |
| [`flytekit.core.local_cache`](flytekit.core.local_cache) | |
| [`flytekit.core.local_fsspec`](flytekit.core.local_fsspec) | |
| [`flytekit.core.mock_stats`](flytekit.core.mock_stats) | |
| [`flytekit.core.node`](flytekit.core.node) | |
| [`flytekit.core.node_creation`](flytekit.core.node_creation) | |
| [`flytekit.core.notification`](flytekit.core.notification) | Notifications are primarily used when defining Launch Plans (also can be used when launching executions) and will trigger. |
| [`flytekit.core.options`](flytekit.core.options) | |
| [`flytekit.core.pod_template`](flytekit.core.pod_template) | |
| [`flytekit.core.promise`](flytekit.core.promise) | |
| [`flytekit.core.python_auto_container`](flytekit.core.python_auto_container) | |
| [`flytekit.core.python_customized_container_task`](flytekit.core.python_customized_container_task) | |
| [`flytekit.core.python_function_task`](flytekit.core.python_function_task) | |
| [`flytekit.core.reference`](flytekit.core.reference) | |
| [`flytekit.core.reference_entity`](flytekit.core.reference_entity) | |
| [`flytekit.core.resources`](flytekit.core.resources) | |
| [`flytekit.core.schedule`](flytekit.core.schedule) | These classes provide functionality related to schedules. |
| [`flytekit.core.shim_task`](flytekit.core.shim_task) | |
| [`flytekit.core.task`](flytekit.core.task) | |
| [`flytekit.core.testing`](flytekit.core.testing) | |
| [`flytekit.core.tracked_abc`](flytekit.core.tracked_abc) | |
| [`flytekit.core.tracker`](flytekit.core.tracker) | |
| [`flytekit.core.type_engine`](flytekit.core.type_engine) | |
| [`flytekit.core.type_helpers`](flytekit.core.type_helpers) | |
| [`flytekit.core.type_match_checking`](flytekit.core.type_match_checking) | |
| [`flytekit.core.utils`](flytekit.core.utils) | |
| [`flytekit.core.worker_queue`](flytekit.core.worker_queue) | |
| [`flytekit.core.workflow`](flytekit.core.workflow) | |
| [`flytekit.deck.deck`](flytekit.deck.deck) | |
| [`flytekit.deck.renderer`](flytekit.deck.renderer) | |
| [`flytekit.exceptions.base`](flytekit.exceptions.base) | |
| [`flytekit.exceptions.eager`](flytekit.exceptions.eager) | |
| [`flytekit.exceptions.scopes`](flytekit.exceptions.scopes) | |
| [`flytekit.exceptions.system`](flytekit.exceptions.system) | |
| [`flytekit.exceptions.user`](flytekit.exceptions.user) | |
| [`flytekit.exceptions.utils`](flytekit.exceptions.utils) | |
| [`flytekit.experimental.eager_function`](flytekit.experimental.eager_function) | |
| [`flytekit.extend.backend.base_connector`](flytekit.extend.backend.base_connector) | |
| [`flytekit.extend.backend.connector_service`](flytekit.extend.backend.connector_service) | |
| [`flytekit.extend.backend.utils`](flytekit.extend.backend.utils) | |
| [`flytekit.extras.accelerators`](flytekit.extras.accelerators) | ## Specifying Accelerators. |
| [`flytekit.extras.cloud_pickle_resolver`](flytekit.extras.cloud_pickle_resolver) | |
| [`flytekit.extras.pydantic_transformer.transformer`](flytekit.extras.pydantic_transformer.transformer) | |
| [`flytekit.extras.pytorch.checkpoint`](flytekit.extras.pytorch.checkpoint) | |
| [`flytekit.extras.pytorch.native`](flytekit.extras.pytorch.native) | |
| [`flytekit.extras.sklearn.native`](flytekit.extras.sklearn.native) | |
| [`flytekit.extras.sqlite3.task`](flytekit.extras.sqlite3.task) | |
| [`flytekit.extras.tasks.shell`](flytekit.extras.tasks.shell) | |
| [`flytekit.extras.tensorflow.model`](flytekit.extras.tensorflow.model) | |
| [`flytekit.extras.tensorflow.record`](flytekit.extras.tensorflow.record) | |
| [`flytekit.extras.webhook`](flytekit.extras.webhook) | |
| **Flytekit SDK > Packages > flytekit.extras.webhook** | |
| **Flytekit SDK > Packages > flytekit.extras.webhook** | |
| **Flytekit SDK > Packages > flytekit.extras.webhook** | |
| [`flytekit.image_spec.default_builder`](flytekit.image_spec.default_builder) | |
| [`flytekit.image_spec.image_spec`](flytekit.image_spec.image_spec) | |
| [`flytekit.image_spec.noop_builder`](flytekit.image_spec.noop_builder) | |
| [`flytekit.interaction.click_types`](flytekit.interaction.click_types) | |
| [`flytekit.interaction.parse_stdin`](flytekit.interaction.parse_stdin) | |
| [`flytekit.interaction.rich_utils`](flytekit.interaction.rich_utils) | |
| [`flytekit.interaction.string_literals`](flytekit.interaction.string_literals) | |
| **Flytekit SDK > Packages > flytekit** | This module provides functionality related to Flytekit Interactive. |
| **Flytekit SDK > Packages > flytekit.interactive** | |
| **Flytekit SDK > Packages > flytekit.interactive** | |
| [`flytekit.interactive.vscode_lib.config`](flytekit.interactive.vscode_lib.config) | |
| [`flytekit.interactive.vscode_lib.decorator`](flytekit.interactive.vscode_lib.decorator) | |
| [`flytekit.interactive.vscode_lib.vscode_constants`](flytekit.interactive.vscode_lib.vscode_constants) | |
| [`flytekit.interfaces.cli_identifiers`](flytekit.interfaces.cli_identifiers) | |
| [`flytekit.interfaces.random`](flytekit.interfaces.random) | |
| [`flytekit.interfaces.stats.client`](flytekit.interfaces.stats.client) | |
| [`flytekit.interfaces.stats.taggable`](flytekit.interfaces.stats.taggable) | |
| [`flytekit.lazy_import.lazy_module`](flytekit.lazy_import.lazy_module) | |
| **Flytekit SDK > Packages > flytekit** | |
| [`flytekit.models.admin.common`](flytekit.models.admin.common) | |
| [`flytekit.models.admin.task_execution`](flytekit.models.admin.task_execution) | |
| [`flytekit.models.admin.workflow`](flytekit.models.admin.workflow) | |
| [`flytekit.models.annotation`](flytekit.models.annotation) | |
| [`flytekit.models.array_job`](flytekit.models.array_job) | |
| [`flytekit.models.common`](flytekit.models.common) | |
| [`flytekit.models.concurrency`](flytekit.models.concurrency) | |
| [`flytekit.models.core.catalog`](flytekit.models.core.catalog) | |
| [`flytekit.models.core.compiler`](flytekit.models.core.compiler) | |
| [`flytekit.models.core.condition`](flytekit.models.core.condition) | |
| [`flytekit.models.core.errors`](flytekit.models.core.errors) | |
| [`flytekit.models.core.execution`](flytekit.models.core.execution) | |
| [`flytekit.models.core.identifier`](flytekit.models.core.identifier) | |
| [`flytekit.models.core.types`](flytekit.models.core.types) | |
| [`flytekit.models.core.workflow`](flytekit.models.core.workflow) | |
| [`flytekit.models.documentation`](flytekit.models.documentation) | |
| [`flytekit.models.domain`](flytekit.models.domain) | |
| [`flytekit.models.dynamic_job`](flytekit.models.dynamic_job) | |
| [`flytekit.models.event`](flytekit.models.event) | |
| [`flytekit.models.execution`](flytekit.models.execution) | |
| [`flytekit.models.filters`](flytekit.models.filters) | |
| [`flytekit.models.interface`](flytekit.models.interface) | |
| [`flytekit.models.launch_plan`](flytekit.models.launch_plan) | |
| [`flytekit.models.literals`](flytekit.models.literals) | |
| [`flytekit.models.matchable_resource`](flytekit.models.matchable_resource) | |
| [`flytekit.models.named_entity`](flytekit.models.named_entity) | |
| [`flytekit.models.node_execution`](flytekit.models.node_execution) | |
| [`flytekit.models.presto`](flytekit.models.presto) | This is a deprecated module. |
| [`flytekit.models.project`](flytekit.models.project) | |
| [`flytekit.models.qubole`](flytekit.models.qubole) | This is a deprecated module. |
| [`flytekit.models.schedule`](flytekit.models.schedule) | |
| [`flytekit.models.security`](flytekit.models.security) | |
| [`flytekit.models.task`](flytekit.models.task) | |
| [`flytekit.models.types`](flytekit.models.types) | |
| [`flytekit.models.workflow_closure`](flytekit.models.workflow_closure) | |
| [`flytekit.remote.backfill`](flytekit.remote.backfill) | |
| [`flytekit.remote.data`](flytekit.remote.data) | |
| [`flytekit.remote.entities`](flytekit.remote.entities) | This module contains shadow entities for all Flyte entities as represented in Flyte Admin / Control Plane. |
| [`flytekit.remote.executions`](flytekit.remote.executions) | |
| [`flytekit.remote.interface`](flytekit.remote.interface) | |
| [`flytekit.remote.lazy_entity`](flytekit.remote.lazy_entity) | |
| [`flytekit.remote.metrics`](flytekit.remote.metrics) | |
| [`flytekit.remote.remote`](flytekit.remote.remote) | This module provides the ``FlyteRemote`` object, which is the end-user's main starting point for interacting. |
| [`flytekit.remote.remote_callable`](flytekit.remote.remote_callable) | |
| [`flytekit.remote.remote_fs`](flytekit.remote.remote_fs) | |
| [`flytekit.sensor.base_sensor`](flytekit.sensor.base_sensor) | |
| [`flytekit.sensor.file_sensor`](flytekit.sensor.file_sensor) | |
| [`flytekit.sensor.sensor_engine`](flytekit.sensor.sensor_engine) | |
| [`flytekit.tools.fast_registration`](flytekit.tools.fast_registration) | |
| [`flytekit.tools.ignore`](flytekit.tools.ignore) | |
| [`flytekit.tools.interactive`](flytekit.tools.interactive) | |
| [`flytekit.tools.module_loader`](flytekit.tools.module_loader) | |
| [`flytekit.tools.repo`](flytekit.tools.repo) | |
| [`flytekit.tools.script_mode`](flytekit.tools.script_mode) | |
| [`flytekit.tools.serialize_helpers`](flytekit.tools.serialize_helpers) | |
| [`flytekit.tools.subprocess`](flytekit.tools.subprocess) | |
| [`flytekit.tools.translator`](flytekit.tools.translator) | |
| [`flytekit.types.directory`](flytekit.types.directory) | Similar to {{< py_class_ref flytekit.types.file.FlyteFile >}} there are some 'preformatted' directory types. |
| **Flytekit SDK > Packages > flytekit.types.directory** | |
| [`flytekit.types.error.error`](flytekit.types.error.error) | |
| [`flytekit.types.file`](flytekit.types.file) | This module provides functionality related to FlyteFile. |
| **Flytekit SDK > Packages > flytekit.types.file** | |
| **Flytekit SDK > Packages > flytekit.types.file** | |
| [`flytekit.types.iterator.iterator`](flytekit.types.iterator.iterator) | |
| [`flytekit.types.iterator.json_iterator`](flytekit.types.iterator.json_iterator) | |
| [`flytekit.types.numpy.ndarray`](flytekit.types.numpy.ndarray) | |
| [`flytekit.types.pickle.pickle`](flytekit.types.pickle.pickle) | |
| [`flytekit.types.schema.types`](flytekit.types.schema.types) | |
| [`flytekit.types.schema.types_pandas`](flytekit.types.schema.types_pandas) | |
| [`flytekit.types.structured`](flytekit.types.structured) | |
| **Flytekit SDK > Packages > flytekit.types.structured** | |
| **Flytekit SDK > Packages > flytekit.types.structured** | |
| **Flytekit SDK > Packages > flytekit.types.structured** | |
| **Flytekit SDK > Packages > flytekit.types.structured** | |
| [`flytekit.utils.asyn`](flytekit.utils.asyn) | Manages an async event loop on another thread. |
| [`flytekit.utils.dict_formatter`](flytekit.utils.dict_formatter) | |
| [`flytekit.utils.pbhash`](flytekit.utils.pbhash) | |
| [`flytekit.utils.rate_limiter`](flytekit.utils.rate_limiter) | |
## Subpages
- **Flytekit SDK > Packages > flytekit**
- [flytekit.bin.entrypoint](flytekit.bin.entrypoint/)
- [flytekit.clients.auth_helper](flytekit.clients.auth_helper/)
- [flytekit.clients.auth.auth_client](flytekit.clients.auth.auth_client/)
- [flytekit.clients.auth.authenticator](flytekit.clients.auth.authenticator/)
- [flytekit.clients.auth.default_html](flytekit.clients.auth.default_html/)
- [flytekit.clients.auth.exceptions](flytekit.clients.auth.exceptions/)
- [flytekit.clients.auth.keyring](flytekit.clients.auth.keyring/)
- [flytekit.clients.auth.token_client](flytekit.clients.auth.token_client/)
- [flytekit.clients.friendly](flytekit.clients.friendly/)
- [flytekit.clients.grpc_utils.auth_interceptor](flytekit.clients.grpc_utils.auth_interceptor/)
- [flytekit.clients.grpc_utils.default_metadata_interceptor](flytekit.clients.grpc_utils.default_metadata_interceptor/)
- [flytekit.clients.grpc_utils.wrap_exception_interceptor](flytekit.clients.grpc_utils.wrap_exception_interceptor/)
- [flytekit.clients.helpers](flytekit.clients.helpers/)
- [flytekit.clients.raw](flytekit.clients.raw/)
- [flytekit.clis.helpers](flytekit.clis.helpers/)
- [flytekit.clis.sdk_in_container.backfill](flytekit.clis.sdk_in_container.backfill/)
- [flytekit.clis.sdk_in_container.constants](flytekit.clis.sdk_in_container.constants/)
- [flytekit.clis.sdk_in_container.executions](flytekit.clis.sdk_in_container.executions/)
- [flytekit.clis.sdk_in_container.helpers](flytekit.clis.sdk_in_container.helpers/)
- [flytekit.clis.sdk_in_container.metrics](flytekit.clis.sdk_in_container.metrics/)
- [flytekit.clis.sdk_in_container.package](flytekit.clis.sdk_in_container.package/)
- [flytekit.clis.sdk_in_container.serialize](flytekit.clis.sdk_in_container.serialize/)
- [flytekit.clis.sdk_in_container.serve](flytekit.clis.sdk_in_container.serve/)
- [flytekit.clis.sdk_in_container.utils](flytekit.clis.sdk_in_container.utils/)
- [flytekit.clis.version](flytekit.clis.version/)
- **Flytekit SDK > Packages > flytekit**
- **Flytekit SDK > Packages > flytekit.configuration**
- **Flytekit SDK > Packages > flytekit.configuration**
- **Flytekit SDK > Packages > flytekit.configuration**
- **Flytekit SDK > Packages > flytekit.configuration**
- **Flytekit SDK > Packages > flytekit.configuration**
- **Flytekit SDK > Packages > flytekit**
- [flytekit.core.annotation](flytekit.core.annotation/)
- [flytekit.core.array_node](flytekit.core.array_node/)
- [flytekit.core.array_node_map_task](flytekit.core.array_node_map_task/)
- [flytekit.core.artifact](flytekit.core.artifact/)
- [flytekit.core.artifact_utils](flytekit.core.artifact_utils/)
- [flytekit.core.base_sql_task](flytekit.core.base_sql_task/)
- [flytekit.core.base_task](flytekit.core.base_task/)
- [flytekit.core.cache](flytekit.core.cache/)
- [flytekit.core.checkpointer](flytekit.core.checkpointer/)
- [flytekit.core.class_based_resolver](flytekit.core.class_based_resolver/)
- [flytekit.core.condition](flytekit.core.condition/)
- [flytekit.core.constants](flytekit.core.constants/)
- [flytekit.core.container_task](flytekit.core.container_task/)
- [flytekit.core.context_manager](flytekit.core.context_manager/)
- [flytekit.core.data_persistence](flytekit.core.data_persistence/)
- [flytekit.core.docstring](flytekit.core.docstring/)
- [flytekit.core.environment](flytekit.core.environment/)
- [flytekit.core.gate](flytekit.core.gate/)
- [flytekit.core.hash](flytekit.core.hash/)
- [flytekit.core.interface](flytekit.core.interface/)
- [flytekit.core.launch_plan](flytekit.core.launch_plan/)
- [flytekit.core.legacy_map_task](flytekit.core.legacy_map_task/)
- [flytekit.core.local_cache](flytekit.core.local_cache/)
- [flytekit.core.local_fsspec](flytekit.core.local_fsspec/)
- [flytekit.core.mock_stats](flytekit.core.mock_stats/)
- [flytekit.core.node](flytekit.core.node/)
- [flytekit.core.node_creation](flytekit.core.node_creation/)
- [flytekit.core.notification](flytekit.core.notification/)
- [flytekit.core.options](flytekit.core.options/)
- [flytekit.core.pod_template](flytekit.core.pod_template/)
- [flytekit.core.promise](flytekit.core.promise/)
- [flytekit.core.python_auto_container](flytekit.core.python_auto_container/)
- [flytekit.core.python_customized_container_task](flytekit.core.python_customized_container_task/)
- [flytekit.core.python_function_task](flytekit.core.python_function_task/)
- [flytekit.core.reference](flytekit.core.reference/)
- [flytekit.core.reference_entity](flytekit.core.reference_entity/)
- [flytekit.core.resources](flytekit.core.resources/)
- [flytekit.core.schedule](flytekit.core.schedule/)
- [flytekit.core.shim_task](flytekit.core.shim_task/)
- [flytekit.core.task](flytekit.core.task/)
- [flytekit.core.testing](flytekit.core.testing/)
- [flytekit.core.tracked_abc](flytekit.core.tracked_abc/)
- [flytekit.core.tracker](flytekit.core.tracker/)
- [flytekit.core.type_engine](flytekit.core.type_engine/)
- [flytekit.core.type_helpers](flytekit.core.type_helpers/)
- [flytekit.core.type_match_checking](flytekit.core.type_match_checking/)
- [flytekit.core.utils](flytekit.core.utils/)
- [flytekit.core.worker_queue](flytekit.core.worker_queue/)
- [flytekit.core.workflow](flytekit.core.workflow/)
- [flytekit.deck.deck](flytekit.deck.deck/)
- [flytekit.deck.renderer](flytekit.deck.renderer/)
- [flytekit.exceptions.base](flytekit.exceptions.base/)
- [flytekit.exceptions.eager](flytekit.exceptions.eager/)
- [flytekit.exceptions.scopes](flytekit.exceptions.scopes/)
- [flytekit.exceptions.system](flytekit.exceptions.system/)
- [flytekit.exceptions.user](flytekit.exceptions.user/)
- [flytekit.exceptions.utils](flytekit.exceptions.utils/)
- [flytekit.experimental.eager_function](flytekit.experimental.eager_function/)
- [flytekit.extend.backend.base_connector](flytekit.extend.backend.base_connector/)
- [flytekit.extend.backend.connector_service](flytekit.extend.backend.connector_service/)
- [flytekit.extend.backend.utils](flytekit.extend.backend.utils/)
- [flytekit.extras.accelerators](flytekit.extras.accelerators/)
- [flytekit.extras.cloud_pickle_resolver](flytekit.extras.cloud_pickle_resolver/)
- [flytekit.extras.pydantic_transformer.transformer](flytekit.extras.pydantic_transformer.transformer/)
- [flytekit.extras.pytorch.checkpoint](flytekit.extras.pytorch.checkpoint/)
- [flytekit.extras.pytorch.native](flytekit.extras.pytorch.native/)
- [flytekit.extras.sklearn.native](flytekit.extras.sklearn.native/)
- [flytekit.extras.sqlite3.task](flytekit.extras.sqlite3.task/)
- [flytekit.extras.tasks.shell](flytekit.extras.tasks.shell/)
- [flytekit.extras.tensorflow.model](flytekit.extras.tensorflow.model/)
- [flytekit.extras.tensorflow.record](flytekit.extras.tensorflow.record/)
- [flytekit.extras.webhook](flytekit.extras.webhook/)
- **Flytekit SDK > Packages > flytekit.extras.webhook**
- **Flytekit SDK > Packages > flytekit.extras.webhook**
- **Flytekit SDK > Packages > flytekit.extras.webhook**
- [flytekit.image_spec.default_builder](flytekit.image_spec.default_builder/)
- [flytekit.image_spec.image_spec](flytekit.image_spec.image_spec/)
- [flytekit.image_spec.noop_builder](flytekit.image_spec.noop_builder/)
- [flytekit.interaction.click_types](flytekit.interaction.click_types/)
- [flytekit.interaction.parse_stdin](flytekit.interaction.parse_stdin/)
- [flytekit.interaction.rich_utils](flytekit.interaction.rich_utils/)
- [flytekit.interaction.string_literals](flytekit.interaction.string_literals/)
- **Flytekit SDK > Packages > flytekit**
- **Flytekit SDK > Packages > flytekit.interactive**
- **Flytekit SDK > Packages > flytekit.interactive**
- [flytekit.interactive.vscode_lib.config](flytekit.interactive.vscode_lib.config/)
- [flytekit.interactive.vscode_lib.decorator](flytekit.interactive.vscode_lib.decorator/)
- [flytekit.interactive.vscode_lib.vscode_constants](flytekit.interactive.vscode_lib.vscode_constants/)
- [flytekit.interfaces.cli_identifiers](flytekit.interfaces.cli_identifiers/)
- [flytekit.interfaces.random](flytekit.interfaces.random/)
- [flytekit.interfaces.stats.client](flytekit.interfaces.stats.client/)
- [flytekit.interfaces.stats.taggable](flytekit.interfaces.stats.taggable/)
- [flytekit.lazy_import.lazy_module](flytekit.lazy_import.lazy_module/)
- **Flytekit SDK > Packages > flytekit**
- [flytekit.models.admin.common](flytekit.models.admin.common/)
- [flytekit.models.admin.task_execution](flytekit.models.admin.task_execution/)
- [flytekit.models.admin.workflow](flytekit.models.admin.workflow/)
- [flytekit.models.annotation](flytekit.models.annotation/)
- [flytekit.models.array_job](flytekit.models.array_job/)
- [flytekit.models.common](flytekit.models.common/)
- [flytekit.models.concurrency](flytekit.models.concurrency/)
- [flytekit.models.core.catalog](flytekit.models.core.catalog/)
- [flytekit.models.core.compiler](flytekit.models.core.compiler/)
- [flytekit.models.core.condition](flytekit.models.core.condition/)
- [flytekit.models.core.errors](flytekit.models.core.errors/)
- [flytekit.models.core.execution](flytekit.models.core.execution/)
- [flytekit.models.core.identifier](flytekit.models.core.identifier/)
- [flytekit.models.core.types](flytekit.models.core.types/)
- [flytekit.models.core.workflow](flytekit.models.core.workflow/)
- [flytekit.models.documentation](flytekit.models.documentation/)
- [flytekit.models.domain](flytekit.models.domain/)
- [flytekit.models.dynamic_job](flytekit.models.dynamic_job/)
- [flytekit.models.event](flytekit.models.event/)
- [flytekit.models.execution](flytekit.models.execution/)
- [flytekit.models.filters](flytekit.models.filters/)
- [flytekit.models.interface](flytekit.models.interface/)
- [flytekit.models.launch_plan](flytekit.models.launch_plan/)
- [flytekit.models.literals](flytekit.models.literals/)
- [flytekit.models.matchable_resource](flytekit.models.matchable_resource/)
- [flytekit.models.named_entity](flytekit.models.named_entity/)
- [flytekit.models.node_execution](flytekit.models.node_execution/)
- [flytekit.models.presto](flytekit.models.presto/)
- [flytekit.models.project](flytekit.models.project/)
- [flytekit.models.qubole](flytekit.models.qubole/)
- [flytekit.models.schedule](flytekit.models.schedule/)
- [flytekit.models.security](flytekit.models.security/)
- [flytekit.models.task](flytekit.models.task/)
- [flytekit.models.types](flytekit.models.types/)
- [flytekit.models.workflow_closure](flytekit.models.workflow_closure/)
- [flytekit.remote.backfill](flytekit.remote.backfill/)
- [flytekit.remote.data](flytekit.remote.data/)
- [flytekit.remote.entities](flytekit.remote.entities/)
- [flytekit.remote.executions](flytekit.remote.executions/)
- [flytekit.remote.interface](flytekit.remote.interface/)
- [flytekit.remote.lazy_entity](flytekit.remote.lazy_entity/)
- [flytekit.remote.metrics](flytekit.remote.metrics/)
- [flytekit.remote.remote](flytekit.remote.remote/)
- [flytekit.remote.remote_callable](flytekit.remote.remote_callable/)
- [flytekit.remote.remote_fs](flytekit.remote.remote_fs/)
- [flytekit.sensor.base_sensor](flytekit.sensor.base_sensor/)
- [flytekit.sensor.file_sensor](flytekit.sensor.file_sensor/)
- [flytekit.sensor.sensor_engine](flytekit.sensor.sensor_engine/)
- [flytekit.tools.fast_registration](flytekit.tools.fast_registration/)
- [flytekit.tools.ignore](flytekit.tools.ignore/)
- [flytekit.tools.interactive](flytekit.tools.interactive/)
- [flytekit.tools.module_loader](flytekit.tools.module_loader/)
- [flytekit.tools.repo](flytekit.tools.repo/)
- [flytekit.tools.script_mode](flytekit.tools.script_mode/)
- [flytekit.tools.serialize_helpers](flytekit.tools.serialize_helpers/)
- [flytekit.tools.subprocess](flytekit.tools.subprocess/)
- [flytekit.tools.translator](flytekit.tools.translator/)
- [flytekit.types.directory](flytekit.types.directory/)
- **Flytekit SDK > Packages > flytekit.types.directory**
- [flytekit.types.error.error](flytekit.types.error.error/)
- [flytekit.types.file](flytekit.types.file/)
- **Flytekit SDK > Packages > flytekit.types.file**
- **Flytekit SDK > Packages > flytekit.types.file**
- [flytekit.types.iterator.iterator](flytekit.types.iterator.iterator/)
- [flytekit.types.iterator.json_iterator](flytekit.types.iterator.json_iterator/)
- [flytekit.types.numpy.ndarray](flytekit.types.numpy.ndarray/)
- [flytekit.types.pickle.pickle](flytekit.types.pickle.pickle/)
- [flytekit.types.schema.types](flytekit.types.schema.types/)
- [flytekit.types.schema.types_pandas](flytekit.types.schema.types_pandas/)
- [flytekit.types.structured](flytekit.types.structured/)
- **Flytekit SDK > Packages > flytekit.types.structured**
- **Flytekit SDK > Packages > flytekit.types.structured**
- **Flytekit SDK > Packages > flytekit.types.structured**
- **Flytekit SDK > Packages > flytekit.types.structured**
- [flytekit.utils.asyn](flytekit.utils.asyn/)
- [flytekit.utils.dict_formatter](flytekit.utils.dict_formatter/)
- [flytekit.utils.pbhash](flytekit.utils.pbhash/)
- [flytekit.utils.rate_limiter](flytekit.utils.rate_limiter/)
=== PAGE: https://www.union.ai/docs/v1/serverless/api-reference/flytekit-sdk/packages/flytekit ===
# flytekit
This package contains all of the most common abstractions you'll need to write Flyte workflows and extend Flytekit.
## Basic Authoring
These are the essentials needed to get started writing tasks and workflows.
- task
- workflow
- kwtypes
- current_context
- ExecutionParameters
- FlyteContext
- map_task
- ImperativeWorkflow
- create_node
- NodeOutput
- FlyteContextManager
> [!NOTE]
> **Local Execution**
>
> Tasks and Workflows can both be locally run, assuming the relevant tasks are capable of local execution.
> This is useful for unit testing.
### Branching and Conditionals
Branches and conditionals can be expressed explicitly in Flyte. These conditions are evaluated
in the flyte engine and hence should be used for control flow. "dynamic workflows" can be used to perform custom conditional logic not supported by flytekit.
### Customizing Tasks & Workflows
- TaskMetadata - Wrapper object that allows users to specify Task
- Resources - Things like CPUs/Memory, etc.
- WorkflowFailurePolicy - Customizes what happens when a workflow fails.
- PodTemplate - Custom PodTemplate for a task.
#### Dynamic and Nested Workflows
See the Dynamic module for more information.
##### Signaling
- approve
- sleep
- wait_for_input
Scheduling
- CronSchedule
- FixedRate
##### Notifications
- Email
- PagerDuty
- Slack
##### Reference Entities
- get_reference_entity
- LaunchPlanReference
- TaskReference
- WorkflowReference
- reference_task
- reference_workflow
- reference_launch_plan
##### Core Task Types
- SQLTask
- ContainerTask
- PythonFunctionTask
- PythonInstanceTask
- LaunchPlan
##### Secrets and SecurityContext
- Secret
- SecurityContext
##### Common Flyte IDL Objects
- AuthRole
- Labels
- Annotations
- WorkflowExecutionPhase
- Blob
- BlobMetadata
- Literal
- Scalar
- LiteralType
- BlobType
## Directory
### Methods
| Method | Description |
|-|-|
| **Flytekit SDK > Packages > flytekit > `current_context()`** | Use this method to get a handle of specific parameters available in a flyte task. |
| **Flytekit SDK > Packages > flytekit > `load_implicit_plugins()`** | This method allows loading all plugins that have the entrypoint specification. |
| **Flytekit SDK > Packages > flytekit > `new_context()`** | |
### Variables
| Property | Type | Description |
|-|-|-|
| `LOGGING_RICH_FMT_ENV_VAR` | `str` | |
## Methods
#### current_context()
```python
def current_context()
```
Use this method to get a handle of specific parameters available in a flyte task.
Usage
```python
flytekit.current_context().logging.info(...)
```
Available params are documented in {{< py_class_ref flytekit.core.context_manager.ExecutionParams >}}.
There are some special params, that should be available
#### load_implicit_plugins()
```python
def load_implicit_plugins()
```
This method allows loading all plugins that have the entrypoint specification. This uses the plugin loading
behavior.
This is an opt in system and plugins that have an implicit loading requirement should add the implicit loading
entrypoint specification to their setup.py. The following example shows how we can autoload a module called fsspec
(whose init files contains the necessary plugin registration step)
> [!NOTE]
> The group is always ``flytekit.plugins``
```python
setup(
...
entry_points={'flytekit.plugins': 'fsspec=flytekitplugins.fsspec'},
...
)
```
This works as long as the fsspec module has
> [!NOTE]
> For data persistence plugins:
```python
DataPersistencePlugins.register_plugin(f"{k}://", FSSpecPersistence, force=True)
```
OR for type plugins:
```python
TypeEngine.register(PanderaTransformer())
# etc
```
#### new_context()
```python
def new_context()
```
=== PAGE: https://www.union.ai/docs/v1/serverless/api-reference/flytekit-sdk/packages/flytekit.configuration ===
# flytekit.configuration
# Configuration
## Flytekit Configuration Sources
There are multiple ways to configure flytekit settings:
### Command Line Arguments
This is the recommended way of setting configuration values for many cases. For example, see `pyflyte package` command.
### Python Config Object
A `Config` object can be used directly, e.g. when initializing a `FlyteRemote` object. See the Control Plane design docs for examples on how to specify a `Config` object.
### Environment Variables
Users can specify these at compile time, but when your task is run, Flyte Propeller will also set configuration to ensure correct interaction with the platform. The environment variables must be specified with the format `FLYTE_{SECTION}_{OPTION}`, all in upper case. For example, to specify the `PlatformConfig.endpoint` setting, the environment variable would be `FLYTE_PLATFORM_URL`.
> [!NOTE]
> Environment variables won't work for image configuration, which need to be specified with the `pyflyte package --image ...` option or in a configuration file.
### YAML Format Configuration File
A configuration file that contains settings for both `flytectl` and `flytekit`. This is the recommended configuration file format. Invoke the `flytectl config init` command to create a boilerplate `~/.flyte/config.yaml` file, and `flytectl --help` to learn about all of the configuration yaml options.
Example `config.yaml` file:
```YAML
# Sample config file
admin:
# For GRPC endpoints you might want to use dns:///flyte.myexample.com
endpoint: dns:///localhost:8089
authType: Pkce
insecure: true
logger:
show-source: true
level: 0
console:
endpoint: http://localhost:8080
insecure: true
# This section is used only in the control plane to trigger a remote execution
storage:
type: minio
stow:
kind: s3
config:
auth_type: accesskey
access_key_id: minio
secret_key: miniostorage
endpoint: http://localhost:9000
region: us-east-1
disable_ssl: true
addressing_style: "path"
```
### INI Format Configuration File
A configuration file for `flytekit`. By default, `flytekit` will look for a file in two places:
1. First, a file named `flytekit.config` in the Python interpreter's working directory.
2. A file in `~/.flyte/config` in the home directory as detected by Python.
Example `flytekit.config` file:
```ini
[sdk]
workflow_packages=my_cool_workflows, other_workflows
```
> [!WARNING]
> The INI format configuration is considered a legacy configuration format. We recommend using the yaml format instead if you're using a configuration file.
## How is configuration used?
Configuration usage can roughly be bucketed into the following areas:
- **Compile-time settings**: these are settings like the default image and named images, where to look for Flyte code, etc.
- **Platform settings**: Where to find the Flyte backend (Admin DNS, whether to use SSL)
- **Registration Run-time settings**: these are things like the K8s service account to use, a specific S3/GCS bucket to write off-loaded data (dataframes and files) to, notifications, labels & annotations, etc.
- **Data access settings**: Is there a custom S3 endpoint in use? Backoff/retry behavior for accessing S3/GCS, key and password, etc.
- **Other settings** - Statsd configuration, which is a run-time applicable setting but is not necessarily relevant to the Flyte platform.
## Configuration Objects
The following objects are encapsulated in a parent object called `Config`:
### Serialization Time Settings
These are serialization/compile-time settings that are used when using commands like `pyflyte package` or `pyflyte register`. These configuration settings are typically passed in as flags to the above CLI commands.
The image configurations are typically either passed in via an `--image` flag, or can be specified in the `yaml` or `ini` configuration files (see examples above).
- **Image**: Represents a container image with optional configuration overrides.
- **ImageConfig**: Represents an image configuration for a given project/domain combination.
- **SerializationSettings**: Controls how to serialize Flyte entities when registering with Admin.
- **FastSerializationSettings**: Configuration for faster serialization settings.
### Execution Time Settings
Users typically shouldn't be concerned with these configurations, as they are typically set by FlytePropeller or FlyteAdmin. The configurations below are useful for authenticating to a Flyte backend, configuring data access credentials, secrets, and statsd metrics.
- **PlatformConfig**: Configuration for how to connect to the Flyte platform.
- **StatsConfig**: Configuration for how to emit statsd metrics.
- **SecretsConfig**: Configuration for how to access secrets.
- **S3Config**: Amazon S3 specific configuration.
- **GCSConfig**: Google Cloud Storage specific configuration.
- **DataConfig**: Configuration for data access.
## Directory
### Classes
| Class | Description |
|-|-|
| [`AuthType`](.././flytekit.configuration#flytekitconfigurationauthtype) | Create a collection of name/value pairs. |
| [`AzureBlobStorageConfig`](.././flytekit.configuration#flytekitconfigurationazureblobstorageconfig) | Any Azure Blob Storage specific configuration. |
| [`Config`](.././flytekit.configuration#flytekitconfigurationconfig) | This the parent configuration object and holds all the underlying configuration object types. |
| [`DataConfig`](.././flytekit.configuration#flytekitconfigurationdataconfig) | Any data storage specific configuration. |
| [`EntrypointSettings`](.././flytekit.configuration#flytekitconfigurationentrypointsettings) | This object carries information about the path of the entrypoint command that will be invoked at runtime. |
| [`FastSerializationSettings`](.././flytekit.configuration#flytekitconfigurationfastserializationsettings) | This object hold information about settings necessary to serialize an object so that it can be fast-registered. |
| [`GCSConfig`](.././flytekit.configuration#flytekitconfigurationgcsconfig) | Any GCS specific configuration. |
| [`GenericPersistenceConfig`](.././flytekit.configuration#flytekitconfigurationgenericpersistenceconfig) | Data storage configuration that applies across any provider. |
| [`Image`](.././flytekit.configuration#flytekitconfigurationimage) | Image is a structured wrapper for task container images used in object serialization. |
| [`ImageConfig`](.././flytekit.configuration#flytekitconfigurationimageconfig) | We recommend you to use ImageConfig. |
| [`LocalConfig`](.././flytekit.configuration#flytekitconfigurationlocalconfig) | Any configuration specific to local runs. |
| [`PlatformConfig`](.././flytekit.configuration#flytekitconfigurationplatformconfig) | This object contains the settings to talk to a Flyte backend (the DNS location of your Admin server basically). |
| [`S3Config`](.././flytekit.configuration#flytekitconfigurations3config) | S3 specific configuration. |
| [`SecretsConfig`](.././flytekit.configuration#flytekitconfigurationsecretsconfig) | Configuration for secrets. |
| [`SerializationSettings`](.././flytekit.configuration#flytekitconfigurationserializationsettings) | These settings are provided while serializing a workflow and task, before registration. |
| [`StatsConfig`](.././flytekit.configuration#flytekitconfigurationstatsconfig) | Configuration for sending statsd. |
| [`TaskConfig`](.././flytekit.configuration#flytekitconfigurationtaskconfig) | Any Project/Domain/Org configuration. |
### Variables
| Property | Type | Description |
|-|-|-|
| `DEFAULT_FLYTEKIT_ENTRYPOINT_FILELOC` | `str` | |
| `DEFAULT_IMAGE_NAME` | `str` | |
| `DEFAULT_IN_CONTAINER_SRC_PATH` | `str` | |
| `DEFAULT_RUNTIME_PYTHON_INTERPRETER` | `str` | |
| `DOMAIN_PLACEHOLDER` | `str` | |
| `PROJECT_PLACEHOLDER` | `str` | |
| `SERIALIZED_CONTEXT_ENV_VAR` | `str` | |
| `VERSION_PLACEHOLDER` | `str` | |
## flytekit.configuration.AuthType
Create a collection of name/value pairs.
Example enumeration:
>>> class Color(Enum):
... RED = 1
... BLUE = 2
... GREEN = 3
Access them by:
- attribute access:
>>> Color.RED
- value lookup:
>>> Color(1)
- name lookup:
>>> Color['RED']
Enumerations can be iterated over, and know how many members they have:
>>> len(Color)
3
>>> list(Color)
[, , ]
Methods can be added to enumerations, and members can have their own
attributes -- see the documentation for details.
## flytekit.configuration.AzureBlobStorageConfig
Any Azure Blob Storage specific configuration.
```python
class AzureBlobStorageConfig(
account_name: typing.Optional[str],
account_key: typing.Optional[str],
tenant_id: typing.Optional[str],
client_id: typing.Optional[str],
client_secret: typing.Optional[str],
)
```
| Parameter | Type | Description |
|-|-|-|
| `account_name` | `typing.Optional[str]` | |
| `account_key` | `typing.Optional[str]` | |
| `tenant_id` | `typing.Optional[str]` | |
| `client_id` | `typing.Optional[str]` | |
| `client_secret` | `typing.Optional[str]` | |
### Methods
| Method | Description |
|-|-|
| **Flytekit SDK > Packages > flytekit.configuration > flytekit.configuration.TaskConfig > Methods > auto()** | |
#### auto()
```python
def auto(
config_file: typing.Union[str, ConfigFile],
) -> GCSConfig
```
| Parameter | Type | Description |
|-|-|-|
| `config_file` | `typing.Union[str, ConfigFile]` | |
## flytekit.configuration.Config
This the parent configuration object and holds all the underlying configuration object types. An instance of
this object holds all the config necessary to
1. Interactive session with Flyte backend
2. Some parts are required for Serialization, for example Platform Config is not required
3. Runtime of a task
Attributes:
platform (PlatformConfig): Settings to connect to a Flyte backend.
secrets (SecretsConfig): Configuration for secrets management.
stats (StatsConfig): Configuration for statsd metrics.
data_config (DataConfig): Data storage configuration.
local_sandbox_path (str): Path for local sandbox runs.
```python
class Config(
platform: PlatformConfig,
secrets: SecretsConfig,
stats: StatsConfig,
data_config: DataConfig,
local_sandbox_path: str,
)
```
| Parameter | Type | Description |
|-|-|-|
| `platform` | `PlatformConfig` | |
| `secrets` | `SecretsConfig` | |
| `stats` | `StatsConfig` | |
| `data_config` | `DataConfig` | |
| `local_sandbox_path` | `str` | |
### Methods
| Method | Description |
|-|-|
| **Flytekit SDK > Packages > flytekit.configuration > flytekit.configuration.TaskConfig > Methods > auto()** | Automatically constructs the Config Object. |
| **Flytekit SDK > Packages > flytekit.configuration > `for_endpoint()`** | Creates an automatic config for the given endpoint and uses the config_file or environment variable for default. |
| **Flytekit SDK > Packages > flytekit.configuration > `for_sandbox()`** | Constructs a new Config object specifically to connect to :std:ref:`deployment-deployment-sandbox`. |
| **Flytekit SDK > Packages > flytekit.configuration > `with_params()`** | |
#### auto()
```python
def auto(
config_file: typing.Union[str, ConfigFile, None],
) -> Config
```
Automatically constructs the Config Object. The order of precedence is as follows
1. first try to find any env vars that match the config vars specified in the FLYTE_CONFIG format.
2. If not found in environment then values ar read from the config file
3. If not found in the file, then the default values are used.
| Parameter | Type | Description |
|-|-|-|
| `config_file` | `typing.Union[str, ConfigFile, None]` | file path to read the config from, if not specified default locations are searched :return: Config |
#### for_endpoint()
```python
def for_endpoint(
endpoint: str,
insecure: bool,
data_config: typing.Optional[DataConfig],
config_file: typing.Union[str, ConfigFile],
) -> Config
```
Creates an automatic config for the given endpoint and uses the config_file or environment variable for default.
Refer to `Config.auto()` to understand the default bootstrap behavior.
data_config can be used to configure how data is downloaded or uploaded to a specific Blob storage like S3 / GCS etc.
But, for permissions to a specific backend just use Cloud providers reqcommendation. If using fsspec, then
refer to fsspec documentation
| Parameter | Type | Description |
|-|-|-|
| `endpoint` | `str` | -> Endpoint where Flyte admin is available |
| `insecure` | `bool` | -> if the connection should be insecure, default is secure (SSL ON) |
| `data_config` | `typing.Optional[DataConfig]` | -> Data config, if using specialized connection params like minio etc |
| `config_file` | `typing.Union[str, ConfigFile]` | -> Optional config file in the flytekit config format. :return: Config |
#### for_sandbox()
```python
def for_sandbox()
```
Constructs a new Config object specifically to connect to :std:ref:`deployment-deployment-sandbox`.
If you are using a hosted Sandbox like environment, then you may need to use port-forward or ingress urls
:return: Config
#### with_params()
```python
def with_params(
platform: PlatformConfig,
secrets: SecretsConfig,
stats: StatsConfig,
data_config: DataConfig,
local_sandbox_path: str,
) -> Config
```
| Parameter | Type | Description |
|-|-|-|
| `platform` | `PlatformConfig` | |
| `secrets` | `SecretsConfig` | |
| `stats` | `StatsConfig` | |
| `data_config` | `DataConfig` | |
| `local_sandbox_path` | `str` | |
## flytekit.configuration.DataConfig
Any data storage specific configuration. Please do not use this to store secrets, in S3 case, as it is used in
Flyte sandbox environment we store the access key id and secret.
All DataPersistence plugins are passed all DataConfig and the plugin should correctly use the right config
```python
class DataConfig(
s3: S3Config,
gcs: GCSConfig,
azure: AzureBlobStorageConfig,
generic: GenericPersistenceConfig,
)
```
| Parameter | Type | Description |
|-|-|-|
| `s3` | `S3Config` | |
| `gcs` | `GCSConfig` | |
| `azure` | `AzureBlobStorageConfig` | |
| `generic` | `GenericPersistenceConfig` | |
### Methods
| Method | Description |
|-|-|
| **Flytekit SDK > Packages > flytekit.configuration > flytekit.configuration.TaskConfig > Methods > auto()** | |
#### auto()
```python
def auto(
config_file: typing.Union[str, ConfigFile],
) -> DataConfig
```
| Parameter | Type | Description |
|-|-|-|
| `config_file` | `typing.Union[str, ConfigFile]` | |
## flytekit.configuration.EntrypointSettings
This object carries information about the path of the entrypoint command that will be invoked at runtime.
This is where `pyflyte-execute` code can be found. This is useful for cases like pyspark execution.
```python
class EntrypointSettings(
path: Optional[str],
)
```
| Parameter | Type | Description |
|-|-|-|
| `path` | `Optional[str]` | |
### Methods
| Method | Description |
|-|-|
| **Flytekit SDK > Packages > flytekit.configuration > `from_dict()`** | |
| **Flytekit SDK > Packages > flytekit.configuration > `from_json()`** | |
| **Flytekit SDK > Packages > flytekit.configuration > flytekit.configuration.SerializationSettings > Methods > schema()** | |
| **Flytekit SDK > Packages > flytekit.configuration > `to_dict()`** | |
| **Flytekit SDK > Packages > flytekit.configuration > `to_json()`** | |
#### from_dict()
```python
def from_dict(
kvs: typing.Union[dict, list, str, int, float, bool, NoneType],
infer_missing,
) -> ~A
```
| Parameter | Type | Description |
|-|-|-|
| `kvs` | `typing.Union[dict, list, str, int, float, bool, NoneType]` | |
| `infer_missing` | | |
#### from_json()
```python
def from_json(
s: typing.Union[str, bytes, bytearray],
parse_float,
parse_int,
parse_constant,
infer_missing,
kw,
) -> ~A
```
| Parameter | Type | Description |
|-|-|-|
| `s` | `typing.Union[str, bytes, bytearray]` | |
| `parse_float` | | |
| `parse_int` | | |
| `parse_constant` | | |
| `infer_missing` | | |
| `kw` | | |
#### schema()
```python
def schema(
infer_missing: bool,
only,
exclude,
many: bool,
context,
load_only,
dump_only,
partial: bool,
unknown,
) -> SchemaType[A]
```
| Parameter | Type | Description |
|-|-|-|
| `infer_missing` | `bool` | |
| `only` | | |
| `exclude` | | |
| `many` | `bool` | |
| `context` | | |
| `load_only` | | |
| `dump_only` | | |
| `partial` | `bool` | |
| `unknown` | | |
#### to_dict()
```python
def to_dict(
encode_json,
) -> typing.Dict[str, typing.Union[dict, list, str, int, float, bool, NoneType]]
```
| Parameter | Type | Description |
|-|-|-|
| `encode_json` | | |
#### to_json()
```python
def to_json(
skipkeys: bool,
ensure_ascii: bool,
check_circular: bool,
allow_nan: bool,
indent: typing.Union[int, str, NoneType],
separators: typing.Tuple[str, str],
default: typing.Callable,
sort_keys: bool,
kw,
) -> str
```
| Parameter | Type | Description |
|-|-|-|
| `skipkeys` | `bool` | |
| `ensure_ascii` | `bool` | |
| `check_circular` | `bool` | |
| `allow_nan` | `bool` | |
| `indent` | `typing.Union[int, str, NoneType]` | |
| `separators` | `typing.Tuple[str, str]` | |
| `default` | `typing.Callable` | |
| `sort_keys` | `bool` | |
| `kw` | | |
## flytekit.configuration.FastSerializationSettings
This object hold information about settings necessary to serialize an object so that it can be fast-registered.
```python
class FastSerializationSettings(
enabled: bool,
destination_dir: Optional[str],
distribution_location: Optional[str],
)
```
| Parameter | Type | Description |
|-|-|-|
| `enabled` | `bool` | |
| `destination_dir` | `Optional[str]` | |
| `distribution_location` | `Optional[str]` | |
### Methods
| Method | Description |
|-|-|
| **Flytekit SDK > Packages > flytekit.configuration > `from_dict()`** | |
| **Flytekit SDK > Packages > flytekit.configuration > `from_json()`** | |
| **Flytekit SDK > Packages > flytekit.configuration > flytekit.configuration.SerializationSettings > Methods > schema()** | |
| **Flytekit SDK > Packages > flytekit.configuration > `to_dict()`** | |
| **Flytekit SDK > Packages > flytekit.configuration > `to_json()`** | |
#### from_dict()
```python
def from_dict(
kvs: typing.Union[dict, list, str, int, float, bool, NoneType],
infer_missing,
) -> ~A
```
| Parameter | Type | Description |
|-|-|-|
| `kvs` | `typing.Union[dict, list, str, int, float, bool, NoneType]` | |
| `infer_missing` | | |
#### from_json()
```python
def from_json(
s: typing.Union[str, bytes, bytearray],
parse_float,
parse_int,
parse_constant,
infer_missing,
kw,
) -> ~A
```
| Parameter | Type | Description |
|-|-|-|
| `s` | `typing.Union[str, bytes, bytearray]` | |
| `parse_float` | | |
| `parse_int` | | |
| `parse_constant` | | |
| `infer_missing` | | |
| `kw` | | |
#### schema()
```python
def schema(
infer_missing: bool,
only,
exclude,
many: bool,
context,
load_only,
dump_only,
partial: bool,
unknown,
) -> SchemaType[A]
```
| Parameter | Type | Description |
|-|-|-|
| `infer_missing` | `bool` | |
| `only` | | |
| `exclude` | | |
| `many` | `bool` | |
| `context` | | |
| `load_only` | | |
| `dump_only` | | |
| `partial` | `bool` | |
| `unknown` | | |
#### to_dict()
```python
def to_dict(
encode_json,
) -> typing.Dict[str, typing.Union[dict, list, str, int, float, bool, NoneType]]
```
| Parameter | Type | Description |
|-|-|-|
| `encode_json` | | |
#### to_json()
```python
def to_json(
skipkeys: bool,
ensure_ascii: bool,
check_circular: bool,
allow_nan: bool,
indent: typing.Union[int, str, NoneType],
separators: typing.Tuple[str, str],
default: typing.Callable,
sort_keys: bool,
kw,
) -> str
```
| Parameter | Type | Description |
|-|-|-|
| `skipkeys` | `bool` | |
| `ensure_ascii` | `bool` | |
| `check_circular` | `bool` | |
| `allow_nan` | `bool` | |
| `indent` | `typing.Union[int, str, NoneType]` | |
| `separators` | `typing.Tuple[str, str]` | |
| `default` | `typing.Callable` | |
| `sort_keys` | `bool` | |
| `kw` | | |
## flytekit.configuration.GCSConfig
Any GCS specific configuration.
```python
class GCSConfig(
gsutil_parallelism: bool,
)
```
| Parameter | Type | Description |
|-|-|-|
| `gsutil_parallelism` | `bool` | |
### Methods
| Method | Description |
|-|-|
| **Flytekit SDK > Packages > flytekit.configuration > flytekit.configuration.TaskConfig > Methods > auto()** | |
#### auto()
```python
def auto(
config_file: typing.Union[str, ConfigFile],
) -> GCSConfig
```
| Parameter | Type | Description |
|-|-|-|
| `config_file` | `typing.Union[str, ConfigFile]` | |
## flytekit.configuration.GenericPersistenceConfig
Data storage configuration that applies across any provider.
```python
class GenericPersistenceConfig(
attach_execution_metadata: bool,
)
```
| Parameter | Type | Description |
|-|-|-|
| `attach_execution_metadata` | `bool` | |
### Methods
| Method | Description |
|-|-|
| **Flytekit SDK > Packages > flytekit.configuration > flytekit.configuration.TaskConfig > Methods > auto()** | |
#### auto()
```python
def auto(
config_file: typing.Union[str, ConfigFile],
) -> GCSConfig
```
| Parameter | Type | Description |
|-|-|-|
| `config_file` | `typing.Union[str, ConfigFile]` | |
## flytekit.configuration.Image
Image is a structured wrapper for task container images used in object serialization.
Attributes:
name (str): A user-provided name to identify this image.
fqn (str): Fully qualified image name. This consists of
#. a registry location
#. a username
#. a repository name
For example: `hostname/username/reponame`
tag (str): Optional tag used to specify which version of an image to pull
digest (str): Optional digest used to specify which version of an image to pull
```python
class Image(
name: str,
fqn: str,
tag: Optional[str],
digest: Optional[str],
)
```
| Parameter | Type | Description |
|-|-|-|
| `name` | `str` | |
| `fqn` | `str` | |
| `tag` | `Optional[str]` | |
| `digest` | `Optional[str]` | |
### Methods
| Method | Description |
|-|-|
| **Flytekit SDK > Packages > flytekit.configuration > `from_dict()`** | |
| **Flytekit SDK > Packages > flytekit.configuration > `from_json()`** | |
| **Flytekit SDK > Packages > flytekit.configuration > `look_up_image_info()`** | Creates an `Image` object from an image identifier string or a path to an ImageSpec yaml file. |
| **Flytekit SDK > Packages > flytekit.configuration > flytekit.configuration.SerializationSettings > Methods > schema()** | |
| **Flytekit SDK > Packages > flytekit.configuration > `to_dict()`** | |
| **Flytekit SDK > Packages > flytekit.configuration > `to_json()`** | |
#### from_dict()
```python
def from_dict(
kvs: typing.Union[dict, list, str, int, float, bool, NoneType],
infer_missing,
) -> ~A
```
| Parameter | Type | Description |
|-|-|-|
| `kvs` | `typing.Union[dict, list, str, int, float, bool, NoneType]` | |
| `infer_missing` | | |
#### from_json()
```python
def from_json(
s: typing.Union[str, bytes, bytearray],
parse_float,
parse_int,
parse_constant,
infer_missing,
kw,
) -> ~A
```
| Parameter | Type | Description |
|-|-|-|
| `s` | `typing.Union[str, bytes, bytearray]` | |
| `parse_float` | | |
| `parse_int` | | |
| `parse_constant` | | |
| `infer_missing` | | |
| `kw` | | |
#### look_up_image_info()
```python
def look_up_image_info(
name: str,
image_identifier: str,
allow_no_tag_or_digest: bool,
) -> Image
```
Creates an `Image` object from an image identifier string or a path to an ImageSpec yaml file.
This function is used when registering tasks/workflows with Admin. When using
the canonical Python-based development cycle, the version that is used to
register workflows and tasks with Admin should be the version of the image
itself, which should ideally be something unique like the git revision SHA1 of
the latest commit.
| Parameter | Type | Description |
|-|-|-|
| `name` | `str` | |
| `image_identifier` | `str` | Either the full image identifier string e.g. somedocker.com/myimage or a path to a file containing a `ImageSpec`. |
| `allow_no_tag_or_digest` | `bool` | :rtype: Image |
#### schema()
```python
def schema(
infer_missing: bool,
only,
exclude,
many: bool,
context,
load_only,
dump_only,
partial: bool,
unknown,
) -> SchemaType[A]
```
| Parameter | Type | Description |
|-|-|-|
| `infer_missing` | `bool` | |
| `only` | | |
| `exclude` | | |
| `many` | `bool` | |
| `context` | | |
| `load_only` | | |
| `dump_only` | | |
| `partial` | `bool` | |
| `unknown` | | |
#### to_dict()
```python
def to_dict(
encode_json,
) -> typing.Dict[str, typing.Union[dict, list, str, int, float, bool, NoneType]]
```
| Parameter | Type | Description |
|-|-|-|
| `encode_json` | | |
#### to_json()
```python
def to_json(
skipkeys: bool,
ensure_ascii: bool,
check_circular: bool,
allow_nan: bool,
indent: typing.Union[int, str, NoneType],
separators: typing.Tuple[str, str],
default: typing.Callable,
sort_keys: bool,
kw,
) -> str
```
| Parameter | Type | Description |
|-|-|-|
| `skipkeys` | `bool` | |
| `ensure_ascii` | `bool` | |
| `check_circular` | `bool` | |
| `allow_nan` | `bool` | |
| `indent` | `typing.Union[int, str, NoneType]` | |
| `separators` | `typing.Tuple[str, str]` | |
| `default` | `typing.Callable` | |
| `sort_keys` | `bool` | |
| `kw` | | |
### Properties
| Property | Type | Description |
|-|-|-|
| `full` | | "
Return the full image name with tag or digest, whichever is available.
When using a tag the separator is `:` and when using a digest the separator is `@`. |
| `version` | | Return the version of the image. This could be the tag or digest, whichever is available. |
## flytekit.configuration.ImageConfig
We recommend you to use ImageConfig.auto(img_name=None) to create an ImageConfig.
For example, ImageConfig.auto(img_name=""ghcr.io/flyteorg/flytecookbook:v1.0.0"") will create an ImageConfig.
ImageConfig holds available images which can be used at registration time. A default image can be specified
along with optional additional images. Each image in the config must have a unique name.
Attributes:
default_image (Optional[Image]): The default image to be used as a container for task serialization.
images (List[Image]): Optional, additional images which can be used in task container definitions.
```python
class ImageConfig(
default_image: Optional[Image],
images: Optional[List[Image]],
)
```
| Parameter | Type | Description |
|-|-|-|
| `default_image` | `Optional[Image]` | |
| `images` | `Optional[List[Image]]` | |
### Methods
| Method | Description |
|-|-|
| **Flytekit SDK > Packages > flytekit.configuration > flytekit.configuration.TaskConfig > Methods > auto()** | Reads from config file or from img_name. |
| **Flytekit SDK > Packages > flytekit.configuration > `auto_default_image()`** | |
| **Flytekit SDK > Packages > flytekit.configuration > `create_from()`** | |
| **Flytekit SDK > Packages > flytekit.configuration > `find_image()`** | Return an image, by name, if it exists. |
| **Flytekit SDK > Packages > flytekit.configuration > `from_dict()`** | |
| **Flytekit SDK > Packages > flytekit.configuration > `from_images()`** | Allows you to programmatically create an ImageConfig. |
| **Flytekit SDK > Packages > flytekit.configuration > `from_json()`** | |
| **Flytekit SDK > Packages > flytekit.configuration > flytekit.configuration.SerializationSettings > Methods > schema()** | |
| **Flytekit SDK > Packages > flytekit.configuration > `to_dict()`** | |
| **Flytekit SDK > Packages > flytekit.configuration > `to_json()`** | |
| **Flytekit SDK > Packages > flytekit.configuration > `validate_image()`** | Validates the image to match the standard format. |
#### auto()
```python
def auto(
config_file: typing.Union[str, ConfigFile, None],
img_name: Optional[str],
) -> ImageConfig
```
Reads from config file or from img_name
Note that this function does not take into account the flytekit default images (see the Dockerfiles at the
base of this repo). To pick those up, see the auto_default_image function..
| Parameter | Type | Description |
|-|-|-|
| `config_file` | `typing.Union[str, ConfigFile, None]` | |
| `img_name` | `Optional[str]` | :return: |
#### auto_default_image()
```python
def auto_default_image()
```
#### create_from()
```python
def create_from(
default_image: Optional[Image],
other_images: typing.Optional[typing.List[Image]],
) -> ImageConfig
```
| Parameter | Type | Description |
|-|-|-|
| `default_image` | `Optional[Image]` | |
| `other_images` | `typing.Optional[typing.List[Image]]` | |
#### find_image()
```python
def find_image(
name,
) -> Optional[Image]
```
Return an image, by name, if it exists.
| Parameter | Type | Description |
|-|-|-|
| `name` | | |
#### from_dict()
```python
def from_dict(
kvs: typing.Union[dict, list, str, int, float, bool, NoneType],
infer_missing,
) -> ~A
```
| Parameter | Type | Description |
|-|-|-|
| `kvs` | `typing.Union[dict, list, str, int, float, bool, NoneType]` | |
| `infer_missing` | | |
#### from_images()
```python
def from_images(
default_image: str,
m: typing.Optional[typing.Dict[str, str]],
)
```
Allows you to programmatically create an ImageConfig. Usually only the default_image is required, unless
your workflow uses multiple images
```python
ImageConfig.from_dict(
"ghcr.io/flyteorg/flytecookbook:v1.0.0",
{
"spark": "ghcr.io/flyteorg/myspark:...",
"other": "...",
}
)
```
urn:
| Parameter | Type | Description |
|-|-|-|
| `default_image` | `str` | |
| `m` | `typing.Optional[typing.Dict[str, str]]` | |
#### from_json()
```python
def from_json(
s: typing.Union[str, bytes, bytearray],
parse_float,
parse_int,
parse_constant,
infer_missing,
kw,
) -> ~A
```
| Parameter | Type | Description |
|-|-|-|
| `s` | `typing.Union[str, bytes, bytearray]` | |
| `parse_float` | | |
| `parse_int` | | |
| `parse_constant` | | |
| `infer_missing` | | |
| `kw` | | |
#### schema()
```python
def schema(
infer_missing: bool,
only,
exclude,
many: bool,
context,
load_only,
dump_only,
partial: bool,
unknown,
) -> SchemaType[A]
```
| Parameter | Type | Description |
|-|-|-|
| `infer_missing` | `bool` | |
| `only` | | |
| `exclude` | | |
| `many` | `bool` | |
| `context` | | |
| `load_only` | | |
| `dump_only` | | |
| `partial` | `bool` | |
| `unknown` | | |
#### to_dict()
```python
def to_dict(
encode_json,
) -> typing.Dict[str, typing.Union[dict, list, str, int, float, bool, NoneType]]
```
| Parameter | Type | Description |
|-|-|-|
| `encode_json` | | |
#### to_json()
```python
def to_json(
skipkeys: bool,
ensure_ascii: bool,
check_circular: bool,
allow_nan: bool,
indent: typing.Union[int, str, NoneType],
separators: typing.Tuple[str, str],
default: typing.Callable,
sort_keys: bool,
kw,
) -> str
```
| Parameter | Type | Description |
|-|-|-|
| `skipkeys` | `bool` | |
| `ensure_ascii` | `bool` | |
| `check_circular` | `bool` | |
| `allow_nan` | `bool` | |
| `indent` | `typing.Union[int, str, NoneType]` | |
| `separators` | `typing.Tuple[str, str]` | |
| `default` | `typing.Callable` | |
| `sort_keys` | `bool` | |
| `kw` | | |
#### validate_image()
```python
def validate_image(
_: typing.Any,
param: str,
values: tuple,
) -> ImageConfig
```
Validates the image to match the standard format. Also validates that only one default image
is provided. a default image, is one that is specified as ``default=`` or just ````. All
other images should be provided with a name, in the format ``name=`` This method can be used with the
CLI
| Parameter | Type | Description |
|-|-|-|
| `_` | `typing.Any` | click argument, ignored here. |
| `param` | `str` | the click argument, here should be "image" |
| `values` | `tuple` | user-supplied images :return: |
## flytekit.configuration.LocalConfig
Any configuration specific to local runs.
```python
class LocalConfig(
cache_enabled: bool,
cache_overwrite: bool,
)
```
| Parameter | Type | Description |
|-|-|-|
| `cache_enabled` | `bool` | |
| `cache_overwrite` | `bool` | |
### Methods
| Method | Description |
|-|-|
| **Flytekit SDK > Packages > flytekit.configuration > flytekit.configuration.TaskConfig > Methods > auto()** | |
#### auto()
```python
def auto(
config_file: typing.Union[str, ConfigFile],
) -> LocalConfig
```
| Parameter | Type | Description |
|-|-|-|
| `config_file` | `typing.Union[str, ConfigFile]` | |
## flytekit.configuration.PlatformConfig
This object contains the settings to talk to a Flyte backend (the DNS location of your Admin server basically).
```python
class PlatformConfig(
endpoint: str,
insecure: bool,
insecure_skip_verify: bool,
ca_cert_file_path: typing.Optional[str],
console_endpoint: typing.Optional[str],
command: typing.Optional[typing.List[str]],
proxy_command: typing.Optional[typing.List[str]],
client_id: typing.Optional[str],
client_credentials_secret: typing.Optional[str],
scopes: List[str],
auth_mode: AuthType,
audience: typing.Optional[str],
rpc_retries: int,
http_proxy_url: typing.Optional[str],
)
```
| Parameter | Type | Description |
|-|-|-|
| `endpoint` | `str` | |
| `insecure` | `bool` | |
| `insecure_skip_verify` | `bool` | |
| `ca_cert_file_path` | `typing.Optional[str]` | |
| `console_endpoint` | `typing.Optional[str]` | |
| `command` | `typing.Optional[typing.List[str]]` | |
| `proxy_command` | `typing.Optional[typing.List[str]]` | |
| `client_id` | `typing.Optional[str]` | |
| `client_credentials_secret` | `typing.Optional[str]` | |
| `scopes` | `List[str]` | |
| `auth_mode` | `AuthType` | |
| `audience` | `typing.Optional[str]` | |
| `rpc_retries` | `int` | |
| `http_proxy_url` | `typing.Optional[str]` | |
### Methods
| Method | Description |
|-|-|
| **Flytekit SDK > Packages > flytekit.configuration > flytekit.configuration.TaskConfig > Methods > auto()** | Reads from Config file, and overrides from Environment variables. |
| **Flytekit SDK > Packages > flytekit.configuration > `for_endpoint()`** | |
#### auto()
```python
def auto(
config_file: typing.Optional[typing.Union[str, ConfigFile]],
) -> PlatformConfig
```
Reads from Config file, and overrides from Environment variables. Refer to ConfigEntry for details
| Parameter | Type | Description |
|-|-|-|
| `config_file` | `typing.Optional[typing.Union[str, ConfigFile]]` | :return: |
#### for_endpoint()
```python
def for_endpoint(
endpoint: str,
insecure: bool,
) -> PlatformConfig
```
| Parameter | Type | Description |
|-|-|-|
| `endpoint` | `str` | |
| `insecure` | `bool` | |
## flytekit.configuration.S3Config
S3 specific configuration
```python
class S3Config(
enable_debug: bool,
endpoint: typing.Optional[str],
retries: int,
backoff: datetime.timedelta,
access_key_id: typing.Optional[str],
secret_access_key: typing.Optional[str],
)
```
| Parameter | Type | Description |
|-|-|-|
| `enable_debug` | `bool` | |
| `endpoint` | `typing.Optional[str]` | |
| `retries` | `int` | |
| `backoff` | `datetime.timedelta` | |
| `access_key_id` | `typing.Optional[str]` | |
| `secret_access_key` | `typing.Optional[str]` | |
### Methods
| Method | Description |
|-|-|
| **Flytekit SDK > Packages > flytekit.configuration > flytekit.configuration.TaskConfig > Methods > auto()** | Automatically configure. |
#### auto()
```python
def auto(
config_file: typing.Union[str, ConfigFile],
) -> S3Config
```
Automatically configure
| Parameter | Type | Description |
|-|-|-|
| `config_file` | `typing.Union[str, ConfigFile]` | :return: Config |
## flytekit.configuration.SecretsConfig
Configuration for secrets.
```python
class SecretsConfig(
env_prefix: str,
default_dir: str,
file_prefix: str,
)
```
| Parameter | Type | Description |
|-|-|-|
| `env_prefix` | `str` | |
| `default_dir` | `str` | |
| `file_prefix` | `str` | |
### Methods
| Method | Description |
|-|-|
| **Flytekit SDK > Packages > flytekit.configuration > flytekit.configuration.TaskConfig > Methods > auto()** | Reads from environment variable or from config file. |
#### auto()
```python
def auto(
config_file: typing.Union[str, ConfigFile],
) -> SecretsConfig
```
Reads from environment variable or from config file
| Parameter | Type | Description |
|-|-|-|
| `config_file` | `typing.Union[str, ConfigFile]` | :return: |
## flytekit.configuration.SerializationSettings
These settings are provided while serializing a workflow and task, before registration. This is required to get
runtime information at serialization time, as well as some defaults.
Attributes:
project (str): The project (if any) with which to register entities under.
domain (str): The domain (if any) with which to register entities under.
version (str): The version (if any) with which to register entities under.
image_config (ImageConfig): The image config used to define task container images.
env (Optional[Dict[str, str]]): Environment variables injected into task container definitions.
default_resources (Optional[ResourceSpec]): The resources to request for the task - this is useful
if users need to override the default resource spec of an entity at registration time.
flytekit_virtualenv_root (Optional[str]): During out of container serialize the absolute path of the flytekit
virtualenv at serialization time won't match the in-container value at execution time. This optional value
is used to provide the in-container virtualenv path
python_interpreter (Optional[str]): The python executable to use. This is used for spark tasks in out of
container execution.
entrypoint_settings (Optional[EntrypointSettings]): Information about the command, path and version of the
entrypoint program.
fast_serialization_settings (Optional[FastSerializationSettings]): If the code is being serialized so that it
can be fast registered (and thus omit building a Docker image) this object contains additional parameters
for serialization.
source_root (Optional[str]): The root directory of the source code.
```python
class SerializationSettings(
image_config: ImageConfig,
project: typing.Optional[str],
domain: typing.Optional[str],
version: typing.Optional[str],
env: Optional[Dict[str, str]],
default_resources: Optional[ResourceSpec],
git_repo: Optional[str],
python_interpreter: str,
flytekit_virtualenv_root: Optional[str],
fast_serialization_settings: Optional[FastSerializationSettings],
source_root: Optional[str],
)
```
| Parameter | Type | Description |
|-|-|-|
| `image_config` | `ImageConfig` | |
| `project` | `typing.Optional[str]` | |
| `domain` | `typing.Optional[str]` | |
| `version` | `typing.Optional[str]` | |
| `env` | `Optional[Dict[str, str]]` | |
| `default_resources` | `Optional[ResourceSpec]` | |
| `git_repo` | `Optional[str]` | |
| `python_interpreter` | `str` | |
| `flytekit_virtualenv_root` | `Optional[str]` | |
| `fast_serialization_settings` | `Optional[FastSerializationSettings]` | |
| `source_root` | `Optional[str]` | |
### Methods
| Method | Description |
|-|-|
| **Flytekit SDK > Packages > flytekit.configuration > `default_entrypoint_settings()`** | Assumes the entrypoint is installed in a virtual-environment where the interpreter is. |
| **Flytekit SDK > Packages > flytekit.configuration > `for_image()`** | |
| **Flytekit SDK > Packages > flytekit.configuration > `from_dict()`** | |
| **Flytekit SDK > Packages > flytekit.configuration > `from_json()`** | |
| **Flytekit SDK > Packages > flytekit.configuration > `from_transport()`** | |
| **Flytekit SDK > Packages > flytekit.configuration > `new_builder()`** | Creates a ``SerializationSettings. |
| **Flytekit SDK > Packages > flytekit.configuration > flytekit.configuration.SerializationSettings > Methods > schema()** | |
| **Flytekit SDK > Packages > flytekit.configuration > `should_fast_serialize()`** | Whether or not the serialization settings specify that entities should be serialized for fast registration. |
| **Flytekit SDK > Packages > flytekit.configuration > `to_dict()`** | |
| **Flytekit SDK > Packages > flytekit.configuration > `to_json()`** | |
| **Flytekit SDK > Packages > flytekit.configuration > `venv_root_from_interpreter()`** | Computes the path of the virtual environment root, based on the passed in python interpreter path. |
| **Flytekit SDK > Packages > flytekit.configuration > `with_serialized_context()`** | Use this method to create a new SerializationSettings that has an environment variable set with the SerializedContext. |
#### default_entrypoint_settings()
```python
def default_entrypoint_settings(
interpreter_path: str,
) -> EntrypointSettings
```
Assumes the entrypoint is installed in a virtual-environment where the interpreter is
| Parameter | Type | Description |
|-|-|-|
| `interpreter_path` | `str` | |
#### for_image()
```python
def for_image(
image: str,
version: str,
project: str,
domain: str,
python_interpreter_path: str,
) -> SerializationSettings
```
| Parameter | Type | Description |
|-|-|-|
| `image` | `str` | |
| `version` | `str` | |
| `project` | `str` | |
| `domain` | `str` | |
| `python_interpreter_path` | `str` | |
#### from_dict()
```python
def from_dict(
kvs: typing.Union[dict, list, str, int, float, bool, NoneType],
infer_missing,
) -> ~A
```
| Parameter | Type | Description |
|-|-|-|
| `kvs` | `typing.Union[dict, list, str, int, float, bool, NoneType]` | |
| `infer_missing` | | |
#### from_json()
```python
def from_json(
s: typing.Union[str, bytes, bytearray],
parse_float,
parse_int,
parse_constant,
infer_missing,
kw,
) -> ~A
```
| Parameter | Type | Description |
|-|-|-|
| `s` | `typing.Union[str, bytes, bytearray]` | |
| `parse_float` | | |
| `parse_int` | | |
| `parse_constant` | | |
| `infer_missing` | | |
| `kw` | | |
#### from_transport()
```python
def from_transport(
s: str,
) -> SerializationSettings
```
| Parameter | Type | Description |
|-|-|-|
| `s` | `str` | |
#### new_builder()
```python
def new_builder()
```
Creates a ``SerializationSettings.Builder`` that copies the existing serialization settings parameters and
allows for customization.
#### schema()
```python
def schema(
infer_missing: bool,
only,
exclude,
many: bool,
context,
load_only,
dump_only,
partial: bool,
unknown,
) -> SchemaType[A]
```
| Parameter | Type | Description |
|-|-|-|
| `infer_missing` | `bool` | |
| `only` | | |
| `exclude` | | |
| `many` | `bool` | |
| `context` | | |
| `load_only` | | |
| `dump_only` | | |
| `partial` | `bool` | |
| `unknown` | | |
#### should_fast_serialize()
```python
def should_fast_serialize()
```
Whether or not the serialization settings specify that entities should be serialized for fast registration.
#### to_dict()
```python
def to_dict(
encode_json,
) -> typing.Dict[str, typing.Union[dict, list, str, int, float, bool, NoneType]]
```
| Parameter | Type | Description |
|-|-|-|
| `encode_json` | | |
#### to_json()
```python
def to_json(
skipkeys: bool,
ensure_ascii: bool,
check_circular: bool,
allow_nan: bool,
indent: typing.Union[int, str, NoneType],
separators: typing.Tuple[str, str],
default: typing.Callable,
sort_keys: bool,
kw,
) -> str
```
| Parameter | Type | Description |
|-|-|-|
| `skipkeys` | `bool` | |
| `ensure_ascii` | `bool` | |
| `check_circular` | `bool` | |
| `allow_nan` | `bool` | |
| `indent` | `typing.Union[int, str, NoneType]` | |
| `separators` | `typing.Tuple[str, str]` | |
| `default` | `typing.Callable` | |
| `sort_keys` | `bool` | |
| `kw` | | |
#### venv_root_from_interpreter()
```python
def venv_root_from_interpreter(
interpreter_path: str,
) -> str
```
Computes the path of the virtual environment root, based on the passed in python interpreter path
for example /opt/venv/bin/python3 -> /opt/venv
| Parameter | Type | Description |
|-|-|-|
| `interpreter_path` | `str` | |
#### with_serialized_context()
```python
def with_serialized_context()
```
Use this method to create a new SerializationSettings that has an environment variable set with the SerializedContext
This is useful in transporting SerializedContext to serialized and registered tasks.
The setting will be available in the `env` field with the key `SERIALIZED_CONTEXT_ENV_VAR`
:return: A newly constructed SerializationSettings, or self, if it already has the serializationSettings
### Properties
| Property | Type | Description |
|-|-|-|
| `entrypoint_settings` | | |
| `serialized_context` | | :return: returns the serialization context as a base64encoded, gzip compressed, json strinnn |
## flytekit.configuration.StatsConfig
Configuration for sending statsd.
```python
class StatsConfig(
host: str,
port: int,
disabled: bool,
disabled_tags: bool,
)
```
| Parameter | Type | Description |
|-|-|-|
| `host` | `str` | |
| `port` | `int` | |
| `disabled` | `bool` | |
| `disabled_tags` | `bool` | |
### Methods
| Method | Description |
|-|-|
| **Flytekit SDK > Packages > flytekit.configuration > flytekit.configuration.TaskConfig > Methods > auto()** | Reads from environment variable, followed by ConfigFile provided. |
#### auto()
```python
def auto(
config_file: typing.Union[str, ConfigFile],
) -> StatsConfig
```
Reads from environment variable, followed by ConfigFile provided
| Parameter | Type | Description |
|-|-|-|
| `config_file` | `typing.Union[str, ConfigFile]` | :return: |
## flytekit.configuration.TaskConfig
Any Project/Domain/Org configuration.
```python
class TaskConfig(
project: Optional[str],
domain: Optional[str],
org: Optional[str],
)
```
| Parameter | Type | Description |
|-|-|-|
| `project` | `Optional[str]` | |
| `domain` | `Optional[str]` | |
| `org` | `Optional[str]` | |
### Methods
| Method | Description |
|-|-|
| **Flytekit SDK > Packages > flytekit.configuration > flytekit.configuration.TaskConfig > Methods > auto()** | |
#### auto()
```python
def auto(
config_file: typing.Union[str, ConfigFile],
) -> TaskConfig
```
| Parameter | Type | Description |
|-|-|-|
| `config_file` | `typing.Union[str, ConfigFile]` | |
=== PAGE: https://www.union.ai/docs/v1/serverless/api-reference/flytekit-sdk/packages/flytekit.configuration ===
# flytekit.configuration
# Configuration
## Flytekit Configuration Sources
There are multiple ways to configure flytekit settings:
### Command Line Arguments
This is the recommended way of setting configuration values for many cases. For example, see `pyflyte package` command.
### Python Config Object
A `Config` object can be used directly, e.g. when initializing a `FlyteRemote` object. See the Control Plane design docs for examples on how to specify a `Config` object.
### Environment Variables
Users can specify these at compile time, but when your task is run, Flyte Propeller will also set configuration to ensure correct interaction with the platform. The environment variables must be specified with the format `FLYTE_{SECTION}_{OPTION}`, all in upper case. For example, to specify the `PlatformConfig.endpoint` setting, the environment variable would be `FLYTE_PLATFORM_URL`.
> [!NOTE]
> Environment variables won't work for image configuration, which need to be specified with the `pyflyte package --image ...` option or in a configuration file.
### YAML Format Configuration File
A configuration file that contains settings for both `flytectl` and `flytekit`. This is the recommended configuration file format. Invoke the `flytectl config init` command to create a boilerplate `~/.flyte/config.yaml` file, and `flytectl --help` to learn about all of the configuration yaml options.
Example `config.yaml` file:
```YAML
# Sample config file
admin:
# For GRPC endpoints you might want to use dns:///flyte.myexample.com
endpoint: dns:///localhost:8089
authType: Pkce
insecure: true
logger:
show-source: true
level: 0
console:
endpoint: http://localhost:8080
insecure: true
# This section is used only in the control plane to trigger a remote execution
storage:
type: minio
stow:
kind: s3
config:
auth_type: accesskey
access_key_id: minio
secret_key: miniostorage
endpoint: http://localhost:9000
region: us-east-1
disable_ssl: true
addressing_style: "path"
```
### INI Format Configuration File
A configuration file for `flytekit`. By default, `flytekit` will look for a file in two places:
1. First, a file named `flytekit.config` in the Python interpreter's working directory.
2. A file in `~/.flyte/config` in the home directory as detected by Python.
Example `flytekit.config` file:
```ini
[sdk]
workflow_packages=my_cool_workflows, other_workflows
```
> [!WARNING]
> The INI format configuration is considered a legacy configuration format. We recommend using the yaml format instead if you're using a configuration file.
## How is configuration used?
Configuration usage can roughly be bucketed into the following areas:
- **Compile-time settings**: these are settings like the default image and named images, where to look for Flyte code, etc.
- **Platform settings**: Where to find the Flyte backend (Admin DNS, whether to use SSL)
- **Registration Run-time settings**: these are things like the K8s service account to use, a specific S3/GCS bucket to write off-loaded data (dataframes and files) to, notifications, labels & annotations, etc.
- **Data access settings**: Is there a custom S3 endpoint in use? Backoff/retry behavior for accessing S3/GCS, key and password, etc.
- **Other settings** - Statsd configuration, which is a run-time applicable setting but is not necessarily relevant to the Flyte platform.
## Configuration Objects
The following objects are encapsulated in a parent object called `Config`:
### Serialization Time Settings
These are serialization/compile-time settings that are used when using commands like `pyflyte package` or `pyflyte register`. These configuration settings are typically passed in as flags to the above CLI commands.
The image configurations are typically either passed in via an `--image` flag, or can be specified in the `yaml` or `ini` configuration files (see examples above).
- **Image**: Represents a container image with optional configuration overrides.
- **ImageConfig**: Represents an image configuration for a given project/domain combination.
- **SerializationSettings**: Controls how to serialize Flyte entities when registering with Admin.
- **FastSerializationSettings**: Configuration for faster serialization settings.
### Execution Time Settings
Users typically shouldn't be concerned with these configurations, as they are typically set by FlytePropeller or FlyteAdmin. The configurations below are useful for authenticating to a Flyte backend, configuring data access credentials, secrets, and statsd metrics.
- **PlatformConfig**: Configuration for how to connect to the Flyte platform.
- **StatsConfig**: Configuration for how to emit statsd metrics.
- **SecretsConfig**: Configuration for how to access secrets.
- **S3Config**: Amazon S3 specific configuration.
- **GCSConfig**: Google Cloud Storage specific configuration.
- **DataConfig**: Configuration for data access.
## Directory
### Classes
| Class | Description |
|-|-|
| [`AuthType`](.././flytekit.configuration#flytekitconfigurationauthtype) | Create a collection of name/value pairs. |
| [`AzureBlobStorageConfig`](.././flytekit.configuration#flytekitconfigurationazureblobstorageconfig) | Any Azure Blob Storage specific configuration. |
| [`Config`](.././flytekit.configuration#flytekitconfigurationconfig) | This the parent configuration object and holds all the underlying configuration object types. |
| [`DataConfig`](.././flytekit.configuration#flytekitconfigurationdataconfig) | Any data storage specific configuration. |
| [`EntrypointSettings`](.././flytekit.configuration#flytekitconfigurationentrypointsettings) | This object carries information about the path of the entrypoint command that will be invoked at runtime. |
| [`FastSerializationSettings`](.././flytekit.configuration#flytekitconfigurationfastserializationsettings) | This object hold information about settings necessary to serialize an object so that it can be fast-registered. |
| [`GCSConfig`](.././flytekit.configuration#flytekitconfigurationgcsconfig) | Any GCS specific configuration. |
| [`GenericPersistenceConfig`](.././flytekit.configuration#flytekitconfigurationgenericpersistenceconfig) | Data storage configuration that applies across any provider. |
| [`Image`](.././flytekit.configuration#flytekitconfigurationimage) | Image is a structured wrapper for task container images used in object serialization. |
| [`ImageConfig`](.././flytekit.configuration#flytekitconfigurationimageconfig) | We recommend you to use ImageConfig. |
| [`LocalConfig`](.././flytekit.configuration#flytekitconfigurationlocalconfig) | Any configuration specific to local runs. |
| [`PlatformConfig`](.././flytekit.configuration#flytekitconfigurationplatformconfig) | This object contains the settings to talk to a Flyte backend (the DNS location of your Admin server basically). |
| [`S3Config`](.././flytekit.configuration#flytekitconfigurations3config) | S3 specific configuration. |
| [`SecretsConfig`](.././flytekit.configuration#flytekitconfigurationsecretsconfig) | Configuration for secrets. |
| [`SerializationSettings`](.././flytekit.configuration#flytekitconfigurationserializationsettings) | These settings are provided while serializing a workflow and task, before registration. |
| [`StatsConfig`](.././flytekit.configuration#flytekitconfigurationstatsconfig) | Configuration for sending statsd. |
| [`TaskConfig`](.././flytekit.configuration#flytekitconfigurationtaskconfig) | Any Project/Domain/Org configuration. |
### Variables
| Property | Type | Description |
|-|-|-|
| `DEFAULT_FLYTEKIT_ENTRYPOINT_FILELOC` | `str` | |
| `DEFAULT_IMAGE_NAME` | `str` | |
| `DEFAULT_IN_CONTAINER_SRC_PATH` | `str` | |
| `DEFAULT_RUNTIME_PYTHON_INTERPRETER` | `str` | |
| `DOMAIN_PLACEHOLDER` | `str` | |
| `PROJECT_PLACEHOLDER` | `str` | |
| `SERIALIZED_CONTEXT_ENV_VAR` | `str` | |
| `VERSION_PLACEHOLDER` | `str` | |
## flytekit.configuration.AuthType
Create a collection of name/value pairs.
Example enumeration:
>>> class Color(Enum):
... RED = 1
... BLUE = 2
... GREEN = 3
Access them by:
- attribute access:
>>> Color.RED
- value lookup:
>>> Color(1)
- name lookup:
>>> Color['RED']