# Platform configuration
> This bundle contains all pages in the Platform configuration section.
> Source: https://www.union.ai/docs/v1/flyte/deployment/flyte-configuration/
=== PAGE: https://www.union.ai/docs/v1/flyte/deployment/flyte-configuration ===
# Platform configuration
> **📝 Note**
>
> An LLM-optimized bundle of this entire section is available at [`section.md`](section.md).
> This single file contains all pages in this section, optimized for AI coding agent context.
This section covers configuring Flyte for deeper integrations with existing infrastructure.
=== PAGE: https://www.union.ai/docs/v1/flyte/deployment/flyte-configuration/configuring-authentication ===
# Configuring authentication
The Flyte platform consists of multiple components. Securing communication between each component is crucial to ensure
the integrity of the overall system.
Flyte supports most of the [OAuth2.0](https://tools.ietf.org/html/rfc6749) authorization grants and use them to control access to workflow and task executions as the main protected resources.
Additionally, Flyte implements the [OIDC1.0](https://openid.net/specs/openid-connect-core-1_0.html) standard to attach user identity to the authorization flow. This feature requires integration with an external Identity Provider.
The following diagram illustrates how the elements of the OAuth2.0 protocol map to the Flyte components involved in the authentication process:
```mermaid
sequenceDiagram
participant Client (CLI/UI/system) as Client (CLI/UI/system)
participant flytepropeller as Resource Server + Owner
(flytepropeller)
participant flyteadmin/external IdP as Authorization Server
(flyteadmin/external IdP)
Client (CLI/UI/system) ->>+ flytepropeller: Authorization request
flytepropeller ->>+ flyteadmin/external IdP: Request authorization grant
flyteadmin/external IdP ->> flytepropeller: Issue authorization grant
flytepropeller ->> Client (CLI/UI/system): Authorization grant
Client (CLI/UI/system) ->> flyteadmin/external IdP: Authorization grant
flyteadmin/external IdP ->> Client (CLI/UI/system): Access token
Client (CLI/UI/system) ->> flytepropeller: Access token
flytepropeller ->> Client (CLI/UI/system): Protected resource
```
There are two main dependencies required for a complete auth flow in Flyte:
* **OIDC (Identity Layer) configuration** The OIDC protocol allows clients (such as Flyte) to confirm the identity of a user, based on authentication done by an Authorization Server.
To enable this, you first need to register Flyte as an app (client) with your chosen Identity Provider (IdP).
* **An authorization server** The authorization server job is to issue access tokens to clients for them to access the protected resources.
Flyte ships with two options for the authorization server:
* **Internal authorization server**: It's part of `flyteadmin` and is a suitable choice for quick start or testing purposes.
* **External (custom) authorization server**: This is a service provided by one of the supported IdPs and is the recommended option if your organization needs to retain control over scope definitions, token expiration policies and other advanced security controls.
> [!NOTE]
> Regardless of the type of authorization server to use, you will still need an IdP to provide identity through OIDC.
## Configuring the identity layer
### Prerequisites
* A public domain name (e.g. example.foobar.com)
* A DNS entry mapping the Fully Qualified Domain Name to the Ingress `host`.
> [!NOTE]
> Checkout this [community-maintained guide](https://github.com/davidmirror-ops/flyte-the-hard-way/blob/main/docs/06-intro-to-ingress.md) for more information about setting up Flyte in production, including Ingress.
### Configuring your IdP for OIDC
In this section, you can find canonical examples of how to set up OIDC on some of the supported IdPs; enabling users to authenticate in the
browser.
> [!NOTE]
> Using the following configurations as a reference, the community has succesfully configured auth with other IdPs as Flyte implements open standards.
#### Google
1. Create an OAuth2 Client Credential following the [official documentation](https://developers.google.com/identity/protocols/oauth2/openid-connect) and take note of the `client_id` and `client_secret`
2. In the **Authorized redirect URIs** field, add `http://localhost:30081/callback` for **sandbox** deployments or `https:///callback` for other deployment methods.
#### Okta
1. If you don't already have an Okta account, [sign up for one](https://developer.okta.com/signup/).
2. Create an app integration, with `OIDC - OpenID Connect` as the sign-on method and `Web Application` as the app type.
3. Add sign-in redirect URIs: `http://localhost:30081/callback` for sandbox or `https:///callback` for other Flyte deployment types.
4. *Optional* - Add logout redirect URIs: `http://localhost:30081/logout` for sandbox, `https:///callback` for other Flyte deployment methods.
5. Take note of the Client ID and Client Secret.
#### Keycloak
1. Create a realm using the [admin console](https://wjw465150.gitbooks.io/keycloak-documentation/content/server_admin/topics/realms/create.html).
2. [Create an OIDC client with client secret](https://wjw465150.gitbooks.io/keycloak-documentation/content/server_admin/topics/clients/client-oidc.html) and note them down.
3. Add Login redirect URIs: `http://localhost:30081/callback` for sandbox or `https:///callback` for other Flyte deployment methods.
#### Microsoft Entra ID
1. In the Azure portal, open Microsoft Entra ID from the left-hand menu.
2. From the Overview section, navigate to **App registrations** > **+ New registration**.
* Under Supported account types, select the option based on your organization's needs.
3. Configure Redirect URIs
* In the Redirect URI section, choose **Web** from the **Platform** dropdown and enter the following URIs based on your environment:
* Sandbox: `http://localhost:30081/callback`
* Production: `https:///callback`
4. Obtain Tenant and Client Information
* After registration, go to the app's Overview page.
* Take note of the Application (client) ID and Directory (tenant) ID. You’ll need these in your Flyte configuration.
5. Create a Client Secret
* From the Certificates & Secrets tab, click + New client secret.
* Add a Description and set an Expiration period (e.g., 6 months or 12 months).
* Click Add and copy the Value of the client secret; it will be used in the Helm values.
6. If the Flyte deployment will be dealing with user data, set API permissions:
* Navigate to **API Permissions > + Add a permission**, select **Microsoft Graph > Delegated permissions**, and add the following permissions:
* `email`
* `openid`
* `profile`
* `offline_access`
* `User.Read`
7. Expose an API (for Custom Scopes). In the Expose an API tab:
* Click + Add a scope, and set the Scope name (e.g., access_flyte).
* Provide a Consent description and enable Admin consent required and Save.
* Then, click + Add a client application and enter the Client ID of your Flyte application.
8. Configure Mobile/Desktop Flow (for flytectl):
* Go to the Authentication tab, and click + Add a platform.
* Select Mobile and desktop applications.
* Add following URI: `http://localhost:53593/callback`
* Scroll down to Advanced settings and enable Allow public client flows.
For further reference, check out the official [Entra ID Docs](https://docs.microsoft.com/en-us/power-apps/maker/portals/configure/configure-openid-settings) on how to configure the IdP for OpenIDConnect.
> Make sure the app is registered without [additional claims](https://docs.microsoft.com/en-us/power-apps/maker/portals/configure/configure-openid-settings#configure-additional-claims).
> **The OpenIDConnect authentication will not work otherwise**.
> Please refer to [this GitHub Issue](https://github.com/coreos/go-oidc/issues/215) and [Entra ID Docs](https://docs.microsoft.com/en-us/azure/active-directory/develop/v2-protocols-oidc#sample-response) for more information.
### Apply the OIDC configuration to the Flyte backend
Select the Helm chart you used to install Flyte:
#### flyte-binary
1. Generate a random password to be used internally by `flytepropeller`
2. Use the following command to hash the password:
```shell
$ pip install bcrypt && python -c 'import bcrypt; import base64; print(base64.b64encode(bcrypt.hashpw("".encode("utf-8"), bcrypt.gensalt(6))))'
```
3. Go to your values file and locate the `auth` section and replace values accordingly:
```yaml
auth:
enabled: true
oidc:
# baseUrl: https://accounts.google.com # Uncomment for Google
# baseUrl: https:///auth/realms/ # Uncomment for Keycloak and update with your installation host and realm name
# baseUrl: https://login.microsoftonline.com//v2.0 # Uncomment for Azure AD
# For Okta use the Issuer URI from Okta's default auth server
baseUrl: https://dev-.okta.com/oauth2/default
# Replace with the client ID and secret created for Flyte in your IdP
clientId:
clientSecret:
internal:
clientSecret: ''
# Use the output of step #2 (only the content inside of '')
clientSecretHash:
authorizedUris:
- https://
```
4. Save your changes
5. Upgrade your Helm release with the new values:
```shell
$ helm upgrade flyteorg/flyte-binary -n --values .yaml
```
Where `` is the name of your Helm release, typically `flyte-backend`. You can find it using `helm ls -n `
6. Verify that your Flyte deployment now requires successful login to your IdP to access the UI (`https:///console`)
#### flyte-core
1. Generate a random password to be used internally by `flytepropeller`
2. Use the following command to hash the password:
```shell
$ pip install bcrypt && python -c 'import bcrypt; import base64; print(base64.b64encode(bcrypt.hashpw("".encode("utf-8"), bcrypt.gensalt(6))))'
```
Take note of the output (only the contents inside `''`).
3. Go to your Helm values file and add the client_secret provided by your IdP to the configuration:
```yaml
flyteadmin:
secrets:
oidc_client_secret:
```
4. Verify that the `configmap` section include the following, replacing the content where indicated:
```yaml
configmap:
adminServer:
server:
httpPort: 8088
grpc:
port: 8089
security:
secure: false
useAuth: true
allowCors: true
allowedOrigins:
# Accepting all domains for Sandbox installation
- "*"
allowedHeaders:
- "Content-Type"
auth:
appAuth:
thirdPartyConfig:
flyteClient:
clientId: flytectl
redirectUri: http://localhost:53593/callback
scopes:
- offline
- all
selfAuthServer:
staticClients:
flyte-cli:
id: flyte-cli
redirect_uris:
- http://localhost:53593/callback
- http://localhost:12345/callback
grant_types:
- refresh_token
- authorization_code
response_types:
- code
- token
scopes:
- all
- offline
- access_token
public: true
flytectl:
id: flytectl
redirect_uris:
- http://localhost:53593/callback
- http://localhost:12345/callback
grant_types:
- refresh_token
- authorization_code
response_types:
- code
- token
scopes:
- all
- offline
- access_token
public: true
flytepropeller:
id: flytepropeller
# Use the bcrypt hash generated for your random password
client_secret: ""
redirect_uris:
- http://localhost:3846/callback
grant_types:
- refresh_token
- client_credentials
response_types:
- token
scopes:
- all
- offline
- access_token
public: false
authorizedUris:
# Use the public URL of flyteadmin (a DNS record pointing to your Ingress resource)
- https://
- http://flyteadmin:80
- http://flyteadmin.flyte.svc.cluster.local:80
userAuth:
openId:
# baseUrl: https://accounts.google.com # Uncomment for Google
# baseUrl: https://login.microsoftonline.com//v2.0 # Uncomment for Azure AD
# For Okta, use the Issuer URI of the default auth server
baseUrl: https://dev-.okta.com/oauth2/default
# Use the client ID generated by your IdP
clientId:
scopes:
- profile
- openid
```
5. Additionally, at the root of the values file, add the following block and replace the necessary information:
```yaml
secrets:
adminOauthClientCredentials:
# If enabled is true, and `clientSecret` is specified, helm will create and mount `flyte-secret-auth`.
# If enabled is true, and `clientSecret` is null, it's up to the user to create `flyte-secret-auth` as described in
# https://docs.flyte.org/en/latest/deployment/cluster_config/auth_setup.html#oauth2-authorization-server
# and helm will mount `flyte-secret-auth`.
# If enabled is false, auth is not turned on.
# Note: Unsupported combination: enabled.false and clientSecret.someValue
enabled: true
# Use the non-encoded version of the random password
clientSecret: ""
clientId: flytepropeller
```
> For [multi-cluster deployments](../multi-cluster.md) you must add this Secret definition block to the `values-dataplane.yaml` file. If you are not running `flytepropeller` in the control plane cluster, you do not need to create this secret there.
6. Save and exit your editor.
7. Upgrade your Helm release with the new configuration:
```shell
$ helm upgrade flyteorg/flyte-binary -n --values .yaml
```
8. Verify that the `flytepropeller`, `flytescheduler` and `flyteadmin` Pods are restarted and running:
```bash
kubectl get pods -n flyte
```
**Congratulations!**
It should now be possible to go to Flyte UI and be prompted for authentication with the default `PKCE` auth flow. Flytectl should automatically pickup the change and start prompting for authentication as well.
The following sections guide you to configure an external auth server (optional for most authorization flows) and describe the client-side configuration for all the auth flows supported by Flyte.
## Configuring your IdP as an External Authorization Server
In this section, you will find instructions on how to setup an OAuth2 Authorization Server in the different IdPs supported by Flyte:
### Okta
Okta's custom authorization servers are available through an add-on license. The free developer accounts do include access, which you can use to test before rolling out the configuration more broadly.
1. From the left-hand menu, go to **Security** > **API**
2. Click on **Add Authorization Server**.
3. Assign an informative name and set the audience to the public URL of FlyteAdmin (e.g. https://example.foobar.com). The audience must exactly match one of the URIs in the `authorizedUris` section above.
4. Note down the **Issuer URI**; this will be used for all the `baseUrl` settings in the Flyte config.
5. Go to **Scopes** and click **Add Scope**.
6. Set the name to `all` (required) and check `Required` under the **User consent** option.
7. Uncheck the **Block services from requesting this scope** option and save your changes.
8. Add another scope, named `offline`. Check both the **Required** and **Include in public metadata** options.
9. Uncheck the **Block services from requesting this scope** option.
10. Click **Save**.
11. Go to **Access Policies**, click **Add New Access Policy**. Enter a name and description and enable **Assign to** - `All clients`.
12. Add a rule to the policy with the default settings (you can fine-tune these later).
13. Navigate back to the **Applications** section.
14. Create an integration for `flytectl`; it should be created with the **OIDC - OpenID Connect** sign-on method, and the **Native Application** type.
15. Add `http://localhost:53593/callback` to the sign-in redirect URIs. The other options can remain as default.
16. Assign this integration to any Okta users or groups who should be able to use the `flytectl` tool.
17. Note down the **Client ID**; there will not be a secret.
18. Create an integration for `flytepropeller`; it should be created with the **OIDC - OpenID Connect** sign-on method and **Web Application** type.
19. Check the `Client Credentials` option under **Client acting on behalf of itself**.
20. This app does not need a specific redirect URI; nor does it need to be assigned to any users.
21. Note down the **Client ID** and **Client secret**; you will need these later.
22. Take note of the **Issuer URI** for your Authorization Server. It will be used as the baseURL parameter in the Helm chart
You should have three integrations total - one for the web interface (`flyteconsole`), one for `flytectl`, and one for `flytepropeller`.
### Keycloak
1. Create a realm in keycloak installation using its [admin console](https://wjw465150.gitbooks.io/keycloak-documentation/content/server_admin/topics/realms/create.html).
2. Under `Client Scopes`, click `Add Create` inside the admin console.
3. Create two clients (for `flytectl` and `flytepropeller`) to enable these clients to communicate with the service.
4. `flytectl` should be created with `Access Type Public` and standard flow enabled.
5. `flytePropeller` should be created as an `Access Type Confidential`, enabling the standard flow
6. Take note of the client ID and client Secrets provided.
### Microsoft Entra ID
1. Navigate to tab **Overview**, obtain `` and ``
2. Navigate to tab **Authentication**, click `+Add a platform`
3. Add **Web** for flyteconsole and flytepropeller, **Mobile and desktop applications** for flytectl.
4. Add URL `https:///callback` as the callback for Web
5. Add URL `http://localhost:53593/callback` as the callback for flytectl
6. In **Advanced settings**, set `Enable the following mobile and desktop flows` to **Yes** to enable deviceflow
7. Navigate to tab **Certificates & secrets**, click `+New client secret` to create ``
8. Navigate to tab **Token configuration**, click `+Add optional claim` and create email claims for both ID and Access Token
9. Navigate to tab **API permissions**, add `email`, `offline_access`, `openid`, `profile`, `User.Read`
10. Navigate to tab **Expose an API**, Click `+Add a scope` and `+Add a client application` to create ``.
### Apply the external auth server configuration to Flyte
Follow the steps in this section to configure `flyteadmin` to use an external auth server. This section assumes that you have already completed and applied the configuration for the OIDC Identity Layer.
#### flyte-binary
1. Go to the values YAML file you used to install Flyte
2. Find the `auth` section and follow the inline comments to insert your configuration:
```yaml
auth:
enabled: true
oidc:
# baseUrl: https:///auth/realms/ # Uncomment for Keycloak and update with your installation host and realm name
# baseUrl: https://login.microsoftonline.com//v2.0 # Uncomment for Azure AD
# For Okta, use the Issuer URI of the custom auth server:
baseUrl: https://dev-.okta.com/oauth2/
# Use the client ID and secret generated by your IdP for the first OIDC registration in the "Identity Management layer : OIDC" section of this guide
clientId:
clientSecret:
internal:
# Use the clientID generated by your IdP for the flytepropeller app registration
clientId:
#Use the secret generated by your IdP for flytepropeller
clientSecret: ''
# Use the bcrypt hash for the clientSecret
clientSecretHash: <-flytepropeller-secret-bcrypt-hash>
authorizedUris:
# Use here the exact same value used for 'audience' when the Authorization server was configured
- https://
```
3. Find the `inline` section of the values file and add the following content, replacing where needed:
```yaml
inline:
auth:
appAuth:
authServerType: External
externalAuthServer:
# baseUrl: https:///auth/realms/ # Uncomment for Keycloak and update with your installation host and realm name
# baseUrl: https://login.microsoftonline.com//v2.0 # Uncomment for Azure AD
# For Okta, use the Issuer URI of the custom auth server:
baseUrl: https://dev-.okta.com/oauth2/
metadataUrl: .well-known/oauth-authorization-server
thirdPartyConfig:
flyteClient:
# Use the clientID generated by your IdP for the `flytectl` app registration
clientId:
redirectUri: http://localhost:53593/callback
scopes:
- offline
- all
userAuth:
openId:
# baseUrl: https:///auth/realms/ # Uncomment for Keycloak and update with your installation host and realm name
# baseUrl: https://login.microsoftonline.com//v2.0 # Uncomment for Azure AD
# For Okta, use the Issuer URI of the custom auth server:
baseUrl: https://dev-.okta.com/oauth2/
scopes:
- profile
- openid
# - offline_access # Uncomment if your IdP supports issuing refresh tokens (optional)
# Use the client ID and secret generated by your IdP for the first OIDC registration in the "Identity Management layer : OIDC" section of this guide
clientId:
```
4. Save your changes
5. Upgrade your Helm release with the new configuration:
```bash
helm upgrade flyteorg/flyte-core -n --values .yaml
```
#### flyte-core
1. Find the `auth` section in your Helm values file, and replace the necessary data:
> If you were previously using the internal auth server, make sure to delete all the `selfAuthServer` section from your values file
```yaml
configmap:
adminServer:
auth:
appAuth:
authServerType: External
# 2. Optional: Set external auth server baseUrl if different from OpenId baseUrl.
externalAuthServer:
# Replace this with your deployment URL. It will be used by flyteadmin to validate the token audience
allowedAudience: https://
# baseUrl: https:///auth/realms/ # Uncomment for Keycloak and update with your installation host and realm name
# baseUrl: https://login.microsoftonline.com//v2.0 # Uncomment for Azure AD
# For Okta, use the Issuer URI of the custom auth server:
baseUrl: https://dev-.okta.com/oauth2/
metadataUrl: .well-known/openid-configuration
userAuth:
openId:
# baseUrl: https:///auth/realms/ # Uncomment for Keycloak and update with your installation host and realm name
# baseUrl: https://login.microsoftonline.com//v2.0 # Uncomment for Azure AD
# For Okta, use the Issuer URI of the custom auth server:
baseUrl: https://dev-.okta.com/oauth2/
scopes:
- profile
- openid
# - offline_access # Uncomment if OIdC supports issuing refresh tokens.
clientId:
secrets:
adminOauthClientCredentials:
enabled: true # see the section "Disable Helm secret management" if you require to do so
# Replace with the client_secret provided by your IdP for flytepropeller.
clientSecret:
# Replace with the client_id provided by provided by your IdP for flytepropeller.
clientId:
```
2. Save your changes
3. Upgrade your Helm release with the new configuration:
```bash
helm upgrade flyteorg/flyte-core -n --values .yaml
```
#### flyte-core with Entra ID
```yaml
secrets:
adminOauthClientCredentials:
enabled: true
clientSecret:
clientId:
---
configmap:
admin:
admin:
endpoint:
insecure: true
clientId:
clientSecretLocation: /etc/secrets/client_secret
scopes:
- api:///.default
useAudienceFromAdmin: true
---
configmap:
adminServer:
auth:
appAuth:
authServerType: External
externalAuthServer:
baseUrl: https://login.microsoftonline.com//v2.0/
metadataUrl: .well-known/openid-configuration
AllowedAudience:
- api://
thirdPartyConfig:
flyteClient:
clientId:
redirectUri: http://localhost:53593/callback
scopes:
- api:///
userAuth:
openId:
baseUrl: https://login.microsoftonline.com//v2.0
scopes:
- openid
- profile
clientId:
```
**Congratulations**
At this point, every interaction with Flyte components -be it in the UI or CLI- should require a successful login to your IdP, where your security policies are maintained and enforced.
## Configuring supported authorization flows
### PKCE
The Proof of Key Code Exchange protocol ([RFC 7636](https://tools.ietf.org/html/rfc7636)) is the default auth flow in Flyte and was designed to mitigate security risks in the communication between the authorization server and the resource server.
- **Good for**: user-to-system interaction with a web browser
- **Supported IdPs**: Google, Okta, Microsoft Entra ID, Keycloak.
- **Supported authorization servers**: internal(`flyteadmin`) or external
#### Client configuration
As this is the default flow, just verify that your `$HOME/.flyte/config.yaml` contains the following configuration:
```yaml
admin:
authType: Pkce
```
### Client Credentials
- **Good for**: system-to-system communication where the client can securely store credentials (e.g. CI/CD).
- **Supported IdPs**: Google, Okta, Microsoft Entra ID, Keycloak.
- **Supported authorization servers**: internal(`flyteadmin`) or external
#### Client configuration
Verify that your `$HOME/.flyte/config.yaml` includes the following configuration:
```yaml
admin:
endpoint:
authType: ClientSecret
clientId: #provided by your IdP
clientSecretLocation: /etc/secrets/client_secret
```
`client_secret` is a file in the local filesystem that just contains the client secret provided by your IdP in plain text.
### Device Code
- **Good for**: “headless” devices or apps where the user cannot directly interact with a browser
- **Supported IdPs**: Google, Okta, Microsoft Entra ID, Keycloak.
- **Supported authorization servers**: external auth server **ONLY**
#### Client configuration
Verify that your `$HOME/.flyte/config.yaml` includes the following configuration:
```yaml
admin:
endpoint:
authType: DeviceFlow
clientId: #provided by your IdP
```
A successful response here it's a link with an authorization code you can use in a system with a browser to complete the auth flow.
## Disable Helm secret management
You can instruct Helm not to create and manage the secret for `flytepropeller`. In that case, you'll have to create it following these steps:
> [!NOTE]
> Verify that your "headless" machine has the `keyrings.alt` Python package installed for this flow to work.
1. Disable Helm secrets management in your values file
```yaml
secrets:
adminOauthClientCredentials:
enabled: true # enable mounting the flyte-secret-auth secret to the flytepropeller.
clientSecret: null # disable Helm from creating the flyte-secret-auth secret.
# Replace with the client_id provided by provided by your IdP for flytepropeller.
clientId:
```
2. Create a secret declaratively:
```yaml
apiVersion: v1
kind: Secret
metadata:
name: flyte-secret-auth
namespace: flyte
type: Opaque
stringData:
# Replace with the client_secret provided by your IdP for flytepropeller.
client_secret:
```
`flytepropeller` then will mount this secret.
## Continuous Integration - CI
If your organization does any automated registration, then you'll need to authenticate using the **Platform configuration > Configuring authentication > Configuring supported authorization flows > Client Credentials** flow.
### Flytekit / pyflyte
Flytekit configuration variables are automatically designed to look up values from relevant environment variables.
However, to aid with continuous integration use-cases, Flytekit configuration can also reference other environment variables.
For instance, if your CI system is not capable of setting custom environment variables like
`FLYTE_CREDENTIALS_CLIENT_SECRET` but does set the necessary settings under a different variable, you may use
`export FLYTE_CREDENTIALS_CLIENT_SECRET_FROM_ENV_VAR=OTHER_ENV_VARIABLE` to redirect the lookup.
Also, `FLYTE_CREDENTIALS_CLIENT_SECRET_FROM_FILE` redirect is available as well, where the value should be the full path to the file containing the value for the configuration setting, in this case, the client secret.
The following is a list of flytekit configuration values the community has used in CI, along with a brief explanation:
```shell
# When using OAuth2 service auth, this is the username and password.
export FLYTE_CREDENTIALS_CLIENT_ID=
export FLYTE_CREDENTIALS_CLIENT_SECRET=
# This tells the SDK to use basic authentication. If not set, Flytekit will assume you want to use the standard PKCE flow.
export FLYTE_CREDENTIALS_AUTH_MODE=basic
# This value should be set to conform to this
# `header config `_
# on the Admin side.
export FLYTE_CREDENTIALS_AUTHORIZATION_METADATA_KEY=
# When using basic authentication, you'll need to specify a scope to the IDP (instead of `openid`, which is
# only for OAuth). Set that here.
export FLYTE_CREDENTIALS_OAUTH_SCOPES=
# Set this to force Flytekit to use authentication, even if not required by Admin. This is useful as you're
# rolling out the requirement.
export FLYTE_PLATFORM_AUTH=True
```
=== PAGE: https://www.union.ai/docs/v1/flyte/deployment/flyte-configuration/monitoring ===
# Monitoring a Flyte deployment
> [!NOTE]
> The Flyte core team publishes and maintains Grafana dashboards built using Prometheus data sources. You can import them to your Grafana instance from the [Grafana marketplace](https://grafana.com/orgs/flyteorg/dashboards).
Before configuring Flyte for observability, it's important to cover the metrics the system emits:
## Metrics for Executions
Whenever you run a workflow, Flyte automatically emits high-level metrics. These metrics follow a consistent schema and aim to provide visibility into aspects of the platform which might otherwise be opaque.
These metrics help users diagnose whether an issue is inherent to the platform or one's own task or workflow implementation.
At a high level, workflow execution goes through the following discrete steps:
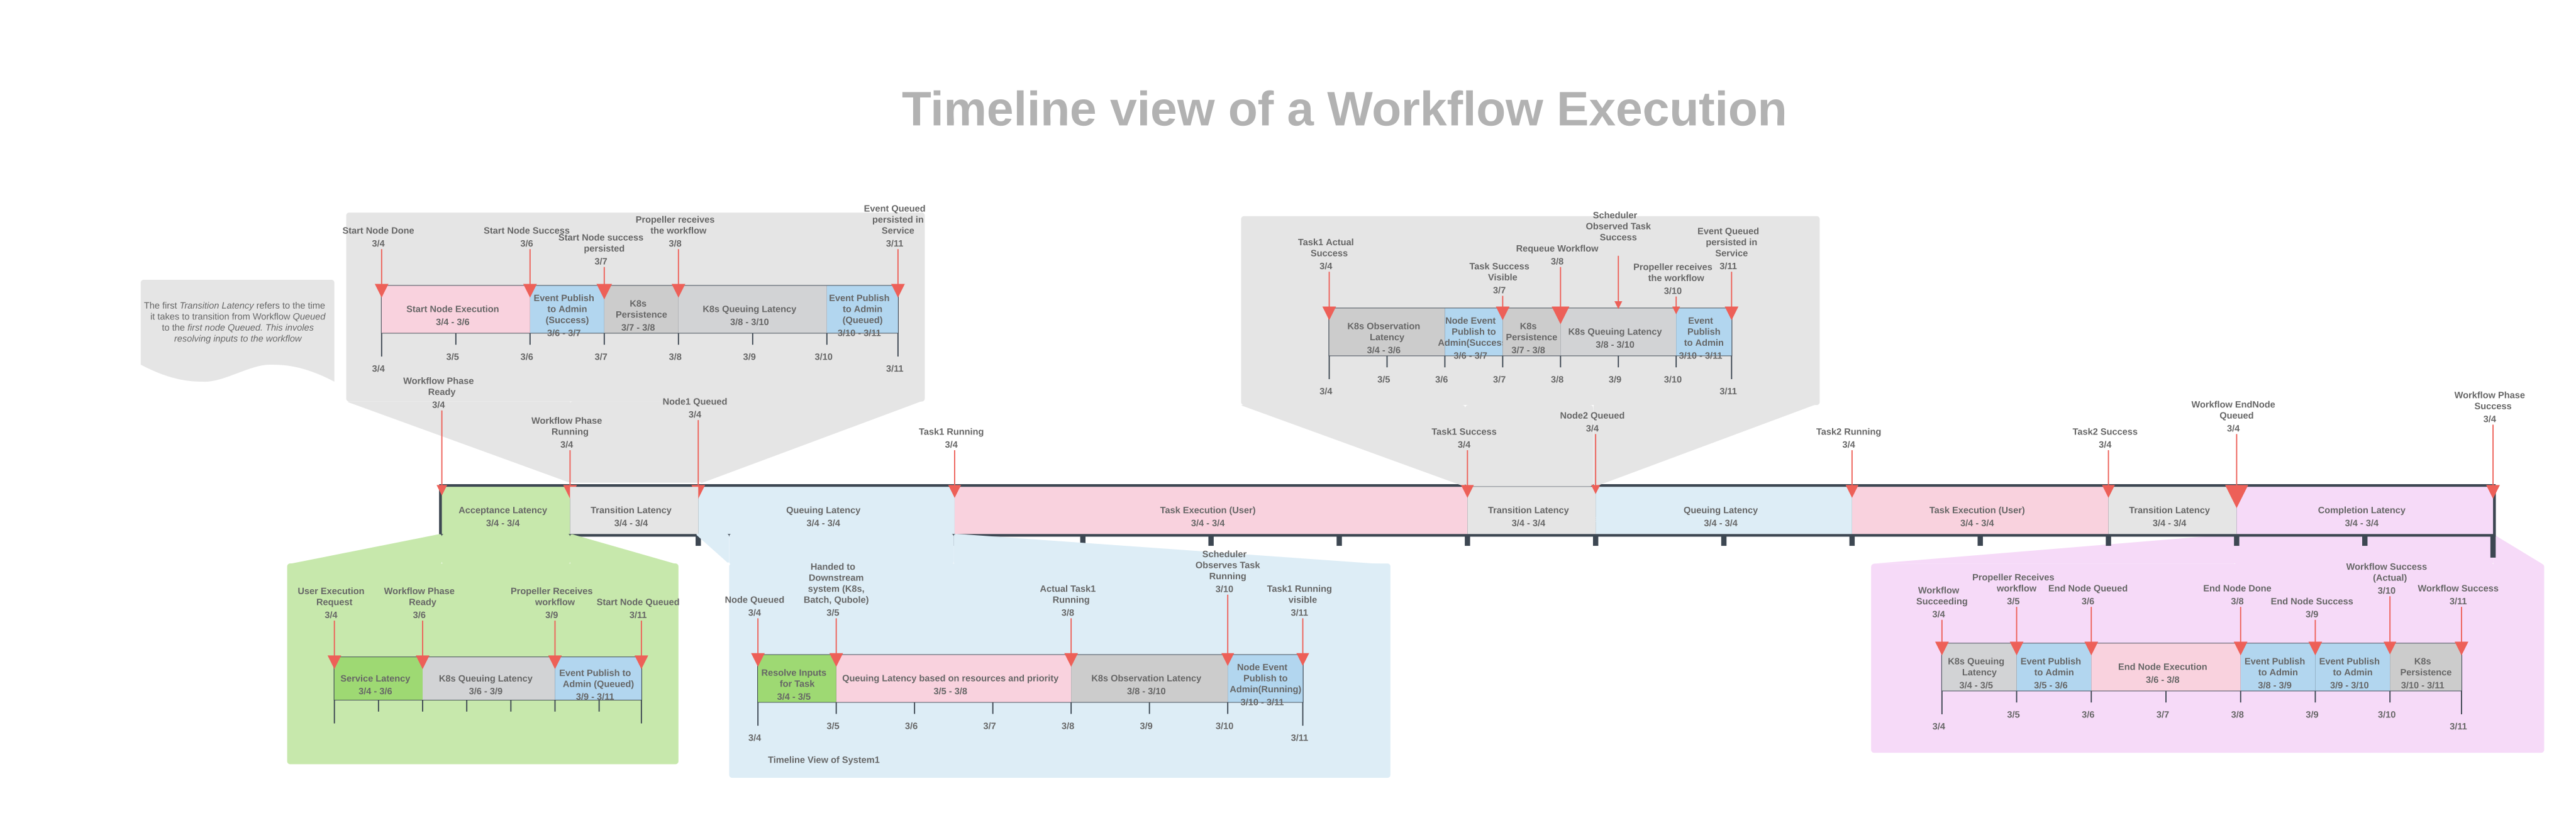
1. **Acceptance**: Measures the time consumed from receiving a service call to creating an Execution (Unknown) and moving to QUEUED.
2. **Transition latency**: Measures the latency between two consecutive node executions; the time spent in Flyte engine.
3. **Queuing latency**: Measures the latency between the node moving to QUEUED and the handler reporting the executable moving to RUNNING state.
4. **Task execution**: Actual time spent executing the user code.
5. (Repeat steps 2-4 for every task)
6. **Transition latency**: See 2, above.
7. **Completion Latency**: Measures the time consumed by a workflow moving from SUCCEEDING/FAILING state to TERMINAL state.
## Flyte statistics schema
The following list the prefix used for each metric emitted by Flyte. The standardized prefixes make it easy to query and analyze the statistics.
* `propeller.all.workflow.acceptance-latency-ms` (timer in ms): Measures the time consumed from receiving a service call to creating an Execution (Unknown) and moving to QUEUED.
* `propeller.all.node.queueing-latency-ms` (timer in ms): Measures the latency between the node moving to QUEUED and the handler reporting the executable moving to RUNNING state.
* `propeller.all.node.transition-latency-ms` (timer in ms): Measures the latency between two consecutive node executions; the time spent in Flyte engine.
* `propeller.all.workflow.completion-latency-ms` (timer in ms): Measures the time consumed by a workflow moving from SUCCEEDING/FAILING state to TERMINAL state.
* `propeller.all.node.success-duration-ms` (timer in ms): Actual time spent executing user code (when the node ends with SUCCESS state).
* `propeller.all.node.success-duration-ms-count` (counter): The number of times a node success has been reported.
* `propeller.all.node.failure-duration-ms` (timer in ms): Actual time spent executing user code (when the node ends with FAILURE state).
* `propeller.all.node.failure-duration-ms-count` (counter): The number of times a node failure has been reported.
All the above statistics are automatically tagged with the following fields for further scoping.
This includes user-produced stats.
Users can also provide additional tags (or override tags) for custom stats.
* `wf`: `{{project}}:{{domain}}:{{workflow_name}}` Fully qualified name of the workflow that was executing when this metric was emitted.
## User Stats With Flyte
The workflow parameters object that the SDK injects into various tasks has a ``statsd`` handle that users should call to emit stats of their workflows not captured by the default metrics. The usual caveats around cardinality apply, of course.
Users are encouraged to avoid creating their own stats handlers.
If not done correctly, these can pollute the general namespace and accidentally interfere with the production stats of live services, causing pages and wreaking havoc.
If you're using any libraries that emit stats, it's best to turn them off if possible.
## Use Published Dashboards to Monitor Flyte Deployment
Flyte Backend is written in Golang and exposes stats using Prometheus. The stats are labeled with workflow, task, project & domain, wherever appropriate.
Both ``flyteadmin`` and ``flytepropeller`` are instrumented to expose metrics. To visualize these metrics, Flyte provides three Grafana dashboards, each with a different focus:
* **User-facing dashboard**: Can be used to investigate performance and characteristics of workflow and task executions. It's published under ID [22146](https://grafana.com/grafana/dashboards/22146-flyte-user-dashboard-via-prometheus/) in the Grafana marketplace.
* **System Dashboards**: Dashboards that are useful for the system maintainer to investigate the status and performance of their Flyte deployments. These are further divided into:
* Data plane (``flytepropeller``) - [21719](https://grafana.com/grafana/dashboards/21719-flyte-propeller-dashboard-via-prometheus/): Execution engine status and performance.
* Control plane (``flyteadmin``) - [21720](https://grafana.com/grafana/dashboards/21720-flyteadmin-dashboard-via-prometheus/): API-level monitoring.
The corresponding JSON files for each dashboard are also located in the ``flyte`` repository at [deployment/stats/prometheus](https://github.com/flyteorg/flyte/tree/master/deployment/stats/prometheus).
> [!NOTE]
> The dashboards are basic dashboards and do not include all the metrics exposed by Flyte. Feel free to use the scripts provided [here](https://github.com/flyteorg/flyte/tree/master/stats) to improve and contribute the improved dashboards.
## Setup instructions
The dashboards rely on a working Prometheus deployment with access to your Kubernetes cluster and Flyte pods.
Additionally, the user dashboard uses metrics that come from ``kube-state-metrics``. Both of these requirements can be fulfilled by installing the [kube-prometheus-stack](https://github.com/prometheus-community/helm-charts/tree/main/charts/kube-prometheus-stack).
Once the prerequisites are in place, follow the instructions in this section to configure metrics scraping for the corresponding Helm chart:
flyte-core
Save the following in a ``flyte-monitoring-overrides.yaml`` file and run a ``helm upgrade`` operation pointing to that ``--values`` file:
```yaml
flyteadmin:
serviceMonitor:
enabled: true
labels:
release: kube-prometheus-stack #This is particular to the kube-prometheus-stacl
selectorLabels:
- app.kubernetes.io/name: flyteadmin
flytepropeller:
serviceMonitor:
enabled: true
labels:
release: kube-prometheus-stack
selectorLabels:
- app.kubernetes.io/name: flytepropeller
service:
enabled: true
```
The above configuration enables the ``serviceMonitor`` that Prometheus can then use to automatically discover services and scrape metrics from them.
flyte-binary
1. Save the following in a ``flyte-monitoring-overrides.yaml`` file and run a ``helm upgrade`` operation pointing to that ``--values`` file:
```yaml
configuration:
inline:
propeller:
prof-port: 10254
metrics-prefix: "flyte:"
scheduler:
profilerPort: 10254
metricsScope: "flyte:"
flyteadmin:
profilerPort: 10254
service:
extraPorts:
- name: http-metrics
protocol: TCP
port: 10254
```
2. Create a ServiceMonitor with a configuration like the following:
```yaml
apiVersion: monitoring.coreos.com/v1
kind: ServiceMonitor
metadata:
name: flytemonitoring
namespace: flyte #or namespace where Flyte is installed
labels:
release: kube-prometheus-stack
spec:
selector:
matchLabels:
app.kubernetes.io/instance: flyte-binary
app.kubernetes.io/name: flyte-binary #read from Helm release name
endpoints:
- port: http-metrics
path: /metrics
```
> [!NOTE]
> By default, the ``ServiceMonitor`` is configured with a ``scrapeTimeout`` of 30s and ``interval`` of 60s. You can customize these values if needed.
With the above configuration completed, you should be able to import the dashboards in your Grafana instance.
=== PAGE: https://www.union.ai/docs/v1/flyte/deployment/flyte-configuration/configuring-logging-links-in-the-ui ===
# Configuring logging links in the UI
To debug your workflows in production, you want to access logs from your tasks as they run.
These logs are different from the core Flyte platform logs, are specific to execution, and may vary from plugin to plugin; for example, Spark may have driver and executor logs.
Every organization potentially uses different log aggregators, making it hard to create a one-size-fits-all solution. Some examples of the log aggregators include cloud-hosted solutions like AWS CloudWatch, GCP Stackdriver, Splunk, Datadog, etc.
Flyte provides a simplified interface to configure your log provider, generating a link in the UI for each node execution live logs.
## How to configure?
To configure your log provider, the provider needs to support `URL` links that are shareable and can be templatized. The templating engine has access to [these](https://github.com/flyteorg/flyteplugins/blob/b0684d97a1cf240f1a44f310f4a79cc21844caa9/go/tasks/pluginmachinery/tasklog/plugin.go#L7-L16) parameters.
The parameters can be used to generate a unique URL to the logs using a templated URI that pertain to a specific task. The templated URI has access to the following parameters:
| Parameter | Description |
|-----------|-------------|
| `{{ .podName }}` | Gets the pod name as it shows in k8s dashboard |
| `{{ .podUID }}` | The pod UID generated by the k8s at runtime |
| `{{ .namespace }}` | K8s namespace where the pod runs |
| `{{ .containerName }}` | The container name that generated the log |
| `{{ .containerId }}` | The container id docker/crio generated at run time |
| `{{ .logName }}` | A deployment specific name where to expect the logs to be |
| `{{ .hostname }}` | The value used to override the hostname the pod uses internally within its own network namespace (i.e., the pod's `.spec.hostname`) |
| `{{ .nodeName }}` | The hostname of the node where the pod is running and logs reside (i.e., the pod's `.spec.nodeName`) |
| `{{ .podRFC3339StartTime }}` | The pod creation time (in RFC3339 format, e.g. "2021-01-01T02:07:14Z", also conforming to ISO 8601) |
| `{{ .podRFC3339FinishTime }}` | Don't have a good mechanism for this yet, but approximating with `time.Now` for now |
| `{{ .podUnixStartTime }}` | The pod creation time (in unix seconds, not millis) |
| `{{ .podUnixFinishTime }}` | Don't have a good mechanism for this yet, but approximating with `time.Now` for now |
The parameterization engine uses Golangs native templating format and hence uses `{{ }}`.
Since Helm chart uses the same templating syntax for args (like `{{ }}`), compiling the chart results in helm replacing Flyte log link templates as well. To avoid this, you can use escaped templating for Flyte logs in the helm chart.
This ensures that Flyte log link templates remain in place during helm chart compilation.
For example:
If your configuration looks like this:
`https://someexample.com/app/podName={{ "{{" }} .podName {{ "}}" }}&containerName={{ .containerName }}`
Helm chart will generate:
`https://someexample.com/app/podName={{.podName}}&containerName={{.containerName}}`
Flytepropeller pod would be created as:
`https://someexample.com/app/podName=pname&containerName=cname`
This code snippet will output two logs per task that use the log plugin.
However, not all task types use the log plugin; for example, the Snowflake plugin will use a link to the Snowflake console.
## Example configurations
### AWS Cloudwatch
```yaml
task_logs:
plugins:
logs:
cloudwatch-enabled: true
cloudwatch-region:
cloudwatch-log-group:
cloudwatch-template-uri: "https://console.aws.amazon.com/cloudwatch/home?region=us-east-1#logEventViewer:group=/flyte-production/kubernetes;stream=var.log.containers.{{.podName}}_{{.namespace}}_{{.containerName}}-{{.containerId}}.log"
```
### Stackdriver (Google Cloud Logging)
```yaml
task_logs:
plugins:
logs:
stackdriver-enabled: true
gcp-project:
stackdriver-logresourcename":
stackdriver-template-uri: "https://console.cloud.google.com/logs/query;query=resource.labels.namespace_name%3D%22{{`{{.namespace}}`}}%22%0Aresource.labels.pod_name%3D%7E%22{{`{{.podName}}`}}-exec%22?project={{.Values.storage.gcs.projectId}}&angularJsUrl=%2Flogs%2Fviewer%3Fproject%3D{{.Values.storage.gcs.projectId}}"
```
### Datadog
1. Install the [Datadog operator](https://docs.datadoghq.com/containers/kubernetes/installation/?tab=datadogoperator) in your Kubernetes cluster
2. Make sure your Datadog configuration enables collection of logs from containers and collection of logs using files:
```yaml
apiVersion: "datadoghq.com/v2alpha1"
kind: "DatadogAgent"
metadata:
name: "datadog"
spec:
global:
site:
credentials:
apiSecret:
secretName: "datadog-secret"
keyName: "api-key"
features:
logCollection:
enabled: true
containerCollectAll: true
containerCollectUsingFiles: true
```
If you're using environment variables, configure them accordingly:
```bash
DD_LOGS_ENABLED: "false"
DD_LOGS_CONFIG_CONTAINER_COLLECT_ALL: "true"
DD_LOGS_CONFIG_K8S_CONTAINER_USE_FILE: "true"
DD_CONTAINER_EXCLUDE_LOGS: "name:datadog-connector" # This is to avoid tracking logs produced by the datadog connector itself
```
3. Upgrade your Flyte Helm installation with values that include the following:
```yaml
task_logs:
plugins:
logs:
templates:
- displayName: Datadog
templateUris:
- https:///logs?query=pod_name%3A{{ "{{" }} .podName {{ "}}" }}%20&from_ts={{ "{{" }} .podUnixStartTime {{ "}}" }}000&to_ts={{ "{{" }} .podUnixFinishTime {{ "}}" }}999&live=false
```
### Kubernetes dashboard
Flyte sandbox (`flytectl demo start`) ships with the Kubernetes dashboard already installed. The only missing step to use it is to configure [Access Control](https://github.com/kubernetes/dashboard/tree/master/docs/user/access-control).
> This may not be scalable for production, hence we recommend exploring other log aggregators.
To use the K8s dashboard in other Flyte distributions (`flyte-binary` or `flyte-core`) follow these steps:
1. [Install the dashboard](https://github.com/kubernetes/dashboard?tab=readme-ov-file#installation) in your Kubernetes cluster and configure [Access Control](https://github.com/kubernetes/dashboard/tree/master/docs/user/access-control)
2. Add the following to your Helm values file and upgrade the installed release:
```yaml
plugins:
logs:
kubernetes-enabled: true
kubernetes-template-uri: 'http:///#/log/{{ "{{" }}.namespace {{ "}}" }}/{{ "{{" }} .podName {{ "}}" }}/pod?namespace={{ "{{" }} .namespace {{ "}}" }}'
```
### Configure lifetime of logging links
By default, log links are shown once a task starts running and do not disappear when the task finishes. Certain log links might, however, be helpful when a task is still queued or initializing, for instance, to debug why a task might not be able to start. Other log links might not be valid anymore once the task terminates. You can configure the lifetime of log links in the following way:
```yaml
task_logs:
plugins:
logs:
templates:
- displayName:
hideOnceFinished: true
showWhilePending: true
templateUris:
- "https://..."
```
> Out-of-the-box persistent logs are available as a feature in Union.
### Configure dynamic log links
Dynamic log links have two unique characteristics:
1. Not shown by default for all tasks, and
2. Can use template variables provided during task registration.
Configure dynamic log links in the flytepropeller the following way:
```yaml
configmap:
task_logs:
plugins:
logs:
dynamic-log-links:
- log_link_a: # Name of the dynamic log link
displayName: Custom dynamic log link A
templateUris: 'https://some-service.com/{{ .taskConfig.custom_param }}'
```
In `flytekit`, dynamic log links are activated and configured using a `ClassDecorator`.
You can define such a custom decorator for controlling dynamic log links.
**Example**
```python
from flytekit.core.utils import ClassDecorator
class configure_log_links(ClassDecorator):
"""
Task function decorator to configure dynamic log links.
"""
def __init__(
self,
task_function: Optional[Callable] = None,
enable_log_link_a: Optional[bool] = False,
custom_param: Optional[str] = None,
**kwargs,
):
"""
Configure dynamic log links for a task.
Args:
task_function (function, optional): The user function to be decorated. If the decorator is called
with arguments, task_function will be None. If the decorator is called without arguments,
task_function will be function to be decorated.
enable_log_link_a (bool, optional): Activate dynamic log link `log_link_a` configured in the backend.
custom_param (str, optional): Custom parameter for log link templates configured in the backend.
"""
self.enable_log_link_a = enable_log_link_a
self.custom_param = custom_param
super().__init__(
task_function,
enable_log_link_a=enable_log_link_a,
custom_param=custom_param,
**kwargs,
)
def execute(self, *args, **kwargs):
output = self.task_function(*args, **kwargs)
return output
def get_extra_config(self) -> dict[str, str]:
"""Return extra config for dynamic log links."""
extra_config = {}
log_link_types = []
if self.enable_log_link_a:
log_link_types.append("log_link_a")
if self.custom_param:
extra_config["custom_param"] = self.custom_param
# Activate other dynamic log links as needed
extra_config[self.LINK_TYPE_KEY] = ",".join(log_link_types)
return extra_config
@task
@configure_log_links(
enable_log_link_a=True,
custom_param="test-value",
)
def my_task():
...
```
For inspiration, consider how the flytekit [wandb](https://github.com/flyteorg/flytekit/blob/master/plugins/flytekit-wandb/flytekitplugins/wandb/tracking.py), [neptune](https://github.com/flyteorg/flytekit/blob/master/plugins/flytekit-neptune/flytekitplugins/neptune/tracking.py) or [vscode](https://github.com/flyteorg/flytekit/blob/master/flytekit/interactive/vscode_lib/decorator.py) plugins make use of dynamic log links.
=== PAGE: https://www.union.ai/docs/v1/flyte/deployment/flyte-configuration/configuring-access-to-gpus ===
# Configuring Access to GPUs
Along with compute resources like CPU and memory, you may want to configure and access GPU resources.
This section describes the different ways Flyte provides to request accelerator resources directly from the task decorator.
## Requesting a GPU with no device preference
The goal in this example is to run the task on a single available GPU :
```python
from flytekit import ImageSpec, Resources, task
image = ImageSpec(
base_image= "ghcr.io/flyteorg/flytekit:py3.10-1.10.2",
name="pytorch",
python_version="3.10",
packages=["torch"],
builder="default",
registry="",
)
@task(requests=Resources(gpu="1"))
def gpu_available() -> bool:
return torch.cuda.is_available() # returns True if CUDA (provided by a GPU) is available
```
### How it works
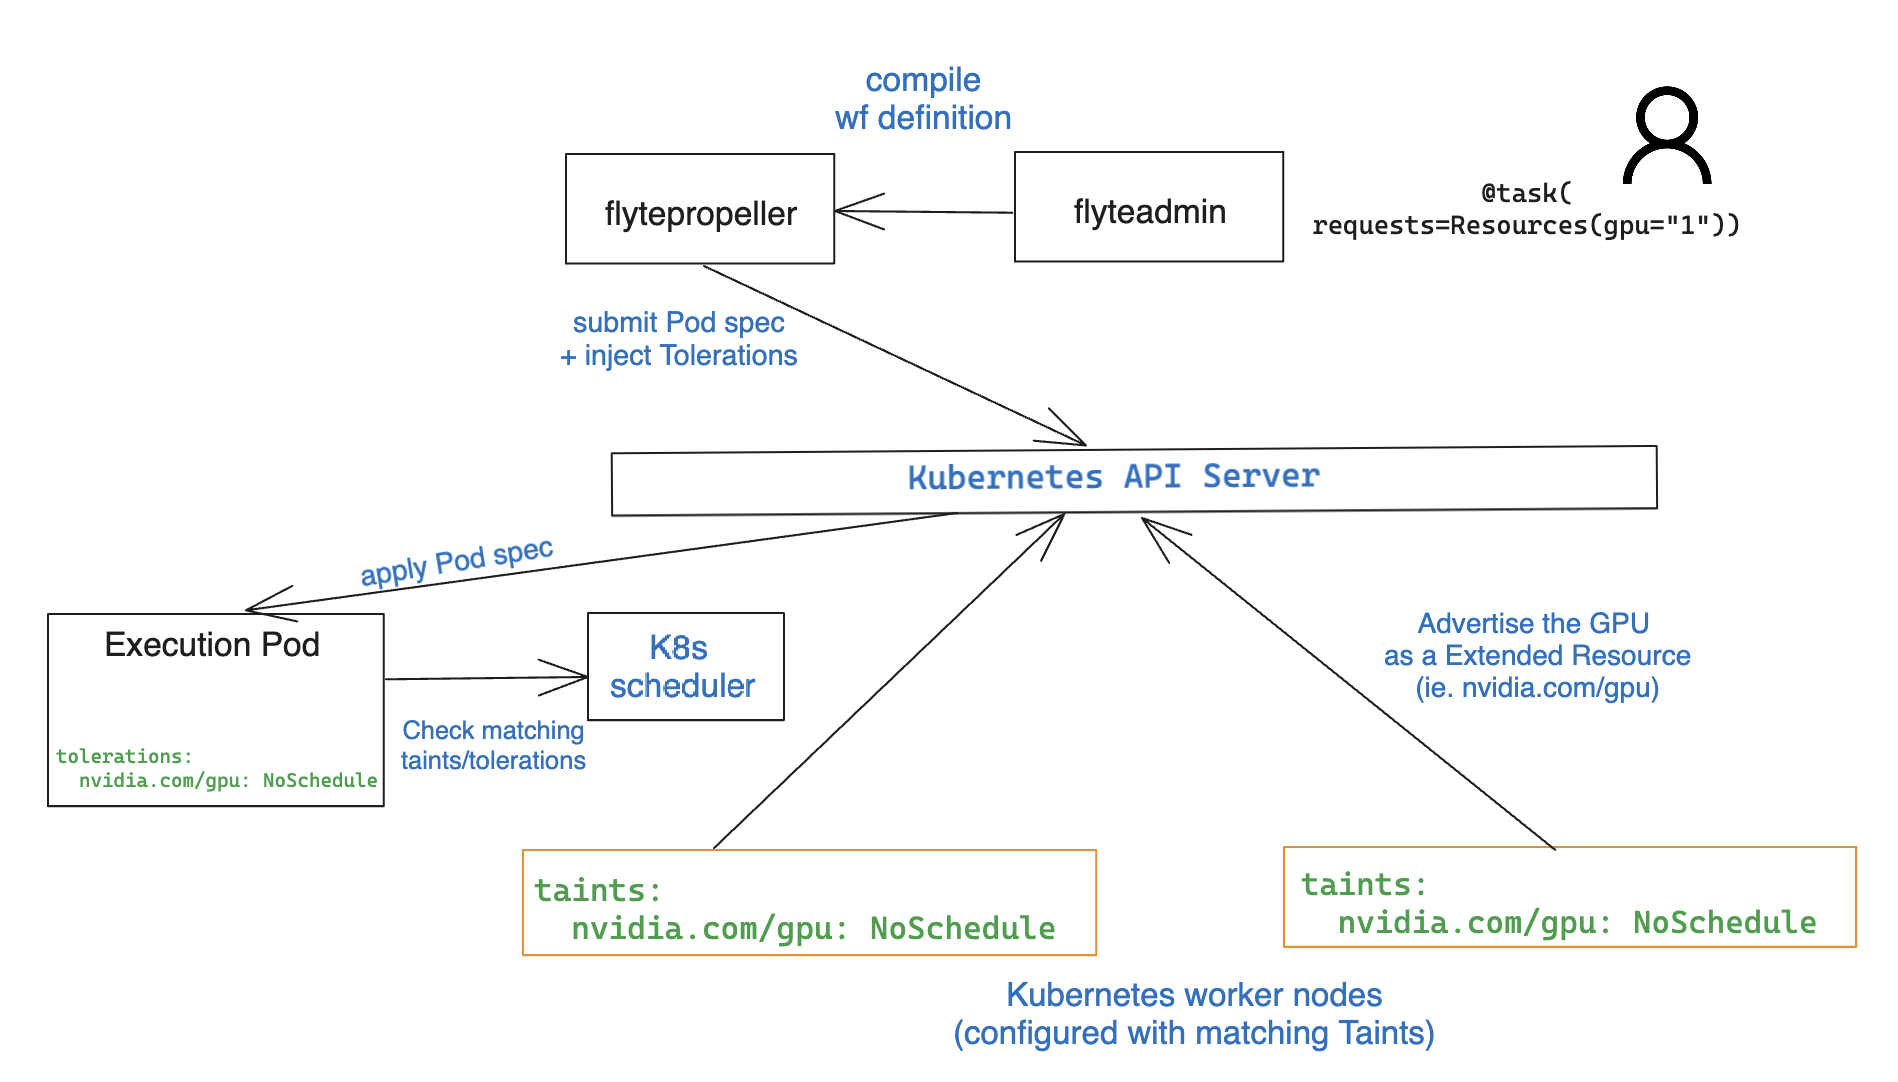
When this task is evaluated, `flytepropeller` injects a [toleration](https://kubernetes.io/docs/concepts/scheduling-eviction/taint-and-toleration/) in the pod spec:
```yaml
tolerations: nvidia.com/gpu:NoSchedule op=Exists
```
The Kubernetes scheduler will admit the pod if there are worker nodes in the cluster with a matching taint and available resources.
The resource `nvidia.com/gpu` key name is not arbitrary though. It corresponds to the [Extended Resource](https://kubernetes.io/docs/tasks/administer-cluster/extended-resource-node/) that the Kubernetes worker nodes advertise to the API server through the [device plugin](https://kubernetes.io/docs/tasks/manage-gpus/scheduling-gpus/#using-device-plugins). Using the information provided by the device plugin, the Kubernetes scheduler allocates an available accelerator to the Pod.
>NVIDIA maintains a [GPU operator](https://docs.nvidia.com/datacenter/cloud-native/gpu-operator/latest/index.html) that automates the management of all software prerequisites on Kubernetes, including the device plugin.
``flytekit`` assumes by default that `nvidia.com/gpu` is the resource name for your GPUs. If your GPU accelerators expose a different resource name, adjust the following key in the Helm values file:
**flyte-core**
```yaml
configmap:
k8s:
plugins:
k8s:
gpu-resource-name:
```
**flyte-binary**
```yaml
configuration:
inline:
plugins:
k8s:
gpu-resource-name:
```
If your infrastructure requires additional tolerations for the scheduling of GPU resources to succeed, adjust the following section in the Helm values file:
**flyte-core**
```yaml
configmap:
k8s:
plugins:
k8s:
resource-tolerations:
- nvidia.com/gpu:
- key: "mykey"
operator: "Equal"
value: "myvalue"
effect: "NoSchedule"
```
**flyte-binary**
```yaml
configuration:
inline:
plugins:
k8s:
resource-tolerations:
- nvidia.com/gpu:
- key: "mykey"
operator: "Equal"
value: "myvalue"
effect: "NoSchedule"
```
>For the above configuration, your worker nodes should have a `mykey=myvalue:NoSchedule` configured [taint](https://kubernetes.io/docs/concepts/scheduling-eviction/taint-and-toleration/).
## Requesting a specific GPU device
The goal is to run the task on a specific type of accelerator: NVIDIA Tesla V100 in the following example:
```python
from flytekit import ImageSpec, Resources, task
from flytekit.extras.accelerators import V100
image = ImageSpec(
base_image= "ghcr.io/flyteorg/flytekit:py3.10-1.10.2",
name="pytorch",
python_version="3.10",
packages=["torch"],
builder="default",
registry="",
)
@task(
requests=Resources(gpu="1"),
accelerator=V100, #NVIDIA Tesla V100
)
def gpu_available() -> bool:
return torch.cuda.is_available()
```
### How it works
When this task is evaluated, `flytepropeller` injects both a toleration and a [nodeSelector](https://kubernetes.io/docs/concepts/scheduling-eviction/assign-pod-node/#nodeselector) for a more flexible scheduling configuration.
An example pod spec on GKE would include the following:
```yaml
apiVersion: v1
kind: Pod
spec:
affinity:
nodeAffinity:
requiredDuringSchedulingIgnoredDuringExecution:
nodeSelectorTerms:
- matchExpressions:
- key: cloud.google.com/gke-accelerator
operator: In
values:
- nvidia-tesla-v100
containers:
- resources:
limits:
nvidia.com/gpu: 1
tolerations:
- key: nvidia.com/gpu # auto
operator: Equal
value: present
effect: NoSchedule
- key: cloud.google.com/gke-accelerator
operator: Equal
value: nvidia-tesla-v100
effect: NoSchedule
```
### Configuring the nodeSelector
The `key` that the injected node selector uses corresponds to an arbitrary label that your Kubernetes worker nodes should already have. In the above example it's `cloud.google.com/gke-accelerator` but, depending on your cloud provider it could be any other value. You can inform Flyte about the labels your worker nodes use by adjusting the Helm values:
**flyte-core**
```yaml
configmap:
k8s:
plugins:
k8s:
gpu-device-node-label: "cloud.google.com/gke-accelerator" #change to match your node's config
```
**flyte-binary**
```yaml
configuration:
inline:
plugins:
k8s:
gpu-device-node-label: "cloud.google.com/gke-accelerator" #change to match your node's config
```
While the `key` is arbitrary, the value (`nvidia-tesla-v100`) is not. `flytekit` has a set of [predefined](https://www.union.ai/docs/v1/flyte/user-guide/core-concepts/tasks/task-hardware-environment/accelerators) constants and your node label has to use one of those values.
## Requesting a GPU partition
`flytekit` supports [Multi-Instance GPU partitioning](https://developer.nvidia.com/blog/getting-the-most-out-of-the-a100-gpu-with-multi-instance-gpu/#mig_partitioning_and_gpu_instance_profiles) on NVIDIA A100 devices for optimal resource utilization.
Example:
```python
from flytekit import ImageSpec, Resources, task
from flytekit.extras.accelerators import A100
image = ImageSpec(
base_image= "ghcr.io/flyteorg/flytekit:py3.10-1.10.2",
name="pytorch",
python_version="3.10",
packages=["torch"],
builder="default",
registry="",
)
@task(
requests=Resources( gpu="1"),
accelerator=A100.partition_2g_10gb, # 2 compute instances with 10GB memory slice
)
def gpu_available() -> bool:
return torch.cuda.is_available()
```
### How it works
In this case, ``flytepropeller`` injects an additional node selector expression to the resulting pod spec, indicating the partition size:
```yaml
spec:
affinity:
nodeAffinity:
requiredDuringSchedulingIgnoredDuringExecution:
nodeSelectorTerms:
- matchExpressions:
- key: nvidia.com/gpu.accelerator
operator: In
values:
- nvidia-tesla-a100
- key: nvidia.com/gpu.partition-size
operator: In
values:
- 2g.10gb
```
Plus and additional toleration:
```yaml
tolerations:
- effect: NoSchedule
key: nvidia.com/gpu.accelerator
operator: Equal
value: nvidia-tesla-a100
- effect: NoSchedule
key: nvidia.com/gpu.partition-size
operator: Equal
value: 2g.10gb
```
In consequence, your Kubernetes worker nodes should have matching labels so the Kubernetes scheduler can admit the Pods:
Node labels (example):
```yaml
nvidia.com/gpu.partition-size: "2g.10gb"
nvidia.com/gpu.accelerator: "nvidia-tesla-a100"
```
If you want to better control scheduling, configure your worker nodes with taints that match the tolerations injected to the pods.
In the example the ``nvidia.com/gpu.partition-size`` key is arbitrary and can be controlled from the Helm chart:
**flyte-core**
```yaml
configmap:
k8s:
plugins:
k8s:
gpu-partition-size-node-label: "nvidia.com/gpu.partition-size" #change to match your node's config
```
**flyte-binary**
```yaml
configuration:
inline:
plugins:
k8s:
gpu-partition-size-node-label: "nvidia.com/gpu.partition-size" #change to match your node's config
```
The ``2g.10gb`` value comes from the [NVIDIA A100 supported instance profiles](https://docs.nvidia.com/datacenter/tesla/mig-user-guide/index.html#concepts) and it's controlled from the Task decorator (``accelerator=A100.partition_2g_10gb`` in the above example). Depending on the profile requested in the Task, Flyte will inject the corresponding value for the node selector.
>Learn more about the full list of ``flytekit`` supported partition profiles and task decorator options [here](https://www.union.ai/docs/v1/flyte/user-guide/core-concepts/tasks/task-hardware-environment/accelerators).
## Additional use cases
### Request an A100 device with no preference for partition configuration
Example:
```python
from flytekit import ImageSpec, Resources, task
from flytekit.extras.accelerators import A100
image = ImageSpec(
base_image= "ghcr.io/flyteorg/flytekit:py3.10-1.10.2",
name="pytorch",
python_version="3.10",
packages=["torch"],
builder="default",
registry="",
)
@task(
requests=Resources( gpu="1"),
accelerator=A100,
)
def gpu_available() -> bool:
return torch.cuda.is_available()
```
#### How it works?
flytekit uses a default `2g.10gb`partition size and `flytepropeller` injects the node selector that matches labels on nodes with an `A100` device:
```yaml
spec:
affinity:
nodeAffinity:
requiredDuringSchedulingIgnoredDuringExecution:
nodeSelectorTerms:
- matchExpressions:
- key: nvidia.com/gpu.accelerator
operator: In
values:
- nvidia-tesla-a100
```
### Request an unpartitioned A100 device
The goal is to run the task using the resources of the entire A100 GPU:
```python
from flytekit import ImageSpec, Resources, task
from flytekit.extras.accelerators import A100
image = ImageSpec(
base_image= "ghcr.io/flyteorg/flytekit:py3.10-1.10.2",
name="pytorch",
python_version="3.10",
packages=["torch"],
builder="default",
registry="",
)
@task(requests=Resources( gpu="1"),
accelerator=A100.unpartitioned,
) # request the entire A100 device
def gpu_available() -> bool:
return torch.cuda.is_available()
```
#### How it works
When this task is evaluated `flytepropeller` injects a node selector expression that only matches nodes where the label specifying a partition size is **not** present:
```yaml
spec:
affinity:
nodeAffinity:
requiredDuringSchedulingIgnoredDuringExecution:
nodeSelectorTerms:
- matchExpressions:
- key: nvidia.com/gpu.accelerator
operator: In
values:
- nvidia-tesla-a100
- key: nvidia.com/gpu.partition-size
operator: DoesNotExist
```
The expression can be controlled from the Helm values:
**flyte-core**
```yaml
configmap:
k8s:
plugins:
k8s:
gpu-unpartitioned-node-selector-requirement :
key: cloud.google.com/gke-gpu-partition-size #change to match your node label configuration
operator: Equal
value: DoesNotExist
```
**flyte-binary**
```yaml
configuration:
inline:
plugins:
k8s:
gpu-unpartitioned-node-selector-requirement:
key: cloud.google.com/gke-gpu-partition-size #change to match your node label configuration
operator: Equal
value: DoesNotExist
```
Scheduling can be further controlled by setting in the Helm chart a toleration that `flytepropeller` injects into the task pods:
**flyte-core**
```yaml
configmap:
k8s:
plugins:
k8s:
gpu-unpartitioned-toleration:
effect: NoSchedule
key: cloud.google.com/gke-gpu-partition-size
operator: Equal
value: DoesNotExist
```
**flyte-binary**
```yaml
configuration:
inline:
plugins:
k8s:
gpu-unpartitioned-toleration:
effect: NoSchedule
key: cloud.google.com/gke-gpu-partition-size
operator: Equal
value: DoesNotExist
```
In case your Kubernetes worker nodes are using taints, they need to match the above configuration.
=== PAGE: https://www.union.ai/docs/v1/flyte/deployment/flyte-configuration/configuring-podtemplates ===
# Configuring task pods with K8s PodTemplates
The [PodTemplate](https://kubernetes.io/docs/concepts/workloads/pods/#pod-templates)
is a K8s-native resource used to define a K8s Pod. It contains all the fields in the PodSpec, in addition to ObjectMeta to control resource-specific metadata such as Labels or Annotations. PodTemplates are commonly applied in resources like Deployments or ReplicaSets to define the managed Pod configuration.
Within Flyte, you can use them to configure Pods created as part
of Flyte's task execution. This ensures complete control over Pod configuration, supporting all options available through the resource and ensuring maintainability in future versions.
There are three ways of defining [PodTemplate](https://kubernetes.io/docs/concepts/workloads/pods/#pod-templates) in Flyte:
1. Compile-time PodTemplate defined at the task level
2. Runtime PodTemplates
3. Cluster-wide default PodTemplate
> These approaches can be used simultaneously, where the cluste-wide configuration will override the default PodTemplate values.
## A note about containers kinds
In a Kubernetes Pod, you can have multiple containers but typically there is one considered "primary", or the one that runs the microservice or main application.
You can also have [initContainers](https://kubernetes.io/docs/concepts/workloads/pods/init-containers/#understanding-init-containers) which are designed to run before the primary to perform anciliary tasks like downloading data. They run sequentially and must complete succesfully before the primary container can run. You would define them under a separate section of the PodTemplate spec:
```yaml
apiVersion: v1
kind: PodTemplate
metadata:
name: myPodTemplate
template:
spec:
containers:
- name: myapp-container #primary container
image: busybox:1.28
command: ['sh', '-c', 'echo The app is running! && sleep 3600']
initContainers:
- name: init-mydb
image: busybox:1.28
command: ['sh', '-c', "until nslookup mydb.$(cat /var/run/secrets/kubernetes.io/serviceaccount/namespace).svc.cluster.local; do echo waiting for mydb; sleep 2; done"]
```
A special case of `initContainer` are the [sidecar containers](https://kubernetes.io/docs/concepts/workloads/pods/sidecar-containers/#pod-sidecar-containers). They are also designed to extend the functionality of the primary container but they remain running even after the Pod startup process completes.
You would configure them as an `initContainer` but with a policy that enables them to be restarted independently from the primary container:
```yaml
apiVersion: v1
kind: PodTemplate
metadata:
name: myPodTemplate
template:
spec:
containers:
- name: myapp-container #primary container
image: busybox:1.28
command: ['sh', '-c', 'echo The app is running! && sleep 3600']
initContainers:
- name: init-mydb
image: busybox:1.28
command: ['sh', '-c', "until nslookup mydb.$(cat /var/run/secrets/kubernetes.io/serviceaccount/namespace).svc.cluster.local; do echo waiting for mydb; sleep 2; done"]
- name: logshipper
image: alpine:latest
restartPolicy: Always #overrides the Pod's restart policy. This makes it a sidecar container
command: ['sh', '-c', 'tail -F /opt/logs.txt']
volumeMounts:
- name: data
mountPath: /opt
```
Flyte support any of the above mentioned container kinds. In the following sections you will learn how to use PodTemplates in Flyte for different scenarios.
## Compile-time PodTemplates
Using the [Kubernetes Python client](https://github.com/kubernetes-client/python), we can define a compile-time PodTemplate as part of the configuration of a [Task](https://docs.flyte.org/en/latest/api/flytekit/generated/flytekit.task.html#flytekit-task).
Example:
```python
from flytekit import task, workflow, PodTemplate
from kubernetes.client import V1PodSpec, V1Container, V1ResourceRequirements, V1EnvVar, V1Volume, V1Toleration
pod_template=PodTemplate(
primary_container_name="primary",
labels={"lKeyA": "lValA", "lKeyB": "lValB"},
annotations={"aKeyA": "aValA", "aKeyB": "aValB"},
pod_spec=V1PodSpec(
containers=[
V1Container(
name="primary",
image="repo/placeholderImage:0.0.0",
command="echo",
args=["wow"],
resources=V1ResourceRequirements(limits={"cpu": "24", "gpu": "10"}),
env=[V1EnvVar(name="eKeyC", value="eValC"), V1EnvVar(name="eKeyD", value="eValD")],
),
],
volumes=[V1Volume(name="volume")],
tolerations=[
V1Toleration(
key="num-gpus",
operator="Equal",
value="1",
effect="NoSchedule",
),
],
)
)
@task(pod_template=pod_template)
def my_flyte_task(input_str: str) -> str:
print(f"Running task with input: {input_str}")
return f"Processed {input_str}"
# Define a workflow to use the task
@workflow
def my_workflow(input_str: str) -> str:
return my_flyte_task(input_str="Hello")
```
Which is rendered as a Pod which includes the following configuration:
```yaml
...
Labels: ...
lKeyA=lValA
lKeyB=lValB
...
Annotations: aKeyA: aValA
aKeyB: aValB
primary_container_name: primary
...
Containers:
primary:
Image: repo/placeholderImage:0.0.0
Port:
Host Port:
...
Limits:
cpu: 24
memory: 1Gi
nvidia.com/gpu: 10
Requests:
cpu: 24
memory: 1Gi
nvidia.com/gpu: 10
Environment:
eKeyC: eValC
eKeyD: eValD
...
Volumes:
volume:
Type: EmptyDir (a temporary directory that shares a pod's lifetime)
Medium:
SizeLimit:
...
Tolerations: ...
num-gpus=1:NoSchedule
```
Notice how in this example we are defining a new PodTemplate inline, which allows us to define a full [V1PodSpec](https://github.com/kubernetes-client/python/blob/master/kubernetes/docs/V1PodSpec.md) and also define the name of the primary container, labels, and annotations.
The term "compile-time" here refers to the fact that the pod template definition is part of the [TaskSpec](https://docs.flyte.org/en/latest/api/flyteidl/docs/admin/admin.html#ref-flyteidl-admin-taskclosure).
## Runtime PodTemplates
Runtime PodTemplates, as the name suggests, are applied during runtime, as part of building the resultant Pod. In terms of how
they are applied, you have two choices: (1) you either elect one specific PodTemplate to be considered as default, or (2) you
define a PodTemplate name and use that in the declaration of the task. Those two options are mutually exclusive, meaning that
in the situation where a default PodTemplate is set and a PodTemplate name is present in the task definition, only the
PodTemplate name will be used.
## Set the ``default-pod-template-name`` in FlytePropeller
This [option](https://docs.flyte.org/en/latest/deployment/cluster_config/flytepropeller_config.html#default-pod-template-name-string)
initializes a K8s informer internally to track system PodTemplate updates
(creates, updates, etc) so that FlytePropeller is
[aware](https://docs.flyte.org/en/latest/deployment/cluster_config/flytepropeller_config.html#config-k8spluginconfig)
of the latest PodTemplate definitions in the K8s environment. You can find this
setting in [FlytePropeller](https://github.com/flyteorg/flyte/blob/e3e4978838f3caee0d156348ca966b7f940e3d45/deployment/eks/flyte_generated.yaml#L8239-L8244)
config map, which is not set by default.
An example configuration is:
```yaml
plugins:
k8s:
co-pilot:
name: "flyte-copilot-"
image: "cr.flyte.org/flyteorg/flytecopilot:v0.0.15"
start-timeout: "30s"
default-pod-template-name:
```
---
## Create a PodTemplate resource
Flyte recognizes PodTemplate definitions with the ``default-pod-template-name`` at two granularities.
1. A system-wide configuration can be created in the same namespace that
FlytePropeller is running in (typically `flyte`).
2. PodTemplates can be applied from the same namespace that the Pod will be
created in. FlytePropeller always favors the PodTemplate with the more
specific namespace. For example, a Pod created in the ``flytesnacks-development``
namespace will first look for a PodTemplate from the ``flytesnacks-development``
namespace. If that PodTemplate doesn't exist, it will look for a PodTemplate
in the same namespace that FlytePropeller is running in (in our example, ``flyte``),
and if that doesn't exist, it will begin configuration with an empty PodTemplate.
Flyte configuration supports all the fields available in the PodTemplate
resource, including container-level configuration. Specifically, containers may
be configured at two granularities, namely "default" and "primary".
In this scheme, if the default PodTemplate contains a container with the name
"default", that container will be used as the base configuration for all
containers Flyte constructs. Similarly, a container named "primary" will be used
as the base container configuration for all primary containers. If both container
names exist in the default PodTemplate, Flyte first applies the default
configuration, followed by the primary configuration.
Note: Init containers can be configured with similar granularity using "default-init"
and "primary-init" init container names.
The ``containers`` field is required in each k8s PodSpec. If no default
configuration is desired, specifying a container with a name other than "default"
or "primary" (for example, "noop") is considered best practice. Since Flyte only
processes the "default" or "primary" containers, this value will always be dropped
during Pod construction. Similarly, each k8s container is required to have an
``image``. This value will always be overridden by Flyte, so this value may be
set to anything. However, we recommend using a real image, for example
``docker.io/rwgrim/docker-noop``.
## Using ``pod_template_name`` in a Task
It's also possible to use PodTemplate in tasks by specifying ``pod_template_name`` in the task definition. For example:
```python
@task(
pod_template_name="a_pod_template",
)
def t1() -> int:
...
```
In this example we're specifying that a previously created Runtime PodTemplate resource named ``a_pod_template`` is going to be applied.
The only requirement is that this PodTemplate exists at the moment this task is about to be executed.
## Flyte's K8s Plugin Configuration
The FlytePlugins repository defines `configuration A["k8s plugin"]
C["runtime PodTemplate"] --> B
D["@task pod_template_name"] --> B
```
To better understand how Flyte constructs task execution Pods based on Compile-time and Runtime PodTemplates,
and K8s plugin configuration options, let's take a few examples.
### Example 1: Runtime PodTemplate and K8s Plugin Configuration
If you have a Runtime PodTemplate defined in the ``flyte`` namespace
(where FlytePropeller instance is running), then it is applied to all Pods that
Flyte creates, unless a **more specific** PodTemplate is defined in the namespace
where you start the Pod.
An example PodTemplate is shown:
```yaml
apiVersion: v1
kind: PodTemplate
metadata:
name: flyte-template
namespace: flyte
template:
metadata:
labels:
foo: from-pod-template
annotations:
foo: initial-value
bar: initial-value
spec:
containers:
- name: default
image: docker.io/rwgrim/docker-noop
terminationMessagePath: "/dev/foo"
hostNetwork: false
```
In addition, the K8s plugin configuration in FlytePropeller defines the default
Pod Labels, Annotations, and enables the host networking.
```yaml
plugins:
k8s:
default-labels:
bar: from-default-label
default-annotations:
foo: overridden-value
baz: non-overridden-value
enable-host-networking-pod: true
```
To construct a Pod, FlytePropeller initializes a Pod definition using the default
PodTemplate. This definition is applied to the K8s plugin configuration values,
and any task-specific configuration is overlaid. During the process, when lists
are merged, values are appended and when maps are merged, the values are overridden.
The resultant Pod using the above default PodTemplate and K8s Plugin configuration is shown:
```yaml
apiVersion: v1
kind: Pod
metadata:
name: example-pod
namespace: flytesnacks-development
labels:
foo: from-pod-template # maintained initial value
bar: from-default-label # value appended by k8s plugin configuration
annotations:
foo: overridden-value # value overridden by k8s plugin configuration
bar: initial-value # maintained initial value
baz: non-overridden-value # value added by k8s plugin configuration
spec:
containers:
- name: ax9kd5xb4p8r45bpdv7v-n0-0
image: ghcr.io/flyteorg/flytecookbook:core-bfee7e549ad749bfb55922e130f4330a0ebc25b0
terminationMessagePath: "/dev/foo"
# remaining container configuration omitted
hostNetwork: true # overridden by the k8s plugin configuration
```
The last step in constructing a Pod is to apply any task-specific configuration.
These options follow the same rules as merging the default PodTemplate and K8s
Plugin configuration (that is, list appends and map overrides). Task-specific
options are intentionally robust to provide fine-grained control over task
execution in diverse use-cases. Therefore, exploration is beyond this scope
and has therefore been omitted from this documentation.
### Example 2: A Runtime and Compile-time PodTemplates
In this example we're going to have a Runtime PodTemplate and a Compile-time PodTemplate defined in a task.
Let's say we have this Runtime PodTemplate defined in the same namespace as the one used to kick off an execution
of the task. For example:
```yaml
apiVersion: v1
kind: PodTemplate
metadata:
name: flyte-template
namespace: flytesnacks-development
template:
metadata:
annotations:
annotation_1: initial-value
bar: initial-value
spec:
containers:
- name: default
image: docker.io/rwgrim/docker-noop
terminationMessagePath: "/dev/foo"
```
And the definition of the Compile-time PodTemplate in a task:
```python
@task(
pod_template=PodTemplate(
primary_container_name="primary",
labels={
"label_1": "value-1",
"label_2": "value-2",
},
annotations={
"annotation_1": "value-1",
"annotation_2": "value-2",
},
pod_spec=V1PodSpec(
containers=[
V1Container(
name="primary",
image="a.b.c/image:v1",
command="cmd",
args=[],
),
],
)
)
)
def t1() -> int:
...
```
The resultant Pod is as follows:
```yaml
apiVersion: v1
kind: Pod
metadata:
name: example-pod
namespace: flytesnacks-development
labels:
label_1: value-1 # from Compile-time value
label_2: value-2 # from Compile-time value
annotations:
annotation_1: value-1 # value overridden by Compile-time PodTemplate
annotation_2: value-2 # from Compile-time PodTemplate
bar: initial-value # from Runtime PodTemplate
spec:
containers:
- name: default
image: docker.io/rwgrim/docker-noop
terminationMessagePath: "/dev/foo"
- name: primary
image: a.b.c/image:v1
command: cmd
args: []
# remaining container configuration omitted
```
Notice how options follow the same merging rules, i.e. lists append and maps override.
### Example 3: Runtime and Compile-time PodTemplates and K8s Plugin Configuration
Now let's make a slightly more complicated example where now we have both Compile-time and Runtime PodTemplates being combined
with K8s Configuration.
Here's the definition of a Compile-time PodTemplate:
```python
@task(
pod_template=PodTemplate(
primary_container_name="primary",
labels={
"label_1": "value-compile",
"label_2": "value-compile",
},
annotations={
"annotation_1": "value-compile",
"annotation_2": "value-compile",
},
pod_spec=V1PodSpec(
containers=[
V1Container(
name="primary",
image="a.b.c/image:v1",
command="cmd",
args=[],
),
],
host_network=True,
)
)
)
def t1() -> int:
...
```
And a Runtime PodTemplate:
```yaml
apiVersion: v1
kind: PodTemplate
metadata:
name: flyte-template
namespace: flyte
template:
metadata:
labels:
label_1: value-runtime
label_2: value-runtime
label_3: value-runtime
annotations:
foo: value-runtime
bar: value-runtime
spec:
containers:
- name: default
image: docker.io/rwgrim/docker-noop
terminationMessagePath: "/dev/foo"
hostNetwork: false
```
And the following K8s Plugin Configuration:
```yaml
plugins:
k8s:
default-labels:
label_1: value-plugin
default-annotations:
annotation_1: value-plugin
baz: value-plugin
```
The resultant pod for that task is as follows:
```yaml
apiVersion: v1
kind: Pod
metadata:
name: example-pod
namespace: flytesnacks-development
labels:
label_1: value-plugin
label_2: value-compile
annotations:
annotation_1: value-plugin
annotation_2: value-compile
foo: value-runtime
bar: value-runtime
baz: value-plugin
spec:
containers:
- name: default
image: docker.io/rwgrim/docker-noop
terminationMessagePath: "/dev/foo"
- name: primary
image: a.b.c/image:v1
command: cmd
args: []
# remaining container configuration omitted
```
=== PAGE: https://www.union.ai/docs/v1/flyte/deployment/flyte-configuration/cloud_events ===
# Cloud Events
Progress of Flyte workflow and task execution is delimited by a series of
events that are passed from the FlytePropeller to FlyteAdmin. Administrators
can configure FlyteAdmin to send these [cloud events](https://cloudevents.io/) onwards to a pub/sub system like
SNS/SQS as well. Note that this configuration is distinct from the
configuration for notifications.
They should use separate topics/queues. These events are meant for external
consumption, outside the Flyte platform.
## Use cases
CloudEvents is a specification for describing event data in common formats
to provide interoperability across services, platforms and systems.
The external events flow can be useful for tracking data lineage and
integrating with existing systems within your organization.
## Supported Implementations
Event egress can be configured to work with **AWS** using
[SQS](https://aws.amazon.com/sqs/) and
[SNS](https://aws.amazon.com/sns/),
[GCP Pub/Sub](https://cloud.google.com/pubsub)
[Apache Kafka](https://kafka.apache.org/), or
[NATS](https://https://nats.io/)
## Configuration
To turn on, add the following to your FlyteAdmin configuration:
AWS SNS
```yaml
cloud_events.yaml: |
cloudEvents:
enable: true
aws:
region: us-east-2
eventsPublisher:
eventTypes:
- all # or node, task, workflow
topicName: arn:aws:sns:us-east-2:123456:123-my-topic
type: aws
```
GCP Pub/Sub
```yaml
cloud_events.yaml: |
cloudEvents:
enable: true
gcp:
projectId: my-project-id
eventsPublisher:
eventTypes:
- all # or node, task, workflow
topicName: my-topic
type: gcp
```
Apache Kafka
```yaml
cloud_events.yaml: |
cloudEvents:
enable: true
kafka:
brokers: 127.0.0.1:9092
eventsPublisher:
eventTypes:
- all
topicName: myTopic
type: kafka
```
NATS
```yaml
cloud_events.yaml: |
cloudEvents:
enable: true
nats:
servers: 127.0.0.1:4222
eventsPublisher:
eventTypes:
- all
topicName: myTopic # this will be used as NATS subject
type: nats
```
### Helm values configuration
There should already be a section for this in the ``values.yaml`` file. Update
the settings under the ``cloud_events`` key and turn ``enable`` to ``true``.
The same flag is used for Helm as for Admin itself.
## Usage
The events are emitted in cloud Event format, and the data in the cloud event
will be base64 encoded binary representation of the following IDL messages:
* ``admin_event_pb2.TaskExecutionEventRequest``
* ``admin_event_pb2.NodeExecutionEventRequest``
* ``admin_event_pb2.WorkflowExecutionEventRequest``
Which of these three events is being sent can be distinguished by the subject
line of the message, which will be one of the three strings above.
Note that these message wrap the underlying event messages
[found here](https://github.com/flyteorg/flyte/blob/master/flyteidl/protos/flyteidl/event/event.proto).
## CloudEvent Spec
```json
{
"specversion" : "1.0",
"type" : "com.flyte.resource.workflow",
"source" : "https://github.com/flyteorg/flyteadmin",
"id" : "D234-1234-1234",
"time" : "2018-04-05T17:31:00Z",
"jsonschemaurl": "https://github.com/flyteorg/flyteidl/blob/master/jsonschema/workflow_execution.json",
"data" : "workflow execution event"
}
```
=== PAGE: https://www.union.ai/docs/v1/flyte/deployment/flyte-configuration/customizable_resources ===
# Customizing project, domain, and workflow resources with flytectl
For critical projects and workflows, you can use the `flytectl update task-resource-attribute` command to configure
settings for task, cluster, and workflow execution resources, set matching executions to execute on specific clusters, set execution queue attributes, and [other attributes](https://github.com/flyteorg/flyte/blob/95baed556f5844e6a494507c3aa5a03fe6d42fbb/flyteidl/protos/flyteidl/admin/matchable_resource.proto#L15)
that differ from the default values set for your global Flyte installation. These customizable settings are created, updated, and deleted via the API and stored in the FlyteAdmin database.
In code, these settings are sometimes called `matchable attributes` or `matchable resources`, because we use a hierarchy for matching the customizations to applicable Flyte inventory and executions.
## Configuring existing resources
### About the resource hierarchy
Many platform specifications set in the FlyteAdmin config are applied to every project and domain. Although these values are customizable as part of your helm installation, they are still applied to every user project and domain combination.
You can choose to customize these settings along increasing levels of specificity with Flyte:
- Domain
- Project and Domain
- Project, Domain, and Workflow name
- Project, Domain, Workflow name and Launch plan name
See [Project and domains](https://www.union.ai/docs/v1/flyte/user-guide/development-cycle/projects-and-domains) for general information about those concepts.
The following section will show you how to configure the settings along these dimensions.
### Task resources
As a system administrator you may want to define default task resource requests and limits across your Flyte deployment. This can be set globally in the FlyteAdmin [config](https://github.com/flyteorg/flyte/blob/95baed556f5844e6a494507c3aa5a03fe6d42fbb/charts/flyte-core/values.yaml#L786-L795)
under `task_resource_defaults`.
**Default** values get injected as the task requests and limits when a task definition omits a specific resource.
**Limit** values are only used as validation. Neither a task request nor limit can exceed the limit for a resource type.
#### Configuring task resources
Available resources for configuration include:
- CPU
- GPU
- Memory
- [Ephemeral Storage](https://kubernetes.io/docs/concepts/configuration/manage-resources-containers/#local-ephemeral-storage)
In the absence of a customization, the global
default values in `task_resource_defaults` are used.
The customized values from the database are assigned at execution, rather than registration time.
### Customizing task resource configuration
To customize resources for project-domain attributes using `flytectl`, define a ``tra.yaml`` file with your customizations:
```yaml
project: flyteexamples
domain: development
defaults:
cpu: "1"
memory: 150Mi
limits:
cpu: "2"
memory: 450Mi
```
Update the task resource attributes for a project-domain combination:
```bash
flytectl update task-resource-attribute --attrFile tra.yaml
```
> Refer to the :ref:`docs ` to learn more about the command and its supported flag(s).
To fetch and verify the individual project-domain attributes:
```bash
flytectl get task-resource-attribute -p flyteexamples -d development
```
You can view all custom task-resource-attributes by visiting
``protocol://`` and substitute
the protocol and host appropriately.
### Cluster resources
Cluster resources are how you configure Kubernetes namespace attributes that are applied at execution time.
This includes per-namespace resource quota, patching the default service account with a bounded IAM role, or attaching `imagePullSecrets` to the default service account for accessing a private container registry
#### Configuring cluster resources
The format of all these parameters are free-form key-value pairs used for populating the Kubernetes object templates consumed by the cluster resource controller. The cluster resource controller ensures these fully rendered object templates are applied as Kubernetes resources for each execution namespace.
The keys represent templatized variables in the
[cluster resource template](https://github.com/flyteorg/flyte/blob/95baed556f5844e6a494507c3aa5a03fe6d42fbb/charts/flyte-core/values.yaml#L1035-L1056)
and the values are what you want to see filled in.
In the absence of custom customized values, your Flyte installation will use ``customData`` from the FlyteAdmin config
as the per-domain defaults. Flyte specifies these defaults by domain and applies them to every project-domain namespace combination.
#### Customizing cluster resource configuration
The cluster resource template values can be specified on domain, and project-and-domain.
Since Flyte execution namespaces are never on a per-workflow or a launch plan basis, specifying a workflow or launch plan level customization is non-actionable.
This is a departure from the usual hierarchy for customizable resources.
Define an attributes file, ``cra.yaml``:
```yaml
domain: development
project: flyteexamples
attributes:
projectQuotaCpu: "1000"
projectQuotaMemory: 5Ti
```
To ensure that the customizations reflect in the Kubernetes namespace
``flyteexamples-development`` (that is, the namespace has a resource quota of
1000 CPU cores and 5TB of memory) when the admin fills in cluster resource
templates:
```bash
flytectl update cluster-resource-attribute --attrFile cra.yaml
```
To fetch and verify the individual project-domain attributes:
```bash
flytectl get cluster-resource-attribute -p flyteexamples -d development
```
Flyte uses these updated values to fill the template fields for the
``flyteexamples-development`` namespace.
For other namespaces, the
[platform defaults](https://github.com/flyteorg/flyte/blob/95baed556f5844e6a494507c3aa5a03fe6d42fbb/charts/flyte-core/values.yaml#L1035-L1056)
apply.
> The template values, for example, ``projectQuotaCpu`` or ``projectQuotaMemory`` are free-form strings. Ensure that they match the template placeholders in your values file (e.g. [values-eks.yaml](https://github.com/flyteorg/flyte/blob/95baed556f5844e6a494507c3aa5a03fe6d42fbb/charts/flyte-core/values-eks.yaml#L357-L379)) for your changes to take effect and custom values to be substituted.
You can view all custom cluster-resource-attributes by visiting ``protocol://``
and substitute the protocol and host appropriately.
### Workflow execution configuration
Although many execution-time parameters can be overridden at execution time itself, it is helpful to set defaults on a per-project or per-workflow basis. This config includes
annotations and labels in the [Workflow execution config](https://github.com/flyteorg/flyte/blob/95baed556f5844e6a494507c3aa5a03fe6d42fbb/flyteidl/gen/pb_python/flyteidl/admin/matchable_resource_pb2.pyi#L15-L24).
- `max_parallelism`: Limits maximum number of nodes that can be evaluated for an individual workflow in parallel
- [security context](https://github.com/flyteorg/flyte/blob/95baed556f5844e6a494507c3aa5a03fe6d42fbb/flyteidl/protos/flyteidl/core/security.proto#L118): configures the pod identity and auth credentials for task pods at execution time
- `raw_output_data_config`: where offloaded user data is stored
- `interruptible`: whether to use [spot instances](https://docs.flyte.org/en/user_guide/productionizing/spot_instances.html)
- `overwrite_cache`: Allows for all cached values of a workflow and its tasks to be overwritten for a single execution.
- `envs`: Custom environment variables to apply for task pods brought up during execution
#### Customizing workflow execution configuration
These can be defined at two levels of project-domain or project-domain-workflow:
```bash
flytectl update workflow-execution-config
```
#### Execution cluster label
This matchable attribute allows forcing a matching execution to consistently execute on a specific Kubernetes cluster for multi-cluster Flyte deployment set-up. In lieu of an explicit customization, cluster assignment is random.
For setting up a multi-cluster environment, follow [the guide](https://www.union.ai/docs/v1/flyte/deployment/flyte-deployment/multicluster)
#### Customizing execution cluster label configuration
Define an attributes file in `ec.yaml`:
```yaml
value: mycluster
domain: development
project: flyteexamples
```
Ensure that admin places executions in the flyteexamples project and development domain onto ``mycluster``:
```bash
flytectl update execution-cluster-label --attrFile ec.yaml
```
To fetch and verify the individual project-domain attributes:
```bash
flytectl get execution-cluster-label -p flyteexamples -d development
```
You can view all custom execution cluster attributes by visiting
``protocol://`` and substitute
the protocol and host appropriately.
### Execution queues
Execution queues are defined in [FlyteAdmin configuration](https://github.com/flyteorg/flyte/blob/95baed556f5844e6a494507c3aa5a03fe6d42fbb/flyteadmin/flyteadmin_config.yaml#L138-L148).
These are used for execution placement for constructs like AWS Batch.
The **attributes** associated with an execution queue must match the **tags**
for workflow executions. The tags associated with configurable resources are
stored in the admin database.
#### Customizing execution queue configuration
```bash
flytectl update execution-queue-attribute
```
You can view existing attributes for which tags can be assigned by visiting
``protocol:///api/v1/matchable_attributes?resource_type=2`` and substitute
the protocol and host appropriately.
## Adding new customizable resources
As a quick refresher, custom resources allow you to manage configurations for specific combinations of user projects, domains and workflows that customize default values.
Examples of such resources include execution clusters, task resource defaults, and more.
In a multi-cluster setup, an example one could think of is setting routing rules to send certain workflows to specific clusters, which demands setting up custom resources.
Here's how you could go about building a customizable priority designation.
**Example**
Let's say you want to inject a default priority annotation for your workflows.
Perhaps you start off with a model where everything has a default priority but soon you realize it makes sense that workflows in your production domain should take higher priority than those in your development domain.
Now, one of your user teams requires critical workflows to have a higher priority than other production workflows.
Here's how you could do that.
**Flyte IDL**
Introduce a new [matchable resource](https://github.com/flyteorg/flyte/blob/95baed556f5844e6a494507c3aa5a03fe6d42fbb/flyteidl/protos/flyteidl/admin/matchable_resource.proto#L15) that includes a unique enum value and proto message definition.
For example:
```
enum MatchableResource {
...
WORKFLOW_PRIORITY = 10;
}
message WorkflowPriorityAttribute {
int priority = 1;
}
message MatchingAttributes {
oneof target {
...
WorkflowPriorityAttribute WorkflowPriority = 11;
}
}
```
See the changes in this `file `__ for an example of what is required.
**FlyteAdmin**
Once your IDL changes are released, update the logic of FlyteAdmin to `fetch `__ your new matchable priority resource and use it while creating executions or in relevant use cases.
For example:
```
resource, err := s.resourceManager.GetResource(ctx, managerInterfaces.ResourceRequest{
Domain: domain,
Project: project, // optional
Workflow: workflow, // optional, must include project when specifying workflow
LaunchPlan: launchPlan, // optional, must include project + workflow when specifying launch plan
ResourceType: admin.MatchableResource_WORKFLOW_PRIORITY,
})
if err != nil {
return err
}
if resource != nil && resource.Attributes != nil && resource.Attributes.GetWorkflowPriority() != nil {
priorityValue := resource.Attributes.GetWorkflowPriority().GetPriority()
// do something with the priority here
}
```
**Flytekit**
For convenience, add a FlyteCTL wrapper to update the new attributes. Refer to [this PR](https://github.com/flyteorg/flytectl/pull/65) for the entire set of changes required.
That's it! You now have a new matchable attribute to configure as the needs of your users evolve.
=== PAGE: https://www.union.ai/docs/v1/flyte/deployment/flyte-configuration/configuring-platform-events ===
# Platform Events
Progress of Flyte workflow and task execution is delimited by a series of events that are passed from the FlytePropeller to FlyteAdmin.
Administrators can configure FlyteAdmin to send these events onwards to a pub/sub system like SNS/SQS as well. Note that this configuration is distinct from the configuration for notifications. They should use separate topics/queues. These events are meant for external consumption, outside the Flyte platform, whereas the notifications pub/sub setup is entirely for Admin itself to send email/pagerduty/etc notifications.
## Use cases
The external events flow can be useful for tracking data lineage and integrating with existing systems within your organization.
### Supported Implementations
Event egress can be configured to work with **AWS** using [SQS](https://aws.amazon.com/sqs/)and [SNS](https://aws.amazon.com/sns/)or **GCP** [Pub/Sub](https://cloud.google.com/pubsub).
## Configuration
To turn on, add the following to your FlyteAdmin:
### AWS SNS
```yaml
cloud_events.yaml: |
cloudEvents:
enable: true
aws:
region: us-east-2
eventsPublisher:
eventTypes:
- all # or node, task, workflow
topicName: arn:aws:sns:us-east-2:123456:123-my-topic
type: aws
```
### GCP Pub/Sub
```yaml
cloud_events.yaml: |
cloudEvents:
enable: true
gcp:
projectId: my-project-id
eventsPublisher:
eventTypes:
- all # or node, task, workflow
topicName: my-topic
type: gcp
```
### Helm configuration
There should already be a section for this in the ``values.yaml`` file.
Update the settings under the ``external_events`` key and turn ``enable`` to ``true``. The same flag is used for Helm as for Admin itself.
## Usage
The events emitted will be base64 encoded binary representation of the following IDL messages:
* ``admin_event_pb2.TaskExecutionEventRequest``
* ``admin_event_pb2.NodeExecutionEventRequest``
* ``admin_event_pb2.WorkflowExecutionEventRequest``
Which of these three events is being sent can be distinguished by the subject line of the message, which will be one of the three strings above.
Note that these message wrap the underlying event messages [found here](https://github.com/flyteorg/flyte/blob/95baed556f5844e6a494507c3aa5a03fe6d42fbb/flyteidl/protos/flyteidl/event/event.proto#L16).
=== PAGE: https://www.union.ai/docs/v1/flyte/deployment/flyte-configuration/configuring-notifications ===
# Workflow notifications
When a workflow completes, users can be notified by email, [Pagerduty](https://support.pagerduty.com/docs/email-integration-guide#integrating-with-a-pagerduty-service),
or [Slack](https://slack.com/help/articles/206819278-Send-emails-to-Slack).
The content of these notifications is configurable at the platform level.
## Usage
The [`Email`](https://www.union.ai/docs/v1/flyte/api-reference/flytekit-sdk/packages/flytekit.core.notification),
[`PagerDuty`](https://www.union.ai/docs/v1/flyte/api-reference/flytekit-sdk/packages/flytekit.core.notification), or
[`Slack`](https://www.union.ai/docs/v1/flyte/api-reference/flytekit-sdk/packages/flytekit.core.notification)
objects are used in the construction of a `LaunchPlan` to configure a notification when a workflow reaches a specified
[terminal workflow execution phase](https://github.com/flyteorg/flytekit/blob/b6f806d2fa493eb78f9c2d964989b5a5a94a44ed/flytekit/core/notification.py#L26-L31).
For example:
```python
from flytekit import Email, LaunchPlan
from flytekit.models.core.execution import WorkflowExecutionPhase
# This launch plan triggers email notifications when the workflow execution it triggered reaches the phase `SUCCEEDED`.
my_notifiying_lp = LaunchPlan.create(
"my_notifiying_lp",
my_workflow_definition,
default_inputs={"a": 4},
notifications=[
Email(
phases=[WorkflowExecutionPhase.SUCCEEDED],
recipients_email=["admin@example.com"],
)
],
)
```
Notifications can be combined with schedules to automatically alert you when a scheduled job succeeds or fails.
## Setting up workflow notifications
The ``notifications`` top-level portion of the FlyteAdmin config specifies how to handle notifications.
As with schedules, the notifications handling is composed of two parts. One handles enqueuing notifications asynchronously and the second part handles processing pending notifications and actually firing off emails and alerts.
This is only supported for Flyte instances running on AWS or GCP.
### AWS configuration
To publish notifications, you'll need to set up an [SNS topic](https://aws.amazon.com/sns/?whats-new-cards.sort-by=item.additionalFields.postDateTime&whats-new-cards.sort-order=desc).
In order to process notifications, you'll need to set up an [AWS SQS](https://aws.amazon.com/sqs/) queue to consume notification events. This queue must be configured as a subscription to your SNS topic you created above.
In order to actually publish notifications, you'll need a [verified SES email address](https://docs.aws.amazon.com/ses/latest/DeveloperGuide/verify-addresses-and-domains.html) which will be used to send notification emails and alerts using email APIs.
The role you use to run FlyteAdmin must have permissions to read and write to your SNS topic and SQS queue.
Let's look at the following config section and explain what each value represents:
```yaml
notifications:
# By default, the no-op executor is used.
type: "aws"
# This specifies which region AWS clients will use when creating SNS and SQS clients.
region: "us-east-1"
# This handles pushing notification events to your SNS topic.
publisher:
# This is the arn of your SNS topic.
topicName: "arn:aws:sns:us-east-1:{{ YOUR ACCOUNT ID }}:{{ YOUR TOPIC }}"
# This handles the recording notification events and enqueueing them to be
# processed asynchronously.
processor:
# This is the name of the SQS queue which will capture pending notification events.
queueName: "{{ YOUR QUEUE NAME }}"
# Your AWS `account id, see: https://docs.aws.amazon.com/IAM/latest/UserGuide/console_account-alias.html#FindingYourAWSId
accountId: "{{ YOUR ACCOUNT ID }}"
# This section encloses config details for sending and formatting emails
# used as notifications.
emailer:
# Configurable subject line used in notification emails.
subject: "Notice: Execution \"{{ workflow.name }}\" has {{ phase }} in \"{{ domain }}\"."
# Your verified SES email sender.
sender: "flyte-notifications@company.com"
# Configurable email body used in notifications.
body: >
Execution \"{{ workflow.name }} [{{ name }}]\" has {{ phase }} in \"{{ domain }}\". View details at
http://flyte.company.com/console/projects/{{ project }}/domains/{{ domain }}/executions/{{ name }}. {{ error }}
```
The full set of parameters which can be used for email templating are checked
into [code](https://github.com/flyteorg/flyte/blob/95baed556f5844e6a494507c3aa5a03fe6d42fbb/flyteadmin/pkg/async/notifications/email.go#L15-L30).
You can find the full configuration file [here](https://github.com/flyteorg/flyte/blob/95baed556f5844e6a494507c3aa5a03fe6d42fbb/flyteadmin/flyteadmin_config.yaml#L93-L107).
### GCP configuration
You'll need to set up a [Pub/Sub topic](https://cloud.google.com/pubsub/docs/create-topic) to publish notifications to,
and a [Pub/Sub subscriber](https://cloud.google.com/pubsub/docs/subscription-overview) to consume from that topic
and process notifications. The GCP service account used by FlyteAdmin must also have Pub/Sub publish and subscribe permissions.
### Email notifications
To set up email notifications, you'll need an account with an external email service which will be
used to send notification emails and alerts using email APIs.
Currently, [SendGrid](https://sendgrid.com/en-us) is the only supported external email service,
and you will need to have a verified SendGrid sender. Create a SendGrid API key with ``Mail Send`` permissions
and save it to a file ``key``.
Create a K8s secret in FlyteAdmin's cluster with that file:
```bash
kubectl create secret generic -n flyte --from-file key sendgrid-key
```
Mount the secret by adding the following to the ``flyte-core`` values YAML:
```yaml
flyteadmin:
additionalVolumes:
- name: sendgrid-key
secret:
secretName: sendgrid-key
items:
- key: key
path: key
additionalVolumeMounts:
- name: sendgrid-key
mountPath: /sendgrid
```
### Helm configuration
In the ``flyte-core`` values YAML, the top-level ``notifications`` config should be
placed under ``workflow_notifications``.
```yaml
workflow_notifications:
enabled: true
config:
notifications:
type: gcp
gcp:
projectId: "{{ YOUR PROJECT ID }}"
publisher:
topicName: "{{ YOUR PUB/SUB TOPIC NAME }}"
processor:
queueName: "{{ YOUR PUB/SUB SUBSCRIBER NAME }}"
emailer:
emailServerConfig:
serviceName: sendgrid
apiKeyFilePath: /sendgrid/key
subject: "Flyte execution \"{{ name }}\" has {{ phase }} in \"{{ project }}\"."
sender: "{{ YOUR SENDGRID SENDER EMAIL }}"
body: View details at https://{{ YOUR FLYTE HOST }}/console/projects/{{ project }}/domains/{{ domain }}/executions/{{ name }}
```
### Webhook connector
In recent Flytekit versions (`>=1.15.0`) it's possible to set up a [`WebhookTask`](https://github.com/flyteorg/flytekit/pull/3058) object to send notifications to any system through webhooks.
The following example uses Slack without email or queue configurations:
```python
from flytekit.extras.webhook import WebhookTask
notification_task = WebhookTask(
name="failure-notification",
url="https://hooks.slack.com/services/xyz", #your Slack webhook
method=http.HTTPMethod.POST,
headers={"Content-Type": "application/json"},
data={"text": "Workflow failed: {inputs.error_message}"},
dynamic_inputs={"error_message": str},
show_data=True,
show_url=True,
description="Send notification on workflow failure"
)
...
@fl.task
def ml_task_with_failure_handling() -> float:
try:
X, y = load_and_preprocess_data()
model = train_model(X=X, y=y)
accuracy = evaluate_model(model=model, X=X, y=y)
return accuracy
except Exception as e:
# Trigger the notification task on failure
notification_task(error_message=str(e))
raise
```
=== PAGE: https://www.union.ai/docs/v1/flyte/deployment/flyte-configuration/performance ===
# Optimizing Performance
Before getting started, it is always important to measure the performance. Consider using the Grafana dashboard templates as described in the [monitoring section](./monitoring).
## Introduction
There are some base design attributes and assumptions that FlytePropeller applies:
- Every workflow execution is independent and can be performed by a completeley distinct process.
- When a workflow definition is compiled, the resulting DAG structure is traversed by the controller and the goal is to gracefully transition each task to ``Success``.
- Task executions are performed by various FlytePlugins; which perform operations on Kubernetes and other remote services as declared in the workflow definition. FlytePropeller is only responsible for effectively monitoring and managing these executions.
In the following sections you will learn how Flyte ensures the correct and reliable execution of workflows through multiple stages, and what strategies you can apply to help the system efficiently handle increasing load.
## Summarized steps of a workflow execution
Let's revisit the lifecycle of a workflow execution.
The following diagram aims to summarize the process described in the [FlytePropeller Architecture](https://www.union.ai/docs/v1/flyte/architecture/component-architecture/flytepropeller_architecture) and [execution timeline](https://www.union.ai/docs/v1/flyte/architecture/workflow-timeline) sections, focusing on the main steps.
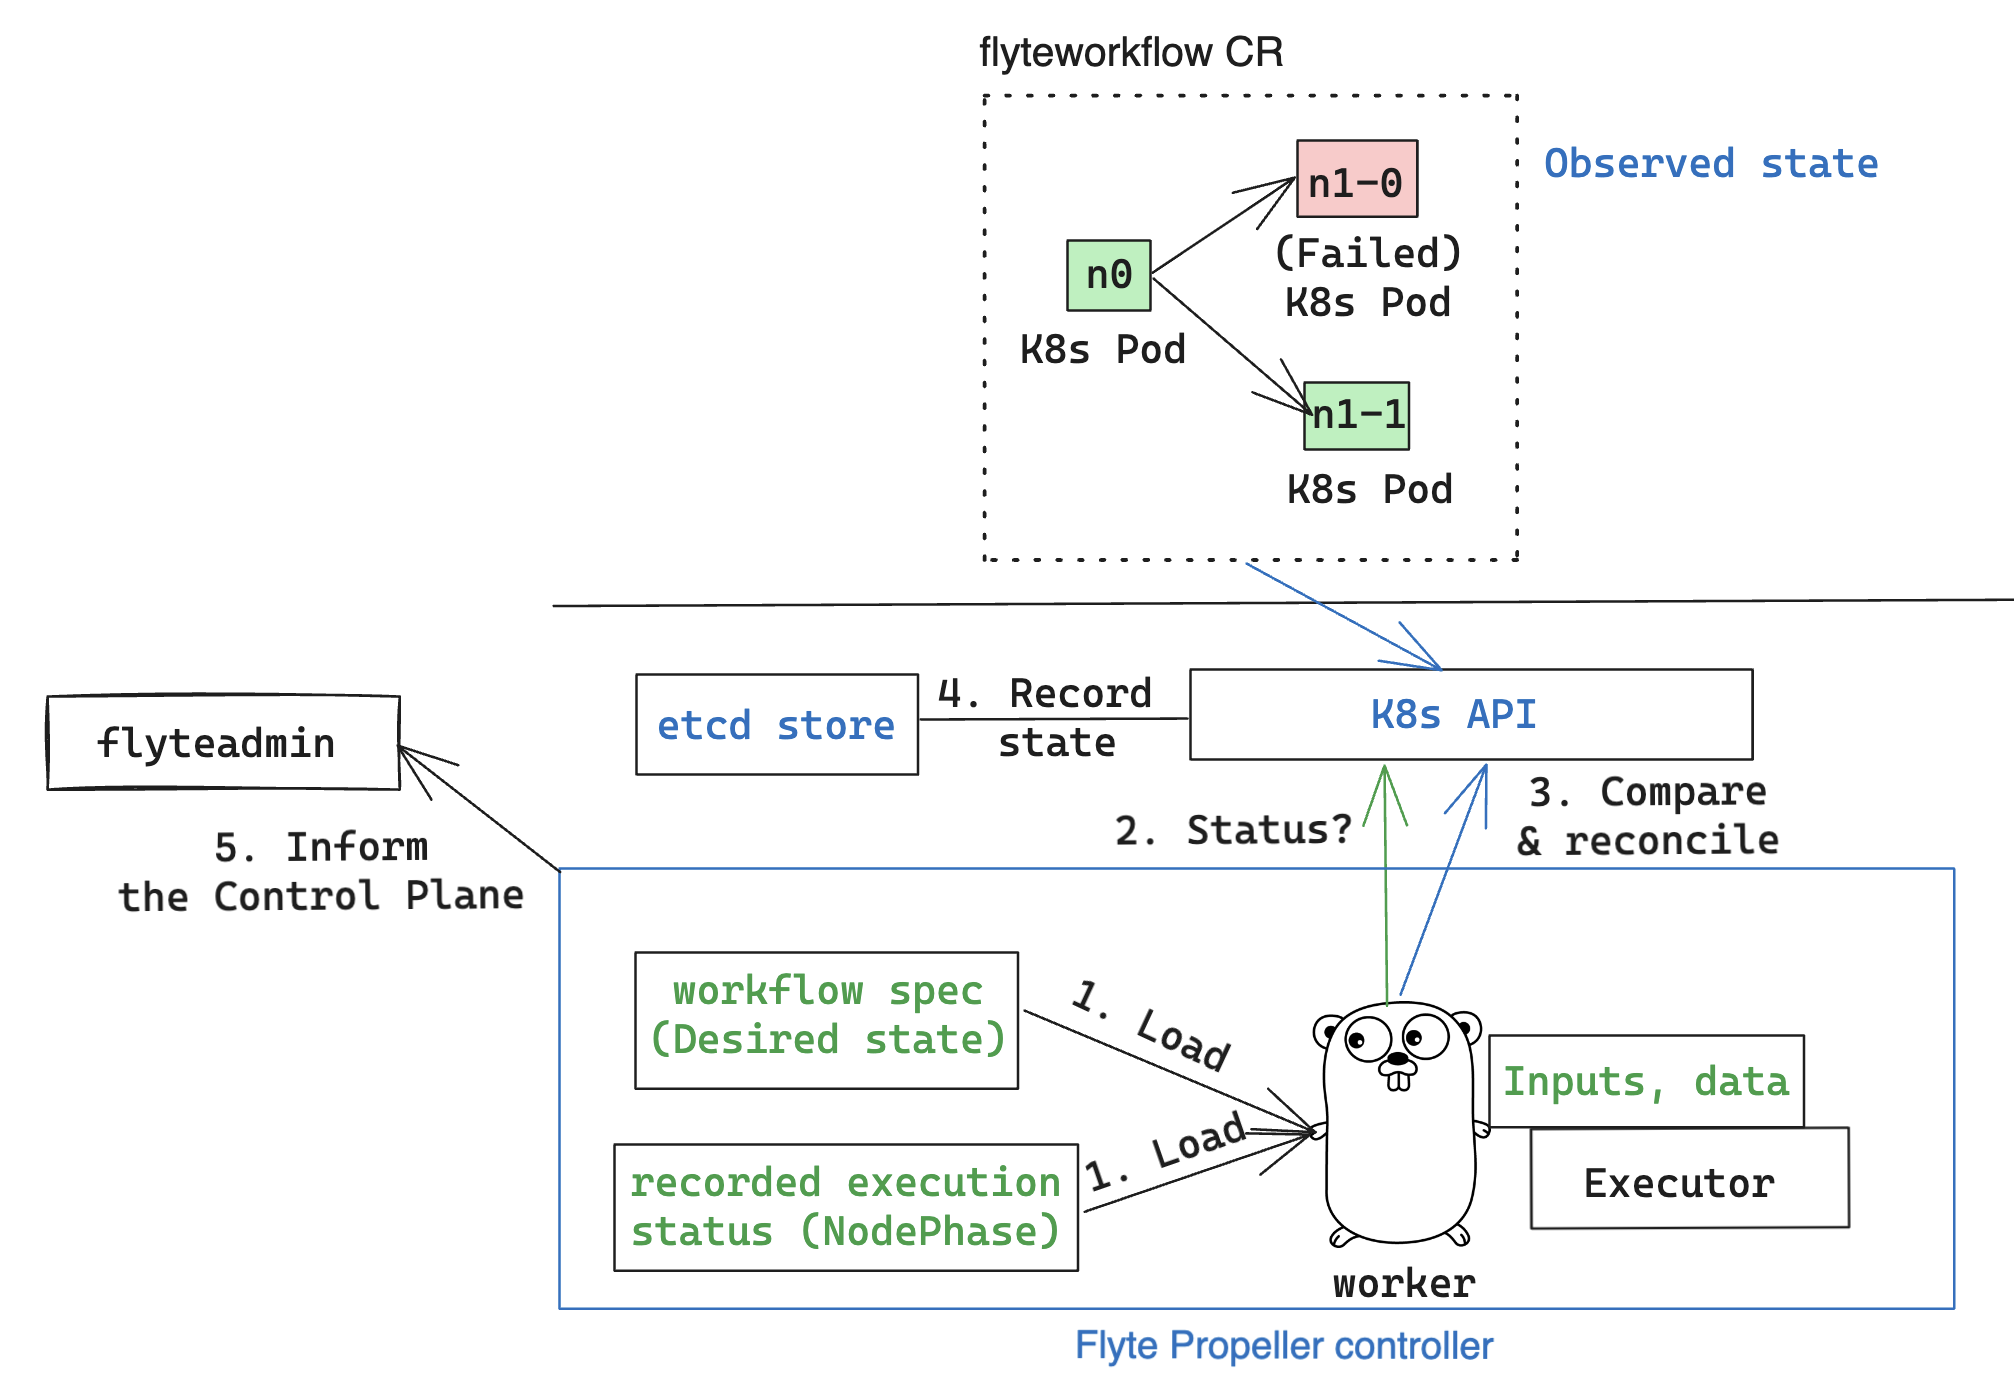
The ``Worker`` is the independent, lightweight, and idempotent process that interacts with all the components in the Propeller controller to drive executions.
It's implemented as a ``goroutine``, and illustrated here as a hard-working gopher which:
1. Pulls from the ``WorkQueue`` and loads what it needs to do the job: the workflow specification (desired state) and the previously recorded execution status.
2. Observes the actual state by querying the Kubernetes API (or the Informer cache).
3. Calculates the difference between desired and observed state, and triggers an effect to reconcile both states (eg. Launch/kill a Pod, handle failures, schedule a node execution, etc), interacting with the Propeller executors to process inputs, outputs and offloaded data as indicated in the workflow spec.
4. Keeps a local copy of the execution status, besides what the K8s API stores in ``etcd``.
5. Reports status to the control plane and, hence, to the user.
This process is known as the "evaluation loop".
While there are multiple metrics that could indicate a slow down in execution performance, ``round_latency`` -or the time it takes FlytePropeller to complete a single evaluation loop- is typically the "golden signal".
Optimizing ``round_latency`` is one of the main goals of the recommendations provided in the following sections.
## Performance tuning at each stage
### 1. Workers, the WorkQueue, and the evaluation loop
| Property | Description | Relevant metric | Impact on performance | Configuration parameter |
|----------|-------------|-----------------|-----------------------|-------------------------|
| `workers`| Number of processes that can work concurrently. Also implies number of workflows that can be executed in parallel. Since FlytePropeller uses `goroutines`, it can accommodate significantly more processes than the number of physical cores. | `flyte:propeller:all:free_workers_count` | A low number may result in higher overall latency for each workflow evaluation loop, while a higher number implies that more workflows can be evaluated in parallel, reducing latency. The number of workers depends on the number of CPU cores assigned to the FlytePropeller pod, and should be evaluated against the cost of context switching. A number around 500 - 800 workers with 4-8 CPU cores is usually adequate. | `propeller.workers` Default value: `20`. |
| Workqueue depth | Current number of workflow IDs in the queue awaiting processing | `sum(rate(flyte:propeller:all:main_depth[5m]))` | A growing trend indicates the processing queue depth is long and is taking longer to drain, delaying start time for executions. | `propeller.queue.capacity`. Default value: `10000` |
### 2. Querying observed state
The Kube client config controls the request throughput from FlytePropeller to the Kube API server. These requests may include creating/monitoring pods or creating/updating FlyteWorkflow CRDs to track workflow execution.
The [default configuration provided by K8s](https://pkg.go.dev/sigs.k8s.io/controller-runtime/pkg/client/config#GetConfigWithContext) results in very conservative rate-limiting. FlytePropeller provides a default configuration that may offer better performance.
However, if your workload involves larger scales (e.g., >5k fanout dynamic or map tasks, >8k concurrent workflows, etc.,) the kube-client rate limiting config provided by FlytePropeller may still contribute to a noticeable drop in performance.
Increasing the ``qps`` and ``burst`` values may help alleviate back pressure and improve FlytePropeller performance. The following is an example kube-client config applied to Propeller:
```yaml
propeller:
kube-client-config:
qps: 100 # Refers to max rate of requests (queries per second) to kube-apiserver
burst: 120 # refers to max burst rate.
timeout: 30s # Refers to timeout when talking with the kube-apiserver
```
> In the previous example, the kube-apiserver will accept ``100`` queries per second, temporariliy admitting up to ``120`` before blocking any subsequent query. A query blocked for ``30s`` will timeout.
It is worth noting that the Kube API server tends to throttle requests transparently. This means that even after increasing the allowed frequency of API requests (e.g., increasing FlytePropeller workers or relaxing Kube client config rate-limiting), there may be steep performance decreases for no apparent reason.
While it's possible to easily monitor Kube API saturation using system-level metrics like CPU, memory, and network usage, we recommend looking at kube-apiserver-specific metrics like ``workqueue_depth`` which can assist in identifying whether throttling is to blame. Unfortunately, there is no one-size-fits-all solution here, and customizing these parameters for your workload will require trial and error.
[Learn more about Kubernetes metrics](https://kubernetes.io/docs/reference/instrumentation/metrics/)
### 3. Evaluating the DAG and reconciling state
| Property | Description | Impact on performance | Configuration parameter |
|-------------------------------|-----------------------------------------------------------------------------------------------------------------------------------------------------------------------------------------------------------------------------------------------------------------------------------------------------------------------------------------|-------------------------------------------------------------------------------------------------------------------------------------------------------------------------------------------------------------------------------------------------------------------------------------------------------------------------------------------------------|---------------------------------------------------------|
| `workflow-reeval-duration` | Interval at which the system re-evaluates the state of a workflow when no external events have triggered a state change. This periodic re-evaluation helps in progressing workflows that may be waiting on conditions or timeouts to be met. | A shorter duration means workflows are checked more frequently, which can lead to quicker progression through workflow steps but at the cost of increased load on the system. Conversely, a longer duration reduces system load but may delay the progression of workflows. | `propeller.workflow-reeval-duration`. Default value: `10s`. |
| `downstream-eval-duration` | Interval at which the system checks for updates on the execution status of downstream tasks within a workflow. This setting is crucial for workflows where tasks are interdependent, as it determines how quickly Flyte reacts to changes or completions of tasks that other tasks depend on. | A shorter interval makes Flyte check more frequently for task updates, which can lead to quicker workflow progression if tasks complete faster than anticipated, at the cost of higher system load and reduced throughput. Conversely, a higher value reduces the frequency of checks, which can decrease system load but may delay workflow progression. | `propeller.downstream-eval-duration`. Default value: `5s`. |
| `max-streak-length` | Maximum number of consecutive evaluation rounds that one propeller worker can use for one workflow. | A large value can lead to faster completion times for workflows that benefit from continuous processing (especially cached or computationally intensive workflows), but at the cost of lower throughput. If set to `1`, workflows are prioritized for fast-changing or "hot" workflows. | `propeller.max-streak-length`. Default value: `8`. |
| `max-size_mbs` | Max size of the write-through in-memory cache that FlytePropeller uses to store Inputs/Outputs metadata for faster read operations. | A too-small cache may increase latency due to frequent misses, while a too-large cache may consume excessive memory. Monitor metrics like [hit/miss rates](https://github.com/flyteorg/flyte/blob/8cc96177e7447d9630a1186215a8c8ad3d34d4a2/deployment/stats/prometheus/flytepropeller-dashboard.json#L1140) to optimize size. | `storage.cache.max-size_mbs`. Default value: `0` (disabled). |
| `backoff.max-duration` | Maximum back-off interval in case of resource-quota errors. | A higher value reduces retry frequency (preventing Kubernetes API overload) but increases latency for recovering workflows. | `tasks.backoff.max-duration`. Default value: `20s`. |
### 4. Recording execution status
| Property | Description | Impact on performance | Configuration parameter |
|------------------------|----------------------------------------------|---------------------------------------------------------------------------------------|--------------------------------------------------------------|
| `workflowStore Policy` | Specifies the strategy for workflow storage management. | The default policy is designed to leverage `etcd` features to reduce latency. | `propeller.workflowStore.policy`. Default value: `ResourceVersionCache`. |
**How `ResourceVersionCache` works?**
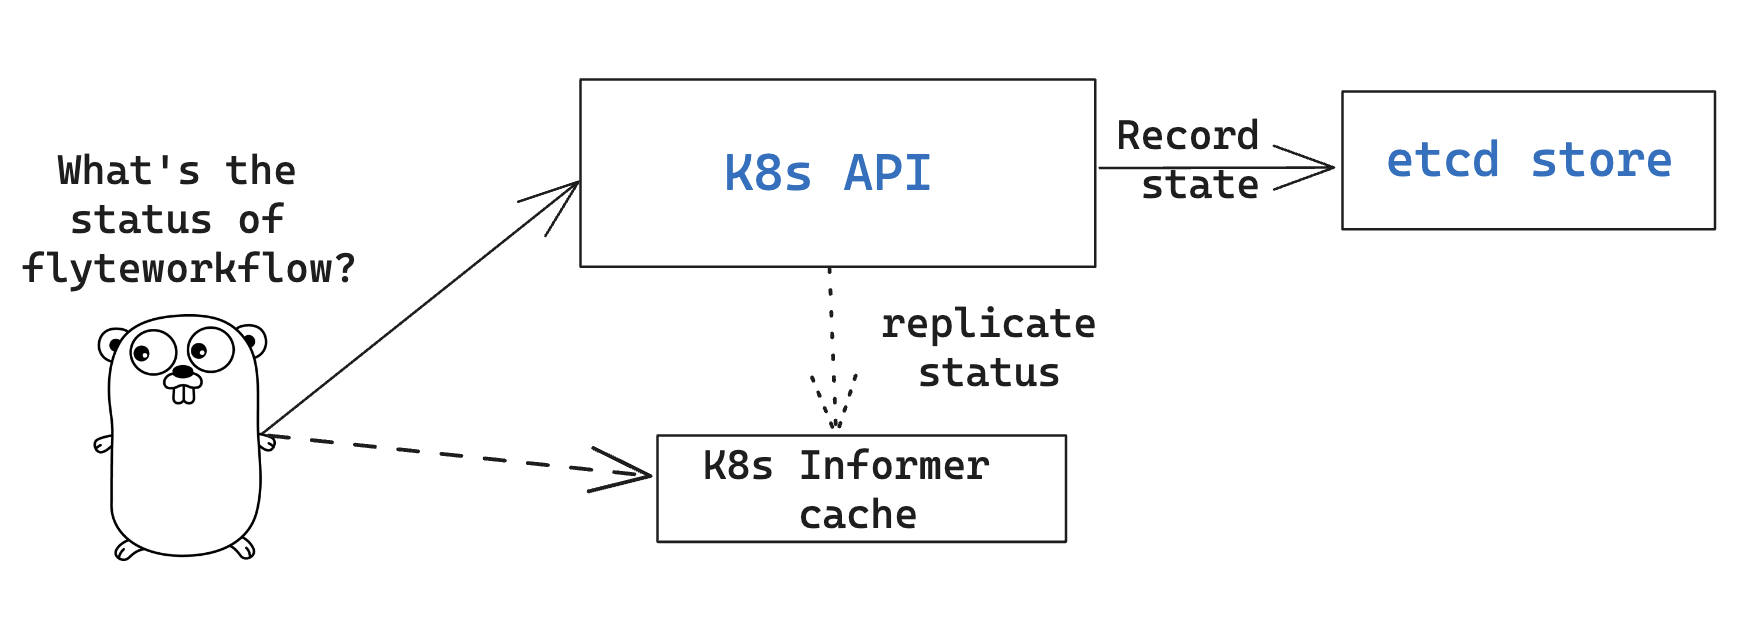
Kubernetes stores the definition and state of all the resources under its management on ``etcd``: a fast, distributed and consistent key-value store.
Every resource has a ``resourceVersion`` field representing the version of that resource as stored in ``etcd``.
**Example**
```bash
kubectl get datacatalog-589586b67f-l6v58 -n flyte -o yaml
```
Sample output (excerpt):
```yaml
apiVersion: v1
kind: Pod
metadata:
...
labels:
app.kubernetes.io/instance: flyte-core
app.kubernetes.io/managed-by: Helm
app.kubernetes.io/name: datacatalog
helm.sh/chart: flyte-core-v1.12.0
name: datacatalog-589586b67f-l6v58
namespace: flyte
...
resourceVersion: "1055227"
```
Every time a resource (e.g. a pod, a flyteworkflow CR, etc.) is modified, this counter is incremented.
As ``etcd`` is a distributed key-value store, it needs to manage writes from multiple clients (controllers in this case)
in a way that maintains consistency and performance.
That's why, in addition to using ``Revisions`` (implemented in Kubernetes as ``Resource Version``), ``etcd`` also prevents clients from writing if they're using
an outdated ``ResourceVersion``, which could happen after a temporary client disconnection or whenever a status replication from the Kubernetes API to
the Informer cache hasn't completed yet. Poorly handled by a controller, this could result in kube-server and FlytePropeller worker overload by repeatedly attempting to perform outdated (or "stale") writes.
FlytePropeller handles these situations by keeping a record of the last known ``ResourceVersion``. In the event that ``etcd`` denies a write operation due to an outdated version, FlytePropeller continues the workflow
evaluation loop, waiting for the Informer cache to become consistent. This mechanism, enabled by default and known as ``ResourceVersionCache``, avoids both overloading the K8s API and wasting ``workers`` resources on invalid operations.
It also mitigates the impact of cache propagation latency, which can be on the order of seconds.
If ``max-streak-length`` is enabled, instead of waiting for the Informer cache to become consistent during the evaluation loop, FlytePropeller runs multiple evaluation loops using its in-memory copy of the ``ResourceVersion`` and corresponding Resource state, as long
as there are mutations in any of the resources associated with that particular workflow. When the ``max-streak-length`` limit is reached, the evaluation loop is done and, if further evaluation is required, the cycle will start again by trying to get the most recent ``Resource Version`` as stored in ``etcd``.
Other supported options for ``workflowStore.policy`` are described below:
- ``InMemory``: utilizes an in-memory store for workflows, primarily for testing purposes.
- ``PassThrough``: directly interacts with the underlying Kubernetes clientset or shared informer cache for workflow operations.
- ``TrackTerminated``: specifically tracks terminated workflows.
### 5. Report status to the control plane
| Property | Description | Impact on performance |
|--------------------------------------------------------------------------|------------------------------------------------------------------------------------------------------|----------------------------------------------------------------------------------------------------------------------------------------------------------------|
| `admin-launcher.tps`, `admin-launcher.cacheSize`, `admin-launcher.workers` | Configure the maximum rate and number of launchplans that FlytePropeller can launch against FlyteAdmin. | Limiting writes from FlytePropeller to FlyteAdmin prevents server brown-outs or throttling. A larger cache size reduces server calls, improving efficiency. |
## Concurrency vs parallelism
While FlytePropeller is designed to efficiently handle concurrency using the mechanisms described in this section, parallel executions (not only concurrent, but evaluated at the same time) pose an additional challenge, especially with workflows that have an extremely large fanout.
This is because FlytePropeller implements a greedy traversal algorithm, that tries to evaluate all unblocked nodes within a workflow in every round.
A way to mitigate the potential performance impact is to limit the maximum number of nodes that can be evaluated simultaneously. This can be done by setting ``max-parallelism`` using any of the following methods:
a. Platform default: This allows to set platform-wide defaults for maximum parallelism within a Workflow execution evaluation loop. This can be overridden per launch plan or per execution.
The default [maxParallelism is configured to be 25](https://github.com/flyteorg/flyteadmin/blob/master/pkg/runtime/application_config_provider.go#L40).
It can be overridden with this config block in flyteadmin
```yaml
flyteadmin:
maxParallelism: 25
```
b. Default for a specific launch plan. For any launch plan, the ``max_parallelism`` value can be changed using :py:meth:`flytekit.LaunchPlan.get_or_create` or the :std:ref:`ref_flyteidl.admin.LaunchPlanCreateRequest`
**Flytekit Example**
```python
LaunchPlan.get_or_create(
name="my_cron_scheduled_lp",
workflow=date_formatter_wf,
max_parallelism=30,
)
```
#. Specify for an execution. ``max-parallelism`` can be overridden using ``pyflyte run --max-parallelism`` or by setting it in the UI.
## Scaling out FlyteAdmin
FlyteAdmin is a stateless service. Often, before needing to scale FlyteAdmin, you need to scale the backing database.
Check the [FlyteAdmin Dashboard](https://github.com/flyteorg/flyte/blob/master/deployment/stats/prometheus/flyteadmin-dashboard.json) for signs of database or API latency degradation.
PostgreSQL scaling techniques like connection pooling can help alleviate pressure on the database instance.
If needed, change the number of replicas of the FlyteAdmin K8s deployment to allow higher throughput.
## Scaling out Datacatalog
Datacatalog is a stateless service that connects to the same database as FlyteAdmin, so the recommendation to scale out the backing PostgreSQL database also applies here.
## Scaling out FlytePropeller
### Sharded scale-out
FlytePropeller Manager facilitates horizontal scaling of FlytePropeller through sharding. Effectively, the Manager is responsible for maintaining liveness and proper configuration over a collection of FlytePropeller instances. This scheme uses K8s label selectors to deterministically assign FlyteWorkflow CRD responsibilities to FlytePropeller instances, effectively distributing load processing over the shards.
Deployment of FlytePropeller Manager requires K8s configuration updates including a modified FlytePropeller deployment and a new PodTemplate defining managed FlytePropeller instances. The easiest way to apply these updates is to set the ``flytepropeller.manager`` value to ``true`` in the Helm values and set the manager config at ``configmap.core.manager``.
Flyte provides a variety of shard strategies to configure how FlyteWorkflows are sharded among managed FlytePropeller instances. These include ``hash``, which uses consistent hashing to load balance evaluation over shards, and ``project`` / ``domain``, which map the respective IDs to specific managed FlytePropeller instances. Below we include examples of Helm configurations for each of the existing shard strategies.
The hash shard Strategy, denoted by ``type: Hash`` in the configuration below, uses consistent hashing to evenly distribute Flyte workflows over managed FlytePropeller instances. This configuration requires a ``shard-count`` variable, which defines the number of managed FlytePropeller instances. You may change the shard count without impacting existing workflows. Note that changing the ``shard-count`` is a manual step; it is not auto-scaling.
```yaml
configmap:
core:
# a configuration example using the "hash" shard type
manager:
# pod and scanning configuration redacted
# ...
shard:
type: Hash # use the "hash" shard strategy
shard-count: 4 # the total number of shards
```
The project and domain shard strategies, denoted by ``type: Project`` and ``type: Domain`` respectively, use the Flyte workflow project and domain metadata to shard Flyte workflows. These shard strategies are configured using a ``per-shard-mapping`` option, which is a list of IDs. Each element in the ``per-shard-mapping`` list defines a new shard, and the ID list assigns responsibility for the specified IDs to that shard. A shard configured as a single wildcard ID (i.e. ``*``) is responsible for all IDs that are not covered by other shards. Only a single shard may be configured with a wildcard ID and, on that shard, there must be only one ID, namely the wildcard.
```yaml
configmap:
core:
# a configuration example using the "project" shard type
manager:
# pod and scanning configuration redacted
# ...
shard:
type: Project # use the "Project" shard strategy
per-shard-mapping: # a list of per shard mappings - one shard is created for each element
- ids: # the list of ids to be managed by the first shard
- flytesnacks
- ids: # the list of ids to be managed by the second shard
- flyteexamples
- flytelabs
- ids: # the list of ids to be managed by the third shard
- "*" # use the wildcard to manage all ids not managed by other shards
```
```yaml
configmap:
core:
# a configuration example using the "domain" shard type
manager:
# pod and scanning configuration redacted
# ...
shard:
type: Domain # use the "Domain" shard strategy
per-shard-mapping: # a list of per shard mappings - one shard is created for each element
- ids: # the list of ids to be managed by the first shard
- production
- ids: # the list of ids to be managed by the second shard
- "*" # use the wildcard to manage all ids not managed by other shards
```
## Multi-Cluster mode
If the K8s cluster itself becomes a performance bottleneck, Flyte supports adding multiple K8s dataplane clusters by default. Each dataplane cluster has one or more FlytePropellers running in it, and flyteadmin manages the routing and assigning of workloads to these clusters.
## Improving etcd Performance
### Offloading Static Workflow Information from CRD
Flyte uses a K8s CRD (Custom Resource Definition) to store and track workflow executions. This resource includes the workflow definition, the tasks and subworkflows that are involved, and the dependencies between nodes. It also includes the execution status of the workflow. The latter information (i.e. runtime status) is dynamic, and changes during the workflow's execution as nodes transition phases and the workflow execution progresses. However, the former information (i.e. workflow definition) remains static, meaning it will never change and is only consulted to retrieve node definitions and workflow dependencies.
CRDs are stored within ``etcd``, which requires a complete rewrite of the value data every time a single field changes. Consequently, the read / write performance of ``etcd``, as with all key-value stores, is strongly correlated with the size of the data. In Flyte's case, to guarantee only-once execution of nodes, we need to persist workflow state by updating the CRD at every node phase change. As the size of a workflow increases this means we are frequently rewriting a large CRD. In addition to poor read / write performance in ``etcd``, these updates may be restricted by a hard limit on the overall CRD size.
To counter the challenges of large FlyteWorkflow CRDs, Flyte includes a configuration option to offload the static portions of the CRD (ie. workflow / task / subworkflow definitions and node dependencies) to the S3-compliant blobstore. This functionality can be enabled by setting the ``useOffloadedWorkflowClosure`` option to ``true`` in the [FlyteAdmin configuration](https://docs.flyte.org/en/latest/deployment/cluster_config/flyteadmin_config.html#useoffloadedworkflowclosure-bool). When set, the FlyteWorkflow CRD will populate a ``WorkflowClosureReference`` field on the CRD with the location of the static data and FlytePropeller will read this information (through a cache) during each workflow evaluation. One important note is that currently this setting requires FlyteAdmin and FlytePropeller to have access to the same blobstore since FlyteAdmin only specifies a blobstore location in the CRD.
=== PAGE: https://www.union.ai/docs/v1/flyte/deployment/flyte-configuration/resource_manager ===
# Flyte ResourceManager
**Flyte ResourceManager** is a configurable component that helps track resource utilization of tasks that run on Flyte and allows plugins to manage resource allocations independently. Default deployments are configured with the ResourceManager disabled, which means plugins rely on each independent platform to manage resource utilization. See below for the default ResourceManager configuration:
```yaml
resourcemanager:
type: noop
```
When using a plugin that connects to a platform with a robust resource scheduling mechanism, like the K8s plugin, we recommend leaving the default ``flyteresourcemanager`` configuration in place. However, with web API plugins (for example), the rate at which Flyte sends requests may overwhelm a service, and we recommend changing the ``resourcemanager`` configuration.
The ResourceManager provides a task-type-specific pooling system for Flyte tasks. Optionally, plugin writers can request resource allocation in their tasks.
A plugin defines a collection of resource pools using its configuration. Flyte uses tokens as a placeholder to represent a unit of resource.
## How Flyte plugins request resources
Flyte plugins register the desired resource and resource quota with the **ResourceRegistrar** when setting up FlytePropeller. When a plugin is invoked, FlytePropeller provides a proxy for the plugin. This proxy facilitates the plugin's view of the resource pool by controlling operations to allocate and deallocate resources.
Once the setup is complete, FlytePropeller builds a ResourceManager based on the previously requested resource registration. Based on the plugin implementation's logic, resources are allocated and deallocated.
During runtime, the ResourceManager:
- Allocates tokens to the plugin.
- Releases tokens once the task is completed.
In this manner, Flyte plugins intelligently throttle resource usage during parallel execution of nodes.
The ResourceManager can use a Redis instance as an external store to track and manage resource pool allocation. By default, it is disabled, and can be enabled with:
```yaml
resourcemanager:
type: redis
resourceMaxQuota: 100
redis:
hostPaths:
- foo
hostKey: bar
maxRetries: 0
```
### Plugin resource allocation
When a Flyte task execution needs to send a request to an external service, the plugin claims a unit of the corresponding resource using a **ResourceName**, which is a unique token and a fully qualified resource request (typically an integer). The task execution generates this unique token and registers the token with the ResourceManager by calling the ResourceManager’s ``AllocateResource`` function. If the resource pool has sufficient capacity to fulfill the request, then the requested resources are allocated, and the plugin proceeds further.
When the status changes to **"AllocationGranted"**, the execution sends out the request for those resources.
The granted token is recorded in a token pool which corresponds to the resource that is managed by the ResourceManager.
## Plugin resource deallocation
When the request is completed, the plugin asks the ResourceManager to release the token by calling the ResourceManager's ``ReleaseResource()`` function, which eliminates the token from the token pool.
**Example**
Flyte has a built-in [Qubole](https://github.com/flyteorg/flyte/blob/95baed556f5844e6a494507c3aa5a03fe6d42fbb/flyteidl/protos/flyteidl/plugins/qubole.proto#L21) plugin which allows Flyte tasks to send Hive commands to Qubole. In the plugin, a single Qubole cluster is considered a resource, and sending a single Hive command to a Qubole cluster consumes a token of the corresponding resource.
The resource is allocated when the status is **“AllocationGranted"**. The Qubole plugin calls:
```go
status, err := AllocateResource(ctx, , , )
```
In our example scenario, the placeholder values are replaced with the following:
```go
status, err := AllocateResource(ctx, "default_cluster", "flkgiwd13-akjdoe-0", ResourceConstraintsSpec{})
```
The resource is deallocated when the Hive command completes its execution and the corresponding token is released. The plugin calls:
```go
status, err := AllocateResource(ctx, , , )
```
In our example scenario, the placeholder values are replaced with the following:
```go
err := ReleaseResource(ctx, "default_cluster", "flkgiwd13-akjdoe-0")
```
See below for an example interface that shows allocation and deallocation of resources:
```go
type ResourceManager interface {
GetID() string
// During execution, the plugin calls AllocateResource() to register a token in the token pool associated with a resource
// If it is granted an allocation, the token is recorded in the token pool until the same plugin releases it.
// When calling AllocateResource, the plugin has to specify a ResourceConstraintsSpec that contains resource capping constraints at different project and namespace levels.
// The ResourceConstraint pointers in ResourceConstraintsSpec can be set to nil to not have a constraint at that level
AllocateResource(ctx context.Context, namespace ResourceNamespace, allocationToken string, constraintsSpec ResourceConstraintsSpec) (AllocationStatus, error)
// During execution, after an outstanding request is completed, the plugin uses ReleaseResource() to release the allocation of the token from the token pool. This way, it redeems the quota taken by the token
ReleaseResource(ctx context.Context, namespace ResourceNamespace, allocationToken string) error
}
```
## Configuring ResourceManager to force runtime quota allocation constraints
Runtime quota allocation constraints can be achieved using ResourceConstraintsSpec. It is a contact that a plugin can specify at different project and namespace levels.
For example, you can set ResourceConstraintsSpec to ``nil`` objects, which means there would be no allocation constraints at the respective project and namespace level. When ResourceConstraintsSpec specifies ``nil`` ProjectScopeResourceConstraint, and a non-nil NamespaceScopeResourceConstraint, it suggests no constraints specified at any project or namespace level.
=== PAGE: https://www.union.ai/docs/v1/flyte/deployment/flyte-configuration/secrets ===
# Secrets
Flyte supports running a variety of tasks, from containers to SQL queries and
service calls, and it provides a native Secret construct to request and access
secrets.
This example explains how you can access secrets in a Flyte Task. Flyte provides
different types of secrets, but for users writing Python tasks, you can only access
secure secrets either as environment variables or as a file injected into the
running container.
## Creating secrets with a secrets manager
### Prerequisites
- Install [kubectl](https://kubernetes.io/docs/tasks/tools/).
- Have access to a Flyte cluster, for e.g. with `flytectl demo start` as
described [here](https://www.union.ai/docs/v1/flyte/user-guide/development-cycle/running-in-a-local-cluster).
The first step to using secrets in Flyte is to create one on the backend.
By default, Flyte uses the K8s-native secrets manager, which we'll use in this
example, but you can also [configure different secret managers](./secrets#configuring-a-secret-management-system-plugin).
First, we use `kubectl` to create a secret called `user-info` with a
`user_secret` key:
```shell
$ kubectl create secret -n - generic user-info --from-literal=user_secret=mysecret
```
> [!NOTE]
> Be sure to specify the correct Kubernetes namespace when creating a secret. If you plan on accessing
> the secret in the `flytesnacks` project under the `development` domain, replace `-`
> with `flytesnacks-development`. This is because secrets need to be in the same namespace as the
> workflow execution.
> [!WARNING]
> The imperative command above is useful for creating secrets in an ad hoc manner,
> but it may not be the most secure or sustainable way to do so. You can, however,
> define secrets using a [configuration file](https://kubernetes.io/docs/tasks/configmap-secret/managing-secret-using-config-file/)
> or tools like [Kustomize](https://kubernetes.io/docs/tasks/configmap-secret/managing-secret-using-kustomize/).
## Using secrets in tasks
Once you've defined a secret on the Flyte backend, `flytekit` exposes a class
called `flytekit.Secret`, which allows you to request a secret
from the configured secret manager:
```python
import os
from typing import Tuple
import flytekit as fl
from flytekit.testing import SecretsManager
secret = fl.Secret(
group="",
key="",
mount_requirement=Secret.MountType.ENV_VAR,
)
```
Secrets consists of `group`, `key`, and `mounting_requirement` arguments,
where a secret group can have multiple secrets associated with it.
If the `mounting_requirement` argument is not specified, the secret will
be injected as an environment variable by default.
In the code below we specify two variables, `SECRET_GROUP` and
`SECRET_NAME`, which maps onto the `user-info` secret that we created
with `kubectl` above, with a key called `user_secret`.
```python
SECRET_GROUP = "user-info"
SECRET_NAME = "user_secret"
```
Now we declare the secret in the `secret_requests` argument of the
`@fl.task` decorator. The request tells Flyte to make
the secret available to the task.
The secret can then be accessed inside the task using the
`flytekit.ExecutionParameters` object, which is returned by
invoking the `flytekit.current_context` function, as shown below.
At runtime, Flytekit looks inside the task pod for an environment variable or
a mounted file with a predefined name/path and loads the value.
```python
@fl.task(secret_requests=[fl.Secret(group=SECRET_GROUP, key=SECRET_NAME)])
def secret_task() -> str:
context = fl.current_context()
secret_val = context.secrets.get(SECRET_GROUP, SECRET_NAME)
print(secret_val)
return secret_val
```
> [!WARNING]
> Never print secret values! The example above is just for demonstration purposes.
> [!NOTE]
> - In case Flyte fails to access the secret, an error is raised.
> - The `Secret` group and key are required parameters during declaration
> and usage. Failure to specify will cause a `ValueError`.
### Multiple keys grouped into one secret
In some cases you may have multiple secrets and sometimes, they maybe grouped
as one secret in the `SecretStore`.
For example, In Kubernetes secrets, it is possible to nest multiple keys under
the same secret:
```shell
$ kubectl create secret generic user-info \
--from-literal=user_secret=mysecret \
--from-literal=username=my_username \
--from-literal=password=my_password
```
In this case, the secret group will be `user-info`, with three available
secret keys: `user_secret`, `username`, and `password`:
```python
USERNAME_SECRET = "username"
PASSWORD_SECRET = "password"
```
The Secret structure allows passing two fields, matching the key and the group, as previously described:
```python
@fl.task(
secret_requests=[
fl.Secret(key=USERNAME_SECRET, group=SECRET_GROUP),
fl.Secret(key=PASSWORD_SECRET, group=SECRET_GROUP),
]
)
def user_info_task() -> Tuple[str, str]:
context = fl.current_context()
secret_username = context.secrets.get(SECRET_GROUP, USERNAME_SECRET)
secret_pwd = context.secrets.get(SECRET_GROUP, PASSWORD_SECRET)
print(f"{secret_username}={secret_pwd}")
return secret_username, secret_pwd
```
> [!WARNING]
> Never print secret values! The example above is just for demonstration purposes.
### Mounting secrets as files or environment variables
It is also possible to make Flyte mount the secret as a file or an environment
variable.
The file type is useful for large secrets that do not fit in environment variables,
which are typically asymmetric keys (like certs, etc). Another reason may be that a
dependent library requires the secret to be available as a file.
In these scenarios you can specify the `mount_requirement=Secret.MountType.FILE`.
In the following example we force the mounting to be an environment variable:
```python
# In the following example we force the mounting to be an environment variable:
@fl.task(
secret_requests=[
fl.Secret(
group=SECRET_GROUP,
key=SECRET_NAME,
mount_requirement=fl.Secret.MountType.ENV_VAR,
)
]
)
def secret_file_task() -> Tuple[str, str]:
secret_manager = fl.current_context().secrets
# get the secrets filename
filename = secret_manager.get_secrets_file(SECRET_GROUP, SECRET_NAME)
# get secret value from an environment variable
secret_val = secret_manager.get(SECRET_GROUP, SECRET_NAME)
# returning the filename and the secret_val
return filename, secret_val
```
These tasks can be used in your workflow as usual
```python
@fl.workflow
def my_secret_workflow() -> Tuple[str, str, str, str, str]:
x = secret_task()
y, z = user_info_task()
f, s = secret_file_task()
return x, y, z, f, s
```
### Testing with mock secrets
The simplest way to test secret accessibility is to export the secret as an
environment variable. There are some helper methods available to do so:
```python
# environment variable. There are some helper methods available to do so:
if __name__ == "__main__":
sec = SecretsManager()
os.environ[sec.get_secrets_env_var(SECRET_GROUP, SECRET_NAME)] = "value"
os.environ[sec.get_secrets_env_var(SECRET_GROUP, USERNAME_SECRET)] = "username_value"
os.environ[sec.get_secrets_env_var(SECRET_GROUP, PASSWORD_SECRET)] = "password_value"
x, y, z, f, s = my_secret_workflow()
assert x == "value"
assert y == "username_value"
assert z == "password_value"
assert f == sec.get_secrets_file(SECRET_GROUP, SECRET_NAME)
```
## Using secrets in task templates
For task types that connect to a remote database, you'll need to specify
secret request as well. For example, for [`flytekitplugins.sqlalchemy.task.SQLAlchemyTask`](https://www.union.ai/docs/v1/flyte/api-reference/plugins/sqlalchemy/packages/flytekitplugins.sqlalchemy.task)
you need to:
1. Specify the `secret_requests` argument.
2. Configure the [`flytekitplugins.sqlalchemy.task.SQLAlchemyTask`](https://www.union.ai/docs/v1/flyte/api-reference/plugins/sqlalchemy/packages/flytekitplugins.sqlalchemy.task) to
declare which secret maps onto which connection argument.
```python
from flytekit import kwtypes
from flytekitplugins.sqlalchemy import SQLAlchemyTask, SQLAlchemyConfig
# define the secrets
secrets = {
"username": fl.Secret(group="", key=""),
"password": fl.Secret(group="", key=""),
}
sql_query = SQLAlchemyTask(
name="sql_query",
query_template="""SELECT * FROM my_table LIMIT {{ .inputs.limit }}""",
inputs=kwtypes(limit=int),
# request secrets
secret_requests=[*secrets.values()],
# specify username and password credentials in the configuration
task_config=SQLAlchemyConfig(
uri="",
secret_connect_args=secrets,
),
)
```
> [!NOTE]
> Here the `secret_connect_args` map to the
> [SQLAlchemy engine configuration](https://docs.sqlalchemy.org/en/20/core/engines.html)
> argument names for the username and password.
You can then use the `sql_query` task inside a workflow to grab data and
perform downstream transformations on it.
## How secrets injection works
The rest of this page describes how secrets injection works under the hood.
For a simple task that launches a Pod, the flow would look something like this:
[Secrets injection](https://mermaid.ink/img/eyJjb2RlIjoic2VxdWVuY2VEaWFncmFtXG4gICAgUHJvcGVsbGVyLT4-K1BsdWdpbnM6IENyZWF0ZSBLOHMgUmVzb3VyY2VcbiAgICBQbHVnaW5zLT4-LVByb3BlbGxlcjogUmVzb3VyY2UgT2JqZWN0XG4gICAgUHJvcGVsbGVyLT4-K1Byb3BlbGxlcjogU2V0IExhYmVscyAmIEFubm90YXRpb25zXG4gICAgUHJvcGVsbGVyLT4-K0FwaVNlcnZlcjogQ3JlYXRlIE9iamVjdCAoZS5nLiBQb2QpXG4gICAgQXBpU2VydmVyLT4-K1BvZCBXZWJob29rOiAvbXV0YXRlXG4gICAgUG9kIFdlYmhvb2stPj4rUG9kIFdlYmhvb2s6IExvb2t1cCBnbG9iYWxzXG4gICAgUG9kIFdlYmhvb2stPj4rUG9kIFdlYmhvb2s6IEluamVjdCBTZWNyZXQgQW5ub3RhdGlvbnMgKGUuZy4gSzhzLCBWYXVsdC4uLiBldGMuKVxuICAgIFBvZCBXZWJob29rLT4-LUFwaVNlcnZlcjogTXV0YXRlZCBQb2RcbiAgICBcbiAgICAgICAgICAgICIsIm1lcm1haWQiOnt9LCJ1cGRhdGVFZGl0b3IiOmZhbHNlfQ)
Breaking down this sequence diagram:
1. Flyte invokes a plugin to create the K8s object. This can be a Pod or a more complex CRD (e.g. Spark, PyTorch, etc.)
> [!NOTE]
> The plugin ensures that the labels and annotations are passed to any Pod that is spawned due to the creation of the CRD.
2. Flyte applies labels and annotations that are referenced to all secrets the task is requesting access to. Note that secrets are not case sensitive.
3. Flyte sends a `POST` request to `ApiServer` to create the object.
4. Before persisting the Pod, `ApiServer` invokes all the registered Pod Webhooks and Flyte's Pod Webhook is called.
5. Using the labels and annotiations attached in **step 2**, Flyte Pod Webhook looks up globally mounted secrets for each of the requested secrets.
6. If found, the Pod Webhook mounts them directly in the Pod. If not found, the Pod Webhook injects the appropriate annotations to load the secrets for K8s (or Vault or Confidant or any secret management system plugin configured) into the task pod.
Once the secret is injected into the task pod, Flytekit can read it using the secret manager.
The webhook is included in all overlays in the Flytekit repo. The deployment file creates two things; a **Job** and a **Deployment**.
1. `flyte-pod-webhook-secrets` **Job**: This job runs `flytepropeller webhook init-certs` command that issues self-signed CA Certificate as well as a derived TLS certificate and its private key. Ensure that the private key is in lower case, that is, `my_token` in contrast to `MY_TOKEN`. It stores them into a new secret `flyte-pod-webhook-secret`.
2. `flyte-pod-webhook` **Deployment**: This deployment creates the Webhook pod which creates a MutatingWebhookConfiguration on startup. This serves as the registration contract with the ApiServer to know about the Webhook before it starts serving traffic.
## Secret discovery
Flyte identifies secrets using a secret group and a secret key, which can
be accessed by [`flytekit.current_context`](https://www.union.ai/docs/v1/flyte/api-reference/flytekit-sdk/packages/flytekit) in the task function
body, as shown in the code examples above.
Flytekit relies on the following environment variables to load secrets (defined [here](https://github.com/flyteorg/flytekit/blob/9d313429c577a919ec0ad4cd397a5db356a1df0d/flytekit/configuration/internal.py#L141-L159)). When running tasks and workflows locally you should make sure to store your secrets accordingly or to modify these:
- `FLYTE_SECRETS_DEFAULT_DIR`: The directory Flytekit searches for secret files. **Default:** `"/etc/secrets"`
- `FLYTE_SECRETS_FILE_PREFIX`: a common file prefix for Flyte secrets. **Default:** `""`
- `FLYTE_SECRETS_ENV_PREFIX`: a common env var prefix for Flyte secrets. **Default:** `"_FSEC_"`
When running a workflow on a Flyte cluster, the configured secret manager will use the secret Group and Key to try and retrieve a secret.
If successful, it will make the secret available as either file or environment variable and will if necessary modify the above variables automatically so that the task can load and use the secrets.
## Configuring a secret management system plugin
When a task requests a secret, Flytepropeller will try to retrieve secrets in the following order:
1. Checking for global secrets, i.e. secrets mounted as files or environment variables on the `flyte-pod-webhook` pod
2. Checking with an additional configurable secret manager.
> [!NOTE]
> The global secrets take precedence over any secret discoverable by the secret manager plugins.
The following secret managers are available at the time of writing:
- [K8s secrets](https://kubernetes.io/docs/concepts/configuration/secret/#creating-a-secret) (**default**): `flyte-pod-webhook` will try to look for a K8s secret named after the secret Group and retrieve the value for the secret Key.
- [AWS Secret Manager](https://docs.aws.amazon.com/secretsmanager/latest/userguide/create_secret.html): `flyte-pod-webhook` will add the AWS Secret Manager sidecar container to a task Pod which will mount the secret.
- [GCP Secret Manager](https://cloud.google.com/security/products/secret-manager): `flyte-pod-webhook` will add the GCP Secret via a sidecar container to a task Pod which will mount the secret. See [gcp_secret_manager.go](https://github.com/flyteorg/flyte/blob/aaf6fecb36653e9b57d54fdcc5221731ba82cff5/flytepropeller/pkg/webhook/gcp_secret_manager.go#L40) for more details.
- [Vault Agent Injector](https://developer.hashicorp.com/vault/tutorials/getting-started/getting-started-first-secret#write-a-secret) : `flyte-pod-webhook` will annotate the task Pod with the respective Vault annotations that trigger an existing Vault Agent Injector to retrieve the specified secret Key from a vault path defined as secret Group.
When using the K8s secret manager plugin, which is enabled by default, the secrets need to be available in the same namespace as the task execution
(for example `flytesnacks-development`). K8s secrets can be mounted as either files or injected as environment variables into the task pod,
so if you need to make larger files available to the task, then this might be the better option.
Furthermore, this method also allows you to have separate credentials for different domains but still using the same name for the secret.
### Helm Chart Config
[`secretManagerType`](https://github.com/flyteorg/flyte/blob/aaf6fecb36653e9b57d54fdcc5221731ba82cff5/flytepropeller/pkg/webhook/config/config.go#L64) in the is relevant config to select the secret manager you would like to use. Here is an example GCP configuration.
```yaml
configmap:
core:
webhook:
secretManagerType: 3 # 1=k8s, 2=AWS, 3=GCP, 4=Vault
```
### AWS secrets manager
When using the AWS secret management plugin, secrets need to be specified by naming them in the format
`:`, where the secret string is a plain-text value, **not** key/value json.
### GCP secrets manager
The GCP secret manager only supports mounting via FILE as shown below.
```python
import flytekit as fl
SECRET_GROUP = "example-secret"
SECRET_GROUP_VERSION = "1"
SECRET_REQUEST = Secret(
group=SECRET_GROUP,
group_version=SECRET_GROUP_VERSION,
mount_requirement=fl.Secret.MountType.FILE
)
@fl.task(secret_requests=[SECRET_REQUEST])
def my_secret_task():
secret_val = fl.current_context().secrets.get(
SECRET_GROUP,
group_version=SECRET_GROUP_VERSION
)
```
### Vault secrets manager
When using the Vault secret manager, make sure you have Vault Agent deployed on your cluster as described in this [step-by-step tutorial](https://learn.hashicorp.com/tutorials/vault/kubernetes-sidecar).
Vault secrets can only be mounted as files and will become available under `"/etc/flyte/secrets/SECRET_GROUP/SECRET_NAME"`.
Vault comes with various secrets engines. Currently Flyte supports working with both version 1 and 2 of the `Key Vault engine ` as well as the `databases secrets engine `.
You can use the `group_version` parameter to specify which secret backend engine to use. Available choices are: "kv1", "kv2", "db":
#### Requesting secrets with the Vault secret manager
```python
secret = fl.Secret(
group="",
key="",
group_version="",
)
```
The group parameter is used to specify the path to the secret in the Vault backend. For example, if you have a secret stored in Vault at `"secret/data/flyte/secret"` then the group parameter should be `"secret/data/flyte"`.
When using either of the Key Vault engine versions, the secret key is the name of a specific secret entry to be retrieved from the group path.
When using the database secrets engine, the secret key itself is arbitrary but is required by Flyte to name and identify the secret file. It is arbitrary because the database secrets engine returns always two keys, `username` and `password` and we need to retrieve a matching pair in one request.
**Configuration**
You can configure the Vault role under which Flyte will try to read the secret by setting webhook.vaultSecretManager.role (default: `"flyte"`).
There is also a deprecated `webhook.vaultSecretManager.kvVersion` setting in the configmap that can be used to specify the version but only for the Key Vault backend engine.
Available choices are: "1", "2". Note that the version number needs to be an explicit string (e.g. `"1"`).
**Annotations**
By default, `flyte-pod-webhook` injects following annotations to task pod:
1. `vault.hashicorp.com/agent-inject` to configure whether injection is explicitly enabled or disabled for a pod.
2. `vault.hashicorp.com/secret-volume-path` to configure where on the filesystem a secret will be rendered.
3. `vault.hashicorp.com/role` to configure the Vault role used by the Vault Agent auto-auth method.
4. `vault.hashicorp.com/agent-pre-populate-only` to configure whether an init container is the only injected container.
5. `vault.hashicorp.com/agent-inject-secret` to configure Vault Agent to retrieve the secrets from Vault required by the container.
6. `vault.hashicorp.com/agent-inject-file` to configure the filename and path in the secrets volume where a Vault secret will be written.
7. `vault.hashicorp.com/agent-inject-template` to configure the template Vault Agent should use for rendering a secret.
It is possible to add extra annotations or override the existing ones in Flyte either at the task level using pod annotations or at the installation level.
If Flyte administrator wants to set up annotations for the entire system, they can utilize `webhook.vaultSecretManager.annotations` to accomplish this.
## Scaling the webhook
### Vertical scaling
To scale the Webhook to be able to process the number/rate of pods you need, you may need to configure a vertical [pod autoscaler](https://github.com/kubernetes/autoscaler/tree/master/vertical-pod-autoscaler).
### Horizontal scaling
The Webhook does not make any external API Requests in response to Pod mutation requests. It should be able to handle traffic quickly. For horizontal scaling, adding additional replicas for the Pod in the
deployment should be sufficient. A single `MutatingWebhookConfiguration` object will be used, the same TLS certificate will be shared across the pods and the Service created will automatically load balance traffic across the available pods.
=== PAGE: https://www.union.ai/docs/v1/flyte/deployment/flyte-configuration/security-overview ===
# Security Overview
Here we cover the security aspects of running your flyte deployments. In the current state, we will cover the user
used for running the flyte services, and go through why we do this and not run them as a root user.
# Using the Non-root User
It's considered to be a best practice to use a non-root user for security because
running in a constrained permission environment will prevent any malicious code
from utilizing the full permissions of the host [source](https://kubernetes.io/blog/2018/07/18/11-ways-not-to-get-hacked/#8-run-containers-as-a-non-root-user)
Moreover, in certain container platforms like [OpenShift](https://engineering.bitnami.com/articles/running-non-root-containers-on-openshift.html),
running non-root containers is mandatory.
Flyte uses OCI-compatible container technology like Docker for container packaging,
and by default, its containers run as root. This gives full permissions to the
system but may not be suitable for production deployments where a security breach
could comprise your application deployments.
## Changes
A new user group and user have been added to the Docker files for all the Flyte components:
[Flyteadmin](https://github.com/flyteorg/flyteadmin/blob/master/Dockerfile),
[Flytepropeller](https://github.com/flyteorg/flytepropeller/blob/master/Dockerfile),
[Datacatalog](https://github.com/flyteorg/datacatalog/blob/master/Dockerfile),
[Flyteconsole](https://github.com/flyteorg/flyteconsole/blob/master/Dockerfile).
Dockerfile uses the [USER command](https://docs.docker.com/engine/reference/builder/#user), which sets the user
and group, that's used for running the container.
Additionally, the K8s manifest files for the flyte components define the overridden security context with the created
user and group to run them. The following shows the overridden security context added for flyteadmin
[Flyteadmin](https://github.com/flyteorg/flyte/blob/master/charts/flyte/templates/admin/deployment.yaml).
## Overriding base configuration
Certain init-containers still require root permissions, and hence we are required to override the security
context for these.
For example: in the case of [Flyteadmin](https://github.com/flyteorg/flyte/blob/master/charts/flyte/templates/admin/deployment.yaml),
the init container of check-db-ready that runs postgres-provided docker image cannot resolve the host for the checks and fails. This is mostly due to no read
permissions on etc/hosts file. Only the check-db-ready container is run using the root user, which we will also plan to fix.
## Running flyteadmin and flyteconsole on different domains
In some cases when flyteadmin and flyteconsole are running on different domains,
you'll would need to allow the flyteadmin's domain to allow cross origin request
from the flyteconsole's domain. Here are all the domains/namespaces to keep in
mind:
- ````: the domain which will get the request.
- ````: the domain which will be sending the request as the originator.
- ````: the k8s namespace where your flyteconsole pod is running.
- ````: the k8s namespace where your flyteadmin pod is running.
### Modify FlyteAdmin Config
To modify the FlyteConsole deployment to use ````, do the following:
1. Edit the deployment:
```bash
kubectl edit deployment flyteconsole -n
```
```yaml
- env:
- name: ENABLE_GA
value: "true"
- name: GA_TRACKING_ID
value: G-0123456789
- name: ADMIN_API_URL
value: https://
```
2. Rollout the flyteconsole deployment:
```bash
kubectl rollout restart deployment/flyteconsole -n
```
Modify the `flyte-admin-config` as follows:
```bash
kubectl edit configmap flyte-admin-config -n
```
```yaml
security:
allowCors: true
......
allowedOrigins:
- 'https://'
......
```
3. Finally, rollout FlyteAdmin
```bash
kubectl rollout restart deployment/flyteadmin -n
```
=== PAGE: https://www.union.ai/docs/v1/flyte/deployment/flyte-configuration/swagger ===
# Flyte API Playground: Swagger
Flyte services expose gRPC services for efficient/low latency communication across all services as well as for external clients (FlyteCTL, FlyteConsole, Flytekit Remote, etc.).
The services are defined [here](https://github.com/flyteorg/flyteidl/tree/master/protos/flyteidl/service).
FlyteIDL also houses open API schema definitions for the exposed services:
- [Admin](https://github.com/flyteorg/flyteidl/blob/master/gen/pb-go/flyteidl/service/admin.swagger.json)
- [Auth](https://github.com/flyteorg/flyteidl/blob/master/gen/pb-go/flyteidl/service/auth.swagger.json)
- [Identity](https://github.com/flyteorg/flyteidl/blob/master/gen/pb-go/flyteidl/service/identity.swagger.json)
To view the UI, run the following command:
```bash
flytectl demo start
```
Once sandbox setup is complete, a ready-to-explore message is shown:
```bash
👨💻 Flyte is ready! Flyte UI is available at http://localhost:30081/console 🚀 🚀 🎉
```
Visit ``http://localhost:30080/api/v1/openapi`` to view the swagger documentation of the payload fields.